before you beginbefore youbegin - · pdf filebefore you beginbefore youbegin 2 50~80mm ... **...
TRANSCRIPT
368 201419
INSTALLATION INSTRUCTIONS
ANGLE CORNER PIVOT SHOWER DOORK-17221T-LS
VALENCIA
-1-, 2008
Copyright Kohler China Ltd., 2008
BEFORE YOU BEGINBEFORE YOU BEGIN
�
�
�
�
�
�
2
(
) 50~80mm
4mm/m
�
�
�
�
�
�
Before you install your shower door, please readthese instructions carefully to familiarize yourselfwith the required tools, materials, and installationsequences. Follow the sections that pertain to yourparticular installation. This will help you avoid costlymistakes. In addition to proper installation, read alloperating and safety instructions.All information is based on the latest productinformation available at the time of publication.Kohler China Ltd. reserves the right to makechanges in product characteristics, packaging, oravailability at any time without notice.These instructions contain important care, cleaning,and warranty information-
Make sure that the bath and the finished wallmaterial are completely and correctly installed priorto installing your shower door. Prepare waterprooflayer to wall and floor of the showering area. It is notallowed for any presence of electric switches andsockets. Make sure the floor drain runs smoothly.Before starting the door installation, lay out andidentify all the parts. Use the exploded viewillustrated on page 2 for reference.For the installation method of customized showerwith different dimensions, please refer to thisinstructions.
Tempered glass cannot be cut, drilled or knockedby hard object. Make sure corner area of theglass refraining from knocking so as to causepersonal injury due to broken glass.
Please install this door on Kohlerreceptors or curbs. (Not included). If the curb is notKohler-branded, please note its top width should fallwithin the range of 50~80mm.
The shower door requires a flat verticalfinished wall. The squareness of the wall isrecommended no more than 4 mm/m. KOHLERCompany won t take responsibility of the installationquality.
please leave theseinstructions for the consumer.
CAUTION: Risk of injury or product damage.
ATTENTION:
IMPORTANT:
13-1 528437
1104524-T01-B
-2-
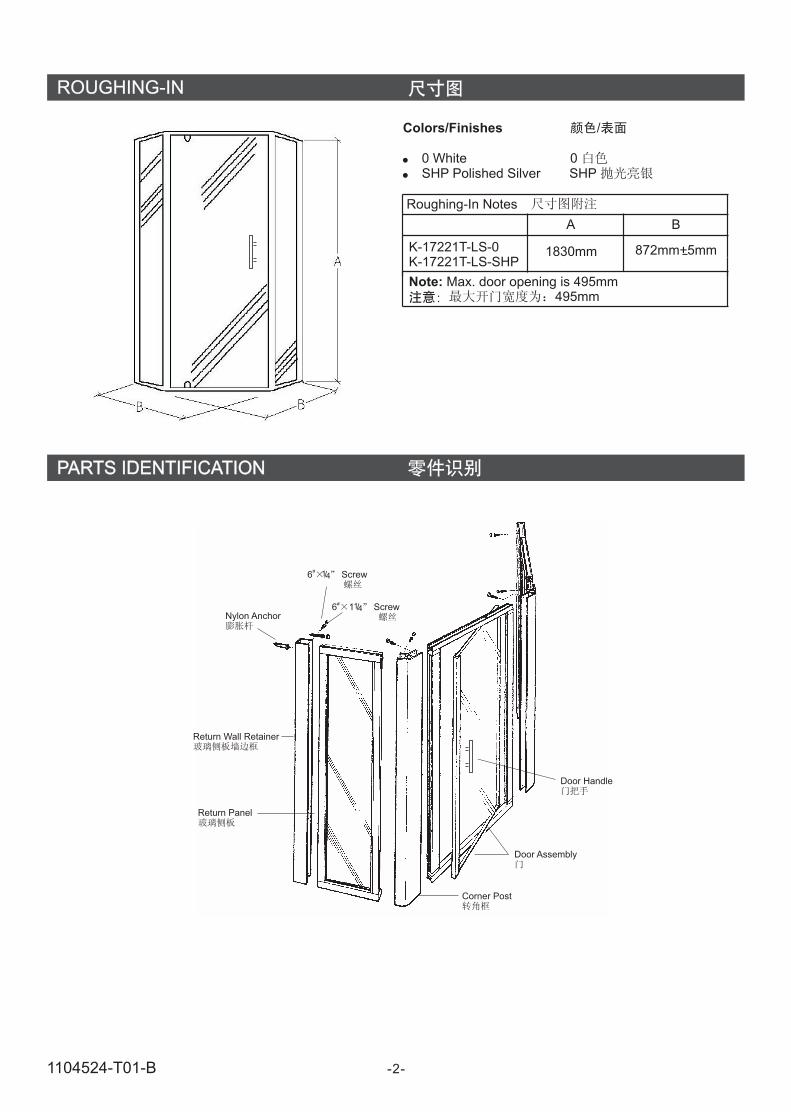
ROUGHING-IN
Colors/Finishes
0 WhiteSHP Polished Silver
�
�
/
0SHP
A B
K-17221T-LS-0K-17221T-LS-SHP
1830mm 872mm+5mm-
Note: Max. door opening is 495mm495mm
Roughing-In Notes
PARTS IDENTIFICATIONPARTS IDENTIFICATION
Door Assembly
6 / Screw# 14
Nylon Anchor
Return Wall Retainer
Return Panel
Corner Post
Door Handle
6 1 / Screw# 14
1104524-T01-B

-3-
INSTALLATION REQUIREMENTSINSTALLATION REQUIREMENTS
�
�
�
�
�
�
�
�
�
�
�
�
�
Phillips Screwdriver
Pencil
Caulk Gun
Measuring Tape
Safety Glasses
Center Punch
Hammer
Knife
Masonry Drill & 6mm Drilll Bit
Level
Materials Required
Drop Cloth
Tape
Silicone Sealant
Tools Required
�
�
�
�
�
�
�
�
�
�
�
�
�
6mm
1. Check that the receptor is level.
It is recommended that the waste outlet be 'tapedover' to avoid the loss of any components duringinstallation.
SHOWER DOOR INSTALLATION
1.
2. Position Wall Retainer Profiles against shower walls,resting on the receptor with 'V' groove facing insideof the shower.
Measure from the wall surface as shown.
2.
'V'
855mm
Dim A
1104524-T01-B
-4-
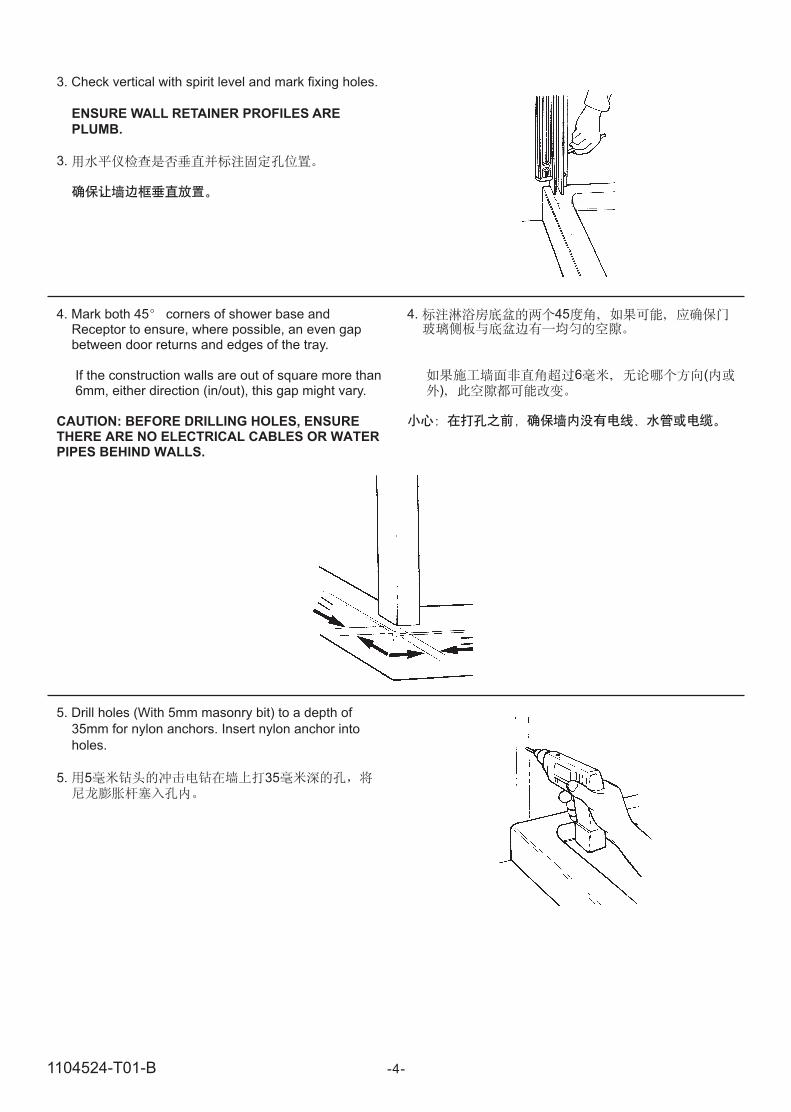
3. Check vertical with spirit level and mark fixing holes.
ENSURE WALL RETAINER PROFILES ARE
PLUMB.
3.
4. Mark both 45 corners of shower base andReceptor to ensure, where possible, an even gapbetween door returns and edges of the tray.
If the construction walls are out of square more than6mm, either direction (in/out), this gap might vary.
CAUTION: BEFORE DRILLING HOLES, ENSURETHERE ARE NO ELECTRICAL CABLES OR WATERPIPES BEHIND WALLS.
4. 45
6 ()
5. Drill holes (With 5mm masonry bit) to a depth of
35mm for nylon anchors. Insert nylon anchor into
holes.
5. 5 35
1104524-T01-B

-5-
6. Select preferred shower door opening. 6.
7. Fix both Return Wall Retainers to wall (
and place both Return Assemblies into
them. Fit 45 Corner Profiles and push into position.
using 6 long
screws),
Insert return panel into wall retainer so that the black
mark aligns with the edge of the wall retainer.
The markings on the top & bottom rails should
be on the out-side of the enclosure & the flexible side
of the PVC gasket on the inside.
NB:
DO NOT push the PVC gasket into position at
this stage.
7. ( 6 )45
PVC
PVC
8. Place Door Assembly between 45 Corner Profilesand slide assemblies into central position.
8. 45
PVC
DO NOT push the PVC gasket into position atthis stage.
9. Fit top and bottom hinge caps(Note bottom cap has "wings".)
9. ()
by sliding into position.
Wings
1104524-T01-B

-6-
10. Slide drip edge seal over wing on bottom hingecover and trim off .
Repeat between hinge cover and extrusion fixed todoor glass.
as shown Ensure the end of thisseal just clears the Door Jamb as the door closes.
Face drip edge seal outer rim towards theinside part of shower door.NOTE:
10.
11. Prise drip edge seal off glass beside door edgeextrusion enough to slip drip seal mouldingunderneath. (Note drip seal moulding and retainerbracket are "handed"). Push drip seal firmly backonto glass and pull into contact with door edgeextrusion.
Clamp in place using the bracket and powdercoated No.6 screw. Fit the other powder coatedscrew to the top hole in the door edge extrusion.Discard unused seal & clamp.
11.(
)
6
12. Fit the handles following instructions with handle
package.
12.
Inside of Shower door
Wings
5mm
Trim HereTrim Here
Drip Seal
1104524-T01-B
-7-
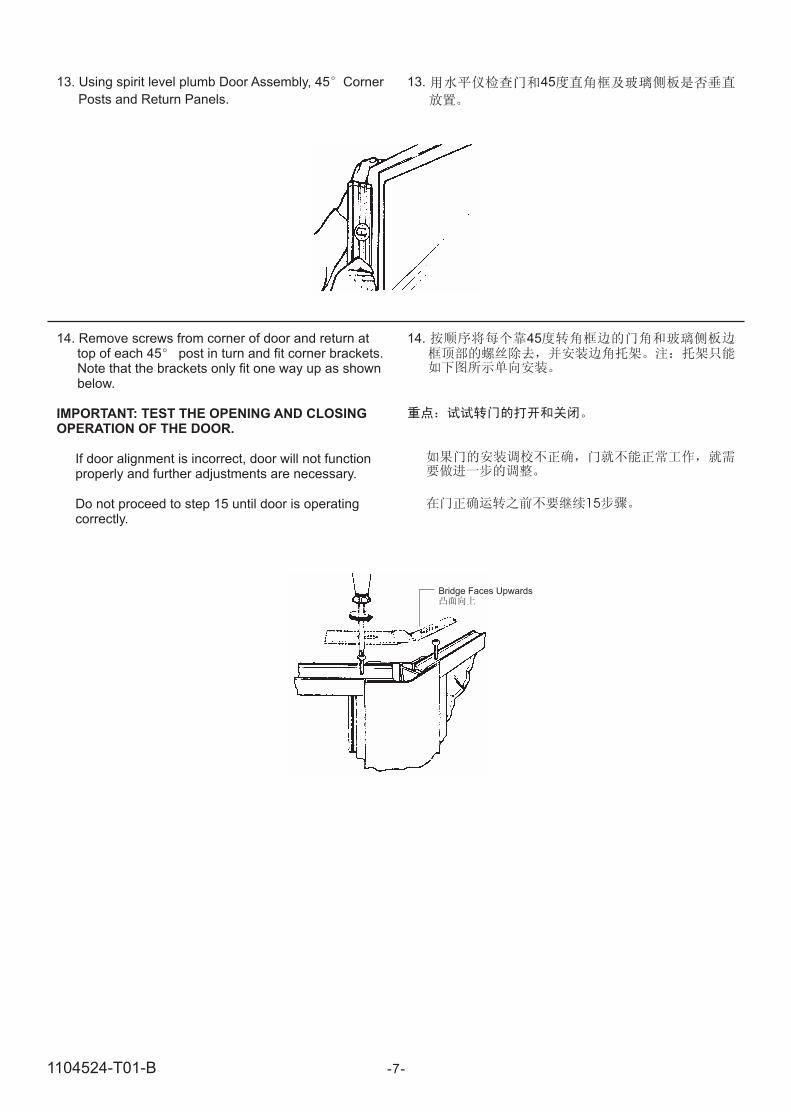
13. Using spirit level plumb Door Assembly, 45 Corner
Posts and Return Panels.
13. 45
14. Remove screws from corner of door and return attop of each 45 post in turn and fit corner brackets.Note that the brackets only fit one way up as shownbelow.
IMPORTANT: TEST THE OPENING AND CLOSINGOPERATION OF THE DOOR.
If door alignment is incorrect, door will not functionproperly and further adjustments are necessary.
Do not proceed to step 15 until door is operatingcorrectly.
14. 45
15
Bridge Faces Upwards
1104524-T01-B
-8-
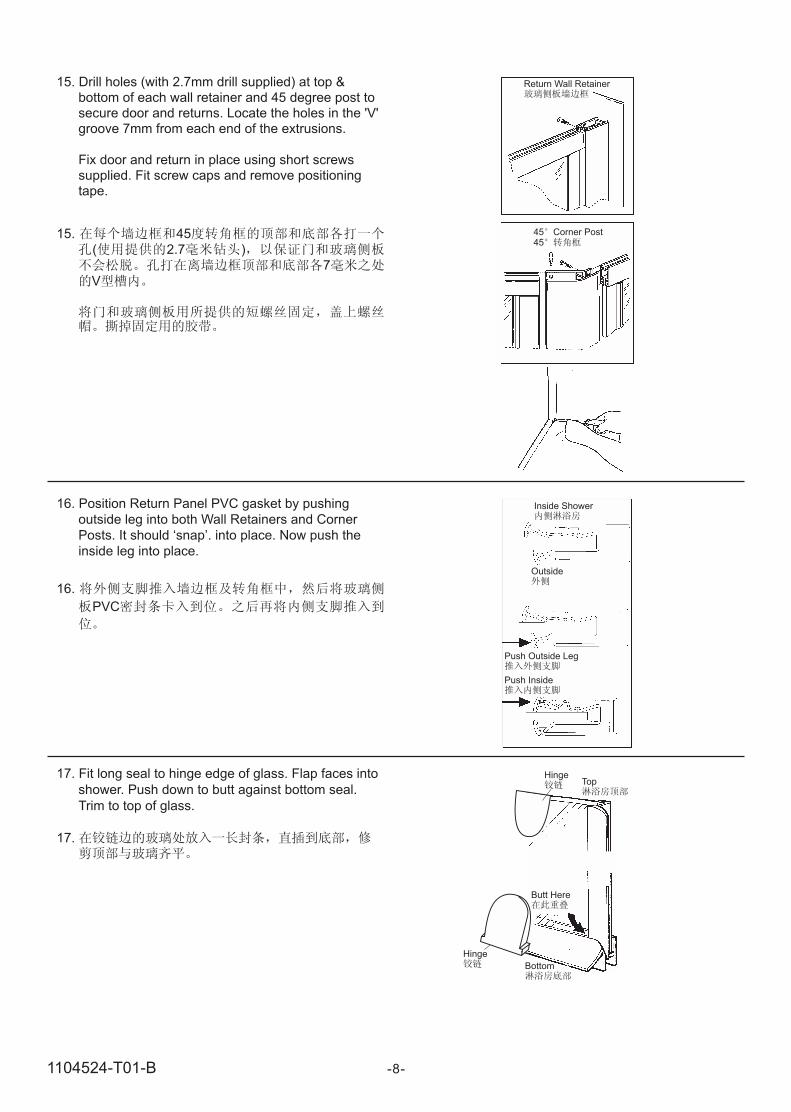
17. Fit long seal to hinge edge of glass. Flap faces into
shower. Push down to butt against bottom seal.
Trim to top of glass.
17.
15. Drill holes (with 2.7mm drill supplied) at top &bottom of each wall retainer and 45 degree post tosecure door and returns. Locate the holes in the 'V'groove 7mm from each end of the extrusions.
Fix door and return in place using short screwssupplied. Fit screw caps and remove positioningtape.
15. 45
( 2.7 )
7
V
Bottom
Hinge
Hinge
Top
Butt Here
45 Corner Post45
Return Wall Retainer
16. Position Return Panel PVC gasket by pushing
outside leg into both Wall Retainers and Corner
Posts. It should snap . into place. Now push the
inside leg into place.
’‘
16.
PVC
Inside Shower
Outside
Push Outside Leg
Push Inside
1104524-T01-B

-9-
IMPORTANT: SILAFLEX NG SEALANT SHOULD BE
APPLIED TO ALL OUTSIDE JOINTS- DO NOT SEAL
FROM THE INSIDE.
Using the sealant provided, seal:
A - Full height between the retainers and walls.
B - Between bottom of extrusions and receptor.
C - Between the retainer and return assemblies to a
height of 100mm. Also between the 45 posts and
the door and return assemblies to a height of
100mm.
D - Seal up to the PVC gasket joints between Return
Panel & Corner Post and Return Panel & Wall
Retainer.
E - On metallic finish shower, seal joint between 45
degree Corner Post and Magnetic Door Jamb.
A -
B -
C - 100
45
100
D - PVC
PVC
24
E - 45
A
C
C
B
10
0m
m
18. SEALANT APPLICATION
a) Cut tip of Silaflex NG Sealant tube nozzle at 45angle.
b) Hold tube at 45 angle and push forward as sealantfills the joint.
c) The surface of the sealant can be smoothed (beforesurface dries) by using a finger dipped in smallquantity of water with one drop of washing-up liquidadded.
d) Excess sealant should be removed immediately witha damp cloth.
e) Allow the sealant 24 hours to cure before using theshower.
CAUTION: AVOID CONTACT WITH SKIN, EYES ANDMOUTH AND AVOID BREATHING VAPOUR. IF INEYES, IMMEDIATELY FLUSH WITH WATER. IFIRRITATION PERSISTS, SEEK MEDICALATTENTION. KEEP OUT OF REACH OF CHILDREN.
18.
a) 45
b) 45
c)
( )
d)
e) 24
5mm45
1104524-T01-B
CARE AND CLEANINGCARE AND CLEANING
Your Kohler Shower Enclosure will remain beautiful ifyou take care of it.Water conditions in various parts of the country willdetermine any extra cleaning attention you may have togive your new shower enclosure. A simple routine ofdaily care will keep your shower enclosure looking likenew.Kohler does not recommend the use of abrasivecleaners on any of its products. Harsh cleaners willdamage the metal or glass finish on your showerenclosre.Replace seas, when they show signs of wear, yellowingor are not watertight. Refer to the Kohler Service Partspage.
-10-1104524-T01-B

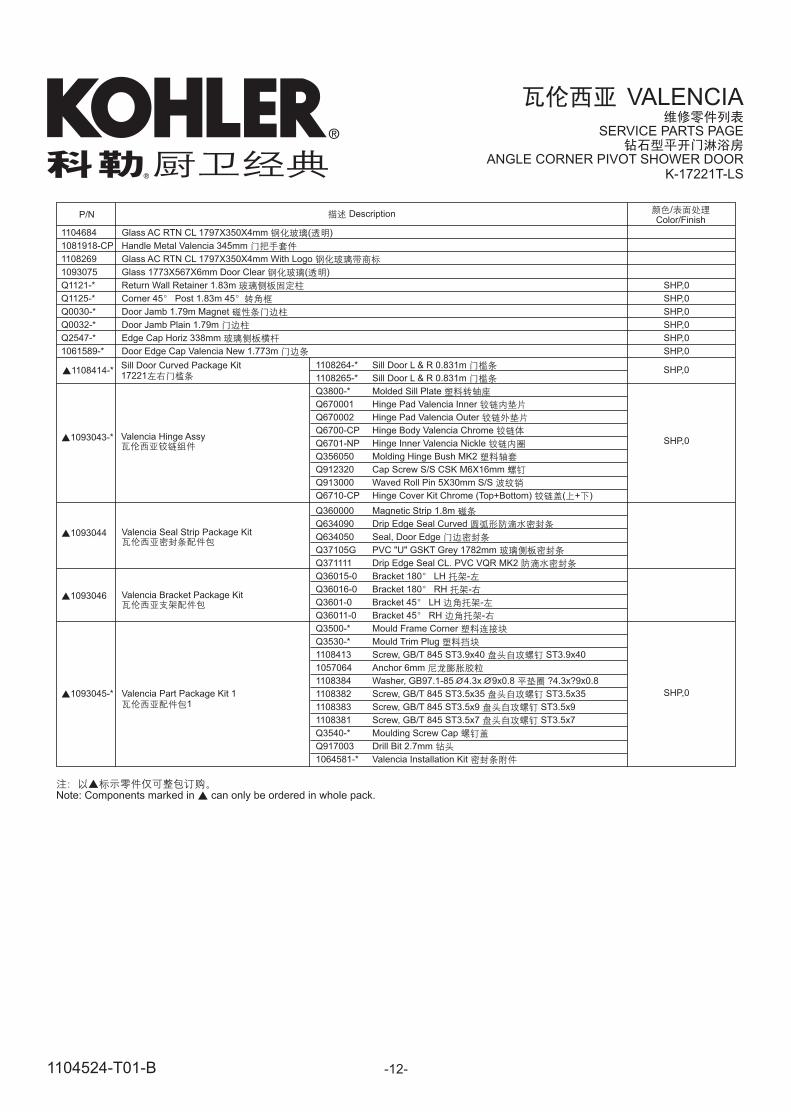
SERVICE PARTS PAGE
ANGLE CORNER PIVOT SHOWER DOORK-17221T-LS
VALENCIA
-11-
**** Color code must be specified when ordering.
1104524-T01-B
Q2547-*Edge Cap Horiz 338mm
Q2547-*Edge Cap Horiz 338mm
Q2547-*Edge Cap Horiz 338mm
Q2547-*Edge Cap Horiz 338mm
Q37105GPVC "U" Gskt Grey 1782mm
Q37105GPVC "U" GsktGrey 1782mm
Q37105GPVC "U" GsktGrey 1782mm
Q37105GPVC "U" GsktGrey 1782mm
Q634050Seal - Door Edge
Q36011-0Bracket 45 RH
-
1108264-*Sill Door L & R 0.831m
1108413Screw,GB/T 845ST3.9x40
ST3.9x40
1108383Screw, GB/T 845ST3.5x9
ST3.5x9
Q3601-0Bracket 45 LH
-
Q360000MagneticStrip 1.8m
Q3540-*Moulding Screw Cap
1108381Screw, GB/T 845 ST3.5x7
ST3.5x7
1057064Anchor 6mm
1108384Washer,GB97.1-85
4.3x 9x0.8
4.3x 9x0.8
1108382Screw, GB/T 845ST3.5x35
ST3.5x35
1104684Glass AC RTN CL1797 X 350x4mm
( )
Q0032-*Door Jamb Plain 1.79m
Q1125-*Corner 45 Post 1.83m45
Q1125-*Corner 45 Post 1.83m45
Q0030-*Door Jamb 1.79m Magnet
Q3530-*Mould Trim Plug
Q3500-*Mould Frame Corner
Q371111Drip Edge SealCl.PVC VQR MK2
1108265-*Sill Door L & R 0.831m
1064581-*Valencia Installation Kit
1108269Glass AC RTN CL1797x350x4mm With LOGO
Q1121-*Return WallRetainer 1.83m
Q1121-*Return WallRetainer 1.83m
1093043-*Valencia Hinge Assy.
1061589-*Door Edge CapValencia New 1.773m
1093075Glass 1773x567x6mmDoor Clear
( )
1081918-CPHandle MetalValencia 345mm
1104524-T01-B -12-
SERVICE PARTS PAGE
ANGLE CORNER PIVOT SHOWER DOORK-17221T-LS
VALENCIA
1104684
1081918-CP
1108269
1093075
Q1121-*
Q1125-*
Q0030-*
Q0032-*
Q2547-*
1061589-*
Glass AC RTN CL 1797X350X4mm ( )
Handle Metal Valencia 345mm
Glass AC RTN CL 1797X350X4mm With Logo
Glass 1773X567X6mm Door Clear ( )
Return Wall Retainer 1.83m
Corner 45 Post 1.83m 45
Door Jamb 1.79m Magnet
Door Jamb Plain 1.79m
Edge Cap Horiz 338mm
Door Edge Cap Valencia New 1.773m
P/N
1093044 Valencia Seal Strip Package Kit
1108264-* Sill Door L & R 0.831m
1108265-* Sill Door L & R 0.831m
Q3800-* Molded Sill Plate
Q670001 Hinge Pad Valencia Inner
Q670002 Hinge Pad Valencia Outer
Q6700-CP Hinge Body Valencia Chrome
Q6701-NP Hinge Inner Valencia Nickle
Q356050 Molding Hinge Bush MK2
Q912320 Cap Screw S/S CSK M6X16mm
Q913000 Waved Roll Pin 5X30mm S/S
Q6710-CP Hinge Cover Kit Chrome (Top+Bottom) ( + )
Q360000 Magnetic Strip 1.8m
Q634090 Drip Edge Seal Curved
Q634050 Seal, Door Edge
Q37105G PVC "U" GSKT Grey 1782mm
Q371111 Drip Edge Seal CL. PVC VQR MK2
Q36015-0 Bracket 180 LH -
Q36016-0 Bracket 180 RH -
Q3601-0 Bracket 45 LH -
Q36011-0 Bracket 45 RH -
Q3500-* Mould Frame Corner
Q3530-* Mould Trim Plug
1108413 Screw, GB/T 845 ST3.9x40 ST3.9x40
1057064 Anchor 6mm
1108384 Washer, GB97.1-85 4.3x 9x0.8 ?4.3x?9x0.8
1108382 Screw, GB/T 845 ST3.5x35 ST3.5x35
1108383 Screw, GB/T 845 ST3.5x9 ST3.5x9
1108381 Screw, GB/T 845 ST3.5x7 ST3.5x7
Q3540-* Moulding Screw Cap
Q917003 Drill Bit 2.7mm
1064581-* Valencia Installation Kit
Valencia Hinge Assy1093043-*
Description
Note: Components marked in can only be ordered in whole pack.
/Color/Finish
SHP,0
SHP,0
SHP,0
SHP,0
SHP,0
SHP,0
SHP,0
1108414-*Sill Door Curved Package Kit17221
SHP,0
1093046 Valencia Bracket Package Kit
1093045-* Valencia Part Package Kit 11
O O
SHP,0