behold, the steampunkin! - professional · ithought it might be a really cool idea to make an...
TRANSCRIPT

I thought it might be a really cool idea tomake an automatonic Steampunk pumpkin
to terrorize my neighbors and trick-or-treaters.
Unlike in my book, where I have all the partslaid out with instructions on how to makesomething, this is an evolved process. Most of the
materials are from the hardware store. Show thema picture of the part you’re looking for and they’llprobably find it for you.
Collect as many as you can of the pieces youplan to use. I know you all have large stockpiles ofjunk lying around.
Behold, the Steampunkin!
1
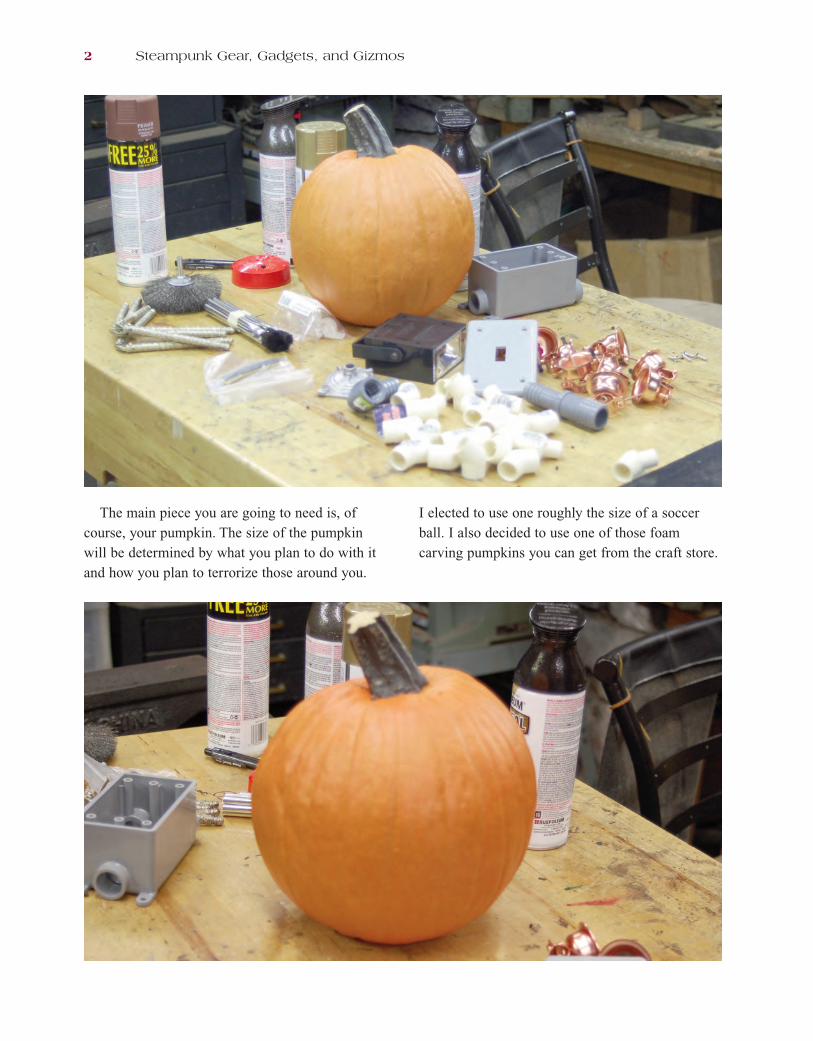
The main piece you are going to need is, ofcourse, your pumpkin. The size of the pumpkinwill be determined by what you plan to do with itand how you plan to terrorize those around you.
I elected to use one roughly the size of a soccerball. I also decided to use one of those foamcarving pumpkins you can get from the craft store.
2 Steampunk Gear, Gadgets, and Gizmos

I’m going to make my pumpkin mobile, so in anattempt to resist the urge to just start hacking away atthe body, I am first going to work on the legs.
I’ve got various 1/2-inch plastic pipe fittings (T-joints, 45-degree joints) and a 5-foot length of1/2-inch plastic pipe. Before I do anything, I peeloff all the stickers, because they will show throughthe paint and it will not be impressive.
First, I’m going to cut four pieces of pipe, eachabout 1 3/4–inch long. (If using a band saw to cutthe pipe, resist the urge to cover the blade in fakeblood and scream, clutching your hand in front ofyour girlfriend, boyfriend, whomever. They will notbe amused.)
Assemble two T-joints and four 45-degree jointswith the 1 3/4–inch pieces of pipe as follows:
Then cut five 3 1/2–inch sections of pipe. Useone of them to connect the two T-joints together, so that it looks like what’s shown in the nextimage.
Next, put a 3 1/2–inch piece into the end ofeach 45-degree joint and put another 45-degreejoint into that. As long as these pieces remainunglued, the legs will remain poseable. What youhave so far should look like this:
Cut four 1 1/4–inch pieces of pipe, and put each1 1/4–inch piece of pipe into a 1/2-inch 45-degreeelbow reducer coupling:
Behold, the Steampunkin! 3

4 Steampunk Gear, Gadgets, and Gizmos
Place these on the end of the legs like this:
To add some length to the legs, I’m going to usesome 7/16-inch brass pipe I happen to have. Youcould also use a wooden dowel (just under 1/2-inchdiameter). You will, of course, want four lengths ofthis, each about 4 inches long.
And for feet, take a 1/2-inch copper-plated bellhanger (shown at left in the next image), removeall the superfluous bits, and bend up the sides so itlooks like the one on the right in the photo. Again,you will want four of these.
Using a drill press, drill a 5/32-inch hole 1/4 inch from the end of each brass (or woodendowel) leg. Use a 3/4-inch 6-32 machine screw anda 6-32 nut at the end of each leg to attach the foot.Note that nothing has been glued yet. The next twophotos show how the completed foot and legassemblies should look.
And now that I’m done with the leg assembly,I’ll detach the four metal leg/foot pieces and primethe plastic parts in preparation for painting later.I’m using Rust-Oleum “Rusty Metal” primer.
So, now that the pumpkin has legs, it needspower (i.e., a boiler). I’m using a plastic electricalconduit box as the boiler. Again, be sure to peel offthe sticker.

I cut off all the tabs using my band saw and thensand off any rough edges with a belt sander. Also,using the band saw, I trim off about 1/2 inch of thedepth of the box.
Look on your pumpkin for a flat spot. Almostevery pumpkin has one, and I recommend makingthat the back of your Steampunkin.
Place the conduit box against the flat spot andtrace out a hole for where you are going to cut inthe back of your pumpkin. To do this, I’m going to
use a carpenter’s knife (you could use an X-ACTOknife or other sharp blade).
Stuff the boiler in the pumpkin to check the fitand adjust as needed, then remove.
I was lucky enough to attend a model train showand I picked up this really cool front boiler plate. It is Lionel scale. (You could also use the front of a toy train.) I’m going to cut off any protrusionsthat get in my way to prepare it to go on the backof the boiler.
Drill a hole in the back of the conduit box toaccommodate a bolt that will be used to put thefront boiler plate onto the boiler. I ended up usinga 1 1/2–inch 8-32 bolt with a finish washer and an8-32 knurled nut to put it on.
Now I’m going to make my boiler look extrasuper spiff.
I put a series of dots about every 1/4 inch alongthe edge of the boiler. On each of these dots, I’mgoing to drill a very small hole, about 1/16 inch indiameter. I’m going to glue a small brass brad in
Behold, the Steampunkin! 5

each of these holes…but not just yet. What youhave for the boiler should look like this:
Cut two pieces of 1/2-inch electrical conduit,each 5 inches long. Place the electrical conduit intothe two holes in the top of the box and hammerthem in with a wooden mallet (do not use a metalhammer). Make sure you insert the electricalconduit pieces before you drill the holes for yourbrads. After drilling the brad holes, remove theboiler door and prime the whole assembly, againusing Rust-Oleum “Rusty Metal” primer.
By this time, the leg assembly you primedearlier should be dry enough to paint. I’m going touse Rust-Oleum “Hammered Dark Bronze” for thePVC part of the legs.
Now I’m beginning to contemplate the face ofmy pumpkin. For the sake of symmetry, draw aline straight down the middle of his face and then ahorizontal line across that to align the eyes. (Thepumpkin will be painted, so these lines won’tshow.) For the eyes, I’m using leftover pieces ofplumbing fittings like I used for the goggle projectin Chapter 5 of my book. These will serve as gunports, which you’ll see later. I put the cut end ofthe fitting against the pumpkin and trace where Iplan on cutting holes for the eyes.
Again, using a sharp knife—and do please beobscenely careful during this step—cut out theholes for the eyes.
I’ve decided to create a double-hinged mouth,making my pumpkin look like some kind ofprehistoric fish. As shown next, the top jaw is onthe left and the bottom jaw is on the right.
6 Steampunk Gear, Gadgets, and Gizmos

I’ve trimmed the edges of the teeth to makethem look sharper and more finished, instead ofjust cut out. And I actually did this without slicingoff my finger, which was a very real possibility.
Now I’m going to do the infamous Cutting ofthe Lid. I want to have an opening so I can put in alight that I can turn on and off. Do I really have toexplain this part? If you don’t know how to cut thelid of a pumpkin, then you don’t deserve to haveever been a kid. Ever.
I use the Rust-Oleum “Hammered DarkBronze” again to paint the stem on the lid. Setaside.
Time to make the arms for the pumpkin. Use a1/2-inch 45-degree elbow reducer coupling. Drill ahole for the reducer into the pumpkin’s right side.Put a 2-inch piece of plastic pipe into the reducercoupling and put another reducer coupling on theother end of the pipe.
I want this arm to have a saw blade at the end,so I look for a large gear in my stockpile andensure there’s a hole in the center that can fit a 6-32 screw. Next, I’m going to cut a 4-inch pieceof my 7/16-inch brass pipe (again, you could use a wooden dowel) and use a 5/32-inch drill bit tomake a hole 1/4 inch from the end. Then, using my band saw, I cut a slot in the brass pipe toaccommodate the gear. Make sure the slot is longenough so the hole in the center of the gear alignswith the hole at the end of the brass pipe.
To secure the blade, I’m using a 6-32 1-inchscrew. First I put a 6-32 knurled nut all the waydown the screw, then slide the screw through thebrass pipe and gear, and secure it on the other sideof the pipe with another 6-32 knurled nut. The nextphoto shows how your resulting arm (of death!)should look.
Behold, the Steampunkin! 7

Now, remove the arm and prime the plastic partswith Rust-Oleum “Rusty Metal” primer. And ifyou made any marks on the brass pipe for the holeor the slot, be sure to wipe off any excess markerink with Goof Off or some other solvent.
Construct the other arm out of this brokenplastic gear (cut off of a toy) and these two 1/2-inch plumbing fittings. Show this picture to
the plumbing person at the DIY store; if theycannot identify these fittings, have them fired!Repeat this till you find someone who knows what they are doing.
Sand down the narrow end of the straightplumbing fitting so that it fits into the widest endof the elbow plumbing fitting. Assist the fittingwith a wooden mallet if needed. Mark a positionon your pumpkin opposite from the other arm. Toaccommodate the narrow side of the elbow fitting,I’m using a 3/4-inch wood boring bit on my handdrill to cut out a hole at the spot I marked.
Cut a slot in the wide end of the straight fitting,which will be the wrist, to accommodate the gearpieces, which will be used as pincers. Use a dab ofsuper duper incredi-glue to hold the pincers ontothe wrist in an open and menacing position. So far,this is the only piece requiring glue. Let thesuperglue dry for 5–10 minutes. The completedarm should look like the next photo.
8 Steampunk Gear, Gadgets, and Gizmos

Remove this arm and prime the plastic parts(including the pincers) with Rust-Oleum “RustyMetal” primer.
Do not give in to the temptation to forgopriming!
Speaking of priming, your boiler and boilerdoor should be ready to paint now. For this I’musing Rust-Oleum “Hammered Black.” Let it dry.Later, you’ll probably be thinking, “It’s almostdone. It’s only a little bit sticky.” You should let itdry overnight. I didn’t.
Place the boiler door back on the boiler andsecure with the knurled nut you were going to puton it in the first place. (You did save it, didn’tyou?) Remember all those teeny holes you made?Take a small spot of superglue to the ends of thoselittle brass brads and start inserting them into theholes. It will add a really cool little level of detail.I assisted my brads with a small tack hammer.
Now it’s time to prime the pumpkin. Be sure toblow or wipe off any dust that may haveaccumulated on the pieces while you were carvingthem. Use the same “Rusty Metal” primer.
By this time, the primer on the arms will be dry enough that you can pretend that handlingthem is a good idea, so paint them the same Rust-Oleum “Hammered Dark Bronze” that wasused on the legs.
Now, paint the inside of the pumpkin “flatblack” and let some of the black overspray throughthe holes. This gives the pumpkin a bit of a burnedeffect around the edges; now it looks extra-creepyand keeps me up at night. The color of the primeris actually really good for the surface of ourinfernal device, so don’t paint another color over it.
Behold, the Steampunkin! 9

Take more of the brass brads and put them instrategic rows down the side of the pumpkin tolook like rivets. They push easily into the foam ofthe pumpkin and shouldn’t need to be glued. Placethem about every 3/4 inch. You could also spacethem 1/2 inch apart but that gets really tedious. Iwould suggest placing the brads around the eye,mouth, arm, and boiler holes for added effect.
Next, use four long straight pins with blackheads (you can find these at fabric and craft stores)to secure each end of the jaws to the pumpkin. TheSteampunkin looks like this:
Now we can add the oculars. First, make surethe nut for the fitting is attached to the uncut end.Insert the cut end of the fitting into the pumpkinuntil the nut rests against the surface of thepumpkin and secure with some two-part, 5-minuteepoxy. (By the way, if you want to know how touse two-part epoxy, read the instructions on thebloody box.) 5-minute epoxy means you have fiveminutes to work with it after you begin to mix itup, before it becomes stiff.
Once the oculars are installed, it’s time to tinkerwith two little cannons I have that will be insidethem, since the eyes are, after all, gun ports.
Trim down the carriages of each cannon, so theywill fit into the oculars. For this, use a rotary toolor any other tool you think will get the job done.
Next, add some ornament—coils and things likethat. The foam is so easy to work with, you canjust stick things right in there. Feel free to add anykind of accoutrements you like.
10 Steampunk Gear, Gadgets, and Gizmos

I’m thinking it’s time to attach the plastic legassembly. Just poke some holes in the bottom ofthe pumpkin and wire it to the leg assembly. Butplace a couple washers on the inside, to keep thewire from pulling through the foam. Here’s whatthe underside of the pumpkin looks like now.
Now it’s time to glue the metal leg/feet piecesinto the plastic leg assembly. And then glue in theboiler. Again with the 5-minute epoxy. Also, it’stime to install the arms. Epoxy them, if necessary,but they should stay in without it; plus you canpose them if you don’t epoxy them.
Epoxy the cannons inside the eye sockets.They’re a bit heavy, so shovel some extra epoxy inthere, just to be safe.
Finally, place a flashing, red LED light from aHalloween shop inside the pumpkin and return thelid. The stem should be dry by now.
There you have it! Let your reign of terrorbegin!
Behold, the Steampunkin! 11