blackbird user manual - camera motion · pdf filepage |1 blackbird user manual warranty the...
TRANSCRIPT

Blackbird User Manual
It is recommended that you also view the Blackbird instructional DVD
© 2009, 2010,2011 Camera Motion Research, LLC Rev H

Page |1 Blackbird User Manual
Warranty
The Blackbird is covered by a full warranty for a period of one year for all defects in materials
or workmanship. Warranty returns will be repaired or replaced at the discretion of CMR. The
warranty does not include accidental damage from severe handling such as impacts, improper
use or weather exposure. Call 919-876-6020 or email [email protected] for warranty
return authorization. Shipping charges will be paid by CMR at the lowest cost shipping
method.
Registration
If you did not purchase your Blackbird directly from Camera Motion Research please take a few
minutes to go to our website www.camotionllc.com, then My Account and then click on the link
at the bottom of the page to register your Blackbird purchase.
(https://www.camotionllc.com/serialno_registration.php)
This will allow us to contact you with product improvement information.

Blackbird User Manual Page |2
Contents
Warranty ................................................................................................................................. 1
Blackbird Part Names ............................................................................................................... 3
Blackbird Full Kit Components.................................................................................................. 4
Packing Blackbird Parts in the Case .......................................................................................... 5
Part I. Getting to know the Blackbird Parts .............................................................................. 6
A. Attaching the T-bar to the Blackbird support arm ......................................................................................... 6
B. Mounting the Camera ...................................................................................................................................... 7
C. Adding or removing counterbalance weights on the horizontal bar............................................................... 8
D. Procedure to change horizontal bar ................................................................................................................ 8
E. Adjusting the gimbal position .......................................................................................................................... 9
F. Attaching the gimbal extender ...................................................................................................................... 10
G. SmoothTouch friction adjuster...................................................................................................................... 11
Part II. Accessories (Not included with Blackbird Basic) ......................................................... 12
A. Resting Stand ................................................................................................................................................ 12
B. Universal Docking Bracket ............................................................................................................................. 13
C. Tripod Adaptor ............................................................................................................................................... 14
Part III. Blackbird Balancing Basics......................................................................................... 15
A. Vertical Balancing (Drop Time) ...................................................................................................................... 15
B. Horizontal Plane Balancing ............................................................................................................................ 17
C. Final vertical balance drop time adjustment ................................................................................................. 19
D. Gimbal Friction effect on drop time and horizontal balance ........................................................................ 19
E. General guidelines and strategies for vertical balancing and setting up the Blackbird ................................ 19
Part IV. A Quick Guide To Operating The Blackbird ............................................................... 21

Page |3 Blackbird User Manual
Blackbird Part Names
T-bar assembly
T-bar clamp
Safety stop (old
removable version is
shown, new version is
integrated)
Counterweights
Camera stage
Counterweight screw
Support arm
Lower control ring
Gimbal
Gimbal locking nut
Upper control ring
Front to back (tilt) adjustment
Camera mounting plate
Side to side (roll) adjustment
Resting stand
Horizontal bar locking screw

Blackbird User Manual Page 4
Blackbird Full Kit Components
[1] Chassis [6] Horizontal bar 11 in. [11] User Manual
[2] T-bar assembly [7] Spare screws and locating pin [12] Horizontal bar 15 in.
[3] Camera mounting plate [8] Universal docking Bracket * [13] Instructional DVD
[4] Counterweights [9] Table clamp* [14] Resting stand*
[5] Gimbal extender [10] Tripod adaptor* [15] Case*
*These accessories not included with Blackbird Basic
2
3
4
5
1 14
13
9
10
12 11
7
8
6 12
15

Page |5 Blackbird User Manual
Packing Blackbird Parts in the Case
Docking Bracket Table Clamp Tripod adaptor
2nd horizontal bar
Gimbal
extender

Blackbird User Manual Page |6
Part I. Getting to know the Blackbird Parts
A. Attaching the T-bar to the Blackbird support arm
The Blackbird is packed in its case with the T-bar removed from the support arm. To assemble the
Blackbird you insert the vertical section of the T-bar assembly into the support arm.
To attach the T-bar to the support arm
simply push it into the support arm Y.
To remove the vertical tube press on the
two spring loaded locking tabs while
pushing the T-bar down into the support
arm Y.
Tighten the T-bar clamp by turning it clockwise to secure the T-
bar. You can change the end position of the T-bar clamp
(without loosening it) at any time by pressing on the button and
pulling it out and then rotating it to the desired position.
Note: Because of its engineered design the T-bar clamp requires
very little force to lock the T-bar securely. If you see small
clamp marks on the vertical bar it is because you are using too
much clamping force.

Page |7 Blackbird User Manual
The rotational position of the horizontal bar does not affect the stabilizer performance. Normally you
would have it side to side relative to the camera so that you can hold the Blackbird closer to your body
without bumping into it. But you can also position it front to back parallel to the camera.
B. Mounting the Camera
Remove the camera mounting plate from the stage by loosening the clamping screw on the stage.
Attach the mounting plate to your camera with the ¼ -20 screw. Drop the camera and mounting plate
into the top of the Blackbird stage and tighten the clamping screw. By loosening the mounting plate
camera screw the camera can be moved front to back. The safety pin on the top of the Blackbird stage
prevents the mounting plate from sliding off the stage even when the clamping screw is a little loose.
Always check that the clamping screw is tight and camera is securely clamped before using the
Blackbird.

Blackbird User Manual Page |8
Which Mounting Hole to Use?
Place the ¼-20 camera screw in the hole that you think will
locate the center of gravity of the camera directly over the
gimbal. Or just start with the #2 hole in the middle of the
camera mounting plate and check balance. The locating
pin screws into the appropriate hole.
If during balancing you cannot get the camera level by
adjusting the front to back and side to side knobs then
move the mounting screw appropriately. For example, if
camera leans to your left, then move the screw to one of the
holes on the right (#3 or #6).
Note: DSLR cameras do not have a hole for the locating
pin in the camera mounting plate. The locating pin on the
camera mounting plate can be removed by unscrewing it
(store it in the spare parts bag).
C. Adding or removing counterbalance weights on the horizontal bar
Equal amounts of counterbalance weights should always be used on each end of the horizontal section
of the T-bar. To add or remove weights simply loosen the locking nuts on each end of the horizontal
bar to make space for the weights. The first weight is keyed on a tab on the horizontal bar and
additional weights nest together. After adding weights retighten the weight nuts.
Each large weight weighs 0.2 lb and each small weight weighs 0.1 lb. So you can combine weights
(equally on each side) from 0 to 0.9 lb in 0.1 lb steps (example, 2 large plus 1 small = 0.5 lb).
D. Procedure to change horizontal bar
The 15 inch horizontal bar provides noticeably more pan axis moment of inertia than the 11 inch bar.
Smaller cameras weighing less than about 3 lbs will benefit the most from using it.
1 2 3
4 5 6
Locating pin
¼- 20 camera screw

Page |9 Blackbird User Manual
Remove the counterweight screws that are
on the present bar you are using and set
them aside. Remove the horizontal bar
screw and set it aside. Slide out the
horizontal bar. Insert the new bar and line
up the tapped hole through the bottom of
the T-joint. Screw the horizontal bar screw
back in to secure the bar. Re-insert the
counterweight screws on the new bar.
E. Adjusting the gimbal position
Question: Why would you want to adjust the gimbal postion? Answer: Adjusting the gimbal position gives
you an additional adjustment for vertical balance in addition to adding or removing counterweights or changing
the height of the T-bar. See part III, A Vertical Balancing
The gimbal stem screws into the bottom of the camera stage and is locked in place by the gimbal
locking nut. To adjust the gimbal position loosen the locking nut and screw the gimbal up or down.
You will have to screw down the locking nut if you want to raise the gimbal up. Always tighten the
gimbal locking nut securely after adjusting the gimbal position.
Note that you can screw the gimbal down too far and not have enough thread engagement with the
camera stage base. To prevent this there is a visual cue on the gimbal stem that is a thread cutout. It is
OK to have the thread cutout just slightly visible as shown below. If you go further and start to see the
threads again you have dropped the gimbal too far and don’t have recommended thread engagement in
the base (should have at least 3 full threads engaged).
The maximum extension for the gimbal
stem is shown at left. When you just
begin to see the shiny thread cutout it
means DON’T GO ANY LOWER.

Blackbird User Manual Page |10
F. Attaching the gimbal extender
For cameras less than about 2 lb. you will need to use the gimbal extender which drops the gimbal
down to allow correct vertical balance.
To install the gimbal extender, first remove the gimbal and handle by loosening the locking nut and
then unscrewing it (counter-clockwise) completely out. Then insert the gimbal extender and lock it
into position with its own locking nut. Finally re-insert the gimbal and handle into the bottom of the
gimbal extender and tighten its locking nut. Just like the gimbal the extender has a thread cutout to
indicate when you shouldn’t have it out any further
The maximum extension for the gimbal
extender is shown at left. When you just
begin to see the shiny thread cutout it
means DON’T GO ANY LOWER.

Page |11 Blackbird User Manual
G. SmoothTouch friction adjuster
The roll and tilt axes friction adjuster is located below the gimbal center block. When turned
clockwise it increases friction in the tilt and roll directions. Turn it counterclockwise to reduce
friction. (note: if the knob turned counter-clockwise too far out it will touch the gimbal lower yoke
and the gimbal will not rotate freely)
Observe the freely swinging handle to see the
amount of friction being added. To do this
support the Blackbird with one hand under the
camera stage and lift the gimbal to about a 45
degree angle and release it. With no friction it
should pendulum about 4 to 6 times before
coming to rest. As you adjust more friction and
drop the handle you will see it come to rest after
fewer and fewer pendulum swings. With a very
high friction adjustment the handle will just
overshoot vertical and stop.

Blackbird User Manual Page |12
Part II. Accessories (Not included with Blackbird Basic)
A. Resting Stand
The resting stand is clamped to the support arm with two screws and pressure plate and is easily
attached or removed from the Blackbird with the supplied allen wrench. It should be positioned on the
support arm approximately 1.5 inches below the camera stage. When properly positioned it just rests
against the support arm while in the folded down position and the rubber foot should be centered at
shown in the picture below.
The resting stand should be folded down for normal flying and flipped up to set down the Blackbird.
The resting stand can only be used when the horizontal bar is positioned side to side as shown below.
For maximum resting stability you can set the rig down and loosen the T-bar clamp slightly while
rotating the Blackbird slightly to get perfect 3 point support.
~ 1.5 in.

Page |13 Blackbird User Manual
B. Universal Docking Bracket
The universal docking bracket allows you to conveniently dock or balance your camera and Blackbird
on a C-stand, tripod or table edge. The Blackbird handle drops into the post on the docking bracket as
shown below.
Caution: The docking bracket is designed with high strength components that are suitable for any
possible loads from the Blackbird and camera. But users must verify that C-stands or tripods or tables
can support the high loads and torques.
Tripod mounting nut (1/4-20)
C-stand mounting hole
(do not install table clamp here)
Table Clamp
C-stand Tripod Table
Table clamp locking nut C-stand locking screw
Blackbird handle post

Blackbird User Manual Page |14
C. Tripod Adaptor
The tripod adaptor allows for quick transfer of your camera between the Blackbird and a tripod. The
adaptor is mounted to the tripod (standard ¼-20 connection) and has a mounting surface and clamping
screw similar to the top stage of the Blackbird.
Page |15 Blackbird User Manual
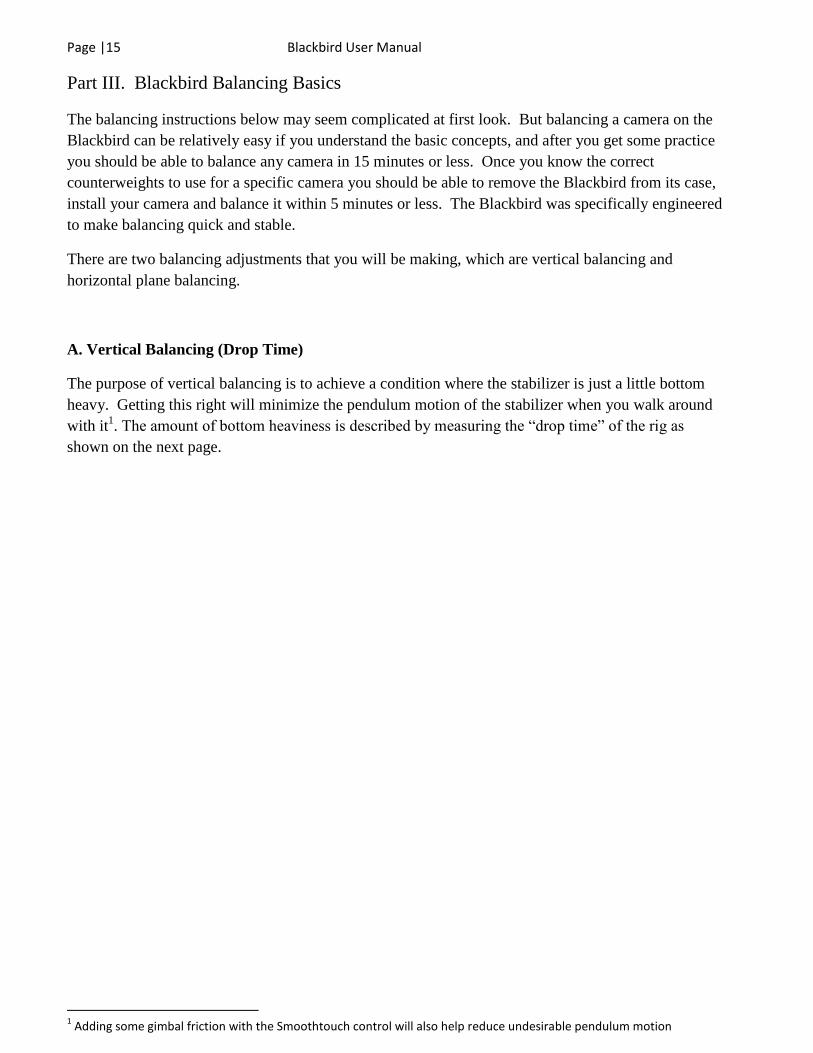
Part III. Blackbird Balancing Basics
The balancing instructions below may seem complicated at first look. But balancing a camera on the
Blackbird can be relatively easy if you understand the basic concepts, and after you get some practice
you should be able to balance any camera in 15 minutes or less. Once you know the correct
counterweights to use for a specific camera you should be able to remove the Blackbird from its case,
install your camera and balance it within 5 minutes or less. The Blackbird was specifically engineered
to make balancing quick and stable.
There are two balancing adjustments that you will be making, which are vertical balancing and
horizontal plane balancing.
A. Vertical Balancing (Drop Time)
The purpose of vertical balancing is to achieve a condition where the stabilizer is just a little bottom
heavy. Getting this right will minimize the pendulum motion of the stabilizer when you walk around
with it1. The amount of bottom heaviness is described by measuring the “drop time” of the rig as
shown on the next page.
1 Adding some gimbal friction with the Smoothtouch control will also help reduce undesirable pendulum motion
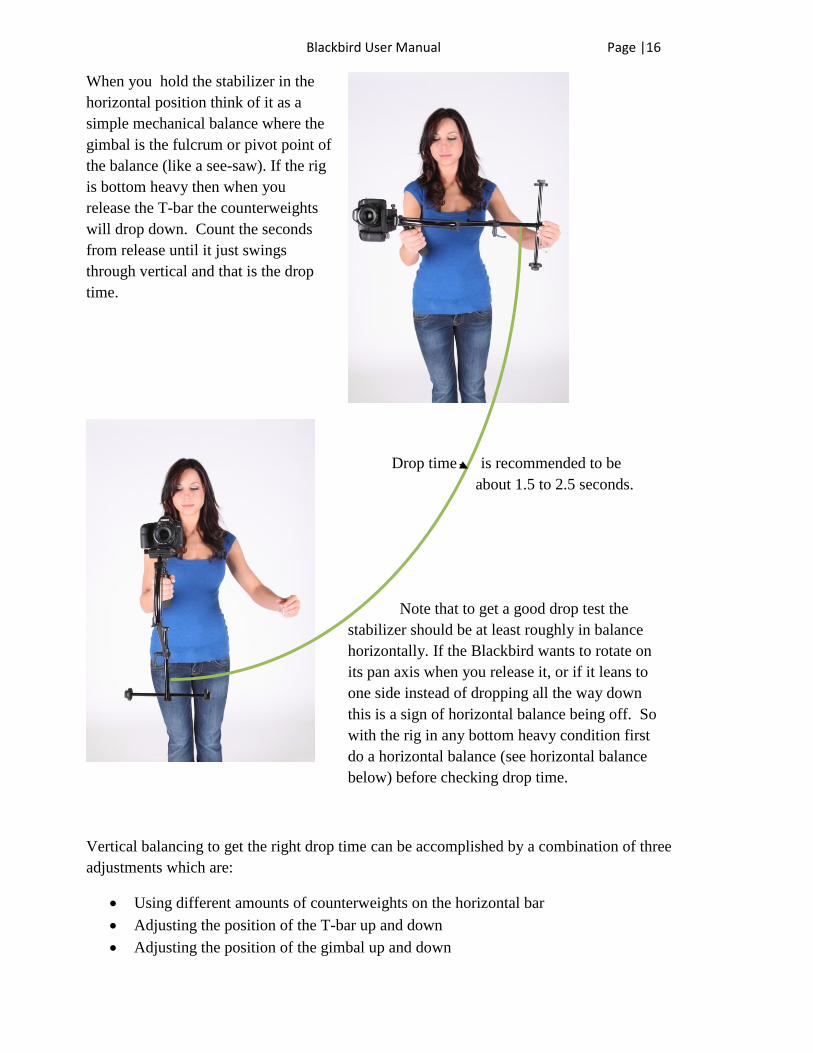
Blackbird User Manual Page |16
When you hold the stabilizer in the
horizontal position think of it as a
simple mechanical balance where the
gimbal is the fulcrum or pivot point of
the balance (like a see-saw). If the rig
is bottom heavy then when you
release the T-bar the counterweights
will drop down. Count the seconds
from release until it just swings
through vertical and that is the drop
time.
Drop time is recommended to be
about 1.5 to 2.5 seconds.
Note that to get a good drop test the
stabilizer should be at least roughly in balance
horizontally. If the Blackbird wants to rotate on
its pan axis when you release it, or if it leans to
one side instead of dropping all the way down
this is a sign of horizontal balance being off. So
with the rig in any bottom heavy condition first
do a horizontal balance (see horizontal balance
below) before checking drop time.
Vertical balancing to get the right drop time can be accomplished by a combination of three
adjustments which are:
Using different amounts of counterweights on the horizontal bar
Adjusting the position of the T-bar up and down
Adjusting the position of the gimbal up and down

Page |17 Blackbird User Manual
Procedure to get rough vertical balance
1. Set the T-bar position to about 8 on the scale. (just a starting point with room for adjustment)
2. Refer to Table 1 below and put the suggested counterweight combination for your camera
weight on each side of the horizontal bar.
3. Hold the Blackbird in the horizontal position and note whether the counterweights tend to drop
or go up.
4. If the counterweights don’t drop then you must add more counterweights until they do to get
the bottom heavy condition.
5. Release the counterweight bar from the horizontal position and count the time it takes for the
counterweights to fall from the horizontal position (9 o’clock) to the bottom position (6
o’clock). This time is called the DROP TIME.
6. If the drop time is less than 1 second (very bottom heavy) then you should remove some
counterweights.
7. Once you get a drop time between about 1 and 3 seconds you must make a horizontal balance
before making the final drop time adjustment.
Table 1. Suggested Counterweight combinations
B. Horizontal Plane Balancing
Horizontal plane balancing means adjusting the Blackbird so that the camera is level in the tilt and roll
directions, in other words it sets the framing of your shots when you just let the stabilizer float.
Fortunately horizontal plane balancing is easy, and it is an adjustment that you may do frequently
when shooting. And most often when shooting you will want to adjust the horizontal balance so that
the camera is level with the horizon in both the roll and tilt directions. But leveling the camera parallel
to the earth plane also positions the camera so that its center of gravity is located directly over the
gimbal. This will also help with adjusting the drop time and gives the best dynamic balance for fast
pans.
You can adjust horizontal balance to get the desired camera leveling by a combination of three
adjustments which are:
Use the camera stage adjustment controls to move the stage front to back and side to side (tilt
and roll adjustment)
Camera Weight lbs Gimbal extender Weights (each side)
1 Yes 1 small or none
2 Yes 1 small
3 optional 1 large
4 No 1 large, 1 small
5 No 2 large
6 No 3 large
7 No 3 large, 1 small
8 No 4 large, 1 small

Blackbird User Manual Page |18
Slide the camera mounting plate forward or back (get tilt adjustment into range)
Use a different hole on the camera mounting plate (get tilt or roll adjustment into range)
Procedure to adjust horizontal balance
The top of the Blackbird is a precision x-y stage with control knobs to move the camera forward or
back for the tilt angle adjustment and side to side for the roll angle adjustment.
The tilt angle adjustment knob is at the rear of the stage. Turning the knob clockwise moves the stage
away from your hand. Note that in addition to adjusting the stage front to back you can get
considerably more front to back adjustment by sliding the camera mounting plate forward or back as
shown below. A safety pin on the blackbird stage prevents the camera mounting plate from sliding off
the stage even if the clamp is a little loose.
You can also get additional adjustment back by using one of the rear holes (#4, #5, or #6) on the
camera mounting plate.
The roll angle adjustment knob is on the side of the stage and it also moves the stage away from your
hand when you turn it clockwise. If the camera is leaning to the left then you turn the roll knob
clockwise to level the camera.
Camera mounting plate all the way back Camera mounting plate all the way
forward

Page |19 Blackbird User Manual
Also, if after using all of the roll angle adjustment on the stage the camera is still tilting to one side or
the other, you can use one of the off-center mounting holes on the camera mounting plate. For
example, if camera leans to your left, then move the screw to one of the holes on the right (#3 or #6).
C. Final vertical balance drop time adjustment
Now that you have the horizontal balance adjusted you can go back and do the final vertical balance.
For most people a drop time of 1.5 to 2.5 seconds works best. If the drop time is too fast then you can
raise up the T-bar to get a slower drop time, or if the drop time is too slow then you should lower the
T-bar.
You can get an additional drop time adjustment by raising or lowering the gimbal because this has the
effect of moving the pivot point. Moving the gimbal up will decrease drop time, and moving it down
will increase drop time2.
D. Gimbal Friction effect on drop time and horizontal balance
The Blackbird feature that allows you to add friction to the tilt and roll gimbal axes can help you get
noticeably better shots. It accomplishes this by damping gimbal motion while still maintaining
reasonable gimbal isolation of hand movements.
You will find that adding even a large amount of gimbal friction has a small effect on the drop time
(with the normal 90 degree drop). But it can make adjusting horizontal balance much less sensitive. In
other words for small angles off vertical in either the tilt or roll axes (say a few degrees up to 10
degrees) there can be significant damping. So with high gimbal friction you may want to shake the
handle gently while setting the horizontal balance.
E. General guidelines and strategies for vertical balancing and setting up the Blackbird
1. For best performance try to balance the rig so that the T-bar is nearly fully extended. It is a
mistake to think that if you add some counterweights and move the T-bar up to maintain
vertical balance that you will have a more stable rig. If you do that you will have a heavier rig
that has LESS moment of inertia in the tilt and roll axes (only the pan axis will benefit from the
added weights).
2. If you want to take low shots and want to get the camera as close to the ground as possible, or
you want to minimize the chance of bumping into the weight bar, then you should balance the
rig with the T-bar raised up appropriately.
3. If you want the lightest weight rig then adjust the gimbal high (close to the camera stage), but
always try to get the T-bar nearly fully extended.
4. For cameras weighing less than about 2 lbs. you usually must use the gimbal extender to get
vertical balance.
2 When dropping the gimbal down please note limit on how far down it can be to maintain enough thread engagement.

Blackbird User Manual Page |20
5. If you have a camera weighing more than about 2 lbs but less than about 3.5 lbs you can
increase the pan and tilt moments of inertia by dropping the gimbal down as much as possible
and/or using the gimbal extender. This will force adding more counterbalance weight. This is
effective in increasing moments of inertia by adding a small amount of weight that can usually
be tolerated for these medium weight camera rigs. But again it is only effective if the T-bar is
nearly fully extended.
6. Remember, moving the gimbal up or moving the combination of gimbal extender and gimbal
up will make the rig more bottom heavy. Moving the gimbal down will make the rig less
bottom heavy.

Page |21 Blackbird User Manual
Part IV. A Quick Guide To Operating The Blackbird
Handheld gimbaled inertial stabilizers can be frustrating tools for beginners, and some patience is
required as you start using your Blackbird. You should watch the Blackbird Instructional Video, but
here are some basic concepts to get you started.
Operation Requires Both Hands
While it is possible and sometimes necessary to operate the Blackbird with just one hand for short
periods, most of the time you will be using both hands to fly the Blackbird. You will use one hand to
support the Blackbird from the handle and the other hand to finely control pan, tilt and roll. The
picture below shows the right hand supporting the Blackbird and the thumb and index finger of the left
hand making very light contact with the upper control ring. Of course you could reverse the role of
each hand, and it’s not a bad idea to practice both ways if you are so inclined.
The skill in operating a handheld stabilizer is a form of
eye-hand coordination. Watching the view screen on
your camera, you gently apply correction with your
control fingers. If the horizon rolls, you have to correct
for it. If you move forward quickly, the camera will tend
to pitch down unless you correct for it. If shooting
outside when it’s windy you just have to do your best to
keep the horizon level and to control pan.
As you practice and get experience it will become a little
more automatic to anticipate the kind of control you will
have to apply to minimize camera pitching (tilting) or roll
as you move with the camera.
But it will always take concentration if you want to get
the best results.
Moving slower than you might want will require less
control to get good shots, and often movement is just too
fast anyway.
Delicate Touch With Your Control Fingers
If you squeeze the control ring too tightly, you will probably be over-controlling and introducing
movement that you don’t want. The only time you need to tightly grip the control ring is when you are
tilting the camera (but for long tilt shots you should trim horizontal balance for the correct tilt angle
and let the stabilizer do the work). For shots with no tilt you might try just making small tapping
corrections with your control hand thumb and index finger rather than keeping them in constant
contact with the control ring.

Blackbird User Manual Page |22
Walking with your Blackbird
You can get great shots going up and down stairs, but please use a spotter (an assistant to catch you if
you fall, should always be below you whether going up or down), or be very, very careful! The same
is true for walking backwards.
Keep your knees bent a little by dropping an inch or two, to avoid the slight vertical bobbing that
results from normal walking.
Use your support arm as a buffer or kind of spring to cushion your body movements similar to what
you do while walking carrying a nearly full open cup of coffee without spilling any.
Practice walking short straight distances with no camera roll, the seasick motion that our brains find so
annoying when watching video. Then practice moving forward from standstill (slowly) and stopping
(slowly) from moving to get minimal tilting in each case. Finally, practice side tracking shots with the
camera pointed to one side as you move forward.
Practice locked-off shots where you are not moving at all, just holding the stabilizer very steady for at
least 5 full seconds. These are important shots in a lot of situations.
Practice keeping the boom height (height of camera off the ground) constant for better looking shots,
unless you actually need to boom for the shot you want.
Some Final Tips to Remember
Set the drop time to about 2 seconds
Use the 15 in. horizontal bar to increase pan stability
Use gimbal friction, more in the beginning, or to reduce effect of wind or for more aggressive
moves.
Shoot with as wide (short focal length) a lens as possible.
The heavier your rig is, the easier it will be to control (and you get the added benefit of
strengthening your arm muscles without paying a gym fee).
For Blackbird technical support please email [email protected] or phone 919-876-6020