buku panduan windows xp
TRANSCRIPT
win-xp-pdf
- 1 -
Securing Your Windows XP ComputerThis document contains the following sections:
• Step 1: Download & Install Symantec AntiVirus for Desktops• Step 2: Run Microsoft Update• Step 3: Configure Windows Firewall• Step 4: Disable Simple File Sharing• Step 5: Secure Your Accounts and Passwords• Step 6: Enable a Screen Saver Password• Step 7: Configure Windows Event Logs• Step 8: Configure Local Security Auditing Policies• Other Security Tips• Advanced Steps
For information related to this topic refer to:
• Secure Computing (http://www.cmu.edu/computing/security/index.html)• Symantec Endpoint Protection
(http://www.cmu.edu/computing/doc/software/index.html)• System Restore (http://www.cmu.edu/computing/doc/security/restore/index.html)• Information Security Office (http://www.cmu.edu/iso/)
IMPORTANT: If your machine is managed by a Carnegie Mellon departmentaladministrator, please check with that person before proceeding with this document. You will also need administrator access to the machine you want to secure. Log on tothe machine using the administrator account for all actions unless otherwise noted.
Last Updated: 12/8/09
win-xp-pdf
- 2 -
Step 1: Download and Install Symantec EndpointProtection for DesktopsTo ensure that your computer is protected, download SymantecEndpoint Protection software from the Computing Services Software(http://www.cmu.edu/computing/software/all/index.html) pageand follow the installation instructions. For more information onconfiguring Symantec read the Symantec Endpoint Protection(http://www.cmu.edu/computing/doc/software/virus-windows/index.html) web page.
Run Live Update
Virus definitions change daily. To fully protect your computer, you need to downloadthe latest virus definition files by running Live Update. The Carnegie Melloninstallation of Symantec Endpoint Protection is pre-configured to run LiveUpdatedaily. In addition, the software is configured with File System Auto-Protectenabled. Read the Live Update section of the Symantec Endpoint Protection(http://www.cmu.edu/computing/doc/software/virus-windows/index.html) page fordetails.
Step 2: Run Microsoft UpdateLast Updated: 12/8/09
win-xp-pdf
- 3 -
Step 2: Run Microsoft Update
Load Service Packs
Windows users should be aware of which version of the operating systemthey are running and should update to the latest Service Pack. To determinewhich Service Pack is installed on your computer and to download the latestService Pack, visit the ISO Microsoft Windows Security Patches and Updates(http://www.cmu.edu/computing/security/ms-update.html) page.
Upgrade to Microsoft Update
Microsoft developed Microsoft Update to install Windows and Office patches via theweb making it easier to keep Microsoft products up-to-date.
The following steps will upgrade Windows Update to Microsoft Update:
IMPORTANT: You MUST use Internet Explorer to use Microsoft Update.
1. Open Internet Explorer.2. In the Address Bar type http://update.microsoft.com/microsoftupdate
(http://update.microsoft.com/microsoftupdate) (Microsoft Update web page).3. If prompted, install the Microsoft Update ActiveX control.
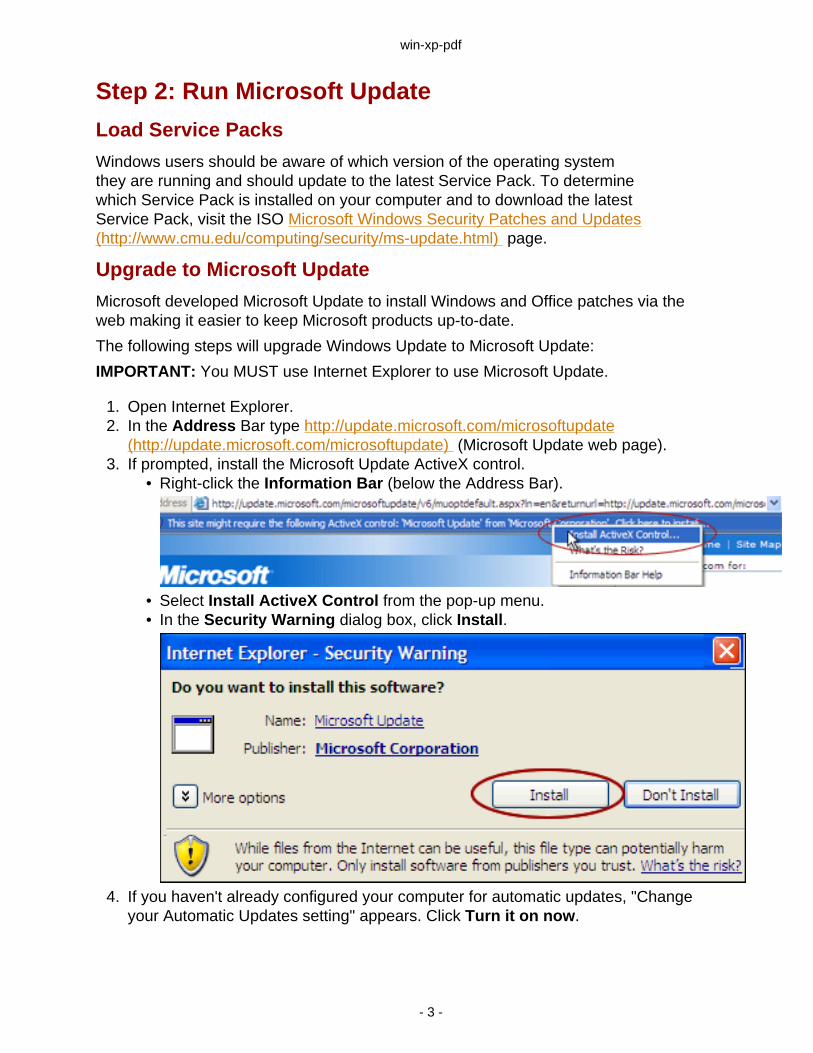
• Right-click the Information Bar (below the Address Bar).
• Select Install ActiveX Control from the pop-up menu.• In the Security Warning dialog box, click Install.
4. If you haven't already configured your computer for automatic updates, "Changeyour Automatic Updates setting" appears. Click Turn it on now.

win-xp-pdf
- 4 -
5. The Automatic Update window appears. Under Install new updates, select Everyday. Be sure to select a time when your computer is turned ON and has Internetaccess.
6. The "Microsoft Update setup is complete" window appears. Click the Check forUpdates button. Continue with the Run Microsoft Update steps below.
Run Microsoft Update
1. A Microsoft Update screen appears (similar to the following) select Express toupdate Microsoft Office AND the Microsoft operating system.

win-xp-pdf
- 5 -
2. The program scans your system to determine which updates you need to install.Once the program finishes scanning, one of the following appears:
• A message that "No high-priority updates for your computer are available...". Ifthis message appears, you're done! Your computer is up to date.
• A list of updates that you need to install. If this list appears, click InstallUpdates. The program will hang for a few moments as the updates areinstalled.
IMPORTANT NOTE: If you have a high number of priority updates to install,you may be prompted to reboot your system between updates. To assure thatALL AVAILABLE updates have been installed:
o Relaunch Internet Explorer
o Revisit the Microsoft Update (http://update.microsoft.com/microsoftupdate)web page
o Select Express. If the "No high-priority updates for your computerare available..." message appears. You're done. If the Install Updates

win-xp-pdf
- 6 -
message appears again, click Install Updates. Repeat the process untilthere are no high-priority updates.
Step 3: Configure Windows FirewallLast Updated: 4/1/09

win-xp-pdf
- 7 -
Step 3: Configure Windows FirewallA firewall is a system designed to reinforce the security of the data flowing betweentwo networks, the internal network and the outside network, such as the Internet.It’s important to note that enabling a firewall may break some applications that usenon-standard or uncommon ports. For these applications, you can relax the firewallsettings and enable exceptions. For more information on these terms, see the SecurityTerm Definitions (http://www.cmu.edu/computing/security/definitions.html) web page.
Follow these steps to configure the firewall:
1. Click Start > Control Panel.• If “Switch to Classic View” appears in the
top-left of the window, select it to reveal the control panel.
2.
Double-click Windows Firewall. The Windows Firewall window appears.
3. Uncheck Don't allow exceptions and select the On radio button.

win-xp-pdf
- 8 -
4. Select the Advanced tab.5. Under Security Logging, click the Settings button. The Log Settings window will
appear.
win-xp-pdf
- 9 -
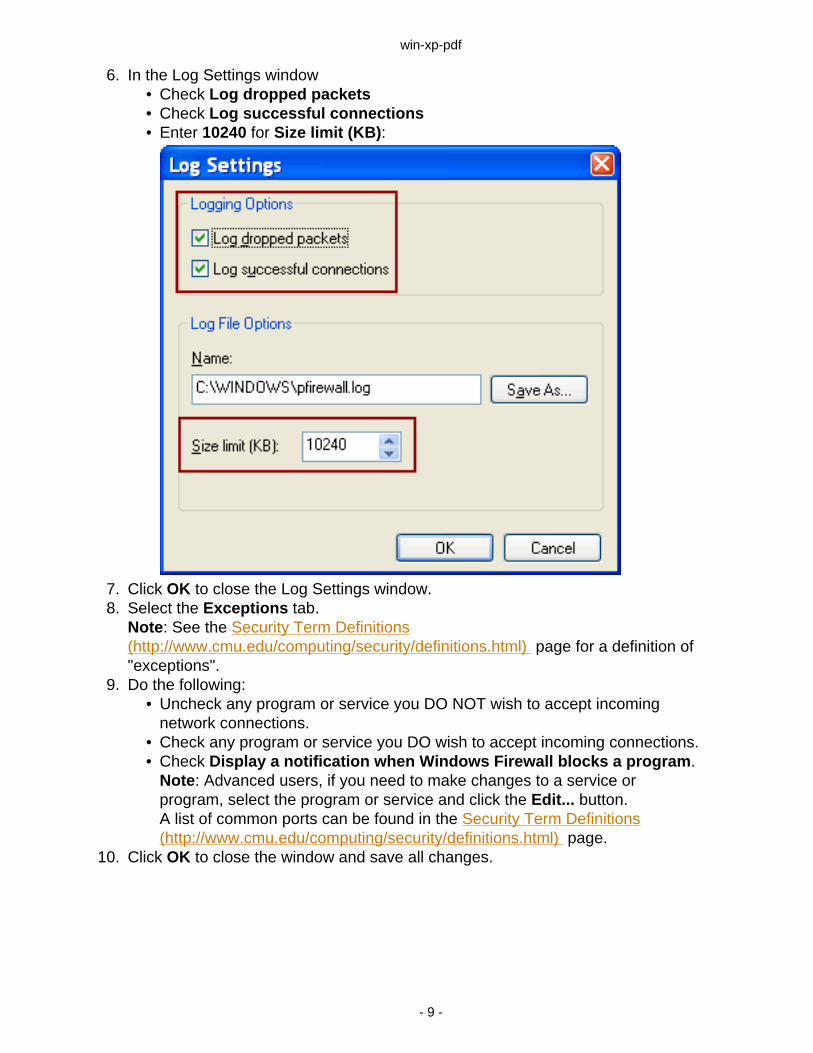
6. In the Log Settings window• Check Log dropped packets• Check Log successful connections• Enter 10240 for Size limit (KB):
7. Click OK to close the Log Settings window.8. Select the Exceptions tab.
Note: See the Security Term Definitions(http://www.cmu.edu/computing/security/definitions.html) page for a definition of"exceptions".
9. Do the following:• Uncheck any program or service you DO NOT wish to accept incoming
network connections.• Check any program or service you DO wish to accept incoming connections.• Check Display a notification when Windows Firewall blocks a program.
Note: Advanced users, if you need to make changes to a service orprogram, select the program or service and click the Edit... button.A list of common ports can be found in the Security Term Definitions(http://www.cmu.edu/computing/security/definitions.html) page.
10. Click OK to close the window and save all changes.

win-xp-pdf
- 10 -
Step 4: Disable File SharingLast Updated: 12/8/09
win-xp-pdf
- 11 -
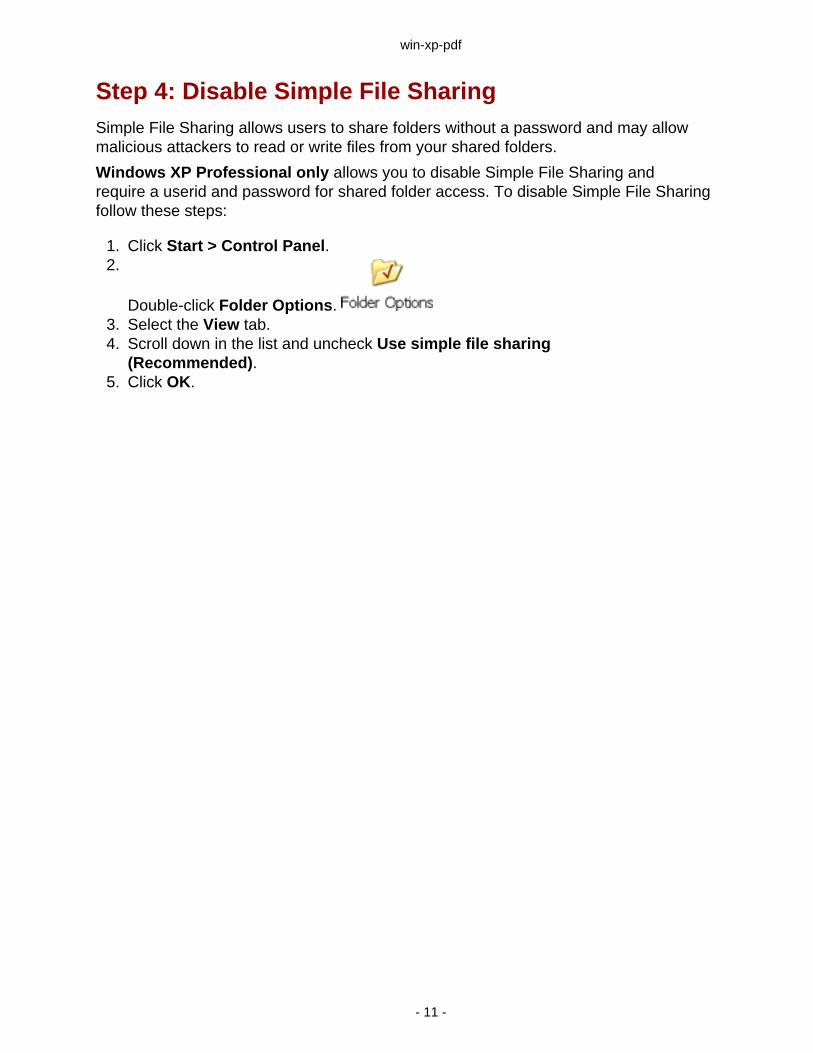
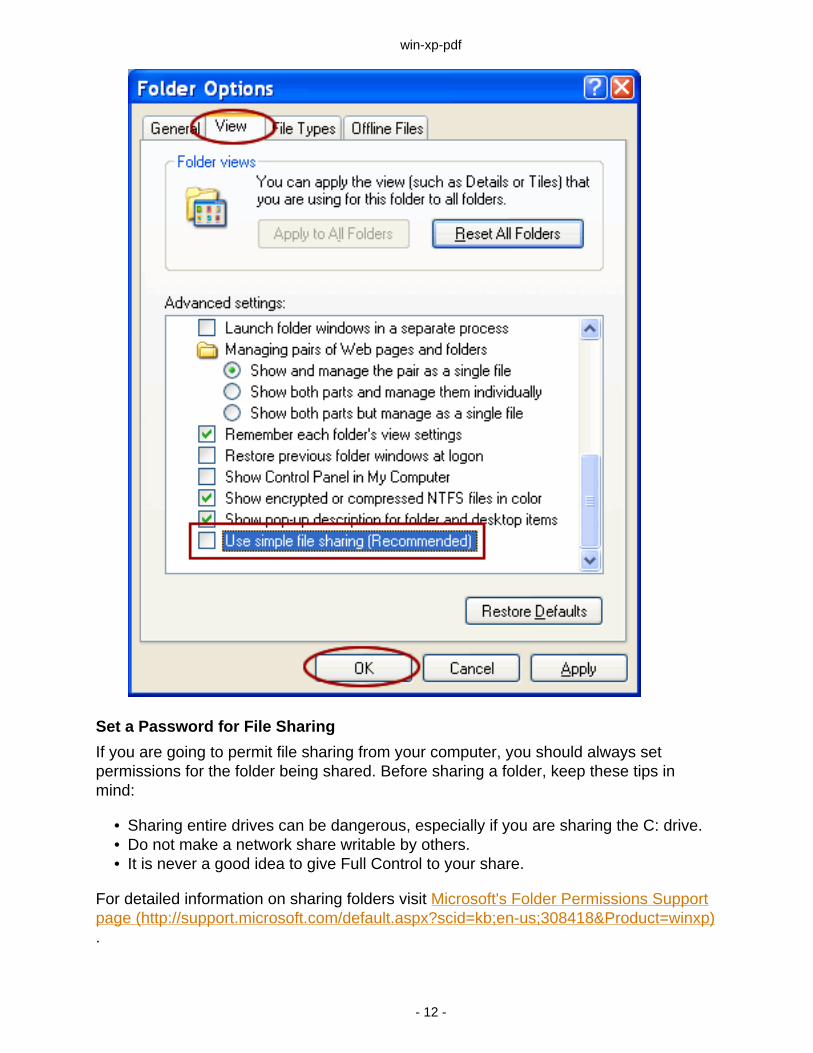
Step 4: Disable Simple File SharingSimple File Sharing allows users to share folders without a password and may allowmalicious attackers to read or write files from your shared folders.
Windows XP Professional only allows you to disable Simple File Sharing andrequire a userid and password for shared folder access. To disable Simple File Sharingfollow these steps:
1. Click Start > Control Panel.2.
Double-click Folder Options. 3. Select the View tab.4. Scroll down in the list and uncheck Use simple file sharing
(Recommended).5. Click OK.
win-xp-pdf
- 12 -
Set a Password for File Sharing
If you are going to permit file sharing from your computer, you should always setpermissions for the folder being shared. Before sharing a folder, keep these tips inmind:
• Sharing entire drives can be dangerous, especially if you are sharing the C: drive.• Do not make a network share writable by others.• It is never a good idea to give Full Control to your share.
For detailed information on sharing folders visit Microsoft's Folder Permissions Supportpage (http://support.microsoft.com/default.aspx?scid=kb;en-us;308418&Product=winxp).

win-xp-pdf
- 13 -
Step 5: Secure Your Accounts andPasswordsLast Updated: 01/12/07

win-xp-pdf
- 14 -
Step 5: Secure Your Accounts and PasswordsYou must establish effective passwords for all active accounts. Existing accounts withweak or nonexistent passwords are an invitation for malicious attackers to compromiseyour system. For tips on selecting an effective password, read Managing Your AndrewPassword (http://www.cmu.edu/computing/doc/accounts/passwords/index.html) .
To disable any unused accounts such as "Guest" and to verify that an effectivepassword is set for the Administrator account, follow these steps:
1. Click Start > Control Panel.2.
Double-click User Accounts. The User Accounts dialog box appears.
3. Select the User Account you want to set a password for (e.g., Administrator).4. Click Change the password and enter your old and new password.5. To disable a Guest account, select it in the dialog box and click Turn off the guest
account.
Step 6: Enable a Screen Saver PasswordLast Updated: 01/12/07
win-xp-pdf
- 15 -
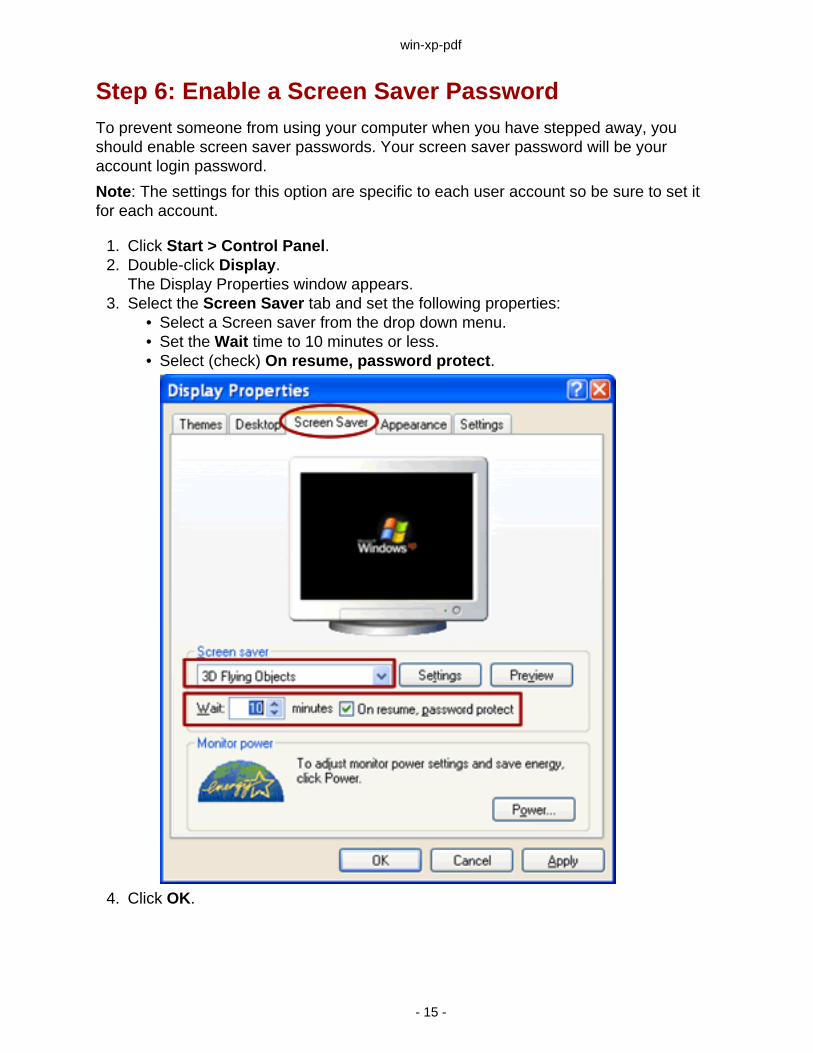
Step 6: Enable a Screen Saver PasswordTo prevent someone from using your computer when you have stepped away, youshould enable screen saver passwords. Your screen saver password will be youraccount login password.
Note: The settings for this option are specific to each user account so be sure to set itfor each account.
1. Click Start > Control Panel.2. Double-click Display.
The Display Properties window appears.3. Select the Screen Saver tab and set the following properties:
• Select a Screen saver from the drop down menu.• Set the Wait time to 10 minutes or less.• Select (check) On resume, password protect.
4. Click OK.

win-xp-pdf
- 16 -
Step 7: Configure Windows Event LogsLast Updated: 01/12/07

win-xp-pdf
- 17 -
Step 7: Configure Windows Event LogsWindows records system events, software changes, and some system setting changeoccurrences in the Windows Event Logs. By default these logs clear events older than 7days because the log size is too small.
If your computer becomes compromised, keeping more logging information increasesthe chances that experts will be able to determine how and when the compromiseoccurred. This information is also useful in diagnosing other system and performanceproblems.
To increase the log size, follow these steps:
1. Click Start > Control Panel.2. Double-click Administrative Tools and then Event Viewer.3. In the left pane, select Application.4. Choose Action > Properties.5. Set the following:
• Maximum log size: 10240KB• Select Overwrite events as needed
6. Click OK to save the settings.7. Repeat Steps 3 through 7 for Security and System. Then, close the window.
Step 8: Configure Local Security AuditingPoliciesLast Updated: 01/12/07
win-xp-pdf
- 18 -
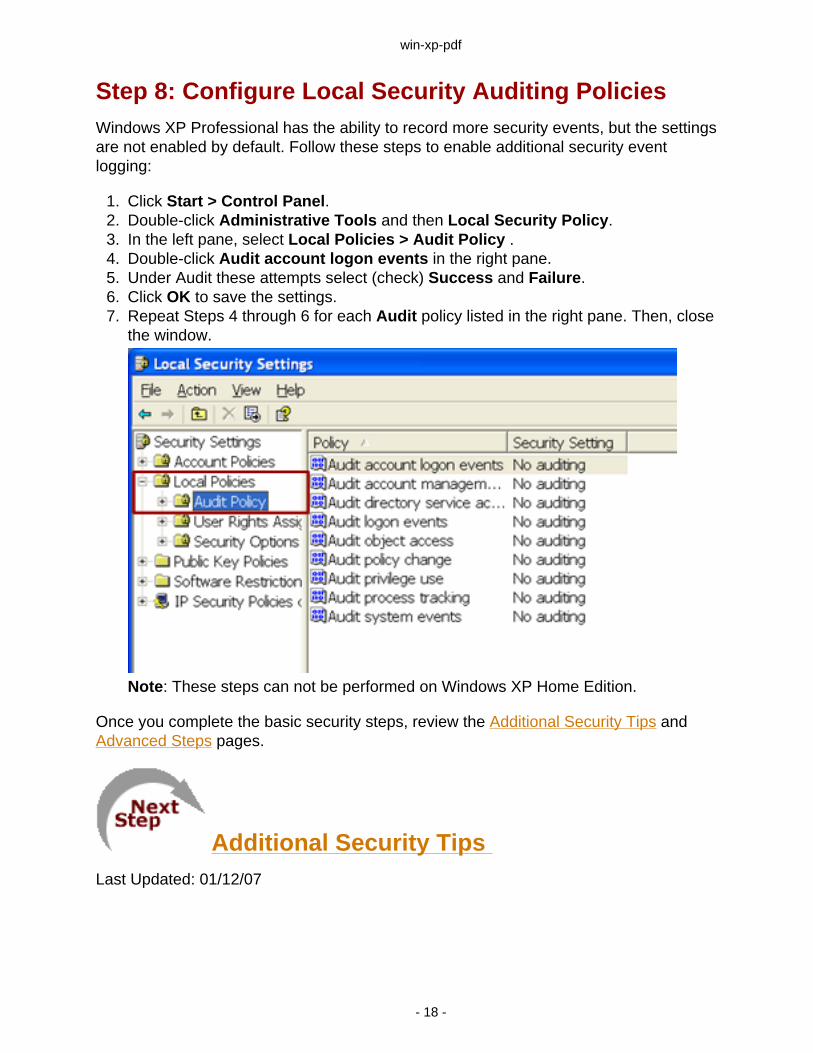
Step 8: Configure Local Security Auditing PoliciesWindows XP Professional has the ability to record more security events, but the settingsare not enabled by default. Follow these steps to enable additional security eventlogging:
1. Click Start > Control Panel.2. Double-click Administrative Tools and then Local Security Policy.3. In the left pane, select Local Policies > Audit Policy .4. Double-click Audit account logon events in the right pane.5. Under Audit these attempts select (check) Success and Failure.6. Click OK to save the settings.7. Repeat Steps 4 through 6 for each Audit policy listed in the right pane. Then, close
the window.
Note: These steps can not be performed on Windows XP Home Edition.
Once you complete the basic security steps, review the Additional Security Tips andAdvanced Steps pages.
Additional Security Tips Last Updated: 01/12/07
win-xp-pdf
- 19 -
Additional Security Tips
• Update Other SoftwareSecurity vulnerabilities can exist in all software. Keep your software updated. Youwill find update information, for most software packages, from the Help menu.
• Use Encrypted AuthenticationClear-text transmission methods transfer your user ID and password WITHOUTconverting them to an encrypted form. This makes your user ID and passwordreadable by outsiders who may attempt to intercept and use the information.Carnegie Mellon servers DO NOT allow clear-text authentication. To ensure normalemail and server access, follow the steps in the Using Encrypted AuthenticationMethods (http://www.cmu.edu/computing/doc/security/encrypt/index.html) document.
• Backup Your Data PeriodicallyYou should perform regular backups on a weekly basis. At a minimum,backup your data before and after any system or data changes. Recoveringfrom a system crash or a security compromise can be expedited if youmaintain proper backups. Otherwise, you may be without your systemfor days or weeks and recreating lost work can be extremely difficult.For more information, read Microsoft's Windows XP Backup Made Easy(http://www.microsoft.com/windowsxp/using/setup/learnmore/bott_03july14.mspx) article.Important: Secure your backup media in a safe, locked place. It may containsensitive information.
• Scan Downloaded Files
Never open files from people or sources with whom you are unfamiliar (whetherthey come from a website or an e-mail) and do NOT execute software thatis downloaded from the Internet unless it has been scanned for viruses.Simply visiting a compromised Web site can cause infection if certain browservulnerabilities are not patched. To scan a downloaded file, right-click the file andselect Scan for Viruses.
Advanced Security StepsLast Updated: 12/8/09

win-xp-pdf
- 20 -
Advanced StepsWe strongly recommend that you follow the advanced steps if you:
• Visit web sites you do not trust on a regular basis.• Download software from servers you do not trust.• Run a web server or semi-private file server.
If any or all of these usage patterns apply to you, please complete the following:
Step 1: Create an Everyday User Account
Step 2: Disable Un-necessary Services
Step 3: Run and Update a Malware Removal Program

win-xp-pdf
- 21 -
Step 1: Create an Everyday User AccountBy creating an everyday user account for daily work you limit the damage a virus ormalicious attacker can inflict.
Follow these steps to create a normal user account.
1. Click Start > Control Panel.2.
Double-click User Accounts. The User Accounts dialog box appears.
3. Select Create a new account.4. Enter a name for the account. Click Next.5. Select Limited for the account type. Choose Create Account .6. Follow steps 2-3 in Step 5: Secure Your Accounts and Passwords page to create a
password for this account.
Step 2: Disable Unnecessary ServicesLast Updated: 01/12/07
win-xp-pdf
- 22 -
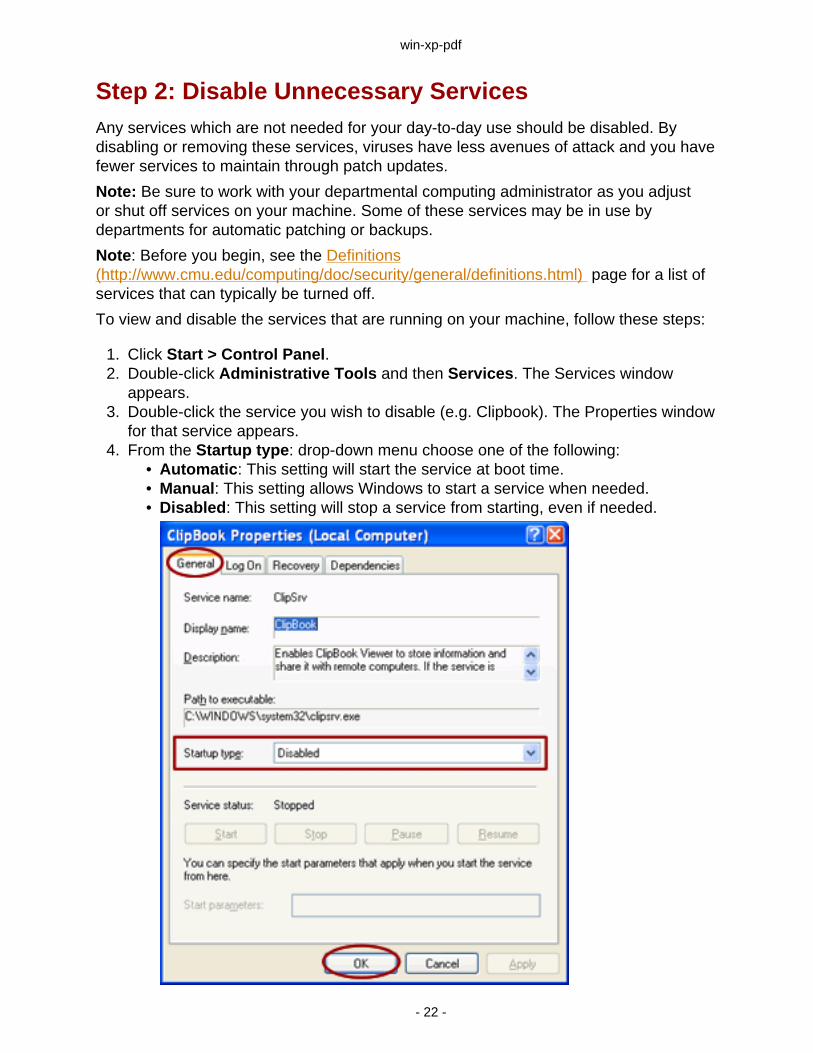
Step 2: Disable Unnecessary ServicesAny services which are not needed for your day-to-day use should be disabled. Bydisabling or removing these services, viruses have less avenues of attack and you havefewer services to maintain through patch updates.
Note: Be sure to work with your departmental computing administrator as you adjustor shut off services on your machine. Some of these services may be in use bydepartments for automatic patching or backups.
Note: Before you begin, see the Definitions(http://www.cmu.edu/computing/doc/security/general/definitions.html) page for a list ofservices that can typically be turned off.
To view and disable the services that are running on your machine, follow these steps:
1. Click Start > Control Panel.2. Double-click Administrative Tools and then Services. The Services window
appears.3. Double-click the service you wish to disable (e.g. Clipbook). The Properties window
for that service appears.4. From the Startup type: drop-down menu choose one of the following:
• Automatic: This setting will start the service at boot time.• Manual: This setting allows Windows to start a service when needed.• Disabled: This setting will stop a service from starting, even if needed.

win-xp-pdf
- 23 -
5. Repeat these steps for each service you want to disable.
Step 3: Run and Update a Spyware RemovalProgramLast Updated: 01/12/07
win-xp-pdf
- 24 -
Step 3: Run and Update a Malware Removal ProgramMalware or more specifically, spyware is any technology-such as web site tracking orkeystroke logging software-that aids in gathering information about a person withouttheir knowledge. SpyWare is often installed along with popular programs such asKaZaA, GrokSter, iMesh and others. It is also installed by some web sites via pop-upads and viruses.In some cases spyware can take over your web browser or generatepop-up ads even when your browser has been closed.
Before you can run a removal program, you need to download it. Youcan use any program of your choice, but we recommend MalwarebytesAnti-Malware Software. For help with downloading and running Malwarebytes,refer to the "Download, Install and Run Malwarebytes' Anti-Malware"(http://www.cmu.edu/computing/doc/security/clean-win/basic#malware.html) section ofthe Clean Your Windows Computer document.
Last Updated: 8/21/09