central venipuncture (cvp) rev 062018central venipuncture (cvp) revised 12/2018 michael costanza,...
TRANSCRIPT

Central Venipuncture (CVP)Revised 12/2018
Michael Costanza MD FACSMichael Costanza, MD, FACSProfessor of SurgeryDivision of Vascular Surgery and Endovascular ServicesUpstate Medical University

Fundamental Principles of pUltrasound Guidance
•Central line complications are potentially fatal•Ultrasound guidance has become the standardUltrasound guidance has become the standard of care for central venous access
•Ultrasound guidance advantages:•Ultrasound guidance advantages:• Identify and locate the target vessel• Identify and differentiate non‐targets• Identify and differentiate non‐targets

R i d K l dRequired Knowledge
•Aseptic technique
•Seldinger technique: “over the wire”

T t V i Id tifi tiTarget Vein Identification
•Pre‐ultrasound Era:•Anatomic landmarks: “nipples notches NAVEL”Anatomic landmarks: nipples, notches, NAVEL
Ult d id•Ultrasound guidance•Appearance, size, compressibility, phasicity, Doppler flflow
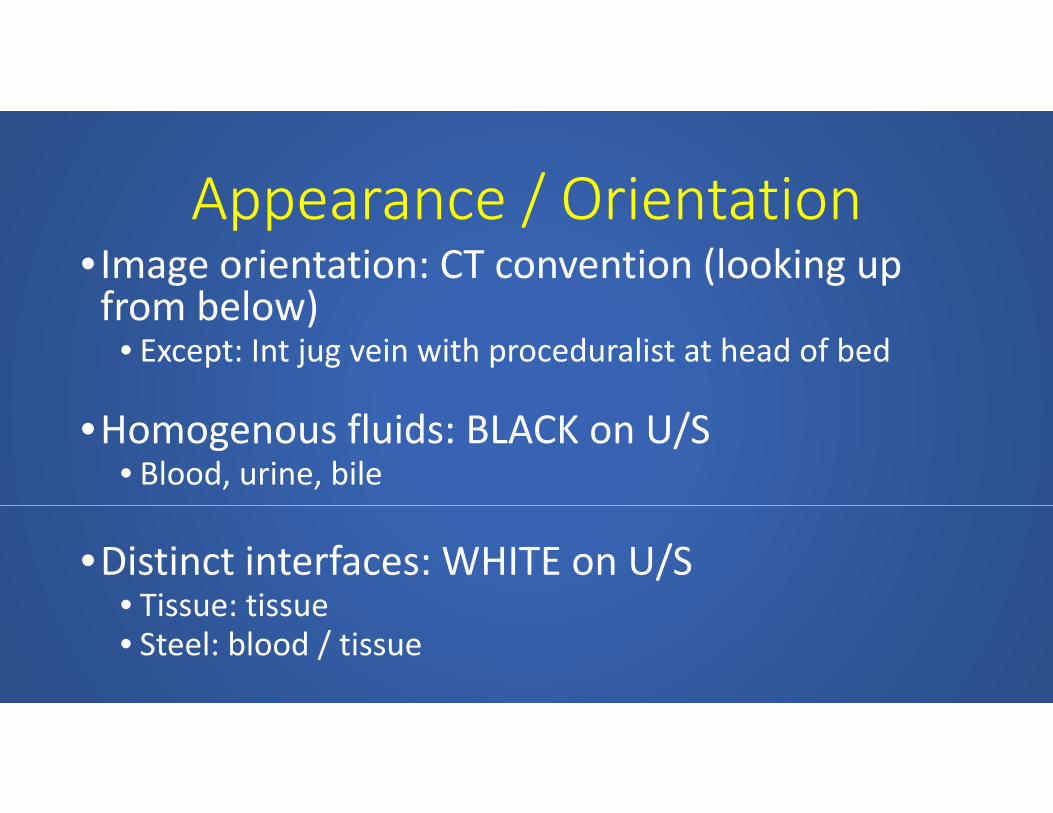
Appearance / OrientationAppearance / Orientation• Image orientation: CT convention (looking up from below)from below)
• Except: Int jug vein with proceduralist at head of bed
•Homogenous fluids: BLACK on U/S• Blood, urine, bile
•Distinct interfaces: WHITE on U/S• Tissue: tissue• Tissue: tissue• Steel: blood / tissue

BLACK on U/SBLACK on U/S
Blood flowing in vessel

WHITE on U/S

Ultrasound Machine:Ultrasound Machine: Technical Issues

Ultrasound Probe TypesLinear• Elements arranged in a line• Elements arranged in a line• Higher frequency (7.5‐10 MHz)• Higher resolutionHigher resolution• Lower penetration
Convex; curvilinearConvex; curvilinear• Elements arranged along a curve• Lower frequency; lower resolutionLower frequency; lower resolution• Higher penetration

3 Finger probe grasp3 Finger probe grasp•Allows remaining fingers or wrist to rest on patient or g g panchor and stabilize
• Finer probe manipulations possiblep p p• Sonographer can watch screen and not hand; prevents wandering probe
•Reduces patient discomfort and injury risk• “Fine” grip preferred over “power grip”Fine grip preferred over power grip

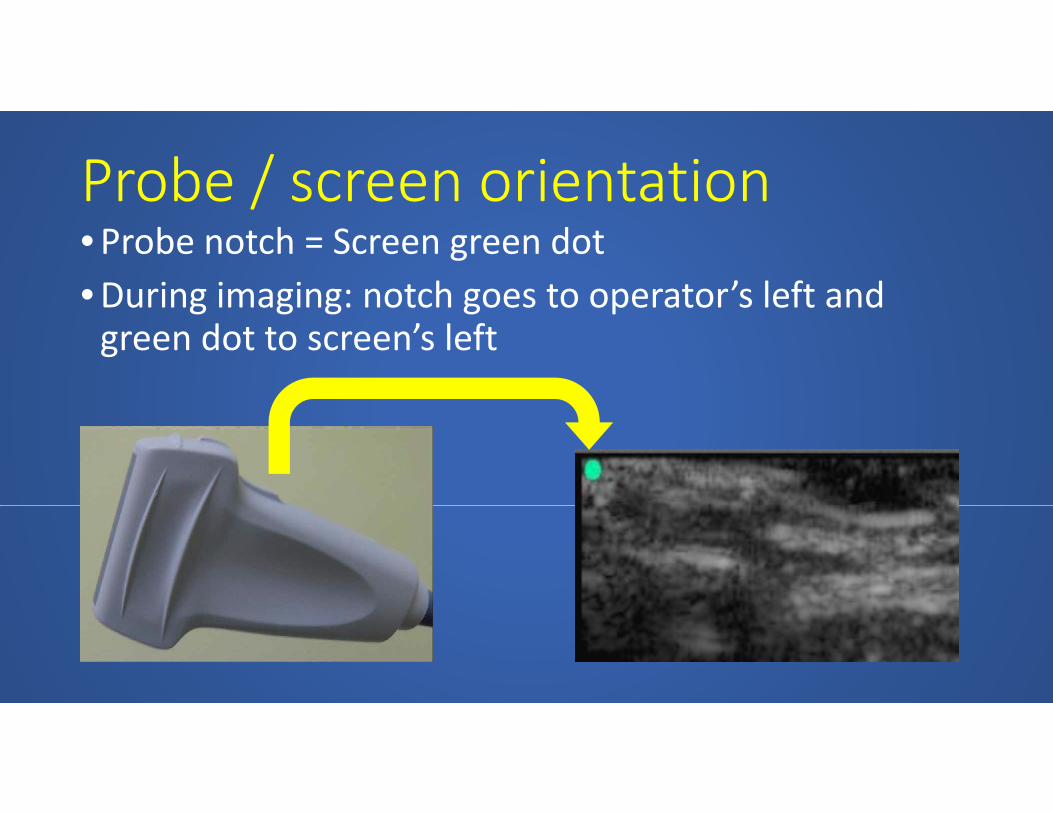
Probe / screen orientation/•Probe notch = Screen green dot•During imaging: notch goes to operator’s left and g g g g pgreen dot to screen’s left

Probe / screen orientationProbe / screen orientation• Internal jugular CVC: operator at head of bed;Internal jugular CVC: operator at head of bed; looking inferiorly at patient and screen• Screen left = reality leftScreen left reality left•Anti‐CT image orientation
•Femoral CVC operator at feet looking superiorlyR lt t i i t ith CT i t ti•Resultant image is consonant with CT orientation

Probe frequencyProbe frequency
•High frequency: high resolution; low penetration•High frequency: high resolution; low penetration• “Res” on Sonosite
•Moderate•Moderate• “Gen” on SonositeL f l l i hi h i•Low frequency: low resolution; high penetration• “Pen” on Sonosite


Screen GeographyScreen Geography
•Allocate screen to area of interest (AOI)•Allocate screen to area of interest (AOI)•Locate AOI at mid depth; devote substantial screen
•Include identifying context anatomyy g y•Avoid quest for perfect still image

AOI
Wastedscreenspace

Cleaning the probeCleaning the probe
•Treat transducer similar to stethoscope head•Treat transducer similar to stethoscope head•“Clean” not sterilize•Cannot heat sterilize•List of approved and prohibited cleansing pp p gagents
•Caviwipes should be with machineCaviwipes should be with machine

Ultrasound Guidance:Ultrasound Guidance: Concepts and Technique

1st Step: U/S Guidance1st Step: U/S Guidance
•Locate and positively identify the target vein

Locating the veinLocating the vein•Anatomy y
•SizeSize
•CompressibilityCompressibility
•Phasicity•Phasicity

Locating the vein: internal jugularLocating the vein: internal jugular
A d th t l id t id (SCM)•Around the sternocleidomastoid (SCM) triangle
•Internal jugular vein (IJ) usuallyInternal jugular vein (IJ) usually superficial and lateral to the common carotid artery (CCA)carotid artery (CCA)
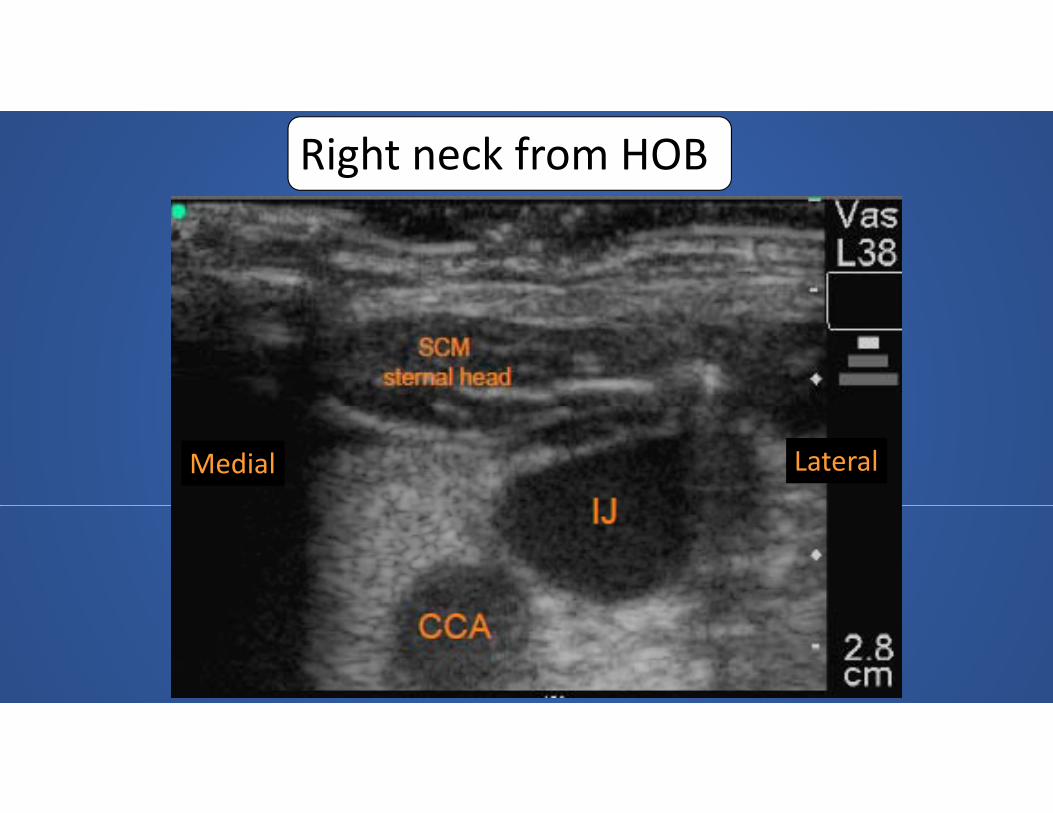
Right neck from HOB
Medial Lateral

Locating the vein: femoralLocating the vein: femoral
f l ( ) d l•Common femoral vein (CFV) is medial to the common femoral artery (CFA)y ( )
I l i i i h CFV•In euvolemic, supine patient the CFV (and IJ) are larger than adjacent arteries

Left femoral: looking up
MedialMedial

Phasicity / CompetencyPhasicity / Competency•Vein volume (size on•Vein volume (size on U/S) can vary with respiratory cycle and p y yabdominal or thoracic pressure

Baseline Abd comp Valsalvapine
Sup
urg
Common femoral vein
v T‐bu
Rev
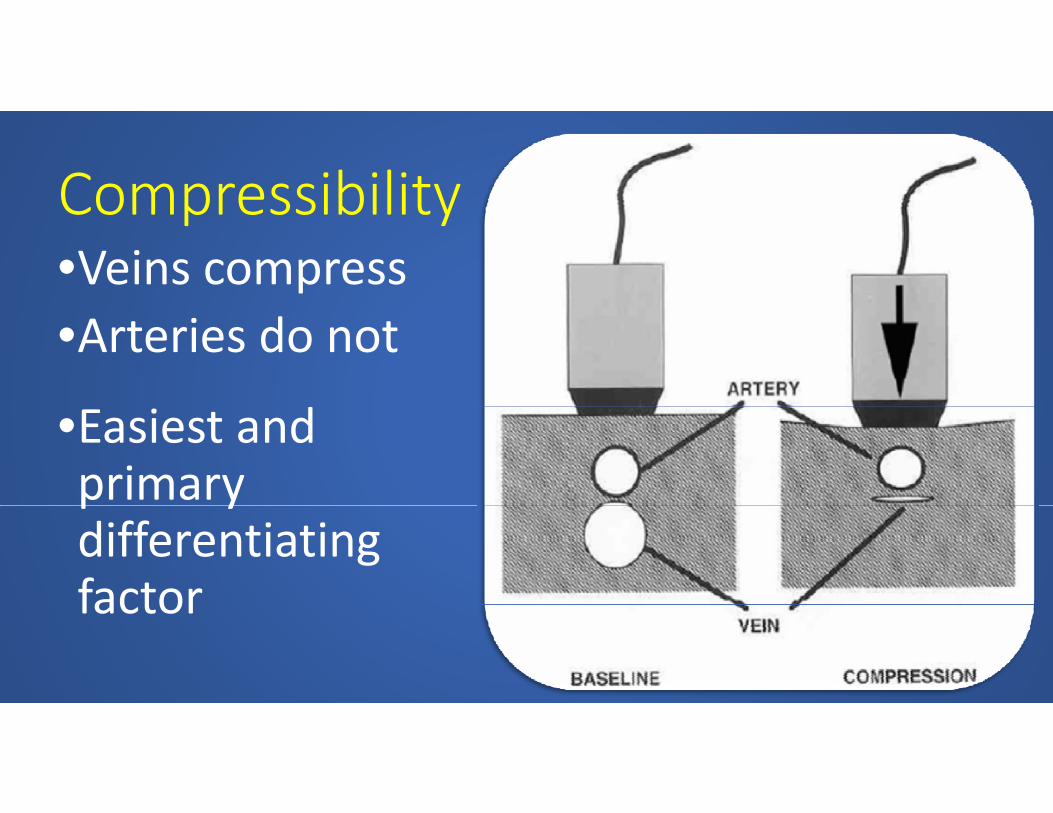
CompressibilityCompressibility•Veins compress•Arteries do not
•Easiest and primary p ydifferentiating factorfactor

CompressionBaseline

CompressionBaseline

Doppler flow characteristicsDoppler flow characteristics•Electronic DopplerElectronic Doppler
•Wave form and l itvelocity

Veins: phasic flow; low velocity

Arteries: pulsatile flow; high velocity

Optimal targetOptimal target• Large caliberg• Superficial location•Distant from non‐target vital structuresDistant from non target vital structures
•Usual venipuncture target is a compromise of these•Usual venipuncture target is a compromise of these characteristics

Technique for IJ positioningTechnique for IJ positioning•Rotation of neck away from procedure side brings IJ y p gover carotid; potentially increasing risk of carotid puncture
•Compromise: rotate head/chin out of operator’s way; avoid extreme rotation
•Real time U/S visualization will decrease risk

Technique for IJ positioningq p g
N t l R t t dNeutral Rotated

U/S Guidance Technique: 4 P’sU/S Guidance Technique: 4 P s•Pre‐scanPre scan
•PreparationPreparation
•Poke•Poke
•Path•Path

Pre‐scanPre scan•Before sterile prep; survey underlying vesselsBefore sterile prep; survey underlying vessels•Confirm target vessel•Optimize patient and machine positions and•Optimize patient and machine positions and settingsS t t bl h i ht d tilt•Set table height and tilt
•Lower room lights; adjust monitor gain (brightness)

PreparationPreparation•Maximum barrier cartMaximum barrier cart•Prepare skin
d il l d l•Transducer sterile sleeve and gel•Drape covering entire patient; mayo stand p g p ; ycover for table
•Gown gloves hat mask•Gown, gloves, hat, mask

PokePoke•Initial skin puncture•Center the target vessel •Near transducer, at midpoint; 45 degree ea t a sduce , at dpo t; 5 deg eeangle
•Places needle in subcutaneous tissue•Places needle in subcutaneous tissue•Locate needle by ultrasound before advancement

PathPath•Following the path of the needle and adjusting g p j gthe course
•Tissue motion to localize needle•Bright spot echo = needle •Short axis: ring down artifactShort axis: ring down artifact•Long axis: reflection and shadowing or reverberation from shaftreverberation from shaft
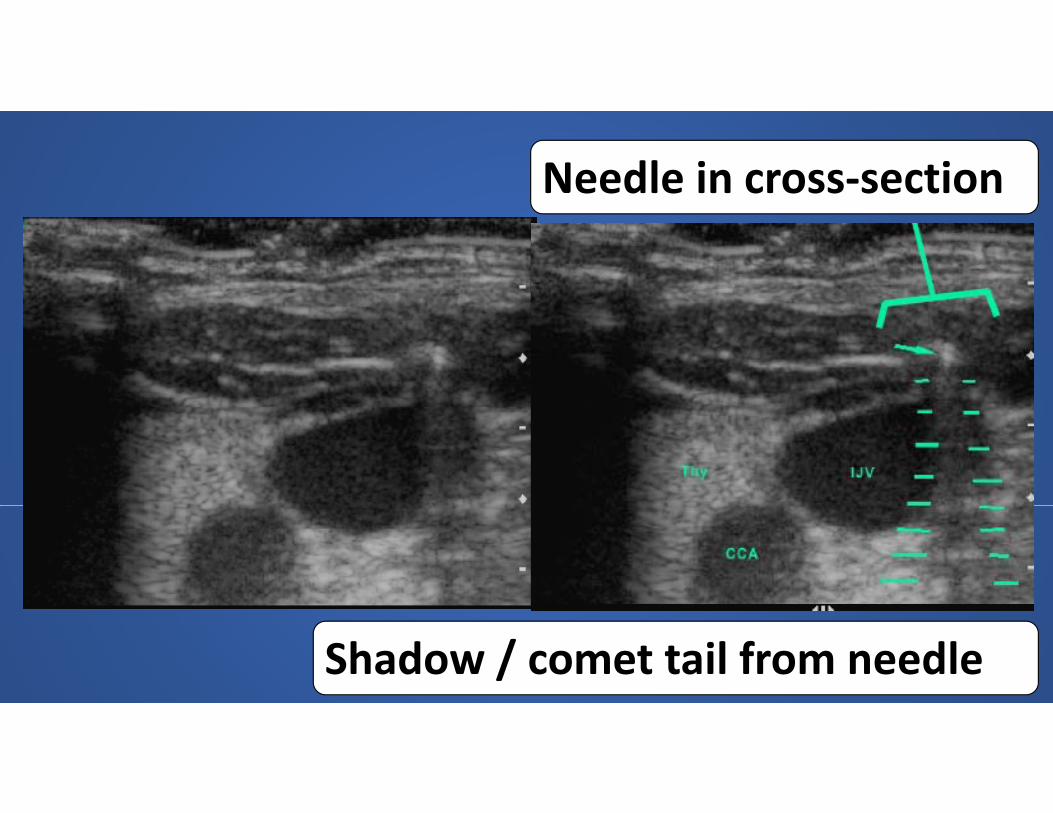
Needle in cross‐section
Shadow / comet tail from needle

PathPath•Locate needle tip prior to advancementp p•Accurately visualize the needle from skin to target vesseltarget vessel
•Requires sweeping motion of scan plane in short axisshort axis
•Potential error: mistaking shaft of needle for tip in transverse planetip in transverse plane

PathPath•Potential error: mistaking shaft of needle forPotential error: mistaking shaft of needle for tip in transverse plane
•Cross section of needle shaft does not represent true vector of needle
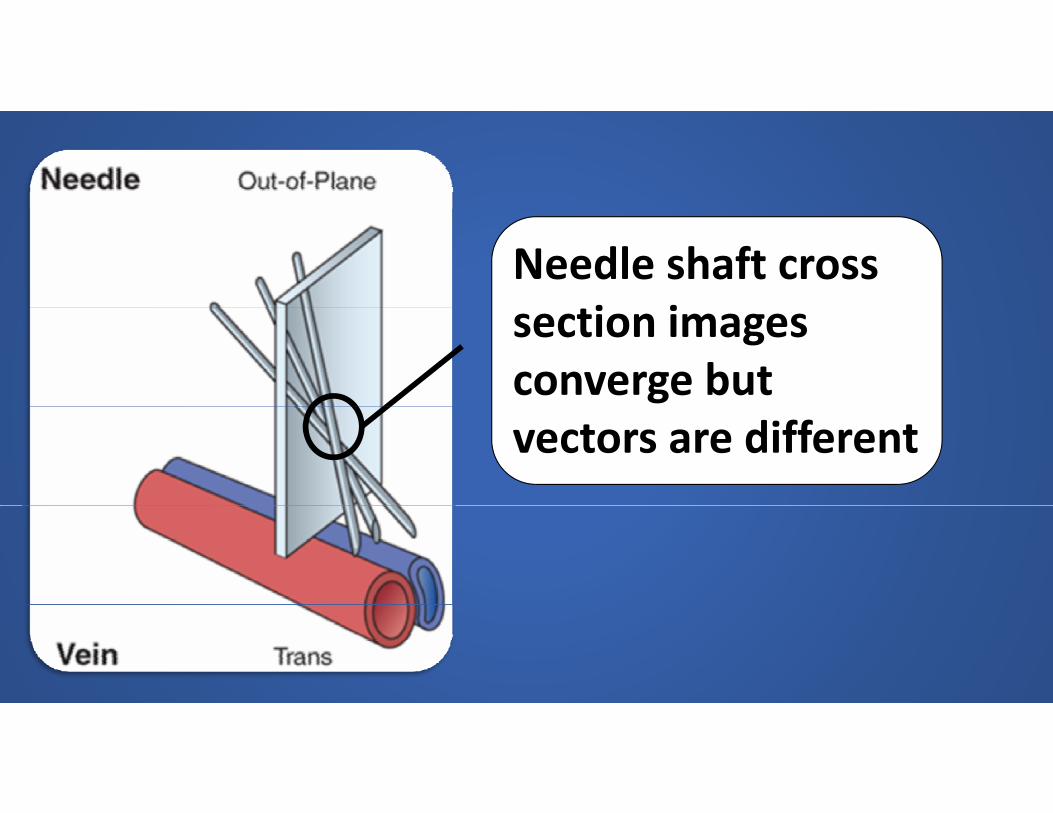
Needle shaft cross i isection images
converge but vectors are different

Transverse plane: better lateral/medial positioninglateral/medial positioning
Longitudinal plane: better l d d th iti islope and depth positioning

During procedure know…• size of target• size of target• distance to target

Estimating distance to targetg g

Vein punctureVein puncture•Vein deforms with pressure of advancing needlep g•Blood in needle• Set aside probe; stop U/SSet aside probe; stop U/S•Complete procedure
•2 operator technique allows more imaging

Needle in cross section

2 person: Seldinger wire entry
CFV long axis view

2 person: Advancing wire
CFV long axis view

2 person: J tip wire
CFV long axis view
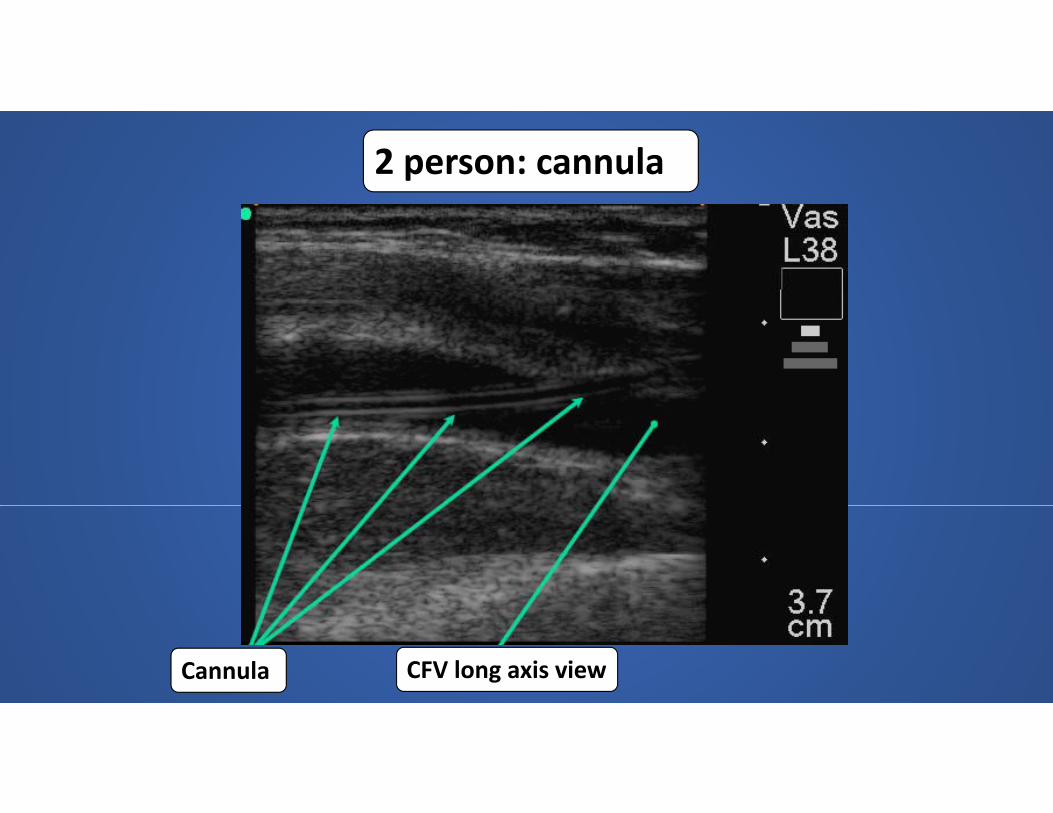
2 person: cannula
CFV long axis viewCannula

Doppler flush of intraluminal cannula

Pitfalls to avoidPitfalls to avoid•Failure to identify needle in tissueFailure to identify needle in tissue•Failure to distinguish between artery and vein•Locating vessel prior to proper positioning•Locating vessel prior to proper positioning•Failure to angle transducer beam into needle
tpuncture area

Maximum Barrier PrecautionsMaximum Barrier Precautions
Central Line BundleCentral Line Bundle•Hand hygieneyg•Maximal barrier precautions;•Chlorhexidine skin antisepsis;Chlorhexidine skin antisepsis;•Optimal catheter site selection, with avoidance of using the femoral vein for central venous access inusing the femoral vein for central venous access in adult patients
•Daily review of line necessity, with prompt removal ofDaily review of line necessity, with prompt removal of unnecessary lines.

Hand hygieneHand hygiene•Washing hands or using an alcohol‐based waterless g ghand cleaner helps prevent contamination of central line sites and resultant bloodstream infections
•All staff prior to starting procedure•15 sec hand wash with soap and water or waterless product rubbed until dry

Maximum Barrier PrecautionsMaximum Barrier Precautions•Operator and assistants: strict compliance with hand p phygiene and wearing a cap, mask, sterile gown, and sterile gloves
•Patient: covering from head to toe with a sterile drape, with a small opening for the site of insertion

Chlorhexidine skin antisepsisChlorhexidine skin antisepsis
•Friction scrub for at least 30 secondsFriction scrub for at least 30 seconds•Allow solution to dry completely (3 minutes)

Optimal catheter site selectionOptimal catheter site selection
•Risk/benefit analysis as to which vein is most appropriate for patient
Daily review of central line necessityDaily review of central line necessity•Risk of infection increases over time as the line remains in place
•Remove lines that are no longer clearly needed g y

ReferencesReferences
Bair, A.E., Parikh, A.K., Rose, J.S. (2014). Vascular Access. In O.J. Ma, J.R. Mateer, R.F. Reardon, S.A. Joing (Eds.), Ma & Mateer’s Emergency Ultrasound (3rd ed., Chapter 21). New York, NY: McGraw‐Hill Education
ACKNOWLEDGEMENT OFEDUCATION COMPLETIONMy signature here means that I have reviewed information regarding Central Venipuncture.Tracker Code: CVP
Date:
PRINTED Name:
Tracker Code: CVP
PRINTED Name:
Signature:
