certified farrier scoring is done on -site by the approved examiner (and/or by afa approved...
TRANSCRIPT

An
Off
icia
l P
ub
licati
on
of
the
A
me
ri
ca
n
Fa
rr
ie
r
’
s
As
so
ci
at
i
on
CHAPTER
3
CERTIFIED FARRIER AFA CERTIFIED FARRIER CLASSIFICATION (CF) REQUIREMENTS PREREQUISITES The Certified Farrier is a farrier who has demonstrated knowledge and skill to perform hoof care on a professional basis. Candidates must have at least one year of experience as a farrier. EXAMINATION COMPONENTS 1. Written Examination
Format: Multiple choice and True/False questions Passing: 80% or higher ( A score of 70% or higher on the Certified
Farrier written test may be applied toward AFA Farrier Classification) . Written Examination Study Outline Subjects covered in the written examination include all items listed below. Some questions pertaining to the AFA Certification testing rules and procedures may be included.
Bones and Joints: Identify and locate the bones and joints of the lower limb from the carpus or tarsus to the distal end of the limb. Demonstrate an understanding of growth plates and joints. Hoof Structure: Demonstrate knowledge of the construction, function, and location of the elastic and inelastic hoof structures and how they contribute to a sound, healthy foot. Include hoof wall growth rate comparisons. Tendons and Ligaments: Demonstrate a fundamental understanding of the suspensory apparatus. Correctly identify (by common and/ or scientific names) definitions, functions and origin and insertion of all tendons and the major ligaments of the lower limb. Recognize the effect of changing medial/lateral and anterior/posterior hoof balance on individual tendons and suspensory ligaments.
10th Edition 2015 AFA Certification Study Guide Chapter 3 Certified Farrier

Blood Circulation: Demonstrate basic knowledge of the circulation system of the hoof and lower leg. Know the attributes and functions of arteries, capillaries, and veins. Identify structures that aid circulation of blood within the hoof. Pathology: Recognize definitions, anatomy involved, and possible causes of the following conditions: bowed tendons, splints, thrush, laminitis, founder, ringbone, carpitis, corns, osslets, sheared heel, stringhalt, and navicular lameness. Recognize factors in identifying the affected limb(s) and locating lameness. Horseshoes: Have an understanding of nail placement in relationship to hoof structure. Demonstrate an understanding of the design and function of modifications required in the Horseshoe Display practical examination and how they may affect the horse. Understand horseshoe features such as wide web, full swedge, half round, heel caulks, and toe grabs. Understand form and function of heartbar shoes. Conformation, Gaits, and Physiology: Know all gaits of the horse including their definitions and differences. Know differences within a gait when applicable. Know all gait problems and faults ( e.g., forging, brushing, speedy cutting, scalping, cross firing, elbow hitting, overreaching, etc.). Know how conformation affects the physiology of the horse and how the horse moves (winging, paddling, etc.). 2. Practical Examination (2 Parts) Part 2a - Shoeing
Format: Hands-on, performance examination. Candidates shoe two feet, either a front pair or a hind pair, with shoes of the candidate’s choice appropriate for the horse. Clipped shoes may be used however the clips must be made by the candidate during the practical exam. If the candidate chooses to use clipped shoes, scoring will be incorporated under the category of “shoe fit.” Candidates are responsible for providing a horse handler.
Time Limit: One Hour (old shoes may be removed before time starts). Scoring: Trimming and shoeing is examined and scored in three parts:
1. Hoof preparation: Scored during the examination’s time limit
2. Shoe preparation and fit: Scored during the examination’s time limit.
3. Nailing, clinching and finishing: Scored after the time limit.
4. A score of 3 on any section of the practical will result in failure of the test.
10th Edition 2015 AFA Certification Study Guide Chapter 3 Certified Farrier

All scoring is done on-site by the Approved Examiner (and/or by AFA Approved Tester(s), and recorded on official score sheets. Passing: 70% or higher (A score of 60% or higher on the Certified Farrier written test may be applied toward AFA Farrier Classification.) Part 2b - Horseshoe Display
Format: Hands-on, performance examination, including an oral component. Candidates bring a prepared horseshoe display to the examination site. Upon acceptance of the display, candidates proceed to a timed component, producing one modification on site. Candidates will be asked for an oral explanation/defense concerning any aspect of the modifications and their applications. Passing: 70% or higher on each modification Time Limit: On site modification, 30 minutes Scoring: Displays are examined and scored by the following standards.
HORSESHOE DISPLAY GUIDELINES
Displays are an example of a candidate’s finest workmanship, evidence of the ability to make or modify horseshoes according to the list of eleven modifications.
Quality of the horseshoes conforms to guidelines established and presented throughout this booklet: shoes are flat/level, have proper nail placement and fit, have a smooth finish with no sharp edges, extensions are boxed, stock width and/or thickness is maintained and not altered by any modification.
All modifications are made or applied by the candidate. A shoe may have more than one modification but must be useable. Candidates may be ask to defend the appropriateness and functionality of any shoe submitted.
All displays incorporate both front and hind patterned shoes and all front or hind shoes are made for the same front or hind foot.
An appropriate nail (or nails) is included with the display.
Template patterns:
Candidates are required to submit one front and one hind metal plate. No specific patterns are designated or specified. Candidates may use patterns of their own design or purchase a set of pattern plates from theAFA.
Metal patterns have a clearly defined frog, bearing surface, defined point of heels, white line and accommodation for clip fit. The candidate is responsible for modifying plates for clip fit.
10th Edition 2015 AFA Certification Study Guide Chapter 3 Certified Farrier

AFA templates modified for clip fit Scoring:
All modifications must be present when the display is initially submitted for evaluation. Partial displays will not be scored.
Fit to the template: Widest point forward, +/- 1/16
th inch tolerance
from the edge of the template. Widest point back, the shoe covers the entire bearing surface of the foot, no more than 3/16
th inch tolerance
allowed outside the template (foot) bearing surface, minimum acceptable is a perimeter fit.
Each horseshoe fitting the candidate’s template pattern will be scored. (Displays submitted prior to May 2012 were not required to have a template but must be completed within two years, no later than April 2014.)
A score of 7 or higher on each modification is the passing standard. A candidate whose horseshoe display has 10 of the 11 modifications meeting the standard may continue to the demonstration portion of the exam as long as the non-passing modification would not be detrimental to the horse (score 4 - 6). A passing score on the demonstrated modification will satisfy the horseshoe display requirements.
A display with more than one failed modification must be rectified and horseshoes fitting the candidate’s patterns submitted for evaluation at a future examination. The original Horseshoe Display Partial Completion form is submitted as evidence of modifications previously passed.
Testers / Examiner write clear concise constructive comments on the Horseshoe Display Partial Completion Form relative to any failing modification(s).
10th Edition 2015 AFA Certification Study Guide Chapter 3 Certified Farrier

HORSESHOE DISPLAY MODIFICATION DESCRIPTIONS
1. Clips-Toe and Quarter (figures 1, 2, 3, 4)
10 - Clip is properly located, toe clip at center of toe, quarter clips between 1
st and 2
nd nail holes. (figures 1, 2)
Thicker at the base and tapering to a thinner peak. (figure 3) Height is approximately twice the thickness of the stock measured from foot surface and is not sharply pointed. (figures 1, 2) Width, at the base, is between two to three times the stock thickness. (figures 1, 2) Source hole appropriate size, foot surface behind clip flat with no cold shuts. (figures 3, 4) Clip forged flush with the outside perimeter of the shoe stock and pitched at the hoof wall angle. (figure 3, 4).
figure 5
figure 7
figure 6
figure 8
8,6,4 - Varying degrees of error in location, thickness, height, width,
taper, etc. Source hole damages a nail hole, or disrupts shoe shape or stock dimension. Clip not forged flush with shoe stock. (figures 8) Clip base so thick as to require excessive hot seating in order to be properly fitted. (figures 5, 6, 7, 8)
10th Edition 2015 AFA Certification Study Guide Chapter 3 Certified Farrier

2- Gross exaggeration/combination of poor features or detrimental to the horse
2. Square Toe (figures 9, 10)
figure 9
figure 10
10- Square toe of the shoe is centered on the toe and perpendicular to the
centerline of the foot with a straight leading edge, set back from toe 1/2 the thickness of the hoof wall at the toe. Stock thickness and width is maintained. (figures 9, 10)
8,6,4- Varying degrees of error, eg. not centered on the toe of the pattern,
excessively rounded or sharp corners, stock dimensions altered. 2- Leading edge of square toe; rounded, not centered on pattern, behind
the white line of foot, stock excessively thin at toe. Detrimental to the horse, eg. excessive sole pressure, seriously compromised nail position.
3. Rolled toe (figures 11, 12)
figure 11
figure 12 10- Rolled toe is centered on the toe of the shoe and perpendicular to
the centerline of the foot. Roll extends from toe nail to toe nail. Stock retains original width. Full stock thickness maintained through half the width at center of the toe. (figures 11 and 12)
8,6,4- Varying degrees of error, eg., not centered on toe, stock width altered,
length of roll short or long, over rolled or under rolled.
10th Edition 2015 AFA Certification Study Guide Chapter 3 Certified Farrier

2- Rolled toe extremely off center, stock width excessively altered, roll excessively short or long on toe. Detrimental to the horse, eg. excessive sole pressure, seriously compromised nail position.
4. Rocker Toe (figures 13, 14)
figure 13
figure 14 10 - Rocker is centered on the toe and perpendicular to the centerline of the
foot. (figure 14) Incorporates 1/2 to 3/4 of the width of the shoe stock on the hoof bearing surface. (figure 14) Ground surface rocked to the thickness of the shoe. (figure 13) Hoof surface behind the rocker is flat, with bend crisp, clean, and neat. Ground-bearing surface behind the rocker is flat and on the same plane as the rest of the ground bearing surface of the shoe. (figures 13)
8,6,4- Varying degrees of error, eg. altered shoe shape, nail hole position/
pitch, sole pressure. 2- Detrimental to the horse, eg. excessive sole pressure, seriously
compromised nail position.
5. Hind Shoe with Extended Heels (figures 15)
figure 15 10- Extensions provide support, are parallel with the centerline of the
foot and are appropriately boxed. Extensions are as long as the shoe stock width measured from the terminal bearing point of the template pattern. Extensions are level with the ground bearing surface of the hoof
10th Edition 2015 AFA Certification Study Guide Chapter 3 Certified Farrier

and the rest of the shoe. (figure 15) 8,6,4 - Various degrees of error e.g., not parallel with the centerline
of the foot, not properly boxed, too short or long. Extensions are pointed, narrowed, or trailered from the centerline of the foot.
2 - Extensions excessively pointed, sharp, narrowed, short, or long.
Dangerous or detrimental to the horse and/or other horses.
6. Straight Bar shoe (figures 16)
figure 16
10- Bar is solidly welded or brazed. Outer perimeter edge of the bar
is straight. If there is a frog plate, it is centered on the bar and perpendicular with centerline of the foot. (figure 16)
8,6,4- Weld is weak. Various degrees of error, eg. bar is not perpendicular
with centerline of foot. 2- Bar is not welded. Bar is extremely crooked to the centerline of the
foot. Detrimental to the horse.
7. Shoe to raise hoof angle (figures 17)
figure 17 10- There is a noticeable even graduation of angle on hoof surface of the shoe
or wedge pad from the toe to heels. (figure 17)
10th Edition 2015 AFA Certification Study Guide Chapter 3 Certified Farrier

8,6,4- Varying degrees of unevenness to the graduation on hoof surface of the shoe or wedge pad.
2- No graduation of angle from toe to heel. Shoe is detrimental to the horse.
8. Shoe with pad (finished as if on hoof) (figures 18)
figure 18
10 - Pad is secured to the shoe at the heels.
Shoe may need to be slightly fuller and longer than the foot/pattern to compensate for pad thickness. (figure 18) Foot surface of pad matches the pattern template and is beveled to the shoe. The heels are appropriately boxed.
8,6,4- Varying degrees of error, eg. shoe size does not accommodate pad
thickness, nail hole position/pitch, sole pressure, lack of beveling/boxing of pad.
2- Detrimental to the horse, eg. nail position, foot/limb not supported.
9. Two types of Traction Devices (figures 19)
figure 19 10 - All traction devices manufactured or applied by the candidate and are
appropriate to the size and type of horseshoe. These may include, but are not limited to; creasing/fullering, toe grabs, screw-in or drive-in studs, block heels, jar caulks, tungsten pins, carbide particles (borium or drill tech). Two different tractions may be applied to a single horseshoe. (figure 19). The use of concave bar stock is not an acceptable traction device.
10th Edition 2015 AFA Certification Study Guide Chapter 3 Certified Farrier

8,6,4- Varying degrees of error, eg. poor craftsmanship.
2- Detrimental to the horse.
10. Trailer (figures 20)
figure 20 10 - Trailer extends laterally from the centerline of the foot and is longer
than the medial heel. (figure 20) Trailer length equals shoe stock width measured from the terminal bearing point of the template pattern. Trailer maintains stock dimensions, is level with the ground bearing surface of the hoof and the rest of the shoe and is appropriately boxed. Horseshoe with trailer maintains correct nail hole location.
8,6,4- Various degrees of error, e.g., not properly boxed, too short or long,
pointed, or narrowed. 2- Trailer excessively pointed, narrowed, short, or long. Shoe does not
cover the foot. Dangerous or otherwise detrimental to the horse or other horses.
11. Punched Nail Hole (figures 21, 22, 23)
figure 21
10th Edition 2015 AFA Certification Study Guide Chapter 3 Certified Farrier

figure 22
figure 23 10 - Nail hole is properly pitched and positioned at or in front of the widest
part of the foot. Nail size appropriate for shoe and foot pattern. Nail hole is positioned over the white line. Nail hole punched through a fac- tory or candidate forged fullering groove is acceptable. (figure 21, 22)
8,6,4 - Varying degrees of error, eg. nail coarse or fine, nail hole
tight or sloppy. Size not appropriate to foot size. (figure 22, 23) 2 - Excessively coarse or fine. (figure 23) Nail hole behind widest part of foot.
HORSESHOE DISPLAY DEMONSTRATION
Candidates will make one modification to a horseshoe and fit that shoe to an assigned pattern at the test site. The time limit is 30 minutes.
The candidate will be assigned the modification to be made and the foot pattern to be fit under direction of the Approved Examiner.
Candidates must provide all tools, equipment, and materials used for the on-site modification demonstration. The use of power tools at an examination site is at the discretion of the Approved Examiner based on safety.
HORSESHOE DISPLAY ORAL PRESENTATION Candidates demonstrate an understanding of the application and the function of the display horseshoes and modifications in an oral examination. Can- didates must be prepared to provide definitions for and explanations of all modifications, including, but not limited to, concerns such as;
Instances or situations where a submitted shoe or modification would be used When it would be applied and/or removed. How the modification should be applied. Disadvantages or detriments associated with particular modifications or shoes Alternative modifications or devices.
(Need to change figure numbers throughout booklet. Start next drawing in shoeing section, page 37, as figure 24 (currently fig 21). Some drawings will be in more than one place.)
10th Edition 2015 AFA Certification Study Guide Chapter 3 Certified Farrier
19

CHAPTER
9
Guidelines for Evaluating Farrier CertificationsThe following guidelines, updated and revised by the AFA’s Certification Committee, provide an excellent gauge for evaluating farriery. Nevertheless, acceptance of these guidelines as a standard method to shoe a horse is notour goal. Instead, these guidelines provide criteria to enable standardized evaluation of skill levels by Certification Examiners and Testers. Theseguidelines are not the only standard to which horses are shod, but theyrepresent solid, basic, and traditional practice and are suitable to a selective evaluation process.
The AFA Certification Guide represents a work in progresswhich takes into account current research in veterinary medicine, farriery, equine research, and historical sources.
-AFA Certification Committee
36
Chapter 9! Guidelines for Evaluating Certifications

Practical Evaluation 1. Hoof Preparation
Level (figures 24, 25)
10 The entire hoof is on an even plane and is in contact with a flat shoe.
8,6,4 There are varying degrees of unevenness which could be corrected
without harming the horse. 2
Nipping/rasping is rough and uneven around the entire hoof wall, with no level surfaces apparent. Balance
(Since balance is subjective, evaluation will be made on the
criteria established below) 10
The horse stands in the middle of the hoof, and the ground surface of the hoof wall is trimmed perpendicular to the centerline of the hoof capsule above it.
8,6,4 There are varying degrees of error in balance which could be
corrected without harming the horse. 2
One side of the hoof wall is lowered to a point that correction is not possible without laming the horse or resorting to the use of shims.
figure 24
figure 25
Chapter 9! Guidelines for Evaluating Certifications
37

Angle (figure 26) 10
Hoof and pastern angles are parallel. Paired feet match each other. The farrier has made every effort to make hoof and pastern angles parallel.
8,6,4 There are varying degrees of error in the angle which could be
corrected without harming the horse. 2
The hoof deviates from the pastern angle due to poor nipping and/or rasping. It cannot be corrected by further nipping or rasping at this time.
Length (figure 27) 10
The hoof is cut to an appropriate, sound length and matches its mate.
8,6,4 There are varying degrees of error in length that could be corrected
without harming the horse. 2
The hoof is cut excessively short or left too long, and cannot be corrected at this time.
figure 26
figure 27
38
Chapter 9! Guidelines for Evaluating Certifications

Sole 10
The sole is pared (if necessary) to an appropriate, sound depth. Bars and sole have not been weakened by excessive paring or rasping. The Seat of Corns are pared to be non-weight bearing.
8,6,4 There are varying degrees of error in paring which could be corrected
without harming the horse. 2
The sole is pared too thin (and yields under light thumb pressure)
Frog 10
The frog is pared (if necessary) to be neat and smooth. The heel bulbs are smooth and free of burrs.
8,6,4 There are varying degrees of error in paring which could be corrected
without harm to the horse. 2
The frog has been pared excessively, exposing sensitive structures which could cause lameness
Wall Dressing (figures 28 and 29) 10
The hoof wall is straight. All dishes and flares removed smoothly from the coronary band to the ground or (at least) the bottom two- thirds of the hoof.
8,6,4,2 There are varying degrees of error (e.g., dubbing, over or under
dressing of dishes and/or flares) which could be corrected without harming the horse or endangering secure nailing.
figure 28
figure 29
Chapter 9! Guidelines for Evaluating Certifications
39

2. Shoe Quality and Fit Shoe level
10 The shoe is flat in all aspects.
8,6,4 There are varying degrees of error in flatness which could be corrected with additional or better work. 2
The shoe is grossly out of level and should not be nailed. Clips (Figure 30-33)
10 The clip is properly located, is thick at the base and tapers to a thin peak, is not sharply pointed, has no cold shuts on the back side, and the source hole is appropriately sized.
8,6,4 There are varying degrees of error in location, thickness, taper,
width, height, sharpness, and size of source hole. 2
There is a gross exaggeration/combination of poor features.
figure 30
figure 31
figure 32
figure 33
40
Chapter 9! Guidelines for Evaluating Certifications

Finish 10
The shoe is smoothly finished without sharp edges, burns, or hammer and rasp marks.
8,6,4 There are varying degrees of error in finish which could have been
avoided by additional or better work. 2
The shoe is excessively sharp and rough. Forging
10 The shoe is forged so that the width of the shoe stock is not pinched or spread excessively in any one spot in relation to its original dimension. The shoe has been seated away from the sole so the inside edge is not thicker than the outside edge. No other forging mistakes are present.
8,6,4,2 There are varying degrees of forging mistakes present
Nail Hole Location (figure 34)
10 Nail holes are properly located from toe to quarters, and are evenly spaced (unless prevented by hoof conditions).
8,6,4 There are varying degrees of error in location of holes which are not justified by hoof conditions.
2 There is gross error in location of nail holes.
figure 34
Chapter 9! Guidelines for Evaluating Certifications
41

Nail Hole Position ( figures 35 and 36) 10
Nail holes are located over the white line.
8,6,4 There are varying degrees of error in depth which result in too fine or
coarse nailing. Use of nail holes will not result in injury or harm to the horse.
2
Use of nail holes will result in injury to the horse.
figure 35
figure 36
42
Chapter 9! Guidelines for Evaluating Certifications
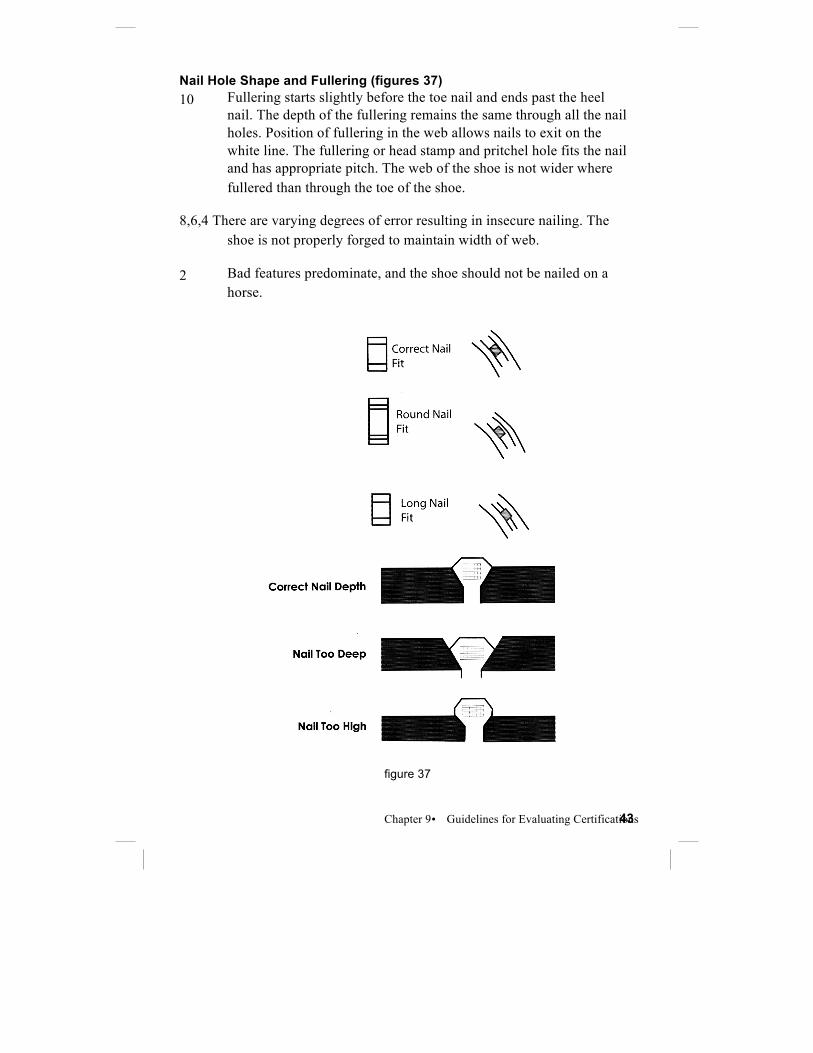
Nail Hole Shape and Fullering (figures 37) 10
Fullering starts slightly before the toe nail and ends past the heel nail. The depth of the fullering remains the same through all the nail holes. Position of fullering in the web allows nails to exit on the white line. The fullering or head stamp and pritchel hole fits the nail and has appropriate pitch. The web of the shoe is not wider where fullered than through the toe of the shoe.
8,6,4 There are varying degrees of error resulting in insecure nailing. The
shoe is not properly forged to maintain width of web. 2
Bad features predominate, and the shoe should not be nailed on a horse.
figure 37
Chapter 9! Guidelines for Evaluating Certifications
43

3. Nailing, Finish, and Fit Shoe Fit Fit
10 The shoe fits the properly trimmed and dressed hoof.
8,6,4 There are varying degrees of error in fitting (e.g., toe too narrow/
wide, branches not following the quarter bends, heels too short or long, toe dubbed, heels of the hoof open to fit short shoe, etc.).
2
Most of the bad characteristics above exist in the fit. Shoe should not be nailed on a horse.
Wall Contact (Figure 38) 10
The shoe is in contact with the hoof wall unless some of the wall is missing.
8,6,4 There are varying degrees of lack of wall contact with the
shoe which could have been corrected. 2
There is a gross lack of wall contact, and the shoe should not be nailed on a horse.
figure 38
44
Chapter 9! Guidelines for Evaluating Certifications

Sole Pressure 10
The hoof surface of the shoe contacts no more than 1/8” of live sole. The seats of corn does not bear weight.
8,6,4 There are varying degrees of error in too much/little sole pressure. 2
The sole has been excessively pared, and the condition cannot be remedied at this time. Expansion (Expansion is established behind the widest part of the foot, beginning at the origin of the heel quarter, and the correct amount of expansion will vary with hoof conformation. Subsequently, candidates must select expansion categories prior to selecting/ forging, and fitting shoes. All expansion categories (a, b, & c,) maintain 1/16” of flat bearing surface with the remainder of expansion boxed).
10
A. An upright or club foot is fitted with expansion equal to the width of a dime (1/16”). B. A normal, balanced foot is fitted with expansion equal to the width of two dimes (1/8”). C. An under-run foot is fitted with expansion equal to the width of three dimes (3/16”).
8,6,4 There are varying degrees of error in providing room on the shoe for
expansion of the hoof. 2
There is too much/little expansion. Hoof wall has been removed to simulate expansion.
Chapter 9! Guidelines for Evaluating Certifications
45

Heel Length (figure 39) (The correct length varies with hoof conformation. Candidates must select heel length and expansion categories prior to selecting/ building & fitting shoes. All heel length categories (a, b, & c,) will maintain 1/16” of flat bearing surface with the remainder of length boxed).
10
A. An upright or club foot is fit with length equal to the width of a dime B. A normal, balanced foot is fit with length equal to the width of two dimes (1/8”). C. An under-run foot is fit with length equal to the width of three dimes (3/16”).
8,6,4 There are varying errors in heel lengths 2
Heels are severely short or excessively long and could cause injury to the horse.
figure 39
46
Chapter 9! Guidelines for Evaluating Certifications

Clip Fit 10
The receiving hole in the hoof wall fits the clip that is drawn. The clip is within the perimeter of the hoof and clip hole.
8,6,4 There are varying degrees of error in the fit of the clip to its receiving
hole. 2
There is gross error in fitting the clip to the receiving hole.
Nailing Height (figure 40) 10
Nails exit the wall 1/3 the height of the wall at the heel nail, and ascend toward the toe. They are 2/3’s the distance from the coronary band to the ground.
8,6,4 There are varying degrees of error in exit height of nails. 2
There is extreme error in exit height of nails.
figure 40
Chapter 9! Guidelines for Evaluating Certifications
47

Alignment (Figure 41) 10
The nails exit the hoof wall in a straight line parallel to the coronary band.
8,6,4 There are varying degree of error in the alignment of the nails. 2
There is extreme misalignment of the nails which may result in injury to the horse or an insecure nailing job.
figure 41
48
Chapter 9! Guidelines for Evaluating Certifications

Clinches (figure 42) 10
All clinches are square, set into the wall, and in alignment with the nail shaft.
8,6,4 There are varying degrees of error in clinching (e.g., over-blocked,
racked, ragged, rasped too thin). 2
The clinches may not hold shoe securely for a serviceable period.
figure 42
Chapter 9! Guidelines for Evaluating Certifications
49

Uniformity (Figure 43) 10
Clinches are identical, strong, square, and set into the wall.
8,6,4 There are varying degrees of error in clinches (e.g., weak, pointed,
thin, short/long, not set into wall). 2
The clinches are dangerous or do not secure shoe to the hoof.
figure 43 Hoof Finish Wall (Figure 44)
10
The hoof wall is smooth.
8,6,4 There are varying degrees of error in finish of the hoof wall with the
rasp. 2
The hoof wall is rough, excessively rasped, and not straight due to rasping.
figure 44
50
Chapter 9! Guidelines for Evaluating Certifications

Edges (figure 45) 10
The hoof and shoe have no sharp edges which could cause injury.
8,6,4 There are varying degrees of error in not removing sharp edges from
hoof/shoe. 2
There are sharp edges on the shoe or hoof which could harm the horse.
figure 45
Clinch Finish (Figure 46)
10 All clinches are tight to the wall with no sharp edges. The clinches are well fitted into the wall.
8,6,4 There are varying degrees of poor finish of the clinches. 2
The clinches are not finished or set into the wall.
figure 46
Chapter 9! Guidelines for Evaluating Certifications
51

Under Clinch Rasping (Figure 47) 10
Although it has been set flush with the wall, there is no evidence of rasp marks or over gouging under the clinch.
8,6,4 There are varying errors in over/under rasping or gouging beneath
clinch. 2
Under clinch burrs have not been removed or the wall is deeply grooved.
figure 47
Shoe Position
10 The shoe has been nailed where it was intended, with no slippage or movement from the original fit.
8,6,4 The shoe has shifted or moved to varying degrees when nailed. 2
The shoe has grossly shifted or moved.
52
Chapter 9! Guidelines for Evaluating Certifications
