changeauditor user guideusdownloads.quest.com.edgesuite.net/repository/support.quest.com... ·...
TRANSCRIPT

ChangeAuditor® 5.6
User Guide

© 2011 Quest Software, Inc. ALL RIGHTS RESERVED
This guide contains proprietary information protected by copyright. The software described in this guide is furnished under a software license or nondisclosure agreement. This software may be used or copied only in accordance with the terms of the applicable agreement. No part of this guide may be reproduced or transmitted in any form or by any means, electronic or mechanical, including photocopying and recording for any purpose other than the purchaser's personal use without the written permission of Quest Software, Inc.
The information in this document is provided in connection with Quest products. No license, express or implied, by estoppel or otherwise, to any intellectual property right is granted by this document or in connection with the sale of Quest products. EXCEPT AS SET FORTH IN QUEST'S TERMS AND CONDITIONS AS SPECIFIED IN THE LICENSE AGREEMENT FOR THIS PRODUCT, QUEST ASSUMES NO LIABILITY WHATSOEVER AND DISCLAIMS ANY EXPRESS, IMPLIED OR STATUTORY WARRANTY RELATING TO ITS PRODUCTS INCLUDING, BUT NOT LIMITED TO, THE IMPLIED WARRANTY OF MERCHANTABILITY, FITNESS FOR A PARTICULAR PURPOSE, OR NON-INFRINGEMENT. IN NO EVENT SHALL QUEST BE LIABLE FOR ANY DIRECT, INDIRECT, CONSEQUENTIAL, PUNITIVE, SPECIAL OR INCIDENTAL DAMAGES (INCLUDING, WITHOUT LIMITATION, DAMAGES FOR LOSS OF PROFITS, BUSINESS INTERRUPTION OR LOSS OF INFORMATION) ARISING OUT OF THE USE OR INABILITY TO USE THIS DOCUMENT, EVEN IF QUEST HAS BEEN ADVISED OF THE POSSIBILITY OF SUCH DAMAGES. Quest makes no representations or warranties with respect to the accuracy or completeness of the contents of this document and reserves the right to make changes to specifications and product descriptions at any time without notice. Quest does not make any commitment to update the information contained in this document.
If you have any questions regarding your potential use of this material, contact:
Quest Software World HeadquartersLEGAL Dept5 Polaris WayAliso Viejo, CA 92656 USAwww.quest.comemail: [email protected]
Refer to our Web site for regional and international office information.
Patents
This product is protected by U.S. Patent #7,979,494. Additional Patents Pending.
Trademarks
Quest, Quest Software, the Quest Software logo, ChangeAuditor, Defender, GPOADmin, InTrust, and Quest Authentication Services are trademarks and registered trademarks of Quest Software, Inc in the United States of America and other countries. For a complete list of Quest Software’s trademarks, please see http://www.quest.com/legal/trademark-information.aspx. Other trademarks and registered trademarks are property of their respective owners.
Third Party Contributions
ChangeAuditor contains some third party components. For a complete list, see the Third Party Components page in the ChangeAuditor online help.
ChangeAuditor User GuideSeptember 2011Version 5.6

Table of ContentsAbout This Guide. . . . . . . . . . . . . . . . . . . . . . . . . . . . . . . . . 9
Overview . . . . . . . . . . . . . . . . . . . . . . . . . . . . . . . . . . .10About Quest Software . . . . . . . . . . . . . . . . . . . . . . . . . .11
Chapter 1ChangeAuditor Overview . . . . . . . . . . . . . . . . . . . . . . . . . 13
Introduction . . . . . . . . . . . . . . . . . . . . . . . . . . . . . . . . .14Start the ChangeAuditor Client . . . . . . . . . . . . . . . . . . . .17Manage Connection Profiles . . . . . . . . . . . . . . . . . . . . . .18Client Components . . . . . . . . . . . . . . . . . . . . . . . . . . . .23Customize Table Content . . . . . . . . . . . . . . . . . . . . . . . .24Filter Data . . . . . . . . . . . . . . . . . . . . . . . . . . . . . . . . . .27Directory Object Picker . . . . . . . . . . . . . . . . . . . . . . . . .29
Chapter 2Deployment Page . . . . . . . . . . . . . . . . . . . . . . . . . . . . . . . 35
Introduction . . . . . . . . . . . . . . . . . . . . . . . . . . . . . . . . .36Deployment Page . . . . . . . . . . . . . . . . . . . . . . . . . . . . .36Deploy Agents . . . . . . . . . . . . . . . . . . . . . . . . . . . . . . .39Change the Agent Installation Location and System Tray Option . . . . . . . . . . . . . . . . . . . . . . . . . . . . . . . . . . . . .41Enable Auto Deployment . . . . . . . . . . . . . . . . . . . . . . . .43Refresh or Clear Deployment Page Information . . . . . . . .44
Chapter 3Overview Page . . . . . . . . . . . . . . . . . . . . . . . . . . . . . . . . . 45
Introduction . . . . . . . . . . . . . . . . . . . . . . . . . . . . . . . . .46My Favorite Search Grid . . . . . . . . . . . . . . . . . . . . . . . .47Define a Favorite Search . . . . . . . . . . . . . . . . . . . . . . . .48Overview Panes . . . . . . . . . . . . . . . . . . . . . . . . . . . . . .48Event Details Pane . . . . . . . . . . . . . . . . . . . . . . . . . . . .54
Chapter 4Searches Page. . . . . . . . . . . . . . . . . . . . . . . . . . . . . . . . . . 55
Introduction . . . . . . . . . . . . . . . . . . . . . . . . . . . . . . . . .56Searches Page . . . . . . . . . . . . . . . . . . . . . . . . . . . . . . .56
3

Quest ChangeAuditor
View a List of Available Searches . . . . . . . . . . . . . . . . . .60Run Searches . . . . . . . . . . . . . . . . . . . . . . . . . . . . . . . .61Run a Quick Search. . . . . . . . . . . . . . . . . . . . . . . . . . . .61
Chapter 5Search Results Page and Event Details. . . . . . . . . . . . . . . 63
Introduction . . . . . . . . . . . . . . . . . . . . . . . . . . . . . . . . .64Search Results Page . . . . . . . . . . . . . . . . . . . . . . . . . . .65View Search Results . . . . . . . . . . . . . . . . . . . . . . . . . . .70Compare Results Side-by-Side . . . . . . . . . . . . . . . . . . . .72View Event Details or Search Properties. . . . . . . . . . . . . .73Display Event’s Knowledge Base Entry. . . . . . . . . . . . . . .74Email Event Details . . . . . . . . . . . . . . . . . . . . . . . . . . . .75Copy Event Details . . . . . . . . . . . . . . . . . . . . . . . . . . . .75Add Comments . . . . . . . . . . . . . . . . . . . . . . . . . . . . . . .76
Chapter 6Custom Searches and Search Properties . . . . . . . . . . . . . 77
Introduction . . . . . . . . . . . . . . . . . . . . . . . . . . . . . . . . .78Create a Custom Search . . . . . . . . . . . . . . . . . . . . . . . .78Preview Search Results . . . . . . . . . . . . . . . . . . . . . . . . .79Search Properties Tabs . . . . . . . . . . . . . . . . . . . . . . . . .80
Chapter 7Enable Alert Notifications . . . . . . . . . . . . . . . . . . . . . . . . 103
Introduction . . . . . . . . . . . . . . . . . . . . . . . . . . . . . . . .104Alert Tab (Search Properties) . . . . . . . . . . . . . . . . . . . .104Enable Alerts . . . . . . . . . . . . . . . . . . . . . . . . . . . . . . .107Disable Alerts . . . . . . . . . . . . . . . . . . . . . . . . . . . . . . .111Alert History Page . . . . . . . . . . . . . . . . . . . . . . . . . . . .113View Alert History . . . . . . . . . . . . . . . . . . . . . . . . . . . .115
Chapter 8Generate and Publish Reports . . . . . . . . . . . . . . . . . . . . 117
Introduction . . . . . . . . . . . . . . . . . . . . . . . . . . . . . . . .118Report Page . . . . . . . . . . . . . . . . . . . . . . . . . . . . . . . .119Generate/View Reports through the ChangeAuditor Client . . . . . . . . . . . . . . . . . . . . . . . . . . . . . . . . . . . .121Publish Reports to SRS . . . . . . . . . . . . . . . . . . . . . . . .123
4

5
Publish Reports to Quest Knowledge Portal . . . . . . . . . .125Print or Save a Page’s Contents . . . . . . . . . . . . . . . . . .126
Chapter 9Agent Configurations . . . . . . . . . . . . . . . . . . . . . . . . . . . 129
Introduction . . . . . . . . . . . . . . . . . . . . . . . . . . . . . . . .130Agent Configuration Page. . . . . . . . . . . . . . . . . . . . . . .131Define Agent Configurations. . . . . . . . . . . . . . . . . . . . .134Assign Agent Configurations to Agents . . . . . . . . . . . . .137Enable Event Logging . . . . . . . . . . . . . . . . . . . . . . . . .138
Chapter 10Coordinator Configuration . . . . . . . . . . . . . . . . . . . . . . . 141
Introduction . . . . . . . . . . . . . . . . . . . . . . . . . . . . . . . .142SMTP Configuration Pane . . . . . . . . . . . . . . . . . . . . . . .143Configure Email Notifications . . . . . . . . . . . . . . . . . . . .145Customize Email Content . . . . . . . . . . . . . . . . . . . . . . .147Group Membership Expansion Pane. . . . . . . . . . . . . . . .148Add Groups to Group Membership Expansion List . . . . . .150Agent Heartbeat Check Pane . . . . . . . . . . . . . . . . . . . .151
Chapter 11Database Maintenance . . . . . . . . . . . . . . . . . . . . . . . . . . 153
Introduction . . . . . . . . . . . . . . . . . . . . . . . . . . . . . . . .154Database Maintenance Page. . . . . . . . . . . . . . . . . . . . .155Database Maintenance Activities . . . . . . . . . . . . . . . . . .156Database Maintenance Wizard . . . . . . . . . . . . . . . . . . .158
Chapter 12SQL Reporting Services Configuration . . . . . . . . . . . . . . 167
Introduction . . . . . . . . . . . . . . . . . . . . . . . . . . . . . . . .168SQL Reporting Services Page . . . . . . . . . . . . . . . . . . . .168SQL Reporting Services Templates . . . . . . . . . . . . . . . .169SQL Reporting Services Wizard. . . . . . . . . . . . . . . . . . .171
Chapter 13ChangeAuditor User Interface Authorization . . . . . . . . . 177
Introduction . . . . . . . . . . . . . . . . . . . . . . . . . . . . . . . .178Application User Interface Authorization Page. . . . . . . . .179

Quest ChangeAuditor
Add Task Definition . . . . . . . . . . . . . . . . . . . . . . . . . . .181Add Role Definition . . . . . . . . . . . . . . . . . . . . . . . . . . .182Add Application Group . . . . . . . . . . . . . . . . . . . . . . . . .183
Chapter 14Enable/Disable Event Auditing . . . . . . . . . . . . . . . . . . . . 185
Introduction . . . . . . . . . . . . . . . . . . . . . . . . . . . . . . . .186Audit Events Page . . . . . . . . . . . . . . . . . . . . . . . . . . . .186Enable/Disable Event Auditing . . . . . . . . . . . . . . . . . . .188Modify Event’s Severity Level or Event Class Description .189Define Events to be Captured Based on Results . . . . . . .190View Event’s Knowledge Base Entry . . . . . . . . . . . . . . .191
Chapter 15Custom Registry Auditing . . . . . . . . . . . . . . . . . . . . . . . . 193
Introduction . . . . . . . . . . . . . . . . . . . . . . . . . . . . . . . .194Registry Auditing Page. . . . . . . . . . . . . . . . . . . . . . . . .195Registry Auditing Templates. . . . . . . . . . . . . . . . . . . . .196Registry Auditing Wizard . . . . . . . . . . . . . . . . . . . . . . .200
Chapter 16Custom Service Auditing. . . . . . . . . . . . . . . . . . . . . . . . . 203
Introduction . . . . . . . . . . . . . . . . . . . . . . . . . . . . . . . .204Services Auditing Page . . . . . . . . . . . . . . . . . . . . . . . .205Service Auditing Templates . . . . . . . . . . . . . . . . . . . . .206Service Auditing Wizard . . . . . . . . . . . . . . . . . . . . . . . .209
Chapter 17Account Exclusion . . . . . . . . . . . . . . . . . . . . . . . . . . . . . . 213
Introduction . . . . . . . . . . . . . . . . . . . . . . . . . . . . . . . .214Excluded Accounts Auditing Page . . . . . . . . . . . . . . . . .215Excluded Accounts Templates. . . . . . . . . . . . . . . . . . . .216Excluded Accounts Wizard . . . . . . . . . . . . . . . . . . . . . .219
Chapter 18Agent Statistics and Logs . . . . . . . . . . . . . . . . . . . . . . . . 225
Introduction . . . . . . . . . . . . . . . . . . . . . . . . . . . . . . . .226Agent Statistics Page. . . . . . . . . . . . . . . . . . . . . . . . . .226Agent System Tray Icon . . . . . . . . . . . . . . . . . . . . . . .230
6

View Agent Status/Statistics . . . . . . . . . . . . . . . . . . . .236Manage ChangeAuditor Agents . . . . . . . . . . . . . . . . . . .238Agent Log Page . . . . . . . . . . . . . . . . . . . . . . . . . . . . .240View and Save Agent Trace Logs . . . . . . . . . . . . . . . . .242
Chapter 19Coordinator Statistics and Logs . . . . . . . . . . . . . . . . . . . 245
Introduction . . . . . . . . . . . . . . . . . . . . . . . . . . . . . . . .246Coordinator Statistics Page . . . . . . . . . . . . . . . . . . . . .246Coordinator System Tray Icon . . . . . . . . . . . . . . . . . . .249View Coordinator Status/Statistics . . . . . . . . . . . . . . . .256Manage ChangeAuditor Coordinator . . . . . . . . . . . . . . .257Coordinator Log Page . . . . . . . . . . . . . . . . . . . . . . . . .258View and Save Coordinator Trace Logs . . . . . . . . . . . . .260
Appendix AAdministration Tasks Tab . . . . . . . . . . . . . . . . . . . . . . . . 263
Administration Task Lists . . . . . . . . . . . . . . . . . . . . . . .264Appendix BChangeAuditor Commands . . . . . . . . . . . . . . . . . . . . . . . 271
Menu Commands . . . . . . . . . . . . . . . . . . . . . . . . . . . .271Tool Bar Buttons . . . . . . . . . . . . . . . . . . . . . . . . . . . . .276Right-Click Commands . . . . . . . . . . . . . . . . . . . . . . . .287
Appendix CChangeAuditor Email Tags . . . . . . . . . . . . . . . . . . . . . . . 293Index. . . . . . . . . . . . . . . . . . . . . . . . . . . . . . . . . . . . . . . . 305
7


About This Guide
• Overview
• Conventions
• About Quest Software
• Contacting Quest Software
• Contacting Quest Support

Quest ChangeAuditor
OverviewThis document has been prepared to assist you in becoming familiar with Quest ChangeAuditor. This User Guide explains the core functionality available in ChangeAuditor regardless of the product license that has been applied. It is intended for network administrators, consultants, analysts, and any other IT professionals using the product.
Conventions
In order to help you get the most out of this guide, we have used specific formatting conventions. These conventions apply to procedures, icons, keystrokes and cross-references.
Separate user guides are available that describe the functionality provided when a valid ChangeAuditor for Active Directory, ChangeAuditor for Exchange, ChangeAuditor for Windows File Servers, ChangeAuditor for SQL Server, ChangeAuditor for LDAP, ChangeAuditor for NetApp, or ChangeAuditor for EMC license is applied.
ELEMENT CONVENTION
Select This word refers to actions such as choosing or highlighting various interface elements, such as files and radio buttons.
Bolded text Interface elements that appear in Quest products, such as menus and commands.
Italic text Used for comments.
Bold Italic text Used for emphasis.
Blue text Indicates a cross-reference. When viewed in Adobe® Reader®, this format can be used as a hyperlink.
Used to highlight additional information pertinent to the process being described.
Used to provide Best Practice information. A best practice details the recommended course of action for the best result.
Used to highlight processes that should be performed with care.
10

About This Guide
About Quest SoftwareQuest Software simplifies and reduces the cost of managing IT for more than 100,000 customers worldwide. Our innovative solutions make solving the toughest IT management problems easier, enabling customers to save time and money across physical, virtual and cloud environments. For more information about Quest go to www.quest.com.
Contacting Quest SoftwarePhone 949.754.8000 (United States and Canada)
Email [email protected]
Mail Quest Software, Inc.World Headquarters5 Polaris WayAliso Viejo, CA 92656USA
Web site www.quest.com
Please refer to our Web site for regional and international office information.
Used to highlight a troubleshooting tip pertaining to the topic being described.
Used to highlight permissions required to perform the action being described.
+ A plus sign between two keystrokes means that you must press them at the same time.
| A pipe sign between elements means that you must select the elements in that particular sequence.
ELEMENT CONVENTION
11
Quest ChangeAuditor
Contacting Quest Support
Quest Support is available to customers who have a trial version of a Quest product or who have purchased a Quest product and have a valid maintenance contract. Quest Support provides unlimited 24x7 access to SupportLink, our self-service portal. Visit SupportLink at http://support.quest.com.
From SupportLink, you can do the following:
• Review thousands of solutions from our online Knowledgebase
• Download the latest releases and service packs
• Create, update and review Support cases
View the Global Support Guide for a detailed explanation of support programs, online services, contact information, and policy and procedures. The guide is available at: http://support.quest.com.
12

1
ChangeAuditor Overview
• Introduction
• Start the ChangeAuditor Client
• Manage Connection Profiles
• Client Components
• Customize Table Content
• Filter Data
• Directory Object Picker
Quest ChangeAuditor
IntroductionThe ChangeAuditor family of products provides total auditing and security coverage for your enterprise network. ChangeAuditor audits the activities taking place in your infrastructure and, with real-time alerts, delivers detailed information about vital changes and activities as they occur. Instantly know who made the change including the IP address of the originating workstation, where and when it occurred along with before and after values. Then automatically turn that information into intelligent, in-depth forensics for auditors and management -- and reduce the risks associated with day-to-day modifications.
• Audit all critical changes across your enterprise including Active Directory, Exchange, Windows File Servers, NetApp, EMC, and SQL Server.
• Automate ongoing compliance with tracking and reporting for compliance initiatives like SOX, HIPAA, GLBA and frameworks/standards such as COBIT, FISMA and SAS 70.
• Speed troubleshooting through real-time insight into changes with a comprehensive audit library including built-in audit alerts, reports and powerful searches.
• Proactively protect (lock down) Active Directory objects, Exchange Mailboxes and Windows files and folders from harmful changes that could open security holes or cause resources to become unavailable.
• Modular approach allows separate product deployment and management for key environments including Active Directory, Exchange, Windows File Servers, NetApp, EMC, and SQL Server.
ChangeAuditor for Active Directory
ChangeAuditor for Active Directory drives the security and control of Active Directory by tracking all AD configuration changes in real-time. ChangeAuditor tracks, audits, reports and alerts on the changes that impact your directory, including changes to users, groups, nested groups, GPOs, computers, services, registry, local users/groups and DNS - without the overhead of native auditing.
In addition, ChangeAuditor for Active Directory allows you to lock down critical Active Directory, ADAM (AD LDS) and Group Policy objects, to protect them from unauthorized or accidental modifications or deletions.
ChangeAuditor for Exchange
ChangeAuditor for Exchange proactively audits the activities taking place in your entire Exchange environment, then provides real-time, detailed alerts about vital changes that occur. Includes over 300 Exchange events covering owner and non-owner mailbox changes,
14

ChangeAuditor Overview
server configurations and permissions, and more. Continually being in-the-know helps you to prove compliance, drive security, and improve uptime while proactively auditing changes to Exchange Server configurations and permissions.
ChangeAuditor for Exchange can also provide additional protection over important mailboxes. The Exchange Mailbox protection feature prevents unwanted access to Exchange mailboxes, making it much more difficult for rogue administrators to access critical mailboxes.
ChangeAuditor for Windows File Servers
ChangeAuditor for Windows File Servers enables administrators to achieve the comprehensive auditing coverage of native tools without the mass of cumbersome data that native event logs generate. Includes auditing of Windows file server activity related to files and folders, shares and changes to permissions. Granular selection allows the auditing scope to be set on an individual file or folder as well as the entire subtree recursive or non-recursive. ChangeAuditor for Windows File Servers also allows you to include or exclude certain files or folders from the audit scope in order to ensure a faster and more efficient audit process.
ChangeAuditor for Windows File Servers also provides an access control model that permits ChangeAuditor Administrators to protect business-critical files and folders on the file server.
ChangeAuditor for EMC
ChangeAuditor for EMC tracks, audits, reports and alerts on EMC Celerra file and folder changes in real time, translating events into plain English and eliminating the time and complexity required by native auditing. Granular selection allows the auditing scope to be set on an individual file, folder, or volume as well as all volumes. ChangeAuditor for EMC also allows you to include or exclude certain files or folders from the audit scope in order to ensure a faster and more efficient audit process.
ChangeAuditor for NetApp
ChangeAuditor for NetApp tracks, audits, reports and alerts on NetApp filer file and folder changes in real time, translating events into plain English and eliminating the time and complexity required by native auditing. The auditing scope can be set on an individual file, folder, or volume as well as all volumes. ChangeAuditor for NetApp also allows you to include or exclude certain files or folders from the audit scope in order to ensure a faster and more efficient audit process.
15

Quest ChangeAuditor
ChangeAuditor for SQL Server
ChangeAuditor for SQL Server provides database auditing to secure SQL database assets with extensive, customizable auditing and reporting for all critical SQL changes including broker, database, object, performance, and transaction events, plus errors and warnings. ChangeAuditor for SQL helps tighten enterprise-wide change and control policies by tracking user and administrator activity such as database additions and deletions, granting and removing SQL access, etc.
ChangeAuditor for LDAP
ChangeAuditor for LDAP monitors directory access across all domain controllers in the environment and aggregates that information in a central database identifying LDAP-enabled applications and how they use Active Directory. The LDAP access data gathered by ChangeAuditor for LDAP can then be used during Active Directory forest migration and restructuring projects.
In addition, ChangeAuditor provides auditing for the following Quest products:
ChangeAuditor for Quest Authentication Services (QAS)
Quest Authentication Services (formerly Vintela Authentication Services) is patented technology that enables organizations to extend the security and compliance of Active Directory to Unix, Linux and Mac platforms and enterprise applications. Leveraging ChangeAuditor for Quest Authentication Services (QAS), users of Authentication Services can now track, audit, report and alert on all critical changes to:
• Unix/Linux/Mac-related data for Active Directory users, groups, computers, NIS objects and QAS personalities
• Unix/Linux/Mac settings in Group Policy Objects
ChangeAuditor for Defender
Quest Defender enhances security by enabling two-factor authentication to network, Web, and applications-based resources. Defender was designed to base all administration and identity management on an organization’s existing investment in Active Directory and eliminates the costs and time involved in setting up and maintaining proprietary databases. ChangeAuditor for Defender tracks changes to user accounts enabled with Defender tokens in Active Directory.
With 24x7 real-time alerts and in-depth analysis and reporting capabilities, your infrastructure is always protected from exposure to suspicious behavior or unauthorized access and kept in compliance with corporate and government standards.
16

ChangeAuditor Overview
Start the ChangeAuditor ClientThe following conditions must be met for a client to properly connect:
• Communications are successful, meaning the Coordinator service is running and has a valid SCP listening port (no firewall implications). If this condition fails, the ChangeAuditor Client will display an error dialog stating the appropriate issue.
• The current authenticated user running the ChangeAuditor Client has the proper credentials for accessing the ChangeAuditor Coordinator service. If this condition fails, the client will display the Coordinator Credentials Required dialog allowing you to enter the proper logon credentials to access the ChangeAuditor Coordinator.
• The current authenticated user is a member of either the ChangeAuditor Administrators or ChangeAuditor Operators AD group. If this condition fails, the ChangeAuditor Client will display an error dialog stating the appropriate issue.
• When using a direct database connection, the current authenticated user running the ChangeAuditor Client has the proper SQL credentials for accessing the SQL database. If this condition fails, the client will display the Database Credentials Required dialog allowing you to enter the proper logon credentials to access the SQL database.
To launch the ChangeAuditor Client:
1. Select Start | All Programs | Quest Software| ChangeAuditor | ChangeAuditor Client.
When you launch the ChangeAuditor Client, the client will display the Connection Profile dialog allowing you to connect to the ‘Default Connection’ profile or define/specify a different connection profile.
A connection profile defines the connection method to be used to connect to a ChangeAuditor Coordinator in trusted or untrusted forests, or to the database directly without connecting with the ChangeAuditor Coordinator. See Manage Connection Profiles for more information on defining connection profiles.
17
Quest ChangeAuditor
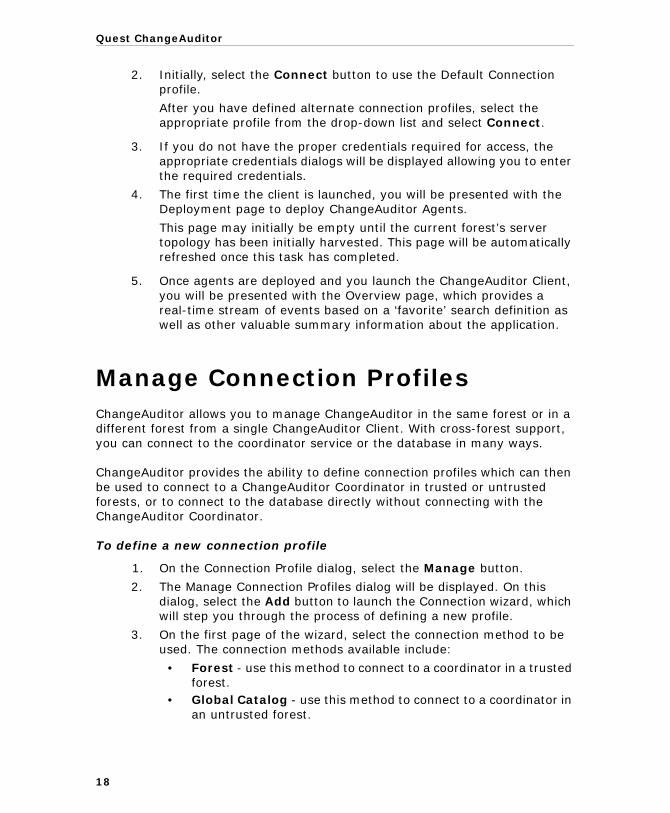
2. Initially, select the Connect button to use the Default Connection profile.
After you have defined alternate connection profiles, select the appropriate profile from the drop-down list and select Connect.
3. If you do not have the proper credentials required for access, the appropriate credentials dialogs will be displayed allowing you to enter the required credentials.
4. The first time the client is launched, you will be presented with the Deployment page to deploy ChangeAuditor Agents.
This page may initially be empty until the current forest’s server topology has been initially harvested. This page will be automatically refreshed once this task has completed.
5. Once agents are deployed and you launch the ChangeAuditor Client, you will be presented with the Overview page, which provides a real-time stream of events based on a ‘favorite’ search definition as well as other valuable summary information about the application.
Manage Connection Profiles ChangeAuditor allows you to manage ChangeAuditor in the same forest or in a different forest from a single ChangeAuditor Client. With cross-forest support, you can connect to the coordinator service or the database in many ways.
ChangeAuditor provides the ability to define connection profiles which can then be used to connect to a ChangeAuditor Coordinator in trusted or untrusted forests, or to connect to the database directly without connecting with the ChangeAuditor Coordinator.
To define a new connection profile
1. On the Connection Profile dialog, select the Manage button.
2. The Manage Connection Profiles dialog will be displayed. On this dialog, select the Add button to launch the Connection wizard, which will step you through the process of defining a new profile.
3. On the first page of the wizard, select the connection method to be used. The connection methods available include:
• Forest - use this method to connect to a coordinator in a trusted forest.
• Global Catalog - use this method to connect to a coordinator in an untrusted forest.
18

ChangeAuditor Overview
• Manual - use this method to connect to a ChangeAuditor Coordinator server located in a different Active Directory forest than the client.
• Database Direct - use this method to bypass the coordinator and connect directly to the ChangeAuditor database (i.e., use this method to connect to an archived database).
4. Depending on the connection method selected, enter the requested information:
• Forest - select the SCP to be used.• Global Catalog - select the SCP to be used. To override the
Coordinator Service DNS, you can enter the IP address and port number assigned to the coordinator.
• Manual - enter the fully-qualified domain name or IP address (IPv4 or IPv6) of the server where the coordinator resides and specify the port number assigned to the coordinator.
• Database Direct - select the server (name or IP address) and SQL instance for the ChangeAuditor database. Enter the name of the database.
5. On the last page of the wizard, review the connection profile details, name the profile and select the Test button to test the new connection profile. Select the Finish button to close the Connection wizard.
6. Back on the Manage Connection Profile dialog, the new connection profile will be added to the list. Select Save to save the new profile and close the Manage Connection Profile dialog.
7. To use this new connection profile, select it from the drop-down list on the Connection Profiles dialog and select the Connect button.
8. If you do not have the proper credentials required for access, the appropriate credentials dialogs will be displayed allowing you to enter the appropriate credentials.
The Administration Tasks tab is not available when using the Database Direct connection method.
If the coordinator host cannot be resolved by DNS, you must enter the IP address of the server where the coordinator resides.
19

Quest ChangeAuditor
Connection Wizard
The Connection wizard is launched when the Add button at the bottom of the Manage Connection Profiles dialog is selected. This wizard will step you through the process of defining a new connection profile.
CHANGEAUDITOR ENVIRONMENT PAGE
Select one of the following connection methods. Depending on the option selected, additional information will be requested on this or subsequent pages.
Note: If logon credentials are required for access, the appropriate credentials dialog will be displayed allowing you to enter the appropriate credentials.
Forest Select this option to locate a ChangeAuditor service in a trusted forest. By default the local forest will be displayed, however, you can enter the DNS name of a different trusted forest that has access to a DNS server and can be resolved.
Note: You can NOT enter an IP address in this field.
Global Catalog Select this option to connect to a ChangeAuditor service in an untrusted forest and enter the name or IP address of the global catalog to be used.
Note: You must use SQL authentication when connecting to untrusted forest.
Manual Select this option to manually specify the IP address of the server where the coordinator resides and the port number assigned to the coordinator.
20

ChangeAuditor Overview
Database Direct Select this option to connect to the ChangeAuditor database directly without going through the coordinator and enter the requested information.
Note: Use the Database Direct method to connect to an archived ChangeAuditor database.
An additional page will be displayed requesting the following information:
• ChangeAuditor Server (\SQL Instance) - Enter or use the Browse button to select the server (name or IP address) and the SQL instance for the ChangeAuditor database.
• ChangeAuditor Database - Enter the name of the ChangeAuditor database.
Note: When using the Database Direct option, the Administration Tasks tab is not available in the ChangeAuditor Client.
CONNECT TO CHANGEAUDITOR COORDINATOR(S) PAGE
This page is displayed after you have selected the connection method to be used. The information required to be entered on this page is based on the connection method selected on the previous page.
Service Connection Point
When the Forest or Global Catalog options are selected on the previous page, this list displays the service connection points (SCPs) available for use. Select the SCP to be used from this list.
Coordinator DNS/IP Address
If you selected the Global Catalog option and want to override the Coordinator Service DNS, enter the IP address (IPv4 or IPv6) of the server where the coordinator resides.
If you selected the Manual option on the previous page, enter the fully-qualified domain name of the server or IP address (IPv4 or IPv6) where the coordinator resides.
Note: If the coordinator host cannot be resolved by DNS, you must enter the IP address of the server.
21

Quest ChangeAuditor
Coordinator Port If you selected the Global Catalog option and entered the IP address to override the Coordinator Server DNS, enter the port number assigned to the coordinator.
If you selected the Manual option on the previous page, enter the port number assigned to the coordinator.
Note: You can obtain the port number assigned to a coordinator using the Coordinator log file or Coordinator Status dialog (Coordinator SysTray Icon).
CONNECTION PROFILE SUMMARY PAGE
This is the last page of the Connection wizard where you can review the connection profile details, name your profile and/or test your new connection profile.
Profile Summary This portion of the page displays the settings defined on the previous pages of the wizard. The content will depend upon the connection method selected. The information displayed may include:
• Global Catalog
• Coordinator
• Port
• SPN
• ChangeAuditor Coordinator server/instance
Connection Profile Name
Enter a descriptive name to be assigned to the new connection profile.
Test Select this button to test the settings defined in the connection profile.
22

ChangeAuditor Overview
Client Components Once a successful connection has been established, the client will be displayed. The ChangeAuditor Client contains the following main components:
• Title Bar - is located across the top of the screen and displays the name of the forest and installation name to which you are currently connected.
• Menu Bar - is located directly below the title bar and displays the menus for accessing ChangeAuditor commands. Please refer to the ChangeAuditor Commands appendix for a description of the menu bar commands available.
• File Menu - use the File Menu commands to connect to or disconnect from a ChangeAuditor coordinator, print or export search results, or exit the ChangeAuditor Client.
• Edit Menu - use the Edit Menu commands to manage your searches and folder on the Searches page.
• Action Menu - use the Active Menu commands to refresh or reset a page, autofit columns, display the XML, SQL or Advanced tabs, enable/disable the auto connect feature or enable/disable the desktop notification messages.
• View Menu - use the View Menu commands to display a different ChangeAuditor page.
• Help Menu - use the Help menu commands to display the online help, retrieve general information about this release, to send feedback about using the product or to collect system logs for troubleshooting purposes.
• Tabbed Pages - are displayed below the menu bar and are used to navigate through ChangeAuditor. The pages that can be displayed, include:
• Use the Deployment page to deploy, upgrade or uninstall ChangeAuditor Agents from a single location.
• The Overview page provides a real-time stream of events based on a ‘favorite’ search definition. It also contains statistics about the audited events and the status information for the ChangeAuditor Agents and the ChangeAuditor Coordinator.
• The Searches page contains a list of all the searches available. From this page you can run a search, create a customized search, and enable/disable alerting.
• A new Search Results page is created whenever a search is run. These pages contain a list of the events returned as a result of the selected search. From this page, you can also view the details of an event.
23
Quest ChangeAuditor
• The Alert History page is displays when the Alert | History right-click command is selected and displays details regarding the events that triggered to selected alert.
• A new Report page is created whenever the Run Local Report right-click command is selected for a search or built-in report. The Report page displays an SRS rendering of the events returned as a result of the selected search or specified built-in report.
• A new Log page is created whenever one of the View Logs commands are selected and displays the event details recorded in the selected log.
• The Agent Statistics page displays status and statistics for all installed agents.
• The Coordinator Statistics page displays status for all installed coordinators.
• The Administration Tasks tab allows you to perform a variety of administration tasks. Use the navigation pane in the left-hand pane to select the administrative task to be performed. Refer to the Administration Tasks Tab appendix for an overview of the tasks that can be performed using the Administration Tasks tab and the product license required to perform these tasks.
Customize Table ContentThe contents of the various data grids displayed in the ChangeAuditor client can be sorted, rearranged and grouped using the simple utilities provided in ChangeAuditor.
Sort Data
An arrow in the column heading identifies the sort criteria and order, ascending or descending, being used to display information.
To change the sort criteria:
1. Click on the column heading to be used for the sort criteria.
2. The sort order will be in ascending order, but can be changed to descending order by clicking on the heading a second time.
3. To specify a secondary sort order, SHIFT + click in the heading of the column to be used for the secondary sort order.
24

ChangeAuditor Overview
Resize or Move Columns
Columns can also be resized or moved within a data grid.
To resize a column:
1. Place your cursor on the boundary between column headings (your cursor will change to a double-arrow).
2. Click and hold the left mouse button dragging the column boundary to the desired size.
To change the order of the columns in the table:
1. Use the left mouse button to click the heading to be moved (the column heading will pop off the table).
2. Drag that column heading to the desired location in the table (arrows will indicate where you are placing the selected column).
Add or Remove Columns
ChangeAuditor displays a default set of columns for the different pages displayed. You can however display additional data or hide a particular column.
To add or remove columns:
1. Select the button to the far left of the column headings.
2. The Field Chooser dialog appears which lists all of the data (columns) available for display.
25

Quest ChangeAuditor
3. From this dialog, select the columns to be displayed and clear the columns you do not want displayed.
Group Data
In addition, you can group data to create a collapsed view that can be expanded to view the detailed information that applies to that group.
To group data:
1. Select a column heading (the column heading will pop off the table) and drag that column heading to the space above the table.
2. Optionally, repeat this step to select additional headings to create a hierarchy of groupings.
This will collapse the table and display the groupings that can be expanded to view the detailed information that applies to that group, as shown below.
For each individual search, you can select the data to be retrieved and displayed in the client using the Advanced search properties tab. From this tab you can also define column order, sort criteria and order, groupings and the format to be used for displaying the retrieved data.
26

ChangeAuditor Overview
3. To expand a group and display the individual events listed, click on the + sign to the left of the label.
4. When a grouping is in place, you can use the Pie Chart or Bar Graph icons, located at the top of the grid, to redisplay the data.
5. In either of these views, use the Data Grid icon to redisplay the data in the grid format.
6. To remove a grouping, select the heading and drag it back down into the table area or right-click a group heading (in area above the grid) and select one of the remove commands.
Filter DataTraditional search capabilities provide the first phase of drilling down on details you may be seeking, but locating individual events typically requires more granular search capabilities and additional steps. ChangeAuditor provides advanced filtering options that allow you to modify the results of a search without changing the original search. With this capability, filtering can be performed on one or more columns of a result, ultimately reducing the need to build the same search multiple times with minor customizations.
Throughout the client, you will see a row of data filtering cells under the headings row in each of the data grids. These cells provide data filtering options which allow you to filter and sort the data displayed.
To filter data:
1. Place your cursor in one of these cells, and click the Click here to filter data...
2. In the selected cell, enter the word or string of characters to be used to filter the data displayed. Filtering will take place as you type your entry.
3. By default, ChangeAuditor will use either the ‘starts with’ or ‘contains’ comparison operator to filter the data. However, if you click
on the search criteria button ( in diagram above), you can select a different operator.
The Pie Chart and Bar Graph displays are only available when a single level grouping has been applied to the data grid.
27

Quest ChangeAuditor
4. To remove the filtering and return to the original data grid, click on
the Remove Filter button ( ) to the far left of the cells.
5. To remove the filtering of an individual cell, use the Remove Filter button to the right of that cell.
To create a custom filter:
When you place your cursor in a data filtering cell, a drop-down arrow appears to the right of this cell. This drop-down displays all of the items available for selection, including (Custom), (Blanks), and (NonBlanks). Selecting an item from this list will display entries based on the item selected.
1. To create a custom filter, place your cursor in the cell beneath the column to be filtered. Click the arrow control and select (Custom).
The Custom Filter dialog appears.
2. Select the appropriate option in the Filter based on <All | Any> of the following conditions.
• Select All if all the criteria entered has to be met in order to be included.
• Select Any if only one of the criteria entered has to be met in order to be included.
3. In the field to the right of the column heading, click the arrow control to select the comparison operation to be used (e.g., Like, Equals, Contains, etc.).
4. In the field to the right of the comparison operator, enter the pattern (character string or value) to be used to search for a match.
Use the * wildcard character to match any string of zero or more characters. For example, entering LIKE *change* in the Event column, will find events that contain the string "change", e.g., changed, ChangeAuditor, etc.
5. To add additional criteria, use the Add button. Selecting this button adds a new row to the custom filer allowing you to specify additional criteria for the selected column.
6. Once you have created the custom filter, select the OK button to close the dialog and filter the data based on the criteria entered.
28

ChangeAuditor Overview
The following procedures walk you through a few scenarios using the custom filtering feature.
To find events generated when a member is added to a group:
1. Run the ’All Events’ search.
2. On the Search Results page, place your cursor in the data filtering cell of the Event column, click the arrow control and select (Custom).
3. Select All.
4. Specify the following criteria:
• Contains | group• Contains | added• Does not contain | group policy
5. Select OK.
To find delete object operations related to a forest container:
1. Run the ’All Events’ search.
2. On the Search Results page, place your cursor in the data filtering cell of the Action column, click the arrow control and select (Custom).
3. Select All.
4. Specify the following criteria:
• Contains | delete• Contains | object
5. Select OK.
6. Back on the Search Results page, place your cursor in the data filtering cell of the Facility column and enter: forest.
Directory Object PickerThroughout the ChangeAuditor Client, you will encounter the directory object picker which allows you to locate and select a directory object from your environment. This object picker will appear in either a stand alone dialog or as part of a wizard and consists of the following tabbed pages:
• Browse - use the Browse page to select a directory object from a hierarchical view of your environment
• Search - use the Search page to search your environment to locate and select a directory object
29

Quest ChangeAuditor
• Options - use the Options page to view or modify various search options or the global catalog to be used to retrieve directory objects
To browse for a directory object:
1. Open the Browse page.
2. In the Find field, either enter or use the drop-down menu to select the type of directory objects to be displayed.
You can enter multiple classes, separated by either a comma or semi-colon. Note that when you type in an entry, you must use the Enter key or the Apply Filter button to display the objects.
3. In the explorer view (left-hand pane), single-click on the expansion state box to the left of a container or double-click a container to expand the view to display subordinate objects.
Select a container in this pane to populate the object list (right-hand pane) with the objects that belong to the selected container.
Use the F5 button to force a refresh of the contents of this pane.
Most of the time, this field will be automatically filled in with the appropriate entry. Thus, when this field is grayed out, this is a read-only field which cannot be changed.
Right-clicking the root domain in the explorer view will display a drop-down menu listing any peer domains. To view a different domain’s objects, select the desired domain from those listed.
30

ChangeAuditor Overview
4. In the object list, click on the object to highlight it and use the Add button to add it to the Selected Objects list at the bottom of the dialog.
5. Once you have added objects to this list, use the Select button to save your selection and close the dialog. Or if the directory object picker is part of a wizard, select Next to save your selection and continue.
To search your environment to locate a directory object:
1. Open the Search page and use the controls at the top of the page to search your environment to locate the desired object(s).
2. In the Find field, either enter or use the drop-down menu to select the type of directory object to be located.
You can enter multiple classes, separated by either a comma or semi-colon. Note that when you type in an entry, either click the Enter key or use the Search button to display the objects.
The Selected Objects list is used for both the Browse and Search pages and will contain the objects selected from either of these pages.
Most of the time, this field will be automatically filled in with the appropriate entry. Thus, when this field is grayed out, this is a read only field which cannot be changed.
31

Quest ChangeAuditor
3. In the Name field, specify a search expression to be used to search Active Directory to locate a particular object. In most cases, this field will contain an asterisk (*) indicating to search for all objects of the type specified in the Find field.
Select the ANR check box to use Ambiguous Name Resolution (ANR) as the search algorithm, which allows you to enter limited input (partial data) to find multiple objects in your network.
When the ANR check box is checked, use one of the following methods to enter your search expression:
• Enter a partial string to return exact matches or a list of possible matches. For example, entering ‘Admin’ will return objects that contain the names ‘Admin’, ‘Admins’, ‘Administrator’, Administrators’, etc.
• Enter a string preceded by the equal sign (=Admins) to return only exact matches. For example, entering ‘=Admin’ will return only those objects containing the name ‘Admin’.
By default, ANR will search the following attribute fields in Active Directory:
• First Name (GivenName)• Last Name (Surname)• Display Name (displayName)• LegacyExchangeDN• msExchMailNickname• Relative Discontinued Name of the object (RDN)• Office (physicalDeliveryOfficeName)• Email address (proxyAddress)• Security Account Manager account (sAMAccountName)
When the ANR check box is not checked, the search expression entered will be used to search only the Display Name of directory objects to locate a particular object.
To use this search mechanism, enter a string of characters and the wildcard (*) character as described below.
• n* will return objects that start with the letter ‘n’• *n will return objects that end in the letter ‘n’• *n* will return objects that contain the letter ‘n’ within their
Display Name.
4. After entering a search expression, use the Search button to initiate the search and return the results of the search.
32

ChangeAuditor Overview
5. The object list displays the objects found as a result of your search. To select an object, click on the object to highlight it and use the Add button to add it to the Selected Objects list.
6. Once you have added objects to this list, use the Select button to save your selection and close the dialog. Or if the directory object picker is part of a wizard, select Next to save your selection and continue.
To view or modify the search options or global catalog to be used to retrieve directory objects:
1. Open the Options page and modify the options as required.
This icon indicates that an object is disabled.
The Selected Objects list is used for both the Browse and Search pages and will contain the objects selected from either of these pages.
The settings on the Options page only apply to the current user and will not impact other users using a ChangeAuditor Client. In addition, the Global Catalog setting only applies to the current session.
33

Quest ChangeAuditor
2. The Search Limit field specifies the maximum number of records to be returned for any given search. The default is 2000 records.
To change this limit, enter a value between 100 and 9999.
Or to allow an unlimited number of records to be returned, select (check) the No Search Limit check box.
3. The Page Size field displays the maximum number of records to be returned per LDAP polling cycle.
4. The Global Catalog field displays the name of the global catalog (GC) being used to retrieve directory objects. To change this, select the Select New GC button.
5. On the Global Catalog dialog, select the GC and specify the credentials to be used.
6. Once you have made changes on the Options page, use the Select button to save your selection and close the dialog. Or if the directory object picker is part of a wizard, select Next to save your selection and continue.
Care should be taken when modifying this value, because it could impact the performance of your searches.
Whenever a new ChangeAuditor session is started, ChangeAuditor automatically selects the GC to be used to retrieve directory objects. When you specify to use a different GC, this GC will be used for the current session only. Also, this setting applies to the current user and will not change the GC being used by other users using a ChangeAuditor Client.
34

2
Deployment Page
• Introduction
• Deploy Agents
• Change the Agent Installation Location and System Tray Option
• Enable Auto Deployment
• Refresh or Clear Deployment Page Information

Quest ChangeAuditor
IntroductionThe Deployment page in the ChangeAuditor Client displays all the servers discovered in your Active Directory environment. From this page you will specify the domain controllers and member servers to host a ChangeAuditor Agent.
Deployment PageThe Deployment page in the ChangeAuditor Client allows you to install and configure the ChangeAuditor Agents from a single location. This page contains a list of the servers found in your Active Directory forest to which an agent can be deployed.
The Deployment page may contain the following information for each server discovered in your Active Directory forest. The default column of the following table indicated those fields that are displayed by default. To display different
fields, select the Field Chooser button located to the far left of the column headings and select the columns to be displayed:
The first time the ChangeAuditor Client is launched, you will be presented with the Deployment page to deploy ChangeAuditor Agents. Once agents are deployed, the Overview page will be displayed whenever the ChangeAuditor Client is launched.
36

Deployment Page
COLUMN DEFAULT DESCRIPTION
Agent Status Yes Displays the current deployment status:
• Active
• Inactive
• Pending
• Copying Files
• Executing Installer
• Uninstalled
Coordinator No Displays the computer name of the ChangeAuditor Coordinator to which the agent is connected.
Creds Yes Indicates whether user credentials have been entered for the selected domain. To enter the credentials to be used to install agents on a domain, use the Credentials tool bar button or right-click command.
Deployment Result Yes Indicates the status of the last deployment task:
• Success - agent was successfully deployed
• Valid Creds - user credentials have been verified; you can schedule a deployment task
• Access Denied - user credentials are not valid; use the Credentials command to enter the proper user credentials for installing an agent on the selected domain
• The target version is already installed - no action required.
Note: You can use the Clear Results right-click command to clear the entry in this column for the selected server.
DN No Displays the Distinguished Name of a server. (This is the ’path’ to the server in the Active Directory Schema.)
DNS Name No Displays the DNS name of a server.
Domain Yes Displays the name of the domain where a server is located.
37

Quest ChangeAuditor
Exchange No Indicates whether Exchange is installed on a server.
Forest No Displays the name of the forest where the agent resides.
GC No Indicates whether the server is a Global Catalog server.
Installation No Displays the installation name assigned to the coordinator to which the agent is connected.
IP Address No Displays the IP address of a server.
Name Yes Displays the NetBIOS name of a server.
Operating System No Displays what version of the operating system is running on a server.
Plug-in No If you used the Advanced Options | Import Plug-in Servers command to import a list of servers containing InTrust Plug-ins, this column will be added to the Deployment page. A Yes in this column indicates that the server was imported from the InTrust Plug-in server list.
Note: This list of servers is only available if you exported a server list from the InTrust database using the InTrust2CA utility.
For more information on upgrading InTrust Plug-ins, please refer to the ChangeAuditor Installation Guide.
Site No Displays the name of the site where a sever resides.
Type No Displays the type of server: member server, domain controller or global catalog.
Version Yes Displays the version number of the ChangeAuditor Agent currently installed on a server.
When No Displays the date and time for a scheduled deployment task. That is, the date and time entered on the Install or Update dialog (or Uninstall dialog) when the When option is selected.
COLUMN DEFAULT DESCRIPTION
38

Deployment Page
In addition to selecting the fields to be displayed in the grid, you can use the drop-down controls above the grid to define what servers are to be included on the Deployment page.
The following table describes how to use these controls to filter the content displayed on the Deployment page.
Deploy AgentsTo deploy ChangeAuditor Agents:
1. Launch the ChangeAuditor Client. The Deployment page will automatically be displayed if agents have not yet been deployed. Otherwise, use View | Deployment to open the Deployment page.
The Deployment page will be populated with the servers (domain controllers and member servers) discovered in your Active Directory environment. (This page may initially be empty until the current forest’s server topology has been initially harvested. This page will be automatically refreshed once this task has completed.)
CONTROL DESCRIPTION
Type Use the left-most control to specify the type of servers to be included in the display:
• All - displays both domain controllers and member servers
• DCs - displays only domain controllers
• Member Servers - displays only member servers
Active Directory View By default, the Deployment page provides a forest view of the servers found. However, you can use the right-most controls to limit your view to an individual domain or site.
Use the middle control to select the Active Directory view (forest, domain or site) then use the right-most control to select an individual forest, domain or site for which servers are to be displayed.
39

Quest ChangeAuditor
2. From this list, select an entry and use the Credentials | Set tool bar or right-click command to enter the proper user credentials for installing agents on the selected domain.
On the Domain Credentials dialog, select the domain from the list and click the Set button. On the Logon Credentials dialog enter the credentials of a user with administrator rights on the selected domain.
3. After entering the proper credentials, select the entry back on the Deployment page and select Credentials | Test on the tool bar or right-click menu. If you get a Valid Creds status in the Deployment Results column, you can deploy agents.
If you get an Access Denied status in the Deployment Results column, use the Credentials | Set command to re-enter the proper credentials for installing agents.
4. Select one or more servers on the Deployment page and select the Install or Upgrade tool bar button or right-click command.
5. On the Install or Upgrade dialog select one of the following options to schedule the deployment task:
• Now (default)• When
If you select the When option, enter the date and time when you want the deployment task to be initiated. Select OK to initiate or schedule the deployment task.
Back on the Deployment page, the Status column will display ’Pending’ and the When column will display the date and time specified.
6. As agents are successfully connected to the ChangeAuditor Coordinator, a desktop notification will be displayed in the lower right-hand corner of your screen.
You can run a ChangeAuditor 5.6 Coordinator and Client while waiting to upgrade ChangeAuditor 5.0, 5.1, or 5.5 agents.
To cancel a pending deployment task. select the server and then select the Install or Upgrade button or right-click command. On the Install or Upgrade dialog, select the Clear Pending button.
To deactivate these desktop notifications, select the Action | Agent Notifications menu command.
40

Deployment Page
41
Change the Agent Installation Location and System Tray OptionBy default, the ChangeAuditor Agent folders (Agent, Systray) will be installed to %SystemDrive%\Program Files\Quest Software\ChangeAuditor\. You can, however, change the location of the installation folder by using the Advanced Options tool bar button on the Deployment page.
To change the agent installation location and System Tray option:
1. On the Deployment page, select one or more agents from the server list. Select the Advanced Options tool bar button to display the Advanced Deployment Options dialog.
2. To change the installation folder, check the Specify Agent Installation Location check box and enter the location to be used for the Agent installation folder.
The other options available when the Advanced Options tool bar button is expanded are discussed in the ChangeAuditor Installation Guide. See the Upgrading ChangeAuditor chapter for information on using the Import InTrust Plug-ins option. See the ActiveRoles Server Integration appendix for information on using the ActiveRoles Server Integration options.
The location entered is used for all agents selected on the Deployment page.

Quest ChangeAuditor
3. Select the appropriate option to specify the action to be taken if the path entered above cannot be created on a server:
• Use the default location and continue (Default)• Fail the installation/upgrade for that agent
4. By default, the system share (ADMIN$) is used, however, you can use a different share by selecting the Specify a Custom Share on the Remote Server option and entering the share to be used.
5. Use the Launch ServiceStatusTray on startup options to indicate whether you would like to launch/install the ChangeAuditor Agent system tray icon when the agent is started.
• Yes - launch the ServiceStatusTray on startup• No - do not launch the ServiceStatusTray on startup• Do not change - do not change the ServiceStatusTray
launch option (default)
For more information about the ChangeAuditor Agent system tray icon, please refer to the ChangeAuditor User’s Guide.
6. Use the Restart Agent on failure options to indicate whether to restart an agent if it fails to start.
• Yes - restart agent on failure (see note below)• No - do not restart agent on failure• Do not change - do not change the restart agent option
(default)
7. After specifying the requested information, select the OK button to save your selections and close the dialog.
You can also use the Save as Default button to save these settings as the default for when you deploy additional agents.
When you select Yes, the agent is restarted if a main ChangeAuditor service goes off line due to a crash, failure or unknown exception; however, if the agent is gracefully shut down, the service will not be restarted.
42

Deployment Page
43
Enable Auto DeploymentThe auto deployment feature allows you to automatically deploy a ChangeAuditor Agent to any new servers that are added to your forest.
To enable auto deployment:
1. From the Deployment page, select the New Servers tool bar button.
2. On the Auto Deploy to New Servers in the Forest dialog, select the Enable Auto Deployment to New Servers check box.
3. Select one of the following options to specify the servers to which agents are to be deployed:
• All New Servers (default)• Include New Server(s) in Container(s)• Exclude New Server(s) in Container(s)
4. When the Include New Server(s) in Container(s) or Exclude New Server(s) in Container(s) option is selected, click the Add button to locate and select individual containers.
5. Selecting the Add button displays the Select one or more Directory Objects dialog. Use the Browse or Search page to locate and select a container. Once a container is selected, use the Add button to add it to the Selection list at the bottom of the dialog. Once you have added all the containers, use the Select button to save your selection and close the dialog.
Auto deployment does NOT apply to servers already in the topology that are promoted to domain controllers.

Quest ChangeAuditor
The containers specified will be displayed in the Containers list back on the Auto Deploy to New Servers in the Forest dialog.
6. By default, ChangeAuditor will check if new servers have been added to the forest every hour and if found will automatically deploy a ChangeAuditor Agent. However, you can use one of the following Check for New Servers Added to Forest options to change this interval:
• Every nn hours• Every Day at <time>
7. Select the Set button to specify the credentials of a user with administrator rights on the selected domain(s). Select OK to save these user credentials and close the Logon Credentials dialog.
8. Select OK to save your selections and close the Auto Deploy to New Servers in the Forest dialog.
Refresh or Clear Deployment Page InformationTo force a topology harvest refresh:
1. On the Deployment page, select the Force Refresh tool bar button.
2. ChangeAuditor will force a topology harvest and display any new servers added since the last topology harvest.
To refresh a coordinator’s status:
1. On the Deployment page, select one or more servers from the list.
2. Select the Refresh Status tool bar button or right-click command.
3. ChangeAuditor will retrieve and display the latest status for the selected agents, including the agent version and deployment results.
To clear the deployment results:
1. On the Deployment page, right-click a server from the list and select Clear Result.
2. This will clear the current and any future entries in the Deployment Result cell for the selected sever.
The default harvest interval is every 24 hours.
44
3
Overview Page
• Introduction
• My Favorite Search Grid
• Define a Favorite Search
• Overview Panes
• Event Details Pane

Quest ChangeAuditor
IntroductionOnce agents are deployed, the Overview page is initially displayed when the ChangeAuditor Client successfully connects to a coordinator. The goal of the Overview page is to provide you with instant access to valuable information about the application. Therefore, this page provides customized views to highlight application details based on your preference. For example, you can display Agent Status, Top Agent Activity, Recent Event Activity, Coordinator Status, Event Counts, Database Maintenance Schedule Summary or Alert History Counts on the various panes on the Overview page.
Additionally, you can view a real-time stream of events based on a ‘favorite’ search definition. By default, the top pane will use the ChangeAuditor Real-Time search definition and display all events (up to 10,000 records) generated in the last 20 minutes. You can, however, define a different ‘favorite’ search and the events captured from that search will then be displayed across the top of the Overview page.
The information on this page is captured when the ChangeAuditor Client is started. To refresh all of the information displayed on the Overview page, use the Refresh button, F5 or the Action | Refresh menu command. Also, when you select a different pane for display, the latest information for the 'new' pane will be displayed.
46

Overview Page
My Favorite Search GridThe top pane displays a real-time view of events generated based on a user-defined ‘favorite’ search. By default, ChangeAuditor will use the ChangeAuditor Real-Time search definition and this pane will display all events captured for the last 20 minutes.
To define a different 'favorite' search, open the Searches page, select/highlight a search, right-click and select the Set As My Favorite menu command. Selecting F5 or the Refresh button on the Overview page, will then display the results of that search in this top pane of the Overview page.
As events are returned, they will be added to this search results grid, providing you with a real-time view of what’s happening in your environment. By default, the events are sorted by date, with the latest event being added to the top of the list. You can, however, use the column controls to select a different sort criteria for the information displayed. For more information on customizing the content of this table, please refer to Customize Table Content.
Double-clicking an event in this grid will display the Event Details pane across the bottom of the page, which contains additional details regarding the event selected in the search results grid. The layout and content for the My Favorite Search grid is the same as that used on the Search Results page. For a description of the search results grid and the Event Details pane, please refer to Search Results Grid and Event Details Pane.
47
Quest ChangeAuditor
48
Define a Favorite SearchBy default the ChangeAuditor Real-Time search (all events captured in the last 20 minutes) is used to capture the events displayed on the Overview page. You can, however, select a different ‘favorite’ search, which will then be used to populate the top pane on the Overview page.
To define a 'favorite' search:
1. Open the Searches page.
2. Select the search to be used, right-click and select Set As My Favorite.
3. Open the Overview page, select F5 (or the Refresh button) to display the results of that search in the My Favorite Search pane at the top of the Overview page.
To modify the current ’favorite’ search:
1. From the Overview page, click on the My Favorite Search: <search name> title at the top of the My Favorite Search grid.
2. The Searches page and corresponding search properties tab are displayed.
3. Use the search properties tabs to modify the search criteria. Select Save from one of the search properties tabs to save your changes.
4. Open the Overview pane, select F5 (or the Refresh button) to display the results of the modified search in the My Favorite Search pane.
Overview PanesThe Overview panes across the bottom of the Overview page can be customized based on your preference to display a variety of overview information about ChangeAuditor. By default, the Top Agent Activity and Agent Status panes are displayed across the bottom of the Overview page. However, each of these panes has an arrow button on its heading that can be used to display the different overview information that is available.
Overview Page
ChangeAuditor provides the following overview views which highlight application details based on your preference:
• Top Agent Activity
• Recent Event Activity
• Count of Events By
• Agent Status
• Coordinator Status
• Database Maintenance
• Alert History
For the panes that display counts, the blue underlined number are hyperlinks that when selected open a new search results page displaying the list of events included in the selected count.
Top Agent Activity
The Top Agent Activity pane displays the top most active ChangeAuditor Agents in your environment, based on the date range specified. That is, the agents that have forwarded the overall most events to the ChangeAuditor Coordinator. If this pane is not displayed, select the arrow on the heading of one of the lower panes and select Top Agent Activity to display this pane.
By default, the agent activity on DCs, Member Servers and workstations for the past month, including uninstalled agents, will be displayed. You can, however, use the controls located at the top of this pane to specify the types of servers to be included as well as the date range.
All | DCs | Member Servers | Workstations
By default all domain controllers, member servers and workstations will be included. However, you can use this drop-down menu to specify the types of servers to be included:
• All - domain controllers, member servers and workstations (default)
• DCs - only domain controllers
49

Quest ChangeAuditor
• Member Servers - only member servers• Workstations - only workstations
Show Uninstalled Agents
This check is selected by default and will include all uninstalled agents in the count.
Last <nn> <interval>
By default, data will be collected for the last month. However, you can use these controls to specify a different time interval for collecting this data.
Where: <nn> is a positive numeric value and <interval> is one of the following:
• Minutes• Hours• Days• Weeks• Months (default)• Quarters• Years
Recent Event Activity
The Recent Event Activity pane allows you to display recent activity for selected events. Select the arrow on the heading of one of the lower panes and select Recent Event Activity to display this pane. Use the Select Events button at the top of the pane to select the events to be included.
The selected events will be listed along with the number of events that occurred each day over the specified time interval. By default, the data will be collected for the last seven days. However, you can use the control in the upper right corner of this pane to display from one to seven days of data.
By default, the data will be displayed in a data grid format. However, you can
display the data in a bar graph by selecting the button at the top of the pane.
Use the button to redisplay the data using the data grid format.
50

Overview Page
Count of Events By
The event counts pane displays a table listing the total number of audited events captured by ChangeAuditor, sorted by the selected category. Select the arrow on the heading of one of the lower panes and select Count of Events By to display this pane. When selecting this pane for display, choose from the following categories:
• Event Class
• Facility
• Location
• Severity
• Result
• User
• License Type
• Origin
• Subsystem
Examples of some of these panes are illustrated below:
Event Class
51

Quest ChangeAuditor
User
Subsystem | Active Directory | Attribute
Agent Status
The Agent Status pane of the Overview Page displays a pie chart depicting the current status of all ChangeAuditor agents in either the entire enterprise or in a selected domain. Select the arrow on the heading of one of the lower panes and select Agent Status to display this pane.
52

Overview Page
Show Uninstalled Agents
By default, only active and inactive agents are included in the pie chart. However, you can select this check box to include the agents that are set as ’uninstalled’ in the pie chart.
Double-clicking the pie chart will display the Agent Statistics page which provides a global view of all ChangeAuditor agents, including their current status.
Coordinator Status
The Coordinator Status pane displays a pie chart depicting the current status of all the ChangeAuditor coordinators installed in either the entire enterprise or in a selected domain. Select the arrow on the heading of one of the lower panes and select Coordinator Status to display this pane.
Show Uninstalled Coordinators
Coordinators set as ’uninstalled’ are not included in the pie chart by default. However, you can select this check box to include uninstalled coordinators in the pie chart.
Double-clicking the pie chart will display the Coordinator Statistics page which provides a global view of all ChangeAuditor coordinators, including their current status.
Database Maintenance
The Database Maintenance pane displays the overview information regarding the database maintenance schedule defined. Select the arrow on the heading of one of the lower panes and select Database Maintenance to display this pane.
53

Quest ChangeAuditor
Alert History
The Alert History pane displays the number of ChangeAuditor alerts that were successfully sent or failed to send. Select the arrow on the heading of one of the lower panes and select Alert History to display this pane.
This information can display just the sent and failed counts for WMI, SNMP and SMTP alerts or it can also include the query name.
Event Details PaneThe Event Details pane is displayed across the bottom of this page, replacing the Overview panes, when the Event Details tool bar button is selected or when you double-click an event in the My Favorite Search grid. This pane provides additional details about the event selected in the My Favorite Search grid at the top of the page. The information displayed is the same as that displayed in the Event Details pane at the bottom of a Search Results page. Please refer to Event Details Pane in the Search Results Page and Event Details Chapter for a description of the details that this pane may contain.
54

4
Searches Page
• Introduction
• Searches Page
• View a List of Available Searches
• Run Searches
• Run a Quick Search
Quest ChangeAuditor
IntroductionOnce ChangeAuditor captures an audited event, it provides several flexible ways to generate meaningful reports. All audited event information is displayed in ChangeAuditor’s client and its ’built-in’ reports provide views for the most common and complex requests. You can view configuration changes from a variety of perspectives. For example, you can view all changes at a particular site. You can view changes made during a specific time frame. Or, you can see the changes performed by a particular administrator. You can event run detailed searches based on user-defined criteria to fit the needs of your organization.
This chapter provides a description of the Searches page and steps on how to run a built-in search. For information on how to create and run a custom search please refer to the Custom Searches and Search Properties chapter.
Searches PageThe Searches page displays all of your search definitions, both private and shared, and the built-in reports provided with ChangeAuditor.
56

Searches Page
Explorer View
The left-hand pane of the Searches page displays a hierarchical view of the folders used to manage your search definitions and the built-in reports provided with ChangeAuditor. This view initially displays the following folders:
FOLDER DESCRIPTION
Quick Search Allows you to define a search that is to be executed as soon as the definition is finished.
Unlike other custom searches, this search definition will not be saved unless you select Save As on one of the Search Properties tabs.
Private Is used to store your personal custom searches (i.e., only you can see these searches).
Shared
Built-In Reports
Contains the predefined search definitions provided with ChangeAuditor and can also be used to store public custom searches (i.e., all ChangeAuditor users can see these searches).
Contains all of the predefined reports provided with ChangeAuditor.
Built-In SRS Reports Contains predefined SRS reports provided with ChangeAuditor.
57

Quest ChangeAuditor
Searches List
The right-hand pane of the Searches page displays a list of the search definitions or built-in reports contained in the folder selected in the explorer view.
The following information is displayed for each search definition:
Double-clicking a search definition will run the selected search and display the results in a new Search Results page.
Search Properties Tabs
Located across the bottom of the page, the Search Properties tabbed pages define the criteria or properties which make up the selected search.
FIELD DESCRIPTION
Type Displays the type of entry: Private Search, Shared Search, Private Alert, Shared Alert or Report.
Enabled Indicates whether an alert has been enabled (N/A for Reports). Valid entries for this field are:
• Enabled - which means that an alert is enabled and that at least one transport method is enabled.
• Disabled - which means that the alert is disabled; however at least one transport method is still enabled.
Name Displays the name assigned to the search definition.
58

Searches Page
The Search Properties tabs displayed are:
For a detailed description of the Search Properties tabs and how to use them to create a custom search, please refer to Search Properties Tabs in the Custom Searches and Search Properties chapter.
TAB NAME DESCRIPTION
INFO Allows you to enter a name and description for the search
WHOAllows you to search for events generated by a specific user, computer, or group.
WHATAllows you to search for events based on subsystem, event class, object class, severity, or results.
WHEREAllows you to search for events captured by a specific agent, domain or site.
WHENAllows you to search for events that occurred within a specific date/time range.
ORIGINAllows you to search for events that originated from a specific workstation or server.
COMMENTS Allows you to search for events that contain specific comments.
ALERTAllows you to enable alerts and define how and where to dispatch alerts.
SQL
Displays the SQL script used to create the selected search definition
Note: Use the Action | Show SQL Tab to display this tab.
XMLDisplays the XML representation of the search criteria.
Note: Use the Action | Show XML Tab to display this tab.
ADVANCED
Allows you to define the data (columns) to be retrieved from the database and the sort order for displaying the retrieved data.
Note: Use the Action | Show Advanced Tab to display this tab.
59
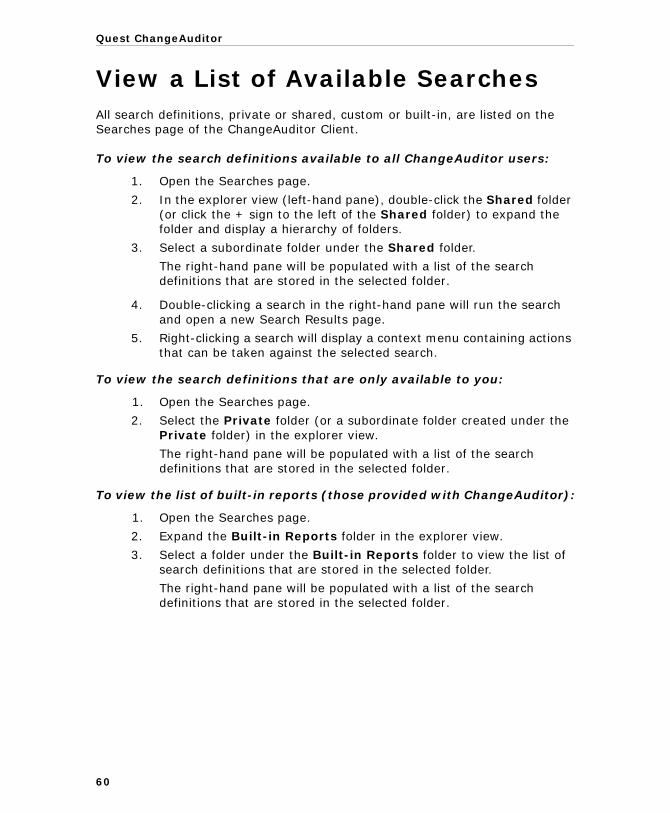
Quest ChangeAuditor
View a List of Available SearchesAll search definitions, private or shared, custom or built-in, are listed on the Searches page of the ChangeAuditor Client.
To view the search definitions available to all ChangeAuditor users:
1. Open the Searches page.
2. In the explorer view (left-hand pane), double-click the Shared folder (or click the + sign to the left of the Shared folder) to expand the folder and display a hierarchy of folders.
3. Select a subordinate folder under the Shared folder.
The right-hand pane will be populated with a list of the search definitions that are stored in the selected folder.
4. Double-clicking a search in the right-hand pane will run the search and open a new Search Results page.
5. Right-clicking a search will display a context menu containing actions that can be taken against the selected search.
To view the search definitions that are only available to you:
1. Open the Searches page.
2. Select the Private folder (or a subordinate folder created under the Private folder) in the explorer view.
The right-hand pane will be populated with a list of the search definitions that are stored in the selected folder.
To view the list of built-in reports (those provided with ChangeAuditor):
1. Open the Searches page.
2. Expand the Built-in Reports folder in the explorer view.
3. Select a folder under the Built-in Reports folder to view the list of search definitions that are stored in the selected folder.
The right-hand pane will be populated with a list of the search definitions that are stored in the selected folder.
60

Searches Page
Run SearchesTo run a previously saved search or built-in report:
1. Open the Searches page.
2. Expand and select the appropriate folder in the explorer view to display the list of search definitions stored in the selected folder.
3. Use one of the following methods to run a search:
• Double-click the search definition• Right-click the search definition and select Run• Select the search definition and select the Run tool bar button
at the top of the Searches page.
4. A new Search Results page will be displayed populated with the audited events that met the search criteria defined in the selected search definition.
Run a Quick SearchThe quick search feature allows you to run a search immediately without saving the search definition. However, if you want to save the search definition, you can use the Save As tool bar button before you run the search.
To run a quick search:
1. Open the Searches page.
2. Select the Quick Search node in the explorer view to display the Quick Search entry in the Searches list (right-hand pane).
3. You can either run the default Quick Search which will retrieve all audited events for the last seven days or define the search criteria to be used.
• To run the default search, double-click the Quick Search entry in the Searches list or select the Run right-click command or tool bar button.
• To define the search criteria, select the Quick Search definition to enable the Search Properties tabs. On the Search Properties tabs, enter the search criteria to be used. Once finished entering the search criteria, use the Run tool bar button from one of the Search Properties tabs.
4. A new search results tab, titled Quick Search, will be displayed populated with the audited events that met the search criteria defined.
61


5
Search Results Page and Event Details
• Introduction
• Search Results Page
• View Search Results
• Compare Results Side-by-Side
• View Event Details or Search Properties
• Display Event’s Knowledge Base Entry
• Email Event Details
• Copy Event Details
• Add Comments
Quest ChangeAuditor
IntroductionAudited events are the configuration change information that is captured by the ChangeAuditor Agent(s) and reported to a Coordinator and then written to the database. These audited events can be retrieved and viewed through searches made via the ChangeAuditor Client. When you run a search, ChangeAuditor searches the audited events in the database for the desired results. The results are then displayed in the Search Results page in the ChangeAuditor Client.
The terms 'searches' and 'reports' are used in conjunction to acquire the desired output. You run a 'search' and the results returned is a ‘report’.
Auditing and centralizing the collection of audited events is only one part of the total control and output required for enterprise security and compliance. It is equally important to be able to retrieve the real-time data and sort through it quickly and efficiently when it’s needed.
This chapter provides a description of the Search Results page and the Event Details pane. It also provides instructions for performing related tasks when viewing the search results. For a description of the other dialogs mentioned in this chapter, please refer to the online help.
64

Search Results Page and Event Details
Search Results PageA new results page is created whenever a search is run. When a search is run, this page displays detailed information about the audited events found as a result of the search.
Search Results Grid
The Search Results Grid is the main display area of the Search Results page and displays the audited events captured as a result of running a search from the Searches page.
The top area of the grid displays the following information:
FIELD DESCRIPTION
Run on Displays the date and time when the search was run.
Run Time Displays the amount of time it took to run the search.
Records Displays the total number of records returned.
Refresh Use the Refresh button to redisplay the latest information.
65

Quest ChangeAuditor
By default, the grid contains the following information about the audited events returned when a search is run. (You can specify the columns, sort order and grouping for a search, as well as the display format by using the Advanced search properties tab.)
Cancel When a large number of records are being captured for display, the Refresh button will become a Cancel button allowing you to cancel the search.
COLUMN DESCRIPTION
Action Displays what change was made to the object.
Domain Displays the name of the domain to which the agented server belongs.
Event Displays the type of change that occurred.
Facility Defines the event class facility to which the change event belongs.
Result Indicates whether the operation mentioned in the event was successfully completed. Valid states are:
• Success - Indicates the operation occurred as stated in the event.
• Protected - Indicates that the operation did not occur because the object is protected using the ChangeAuditor object locking feature.
• Failed - indicates that the operation did not occur due to a factor/setting outside of ChangeAuditor’s control.
• None - indicates that the operation occurred as stated, but no results were captured for the event. For example, this state is used for most of the internal ChangeAuditor events.
Server Displays the name of the server where the change occurred.
Severity Displays the severity assigned to a configuration change event:
• High
• Medium
• Low
Site Displays the name of the site where the agented server resides.
Subsystem Defines the subsystem, or area of auditing, where the change event occurred.
Time Detected Displays the date and time when the agent captured the event.
FIELD DESCRIPTION
66

Search Results Page and Event Details
Search Properties Tabs
Use the Search Properties toolbar button or the Show Properties right-click command to display the Search Properties tabs across the bottom of the screen. This view consists of tabbed pages defining the criteria or properties which make up the selected search. Refer to Search Properties Tabs in the Custom Searches and Search Properties chapter for a detailed explanation of all the Search Properties tabs.
Event Details Pane
The Event Details pane is displayed when you select the Event Details toolbar button or the Show Details right-click command on a Search Results page, or when you double-click an event in the search results grid on the Overview page, a Search Results page or the Alert History page.
This pane is displayed at the bottom of the screen (replaces the Search Properties tabs) and provides the following details about the event selected in the data grid at the top of the page:
User Displays the name of the user who initiated the change.
FIELD DESCRIPTION
Severity The severity level assigned to the search is displayed in the upper left-hand corner.
Who This field specifies the name of the user who initiated the change. If available, the display name of the user account is also displayed in parenthesis.
When This field specifies the date and time when the change occurred.
COLUMN DESCRIPTION
67
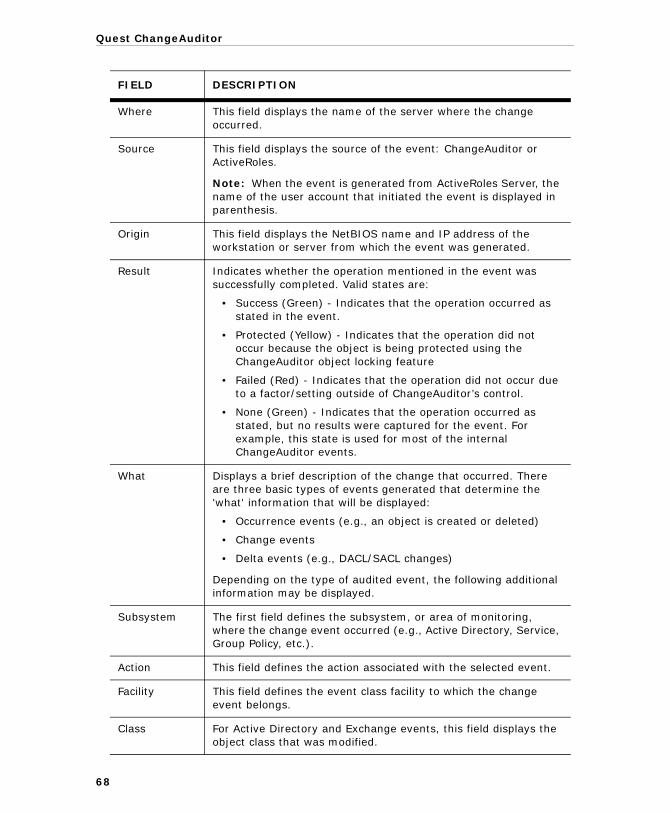
Quest ChangeAuditor
Where This field displays the name of the server where the change occurred.
Source This field displays the source of the event: ChangeAuditor or ActiveRoles.
Note: When the event is generated from ActiveRoles Server, the name of the user account that initiated the event is displayed in parenthesis.
Origin This field displays the NetBIOS name and IP address of the workstation or server from which the event was generated.
Result Indicates whether the operation mentioned in the event was successfully completed. Valid states are:
• Success (Green) - Indicates that the operation occurred as stated in the event.
• Protected (Yellow) - Indicates that the operation did not occur because the object is being protected using the ChangeAuditor object locking feature
• Failed (Red) - Indicates that the operation did not occur due to a factor/setting outside of ChangeAuditor’s control.
• None (Green) - Indicates that the operation occurred as stated, but no results were captured for the event. For example, this state is used for most of the internal ChangeAuditor events.
What Displays a brief description of the change that occurred. There are three basic types of events generated that determine the 'what' information that will be displayed:
• Occurrence events (e.g., an object is created or deleted)
• Change events
• Delta events (e.g., DACL/SACL changes)
Depending on the type of audited event, the following additional information may be displayed.
Subsystem The first field defines the subsystem, or area of monitoring, where the change event occurred (e.g., Active Directory, Service, Group Policy, etc.).
Action This field defines the action associated with the selected event.
Facility This field defines the event class facility to which the change event belongs.
Class For Active Directory and Exchange events, this field displays the object class that was modified.
FIELD DESCRIPTION
68

Search Results Page and Event Details
Attribute If an attribute has been modified, this field displays the name of the attribute.
Object For Active Directory and Exchange events, this field displays the name of the object that was modified.
Path For File System events, this field displays the full path of the file or folder where the modification occurred.
Process For File System events, this field is populated with the full path of the application responsible for the file change.
Service For Service events, this field displays the name of the service(s) that were modified.
Key For Registry events, this field displays the name of the registry key that was modified.
Value For Registry events, this field displays the registry value that was modified.
Policy For Group Policy events, this field displays the name of the group policy that was modified.
Section For Group Policy events, this field displays what section of the group policy was modified.
Item For Group Policy events, this field displays the group policy item that was modified.
Account For Local Account events, this field displays the local account that was modified.
From This text box lists the old value that was assigned to the object.
To This text box lists the new value that is now assigned to the object.
Note: The To and From information does not apply to permission/ACL (Access Control List) type changes and is replaced with the Change Details section. This information is also not available for occurrence type events, e.g., when an object is created or deleted.
Type For LDAP Query events, this field displays the type of query: LDAP or GC.
Scope For LDAP Query events, this field displays the scope of coverage: This object only or This object and all children.
Results For LDAP Query events, this field displays the number of results returned as a result of the query.
FIELD DESCRIPTION
69

Quest ChangeAuditor
View Search ResultsTo view the results of a search:
1. From the Searches page, run a search.
2. For each search that is run, a new search results page will automatically be created and opened, allowing you to view the audited event records returned.
3. When multiple search results are active, select the heading tab at the top of a search page to view the selected search results.
SSL/TLS For Active Directory and LDAP Query events, this field indicates whether the LDAP operation or LDAP query is secured using SSL or TLS technology.
Note: If you upgraded from a previous version of ChangeAuditor, the event details for pre-5.5 Active Directory and LDAP events will not include this field.
Note: If changes are initiated within LSASS and not through the LDAP protocol itself, this field will not be captured.
Occurrences For LDAP Query events, this field displays the number of times the LDAP query occurred during the specified interval.
Since For LDAP Query events, this field displays the date and time when the LDAP query was first initiated.
Elapsed For LDAP Query events, this field displays how long the LDAP query took to run. Zero (0) indicates that it took less than a millisecond to complete.
Sign/Seal For Active Directory and LDAP Query events, this field indicates whether the LDAP operation or LDAP query is signed using Kerberos-based encryption.
Note: If you upgraded from a previous version of ChangeAuditor, the event details for pre-5.5 Active Directory and LDAP events will not include this field.
Note: If changes are initiated within LSASS and not through the LDAP protocol itself, this field will not be captured.
Filter For LDAP Query events, this text box displays the filter string used in the LDAP query.
Attributes For LDAP Query events, this text box displays the attributes that were queried.
FIELD DESCRIPTION
70

Search Results Page and Event Details
4. Use the column controls to sort, rearrange, or group the data displayed. See Customize Table Content for more information on using the column controls to customize the content of this page.
5. ChangeAuditor also provides advanced filtering options that allow you to modify the results of a search without changing the original search. Click in the Click here to filter data ... cell to enter the criteria to be used to filter the data displayed. See Filter Data for more information on using ChangeAuditor’s filtering feature.
Display Results in Different Formats
When a grouping is created (i.e., a single column heading is dragged up into the heading area to group the data), three icons are added to the heading area which can be used to display the data in a different format. The following icons/formats are available:
DATA GRID
Select the data grid icon to redisplay the data in the grid format (default format).
PIE CHART
Select the pie chart icon to display a pie chart showing the correlated data. Move your cursor over the pieces in the pie chart to display the label and number of items that make up that piece of the pie.
BAR GRAPH
Select the bar graph icon to display a bar graph showing the correlated data. Move your cursor over the bars in the graph to display the label and number of items that make up that bar
The Pie Chart and Bar Graph displays are only available when a single level grouping has been applied to the data grid. Also, when the search results are too numerous to chart, a message will display stating that there are too many items to display them all.
71

Quest ChangeAuditor
Compare Results Side-by-SideChangeAuditor allows you to run two searches side-by-side simultaneously. When multiple ChangeAuditor pages are open, you can split the current screen to display two or more pages at the same time. For example, you can view multiple search results pages in the ChangeAuditor Client allowing you to compare the results against each other.
To compare results side-by-side:
1. Run the searches to be compared. On the Search Results pages, we recommend that you hide the Event Details or Search Properties tabs so that when the screen spits, you will have more space for viewing audited events.
2. Right-click the heading tab of one of these Search Results pages and select one of the following commands:
• New Horizontal Tab Group - to view two or more panes down the screen.
• New Vertical Tab Group - to view two or more panes across the screen.
For optimal viewing, this feature should be used in a dual monitor configuration.
72

Search Results Page and Event Details
3. This will split the screen (either horizontally or vertically depending on the command selected) displaying multiple pages in the single view.
4. To move a page from one pane to another, right-click the heading tab of the page to be moved and select the Move to Next Tab Group menu command. This will move the selected page to the other pane displayed. To move this page back, right-click the heading tab and select the Move to Previous Tab Group menu command.
5. To close the split screen and return to a single pane, use the Action | Reset Display menu command.
View Event Details or Search PropertiesFrom the Search Results page, you can view the search properties used to generate the displayed audited events or you can access more detailed information about an audited event. Using the toolbar buttons at the top of the Search Results page, you can easily switch between the Search Properties and Event Details at any time.
To display event details for an audited event:
1. Open a Search Results tab and select an audited event from the Search Results grid.
2. If neither the Search Properties tabs or Event Details pane are being displayed, use one of the following methods to display the event details:
• double-click the audited event entry in the results grid• select the Event Details tool bar button• right-click the audited event and select Show Details
3. If the Search Properties tabs are displayed across the bottom of the page, either double-click the audited event entry or select the Event Details tool bar button. The Event Details pane will replace the Search Properties tabs.
4. Use the Hide Details right-click command to hide the Event Details pane.
73

Quest ChangeAuditor
To display Search Properties for an audited event:
1. Open a Search Results tab and select an audited event from the Search Results grid.
2. If neither the Search Properties tabs or Event Details pane are being displayed, either select the Search Properties tool bar button or right-click the audited event and select the Show Properties menu command.
3. If the Event Details pane is displayed across the bottom of the page, select the Search Properties tool bar button to display the search properties tabs.
4. Use the Hide Properties right-click command to hide the Search Properties tabs.
Display Event’s Knowledge Base EntryIn addition to the search properties and event details, ChangeAuditor also provides access to an audited event knowledge base, which contains detailed descriptions for each audited event, including information about how ChangeAuditor detected the configuration change event, what the changed parameter controls, and the consequence of such a change. Many of the knowledge base entries also include links to articles or documents that offer additional information about the audited event.
To display knowledge base entry for an event:
1. Open a Search Results tab and select an audited event from the Search Results grid.
2. Use one of the following methods to launch the ChangeAuditor knowledge base:
• From the Search Results grid, right-click the audited event and select KnowledgeBase
• From the Event Details pane, select the KnowledgeBase tool bar button
3. This will launch your browser and display the knowledge base article for the selected event.
74

Search Results Page and Event Details
75
Email Event DetailsTo email an event’s details:
1. Open a Search Results tab and select an audited event from the Search Results grid.
2. Use one of the following methods to email the selected event’s details:
• Right-click the audited event in the Search Results grid and select Email.
• From the Event Details pane, select the Email tool bar button.
3. This will create a new email containing the contents of the Event Details pane. Enter the recipient's email address (in the To and CC fields) and edit the subject line if desired.
4. Select Send.
5. If applicable, the Internet Connection Wizard will be displayed allowing you create a new Internet account, which includes the following information:
• display name as you would like it to appear in the From field of the outgoing message
• your email address• your incoming mail server• your outgoing mail (SMTP) server
Copy Event DetailsTo copy an event’s details:
1. Open a Search Results tab and select an audited event from the Search Results grid.
2. Use one of the following methods to copy the contents to the clipboard:
• Right-click the audited event and select Copy.• From the Events Details pane, select the Copy tool bar button.
You can also hold down the Shift key while selecting the Email button to email additional event details. This additional information may be requested from the Quest Support staff for troubleshooting purposes.
You can also hold down the Shift key while selecting the Copy button to copy additional event details to the clipboard. This additional information may be requested from the Quest Support staff for troubleshooting purposes.

Quest ChangeAuditor
3. Open the application (e.g., Notepad) to which the content is to be pasted, right-click and select Paste.
Add CommentsChangeAuditor allows you to append comments to an event which can then be later specified as search criteria to retrieve all the events that contain a specific comment or ’key’ word.
To add comments to an event:
1. Open a Search Results tab and select an audited event from the Search Results grid.
2. Use one for the following methods to add or append comments to the selected audited event:
• Right-click the audited event and select Comments.• From the Event Details pane, use the Comments tool bar
button.
3. This will display the Comments dialog. In the New Comments text box at the bottom of this dialog, enter the comments to be associated with the selected event.
4. Select OK to close the dialog and return to the Search Results tab.
To view comments:
1. Open a Search Results tab and select an audited event from the Search Results grid.
2. Use one for the following methods to view or append comments to the selected audited event:
• Right-click the audited event and select Comments.• From the Event Details pane, use the Comments tool bar
button.
3. This will display the Comments dialog where previously entered comments are displayed in the top pane.
4. To append a new comment to those that already exist, use the text box at the bottom of the screen to enter your new comment.
5. Select OK to close the dialog and return to the Search Results tab.
76

6
Custom Searches and Search Properties
• Introduction
• Create a Custom Search
• Preview Search Results
• Search Properties Tabs
• Info Tab
• Who Tab
• What Tab
• Where Tab
• When Tab
• Origin Tab
• Comments Tab
• Alert Tab
• SQL Tab
• XML Tab
• Advanced Tab

Quest ChangeAuditor
IntroductionChangeAuditor enables you to create custom search definitions to search for the configuration changes that need to be tracked in your environment. You will use the search properties tabs across the bottom of the Searches page to define new custom searches.
This chapter provides steps on how to create custom searches and to preview search results. It also provides a description of the Search Properties tabs and how to use these tabs to customize your searches. For a description of the other dialogs mentioned in this chapter, please refer to the online help.
Create a Custom SearchThe following procedure provides the ’general’ steps involved in creating a custom search. For more specific instructions on using the Search Properties tabs to define search criteria, please refer to the appropriate section later in this chapter.
To define a new search:
1. Open the Searches page.
2. In the explorer view (left-hand pane), expand and select the folder where you want to save your search.
Selecting the Private folder will create a search that only you can run and view, whereas selecting the Shared folder will create a search which can be run and viewed by all ChangeAuditor users.
3. Select the New tool bar button at the top of the Searches page (or right-click a folder and select the New | New Search menu command).
4. On the Search Properties tabs, enter the search criteria to be used.
• Info - enter a name and description for the search• Who - allows you to search for events generated by a specific
user, computer or group • What - allows you to search for events based on subsystem,
event class, object class, severity or results• Where - allows you to search for events captured by a specific
agent, domain or site
When you specify criteria on more than one search properties tab, ChangeAuditor uses the ’and’ operator to determine whether an event meets the search criteria.
78

Custom Searches and Search Properties
• When - allows you to search for events that occurred during a specified date/time range
• Origin - allows you to search for events that originated from a specific workstation or server
• Comments - allows you to search for events that contain a specific comment
5. If you want to be notified when an event is captured as a result of this custom search, open the Alert tab to enable and define how and where to dispatch alerts when the selected search criteria is met. Please refer to Enable Alert Notifications for more information on setting up alert notifications.
6. Once you have defined the search criteria to be used, you can either save the search definition or run the search.
• To save and run the search, select Run from one of the Search Properties tabs.
• To save the search definition without running it, select Save from one of the Search Properties tabs.
• To create a new search using a different name than was initially entered, select Save As | Save As from one of the Search Properties tabs.
• To save the search definition as the new default for new searches, select Save As | Save As Default from one of the Search Properties tabs.
Preview Search ResultsResearch uncovered that customers modify a search three times on the average. Thus, the criteria definition is now in-line with the results, which enables you to preview and modify the results without closing and opening multiple dialogs as in the past.
To modify search properties and preview the results:
1. Open a Search Results tab and select an audited event from the Search Results grid.
2. Select the Search Properties tool bar button to display the Search Properties tabs across the bottom of the page.
3. Use these tabbed pages to modify the criteria used in the selected search.
4. After modifying the search criteria, select the Preview Changes tool bar button from one of the tabbed pages.
79
Quest ChangeAuditor
5. The results of the modified search will then be displayed in the Search Results page already being displayed. An asterisk will be added to the name in the tab denoting that the search results has been modified.
6. Once you have achieved the desired results and you want to save the modifications made to the search, use Save or Save As on one of the Search Properties tabs.
Search Properties TabsYou will use the Search Properties tabs, which are displayed across the bottom of the Searches page, to define custom search criteria.
To display/activate the Search Properties tabs:
1. Use one of the following methods to display/activate these tabs:
• right-click a search definition in the Search list (right-hand pane) and select Show Properties
• select a search definition from the Search list and select the New | New Search tool bar button or right-click command
• select a folder from the explorer view and select the New | New Search tool bar button or right-click command
2. Use the controls in the upper right-hand corner of the Search Properties tab pane to pin/unpin or hide this pane:
Use the Pin Properties button to collapse the tabs and pin them to the bottom of the screen.
Use the Unpin Properties button to expand/display the pinned tabs.
Use the Hide Properties button to close the Search Properties tabs.
80

Custom Searches and Search Properties
81
Info Tab
The Info tab is the first of the Search properties tabs. From this tab, you can view or enter the name and description of a search definition. You can also define the maximum number of records to be retrieved and displayed, or enable a refresh interval that defines how often the client is to retrieve and redisplay updated information.
To name a new search:
1. Place your cursor in the Search Name text box and enter a descriptive name for the search.
2. Use the Tab key to move your cursor to the Search Description text box and enter a brief description of the search. This step is optional.
3. After entering the search name and optional description, proceed to the other Search Properties tabs to enter the search criteria.
To change the maximum number of records to be retrieved:
The Search Limit field specifies the maximum number of records to be retrieved and displayed for the selected search. By default, a maximum of 50,000 records will be returned from the database during a single request.
1. To change this value, ensure that the Search Limit check box is checked. If it is not checked, click in the checkbox to the left of this field.
2. Enter or use the arrow controls to specify the maximum number of records to be retrieved and displayed.
If you do not enter a new name for your search, it will be named ’New Search’.
Clearing this check box removes the search limitation, which may increase both client memory and wait time if expected search results are over 100,000. Therefore, it is highly recommended that you leave this check box checked and use the defined search limit.

Quest ChangeAuditor
To set a refresh interval:
The Refresh Interval field specifies how often the client is to retrieve and redisplay updated information.
1. Select the Refresh Interval check box to enable this feature and activate the field to the right of this field.
2. Enter or use the arrow controls to set the refresh interval (how many minutes between refreshes) for the selected search.
When this option is checked, an additional field, Next Refresh, will be added to the heading area of the search results grid whenever this search is run.
Who Tab
The Who tab allows you to view or define the users, computers and/or groups to be included in (or excluded from) the search definition.
This option is not checked by default for new searches, only for the default favorite search (ChangeAuditor Real-Time) used in the Overview page. The default interval for the default favorite search is five minutes.
You can add a Group to a search to find all events made by the members of that group. ChangeAuditor must expand and store the membership of the group before all expected events are returned when the search is run. When the search is saved, ChangeAuditor will expand the Group if it has not already been expanded. This may take several minutes, depending on your environment. Please refer to Group Membership Expansion Pane for the options available regarding group expansion.
Activity performed by any accounts specified in an Excluded Accounts template will not be captured for the agent(s) to which this template is assigned. Thus, ChangeAuditor will not return any audited events for these excluded accounts even if you specify them in your Who search criteria. For more information on excluding accounts, please refer to Account Exclusion.
82

Custom Searches and Search Properties
To search for events generated by a specific user, computer or group:
1. On the Who tab, select the Add tool bar button to add an active user, computer or group to the ’who’ list.
2. On the Select one or more Directory Objects dialog, use either the Browse or Search page to search your environment to locate and select the user, computer or group to be included.
Once you have located a directory object to be included, select it and use the Add button to add it to your selection list.
3. Repeat step 2 to include each additional directory object.
4. After selecting one or more directory objects, use the Select button to save your selection and close the dialog.
5. When this search is run, ChangeAuditor will now search for change events generated by only the user(s), computer(s) and group(s) listed on the Who tab.
By default, for each new search ChangeAuditor will search for change events generated by all users, computers and groups, therefore, the list box on the Who tab will be empty.
You can use the Add with Events tool bar button (instead of Add) to search for a user, computer or group that already has an audited event in the database. Use this feature to search for events that are tied to users who have been removed from Active Directory.
Select the Runtime Prompt check box on the Who tab, if you want to prompt for the ’who’ criteria every time the search is run. When this check box is checked, the Add tool bar buttons will be disabled.
Please note that you can NOT enable alerting for search definitions that use the Runtime Prompt option.
Check the Exclude The Following Selection(s) check box, if you want to search for change events generated by all users, groups and computers EXCEPT those listed in the ’who’ list.
If you are running Quest’s ActiveRoles Server (ARS) and want to include events generated by ARS in the search, select the Include Event Source Initiator check box. Selecting this check box instructs ChangeAuditor to retrieve all change events made by the specified user account, including those initiated by ARS. Also, an additional column is added to the Search Results grid to display the user account that initiated the change using ARS. For more information, see the ActiveRoles Server Integration appendix in the ChangeAuditor Installation Guide.
83

Quest ChangeAuditor
To use a wildcard expression to specify a user or group:
1. On the Who tab, expand the Add tool bar button and select the Add Wildcard Expression option.
2. On the Add Who dialog, enter the wildcard expression to be used to search for user (domain\user name) or group (domain\group name):
• Select the comparison operator to be used: Like or Not Like.• In the field to the right, enter the pattern (character string and
* wildcard character) to be used to search for a match.Use the * wildcard character to match any string of zero or more characters. For example, LIKE *admin* will find all users with the character string ’admin’ anywhere in the name
• By default, the wildcard expression will be used to search for a user. To search for a group, select the Group option.
3. After entering the wildcard expression to be used, select the OK button to close the dialog and add the wildcard expression to the ’Who’ list.
4. When this search is run, ChangeAuditor will now search for change events generated by the user(s) or user(s) that are members of the group(s) whose name matches the specified wildcard expression.
What Tab
The What tab allows you to search for events based on subsystem, event class, object class, severity or results. When criteria is specified on the What tab, ChangeAuditor will retrieve only those change events that match the ’what’ criteria listed on the What tab. When multiple ’what’ criteria is specified, ChangeAuditor uses the ’OR’ operator to determine whether the event is to be included.
When using the Group option, the Group Membership Expansion option on the Coordinator Configuration page (on the Administration Tasks tab) should be set to Expand all groups.
By default, all entities will be included in a new search definition and therefore the list box on the What tab will be empty.
84
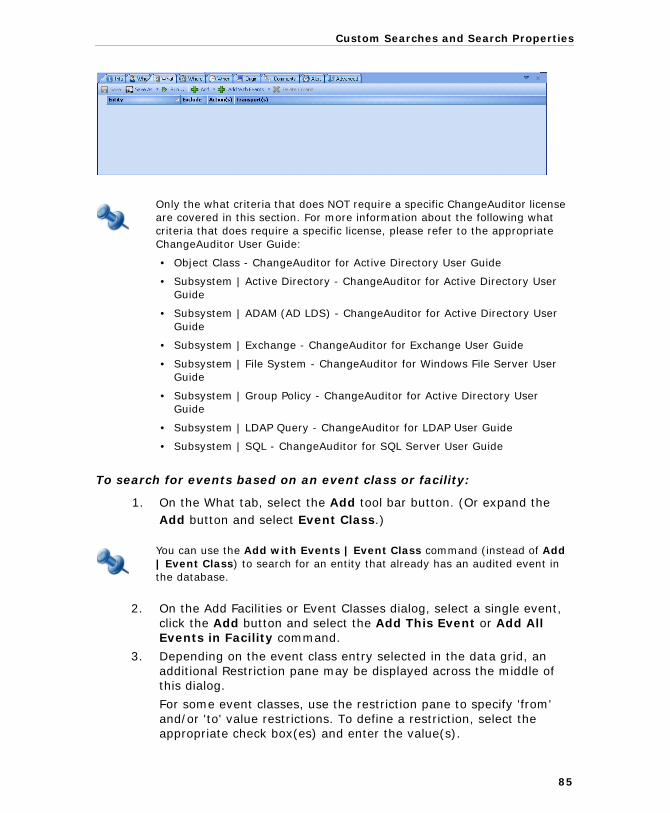
Custom Searches and Search Properties
To search for events based on an event class or facility:
1. On the What tab, select the Add tool bar button. (Or expand the Add button and select Event Class.)
2. On the Add Facilities or Event Classes dialog, select a single event, click the Add button and select the Add This Event or Add All Events in Facility command.
3. Depending on the event class entry selected in the data grid, an additional Restriction pane may be displayed across the middle of this dialog.
For some event classes, use the restriction pane to specify 'from' and/or 'to' value restrictions. To define a restriction, select the appropriate check box(es) and enter the value(s).
Only the what criteria that does NOT require a specific ChangeAuditor license are covered in this section. For more information about the following what criteria that does require a specific license, please refer to the appropriate ChangeAuditor User Guide:
• Object Class - ChangeAuditor for Active Directory User Guide
• Subsystem | Active Directory - ChangeAuditor for Active Directory User Guide
• Subsystem | ADAM (AD LDS) - ChangeAuditor for Active Directory User Guide
• Subsystem | Exchange - ChangeAuditor for Exchange User Guide
• Subsystem | File System - ChangeAuditor for Windows File Server User Guide
• Subsystem | Group Policy - ChangeAuditor for Active Directory User Guide
• Subsystem | LDAP Query - ChangeAuditor for LDAP User Guide
• Subsystem | SQL - ChangeAuditor for SQL Server User Guide
You can use the Add with Events | Event Class command (instead of Add | Event Class) to search for an entity that already has an audited event in the database.
85

Quest ChangeAuditor
For other event classes (e.g., DNS Zone, Distribution and Security groups), use the restriction pane to apply filter options for filtering by individual parameter values (e.g., auditing of static DNS entries).
To do this, select the Filter by parameter checkbox and then select from the available parameter values that are activated (e.g., for the DNS Entry Type parameter, you can select Static and/or Automatically expiring).
4. Once you have defined the restrictions, use either the Add or Modify Restriction buttons as described below:
• if the event has not been added to the Selections list box, select the Add button to add the event to the selection list.
• if the event was previously added to the Selections list box, select the Modify Restriction button to update the restrictions for the event.
You can also use the Shift and Ctrl keys to add multiple event classes to the selection list. However, the restrictions pane and the Add | Add All Events in Facility command will not be available when multiple event classes are selected.
86

Custom Searches and Search Properties
5. Once you have made your selection(s), use the OK button to save your selection and close the dialog.
6. The search criteria listed back on the What tab now defines what will be searched for when this search is run.
To search for internal ChangeAuditor auditing events:
1. On the What tab, expand the Add tool bar button and select Subsystem | ChangeAuditor Event.
2. On the Add ChangeAuditor Events dialog, select an event from the list and use the Add button to add it to the selection list at the bottom of the screen.
You can also use the Shift and Ctrl keys to add multiple events to the selection list.
3. Once you have selected the ChangeAuditor events to be included in the search, use the OK button to save your selection and close the dialog.
4. The search criteria listed back on the What tab now defines what will be searched for when this search is run.
Select the Exclude the Above Selection(s) check box if you want to search for all event classes/facilities EXCEPT those listed in the ’what’ list.
Select the Runtime Prompt check box on this dialog, to prompt for the facility or event class criteria every time the search is run. When this check box is checked, the data grid and buttons on this dialog will be disabled.
Please note that you can NOT enable alerting for search definitions that use the Runtime Prompt option.
You can use the Add with Events | Subsystem | ChangeAuditor Event command (instead of Add | Subsystem | ChangeAuditor Event) to search for an entity that already has an audited event in the database.
Select the Exclude the Above Selection(s) check box if you want to search for all ChangeAuditor events EXCEPT those listed in the ’what’ list.
Select the Runtime Prompt check box on this dialog, to prompt for the ChangeAuditor event every time the search is run. When this check box is checked, the data grid and buttons on this dialog will be disabled.
Please note that you can NOT enable alerting for search definitions that use the Runtime Prompt option.
87

Quest ChangeAuditor
To search for computer events:
1. On the What tab, expand the Add tool bar button and select Subsystem | Computer Event.
2. On the Add Computer Events dialog, select an event from the list and use the Add button to add it to the selection list box at the bottom of the screen.
You can also use the Shift and Ctrl keys to add multiple events to the selection list.
3. Once you have selected the computer events to be included in the search, use the OK button to save your selection and close the dialog.
4. The search criteria listed back on the What tab now defines what will be searched for when this search is run.
To search for changes to local users or groups:
1. On the What tab, expand the Add tool bar button and select Subsystem | Local Account.
2. On the Add Local Account dialog, select one of the following options to define the scope of coverage:
• All Objects - select this option to include all objects• This Object - select this option to include individual object(s)
You can use the Add with Events | Subsystem | Computer Event command (instead of Add | Subsystem | Computer Event) to search for an entity that already has an audited event in the database.
Select the Exclude the Above Selection(s) check box if you want to search for all computer events EXCEPT those listed in the ’what’ list.
Select the Runtime Prompt check box on this dialog, to prompt for the computer event every time the search is run. When this check box is checked, the data grid and buttons on this dialog will be disabled.
Please note that you can NOT enable alerting for search definitions that use the Runtime Prompt option.
You can use the Add with Events | Subsystem | Local Account command (instead of Add | Subsystem | Local Account) to search for an entity that already has an audited event in the database.
88

Custom Searches and Search Properties
3. If you selected This Object, the data grid, which displays a list of all the users and groups in the local SAM databases on the selected Member Server, and associated buttons will be enabled.
4. To add an account, select the account in the data grid and use the Add button to add it to be selection list at the bottom of the dialog. Repeat to add additional accounts.
5. To replace an account in the selection list, select the ’new’ account in the data grid, select the ’old’ account in the selection list and use the Modify button. The entry in the selection list will be replaced with the ’new’ account.
6. To select a local account on a different computer, use the Browse button to the right of the Path field. On the Select a Directory Object dialog, use the Browse or Search pages to locate and select another computer. Use the Select button to save your selection and close the dialog.
Back on Add Local Account dialog, the local user and group accounts available on the specified computer will then be displayed in the data grid.
7. Once you have selected the local accounts to be included in the search, use the OK button to save your selection and close the dialog.
8. When this search is run, ChangeAuditor will search for events generated by the local account(s) listed on the What tab.
Select the Exclude the Above Selection(s) check box if you want to search for events generated by all local accounts EXCEPT those listed in the ’what’ list.
Select the Runtime Prompt check box on this dialog to prompt for a local account every time the search is run. When this check box is checked, the data grid and buttons on this dialog will be disabled.
Please note that you can NOT enable alerting for search definitions that use the Runtime Prompt option.
89

Quest ChangeAuditor
To search for changes to registry keys:
1. On the What tab, expand the Add tool bar button and select Subsystem | Registry.
2. On the Add Registry Key dialog, select one of the following options to define which system registry keys are to be included in your search definition:
• All Registry Keys - select this option to include all registry keys • This Object - select this option to include only the selected
object(s)• This Object and Child Objects Only - select this option to
include the selected object(s) and its direct child objects• This Object and All Child Objects - select this option to
include the selected object(s) and all subordinate objects (in all levels)
3. By default, All Actions is selected meaning that all of the registry actions listed will be included in the search definition. However, you can clear the All Actions option and select individual actions for auditing.
Select one or more of the following options:
• All Actions - select this option to include all of the actions. When this option is selected, all of the other options are disabled. (Default)
• Add Value - select this option to include when a new value is added to the selected registry key.
• Delete Value - select this option to include when a registry key value is removed.
• Modify Value - select this option to include when a registry key value is modified.
• Add Key - select this option to include when a new registry key is added.
• Delete Key - select this option to include when a registry key is removed.
Registry auditing is only available when you have applied custom Registry Auditing templates that define the registry changes to be audited
You can use the Add with Events | Subsystem | Registry command (instead of Add | Subsystem | Registry) to search for an entity that already has an audited event in the database.
90

Custom Searches and Search Properties
4. When a scope option other than the All Registry Keys option is selected, the registry key hierarchy will be enabled allowing you to locate and select an individual registry key.
Expand the hierarchy to locate and select a registry key. Then use the Add button to add it to the selection list box at the bottom of the dialog. Repeat to add additional registry keys.
5. To replace a registry key in the selection list, select the ’new’ registry key in the hierarchy, select the ’old’ key in the selection list and use the Modify button. The entry in the selection list will be replaced with the ’new’ registry key.
6. To select a registry key on a different computer, use the Browse button to the right of the Path field. On the Select a Directory Object dialog, use the Browse or Search pages to locate and select another computer. Use the Select button to save your selection and close the dialog.
Back on Add Registry Key dialog, the system registry keys associated with the specified computer will then be displayed in the hierarchy view.
7. Once you have selected the registry keys to be included in the search, use the OK button to save your selection and close the dialog.
8. When this search is run, ChangeAuditor will search for the selected events (actions) in the registry key(s) listed on the What tab.
If you selected the Add With Events command, the registry key hierarchy pane will be replaced with a data grid listing the registry keys that have an audited event associated with it in the database.
Select the Exclude the Above Selection(s) check box if you want to search for events in all registry keys EXCEPT those listed in the ’what’ list.
Select the Runtime Prompt check box on this dialog to prompt for a registry key every time the search is run. When this check box is checked, the hierarchy pane/data grid and buttons on this dialog will be disabled.
Please note that you can NOT enable alerting for search definitions that use the Runtime Prompt option.
91
Quest ChangeAuditor
To search for changes to services:
1. On the What tab, expand the Add button and select Subsystem | Service.
2. On the Add Service dialog, select one or more services from the list at the top of the dialog and use the Add button to move them to the selection list box at the bottom of the page.
You can also use the Add All button to include all the listed services in the search definition.
3. To select services on a different computer, use the Browse button to the right of the You are viewing services on field. On the Select a Directory Object dialog, use the Browse or Search pages to locate and select another computer. Use the Select button to save your selection and close the dialog.
Back on the Add Services dialog, the services found on the specified computer will then be displayed.
4. Once you have selected the services to be included in the search, use the OK button to save your selection and close the dialog.
5. When this search is run, ChangeAuditor will search for change events to the service(s) listed on the What tab.
Service auditing is only available when you have applied custom Service Auditing templates that define the services to be audited.
You can use the Add with Events | Subsystem | Service command (instead of Add | Subsystem | Service) to search for an entity that already has an audited event in the database.
Select the Exclude the Above Selection(s) check box if you want to search for events to all services EXCEPT those listed in the ’what’ list.
Select the Runtime Prompt check box on this dialog to prompt for a service every time the search is run. When this check box is checked, the data grid and buttons on this dialog will be disabled.
Please note that you can NOT enable alerting for search definitions that use the Runtime Prompt option.
92

Custom Searches and Search Properties
To search for events based on severity:
1. On the What tab, expand the Add button and select Severity.
2. On the Add Severity dialog, select one or more severity levels and use the Add button to add them to the selection list box at the bottom of the dialog.
3. Once you have defined the severity level(s) to be included in the search, use the OK button to save your selection and close the dialog.
4. When this search is run, ChangeAuditor will search for events with the severity level(s) that are included on the What tab.
To search for events based on results:
1. On the What tab, expand the Add button and select Results.
2. On the Add Results dialog, select one or more results (none, success, protected or failed) and use the Add button to add them to the selected list box at the bottom of the dialog.
You can use the Add with Events | Severity command (instead of Add | Severity) to search for an entity that already has an audited event in the database.
Select the Exclude the Above Selection(s) check box if you want to search for all events EXCEPT those assigned a severity level that is listed in the ’what’ list.
Select the Runtime Prompt check box on this dialog to prompt for a severity every time the search is run. When this check box is checked, the data grid and buttons on this dialog will be disabled.
Please note that you can NOT enable alerting for search definitions that use the Runtime Prompt option.
You can use the Add with Events | Results command (instead of Add | Results) to search for an entity that already has an audited event in the database.
Select the Exclude The Above Selection(s) check box if you want to search for all events EXCEPT those with the selected results.
93

Quest ChangeAuditor
3. Once you have defined the result(s) to be included in the search, use the OK button to save your selection and close the dialog.
4. When this search is run, ChangeAuditor will search for events with the result(s) that are included on the What tab.
Where Tab
The Where tab allows you to specify which ChangeAuditor agents are to be included (or excluded) in the search definition. You can select individual ChangeAuditor agents, all agents in a specific domain or in a given site.
To search for events captured by a specific agent, domain or site:
1. Open the Where tab and select the Add tool bar button.
2. On the Chose the Agents, Domains or Sites to Include dialog, use the Browse or Search pages to locate and select an individual agent, a domain or a site.
3. Use the Add button to add your selection to the selection list box at the bottom of the page.
Select the Runtime Prompt check box on this dialog to prompt for a result every time the search is run. When this check box is checked, the data grid and buttons on this dialog will be disabled.
Please note that you can NOT enable alerting for search definitions that use the Runtime Prompt option.
By default, all agents will be included in a new search, therefore the list box on the Where tab will be empty.
You can also select the Grid View option to select an agent from a list rather than using the Explorer View to locate it within your environment.
94
Custom Searches and Search Properties
4. Once you have selected the agent(s), domain(s) and site(s) to be included in the search, select the OK button to save your selection and close the dialog.
5. The agents, domains and/or sites listed back on the Where tab now define where the search will be conducted when this search is run.
To use a wildcard expression to specify a domain, site or agent:
1. On the Where tab, expand the Add tool bar button and select the Add Wildcard Expression option.
2. On the Add Where dialog, enter the wildcard expression to be used to search for an agent (NetBIOS name), domain or site:
• Select the comparison operator to be used: Like or Not Like.• In the field to the right, enter the pattern (character string and
* wildcard character) to be used to search for a match.Use the * wildcard character to match any string of zero or more characters. For example, LIKE *local will find all agents who’s NetBIOS name ends in ’local’.
• By default, the wildcard expression will be used to search for an agent. To search for a domain or site, select the Domain or Site option.
3. After entering the wildcard expression to be used, select the OK button to close the dialog and add the wildcard expression to the ’Where’ list.
4. When this search is run, ChangeAuditor will now search for change events generated on the domains, sites or agents whose name matches the specified wildcard expression.
You can use the Add With Events button (instead of Add) to select an agent, domain or site which already has an audited event in the database.
Check the Exclude The Following Selection(s) check box, if you want to search for change events generated by all ChangeAuditor agents EXCEPT those listed in the ’where’ list.
95

Quest ChangeAuditor
When Tab
The When tab allows you to define a date and/or time range to limit your search to include only those events that occur during the selected range(s).
To search for events generated during a specific date/time range:
1. Open the When tab.
2. In the Date Interval pane, check one of the following options to specify a date range to limit your search:
• From - select/enter the starting date for your date range. That is, only events that occurred on or after this date will be included in the search.
• To - select/enter the ending date for your date range. That is, only events that occurred before or on this date will be included in the search.
• Last - select the appropriate relative date and value (i.e., number of minutes, hours, days, weeks, months, quarters, or years). (Last 7 days is selected by default for new searches.)
3. In the Time Interval pane, specify a time range to further limit your search:
• From - select/enter the starting time for your time range. That is, only events that occurred at or after this time will be included in the search.
• To - select/enter the ending time for your time range. That is, only events that occurred before or at this time will be included in the search.
By default, new searches will include the events captured in the last seven days.
Relative dates are calculated based on the actual date and time when the search is started.
96

Custom Searches and Search Properties
Origin Tab
The Origin tab allows you to search for events based on the workstation or server from which the event originated.
To search for events base on where it originated:
1. Open the Origin tab.
2. Click the Add tool bar button.
3. On the Add Origin dialog, enter the wildcard expression to be used to search for a workstation or server, based on its NetBIOS name or IP address:
• Select the comparison operator to be used: Like or Not Like.• In the field to the right, enter the pattern (character string and
* wildcard character) to be used to search for a match.Use the * wildcard character to match any string of zero or more characters.
4. After entering the wildcard expression to be used, select the OK button to close the dialog and add the wildcard expression to the ’Origin’ list.
5. When this search is run, ChangeAuditor will now search for change events originating on workstations/servers whose name or IP address matches the specified wildcard expression.
Select the Runtime Prompt checkbox on the When tab, if you want to prompt for the date and/or time interval every time the search is run. When this check box is checked, the Date/Time Interval settings will be disabled.
Please note that you can NOT enable alerting for search definitions that use the Runtime Prompt option.
By default, all events regardless of the workstation or server from which it originated will be included in the search.
97

Quest ChangeAuditor
Comments Tab
The Comments tab allows you to search for a specific word or string of characters in the comments that you have previously added to existing audited events.
To search for events that contain specific comments:
1. In the Search for comments field, enter the comments (word or string of characters) that are to be included in the search.
2. To search for comments that do NOT include the contents of the Search for comments field, select the Exclude check box.
3. To search for events that do not contain any comments, select the Blanks check box.
Alert Tab
The Alert tab allows you to enable alerting and define how and where to dispatch alerts. Please refer to Alert Tab (Search Properties) for a detailed description of the contents of this tab.
SQL Tab
The SQL tab displays the SQL query built to run the selected search. This information is only available once a search has been created.
Select the Runtime Prompt check box on the Comment tab, if you want to prompt for the 'comment' criteria whenever the search is run. When this check box is checked, the Search for comments field will be disabled.
Please note that you can NOT enable alerting for search definitions that use the Runtime Prompt option.
The SQL tab is hidden by default. To display the SQL tab, use the Action | Show SQL Tab menu command.
98

Custom Searches and Search Properties
XML Tab
The XML tab displays the XML representation of the search criteria. This same information can be exported by right-clicking a search in the Searches list on the Searches page and selecting the Export command.
Advanced Tab
Using the Advanced tab, you can define the data (columns) to be retrieved from the database and displayed in the client for the selected search. From this tab you can also define the column order, sort criteria and order, groupings and the format to be used for displaying the retrieved data.
To customize what’s displayed for the selected search:
1. Open the Advanced tab. (If it is not displayed, use the Action | Show Advanced Tab menu command.)
2. Review the columns listed in the Selected Columns table (second table from the left) to determine if it contains the information you want to display for the selected search.
3. To add a column, select the column from the Unselected Columns table and use the right arrow button (located between the first two tables) to move it to the Selected Columns table.
You can also ’drag and drop’ a column to the Selected Columns table.
The XML tab is hidden by default. To display the XML tab, use the Action | Show XML Tab menu command.
The settings on this tab are also used when publishing reports through SQL Server Reporting Services (SRS), using the dynamically generated report template (default) option.
99
4. To remove a column from display, select the column from the Selected Columns table and use the left arrow button (located between the first two tables) to move it back to the Unselected Columns table.
You can also ’drag and drop’ a column back to the Unselected Columns table.
5. The Selected Columns table also displays the order the columns will be presented. To rearrange the order of the columns, in the Selected Columns table select the column to be moved and use the up or down arrow button (located to the right of the Selected Columns table) to move the selected column to the desired location.
You can also ’drag and drop’ columns in this table to define the order.
6. The Sort Criteria table (third table) defines the sort criteria, including ascending or descending direction, to be used to sort the search results. To define the sort criteria for your search results, select a column in the Selected Columns table and use the right arrow button (located to the right of the Selected Columns table) to move it to the Sort Criteria table.
To specify secondary sort criteria, add the additional column to the Sort Criteria table. Use the arrow controls to the right of this table to define the primary (first column in list) and subsequent sort criteria.
You can also ’drag and drop’ columns between the Selected Columns and Sort Criteria tables and within the Sort Criteria table to define the sort criteria.
7. To change the direction, ascending or descending, select a column in the Sort Criteria table, click in the Direction cell and select either ascending (ASC) or descending (DESC) from the drop-down menu.
8. In addition, you can use the Group By column to define groupings. To group the selected search’s results, in the Sort Criteria table select the column to be used for the grouping, click in the Group By cell and select Yes from the drop-down menu.
You cannot remove the Results column from the search results grid. Even though you can select and move the Results column to the Unselected Columns table on the Advanced tab, the Results column will always be displayed in the search results grid.
To reset the column selection and arrangements in the Selected Columns
table back to the factory defaults, use the button located next to the
lower right-hand corner of this table.

Custom Searches and Search Properties
9. When a grouping is defined, you can select one of the following options in the Display Results table to define the display format to be used for the selected search:
• In a Grid (default)• As a Pie Chart• As a Bar Graph
10. Use one of the following tool bar commands to save your selections:
• Save• Save As | Save As• Save As | Save As Default• Run
To reset the settings in the Sort Criteria table and Display Results table back
to the default settings, use the button located next to the lower
right-hand corner of the Sort Criteria table.
101


7
Enable Alert Notifications
• Introduction
• Alert Tab (Search Properties)
• Enable Alerts
• Disable Alerts
• Alert History Page
• View Alert History
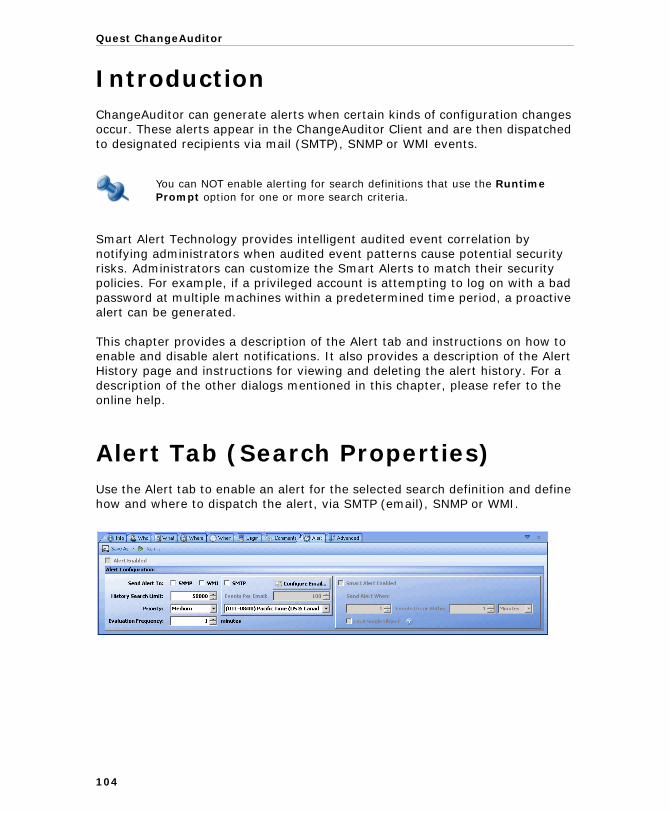
Quest ChangeAuditor
IntroductionChangeAuditor can generate alerts when certain kinds of configuration changes occur. These alerts appear in the ChangeAuditor Client and are then dispatched to designated recipients via mail (SMTP), SNMP or WMI events.
Smart Alert Technology provides intelligent audited event correlation by notifying administrators when audited event patterns cause potential security risks. Administrators can customize the Smart Alerts to match their security policies. For example, if a privileged account is attempting to log on with a bad password at multiple machines within a predetermined time period, a proactive alert can be generated.
This chapter provides a description of the Alert tab and instructions on how to enable and disable alert notifications. It also provides a description of the Alert History page and instructions for viewing and deleting the alert history. For a description of the other dialogs mentioned in this chapter, please refer to the online help.
Alert Tab (Search Properties)Use the Alert tab to enable an alert for the selected search definition and define how and where to dispatch the alert, via SMTP (email), SNMP or WMI.
You can NOT enable alerting for search definitions that use the Runtime Prompt option for one or more search criteria.
104

Enable Alert Notifications
Use the controls on the Alert tab as described below.
FIELD/CONTROL DESCRIPTION
Alert Enabled Select the Alert Enabled check box to enable an alert for the current search definition.
This option will became available only after one of the transport methods are selected in the Send Alert To section of this tab.
ALERT CONFIGURATION PANE
Send Alert To: Select all of the transport options that are to be applied to this search definition:
• SNMP - Select this option to dispatch ChangeAuditor alerts for this search definition via SNMP traps.
• WMI - Select this option to dispatch ChangeAuditor alerts for this search definition via WMI (Windows Management Instrumentation) events.
• SMTP - Select this option to dispatch alerts for this search definition via email. Selecting this option will display the Alert Custom Email dialog allowing you to specify the email address of the person(s) who are to receive the email notification.
History Search Limit By default, up to 50,000 events can be included in the alert history. Use the arrow controls to increase or decrease this value to define the maximum number of events to be included in the alert history.
Note: The History Search Limit setting is a global setting and changes made to this setting will be applied to ALL alerts.
Priority Select the priority to be assigned to alert processing. Use the drop-down menu to select one of the following priorities:
• High
• Medium (default)
• Low
Note: High priority alerts get delivered first, followed by medium priority alerts and then low priority alerts.
105

Quest ChangeAuditor
Evaluation Frequency By default this alert will be evaluated to see if it meets the specified criteria every minute. Use the arrow controls to modify this setting if you want to delay the evaluation of alerts.
Note: The minimum value is one minute.
Configure Email For SMTP alerts, select this button to display the Alert Custom Email dialog to change the details about the alert email to be sent, including the To address, the Reply To address, and the Subject Line. In addition, from the Alert Custom Email dialog you can access the Alert Body Configuration dialog to configure the body of the email alert.
Note: If SMTP is not configured, a message box will display stating that the Coordinator email configuration has not been configured. Open the Administration Tasks tab and use the Coordinator Configuration page to configure SMTP
Events Per Email For SMTP alerts, a maximum of 100 events will be included in a single alert email by default. Use the arrow controls to increase or decrease this value to define the maximum number of events to be included in an email.
Time Zone For SMTP alerts, use this field to specify the time zone to be used for the alert’s date/time stamp in the notification emails. By default, the time zone of the machine where the ChangeAuditor Client resides will be used.
SMART ALERT PANE
Smart Alert Enabled Select this check box to specify under what conditions an alert is to be sent. This feature is only available for SMTP and SNMP notifications.
Send Alert When <nn> Events Occur Within <nn> <interval>
Select this option to specify the number of events that must occur within a specified time interval before generating/dispatching the alert.
Where: <interval> is one of the following: minutes, hours or days
FIELD/CONTROL DESCRIPTION
106

Enable Alert Notifications
Enable AlertsUsing the Searches page, you can enable (disable) alerting for individual search definitions and dispatch them via SMTP (email), SNMP or WMI.
To enable SMTP (email) alerts for individual search definitions:
1. Open the Searches page.
2. Expand the Private or Shared folders in the explorer view to locate the search to which an alert is to be associated. Select the search from the Search list in the right-hand pane.
3. Use one of the following methods to enable an alert:
• Right-click the search and select the Alert | Enable Transport | SMTP command.
• Open the Alert tab and select the SMTP check box and then the Alert Enabled check box. (If the Search Properties tabs are not being displayed, right-click the search definition and select the Show Properties menu command).
4. Using either of these methods will display the Alert Custom Email dialog allowing you to enter the email address of the person(s) who are to receive the alert.
On A Single Object Select this check box to specify that the event must occur for the same object the specified number of times before the alert will be triggered. When this check box is cleared (default), the event can occur on any object the specified number of times to trigger the alert.
Regardless of the alert state (enabled or disabled) the alert history for an alert-enabled search is always available until it is removed using the Alert | Delete History right-click menu command.
In order to dispatch configuration change alerts through email (SMTP) you must first enable email notification on the Coordinator Configuration page. See Configure Email Notifications.
If SMTP is not configured, a message box will display stating that the Coordinator email configuration has not been configured. Open the Administration Tasks tab and use the Coordinator Configuration page to configure SMTP.
FIELD/CONTROL DESCRIPTION
107

Quest ChangeAuditor
• To send an alert to the user who initiated the change that triggered the alert, select the Add Who check box.
• To send an alert to the Exchange Mailbox owner whose mailbox was accessed by another user and their action triggered an alert, select the Add Owner(s) of Non-Owner Events check box. (This feature only applies to Exchange Mailbox Monitoring, which is available in ChangeAuditor for Exchange.)
If you do not want to use the default settings (from Coordinator Configuration page) for this alert, use the Alert Custom Email dialog to specify the details including the Reply To address, and the Subject Line.
In addition, from the Alert Custom Email dialog you can access the Alert Body Configuration dialog to configure the body of the email alert.
5. In addition, you can use the Alert tab (Search Properties tabs) to specify the following:
• By default, up to 50,000 events will be included in the alert history. Use the History Search Limit setting to change this value.
• By default, the alert processing will be assigned a medium priority. Use the Priority setting to change this setting if you need the alert to be processed at a higher or lower priority.
• By default, the alert will be evaluated every minute to determine if the criteria has been met and an alert is to be triggered. Use the Evaluation Frequency setting to change how often the alert criteria is to be checked.
• By default, a maximum of 100 events will be included in a single alert email. Use the Events Per Email setting to change this number.
• By default the time zone of the machine where the ChangeAuditor Client resides will be used for an alert’s date/time stamps in the email. To change the time zone to be used for these date/time stamps, select the time zone from the drop-down list.
• If you want to specify under what conditions an alert is to be sent, select the Smart Alert Enabled check box and specify the number of events that must occur within a specified time interval before generating/dispatching the alert.
• By default, a smart alert is generated when the event occurs on any object the specified number of times. You can however, select the On a Single Object option to have the smart alert triggered when the event occurs on the same object the specified number of times.
108

Enable Alert Notifications
6. When an alert is enabled, the icon for the search will change to an alarm clock, the label will change from ‘search’ to ‘alert’ and a green ‘Enabled’ entry will be added to the Enabled column next to the alert on the Searches page.
To enable SNMP alerts for individual search definitions:
1. Open the Searches page.
2. Expand the Private and Shared folders in the explorer view to locate the search to which an alert is to be associated. Select the search from the Search list in the right-hand pane.
3. Use one of the following methods to enable an alert:
• Right-click the search and select the Alert | Enable Transport | SNMP command.
• Open the Alert tab at the bottom of the page, select the SNMP check box, then the Alert Enabled check box. (If the Search Properties tabs are not being displayed, right-click the alert definition and select the Show Properties menu command).
4. In addition, you can use the Alert tab (Search Properties tabs) to specify the following:
• By default, up to 50,000 events will be included in the alert history. Use the History Search Limit setting to change this value.
• By default, the alert processing will be assigned a medium priority. Use the Priority setting to change this setting if you need the alert to be processed at a higher or lower priority.
• By default, the alert will be evaluated every minute to determine if the criteria has been met and an alert is to be triggered. Use the Evaluation Frequency setting to change how often the alert criteria is to be checked.
• If you want to specify under what conditions an alert is to be sent, select the Smart Alert Enabled check box and specify the number of events that must occur within a specified time interval before generating/dispatching the alert.
If using the Alert tab, be sure to select the Save button to save the alert definition.
In order to generate SNMP alerts, SNMP must be installed and the trap receiver must be started.
109
Quest ChangeAuditor
110
• By default, a smart alert is generated when the event occurs on any object the specified number of times. You can however, select the On a Single Object option to have the smart alert triggered when the event occurs on the same object the specified number of times.
5. When an alert is enabled, the icon for the search will change to an alarm clock, the label will change from ‘search’ to ‘alert’ and a green ‘Enabled’ entry will be added to the Enabled column next to the alert on the Searches page.
To enable WMI alerts for individual search definitions:
1. Open the Searches page.
2. Expand the Private and Shared folders in the explorer view to locate the search to which an alert is to be associated. Select the search from the Search list in the right-hand pane.
3. Use one of the following methods to enable an alert:
• Right-click the search and select the Alert | Enable Transport | WMI command.
• On the Alert tab, select the WMI check box and then the Alert Enabled check box. (If the Search Properties tabs are not being displayed, right-click the alert definition and select the Show Properties menu command).
4. In addition, you can use the Alert tab (Search Properties tabs) to specify the following:
• By default, up to 50,000 events will be included in the alert history. Use the History Search Limit setting to change this value.
• By default, the alert processing will be assigned a medium priority. Use the Priority setting to change this setting if you need the alert to be processed at a higher or lower priority.
• By default, the alert will be evaluated every minute to determine if the criteria has been met and an alert is to be triggered. Use the Evaluation Frequency setting to change how often the alert criteria is to be checked.
If using the Alert tab, be sure to select the Save button to save the alert definition.
In order to generate WMI alerts, WMI must be installed and started. A WMI event consumer must also be running on the Coordinator server.
Enable Alert Notifications
5. When an alert is enabled, the icon for the search will change to an alarm clock, the label will change from ‘search’ to ‘alert’ and a green ‘Enabled’ entry will be added to the Enabled column next to the alert on the Searches page.
Disable AlertsTo disable alerts:
1. Open the Searches page.
2. Expand the Private and Shared folders in the explorer view to locate the alert-enabled search to be disabled. Select the alert from the Search list box in the right-hand pane.
3. Use one of the following methods to disable an alert:
• Right-click the alert and select the Alert | Disable Alert command. A message box will be displayed asking you to confirm that you want to disable the alert. Select Yes.
• Open the Alert tab, clear the Alert Enabled check box. (If the Search Properties tabs are not being displayed, right-click the alert definition and select the Show Properties menu command.)
4. When the alert is disabled, the green 'Enabled' entry in the Enabled column will change to a red 'Disabled' entry.
In addition to disabling an alert, you can also disable the alerting transports for an alert-enabled search.
If using the Alert tab, select the Save button to save the alert definition
If using the Alert tab, select the Save button to apply the change.
111

Quest ChangeAuditor
To disable SMTP alerts for individual search definition:
1. Open the Searches page.
2. Expand the Private and Shared folders in the explorer view to locate the alert-enabled search to be disabled. Select the alert from the Search list in the right-hand pane.
3. Use one of the following methods to disable an alert:
• Right-click the alert and select Alert | Disable Transport |SMTP. A message box will be displayed asking you to confirm that you want to disable the alert. Select Yes.
• Open the Alert tab, clear the SMTP check box and the Alert Enabled check box. (If the Search Properties tabs are not being displayed, right-click the alert definition and select the Show Properties menu command.)
4. When the alert is disabled, the green 'Enabled' entry in the Enabled column will change to a red 'Disabled' entry.
To disable SNMP alerts for individual search definition:
1. Open the Searches page.
2. Expand the Private and Shared folders in the explorer view to locate the alert-enabled search to be disabled. Select the alert from the Search list in the right-hand pane.
3. Use one of the following methods to disable an alert:
• Right-click the alert and select Alert | Disable Transport |SNMP. A message box will be displayed asking you to confirm that you want to disable the alert. Select Yes.
• Open the Alert tab, clear the SNMP check box and the Alert Enabled check box. (If the Search Properties tabs are not being displayed, right-click the alert definition and select the Show Properties menu command.)
4. When the alert is disabled, the green 'Enabled' entry in the Enabled column will change to a red 'Disabled' entry.
If using the Alert tab, select the Save button to apply the change.
If using the Alert tab, select the Save button to apply the change.
112

Enable Alert Notifications
To disable WMI alerts for individual search definition:
1. Open the Searches page.
2. Expand the Private and Shared folders in the explorer view to locate the alert-enabled search to be disabled. Select the alert from the Search list in the right-hand pane.
3. Use one of the following methods to disable an alert:
• Right-click the alert and select Alert | Disable Transport |WMI. A message box will be displayed asking you to confirm that you want to disable the alert. Select Yes.
• Open the Alert tab, clear the WMI check box and the Alert Enabled check box. (If the Search Properties tabs are not being displayed, right-click the alert definition and select the Show Properties menu command.)
4. When the alert is disabled, the green 'Enabled' entry in the Enabled column will change to a red 'Disabled' entry.
Alert History PageThe Alert History page can be accessed using the Alert | History right-click menu command when an alert is selected on the Searches page. This page displays details regarding the events that triggered the selected alert, including the time the alert was triggered, the type of alert generated (e.g., WMI, SNMP, or SMTP), if the alert was successfully sent, a description of the event that triggered the alert, and if applicable, an error message stating the alert was not sent.
If using the Alert tab, select the Save button to apply the change.
113

Quest ChangeAuditor
The data grid on this page contains the following information for each event that triggered an alert:
COLUMN DESCRIPTION
Time Alerted Displays the time the alert occurred.
Alert Type Displays the type of alert that was generated:
• WMI
• SNMP
• SMTP
Sent Indicates whether the alert was successfully sent: Yes or No.
Description Displays a description of the events that caused this alert to be triggered.
Error Message Displays an error message if the alert was not successfully sent.
114

Enable Alert Notifications
View Alert HistoryFor each enabled alert, two additional context menu commands become available whenever you right-click an alert-enabled search definition on the Searches page: Alert | History and Alert | Delete History.
To view the alerts triggered for a search:
1. On the Searches page, select an alert-enabled search definition, right-click, expand the Alert command and select the History option.
2. This will open a new Alert History page, which displays details regarding the alerts triggered for the selected search.
To delete alert history:
1. On the Searches page, select an alert-enabled search, right-click, expand the Alert command and select the Delete History option.
2. Selecting this command will clear the alert history for the selected alert.
The Alert | History and Alert | Delete History right-click commands are available for any search that has ever had an alert enabled in the current product version, regardless of its current state. These commands are not available for disabled alerts, only after the alert history has been deleted using the Alert | Delete History command.
You can also define a purge job to delete alert history that is older than the specified time interval. To set up an alert history purge job, use the Alert History tool bar button on the Database Maintenance page on the Administration Tasks tab.
115


8
Generate and Publish Reports
• Introduction
• Generate/View Reports through the ChangeAuditor Client
• Publish Reports to SRS
• Publish Reports to Quest Knowledge Portal
• Print or Save a Page’s Contents

Quest ChangeAuditor
IntroductionPresenting audited information in a professional, concise and effective way is clearly as critical as gathering it in the first place. Thus, ChangeAuditor leverages Microsoft SQL Server Reporting Services (SRS) to provide reports that can be viewed from the ChangeAuditor client or published to SRS. In addition, you can publish ChangeAuditor reports to Quest Knowledge Portal which extends SRS to provide easy report management and delivery.
This reporting flexibility allows organizations to granularly discern which business units see which types of data and also to set custom criteria for the types of information shared in the report. For example, Administrators could pull reports highlighting how many times a particular event or category of events occurred in the last 30 days or provide a more detailed accounting to articulate who made the changes, how many times, and the before and after values associated with those changes. Whether for operations insight or security reporting for management, ChangeAuditor provides reports that streamline reporting to meet any requirement.
This chapter provides a description of the Reporting page and instructions on how to generate reports through the ChangeAuditor Client, publish reports to SRS, and print or save the contents of the active page. For a description of the other dialogs mentioned in this chapter, please refer to the online help.
118

Generate and Publish Reports
Report PageA new Report page is created whenever a local report is generated for a search or built-in report (Run Local Report right-click command). This page displays the audited events found as a result of running the selected search/report. If a built-in SRS report is generated, this page displays the results based on the options selected on the Report Options dialog.
Use the tool bar buttons at the top of the report as described below:
Use to hide (or display) the report navigation pane to the left of the report. N/A for ChangeAuditor reports.
Use to display the first page of the report.
Use to display the previous page in the report.
This control displays the page currently being displayed and the total number of pages in the report. You can use this control to display a specific page by entering a page number and pressing Enter.
Use to display the next page in the report.
Use to display the last page of the report.
119

Quest ChangeAuditor
Use to redisplay the latest available data in the report.
Use to send the report to the designated printer.
Use to return to the parent report if you have drilled down into a more detailed report.
Use to stop rendering the report.
Use to preview the print layout of the report.
Use to display the page setup and print options for the report.
Use to export a report to a file. Use the drop-down arrow to specify the file format and destination. Excel and Acrobat PDF files are supported.
Use to specify the magnification of the report.
Enter a specific string of characters or word to be located in the report and use the Find button to locate the text. Use the Next button to find the next occurrence of the word or string of characters specified.
120

Generate and Publish Reports
Generate/View Reports through the ChangeAuditor ClientChangeAuditor allows you to generate and view an SRS rendering of the audited events returned for a selected search definition or built-in report, which includes all of the Security and Compliance reports provided with the product. In addition, ChangeAuditor provides the following built-in SRS reports that can also be viewed through the ChangeAuditor Client:
• Event Analysis - event analysis reports can be run to show the event activity of a server or a domain.
• Event Summary - event summary reports capture the event counts and can be grouped by event class, date and hour, or domain and server.
• File Monitoring - the file monitoring report captures information about custom file monitoring events.
Since all of these reports can be viewed directly from the ChangeAuditor Client, they do NOT require SRS. When you run one of these reports, the SQL rendering will be displayed in a new Report page, where you can then scroll through, print or export the report.
To generate/view an SRS rendering of a search or built-in report definition:
1. Open the Searches page.
2. Expand the Private and Shared folders in the explorer view to locate a search or built-in report. Select the search from the Search list in the right-hand pane, right-click and select Run Local Report.
3. A new Report page will be created displaying the SRS rendering of the audited events that met the selected search/report definition.
4. Use the tool bar buttons across the top of the report to scroll through the report, print the report, etc.
To generate a built-in SRS report:
1. Open the Searches page.
2. Expand the Built-in SRS Reports folder in the explorer view to locate a built-in SRS report. Select the report from the Search list in the right-hand pane, right-click and select Run Local Report (or double-click on the report).
3. On the Report Options dialog specify what information is to be included in the selected report. By default, all information for the last seven days will be included.
121

Quest ChangeAuditor
Depending on the report selected, different options will be displayed allowing you to customize your report to include specific data.
• For most of the options, use the browse button to display an additional dialog to select the specific data to be included in the report.
• To specify an organizational unit, place your cursor in the Org. Unit text field and enter an OU (e.g., Quest\Sales or Quest\S%).
• To specify a file name, place your cursor in the File Name text field and enter a file name (e.g., ChangeAuditor.txt or Change%). (Where % is a wildcard.)
The following table illustrates the report options that can be set for each of the different reports:
REPORT: REPORT OPTIONS:
Event Analysis Report By Domain Domain, Facility, Event Class, User
Event Analysis Report By OU Facility, Event Class, User, Org. Unit
Event Analysis Report By Server Server, Facility, Event Class, User
Event Summary Report Grouped By Date and Hour
Facility, Event Class
Event Summary Report Grouped By Domain and OU
Facility, Event Class
Event Summary Report Grouped By Domain and Server
Facility, Event Class
Event Summary Report Grouped By Event Class
Server, Domain, User
File Monitoring Report Server, User, File Name
122
Generate and Publish Reports
4. A new Report page will be created displaying the selected report.
5. Use the tool bar buttons across the top of the report to scroll through the report, print the report, etc.
Publish Reports to SRSChangeAuditor supports Microsoft's SQL Server 2005 and 2008 Reporting Services (SRS), providing a comprehensive, server-based solution that enables the creation, management and delivery of both traditional, paper and interactive web-based reports. In this implementation, administrators no longer need to traverse the various auditing solutions to create the desired reports. Instead they can interact with a web-based reporting portal and simply subscribe to the reports they want to see.
To publish a single report to a SRS server:
1. Open the Searches page.
2. Expand the Private and Shared folders and select a folder in the explorer view to display the list of search/report definitions stored in the selected folder.
3. From the right-hand pane, right-click a search/report definition and select Create Report(s) Using SQL Reporting Services.
4. This will display the Create Report dialog allowing you to configure the SQL Server Reporting services to be used and to specify the report details.
• If not already configured, select the Configure button to specify the reporting services and ChangeAuditor shared data source to be used.
• Enter the URL of the SRS server that is to host the ChangeAuditor reports For example: http://<SQL_Server>/<ReportServer>
where: <SQL_Server> is the name of the server hosting SRS and <ReportServer> is the name of the report server virtual directory. (In a default Reporting Services installation, the name of the virtual directory is reportserver.)
You can use the Import SRS Settings button on the Reporting Services Setup dialog to import a SQL Reporting Services template that was previously created to define the necessary SRS settings or enter the SRS settings as defined below. See the SQL Reporting Services Configuration chapter for more information on creating a SQL Reporting Services template.
123
Quest ChangeAuditor
• Enter the user account, credentials and domain for a Windows account that has permissions to copy files to SRS.
• Enter the user account and credentials to be used to access the ChangeAuditor database (data source).
• Use the Test button to verify the credentials entered above.• Back on the Create Report dialog, you can also define the name
of the report, the location where the selected report is to be published so it can be accessed through SRS and the report template (RDL file) to be used to render the report.
5. Once you have entered the requested information, ChangeAuditor will publish the report to the specified server, which will then be available through SQL Server Reporting Services.
To publish a series of reports (folder) to a SQL Reporting Services server:
1. Open the Searches page.
2. Select a folder in the explorer view to publish a report for each search/report included in the selected folder.
3. Right-click the folder and select Create Report(s) Using SQL Reporting Services.
4. This will display the Create Report dialog allowing you to configure the SQL Server Reporting services to be used and specify the report details.
• If not already configured, select the Configure button to specify the reporting services and ChangeAuditor shared data source to be used.
• Enter the URL of the SRS server that is to host the ChangeAuditor reports For example: http://<SQL_Server>/<ReportServer>
where: <SQL_Server> is the name of the server hosting SRS and <ReportServer> is the name of the report server virtual directory. (In a default Reporting Services installation, the name of the virtual directory is reportserver.)
This Windows account requires rights to create SRS reports and data sources on the server (a.k.a. Content Manager).
You can use the Import SRS Settings button on the Reporting Services Setup dialog to import a SQL Reporting Services template that was previously created to define the necessary SRS settings or enter the SRS settings as defined below. See the SQL Reporting Services Configuration Chapter for more information on creating a SQL Reporting Services template.
124

Generate and Publish Reports
• Enter the user account, credentials and domain for a Windows account that has permissions to copy files to SRS.
• Enter the user account and credentials to be used to access the ChangeAuditor database (data source).
• Use the Test button to verify the credentials entered above.• Back on the Create Report dialog, you can also define the name
of the report, the location where the selected report is to be published so it can be accessed through SRS and the report template (RDL file) to be used to render the report.
5. Once you have entered the requested information, ChangeAuditor will publish the reports to the specified server, which will then be available through SQL Reporting Services.
Publish Reports to Quest Knowledge PortalQuest Knowledge Portal is an extension for SQL Server Reporting Services that allows you to work with reports interactively.
To publish ChangeAuditor reports to Quest Knowledge Portal:
1. Open the Searches page.
2. Expand the Private and Shared folders and select a folder in the explorer view to display the list of search/report definitions stored in the selected folder.
3. From the right-hand pane, right-click a search/report definition and select Create Report(s) Using SQL Reporting Services.
This Windows account requires rights to create SRS reports and data sources on the server (a.k.a. Content Manager).
Quest Knowledge Portal analyzes and reports on data from the InTrust database; therefore, the following products/components much be installed prior to publishing ChangeAuditor reports to Quest Knowledge Portal: Quest Intrust and the ChangeAuditor Knowledge packs and Report pack. In addition, event logging must be enabled within the ChangeAuditor Client so the event logs can be collected using the Quest InTrust framework. For information on installing Quest InTrust and Quest Knowledge Portal, please refer to the respective product installation guides.
125

Quest ChangeAuditor
4. On the Create Report dialog, select the Configure button to specify the virtual directory for the Knowledge Portal web application.
For example: http://<SQL_Server>/<QKP_VirtualDirectory>
Enter the user account, credentials and domain for a Windows account that has permissions to copy files to SRS.
Enter the user account and credentials to be used to access the ChangeAuditor database (data source).
Use the Test button to verify the credentials entered above.
5. Back on the Create Report dialog, you can also define the name of the report, the location where the selected report is to be stored and the report template (RDL file) to be used to render the report.
6. Once you have entered the requested information, ChangeAuditor will publish the reports to the specified server, which will then be available through Quest Knowledge Portal.
Print or Save a Page’s ContentsFrom the ChangeAuditor Client you can print or save the contents of the currently displayed page using the File | Print menu commands or the Print tool bar options. For each ChangeAuditor page, the data grid as it is displayed on the page is printed, except for the following pages:
• Searches page - The search properties specified for the selected search is printed. You must select a search from the searches list in the right-hand page to enable the print options.
• Search Results page - The data grid, pie chart or bar graph as it is displayed on this page is printed.
• Coordinator Configuration page - The settings specified in the SMTP Configuration, Group Membership Expansion and Agent Heartbeat Check panes in printed.
To publish a series of reports (folder), select a folder in the explorer view, right-click and select Create Report(s) Using SQL Reporting Services.
This Windows account requires rights to create SRS reports and data sources on the server (a.k.a. Content Manager).
126

Generate and Publish Reports
• Database Maintenance page - The archive and/or purge options and schedule defined to maintain the ChangeAuditor database is printed.
• AD Attributes Auditing page - The attributes selected for auditing are printed.
• ADAM (AD LDS) Attributes Auditing page - The attributes selected for auditing are printed.
• Application User Interface page - Printing is not available for this page.
To print a page:
1. Open the page to be printed and select the Print command
2. On the native Print dialog, specify your print options and the printer to be used.
3. Select Print to close the dialog and send the displayed page to the designated printer.
To preview a report prior to printing:
1. Open the page to be printed and select the Print Preview command.
2. Use the controls at the top of the preview screen to print the report, display multiple or selected pages, zoom and close the preview screen.
To save a page to a file:
1. Open the page to be saved to a file and select one of the following commands:
• Print to File • Print to PDF
2. The native Save As dialog is displayed allowing you to specify the file name and location. Also if you selected the Print to File command, you can specify the type of file to be saved (.xls or .csv).
You may want to use the Print Setup option in the ChangeAuditor client or Preference button on the Print dialog to change the page orientation to Landscape prior to printing the pages that contain grids.
127

9
Agent Configurations
• Introduction
• Agent Configuration Page
• Define Agent Configurations
• Assign Agent Configurations to Agents
• Enable Event Logging

Quest ChangeAuditor
IntroductionChangeAuditor assigns a default configuration to each agent when it is deployed. This default configuration consists of the following settings:
• Use Direct SQL Connection
• Polling interval: 900 seconds
• Forwarding Interval: 5 seconds
• Retry Interval: 300 seconds
• Maximum Events per Connection: 500
• Allow time for connection: 24 x 7
• File System Events: Discard duplicate file system events that occur within: 10 seconds
• LDAP Query Events: Discard results less than 0
• LDAP Query Events: Discard duplicates that occur within 15 minutes
• LDAP Query Events: Discard elapsed less than 20 milliseconds
You can, however, define and assign different agent configurations to each deployed agent using the Agent Configuration page on the Administration Tasks tab.
Also, in order to enable various custom auditing and protection features, you are required to assign templates to an agent’s configuration. The custom auditing and protection features that require custom templates to be assigned to an agent’s configuration are:
• File System Auditing
• Registry Auditing
• Service Auditing
• SQL Auditing
• Excluded Accounts Auditing
• File System Protection
Whenever you upgrade from a previous version of ChangeAuditor, these default configuration settings will be restored. Therefore, if you want to modify the default configuration settings, it is best to copy the default configuration and then save it using a different name.
130

Agent Configurations
This chapter describes the Agent Configuration page and how to perform the tasks associated with defining and assigning configurations to ChangeAuditor Agents. For a description of the other dialogs mentioned in this chapter, please refer to the online help. For more information on Registry Auditing, Service Auditing and Excluded Accounts Auditing refer to the appropriate chapters in this document. For more information on File System Auditing and File System Protection, see the ChangeAuditor for Windows File Servers User Guide. For more information on SQL Auditing, see the ChangeAuditor for SQL Server User Guide.
Agent Configuration PageUse the Agent Configuration page to define and assign agent configurations. The Agent Configuration page is displayed when Agent in the Configuration task list is selected in the explorer view of the Administration Tasks tab.
The Agent Configuration page may contain the following information for each agent that is deployed. The default column identifies the fields that are displayed
by default. To display different fields, use the Field Chooser button located to the far left of the column headings.
The NetApp and EMC Auditing templates define the ChangeAuditor Agents that are used to capture these file system events; however, these templates do not use the agent configurations as described in this chapter. Please see the ChangeAuditor for NetApp User Guide and ChangeAuditor for EMC User Guide for more information.
All times displayed are local times.
131

Quest ChangeAuditor
COLUMN DEFAULT DESCRIPTION
Active Directory No Indicates whether Active Directory auditing and/or protection has been defined.
ADAM No Indicates whether ADAM (AD LDS) auditing and/or protection has been defined.
Agent Yes Displays the NetBIOS name of the server that hosts the ChangeAuditor Agent.
Agent FQDN No Displays the fully qualified domain name (FQDN), consisting of the host and domain name including the top-level domain, of an agent.
Configuration Yes Displays the name of the agent configuration assigned to each agent listed.
Coordinator No Displays the computer name of the ChangeAuditor Coordinator that an agent is connected through.
DB Size No Displays the size of an agent’s database.
Domain Yes Displays the name of the domain where the server resides.
EMC No Indicates whether an agent has been assigned to an EMC auditing template to receive EMC Celerra events.
Events Last 24 Hours No Displays the number of audited events encountered on the agent during the past 24 hours from when the Agent Configuration page is initially opened during the current client session or when the Refresh button is selected.
The value in this field is a hyperlink and when selected will launch a quick search and display events generated in the last 24 hours in a new Search Results page.
Events Today No Displays the number of audited events encountered on the agent since 12:00 a.m. of the current day (based on the relative Coordinator computer's time).
The value in this field is a hyperlink and when selected will launch a quick search and display today’s events in a new Search Results page.
132

Agent Configurations
Events Total No Displays the number of audited events encountered since the agent was started.
The value in this field is a hyperlink and when selected will launch a quick search and display all events encountered since the agent was started in a new Search Results page.
Events Yesterday No Displays the number of audited events encountered between 12:00 a.m. yesterday and 12:00 a.m. of the current day (based on the relative Coordinator computer's time).
The value in this field is a hyperlink and when selected will launch a quick search and display yesterday’s events in a new Search Results page.
Exchange No For agents hosting Exchange, this column indicates whether Exchange Mailbox auditing and/or Exchange Mailbox protection has been defined.
Exclude Account Yes Indicates whether an Excluded Accounts Auditing template has been assigned to an agent’s configuration.
File System Yes Indicates whether a File System Auditing or File System Protection template has been assigned to an agent’s configuration.
Group Policy No Indicates whether Group Policy protection has been defined.
Last Event Sent No Displays the date and time when the coordinator last received an audited event from the agent.
Last Update No Displays the date and time when the agent configuration was last updated.
NetApp No Indicates whether an agent has been assigned to a NetApp auditing template to receive NetApp filer events.
Registry Yes Indicates whether a Registry Auditing template has been assigned to an agent’s configuration.
Service Yes Indicates whether a Service Auditing template has been assigned to an agent’s configuration.
COLUMN DEFAULT DESCRIPTION
133
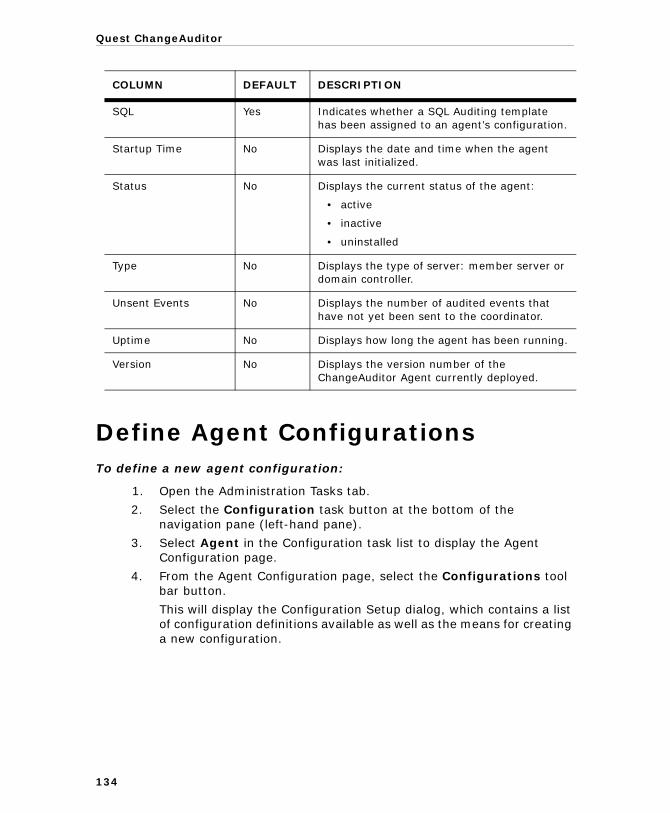
Quest ChangeAuditor
Define Agent ConfigurationsTo define a new agent configuration:
1. Open the Administration Tasks tab.
2. Select the Configuration task button at the bottom of the navigation pane (left-hand pane).
3. Select Agent in the Configuration task list to display the Agent Configuration page.
4. From the Agent Configuration page, select the Configurations tool bar button.
This will display the Configuration Setup dialog, which contains a list of configuration definitions available as well as the means for creating a new configuration.
SQL Yes Indicates whether a SQL Auditing template has been assigned to an agent’s configuration.
Startup Time No Displays the date and time when the agent was last initialized.
Status No Displays the current status of the agent:
• active
• inactive
• uninstalled
Type No Displays the type of server: member server or domain controller.
Unsent Events No Displays the number of audited events that have not yet been sent to the coordinator.
Uptime No Displays how long the agent has been running.
Version No Displays the version number of the ChangeAuditor Agent currently deployed.
COLUMN DEFAULT DESCRIPTION
134
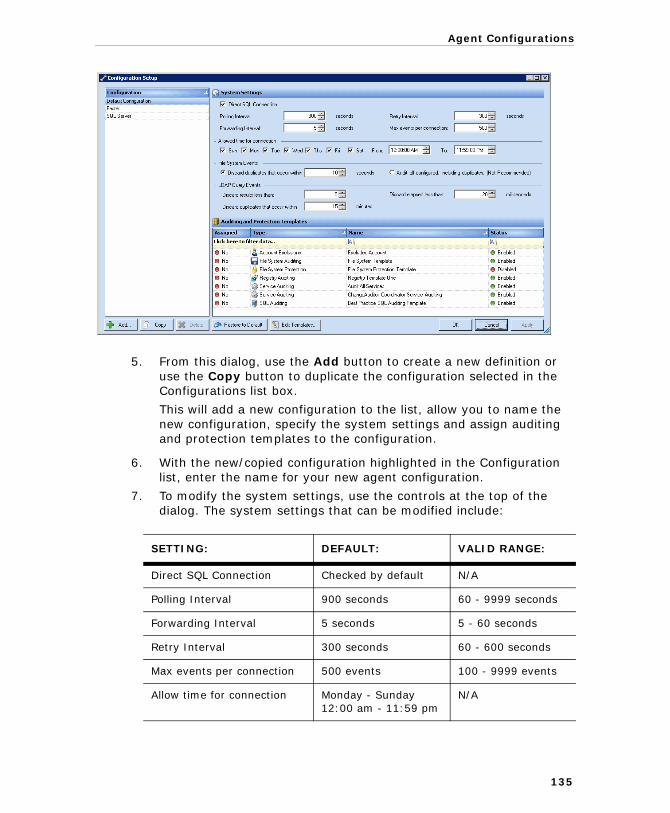
Agent Configurations
5. From this dialog, use the Add button to create a new definition or use the Copy button to duplicate the configuration selected in the Configurations list box.
This will add a new configuration to the list, allow you to name the new configuration, specify the system settings and assign auditing and protection templates to the configuration.
6. With the new/copied configuration highlighted in the Configuration list, enter the name for your new agent configuration.
7. To modify the system settings, use the controls at the top of the dialog. The system settings that can be modified include:
SETTING: DEFAULT: VALID RANGE:
Direct SQL Connection Checked by default N/A
Polling Interval 900 seconds 60 - 9999 seconds
Forwarding Interval 5 seconds 5 - 60 seconds
Retry Interval 300 seconds 60 - 600 seconds
Max events per connection 500 events 100 - 9999 events
Allow time for connection Monday - Sunday12:00 am - 11:59 pm
N/A
135

Quest ChangeAuditor
For a detailed description of these system settings, please refer to the online help.
8. To add an auditing or protection template to the selected configuration, use the Auditing and Protection Templates pane. This pane displays the auditing and protection templates previously defined.
Use one of the following methods to assign a template to an agent configuration:
• Select a template and ’drag and drop’ it onto a configuration in the Configuration list.
• Select a configuration from the Configuration list and ’drag and drop’ it onto a template in the Auditing and Protection Templates pane.
• Select a configuration, then select a template, right-click and select Assign.
• Select a configuration, then select a template, click in the corresponding Assigned cell and select Yes.
Repeat this step to add additional templates to the selected configuration.
FILE SYSTEM EVENTS
The following two settings only apply when ChangeAuditor for Windows File Servers is licensed.
Discard duplicates that occur within nn seconds
Enabled by default
10 seconds
1 - 600 seconds
Audit all configured, including duplicates (Not recommended)
Disabled by default N/A
LDAP QUERY EVENTS
The following settings only apply when ChangeAuditor for LDAP is licensed.
Discard results less than nn 0 0 - 99999
Discard duplicates that occur within nn minutes
15 minutes 1 - 1440 minutes
Discard elapsed less than nn milliseconds
20 milliseconds 0 - 99999 milliseconds
SETTING: DEFAULT: VALID RANGE:
136

Agent Configurations
9. If the templates list is empty or you want to define a new template, select the Edit Templates button.
• On the Auditing and Protection Templates dialog, select the tab for the type of template to be added (e.g., Excluded Accounts) and select the Add Template button.
• The associated wizard will be displayed allowing you to define the auditing or protection to be applied. Please refer to the appropriate chapters in this guide for details on completing each of these wizards.
10. Once you have defined the new template, select OK to close this dialog and return to the Configuration Setup dialog. Select this new template, right-click and select Assign.
11. Once you have named the configuration, selected the system settings and added auditing or protection templates, select the OK button to save your configuration and return to the Agent Configuration page.
Assign Agent Configurations to AgentsOnce agent configurations are defined they can be assigned to one or more installed agents. Again, use the Agent Configuration page to assign agent configurations to agents.
To assign a configuration to an agent from Agent Configuration page:
1. On the Agent Configuration page, select one or more agents from the agent list and select the Assign tool bar button or right-click command.
2. On the Agent Assignment dialog, select the configuration definition to be assigned to the selected agents and select the OK button.
3. Back on the Agent Configuration page, the agent configuration assignment will be updated in the Configuration column.
To reset ALL agent configurations back to the default configuration:
1. On the Agent Configuration page, select the Default All tool bar button.
2. A message will be displayed confirming that you want to reset ALL agent configurations back to the factory default settings. Select Yes.
3. Back on the Agent Configuration page, the agent configuration assignment will be updated in the Configuration column.
137

Quest ChangeAuditor
Enable Event LoggingUsing the Agent Configuration page you can also enable the event logging feature which writes ChangeAuditor audited events locally to a Windows event log. These event logs can then be collected using Quest InTrust to satisfy long-term storage requirements.
This is a global setting and applies to all ChangeAuditor Agents. However, keep the following in mind when defining custom auditing:
• Disabling ChangeAuditor events does NOT impact event logging.
• Excluding accounts from auditing does NOT impact event logging with the exception of Exchange. That is, if an Exchange Mailbox account is set to exclude ALL mailbox events, then these events will also be excluded from the event log.
• For Registry events, event logging is disabled by default. When enabled, only configured activities are sent to the event log.
• For Service events, event logging is disabled by default. When enabled, only configured activities are sent to the event log.
• For Active Directory events, event logging is disabled by default. When enabled, all Active Directory activity is sent to the event log.
• For ADAM (AD LDS) events, event logging is disabled by default. When enabled, all ADAM activity is sent to the event log.
• For File System events, event logging is disabled by default. When enabled, only configured activities are sent to the event log.
• For Exchange mailbox events, event logging is disabled by default. When enabled, only configured Exchange Mailbox activity is sent to the event log.
• For SQL server events, event logging is disabled by default. When enabled, only configured activities are sent to the event log.
• For EMC events, event logging is disabled by default. When enabled, only configured activities are sent to the event log.
• For NetApp events, event logging is disabled by default. When enabled, only configured activities are sent to the event log.
Event logging must be enabled for ChangeAuditor’s audited events to be available in InTrust.
When upgrading, if ChangeAuditor finds an Intrust Plug-in, the corresponding event logging is enabled (e.g., if an Intrust for Active Directory Plug-in is discovered when ChangeAuditor is installed, then event logging for Active Directory will be enabled in ChangeAuditor).
138

Agent Configurations
To enable event logging:
1. Open the Administration Tasks tab.
2. From the left-hand pane, select Agent (under the Configuration task list) to display the Agent Configuration page.
3. Select the Event Logging tool bar button.
4. On the Event Logging dialog, select the type of event logging to be enabled:
• Active Directory• ADAM (AD LDS)• Exchange• File System• SQL• EMC• Registry• Service• Local Account• ChangeAuditor• NetApp
5. Select OK to save your selection and close the dialog.
If an option is disabled, this indicates that you do not have the corresponding component licensed. For example, if the SQL check box is disabled, you do not have a ChangeAuditor for SQL Server license.
139


10
Coordinator Configuration
• Introduction
• SMTP Configuration Pane
• Configure Email Notifications
• Customize Email Content
• Group Membership Expansion Pane
• Add Groups to Group Membership Expansion List
• Agent Heartbeat Check Pane

Quest ChangeAuditor
IntroductionThe Coordinator Configuration page is displayed when Coordinator in the Configuration task list is selected in the navigation pane of the Administration Tasks tab. This page consists of the following panes:
• SMTP Configuration - for enabling and configuring email alerting
• Group Membership Expansion - for defining the schedule for expanding nested membership of Active Directory groups that are referenced in Searches (Who search criteria) or groups that are defined in the Member of Group auditing feature
• Agent Heartbeat Check - for specifying how long the Coordinator service is to wait before an agent that is not sending updates will be marked as ’inactive’
This chapter provides a description of the panes listed above and instructions on how to use these panes to configure email alerting and group membership expansion. For a description of the other dialogs mentioned in this chapter, please refer to the online help.
142

Coordinator Configuration
SMTP Configuration PaneChangeAuditor can generate alerts when certain kinds of configuration changes occur. If an audited event matches all of the criteria defined and alerting is enabled, ChangeAuditor dispatches the alert via email (SMTP), SNMP or WMI events, as defined on the Alert search properties tab.
Configure email alerting by specifying the following information on the SMTP Configuration pane:
SMTP, SNMP and/or WMI must be configured to receive ChangeAuditor alerts BEFORE any alert notifications will be sent. To enable and configure SMTP alerting, please refer to Enable Alerts.
FIELD/CONTROL DESCRIPTION
Enable SMTP for Alerts Select (check) this option to enable email alert notifications. Checking this option will activate the remaining fields on this page to customize alert emails.
Note: The settings set on this page are global settings and will apply to all alert emails. You can, however, override the reply to, subject line, signature and body content for individual alerts using the settings on the Alert tab (Searches Properties tabs).
143

Quest ChangeAuditor
Mail Server When email alert notification is enabled, enter the name or IP address of the mail server in this text box.
Note: ChangeAuditor sends alerts through a single SMTP (email) relay configuration even when multiple coordinators are configured. That is, all coordinators will use the same mail server for sending alert notifications.
From Address Displays the address where the email message will originate.
Reply To Enter the address where replies to alert emails are to be sent.
Subject Line Enter a customized subject line to replace the default text in the subject line. The default subject line contains the following information:
ChangeAuditor %Alert_Type% from %Alert_Coordinator_Name%: %Alert_Name%
Where: %Alert_Type% is either 'Alert' or 'Smart Alert'
%Alert_Coordinator_Name% is the name of the coordinator generating the alert
%Alert_Name% is the name of the alert that fired
Select the button to the far right of the Subject Line to select the variable to be inserted into the subject line or to reset it back to the default content.
Insert Variable Expand the Insert Variable option to insert a variable into the subject line:
• ALERT_NAME
• ALERT_TIME_SENT
• ALERT_TYPE
• ALERT_COORDINATOR_DOMAIN
• ALERT_COORDINATOR_NAME
• SMART_ALERT
• SMART_ALERT_GROUPING
• SMART_ALERT_OCCURRENCE
• SMART_ALERT_PERIOD
• SMART_ALERT_PERIOD_UNIT
• BATCH_ID
• EVENT_COUNT
FIELD/CONTROL DESCRIPTION
144
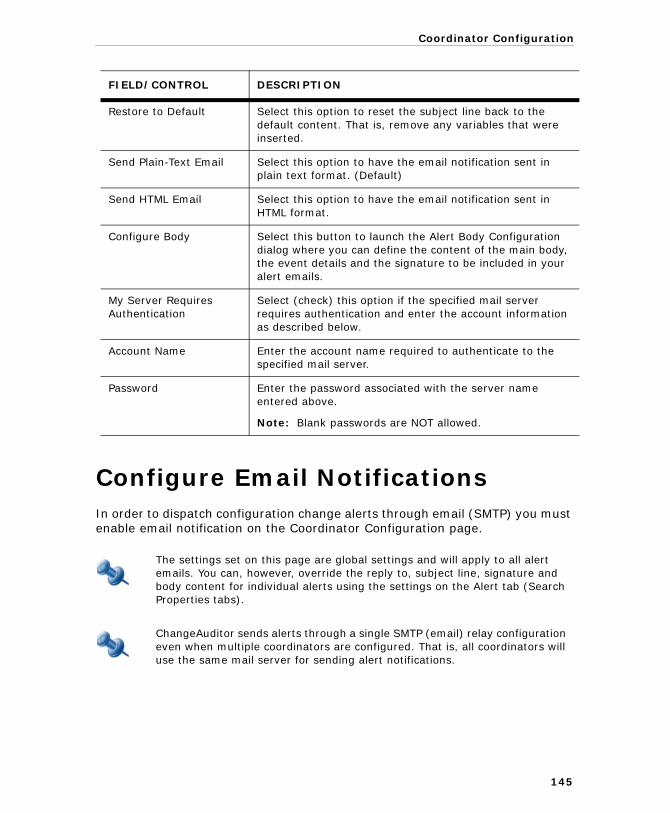
Coordinator Configuration
Configure Email NotificationsIn order to dispatch configuration change alerts through email (SMTP) you must enable email notification on the Coordinator Configuration page.
Restore to Default Select this option to reset the subject line back to the default content. That is, remove any variables that were inserted.
Send Plain-Text Email Select this option to have the email notification sent in plain text format. (Default)
Send HTML Email Select this option to have the email notification sent in HTML format.
Configure Body Select this button to launch the Alert Body Configuration dialog where you can define the content of the main body, the event details and the signature to be included in your alert emails.
My Server Requires Authentication
Select (check) this option if the specified mail server requires authentication and enter the account information as described below.
Account Name Enter the account name required to authenticate to the specified mail server.
Password Enter the password associated with the server name entered above.
Note: Blank passwords are NOT allowed.
The settings set on this page are global settings and will apply to all alert emails. You can, however, override the reply to, subject line, signature and body content for individual alerts using the settings on the Alert tab (Search Properties tabs).
ChangeAuditor sends alerts through a single SMTP (email) relay configuration even when multiple coordinators are configured. That is, all coordinators will use the same mail server for sending alert notifications.
FIELD/CONTROL DESCRIPTION
145

Quest ChangeAuditor
To enable and configure email notifications:
1. Open the Administration Tasks page.
2. Select the Configuration task button at the bottom of the navigation pane (left-hand pane).
3. Select Coordinator in the Configuration task list to open the Coordinator Configuration page.
4. On the SMTP Configuration pane, select (check) the Enable SMTP for Alerts option to enable email alert notifications. Checking this option will activate the remaining fields on this page to configure and customize alert emails. Enter the following information:
• Mail Server• From Address• Reply To• Subject Line
5. Select the appropriate option to have the email notification sent in plain text format (default) or HTML format.
6. Optionally, select the Configure Body button to launch the Alert Body Configuration dialog where you can define the content of the main body, the event details and the signature to be included in your alert emails. After configuring the alert body, select OK to return to the Coordinator Configuration page.
7. If the specified mail server requires authentication, select (check) the My Server Requires Authentication option and enter the account credentials to be used.
8. Select the Test SMTP tool bar button to test the mail server configuration.
9. Once the mail server configuration is verified, select the Apply Changes tool bar button to save the configuration.
10. Now that SMTP alerting is enabled and configured, you can enable email alerts for individual search definitions using the Alerts tab (Search Properties tabs).
You can use the button to the right of the Subject Line field to insert a variable into the subject line or to reset it back to the default content.
146

Coordinator Configuration
Customize Email ContentIn addition to the customizable fields (Reply To, Subject Line and Signature) on the Coordinator Configuration dialog, you can use the Configure Body button to define the content to be used in the main body of your alert emails as well as the event details to be included.
1. Select the Configure Body button to display the Alert Body Configuration dialog.
2. On the Alert Body Configuration dialog, select the appropriate option (at the bottom of the dialog) to edit either the Plain Text (default) or the HTML representation of the alert emails.
3. Use the Main Body tab to enter the text to be included and define the overall layout of the alert body.
• Select the Show Variables check box to display the variables that can be added to the main body of your email.
• To add a variable, double-click the variable from the Variable list at the bottom of the page. You can also drag and drop a variable from the Variable list into the main body text box.
4. Use the Event Details tab to specify the event details to be included. That is, you can rearrange the entries, remove entries, or modify text, etc.
• Select the Show Variables check box to display a list of the variable that can be added to the event details of your alert email.
• To add a variable, double-click the variable from the Variable list at the bottom of the page. You can also drag and drop a variable from the Variable list into the Event Details text box.
When accessed through the Coordinator Configuration page, these settings will apply globally to all alert emails. However, if accessed through the Alert tab, these settings will apply to the selected alert only.
The event details defined in the Event Details tab are placed in the Main Body pane using the following tag: %EVENT_DETAILS%. This tag should NOT be removed from the Main Body tab if you want to include the event details in the alert emails.
Do NOT modify the blue text surrounded by percent signs (e.g., %USERNAME%). These are tags which represent actual data retrieved from the ChangeAuditor event that triggered the alert. See ChangeAuditor Email Tags for more information on these tags and the data retrieved by each.
147
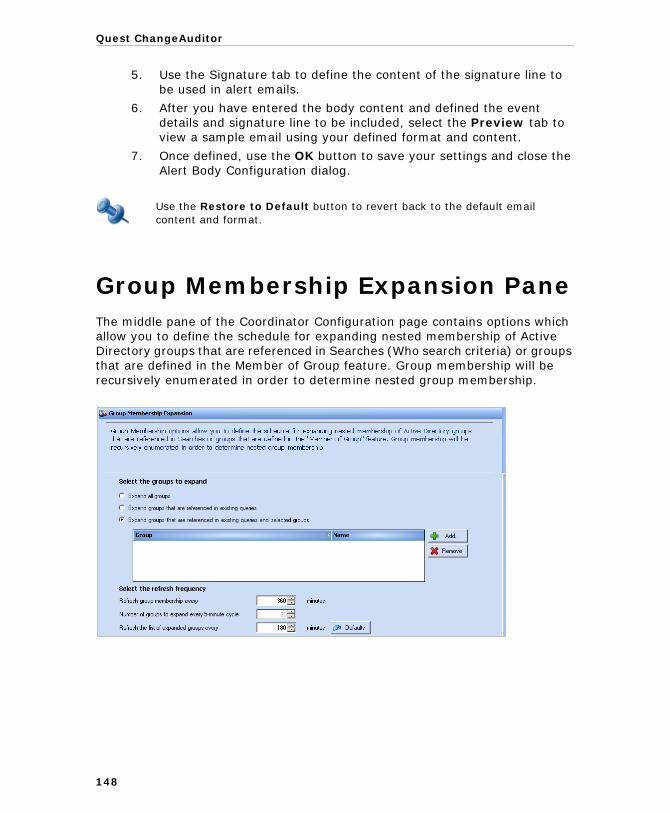
Quest ChangeAuditor
5. Use the Signature tab to define the content of the signature line to be used in alert emails.
6. After you have entered the body content and defined the event details and signature line to be included, select the Preview tab to view a sample email using your defined format and content.
7. Once defined, use the OK button to save your settings and close the Alert Body Configuration dialog.
Group Membership Expansion PaneThe middle pane of the Coordinator Configuration page contains options which allow you to define the schedule for expanding nested membership of Active Directory groups that are referenced in Searches (Who search criteria) or groups that are defined in the Member of Group feature. Group membership will be recursively enumerated in order to determine nested group membership.
Use the Restore to Default button to revert back to the default email content and format.
148
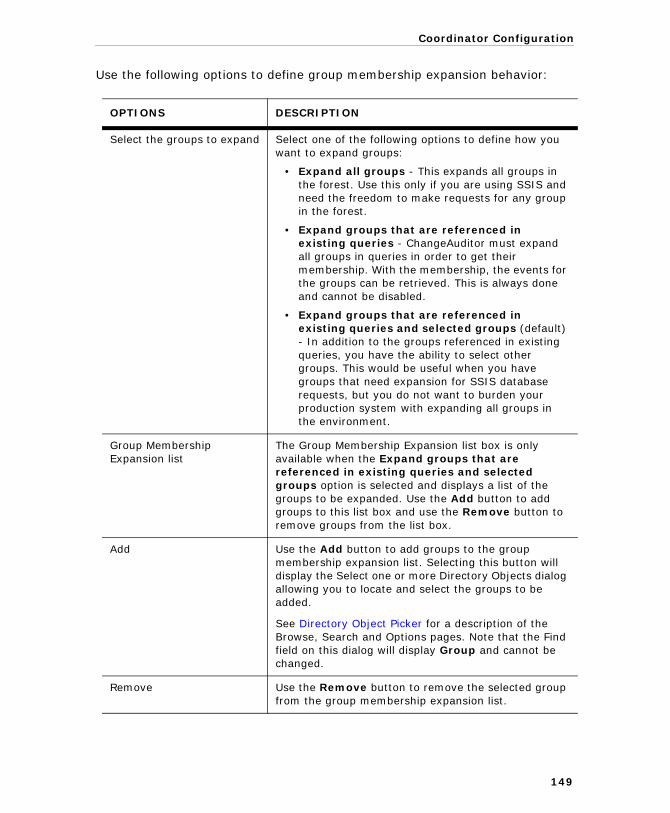
Coordinator Configuration
Use the following options to define group membership expansion behavior:
OPTIONS DESCRIPTION
Select the groups to expand Select one of the following options to define how you want to expand groups:
• Expand all groups - This expands all groups in the forest. Use this only if you are using SSIS and need the freedom to make requests for any group in the forest.
• Expand groups that are referenced in existing queries - ChangeAuditor must expand all groups in queries in order to get their membership. With the membership, the events for the groups can be retrieved. This is always done and cannot be disabled.
• Expand groups that are referenced in existing queries and selected groups (default) - In addition to the groups referenced in existing queries, you have the ability to select other groups. This would be useful when you have groups that need expansion for SSIS database requests, but you do not want to burden your production system with expanding all groups in the environment.
Group Membership Expansion list
The Group Membership Expansion list box is only available when the Expand groups that are referenced in existing queries and selected groups option is selected and displays a list of the groups to be expanded. Use the Add button to add groups to this list box and use the Remove button to remove groups from the list box.
Add Use the Add button to add groups to the group membership expansion list. Selecting this button will display the Select one or more Directory Objects dialog allowing you to locate and select the groups to be added.
See Directory Object Picker for a description of the Browse, Search and Options pages. Note that the Find field on this dialog will display Group and cannot be changed.
Remove Use the Remove button to remove the selected group from the group membership expansion list.
149
Quest ChangeAuditor
Add Groups to Group Membership Expansion ListBy default, the Expand groups that are referenced in existing queries and selected groups option is selected on the Group Membership Expansion pane of the Coordinator Configuration page. With the option selected, you can use add groups to the Group Membership Expansion list as described below:
1. Select the Add button to display the Select one or more Directory Objects dialog.
2. Use either the Browse page or Search page to locate and select a group to be added to this list. Once a group is selected, use the Add button on this dialog to add it to the selection list at the bottom of the dialog.
Repeat this step to add each additional group.
3. Once you have selected all the groups to be added, use the Select button to save your selection.
The specified groups will now be listed in the Group Membership Expansion list back on the Coordinator Configuration page.
4. Back on the Coordinator Configuration page, select the Apply Changes tool bar button to apply your changes regarding group membership expansion.
SELECT THE REFRESH FREQUENCY
Select from the following options to define how often you want to refresh the group membership expansion list.
Refresh group membership every nnn minutes
By default, group membership will be refreshed every 360 minutes. Use the arrow controls to increase or decrease this value.
Number of groups to expand every 5-minute cycle
By default, 20 groups will be expanded every 5-minute cycle. Use the arrow controls to increase or decrease this value
Refresh the list of expanded groups every nnn minutes
By default, the group membership expansion list is refreshed every 180 minutes. Use the arrow controls to increase or decrease this value.
Defaults Use the Defaults button to reset the fresh frequency settings back to the factory defaults.
OPTIONS DESCRIPTION
150
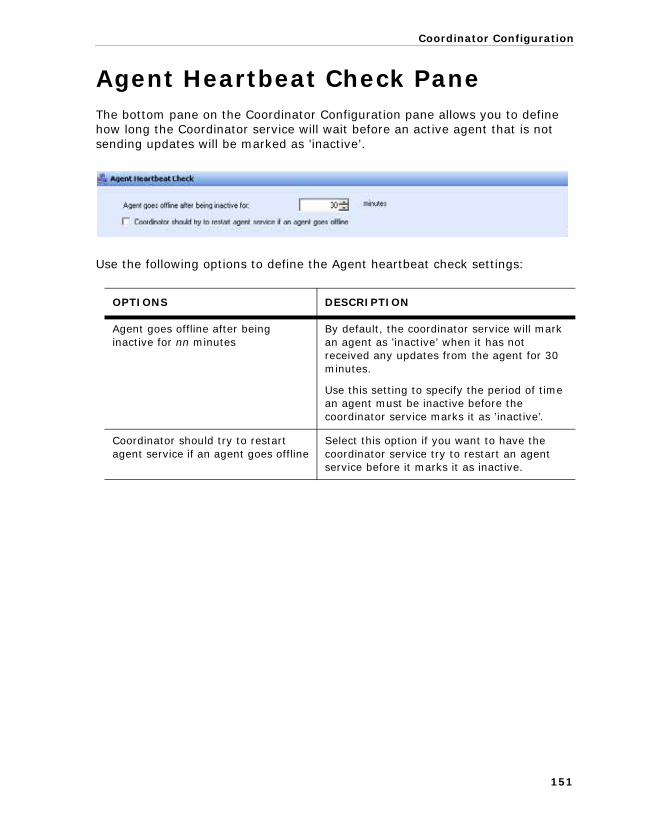
Coordinator Configuration
Agent Heartbeat Check PaneThe bottom pane on the Coordinator Configuration pane allows you to define how long the Coordinator service will wait before an active agent that is not sending updates will be marked as ’inactive’.
Use the following options to define the Agent heartbeat check settings:
OPTIONS DESCRIPTION
Agent goes offline after being inactive for nn minutes
By default, the coordinator service will mark an agent as ’inactive’ when it has not received any updates from the agent for 30 minutes.
Use this setting to specify the period of time an agent must be inactive before the coordinator service marks it as ’inactive’.
Coordinator should try to restart agent service if an agent goes offline
Select this option if you want to have the coordinator service try to restart an agent service before it marks it as inactive.
151


11
Database Maintenance
• Introduction
• Database Maintenance Page
• Database Maintenance Activities
• Database Maintenance Wizard

Quest ChangeAuditor
IntroductionChangeAuditor provides administrators with several options to perform both interactive and scheduled purge and/or archive actions. With automated database maintenance, administrators can keep their critical and relevant data online while archiving older data to an archive database. Audited events that are no longer required can be purged from the production database to keep it trim and current. This feature not only reduces storage space requirements for audit data, but it increases overall operational efficiency by speeding up searches and data retrieval from the database.
This chapter provides a description of the Database Maintenance page and instructions on how to purge and/or archive the ChangeAuditor database. For a description of the other dialogs mentioned in this chapter, please refer to the online help.
The database maintenance feature uses the SQL Server Agent to perform the designated maintenance activities, therefore the coordinator database account must have the proper permissions to add or modify SQL Server Agent jobs to use this feature. That is, this account must be a member of the following roles in the msdb database in order to use the database maintenance feature:
• db_datareader
• db_datawriter
• SQLAgentUserRole
154
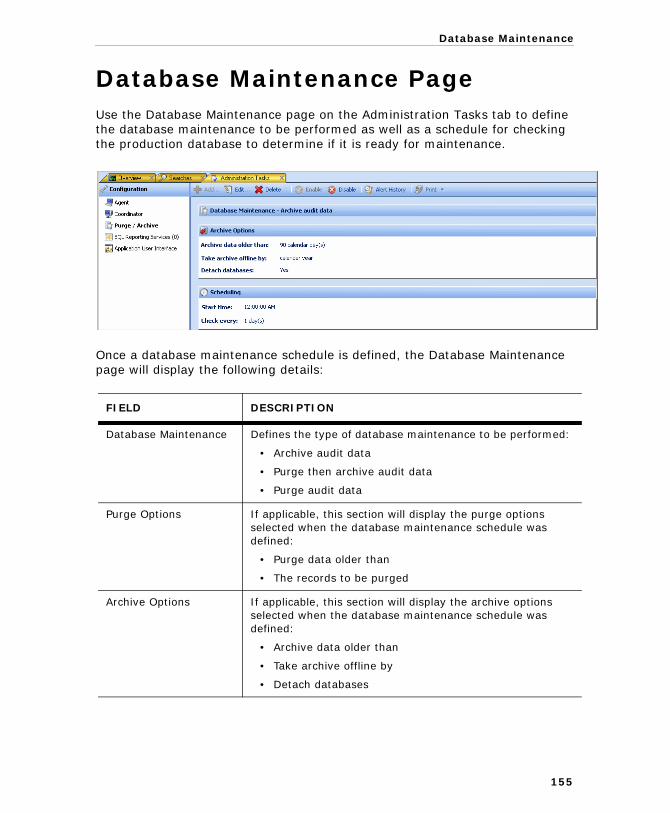
Database Maintenance
Database Maintenance PageUse the Database Maintenance page on the Administration Tasks tab to define the database maintenance to be performed as well as a schedule for checking the production database to determine if it is ready for maintenance.
Once a database maintenance schedule is defined, the Database Maintenance page will display the following details:
FIELD DESCRIPTION
Database Maintenance Defines the type of database maintenance to be performed:
• Archive audit data
• Purge then archive audit data
• Purge audit data
Purge Options If applicable, this section will display the purge options selected when the database maintenance schedule was defined:
• Purge data older than
• The records to be purged
Archive Options If applicable, this section will display the archive options selected when the database maintenance schedule was defined:
• Archive data older than
• Take archive offline by
• Detach databases
155
Quest ChangeAuditor
Database Maintenance Activities
To define database maintenance:
1. Open the Administration Tasks tab.
2. Select the Configuration task button at the bottom of the navigation pane (left-hand pane).
3. Select Purge/Archive in the Configuration task list to open the Database Maintenance page.
4. Use the Add tool bar button to launch the Database Maintenance wizard to define a new maintenance schedule.
5. On the first page of the wizard, select the type of database maintenance to be performed: Archive Only, Purge Then Archive or Purge Only.
6. If the Purge then Archive or Purge Only options are selected on the first page, the Select Purge Options page will be displayed allowing you to choose the records to be deleted from the production database.
7. If the Archive Only or Purge then Archive options are selected on the first page, the Select Archive Options page will be displayed allowing you to choose the records to be moved from the production database to the archive database and the size of the archive database.
8. The last page of the wizard allows you to define when the database is to be checked to determine if it meets the archive/purge requirements defined. If it does, the selected records will be archived/purged as defined. If it does not, no action will be taken.
Scheduling This section displays when the production database is to be checked to determine if maintenance is to be performed:
• Start time
• How often to check the database
There can only be one maintenance schedule defined at a time. See the ChangeAuditor Technical Insight Guide for database archiving best practices.
Use the Once option to run the defined database maintenance one time only.
FIELD DESCRIPTION
156

Database Maintenance
9. Once defined, the Database Maintenance page will display the details regarding the database maintenance schedule.
To edit a maintenance schedule:
1. On the Database Maintenance page, select the Edit tool bar button.
2. This will launch the Database Maintenance wizard allowing you to modify the current maintenance settings.
To delete a maintenance schedule:
1. On the Database Maintenance page, select the Delete tool bar button.
2. When prompted, confirm that you want to delete the database maintenance schedule.
To disable a maintenance schedule or re-enable a disabled schedule:
1. On the Database Maintenance page, select the Disable tool bar button.
2. When a schedule is disabled, it will be grayed out on the Database Maintenance page and no maintenance activities will take place.
3. To enable a previously disabled maintenance schedule, select the Enable tool bar button.
To define a job for purging alert history:
1. On the Database Maintenance page, select the Alert History tool bar button.
The Alert History dialog appears allowing you to specify when to purge events from the alert history.
2. Select the Purge alert history older than check box.
3. Use the two fields to the right of this check box to specify how old the records are to be before they are purged:
• <nn> Calendar Days• <nn> Calendar Weeks• <nn> Calendar Months• <nn> Calendar Quarters• <nn> Calendar Years
4. Select OK to save your alert history purge job.
157

Quest ChangeAuditor
Database Maintenance WizardThe Database Maintenance wizard is launched when you select the Add tool bar button from the Database Maintenance page on the Administration Tasks page. The Database Maintenance wizard consists of the following information:
SELECT MAINTENANCE ACTION PAGE
Select the database maintenance to perform on audit records
Select one of the following options to define the type of database maintenance to be performed:
Archive Only - Use this option to move audit records from the production database to an online archive database.
Purge then Archive - Use this option to delete records from the production database, then move records from the production database to an archive database.
Purge Only - Use this option to delete audit records from the production database.
158

Database Maintenance
SELECT PURGE OPTIONS PAGE
If the Purge then Archive or Purge Only options are selected on the first page, the Select Purge Options page will be displayed allowing you to choose the records to be deleted from the production database.
Purge all records older than Select this option to purge all records from the production database and use the controls to specify how old the records are to be before they are purged. Valid options include:
<nn> Calendar Days
<nn> Calendar Weeks
<nn> Calendar Months
<nn> Calendar Quarters
<nn> Calendar Years
159

Quest ChangeAuditor
Purge selected records older than
Select this option to purge only selected records from the production database. Use the controls to the right of this option to specify how old the records are to be before they are purged. Valid options include:
<nn> Calendar Days
<nn> Calendar Weeks
<nn> Calendar Months
<nn> Calendar Quarters
<nn> Calendar Years
After selecting a value and calendar interval, use the criteria tabs to define the records to be deleted from the production database:
• Who - purge events generated by a specific user, computer or group.
• What - purge events based on subsystem, event class, object class, severity or results.
• Where - purge events captured by a specific agent, domain or site.
• Origin - purge events originating from a specific workstation or server.
• Comments - purge events that contain a specific comment.
See Purge Selected Records for a description of the tabs and the dialogs that will be launched allowing you to specify the records to be purged.
Note: You must specify at least one type of record (specify criteria on at least one tab) before you can proceed through the wizard. If you specify criteria on more than one tab, the criteria specified on all of the tabs must be met before a record will be deleted from the production database.
160

Database Maintenance
SELECT ARCHIVE OPTIONS PAGE
If the Archive Only or Purge then Archive options are selected on the first page, the Select Archive Options page will be displayed allowing you to choose the records to be moved from the production database to the archive database and the size of the archive database.
Archive data older than Use these controls to define what is to be retained in the production database. By default, the production database will retain 90 calendar day's worth of data after the archive occurs. The options that can be used to define this include:
<nn> Calendar Days (default)
<nn> Calendar Weeks
<nn> Calendar Months
<nn> Calendar Quarters
<nn> Calendar Years
Save archives by Use this control to define the amount of data that is to be retained in the archive database. By default, the archive database will contain one calendar month's worth of data. Other options are calendar year and calendar quarter.
161
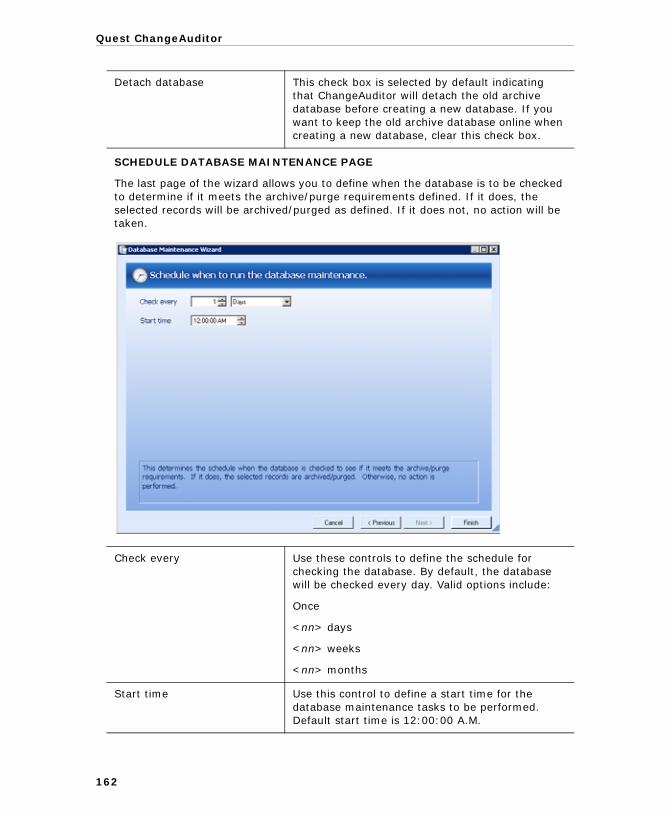
Quest ChangeAuditor
Detach database This check box is selected by default indicating that ChangeAuditor will detach the old archive database before creating a new database. If you want to keep the old archive database online when creating a new database, clear this check box.
SCHEDULE DATABASE MAINTENANCE PAGE
The last page of the wizard allows you to define when the database is to be checked to determine if it meets the archive/purge requirements defined. If it does, the selected records will be archived/purged as defined. If it does not, no action will be taken.
Check every Use these controls to define the schedule for checking the database. By default, the database will be checked every day. Valid options include:
Once
<nn> days
<nn> weeks
<nn> months
Start time Use this control to define a start time for the database maintenance tasks to be performed. Default start time is 12:00:00 A.M.
162
Database Maintenance
Purge Selected Records
Use the criteria tabs on the Select Purge Options page to define what specific records are to be deleted from the database. These tabs are enabled when you choose the Purge selected records older than option on the Select Purge Options page of the Database Maintenance wizard. For more information about each of the dialogs mentioned in the procedures provided, please refer to the online help.
Who Tab
By default, (when the Who list is blank) change events generated by all users, computers, and groups will be deleted from the production database.
To purge events generated by a specific user, computer or group:
1. On the Who tab, select the Add tool bar button to add an active user, computer or group to the ’who’ list.
2. On the Select Active Directory Objects dialog, use either the Browse or Search page to search your environment to locate the user, computer or group to be included.
Once you have located a directory object, select it and use the Add button to add it to the selection list at the bottom of the dialog.
3. Repeat step 2 to include each additional directory object.
4. After selecting one or more directory objects, use the Select button to save your selection and close the dialog.
When the Purge selected records older than option is selected, you must specify at least one type of record (specify criteria on at least one tab) before you can proceed through the wizard. If you specify criteria on more than one tab, the criteria specified on all of the tabs must be met before a record will be deleted from the production database.
You can use the Add with Events tool bar button (instead of Add) to select user(s), computer(s) or group(s) that already have an audited event in the database. Use this feature to purge events tied to users who have been removed from Active Directory.
You can expand the Add tool bar button and select the Add Wildcard Expression option to use a wildcard expression to specify a user or group. On the Add Who dialog, select the comparison operator (Like or Not Like) and enter the pattern (character string and * wildcard character) to be used to find a match.
163

Quest ChangeAuditor
ChangeAuditor will now only purge events generated by the user(s), computer(s), or group(s) listed on the Who tab.
What Tab
By default, (when the What tab is empty) all events regardless of the subsystem, event class, object class, severity, or results will be purged from the database.
To purge events based on a specific entity:
1. Use the What tab to specify the what criteria to be used to determine whether an event is to be purged from the database.
2. To add criteria, expand the Add tool bar button and select the appropriate option. When you select an option, an additional dialog appears allowing you to enter specific criteria:
• Subsystem | Active Directory - Add Active Directory Container dialog
• Subsystem | ADAM (AD LDS) - Select the agent that hosts the ADAM/AD LDS Instance dialog
• Subsystem | ChangeAuditor Event - Add ChangeAuditor Events dialog
• Subsystem | Computer Event - Add Computer Events dialog• Subsystem | Exchange - Add Exchange Container dialog• Subsystem | File System - Add File System Path dialog• Subsystem | Group Policy - Add Group Policy Container dialog• Subsystem | LDAP Query - Add Active Directory Container dialog• Subsystem | Local Account - Add Local Account dialog• Subsystem | Registry - Add Registry Key dialog• Subsystem | Service - Add Service dialog• Subsystem | SQL - Add SQL Instance dialog• Event Class - Add Facilities or Event Classes dialog• Object Class - Add Object Classes dialog• Severity - Add Severities dialog• Results - Add Results dialog
3. Once you have selected or entered the specific criteria, use the Add button to add it to the selection list at the bottom of the dialog.
4. Select the OK button to save your selection and close the dialog.
To purge events NOT generated by the user(s), computer(s) or group(s) listed on the Who tab, select the Exclude The Following Selection(s) check box on the Who tab.
164

Database Maintenance
ChangeAuditor will now only purge change events that match the ’what’ criteria listed on the What tab. When multiple ’what’ criteria is specified, ChangeAuditor uses the ’or’ operator to determine whether the record should be purged.
Where Tab
By default, (when the Where tab is empty) events captured by all agents will be purged from the database.
To purge events captured by a specific agent, domain or site:
1. On the Where tab, select the Add tool bar button.
2. On the Choose the Agents, Domains or Sites to Include dialog, use the Browse or Search pages to locate and individual agent, domain or site.
Once you have located an agent, domain or site, select it and use the Add button to add it to the selection list at the bottom of the dialog.
3. Once you have selected the agent(s) to be included, select the OK button to save your selection and close the dialog.
ChangeAuditor will now only purge change events generated by the agent(s), domain(s), or site(s) listed on the Where tab.
You can also use the Grid View option to select an agent from a list rather than using the Explorer View to locate it within your environment.
You can use the Add With Events button (instead of Add) to select an agent, domain or site which already has an audited event in the database.
You can expand the Add tool bar button and select the Add Wildcard Expression option to use a wildcard expression to specify an agent (NetBIOS name), domain or site. On the Add Where dialog, select the comparison operator (Like or Not Like) and enter the pattern (character string and * wildcard character) to be used to find a match.
To purge events NOT generated by the agent(s), domain(s) or site(s) listed on the Where tab, select the Exclude The Following Selection(s) check box at the top of the Where tab.
165
Quest ChangeAuditor
Origin Tab
By default, (when the Origin tab is blank) change events will be purged from the database regardless of the workstation from which they originated.
To purge events based on the workstation from which they originated:
1. On the Origin tab, select the Add tool bar button.
2. On the Add Origin dialog, select the comparison operator (Like or Not Like) and enter the pattern (character string and * wildcard character) to be used to find a match.
3. After entering the wildcard expression to be used, select the OK button to close the dialog and add the wildcard expression to the ’Origin’ list.
ChangeAuditor will now only purge change events originating on workstations whose machine name matches the specified wildcard expression.
Comments Tab
By default, all events regardless of what’s in the comment field will be deleted from the production database.
To purge events that contain specific comments:
1. On the Comments tab, in the Search for comments field, enter the comments (word or string of characters) that you want to match.
2. To search for events with comments that do NOT include the contents of the Search for comments field, select the Exclude check box.
3. To search for events that do not contain any comments, select the Blanks check box.
ChangeAuditor will now only purge the change events that meet the criteria entered on the Comments tab.
To purge events NOT originating from the workstations or servers listed on the Origin tab, select the Exclude The Following Selection(s) check box at the top of the Origin tab.
166

12
SQL Reporting Services Configuration
• Introduction
• SQL Reporting Services Page
• SQL Reporting Services Templates
• SQL Reporting Services Wizard

Quest ChangeAuditor
IntroductionChangeAuditor allows you to define SQL Reporting Services (SRS) templates that define all the necessary Report Server information (URL and credentials) and ChangeAuditor data source information for publishing reports. These templates can then be made available to users who which to publish ChangeAuditor reports to SRS. That is, when an authorized user attempts to publish a ChangeAuditor report to SRS using the Create Report(s) Using SQL Reporting Services right-click command on the Searches page, they can use the Import SRS Settings button on the Reporting Services Setup dialog to import the settings defined in an SQL Reporting Services template to publish their reports.
This chapter provides instructions for creating SQL Reporting Services templates, as well as a description of the SQL Reporting Services page and SQL Reporting Services wizard. For a description of the other dialogs mentioned in this chapter, please refer to the online help.
SQL Reporting Services PageThe SQL Reporting Services page is displayed when SQL Reporting Services in the Configuration task list is selected in the navigation pane of the Administration Tasks tab. From this page you can launch the SQL Reporting Services wizard to define the reporting services and data source information needed to publish reports to SRS. You can also edit existing templates, disable/enable templates and remove templates that are no longer being used.
168

SQL Reporting Services Configuration
The SQL Reporting Services page contains an expandable view of all the SQL Reporting Services templates that have been previously defined. To add a new template to this list, use the Add tool bar button. Once added, the following information is provided for each template:
Click the expansion box to the left of the Template name to expand this view and display the following details:
SQL Reporting Services TemplatesTo create a SQL Reporting Services template:
1. Open the Administration Tasks tab.
2. Select the Configuration task button at the bottom of the navigation pane (left-hand pane).
3. Select SQL Reporting Services in the Configuration task list to open the SQL Reporting Services page.
4. Use the Add tool bar button to launch the SQL Reporting Services wizard to define the report server and data source information.
FIELD DESCRIPTION
Template Displays the name assigned to the template when it was created.
Status Indicates whether the template is enabled or disabled.
FIELD DESCRIPTION
URL Displays the Report Server URL specified in the wizard.
Database Displays the Data Source name of the database as specified in the wizard.
Authorized Account
Displays the accounts that are authorized to use this SQL Reporting Services template.
The cells directly under the main heading rows are used for filtering data. That is, as you enter characters into these cells, the client will redisplay the templates that meet the search criteria (i.e., comparison operator and characters entered). For more details about using the data filtering function provided throughout the ChangeAuditor Client, see Filter Data.
169
Quest ChangeAuditor
170
5. On the first page of the wizard:
• Enter a name for the template.• Enter the URL of the SRS server that is to host the
ChangeAuditor reports For example: http://<SQL_Server>/<ReportServer>
where: <SQL_Server> is the name of the server hosting SRS and <ReportServer> is the name of the report server virtual directory. (In a default Reporting Services installation, the name of the virtual directory is reportserver.)
• Enter the user account, credentials and domain for a Windows account the has permissions to copy files to SRS.
• Enter the user account and credentials to be used to access the ChangeAuditor database (data source).
• Use the Test button to verify the credentials entered above.
6. On the second page of the wizard, select the user or group accounts that are authorized to use this template to publish ChangeAuditor reports to SRS.
Use the Browse or Search pages to locate and select the accounts to be included in the template. Use the Add button to add these accounts to the list box at the bottom of the page.
7. Select Finish to create the template and return to the SQL Reporting Services page.
Now when an authorized user attempts to publish a ChangeAuditor report to SRS using the Create Report(s) Using SQL Reporting Services right-click command on the Searches page, they can use the Import SRS Settings button on the Reporting Services Setup dialog to import the settings defined in this template to publish their reports.
This Windows account requires rights to create SRS reports and data sources on the server (a.k.a. Content Manager).
The user and group accounts entered on this page are the ONLY accounts that are allowed to import the settings in this template to publish ChangeAuditor reports to SRS. For example, the first time an authorized user selects the Import SRS Settings button on the Reporting Services Setup dialog, the ChangeAuditor Administrators will not be able to import the settings in this template to publish reports to SRS unless they are also added as an authorized account on this page.
SQL Reporting Services Configuration
171
To modify a template:
1. On the SQL Reporting Services page, select the template to be modified and select the Edit tool bar button or right-click command.
2. This will display the SQL Reporting Services wizard, where you can modify the report server and data source settings and authorized accounts included in the template.
3. Select the Finish button.
To disable a template:
The disable feature allows you to temporarily disable the use of a template without having to remove it from ChangeAuditor.
1. On the SQL Reporting Services page, use one of the following methods to disable a template:
• Click in the Status cell for the template to be disabled and select Disabled
• Right-click the template to be disabled and select Disable
The entry in the Status column for the template will change to ’Disabled’.
2. To re-enable a template, use the Enable option in either the Status cell or right-click menu.
To delete a template:
1. On the SQL Reporting Services Auditing page, use one of the following methods to delete a template:
• Select the template to be deleted and use the Delete | Delete Template tool bar button
• Right-click the template to be deleted and select Delete
2. A dialog will be displayed confirming that you want to delete the selected template. Select Yes.
SQL Reporting Services WizardThe SQL Reporting Services wizard is displayed when you select the Add tool bar button on the SQL Reporting Services page. Using this wizard you can define the reporting services and data source information to be included in the template, as well the user and group accounts authorized to use this template to publish reports to SRS.

Quest ChangeAuditor
The following table provides a description of the fields and controls in the SQL Reporting Services wizard.
A red flashing icon indicates that you have not yet entered the required information. A green check mark indicates that the required information has been specified and you are ready to proceed.
CREATE OR MODIFY A SQL REPORTING SERVICES TEMPLATE PAGE
Use this page to enter a name for the template and credentials to be used to access the SQL Reporting Services server and ChangeAuditor shared data source.
Template Name Enter a descriptive name for the SQL Reporting Services template being created.
SQL SERVER REPORTING SERVICES
Note: SQL Reporting Services must be configured with anonymous access disabled.
Note: The account entered in this section requires rights to create SRS reports and data sources on the server (a.k.a. Content Manager).
172
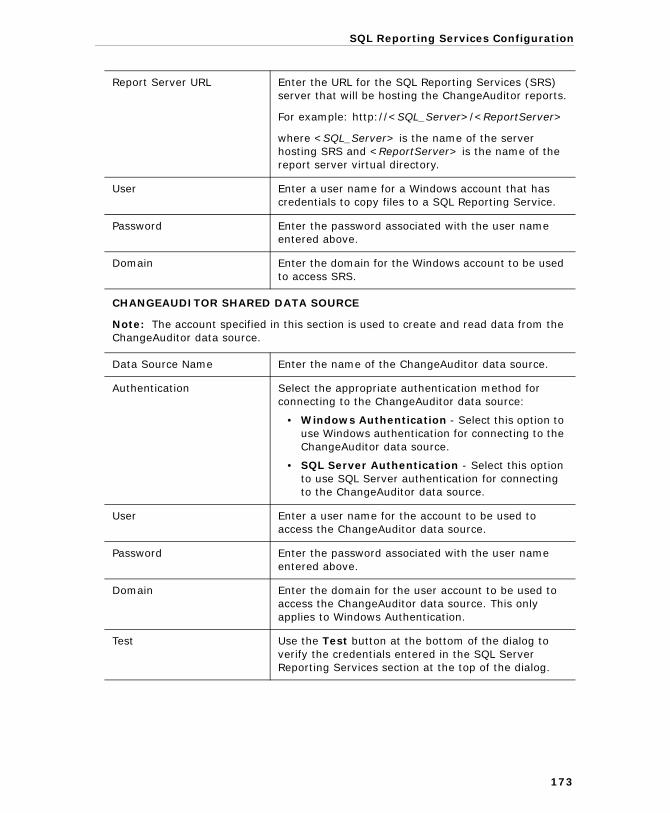
SQL Reporting Services Configuration
Report Server URL Enter the URL for the SQL Reporting Services (SRS) server that will be hosting the ChangeAuditor reports.
For example: http://<SQL_Server>/<ReportServer>
where <SQL_Server> is the name of the server hosting SRS and <ReportServer> is the name of the report server virtual directory.
User Enter a user name for a Windows account that has credentials to copy files to a SQL Reporting Service.
Password Enter the password associated with the user name entered above.
Domain Enter the domain for the Windows account to be used to access SRS.
CHANGEAUDITOR SHARED DATA SOURCE
Note: The account specified in this section is used to create and read data from the ChangeAuditor data source.
Data Source Name Enter the name of the ChangeAuditor data source.
Authentication Select the appropriate authentication method for connecting to the ChangeAuditor data source:
• Windows Authentication - Select this option to use Windows authentication for connecting to the ChangeAuditor data source.
• SQL Server Authentication - Select this option to use SQL Server authentication for connecting to the ChangeAuditor data source.
User Enter a user name for the account to be used to access the ChangeAuditor data source.
Password Enter the password associated with the user name entered above.
Domain Enter the domain for the user account to be used to access the ChangeAuditor data source. This only applies to Windows Authentication.
Test Use the Test button at the bottom of the dialog to verify the credentials entered in the SQL Server Reporting Services section at the top of the dialog.
173

Quest ChangeAuditor
Select Accounts Authorized to Use This SRS Template Page
When you enter a user and group account on this page, you are saying that these users/groups are the only ones that are allowed to use this template to publish ChangeAuditor reports to SRS. For example, the first time an authorized user selects the Import SRS Settings button on the Reporting Services Setup dialog, the ChangeAuditor Administrators will not be able to use this template to publish reports to SRS unless they are also added as an authorized account on this page.
Browse Page Displays a hierarchical view of the containers in your environment allowing you to locate and select the user or group account(s) to be included in this template.
Once you have selected an account, use the Add button to add it to the list box at the bottom of the page.
Search Page Use the controls at the top of the Search page to search your environment to locate the desired user or group account.
Once you have selected an account, use the Add button to add it to the list box at the bottom of the page.
Options Page Use the Options page to modify the search options or global catalog to be used to retrieve directory objects.
174

SQL Reporting Services Configuration
Note: For more information on using the Browse, Search or Options pages, please refer to Directory Object Picker.
Account List The list box located across the bottom of this page, displays the accounts that are authorized to import the SRS settings in this template to publish ChangeAuditor reports to SRS. Use the buttons located above this list box to add and remove objects:
Add - select a user or group in the Browse or Search page and select the Add button to add it to the list.
Remove - select an entry from the list and then select the Remove button to remove it.
175


13
ChangeAuditor User Interface Authorization
• Introduction
• Application User Interface Authorization Page
• Add Task Definition
• Add Role Definition
• Add Application Group

Quest ChangeAuditor
IntroductionRole-based access control allows you to assign users/groups to roles based on their job functions and grant these roles permissions to perform related tasks. Role-based access control can be broken down into the following entities that are used to define ’who can do what’:
• Operation: a single action that users need to be granted rights to perform
• Task: a collection of logically related operations
• Role: a logical group of users and the tasks they are allowed to perform
Authorization for using the different features of the ChangeAuditor Client is defined using the Application User Interface Authorization Page. By default, the following roles and tasks are defined; therefore, no action is required on your part to start using the ChangeAuditor Client:
• AD Protection Role - has access to view Active Directory and Group Policy protection in ChangeAuditor
• Administrator Role - has full administrator privileges with access to all aspects of ChangeAuditor, including the deployment of ChangeAuditor Agents
• Operator Role - has only operator privileges with limited access to ChangeAuditor, e.g. these users can define and run searches, but they cannot access the Administration, Statistics or Deployment pages
• AD Protection Task - grants access to Active Directory and Group Policy protection tasks
• Administrator Task - grants full administrator access
• Operator Task - grants operator access only
During the ChangeAuditor installation, you added user accounts to the ChangeAuditor security groups (ChangeAuditor Administrators - <InstallationName> and ChangeAuditor Operators - <InstallationName>). These security groups are automatically added as members of the appropriate role (Administrator Role and Operator Role). However, using the Application User Interface Authorization page on the Administration tab, you can add new task and role definitions or delete user-defined roles and tasks that are no longer being used.
The Administrator and Operator roles and tasks cannot be removed or renamed.
178

ChangeAuditor User Interface Authorization
179
In addition, using the AD Protection role and task, ChangeAuditor administrators can specify who is authorized to view protection definitions for Active Directory and Group Policy objects. Please refer to the ChangeAuditor for Active Directory User Guide for more information on restricting access to specific domains and organizational units.
This chapter provides a description of the Application User Interface Authorization page. It also provides instructions for adding task definitions, role definitions and application groups to define who can use the different features available in the ChangeAuditor Client. For a description of the other dialogs mentioned in this chapter, please refer to the online help.
Application User Interface Authorization PageThe Application User Interface Authorization page is displayed when Application User Interface (in the Configuration task list) is selected in the navigation pane of the Administration Tasks tab.
From this page, you can define who is authorized to perform the different operations available in the ChangeAuditor Client, including performing the administrative tasks listed on the Administration Tasks tab and defining search criteria.

Quest ChangeAuditor
The Application User Interface Authorization page contains an expandable view of the role and task definitions which define role-based access. To add a role or task, use the appropriate Add tool bar command: Add |Add Role Definition or Add | Add Task Definition.
Once added, the following information is provided for each definition:
Click the expansion box to the left of a Role Definition to expand this view and display the following details:
FIELD DESCRIPTION
Name Displays the name assigned to the role or task definition when it was created.
Type Indicates the type of definition:
• Role
• Task
Description Displays the description entered when the role or task definition was created.
FIELD DESCRIPTION
Member Displays the user and group accounts that are assigned as members of the selected role.
Type Indicates the type of account in the selected role:
• Group
• User
• Application Group
Description Displays the description from the Members tab of the Authorization Role dialog when the role was created.
The cells directly under the main heading rows are used for filtering data. That is, as you enter characters into these cells, the client will redisplay the roles or tasks that meet the search criteria (i.e., comparison operator and characters entered). For more details about using the data filtering function provided throughout the ChangeAuditor Client, see Filter Data.
180

ChangeAuditor User Interface Authorization
Add Task DefinitionA task is a collection of operations and sometimes lower-level tasks that can be performed.
1. Open the Administration Tasks tab.
2. Select the Configuration task button at the bottom of the navigation pane (left-hand pane).
3. Select Application User Interface in the Configuration task list to open the Application User Interface Authorization page.
4. Expand the Add tool bar button and select the Add Task Definition command.
5. On the Task page of the Authorizations: Task dialog, enter the following information:
• name for the task• brief description of the task
6. Open the Definition tab and add the operations and lower-level tasks that can be performed:
• To add a lower-level task, select the Add Task button and select a task from the Authorizations: Task Definitions dialog.
• To add an operation, select the Add Operation button and select one or more operations from the Authorizations: Operations dialog.
7. Use the OK button to save your new task definition and close the Authorizations: Task dialog.
8. This task will now be included in the task list on the Authorizations: Task Definitions dialog and can be included in a Role Definition.
Task definitions are also listed on the Application User Interface Authorization page.
181

Quest ChangeAuditor
Add Role DefinitionA role definition defines who is authorized to perform specific tasks and/or individual operations in the ChangeAuditor Client. A role usually corresponds to a job function or responsibility and consists of a collection of tasks that a user must be authorized to perform to do their job function.
1. Open the Application User Interface Authorization page.
2. Select the Add tool bar button or expand the Add button and select Add Role Definition.
3. On the Authorizations: Role dialog, enter the following on the Role tab:
• a name for the role• a brief description of the role
4. Open the Definition tab to add a role, task or operation to this role:
• To add a role, select the Add Role button and select a role from the Authorizations: Role Definitions dialog.
• To add a task, select the Add Task button and select a task from the Authorizations: Task Definitions dialog.
• To add an operation, select the Add Operation button and select one or more operations from the Authorizations: Operations dialog.
5. Open the Members tab to add a user, group or application group to this role.
• To add a user or group, select the Add User or Group button, which will display the Select one or more Directory Objects dialog. Use the Browse page or Search page to locate and select the user and/or group account(s) to be added.
• To add an application group, select the Add Application Group button and select an application group from the Authorizations: Application Groups dialog.
6. Use the OK button to save your new role definition and close the Authorizations: Role dialog.
Role Definitions are displayed back on the Application User Interface Authorization page.
If a user or group account is added to multiple access roles, the account will have authority to perform the operations defined in the more authoritative role.
182

ChangeAuditor User Interface Authorization
Add Application GroupApplication groups allow you an alternate way of assigning users to roles. An application group is a feature of Windows Authorization Manager (AzMan) where you can define a group of users without having to go through your domain administrator to add a new group to Active Directory.
1. Open the Application User Interface Authorization page.
2. Expand the Add tool bar button and select Add Application Group.
3. On the Group tab of the Authorizations: Application Group dialog, enter the following information:
• name for the application group• brief description for the application group• basic vs. LDAP query
4. Open the Members tab and add the users and groups that are to be members of this application group.
• To add a user or group, select the Add User of Group button, which will display the Select one or more Directory Objects dialog. Use the Browse page or Search page to locate and select the user(s) and/or group(s) to be added.
• To add an application group, select the Add Application Group button and select an application group from the Authorizations: Application Groups dialog.
5. Optionally, open the Non-Members tab and add the users and groups that are to be excluded from this application group.
• To add a user or group, select the Add User of Group button, which will display the Select one or more Directory Objects dialog. Use the Browse page or Search page to locate and select the user(s) and/or group(s) to be added.
• To add an application group, select the Add Application Group button and select an application group from the Authorizations: Application Groups dialog.
6. Use the OK button to save your new role definition and close the Authorizations: Role dialog.
7. When the selected member(s) now try to define Active Directory protection they will be restricted to defining protection for the selected domain or organizational unit.
Basic groups are a lot like Active Directory groups; however you can define both included and excluded members. LDAP query groups allow you to define an LDAP query to dynamically create a group of users who are similar in some way. Refer to the Windows Authorization Manager documentation for more information on basic and LDAP query groups.
183


14
Enable/Disable Event Auditing
• Introduction
• Audit Events Page
• Enable/Disable Event Auditing
• Modify Event’s Severity Level or Event Class Description
• Define Events to be Captured Based on Results
• View Event’s Knowledge Base Entry

Quest ChangeAuditor
IntroductionChangeAuditor provides in-depth, real-time auditing for key Active Directory configuration changes. ChangeAuditor allows you to enable/disable the auditing of individual audited events so that ChangeAuditor is auditing only those events that are vital to your organization’s operation. In addition, ChangeAuditor allows you to modify the severity level (High, Medium, or Low) and description assigned to each audited event. The severity level is used by ChangeAuditor when processing events and to help you in determining the potential level of risk associated with each configuration change event.
Audit Events PageThe Audit Events page lists all of the events available for auditing by ChangeAuditor. It also displays the facility to which the event belongs, the severity assigned to each event, if the event is enabled or disabled and the type of ChangeAuditor license that is required.
Changes made on this page are global and will apply to ALL ChangeAuditor agents.
186
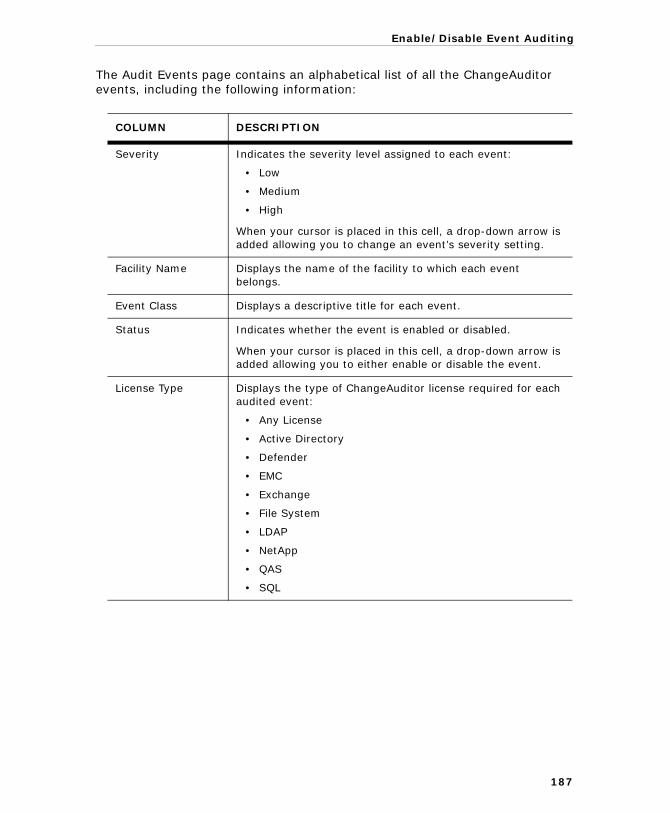
Enable/Disable Event Auditing
The Audit Events page contains an alphabetical list of all the ChangeAuditor events, including the following information:
COLUMN DESCRIPTION
Severity Indicates the severity level assigned to each event:
• Low
• Medium
• High
When your cursor is placed in this cell, a drop-down arrow is added allowing you to change an event’s severity setting.
Facility Name Displays the name of the facility to which each event belongs.
Event Class Displays a descriptive title for each event.
Status Indicates whether the event is enabled or disabled.
When your cursor is placed in this cell, a drop-down arrow is added allowing you to either enable or disable the event.
License Type Displays the type of ChangeAuditor license required for each audited event:
• Any License
• Active Directory
• Defender
• EMC
• Exchange
• File System
• LDAP
• NetApp
• QAS
• SQL
187
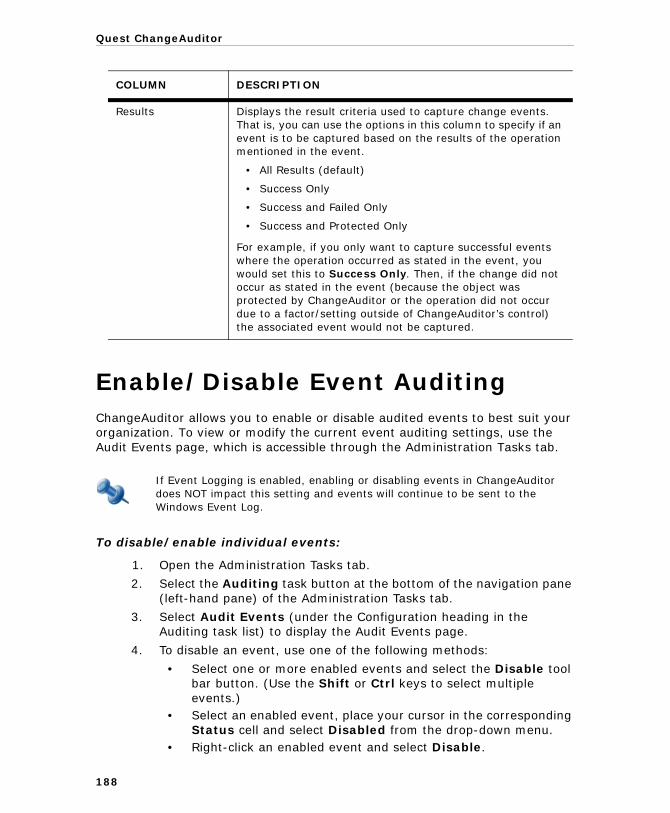
Quest ChangeAuditor
188
Enable/Disable Event AuditingChangeAuditor allows you to enable or disable audited events to best suit your organization. To view or modify the current event auditing settings, use the Audit Events page, which is accessible through the Administration Tasks tab.
To disable/enable individual events:
1. Open the Administration Tasks tab.
2. Select the Auditing task button at the bottom of the navigation pane (left-hand pane) of the Administration Tasks tab.
3. Select Audit Events (under the Configuration heading in the Auditing task list) to display the Audit Events page.
4. To disable an event, use one of the following methods:
• Select one or more enabled events and select the Disable tool bar button. (Use the Shift or Ctrl keys to select multiple events.)
• Select an enabled event, place your cursor in the corresponding Status cell and select Disabled from the drop-down menu.
• Right-click an enabled event and select Disable.
Results Displays the result criteria used to capture change events. That is, you can use the options in this column to specify if an event is to be captured based on the results of the operation mentioned in the event.
• All Results (default)
• Success Only
• Success and Failed Only
• Success and Protected Only
For example, if you only want to capture successful events where the operation occurred as stated in the event, you would set this to Success Only. Then, if the change did not occur as stated in the event (because the object was protected by ChangeAuditor or the operation did not occur due to a factor/setting outside of ChangeAuditor’s control) the associated event would not be captured.
If Event Logging is enabled, enabling or disabling events in ChangeAuditor does NOT impact this setting and events will continue to be sent to the Windows Event Log.
COLUMN DESCRIPTION

Enable/Disable Event Auditing
189
5. To enable an event, use one for the following methods:
• Select one or more disabled events and select the Enable tool bar button. (Use the Shift or Ctrl keys to select multiple events.)
• Select a disabled event, place your cursor in the corresponding Status cell and select Enabled from the drop-down menu.
• Right-click a disabled event and select Enable.
Modify Event’s Severity Level or Event Class DescriptionIn addition, each event has been assigned a severity level and a description, which can also be changed based on your organization’s operation. To view or modify the current event auditing settings, use the Audit Events page, which is accessible through the Administration Tasks tab.
To modify an event’s severity level:
1. Open the Audit Events page.
2. Use one of the following methods to change an event’s severity:
• Select one or more events and select the appropriate Severity (High, Medium or Low) tool bar button. Use the Shift or Ctrl keys to select multiple events.
• Select an event, place your cursor in the corresponding Severity cell and select the appropriate severity level from the drop-down menu.
• Right-click an event and select the appropriate severity level from the context menu.
3. To reset an event’s severity to the factory default, select one or more events and use the Default tool bar button.
To modify an event class description:
1. Open the Audit Events page.
2. Select the event from the list and select the Edit tool bar button.
This will display the Rename dialog listing the existing description and allowing you to enter a new description for the selected event.
3. In the New field, enter the new description for the selected event and select OK.
You can also disable or enable an event using the Disable/Enable tool bar button at the top of the Event Details pane on a Search Results page.

Quest ChangeAuditor
Define Events to be Captured Based on ResultsThe Results column on the Audited Events page allows you to specify if an individual event is to be captured by ChangeAuditor based on the results of the operation performed in the event. That is, you can specify to capture an individual event based on the following results:
• All Results - capture event regardless of the result returned.
• Success Only - capture event only if the operation occurred as stated in the event.
• Success and Failed Only - capture event if the operation occurred as stated in the event or if it did not occur due to a factor/setting outside of ChangeAuditor’s control.
• Success and Protected Only - capture event if the operation occurred as stated in the event or if it did not occur because the object was protected using ChangeAuditor’s protection feature.
To change the Results criteria for capturing an event:
1. Open the Audit Events page.
2. Locate the event to be modified.
3. Click in the Results cell for that event and select one of the following options:
• All Results (default)• Success Only• Success and Failed Only• Success and Protected Only
4. ChangeAuditor will now only capture and return the event if the operation mentioned in the event meets the Results criteria selected.
190

Enable/Disable Event Auditing
View Event’s Knowledge Base EntryChangeAuditor provides access to an audited event knowledge base, which contains detailed descriptions for each audited event, including information about how ChangeAuditor detected the configuration change event, what the changed parameter controls, and the consequence of such a change. The knowledge base entries also include links to articles or documents that offer additional information about the audited event.
To launch a knowledge base entry:
1. Open the Audit Events page.
2. Select an event from the list and select the Knowledgebase tool bar button or right-click command.
This will launch your browser and display the event’s knowledge base entry.
191


15
Custom Registry Auditing
• Introduction
• Registry Auditing Page
• Registry Auditing Templates
• Registry Auditing Wizard

Quest ChangeAuditor
IntroductionThe ability to audit registry settings improves operational efficiency dramatically. For example, some applications, such as virus scanning software, modify registry keys when an update is installed. By capturing these change events proactively, Administrators can determine whether or not specific machines received an update.
Furthermore, other applications may warrant the tracking of modifications to certain registry settings to ensure that they have not been tampered with. ChangeAuditor’s enhanced registry auditing feature allows you to audit changes to a specific key or to a folder and its sub folders.
To capture registry audited events in ChangeAuditor, you must first complete the following steps to define the registry keys to be audited and the events to be captured:
1. Create a Registry Auditing template which specifies the registry key(s) and events to be audited. For more information on creating a Registry Auditing template, please refer to Registry Auditing Templates.
2. Add this template to an agent configuration. For more information on adding a Registry Auditing template to an agent configuration, please refer to Define Agent Configurations.
3. Assign the agent configuration to ChangeAuditor agents. For more information on assigning an agent configuration to an agent, please refer to Assign Agent Configurations to Agents.
This chapter provides instructions for creating Registry Auditing templates, as well as a description of the Registry Auditing page and Registry Auditing wizard. For a description of the other dialogs mentioned in this chapter, please refer to the online help.
For Registry auditing, event logging is disabled by default; and when enabled, only configured registry activities will be captured in the Windows Event Log.
194

Custom Registry Auditing
Registry Auditing PageThe Registry Auditing page is displayed when Registry in the Auditing task list is selected in the navigation pane of the Administration Tasks page. From this page you can launch the Registry Auditing wizard to specify a registry key to be audited. You can also edit existing templates, disable/enable templates and remove templates that are no longer being used.
The Registry Auditing page contains an expandable view of all the Registry Auditing templates that have been previously defined. To add a new template to the list, use the Add tool bar button. Once added, the following information is provided for the template:
Click the expansion box to the left of the Template name to expand this view and display additional details about an auditing template.
FIELD DESCRIPTION
Template Displays the name assigned to the template when it was created.
Status Indicates whether the auditing template is enabled or disabled.
FIELD DESCRIPTION
Registry Key Displays the name of the file path for the registry key in the HKEY_LOCAL_MACHINE hive which was selected for auditing on the Key page of the wizard.
Status Indicates whether the registry key is enabled or disabled.
195

Quest ChangeAuditor
Registry Auditing TemplatesIn order to enable custom registry auditing in ChangeAuditor, you must first create a Registry Auditing template which specifies the registry keys and events to be audited. You can then assign this template to an agent configuration, which then needs to be assigned to the appropriate ChangeAuditor agents.
To create a registry auditing template:
1. Open the Administration Tasks tab.
2. Select the Auditing task button from the bottom of the navigation pane (left-hand pane).
3. Select Registry (under the Agent Templates heading in the Auditing task list) to open the Registry Auditing page.
4. Use the Add tool bar button to launch the Registry Auditing wizard which will step you through the process of creating a Registry Auditing template.
5. Enter a name for the template.
6. Enter or use the Browse button to locate and select the registry key in the HKEY_LOCAL_MACHINE hive to be audited. Use the Add button to add the selected key to the selection list.
Scope Displays the scope selected for this template on the Key page of the wizard:
• This object only
• This object and child objects only
• This object and all child objects
Value If applicable, this column displays the specific value selected for auditing (only applies to ‘This Object and Child Objects Only’ scope).
Operations Displays the events selected for auditing on the Events page of the wizard. Hover your mouse over this cell to view all of the events included in the template.
The cells directly under the main heading rows are used for filtering data. That is, as you enter characters into these cells, the client will redisplay the templates that meet the search criteria (i.e., comparison operator and characters entered). For more details about using the data filtering function provided throughout the ChangeAuditor Client, see Filter Data.
FIELD DESCRIPTION
196
Custom Registry Auditing
7. In the Scope cell, use the drop-down menu to select the scope of coverage:
• This object only• This object and child objects only• This object and all child objects (default)
8. On the Events tab select the events that are to be included in the audit. You can either select individual events or select a check box in the heading to select all of the events listed under the heading.
9. If you selected the This Object and Child Objects Only option in the Scope cell, you can also specify to audit a specific value for the selected key. To audit a specific value, open the Value tab and enter the value to be audited in the text box provided.
10. Repeat steps 6- 9 to add additional registry keys to the template.
11. To create the template without assigning it to an agent configuration, select the Finish button.
Selecting the Finish button will create the template, close the wizard and return to the Registry Auditing page, where the newly created template will now be listed.
12. To create the template and assign it to an agent configuration, expand the Finish button and select the Finish and Assign to Agent Configuration option.
This will display the Configuration Setup dialog, allowing you to select the agent configuration to which this template is to be assigned.
To add another registry key to a registry auditing template:
1. On the Registry Auditing page, select the template to be modified and select the Edit tool bar button or right-click command.
2. On the Registry Auditing wizard, enter or use the Browse button to locate and select the registry key to be added.
3. In the Scope cell, use the drop-down menu to select the scope of coverage.
4. On the Events page, select the events to be audited.
5. If applicable, open the Value tab to enter the specific value to be audited.
6. Select the Finish button or expand the Finish button and select Finish and Assign to Agent Configuration.
Back on the Registry Auditing page, you can also use the Assign tool bar button to assign the selected template to an agent configuration. Selecting this button will display the Configuration Setup dialog allowing you to select the agent configuration to which this template is to be assigned.
197

Quest ChangeAuditor
To modify the key properties in a registry auditing template:
1. On the Registry Auditing page, select the registry key whose properties are to be modified, and select the Edit tool bar button or right-click command.
2. This will display the Registry Auditing wizard, where you can modify the following properties:
• Registry key (Key page)• Scope (Key page)• Events (Event page)
3. Once you have made your modifications, select the Modify Key Properties button. The changes made will be reflected in the list box at the bottom of the page.
4. Select the Finish button or expand the Finish button and select Finish and Assign to Agent Configuration.
To disable a registry auditing template:
The disable feature allows you to temporarily stop auditing the specified registry key without having to remove the auditing template or individual registry key from an active template.
1. On the Registry Auditing page, use one of the following methods to disable a registry auditing template:
• Click in the Status cell for the registry template to be disabled and select Disabled
• Right-click the template to be disabled and select Disable
The entry in the Status column for the template will change to ’Disabled’.
2. To re-enable the auditing template, use the Enable option in either the Status cell or right-click men.
To disable a registry key within an auditing template:
1. On the Registry Auditing page, use one of the following methods to disable a registry key:
• Click in the Status cell for the registry key to be disabled, and select Disabled from the drop-down menu
• Right-click the registry key to be disabled and select Disable
The entry in the Status column for the registry key will change to ’Disabled’.
2. To re-enable the auditing of a registry key, use the Enable option in either the Status cell or right-click menu.
198

Custom Registry Auditing
To delete a registry auditing template:
1. On the Registry Auditing page, use one of the following methods to delete a registry auditing template:
• Select the template to be deleted and use the Delete | Delete Template tool bar button
• Right-click the template to be deleted and select Delete
2. A dialog will be displayed confirming that you want to delete the selected template. Select Yes.
To delete a registry key from a registry auditing template:
1. On the Registry Auditing page, use one of the following methods to delete a registry key from an auditing template:
• Select the registry key to be deleted and use the Delete | Delete Registry Key tool bar button
• Right-click the registry key to be deleted and select Delete• Select the template to be modified and select the Edit tool bar
button or right-click command. On the Registry Auditing wizard, select the registry key to be removed and select the Remove button.
2. A dialog will be displayed confirming that you want to delete the registry key from the template. Select Yes.
If the registry key is the last one in the template, deleting this registry key will also delete the template.
199

Quest ChangeAuditor
Registry Auditing WizardThe Registry Auditing wizard is displayed when you select the Add tool bar button on the Registry Auditing page. From this wizard, select the registry key to be audited as well as the events to be audited.
The following table provides a description of the fields and controls in the Registry Auditing wizard.
A red flashing icon indicates that you have not yet entered the required information. Hovering your cursor over this icon displays a tool tip explaining what needs to be entered. A green check mark indicates that the required information has been specified and you are ready to proceed.
CREATE OR MODIFY A REGISTRY AUDITING TEMPLATE PAGE
Use the first page of the wizard to enter a name for the template and select the registry key(s) to be audited.
Template Name Enter a descriptive name for the registry auditing template being created.
200

Custom Registry Auditing
Registry key in the HKEY_LOCAL_MACHINE hive
Enter or select the registry key in the HKEY_LOCAL_MACHINE hive to be audited.
Browse Use the Browse button to select the type of registry to be browsed to locate the registry key:
• Local Registry - select this option to browse the registry for the local computer
• Remote Registry - select this option to browse the registry for a remote server
Note: Make sure that the selected remote computer is on the network, has remote administration enabled and that both computers are running the remote registry service. If the remote computer does not allow remote admin access, a message will be displayed explaining that you need to select a different server.
Add Use the Add button to add the specified registry key to the template. Registry keys to be included in the template will be listed in the list in the middle pane of this dialog.
Remove Select a registry key from the list and use the Remove button to remove the selected registry key from the template.
Registry Keys List The list box located across the middle of the page displays the registry keys to be included in the Registry Auditing template.
Use the drop-down box in the Scope cell of the list box to specify the scope of coverage:
• This Object Only- select this option to audit only this key, not its values or subkeys. (Default)
• This Object and Child Objects Only - select this option to audit this key, its values and direct subkeys only. This is not recursive.
• This Object and All Child Objects - select this option to audit this key, all subkeys and all values.
Select a key in this list to enable the corresponding Events and Value tabs at the bottom of this page.
201

Quest ChangeAuditor
Events Tab
Use the Events tab to select the type of events (e.g., registry key added, registry key deleted) that are to be audited for the selected registry key. The contents of this tab is based on the entry selected above in the Registry Keys list.
Key Events Select the Key events to audit. Select the Key Events check box to select all of the Key events listed or select individual events from the list.
Value Events Select the Value events to audit. Select the Value Events check box to select all of the Value events listed or select individual events from the list.
Value Tab
If you selected the This Object and Child Objects Only option in the Scope cell, this additional page will be displayed allowing you to enter a specific value to be audited for the selected key.
Audit a Specific Value Enter the value to be audited for the selected key.
202

16
Custom Service Auditing
• Introduction
• Services Auditing Page
• Service Auditing Templates
• Service Auditing Wizard
Quest ChangeAuditor
IntroductionWindows services are the backbone of applications and require frequent administrator actions. Changes can be simple, such as changing a startup type or service account password. But, even the simple changes can cause major issues. In fact, in this case it would render an application useless to its users. ChangeAuditor provides service auditing capabilities, including the ability to track who starts and stops a service.
To capture service audited events, you must first complete the following steps to define the services to be audited:
1. Create a Service Auditing template which specifies the system service(s) to be audited or excluded from auditing. For more information on creating a template, please refer to Service Auditing Templates.
2. Add this template to an agent configuration. For more information on how to add a template to an agent configuration, please refer to Define Agent Configurations.
3. Assign the agent configuration to ChangeAuditor agents. For more information on how to assign an agent configuration to an agent, please refer to Assign Agent Configurations to Agents.
This chapter provides instructions for creating Service Auditing templates, as well as a description of the Service Auditing page and Service Auditing wizard. For a description of the other dialogs mentioned in this chapter, please refer to the online help.
On an upgrade, ChangeAuditor will apply a default Service Auditing template to the Default Configuration which will audit all services as the product did in the past. To specify individual services, you will need to modify this auditing template for the Default Configuration or create and apply a new Service Auditing template.
For Service auditing, event logging is disabled by default; when enabled, only configured service activities will be captured in the Windows Event Log.
204

Custom Service Auditing
Services Auditing PageThe Services Auditing page is displayed when Services in the Auditing task list is selected in the navigation pane of the Administration Tasks tab. From this page you can launch the Service Auditing wizard to define the system services to be included in the auditing template. You can also edit existing templates, disable/enable templates and remove templates that are no longer being used.
The Service Auditing page contains an expandable view of all the Service Auditing templates that have been previously defined. To add a new template to this list, use the Add tool bar button. Once added, the following information is provided for each template:
FIELD DESCRIPTION
Template Displays the name assigned to the template when it was created.
Status Indicates whether the auditing template is enabled or disabled.
Exclude Displays the option selected to determine which services are to be included or excluded from auditing:
• Audit ALL
• Audit all EXCEPT
• Audit ONLY
205

Quest ChangeAuditor
206
When individual services have been included in a Service Auditing template, click the expansion box to the left of the Template name to expand this view and display the following details:
Service Auditing TemplatesIn order to enable service auditing in ChangeAuditor, you must first create a Service Auditing template which specifies the system services to be audited or those to be excluded from auditing. You can then assign this template to an agent configuration, which then needs to be assigned to the appropriate ChangeAuditor agents.
To create a service auditing template:
1. Open the Administration Tasks tab.
2. Select the Auditing task button at the bottom of the navigation pane (left-hand pane).
3. Select Services (under the Agent Template heading in the Auditing task list) to open the Services Auditing page.
4. Use the Add tool bar button to launch the Service Auditing wizard which allows you to define the system services to be included in the template.
5. Enter a name for the template.
6. Select one of the following options to define whether this template is to include or exclude system services for auditing:
• Audit ALL services (default)• Audit ALL services except the following• Audit ONLY the following services
FIELD DESCRIPTION
Service Displays the name of the service(s) included in the template.
Status Indicates whether the service is enabled or disabled.
Display Name Displays the display name for the listed services.
The cells directly under the main heading rows are used for filtering data. That is, as you enter characters into these cells, the client will redisplay the templates that meet the search criteria (i.e., comparison operator and characters entered). For more details about using the data filtering function provided throughout the ChangeAuditor Client, see Filter Data.
Custom Service Auditing
7. If you selected either the Audit ALL services except the following or the Audit ONLY the following services option, the data grid will be activated allowing you to select the services to be included or excluded depending on the option selected.
From the services listed, select one or more services and use the Add button to move them to the list box located at the bottom of the page. Or you can use the Add All button to move all of the services listed to the list box.
8. If you would like to view the services on a different server, use the browse button to the far right of the field entitled You are viewing services on.
Selecting the browse button will display the Select a Directory Object dialog, where you can use either the Browse or Search pages to locate and select a different server. After selecting the server to be viewed, use the Select button to close the dialog and display the services found on the selected server.
9. To create the template without assigning it to an agent configuration, select the Finish button.
Selecting the Finish button will create the template, close the wizard and return to the Services Auditing page, where the newly created template will now be listed.
10. To create the template and assign it to an agent configuration, expand the Finish button and select Finish and Assign to Agent Configuration.
This will display the Configuration Setup dialog allowing you to select the agent configuration to which this template is to be assigned.
To modify a template:
1. On the Services Auditing page, select the template to be modified and select the Edit tool bar button or right-click command.
2. This will display the Service Auditing wizard, where you can modify the current list of services included in the template.
3. Select the Finish button or expand the Finish button and select Finish and Assign to Agent Configuration.
Back on the Service Auditing page, you can also use the Assign tool bar button to assign the selected template to an agent configuration. Selecting this button will display the Configuration Setup dialog allowing you to select the agent configuration to which this template is to be assigned.
207

Quest ChangeAuditor
To disable a template:
The disable feature allows you to temporarily stop auditing the specified service without having to remove the auditing template or individual service from an active template.
1. On the Services Auditing page, use one of the following methods to disable a service auditing template:
• Click in the Status cell for the service template to be disabled and select Disabled
• Right-click the template to be disabled and select Disable
The entry in the Status column for the template will change to ’Disabled’.
2. To re-enable a template, use the Enable option in either the Status cell or right-click menu.
To disable the auditing of a service within a template:
1. On the Services Auditing page, use one of the following methods to disable a service:
• Click in the Status cell for the service to be disabled, and select Disabled
• Right-click the service to be disabled and select Disable
The entry in the Status column for the service will change to ’Disabled’.
2. To re-enable the auditing of a service, use the Enable option in either the Status cell or right-click menu.
To delete a template:
1. On the Services Auditing page, use one of the following methods to delete a service auditing template:
• Select the template to be deleted and use the Delete | Delete Template tool bar button
• Right-click the template to be deleted and select Delete
2. A dialog will be displayed confirming that you want to delete the selected template. Select Yes.
To delete a service from an auditing template:
1. On the Services Auditing page, use one of the following methods to delete a service from an auditing template:
• Select the service to be deleted and use the Delete | Delete Service tool bar button
• Right-click the service to be deleted and select Delete
208

Custom Service Auditing
• Select the template to be modified and select the Edit tool bar button or right-click command. On the wizard, select the service to be deleted and select the Remove button.
2. A dialog will be displayed confirming that you want to delete the service from the template. Select Yes.
Service Auditing WizardThe Service Auditing wizard is displayed when you select the Add tool bar button on the Services Auditing page. Using this wizard you can define the system services to be included in the template.
The following table provides a description of the fields and controls in the Service Auditing wizard.
If the service is the last one in the template, deleting this service will also delete the template.
A red flashing icon indicates that you have not yet entered the required information. Hovering your cursor over this icon displays a tool tip explaining what needs to be entered.
209

Quest ChangeAuditor
CREATE OR MODIFY A SERVICE AUDITING TEMPLATE PAGE
Use this page to enter a name for the template and select the services that are to be audited.
Template Name Enter a descriptive name for the Service Auditing template being created.
Select one of the following options to define whether this template is to include or exclude system services for auditing:
• Audit ALL services (default)
• Audit ALL services except the following
• Audit ONLY the following services
Service Data Grid If you selected either the Audit ALL services except the following or the Audit ONLY the following services option, the data grid will be activated allowing you to select the services to be included or excluded depending on the option selected.
Select the service(s) to be included in the template and use the Add button to add them to the list box at the bottom of the dialog.
210
Custom Service Auditing
You are viewing services on Displays the name of the server from which the service data grid was populated.
Use the browse button to the right of this field to select a different server. The services found on the selected server will then be displayed.
Services List The list box located across the bottom of the page displays the individual services to be included in the Services Auditing template. Use the buttons above this list box to add services to or remove services.
Add - Use the Add button to add the services selected in the Services data grid to the list.
Add All - Use the Add All button to add all of the services listed in the Service data grid to the list.
Remove - Select a service entry in the list and use the Remove button to remove it from the template.
Note: If you want to audit all services, this list will be empty.
211


17
Account Exclusion
• Introduction
• Excluded Accounts Auditing Page
• Excluded Accounts Templates
• Excluded Accounts Wizard

Quest ChangeAuditor
IntroductionThe Account Exclusion feature allows you to define a list of trusted accounts which are to be excluded from the ChangeAuditor auditing process. This enables you to exclude change events generated by accounts that make a large number of changes via scripting or by accounts which are trusted.
To use the account exclusion feature, you must first complete the following steps to define the user/computer accounts that can make changes without triggering an audited event in ChangeAuditor:
1. Create an Excluded Accounts template which specifies the user and/or computer accounts that are to be excluded from the auditing process. For more information on creating a template, please refer to Excluded Accounts Templates.
2. Add this template to an agent configuration. For more information on how to add a template to an agent configuration, please refer to Define Agent Configurations.
3. Assign the agent configuration to ChangeAuditor agents. For more information on how to assign an agent configuration to an agent, please refer to Assign Agent Configurations to Agents.
This chapter provides instructions for creating Excluded Accounts templates, as well as a description of the Excluded Accounts page and Excluded Accounts wizard. For a description of the other dialogs mentioned in this chapter, please refer to the online help.
214

Account Exclusion
Excluded Accounts Auditing PageThe Excluded Accounts Auditing page is displayed when Excluded Accounts in the Auditing task list is selected in the navigation pane of the Administration Tasks tab. From this page you can launch the Excluded Accounts wizard to create a new template. You can also edit existing templates and remove templates that are no longer being used.
The Excluded Accounts Auditing page contains an expandable view of all the Excluded Accounts templates that have been previously defined. To add a new template to this list, use the Add tool bar button. Once added, the following information is provided for each Excluded Accounts template:
FIELD DESCRIPTION
Template Displays the name assigned to the template when it was created.
Status Indicates whether the auditing template is enabled or disabled.
Operations If specified, displays the event classes and/or facilities specified on the first page of the wizard that are to be excluded for the account.
215

Quest ChangeAuditor
Click the expansion box to the left of the Template Name to expand this view and display the following details about the template:
Excluded Accounts TemplatesIn order to exclude accounts from ChangeAuditor auditing, you must first create an Excluded Accounts template which specifies the user or computer accounts that are to be excluded. You can then add this template to an agent configuration, which then needs to be assigned to the appropriate ChangeAuditor agent(s).
To create an Excluded Accounts template:
1. Open the Administration Tasks tab.
2. Select the Auditing task button at the bottom of the navigation pane (left-hand pane).
3. Select Excluded Accounts (under the Agent Templates heading in the Auditing task list) to open the Excluded Accounts Auditing page.
4. Select the Add tool bar button to launch the Excluded Accounts wizard which will step you through the process of creating an Excluded Accounts template.
5. On the first page of the wizard, enter the following information:
• Template Name - Enter a name for the template.• Optionally select the facilities/event classes to be excluded.
FIELD DESCRIPTION
Type Displays the type of account (i.e., user, computer or group) selected for exclusion as specified on the second page of the wizard.
Account Displays the name of the account selected for exclusion.
Display Name If available, displays the display name assigned to the excluded accounts listed.
Excluded Accounts by Wildcard
Displays the additional user accounts that are excluded using a wildcard as specified on the last page of the wizard.
The cells directly under the main heading rows are used for filtering data. That is, as you enter characters into these cells, the client will redisplay the templates that meet the search criteria (i.e., comparison operator and characters entered). For more details about using the data filtering function provided throughout the ChangeAuditor Client, see Filter Data.
216
Account Exclusion
• To add individual event classes, select one or more events from the displayed list and use the Add | Add This Event button.
• To add all the events in a facility, select an event from the facility and use the Add | Add All Events in Facility button.
After providing a name and optionally selecting the facilities/events classes to be excluded, select Next.
6. On the second page of the wizard, select the accounts that are to be excluded from ChangeAuditor auditing.
Use the Browse or Search pages to locate and select the accounts to be excluded. Use the Add button to add these accounts to the list box at the bottom of the page.
7. (Optional) To specify a wildcard search expression to dynamically exclude additional user accounts from auditing, select Next. In the text box, enter the string of characters and corresponding wildcard to be used to search for matching users:
• Use an asterisk (*) to substitute zero or more alphanumeric characters.
• Use a question mark (?) to substitute a single alphanumeric character.
Use the Add button to add the string to the Account list.
8. After specifying the accounts to be excluded, use the Finish button to create the template without assigning it to an agent configuration.
Selecting the Finish button will create the template, close the wizard and return to the Excluded Accounts Auditing page, where the newly created template will now be listed.
9. However, to create the template and assign it to an agent configuration, expand the Finish button and select Finish and Assign to Agent Configuration.
This will display the Configuration Setup dialog, allowing you to select the agent configuration to which this template is to be assigned.
This page should be used to exclude multiple users that match the wildcard search expression. Explicitly named user accounts must be specified on the previous page of the wizard.
Back on the Excluded Accounts Auditing page, you can also use the Assign tool bar button to assign the selected template to an agent configuration. Selecting this button will display the Configuration Setup dialog allowing you to select the agent configuration to which this template is to be assigned.
217

Quest ChangeAuditor
218
To modify an Excluded Accounts template:
1. On the Excluded Accounts Auditing page, select the template to be modified and select the Edit tool bar button or right-click command.
2. This will display the Excluded Accounts wizard, where you can modify the current list of accounts included in the template.
3. Select the Finish button or expand the Finish button and select Finish and Assign to Agent Configuration.
To disable an Excluded Accounts template:
The disable feature allows you to temporarily stop excluding the specified accounts without having to remove the auditing template.
1. On the Excluded Accounts Auditing page, use one of the following methods to disable an Excluded Accounts template:
• Click in the Status cell for the template to be disabled and select Disabled
• Right-click the template to be disabled and select Disable
The entry in the Status column for the template will change to ’Disabled’.
2. To re-enable the template, use the Enable option in either the Status cell or right-click menu.
To delete an Excluded Accounts template:
1. On the Excluded Accounts Auditing page, use one of the following methods to delete an Excluded Accounts template:
• Select the template to be deleted and use the Delete | Delete Template tool bar button
• Right-click the template to be deleted and select Delete
2. A dialog will be displayed confirming that you want to delete the selected template. Select Yes.
To delete an account from an Excluded Accounts template:
1. On the Excluded Accounts Auditing page, use one of the following methods to delete an account from an auditing template:
• Select the account to be deleted and use the Delete | Delete Excluded Account tool bar button
• Right-click the account to be deleted and select Delete
2. A dialog will be displayed confirming that you want to delete the account from the template. Select Yes.
If the account is the last one in the template, deleting this account will also delete the template.

Account Exclusion
Excluded Accounts WizardThe Excluded Accounts wizard is displayed when you select the Add tool bar button on the Excluded Accounts Auditing page. This wizard steps you through the process of creating a new Excluded Accounts template, identifying the user, computer or group accounts to be included in the template. You will also use this wizard to modify a previously defined Excluded Accounts template.
The following table provides a description of the fields and controls in the Excluded Accounts wizard:
A red flashing icon indicates that you have not yet entered the required information. Hovering your cursor over this icon displays a tool tip explaining what needs to be entered.
CREATE OR MODIFY AN EXCLUDED ACCOUNTS AUDITING TEMPLATE PAGE
On the first page of the wizard, enter a name for the template and optionally select the event classes/facilities to be excluded.
Template Name Enter a descriptive name for the Excluded Accounts template being created.
219

Quest ChangeAuditor
Facility/Event Class Data Grid
Displays all of the event classes available for auditing in ChangeAuditor.
By default, all event classes/facilities will be excluded for the selected account(s). To exclude individual event classes and/or facilities, use this grid to select the event class(es) and/or facilities to be excluded and use the Add button to add them to the Exclusion list box at the bottom of the page.
Note: The ChangeAuditor Internal Auditing facility or events CANNOT be excluded.
Exclusion List The list box located at the bottom of this page displays the individual event classes or facilities selected for exclusion. Use the buttons above this list box to add or remove entries from this list.
Add | Add This Event - Use the Add | Add This Event to add the selected events to the list box. This option is selected by default when more than one event is selected in the data grid.
Add | Add All Events in Facility - Use the Add | Add All Events in Facility to add all of the events in the selected facility to the list box. This option is only available when a single event is selected in the data grid.
Remove - Select an entry in the list box and use the Remove button to remove it from the template.
Note: If you want to exclude all event classes/facilities for the selected account, this list box will be empty.
220

Account Exclusion
SELECT ACCOUNTS TO EXCLUDE PAGE (A.K.A. DIRECTORY OBJECT PICKER)
Use this page to select the individual accounts to be excluded from auditing.
Browse Page Displays a hierarchical view of the directory objects in your environment allowing you to locate and select the account(s) to be excluded from auditing.
Note: If you do not see or cannot select an account from the hierarchical view, check that you have the correct type of directory object(s) selected in the Find field at the top of the page. You can enter multiple classes, separated by either a comma or semi-colon. When entering data in this field, select Enter or use the Apply Filter button to refresh the display.
Once you have selected an account, use the Add button to add it to the list box at the bottom of the page.
Search Page Use the controls at the top of the Search page to search your environment to locate the desired account.
Note: If you do not see an account on the Search page, check that you have the correct type of directory object(s) selected in the Find field at the top of the page. You can enter multiple classes, separated by either a comma or semi-colon. When entering data in this field, select Enter to refresh the display.
Once you have selected an account, use the Add button to add it to the list box at the bottom of the page.
221
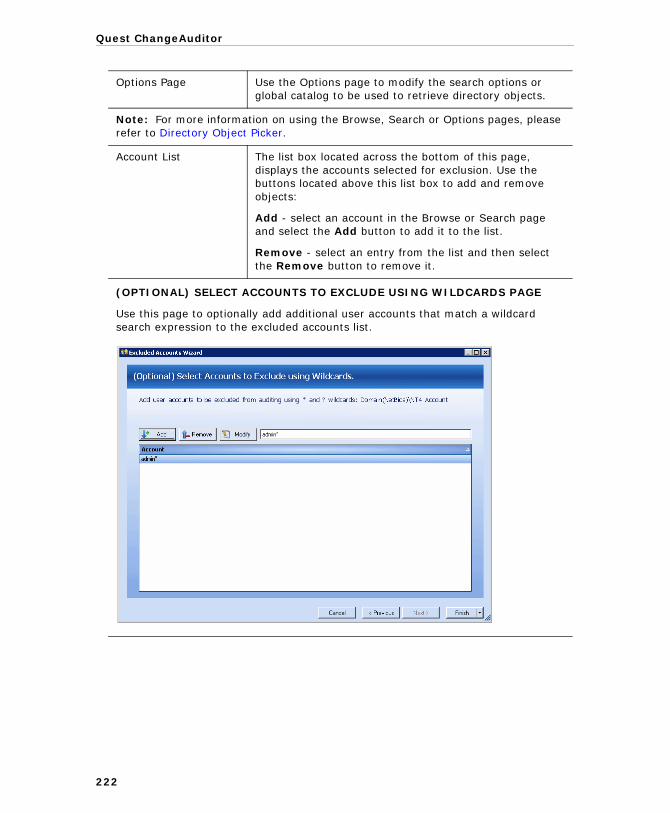
Quest ChangeAuditor
Options Page Use the Options page to modify the search options or global catalog to be used to retrieve directory objects.
Note: For more information on using the Browse, Search or Options pages, please refer to Directory Object Picker.
Account List The list box located across the bottom of this page, displays the accounts selected for exclusion. Use the buttons located above this list box to add and remove objects:
Add - select an account in the Browse or Search page and select the Add button to add it to the list.
Remove - select an entry from the list and then select the Remove button to remove it.
(OPTIONAL) SELECT ACCOUNTS TO EXCLUDE USING WILDCARDS PAGE
Use this page to optionally add additional user accounts that match a wildcard search expression to the excluded accounts list.
222
Account Exclusion
Search Expression In the text box, enter the string of characters and wildcard character to be used to search for additional user accounts that are to be excluded from auditing. Valid wildcards are:
• Use an asterisk (*) to substitute zero or more characters.
• Use a question mark (?) to substitute a single character.
Use the Add button to add the string to the Account list.
Account list The list at the bottom of the page displays the wildcard search expressions to be used to search for additional user accounts that are to be excluded from auditing. Use the buttons to the left of the text box to add, remove and modify a search expression:
Add - Use the Add button to add the search expression in the text box to the Account list.
Remove - Select an entry in the Account list and use the Remove button to remove it from the list.
Modify - Select an entry in the Account list, make the necessary changes to the search expression (which is displayed in the text box) then use the Modify button to replace it in the Account list.
Note: If you select the Add button after modifying a search expression, an additional entry will be added instead of replacing the original search expression.
223

18
Agent Statistics and Logs
• Introduction
• Agent Statistics Page
• Agent System Tray Icon
• View Agent Status/Statistics
• Manage ChangeAuditor Agents
• Agent Log Page
• View and Save Agent Trace Logs

Quest ChangeAuditor
IntroductionIn addition to the overview information provided in the Top Agent Activity pane and Agent Status pane on the Overview page, ChangeAuditor provides two additional means of obtaining agent status and statistics:
• The Agent Statistics page provides a global view of all installed (and if selected, uninstalled) ChangeAuditor agents, including the current status and other usage statistics for each agent.
• The Agent Status window, which is accessed using the ChangeAuditor Agent System Tray icon, provides the status and usage statistics for a single agent.
You can also view or retrieve agent trace logs from the Agent Statistics page or by using the ChangeAuditor Agent System Tray icon.
Agent Statistics PageUse the View | Statistics | Agent menu command (or Ctrl+F11) to display the Agent Statistics page, which provides a global view of all installed ChangeAuditor agents, including the current status and usage statistics of the each agent.
When agents are connected or disconnected, an Agent Status message will be displayed in the lower right-hand corner of your screen. You can use the View Agent Statistics link in this message box to display the Agent Statistics page.
226

Agent Statistics and Logs
The Agent Statistics page may contain the following information for each agent. The default column identifies the fields that are displayed by default. To display
different fields, select the Field Chooser button located to the far left of the column headings and select the columns to be displayed:
COLUMN DEFAULT DESCRIPTION
Active Directory No Indicates whether custom Active Directory auditing or protection has been defined.
ADAM No Indicates whether custom ADAM (AD LDS) auditing or protection has been defined.
Agent Yes Displays the NetBIOS name of the server that hosts a ChangeAuditor Agent.
Agent FQDN No Displays the fully qualified domain name of the agent.
Architecture No Displays whether the agent is installed in a 32-bit (x86) or 64-bit (x64) environment.
Configuration No Displays the agent configuration assigned to the agent.
Coordinator No Displays the computer name of the ChangeAuditor Coordinator that the agent is connected through.
DB Size Yes Displays the size of the agent database.
Domain Yes Displays the name of the domain where the agent is located.
EMC No Indicates whether the agent is assigned to an EMC Auditing template to capture EMC Celerra events.
Events Last 24 Hours No Displays the number of audited events encountered on the agent during the past 24 hours from when the dialog is initially opened during the current client session of when the Refresh button is selected.
The value in this field is a hyperlink and when selected will launch a quick search and display events generated in the last 24 hours in a new Search Results page.
227

Quest ChangeAuditor
Events Today Yes Displays the number of audited events encountered on the agent since 12:00 a.m. of the current day (based on the relative coordinator computer's time).
The value in this field is a hyperlink and when selected will launch a quick search and display today’s events in a new Search Results page.
Events Total Yes Displays the number of audited events encountered since the agent was started.
The value in this field is a hyperlink and when selected will launch a quick search and display all events encountered since the agent was started in a new Search Results page.
Events Yesterday No Displays the number of audited events encountered between 12:00 a.m. yesterday and 12:00 a.m. of the current day (based on the relative coordinator computer's time).
The value in this field is a hyperlink and when selected will launch a quick search and display yesterday’s events in a new Search Results page.
Exchange No For agents hosting Exchange, this column indicates whether Exchange Mailbox auditing or Exchange Mailbox protection has been defined.
Exchange Server No Indicates whether the server is an Exchange Server.
Exclude Account No Indicates whether an Excluded Accounts Auditing template has been assigned to the agent’s configuration.
File System No Indicates whether a File System Auditing template or File System Protection template has been assigned to the agent’s configuration.
Forest No Displays the name of forest where the agent resides.
Group Policy No Indicates whether Group Policy protection has been defined.
IP Address No Displays the IP address of the agent.
COLUMN DEFAULT DESCRIPTION
228

Agent Statistics and Logs
Last Event Sent No Displays the date and time when the coordinator last received an audited event from the agent.
Last Update Yes Displays the date and time when the agent configuration was last updated.
Load Yes Displays the load status of the agent service in regards to processing audited events. Valid entries are:
• Normal - agent service is running and processing events as expected
• Medium - agent service has more than 100 events waiting
• Critical - agent service has reached a critical load and events may be missed
NetApp No Indicates whether an agent is assigned to a NetApp Auditing template to capture NetApp filer events.
Registry No Indicates whether a Registry Auditing template has been assigned to the agent’s configuration.
Service No Displays whether a Service Auditing template has been assigned to the agent’s configuration.
SQL No Indicates whether a SQL Auditing template has been assigned to the agent’s configuration.
Startup Time No Displays the date and time when the agent was last initialized.
Status Yes Displays the current status of the agent:
• active
• inactive
• uninstalled
Type No Displays the type of server: member server or domain controller.
Unsent Events Yes Displays the number of audited events that have not yet been sent to the Coordinator.
Uptime Yes Displays how long the agent has been running.
COLUMN DEFAULT DESCRIPTION
229

Quest ChangeAuditor
Agent System Tray Icon
ChangeAuditor provides an agent icon in the system tray which can be used to enable/disable or display the status of the ChangeAuditor agent installed on the current server. Whenever an agent is not active, a status indicator will appear in the lower left corner of this icon to represent its current status:
• Red - inactive
• Yellow - initializing
You can load the agent system tray icon using one of the following methods:
• Use the Advanced Options tool bar button on the Deployment page to launch the Advanced Deployment Options dialog. From this dialog, select the Yes option for the Launch ServiceStatusTray on startup setting.
• Navigate to %System Root%\Program Files\Quest Software\ ChangeAuditor\Agent and double-click on the ServiceStatusTray.exe file.
Version No Displays the version number of the ChangeAuditor Agent currently deployed.
All times displayed are local times.
By default, the Do not change option will be selected which indicates that you want to use the current setting for the agent system tray icon. That is, if you already have it set to launch on startup it will continue to operate that way. Similarly, it will not launch on startup if this is a clean install and you have not previously set it up to do so.
COLUMN DEFAULT DESCRIPTION
230

Agent Statistics and Logs
By right-clicking on an Agent icon in the System Tray, a context menu is displayed which consists of the following commands:
Agent Status
Use the Agent Status command to display the ChangeAuditor Agent Status Window which assists you in determining if the agent is running, what version is installed, and how active the agent is. See ChangeAuditor Agent Status Window for a full description of this status window.
Enable/Disable Agent
Use the Enable/Disable Agent command to start or stop the ChangeAuditor Agent Service.
Refresh Configuration
Use the Refresh Configuration command to apply a new agent configuration to the selected agent.
Configure Coordinator
Use the Configure Coordinator command to enter the credentials of the agent that can be used to find and connect to a coordinator in an Active Directory forest. This command is only available when you install a ChangeAuditor Agent on a workgroup server. Please refer to the ChangeAuditor for Active Directory User Guide for more information on this utility.
View Agent Log
Use the View Agent Log command to launch the log viewer to review the events recorded in the ChangeAuditor agent log (ChangeAuditor.dll.nptlog). For example: C:\Program Files\Quest Software\ChangeAuditor\Agent\ChangeAuditor.dll.nptlog
Load on Startup
Select the Load on Startup command to automatically load the system tray application when the ChangeAuditor Agent Service starts.
About
Use the About command to display information about the ChangeAuditor agent including the installed version number and licensing information.
Exit
Use the Exit command to close the System Tray application.
231
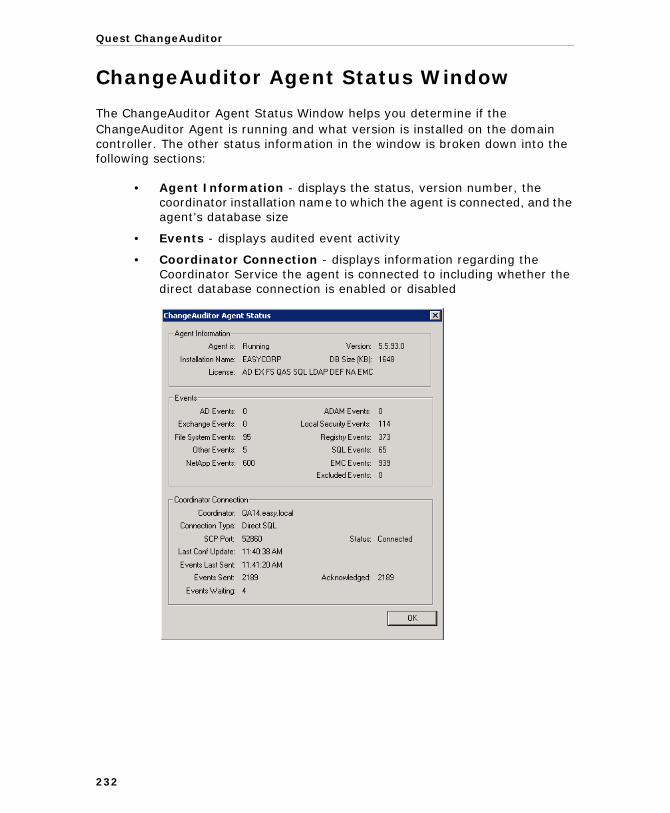
Quest ChangeAuditor
ChangeAuditor Agent Status Window
The ChangeAuditor Agent Status Window helps you determine if the ChangeAuditor Agent is running and what version is installed on the domain controller. The other status information in the window is broken down into the following sections:
• Agent Information - displays the status, version number, the coordinator installation name to which the agent is connected, and the agent’s database size
• Events - displays audited event activity
• Coordinator Connection - displays information regarding the Coordinator Service the agent is connected to including whether the direct database connection is enabled or disabled
232

Agent Statistics and Logs
This window contains the following status information:
FIELD DESCRIPTION
AGENT INFORMATION
Agent is This field displays the current agent status:
• Running - the agent service is running
• Initializing - the agent service has started but is still initializing
• Not Running - the agent service is not currently running
• Failed - the agent service failed to initialize
• Incompatible - the agent service has not been upgraded to version 4.7 (or higher) and is not operating at the same version as the coordinator. Once the agent is upgraded, the incompatible status is cleared. (Beginning with 4.7, SysTray changes were required to compensate for the UAC in Windows 2008; therefore, this change is ‘not compatible’ with previous versions of the agent.)
Version This field displays the current version of the agent installed on the server.
Installation Name This field displays the installation name assigned to the Coordinator to which the agent is connected.
DB Size (KB) This field displays the size of the agent database, in kilobytes. This is dependent on the number of monitored Active Directory, registry and file system objects, and the number of events queued for transmission to the Coordinator. If a Coordinator is not available, this database may become large. When the events are successfully sent to a Coordinator, the database space is re-used for subsequent events, but the displayed database size will not decrease.
License This field displays the ChangeAuditor license(s) that are applied:
• AD - ChangeAuditor for Active Directory
• DEF - ChangeAuditor for Quest Defender
• EMC - ChangeAuditor for EMC
• EX - ChangeAuditor for Exchange
• FS - ChangeAuditor for Windows File Servers
• LDAP - ChangeAuditor for LDAP
• NA - ChangeAuditor for NetApp
• QAS - ChangeAuditor for Quest Authentication Services
• SQL - ChangeAuditor for SQL Server
233

Quest ChangeAuditor
EVENTS
The Events section contains indicators of internal ChangeAuditor activity and may be used by Quest Support should they need to diagnose ChangeAuditor agent problems.
AD Events If licensed (ChangeAuditor for Active Directory), this is the number of Active Directory-related events processed by the agent. This field will be blank for agents running on member servers.
ADAM Events If licensed (ChangeAuditor for Active Directory), this is the number of ADAM events processed by the agent.
Exchange Events If licensed (ChangeAuditor for Exchange) and configured, this is the number of Exchange Mailbox audited events processed by the agent.
Local Security Events
If licensed (ChangeAuditor for Active Directory), this is the number of local user and group (SAM) events processed by the agent.
File System Events If licensed (ChangeAuditor for Windows File Servers) and configured, this is the number of File System audited events processed by the agent.
Registry Events If configured, this is the number of Registry audited events processed by the agent.
Other Events This is the number of events processed by the agent that do not ’fit’ into the other event categories (e.g., QAS events, Service events, etc.)
SQL Events If licensed (ChangeAuditor for SQL Server) and configured, this is the number of SQL Server audited events processed by the agent.
NetApp Events If licensed (ChangeAuditor for NetApp) and configured, this is the number of NetApp filer audited events processed by the agent.
EMC Events If licensed (ChangeAuditor for EMC) and configured, this is the number of EMC Celerra audited events processed by the agent.
Excluded Events If configured, this is the number of audited events excluded by the agent because they where made by a user or computer that was defined as an excluded account.
FIELD DESCRIPTION
234

Agent Statistics and Logs
COORDINATOR CONNECTION
Coordinator This field displays the computer name of the ChangeAuditor Coordinator to which this agent is currently connected. The ChangeAuditor agent can connect to only one coordinator. For more details on agent connection behavior, see Appendix A: Installation Notes and Best Practices in the ChangeAuditor Installation Guide.
Note: Even if the agent is configured to use the Direct SQL Connection method, it will still display the name of the Coordinator.
Connection Type This field indicates whether the agent was configured to forward its audited events directly to the SQL database or go through the ChangeAuditor coordinator service to the SQL database. Valid entries are:
• Direct SQL - connect directly to the SQL database rather than going through the Coordinator
• Coordinator - connect via the ChangeAuditor Coordinator to the SQL database
Direct SQL connection is enabled by default and it is the recommended connection method for performance reasons, but it does require the appropriate Microsoft SQL licensing. The option to enable or disable direct SQL connections is available on the Configuration Setup dialog.
SCP Port This field displays the port number assigned to the Coordinator Service Connection Point (SCP) to which the agent is connected.
Status This field displays the current status of the agent: connected or not connected.
Last Config Update This field displays the time when the agent last downloaded the agent configuration information/settings.
Events Last Sent This field provides the local time when the last event was sent. If no events have been detected by ChangeAuditor recently, this time may be fairly old.
Events Sent This field displays the number of events that have been sent to the Coordinator since the agent was started.
FIELD DESCRIPTION
235
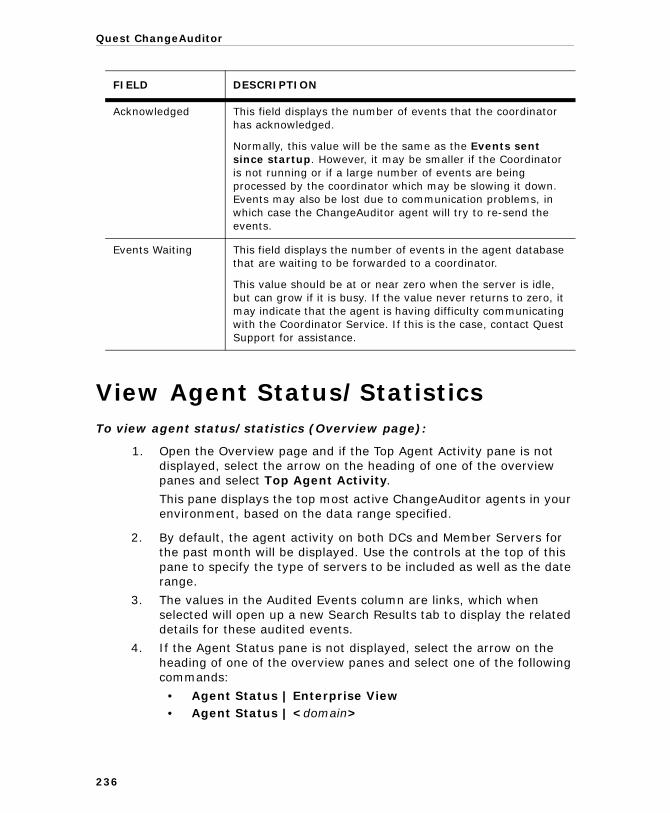
Quest ChangeAuditor
View Agent Status/StatisticsTo view agent status/statistics (Overview page):
1. Open the Overview page and if the Top Agent Activity pane is not displayed, select the arrow on the heading of one of the overview panes and select Top Agent Activity.
This pane displays the top most active ChangeAuditor agents in your environment, based on the data range specified.
2. By default, the agent activity on both DCs and Member Servers for the past month will be displayed. Use the controls at the top of this pane to specify the type of servers to be included as well as the date range.
3. The values in the Audited Events column are links, which when selected will open up a new Search Results tab to display the related details for these audited events.
4. If the Agent Status pane is not displayed, select the arrow on the heading of one of the overview panes and select one of the following commands:
• Agent Status | Enterprise View• Agent Status | <domain>
Acknowledged This field displays the number of events that the coordinator has acknowledged.
Normally, this value will be the same as the Events sent since startup. However, it may be smaller if the Coordinator is not running or if a large number of events are being processed by the coordinator which may be slowing it down. Events may also be lost due to communication problems, in which case the ChangeAuditor agent will try to re-send the events.
Events Waiting This field displays the number of events in the agent database that are waiting to be forwarded to a coordinator.
This value should be at or near zero when the server is idle, but can grow if it is busy. If the value never returns to zero, it may indicate that the agent is having difficulty communicating with the Coordinator Service. If this is the case, contact Quest Support for assistance.
FIELD DESCRIPTION
236

Agent Statistics and Logs
237
5. By default, this pane will only include active and inactive (installed) agents in the pie chart. You can however, select the Show Uninstalled Agents check box to include agents that are set as ’uninstalled’ in the pie chart.
6. Double-clicking the pie chart will display the Agent Statistics page.
To view agent status/statistics (Agent Statistics page):
1. Open the Agent Statistics page.
2. Use the Refresh button to retrieve updated information.
3. Use the Show Uninstalled Agents tool bar button to include uninstalled agents. Use the Hide Uninstalled Agents tool bar button to exclude uninstalled agents from the display.
4. The values in the different event columns are links, which when selected will open up a new Search Results tab to display the related details for these audited events.
To view agent status/statistics on the current agent only (Agent System Tray icon):
1. Right-click the system tray icon and select the Agent Status command.
2. This will display the ChangeAuditor Agent Status window, which displays agent information (including if the agent is running), event activity for the agent and coordinator connection information.
3. Use the OK button on this dialog to close the dialog.
The agent system try icon can be loaded using one of the following methods:
• Select the Advanced Options tool bar button on the Deployment page to display the Advanced Deployment Options dialog. From this dialog, select the appropriate Launch ServiceStatusTray on startup option (Yes or Do not change).
• Navigate to %SystemRoot%\Program Files\Quest Software\ ChangeAuditor\Agent and double-click on the ServiceStatusTray.exe file.

Quest ChangeAuditor
Manage ChangeAuditor Agents
To stop an agent (Agent Statistics page):
1. Open the Agent Statistics page.
2. Select the agent to be stopped and select the Stop Agent tool bar button or right-click command.
3. An information message will be displayed, select OK to stop the agent.
4. In addition, a desktop notification will be displayed in the lower right-hand corner of your screen explaining that the selected agent is being disconnected from a specific coordinator.
Once disconnected, the agent’s status will be changed to ’Inactive’ back on the Agent Statistics page.
5. If you so choose, you can use the Set Agent Uninstalled tool bar button or right-click command to flag the selected agent as ’Uninstalled’.
6. Use the Show Uninstalled Agents tool bar button to include uninstalled agents in the Agent Statistics list. Use the Hide Uninstalled Agents tool bar button to exclude uninstalled agents from the display.
To stop an agent (Agent System Tray icon):
1. From the server where the agent to be stopped resides, right-click the Agent System Tray icon and select Disable Agent.
2. On the confirmation dialog, select Yes to unload the agent service.
3. A message will be displayed explaining that the agent is being stopped.
4. In addition, a desktop notification will be displayed in the lower right-hand corner of your screen explaining that the selected agent is being disconnected from a specific coordinator.
Once disconnected, the Agent System Tray icon will contain a red light
indicating that the agent is inactive.
You can use the Action | Agent Notifications menu command to hide (or display) the desktop notifications that are displayed when these processes are performed.
The Stop Agent command is only available when an agent is ’Active’.
238

Agent Statistics and Logs
To start an agent (Agent Statistics page):
1. Open the Agent Statistics page.
2. Select a previously stopped agent and select the Start Agent tool bar button or right-click command.
3. An information message will be displayed explaining that it may take a few minutes to start the agent. Select OK to start the agent.
4. In addition, a desktop notification will be displayed in the lower right-hand corner of your screen explaining that the selected agent is being connected to a specific coordinator.
Once connected, the agent’s status will return to ’Active’ back on the Agent Statistics page.
To start an agent (Agent System Tray icon):
1. From the server where the agent to be started resides, right-click the Agent System Tray icon and select Enable Agent.
2. A message will be displayed explaining that the agent is being started.
3. In addition, a desktop notification will be displayed in the lower right-hand corner of your screen explaining that the selected agent is being connected to a specific coordinator.
Once connected, the Agent System Tray icon will no longer contain a red or yellow button indicating that the agent is now active.
The Start Agent command is only available when an agent is ’Inactive’.
239

Quest ChangeAuditor
Agent Log PageA new Log page is created whenever the View Agent Log command is selected and displays the event details recorded in the trace log for the selected agent.
The data grid and event details pane on this page contains the following information for each log entry. The default column in the table below identifies the fields that are displayed in the data grid by default. To display different fields,
use the Field Chooser button located to the far left of the column headings.
COLUMN DEFAULT DESCRIPTION
File No Specifies the name of the source file that logged the message.
Function No Displays the name of the function that logged the message.
ID No Displays the event ID used to identify the event.
240

Agent Statistics and Logs
Use the tool bar buttons at the top of the log page to scroll through the log and search for log entries.
Level Yes Indicates the severity of the event message:
• Info - ’For your information’; does not require attention
• Error - events that indicate a problem has occurred; requires attention
• Warning - events that warn of potential problems; does not require immediate attention
Line No Specifies the line within the source file that logged the message.
Logger No Specifies the logger used to log events.
Message Yes Displays the event message that was posted to the log.
Thread No Specifies the thread within the source file that logged the message.
Timestamp Yes Displays the date and time when the entry was posted to the log.
Refresh Use to refresh the contents of the displayed log.
Use to copy the selected content to the clip board. Use with the Select All button to copy and paste the contents of the entire log into another application.
Use to select the entire contents of the log. Use with the Copy button to copy and paste the contents of the log into another application.
Enter a specific string of characters or word to be located in the log and use the Find button to locate the text.
Use to display only the entries that match the word/string of characters entered in the search text.
Use to locate entries that match the case as it was entered in the search text.
Use to move to the previous entry that contains the search text.
COLUMN DEFAULT DESCRIPTION
241

Quest ChangeAuditor
View and Save Agent Trace LogsTo view ChangeAuditor logs (Agent Statistics page):
1. Open the Agent Statistics page.
2. Select the Logs | Open Log tool bar button or right-click command.
3. On the Open Log File dialog, use the controls at the top of the dialog to locate the ChangeAuditor log to be viewed. Select the log file and select Open.
4. This will open a new page in the ChangeAuditor Client which displays the log entries for the selected log.
5. Whenever an entry is highlighted in the top pane, the corresponding details will be displayed in the Event Details pane across the bottom of the screen.
6. Use the tool bar buttons as described above to search the log for a specific entry, to copy and paste the contents of this log for use in another application, and to print or save the contents of the this log.
To save ChangeAuditor logs to a specific location (Agent Statistics page):
1. Open the Agent Statistics page.
2. Select one or more agents from the list and select the Logs | Get All Logs tool bar button or right-click command.
3. On the Browse for Folder dialog, select the location where the logs for the selected agent(s) are to be saved. Select the OK button to save your selection.
Use to move to the next entry that contains the search text.
Use one of the Print options to print or save the contents of the this log.
If necessary, use the Make New Folder button to create a new folder for these logs.
242

Agent Statistics and Logs
To view Agent logs (Agent Statistics page):
1. Open the Agent Statistics page.
2. Select one or more agents from the list and select the Logs | View Agent Log tool bar button or right-click command.
3. This will open a new page in the ChangeAuditor Client which displays the selected agent’s log (ChangeAuditor.dll.nptlog). If multiple agents were selected, multiple log pages will be created.
4. Whenever an entry is highlighted in the top pane, the corresponding details will be displayed in the Event Details pane across the bottom of the screen.
In addition, when an error is highlighted in the top pane and there is a call stack available for that error, an Exception pane will also be displayed.
5. Use the tool bar buttons as described above to search the log for a specific entry, to copy and paste the contents of this log for use in another application, and to print or save the contents of the this log.
To view Agent logs (Agent System Tray icon):
1. On the server where the agent resides, right-click the ChangeAuditor System Tray icon and select View Agent Logs.
2. This will launch the log viewer allowing you to review the events recorded in the selected agent’s log (ChangeAuditor.dll.nptlog).
243


19
Coordinator Statistics and Logs
• Introduction
• Coordinator Statistics Page
• Coordinator System Tray Icon
• View Coordinator Status/Statistics
• Coordinator Log Page
• View and Save Coordinator Trace Logs

Quest ChangeAuditor
IntroductionIn addition to the overview information provided in the Coordinator Status pane on the Overview page, ChangeAuditor provides two additional means of obtaining coordinator status and statistics:
• The Coordinator Statistics page provides a global view of all installed ChangeAuditor coordinators, including the current status and other usage statistics for each coordinator.
• The Coordinator Status window, which is accessed using the ChangeAuditor Coordinator System Tray icon, provides the status and usage statistics for a single coordinator.
You can also view or retrieve coordinator trace logs from the Coordinator Statistics page or by using the Coordinator System Tray icon.
Coordinator Statistics PageUse the View | Statistics | Coordinator menu command (or Shift+F11) to display the Coordinator Statistics page, which provides a global view of all installed ChangeAuditor coordinators, including the current status of the coordinators.
The Coordinator Statistics page may contain the following information for each coordinator. The default column in the table below identifies the fields that are displayed by default. To display different fields, select the Field Chooser button
located to the far left of the column headings and select the columns to be displayed:
All times displayed are local times.
246
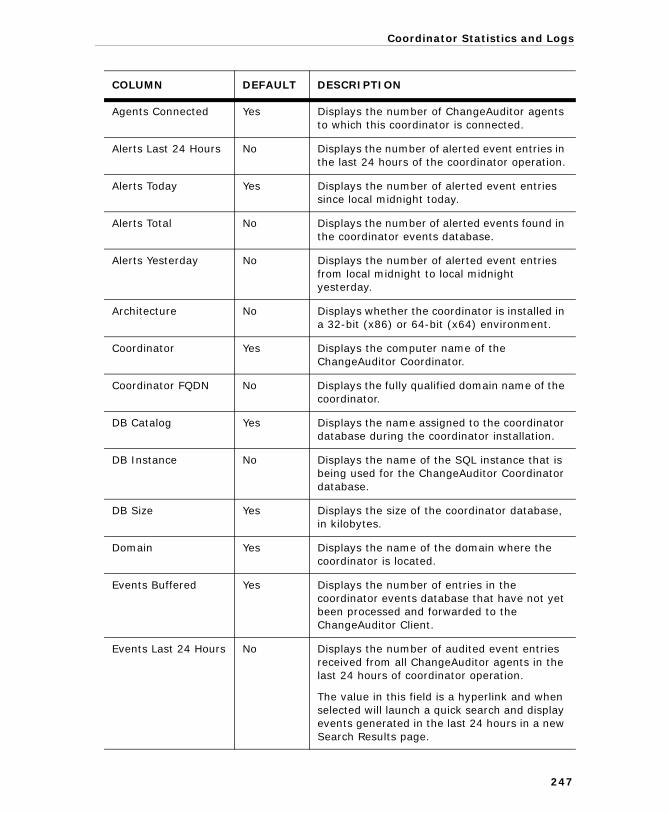
Coordinator Statistics and Logs
COLUMN DEFAULT DESCRIPTION
Agents Connected Yes Displays the number of ChangeAuditor agents to which this coordinator is connected.
Alerts Last 24 Hours No Displays the number of alerted event entries in the last 24 hours of the coordinator operation.
Alerts Today Yes Displays the number of alerted event entries since local midnight today.
Alerts Total No Displays the number of alerted events found in the coordinator events database.
Alerts Yesterday No Displays the number of alerted event entries from local midnight to local midnight yesterday.
Architecture No Displays whether the coordinator is installed in a 32-bit (x86) or 64-bit (x64) environment.
Coordinator Yes Displays the computer name of the ChangeAuditor Coordinator.
Coordinator FQDN No Displays the fully qualified domain name of the coordinator.
DB Catalog Yes Displays the name assigned to the coordinator database during the coordinator installation.
DB Instance No Displays the name of the SQL instance that is being used for the ChangeAuditor Coordinator database.
DB Size Yes Displays the size of the coordinator database, in kilobytes.
Domain Yes Displays the name of the domain where the coordinator is located.
Events Buffered Yes Displays the number of entries in the coordinator events database that have not yet been processed and forwarded to the ChangeAuditor Client.
Events Last 24 Hours No Displays the number of audited event entries received from all ChangeAuditor agents in the last 24 hours of coordinator operation.
The value in this field is a hyperlink and when selected will launch a quick search and display events generated in the last 24 hours in a new Search Results page.
247
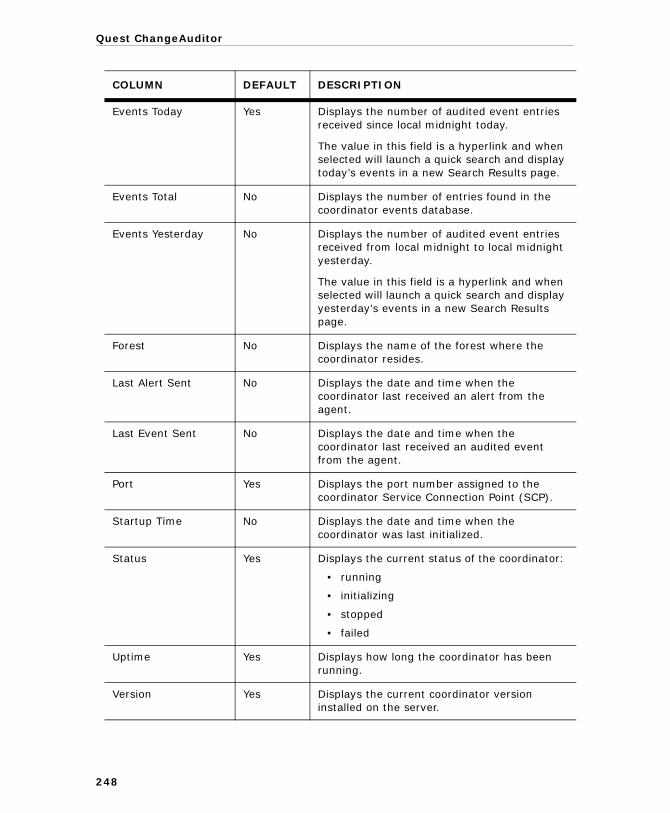
Quest ChangeAuditor
Events Today Yes Displays the number of audited event entries received since local midnight today.
The value in this field is a hyperlink and when selected will launch a quick search and display today’s events in a new Search Results page.
Events Total No Displays the number of entries found in the coordinator events database.
Events Yesterday No Displays the number of audited event entries received from local midnight to local midnight yesterday.
The value in this field is a hyperlink and when selected will launch a quick search and display yesterday’s events in a new Search Results page.
Forest No Displays the name of the forest where the coordinator resides.
Last Alert Sent No Displays the date and time when the coordinator last received an alert from the agent.
Last Event Sent No Displays the date and time when the coordinator last received an audited event from the agent.
Port Yes Displays the port number assigned to the coordinator Service Connection Point (SCP).
Startup Time No Displays the date and time when the coordinator was last initialized.
Status Yes Displays the current status of the coordinator:
• running
• initializing
• stopped
• failed
Uptime Yes Displays how long the coordinator has been running.
Version Yes Displays the current coordinator version installed on the server.
COLUMN DEFAULT DESCRIPTION
248

Coordinator Statistics and Logs
Coordinator System Tray IconDuring the coordinator installation process, ChangeAuditor automatically loads
an icon in the system tray of each ChangeAuditor Coordinator. This system try icon allows you to enable/disable the coordinator, display the status of the coordinator installed on the current machine, and change the database instance and service accounts used to access the database. Whenever a coordinator is not active, a status indicator will appear in the lower left corner of this icon to represent its current status:
• Red - inactive
• Yellow - initializing
By right-clicking on the ChangeAuditor Coordinator icon in the System Tray, a context menu is displayed which consists of the following commands:
Coordinator Status
Use the Coordinator Status command to display the Coordinator Status Window which assists you in determining if the coordinator is running, what version is installed and how active the coordinator is. See ChangeAuditor Coordinator Status Window for a full description of this status window.
Enable/Disable Coordinator
Use the Enable/Disable Coordinator command to start or stop the ChangeAuditor Coordinator.
View Coordinator Log
Use the View Coordinator Log command to launch the log viewer to review the events recorded in the ChangeAuditor coordinator log (ChangeAuditor.Service.exe.nptlog). For example:C:\Program Files\Quest Software\ChangeAuditor\Service\ChangeAuditor.Service.exe.nptlog
Coordinator Database Configurator
Use the Coordinator Database Configurator command to launch the Coordinator Configuration Tool which allows you to:
• modify the credentials used to access the ChangeAuditor Coordinator database
• specify a ‘static’ port to be used for communication with the coordinator
• specify where the Active Directory/GPO protection templates are to be stored: SQL (default) or Active Directory
249
Quest ChangeAuditor
See Coordinator Configuration Tool for a description of how to use this utility.
Load On Startup
Select (check) the Load on Startup command to automatically load the system tray application when the ChangeAuditor Coordinator starts.
About
Use the About command to display information about ChangeAuditor including the installed version number and licensing information.
Exit
Use the Exit command to close the System Tray application.
ChangeAuditor Coordinator Status Window
The ChangeAuditor Coordinator Status Window helps you determine if the ChangeAuditor Coordinator is running and what version is installed on the server. The other status information on the window is broken down into the following sections:
• Coordinator Information - displays the status, version number, SCP port and installation name for the coordinator
• Database Information - displays the coordinator database server, name and size
• Agent Connections - displays the number of connected agents, active and inactive
• Events and Alerts - displays status information regarding events, alerts, and search activities
250

Coordinator Statistics and Logs
The ChangeAuditor Coordinator Status Window contains the following information:
FIELD DESCRIPTION
COORDINATOR INFORMATION
Coordinator Status Displays the current status of the coordinator:
• Running
• Initializing
• Stopped
• Failed
This value will normally be ‘Running’. If the credentials supplied for the database access during the ChangeAuditor Coordinator installation are incorrect or have expired, this field will display ‘Not Running’ indicating that the coordinator did not successfully start. If this happens, use the Database Configuration Utility to change the permissions trying to access the database.
Installation Name Displays the installation name assigned to the coordinator during installation.
Client SCP Port Displays the port number assigned to the coordinator Service Connection Point (SCP).
Version Displays the current version of the coordinator installed on the server.
DATABASE INFORMATION
SQL Server Displays the name of the server where the coordinator resides.
Database Catalog Displays the name assigned to the coordinator database during the coordinator installation.
Database Size Displays the size of the ChangeAuditor Coordinator database, in megabytes.
AGENT CONNECTIONS
Agents Connected, total
Displays the total number of ChangeAuditor agents connected to a ChangeAuditor Coordinator, not just the current one.
Agents connected to this Coordinator
Displays the number of ChangeAuditor agents to which this coordinator is connected.
251

Quest ChangeAuditor
Coordinator Configuration Tool
The Coordinator Configuration Tool can be used to modify the credentials used by the ChangeAuditor Coordinator when accessing the database. The Coordinator Configuration tool can be accessed through the ChangeAuditor Coordinator system tray icon.
By right-clicking on the coordinator system tray icon and selecting the Coordinator Database Configurator command, the Coordinator Configuration Tool dialog will be displayed allowing you to:
• specify the credentials to be used to access the database
• change the database instance
EVENTS AND ALERTS
Events in Receive Buffer
Displays the number of entries in the coordinator events database that have not yet been processed and forwarded to the ChangeAuditor Client.
Total Events Displays the number of entries in the coordinator events database.
Events last 24 hours Displays the number of event entries received from all ChangeAuditor agents in the last 24 hours of coordinator operation.
Events Yesterday Displays the number of event entries received from local midnight to local midnight yesterday.
Events Today Displays the number of event entries received since local midnight today.
Total Alerts Displays the number of alerted events found in the coordinator events database.
Alerts last 24 hours Displays the number of alerted event entries in the last 24 hours of coordinator operation.
Alerts Yesterday Displays the number of alerted event entries from local midnight to local midnight yesterday.
Alerts Today Displays the number of alerted event entries since local midnight today.
FIELD DESCRIPTION
252
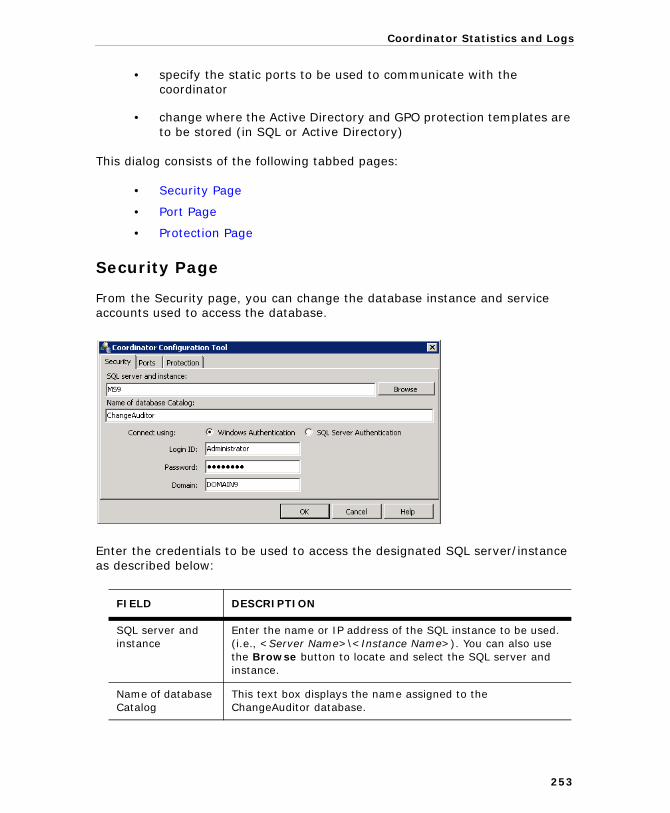
Coordinator Statistics and Logs
• specify the static ports to be used to communicate with the coordinator
• change where the Active Directory and GPO protection templates are to be stored (in SQL or Active Directory)
This dialog consists of the following tabbed pages:
• Security Page
• Port Page
• Protection Page
Security Page
From the Security page, you can change the database instance and service accounts used to access the database.
Enter the credentials to be used to access the designated SQL server/instance as described below:
FIELD DESCRIPTION
SQL server and instance
Enter the name or IP address of the SQL instance to be used. (i.e., <Server Name>\<Instance Name>). You can also use the Browse button to locate and select the SQL server and instance.
Name of database Catalog
This text box displays the name assigned to the ChangeAuditor database.
253

Quest ChangeAuditor
Port Page
By default, ChangeAuditor dynamically assigns communication ports to be used to communicate with each installed coordinator. However, using the Port page of the Coordinator Configuration tool, you can specify static SCP listening ports to be used to communicate with the ChangeAuditor Coordinator.
Connect using Specify whether Windows authentication or SQL server authentication is to be used when communicating with the SQL database instance. (The authentication method is set up when SQL is installed.)
• Windows Authentication - this option is selected by default and will use Windows authentication to access the database.
• SQL Server Authentication - select this option to use SQL Server authentication to access the database.
Depending on the authentication option selected above, enter the appropriate user credentials.
Login ID Enter the user name for the account to be used to access the SQL server instance.
Password Enter the password associated with the user account entered above.
Domain Enter the domain name for the Windows account to be used to access the designated SQL server instance. (Only valid for Windows Authentication.)
FIELD DESCRIPTION
254

Coordinator Statistics and Logs
Enter the static port(s) to be used to communicate with the coordinator:
Protection Page
By default, ChangeAuditor stores the Active Directory and Group Policy protection templates in SQL. However, you can use the Protection page of the Coordinator Configuration tool to have ChangeAuditor store the Active Directory and Group Policy protection templates in Active Directory instead of SQL.
FIELD DESCRIPTION
Client Port Enter the static port number to be used by the ChangeAuditor Client to communicate with the coordinator.
Public SDK Port Enter the static port number to be used by external applications to access the ChangeAuditor Coordinator.
Agent Port Enter the static port number to be used by the ChangeAuditor Agents to communicate with the coordinator.
A zero (0) indicates that a dynamic port is being used. If you have set a static port and wish to use a dynamic port, change the port number back to 0.
The additional setting is intended for customers who require tighter security ACLs on their Active Directory and GPO objects and templates (i.e., the ChangeAuditor SQL database may not be fully secured by ChangeAuditor Administrators).
255

Quest ChangeAuditor
Select one of the following options:
• Store Active Directory / GPO Protection in SQL
• Store Active Directory / GPO Protection in AD
View Coordinator Status/StatisticsTo view coordinator status/statistics (Overview page):
1. Open the Overview and if the Coordinator Status overview pane is not being displayed, select the arrow button one of the overview panes and select one of the following commands:
• Coordinator Status | Enterprise View• Coordinator Status | <domain>
This will display a pie chart depicting the current status of all the ChangeAuditor Coordinators installed in either the entire enterprise or in a selected domain.
2. By default, this pane will only include installed coordinators in the pie chart. You can however, select the Show Uninstalled Coordinators check box to include uninstalled coordinators in the pie chart.
3. Double-clicking the pie chart will display the Coordinator Statistics page.
To view coordinator status/statistics (Coordinator Statistics page):
1. Open the Coordinator Statistics page.
2. Use the Show Uninstalled Coordinators tool bar button to include coordinators set as ’uninstalled’. Use the Hide Uninstalled Coordinators tool bar button to exclude these coordinators from the display.
3. The values in the different event columns are links, which when selected will open up a new Search Results tab to display the related details for these audited events.
When you have selected to store your Active Directory and Group Policy protection templates in Active Directory, you can use the Security feature on the Active Directory Protection page and Group Policy Protection page to provide an additional layer of security for your protected objects. See the ChangeAuditor for Active Directory User Guide for more information on using the Security feature.
256

Coordinator Statistics and Logs
To view coordinator status/statistics on current coordinator only (Coordinator System Tray icon):
1. From the server where the coordinator is installed, right-click the Coordinator System Tray icon and select Coordinator Status.
2. This will display the ChangeAuditor Coordinator Status dialog, which displays status and statistics regarding the coordinator, database, agent connections and events and alerts.
3. Use the OK button to close this dialog.
Manage ChangeAuditor Coordinator
To stop a coordinator:
1. From the server where the coordinator to be stopped resides, right-click the Coordinator System Tray icon and select Disable Coordinator.
2. On the confirmation dialog, select Yes to unload the coordinator service.
3. A message will be displayed explaining that the coordinator is being stopped.
4. In addition, a desktop notification will be displayed in the lower right-hand corner of your screen explaining that the selected coordinator is being disabled.
Once disabled, the Coordinator System Tray icon will contain a red
light indicating that the coordinator is disabled.
5. If you so choose, you can use the Set Coordinator Uninstalled tool bar button or right-click command to flag the selected coordinator as ’Uninstalled’.
6. Use the Show Uninstalled Coordinators tool bar button to include uninstalled coordinators in the Coordinator Statistics list. Use the Hide Uninstalled Coordinators tool bar button to exclude uninstalled coordinators from the display.
To start a coordinator:
1. From the server where the coordinator to be started resides, right-click the Coordinator System Tray icon and select Enable Coordinator.
You can use the Action | Agent Notifications menu command to hide (or display) the desktop notifications that are generated when these processes are performed.
257
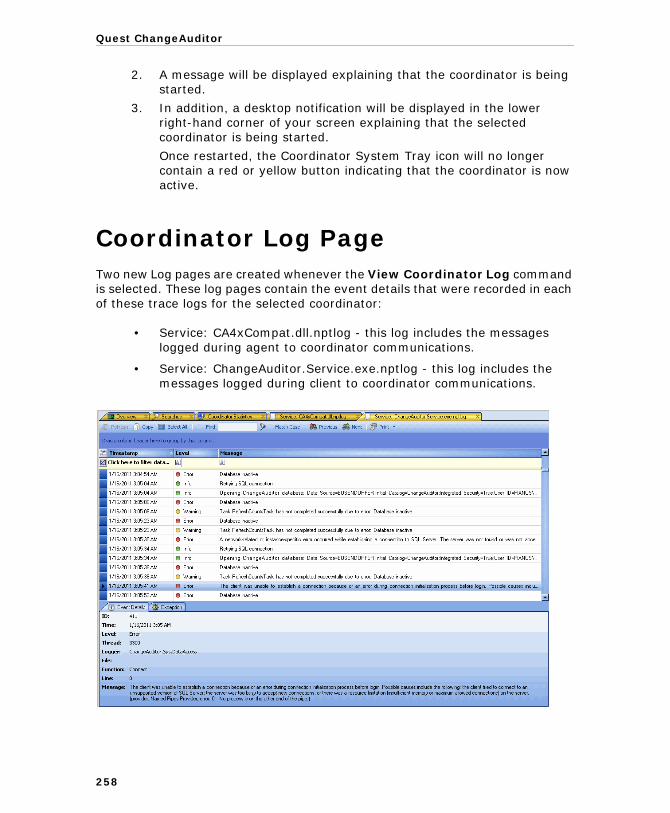
Quest ChangeAuditor
2. A message will be displayed explaining that the coordinator is being started.
3. In addition, a desktop notification will be displayed in the lower right-hand corner of your screen explaining that the selected coordinator is being started.
Once restarted, the Coordinator System Tray icon will no longer contain a red or yellow button indicating that the coordinator is now active.
Coordinator Log PageTwo new Log pages are created whenever the View Coordinator Log command is selected. These log pages contain the event details that were recorded in each of these trace logs for the selected coordinator:
• Service: CA4xCompat.dll.nptlog - this log includes the messages logged during agent to coordinator communications.
• Service: ChangeAuditor.Service.exe.nptlog - this log includes the messages logged during client to coordinator communications.
258

Coordinator Statistics and Logs
The data grid and event details pane on this page contains the following information for each log entry. The default column in the table below identifies the fields that are displayed in the data grid by default. To display different
fields, use the Field Chooser button located to the far left of the column headings.
COLUMN DEFAULT DESCRIPTION
File No Specifies the name of the source file that logged the message.
Function No Displays the name of the function that logged the message.
ID No Displays the event ID used to identify the event.
Level Yes Indicates the severity of the event message:
• Info - ’For your information’; does not require attention
• Error - events that indicate a problem has occurred; requires attention
• Warning - events that warn of potential problems; does not require immediate attention
Line No Specifies the line within the source file that logged the message.
Logger No Specifies the logger used to log events.
Message Yes Displays the event message that was posted to the log.
Thread No Specifies the thread within the source file that logged the message.
Timestamp Yes Displays the date and time when the entry was posted to the log.
259

Quest ChangeAuditor
Use the tool bar buttons at the top of the log page to scroll through the log and search for log entries.
View and Save Coordinator Trace LogsTo view ChangeAuditor logs (Coordinator Statistics page):
1. Open the Coordinator Statistics page.
2. Select the Logs | Open Log tool bar button or right-click command.
3. On the Open Log File dialog, use the controls at the top of the dialog to locate the ChangeAuditor log to be viewed. Select the log file and select Open.
4. This will open a new page in the ChangeAuditor Client which displays the log entries for the selected log.
5. Whenever an entry is highlighted in the top pane, the corresponding details will be displayed in the Event Details pane across the bottom of the screen.
Refresh Use to refresh the contents of the displayed log.
Use to copy the selected content to the clip board. Use with the Select All button to copy and paste the contents of the entire log into another application.
Use to select the entire contents of the log. Use with the Copy button to copy and paste the contents of the log into another application.
Enter a specific string of characters or word to be located in the log and use the Find button to locate the text.
Use to display only the entries that match the word/string of characters entered in the search text.
Use to locate entries that match the case as it was entered in the search text.
Use to move to the previous entry that contains the search text.
Use to move to the next entry that contains the search text.
Use one of the Print options to print or save the contents of the this log.
260

Coordinator Statistics and Logs
6. Use the tool bar buttons as described above to search the log for a specific entry, to copy and paste the contents of this log for use in another application, and to print or save the contents of the this log.
To save ChangeAuditor logs to a specific location (Coordinator Statistics page):
1. Open the Coordinator Statistics page.
2. Select a coordinator from the list and select the Logs | Get All Logs tool bar button or right-click command.
3. On the Browse for Folder dialog, select the location where these logs are to be saved. Select the OK button to save your selection.
To view the coordinator log (Coordinator Statistics page):
1. Open the Coordinator Statistics page.
2. Select a coordinator from the list and select the Logs | View Coordinator Log tool bar button or right-click command.
3. This will open a new page in the ChangeAuditor Client which displays the log entries in the ChangeAuditor Coordinator log (ChangeAuditor.Service.exe.nptlog).
4. Whenever an entry is highlighted in the top pane, the corresponding details will be displayed in the Event Details pane across the bottom of the screen.
In addition, when an error is highlighted in the top pane and there is a call stack available for that error, an Exception pane will also be displayed.
5. Use the tool bar buttons as described above to search the log for a specific entry, to copy and paste the contents of this log for use in another application, and to print or save the contents of the this log.
To view the coordinator log (Coordinator System Tray icon):
1. From the server where the coordinator is installed, right-click the Coordinator System Tray icon and select View Coordinator Log.
2. This will launch the log viewer, allowing you to review the entries recorded in the ChangeAuditor Coordinator log (ChangeAuditor.Service.exe.nptlog).
If necessary, use the Make New Folder button to create a new folder for these logs.
261


263
Appendix AAdministration Tasks TabThe Administration Tasks tab allows you to perform a variety of administration tasks based on the ChangeAuditor license(s) that are applied. Use the View | Administration menu command to display the Administration Tasks tab, which consists of a navigation pane to the left and information pages to the right.
The Administration Tasks tab navigation pane is divided into different task lists: Configuration, Auditing and Protection. Select a task button from the bottom of the navigation pane to display a task list. Then select a task from the displayed task list to display the appropriate information page, from which you can perform the corresponding administrative task.
Authorization to use the administration tasks on the Administration Tasks tab is defined using the Application User Interface page. If you are denied access to the tasks on this page, please refer to the ChangeAuditor User Interface Authorization Chapter.

Quest ChangeAuditor
Administration Task ListsThe following table lists the navigation pane’s task lists and a brief description of the administrative tasks that can be performed. Many of the tasks listed require a specific ChangeAuditor license, which is indicated by the following codes in the last column of the table:
• Any - does not require a specific license; available with any license
• CAAD - ChangeAuditor for Active Directory
• CAEX - ChangeAuditor for Exchange
• CAFS - ChangeAuditor for Windows File Servers
• CASQL - ChangeAuditor for SQL Server
• CALDAP - ChangeAuditor for LDAP
• CAEMC - ChangeAuditor for EMC
• CANA - ChangeAuditor for NetApp
For more detailed information on how to perform an administrative task or a description of the page that is displayed, please refer to the appropriate chapter in the different ChangeAuditor user guides.
The product will not prevent you from performing any of the administration tasks on the Administration Tasks tab; however, associated events will not be captured and/or associated protection will not occur unless the proper license is applied.
To hide unlicensed ChangeAuditor features from the Administration Tasks tab (including unavailable audit events throughout the client), use the Action | Hide Unlicensed Components command.
TASK LIST/TASK DESCRIPTION LICENSE
CONFIGURATION
The following tasks are available in the Configuration task list:
Agent Define and assign agent configurations.
For more information refer to Agent Configurations.
Any
Coordinator Configure email notifications and define group membership expansion.
For more information refer to Coordinator Configuration.
Any
264

Administration Tasks Tab
Purge / Archive Define database maintenance activities.
For more information refer to Database Maintenance.
Any
SQL Reporting Services Define SQL Reporting Services templates and define who is authorized to use them.
These templates can then be used by authorized users to import SRS settings for publishing reports to SRS.
For more information refer to SQL Reporting Services Configuration.
Any
Application User Interface Define who is authorized to use the various ChangeAuditor Client features.
In addition you can define who is authorized to view the Active Directory and Group Policy protection tasks in ChangeAuditor.
For more information refer to ChangeAuditor User Interface Authorization.
Any
AUDITING
The Auditing task list is divided into separate task lists that identify configuration tasks, tasks that are globally applied, tasks that are applied on an agent basis using custom auditing templates, and tasks that define NAS device auditing.
CONFIGURATION
Use the tasks under this heading to configure the audit events to be captured by ChangeAuditor.
Audit Events Enable/disable event auditing and modify an event’s severity level or description.
For more information refer to Enable/Disable Event Auditing.
Any
TASK LIST/TASK DESCRIPTION LICENSE
265

Quest ChangeAuditor
GLOBAL
Use the tasks under this heading to define global custom auditing definitions.
Active Directory Define custom Active Directory object class auditing.
For more information refer to the ChangeAuditor For Active Directory User Guide.
CAAD
Attributes Define custom Active Directory attribute auditing.
For more information refer to the ChangeAuditor for Active Directory User Guide.
CAAD
Member of Group Define a Member of Group auditing list to specify the users to be audited based on their group membership.
For more information refer to the ChangeAuditor for Active Directory User Guide.
CAAD
Excluded LDAP Define the Active Directory containers that are to be excluded from LDAP query auditing.
For more information refer to the ChangeAuditor for LDAP User Guide.
CALDAP
ADAM (AD LDS) Define custom ADAM (AD LDS) object auditing.
For more information refer to the ChangeAuditor for Active Directory User Guide.
CAAD
Attributes Define custom ADAM (AD LDS) attribute auditing.
For more information refer to the ChangeAuditor for Active Directory User Guide.
CAAD
Exchange Mailbox Define an Exchange Mailbox auditing list to specify which directory object’s mailbox activities are to be audited.
For more information refer to the ChangeAuditor for Exchange User Guide.
CAEX
TASK LIST/TASK DESCRIPTION LICENSE
266

Administration Tasks Tab
AGENT TEMPLATES
Use the tasks under this heading to create auditing templates that can then be assigned to agent configurations to enable custom auditing.
File System Create File System Auditing templates to define the files/folders that are to be audited.
For more information refer to the ChangeAuditor for Windows File Servers User Guide.
CAFS
Registry Create Registry Auditing templates to define the registry keys and events that are to be audited.
For more information refer to Custom Registry Auditing.
Any
Services Create Service Auditing templates to specify the system services that are to be audited.
For more information refer to Custom Service Auditing.
Any
SQL Create SQL Auditing templates to define the SQL instances and operations that are to be audited.
For more information refer to the ChangeAuditor for SQL Server User Guide.
CASQL
Excluded Accounts Create Excluded Accounts templates to define individual accounts that are to be excluded from ChangeAuditor auditing.
For more information refer to Account Exclusion.
Any
TASK LIST/TASK DESCRIPTION LICENSE
267

Quest ChangeAuditor
NAS TEMPLATES
Use the tasks under this heading to create auditing templates for NAS devices.
EMC Create a separate EMC Auditing template for each CIFS file access protocol to be audited by ChangeAuditor, defining the EMC file server (CIFS), auditing scope and ChangeAuditor Agent(s) that are to receive the EMC Celerra audit events.
For more information refer to the ChangeAuditor for EMC User Guide.
CAEMC
NetApp Create a separate NetApp Auditing template for each NetApp filer to be audited by ChangeAuditor, defining the location of the NetApp filer, the auditing scope, and the ChangeAuditor Agent(s) that are to receive the NetApp filer audit events.
For more information refer to the ChangeAuditor for NetApp User Guide.
CANA
PROTECTION
The Protection task list is divided into two separate task lists: one for tasks that are globally applied and another for tasks that are applied on an agent basis using protection templates.
GLOBAL
Use the tasks under this heading to define global protection definitions.
Active Directory Create Active Directory Protection templates to define critical Active Directory objects that are to be protected against unauthorized modifications.
For more information refer to the ChangeAuditor for Active Directory User Guide.
CAAD
ADAM (AD LDS) Create ADAM (AD LDS) Protection templates to define critical ADAM objects that are to be protected against unauthorized modifications.
For more information refer to the ChangeAuditor for Active Directory User Guide.
CAAD
TASK LIST/TASK DESCRIPTION LICENSE
268

Administration Tasks Tab
Group Policy Create Group Policy Protection templates to define critical Group Policy objects that are to be protected against unauthorized modifications.
For more information refer to the ChangeAuditor for Active Directory User Guide.
CAAD
Exchange Mailbox Create Exchange Mailbox Protection templates to define critical Exchange Mailboxes that are to be protected against unauthorized modifications.
For more information refer to the ChangeAuditor for Exchange User Guide.
CAEX
AGENT TEMPLATESUse the tasks under this heading to create protection templates that can then be assigned to agent configurations to enable protection.
File System Create File System Protection templates to define critical files/folders that are to be protected against unauthorized modifications.
For more information refer to the ChangeAuditor for Windows File Servers User Guide.
CAFS
TASK LIST/TASK DESCRIPTION LICENSE
269


Appendix BChangeAuditor CommandsThis appendix lists the commands available throughout the ChangeAuditor client. The tables in this appendix list the menu commands, toolbar buttons, and right-click commands available throughout the entire client.
Menu CommandsThe ChangeAuditor menus follow the same convention as standard Windows menus. That is, commands are grouped under a menu on the menu bar. Some of these commands perform an action immediately; others display an additional dialog or launch a wizard where you select various options or specify additional information.
The following table provides a description of the commands available under each of the ChangeAuditor menus.
MENU COMMANDS:SHORTCUT KEYS:
DESCRIPTION:
FILE MENU
Connect Ctrl+O Use to display the Connection Profile dialog to select the connection profile to be used to connect to a ChangeAuditor Coordinator.
This command is only available when the client is disconnected from a coordinator.
Disconnect Ctrl+D Use to disconnect from the current coordinator.
Open Log Use to view one of the ChangeAuditor log files. Selecting this command will display the Open Log dialog allowing you to select the log file to be viewed. Once selected, a new tabbed page will be created in the ChangeAuditor Client displaying the entries logged in the selected log.
Open Client Log Use to view the current ChangeAuditor Client log. A new tabbed page will be created in the ChangeAuditor Client displaying the entries logged to the current client log.
271

Quest ChangeAuditor
Print Ctrl+P Use to send the contents of the displayed page to the designated printer. When you select this command, the native Print dialog will be displayed allowing you to specify various print options.
Print to File Ctrl+Shift+F Use to save the contents of the displayed page to either an Excel (.xls) or Comma Delimited (.csv) file. When you select this command, the native Save As dialog will be displayed allowing you to specify the location, file name and type of file to be created.
Print to PDF Ctrl+Shift+D Use to save the contents of the displayed page to a PDF file. When you select this command, the native Save As dialog will be displayed allowing you to specify the location and file name.
Print Preview Ctrl+Shift+P Use to preview the contents of the displayed page prior to printing it.
Page Setup Ctrl+Shift+U Use to define the page settings for printing. Selecting this command will display the native Page Setup dialog allowing you to define the paper, page orientation and margins.
Exit Ctrl+Q Use to close the ChangeAuditor Client.
EDIT MENU
Cut Ctrl+X Use to move the selected item (folder or search definition) to a different location in the ChangeAuditor explorer on the Searches page. Once cut, this item can then be pasted (or moved) to another location.
Copy Ctrl+C Use to copy the selected item (folder or search definition) to another location in the ChangeAuditor explorer on the Searches page. Once copied, a copy of this item can be pasted to another location.
Paste Ctrl+V Use to paste the contents of the clipboard (folder or search definition) to the selected location.
MENU COMMANDS:SHORTCUT KEYS:
DESCRIPTION:
272

ChangeAuditor Commands
Delete Use to remove the selected user-defined item (folder or search definition).
Move Use to move the selected item (folder or search definition) to another location in the ChangeAuditor explorer view on the Searches page. Selecting this command will display the Select the Destination Folder dialog allowing you to select the new location.
ACTION MENU
Refresh F5 Use to retrieve and redisplay current data.
Autofit Columns to Contents
Ctrl+F Use to resize the columns based on the content, which will eliminate the scroll bars.
Reset Display Use to close multiple client windows and return to a single client window.
Auto Connect Use to enable or disable the auto connect feature. When enabled, the Connection Profile dialog will not be displayed when the client is launched. Instead, the previously specified connection profile will automatically be used to connect to the coordinator.
Agent Notifications Use to hide (or display) the desktop notification that is displayed in the lower right-hand corner of the screen whenever an agent is connected or disconnected from the ChangeAuditor Coordinator, or when the coordinator is stopped or started.
Agent Notification is enabled by default.
Agent Auto Refresh Use to enable or disable the refreshing of the currently displayed grid (on the Deployment, Overview or Agent Statistics page) when an agent either connects or disconnects.
Agent Auto Refresh is enabled by default.
Show XML Tab Use to display the XML tab, which displays the XML representation of a selected search criteria, at the end of the Search Properties tabs.
This command is only available from the Searches page and a Search Results page.
MENU COMMANDS:SHORTCUT KEYS:
DESCRIPTION:
273

Quest ChangeAuditor
Show SQL Tab Use to display the SQL tab, which displays the SQL query built to run a selected search, at the end of the Search Properties tabs.
This command is only available from the Searches page and a Search Results page.
Show Advanced Tab Use to display the Advanced tab, which provides options for defining the data (columns) to be retrieved from the database and displayed in the client, at the end of the Search Properties tabs.
This command is only available from the Searches page and a Search Results page.
Hide Unlicensed Components
Use to hide unlicensed components from the Administration Tasks tab and unlicensed events throughout the client.
This command is only available from the Administration Tasks tab.
Note: This feature only applies to users who have never had a specific product license (e.g., ChangeAuditor for Exchange). Users who had a trial license that has expired, will not be able to hide components. This is so that you can continue to search for events that may have occurred during your trial period.
Export Use to export the displayed information/settings into an XML file. Selecting this command will display the Save Configuration dialog allowing you to specify the location and file name for the exported file.
This command is only available from the Administration Tasks tab.
Import Use to import previously exported information/settings. Selecting this command will display the Open Configuration File dialog allowing you to locate and select the XML file to be imported.
This command is only available from the Administration Tasks tab.
MENU COMMANDS:SHORTCUT KEYS:
DESCRIPTION:
274

ChangeAuditor Commands
VIEW MENU
Deployment CTRL+F8 Use to display the Deployment page, from which you can deploy ChangeAuditor Agents.
Overview CTRL+F9 Use to display the Overview page, which displays the results of your favorite search as well as an overview of the following information:
• Top agent activity
• Recent event activity
• Count of events by event class, facility, location, severity, user, license type, or subsystem
• Agent status for the entire enterprise or individual domain
• Coordinator status for the entire enterprise or a single domain
• Database maintenance
• Alert history
Searches CTRL+F10 Use to display the Searches page, from which you can run searches, define new searches and enable alerting.
Statistics | Agent CTRL+F11 Use to display the Agent Statistics page which provides a global view of all your agents, providing you with their current status and statistics.
Statistics | Coordinator
SHIFT+F11 Use to display the Coordinator Statistics page which provides coordinator status, database information and agent connection, event and alert data.
Administration CTRL+F12 Use to display the Administration Tasks tab which provides a single location where you can perform various administrative tasks related to configuring ChangeAuditor, customizing the auditing process and defining protection.
Close All Windows Use to close all open windows.
MENU COMMANDS:SHORTCUT KEYS:
DESCRIPTION:
275

Quest ChangeAuditor
Tool Bar ButtonsThe following table lists all of the commands available on the various tool bars in the ChangeAuditor client. It lists the commands/buttons in alphabetical order and provides a brief description of each command.
List of Open Windows
The remainder of this menu lists all of the windows that are currently opened in the ChangeAuditor Client. A check mark to the left of a window indicates the window that is currently active.
HELP MENU
About Use to display the About ChangeAuditor dialog which displays the current version, copyright and licensing information.
Select the License Info button on this dialog to view license compliance information.
Feedback Use to access Quest product forums to provide feedback on using ChangeAuditor and to collect system logs that can be sent to Quest’s Technical Support to assist in troubleshooting your case.
Contents F1 Use to display the contents and initial screen of the ChangeAuditor online help.
When a tool bar button contains an arrow to the far right, this indicates that you can expand the button to select an additional command.
TOOL BAR BUTTON: DESCRIPTION:CHANGEAUDITOR PAGES:
Add Depending on the page, use to add an entry to a search criteria list, add an object to an auditing list, define a new template, define a database maintenance schedule, etc.
Most Administration Tasks pages
MENU COMMANDS:SHORTCUT KEYS:
DESCRIPTION:
276

ChangeAuditor Commands
Add Add Role DefinitionAdd Task DefinitionAdd Application Group
Use the Add options as defined below:
Add Role Definition - use to define a new role defining who is authorized to perform the selected tasks and/or operations.
Add Task Definition - use to define a new task defining the operations that can be performed.
Add Application Group - use to define a new Authorization Manager Application Group.
Application User Interface page
AddSubsystemEvent ClassObject ClassSeverityResults
Use to add an entity (subsystem, event class, object class, severity or results) to the What search criteria list or purge criteria.
What tab
Add with EventsSubsystemEvent ClassObject ClassSeverityResults
Use to add an entity that already has an audited event in the coordinator database to the What search criteria list or purge criteria.
What tab
Add with Events Use to add an entity that already has an audited event in the coordinator database to the search or purge criteria.
Who tab
Where tab
Origin tab
Add | Add Wildcard Expression
Use to specify a wildcard expression for the search criteria or purge criteria.
Who tab
Where tab
Add | Select Multiple Objects
Use to define custom Active Directory and ADAM auditing - defining the objects, classes and/or attributes to be audited by ChangeAuditor.
Active Directory Auditing page
ADAM (AD LDS) Auditing page
TOOL BAR BUTTON: DESCRIPTION:CHANGEAUDITOR PAGES:
277

Quest ChangeAuditor
Advanced Options | Advanced Options
Use to display the Advanced Deployment Options dialog where you can view or modify the following settings:
• Specify Agent Installation Location
• Specify a Custom Share on the Remove Server
• Launch ServiceStatusTray of startup
• Restart Agent on failure
• Specify a Group Policy Backup
Deployment page
Advanced Options | ActiveRoles Server Integration
Deploy Scripts Only
Deploy Scripts and Excluded Accounts
Use the ActiveRoles Server Integration options as described below:
Deploy Scripts Only - use to copy and run the ARS integration scripts on the ARS server. These scripts instruct ARS to capture the initiator information for all users and pass this information onto ChangeAuditor.
Deploy Scripts and Excluded Accounts - use to specify user and computer accounts that are to be excluded from this integration. ChangeAuditor then deploys the ARS integration scripts that signals ARS to retrieve the initiator information for all users except for those specified for exclusion.
Please refer to the ChangeAuditor Installation Guide for more information on ActiveRoles Server integration.
Deployment page
TOOL BAR BUTTON: DESCRIPTION:CHANGEAUDITOR PAGES:
278
ChangeAuditor Commands
Advanced Options | Import Plug-in Servers
Use to import an XML file containing a list of servers that are hosting an InTrust Agent.
Note: This option only applies to those upgrading from InTrust to ChangeAuditor. Please refer to the ChangeAuditor Installation Guide for more information on upgrading InTrust to ChangeAuditor.
Deployment page
Alert History Use to define a purge job for alert history.
Database Maintenance page
Alert Properties Use to display the Alert properties across the bottom of the Alert History page.
Alert History page
Apply Changes Use to save your coordinator configuration settings.
Coordinator Configuration page
Assign Use to assign an agent configuration to the selected agents or to assign a template to an agent configuration.
Agent Configuration page
Agent Templates Auditing pages
NAS Templates Auditing pages
Agent Templates Protection pages
Comments Use to enter a comment for the selected audited event.
Event Details pane
Configurations Use to display the Configuration Setup dialog to add, edit or delete agent configuration definitions.
Agent Configuration page
Connect To Use this button to select the domain controller to be used to apply ACLs or to revert back to the client’s default global catalog.
Note: This button is available only when you have selected to save your Active Directory and Group Policy protection templates to Active Directory using the Protection tab of the Coordinator Configuration Tool.
Active Directory Protection page
Group Policy Protection page
TOOL BAR BUTTON: DESCRIPTION:CHANGEAUDITOR PAGES:
279

Quest ChangeAuditor
Copy Use to copy the displayed audited event details to the clipboard.
Log pages
Event Details pane
CredentialsSetClearTest
Use to set, clear or test the credentials to be used for installing agents on the selected domain.
Deployment page
Default Use to reset the severity and enabled settings of the selected events back to the factory defaults.
Audit Events page
Default All Use to reset all agent configurations back to the Default Configuration.
Agent Configuration page
Delete Use to remove the selected entry from the list.
Database Maintenance page
Application User Interface page
Member of Group Auditing page
Excluded LDAP Auditing page
Exchange Mailbox Auditing page
Who tab
Where tab
Origin tab
Delete | Delete Administration Account
Use to remove the selected administration account from an Active Directory, ADAM (AD LDS), or Group Policy protection template.
Active Directory Protection page
ADAM (AD LDS) Protection page
Group Policy Protection page
Delete | Delete Agent Use to remove the selected ChangeAuditor Agent from an EMC or NetApp auditing template.
EMC Auditing page
NetApp Auditing page
TOOL BAR BUTTON: DESCRIPTION:CHANGEAUDITOR PAGES:
280

ChangeAuditor Commands
Delete | Delete Excluded Account
Use to remove the selected account from an Excluded Accounts auditing template.
Excluded Accounts Auditing page
Delete | Delete File Path
Use to remove the selected file path from a File System auditing or protection template, a EMC auditing template or a NetApp auditing template.
File System Auditing page
EMC Auditing page
NetApp Auditing page
Delete | Delete Object Use to remove the selected object from custom Active Directory or ADAM auditing; an Active Directory, ADAM (AD LDS) or Group Policy protection template; or a SQL Reporting Services template.
Active Directory Auditing & Protection pages
ADAM (AD LDS) Auditing & Protection pages
Group Policy Protection page
SQL Reporting Services page
Delete | Delete Object Class
Use to remove the selected object class from the Active Directory or ADAM (AD LDS) auditing list.
Active Directory Auditing page
ADAM (AD LDS) Auditing page
Delete | Delete Override Account
Use to remove the selected override account from a protection template.
Protection pages
Delete | Delete Registry Key
Use to remove the selected registry key from a Registry auditing template.
Registry Auditing page
Delete | Delete Service
Use to remove the selected service from a Service auditing template.
Service Auditing page
Delete | Delete SQL Instance
Use to remove the selected SQL instance from a SQL auditing template
SQL Auditing page
Delete |Delete Template
Use to remove the selected auditing or protection template.
Auditing pages
Protection pages
Delete Criteria Use to remove the selected entry from the What search criteria list.
What tab
TOOL BAR BUTTON: DESCRIPTION:CHANGEAUDITOR PAGES:
281

Quest ChangeAuditor
Disable Use to disable the selected events or database schedule.
Event Details pane
Audit Events page
Database Maintenance page
Edit Use to modify the selected item. Audit Events page
Auditing pages
Protection pages
Database Maintenance page
Application User Interface page
Edit Event Class Use to modify the selected entry in the What search criteria list.
What tab
Email Use to launch the configured email client to email the selected audited event details.
Event Details pane
Enable Use to enable the selected events or database schedule.
Audit Events page
Event Details pane
Database Maintenance page
Event Details Use to display the Event Details pane across the bottom of the Overview pane, Search Results page, Alert or History page.
Overview page
Search Results page
Alert History page
Event Logging Use to enable or disable event logging.
Agent Configuration page
Explorer View Use to show the explorer view in the left-hand pane of the Searches page.
Searches page
Find Use to search for text in the currently displayed trace log. Enter a word or string of characters to be located.
Log pages
TOOL BAR BUTTON: DESCRIPTION:CHANGEAUDITOR PAGES:
282
ChangeAuditor Commands
Force Refresh Use to force a topology harvest refresh to discover new servers added to the Active Directory forest and display them on the Deployment page.
Deployment page
Grid View Use to hide the explorer view and display only the Searches list on the Searches page.
Searches page
Hide Uninstalled Agents
Use to remove uninstalled agents from the current Agent Statistics view.
Agent Statistics page
Hide Uninstalled Coordinators
Use to remove uninstalled coordinators from the current Coordinator Statistics view.
Coordinator Statistics page
High/Medium/Low Use to change the severity level assigned to the selected audit events.
Audit Events page
Install or Upgrade Use to install or upgrade a ChangeAuditor Agent on the selected servers.
Deployment page
Knowledgebase Use to display the knowledge base entry for the selected audited event.
Audit Events page
Event Details pane
Logs Open LogGet All LogsView Agent LogView Coordinator Log
Use the Log options as described below:
Open Log - use to retrieve a ChangeAuditor trace log file and display it in the ChangeAuditor Client.
Get All Logs - use to retrieve any associated logs and save them to a specified location on the local machine.
View Agent Log - use to display the current ChangeAuditor Agent trace log in the ChangeAuditor Client.
View Coordinator Log - use to display the current coordinator trace log in the ChangeAuditor Client.
Agent Configuration page
Agent Statistics page
Coordinator Statistics page
Deployment page
TOOL BAR BUTTON: DESCRIPTION:CHANGEAUDITOR PAGES:
283

Quest ChangeAuditor
Match Case Use to locate log entries that match the case it was entered in the search text.
Log pages
New
New Folder
New Search
Use the New options as described below:
New Folder - use to create a new folder in the explorer view of the Searches page.
New Search - use to create a new search definition.
Searches page
New Servers Use to enable or disable the automatic deployment of agents to new servers found in your Active Directory forest.
Deployment page
Next Use to move to the next log entry that contains the search text.
Log pages
Overviews Use to display the Overview panes across the bottom of the Overview page.
Overview page
Preview Changes Use to run the search based on the changes made to the search definition and display the results in the current Search Results page.
Search Properties tabs
Previous Use to move to the previous log entry that contains the search text.
Log pages
TOOL BAR BUTTON: DESCRIPTION:CHANGEAUDITOR PAGES:
284

ChangeAuditor Commands
PrintPrintPrint to FilePrint to PDFPrint PreviewPage Setup
Use the print options to print or save the contents of the displayed page.
Print - use to send the contents of the active page to a designated printer.
Print to File - use to save the contents of the active page to either an Excel (.xls) or Comma Delimited (.csv) file.
Print to PDF - use to save the contents of the active page to a PDF file.
Print Preview - use to display the print layout of the active page prior to printing it.
Page Setup - use to define the page settings for printing.
All pages
Refresh Use to retrieve and display the latest data available.
Overview page
Log pages
Refresh Configuration Use to retrieve the current agent configuration assignments.
Agent Configuration page
Refresh Status Use to refresh the deployment status of the selected servers.
Deployment page
Restart Agent Use to stop and then restart a ChangeAuditor Agent. This button is only available when an agent is in an ’active’ state.
Agent Statistics page
Run Use to run the selected search and display the events returned in a new Search Results page.
Search Properties tabs
Save Use to save a newly created search or modifications made to a search definition.
Search Properties tabs
TOOL BAR BUTTON: DESCRIPTION:CHANGEAUDITOR PAGES:
285

Quest ChangeAuditor
Save AsSave AsSave As Default
Use the Save As options as described below:
Save As - use to save the search definition using a different name and/or location.
Save As Default - use to save the search definition as the new default for creating new searches.
Search Properties tabs
Search Properties Use to display the Search Properties tabs across the bottom of the page.
Search Results page
Select All Use to select all the entries in the currently displayed trace log, which can then be copied for use in another application
Log pages
Set Agent Uninstalled Use to flag the selected ChangeAuditor Agent as ’uninstalled’. This button is only available when the selected agent is in an ’active’ state.
Agent Statistics page
Set Coordinator Uninstalled
Use to flag the selected ChangeAuditor Coordinator as ’uninstalled’. This button is only available when the selected coordinator is in an ’active’ state.
Coordinator Statistics page
Shared Mailboxes Use to view automatically detected shared mailboxes or to define a shared mailbox on the Exchange Mailbox auditing page.
Exchange Mailbox Auditing page
Show Matched Entries
Only ( )
Use to display only the log entries that match the word/string of characters entered in the search text.
Log pages
Show Uninstalled Agents
Use to include uninstalled agents in the current Agent Statistics view.
Agent Statistics page
Show Uninstalled Coordinators
Use to include uninstalled coordinators in the current Coordinator Statistics view.
Coordinator Statistics page
Start Agent Use to start a stopped ChangeAuditor Agent. This button is only available when an agent is in an ’inactive’ state.
Agent Statistics page
TOOL BAR BUTTON: DESCRIPTION:CHANGEAUDITOR PAGES:
286

ChangeAuditor Commands
Right-Click CommandsThe following table lists the commands which are available through right-click functionality. The commands are listed in alphabetical order with a reference to the pages from which they can be accessed.
Stop Agent Use to stop a ChangeAuditor Agent. This button is only available when an agent is in an ’active’ state.
Agent Statistics page
Test SMTP Use to generate a test email based on the configuration information entered in the SMTP Configuration pane.
Coordinator Configuration page
Test SNMP Use to generate a test SNMP trap based on the configuration information entered in the SMTP Configuration pane.
Coordinator Configuration page
Uninstall Use to uninstall the ChangeAuditor Agent from the selected servers.
Deployment page
COMMAND PRESENT ON FOLLOWING PAGES:
Add Application Group Administration Tasks Tab:• Application User Interface Authorization - Role• Application User Interface Authorization - Member
Add Task Definition Administration Tasks Tab:• Application User Interface Authorization - Role• Application User Interface Authorization - Member
Add Role Definition Administration Tasks Tab:• Application User Interface Authorization - Role• Application User Interface Authorization - Member
TOOL BAR BUTTON: DESCRIPTION:CHANGEAUDITOR PAGES:
287

Quest ChangeAuditor
AlertEnable Transport
SMTPSNMPWMI
Disable TransportSMTPSNMPWMI
Disable AlertHistoryDelete History
Searches Page - Search definition (right pane)
Note: History and Delete History options are only displayed when alerting has been enabled for a search definition.
All Results Administration Tasks Tab:• Audit Events - event
Assign Administration Tasks Tab:• Agent Configuration
Assign to Configuration Administration Tasks Tab:• Excluded Accounts Auditing - template or account• File System Auditing - template or file path• File System Protection - template or file path• Registry Auditing - template or registry key• Services Auditing - template or service• SQL Auditing - template or instance
Clear Result Deployment Page - Agent
Collapse All Searches Page - Folder (left pane)
Comments Search Results Page - Event (Data Grid)
Copy Administration Tasks Tab:• Coordinator Configuration - Text boxes
Event Details Pane - Text boxes
Searches Results Page - Event (Data Grid)
Searches Page:• Folder (left pane)• Search Definition (right pane)• Text boxes (Search Properties tabs)
Create Report(s) using SQL Reporting Services
Searches Page:• Folder (left pane)• Search Definition (right pane)
COMMAND PRESENT ON FOLLOWING PAGES:
288

ChangeAuditor Commands
CredentialsSetClearTest
Deployment Page - Agent
Cut Administration Tasks Tab:• Coordinator Configuration - Text boxes
Event Details Pane - Text boxes
Searches Page:• Folder (left pane)• Search Definition (right pane)• Text boxes (Search Properties tabs)
Delete Administration Tasks Tab:• Active Directory Auditing - object• Active Directory Auditing - object class• Application User Interface Authorization - role• Coordinator Configuration - text boxes• EMC Auditing - template or file path• Exchange Mailbox Auditing - mailbox• Exchange Mailbox Protection - template or mailbox• Excluded Account Auditing - template or account• Excluded LDAP Auditing - container• File System Auditing - template or file path• File System Protection - template or file path• NetApp Auditing - template or file path• Registry Auditing - template or registry key• Services Auditing - template or service• SQL Auditing - template or instance
Event Details Pane - Text boxes
Searches Page:• Folder (left pane)• Search Definition (right pane)• Text boxes (Search Properties tabs)
COMMAND PRESENT ON FOLLOWING PAGES:
289
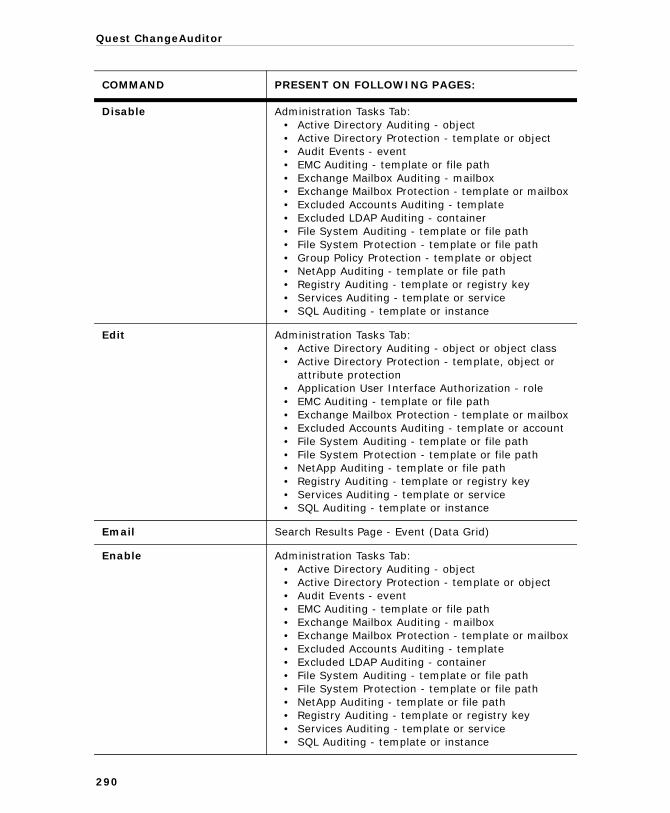
Quest ChangeAuditor
Disable Administration Tasks Tab:• Active Directory Auditing - object• Active Directory Protection - template or object• Audit Events - event• EMC Auditing - template or file path• Exchange Mailbox Auditing - mailbox• Exchange Mailbox Protection - template or mailbox• Excluded Accounts Auditing - template• Excluded LDAP Auditing - container• File System Auditing - template or file path• File System Protection - template or file path• Group Policy Protection - template or object• NetApp Auditing - template or file path• Registry Auditing - template or registry key• Services Auditing - template or service• SQL Auditing - template or instance
Edit Administration Tasks Tab:• Active Directory Auditing - object or object class• Active Directory Protection - template, object or
attribute protection• Application User Interface Authorization - role• EMC Auditing - template or file path• Exchange Mailbox Protection - template or mailbox• Excluded Accounts Auditing - template or account• File System Auditing - template or file path• File System Protection - template or file path• NetApp Auditing - template or file path• Registry Auditing - template or registry key• Services Auditing - template or service• SQL Auditing - template or instance
Email Search Results Page - Event (Data Grid)
Enable Administration Tasks Tab:• Active Directory Auditing - object• Active Directory Protection - template or object• Audit Events - event• EMC Auditing - template or file path• Exchange Mailbox Auditing - mailbox• Exchange Mailbox Protection - template or mailbox• Excluded Accounts Auditing - template• Excluded LDAP Auditing - container• File System Auditing - template or file path• File System Protection - template or file path• NetApp Auditing - template or file path• Registry Auditing - template or registry key• Services Auditing - template or service• SQL Auditing - template or instance
COMMAND PRESENT ON FOLLOWING PAGES:
290

ChangeAuditor Commands
Expand All Searches Page - Folder (left pane)
Export Searches Page:• Folder (left pane)• Search Definition (right pane)
Hide Details Search Results Page - Event (Data Grid)
Hide Properties Searches Page:• Folder (left pane)• Search Definition (right pane)
High/Medium/Low Administration Tasks Tab:• Audit Events Auditing
Import Folder Searches Page - Folder (left pane)
Import Search Searches Page - Folder (left pane)
Install or Upgrade Deployment Page - Agent
KnowledgeBase Administration Tasks Tab:• Audit Events Auditing
Search Results - Event (Data Grid)
LogsOpen LogGet All LogsView Agent LogView Coordinator Log
Agent Statistics Page - Agent
Coordinator Statistics Page - Coordinator
Deployment Page - Agent
Move Searches Page:• Folder (left pane)• Search Definition (right pane)
New New FolderNew Search
Searches Page:• Folder (left pane)• Search Definition (right pane)
Paste Administration Tasks Tab:• Coordinator Configuration - Text boxes
Event Details Pane - Text boxes
Search Properties tabs - Text boxes
Refresh Configuration Administration Tasks Tab:• Agents Configuration
Refresh Status Deployment Page - Agent
COMMAND PRESENT ON FOLLOWING PAGES:
291

Quest ChangeAuditor
Rename Searches Page - Folder (left pane)
Restart Agent Agent Statistics Page - Agent
Run Searches Page - Search definition (right pane)
Run Local Report Searches Page - Search definition (right pane)
Security Active Directory Protection Page - object
Group Policy Protection Page - object
Select All Administration Tasks Tab:• Coordinator Configuration - Text boxes
Event Details Pane - Text boxes
Search Properties tabs - Text boxes
Set Agent Uninstalled Agent Statistics Page
Set As My Favorite Searches Page - Search definition (right pane)
Show Details Search Results Page - Event (Data Grid)
Show Properties Searches Page• Folder (left pane)• Search Definition (right pane)
Start Agent Agent Statistics Page - Agent
Stop Agent Agent Statistics Page - Agent
Success Only Administration Tasks Tab:• Audit Events - event
Success and Protected Only
Administration Tasks Tab:• Audit Events - event
Success and Failed Only Administration Tasks Tab:• Audit Events - event
Undo Administration Tasks Tab:• Coordinator Configuration - Text boxes
Event Details Pane - Text boxes
Search Properties tabs - Text boxes
Uninstall Deployment Page - Agent
COMMAND PRESENT ON FOLLOWING PAGES:
292
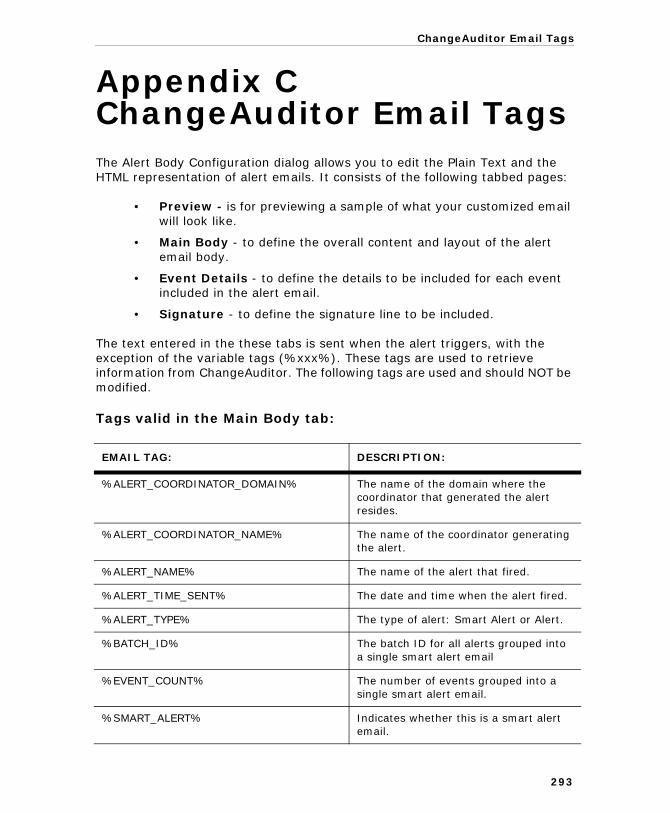
ChangeAuditor Email Tags
Appendix CChangeAuditor Email TagsThe Alert Body Configuration dialog allows you to edit the Plain Text and the HTML representation of alert emails. It consists of the following tabbed pages:
• Preview - is for previewing a sample of what your customized email will look like.
• Main Body - to define the overall content and layout of the alert email body.
• Event Details - to define the details to be included for each event included in the alert email.
• Signature - to define the signature line to be included.
The text entered in the these tabs is sent when the alert triggers, with the exception of the variable tags (%xxx%). These tags are used to retrieve information from ChangeAuditor. The following tags are used and should NOT be modified.
Tags valid in the Main Body tab:
EMAIL TAG: DESCRIPTION:
%ALERT_COORDINATOR_DOMAIN% The name of the domain where the coordinator that generated the alert resides.
%ALERT_COORDINATOR_NAME% The name of the coordinator generating the alert.
%ALERT_NAME% The name of the alert that fired.
%ALERT_TIME_SENT% The date and time when the alert fired.
%ALERT_TYPE% The type of alert: Smart Alert or Alert.
%BATCH_ID% The batch ID for all alerts grouped into a single smart alert email
%EVENT_COUNT% The number of events grouped into a single smart alert email.
%SMART_ALERT% Indicates whether this is a smart alert email.
293

Quest ChangeAuditor
Tags valid in the Event Details tab:
%SMART_ALERT_GROUPING% Indicates whether this is a smart alert email and on a single object.
%SMART_ALERT_OCCURRENCE% For smart alerts, the occurrence value specified in ’Send alert when <nn> Events occur within <nn> <interval>’.
%SMART_ALERT_PERIOD% For smart alerts, the period of time specified in ’Send alert when <nn> Events occur within <nn> <interval>’.
%SMART_ALERT_PERIOD_UNIT% For smart alerts, the time interval (minutes, hours or days) specified in ’Send alert when <nn> Events occur within <nn> <interval>’.
EMAIL TAG: DESCRIPTION:
%ACTIONNAME% The action associated with the event (e.g., Modify Attribute).
%ADAM.INSTANCENAME% For ADAM (AD LDS) events, the name of ADAM (AD LDS) instance where the change occurred.
%ADAM.PARTITIONNAME% For ADAM (AD LDS) events, the name of the directory partition where the change event occurred.
%AGENTID% The event identification number assigned by the agent.
%ALERT_COORDINATOR_DOMAIN% The name of the domain where the coordinator that generated the alert resides.
%ALERT_COORDINATOR_NAME% The name of the coordinator generating the alert.
%ALERT_NAME% The name of the alert that fired.
%ALERT_TIME_SENT% The date and time when the alert fired.
%ALERT_TYPE% The type of alert: Smart Alert or Alert.
EMAIL TAG: DESCRIPTION:
294

ChangeAuditor Email Tags
%ATTRIBUTENAME% For Active Directory and ADAM (AD LDS) events, the name of the schema attribute that was modified (e.g., displayName).
For File System events, the name of the file or folder attribute that was modified.
%BATCH_ID% The batch ID assigned to all alerts grouped into a single smart alert email.
%DOMAINNAME% The name of the domain where the ChangeAuditor Agent that generated the alert resides.
%EVENT_COUNT% The number of events grouped into a smart alert email.
%EVENTCLASSNAME% The event name.
%EVENTID% The event identification number assigned by the coordinator.
%EVENTMESSAGE% The actual event that triggered the alert.
%EVENTSOURCE% Indicates the application where the change event came from: ChangeAuditor or ActiveRoles.
%FACILITYNAME% The name of the event class facility to which the event belongs (e.g., Domain Configuration).
%FILESYSTEM.FILENAME% For File System events, the name of the file that was modified.
%FILESYSTEM.FILESERVER% For File System events, the name of the server where the file or folder that was modified resides.
%FILESYSTEM.FILESYSTEMTYPEID% For File System events, the type of object (File or Folder) that was modified.
%FILESYSTEM.FOLDERPATH% For File System events, the full path of the file or folder where the modification occurred.
%FILESYSTEM.LOGONID% For File System events, the logon ID of the user who made the change.
EMAIL TAG: DESCRIPTION:
295

Quest ChangeAuditor
%FILESYSTEM.PRIMARYSID% For File System events, the SID of the user who made the change.
%FILESYSTEM.PROCESSNAME% For File System events, the full path of the application responsible for the change.
%FILESYSTEM.SHARENAME% For File System events, the name of the local share that was modified.
%FILESYSTEM.TRANSACTIONID% For File System Transaction Status Changed events, the identification number assigned to a transaction.
Note: Transaction Status events are only supported on Windows Server 2008 or newer OS.
%FILESYSTEM.TRANSACTIONSTATUS% For File System Transaction Status Changed events, the current status of the transaction.
Note: Transaction Status events are only supported on Windows Server 2008 or newer OS.
%FORESTNAME% The name of the forest where the ChangeAuditor Agent that captured the event resides.
%GROUPPOLICY.POLICYITEM% For Group Policy events, the group policy item that was modified.
%GROUPPOLICY.POLICYSECTION% For Group Policy events, the section of the group policy that was modified.
%INITIATORSID% For events generated by ActiveRoles Server, the SID of the user that initiated the event.
%INITIATORUSERNAME% For events generated by ActiveRoles Server, the name of the user that initiated the event.
%LDAP.ATTRIBUTES% For LDAP Query events, the attributes that were queried.
%LDAP.ELAPSED% For LDAP Query events, how long the LDAP query took to run.
%LDAP.FILTER% For LDAP Query events, the filter string used in the LDAP query.
EMAIL TAG: DESCRIPTION:
296

ChangeAuditor Email Tags
%LDAP.OCCURRENCES% For LDAP Query events, the number of times the LDAP query occurred during the specified interval.
%LDAP.RESULTS% For LDAP Query events, the number of results returned as result of the query.
%LDAP.SCOPE% For LDAP Query events, the scope of coverage: This object only or This object and all children.
%LDAP.SINCE% For LDAP Query events, the date and time when the LDAP query was first intiated.
%LDAP.TYPE% For LDAP Query events, the type of query: LDAP or GC.
%OBJECTCANONICAL% For Active Directory and ADAM (AD LDS) events, the canonical name of the object that was modified.
For Group Policy events, the canonical name of the group policy that was modified.
For LDAP Query events, the LDAP object canonical name of the object that was queried.
%OBJECTCLASS% For Active Directory and Exchange events, the object class that was modified (e.g., groupPolicyContainer).
For ADAM (AD LDS) events, the object class that was modified (e.g., container, user, group).
For LDAP Query events, the object class that was queried.
EMAIL TAG: DESCRIPTION:
297

Quest ChangeAuditor
%OBJECTID% For Active Directory events, the identification number associated with the directory object that was changed.
For ADAM (AD LDS) events, the indentification number associated with the ADAM object that was modified.
For Group Policy events, the identification number associated with the group policy that was modifed.
For LDAP Query events, the identification number associated with the object that was queried.
%OBJECTNAME% For Active Directory and Exchange events, the name of the object that was modified.
For ADAM (AD LDS) events, the distinguished name of the object that was modified.
For Group Policy events, the name of the group policy that was modified.
For LDAP Query events, the name of the object that was queried.
%ORGANIZATIONALUNIT% For Active Directory and ADAM (AD LDS) events, the OU associated with the object that was modified.
For Group Policy events, the name of the OU that is linked to the group policy that was modified.
For LDAP Query events, the name of the OU associated with the LDAP query.
EMAIL TAG: DESCRIPTION:
298
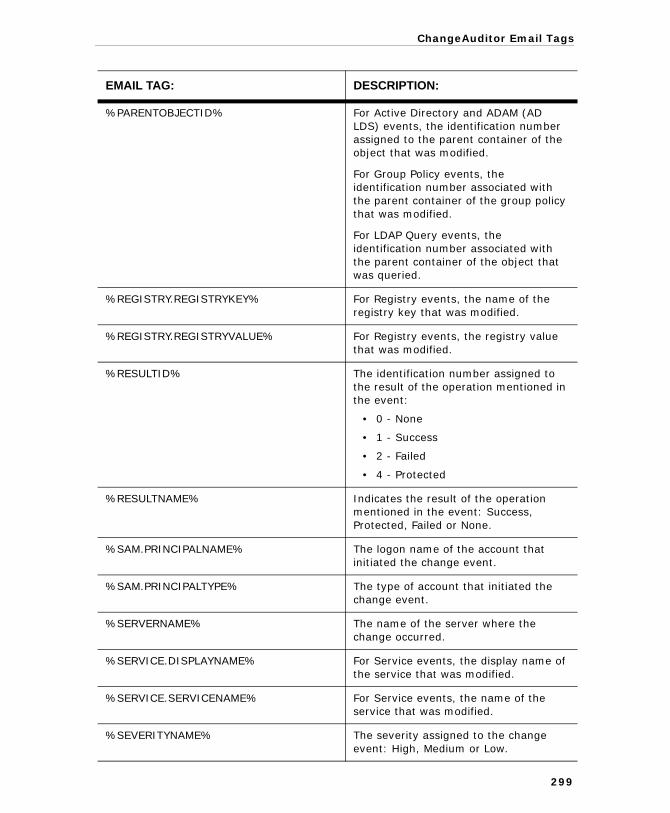
ChangeAuditor Email Tags
%PARENTOBJECTID% For Active Directory and ADAM (AD LDS) events, the identification number assigned to the parent container of the object that was modified.
For Group Policy events, the identification number associated with the parent container of the group policy that was modified.
For LDAP Query events, the identification number associated with the parent container of the object that was queried.
%REGISTRY.REGISTRYKEY% For Registry events, the name of the registry key that was modified.
%REGISTRY.REGISTRYVALUE% For Registry events, the registry value that was modified.
%RESULTID% The identification number assigned to the result of the operation mentioned in the event:
• 0 - None
• 1 - Success
• 2 - Failed
• 4 - Protected
%RESULTNAME% Indicates the result of the operation mentioned in the event: Success, Protected, Failed or None.
%SAM.PRINCIPALNAME% The logon name of the account that initiated the change event.
%SAM.PRINCIPALTYPE% The type of account that initiated the change event.
%SERVERNAME% The name of the server where the change occurred.
%SERVICE.DISPLAYNAME% For Service events, the display name of the service that was modified.
%SERVICE.SERVICENAME% For Service events, the name of the service that was modified.
%SEVERITYNAME% The severity assigned to the change event: High, Medium or Low.
EMAIL TAG: DESCRIPTION:
299

Quest ChangeAuditor
%SIGNSEAL% For Active Directory and LDAP Query events, indicates whether the LDAP operation or LDAP query is signed using Kerberos-based encryption.
%SITENAME% The name of the site where the server resides.
%SMART_ALERT% Indicates whether this is a smart alert email.
%SMART_ALERT_GROUPING% Indicates whether this is a smart alert email and one a single object.
%SMART_ALERT_OCCURRENCE% For smart alerts, the occurrence value specified in ’Send alert when <nn> Events occur within <nn> <interval>’.
%SMART_ALERT_PERIOD% For smart alerts, the period of time specified in ’Send alert when <nn> Events occur within <nn> <interval>’.
%SMART_ALERT_PERIOD_UNIT% For smart alerts, the time interval (minutes, hours or days) specified in ’Send alert when <nn> Events occur within <nn> <interval>’.
%SQL.APPLICATIONNAME% For SQL events, the name of the client application that initiated the change event.
%SQL.CLIENTPROCESSID% For SQL events, the identification number associated with the client process that initiated the change event.
%SQL.DATABASEID% For SQL events, the identification number associated with the SQL database used by the process that initiated the change event.
%SQL.DATABASENAME% For SQL events, the name of the SQL database used by the process that initiated the change event.
%SQL.EVENTCLASS% For SQL events, the SQL server operation (event class) that was performed.
%SQL.EVENTSUBCLASS% For SQL events, the type of event subclass that was performed.
EMAIL TAG: DESCRIPTION:
300

ChangeAuditor Email Tags
%SQL.HOSTNAME% For SQL events, the name of the client workstation that initiated the session.
%SQL.INSTANCENAME% For SQL events, the name of the SQL instance where the change event occurred.
%SQL.ISSYSTEM% For SQL events, indicates whether a system session initiated the change.
%SQL.LINKEDSERVERNAME% For SQL events, the name of the linked server.
%SQL.OBJECTID% For SQL events, the object identifier associated with the SQL object that was changed.
%SQL.OBJECTID2% For SQL events, the object identifier of related objects or entities, if available.
%SQL.OBJECTNAME% For SQL events, the name of the SQL Server object that was changed.
%SQL.OBJECTTYPE% For SQL events, the type of SQL Server object that was changed.
%SQL.OWNERID% For SQL lock events, the type of object that owns a lock.
%SQL.OWNERNAME% For SQL events, the database user name of the object owner.
%SQL.PARENTNAME% For SQL events, the name of the schema in which the object that changed resides.
%SQL.PROVIDERNAME% For SQL events, the name of the OLEDB provider.
%SQL.SESSIONLOGINNAME% For SQL events, the SQL Server login name used by the client to create the session.
%SQL.SPID% For SQL events, the SQL Server Process ID associated with the process that initiated the change.
%SQL.SUCCESS% For SQL events, indicates whether the event was successful.
EMAIL TAG: DESCRIPTION:
301
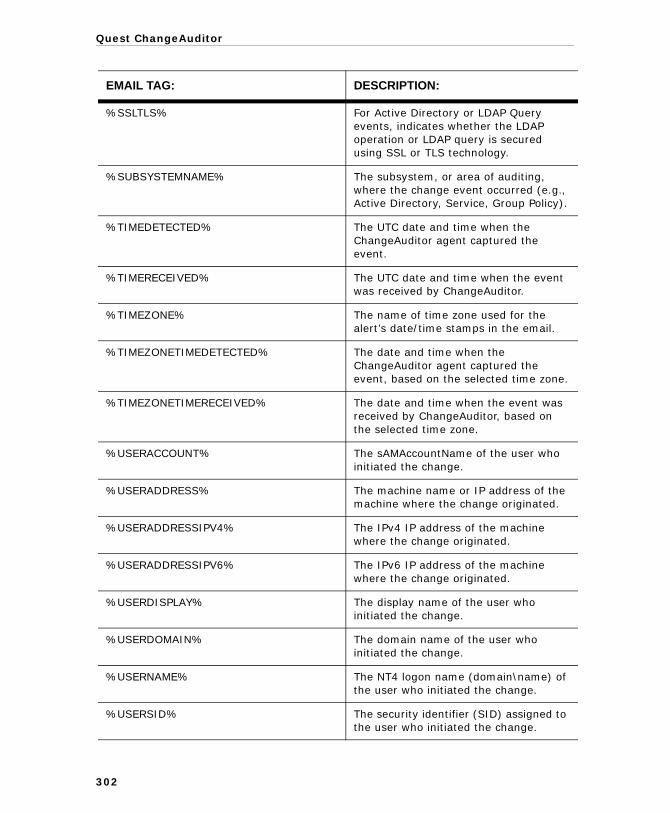
Quest ChangeAuditor
%SSLTLS% For Active Directory or LDAP Query events, indicates whether the LDAP operation or LDAP query is secured using SSL or TLS technology.
%SUBSYSTEMNAME% The subsystem, or area of auditing, where the change event occurred (e.g., Active Directory, Service, Group Policy).
%TIMEDETECTED% The UTC date and time when the ChangeAuditor agent captured the event.
%TIMERECEIVED% The UTC date and time when the event was received by ChangeAuditor.
%TIMEZONE% The name of time zone used for the alert’s date/time stamps in the email.
%TIMEZONETIMEDETECTED% The date and time when the ChangeAuditor agent captured the event, based on the selected time zone.
%TIMEZONETIMERECEIVED% The date and time when the event was received by ChangeAuditor, based on the selected time zone.
%USERACCOUNT% The sAMAccountName of the user who initiated the change.
%USERADDRESS% The machine name or IP address of the machine where the change originated.
%USERADDRESSIPV4% The IPv4 IP address of the machine where the change originated.
%USERADDRESSIPV6% The IPv6 IP address of the machine where the change originated.
%USERDISPLAY% The display name of the user who initiated the change.
%USERDOMAIN% The domain name of the user who initiated the change.
%USERNAME% The NT4 logon name (domain\name) of the user who initiated the change.
%USERSID% The security identifier (SID) assigned to the user who initiated the change.
EMAIL TAG: DESCRIPTION:
302

ChangeAuditor Email Tags
Finally, the event details defined in the Event Details tab are placed in the Main Body tab using the following tag:
%EVENT_DETAILS%
Please note that the following 4.x email tags are no longer supported. However, if you have 4.x email alerts already defined using these tags, the ’old’ tags will be translated to display the appropriate information in your email alerts. The following table lists the depreciated tags and the new tags that will be used.
%VALUENEW% The new value that is now assigned to the object.
%VALUEOLD% The old value that was assigned to the object.
DEPRECIATED TAGS CONVERTED TO:
%EVENT_ACTION% %ACTIONNAME%
%EVENT_AGENT_DOMAIN% %DOMAINNAME%
%EVENT_AGENT_ID% %AGENTID%
%EVENT_AGENT_NAME% %SERVERNAME%
%EVENT_ATTRIBUTE_NAME% %DIRECTORY.ATTRIBUTENAME%
%EVENT_COORDINATOR_ID% %EVENTID%
%EVENT_DESCRIPTION% %EVENTMESSAGE%
%EVENT_FACILITY% %FACILITYNAME%
%EVENT_FROM_VALUE% %VALUEOLD%
%EVENT_OBJECT_NAME% %OBJECTNAME%
%EVENT_OBJECTCLASS% %DIRECTORY.OBJECTCLASS%
%EVENT_REPOSITORY_ID% %EVENTID%
%EVENT_TIME_DETECTED% %TIMEDETECTED%
%EVENT_TIME_RECEIVED% %TIMERECEIVED%
%EVENT_TO_VALUE% %VALUENEW%
%EVENT_USER_NAME% %USERNAME%
EMAIL TAG: DESCRIPTION:
303


INDEX
AAbout command 231, 250Account Exclusions feature 213Activate Search Properties tabs 80Add application group 183Add Comments 76Add groups to Group Membership
Expansion list 150Add or remove columns 25Add role definition 182Add task definition 181Administration Tasks tab
Application User Interface Authorization page 179
Audit Events page 186Coordinator Configuration
page 142Database Maintenance page 155Deployment page 36Excluded Account Auditing
page 215Registry Auditing page 195Service Auditing page 205SQL Reporting Services page 168Task lists and tasks 263
Advanced Deployment Options dialog 41
Advanced tab 99Agent
Auto deployment 43Changing installation location 41Changing system tray option 41Deployment procedure 39
Agent Configuration page 138Assign configurations to
agents 137Agent Heartbeat Check pane 151Agent port 255Agent Statistics page 226
Save ChangeAuditor logs 242Start an agent 239Stop an agent 238View Agent logs 243View agent status/statistics 237View ChangeAuditor logs 242
Agent StatusCommand 231Overview page 52Window 232
Agent System Tray icon 230Start an agent 239Stop an agent 238
View Agent logs 243View agent status/statistics 237
Alert HistoryDelete 115Overview page 54Page 113Purge 157View 115
Alert tab 98Alerts
Disable alert 111Disable transport 111Enable transport 107
Application group 183Application User Interface
Authorization page 179Add application group 183Add role definition 182Add task definition 181
Assign a configuration to an agent 137
Audit Events page 186Auto Deploy to New Servers in Forest
dialog 43
BBar Graph button 71
CChangeAuditor
Agent Status Window 232Client components 23Client overview 13Coordinator Configuration Tool 252Coordinator Status Window 250
Changing agent installation location 41
ClientAuthorization roles 178Authorization tasks 178Components 23Overview 13SCP listening port 255Start 17
Comments tab 98Configure Coordinator command 231Connection profiles 18
Define new profile 18Coordinator
Log page 258Start service 257Stop service 257
305

Quest ChangeAuditor
Coordinator Configuration page 142Agent Heartbeat Check pane 151Configure email notifications 145Group Membership Expansion
pane 148SMTP Configuration pane 143
Coordinator Configuration Tool 252Port page 254Protection page 255Security page 253
Coordinator Database Configurator command 249
Coordinator Statistics page 246Save ChangeAuditor logs 261View ChangeAuditor logs 260View coordinator log 261View coordinator
status/statistics 256Coordinator Status
Command 249Overview page 53Window 250
Coordinator System Tray icon 249View coordinator log 261View coordinator
status/statistics 257Copy Event Details 75Count of Events pane 51Create a custom search 78Create auditing templates
Excluded Account 216Registry Auditing 196Service Auditing 206
Create Report using SQL Reporting Services command 123, 124, 125
Custom AuditingEnable event auditing 188
Customize email content 147Customize table content 24
DData Grid button 71Database Maintenance 156
Define maintenance schedule 156Delete maintenance schedule 157Disable maintenance schedule 157Edit maintenance schedule 157Overview page 53Page 155Purge alert history 157Wizard 158
Default configuration settings 130Define a new agent configuration 134Define database maintenance
activities 156Delete a database maintenance
schedule 157Delete alert history 115Deploying agents 39Deployment page 36Deployment results 37Disable a database maintenance
schedule 157Disable audited events 188Disable Coordinator command 249Disable event auditing 188Display results in different
formats 71
EEdit a database maintenance
schedule 157Email alerts 107Email content customization 147Email Event Details 75Email notifications
Configure 145Customize content 147
Email tags 293Enable auto deployment
configuration 43Enable Coordinator command 249Enable event auditing 188Enable/Disable Agent command 231Event Details
Add comments 76Copy 75Display 73Email 75Overview page 54Search Results page 67
Event details 73Excluded Accounts
Create auditing templates 216Wizard 219
Excluded Accounts Auditing page 215Exit command 231, 250
FFavorite Search 48Filter data 27Force topology harvest refresh 44
306

Index
GGenerate reports 118
Through the ChangeAuditor Client 121
Group Membership Expansion pane 148
IImport SRS Settings 123, 168Include Event Source Initiator
option 83Info tab 81
LLoad on Startup command 231, 250
MManage connection profiles 18Move columns 25My Favorite Search grid 47
OObject Picker 29Origin tab 97Overview page
Agent Status 52Alert History pane 54Coordinator Status 53Count of Events pane 51Database Maintenance pane 53Event Details pane 54My Favorite Search grid 47Recent Event Activity pane 50Top Agent Activity pane 49View agent status/statistics 236View coordinator
status/statistics 256
PPie Chart button 71Print page contents 126Public SDK port 255Publish reports to SRS 123Purge alert history 157
QQuest Software
Contacting headquarters 11Contacting support 12
Quick Search 61
RRecent Event Activity pane 50Refresh Configuration command 231Refresh Interval setting 82Registry Auditing 194
Create auditing templates 196Page 195Wizard 200
Resize columns 25Restart agent on failure options 42Result column 66Role definition 182Run a Quick Search 61Run Local Report command 121Run searches 61
SSave ChangeAuditor logs
Agent Statistics page 242Coordinator Statistics page 261
Save page contents 126SCP listening ports 255Search Limit setting 81Search Properties tabs 58, 80
Activate 80Advanced 99Alert 98, 104Comments 98Display 80Info 81Origin 97SQL 98What 84When 96Where 94Who 82XML 99
Search Results grid 65Search Results page 64
Compare results side-by-side 72Display different formats 71Display knowledge base entry 74Event Details pane 67Preview search results 79View event details 73View search properties 74View search results 70
Searches page 56Create a custom search 78Define a favorite search 48Delete alert history 115Disable alerts 112
307
Quest ChangeAuditor
Enable SMTP alerts 107Enable SNMP alerts 109Enable WMI alerts 110Explorer view 57Generate built-in SRS report 121Publish a series of reports to
SRS 124Publish a single report to SRS 123Run a Quick Search 61Run searches 61Searches list 58View alert history 115View list of searches 60View SRS rendering of search
definition 121Service Auditing 204
Create auditing template 206Page 205Wizard 209
ServiceStatusTray launch options 42SMTP alerts 107SMTP Configuration pane 143SNMP alerts 109Sort data 24SQL Reporting Services
Create template 169Page 168Publish a series of reports 124Publish a single report 123Templates 168Wizard 171
SQL tab 98Start a coordinator 257Start an agent
Agent Statistics page 239Agent System Tray icon 239
Start the ChangeAuditor Client 17Statistics
Agent Statistics page 226Agent Status Window 232Coordinator Statistics page 246Coordinator Status Window 250
Status WindowAgent 232Coordinator 250
Stop a coordinator 257Stop an agent
Agent Statistics page 238Agent System Tray icon 238
System Tray iconAgent 230Coordinator 249
TTask definition 181Top Agent Activity pane 49
UUsing the object picker 29
VView Agent Log command 231View Agent logs
Agent Statistics page 243Agent System Tray icon 243
View agent status/statisticsAgent Statistics page 237Agent System Tray icon 237Overview page 236
View ChangeAuditor logsAgent Statistics page 242Coordinator Statistics page 260
View coordinator logCoordinator Statistics page 261Coordinator System Tray icon 261
View Coordinator Log command 249View coordinator status/statistics
Coordinator Statistics page 256Coordinator System Tray icon 257Overview page 256
View event details 73View list of available searches 60View reports through ChangeAuditor
Client 121View search results 70
WWhat tab 84When tab 96Where tab 94Who tab 82wildcard expression 95Wizards
Connection 20Database Maintenance 158Excluded Accounts 219Registry Auditing 200Service Auditing 209SQL Reporting Services 171
WMI alerts 110
XXML tab 99
308