quest exchange migration wizard 4.0 - quick start...
TRANSCRIPT

Quick Start Guide
4.0
© Copyright Quest® Software, Inc. 2007. All rights reserved. This guide contains proprietary information, which is protected by copyright. The software described in this guide is furnished under a software license or nondisclosure agreement. This software may be used or copied only in accordance with the terms of the applicable agreement. No part of this guide may be reproduced or transmitted in any form or by any means, electronic or mechanical, including photocopying and recording for any purpose other than the purchaser's personal use without the written permission of Quest Software, Inc.
DISCLAIMER The information in this document is provided in connection with Quest products. No license, express or implied, by estoppel or otherwise, to any intellectual property right is granted by this document or in connection with the sale of Quest products. EXCEPT AS SET FORTH IN QUEST'S TERMS AND CONDITIONS AS SPECIFIED IN THE LICENSE AGREEMENT FOR THIS PRODUCT, QUEST ASSUMES NO LIABILITY WHATSOEVER AND DISCLAIMS ANY EXPRESS, IMPLIED OR STATUTORY WARRANTY RELATING TO ITS PRODUCTS INCLUDING, BUT NOT LIMITED TO, THE IMPLIED WARRANTY OF MERCHANTABILITY, FITNESS FOR A PARTICULAR PURPOSE, OR NON-INFRINGEMENT. IN NO EVENT SHALL QUEST BE LIABLE FOR ANY DIRECT, INDIRECT, CONSEQUENTIAL, PUNITIVE, SPECIAL OR INCIDENTAL DAMAGES (INCLUDING, WITHOUT LIMITATION, DAMAGES FOR LOSS OF PROFITS, BUSINESS INTERRUPTION OR LOSS OF INFORMATION) ARISING OUT OF THE USE OR INABILITY TO USE THIS DOCUMENT, EVEN IF QUEST HAS BEEN ADVISED OF THE POSSIBILITY OF SUCH DAMAGES. Quest makes no representations or warranties with respect to the accuracy or completeness of the contents of this document and reserves the right to make changes to specifications and product descriptions at any time without notice. Quest does not make any commitment to update the information contained in this document.
TRADEMARKS Quest Exchange Migration Wizard is a trademark of Quest Software, Inc. Other trademarks and registered trademarks used in this guide are property of their respective owners.
World Headquarters 5 Polaris Way Aliso Viejo, CA 92656 www.quest.com e-mail: [email protected]
Please refer to our Web site for regional and international office information.
Quest Exchange Migration Wizard Updated – February 19, 2007 Software version – 4.0
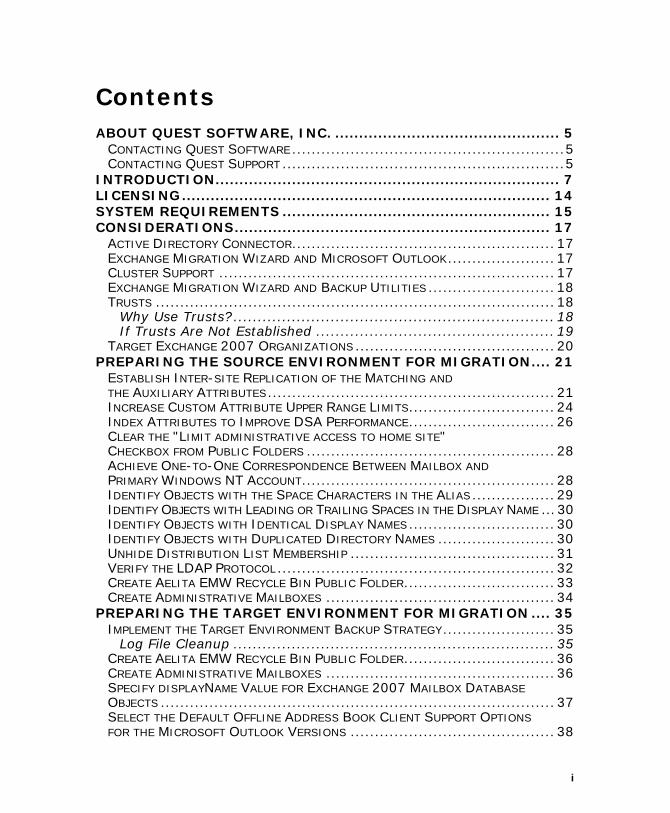
Contents ABOUT QUEST SOFTWARE, INC. ............................................... 5
CONTACTING QUEST SOFTWARE ........................................................5 CONTACTING QUEST SUPPORT ..........................................................5
INTRODUCTION........................................................................ 7 LICENSING............................................................................. 14 SYSTEM REQUIREMENTS ........................................................ 15 CONSIDERATIONS.................................................................. 17
ACTIVE DIRECTORY CONNECTOR...................................................... 17 EXCHANGE MIGRATION WIZARD AND MICROSOFT OUTLOOK...................... 17 CLUSTER SUPPORT ..................................................................... 17 EXCHANGE MIGRATION WIZARD AND BACKUP UTILITIES .......................... 18 TRUSTS .................................................................................. 18
Why Use Trusts? .................................................................. 18 If Trusts Are Not Established ................................................. 19
TARGET EXCHANGE 2007 ORGANIZATIONS ......................................... 20 PREPARING THE SOURCE ENVIRONMENT FOR MIGRATION.... 21
ESTABLISH INTER-SITE REPLICATION OF THE MATCHING AND THE AUXILIARY ATTRIBUTES........................................................... 21 INCREASE CUSTOM ATTRIBUTE UPPER RANGE LIMITS.............................. 24 INDEX ATTRIBUTES TO IMPROVE DSA PERFORMANCE.............................. 26 CLEAR THE "LIMIT ADMINISTRATIVE ACCESS TO HOME SITE" CHECKBOX FROM PUBLIC FOLDERS ................................................... 28 ACHIEVE ONE-TO-ONE CORRESPONDENCE BETWEEN MAILBOX AND PRIMARY WINDOWS NT ACCOUNT.................................................... 28 IDENTIFY OBJECTS WITH THE SPACE CHARACTERS IN THE ALIAS................. 29 IDENTIFY OBJECTS WITH LEADING OR TRAILING SPACES IN THE DISPLAY NAME ...30 IDENTIFY OBJECTS WITH IDENTICAL DISPLAY NAMES.............................. 30 IDENTIFY OBJECTS WITH DUPLICATED DIRECTORY NAMES ........................ 30 UNHIDE DISTRIBUTION LIST MEMBERSHIP .......................................... 31 VERIFY THE LDAP PROTOCOL......................................................... 32 CREATE AELITA EMW RECYCLE BIN PUBLIC FOLDER............................... 33 CREATE ADMINISTRATIVE MAILBOXES ............................................... 34
PREPARING THE TARGET ENVIRONMENT FOR MIGRATION .... 35 IMPLEMENT THE TARGET ENVIRONMENT BACKUP STRATEGY....................... 35
Log File Cleanup .................................................................. 35 CREATE AELITA EMW RECYCLE BIN PUBLIC FOLDER............................... 36 CREATE ADMINISTRATIVE MAILBOXES ............................................... 36 SPECIFY DISPLAYNAME VALUE FOR EXCHANGE 2007 MAILBOX DATABASE OBJECTS ................................................................................. 37 SELECT THE DEFAULT OFFLINE ADDRESS BOOK CLIENT SUPPORT OPTIONS FOR THE MICROSOFT OUTLOOK VERSIONS .......................................... 38
i
Quest Exchange Migration Wizard
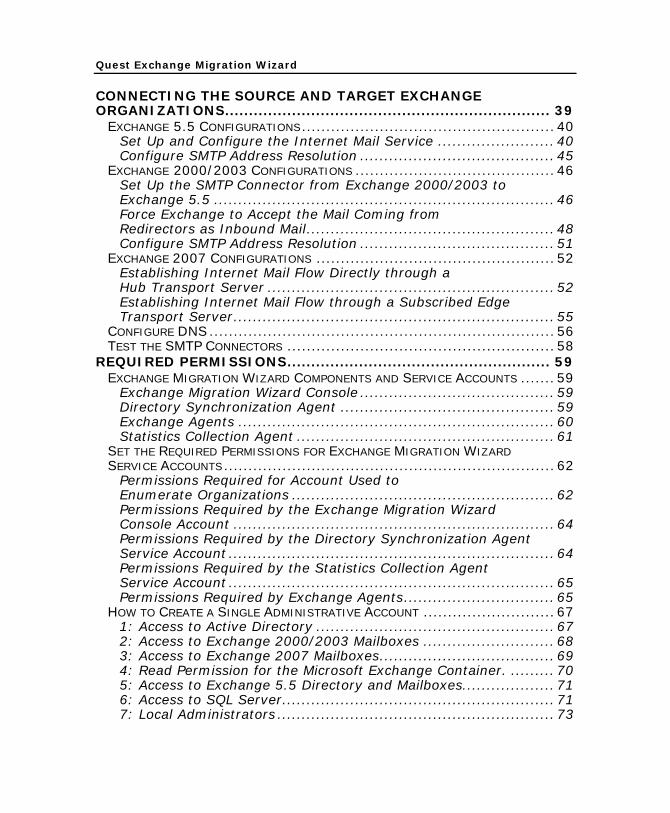
CONNECTING THE SOURCE AND TARGET EXCHANGE ORGANIZATIONS.................................................................... 39
EXCHANGE 5.5 CONFIGURATIONS.................................................... 40 Set Up and Configure the Internet Mail Service ........................ 40 Configure SMTP Address Resolution ........................................ 45
EXCHANGE 2000/2003 CONFIGURATIONS ......................................... 46 Set Up the SMTP Connector from Exchange 2000/2003 to Exchange 5.5 ...................................................................... 46 Force Exchange to Accept the Mail Coming from Redirectors as Inbound Mail................................................... 48 Configure SMTP Address Resolution ........................................ 51
EXCHANGE 2007 CONFIGURATIONS ................................................. 52 Establishing Internet Mail Flow Directly through a Hub Transport Server ........................................................... 52 Establishing Internet Mail Flow through a Subscribed Edge Transport Server.................................................................. 55
CONFIGURE DNS ....................................................................... 56 TEST THE SMTP CONNECTORS ....................................................... 58
REQUIRED PERMISSIONS....................................................... 59 EXCHANGE MIGRATION WIZARD COMPONENTS AND SERVICE ACCOUNTS ....... 59
Exchange Migration Wizard Console ........................................ 59 Directory Synchronization Agent ............................................ 59 Exchange Agents ................................................................. 60 Statistics Collection Agent ..................................................... 61
SET THE REQUIRED PERMISSIONS FOR EXCHANGE MIGRATION WIZARD SERVICE ACCOUNTS.................................................................... 62
Permissions Required for Account Used to Enumerate Organizations ...................................................... 62 Permissions Required by the Exchange Migration Wizard Console Account .................................................................. 64 Permissions Required by the Directory Synchronization Agent Service Account ................................................................... 64 Permissions Required by the Statistics Collection Agent Service Account ................................................................... 65 Permissions Required by Exchange Agents............................... 65
HOW TO CREATE A SINGLE ADMINISTRATIVE ACCOUNT ........................... 67 1: Access to Active Directory ................................................. 67 2: Access to Exchange 2000/2003 Mailboxes ........................... 68 3: Access to Exchange 2007 Mailboxes.................................... 69 4: Read Permission for the Microsoft Exchange Container. ......... 70 5: Access to Exchange 5.5 Directory and Mailboxes................... 71 6: Access to SQL Server........................................................ 71 7: Local Administrators ......................................................... 73
Quick Start Guide
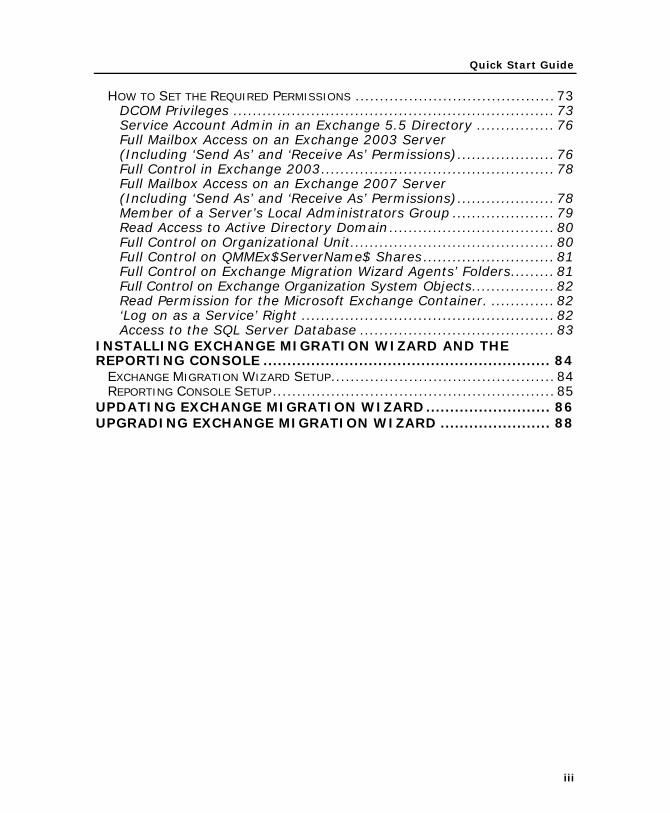
HOW TO SET THE REQUIRED PERMISSIONS ......................................... 73 DCOM Privileges .................................................................. 73 Service Account Admin in an Exchange 5.5 Directory ................ 76 Full Mailbox Access on an Exchange 2003 Server (Including ‘Send As’ and ‘Receive As’ Permissions).................... 76 Full Control in Exchange 2003................................................ 78 Full Mailbox Access on an Exchange 2007 Server (Including ‘Send As’ and ‘Receive As’ Permissions).................... 78 Member of a Server’s Local Administrators Group ..................... 79 Read Access to Active Directory Domain.................................. 80 Full Control on Organizational Unit.......................................... 80 Full Control on QMMEx$ServerName$ Shares........................... 81 Full Control on Exchange Migration Wizard Agents’ Folders......... 81 Full Control on Exchange Organization System Objects................. 82 Read Permission for the Microsoft Exchange Container. ............. 82 ‘Log on as a Service’ Right .................................................... 82 Access to the SQL Server Database ........................................ 83
INSTALLING EXCHANGE MIGRATION WIZARD AND THE REPORTING CONSOLE ............................................................ 84
EXCHANGE MIGRATION WIZARD SETUP.............................................. 84 REPORTING CONSOLE SETUP.......................................................... 85
UPDATING EXCHANGE MIGRATION WIZARD.......................... 86 UPGRADING EXCHANGE MIGRATION WIZARD ....................... 88
iii

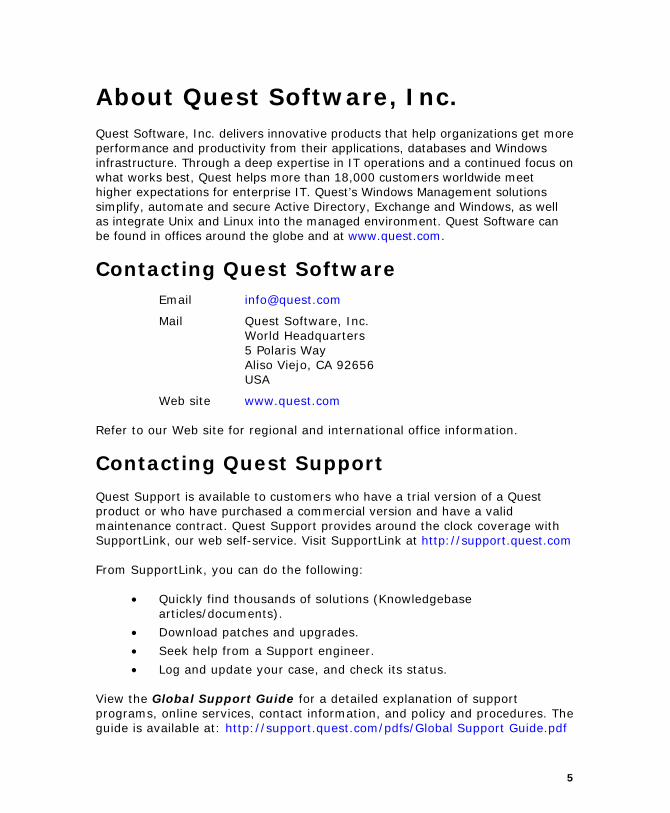
About Quest Software, Inc. Quest Software, Inc. delivers innovative products that help organizations get more performance and productivity from their applications, databases and Windows infrastructure. Through a deep expertise in IT operations and a continued focus on what works best, Quest helps more than 18,000 customers worldwide meet higher expectations for enterprise IT. Quest’s Windows Management solutions simplify, automate and secure Active Directory, Exchange and Windows, as well as integrate Unix and Linux into the managed environment. Quest Software can be found in offices around the globe and at www.quest.com.
Contacting Quest Software Email [email protected]
Mail Quest Software, Inc. World Headquarters 5 Polaris Way Aliso Viejo, CA 92656 USA
Web site www.quest.com
Refer to our Web site for regional and international office information.
Contacting Quest Support
Quest Support is available to customers who have a trial version of a Quest product or who have purchased a commercial version and have a valid maintenance contract. Quest Support provides around the clock coverage with SupportLink, our web self-service. Visit SupportLink at http://support.quest.com
From SupportLink, you can do the following:
• Quickly find thousands of solutions (Knowledgebase articles/documents).
• Download patches and upgrades.
• Seek help from a Support engineer.
• Log and update your case, and check its status.
View the Global Support Guide for a detailed explanation of support programs, online services, contact information, and policy and procedures. The guide is available at: http://support.quest.com/pdfs/Global Support Guide.pdf
5

Introduction About this Document
This guide explains how to make the necessary preparations and install Quest® Exchange Migration Wizard™ 4.0.
Terminology Used
Throughout this document, the following terms are used:
Source servers: The Exchange 5.5 servers from which the messaging system is migrated
Target servers: The servers to which the system is migrated
Console: The computer on which Exchange Migration Wizard is installed
In the remainder of this document:
• “Exchange 2003” denotes Exchange 2000 and Exchange 2003 organizations, servers, mailboxes, etc.
• “Exchange 200x” denotes Exchange 2000, Exchange 2003 and Exchange 2007 organizations, servers, mailboxes, etc.
Check List
Before you install Exchange Migration Wizard 4.0 and start the migration process, make sure that your environment is prepared for migration properly.
It is highly recommended to use Exchange Migration Wizard Deployment Tools available on the Exchange Migration Wizard distribution CD to complete all the tasks mentioned in the table below.
To ease the efforts of preparing the source Exchange 5.5 organization use the Exchange Migration Preparation Wizard available on the Exchange Migration Wizard distribution CD.
The Exchange Migration Preparation Wizard is a complementary program to Quest Exchange Migration Wizard. It can be found on Exchange Migration Wizard distribution CD.
With Exchange Migration Preparation Wizard you can collect information about the source Exchange 5.5 environment, run a number of pre-defined reports to identify the conflicting objects, and resolve the conflicts.
Refer to the Exchange Migration Preparation Wizard—User Guide for more details.
7
Quest Exchange Migration Wizard
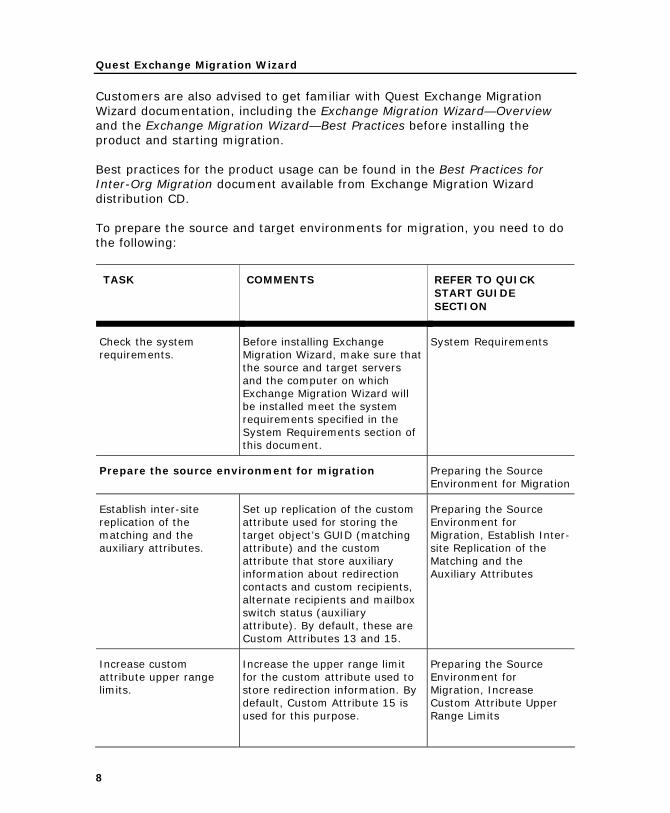
Customers are also advised to get familiar with Quest Exchange Migration Wizard documentation, including the Exchange Migration Wizard—Overview and the Exchange Migration Wizard—Best Practices before installing the product and starting migration.
Best practices for the product usage can be found in the Best Practices for Inter-Org Migration document available from Exchange Migration Wizard distribution CD.
To prepare the source and target environments for migration, you need to do the following:
TASK COMMENTS REFER TO QUICK START GUIDE SECTION
Check the system requirements.
Before installing Exchange Migration Wizard, make sure that the source and target servers and the computer on which Exchange Migration Wizard will be installed meet the system requirements specified in the System Requirements section of this document.
System Requirements
Prepare the source environment for migration Preparing the Source Environment for Migration
Establish inter-site replication of the matching and the auxiliary attributes.
Set up replication of the custom attribute used for storing the target object’s GUID (matching attribute) and the custom attribute that store auxiliary information about redirection contacts and custom recipients, alternate recipients and mailbox switch status (auxiliary attribute). By default, these are Custom Attributes 13 and 15.
Preparing the Source Environment for Migration, Establish Inter-site Replication of the Matching and the Auxiliary Attributes
Increase custom attribute upper range limits.
Increase the upper range limit for the custom attribute used to store redirection information. By default, Custom Attribute 15 is used for this purpose.
Preparing the Source Environment for Migration, Increase Custom Attribute Upper Range Limits
8
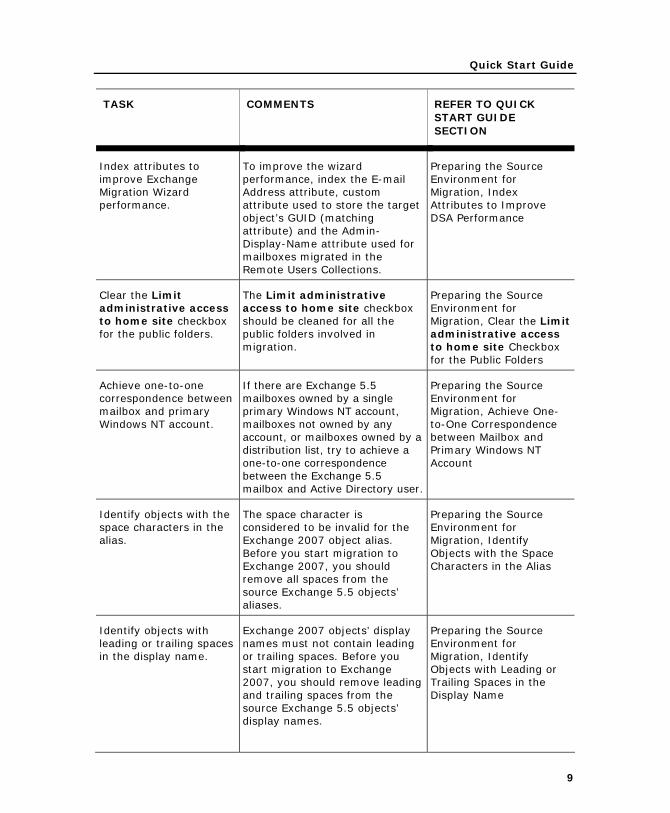
Quick Start Guide
TASK COMMENTS REFER TO QUICK START GUIDE SECTION
Index attributes to improve Exchange Migration Wizard performance.
To improve the wizard performance, index the E-mail Address attribute, custom attribute used to store the target object’s GUID (matching attribute) and the Admin-Display-Name attribute used for mailboxes migrated in the Remote Users Collections.
Preparing the Source Environment for Migration, Index Attributes to Improve DSA Performance
Clear the Limit administrative access to home site checkbox for the public folders.
The Limit administrative access to home site checkbox should be cleaned for all the public folders involved in migration.
Preparing the Source Environment for Migration, Clear the Limit administrative access to home site Checkbox for the Public Folders
Achieve one-to-one correspondence between mailbox and primary Windows NT account.
If there are Exchange 5.5 mailboxes owned by a single primary Windows NT account, mailboxes not owned by any account, or mailboxes owned by a distribution list, try to achieve a one-to-one correspondence between the Exchange 5.5 mailbox and Active Directory user.
Preparing the Source Environment for Migration, Achieve One-to-One Correspondence between Mailbox and Primary Windows NT Account
Identify objects with the space characters in the alias.
The space character is considered to be invalid for the Exchange 2007 object alias. Before you start migration to Exchange 2007, you should remove all spaces from the source Exchange 5.5 objects’ aliases.
Preparing the Source Environment for Migration, Identify Objects with the Space Characters in the Alias
Identify objects with leading or trailing spaces in the display name.
Exchange 2007 objects’ display names must not contain leading or trailing spaces. Before you start migration to Exchange 2007, you should remove leading and trailing spaces from the source Exchange 5.5 objects’ display names.
Preparing the Source Environment for Migration, Identify Objects with Leading or Trailing Spaces in the Display Name
9
Quest Exchange Migration Wizard
TASK COMMENTS REFER TO QUICK START GUIDE SECTION
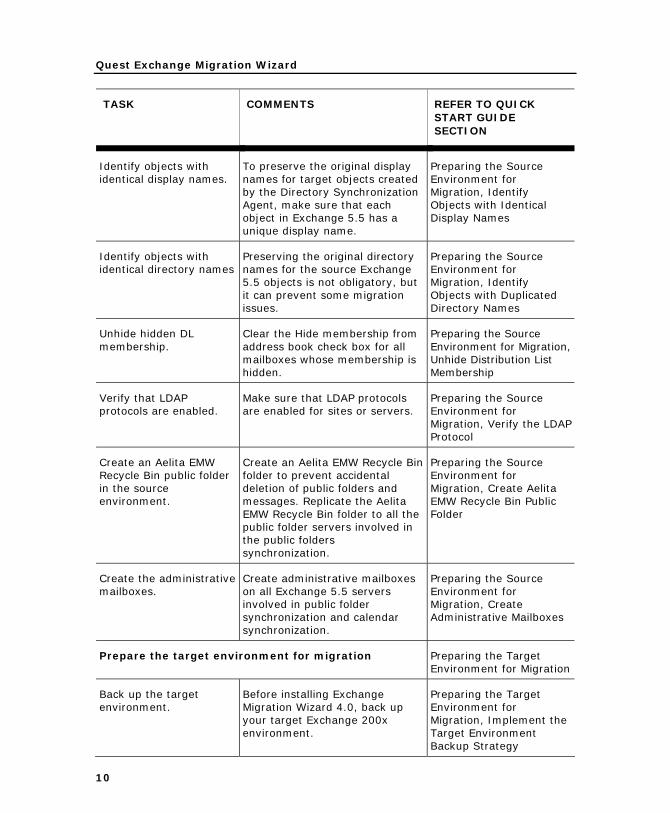
Identify objects with identical display names.
To preserve the original display names for target objects created by the Directory Synchronization Agent, make sure that each object in Exchange 5.5 has a unique display name.
Preparing the Source Environment for Migration, Identify Objects with Identical Display Names
Identify objects with identical directory names
Preserving the original directory names for the source Exchange 5.5 objects is not obligatory, but it can prevent some migration issues.
Preparing the Source Environment for Migration, Identify Objects with Duplicated Directory Names
Unhide hidden DL membership.
Clear the Hide membership from address book check box for all mailboxes whose membership is hidden.
Preparing the Source Environment for Migration, Unhide Distribution List Membership
Verify that LDAP protocols are enabled.
Make sure that LDAP protocols are enabled for sites or servers.
Preparing the Source Environment for Migration, Verify the LDAP Protocol
Create an Aelita EMW Recycle Bin public folder in the source environment.
Create an Aelita EMW Recycle Bin folder to prevent accidental deletion of public folders and messages. Replicate the Aelita EMW Recycle Bin folder to all the public folder servers involved in the public folders synchronization.
Preparing the Source Environment for Migration, Create Aelita EMW Recycle Bin Public Folder
Create the administrative mailboxes.
Create administrative mailboxes on all Exchange 5.5 servers involved in public folder synchronization and calendar synchronization.
Preparing the Source Environment for Migration, Create Administrative Mailboxes
Prepare the target environment for migration Preparing the Target Environment for Migration
Back up the target environment.
Before installing Exchange Migration Wizard 4.0, back up your target Exchange 200x environment.
Preparing the Target Environment for Migration, Implement the Target Environment Backup Strategy
10
Quick Start Guide
TASK COMMENTS REFER TO QUICK START GUIDE SECTION
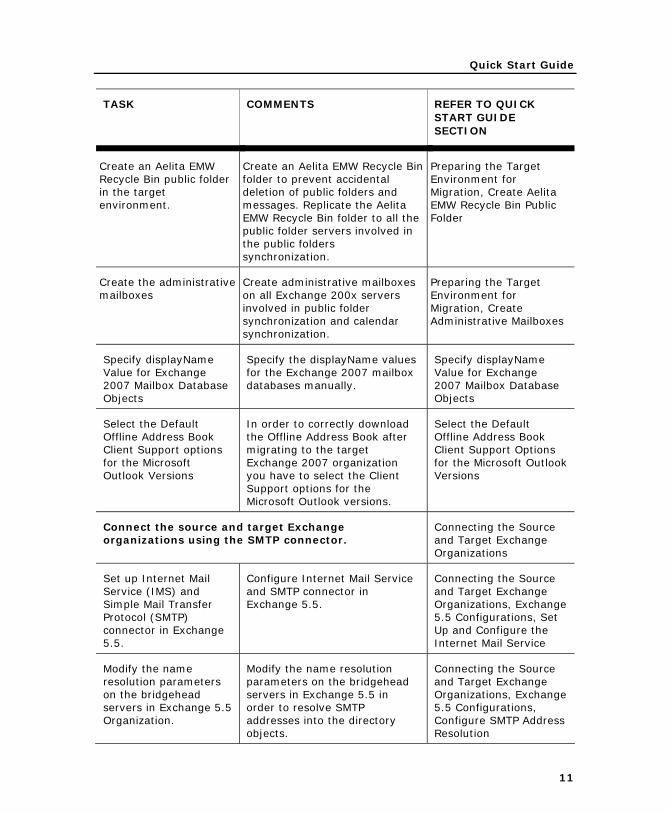
Create an Aelita EMW Recycle Bin public folder in the target environment.
Create an Aelita EMW Recycle Bin folder to prevent accidental deletion of public folders and messages. Replicate the Aelita EMW Recycle Bin folder to all the public folder servers involved in the public folders synchronization.
Preparing the Target Environment for Migration, Create Aelita EMW Recycle Bin Public Folder
Create the administrative mailboxes
Create administrative mailboxes on all Exchange 200x servers involved in public folder synchronization and calendar synchronization.
Preparing the Target Environment for Migration, Create Administrative Mailboxes
Specify displayName Value for Exchange 2007 Mailbox Database Objects
Specify the displayName values for the Exchange 2007 mailbox databases manually.
Specify displayName Value for Exchange 2007 Mailbox Database Objects
Select the Default Offline Address Book Client Support options for the Microsoft Outlook Versions
In order to correctly download the Offline Address Book after migrating to the target Exchange 2007 organization you have to select the Client Support options for the Microsoft Outlook versions.
Select the Default Offline Address Book Client Support Options for the Microsoft Outlook Versions
Connect the source and target Exchange organizations using the SMTP connector.
Connecting the Source and Target Exchange Organizations
Set up Internet Mail Service (IMS) and Simple Mail Transfer Protocol (SMTP) connector in Exchange 5.5.
Configure Internet Mail Service and SMTP connector in Exchange 5.5.
Connecting the Source and Target Exchange Organizations, Exchange 5.5 Configurations, Set Up and Configure the Internet Mail Service
Modify the name resolution parameters on the bridgehead servers in Exchange 5.5 Organization.
Modify the name resolution parameters on the bridgehead servers in Exchange 5.5 in order to resolve SMTP addresses into the directory objects.
Connecting the Source and Target Exchange Organizations, Exchange 5.5 Configurations, Configure SMTP Address Resolution
11
Quest Exchange Migration Wizard
TASK COMMENTS REFER TO QUICK START GUIDE SECTION
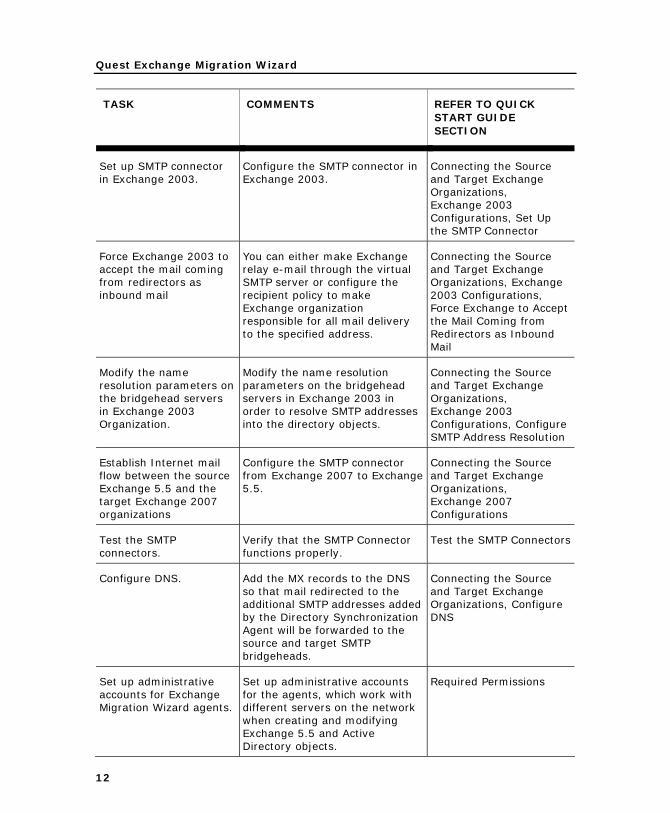
Set up SMTP connector in Exchange 2003.
Configure the SMTP connector in Exchange 2003.
Connecting the Source and Target Exchange Organizations, Exchange 2003 Configurations, Set Up the SMTP Connector
Force Exchange 2003 to accept the mail coming from redirectors as inbound mail
You can either make Exchange relay e-mail through the virtual SMTP server or configure the recipient policy to make Exchange organization responsible for all mail delivery to the specified address.
Connecting the Source and Target Exchange Organizations, Exchange 2003 Configurations, Force Exchange to Accept the Mail Coming from Redirectors as Inbound Mail
Modify the name resolution parameters on the bridgehead servers in Exchange 2003 Organization.
Modify the name resolution parameters on the bridgehead servers in Exchange 2003 in order to resolve SMTP addresses into the directory objects.
Connecting the Source and Target Exchange Organizations, Exchange 2003 Configurations, Configure SMTP Address Resolution
Establish Internet mail flow between the source Exchange 5.5 and the target Exchange 2007 organizations
Configure the SMTP connector from Exchange 2007 to Exchange 5.5.
Connecting the Source and Target Exchange Organizations, Exchange 2007 Configurations
Test the SMTP connectors.
Verify that the SMTP Connector functions properly.
Test the SMTP Connectors
Configure DNS. Add the MX records to the DNS so that mail redirected to the additional SMTP addresses added by the Directory Synchronization Agent will be forwarded to the source and target SMTP bridgeheads.
Connecting the Source and Target Exchange Organizations, Configure DNS
Set up administrative accounts for Exchange Migration Wizard agents.
Set up administrative accounts for the agents, which work with different servers on the network when creating and modifying Exchange 5.5 and Active Directory objects.
Required Permissions
12
Quick Start Guide
TASK COMMENTS REFER TO QUICK START GUIDE SECTION
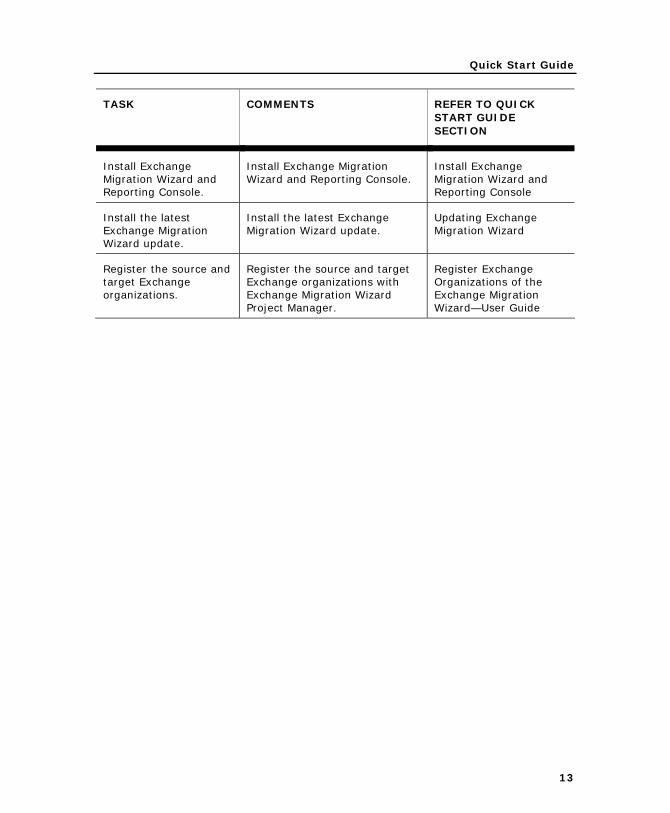
Install Exchange Migration Wizard and Reporting Console.
Install Exchange Migration Wizard and Reporting Console.
Install Exchange Migration Wizard and Reporting Console
Install the latest Exchange Migration Wizard update.
Install the latest Exchange Migration Wizard update.
Updating Exchange Migration Wizard
Register the source and target Exchange organizations.
Register the source and target Exchange organizations with Exchange Migration Wizard Project Manager.
Register Exchange Organizations of the Exchange Migration Wizard—User Guide
13
Quest Exchange Migration Wizard
Licensing The Exchange Migration Wizard license specifies the maximum number of mailboxes that you can migrate.
As Exchange Migration Wizard uses a distributed architecture, the Exchange Migration Wizard agents obtain all license information from a single license server. By default a server on which the Project Manager is installed is used as the license server. Later you can change the license server using Exchange Migration Wizard Options dialog.
Note that the agents should have access to the license server. Please see the Required Permissions section of this document for details.
14
Quick Start Guide
15
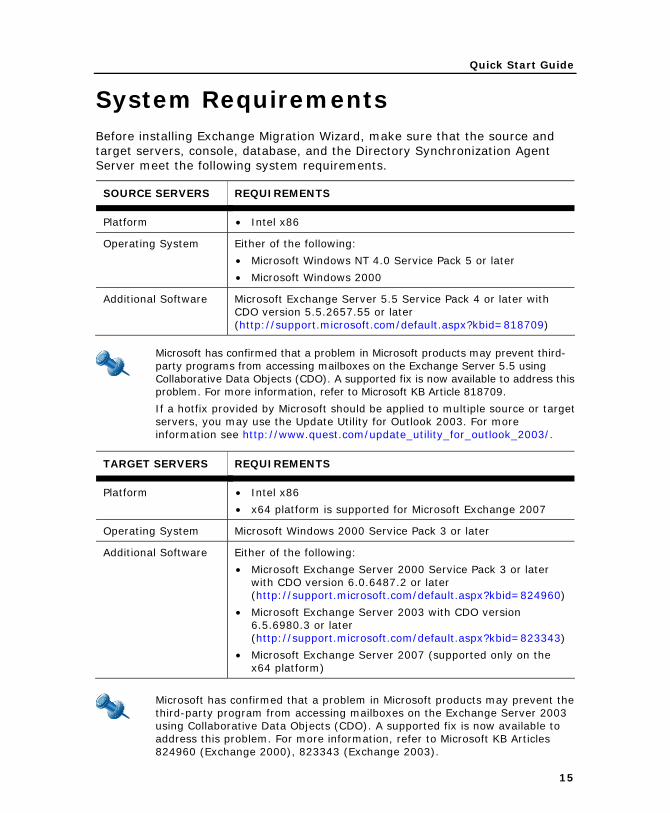
System Requirements Before installing Exchange Migration Wizard, make sure that the source and target servers, console, database, and the Directory Synchronization Agent Server meet the following system requirements.
SOURCE SERVERS REQUIREMENTS
Platform • Intel x86
Operating System Either of the following:
• Microsoft Windows NT 4.0 Service Pack 5 or later
• Microsoft Windows 2000
Additional Software Microsoft Exchange Server 5.5 Service Pack 4 or later with CDO version 5.5.2657.55 or later (http://support.microsoft.com/default.aspx?kbid=818709)
Microsoft has confirmed that a problem in Microsoft products may prevent third-party programs from accessing mailboxes on the Exchange Server 5.5 using Collaborative Data Objects (CDO). A supported fix is now available to address this problem. For more information, refer to Microsoft KB Article 818709.
If a hotfix provided by Microsoft should be applied to multiple source or target servers, you may use the Update Utility for Outlook 2003. For more information see http://www.quest.com/update_utility_for_outlook_2003/.
TARGET SERVERS REQUIREMENTS
Platform • Intel x86
• x64 platform is supported for Microsoft Exchange 2007
Operating System Microsoft Windows 2000 Service Pack 3 or later
Additional Software Either of the following:
• Microsoft Exchange Server 2000 Service Pack 3 or later with CDO version 6.0.6487.2 or later (http://support.microsoft.com/default.aspx?kbid=824960)
• Microsoft Exchange Server 2003 with CDO version 6.5.6980.3 or later (http://support.microsoft.com/default.aspx?kbid=823343)
• Microsoft Exchange Server 2007 (supported only on the x64 platform)
Microsoft has confirmed that a problem in Microsoft products may prevent the third-party program from accessing mailboxes on the Exchange Server 2003 using Collaborative Data Objects (CDO). A supported fix is now available to address this problem. For more information, refer to Microsoft KB Articles 824960 (Exchange 2000), 823343 (Exchange 2003).

Quest Exchange Migration Wizard
16
EXCHANGE MIGRATION WIZARD CONSOLE
REQUIREMENTS
Platform • Intel x86 • x64 platform is not supported
Operating System Either of the following:
• Microsoft Windows 2000 • Microsoft Windows XP • Microsoft Windows Server 2003
Additional Software MDAC 2.6 or later
Either of the following:
• Microsoft Outlook 2000 or later with Collaboration Data Objects (CDO)
• Microsoft Exchange Server 5.5 Service Pack 4 or later
EXCHANGE MIGRATION WIZARD DATABASE
REQUIREMENTS
Platform • Intel x86
Additional Software Either of the following:
• Microsoft SQL Server 2000 • Microsoft SQL Server 2005 • Microsoft SQL Server Desktop Engine (MSDE)
EXCHANGE MIGRATION WIZARD DIRECTORY SYNCHRONIZATION AGENT SERVER
REQUIREMENTS
Platform • Intel x86
Operating System Either of the following:
• Microsoft Windows 2000 • Microsoft Windows XP • Microsoft Windows Server 2003
The VMWare, Virtual PC/Server, or any other virtual machines are not supported during Exchange Migration Wizard production use and may be used for test lab only.
Quick Start Guide
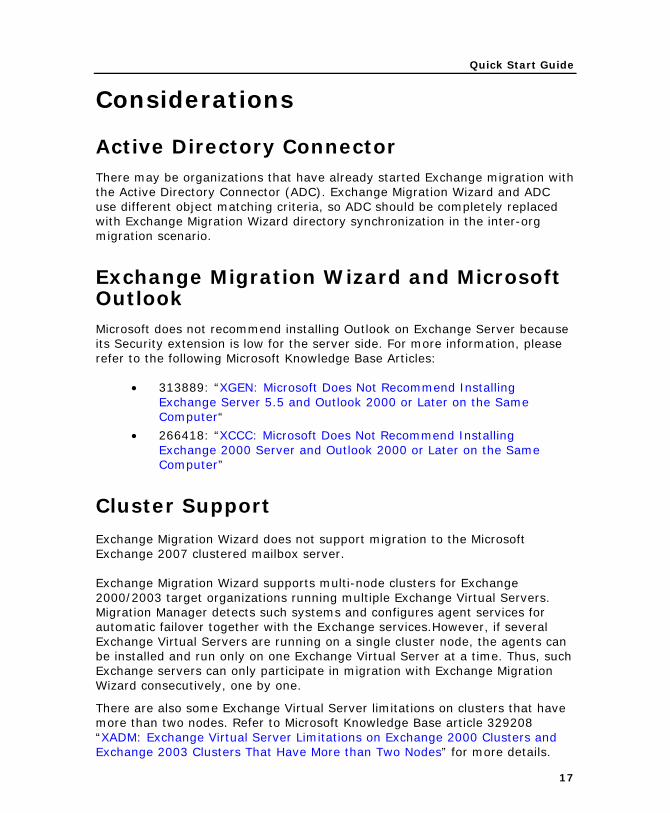
Considerations
Active Directory Connector There may be organizations that have already started Exchange migration with the Active Directory Connector (ADC). Exchange Migration Wizard and ADC use different object matching criteria, so ADC should be completely replaced with Exchange Migration Wizard directory synchronization in the inter-org migration scenario.
Exchange Migration Wizard and Microsoft Outlook Microsoft does not recommend installing Outlook on Exchange Server because its Security extension is low for the server side. For more information, please refer to the following Microsoft Knowledge Base Articles:
• 313889: “XGEN: Microsoft Does Not Recommend Installing Exchange Server 5.5 and Outlook 2000 or Later on the Same Computer“
• 266418: “XCCC: Microsoft Does Not Recommend Installing Exchange 2000 Server and Outlook 2000 or Later on the Same Computer”
Cluster Support
Exchange Migration Wizard does not support migration to the Microsoft Exchange 2007 clustered mailbox server.
Exchange Migration Wizard supports multi-node clusters for Exchange 2000/2003 target organizations running multiple Exchange Virtual Servers. Migration Manager detects such systems and configures agent services for automatic failover together with the Exchange services.However, if several Exchange Virtual Servers are running on a single cluster node, the agents can be installed and run only on one Exchange Virtual Server at a time. Thus, such Exchange servers can only participate in migration with Exchange Migration Wizard consecutively, one by one.
There are also some Exchange Virtual Server limitations on clusters that have more than two nodes. Refer to Microsoft Knowledge Base article 329208 “XADM: Exchange Virtual Server Limitations on Exchange 2000 Clusters and Exchange 2003 Clusters That Have More than Two Nodes” for more details.
17
Quest Exchange Migration Wizard
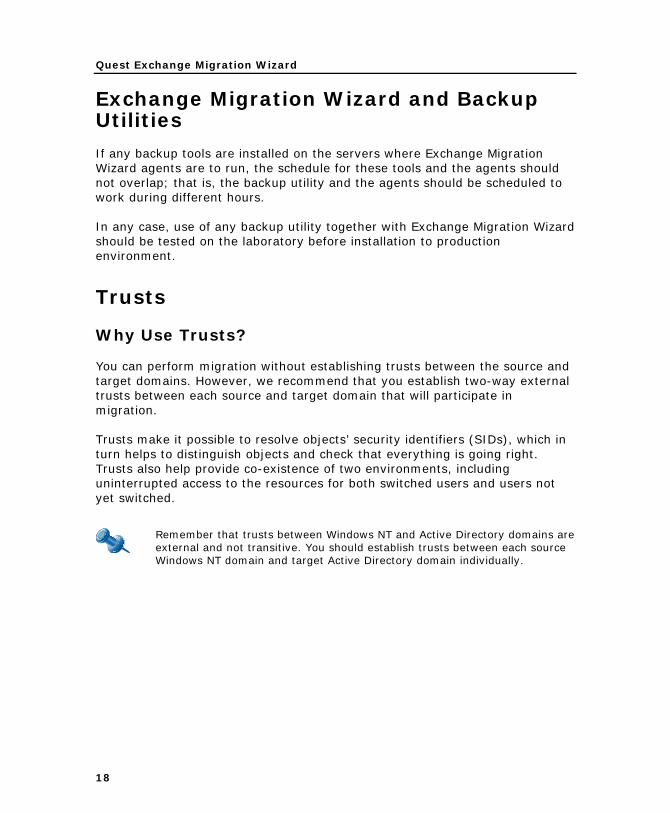
Exchange Migration Wizard and Backup Utilities
If any backup tools are installed on the servers where Exchange Migration Wizard agents are to run, the schedule for these tools and the agents should not overlap; that is, the backup utility and the agents should be scheduled to work during different hours.
In any case, use of any backup utility together with Exchange Migration Wizard should be tested on the laboratory before installation to production environment.
Trusts
Why Use Trusts?
You can perform migration without establishing trusts between the source and target domains. However, we recommend that you establish two-way external trusts between each source and target domain that will participate in migration.
Trusts make it possible to resolve objects’ security identifiers (SIDs), which in turn helps to distinguish objects and check that everything is going right. Trusts also help provide co-existence of two environments, including uninterrupted access to the resources for both switched users and users not yet switched.
Remember that trusts between Windows NT and Active Directory domains are external and not transitive. You should establish trusts between each source Windows NT domain and target Active Directory domain individually.
18
Quick Start Guide
If Trusts Are Not Established
When deciding whether to establish trusts, remember that if no trusts are established between the source and target domains, the following restrictions apply:
1. You will not be able to use a single administrative account for migration.
2. You will have to switch users and resources at once. This means that when a user starts using his or her target account (normally, when the user's workstation is moved to the target domain), all resources must be updated, so that the target user has the same access to the resources as the corresponding source user.
3. The computer on which Exchange Migration Wizard is installed must be a member of the domain in which the target Exchange cluster servers reside. If you have cluster servers in both the source and target domains, you need trusts established between the domains.
4. If you migrate Exchange first and set the user’s NT account to be the Associated External Account for the corresponding Exchange 2003 mailbox, users will not be able to log on to the target mailboxes with their source accounts.
5. Users will have to specify the target security account when they are switched to the target server. Because there are no trusts, their source accounts will not have permissions for the target mailboxes.
However, the migration is possible if trusts are not established. For example, the console will automatically net use the corresponding server using the Exchange account during the following operations:
• When adding an Exchange organization to the configuration database • When opening Exchange Server Properties • When adding a public folder, mailbox, calendar, or free/busy
synchronization job • When applying general options • When installing or uninstalling agents • When installing agent updates • When installing add-ins • When committing job changes
19
Quest Exchange Migration Wizard
Target Exchange 2007 Organizations
We assume that the target Exchange 2007 organization has a public folder store, otherwise the Exchange Migration Wizard will not support such organization.
20

Quick Start Guide
Preparing the Source Environment for Migration
Establish Inter-site Replication of the Matching and the Auxiliary Attributes
By default the Directory Synchronization Agent (DSA) uses Exchange 5.5 directory Custom Attribute 13 to store the target object’s global unique identifier (GUID) of the Active Directory object. This attribute is referred to as the matching attribute. The matching attribute is populated when the Directory Synchronization Agent first locates the Active Directory object corresponding to the Exchange 5.5 directory object.
The Directory Synchronization Agent also uses Exchange 5.5 directory Custom Attribute 15 to store auxiliary information about redirection contacts and custom recipients, alternate recipients and mailbox switch status. This attribute is referred to as the auxiliary attribute.
By default, Exchange 5.5 Directory Replication Connector does not replicate Custom Attribute 13 and Custom Attribute 15 between sites. However, Custom Attribute 13 replication is necessary for any inter-site links migration including group membership, client permissions for mailboxes, and public folders. Also, Custom Attribute 15 replication is necessary to prevent issues with mailbox switch status update when you refresh the organization in Exchange Migration Wizard Project Manager.
You can configure the Directory Synchronization Agent to use any custom attribute not used in the Exchange 5.5 organization as the service attributes. The agent uses Custom Attributes 11-15, by default.
If you configured Exchange Migration Wizard to use custom attributes other than custom Attribute 13 and Custom Attribute 15 to store matching and auxiliary information, you should replicate these attributes. Please refer to the Exchange Migration Wizard—User Guide for more information on how to specify different service attributes for the agent.
21
Quest Exchange Migration Wizard
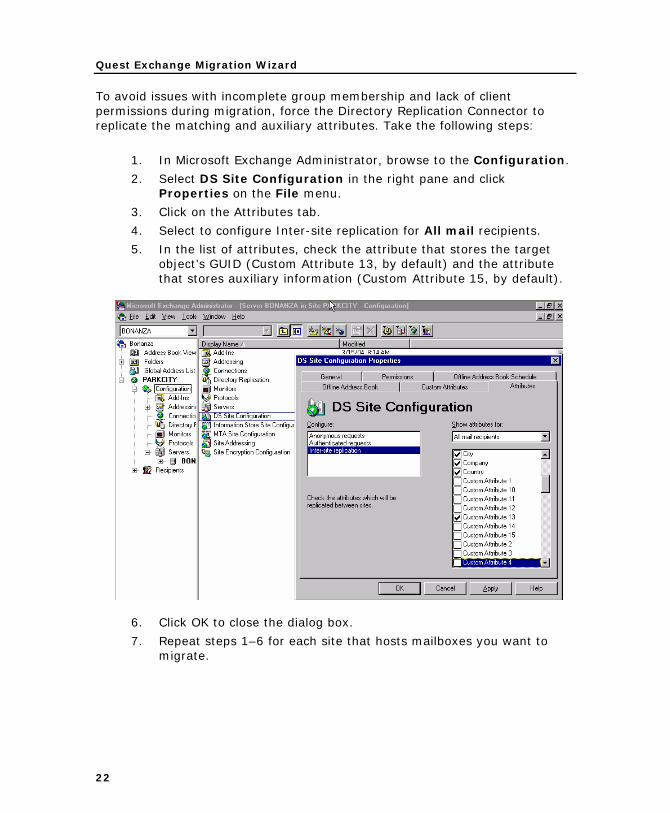
To avoid issues with incomplete group membership and lack of client permissions during migration, force the Directory Replication Connector to replicate the matching and auxiliary attributes. Take the following steps:
1. In Microsoft Exchange Administrator, browse to the Configuration.
2. Select DS Site Configuration in the right pane and click Properties on the File menu.
3. Click on the Attributes tab.
4. Select to configure Inter-site replication for All mail recipients.
5. In the list of attributes, check the attribute that stores the target object’s GUID (Custom Attribute 13, by default) and the attribute that stores auxiliary information (Custom Attribute 15, by default).
6. Click OK to close the dialog box.
7. Repeat steps 1–6 for each site that hosts mailboxes you want to migrate.
22
Quick Start Guide
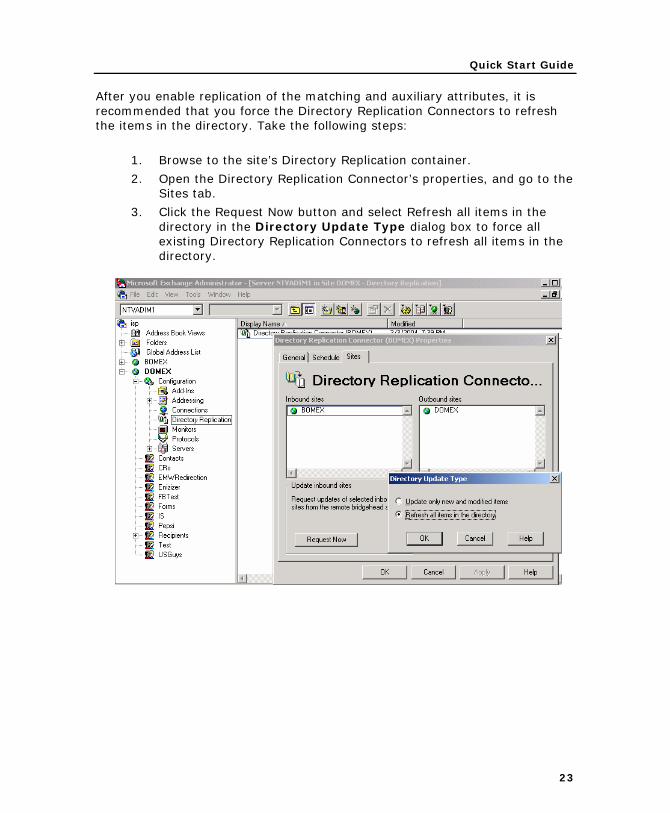
After you enable replication of the matching and auxiliary attributes, it is recommended that you force the Directory Replication Connectors to refresh the items in the directory. Take the following steps:
1. Browse to the site’s Directory Replication container.
2. Open the Directory Replication Connector’s properties, and go to the Sites tab.
3. Click the Request Now button and select Refresh all items in the directory in the Directory Update Type dialog box to force all existing Directory Replication Connectors to refresh all items in the directory.
23
Quest Exchange Migration Wizard
Increase Custom Attribute Upper Range Limits By default Exchange Migration Wizard uses Custom Attribute 15 of the Exchange 5.5 directory to store auxiliary information. (You can configure it to use a different custom attribute.) After the Directory Synchronization Agent first processes an object, that custom attribute is populated with the following information:
• Distinguished name of the source redirector (the custom recipient created in Exchange 5.5 directory for the purpose of redirection mail to the target mailbox.)
• Distinguished name of the of the target redirector (the contact created in the Active Directory for the purpose of redirection mail to the source mailbox.)
• Distinguished name of the Exchange 5.5 mailbox selected as an Alternate Recipient, if no matching object in the Active Directory was found for the alternate recipient specified for the Exchange 5.5 mailbox.
• Distinguished name of the Active Directory object corresponding to the Exchange 5.5 alternate recipient, if a matching Active Directory object was found for the selected alternate recipient.
Because this is a great deal of data, you need to increase the length of the Exchange 5.5 Custom Attribute 15 (or the other custom attribute you specified) to 4096. Take the following steps:
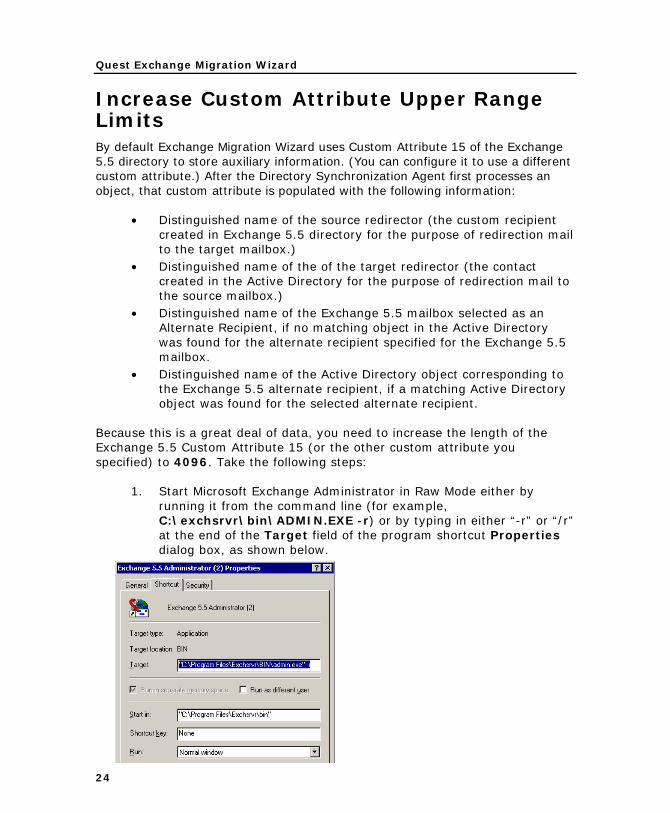
1. Start Microsoft Exchange Administrator in Raw Mode either by running it from the command line (for example, C:\exchsrvr\bin\ADMIN.EXE -r) or by typing in either “-r” or “/r” at the end of the Target field of the program shortcut Properties dialog box, as shown below.
24
Quick Start Guide
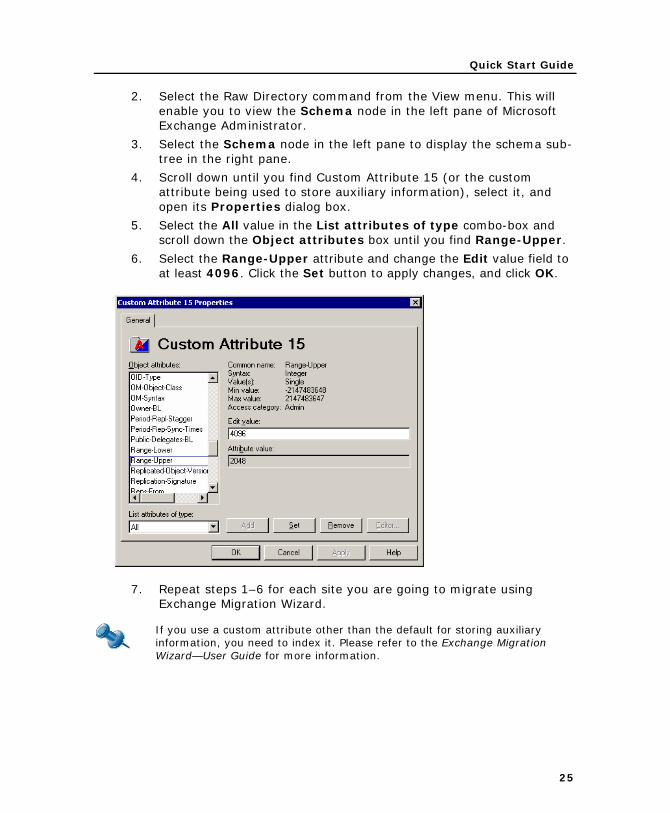
2. Select the Raw Directory command from the View menu. This will enable you to view the Schema node in the left pane of Microsoft Exchange Administrator.
3. Select the Schema node in the left pane to display the schema sub-tree in the right pane.
4. Scroll down until you find Custom Attribute 15 (or the custom attribute being used to store auxiliary information), select it, and open its Properties dialog box.
5. Select the All value in the List attributes of type combo-box and scroll down the Object attributes box until you find Range-Upper.
6. Select the Range-Upper attribute and change the Edit value field to at least 4096. Click the Set button to apply changes, and click OK.
7. Repeat steps 1–6 for each site you are going to migrate using Exchange Migration Wizard.
If you use a custom attribute other than the default for storing auxiliary information, you need to index it. Please refer to the Exchange Migration Wizard—User Guide for more information.
25

Quest Exchange Migration Wizard
Index Attributes to Improve DSA Performance
To increase Directory Synchronization Agent performance, it is highly recommended to index the following attributes:
E-mail address: When creating redirection custom recipients, the Directory Synchronization Agent has to check for the uniqueness of the target e-mail address among all the custom recipients of the Exchange 5.5 organization. With the E-mail address attribute indexed, the process of creating redirection is much faster.
Custom Attribute 13 (or other attribute used for storing the target object’s GUID): After the Directory Synchronization Agent establishes matching, it uses one of the custom attributes of the Exchange 5.5 objects to store the corresponding target objects' GUID. Since the agent always checks whether an Exchange 5.5 object’s Custom Attribute 13 is populated and valid, indexing of this attribute improves the agent’s performance approximately 100 times.
Admin-Display-Name: When processing mailboxes in the Remote Users Collections, the Mail Target Agents can make heavy LDAP queries to the Exchange 5.5 directory looking up for the Admin-Display-Name attribute values. By indexing this attribute in the Exchange 5.5 schema you can achieve significant increase in overall mailbox migration performance when using the Remote Users Collections.
To index these attributes, do the following:
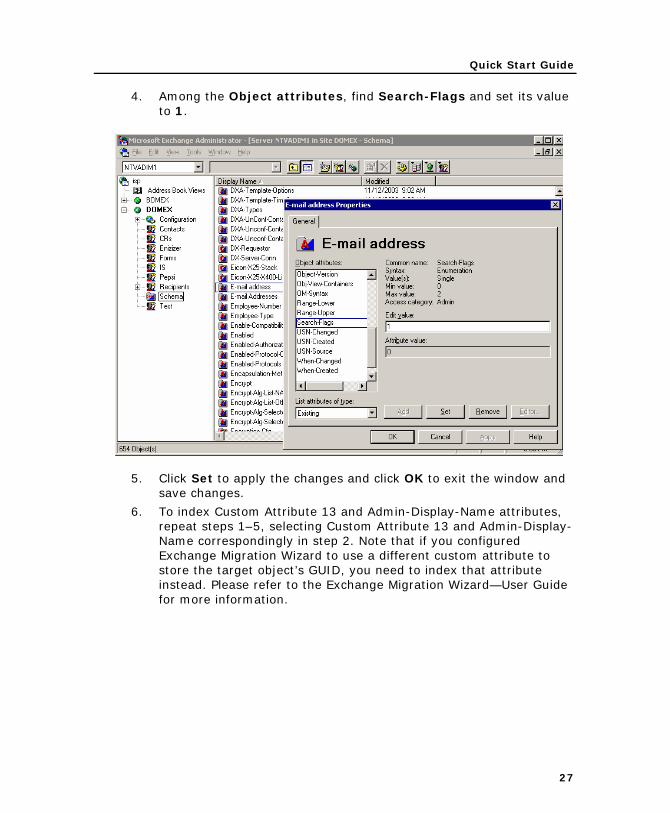
1. Start Exchange Administrator in the raw mode and select the Raw Directory command from the View menu.
2. For each Exchange 5.5 site, select Schema, node in the left pane and scroll down to find the E-mail address attribute in the right pane.
3. Select the Raw Properties command from the File menu.
26
Quick Start Guide
4. Among the Object attributes, find Search-Flags and set its value to 1.
5. Click Set to apply the changes and click OK to exit the window and save changes.
6. To index Custom Attribute 13 and Admin-Display-Name attributes, repeat steps 1–5, selecting Custom Attribute 13 and Admin-Display-Name correspondingly in step 2. Note that if you configured Exchange Migration Wizard to use a different custom attribute to store the target object’s GUID, you need to index that attribute instead. Please refer to the Exchange Migration Wizard—User Guide for more information.
27
Quest Exchange Migration Wizard
Clear the "Limit administrative access to home site" Checkbox from Public Folders
To allow public folder synchronization agents to access public folders and migrate data, the Limit administrative access to home site checkbox should be cleared from all public folders involved in migration.
Perform the following steps for each public folder that will be used as a synchronization root:
1. Start the Microsoft Exchange Administrator.
2. Expand the Folders, Public Folders branch.
3. Select a public folder and open its Properties.
4. Clear the Limit administrative access to home site checkbox on the General tab.
5. Set the Propagate these properties to all subfolders option and click OK.
6. In the Subfolder Properties dialog box that appears, select the Limit administrative access to home site checkbox and click OK.
Achieve One-to-One Correspondence Between Mailbox and Primary Windows NT Account
In Microsoft Exchange 200x Server a mailbox is a single-valued attribute of an object in Active Directory, while in Exchange Server 5.5, a mailbox is an object itself.
This may cause problems when migrating the following types of mailboxes:
• Exchange 5.5 mailboxes owned by a single domain user (mailboxes having the same primary Windows NT account)
• Exchange 5.5 mailboxes owned by a Windows NT groups
• Exchange 5.5 mailboxes having no primary Windows NT account
Those mailboxes will be incorrectly matched by Exchange Migration Wizard during directory synchronization and their further synchronization will be performed incorrectly. Therefore, it is recommended to achieve a one-to-one correspondence between Exchange 5.5 mailbox and Active Directory user (if it already exists) or primary Windows NT account before the migration is started.
28
Quick Start Guide
In order to identify which mailboxes belong to the above mentioned categories, use the following reports from the Exchange Migration Preparation Wizard:
• Users with Multiple Mailboxes—To identify the Exchange 5.5 mailboxes owned by a single domain user.
• Mailboxes with Groups as Primary Owners—To identify the Exchange 5.5 mailboxes owned by a Windows NT group.
• Mailboxes with Invalid Primary Windows NT Accounts—To search for Exchange 5.5 mailboxes having no primary Windows NT account.
Refer to the Exchange Migration Preparation Wizard—User Guide for more details.
Alternatively, you may use the various reports provided by Quest MessageStats:
• Inventory—Multiple Mailboxes—To identify the Exchange 5.5 mailboxes owned by a single domain user.
• Inventory—Group Accounts—To identify the Exchange 5.5 mailboxes owned by a Windows NT group.
• Inventory—Mailboxes—To search for Exchange 5.5 mailboxes having no primary Windows NT account.
For more information about how to migrate mailboxes owned by a single domain user, and about troubleshooting the mailboxes which were incorrectly matched please refer to the Exchange Migration Wizard—Directory Objects Matching document.
Identify Objects with the Space Characters in the Alias
The space character is considered to be invalid in the Exchange 2007 object alias. Therefore, before you start migration to Exchange 2007, you should remove all spaces from the source Exchange 5.5 objects’ aliases.
Use the Objects with the Space Characters in the Alias report from Exchange Migration Preparation Wizard to resolve the issue. Refer to the Exchange Migration Preparation Wizard—User Guide for more details.
29
Quest Exchange Migration Wizard
Identify Objects with Leading or Trailing Spaces in the Display Name Exchange 2007 objects’ display names must not contain leading or trailing spaces. Therefore, before you start migration to Exchange 2007, you should remove leading and trailing spaces from the source Exchange 5.5 objects’ display names.
Use the Objects with Leading or Trailing Spaces in the Display Name report from Exchange Migration Preparation Wizard to resolve the issue. Refer to the Exchange Migration Preparation Wizard—User Guide for more details.
Identify Objects with Identical Display Names Exchange 5.5 allows multiple objects to have the same display name. The Exchange Migration Wizard Directory Synchronization Agent uses an object's display name as a naming reference when creating the corresponding object in the target directory. The Directory Synchronization Agent handles such situations by default by adding an incremented number to the end of the new object name.
However, if you want to preserve the original display names, make the appropriate changes so that each object has a unique display name.
Use the Objects with Identical Display Names report from Exchange Migration Preparation Wizard to resolve the issue. Refer to the Exchange Migration Preparation Wizard—User Guide for more details.
Alternatively, to search for mailboxes with identical display names you can use the Inventory—Mailbox Duplicate Names report provided by Quest MessageStats.
Identify Objects with Duplicated Directory Names Exchange 5.5 allows multiple objects to have the same directory name. However, if you want to preserve the original directory names, make the appropriate changes so that each object has a unique directory name.
Use the Mailboxes with Duplicated Directory Names report from Exchange Migration Preparation Wizard to resolve the issue, or exclude these objects from synchronization. Refer to the Exchange Migration Preparation Wizard—User Guide for more details.
30
Quick Start Guide
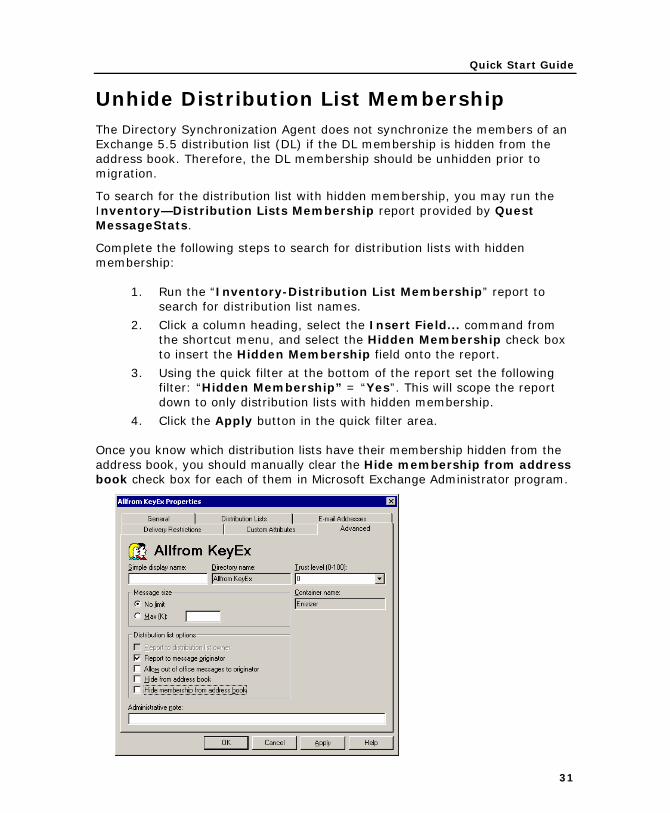
Unhide Distribution List Membership The Directory Synchronization Agent does not synchronize the members of an Exchange 5.5 distribution list (DL) if the DL membership is hidden from the address book. Therefore, the DL membership should be unhidden prior to migration.
To search for the distribution list with hidden membership, you may run the Inventory—Distribution Lists Membership report provided by Quest MessageStats.
Complete the following steps to search for distribution lists with hidden membership:
1. Run the “Inventory-Distribution List Membership” report to search for distribution list names.
2. Click a column heading, select the Insert Field... command from the shortcut menu, and select the Hidden Membership check box to insert the Hidden Membership field onto the report.
3. Using the quick filter at the bottom of the report set the following filter: “Hidden Membership” = “Yes”. This will scope the report down to only distribution lists with hidden membership.
4. Click the Apply button in the quick filter area.
Once you know which distribution lists have their membership hidden from the address book, you should manually clear the Hide membership from address book check box for each of them in Microsoft Exchange Administrator program.
31
Quest Exchange Migration Wizard
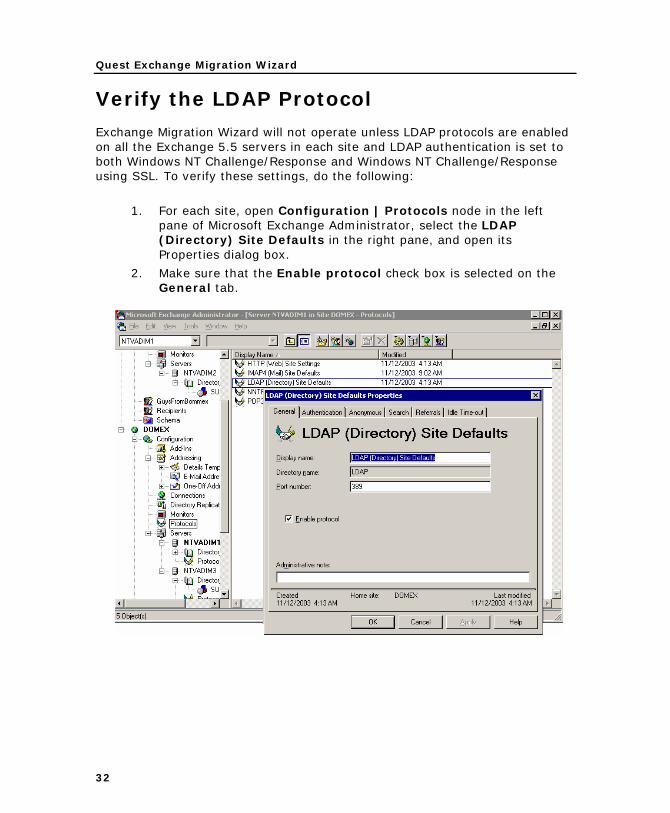
Verify the LDAP Protocol
Exchange Migration Wizard will not operate unless LDAP protocols are enabled on all the Exchange 5.5 servers in each site and LDAP authentication is set to both Windows NT Challenge/Response and Windows NT Challenge/Response using SSL. To verify these settings, do the following:
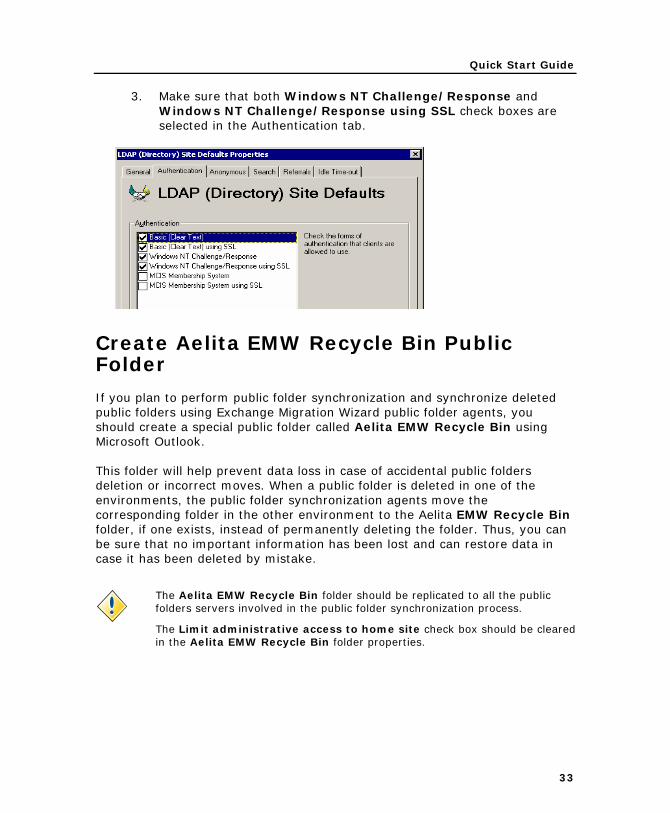
1. For each site, open Configuration | Protocols node in the left pane of Microsoft Exchange Administrator, select the LDAP (Directory) Site Defaults in the right pane, and open its Properties dialog box.
2. Make sure that the Enable protocol check box is selected on the General tab.
32
Quick Start Guide
3. Make sure that both Windows NT Challenge/Response and Windows NT Challenge/Response using SSL check boxes are selected in the Authentication tab.
Create Aelita EMW Recycle Bin Public Folder
If you plan to perform public folder synchronization and synchronize deleted public folders using Exchange Migration Wizard public folder agents, you should create a special public folder called Aelita EMW Recycle Bin using Microsoft Outlook.
This folder will help prevent data loss in case of accidental public folders deletion or incorrect moves. When a public folder is deleted in one of the environments, the public folder synchronization agents move the corresponding folder in the other environment to the Aelita EMW Recycle Bin folder, if one exists, instead of permanently deleting the folder. Thus, you can be sure that no important information has been lost and can restore data in case it has been deleted by mistake.
The Aelita EMW Recycle Bin folder should be replicated to all the public folders servers involved in the public folder synchronization process.
The Limit administrative access to home site check box should be cleared in the Aelita EMW Recycle Bin folder properties.
33
Quest Exchange Migration Wizard
Create Administrative Mailboxes
Administrative mailboxes should be created on all Exchange 5.5 servers involved in public folder synchronization and calendar synchronization. These mailboxes are used to access the public folder tree and the SCHEDULE+ FREE/BUSY system public folder when creating public folder and calendar synchronization jobs.
The account under which the public folder synchronization agent and the calendar synchronization agent run should have full access to the administrative mailbox specified for the appropriate server so that the agents can get administrative access to the synchronized folders.
Please note that the administrative mailbox specified for the synchronization job should not be changed during the synchronization process.
The administrative mailboxes should not be included in mailbox or calendar synchronization jobs as well.
34
Quick Start Guide
Preparing the Target Environment for Migration
Implement the Target Environment Backup Strategy
Before implementing Exchange Migration Wizard in your production environment, back up your Exchange 200x infrastructure. Then, during migration, back up frequently: it is recommended that Active Directory data be backed up at least twice a day during migration.
Bear in mind that if you use circular logging, only full backups can be performed.
Log File Cleanup
When Exchange Migration Wizard synchronizes mail and public folders from Exchange 5.5 to Exchange 200x, for every megabyte of data migrated from the source to the target, a transaction log file of equal size is generated on the target Exchange 200x server.
Exchange-aware backup applications purge the transaction logs after the backup completes. By the time the backup finishes, all logged transactions have already been applied to the store and backed up to tape, making log cleaning safe.
Microsoft recommends that circular logging be turned off on Exchange server. However, if you need circular logging to be turned on due to security policy or some other reasons, bear in mind that large transaction logs will be generated and watch closely that the logs are properly cleaned after backup.
35
Quest Exchange Migration Wizard
Create Aelita EMW Recycle Bin Public Folder
If you plan to perform public folder synchronization and synchronize deleted public folders using Exchange Migration Wizard public folder agents, you should create a special public folder called Aelita EMW Recycle Bin using Microsoft Outlook.
This folder will help to prevent data loss in case of accidental public folders deletion or incorrect moves. When a public folder is deleted in one of the environments, the public folder synchronization agents move the corresponding folder in the other environment to the Aelita EMW Recycle Bin folder, if one exists, instead of permanently deleting the folder. Thus, you can be sure that no important information has been lost and can restore data in case it has been deleted by mistake.
The Aelita EMW Recycle Bin folder should be replicated to all the public folders servers involved in the public folders synchronization process.
Create Administrative Mailboxes
Administrative mailboxes should be created on all Exchange 200x servers involved in public folder synchronization and calendar synchronization. The mailboxes are used to access the public folder tree and the SCHEDULE + FREE/BUSY folder when creating public folder and calendar synchronization jobs.
The account under which the public folder synchronization agents and the calendar synchronization agents run should have full access to the administrative mailbox specified for the appropriate server so that the agents can get administrative access to the synchronized folders.
Please note that the administrative mailbox specified for the synchronization job should not be changed during the synchronization process.
36
Quick Start Guide
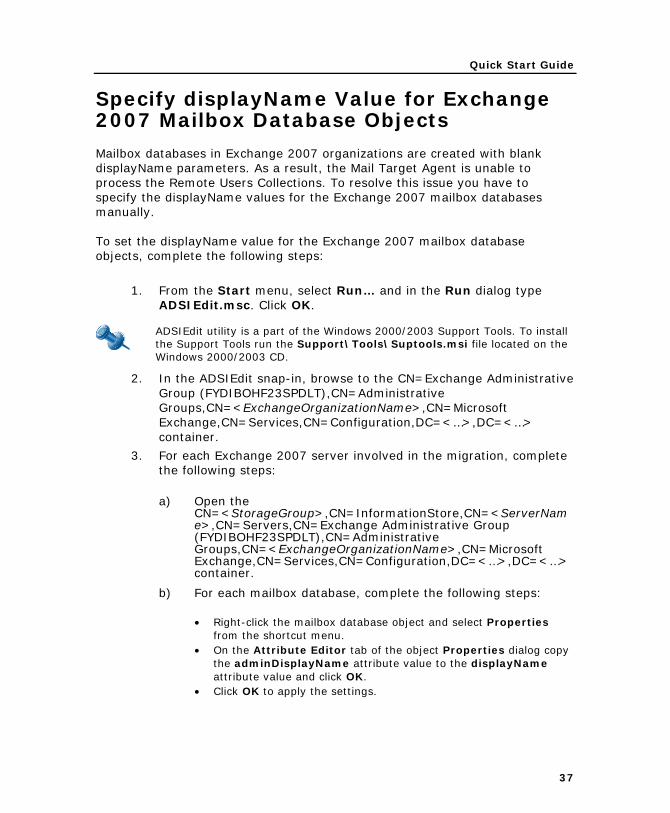
Specify displayName Value for Exchange 2007 Mailbox Database Objects
Mailbox databases in Exchange 2007 organizations are created with blank displayName parameters. As a result, the Mail Target Agent is unable to process the Remote Users Collections. To resolve this issue you have to specify the displayName values for the Exchange 2007 mailbox databases manually.
To set the displayName value for the Exchange 2007 mailbox database objects, complete the following steps:
1. From the Start menu, select Run… and in the Run dialog type ADSIEdit.msc. Click OK.
ADSIEdit utility is a part of the Windows 2000/2003 Support Tools. To install the Support Tools run the Support\Tools\Suptools.msi file located on the Windows 2000/2003 CD.
2. In the ADSIEdit snap-in, browse to the CN=Exchange Administrative Group (FYDIBOHF23SPDLT),CN=Administrative Groups,CN=<ExchangeOrganizationName>,CN=Microsoft Exchange,CN=Services,CN=Configuration,DC=<…>,DC=<…> container.
3. For each Exchange 2007 server involved in the migration, complete the following steps:
a) Open the CN=<StorageGroup>,CN=InformationStore,CN=<ServerName>,CN=Servers,CN=Exchange Administrative Group (FYDIBOHF23SPDLT),CN=Administrative Groups,CN=<ExchangeOrganizationName>,CN=Microsoft Exchange,CN=Services,CN=Configuration,DC=<…>,DC=<…> container.
b) For each mailbox database, complete the following steps:
• Right-click the mailbox database object and select Properties from the shortcut menu.
• On the Attribute Editor tab of the object Properties dialog copy the adminDisplayName attribute value to the displayName attribute value and click OK.
• Click OK to apply the settings.
37

Quest Exchange Migration Wizard
Select the Default Offline Address Book Client Support Options for the Microsoft Outlook Versions
In order to correctly download the Offline Address Book after migrating to the target Exchange 2007 organization you have to select the Client Support options for the Microsoft Outlook versions. To do so, open the Offline Address Book Properties dialog in the Exchange Management Console and make sure the Outlook 98 SP1 or earlier (Version 2), the Outlook 98 SP2 or later (Version 3) and the Outlook 2003 SP2 or later (Version 4) checkboxes are selected on the Distribution tab.
38
Quick Start Guide
Connecting the Source and Target Exchange Organizations To ensure that users do not lose their mail during the migration period, and to make the migration from Exchange 5.5 to Exchange 200x smooth, Exchange Migration Wizard establishes mail redirection between the source and the target Exchange servers. Accordingly, Exchange Migration Wizard requires that the source and target Exchange organizations be connected using the SMTP (recommended) or X400 connector.
If you want to use the X400 connector to connect organizations, see the appropriate Microsoft documentation.
When Exchange Migration Wizard is configured to use SMTP for mail redirection, mail is forwarded to additional SMTP addresses generated by the Directory Synchronization Agent and based on the address templates (additional address spaces) you provide when setting up the directory synchronization jobs.
As an example, we will use the following address templates:
• @source.local—to redirect mail from target to source mailboxes. A secondary SMTP address will be added to each source mailbox by the Directory Synchronization Agent according to this template.
• @target.local—to redirect mail from source to target mailboxes. A secondary SMTP address will be added to each target mailbox by the Directory Synchronization Agent according to this template.
For more information on mail redirection and the directory synchronization process, please refer to the appropriate chapters of the Exchange Migration Wizard—User Guide and the Exchange Migration Wizard—Overview documents.
39

Quest Exchange Migration Wizard
Exchange 5.5 Configurations
Set Up and Configure the Internet Mail Service
To configure the Internet Mail Service, take the following steps:
1. In the Microsoft Exchange Administrator, select the Connections container under the site node. On the File menu, select New Other and then select Internet Mail Service….
This will start the Internet Mail Wizard, which will help you install and configure the Internet Mail Service.
40
Quick Start Guide
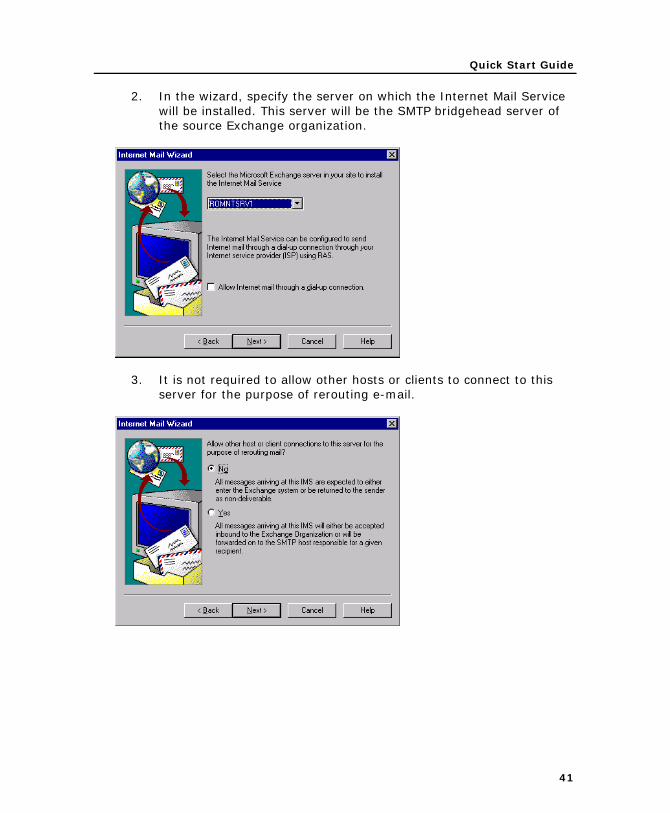
2. In the wizard, specify the server on which the Internet Mail Service will be installed. This server will be the SMTP bridgehead server of the source Exchange organization.
3. It is not required to allow other hosts or clients to connect to this server for the purpose of rerouting e-mail.
41
Quest Exchange Migration Wizard
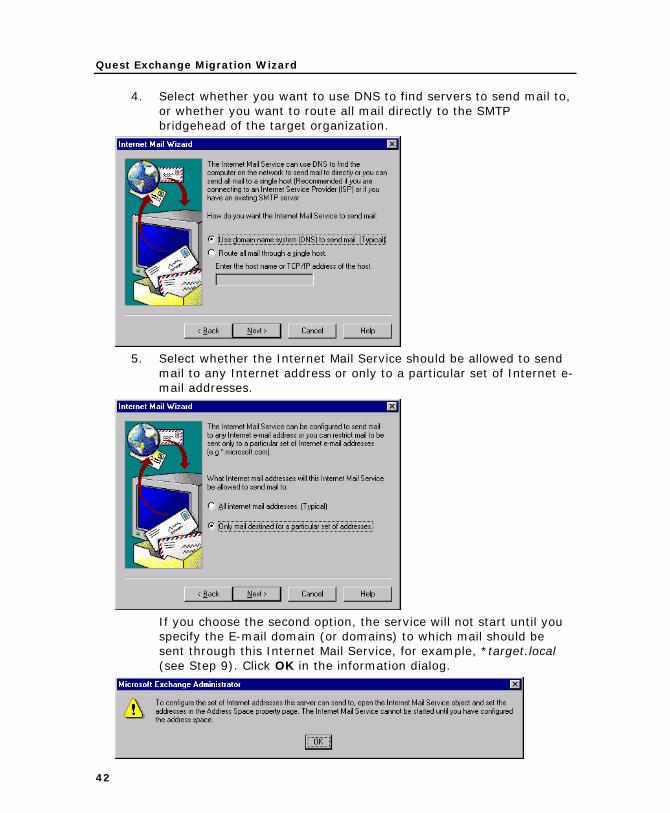
4. Select whether you want to use DNS to find servers to send mail to, or whether you want to route all mail directly to the SMTP bridgehead of the target organization.
5. Select whether the Internet Mail Service should be allowed to send
mail to any Internet address or only to a particular set of Internet e-mail addresses.
If you choose the second option, the service will not start until you specify the E-mail domain (or domains) to which mail should be sent through this Internet Mail Service, for example, *target.local (see Step 9). Click OK in the information dialog.
42
Quick Start Guide
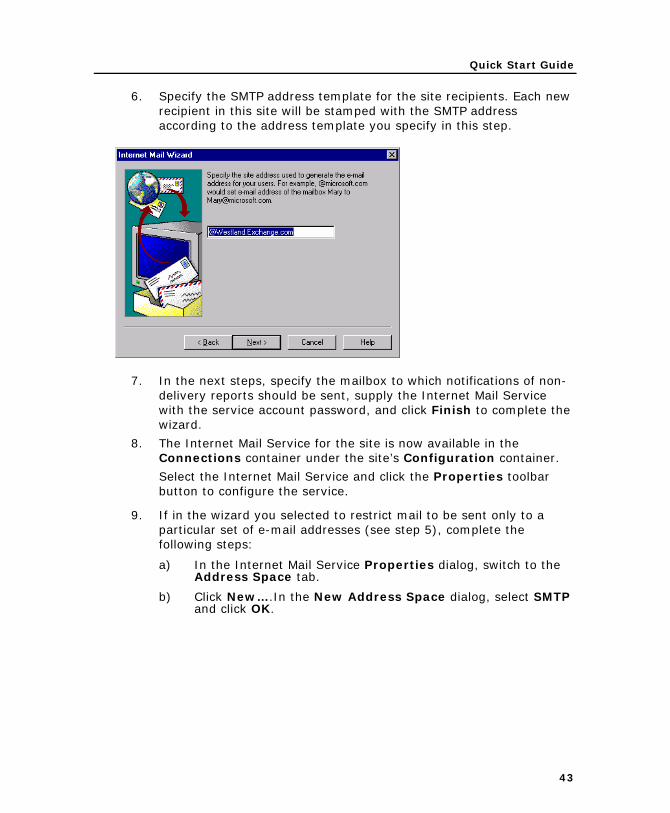
6. Specify the SMTP address template for the site recipients. Each new recipient in this site will be stamped with the SMTP address according to the address template you specify in this step.
7. In the next steps, specify the mailbox to which notifications of non-delivery reports should be sent, supply the Internet Mail Service with the service account password, and click Finish to complete the wizard.
8. The Internet Mail Service for the site is now available in the Connections container under the site’s Configuration container.
Select the Internet Mail Service and click the Properties toolbar button to configure the service.
9. If in the wizard you selected to restrict mail to be sent only to a particular set of e-mail addresses (see step 5), complete the following steps:
a) In the Internet Mail Service Properties dialog, switch to the Address Space tab.
b) Click New….In the New Address Space dialog, select SMTP and click OK.
43
Quest Exchange Migration Wizard
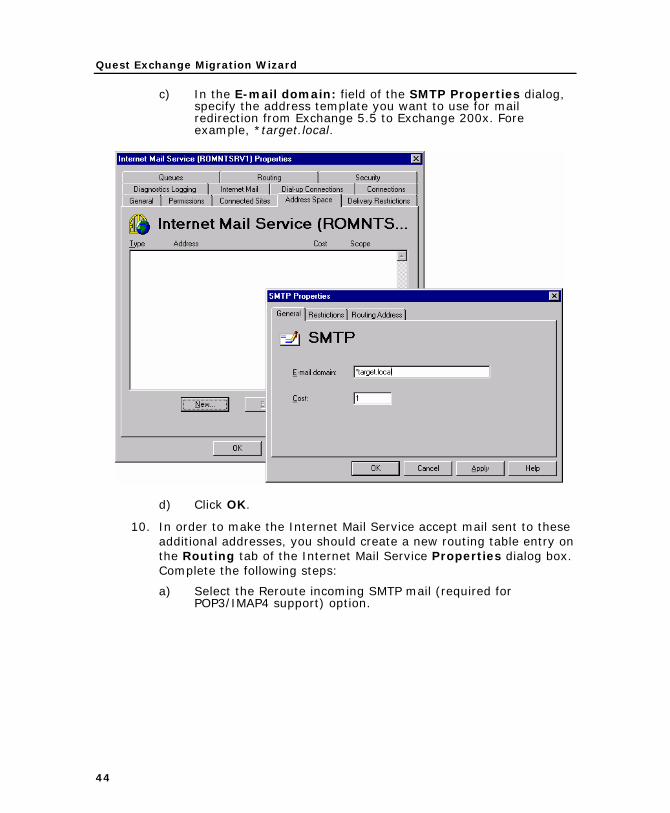
c) In the E-mail domain: field of the SMTP Properties dialog, specify the address template you want to use for mail redirection from Exchange 5.5 to Exchange 200x. Fore example, *target.local.
d) Click OK.
10. In order to make the Internet Mail Service accept mail sent to these additional addresses, you should create a new routing table entry on the Routing tab of the Internet Mail Service Properties dialog box. Complete the following steps:
a) Select the Reroute incoming SMTP mail (required for POP3/IMAP4 support) option.
44
Quick Start Guide
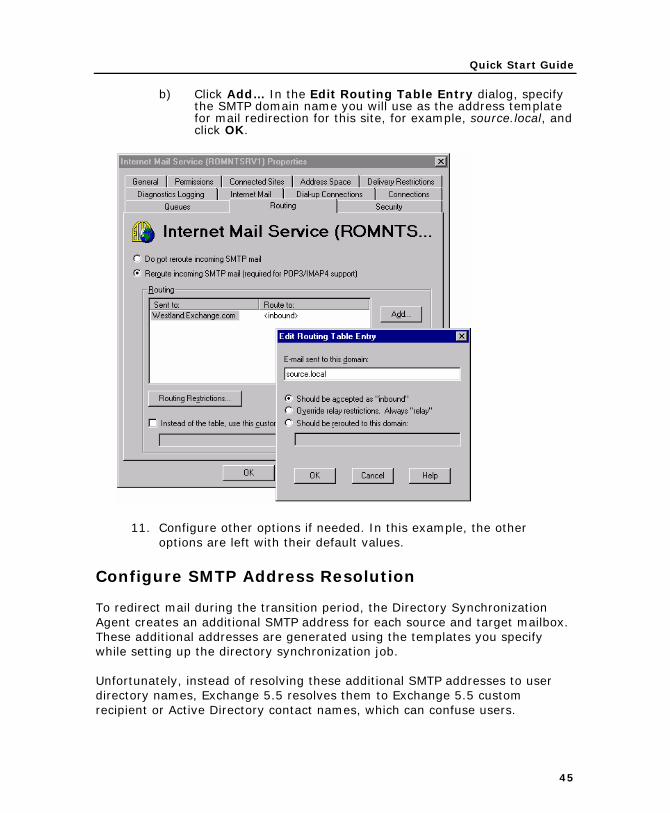
b) Click Add… In the Edit Routing Table Entry dialog, specify the SMTP domain name you will use as the address template for mail redirection for this site, for example, source.local, and click OK.
11. Configure other options if needed. In this example, the other options are left with their default values.
Configure SMTP Address Resolution
To redirect mail during the transition period, the Directory Synchronization Agent creates an additional SMTP address for each source and target mailbox. These additional addresses are generated using the templates you specify while setting up the directory synchronization job.
Unfortunately, instead of resolving these additional SMTP addresses to user directory names, Exchange 5.5 resolves them to Exchange 5.5 custom recipient or Active Directory contact names, which can confuse users.
45
Quest Exchange Migration Wizard
To force Exchange 5.5 to resolve SMTP addresses to directory names and avoid user confusion, modify the ResolveP2 parameter in every Exchange 5.5 SMTP bridgehead server registry, as follows:
1. Locate the registry key HKEY_LOCAL_MACHINE\SYSTEM\CurrentControlSet\Services\MSExchangeIMC\Parameters
2. Set the ResolveP2 DWORD value to ‘1’.
For more information on the ResolveP2 parameter, please see the Microsoft article174755 “XFOR: ResolveP2 Registry Setting Expanded in Exchange 5.5”.
Exchange 2000/2003 Configurations
If you migrate to Exchange 2000/2003 organization, complete the following steps:
1. Set up the SMTP connector from Exchange 2000/2003 to Exchange 5.5.
2. Force Exchange to accept the mail coming from redirectors as inbound mail.
3. Configure SMTP address resolution.
These steps are described in details below.
Set Up the SMTP Connector from Exchange 2000/2003 to Exchange 5.5
To set up and configure the SMTP Connector, follow the steps below:
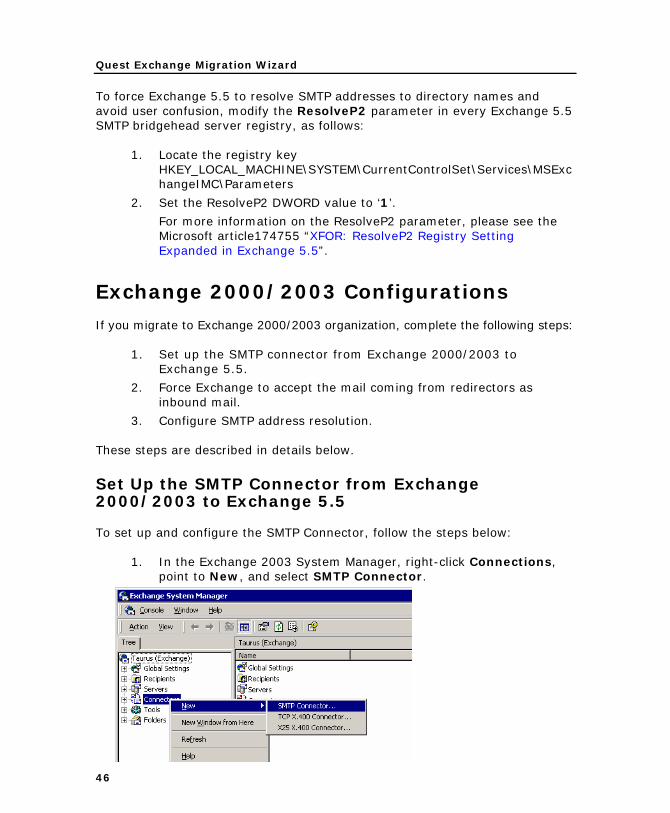
1. In the Exchange 2003 System Manager, right-click Connections, point to New, and select SMTP Connector.
46
Quick Start Guide
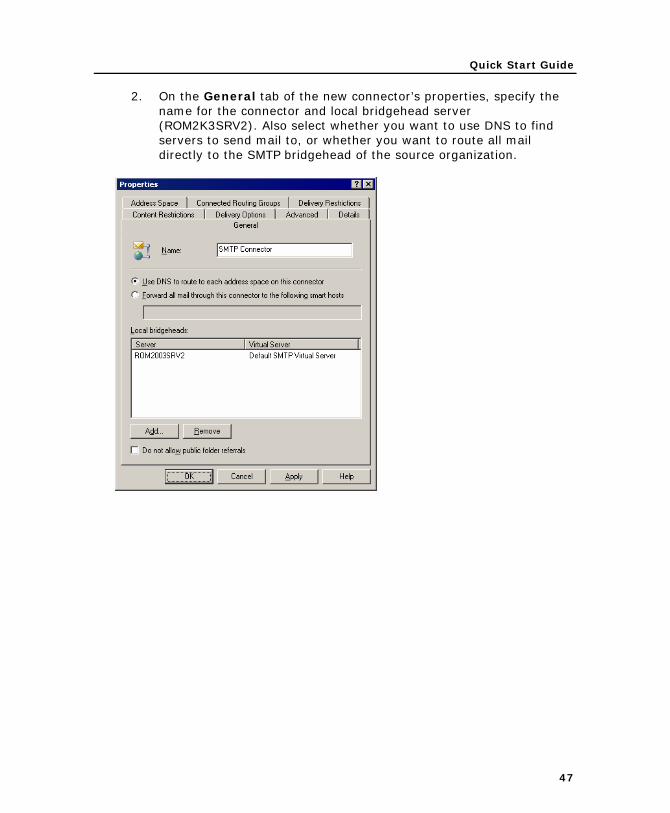
2. On the General tab of the new connector’s properties, specify the name for the connector and local bridgehead server (ROM2K3SRV2). Also select whether you want to use DNS to find servers to send mail to, or whether you want to route all mail directly to the SMTP bridgehead of the source organization.
47

Quest Exchange Migration Wizard
3. On the Address Space tab, click Add… to add a new address space. In the Add Address Space dialog, select SMTP and click OK. Then, in the Internet Address Space Properties dialog, specify the name space you will use to redirect mail from target to source organization, for example, source.local.
4. Configure other options if needed. This example shows the other options keeping their default values.
Force Exchange to Accept the Mail Coming from Redirectors as Inbound Mail
There are two ways to make Exchange consider the mail coming from redirectors to be inbound mail: you can either make Exchange relay e-mail through the virtual SMTP server or configure the recipient policy to make Exchange organization responsible for all mail delivery to the specified address. Both ways are described below in detail.
48
Quick Start Guide
Relaying Mail through Virtual SMTP Server
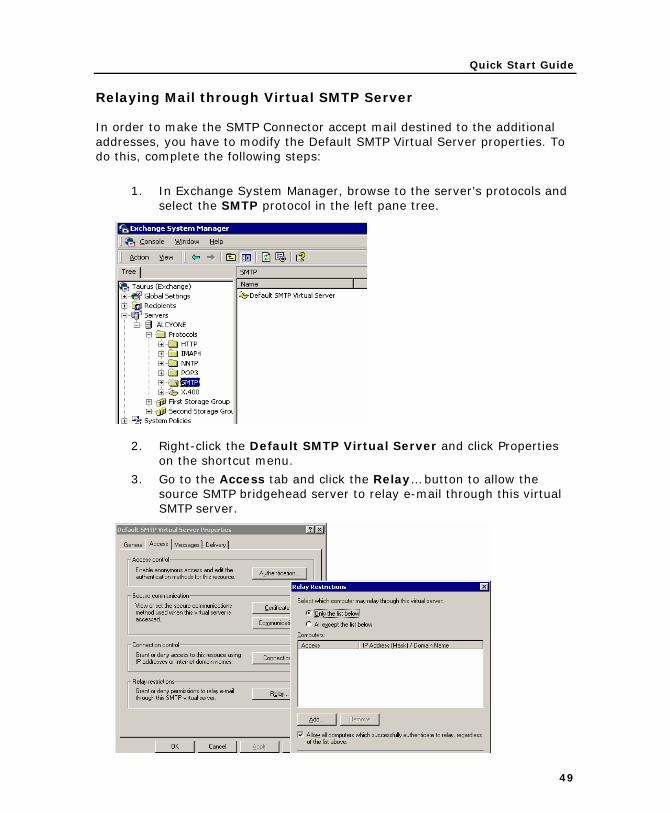
In order to make the SMTP Connector accept mail destined to the additional addresses, you have to modify the Default SMTP Virtual Server properties. To do this, complete the following steps:
1. In Exchange System Manager, browse to the server’s protocols and select the SMTP protocol in the left pane tree.
2. Right-click the Default SMTP Virtual Server and click Properties on the shortcut menu.
3. Go to the Access tab and click the Relay… button to allow the source SMTP bridgehead server to relay e-mail through this virtual SMTP server.
49

Quest Exchange Migration Wizard
4. Click Add…, and then either type the IP address of the source site’s SMTP bridgehead server or click DNS Lookup… to look up the address.
Configuring Recipient Policy
To make Exchange 2003 consider the mail coming from redirectors to be inbound mail and search for the recipients in Active Directory, configure your recipient policy as follows:
1. In Exchange System Manager, select the Recipient Policies node under Recipients in the left pane.
2. Right-click the Default Policy (or another policy that applies to all recipients) in the right pane and select Properties from the shortcut menu.
3. Click the E-mail Addresses (Policy) tab of the policy Properties dialog box.
4. Add a new SMTP address by clicking New… and selecting the SMTP Address from the list in the New E-mail Address dialog box.
5. Click OK in the New E-mail Address dialog box, and the SMTP Address Properties dialog will open.
6. In the Address field, type the address space you specified for the target Exchange organization while setting up the directory synchronization job, for example, @target.local.
7. Make sure that the This Exchange Organization is responsible for all mail delivery to this address check box is selected.
50
Quick Start Guide
Configure SMTP Address Resolution
To make migration unnoticeable to users, mail coming from redirectors must be resolved to the corresponding directory objects whose addresses are contained in the Global Address List (GAL).
Exchange 2000 resolves all incoming mail automatically. For more information on the ResolveP2 parameter in Exchange 2000, please see Microsoft Knowledge Base Article 288635 “XIMS: ResolveP2 Functionality in Exchange 2000 Server.”
Due to architecture changes in Exchange 2003, the ResolveP2 parameter has been replaced by the Resolve anonymous senders parameter.
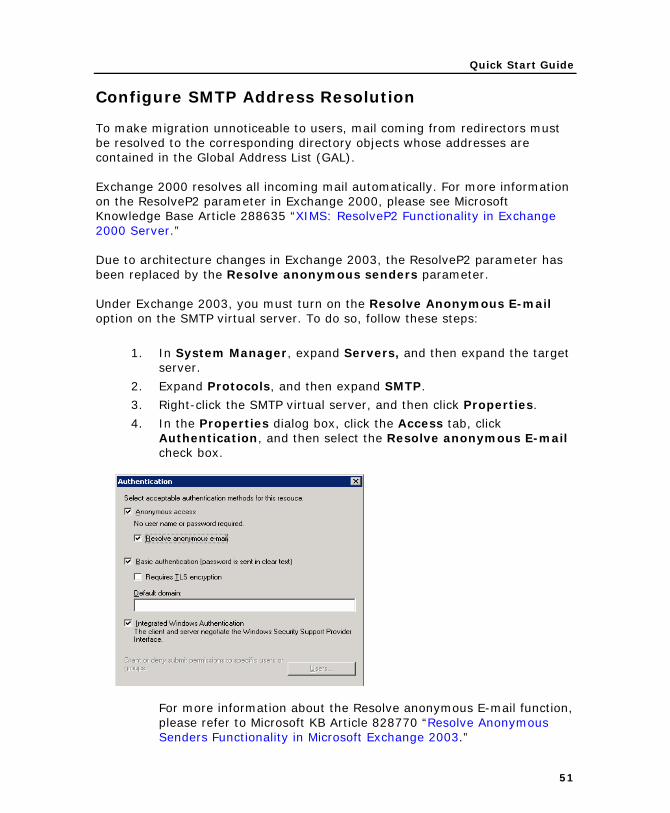
Under Exchange 2003, you must turn on the Resolve Anonymous E-mail option on the SMTP virtual server. To do so, follow these steps:
1. In System Manager, expand Servers, and then expand the target server.
2. Expand Protocols, and then expand SMTP.
3. Right-click the SMTP virtual server, and then click Properties.
4. In the Properties dialog box, click the Access tab, click Authentication, and then select the Resolve anonymous E-mail check box.
For more information about the Resolve anonymous E-mail function, please refer to Microsoft KB Article 828770 “Resolve Anonymous Senders Functionality in Microsoft Exchange 2003.”
51
Quest Exchange Migration Wizard
Exchange 2007 Configurations
If you migrate to Exchange 2007 organization, you need to establish Internet mail flow between the target Exchange 2007 organization and the source Exchange 5.5.
You can establish Internet mail flow between the target Exchange 2007 organization and the source Exchange 5.5 organization by using the following two methods:
• Establish Internet mail flow directly through a Hub Transport server.
• Establish Internet mail flow through a subscribed Edge Transport server.
Establishing Internet Mail Flow Directly through a Hub Transport Server
In this scenario, you will create the Internet Send connector and Receive connector on an Exchange 2007 Hub Transport server that can be directly reached through the Internet.
To establish mail flow to and from the Internet through a Hub Transport server, follow these steps:
1. Create a Send connector on the Hub Transport server to send e-mail to the Internet.
2. Modify the default Receive connector to allow anonymous connections.
3. Add the source e-mail domain used for redirection to the list of accepted domains on the Hub Transport server.
Creating the Send Connector
To create the Send connector from target Exchange 2007 organization to the Internet using the Exchange Management Console, follow these steps:
1. Open the Exchange Management Console. Expand Organization Configuration, click Hub Transport, and then in the action pane, click New Send connector.
2. On the New Send connector wizard Introduction page, in the Name field, type a unique name for the connector, for example, "EMW Send Connector". From the Select the intended use for this Send connector drop-down list, select Custom, and then click Next.
52
Quick Start Guide
3. On the Address Space page, click Add. In the Add Address Space dialog box, specify address space you want to use for mail redirection from target to source organization, for example, *.source.local, select the Include all subdomains checkbox and then click Next.
4. On the Network Settings page, select Use Domain Name System (DNS) "MX" records to route mail automatically. Select the check box to Use External DNS Lookup settings. Click Next.
5. On the Source Server page, click Add. In the Select Hub Transport and subscribed Edge Transport servers dialog box, select one or more Hub Transport servers in your organization, click OK, and then click Next.
6. On the New Connector page, click New, and then on the Completion page, click Finish.
To create the Send connector from target Exchange 2007 organization to the Internet using the Exchange Management Shell, run the following command:
new-SendConnector -Name 'EMW Send Connector' -Usage 'Custom' -AddressSpaces 'smtp:source.local;1' -DNSRoutingEnabled $true -UseExternalDNSServersEnabled $false -SourceTransportServers 'ServerName'
In this example:
• *.source.local is the address space you want to use for mail redirection from target to source organization.
• ServerName is the Hub Transport server name.
Modifying the Default Receive Connector
To modify the Default Receive connector for the target domain to accept anonymous e-mail mail from the Internet using the Exchange Management Console, follow these steps:
1. Run the Exchange Management Console.
2. Select the Server Configuration | Hub Transport node.
3. On the Receive Connectors tab, select the Default <Server Name> connector. In the Actions pane, click Properties for this connector.
4. In Default <Server Name> Properties dialog select the Permission Groups tab.
5. Select Anonymous Users checkbox to add anonymous permissions.
6. Click OK to apply the settings.
53

Quest Exchange Migration Wizard
To modify the default Receive connector for the target Exchange 2007 organization to receive mail from the Internet using the Exchange Management Shell, run the following command:
Set-ReceiveConnector -Name "Default <ServerName>" -Server ServerName -PermissionGroups AnonymousUsers,ExchangeUsers,ExchangeServers,ExchangeLegacyServers
In this example:
• ServerName—is the Hub Transport server name.
Adding Source E-mail Domain Used for Redirection to the List of Accepted Domains on the Hub Transport Server
To add a new Accepted domain on a computer that has the Hub Transport server role installed using the Exchange Management Console, follow these steps:
1. Run the Exchange Management Console.
2. Select the Organization Configuration | Hub Transport node.
3. In the Actions pane, click New Accepted Domain…. This will start the New Accepted Domain wizard.
4. In the first page, provide the following information: • Name—Use this field to identify the accepted domain in the user
interface. For example, target.local. • Accepted Domain—Use this field to identify the SMTP namespace
for which the Exchange organization will accept e-mail messages. For example, *.target.local.
5. Select the Authoritative Domain. E-mail is delivered to a recipient in this Exchange organization option for the accepted domain type.
6. Click New.
7. In the Completion page, click Finish.
To add a new Accepted domain on a computer that has the Hub Transport server role installed using the Exchange Management Shell, follow these steps:
New-AcceptedDomain -Name "target.local" -DomainName target.local -DomainType Authoritative
In this example the target.local is the address space you want to use for mail redirection from source to target organization.
54
Quick Start Guide
Establishing Internet Mail Flow through a Subscribed Edge Transport Server
In this scenario, you will subscribe the Edge Transport server to an Active Directory site. The connectors that establish mail flow to the Internet are created automatically when you subscribe an Edge Transport server to an Active Directory site by using the Edge Subscription process.
Before you begin this procedure, verify that the following prerequisites are met:
• Authoritative domains are configured on the Hub Transport server.
• E-mail address policies are configured on the Hub Transport server.
• Network communications over the secure LDAP port 50636/TCP are enabled through the firewall separating your perimeter network from the Exchange organization.
To establish mail flow to and from the Internet through a subscribed Edge Transport server, follow these steps:
1. Export the Edge Subscription file on the Edge Transport server.
2. Import the Edge Subscription file on the Hub Transport server.
3. Force EdgeSync synchronization to being on the Hub Transport server.
Exporting an Edge Subscription file on the Edge Transport Server
Perform the following procedure on the Edge Transport server. You must provide the complete file path of the Edge Subscription file that you are creating.
New-EdgeSubscription -FileName "C:\EdgeSubscriptionInfo.xml"
Copy the resulting XML file to the Hub Transport server
Importing the Edge Subscription file on the Hub Transport Server
On the Hub Transport server, run the following command:
New-EdgeSubscription -filename "C:\EdgeSubscriptionInfo.xml" -CreateInternetSendConnector $true -CreateInboundSendConnector $true -site "Site-Name"
Where the Site-Name is the name of Active Directory site in which the Hub Transport server is located.
55
Quest Exchange Migration Wizard
Forcing EdgeSync Synchronization
To force EdgeSync synchronization, run the following command from the Exchange Management Shell on the Hub Transport server:
Start-EdgeSynchronization
Configure DNS
After you have configured the SMTP connection between the source and target Exchange organizations, you should also add the MX (Mail Exchanger) records to the DNS. This is needed so that mail redirected to the additional SMTP addresses added by the Directory Synchronization Agent is forwarded to the source and target SMTP bridgeheads.
As an example, we will use the following additional address spaces:
• @source.local—to redirect mail from target to source mailboxes. A secondary SMTP address will be added to each source mailbox by the Directory Synchronization Agent according to this template.
• @target.local—to redirect mail from source to target mailboxes. A secondary SMTP address will be added to each target mailbox by the Directory Synchronization Agent according to this template.
To set the Mail Exchanger (MX) record for the source domain, complete the following steps:
1. In the DNS snap-in, connect to the source DNS server and browse to the Forward Lookup Zones container.
2. Right-click the Forward Lookup Zones and select New Zone…
3. In the New Zone wizard, select the Primary zone to be created.
4. Type local for the Zone name and complete the wizard.
5. Right-click the newly-created zone object local, and click New Mail Exchanger… on the shortcut menu.
6. In the New Resource Record dialog, Type source for the Host or child domain.
7. Click Browse… and select the Exchange server in the source domain to which mail sent to the @source.local domain will be redirected.
8. Click OK.
56
Quick Start Guide
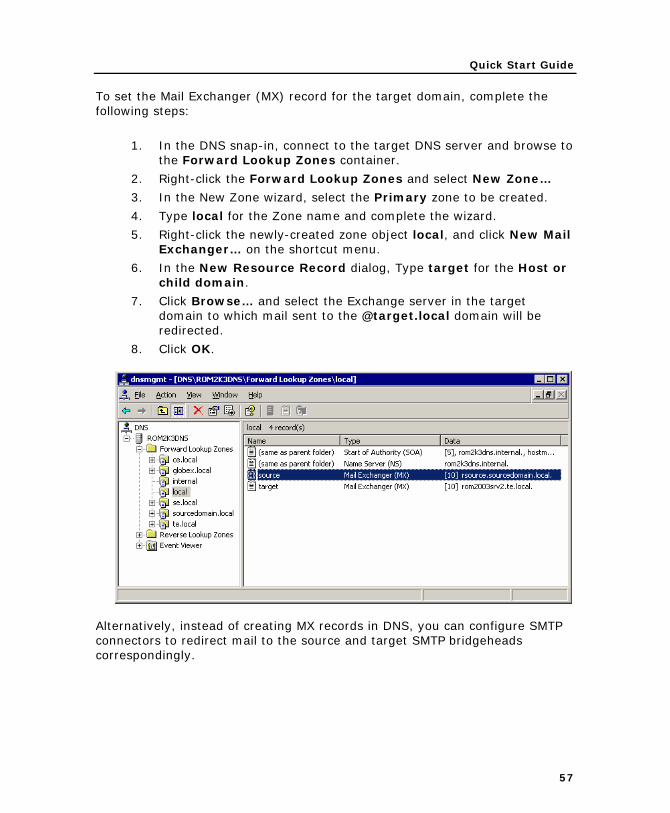
To set the Mail Exchanger (MX) record for the target domain, complete the following steps:
1. In the DNS snap-in, connect to the target DNS server and browse to the Forward Lookup Zones container.
2. Right-click the Forward Lookup Zones and select New Zone…
3. In the New Zone wizard, select the Primary zone to be created.
4. Type local for the Zone name and complete the wizard.
5. Right-click the newly-created zone object local, and click New Mail Exchanger… on the shortcut menu.
6. In the New Resource Record dialog, Type target for the Host or child domain.
7. Click Browse… and select the Exchange server in the target domain to which mail sent to the @target.local domain will be redirected.
8. Click OK.
Alternatively, instead of creating MX records in DNS, you can configure SMTP connectors to redirect mail to the source and target SMTP bridgeheads correspondingly.
57
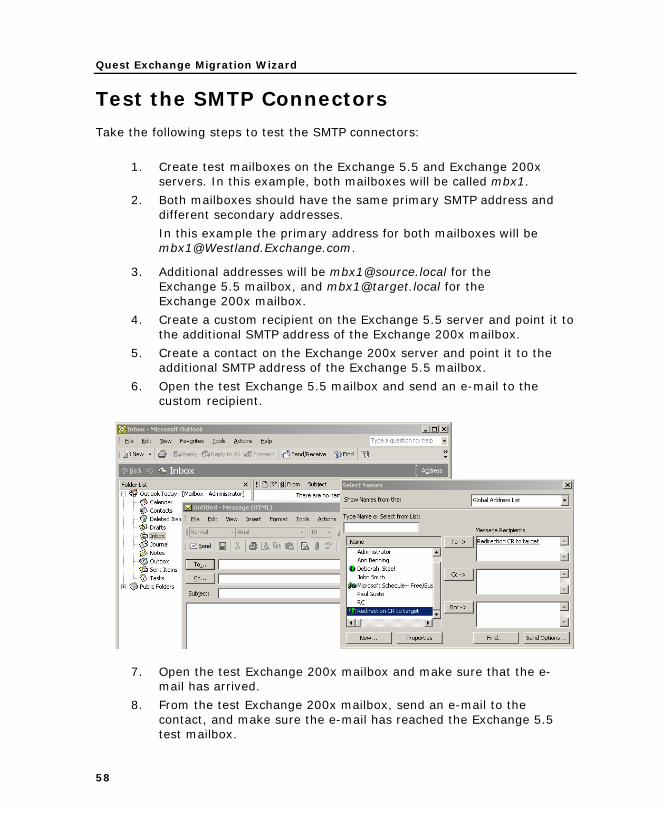
Quest Exchange Migration Wizard
Test the SMTP Connectors
Take the following steps to test the SMTP connectors:
1. Create test mailboxes on the Exchange 5.5 and Exchange 200x servers. In this example, both mailboxes will be called mbx1.
2. Both mailboxes should have the same primary SMTP address and different secondary addresses.
In this example the primary address for both mailboxes will be [email protected].
3. Additional addresses will be [email protected] for the Exchange 5.5 mailbox, and [email protected] for the Exchange 200x mailbox.
4. Create a custom recipient on the Exchange 5.5 server and point it to the additional SMTP address of the Exchange 200x mailbox.
5. Create a contact on the Exchange 200x server and point it to the additional SMTP address of the Exchange 5.5 mailbox.
6. Open the test Exchange 5.5 mailbox and send an e-mail to the custom recipient.
7. Open the test Exchange 200x mailbox and make sure that the e-mail has arrived.
8. From the test Exchange 200x mailbox, send an e-mail to the contact, and make sure the e-mail has reached the Exchange 5.5 test mailbox.
58

Quick Start Guide
Required Permissions
Exchange Migration Wizard Components and Service Accounts
Exchange Migration Wizard consists of several components. To perform their tasks, these components use several accounts, called service accounts or administrative accounts. The sections below describe these components and service accounts.
The permissions required by each account are described in the Set the Required Permissions for Exchange Migration Wizard Service Accounts section.
Exchange Migration Wizard Console
Exchange Migration Wizard Project Manager (also referred to as Exchange Migration Wizard console) is the central application to manage other product components (agents).
The account used to log on to the computer on which Exchange Migration Wizard Project Manager is installed is called the console account.
This account is used to create the SQL configuration database and tables within the database when a migration project is created and to access the SQL configuration database later.
Directory Synchronization Agent
Synchronization of objects between the Exchange 5.5 directory and Active Directory is performed by the Directory Synchronization Agent.
The Directory Synchronization Agent is running as a service under the account you specify when you install the agent. This account is referred to as the Directory Synchronization Agent service account.
The Directory Synchronization Agent service account is used to start and run the Directory Synchronization Agent service on the server.
59
Quest Exchange Migration Wizard
The Directory Synchronization Agent also uses the following accounts to connect to the Exchange 5.5 directory and Active Directory when processing directory synchronization jobs:
• Exchange 5.5 account—Used by the Directory Synchronization Agent to connect to the Exchange 5.5 directory. You specify this account when you create and configure a directory synchronization job.
• Active Directory account—Used by the Directory Synchronization Agent to connect to the target Active Directory domain. You specify this account when you create and configure a directory synchronization job.
Exchange Agents
Exchange Migration Wizard agents work with different Exchange servers on the network. They create and modify Exchange 5.5/2000/2003/2007 and Active Directory objects and work with mailboxes and public folders.
To access Exchange and Active Directory, the agents use the following accounts:
• Source Exchange account—Used to: • Install agents on the source Exchange servers • Work with source Exchange mailboxes and public folders • Synchronize Calendar information • Synchronize Free/busy data (optional) • Switch mailboxes
• Source Transmission account—Used to: • Install and start the Transmission Agent on the source Exchange
servers • Copy service files with mailbox and public folder contents prepared
by other Exchange agents from source Exchange 5.5 to target Exchange 200x servers.
• Target Exchange account—Used to: • Install agents on the target Exchange servers • Work with target Exchange mailboxes and public folders • Synchronize Calendar information • Synchronize Free/busy data (optional)
• Target Active Directory account—Used to: • Work with the target Active Directory • Mail-enable the newly-created public folders
(public folder agents only) • Move mailboxes (Mail Target Agent) • Switch mailboxes and synchronize mailboxes in the Remote Users
Collections (Mail Target Agent)
60
Quick Start Guide
61
• Target Transmission account—Used to: • Install and start the Transmission Agent on the target Exchange
servers • Copy service files with public folder contents prepared by other
Exchange agents from target Exchange 200x to source Exchange 5.5 servers.
The agents working on the source Exchange servers run under the source Exchange account, and the agents working on the target Exchange servers run under the target Exchange account.
The target Active Directory account is used by the agents to access the target Active Directory domain.
In the rest of the document, Exchange Migration Wizard agents are referred to as Exchange agents.
Statistics Collection Agent
The Statistics Collection Agent is the optional Exchange Migration Wizard component that is used to collect statistical data on Exchange data migration progress.
You can select to install the Statistics Collection Agent during installation of Exchange Migration Wizard Project Manager. The Statistics Collection Agent can be installed and run on the console machine only.
If you select to install the Statistics Collection Agent, you will be asked to specify the account for the agent service.
The Statistics Collection Agent can run under either Local System account (which is by default) or any other user account that has proper permissions. This account is used to start and run the Statistics Collection Agent service, access all the Exchange Migration Wizard agents’ statistics, and access the SQL configuration database to write the statistical information, in case the Windows Authentication is specified to access the SQL database.
You can change this account later on the Statistics Collection Agent Service page of the Exchange Migration Wizard Project Manager Options dialog.

Quest Exchange Migration Wizard
Set the Required Permissions for Exchange Migration Wizard Service Accounts
The Exchange Migration Wizard agents work with different servers on the network—they create and modify Exchange 5.5 and Active Directory objects, and work with mailboxes and public folders. To do all these tasks, the agents must have the appropriate permissions.
Exchange Migration Wizard allows you to use different administrative accounts for different purposes. For example, the Source Exchange account is used for working with the Exchange 5.5 directory, and the Target Exchange account is used to access the Exchange 200x mailboxes and public folders.
However, you can create a single administrative account that has all the required permissions. Please see the How to Create a Single Administrative Account section of this document for step-by-step instructions on creating such an account.
The table below shows which accounts are used by which agents, where you can set these accounts, and what privileges each account should have.
To learn how to set each of the permissions that are required by the Exchange Migration Wizard agents, please see the How to Set the Required Permissions section below.
Permissions Required for Account Used to Enumerate Organizations
When you add source and target Exchange organizations to the project, you specify the account to enumerate organizations. The following permissions are required for the account:
1. The account must be a member of local Administrators group on each Exchange server in the organization (if the rights are not sufficient for some of the servers you will need to change the account on these servers’ properties later and refresh the servers).
2. Service Account Admin in the Exchange 5.5 directory (note that you should assign this permission to the account on the Site and Configuration objects).
62
Quick Start Guide
3. The account must have Read access in Active Directory (sufficient to read the Exchange 2000/2003/2007 configuration).
The account first specified in the Add Source Organization Wizard is then used by default as the Exchange account and Transmission account for all the servers of the Exchange 5.5 organization.
The account first specified in the Add Target Organization Wizard is then used by default as the Exchange account, Transmission account and Active Directory account for all the servers of the Exchange 200x organization.
If you do not want to change these accounts after the organization is registered for each server, grant these accounts the permissions as detailed in the Permissions Required by Exchange Agents section below.
You can change the Exchange account, Transmission account and Active Directory account for each source and target Exchange server.
To change the Exchange account and the Transmission account, take the following steps:
1. Select the server in the migration project tree, right-click the server, and select Properties.
2. On the Connection page, click Modify for either the Exchange account or the Transmission account.
3. In the Connect As dialog that appears, specify a new account and password and click OK.
To change the Active Directory account, take the following steps:
1. Select the server in the migration project tree, right-click the server, and select Properties.
2. On the Associated domain controller page, click Modify.
3. In the Connect As dialog that appears, specify a new account and password and click OK.
63
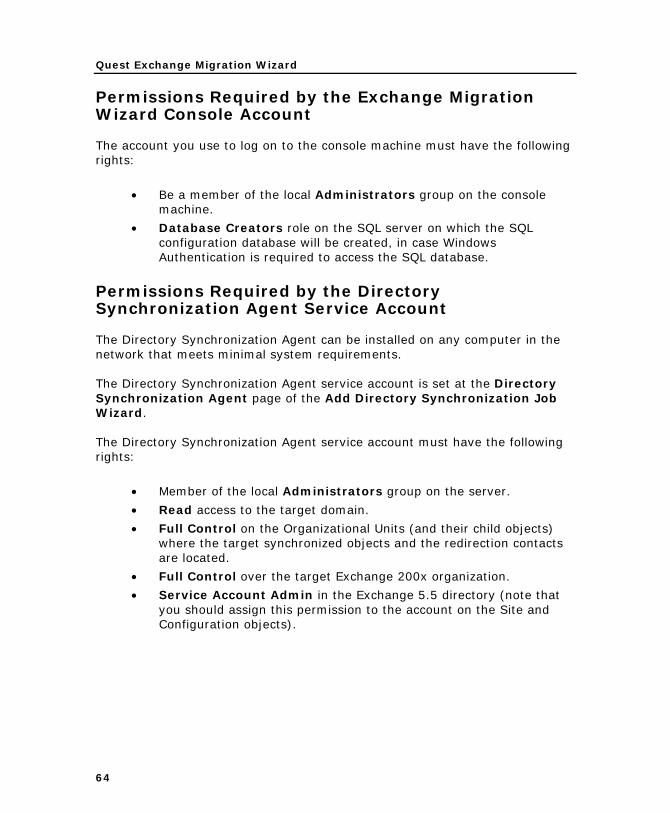
Quest Exchange Migration Wizard
Permissions Required by the Exchange Migration Wizard Console Account
The account you use to log on to the console machine must have the following rights:
• Be a member of the local Administrators group on the console machine.
• Database Creators role on the SQL server on which the SQL configuration database will be created, in case Windows Authentication is required to access the SQL database.
Permissions Required by the Directory Synchronization Agent Service Account
The Directory Synchronization Agent can be installed on any computer in the network that meets minimal system requirements.
The Directory Synchronization Agent service account is set at the Directory Synchronization Agent page of the Add Directory Synchronization Job Wizard.
The Directory Synchronization Agent service account must have the following rights:
• Member of the local Administrators group on the server.
• Read access to the target domain.
• Full Control on the Organizational Units (and their child objects) where the target synchronized objects and the redirection contacts are located.
• Full Control over the target Exchange 200x organization.
• Service Account Admin in the Exchange 5.5 directory (note that you should assign this permission to the account on the Site and Configuration objects).
64

Quick Start Guide
65
Permissions Required by the Statistics Collection Agent Service Account
The Statistics Collection Agent service account must have the following rights:
• Member of the local Administrators group on the console.
• Full Control right on QMMEx$ServerName$ shares on all the servers where Exchange Migration Wizard agents are installed.
• Full Control NTFS permission on the Exchange Migration Wizard agents’ installation folder.
• Log on as a service right on the console.
Permissions Required by Exchange Agents
Source Exchange Servers
The table below shows which accounts are used by which agents working on the source Exchange servers, and what privileges each account should have.
SET AT ACCOUNT TYPE
USED BY REQUIRED PERMISSIONS
Exchange account
Mail Source Agent
Public Folder Source Agent
Public Folder Target Agent
Calendar Synchronization Agent
Free/Busy Synchronization Agent
Member of the local Administrators group on the Exchange 5.5 server. (If a server is a Windows 2000 Domain Controller, the account should be added to the domain local Administrators group of the domain.)
Member of the local Administrators group on the license server.
Service Account Admin in the Exchange 5.5 directory (note that you should assign this permission to the account on the Site and Configuration objects).
The Connection page of the source Exchange server Properties
Transmission account
Transmission Agent Member of the local Administrators group on the Exchange 5.5 server.
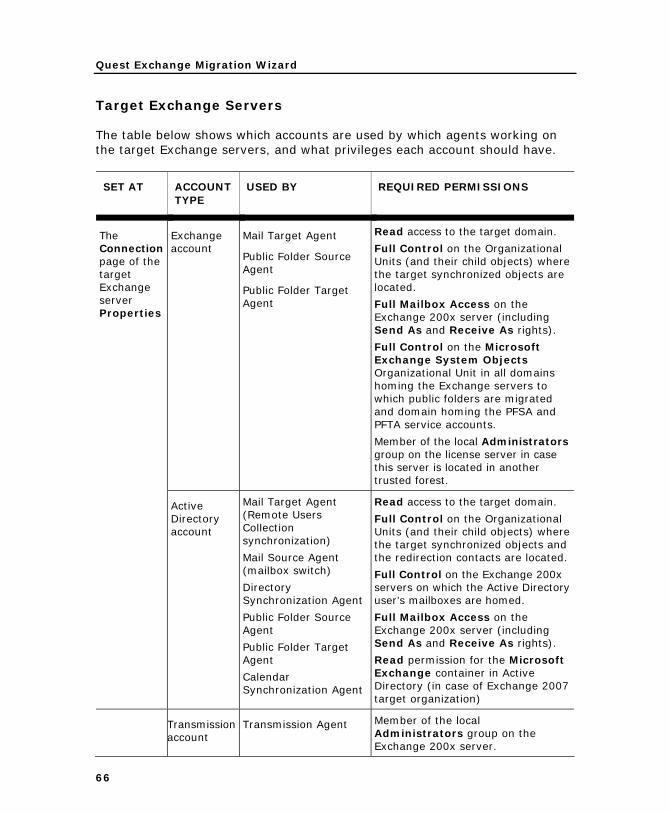
Quest Exchange Migration Wizard
Target Exchange Servers
The table below shows which accounts are used by which agents working on the target Exchange servers, and what privileges each account should have.
SET AT ACCOUNT TYPE
USED BY REQUIRED PERMISSIONS
Exchange account
Mail Target Agent
Public Folder Source Agent
Public Folder Target Agent
Read access to the target domain.
Full Control on the Organizational Units (and their child objects) where the target synchronized objects are located.
Full Mailbox Access on the Exchange 200x server (including Send As and Receive As rights).
Full Control on the Microsoft Exchange System Objects Organizational Unit in all domains homing the Exchange servers to which public folders are migrated and domain homing the PFSA and PFTA service accounts.
Member of the local Administrators group on the license server in case this server is located in another trusted forest.
The Connection page of the target Exchange server Properties
Active Directory account
Mail Target Agent (Remote Users Collection synchronization)
Mail Source Agent (mailbox switch)
Directory Synchronization Agent
Public Folder Source Agent
Public Folder Target Agent
Calendar Synchronization Agent
Read access to the target domain.
Full Control on the Organizational Units (and their child objects) where the target synchronized objects and the redirection contacts are located.
Full Control on the Exchange 200x servers on which the Active Directory user’s mailboxes are homed.
Full Mailbox Access on the Exchange 200x server (including Send As and Receive As rights).
Read permission for the Microsoft Exchange container in Active Directory (in case of Exchange 2007 target organization)
Transmissionaccount
Transmission Agent Member of the local Administrators group on the Exchange 200x server.
66
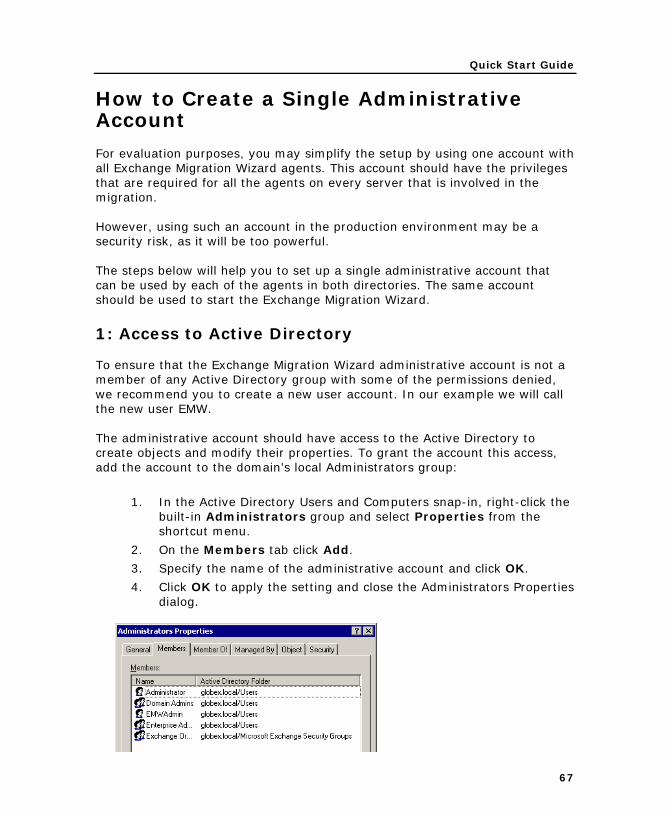
Quick Start Guide
How to Create a Single Administrative Account
For evaluation purposes, you may simplify the setup by using one account with all Exchange Migration Wizard agents. This account should have the privileges that are required for all the agents on every server that is involved in the migration.
However, using such an account in the production environment may be a security risk, as it will be too powerful.
The steps below will help you to set up a single administrative account that can be used by each of the agents in both directories. The same account should be used to start the Exchange Migration Wizard.
1: Access to Active Directory
To ensure that the Exchange Migration Wizard administrative account is not a member of any Active Directory group with some of the permissions denied, we recommend you to create a new user account. In our example we will call the new user EMW.
The administrative account should have access to the Active Directory to create objects and modify their properties. To grant the account this access, add the account to the domain’s local Administrators group:
1. In the Active Directory Users and Computers snap-in, right-click the built-in Administrators group and select Properties from the shortcut menu.
2. On the Members tab click Add.
3. Specify the name of the administrative account and click OK.
4. Click OK to apply the setting and close the Administrators Properties dialog.
67

Quest Exchange Migration Wizard
2: Access to Exchange 2000/2003 Mailboxes
The Exchange Migration Wizard administrative account should have the Full Mailbox Access right in the Exchange 2003 organization, including the Send As and Receive As permissions.
Note that by default you are not allowed to modify security on the organization object, and the Security tab is not displayed. To force the display of the Security tab on the organization, you must modify the Registry as described below.
An incorrectly modified registry cannot be undone and may cause serious problems with the operating system. We recommend that only advanced users modify the registry. If you do not want to modify the Registry, you can grant the account access to every single server of the target organization.
To grant the account the required permissions on the target organization, do the following:
1. Click Run on the Start Menu and type regedit to start Registry Editor.
2. Locate the following registry key on the local machine: HKEY_CURRENT_USER\Software\Microsoft\Exchange\ExAdmin.
3. On the Edit menu, click Add Value, and then add the following registry value:
Value Name: ShowSecurityPage
Data Type: REG_DWORD
Value: 1
68

Quick Start Guide
4. Quit Registry Editor. This change takes effect immediately; you do not need to restart Exchange System Manager if it is running. This change only affects the currently logged on user.
5. In Exchange 2003 System Manager, right-click the organization and click Properties.
6. On the Security tab, click Add and add the administrative account (in our case, EMW).
7. Give the account the Full Control right on the organization, including the Send As and the Receive As rights.
3: Access to Exchange 2007 Mailboxes
The Exchange Migration Wizard administrative account should have the Full Mailbox Access permission in the Exchange 2007 organization, including the Send As and Receive As permissions.
To grant the account the required permissions for the target organization, do the following:
1. From the Start menu, select Run… and in the Run dialog type ADSIEdit.msc. Click OK.
ADSIEdit utility is a part of the Windows 2000/2003 Support Tools. To install the Support Tools run the Support\Tools\Suptools.msi file located on the Windows 2000/2003 CD.
69
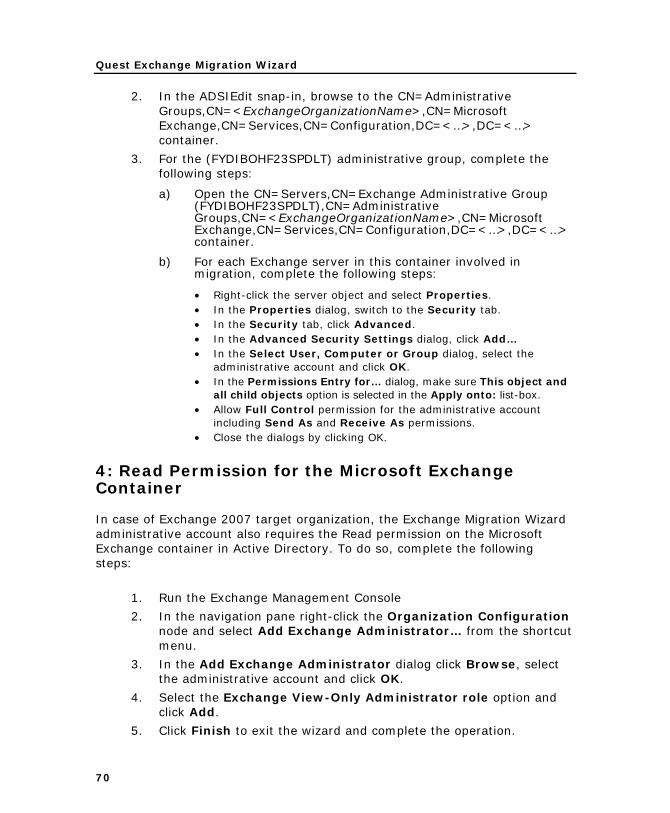
Quest Exchange Migration Wizard
2. In the ADSIEdit snap-in, browse to the CN=Administrative Groups,CN=<ExchangeOrganizationName>,CN=Microsoft Exchange,CN=Services,CN=Configuration,DC=<…>,DC=<…> container.
3. For the (FYDIBOHF23SPDLT) administrative group, complete the following steps:
a) Open the CN=Servers,CN=Exchange Administrative Group (FYDIBOHF23SPDLT),CN=Administrative Groups,CN=<ExchangeOrganizationName>,CN=Microsoft Exchange,CN=Services,CN=Configuration,DC=<…>,DC=<…> container.
b) For each Exchange server in this container involved in migration, complete the following steps:
• Right-click the server object and select Properties. • In the Properties dialog, switch to the Security tab. • In the Security tab, click Advanced. • In the Advanced Security Settings dialog, click Add… • In the Select User, Computer or Group dialog, select the
administrative account and click OK. • In the Permissions Entry for… dialog, make sure This object and
all child objects option is selected in the Apply onto: list-box. • Allow Full Control permission for the administrative account
including Send As and Receive As permissions. • Close the dialogs by clicking OK.
4: Read Permission for the Microsoft Exchange Container
In case of Exchange 2007 target organization, the Exchange Migration Wizard administrative account also requires the Read permission on the Microsoft Exchange container in Active Directory. To do so, complete the following steps:
1. Run the Exchange Management Console
2. In the navigation pane right-click the Organization Configuration node and select Add Exchange Administrator… from the shortcut menu.
3. In the Add Exchange Administrator dialog click Browse, select the administrative account and click OK.
4. Select the Exchange View-Only Administrator role option and click Add.
5. Click Finish to exit the wizard and complete the operation.
70

Quick Start Guide
5: Access to Exchange 5.5 Directory and Mailboxes
The Exchange Migration Wizard administrative account should have access to the Exchange 5.5 directory and the source Exchange 5.5 mailboxes. The account should be assigned the Service Account Admin role on each of the Exchange 5.5 sites and Configuration objects. In the Microsoft Exchange Administrator, take the following steps:
1. Select a site and click Properties on the File menu.
2. On the Permissions tab, click Add and add the administrative account.
3. Select the Service Account Admin role from the Roles list for the account.
4. Assign the account the same Service Account Admin role on each of the rest Exchange 5.5 sites and all the Configuration objects.
6: Access to SQL Server
The Exchange Migration Wizard administrative account should have the appropriate permissions to create and modify databases on a SQL server.
In the SQL Server Enterprise Manager, browse to the server that will be used by Exchange Migration Wizard and select Logins from the server’s Security node.
71

Quest Exchange Migration Wizard
To create a new login for the administrative account:
1. Right-click Logins and click New Login.
2. For the new login, specify the Exchange Migration Wizard administrative account as the Name and set the Windows Authentication method.
3. On the Server Roles tab of the New Login dialog box select the Database Creators role.
72
Quick Start Guide
7: Local Administrators
The administrative account should be a member of local Administrators groups on the following servers:
• The source Exchange 5.5 servers
If an Exchange 5.5 server is a Windows 2000 or Windows 2003 Domain Controller, the Exchange Migration Wizard account should be added to the domain local Administrators group of the domain.
• The Directory Synchronization Agent installation servers
• The Project Manager server
• The license server specified in the Project Manger Options, in case this server is located in another trusted forest
• The Target Exchange 200x servers
On a computer running Windows NT, this can be set in the User Manager.
On a computer running Windows 2000 or Windows 2003, this can be set in the Computer Management snap-in.
How to Set the Required Permissions
This section will help you to set the permissions that are required by the Exchange Migration Wizard agents.
DCOM Privileges
The accounts under which the agents run should have DCOM Access and Launch permissions on each Windows NT 4.0 running computer on which the Exchange Migration Wizard agents are installed.
By default, the wizard adds the DCOM privileges to the local server's Administrators group the first time you start an agent on the Windows NT 4.0 server.
If you do not want Exchange Migration Wizard to set these privileges automatically, you can clear the Automatically grant administrative DCOM permissions to the agent service accounts on the servers running Microsoft Windows NT 4.0 check box on the Security page of the Exchange Migration Wizard Options dialog box. In this case you will have to manually set the DCOM privileges for each agent's account on every server, as described below.
73
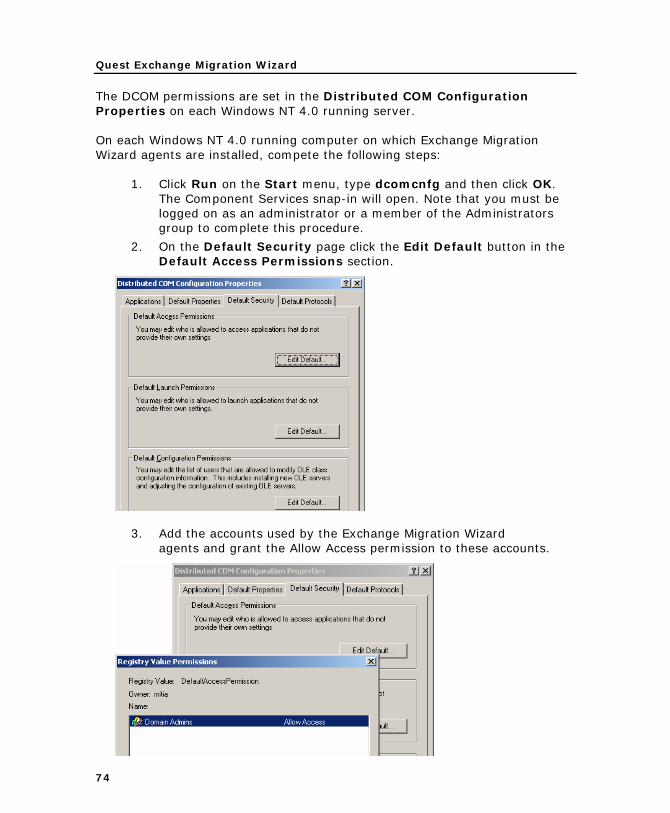
Quest Exchange Migration Wizard
The DCOM permissions are set in the Distributed COM Configuration Properties on each Windows NT 4.0 running server.
On each Windows NT 4.0 running computer on which Exchange Migration Wizard agents are installed, compete the following steps:
1. Click Run on the Start menu, type dcomcnfg and then click OK. The Component Services snap-in will open. Note that you must be logged on as an administrator or a member of the Administrators group to complete this procedure.
2. On the Default Security page click the Edit Default button in the Default Access Permissions section.
3. Add the accounts used by the Exchange Migration Wizard agents and grant the Allow Access permission to these accounts.
74
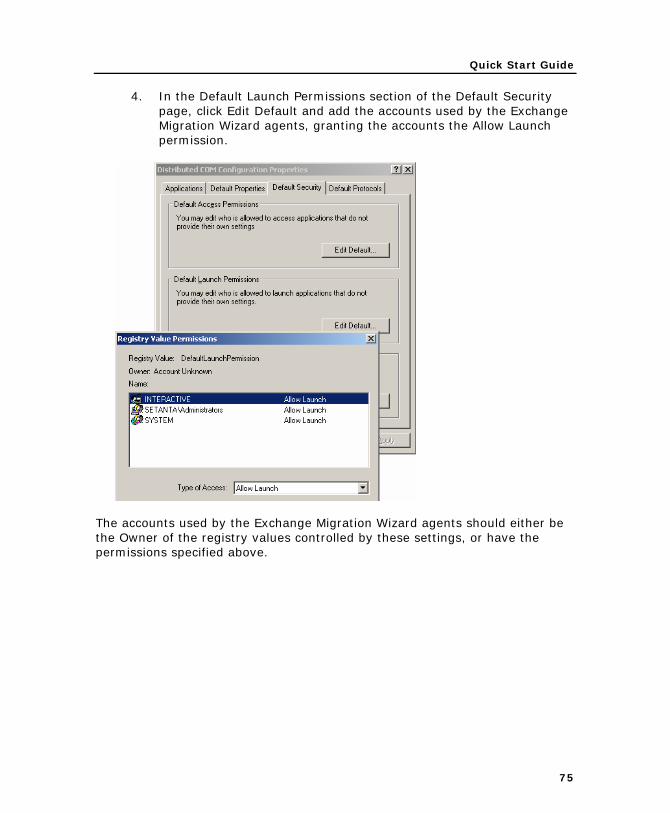
Quick Start Guide
4. In the Default Launch Permissions section of the Default Security page, click Edit Default and add the accounts used by the Exchange Migration Wizard agents, granting the accounts the Allow Launch permission.
The accounts used by the Exchange Migration Wizard agents should either be the Owner of the registry values controlled by these settings, or have the permissions specified above.
75
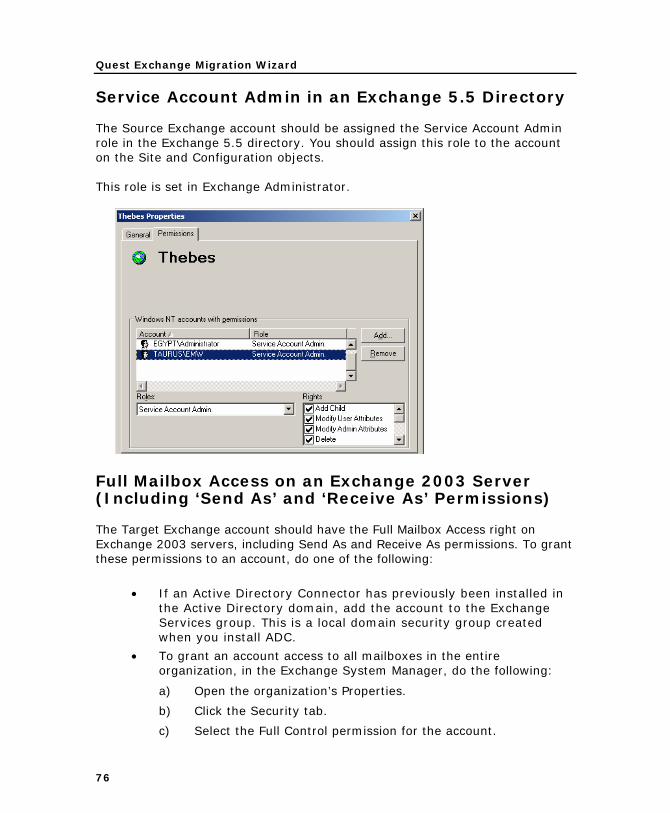
Quest Exchange Migration Wizard
Service Account Admin in an Exchange 5.5 Directory
The Source Exchange account should be assigned the Service Account Admin role in the Exchange 5.5 directory. You should assign this role to the account on the Site and Configuration objects.
This role is set in Exchange Administrator.
Full Mailbox Access on an Exchange 2003 Server (Including ‘Send As’ and ‘Receive As’ Permissions)
The Target Exchange account should have the Full Mailbox Access right on Exchange 2003 servers, including Send As and Receive As permissions. To grant these permissions to an account, do one of the following:
• If an Active Directory Connector has previously been installed in the Active Directory domain, add the account to the Exchange Services group. This is a local domain security group created when you install ADC.
• To grant an account access to all mailboxes in the entire organization, in the Exchange System Manager, do the following:
a) Open the organization’s Properties.
b) Click the Security tab.
c) Select the Full Control permission for the account.
76
Quick Start Guide
By default you are not allowed to modify security on the organization object, and the Security tab is not displayed. To force the display of the Security tab on the organization objects, you must add the following registry key:
1. Click Run on the Start Menu and type regedit to start Registry Editor 2. Locate the following registry key on the local machine:
HKEY_CURRENT_USER\Software\Microsoft\Exchange\ExAdmin 3. On the Edit menu, click Add Value, and then add the following registry
value:
Value Name: ShowSecurityPage Data Type: REG_DWORD Value: 1
4. Quit Registry Editor.
This change takes effect immediately; you do not need to restart Exchange System Manager. This change affects only the currently logged on user.
An incorrectly modified registry cannot be undone and may cause serious problems with the operating system. We recommend that only advanced users modify the registry.
• If you do not want to modify the Registry, you can grant the account access to every single server.
In the Exchange System Manager, do the following:
a) Open the target server’s Properties.
b) Click the Security tab.
c) Select the Full Control or the Send As and Receive As permissions for the account.
After you change permissions, you may need to log off and log back on. You should wait for about 10 minutes for the directory cache to expire. If you have multiple domain controllers in the forest, it may also be necessary to wait for directory replication to complete.
The explicit denial of rights to administrators is set on the organization object by denying the Receive As and Send As rights. If the account is an Exchange Administrator, or belongs to the Enterprise Admins or Domain Admins groups, it will still not be able to access mailboxes, because the denial to the group will take precedence over the grant of permissions to the individual account.
77

Quest Exchange Migration Wizard
Full Control in Exchange 2003
Several accounts should have Full Control in the Exchange 2003 organization, but do not require the Send As and Receive As permissions. You can set the permissions manually as described above, or delegate the Exchange Full Administrator role in Exchange 2003 organization to these accounts.
To delegate control, in the System Manager snap-in do the following:
1. Right-click the organization, and then click Delegate control to start the Exchange Administration Delegation Wizard.
2. In Users or Groups step of the wizard, click Add to grant a new account administrative permissions, or select an existing account from the list and click Edit to change its role.
3. Select the Exchange Full Administrator role for the account.
The explicit denial of rights to administrators is set on the organization level by denying the Receive As and Send As rights. If you delegate control to an account, it cannot be used as the Source or Target Exchange account. We recommend that you do not use the Exchange Administration Delegation Wizard to give rights to the accounts that you are going to use as the Source or Target Exchange account.
Full Mailbox Access on an Exchange 2007 Server (Including ‘Send As’ and ‘Receive As’ Permissions)
The target Exchange account and the Active Directory account should have the Full Mailbox Access permission in the Exchange 2007 organization, including the Send As and Receive As permissions.
To grant the account the required permissions for the target organization, do the following:
1. From the Start menu, select Run… and in the Run dialog type ADSIEdit.msc. Click OK.
ADSIEdit utility is a part of the Windows 2000/2003 Support Tools. To install the Support Tools run the Support\Tools\Suptools.msi file located on the Windows 2000/2003 CD.
2. In the ADSIEdit snap-in, browse to the CN=Administrative Groups,CN=<ExchangeOrganizationName>,CN=Microsoft Exchange,CN=Services,CN=Configuration,DC=<…>,DC=<…> container.
78
Quick Start Guide
3. For the (FYDIBOHF23SPDLT) administrative group, complete the following steps:
a) Open the CN=Servers,CN=Exchange Administrative Group (FYDIBOHF23SPDLT),CN=Administrative Groups,CN=<ExchangeOrganizationName>,CN=Microsoft Exchange,CN=Services,CN=Configuration,DC=<…>,DC=<…> container.
b) For each Exchange server in this container involved in migration, complete the following steps:
• Right-click the server object and select Properties. • In the Properties dialog, switch to the Security tab. • In the Security tab, click Advanced. • In the Advanced Security Settings dialog, click Add… • In the Select User, Computer or Group dialog, select the
administrative account and click OK. • In the Permissions Entry for… dialog, make sure This object and
all child objects option is selected in the Apply onto: list-box. • Allow Full Control permission for the administrative account
including Send As and Receive As permissions. • Close the dialogs by clicking OK.
Member of a Server’s Local Administrators Group
Most of the administrative accounts used by Exchange Migration Wizard agents should be members of the Exchange servers’ local Administrators groups.
If the computer is running Windows NT, this can be set in the User Manager.
79
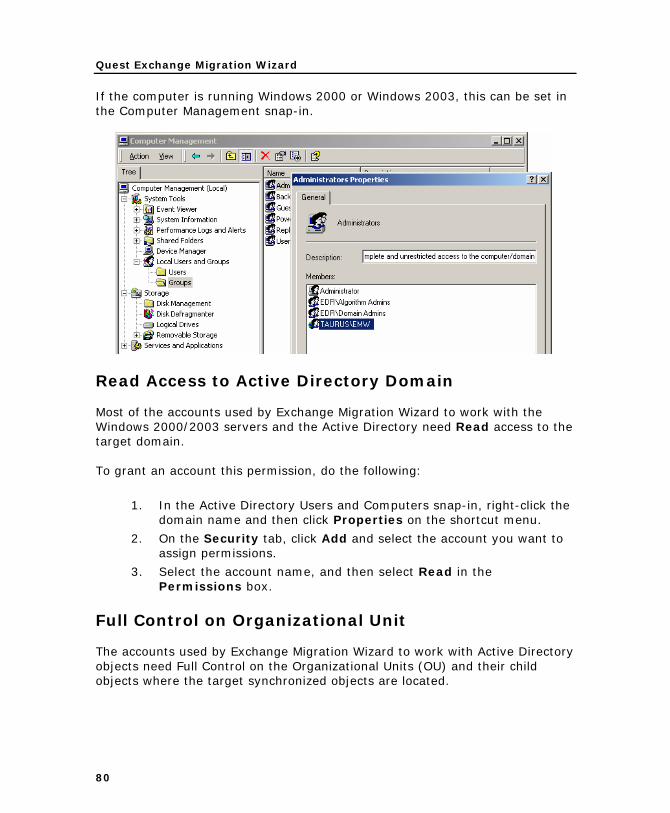
Quest Exchange Migration Wizard
If the computer is running Windows 2000 or Windows 2003, this can be set in the Computer Management snap-in.
Read Access to Active Directory Domain
Most of the accounts used by Exchange Migration Wizard to work with the Windows 2000/2003 servers and the Active Directory need Read access to the target domain.
To grant an account this permission, do the following:
1. In the Active Directory Users and Computers snap-in, right-click the domain name and then click Properties on the shortcut menu.
2. On the Security tab, click Add and select the account you want to assign permissions.
3. Select the account name, and then select Read in the Permissions box.
Full Control on Organizational Unit
The accounts used by Exchange Migration Wizard to work with Active Directory objects need Full Control on the Organizational Units (OU) and their child objects where the target synchronized objects are located.
80
Quick Start Guide
81
To grant an account the required permissions, do the following:
1. In the Active Directory Users and Computers snap-in, right-click the OU where the target synchronized objects are located, and click Properties on the shortcut menu.
2. On the Security tab, click Add and select the account you want to assign permissions.
3. Select the account name and then select Full Control in the Permissions box.
Full Control on QMMEx$ServerName$ Shares
The Transmission account should have the Full Control right for the QMMEx$ServerName$ share on every server where the installed Transmission Agent is run under this account.
The Statistics Collection Agent Service account should have the Full Control right for the QMMEx$ServerName$ shares on all the servers on which the Exchange Migration Wizard agents are installed.
The QMMEx$ServerName$ share is an auxiliary shared folder that is created for every agent. By default the Full Control permission for this share is granted to Everyone.
The QMMEx$ServerName$ share is created on a server when any agent is installed on it.
Full Control on Exchange Migration Wizard Agents’ Folders
By default the Full Control right is granted to everyone on the QMMEx$ServerName$ share, but an account may not have the NTFS rights to create objects in the shared folder. This is because only members of the local Administrators group have access to the folder by default.
If you change the default permissions, you will have to manually set this right for an account, as follows:
1. On the server, browse to the agents’ folder. By default, it is the \WINNT\System32\Aelita Exchange Migration Wizard folder.
2. Right-click the folder and click Properties.
3. Click the Security tab, add the account to the Permissions list, and grant the account the Full Control right.
Quest Exchange Migration Wizard
Full Control on Exchange Organization System Objects
To grant the account Full Control permission for the Exchange organization system objects, complete the following steps:
1. Run the Active Directory Users and Computers snap-in.
2. In the View menu select Advanced Features.
3. Right-click the Microsoft Exchange System Objects in the navigation pane and select Properties.
4. In the Microsoft Exchange System Objects select the Security tab.
5. Add the corresponding account and select the Allow check box next to Full Control for that account.
6. Click OK to complete the operation.
Read Permission for the Microsoft Exchange Container
In case of Exchange 2007 target organization, the Active Directory account also requires the Read permission on the Microsoft Exchange container in Active Directory. To do so, complete the following steps:
1. Run the Exchange Management Console
2. In the navigation pane right-click the Organization Configuration node and select Add Exchange Administrator… from the shortcut menu.
3. In the Add Exchange Administrator dialog click Browse, select the administrative account and click OK.
4. Select the Exchange View-Only Administrator role option and click Add.
Click Finish to exit the wizard and complete the operation.
‘Log on as a Service’ Right
The Statistics Collection Agent’s account should have the Log on as a service right on the console server.
To check this right, do the following:
1. Start the Local Security Settings snap-in.
2. In the left pane, select User Rights Assignment under the Local Policies node.
82
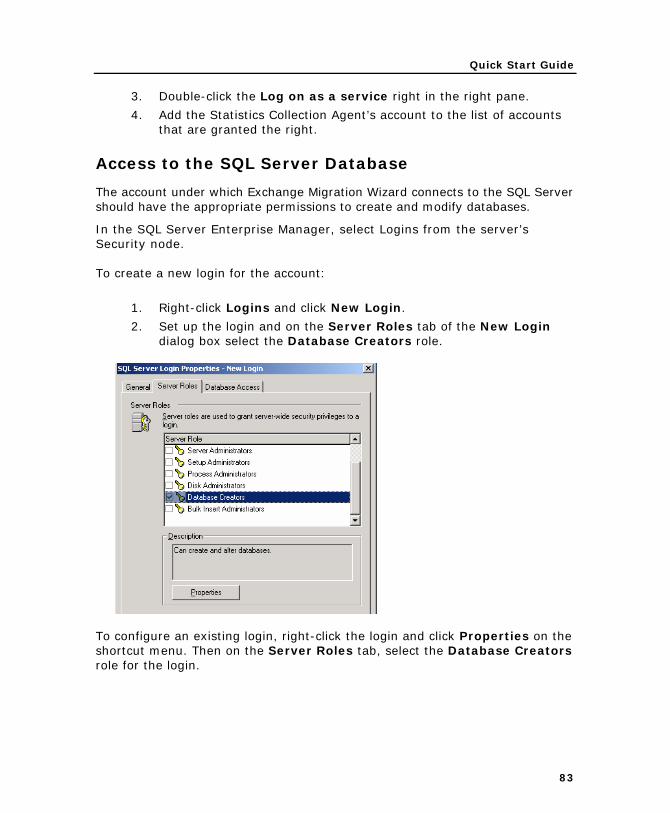
Quick Start Guide
3. Double-click the Log on as a service right in the right pane.
4. Add the Statistics Collection Agent’s account to the list of accounts that are granted the right.
Access to the SQL Server Database
The account under which Exchange Migration Wizard connects to the SQL Server should have the appropriate permissions to create and modify databases.
In the SQL Server Enterprise Manager, select Logins from the server’s Security node.
To create a new login for the account:
1. Right-click Logins and click New Login.
2. Set up the login and on the Server Roles tab of the New Login dialog box select the Database Creators role.
To configure an existing login, right-click the login and click Properties on the shortcut menu. Then on the Server Roles tab, select the Database Creators role for the login.
83
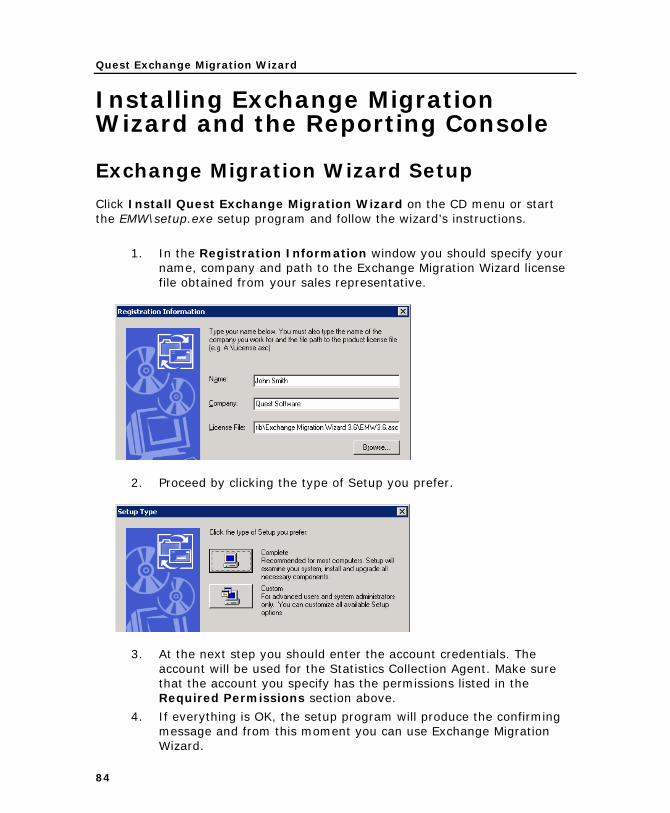
Quest Exchange Migration Wizard
Installing Exchange Migration Wizard and the Reporting Console
Exchange Migration Wizard Setup
Click Install Quest Exchange Migration Wizard on the CD menu or start the EMW\setup.exe setup program and follow the wizard’s instructions.
1. In the Registration Information window you should specify your name, company and path to the Exchange Migration Wizard license file obtained from your sales representative.
2. Proceed by clicking the type of Setup you prefer.
3. At the next step you should enter the account credentials. The account will be used for the Statistics Collection Agent. Make sure that the account you specify has the permissions listed in the Required Permissions section above.
4. If everything is OK, the setup program will produce the confirming message and from this moment you can use Exchange Migration Wizard.
84
Quick Start Guide
The Installation Wizard will install the Statistics Collection Agent with Exchange Migration Wizard by default. If you don’t install this component, you will still be able to view individual logs from Exchange Migration Wizard agents, as well as their statistics in the Project Manager. However, you will not be able to get the comprehensive Reporting Console reports, including data from all computers participating in the migration.
The Statistics Collection Agent is installed on the computer on which you install Exchange Migration Wizard and is run as a service. The Installation Wizard will prompt you for the account under which the agent service will run on the server.
The account you specify for the Statistics Collection Agent should be a member of the server’s local Administrators group. Please see the Required Permissions section to configure the account.
Reporting Console Setup
If you want to get comprehensive reports on the migration process from all the agents, you can also install the Quest Reporting Console. The Quest Reporting Console provides a simple and convenient way to view, print, save, create and edit reports, charts and forms. Its scheduling capabilities allow you to set up automatic notification on the migration status.
Click Install Quest Reporting Console on the CD menu or start the Reporting Console\setup.exe setup program and follow the wizard’s instructions.
For more information on using the RC, start the Reporting Console, and then click Contents on the Help menu.
85
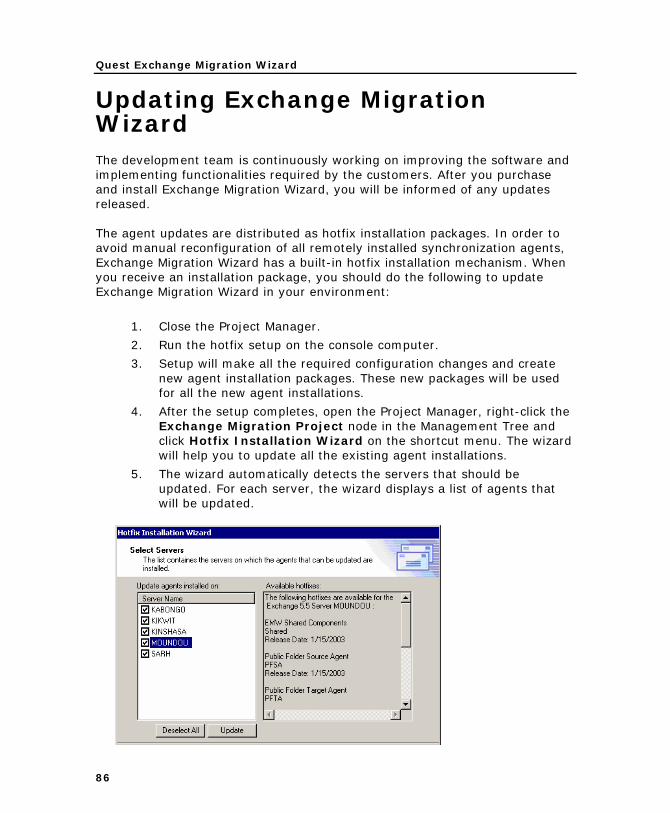
Quest Exchange Migration Wizard
Updating Exchange Migration Wizard The development team is continuously working on improving the software and implementing functionalities required by the customers. After you purchase and install Exchange Migration Wizard, you will be informed of any updates released.
The agent updates are distributed as hotfix installation packages. In order to avoid manual reconfiguration of all remotely installed synchronization agents, Exchange Migration Wizard has a built-in hotfix installation mechanism. When you receive an installation package, you should do the following to update Exchange Migration Wizard in your environment:
1. Close the Project Manager.
2. Run the hotfix setup on the console computer.
3. Setup will make all the required configuration changes and create new agent installation packages. These new packages will be used for all the new agent installations.
4. After the setup completes, open the Project Manager, right-click the Exchange Migration Project node in the Management Tree and click Hotfix Installation Wizard on the shortcut menu. The wizard will help you to update all the existing agent installations.
5. The wizard automatically detects the servers that should be updated. For each server, the wizard displays a list of agents that will be updated.
86
Quick Start Guide
6. Click Next to start updating the agents on the selected servers. Note that this process can take a relatively long time to complete.
7. After the wizard is completed, you can view the log to see the success status of the hotfix installation. If network or server problems prevented the agents from being updated on any of the selected servers, you should run the Hotfix Installation Wizard again after the problems are fixed.
The Project Manager should not be installed on the same server with the synchronization agents. Otherwise the Hotfix Installation Wizard will not be able to update the agents and the Shared Components on this server.
87

Quest Exchange Migration Wizard
Upgrading Exchange Migration Wizard If you are running a previous version of Exchange Migration Wizard, you should use a special utility to upgrade to Exchange Migration Wizard version 4.0. Refer to the Exchange Migration Wizard—Upgrade Guide for more details.
88