cluster getting started guide - hitachi vantara … troubleshooting ... and focuses on configuring a...
TRANSCRIPT

Hitachi Data IngestorCluster Getting Started Guide
MK-90HDI001-12
Product Version
Getting Help
Contents

© 2010 - 2014 Hitachi, Ltd. All rights reserved.
No part of this publication may be reproduced or transmitted in any form or by any means,electronic or mechanical, including photocopying and recording, or stored in a database or retrievalsystem for any purpose without the express written permission of Hitachi, Ltd.
Hitachi, Ltd., reserves the right to make changes to this document at any time without notice andassumes no responsibility for its use. This document contains the most current information availableat the time of publication. When new or revised information becomes available, this entiredocument will be updated and distributed to all registered users.
Some of the features described in this document might not be currently available. Refer to the mostrecent product announcement for information about feature and product availability, or contactHitachi Data Systems Corporation at https://portal.hds.com.
Notice: Hitachi, Ltd., products and services can be ordered only under the terms and conditions ofthe applicable Hitachi Data Systems Corporation agreements. The use of Hitachi, Ltd., products isgoverned by the terms of your agreements with Hitachi Data Systems Corporation.
Hitachi is a registered trademark of Hitachi, Ltd., in the United States and other countries. HitachiData Systems is a registered trademark and service mark of Hitachi, Ltd., in the United States andother countries.
Archivas, Essential NAS Platform, HiCommand, Hi-Track, ShadowImage, Tagmaserve, Tagmasoft,Tagmasolve, Tagmastore, TrueCopy, Universal Star Network, and Universal Storage Platform areregistered trademarks of Hitachi Data Systems Corporation.
AIX, AS/400, DB2, Domino, DS8000, Enterprise Storage Server, ESCON, FICON, FlashCopy, IBM,Lotus, OS/390, RS6000, S/390, System z9, System z10, Tivoli, VM/ESA, z/OS, z9, zSeries, z/VM, z/VSE are registered trademarks and DS6000, MVS, and z10 are trademarks of International BusinessMachines Corporation.
All other trademarks, service marks, and company names in this document or website areproperties of their respective owners.
Microsoft product screen shots are reprinted with permission from Microsoft Corporation.
iiHitachi Data Ingestor Cluster Getting Started Guide
Contents
Preface...................................................................................................vIntended audience....................................................................................................viProduct version.........................................................................................................viRelease notes...........................................................................................................viOrganization of HDI manuals.....................................................................................viDocument conventions..............................................................................................viiConvention for storage capacity values......................................................................viiGetting help............................................................................................................viiiComments...............................................................................................................viii
1 Introduction.........................................................................................1-1Network configuration.............................................................................................1-2
2 Before you begin..................................................................................2-1Prerequisites..........................................................................................................2-2
3 Getting started.....................................................................................3-1Workflow for setting up a system.............................................................................3-2Before setting up a system......................................................................................3-2Creating an HCP tenant ..........................................................................................3-3Installing Hitachi File Services Manager....................................................................3-3Registering a tenant into Hitachi File Services Manager (optional)..............................3-4Setting up an HDI environment................................................................................3-4
Acronyms
iiiHitachi Data Ingestor Cluster Getting Started Guide

ivHitachi Data Ingestor Cluster Getting Started Guide

Preface
The Hitachi Data Ingestor (HDI) has three models: cluster, single, and VMappliance. This guide is specifically for the configuration of the cluster modeland contains procedures for linking a clustered system to a Hitachi ContentPlatform (HCP) system in order to run a system.
Notice: The use of Hitachi Data Ingestor and all other Hitachi Data Systemsproducts is governed by the terms of your agreement(s) with Hitachi DataSystems.
□ Intended audience
□ Product version
□ Release notes
□ Organization of HDI manuals
□ Document conventions
□ Convention for storage capacity values
□ Getting help
□ Comments
Preface vHitachi Data Ingestor Cluster Getting Started Guide

Intended audienceThis document is intended for system administrators who want to run an HDIcluster appliance model (integrated with the HUS100 series).
In addition, the user must have the following knowledge:
• A basic knowledge of HDI systems and HCP systems.
• Experience with setting up HDI systems and HCP systems.
Product versionThis document revision applies to Hitachi Data Ingestor version 5.0 or later.
Release notesRelease notes can be found on the documentation CD. Release notes containrequirements and more recent product information that may not be fullydescribed in this manual. Be sure to review the release notes beforeinstallation.
Organization of HDI manualsHDI manuals are organized as shown below.
Note that whether HDI nodes can be set up in a redundant configurationdepends on the HDI model. A configuration where nodes are made redundantis called a cluster configuration, and a configuration where a node is notmade redundant with another node is called a single-node configuration.Which manuals you need to read depends on which configuration you aregoing to use.
Manual name Description
Hitachi Data IngestorInstallation andConfiguration Guide,MK-90HDI002
You must read this manual first to use an HDI system.
This manual contains the information that you must be awareof before starting HDI system operation, as well as theenvironment settings for an external server.
Hitachi Data IngestorCluster Getting StartedGuide (This manual)
This manual explains how to set up an HDI system in acluster configuration.
Hitachi Data IngestorCluster Administrator'sGuide, MK-90HDI038
This manual provides procedures for using HDI systems in acluster configuration, as well as provides GUI references.
Hitachi Data IngestorCluster TroubleshootingGuide, MK-90HDI029
This manual provides troubleshooting information for HDIsystems in a cluster configuration.
Hitachi Data IngestorSingle Node Getting
This manual explains how to set up an HDI system in asingle-node configuration.
vi PrefaceHitachi Data Ingestor Cluster Getting Started Guide

Manual name Description
Started Guide,MK-90HDI028
Hitachi Data IngestorSingle NodeAdministrator's Guide,MK-90HDI039
This manual explains the procedures for using HDI systems ina single-node configuration, as well as provides GUIreferences.
Hitachi Data IngestorSingle NodeTroubleshooting Guide,MK-90HDI030
This manual provides troubleshooting information for HDIsystems in a single-node configuration.
Hitachi Data Ingestor CLIAdministrator's Guide,MK-90HDI034
This manual describes the syntax of the commands that canbe used for HDI systems in a cluster configuration or asingle-node configuration.
Hitachi Data Ingestor APIReferences,MK-90HDI026
This manual explains how to use the API for HDI systems in acluster configuration or a single-node configuration.
Hitachi Data IngestorError Codes,MK-90HDI005
This manual contains messages for HDI systems in a clusterconfiguration or a single-node configuration.
Hitachi Data Ingestor FileSystem Protocols (CIFS/NFS) Administrator'sGuide, MK-90HDI035
This manual contains the things to keep in mind before usingthe CIFS or NFS service of an HDI system in a clusterconfiguration or a single-node configuration from a CIFS orNFS client.
Document conventionsThis document uses the following typographic conventions:
Convention Description
Bold Indicates text on a window, other than the window title,including menus, menu options, buttons, fields, and labels.Example: Click OK.
Italic Indicates a variable, which is a placeholder for actual textprovided by the user or system. Example: copy source-filetarget-file
Note: Angled brackets (< >) are also used to indicatevariables.
screen/code Indicates text that is displayed on screen or entered by theuser. Example: # pairdisplay -g oradb
Convention for storage capacity valuesStorage capacity values (e.g., drive capacity) are calculated based on thefollowing values:
Preface viiHitachi Data Ingestor Cluster Getting Started Guide

Capacity Unit Physical Value Logical Value
1 KB 1,000 bytes 1,024 (210) bytes
1 MB 1,000 KB or 1,0002 bytes 1,024 KB or 1,0242 bytes
1 GB 1,000 MB or 1,0003 bytes 1,024 MB or 1,0243 bytes
1 TB 1,000 GB or 1,0004 bytes 1,024 GB or 1,0244 bytes
1 PB 1,000 TB or 1,0005 bytes 1,024 TB or 1,0245 bytes
1 EB 1,000 PB or 1,0006 bytes 1,024 PB or 1,0246 bytes
1 block - 512 bytes
Getting helpThe Hitachi Data Systems customer support staff is available 24 hours a day,seven days a week. If you need technical support, log on to the Hitachi DataSystems Portal for contact information: https://portal.hds.com
CommentsPlease send us your comments on this document: [email protected] the document title, number, and revision, and refer to specificsection(s) and paragraph(s) whenever possible.
Thank you! (All comments become the property of Hitachi Data SystemsCorporation.)
viii PrefaceHitachi Data Ingestor Cluster Getting Started Guide

1Introduction
The Hitachi Data Ingestor (HDI) has three models: cluster, single, and VMappliance. This guide provides information for configuring the cluster modeland focuses on configuring a system for a Windows Active Directlyenvironment with a single front-end network.
□ Network configuration
Introduction 1-1Hitachi Data Ingestor Cluster Getting Started Guide
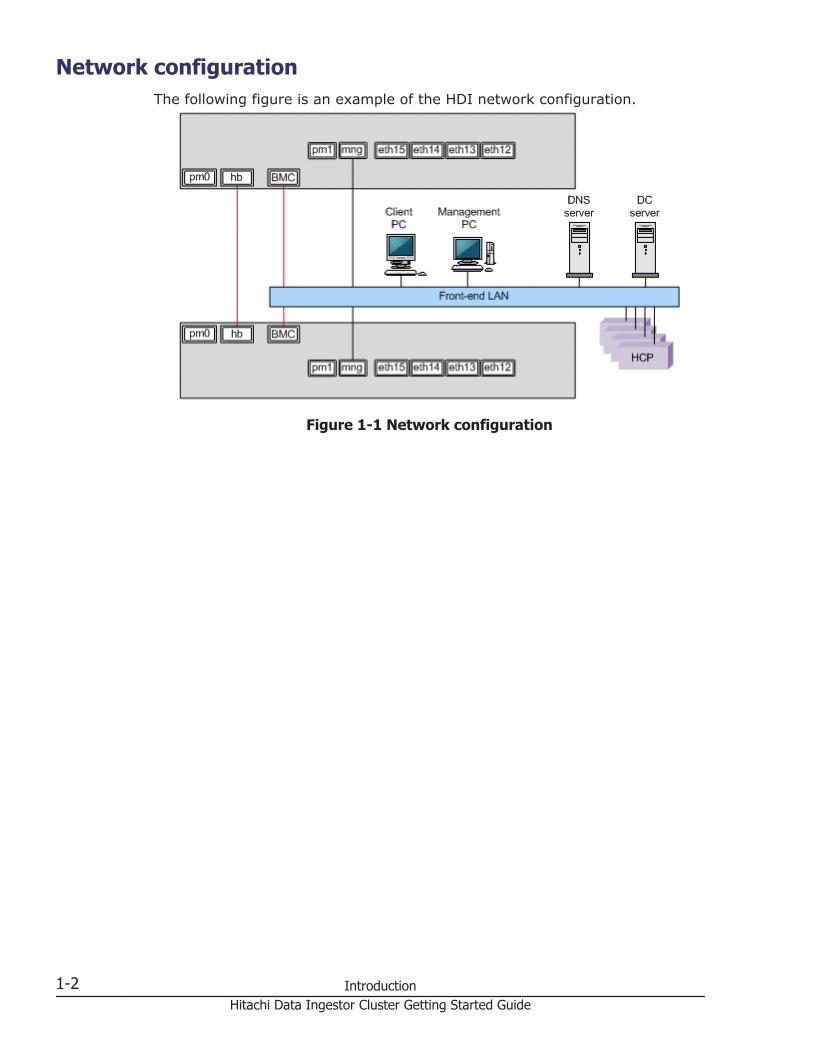
Network configurationThe following figure is an example of the HDI network configuration.
Figure 1-1 Network configuration
1-2 IntroductionHitachi Data Ingestor Cluster Getting Started Guide

2Before you begin
This chapter lists the prerequisites for setting up a system.
□ Prerequisites
Before you begin 2-1Hitachi Data Ingestor Cluster Getting Started Guide

PrerequisitesThe prerequisites for a system include:
• An HCP system is installed.
• The management network of the HDI system and HCP front-end networkis correctly connected by way of TCP/IP.
• The Management IP address and baseboard management controller(BMC) IP address within the front-end network need to be assigned toboth nodes. If not assigned, configure them in the HDI prompt throughthe directly-attached keyboard/monitor.
• A Windows PC is required for the management GUI. For the systemrequirement, 1 GB or more of memory and 4 GB or more of disk capacityis required. See the Installation and Configuration Guide for details.
• One 70 GB LU for the cluster management and LUs for user file system instorage should be created and assigned to both HDI nodes by way of FCconnection up front.For the appliance model and the cluster model, the cluster managementshould have been assigned at the distribution center. Otherwise, ask yourstorage administrator to assign and map these LUs to both nodes.
The following table lists the information that needs to be checked beforebeginning setup, provides space for recording those values, and describeswhere those values are used.
Table 2-1 Check all items before starting setup
Target Item Value Procedure whereused
HDI system The management IPaddress and BMC IPaddress for both nodes.
Setting up an HDIenvironment on page3-4
License key files orlicense keys (whether toencrypt user LUs whenusing an encryptionlicense)
HCP system Host name (fullyqualified domain name)of the node in which anamespace is to becreated
Registering a tenantinto Hitachi File ServicesManager (optional) onpage 3-4, Setting upan HDI environment onpage 3-4
NTP server IP address Setting up an HDIenvironment on page3-4
DNS server Domain name Setting up an HDIenvironment on page3-4
2-2 Before you beginHitachi Data Ingestor Cluster Getting Started Guide

Target Item Value Procedure whereused
IP address Setting up an HDIenvironment on page3-4
Other than thoseabove
Time zone Setting up an HDIenvironment on page3-4
AD DC joiningand RID usermapping
AD Domain name Setting up an HDIenvironment on page3-4
AD Domainname(NetBIOS)
Setting up an HDIenvironment on page3-4
DC server name(s) Setting up an HDIenvironment on page3-4
Domain user account tojoin a domain
Setting up an HDIenvironment on page3-4
Password for the domainuser
Setting up an HDIenvironment on page3-4
Before you begin 2-3Hitachi Data Ingestor Cluster Getting Started Guide

2-4 Before you beginHitachi Data Ingestor Cluster Getting Started Guide

3Getting started
This chapter explains how to set up a system.
The following procedures assume that you are linking an system to an HCPsystem.
□ Workflow for setting up a system
□ Before setting up a system
□ Creating an HCP tenant
□ Installing Hitachi File Services Manager
□ Registering a tenant into Hitachi File Services Manager (optional)
□ Setting up an HDI environment
Getting started 3-1Hitachi Data Ingestor Cluster Getting Started Guide
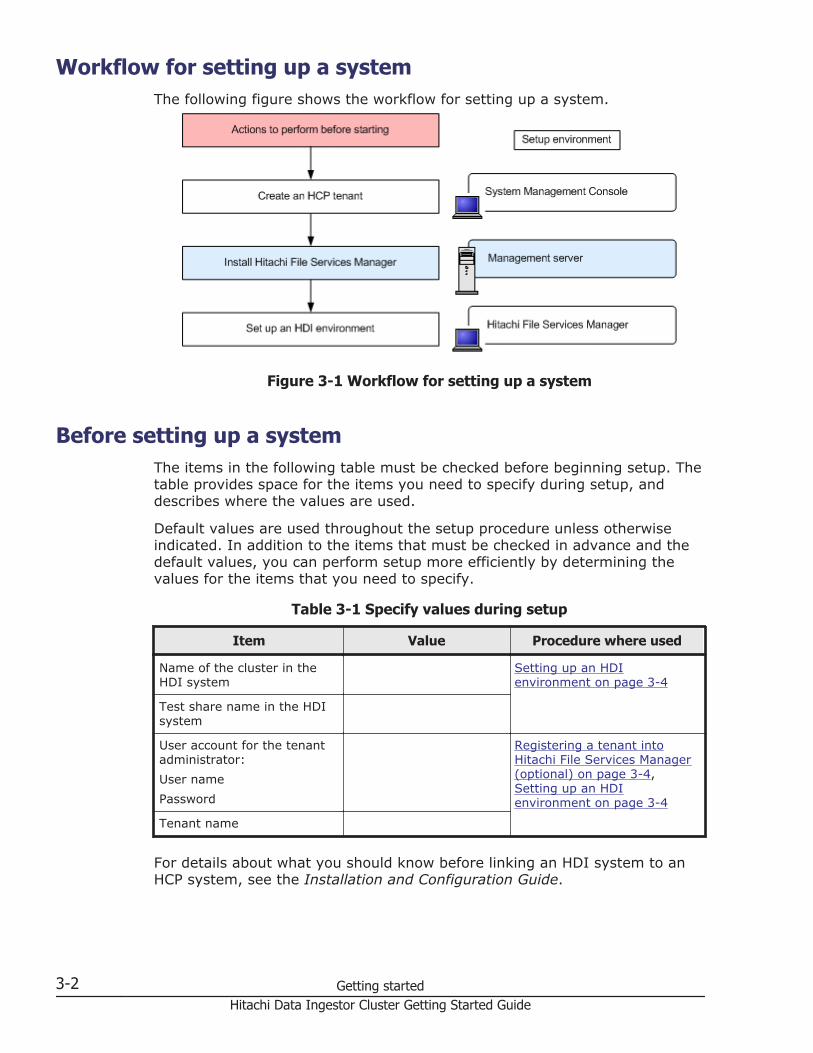
Workflow for setting up a systemThe following figure shows the workflow for setting up a system.
Figure 3-1 Workflow for setting up a system
Before setting up a systemThe items in the following table must be checked before beginning setup. Thetable provides space for the items you need to specify during setup, anddescribes where the values are used.
Default values are used throughout the setup procedure unless otherwiseindicated. In addition to the items that must be checked in advance and thedefault values, you can perform setup more efficiently by determining thevalues for the items that you need to specify.
Table 3-1 Specify values during setup
Item Value Procedure where used
Name of the cluster in theHDI system
Setting up an HDIenvironment on page 3-4
Test share name in the HDIsystem
User account for the tenantadministrator:
User name
Password
Registering a tenant intoHitachi File Services Manager(optional) on page 3-4,Setting up an HDIenvironment on page 3-4
Tenant name
For details about what you should know before linking an HDI system to anHCP system, see the Installation and Configuration Guide.
3-2 Getting startedHitachi Data Ingestor Cluster Getting Started Guide

Creating an HCP tenant
Create a tenant by using the System Management Console in HCP. Fordetails, see the HCP documentation. To create a tenant, the followingoperations are required:
• Enable the management API (MAPI) in the security settings.
• Create a user account (user name and password) for the tenantadministrator.
• Set the role for the created user account so that all permissions aregranted.
• Set a hard quota for the tenant capacity.
• Specify the settings so that the retention mode can be selected.
• Enable version management (versioning).
• If the version of the linked HCP system is 4.1 or later, specify a value ofat least number-of-file-system-namespaces + 1 for the namespace quota.
Installing Hitachi File Services Manager
To use Hitachi File Services Manager as the HDI GUI, you need to installHitachi File Services Manager on the management server.
This section describes how to install Hitachi File Services Manager. For detailsabout the management server requirements and the browser settingsrequired to use the GUI, such as pop-up block and security, see theInstallation and Configuration Guide.
To install Hitachi File Services Manager
1. Insert the installation media into the management server optical drive,and then run the HFSMinst.exe file.
2. Follow the instructions in the dialog boxes.Specify any required information, such as where to install the programand where to store database files.If the installation is completed successfully, the Installation Completedialog box is displayed.
3. Click Finish to finish the installation.
Getting started 3-3Hitachi Data Ingestor Cluster Getting Started Guide
Registering a tenant into Hitachi File Services Manager(optional)
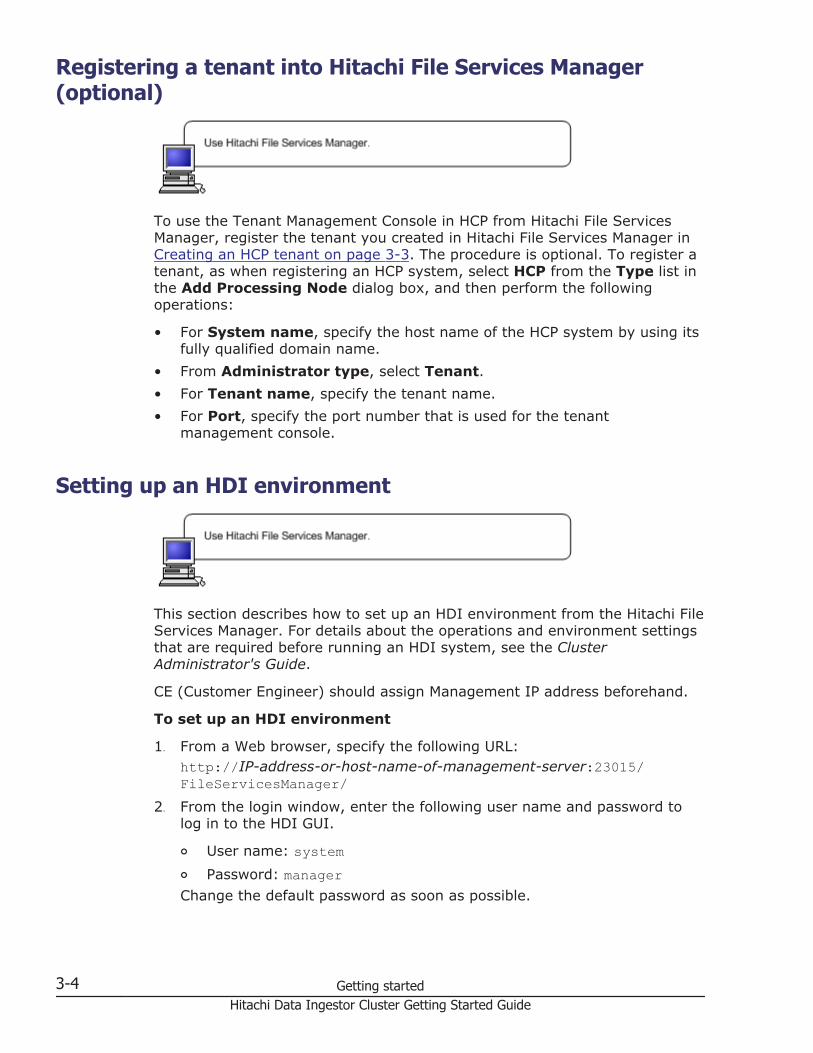
To use the Tenant Management Console in HCP from Hitachi File ServicesManager, register the tenant you created in Hitachi File Services Manager inCreating an HCP tenant on page 3-3. The procedure is optional. To register atenant, as when registering an HCP system, select HCP from the Type list inthe Add Processing Node dialog box, and then perform the followingoperations:
• For System name, specify the host name of the HCP system by using itsfully qualified domain name.
• From Administrator type, select Tenant.
• For Tenant name, specify the tenant name.
• For Port, specify the port number that is used for the tenantmanagement console.
Setting up an HDI environment
This section describes how to set up an HDI environment from the Hitachi FileServices Manager. For details about the operations and environment settingsthat are required before running an HDI system, see the ClusterAdministrator's Guide.
CE (Customer Engineer) should assign Management IP address beforehand.
To set up an HDI environment
1. From a Web browser, specify the following URL:http://IP-address-or-host-name-of-management-server:23015/FileServicesManager/
2. From the login window, enter the following user name and password tolog in to the HDI GUI.
¢ User name: system¢ Password: managerChange the default password as soon as possible.
3-4 Getting startedHitachi Data Ingestor Cluster Getting Started Guide

The Configuration Wizard automatically starts the first time the system islogged in to.
3. In the 1. Introduction dialog box, click Next >.
4. In the 2. Node settings dialog box, enter the IP address in the *Mgmt.IP address first node box and in the Mgmt. IP address second nodebox. Enter the password manager in the *Password box, and then clickNext >.
5. In the confirmation screen, click Next >.
6. In the 3. License settings dialog box, click Activate License.
7. In the Activate License dialog box, specify the settings for the licenseand click OK.
¢ If you are using a license key file, specify the license key file path intothe text box. If you want to browse and specify the file name, clickthe Browse button.
¢ If you want to enter a license key directly, enter the license key intothe text box.
8. In the confirmation screen, select the check box and click the Confirmbutton.
9. In the 3. License settings dialog box, click Next >.
10. In the 4. Cluster settings dialog box, enter the cluster name in the*Cluster name box and the physical node host name in the Physicalnode host name box. Select the Change box, and then select an optionfrom Network address of the heartbeat port menu. Make sure thatyour selection does not conflict with the front-end network as theNetwork address of the heartbeat port. Note that once configured,this value cannot be changed. Select the Yes check box to encrypt userLUs. You can use this if an encryption license is set. Click Next >.
11. In the 5. Network settings dialog box, specify the Virtual IP address,and then click Next >.
12. In the 6. Optional settings dialog box, make sure that Custom setting,DNS settings, Time settings, HCP settings, and User authenticationsetting are selected, and then click Next >.
13. In the 6-1. DNS setting dialog box, click DNS settings. Enter the IPaddresses in the *Primary DNS server box. The Secondary DNSserver box is optional. The Default domain name is optional. Click Next>.
14. In the 6-2. Time setting dialog box, specify the *Region, *Time zone,and NTP server IP address in the appropriate boxes, and then clickNext >.
15. In the 6-3 HCP settings dialog box, click HCP setting and specify thefollowing:
¢ The HCP system by using a fully qualified domain name in the*System name box.
¢ The tenant name in the *Tenant name box.
Getting started 3-5Hitachi Data Ingestor Cluster Getting Started Guide

¢ The user account (in the User name box and Password box) for thetenant administrator in Tenant admin account.
Click Test Connection, and then click Next >.
16. In the 6-4. User authentication settings dialog box, click Protocoland the CIFS and NFS boxes, and then click Next >.
17. In the 6-4. User authentication settings dialog box, select ActiveDirectory authentication in CIFS user management methods, and thenclick Next >.
18. In the 6-4. User authentication settings dialog box, specify the*Domain name, *Domain name (NetBIOS), *DC Server name(s),Domain user name and Domain user password in the appropriateboxes. Click RIDs in User mapping, and then click Next >.
19. In the 6-4. User authentication settings dialog box, specify 70000 and2000000* in the Range of UIDs and GIDs box. Specify the Domainname (Net BIOS) in the Domain name (NetBIOS) box, and then specify70000 and 2000000 in the Range of UIDs and GIDs box. Click Add,and then click Next >.
20. In the 6-4. User authentication settings dialog box, if you are usingNIS or LDAP in your NFS environment, select the External name-resolution server, and then click Next >, Select and specify theappropriate setting for your environment, and then click Next >.
21. In the 7. Confirmation dialog box, confirm the information, and clickDetails. Click the Yes I have read the above warning and wish toexecute the configuration wizard box, and then click < Back. ClickConfirm.The AD user is accessible to HDI CIFS share. If it is not accessible, try todelete CIFS access cache from Service Maintenance on the CIFS servicemodify window.
22. In the 9. Completion dialog box, click Create and Share File System.
23. In the Create and Share File System dialog box, specify the followinginformation:
a. In the Basic tab, specify the CIFS share name. Click the Select fromexisting LUs option, and then select an LU name that you want totest from the from the list.
b. In the Basic tab, select Yes in Use namespace, select Off inContent sharing, and then specify the quota allocated to thenamespace in Quota.
c. Specify the migration time in Migration schedule in the Namespacetab.
24. Click Close to complete the Configuration Wizard.
25. In the Advanced subtab of the Settings tab in the physical-nodesubwindow, click the Backup Configuration.
26. In the Save All System Settings page of the Backup Configurationdialog box, click the Save and Download button to download the systemconfiguration information to storage media outside the system.
3-6 Getting startedHitachi Data Ingestor Cluster Getting Started Guide
Acronyms
This section lists the acronyms used in this manual.
C
CIFSCommon Internet File System
CLIcommand line interface
D
DNSDomain Name System
G
GUIgraphical user interface
H
HDIHitachi Data Ingestor
# A B C D E F G H I J K L M N O P Q R S T U V W X Y Z
Acronyms-1Hitachi Data Ingestor Cluster Getting Started Guide
HCPHitachi Content Platform
I
IPInternet Protocol
L
LANlocal area network
LDAPLightweight Directory Access Protocol
LUlogical unit
N
NISNetwork Information Service
NTPNetwork Time Protocol
U
URLUniform Resource Locator
# A B C D E F G H I J K L M N O P Q R S T U V W X Y Z
Acronyms-2Hitachi Data Ingestor Cluster Getting Started Guide

Hitachi Data Ingestor Cluster Getting Started Guide

Hitachi Data Systems
Corporate Headquarters2845 Lafayette StreetSanta Clara, California 95050-2639U.S.A.www.hds.com
Regional Contact Information
Americas+1 408 970 [email protected]
Europe, Middle East, and Africa+44 (0)1753 [email protected]
Asia Pacific+852 3189 [email protected]
MK-90HDI001-12