collaborate ultra moderator training fs2.indd
TRANSCRIPT
Blackboard Collaborate Ultra: Moderator Guide
Getting Started: The ITS Help Desk is a service provided to all Mississippi State University
students, staff , and faculty. The ITS consultants are available to help with various
computer-related problems as well as provide answers to computer and technolo-
gy-related questions. Visit the Web site at www.its.msstate.edu for handouts and
resolutions to common computer problems. If you cannot fi nd an answer to your
question on the Web or you do not have access to the Internet, please call at 325-
0631 (7:30 a.m. to 5:00 p.m. Monday through Friday). You may also contact the
ITS Help Desk by email at [email protected].
June 2016
Blackboard Collaborate: Ultra Experience is a real-time video conferencing
tool specifi cally designed for education purposes. Blackboard Collaborate Ultra
has been redesigned to allow for easy and reliable Online collaboration within
Blackboard. The updated version of Collaborate has been streamlined to allow
instructors the functionality to use public chat, a white-board, application sharing,
and the ability to add and edit content at any time. With the Ultra experience of
Blackboard Collaborate, you aren’t just replicating the face-to-face experience,
you’re adding a personal touch to Online collaboration. While all browsers are cur-
rently supported, for the best user experience, it is suggested that Google Chrome
is used while using Ultra. More information can be found at the Blackboard site:
https://en-us.help.blackboard.com/Collaborate/Ultra
• Understand the interface for
Moderator functions and purposes
• Edit and manage features
• Conduct a collaborative meeting
with chatting and raised hands
• Share Moderator screen with
student participants
• Share applications and files
• Record session
Objectives
2
Assessing Blackboard Collaborate Ultra ............................................................................... 3 Edit a Room .................................................................................................................. 4 Add Link for Course Content ....................................................................................... 4 Invite Guests to Sessions .............................................................................................. 5Setting Up the Audio and Video ............................................................................................. 6Introduction to Collaborate Ultra Interface .............................................................................8Changing Session Settings ......................................................................................................8My Settings ............................................................................................................................... 9 Adding a Profi le Picture ............................................................................................... 9 Audio and Video Setting ................................................................................................ 9 Notifi cation Setting.......................................................................................................10Calling into a Session ...........................................................................................................10 Students Joining Session .............................................................................................11 Students Leaving Session/Removing Students ...........................................................11Granting Moderator/Presenter/Captioner Roles ....................................................................11Interacting with Participants ................................................................................................. 12 Audio and Network Indicators ..................................................................................... 12 Switching View Modes ................................................................................................ 13 Chatting with Participants ............................................................................................13 Raise Hand ................................................................................................................... 13Sharing Content with Participants ......................................................................................... 14 Sharing a Blank Whiteboard ...................................................................................... 14 Sharing an Application ............................................................................................... 16 Sharing a File .............................................................................................................. 17Leaving a Session ...................................................................................................................18Record a Session ..................................................................................................................... 19Notes ....................................................................................................................................... 21
Table of Contents
3
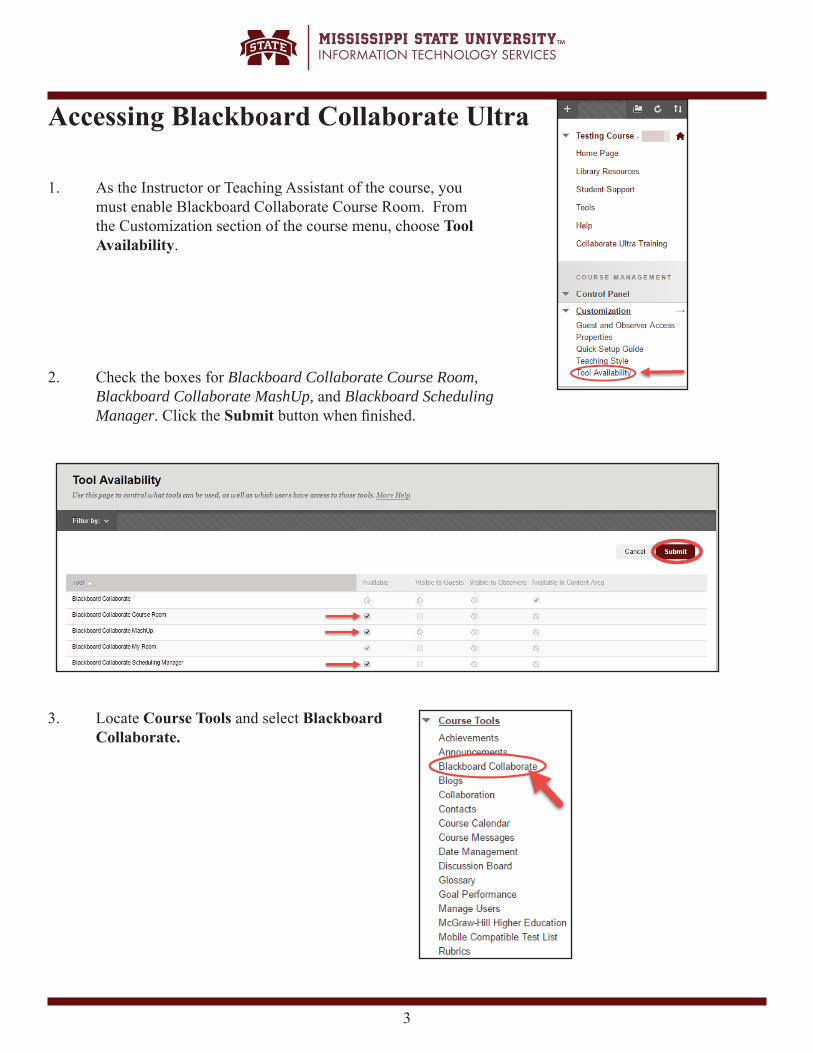
Accessing Blackboard Collaborate Ultra
1. As the Instructor or Teaching Assistant of the course, you must enable Blackboard Collaborate Course Room. From the Customization section of the course menu, choose Tool Availability.
2. Check the boxes for Blackboard Collaborate Course Room, Blackboard Collaborate MashUp, and Blackboard Scheduling Manager. Click the Submit button when fi nished.
3. Locate Course Tools and select Blackboard Collaborate.
4
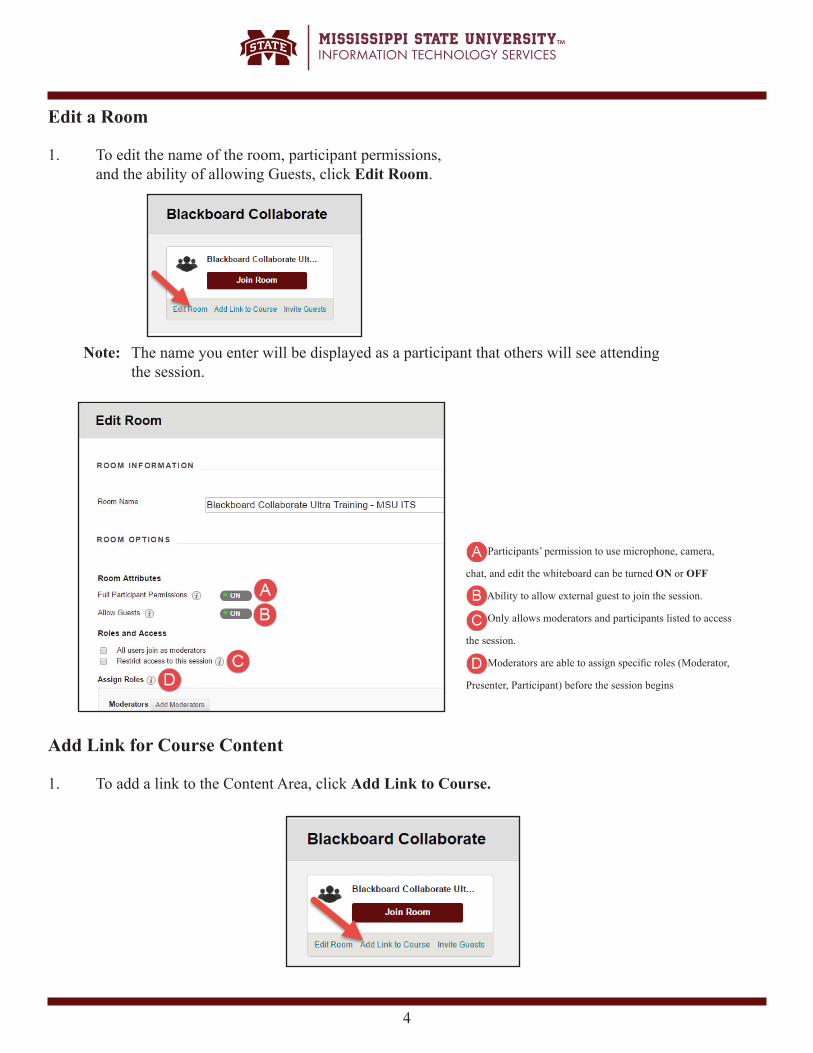
1. To edit the name of the room, participant permissions, and the ability of allowing Guests, click Edit Room.
Note: The name you enter will be displayed as a participant that others will see attending the session.
Participants’ permission to use microphone, camera,
chat, and edit the whiteboard can be turned ON or OFF
Ability to allow external guest to join the session.
Only allows moderators and participants listed to access
the session.
Moderators are able to assign specifi c roles (Moderator,
Presenter, Participant) before the session begins
1. To add a link to the Content Area, click Add Link to Course.
Edit a Room
Add Link for Course Content
5
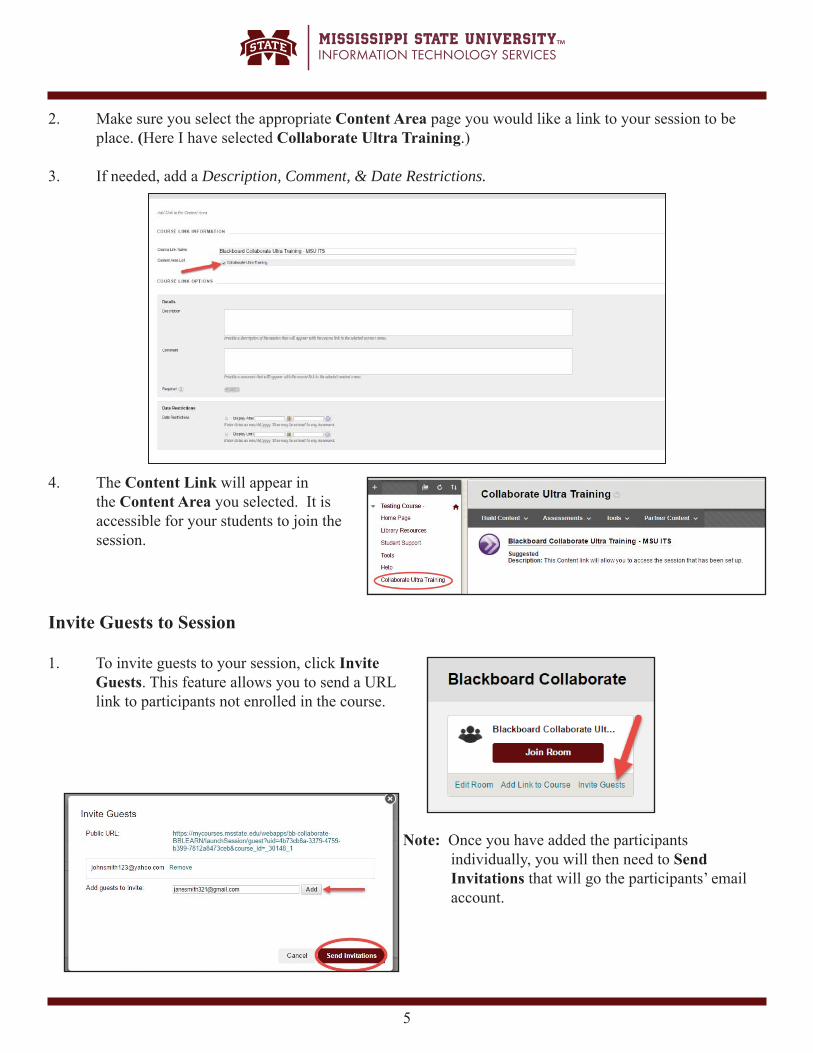
2. Make sure you select the appropriate Content Area page you would like a link to your session to be place. (Here I have selected Collaborate Ultra Training.)
3. If needed, add a Description, Comment, & Date Restrictions.
4. The Content Link will appear in the Content Area you selected. It is accessible for your students to join the session.
1. To invite guests to your session, click Invite Guests. This feature allows you to send a URL link to participants not enrolled in the course.
Note: Once you have added the participants individually, you will then need to Send Invitations that will go the participants’ email account.
Invite Guests to Session
6
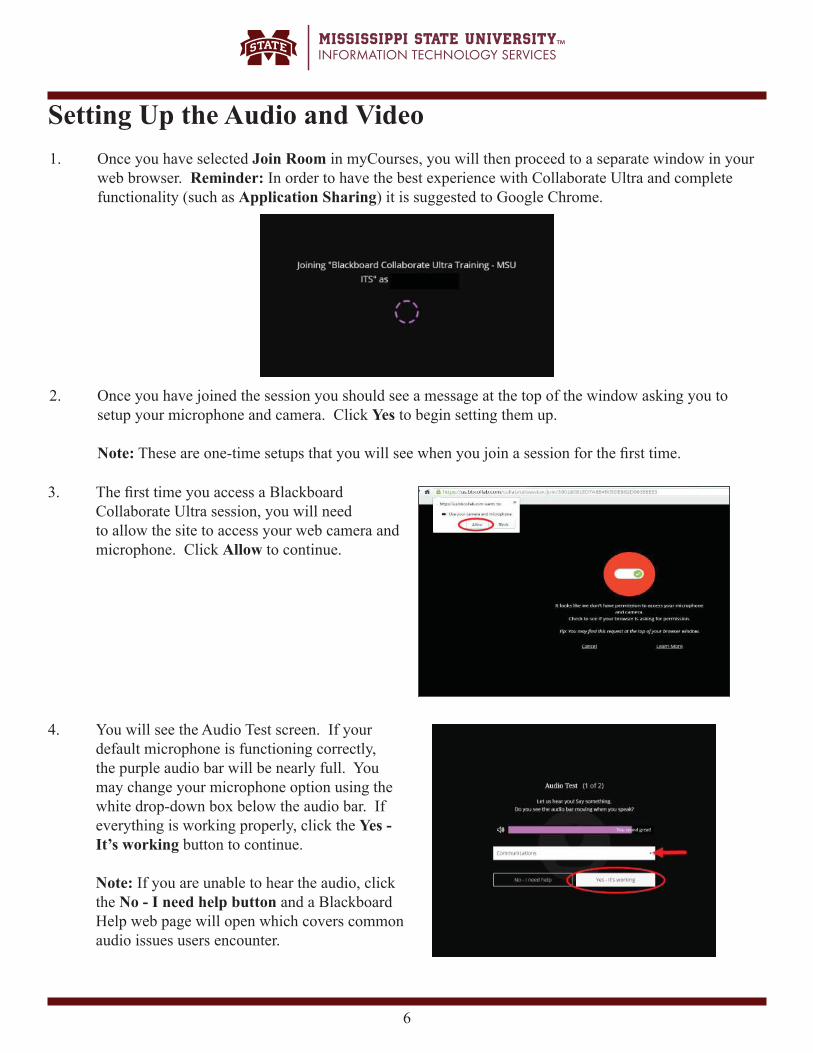
Setting Up the Audio and Video 1. Once you have selected Join Room in myCourses, you will then proceed to a separate window in your
web browser. Reminder: In order to have the best experience with Collaborate Ultra and complete functionality (such as Application Sharing) it is suggested to Google Chrome.
2. Once you have joined the session you should see a message at the top of the window asking you to setup your microphone and camera. Click Yes to begin setting them up.
Note: These are one-time setups that you will see when you join a session for the fi rst time.
3. The fi rst time you access a Blackboard Collaborate Ultra session, you will need to allow the site to access your web camera and microphone. Click Allow to continue.
4. You will see the Audio Test screen. If your default microphone is functioning correctly, the purple audio bar will be nearly full. You may change your microphone option using the white drop-down box below the audio bar. If everything is working properly, click the Yes - It’s working button to continue.
Note: If you are unable to hear the audio, click
the No - I need help button and a Blackboard Help web page will open which covers common audio issues users encounter.
7
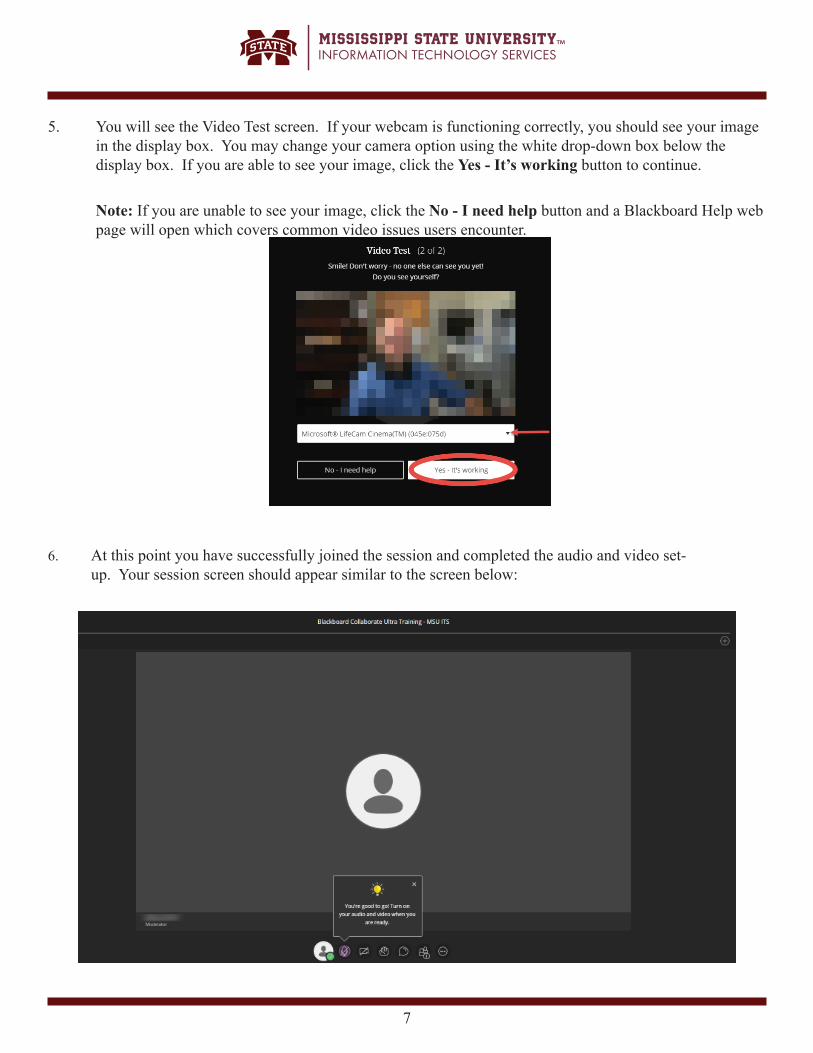
5. You will see the Video Test screen. If your webcam is functioning correctly, you should see your image in the display box. You may change your camera option using the white drop-down box below the display box. If you are able to see your image, click the Yes - It’s working button to continue.
Note: If you are unable to see your image, click the No - I need help button and a Blackboard Help web page will open which covers common video issues users encounter.
6. At this point you have successfully joined the session and completed the audio and video set-up. Your session screen should appear similar to the screen below:
8
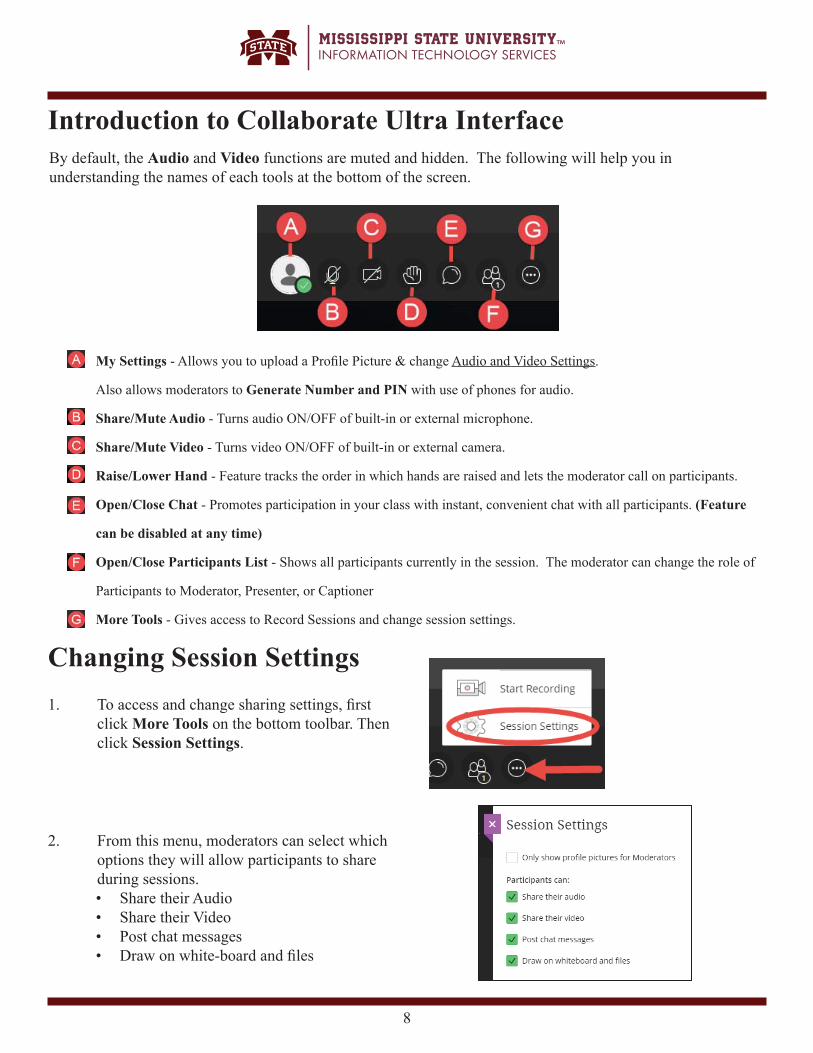
By default, the Audio and Video functions are muted and hidden. The following will help you in understanding the names of each tools at the bottom of the screen.
Introduction to Collaborate Ultra Interface
My Settings - Allows you to upload a Profi le Picture & change Audio and Video Settings.
Also allows moderators to Generate Number and PIN with use of phones for audio.
Share/Mute Audio - Turns audio ON/OFF of built-in or external microphone.
Share/Mute Video - Turns video ON/OFF of built-in or external camera.
Raise/Lower Hand - Feature tracks the order in which hands are raised and lets the moderator call on participants.
Open/Close Chat - Promotes participation in your class with instant, convenient chat with all participants. (Feature
can be disabled at any time)
Open/Close Participants List - Shows all participants currently in the session. The moderator can change the role of
Participants to Moderator, Presenter, or Captioner
More Tools - Gives access to Record Sessions and change session settings.
Changing Session Settings 1. To access and change sharing settings, fi rst click More Tools on the bottom toolbar. Then click Session Settings.
2. From this menu, moderators can select which options they will allow participants to share during sessions.
• Share their Audio• Share their Video• Post chat messages• Draw on white-board and fi les
9
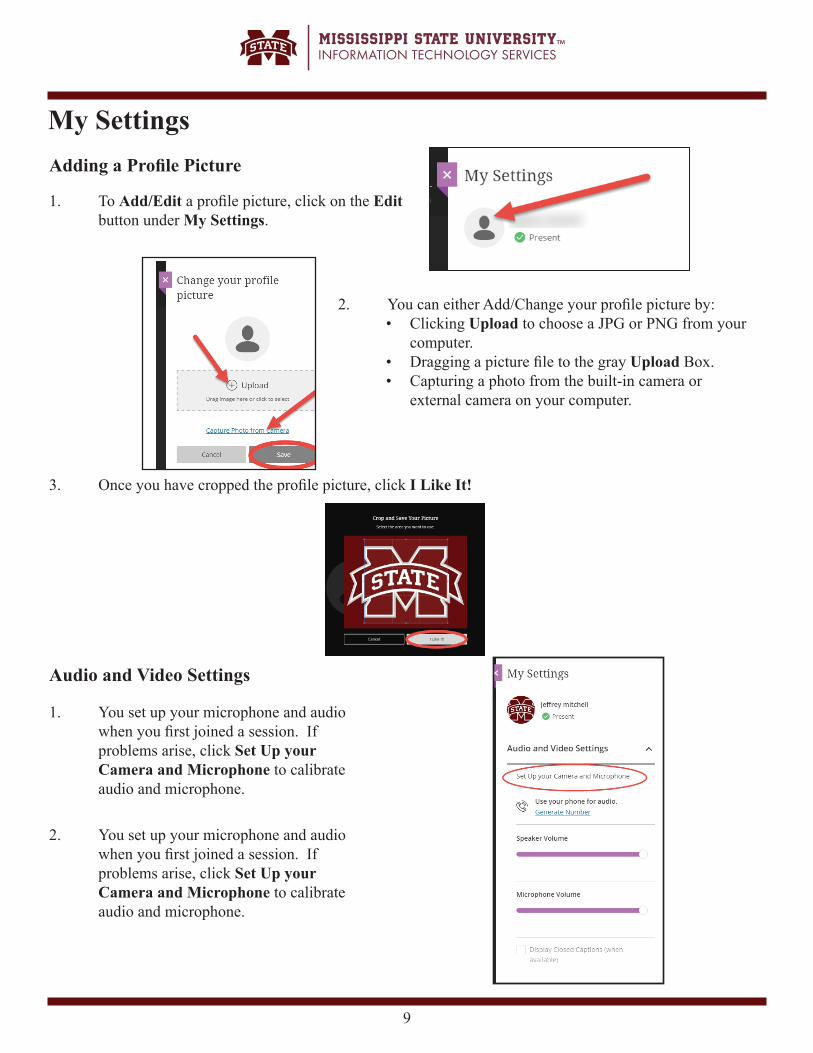
3. Once you have cropped the profi le picture, click I Like It!
1. To Add/Edit a profi le picture, click on the Edit button under My Settings.
Adding a Profi le Picture
2. You can either Add/Change your profi le picture by:• Clicking Upload to choose a JPG or PNG from your
computer.• Dragging a picture fi le to the gray Upload Box.• Capturing a photo from the built-in camera or
external camera on your computer.
My Settings
Audio and Video Settings
1. You set up your microphone and audio when you fi rst joined a session. If problems arise, click Set Up your Camera and Microphone to calibrate audio and microphone.
2. You set up your microphone and audio when you fi rst joined a session. If problems arise, click Set Up your Camera and Microphone to calibrate audio and microphone.

10
Calling into a Session If enabled, you can use the telephony feature to communicate with other users. As a telephony user, you can use all Blackboard Collaborate features and communicating with all users in the session.
1. Under My Settings > Audio and Video Settings, click Generate Number. You are given a unique PIN to help identify you. Each PIN is specifi c to an individual session and a user in that session. You must be joined to a session on a browser to use your phone.
Notifi cation Settings
You are able to change the setting to receiving a visual or audio notifi cation.
1. Click Notifi cation Settings to adjust notifi cation settings for participants joining or leaving session, posted chat messages, closed captioning available, and raising hands.
11
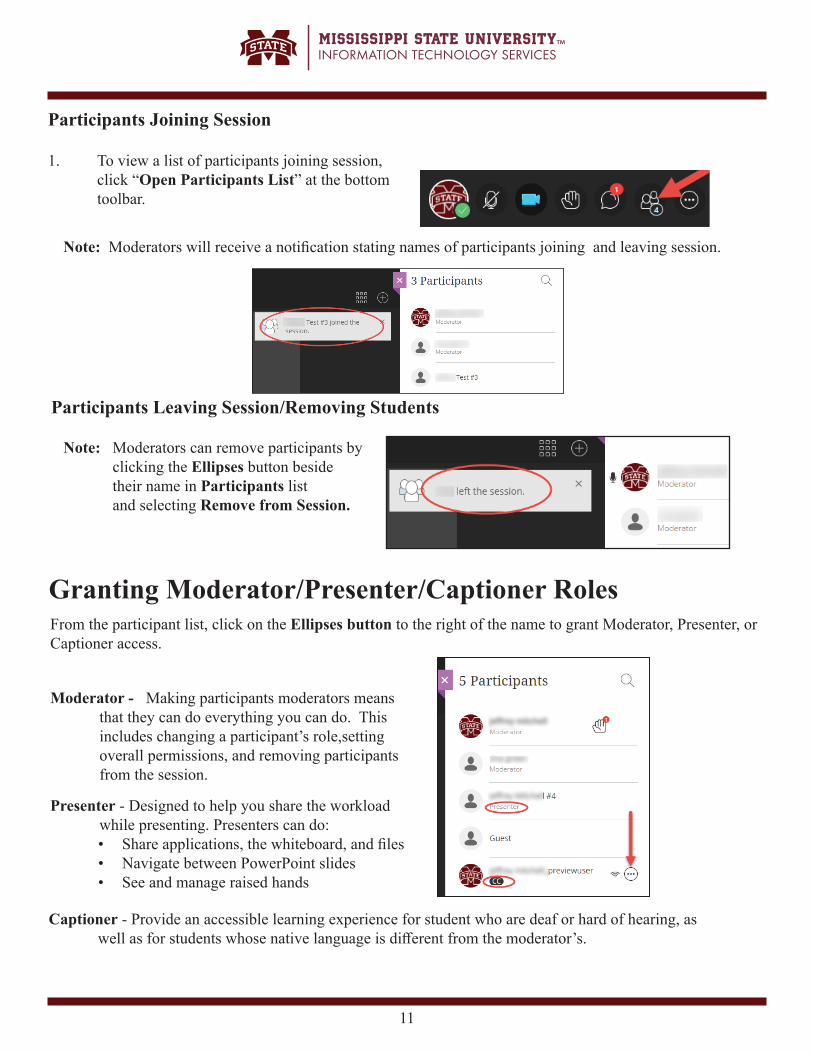
Participants Joining Session
Note: Moderators will receive a notifi cation stating names of participants joining and leaving session.
1. To view a list of participants joining session, click “Open Participants List” at the bottom toolbar.
Granting Moderator/Presenter/Captioner Roles From the participant list, click on the Ellipses button to the right of the name to grant Moderator, Presenter, or Captioner access.
Moderator - Making participants moderators means that they can do everything you can do. This includes changing a participant’s role,setting overall permissions, and removing participants from the session.
Presenter - Designed to help you share the workload while presenting. Presenters can do:
• Share applications, the whiteboard, and fi les• Navigate between PowerPoint slides• See and manage raised hands
Participants Leaving Session/Removing Students
Note: Moderators can remove participants by clicking the Ellipses button beside their name in Participants list and selecting Remove from Session.
Captioner - Provide an accessible learning experience for student who are deaf or hard of hearing, as well as for students whose native language is diff erent from the moderator’s.
12
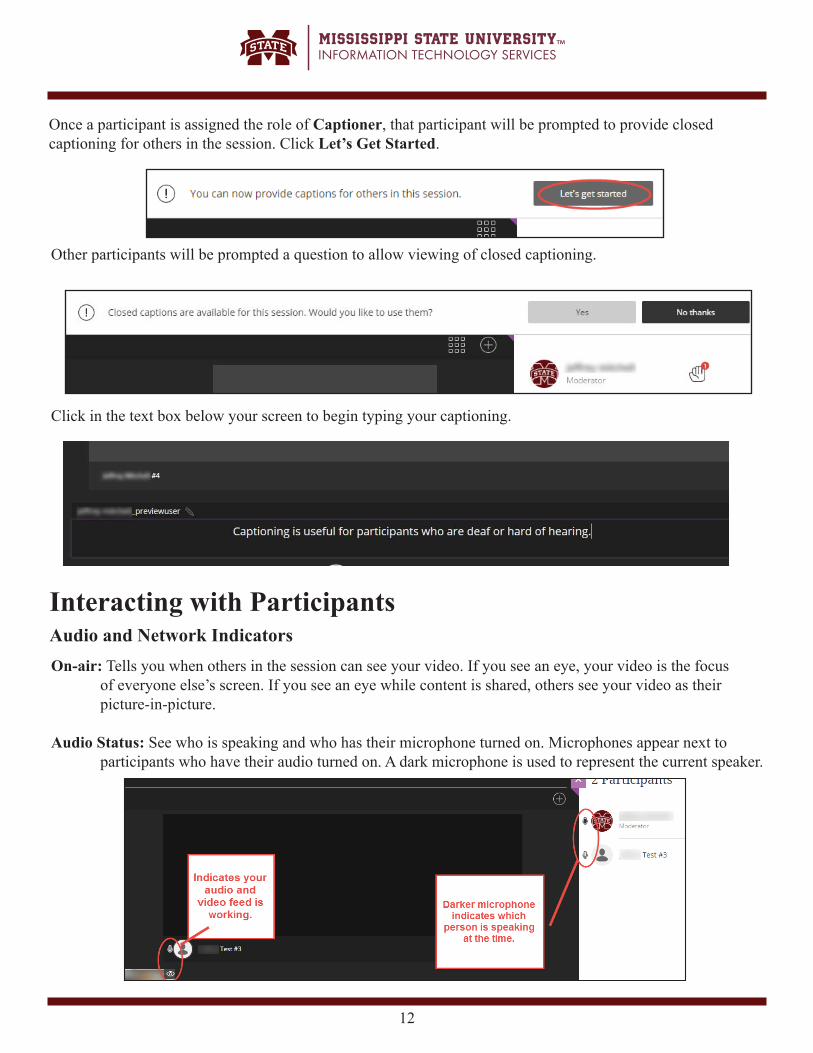
Interacting with Participants Audio and Network IndicatorsOn-air: Tells you when others in the session can see your video. If you see an eye, your video is the focus of everyone else’s screen. If you see an eye while content is shared, others see your video as their picture-in-picture.
Audio Status: See who is speaking and who has their microphone turned on. Microphones appear next to participants who have their audio turned on. A dark microphone is used to represent the current speaker.
Once a participant is assigned the role of Captioner, that participant will be prompted to provide closed captioning for others in the session. Click Let’s Get Started.
Other participants will be prompted a question to allow viewing of closed captioning.
Click in the text box below your screen to begin typing your captioning.
13
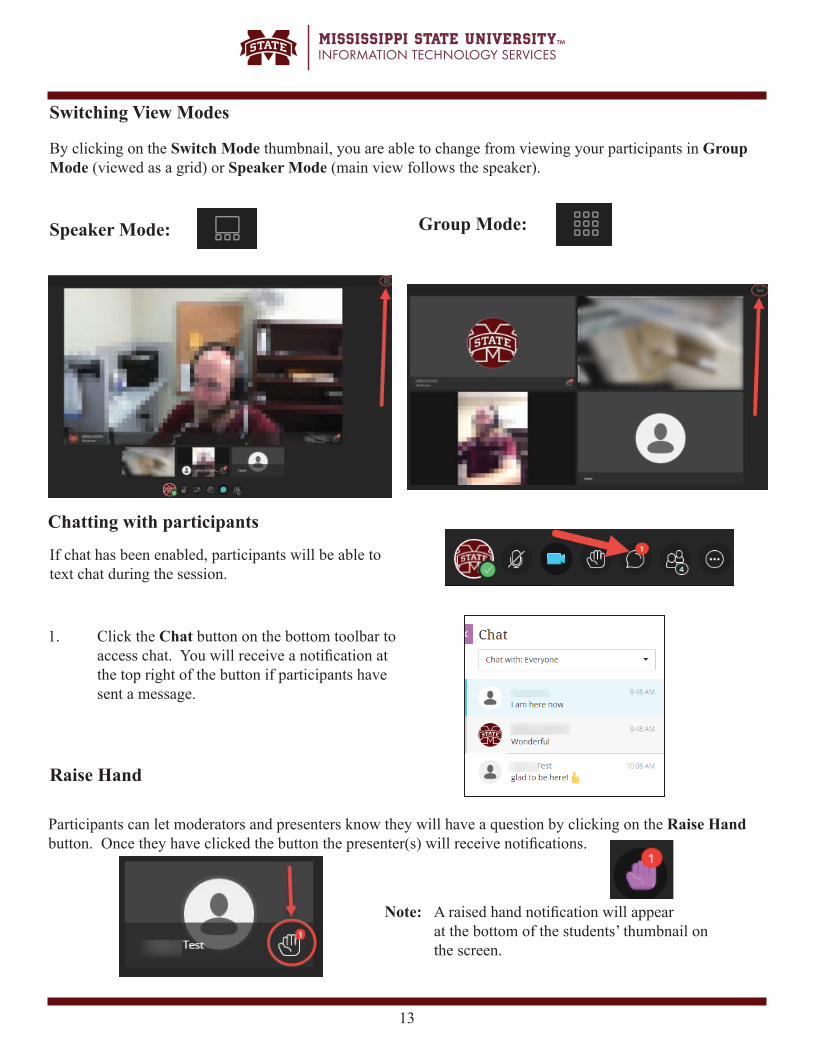
If chat has been enabled, participants will be able to text chat during the session.
1. Click the Chat button on the bottom toolbar to access chat. You will receive a notifi cation at the top right of the button if participants have sent a message.
Chatting with participants
Raise Hand
Participants can let moderators and presenters know they will have a question by clicking on the Raise Hand button. Once they have clicked the button the presenter(s) will receive notifi cations.
Note: A raised hand notifi cation will appear at the bottom of the students’ thumbnail on the screen.
Switching View Modes
By clicking on the Switch Mode thumbnail, you are able to change from viewing your participants in Group Mode (viewed as a grid) or Speaker Mode (main view follows the speaker).
Speaker Mode: Group Mode:

14
By clicking on the Share Content button, represented by the (+) symbol at the top right of the screen, mod-erators are able to share a Blank White-board, Applications, & Files with your participants.
Sharing Content with Participants
By clicking Share Blank Whiteboard, moderators are able to collaborate with students. A blank whiteboard will open to draw or just jot down notes. You decide in Sessions Settings if participants can use the whiteboard and tools along with you during a session.
Sharing a Blank Whiteboard
- Leave Session
- Show/Hide View Controls
- Stop Sharing
Whiteboard Tools:
Select - Use the arrow to select and object on the whiteboard. After you select it you can resize, move, ad delete it. Pointer - Use the hand to point to diff erent areas of the visible slide. Participants see wherever you are pointing on the side Pencil - Use the pencil to draw free hand on the slide.
Shapes - Use the square to draw a rectangle, ellipse, or a straight line. Your choice. Text - Type text on the slide with the “T”.
Erase - Use the eraser to undo everything you or another modera-tor has added to the slide with one click
Note: You will ONLY be able to Share Application with participants if you are using Google Chrome as your web browser.
15
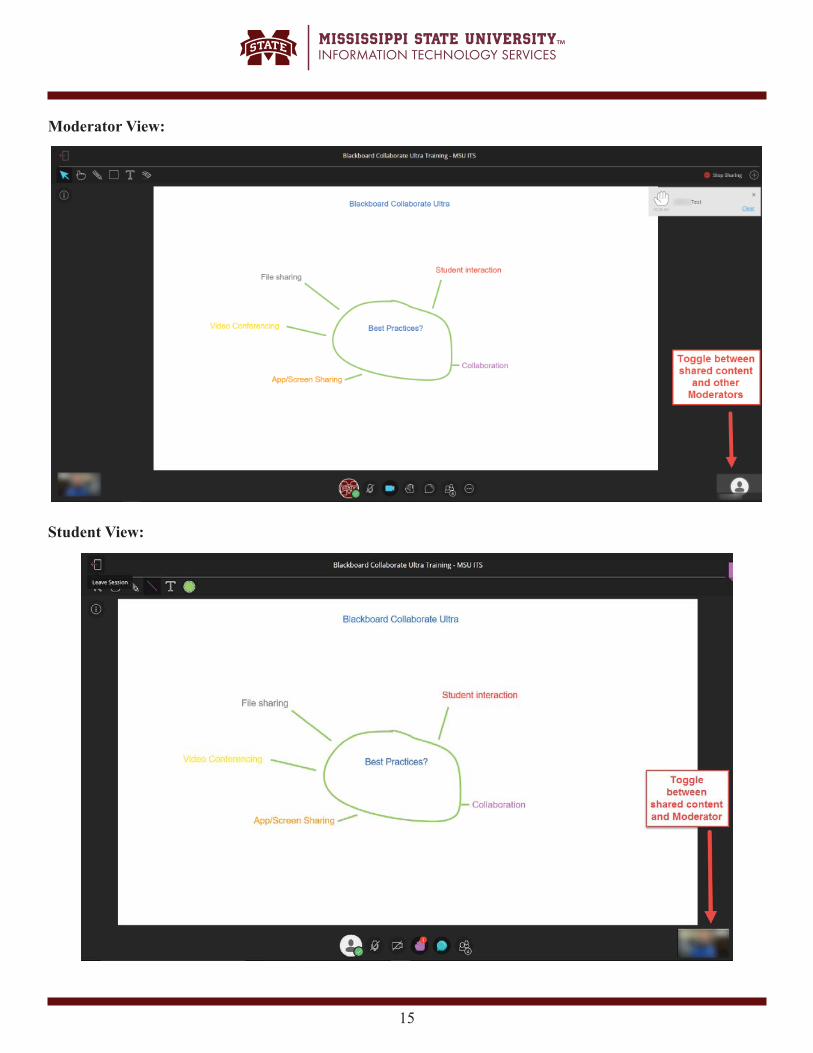
Moderator View:
Student View:

16
Sharing an Application Moderators can share the desktop or a software application to teach students about a particular topic. Whenever you move through the application or desktop, your students automatically follow along.
1. To share a program you currently have open or your entire desktop, click on Share Application in the Share Content menu.
2. You may get a message stating in order to share your screen you’ll need the “Desktop Sharing” extension in Google Chrome. Click Add to Chrome, then Add Extension.
3. The Desktop Sharing extension is then added to Chrome and will appear at the top in the toolbar.
4. Click the (+) in the upper right corner to Share an Application.
5. A new window will appear asking you to select which screen (for desktop sharing) or specifi c program you would like to share with the group.

17
6. To stop application sharing, click on the blue Stop Sharing button on the bottom of your screen. Alternatively, you may return to the Collaborate Ultra session window and click the Stop Sharing link in the upper-right corner of the session window.
Sharing a File
Moderators can upload GIF, JPEG, and PNG images, PDF fi les, or PowerPoint presentations of 60MB or lower to your session.
1. Select Add Files Here or drag a fi le into the box to upload it. Click Share Now when you’re ready for students to see the fi le. If you would like to remove a fi le from the list, select the trash icon.
Note: You can choose to allow participants to mark up your shared fi le during a session in Session Settings.
18
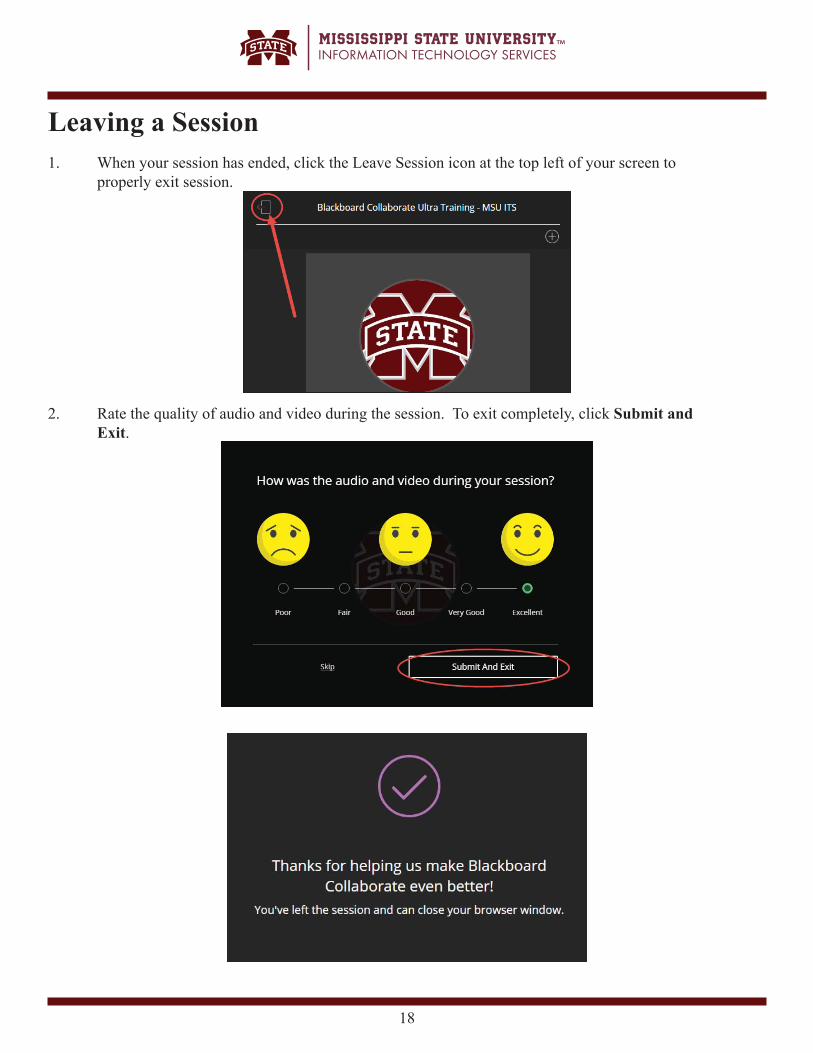
Leaving a Session1. When your session has ended, click the Leave Session icon at the top left of your screen to properly exit session.
2. Rate the quality of audio and video during the session. To exit completely, click Submit and Exit.
19
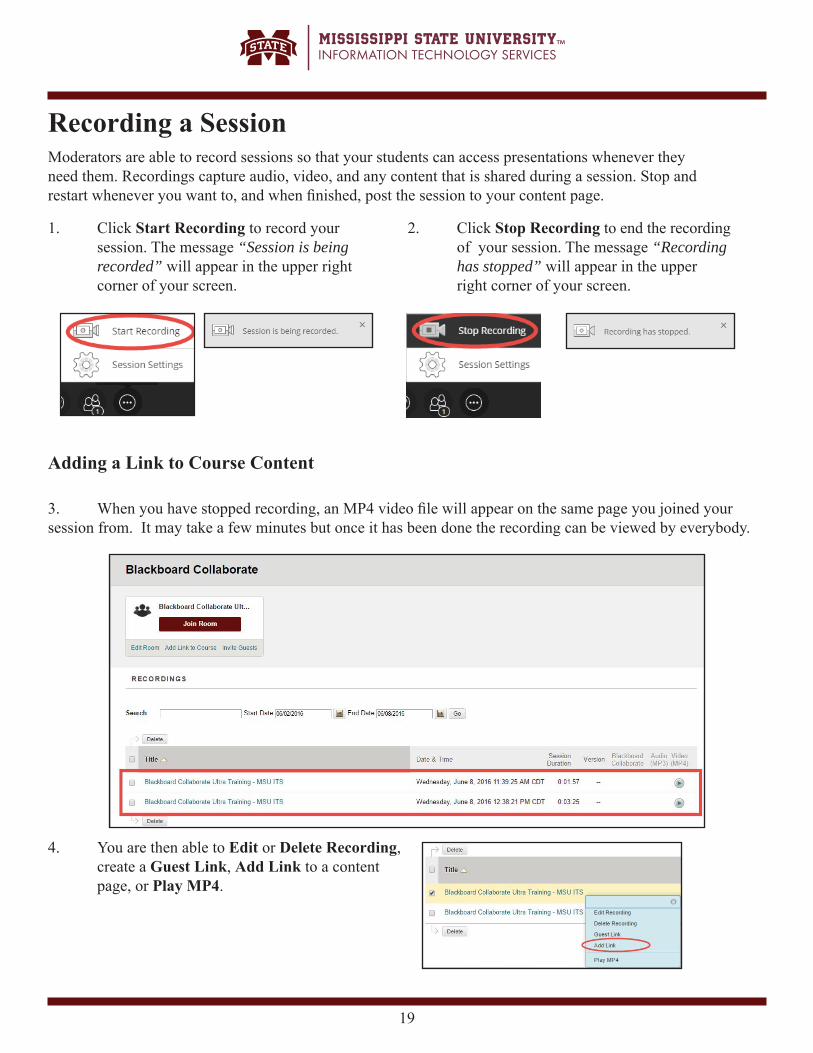
Moderators are able to record sessions so that your students can access presentations whenever they need them. Recordings capture audio, video, and any content that is shared during a session. Stop and restart whenever you want to, and when fi nished, post the session to your content page.
Recording a Session
1. Click Start Recording to record your session. The message “Session is being recorded” will appear in the upper right corner of your screen.
2. Click Stop Recording to end the recording of your session. The message “Recording has stopped” will appear in the upper right corner of your screen.
3. When you have stopped recording, an MP4 video fi le will appear on the same page you joined your session from. It may take a few minutes but once it has been done the recording can be viewed by everybody.
4. You are then able to Edit or Delete Recording, create a Guest Link, Add Link to a content page, or Play MP4.
Adding a Link to Course Content
20
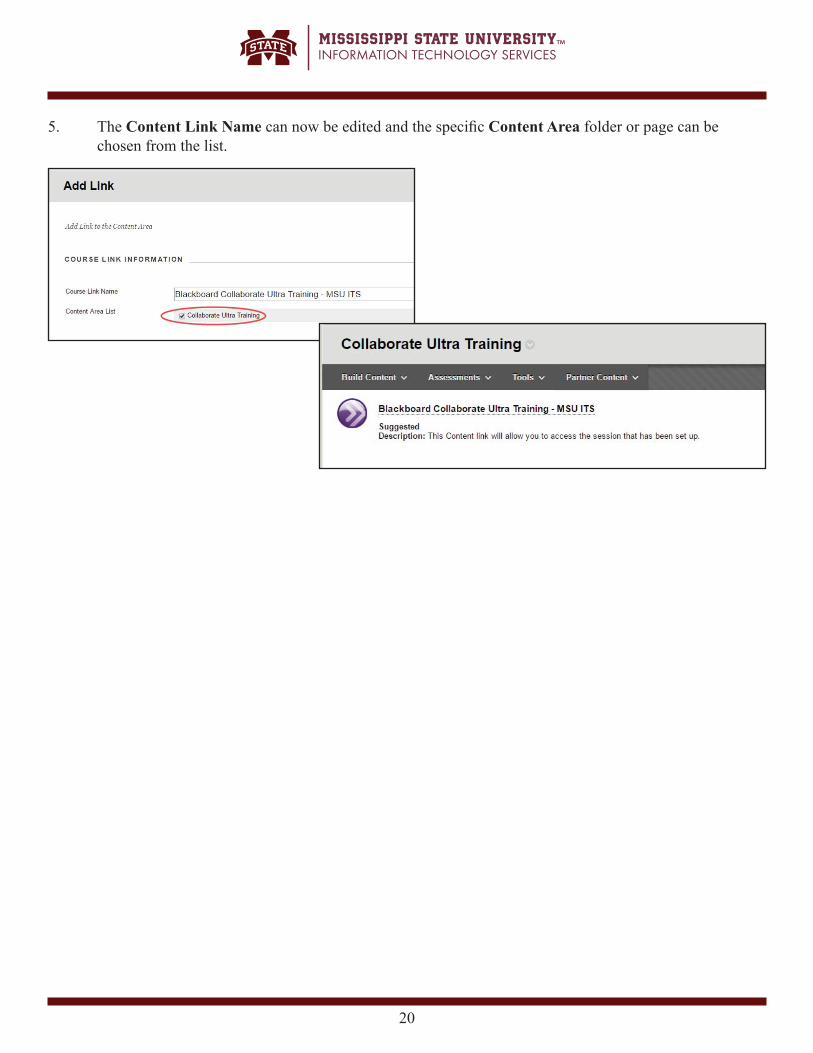
5. The Content Link Name can now be edited and the specifi c Content Area folder or page can be chosen from the list.

21
Notes

22
Notes

23
Notes

24