colorgate quick installation and user guide
TRANSCRIPT

RICOH Ri 2000 ColorGATE Quick installation and User Guide

To prepare printable files for the Ri 2000 printer, the ColorGATE RIP software translates graphic data into printable .prn files.
Get Started With ColorGATE Productionserver 10 (PS10) RIP Software!
ColorGATE Productionserver 10 (PS10) RIP Software is included for free with your RICOH Ri 1000 and can be used to convert images into printable files.
The included USB Protection Key is required to run PS10 on your desktop or laptop computer. Your actual PS10 RIP Software must be installed separately. For software download, installation instructions, user manual, and additional information, please visit: https://anajet.com/colorgate. For assistance, please contact Technical Support at 1-877-646-0999 or at [email protected]
1st step is to set up the printer for communication with ColorGATE RIP software
Printer Setup
Setting the IP address for the printer.
The setting method of IP address for Printer are two patterns.
Case1: For connecting directly to the printer from a PC that is not parts of a network.
Case2: For a DYNAMIC setup - where the printer is with in a network
For either case connect the printer to the PC (case 1) or router (case 2) with an Ethernet cable to the port located in the back right of the printer

Case1: For connecting directly to the printer from a PC that is not parts of a network. [Confirm IP address of your PC] 1. Open the command prompt dialogue box on your PC.
2. Type IPCONFIG in the first line in the command prompt
3. In the Ethernet Adapter Ethernet section, use the IP address but change the last 3 digits to a
number that will be unique to the printer and the Subnet Mask. In the example below, we took the 169.254.248.172 and will assign 169.254.248.174 to the printer

4. Enter the new IP address and the subnet mask into the printer by going to the settings tab, options IP Address (DHCP must be disable)
A. Go to the settings config on the Ri 1000
B. Select the OPTION under the settings tab
C. Select the IP ADDRESS option in the menu dialogue box
Select change when all has been entered
In the command prompt - type ping and then the printer IP address that you have entered to confirm communication is set between the PC and the printer.
Case2: For a DYNAMIC setup 1. Enable the DHCP as shown below to add the printer to an existing network.
And Check the assigned IP ADDRESS.

Next we need to register and install the ColorGATE software on a PC
Go to the URL listed on the shipping insert
https://anajet.com/colorgate.
On this site
Click on the link
https://support.colorgate.com - this will take you to the colorGATE website so you can register as a user.
On this website click on User & Products and select User registration from the pull down. You will then be asked to fill in an email address and password and you can enter personal information such as company name address, etc.
1. The web site will guide you through the next steps to register your user account and to register your product which is your dongle #. Please note. This process requires a series of emails from

[email protected]. Depending on your mail server settings these emails may go to the Spam or Junk folder so make sure to check there. The email sequence is:
a) After user registration - a user registration activation email will be sent immediately
b) After clicking on the activation link an email is sent immediately letting you know that your user account was successfully activated and you can use the ColorGATE web service which allows you to register your product
c) You then can go back to the ColorGATE website and login using your email address and password - under User & Products you will select product registration. Use the number on your dongle to register the product. After registering your product (dongle #) you will immediately receive an email letting you know that you have successfully register your product and that your license will be verified.
d) You will receive a final email that gives you your licenses activation which will convert your licenses from a temporary licenses to a permanent license. This email may take a day or two as the ColorGATE team reviews and verifies your licenses. You can use the software while you wait with a 30 day time limit. Just select “activate later” on the pop up screen at start up. When you receive this email - when you reopen the software the Key update screen will appear
Here is a helpful video that guides you through this process https://www.youtube.com/watch?v=q4DRYkaJ434&feature=youtu.be
Download software of ColorGate RIP and MIM files.
2. Go to the RicohDTG website again https://anajet.com/colorgate. Download the MIM package (.cmp file extension) for the Ri 2000 (the site will also have a package for the Ri 1000 but this will not work for the Ri 1000).
Place this file in a location on your PC that you can retrieve it when you 1st set up the software
3. Then you will need to get the installation executable file – go to https://anajet.com/colorgate. 4. Download the file PS10Setup.33.XXXX
5. Run the executable file and the installation wizard will walk you through the install
6. At the end of the installation you will be asked to restart your computer and after restart the Production 10 icon will appear on your desktop

Start RIP Software
1. Insert the USB dongle to an USB port on the computer.
2. Click Windows mark on left bottom on your pc.
3. Click Productionserver10 -> Productionserver10 .
License Update
4. The following dialog will open when an update is available for your license when the software is started. It will appear if you have received your final activation key after product registration (the fourth email in the user and product registration process). If you do see it select “Start Update…” .
You will then be asked if you want to update the dongle – select update dongle and the update will be compete
Clicking on the PS10 icon on the desk top will start the ColorGATE software. Make sure the security dongle is installed.
1 The software will open to a blank screen – now set up the printer. In the Menu - Printer -> "New" button:
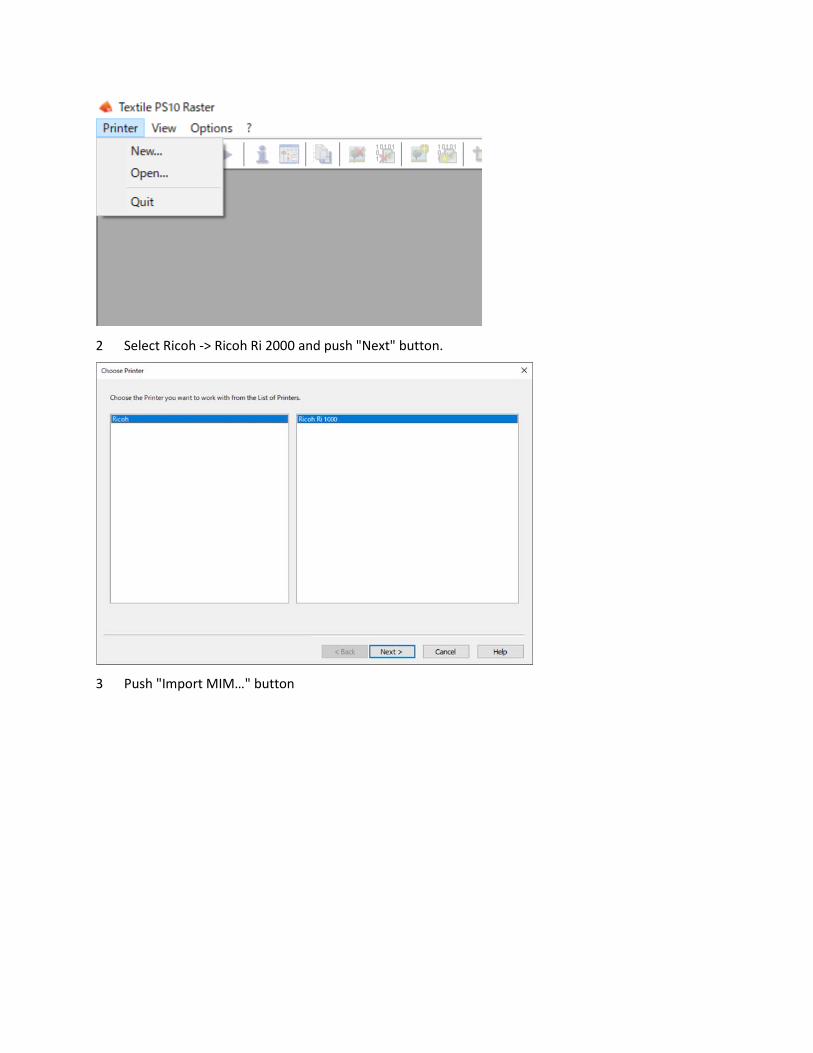
2 Select Ricoh -> Ricoh Ri 2000 and push "Next" button.
3 Push "Import MIM…" button

4 Select MIM file that you previously downloaded(*) and push "Next" button.
*ex. filename: PS Ricoh Ri 2000 Combi-MIM.cmp
5 Check on "All" in Media and push "Next" button.

6 Push "Next" button.
7 Push "Finish" button.

8 Push "Next" button
9 Next you will be asked to input the printer port – put in the IP address of the printer. Selecting the Test button will confirm communication with the printer. You can also click on the arrow next to TCP / IP and you can change the output to Path. You can then input the file path where you want the printable .prn files to go in your computer. Push Next when you are done
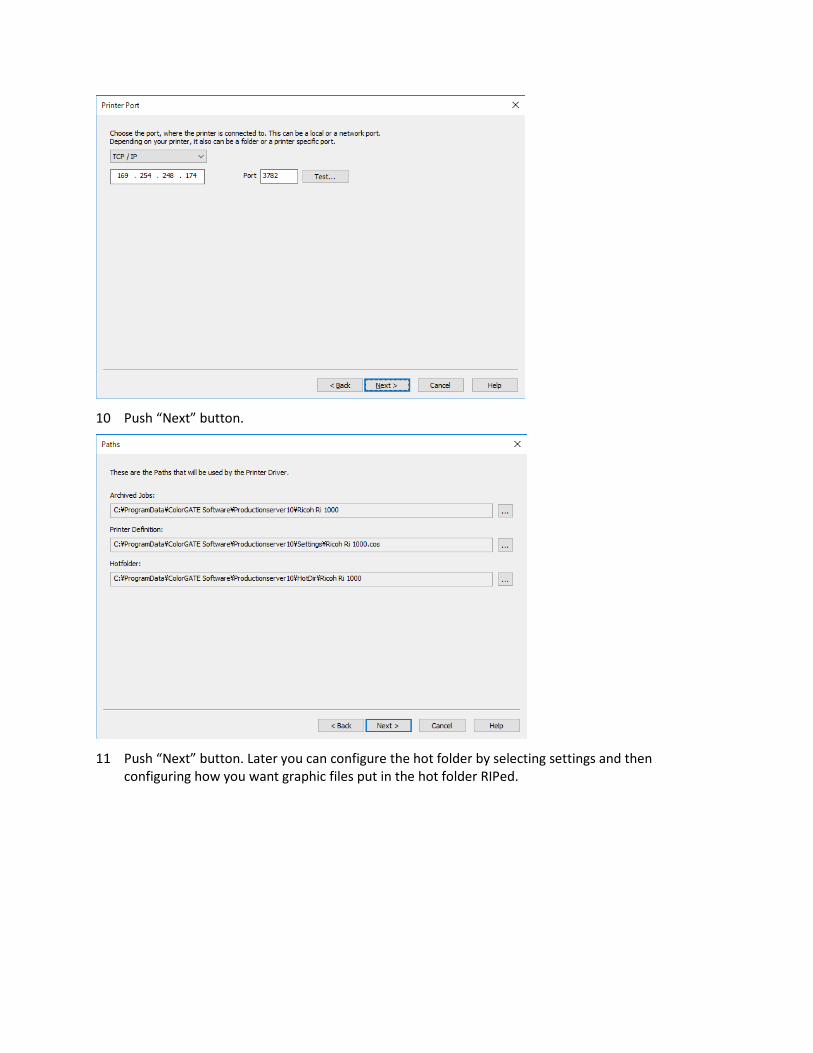
10 Push “Next” button.
11 Push “Next” button. Later you can configure the hot folder by selecting settings and then
configuring how you want graphic files put in the hot folder RIPed.

12 Push "Finish” Button. If you want to make changes like change the printer IP address or switch to print to file then in the top menu bar select Printer – Properties – then select the Printer Port tab and make the changes
ColorGATE Use:
Here is a basic description of how to use the software and prepare printable files
Print method
1. Drag your job (the file/s) via drag & drop from Windows Explorer into the job queue which is the window on the lower left of the ColorGATE software screen. You can also click on the arrow next to the file cabinet icon above that window and select Ricoh Ri 1000 and then select a graphic from the file browser.

2. ColorGATE excepts .png, .tiff and .jpeg files
For more detail, refer to “Loading and Printing Jobs > Load Job > Overview” in ProductionSever -> ? -> Help Contents.
Change of print mode
1. Select the job and click right mouse button and select the “Settings” or double click on the graphic file name in the lower left RIP que window

2. Move the following screen (“Color” Tab
3. For Media - You can select Black Garment or White Garment – IF Black garment is selected then a white under base will print, If White Garment is selected the no white ink will print.
4. Ink will always be Tex 1
5. For MetaMode you can select from the following Quality Levels
SuperSpeed – 1 pass - Works for white shirts - some indexing lines will show in dark shirts
Speed – 2 pass – some indexing lines show in some cases on dark shirts
Fine – 4 pass
Superfine - 8 pass 1200 X 1200 dpi
Superfine Color burst – 8 pass 1200 X 1200 dpi for more vivid colors
6. Select OK when you are done adjusting – if you do not select OK the changes will not take place.

Additional Tips:
If Black Garment is selected as the Media - Move to the color tab > Settings (under the Advanced heading) > Print Mode tab
Under Special Colors White: Select Brightness Black substrate if printing on a Black T-shirt
Select Brightness if printing on a colored T-shirt – set the minimum to 30 – this will protect the color of the shirt from influencing the color of the print.
When selecting Brightness - black ink will also print in the black sections of the graphic. In the default of the of Brightness Black substrate black ink will not print because the assumption is the shirt is black.
You can also move to the Color Correction Tab – You can set the Contrast to 70 if you want the prints to POP a little more.

Again select OK when you are done making changes – If you do not hit OK then the changes will not take place

How to change view to platen or media view under View
Item Description Image
DocumentPreview
Image Preview You can also select by going to “View” in the top menu bar– Preview – Document preview
Media Preview
Standard operation
Preview the position and size on the platen to be printed – You can also select by going to “View” in the top menu bar– Preview – Media preview – this will show how the image positions on the printer platen
Printer Output
Preview the printing result. You can also select by going to “View” in the top menu bar– Preview – Printer output – this will show how the image will look as you look at the front of the printer
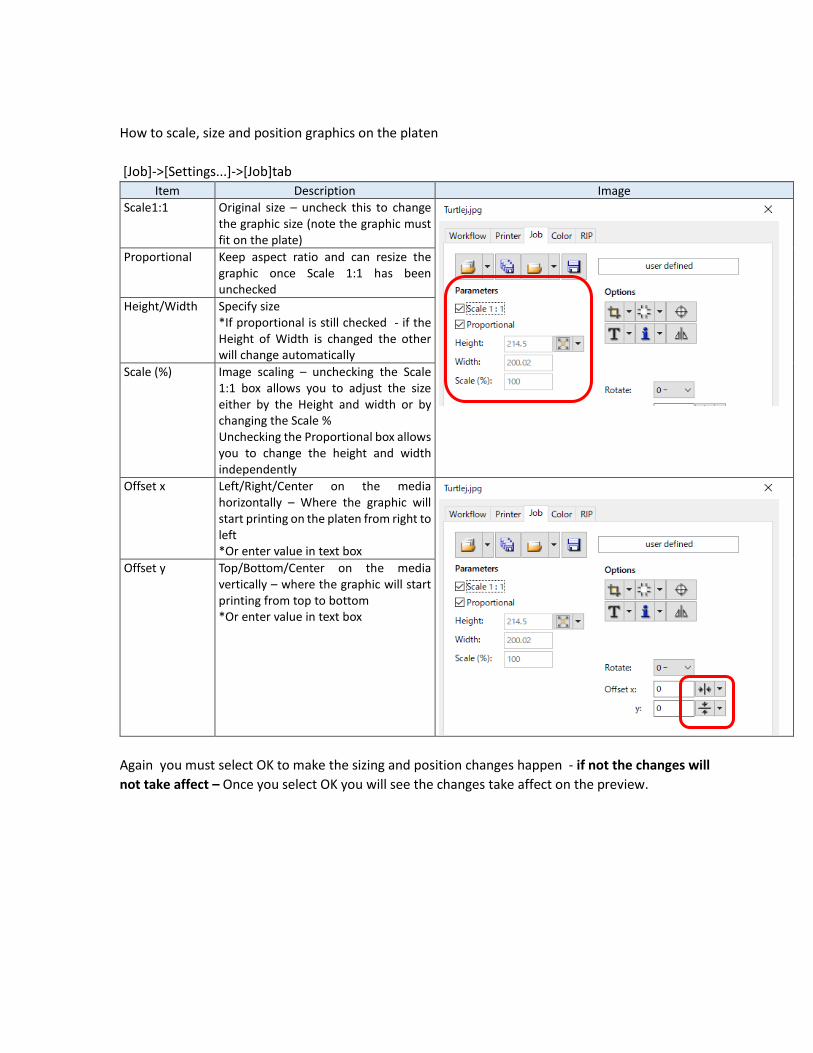
How to scale, size and position graphics on the platen [Job]->[Settings...]->[Job]tab
Item Description Image Scale1:1 Original size – uncheck this to change
the graphic size (note the graphic must fit on the plate)
Proportional Keep aspect ratio and can resize the graphic once Scale 1:1 has been unchecked
Height/Width Specify size *If proportional is still checked - if the Height of Width is changed the other will change automatically
Scale (%) Image scaling – unchecking the Scale 1:1 box allows you to adjust the size either by the Height and width or by changing the Scale % Unchecking the Proportional box allows you to change the height and width independently
Offset x Left/Right/Center on the media horizontally – Where the graphic will start printing on the platen from right to left *Or enter value in text box
Offset y Top/Bottom/Center on the media vertically – where the graphic will start printing from top to bottom *Or enter value in text box
Again you must select OK to make the sizing and position changes happen - if not the changes will not take affect – Once you select OK you will see the changes take affect on the preview.

How to change the platen size “Media size” Printertab->Media Size Select media size (platen size) from pulldown. Default is Medium - you can select small or large as well – make sure this matches the platen that is on the printer
If the document has a transparency –
- If you are printing on a dark shirt and the graphic file has a transparency layer – this will print as a solid white background unless you check Use document transparency.
- To do this go to the RIP tab and check the Use document transparency box under the Output Opacity heading

Printing a file:
To print drag the job from the bottom left Print que window to the top left window or Right click on the job and select print.