create a movie in cinemagic - roxioimg.roxio.com/enu/pdf/creator2010/cinemagic.pdf ·...
TRANSCRIPT

Create a Movie In CineMagic Roxio CineMagic is a Roxio Creator task assistant that helps you produce stunning videos in just a few minutes.
Getting Started:
1. Run CineMagic. In Creator, click “Video – Movies” in the Project Pane, and “Edit Video – Automatically” from the Edit and Transfer task list. CineMagic opens.
2. Add content. Click “Add Video/Photos.” The Add Video/Photo dialog opens.

3. Choose your files. Click to choose the target video files, and then click “Open.” CineMagic adds the files to the project.
4. Select your scenes (if desired). Click “Select Scenes” to choose which scenes to include or exclude from the finished movie. CineMagic opens the Select Scenes window.

5. Choose which scenes to include, exclude or let CineMagic decide. In the Select Scenes window, click a scene once to include it in the project, twice to exclude it, or don’t click it at all to let CineMagic decide whether to include or exclude the scene. When done, click “OK” to close the Select Scenes window.
6. Choose a style and insert a title. Styles control the look of the introduction, the pacing of the video and the special effects applied. Click a style, and the description displays beneath the styles list. The highlighted style (in this case, Travel) is the style CineMagic applies. After choosing a style, type the title in the Main Title text box. CineMagic will display this title at the start of the movie.

7. Add Background Audio. Click “Add Background Audio” (see the screen above) and CineMagic opens the Background Audio window. Click “Add Audio Track” to add an audio file already stored on your hard disk, or “Add SmartSound Audio” to create background audio with SmartSound. We’ll do the latter in this tutorial.
8. Choose your SmartSound track. Click the desired “Style/Library,” “Title” and “Variation,” which you can preview by clicking the “Preview” button. If desired, enter a duration for the song on the top right, and then click “OK” to close the SmartSound Audio dialog.
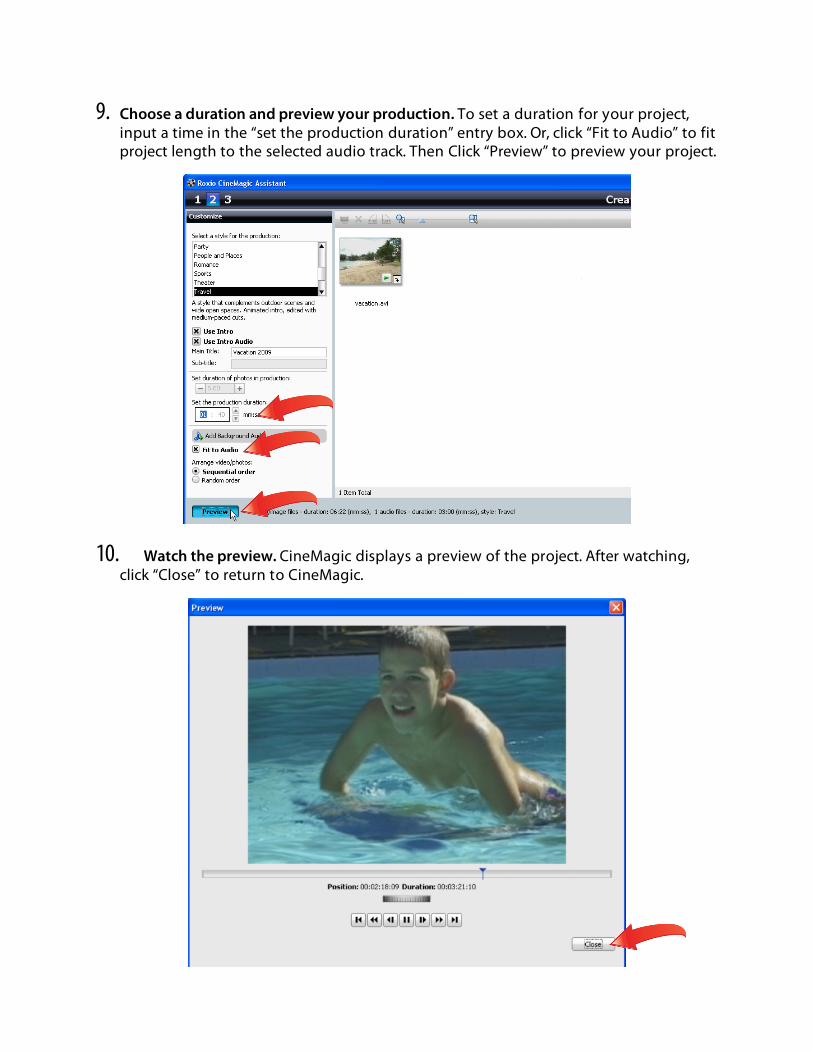
9. Choose a duration and preview your production. To set a duration for your project, input a time in the “set the production duration” entry box. Or, click “Fit to Audio” to fit project length to the selected audio track. Then Click “Preview” to preview your project.
10. Watch the preview. CineMagic displays a preview of the project. After watching, click “Close” to return to CineMagic.

11. Edit further, or produce your movie. After previewing your movie, you can change any aspect of the production, including adding or deleting video and choosing to include or exclude scenes as you did in Step 5 (Click “Back” to return to the Add Video window). Or, you can change the style or background music as you did in steps 6-8 in the Customize window. When you’re ready to produce your movie, click “Next.” CineMagic opens the Output window.
12. Choose your output. In the Output window, you can save the project, share it online, create a video file, or send the project to VideoWave for additional editing.