creating custom forms. 2 design and create a custom form you can create a custom form by modifying...
Post on 19-Dec-2015
217 views
TRANSCRIPT

Creating Custom Forms

2
Design and create a custom form
• You can create a custom form by modifying an existing form or creating a new form. Either way, the custom form is created in the Form Design window.
• You can create a simple form or a much more complex form with multiple pages.
• You place objects on the form, called controls, that will be either bound or unbound controls.
• Bound controls are linked to a particular field in the underlying table.
• Unbound controls are not linked to any particular field. – An example of an unbound control is a label control that is on
the form simply to provide some information on the form

3
Plan your custom form first

4
Removing the Lookup Feature
• Form design guidelines recommend performing all database updates using forms.
• Table or query datasheets should not be used to update forms.
• To remove the lookup feature for a field, enter Design view for that field’s table, select the field, and click the Lookup tab.
• Change the Display Control field property to a Text box.

5
Printing Relationships using the Documenter
• To create detailed documentation of one or more objects in your database, you can use the Documenter.
• To access the Documenter, click Tools, point to Analyze, and select Documenter on the Analyze submenu.

6
Documenter dialog box 1

7
Documenter dialog box 2

8
Object Definition Window

9
Add, select, move, resize, delete, and rename controls
• You can add and delete controls as you wish. • When you add a bound control to the form, you will see both
a text box and a label. – The text box is where the data will appear when the form is
displayed– The label will contain the name of the field
• To move a control, you must first select it: – When a control is selected, sizing handles will be displayed on the
control – The handle on the upper-left side of the control is its move handle.
Drag the move handle to the position you want to place the control – Click on any of the remaining sizing handles and drag to the position
you want to resize the control• You can rename the control by changing the control's name
property to the name you wish to assign to it.• Create a new form in the Database window.

10
Form Design View

11
Form and report buttons

12
Resizing and moving controls
In order to move or resize a control, you must have that control selected. In the figure below, the EmployerID text box is selected and has just been moved and resized. When you see the sizing handles, the control is selected and can be moved around on the form.

13
Add Form Headers and Footers
• To create a form header, you must add a form header and form footer section to the form.
• To add these sections to your form, select Form Header/Footer from the View menu. – If you do not want to have one or the other (the
header or the footer section), you can reduce its height to zero, which will eliminate it from the form's display
• Once you have these sections, you can add labels to them to document the form.
• When creating a title on the form, you will often want to change its font size and weight to make it stand out on the form.

14
Form Design view with header and footer sections shown

15
Adding a Label
• You can add a title or other text to a form by using the Label tool on the toolbox.
• After selecting the Label tool, draw the Label in your form design where you would like it to appear in your form.

16
Adding a Label

17
Add a graphic image to a form
• To enhance the appearance of a form, you may choose to add a picture to the form.
• The image tool on the toolbox will allow you to create a control that contains a graphical image.
• When you draw the image control on the form, you will be prompted to supply a name of a valid graphic image file.
• Whatever size you set for the control will determine the size of the picture on the form.

18
A form with a graphic image inserted

19
Use Control Wizards to create a multi-page form with a subform
• Because Access is a relational database you will often want to create multi-page forms.
• You can insert a page break control or a tab control to accomplish this task.
• The tab control places two tabbed pages, by default, on your form.
• Once the tab control is in place, you can add controls to any of the tabs just as you would to the form.

20
A multi-page form with tab controls

21
A Form tab with controls added

22
Changing Control Types
• To change a control type, you must first be in design view.
• Click the control of which you wish to change the type, and click Format on the menu bar. Point to the Change To submenu item, and select the control you wish to change to in the Change To submenu.

23
Adding Combo Boxes to a Form
• A combo box presents the user with a predefined list of values from which to select an option.
• The Combo Box tool is used to add a combo box to a form.
• The Control Wizard offers help by asking a series of questions when adding a control.

24
Adding Combo Boxes to a Form

25
Adding a Subform to a Form
• You can use the Subform/Subreport tool to add a subform to a form.
• Click the tab on your form for which you wish to add the subform and click the Subform/Subreport tool on the toolbox.

26
Adding a Subform dialog box 1

27
Adding a Subform dialog box 2

28
Subform Added to Form

29
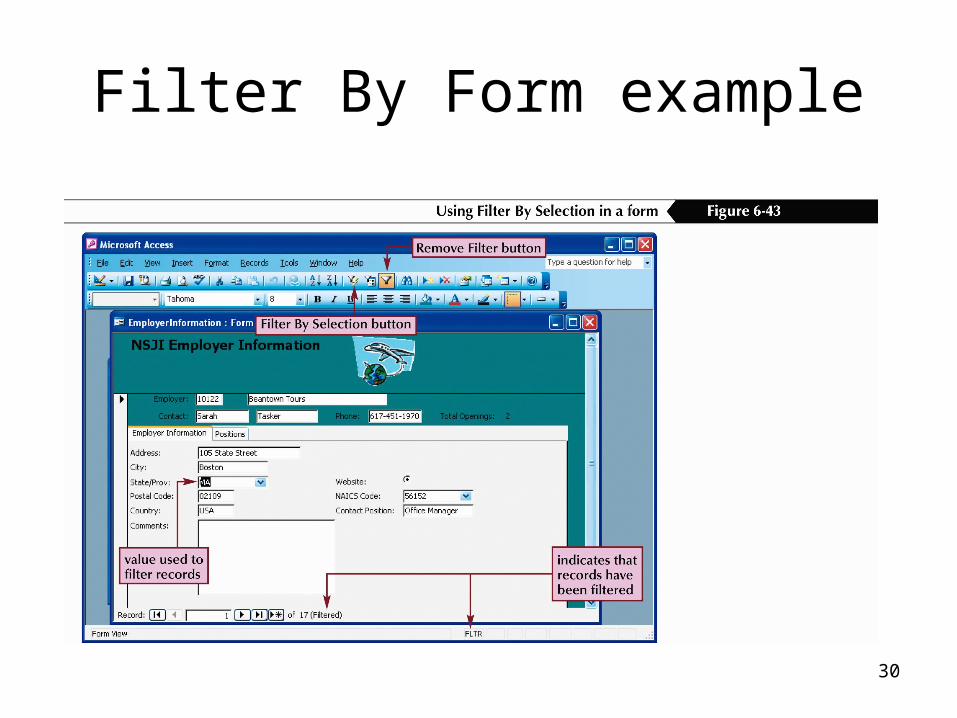
Use Filter By Form• Filter By Form can be used to specify which
records should be displayed in the forms. • When you click on the Filter By Form button, a
blank form is displayed. • In this blank form, you can enter values that will
become the criteria that will determine which records are displayed.
• You can save the filter as a query that can be used to view the information later.
• When the filter has been saved as a query, you can reapply it to a form as desired.
30
Filter By Form example