creating fredericksburg · 2014-02-24 · creating fredericksburg building a battlefield by bill...
TRANSCRIPT

CREATING FREDERICKSBURG
BUILDING A BATTLEFIELD By Bill Moreno
For many years now, Bill Moreno has been running great convention games, big spectacles of wonderfully built terrain boards with thousands of 10mm troops spread across them. After discussing his Fredericksburg table with him at HISTORICON this year, Bill offered to write us up an article on how he goes about building his boards.
As many of you may know, HISTORICON 2012 was held in Fredericksburg, VA. I knew the location in advance and I decided to bring out my old Fredericksburg board and the Fire & Fury scenario I wrote back in 1999. At that time, I had been working on a Classic Fire & Fury scenario book in collaboration with Rich Hasenauer. Fredericksburg was the feature scenario in a group of eight scenarios I wrote for this book. The book has been on the back burner now for several years while Regimental Fire & Fury went through the development and publishing process. Rich and I are now actively pursuing a revision of the original brigade level rules to accompany the release of the scenario book. Therefore, I was excited to get to work on cleaning up and dusting off the boards.
Over many years of running convention games, I have had hundreds of questions
on the manner in which I construct my terrain boards. So, rather than publish yet another run of the mill, after-action report, I decided to tell you, humble reader, about my terrain making methodology. Let me preface this by saying I am no artist or architect. The terrain boards I make are purpose built for gaming. Many of the techniques I use were borrowed from the railroad hobby. The methods are cheap and easy, but can produce stunning results. I have run the Fredericksburg game many times over the last 13 years. I have built and re-built the board three times in that period, as the maps and topography were perfected for the scenario. I have a board now that is what I consider to be the fi nal version. Using these boards, I ran a successful Fredericksburg game at HISTORICON this year as planned. To paraphrase from the movie Young Frankenstein, here is “How I Did It”.
THE TERRAIN BOARDS
There are now many excellent hot wire foam cutters available. I purchased two of these devices. One is called the Hot Wire Foam Factory. I bought this over the web from a company called Micro Mark. You may fi nd them on the web at (www.micromark.com). This foam cutter is a little pricey at $169. It does, however, come with a scroll table, a scribing tool and a wire cutting hand tool. It has a transformer to control the heat intensity. I used these tools to make all the major cuts on the board.
The second foam cutter I purchased was a device called Tippi for about $50. It is much smaller and has several heavy wire tips in various shapes. The wire is about the thickness of a paper clip. This tool makes precision cuts needed for streams and roads. I highly recommend this tool as it has saved me from tons of debris.
Here’s a quick rundown of the three cutting tools I use on foam (and where):
• Hot Wire Foam Factory - Major board and terrain cuts. Comes with power transformer and three types of foam cutting hand tools.
The Battle of Fredericksburg at HISTORICON 2012
40
WI302-FredericksburgTable.indd 2 16/10/2012 23:03

• Avalon Tippi Tool - Roads, streams and rifl e pits. Hand-held tool with various shapes of wire attachments; some square, some round, some pointed.
• Crafters Hot Knife - Large hills and escarpments. Large hot knife without attachments.
At Home Depot or Lowes (big DIY stores) I purchase foam boards called “polyfoam boards”. These are white, cellular boards which measure 48" x 14" x ½" each. There are six to eight boards in a package for about $5. I usually buy around six packages as I always have some left over from my previous project.
A good thing to consider when calculating your foam purchase is the amount of elevation variation on the table. It will take more foam to build a 6' x 8' board such as Cedar Creek, which has a large amount of elevation variance, then it will to build a 6' x 12' board with less elevation variance, such as Antietam. I choose to use this material for its fl exibility and ease of cutting - it is far easier to work with hot wire tools than the more dense, and more expensive, pink or blue foam boards.
I usually cut the length of the boards down to 2' long sections to approximate the Fire & Fury map layouts. This makes the translation of road and river features from map to terrain board far easier to execute. It also reduces the chance of warping during long term storage.
Stack the foam boards in layers to match, as closely as possible, the terrain pattern
Above: A look at how Burnside pushed his Union army forward, and where they were repulsed. There were quite a few famous names involved in this battle.Above: A look at how Burnside pushed his Union army forward, and where they were
Bill’s “tools of the trade”. Here you can see his Hot Wire Foam Factory (below) used for large cuts, and his Tippi cutter (inset) with its different-shaped heads used for rivers and roads.
41
Am
eric
an
Civ
il
Wa
r 1
861-
186
5
WI302-FredericksburgTable.indd 3 17/10/2012 11:05

from historical reference maps. Virtually any Civil War-era map may now be found online. I highly recommend you make your large elevation cuts with these boards simply pinned together (with bamboo skewers or something similar). It is important to make these cuts prior to the application of glue as hot wire tools have a diffi cult time cutting through glue of any type.
Shape the foam to match the elevations required for the scenario board. Level one is any river feature, such as at Fredricksburg. These are normally “one board” thick. Thinner foam may be used here as the river is below the ground level of the main board. Thinner sheets of foam can be found at railroading hobby stores. Higher elevations may be up to “four or fi ve boards” thick.
Glue these boards together using yellow carpenter’s glue (aka wood glue). Do not attempt to use white glue here (aka PVA) as it can take weeks to dry. Yellow carpenter’s glue will dry in hours. Leave this out to dry overnight. Once dry, take colored markers and mark the path of each stream, railroad, road, hill, or rifl e pit. Mark the placement of the town, major fortifi cations and landmarks of note. Don’t worry too much about the ink as it will burn away or be covered with fl ocking material in most cases. Be sure to remove other marks before you paint, as they may bleed through the paint. I mark my roads in black, trenches in light brown, streams in light blue and larger water features in darker blue. This way, marking can be kept to a minimum and it makes the next step far simpler than it might otherwise be.
Use the Tippi tool’s square end to cut roads. The square attachment can be passed through the foam just below the surface to accomplish this appearance for slightly sunken roads. Go deeper for older roadbeds. Streams may be cut using the small curved attachment with this same tool.
Railroad beds require special attention. The surface must be raised just above the surrounding terrain. I use black-grey fl exible foam railroad bed from railroad scenics sources. This is built for N-Gauge track, perfect for 10 or 15mm miniatures. This is glued to the board and allowed to dry. Later it will be painted and covered with railroad ballast. N-Gauge track will also be laid on top of this and weathered using weathering powders.
Bill’s trusty 3" roller, used for painting the sides of the boards (as seen here), as well as the tops of the boards once things get closer to the end of the process.
You can see the recessed areas for the streams and roads, as well as the raised railroad bed. All of these things work to add another level of depth and texture to Bill’s great tables.
42
WI302-FredericksburgTable.indd 4 16/10/2012 23:03

Crossing the RappahannockBy Neil Smith
Building a pontoon bridge in the American Civil War was a laborious and time-consuming task. To build one under fi re was a dangerous occupation, and to do so at Fredericksburg under the guns of Lee’s army bordered on lunacy. But for Union commanders, crossing the Rappahannock was essential if they were to bring the Confederacy to heel, so they would just have to get on with it.
The basic idea of a pontoon bridge is to build a temporary structure across a river to facilitate the movement of men and resources. This was achieved using small boats lashed together parallel to the riverbank with planks placed across them to form a road surface. The Army of the Potomac deployed French style boats, known as bateau, which were fl at-bottomed with squared-off ends and measured 31 feet long. They were very sturdy platforms, but also extremely heavy, and it took a large transport train, involving many large, specialized wagons, to get them to the crossing site. Establishing the passage also occupied many engineers and soldiers who would have no doubt preferred to complete their work unmolested, but at least initially at Fredericksburg that was not an option.
Burnside ordered the fi rst bridges built across the Rappahannock in great haste and overconfi dence. Thus, before dawn on 10 December, Confederate sharpshooters could just see in the mist Union engineers scurrying around on the far bank of the river, preparing their pontoons. The rebels put the bluecoats under a galling fi re and would not be dislodged even under artillery fi re. Nine times the engineers tried, but when casualties mounted they gave up. Downstream, Union engineers were more successful in breaching the Confederate bank, but it would take an amphibious assault against the town to fi nalize that bridge. Other bridges followed and the Union army made its way across to face its fate on Fredericksburg’s killing grounds.
The pontoon bridges were an important feature of the Battle of Fredericksburg.
43
WI302-FredericksburgTable.indd 5 16/10/2012 23:03

Some features around major fortifi cations are also raised above the board’s ‘ground level’. These are cut with the hot-wire tool and glued in place. Seams (where two differing levels of foam meet) can be covered in two ways. Large features can be covered using plaster cloth while for minor features and cliffs I use foam putty - both products brought to us by model railroaders. The putty is lightweight and designed to work with foam. This is also now available from large home project stores and sells under the name Patch & Paint. In this form it is far cheaper and is the same material.
I also use another of these products called Flex Paste. I fi ll in all the streambeds and creeks with this and shape it to resemble fl owing water. The product is white and rubber-like when dry. We will apply paint to this later, and the ripples you create now will be quite evident later. If you desire a smoother surface, plain white glues can be used to cover the stream bed.
It is now time to paint the railroad, roads, streambeds, rifl e pits, bayous and the river. The streams and rivers are a blend of dark brown and black-blue. Apply the brown to the edges and the black-blue
in the center of water features. This is then blended with a cheap paintbrush. The more brown, the muddier the water. This is particularly important when representing America’s western rivers. Roads and rifl e pits are brown. I paint the sides of my boards brown to ease the transition from board to board. All the painted features should be allowed to dry completely before further work can progress. I recommend using an interior latex paint that you can buy in bulk. They are very easy to come by in your nearest big box store, and you can save them for later projects.
Union and Confederate troops prepare to clash just west of the canal.
Already well into the game at HISTORICON 2012, both sides are under a lot of pressure.
44
WI302-FredericksburgTable.indd 6 16/10/2012 23:04
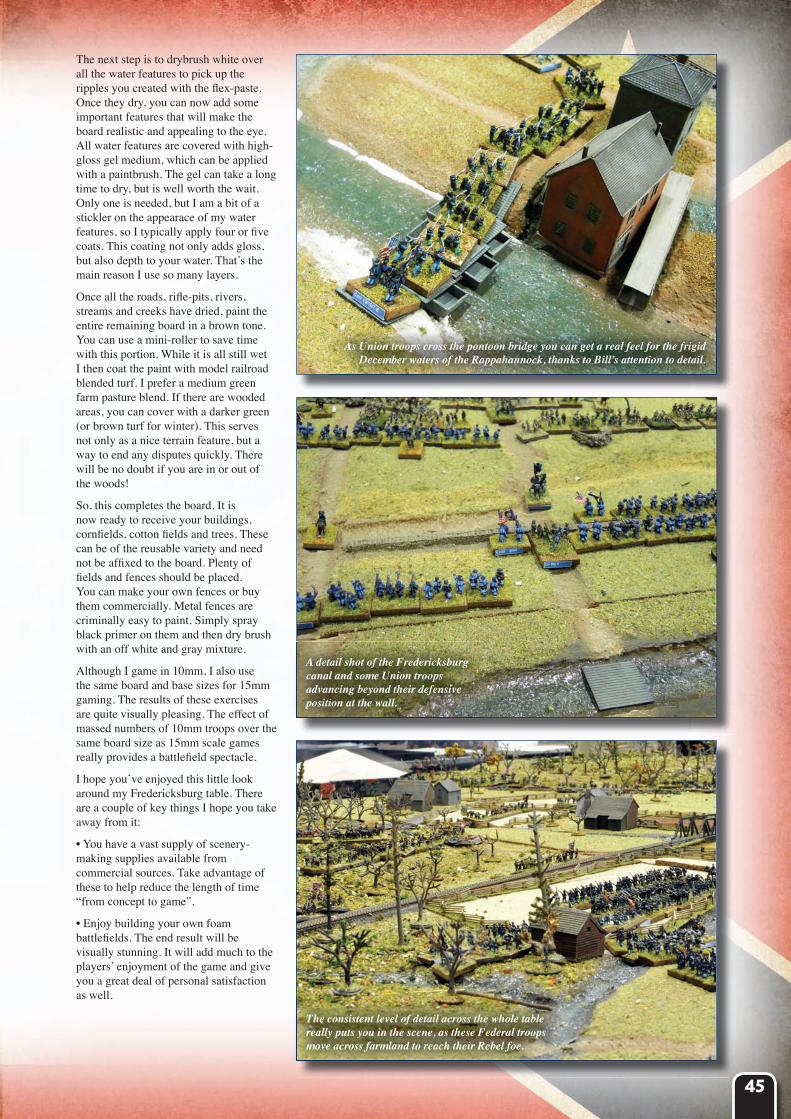
The next step is to drybrush white over all the water features to pick up the ripples you created with the fl ex-paste. Once they dry, you can now add some important features that will make the board realistic and appealing to the eye. All water features are covered with high-gloss gel medium, which can be applied with a paintbrush. The gel can take a long time to dry, but is well worth the wait. Only one is needed, but I am a bit of a stickler on the appearace of my water features, so I typically apply four or fi ve coats. This coating not only adds gloss, but also depth to your water. That’s the main reason I use so many layers.
Once all the roads, rifl e-pits, rivers, streams and creeks have dried, paint the entire remaining board in a brown tone. You can use a mini-roller to save time with this portion. While it is all still wet I then coat the paint with model railroad blended turf. I prefer a medium green farm pasture blend. If there are wooded areas, you can cover with a darker green (or brown turf for winter). This serves not only as a nice terrain feature, but a way to end any disputes quickly. There will be no doubt if you are in or out of the woods!
So, this completes the board. It is now ready to receive your buildings, cornfi elds, cotton fi elds and trees. These can be of the reusable variety and need not be affi xed to the board. Plenty of fi elds and fences should be placed. You can make your own fences or buy them commercially. Metal fences are criminally easy to paint. Simply spray black primer on them and then dry brush with an off white and gray mixture.
Although I game in 10mm, I also use the same board and base sizes for 15mm gaming. The results of these exercises are quite visually pleasing. The effect of massed numbers of 10mm troops over the same board size as 15mm scale games really provides a battlefi eld spectacle.
I hope you’ve enjoyed this little look around my Fredericksburg table. There are a couple of key things I hope you take away from it:
• You have a vast supply of scenery-making supplies available from commercial sources. Take advantage of these to help reduce the length of time “from concept to game”.
• Enjoy building your own foam battlefi elds. The end result will be visually stunning. It will add much to the players’ enjoyment of the game and give you a great deal of personal satisfaction as well.
As Union troops cross the pontoon bridge you can get a real feel for the frigid December waters of the Rappahannock, thanks to Bill’s attention to detail.
A detail shot of the Fredericksburg canal and some Union troops advancing beyond their defensive position at the wall.
The consistent level of detail across the whole table really puts you in the scene, as these Federal troops move across farmland to reach their Rebel foe.
45
WI302-FredericksburgTable.indd 7 16/10/2012 23:04