cubit user guide - buildsoftbuildsoft.com.au/wp-content/uploads/cubit-user-guide.pdf · 7 job...
TRANSCRIPT

Cubit User Guide

1
Introduction ....................................................................................................................................................................................... 6
Job Manager ...................................................................................................................................................................................... 7
Projects .......................................................................................................................................................................................... 7
Create ........................................................................................................................................................................................ 7
Delete ........................................................................................................................................................................................ 8
Jobs ............................................................................................................................................................................................... 8
Create & Open............................................................................................................................................................................ 9
Finding a Job using Filtering ........................................................................................................................................................ 9
Delete ...................................................................................................................................................................................... 10
Folders ......................................................................................................................................................................................... 11
Create ...................................................................................................................................................................................... 11
Moving Jobs into Folders .......................................................................................................................................................... 12
Delete ...................................................................................................................................................................................... 12
Price lists ...................................................................................................................................................................................... 13
Export and Import ........................................................................................................................................................................ 13
Export ...................................................................................................................................................................................... 13
Import ...................................................................................................................................................................................... 14
User Interface .................................................................................................................................................................................. 16
Quick Access Toolbar.................................................................................................................................................................... 16
JOb MANAGER ............................................................................................................................................................................. 16
Ribbon ......................................................................................................................................................................................... 17
home tab.................................................................................................................................................................................. 17
PLans tab .................................................................................................................................................................................. 17
VIEW tab .................................................................................................................................................................................. 18
DATA TAB ................................................................................................................................................................................. 18
Panes ........................................................................................................................................................................................... 18
Estimate Pane .............................................................................................................................................................................. 19
Estimate Window Button Bar .................................................................................................................................................... 19
Viewport Pane ............................................................................................................................................................................. 20
Plans Pane ................................................................................................................................................................................... 20
Details Pane ................................................................................................................................................................................. 21
Navigation Pane ........................................................................................................................................................................... 23
Using the Viewport pane .............................................................................................................................................................. 23
Navigation ................................................................................................................................................................................ 24
viewport toolbar....................................................................................................................................................................... 24

2
Selection .................................................................................................................................................................................. 24
Drawing.................................................................................................................................................................................... 24
Polyline .................................................................................................................................................................................... 24
Using Grids and Lists .................................................................................................................................................................... 25
Application menu ......................................................................................................................................................................... 25
Options Window .......................................................................................................................................................................... 26
General .................................................................................................................................................................................... 26
Viewport .................................................................................................................................................................................. 26
Dimensions .............................................................................................................................................................................. 26
Reports .................................................................................................................................................................................... 26
Templates ........................................................................................................................................................................................ 28
Create a Template ........................................................................................................................................................................ 28
Using a Template when you create a new Job ............................................................................................................................... 28
Using a Template in an existing Job .............................................................................................................................................. 29
Price Lists ......................................................................................................................................................................................... 32
Create new Price list ..................................................................................................................................................................... 32
Building up a Price List .................................................................................................................................................................. 33
Price List Window Button Bar ....................................................................................................................................................... 33
Import a CSV file .......................................................................................................................................................................... 34
Using values from a Price List in a Job ........................................................................................................................................... 35
Add Rate ...................................................................................................................................................................................... 35
Job grouping .................................................................................................................................................................................... 37
What is Job Grouping? ................................................................................................................................................................. 37
Quantity Code Group Example usage ........................................................................................................................................ 37
Rate Code Group Example usage .............................................................................................................................................. 38
Create a new Code Group............................................................................................................................................................. 38
Add a Code Group to your Estimate .............................................................................................................................................. 39
Assign a Code to an item in your Estimate .................................................................................................................................... 40
Import a Code Group.................................................................................................................................................................... 41
Using Code Groups created in Offsider or Global Estimating ......................................................................................................... 42
Plans ................................................................................................................................................................................................ 44
Supported formats ....................................................................................................................................................................... 44
How to insert a Plan ..................................................................................................................................................................... 44
Insert a Raster Plan ................................................................................................................................................................... 44
Insert a PDF Plan ...................................................................................................................................................................... 45

3
Insert a CAD Plan ...................................................................................................................................................................... 45
Rotating your Plan ........................................................................................................................................................................ 45
Rotate Plan by any angle .......................................................................................................................................................... 45
Scaling your Plans......................................................................................................................................................................... 46
Create a scale from a reference line .......................................................................................................................................... 46
Enter a custom scale ................................................................................................................................................................. 47
Use a scale from an existing Plan .............................................................................................................................................. 47
Interacting with your Plans in a Job .............................................................................................................................................. 47
Seeing a Plan in the Viewport ................................................................................................................................................... 47
Plan pane ................................................................................................................................................................................. 48
Layers....................................................................................................................................................................................... 48
Plan Revisions .............................................................................................................................................................................. 48
Adding a Revision ..................................................................................................................................................................... 48
Managing Changes ................................................................................................................................................................... 49
Finalising your Revision ............................................................................................................................................................ 49
Takeoff ............................................................................................................................................................................................ 51
Result types ................................................................................................................................................................................. 51
Assigning a result type to an item ............................................................................................................................................. 51
Area ......................................................................................................................................................................................... 52
Length ...................................................................................................................................................................................... 52
Length less openings ................................................................................................................................................................ 52
Volume .................................................................................................................................................................................... 52
Volume by length ..................................................................................................................................................................... 52
Vertical area ............................................................................................................................................................................. 53
Vertical area less openings ....................................................................................................................................................... 53
Count ....................................................................................................................................................................................... 53
Window ................................................................................................................................................................................... 53
Door ......................................................................................................................................................................................... 53
Note ......................................................................................................................................................................................... 53
Takeoff Tools ............................................................................................................................................................................... 54
Drawing Takeoff ........................................................................................................................................................................... 54
Polyline .................................................................................................................................................................................... 54
Pick lines .................................................................................................................................................................................. 55
Rectangle ................................................................................................................................................................................. 55
Ellipse....................................................................................................................................................................................... 55

4
Line .......................................................................................................................................................................................... 55
Counting Takeoff .......................................................................................................................................................................... 55
Annotation ................................................................................................................................................................................... 56
Define Shape Information ............................................................................................................................................................ 56
New Shape values .................................................................................................................................................................... 57
Next line values ........................................................................................................................................................................ 58
Estimating ........................................................................................................................................................................................ 59
Creating Trades ............................................................................................................................................................................ 60
Creating Headings ........................................................................................................................................................................ 60
Columns ....................................................................................................................................................................................... 60
Description ............................................................................................................................................................................... 61
Quantity ................................................................................................................................................................................... 61
Unit .......................................................................................................................................................................................... 61
Rate ......................................................................................................................................................................................... 61
Markup % ................................................................................................................................................................................. 61
Total......................................................................................................................................................................................... 61
Calculation Sheet ......................................................................................................................................................................... 61
Description ............................................................................................................................................................................... 62
factor ....................................................................................................................................................................................... 62
Length, Width and Depth .......................................................................................................................................................... 62
Markup .................................................................................................................................................................................... 62
Total......................................................................................................................................................................................... 63
Rounding ..................................................................................................................................................................................... 63
Rate Breakup Sheet ...................................................................................................................................................................... 63
Description ............................................................................................................................................................................... 63
The + % column ........................................................................................................................................................................ 64
Markup (%) .............................................................................................................................................................................. 64
Mathematical Operators .............................................................................................................................................................. 64
Job markup, adjustments and sales tax ......................................................................................................................................... 65
Reports ............................................................................................................................................................................................ 67
Standard reports .......................................................................................................................................................................... 67
All reports ................................................................................................................................................................................ 67
Change which reports are shown in the ribbon ......................................................................................................................... 68
Report Preview ............................................................................................................................................................................ 68
Parametric Reporting ................................................................................................................................................................... 68

5
Headers and Footers .................................................................................................................................................................... 68
Custom Reports ........................................................................................................................................................................... 69
Bill of Quantities .............................................................................................................................................................................. 71
Configuring Options ..................................................................................................................................................................... 71
Preview ........................................................................................................................................................................................ 72

6
INTRODUCTION
Cubit is the natural estimating software developed by Buildsoft, using our 30 years of experience to combine state of the art 3D
visualisations with powerful estimating and takeoff tools.

7
JOB MANAGER
The Job Manager window is the first window you see when you open the application. In this window you have the ability the create
Projects and Jobs, to backup and restore jobs and structure your filing system for Cubit. The Job Manager window can be accessed
at any time by pushing the Job Manager button (the two books) on the Quick Access Toolbar.
Figure 1. Job Manager button
PROJECTS
Projects describe a folder which contains Jobs having something in common, ie a client. A Project might contain multiple estimates
for one construction site, or all the Jobs for a particular customer.
CREATE
Projects are created in the Job Manager window.
To create a new Project:
1. Enter New Job menu by clicking on the New Job label in the List group on the Home tab in the ribbon.
2. Click Project.
3. Enter the “Project name in the New Project window.

8
4. Click Ok
Figure 2 Create Project
DELETE
Projects can only be deleted if they contain no Jobs.
To delete a Project in the Job Manager window:
1. Select the Project you wish to delete.
2. Click Delete on the ribbon.
3. Click Delete in the Delete Project(s) window which asks you to confirm that you wish to delete the project.
Figure 3 Delete Project
JOBS

9
After you have created a Project, you can create a Job, which is where you will work on your takeoff.
CREATE & OPEN
Jobs are created in the Job Manager window.
To create a Job:
1. Click on the Project Name where you would like to create your job.
2. Click New Job on the ribbon
3. The New Job window will open and you will be asked to enter the name of the Job and select whether you want to load a
template into the Job. A new Job will generate in the Job list.
4.
Figure 4 Create Job
To start estimating straight away you can open your Job by double clicking on the Job name in the Job list or by clicking Open on the
ribbon.
You can edit your metadata before you begin your estimating. Select your Job and beside the Job list is your metadata information.
This window allows you to enter information about the Job, the Site Address, and the Client.
FINDING A JOB USING FILTERING
If you are having trouble finding the Job you want in your Job Manager window you can use the Auto Filter Row. This row is placed
at the top of the Job list, and when you enter information it searches and displays any jobs that match that data.

10
When filtering your jobs ensure that you enter what you’re searching for in the appropriate column, job name in the Name column,
client name in the Client column or any of the customisable rows.
To add a new column:
1. Right mouse click on the title bars of the Job list.
2. Click Column Chooser.
3. Double click the row names from the Customization window.
Figure 5 Job List
Figure 6 Job List Customization
DELETE
Deleting Jobs are done in the Job Manager window.
To delete a Job:
1. Click on the Job you wish to delete.
2. Click Delete on the ribbon.
3. Click Delete in the Delete Job(s) window which asks you to confirm that you wish to delete the job.

11
Figure 7 Delete Job
FOLDERS
You can manage large projects by dividing your jobs into separate folders, folder management is done in the Job Manager window.
CREATE
To create a new folder:
1. Right mouse click the Project that you want the folder to appear in.
2. Select New Folder.
3. In the New Folder window that opens name your folder.
4. Click OK.
Figure 8 New Project Folder

12
MOVING JOBS INTO FOLDERS
Moving a job into a folder is achieved left mouse clicking on a job, and, while holding the mouse, dragging the job into the folder.
Figure 9 Drag to New Folder Prompt
DELETE
Folders can only be deleted if they contain no Jobs.
Deleting Folders are done in the Job Manager window.
To delete a Folder:
1. Click on the Folder you wish to delete.
2. Click Delete on the ribbon OR click the right mouse button.
3. Click Delete in the Delete Folder(s) window which asks you to confirm that you wish to delete the job.
Figure 10 Delete Folder

13
PRICE LISTS
Price lists are used to simplify pricing a job. Price lists are stored in the Price List tab of the Job Manager window.
The New Price List will be created and be available through the Price List tab, you can open the Price List by double clicking it.
Figure 11 Price List Tab
To create a new Price List:
1. Click the New Job drop down menu on the ribbon.
2. Click Price List.
3. Enter in the name of your Price List.
4. Click OK.
Figure 12 New Price List
EXPORT AND IMPORT
Cubit allows you to export and import your jobs. These options are on the Data group in the ribbon on the Job Manager window.
EXPORT

14
To export a job:
1. Click Export in the Data group on the ribbon.
2. Select the location that you wish to export your job to through the Job export path box.
3. Check whether you want to include drawing(s), Include calculation sheet, Include rate sheet.
4. Click Export.
Figure 13 Export Job
IMPORT
To import a job:
1. Click Import in the Data group on the ribbon.
2. Browse through your computer to find file you wish to import.
3. Click OK.
Figure 14 Import a Job

15
16
USER INTERFACE
The Cubit User Interface is comprised of three main interactive components: the Quick Access toolbar, the Ribbon, and the Panes.
QUICK ACCESS TOOLBAR
The Quick Access Toolbar provides immediate commands that are commonly used through the estimating process. They are
accessible regardless of the tab that is selected in the ribbon or the pane you are looking at. Click the arrow to expand the toolbar
and uncheck whichever commands you want to hide.
At the top of the application window, the Quick Access toolbar displays frequently used tools.
Tools that extend past the maximum length of the toolbar are displayed in a drop-down button.
You can add unlimited tools to the Quick Access toolbar. One command button is available to you initially on the Quick Access Tool
Bar.
JOB MANAGER
This button will bring forward the Job Manager screen. The job you have open will stay open. It allows you to open a second job at
the same time. If you wish to return to the original job, highlight the job again in the Job Manager and choose Open.
To add a ribbon button to the Quick Access toolbar:
1. Locate the group that contains the button you want to add to the Quick Access toolbar.
2. Right-click the button on the ribbon and select Add to Quick Access Toolbar.
To remove a ribbon button from the Quick Access toolbar right-click the button on the Quick Access toolbar and select Remove
from Quick Access Toolbar.

17
Figure 15 Job Manager button
RIBBON
The ribbon organises all the commands needed to complete a job. The commands on the ribbon will change depending on which tab
is selected. The default tab is Home, the other tabs are Plans, View, and Data.
HOME TAB
The default tab is Home, and where you will do most of your takeoff, it houses your drawing and shape tools, openings library and
where you insert price lists and templates.
Figure 16 Home Ribbon
PLANS TAB
The Plans Tab is where you control the elements of your plan, specifically scaling and rotating your plan and managing your
revisions.
Figure 17 Plans Ribbon

18
VIEW TAB
The View Tab is where you control the layout of your screen, what information is displayed and whether you’re looking at your plan
in 2D or 3D.
Figure 18 View Ribbon
DATA TAB
The Data Tab is where you will find your reporting information, and where you can integrate other programs, rates and codes into
your plan.
Figure 19 Data Ribbon
PANES
The Panes are designed to simplify and specify the data you see and interact with, they are moveable and you can control how they
are organised.
In the Layout group on the View tab of the ribbon you can manage how your screen(s) is (are) organised. To arrange the panes with
a focus on takeoff click on Takeoff, to arrange the panes with a focus on estimating click Estimating. For users with two monitors
click Dual screen to adjust the panes for optimal view. To set your own preference, arrange the panes to your own liking then use
Custom to save your preference. Multiple Custom layouts can be saved.

19
Figure 20 Layout Group
ESTIMATE PANE
The Estimate Pane defaults to the left of the screen under the ribbon, and breaks down in the Estimate takeoff data, broken down
by trade. This window allows you to interact directly with the takeoff by choosing how you measure your shapes and lines. The
upper window is also is where you can adjust your rate per trade and view your totals. The lower window of the Estimate Pane is
dedicated to the Calculation sheet and Rate sheet, which gives you even more specific details and control over calculations and
rates.
ESTIMATE WINDOW BUTTON BAR
Figure 21 Estimate Bar
Heading-Make the selected row(s) a heading.
Item-Make the selected row(s) an item for measurement and/or pricing.
Unindent (CRTL + >)-Unindent the selected row(s).

20
VIEWPORT PANE
The Viewport Pane is the main window you will use for your takeoff, inside this window you will draw shapes, create openings and
view your 3D plan. The Viewport Pane defaults to the middle of the screen, if you use dual screens it is advised to give this pane its
own screen. At the footer of the Viewport Pane will also display tabs for the various plans you have imported, allowing you to easily
switch between plans.
Figure 22 Viewport Pane
PLANS PANE
The Plans Pane is an extension of the Viewport Pane. In this pane you will be view all the plans you have inserted into the job, have
the ability to turn on/off layers off in appropriate Vector file plans. Hide or displays plans in the Viewport. The right mouse button
will display a list of all the plan commands possible in this window.
Indent (CRTL + <)-Indent the selected row(s).
Insert New-Insert a new item before the current row.
Add New-Add a new item to the end of the current heading.

21
Figure 23 Plans Pane
Figure 24 Plans Pane Options
DETAILS PANE
The Details Pane is the window that offers more detailed information about any selected shape or line used in your takeoff. In the
Details tab you can edit information like shape description, wall height, trench width and volume depth, among others. To view the
details of a shape or line, highlight the item in the Estimate Pane then highlight the shape you want to edit in the Calculation Sheet
Pane. The Details Pane will then display the detail of the shape.
The result type selected for the shape when it was drawn will govern what will be displayed for editing in the Details Pane.
Area results can have a pitch applied
e.g. a vaulted ceiling.
Figure 25 Details Pane – Area
22
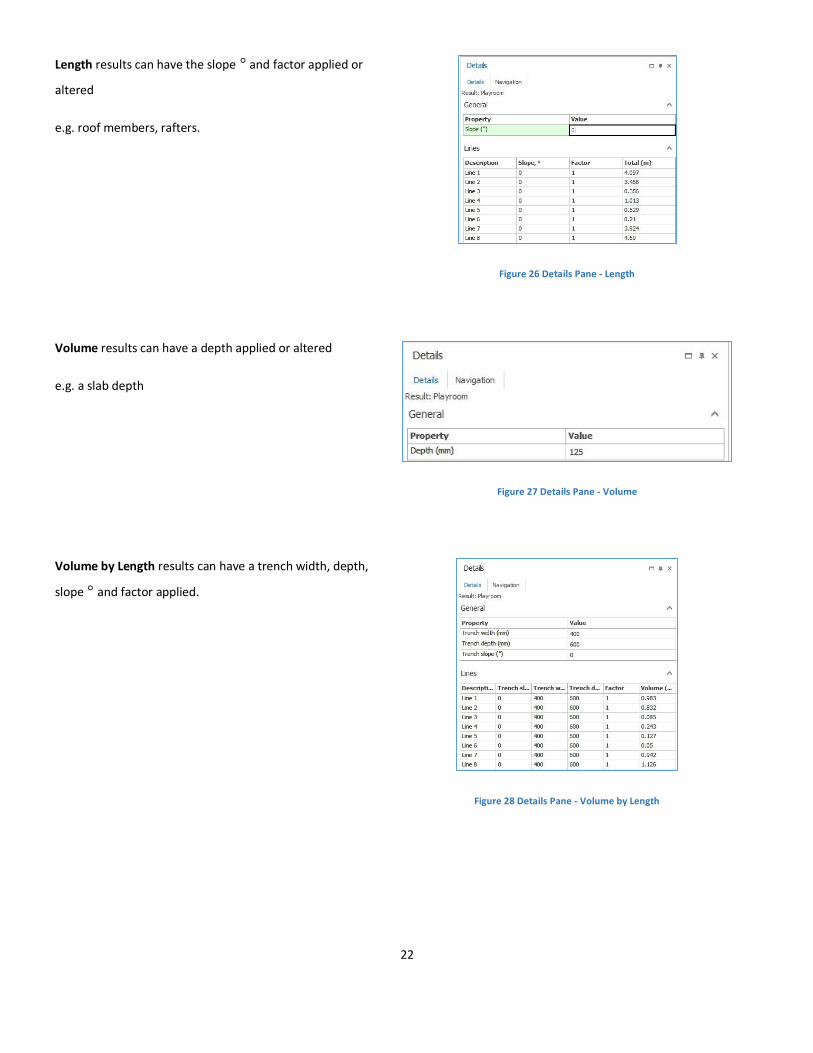
Length results can have the slope ° and factor applied or
altered
e.g. roof members, rafters.
Figure 26 Details Pane - Length
Volume results can have a depth applied or altered
e.g. a slab depth
Figure 27 Details Pane - Volume
Volume by Length results can have a trench width, depth,
slope ° and factor applied.
Figure 28 Details Pane - Volume by Length

23
Vertical results can have a wall height at each end of the
line
e.g. raking wall and a factor applied.
Figure 29 Details Pane - Vertical
NAVIGATION PANE
The Navigation Window Pane allows you highlight a zoomed in section of the drawing and navigate around the drawing whilst
zoomed in. Hold down the mouse button to move the highlighted section around the plan in the navigation pane.
Figure 30 Navigation Pane
USING THE VIEWPORT PANE
The Viewport Pane is the main window you will use for your takeoff, inside this window you will draw lines, shapes and create
openings.

24
NAVIGATION
The Viewport Pane is navigated with the mouse. To move the plan in any direction, push and hold the centre scroll wheel then move
your mouse to move your plan. To zoom in, scroll the wheel forward. To zoom out, scroll the wheel backwards.
VIEWPORT TOOLBAR
The Viewport toolbar is a selection of tools that hover at the top of the plan. Zoom Selected zooms to any selected shapes. Zoom
Window lets you select a box on your plan and zooms to fit that box. Zoom allows you to zoom into and out of the plan. Pan allows
you to drag the plan in any direction. Rotate allows you to move around a plan when it is in 3D. Zoom Fit snaps fit your plan into the
Viewport, whether you are zoomed in or zoomed out.
Figure 31 Viewport Toolbar
SELECTION
There are two main ways to interact with your Viewport Pane, drawing and selection. To enable selection, on the Home tab, in the
Edit group, click Select.
DRAWING
There are two main ways to interact with your Viewport Pane, drawing and selection. To enable drawing, on the Home tab, in the
Shapes group, ensure one of the takeoff methods is selected.
POLYLINE
The Polyline tool is how you will perform most drawing.
To draw a line:

25
1. Left click where you want to start your line. (If you are drawing on an applicable vector plan, before you click to draw, if you
hover over the end of already drawn line an orange box appears around your cursor indicating that you’re taking off from
the exact point on the plan.)
2. Left click when you want to end your line. (An orange box will appear again if using an applicable vector plan.)
3. Right click to finish the task.
To draw a shape:
1. Left click where you want to start your line. (If you are drawing on an applicable vector plan, before you click to draw, if you
hover over the end of already drawn line an orange box appears around your cursor indicating that you’re taking off from
the exact point on the plan.)
2. Left click when you want to line to change direction, such as a corner. (An orange box will appear if using an applicable
vector plan.)
3. Repeat Step 2 for every corner or direction change.
4. To complete your shape left click at the beginning point of the shape. (An orange box will appear if using an applicable
vector plan.)
USING GRIDS AND LISTS
Not all grids and lists behave the same. Some have been customised to provide a more helpful user experience. However the
following interaction mechanisms will be applicable to many grids and lists in Cubit.
Most columns in the grids are expandable, so you can expand the information that is important and applicable to the job that you’re
on and minimise the fields where you need to view less. By right mouse clicking the title bar of a grid you can access the Column
Chooser where you can customise, to some degree, the columns that are shown. Some of the default columns are un-removable.
Most columns and lists are expandable. To expand a list or column click the triangle next to the item you wish to see.
APPLICATION MENU
To access the Application menu click Job on the ribbon.
Through the Application menu you can easily access the Job Manager, close the program or access the Cubit Options window.

26
OPTIONS WINDOW
The Cubit Options Window is where you control factors of Cubit that affect the entire program.
The tabs are General, Viewport, Dimensions, and Reports.
GENERAL
The options in the General Tab concern mainly the defaults that affect the program.
The Plans group sets the options for when opening a plan, here you can check Prompt for scaling after insert and select the default
file type when Import PDFs as:.
The Panes group allows you to check whether you want your panes to be Movable or Collapsible.
The Default adjustment and sales tax does exactly as it describes, setting the default adjustment and tax for your plan.
VIEWPORT
The options in the Viewport tab concern mainly colouring for the viewport pane and other interactive elements.
The Viewport group allows you to check whether you want snapping on or off.
DIMENSIONS
The Dimensions tab is where the default dimensions are set and changed, and where you select your Default measurement units.
The Default metric dimensions group is where you enter the dimensions in mm of what you want your Vertical area height, Volume
depth, Width, and Depth.
The Count Results group allows you to set your Default count unit.
REPORTS
The Reports tab is where you control the options for your reporting.

27
The Logo group allows you to select an image you would like to use as your logo in your reporting.
The Storage group allows you to locate a folder where you’d like your reports to be exported to.
Clicking the System BOQ Settings button in the BOQ Settings group is where you access the setting for your Bill of Quantities
reporting.

28
TEMPLATES
Templates give you a facility to rapidly build up descriptions and rates for your estimates. You can:
Base new Jobs or Pricelists on templates
Insert specific rows or values from a Template into a Job or Pricelist.
CREATE A TEMPLATE
Templates are creating using an existing Job or Pricelist.
To create a template from a Job:
1. In the Job Manager window click on the Job in the Job list that you want to use as a template
2. Click Use as template in the details pane. This Job is now a Template.
The process for creating a Template from a Pricelist is similar except you select the Pricelist from the list of Pricelists. You can start a
brand new Template by first creating it as a Job. Once you have marked your Job as a Template you can still use that as a normal Job.
Any edits you make in this Job will be reflected when you next use the Job as a Template.
Figure 32 Use as template option
USING A TEMPLATE WHEN YOU CREATE A NEW JOB
29
When creating a Job you do not need to use a Template. If you don’t use a template the Job will be empty. If you are using a
template the new Job will come prepopulated with estimate sheet information from the template. It copies over all the information
that is not Job specific. That is Plans and calculated quantities for a specific Job will not be brought across. This allows you to quickly
measure these in your new Job.
To create a new Job using a Template simply select the Template you want to use when creating a new Job.
Figure 33 Insert Template
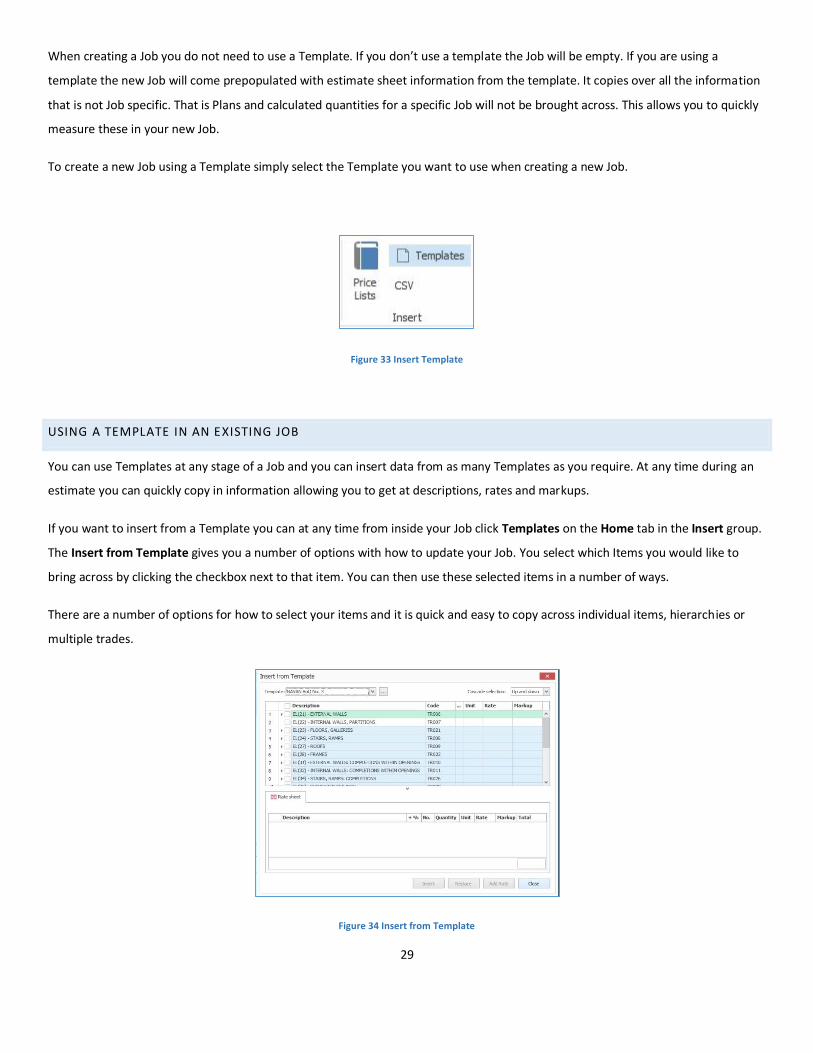
USING A TEMPLATE IN AN EXISTING JOB
You can use Templates at any stage of a Job and you can insert data from as many Templates as you require. At any time during an
estimate you can quickly copy in information allowing you to get at descriptions, rates and markups.
If you want to insert from a Template you can at any time from inside your Job click Templates on the Home tab in the Insert group.
The Insert from Template gives you a number of options with how to update your Job. You select which Items you would like to
bring across by clicking the checkbox next to that item. You can then use these selected items in a number of ways.
There are a number of options for how to select your items and it is quick and easy to copy across individual items, hierarchies or
multiple trades.
Figure 34 Insert from Template

30
As well as directly clicking the checkbox next to each item you want to bring into the Job you can control how Cubit interprets your
selection with the Cascade selection dropdown. There are four possible values as outlined below.
Down
Use this to bring across whole Trades or all the items under headings.
For every heading or trade you select, Cubit will bring across all of the
Items contained in that heading.
Up
Use this option if you would like the headings of selected Items to be
brought into the new Job. This allows you to select only the Items you
want but still ensures the heading hierarchy you enter is carried across
into the new Job without you having to explicitly select those headings.
Up and
Down
Both of the options applied together. All child Items will be brought into
the Job and all heading hierarchies are maintained.
None
Only the rows that you have selected yourself will be brought into the
Job.
Once you have the selection you want to use you can choose to use that selection in a number of ways:
Insert
The selected rows will be inserted as new Items at the current position
of the active row in the estimate sheet.
Replace
The selected Rate will update the currently active row Rate.
Add Rate
The selected Rows will be added to the Rate sheet for the currently
active Row.

31

32
PRICE LISTS
Price lists contain a collection of price information collated together for use within one or more Jobs. You can have as many Price
Lists as you want. Price Lists can then be nominated as Templates or called up from within a Job to use the prices.
CREATE NEW PRICE LIST
Price Lists are created in the Job Manager window.
To create a new Price List:
1. Enter the New Job menu by clicking on the New Job label in the List group on the Home tab on the ribbon.
2. Click Price List
3. Enter the “Price List” name in the New Price List window and click OK.
Figure 35 Create Price List
Figure 36 New Price List
Figure 37 Price List

33
The structure of a Price List is very similar to that of a Job’s estimate. Except there is no quantity information.
The upper window “Price Items” is where you can adjust your rates per price list trade. The lower window, the Rate sheet gives the
ability to build up complex rates for specific items.
Figure 38 Price List Rate Build up
BUILDING UP A PRICE LIST
There are a number of ways of entering items into Price Lists. You can if you like build up a new price list from scratch entering in all
the items and prices yourself. Alternatively you can transfer an existing price list.
Cubit allows you to transfer Pricelists from:
Offsider and Global Estimating
CSV (or Microsoft Excel) file
Cordell Direct
PRICE LIST WINDOW BUTTON BAR
Figure 39 Price List Button Bar

34
The Price List Window button bar is used to format the text when a price list is typed in.
Heading-Make the selected row(s) a heading.
Item-Make the selected row(s) an item for pricing.
Unindent (CRTL + >)-Unindent the selected row(s).
Indent (CRTL + <)-Indent the selected row(s).
Insert New-Insert a new item before the current row.
Add New-Add a new item to the end of the current heading.
IMPORT A CSV FILE
To import a CSV file:
1. Click CSV in the Insert tab on the Home ribbon.
2. Left click the mouse on the File: field.
3. Locate the CSV file in your computer and click Open.
4. One of the following options need to be checked: Header in first row, Skip rows with no description, or Skip empty rows.
5. Source column fields can be one of the following: ‘Description’, ‘Unit’, ‘Rate’, ‘Markup’,’ ‘Code’, or ‘Heading’.
6. Click either Insert to convert a new price list or Update to update an existing price list.
35
Figure 40 Price List CSV
USING VALUES FROM A PRICE LIST IN A JOB
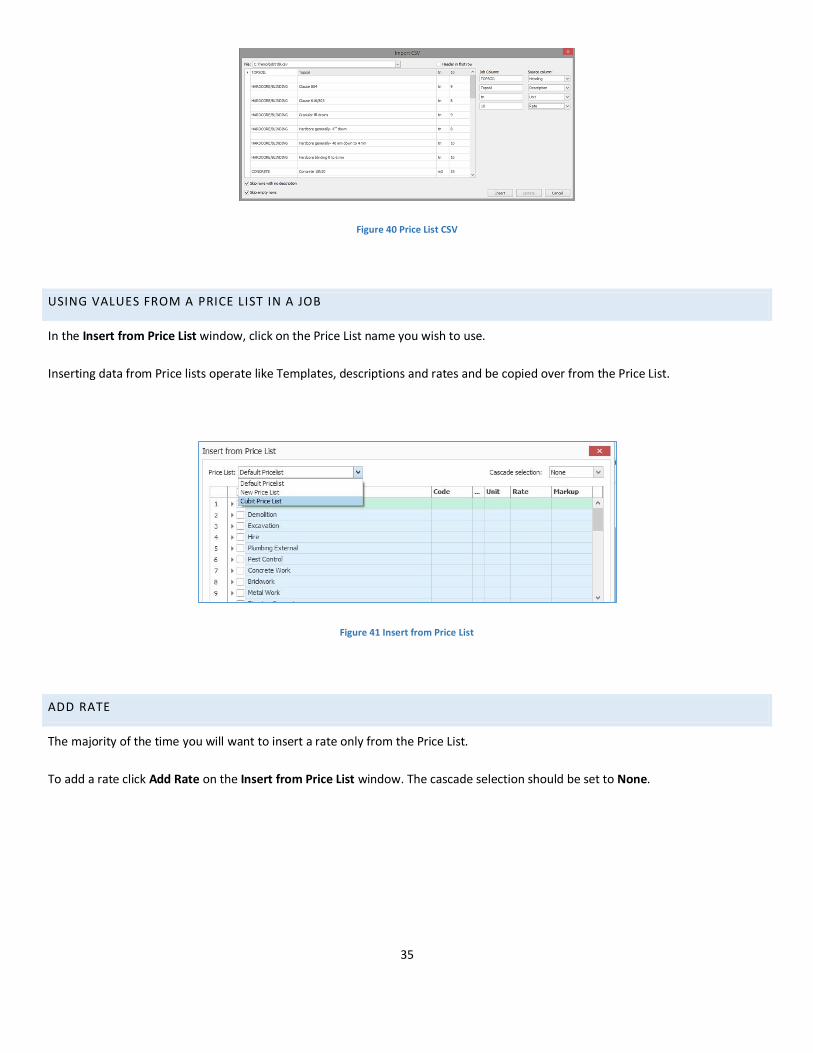
In the Insert from Price List window, click on the Price List name you wish to use.
Inserting data from Price lists operate like Templates, descriptions and rates and be copied over from the Price List.
Figure 41 Insert from Price List
ADD RATE
The majority of the time you will want to insert a rate only from the Price List.
To add a rate click Add Rate on the Insert from Price List window. The cascade selection should be set to None.

36
Figure 42 Insert Rate from Price List

37
JOB GROUPING
The way you first structure your estimate or Bill of Quantities is not necessarily the only way you want to view your information. Job
Grouping is incorporated into Cubit and allows you to group similar information together using resource codes. This can be done
using a set of user defined codes, sometimes called ‘Code Files’.
Each set of codes can comprise of 1 or more coding values that can be applied to your estimate, or Bill of Quantities for grouping like
items together later. This is a flexible solution for modifying data presentation.
WHAT IS JOB GROUPING?
There are two separate code groups available: Quantity codes and Rate codes. Both code group types can be used to apply codes in
the Estimate Pane.
Quantity codes can also be used in the Calculation Sheet tab in the Estimate pane where the quantity calculated for a specific item
needs to be subdivided and assigned to two or more quantity codes e.g. Block A, Block B, Block C etc.
Rate codes can also be used in the Rate Sheet tab in the Estimate pane where the rate calculated for a specific item needs to be
subdivided and assigned to two or more rate codes e.g. Material Type, Labour Type, Plant Type, Subcontract Type etc.
Rate codes can also be used in the same way in Price Lists. If this is done, when rates are inserted into an estimate or BoQ the rate
codes are transferred with the rate.
Each code added in any of the code groups, can have up to 25 characters. There is no character limit on the descriptions of each
code.
QUANTITY CODE GROUP EXAMPLE USAGE
An example of the use of this coding ability is if you were to employ subcontractors to do some of the work and you wanted to
separate this work so a quote could be calculated, say for just the concrete component.
When estimating each item can be coded for this example all concrete items could be coded CO from a Quantity Code Group.
Then when the Estimate is finished the Job can be grouped where a separate trade will be created called Concrete. This trade can
then be printed as a separate item and handed to the subcontractor to quote on.
This sorting of the Estimate could also be used to calculate the percentage of one or more materials compared to the whole job.

38
RATE CODE GROUP EXAMPLE USAGE
It is normal practice to group together the labour content on a project according to 'Trade' type and to group the materials
according to ‘Material Type’.
When estimating, each type of labour could be coded. For example, subcontractor labour could be coded SUB01, while your labour
could be coded OWN01 from a Rate Code Group. Each individual Material could be coded with a unique code to identify it, too. For
example concrete supply could be CONC01, and concrete testing could be CONC02.
When the Estimate is finished the Job can be resorted with separate trades created for each code assigned, grouping together all
items given the same code. This could then be used as a method of performing a detailed tender analysis on the job.
CREATE A NEW CODE GROUP
New Code Files are created at the Job Manager window.
To create a new Price List:
1. Click Codes in the Grouping tab on the ribbon.
2. Choose the appropriate code type by clicking either the Quantity tab or Rate tab.
3. Type a code file name in the Code column.
4. Type a code file description in the Description column
5. In the right window pane, type your code and code description
Figure 43 Grouping Codes

39
Figure 44 Grouping Code Example
ADD A CODE GROUP TO YOUR ESTIMATE
To add a code group to your estimate:
1. Make sure your estimate is open.
2. Click Groups in the Codes group on the Data tab.
3. Chose the code file(s) to map the estimate by checking the box to the right of the Group name.
4. Click Ok.
Figure 45 Group Mapping

40
Multiple Quantity and Rate code files can be assigned to the single estimate, allowing the user to perform a variety of group analysis
on the estimate.
When a group is assigned to the estimate a column for that group is added to the Estimate Window.
If a Quantity group is added a column is also added to the Calculation Sheet. If a Rate group in added a column is also added to the
Rate Sheet.
Figure 46 Estimate Group Column
ASSIGN A CODE TO AN ITEM IN YOUR ESTIMATE
Codes can be assigned at various points inside your Estimate. Typically the codes are managed inside the Estimate sheet itself, but
you can assign codes inside the Calculation Sheets and Rate Sheets.
Quantity Codes Rate Codes
Estimate Sheet Estimate Sheet
Calculation Sheet Rate Sheet
To assign a code to an item double click the mouse in the column of the row to be assigned the code and pick the relevant code from
the list displayed.

41
Figure 47 Estimate Group Column Select
IMPORT A CODE GROUP
If you have a Code Table in Offsider or Global Estimating, or a CSV with a list of names and codes to import you can use the Import
Grouping Code function in Cubit.
To import a code group:
1. Click Codes in the Job Manager window, in the Grouping group.
2. Click Import in the Grouping Codes window.
3. Browse to the location of the CSV file using the File field browse button.
4. Select either Quantity Group or Rate Group from the Category from down menu.
5. Enter a name and description for the code in the Group and Description fields.
6. Click Import.
Figure 48 Import grouping codes

42
USING CODE GROUPS CREATED IN OFFSIDER OR GLOBAL ESTIMATING
There are a number of restrictions in Offsider and Global Estimating that are not in Cubit. Codes in Cubit can be longer than those
supported in Offsider or Global Estimating, and there can be more Code Groups assigned to an estimate.
To export codes from Global/Offsider Estimating:
1. Ensure the job you want to pull your codes from is open.
2. Access the File menu.
3. Click View Code File.
4. Click Export on the Codes menu.
5. Browse to the location you want to save your codes at.
6. Enter the name of your codes in the File name: field.
Figure 49 Estimating Codes Menu
If you intend to keep the code file interchangeable between Global or Offsider and Cubit ensure the code constraint options are
ticked when imported into Cubit. This will ensure that any new codes added in Cubit conform to the Global or Offsider constraints.
These options appear on the bottom of the Group Codes window.

43
Figure 50 R Code Constraint

44
PLANS
SUPPORTED FORMATS
Cubit allows you to extract quantities from Vector or Raster plans and drawings.
Supported Vector files include PDF, CAD (DWG, DXF) and BIM (DWFx) these can be exported from applications like AutoCAD™ and
Microstation™. Supported Raster files include PDF, JPG, BMP, PNG and TIFF, these can be taken from plan files.
Cubit prefers CAD plans (DWG, DXF) as they typically have both better layer data and more accurate lines when taking off. Vector
PDFs are the next best, as they are typically created from a CAD document. Vector based plans are preferred as they have additional
functionality, specifically around accuracy.
HOW TO INSERT A PLAN
To insert a plan:
1. Click Insert, in Insert group on the Plans tab on the ribbon
2. In the Open window that appears, search for the plan you want to use.
3. Select your plan and then click Open.
Figure 51 Insert a Plan
INSERT A RASTER PLAN
Raster plans are single layered, flattened images, and will require a drawn scale. Typically these are image files or flat PDF files.

45
INSERT A PDF PLAN
PDF plans are one of the most commonly used file type, and can be both a flat raster plan (ie scanned plan) or a smart layered,
vector plan (ie from CAD). PDF plans will need to be scaled.
INSERT A CAD PLAN
CAD plans will typically have the correct scale already inside the file, and won’t require scaling, although always check and validate
the scale.
ROTATING YOUR PLAN
To rotate your Plan to the left, click Rotate 90° Left in the Plans tab in the Align group on the ribbon.
To rotate your plan to the right, click Rotate 90° Right in the Plans tab in the Align group on the ribbon.
Figure 52 Rotate Plan
ROTATE PLAN BY ANY ANGLE
For any other rotation click Custom. A new window will open and allow you to rotate your plan left 90°, right 90°, or select a rotation
percentage.

46
Figure 53 Rotate Plan Window
SCALING YOUR PLANS
By default Prompt for scaling after insert is checked in Cubit Options. Whenever you import a plan into Cubit for the first time, the
Scale Plan window should automatically open. This window gives you the options for scaling your plan.
You can change your scale at any time by clicking Scale in the Insert group on the Plans tab in the ribbon.
Figure 54 Scale Plan
CREATE A SCALE FROM A REFERENCE LINE
By default Draw Scale: is already selected, along with the option Single horizontal OR vertical line.
To create a scale from a reference line:

47
1. In the Viewport Pane, and using any line from the legend, left click the mouse at one end and left click at the other.
2. In the Length (mm) field, enter the length in mm from the legend.
3. Click Scale.
The process is the same using the Single diagonal line option from the ‘Draw Scale’.
The process is the same when you use the Horizontal AND vertical lines option, except you must scale off both a horizontal and
vertical line. This is done for maximum accuracy, and provides the most accurate scale achievable in Cubit.
ENTER A CUSTOM SCALE
You can custom scale from the Scale Plan window by clicking Manual and entering your scale into the Overall Scale option.
USE A SCALE FROM AN EXISTING PLAN
You can scale a plan from another plan as long as that plan is previously scaled. When the Scale Plan window opens you need to
select “From Plan:” and select the name of the existing Plan you wish to scale from.
INTERACTING WITH YOUR PLANS IN A JOB
SEEING A PLAN IN THE VIEWPORT
To open a plan through the Viewport:
1. Click Insert.
2. In the Open window that appears, search for the plan you want to use.
3. Select your plan and then click Open.
VIEWING MULTIPLE PLANS AT ONCE
You can view more than a single plan at any one time. By default you can view up to 2 plans, but through Cubit Options General tab
you can change this figure. The default option is set to cater to standard computers, only change this for more powerful machines.

48
PLAN PANE
The ‘Plans’ pane is a snapshot of the plans you have imported and it allows you to choose what layers of that plan you view.
Figure 55 Plans Pane
LAYERS
Vector plans can store layer information, including outlines, text, walls, room names, etc. You can access the various layers, and
chose the ones you wish you view inside the Viewport pane by clicking the arrow beside the plan name. Beside each layer is an eye,
clicking an eye will turn the layer off, clicking the eye again will turn it back on
PLAN REVISIONS
Plan revisions allows you to import revised plans and compare the differences between the plans. It makes viewing changes like
walls, floor space or openings easy to do.
ADDING A REVISION
To add a plan revision:
1. Click Add Revisions in the Revisions group on the Plans tab in the ribbon.
2. In the Open window that appears, search for the plan you want to use.
3. Select your plan and then click Open.

49
Figure 56 Add Revision
MANAGING CHANGES
When the revised plan is imported into your estimate, the Viewport pane will highlight the difference between the original and
revised plan. Added elements not in the original plan will appear in green, while removed elements will appear in red. Unchanged
elements of takeoff will appear in grey.
In the Plans pane you can manage both the original plan and revised plan, select the eye beside either plan to toggle viewing it on
the Viewport pane. Through the Revisions tab on the Plans pane the plan is divided up into three categories which help to easily
manage your job: new, deleted or unchanged.
Figure 57 Revisions Tab
FINALISING YOUR REVISION
You can choose to keep or discard your changes. On the Plans tab on the ribbon, click Cancel Revision to discard changes or Finish
Revision to save them. If you discard your changes they will be gone and irretrievable.

50
Figure 58 Finish Revision

51
TAKEOFF
The term “takeoff” describes the process and results of digitizing elements of a plan.
In Cubit performing takeoff creates Shapes which create Results that are assigned into items in the Estimate. The type of result
assigned to the selected estimate item(s) will depend on the Result Type(s) that is selected for the selected rows.
Each Result has values separate from its underlying shape allowing control over how you reuse your shapes. Such that you can use
the same base shape for many different types of takeoff. Even though you can have different wall heights, names and so on based
off the same shape changes to the base shapes geometry are reflected in all of its results. Such that when there is a change to the
base shape you change the shape in your estimate and those changes are reflected everywhere.
RESULT TYPES
Cubit is the first program where you perform your takeoff directly into your estimate, rather than a list. You use your estimate to
control what quantities you are taking off. After your plan is inserted and scaled, you will need to have an estimate item setup with a
result type defined before you can start your take off.
ASSIGNING A RESULT TYPE TO AN ITEM
Everything you takeoff in the application can have a number of different results derived from them. You need to specify which result
you want to use for your estimate item. Save time by assigning result types to a heading. Newly created items underneath that
heading will use that result type by default.

52
Figure 59 Result Types
AREA
Area calculates the top down projection of a shape. It is useful for calculating the area of floors, ceilings, roofs and gardens and so
useful often by tilers, carpenters, painters, landscapers, among others.
LENGTH
Length calculates the length of a line or a shape. Length is useful for guttering, pipes, corners and edge from concrete, and so often
used by plumbers, concreters and roofers among others.
LENGTH LESS OPENINGS
Length less openings calculates the length of a line or shape, minus any openings that intersect. It is useful for measuring skirting
and useful for carpenters among others.
VOLUME
Volume calculates the volume of a shape. Volume is useful for concrete slabs and concreting pilings among others.
VOLUME BY LENGTH

53
Volume by length calculates the volume based off the shape length. It is used for calculating trenching, strip footings and beams,
and useful for concreters and excavators among others.
VERTICAL AREA
Vertical area calculates the vertical area of a shape or line. It is a very common result type used for walls, and often used by
carpenters, brick layers and plasterers among many.
VERTICAL AREA LESS OPENINGS
Vertical area less openings calculates the vertical area of a shape or line, taking out any openings on that area space, such as doors
or windows. It is used for getting specific wall areas and used by painters, carpenters and many others.
COUNT
Count is used for counting specific objects used on a plan. It is used for counting objects such as lighting fixtures, power points, taps
and toilets and useful for any trade that has a desire to count a number of objects.
WINDOW
Window calculates the number of windows inserted in the plan.
DOOR
Door calculates the number of doors inserted in the plan.
NOTE
Note is a custom field, where you can insert any information you want that isn’t listed in any other result type.

54
TAKEOFF TOOLS
There are two main types of quantity takeoff:
1. Drawing is the process where you trace or create shapes that define elements of your Job.
2. Counting is the process where you are able to calculate how many times an item is in your Job.
In Cubit you can get quantities from BIM files, and from other applications.
DRAWING TAKEOFF
We have a variety of drawing tools that can be used in your take off.
Figure 60 Drawing Tools
POLYLINE
The Polyline Tool allows you to draw lines (straight or curved) and create shapes that can be used to extract quantities from.
When using the Polyline tool ensure:
1. Your plan is scaled off.
2. That an estimate item with a valid result type is active.
3. That you are in Polyline mode, Polyline tool will be highlighted in the Shapes group in the Home tab of the ribbon.
DRAW STRAIGHT LINES
Straight lines are done by left mouse clicking to start the line and left mouse clicking to finish the line. You can complete the shape at
any time by right mouse clicking after completing a line or bringing your shape to close with a left mouse click to the starting point.

55
DRAW ARCS
Arcs are drawn by left mouse clicking to start the line and when finishing the line clicking and holding down left mouse button, then
(while holding the mouse button down) moving the mouse cursor where you want the line to curve.
PICK LINES
The Pick lines tool allows you to select lines from a plan for any DWG and PDF vector with layer information. This tool is used by
clicking on a line from the plan and transforming that line into a shape or line.
RECTANGLE
The Rectangle tool is selected by clicking Rectangle in the Shapes group on the Home tab in the ribbon. This tool is used by left
clicking at one corner and dragging the shape to the opposite corner and left mouse click again.
ELLIPSE
The Ellipse tool is used for making complete circles or ovals. To use it click Ellipse in the Shapes group on the Home tab in the
ribbon. Left mouse click to start the shape, move your cursor to generate the shape you need and left mouse click to complete.
LINE
The Line tool is used to draw just a line. To use, click Line in the Shapes group on the Home tab in the ribbon. When selected left
mouse click to start the line and left mouse click to finish the line.
COUNTING TAKEOFF
Although most of your calculations will be pulled from shapes and lines you create and control, when you need to count specific
items you would use the Count tool. This tool is used by clicking Count in the Shapes group on the Home tab of the ribbon.
On raster plans or any plans without layer and object information, you would start by picking the line which you need to calculate
the counts for that has the Result type of Count and then click on every applicable

56
The Count tool requires even less effort on any CAD file or intelligent PDF. When you select objects on one of these applicable plans,
your count will automatically select all the objects.
ANNOTATION
You can annotate on your plans by clicking Text in the Shapes group on the Home tab of the ribbon. This creates a new shape that is
grouped as Text. By double clicking into the shape you can change the text you type.
DEFINE SHAPE INFORMATION
Before you draw your takeoff setup the dimensions you want to use for the shapes you are drawing. These values control the results
that are created. Selecting this information is done in the Plans pane in the New task tab.
Information on the New task tab will only be accessible if you have a takeoff tool selected (ie, Polyline, Rectangle, etc) and if you
have selected an item from the Estimate pane that you are taking off.
Figure 61 New task tab

57
NEW SHAPE VALUES
There are multiple values that you can enter into the New Shapes pane, many of these have default information, many is
changeable in the Cubit Options.
DEDUCTION
By checking the Deduction check box option, the next shape will be drawn as a deduction this will mean that values returned from
the Shape will default to negative. After you have completed your shape you can change whether a shape result is a deduction or
not by clicking the relevant Deduction check box in the Calculation Sheet.
CLOSE POLYLINE
For drawing shape results that don’t require a closed area like Length, Length less openings and Volume by length you can click this
checkbox to either allow an open shape or force a closed shape.
DESCRIPTION
The description is applied as the default description for any created Shape results. The values for shape results can be modified at
any time in the relevant Calculation Sheet.
To change the shape description for an already created Shape:
1. Select 1 or more Shape(s)
2. In the Viewport right click one of the Shapes
3. Click Rename
4. Enter a new name and click OK
FACTOR
Factor can be used if you want to draw a single shape to represent a number of entities or if you want to introduce some form of
wastage factor. Factors used in the Shape can be overridden for individual Shape results.

58
AREA PITCH
Area Pitch sets the angle that an area is tilted at and affects the value returned for the Area result type and will return the true area
rather than the projected top-down one.
VOLUME DEPTH
Volume depth is the depth to use when using the volume result type.
HEIGHT
Changing the Height value will change the individual heights of the corners of any shapes that are yet to be drawn. For any corners
you have already drawn it is assumed that they were entered at the correct height and so are not changed.
To modify the height used in a shape result that is already entered requires going to the relevant Calculation sheet to select the
shape result then modifying the values in the Details pane.
NEXT LINE VALUES
You can control not only the values of the shape but you can control specific elements of the next line.
START AND END HEIGHT
Start / End Height calculates the height details for the next line drawn, this doesn’t affect any completed line.

59
ESTIMATING
All your takeoff work is done to simplify and speed up the time it takes you to accurately and thoroughly generate an estimates for a
Job. Your quantities and trades are updated as you takeoff, so your estimates are done in real time.
An estimate is divided into a number of different sheets; unlike our older software we do not separate Trade (Job Summary) and
Item (Trade Breakup). Cubit uses a single Estimate sheet.
In the Estimate sheet every top level item is a Trade which can contain an unlimited number of headings and items. Items enable
you to identify, categorise and manage all of your costing and note information for your Job. You can expand or collapse Trades and
Headings so you can see or hide what you want.
Each Item inside a Trade have a Quantity and a Rate, these are the base units of pricing your Job. There are a number of other
columns many of which are self-explanatory. These fields can accept a number of mathematical operations and the quantity and
rate can have their values determined in their own separate sheet.
Every Quantity in a Job can contain a Calculation sheet and every Rate can be built up using a Rate sheet, so you can handle
complex estimating scenarios in a specific, easy to access section.
Figure 62 Estimate Pane

60
CREATING TRADES
Your estimate should be divided into Trades to simplify and organise an estimate.
To create a Trade:
1. In your Estimate Pane double left mouse click the most left text box.
2. Enter into that text box the trade you would like to create, ie. Concrete, Brickwork, Painter.
3. Press enter key.
4. Select the line trade line you just created
5. Click Heading on the Estimate toolbar.
Figure 63 Estimate toolbar
CREATING HEADINGS
To organise each trade even further you can have additional headings within each trade, this process is very similar to creating
trades.
To create a heading:
1. In your Estimate Pane double left mouse click the most left text box underneath your trade.
2. Enter into that text box the heading you would like to create, ie. Feature Wall, Rompus, Ensuite
3. Press enter key.
4. Select the line trade line you just created
5. Click Heading on the Estimate toolbar.
COLUMNS

61
DESCRIPTION
The item Description column will hold the name of the item being added to the estimate and can be inserted from both Price lists
and Templates. While a full description is not required, we recommend storing enough information so that it is clear as to what the
Item refers to.
QUANTITY
The Quantity column reflects the total number of items in the Description. This value can be typed or calculated using a formula, or
returned from its Calculation Sheet. If a value is returned from the Calculation Sheet it will be written in blue text and cannot be
changed on this sheet. To change this value you need to go directly to its Calculation Sheet or remove the value.
UNIT
The Unit column displays the unit of the item in the Description field. There is not set unit, and the column will accept any short
description that is required. A default unit is setup for each Result Type as described in the takeoff section but these do not need to
be used.
RATE
The Rate column contains the cost of the item named in the Description field. Like quantity, the rate can be typed directly or
calculated from a formula. However the rate will not return a value from a calculation sheet, it uses a Rate Sheet. If a value is
returned from the Rate Sheet it will be written in blue text and cannot be changed directly in this sheet. Instead you will have to go
into the Rate Sheet to alter the values.
MARKUP %
The Markup column is used to add a mark-up to the cost of an item. It can be used to designate either a markup or a discount.
TOTAL
The Total column shows the total cost of the item. Although this column is automatically calculated by Cubit from your takeoff, you
can also set a manual total by typing over the total.
CALCULATION SHEET
The Calculation Sheet allows you to calculate complex quantities for every item in a Job. This sheet replaces your notepad and
calculator and allows you to work out quantities in an easily auditable way.
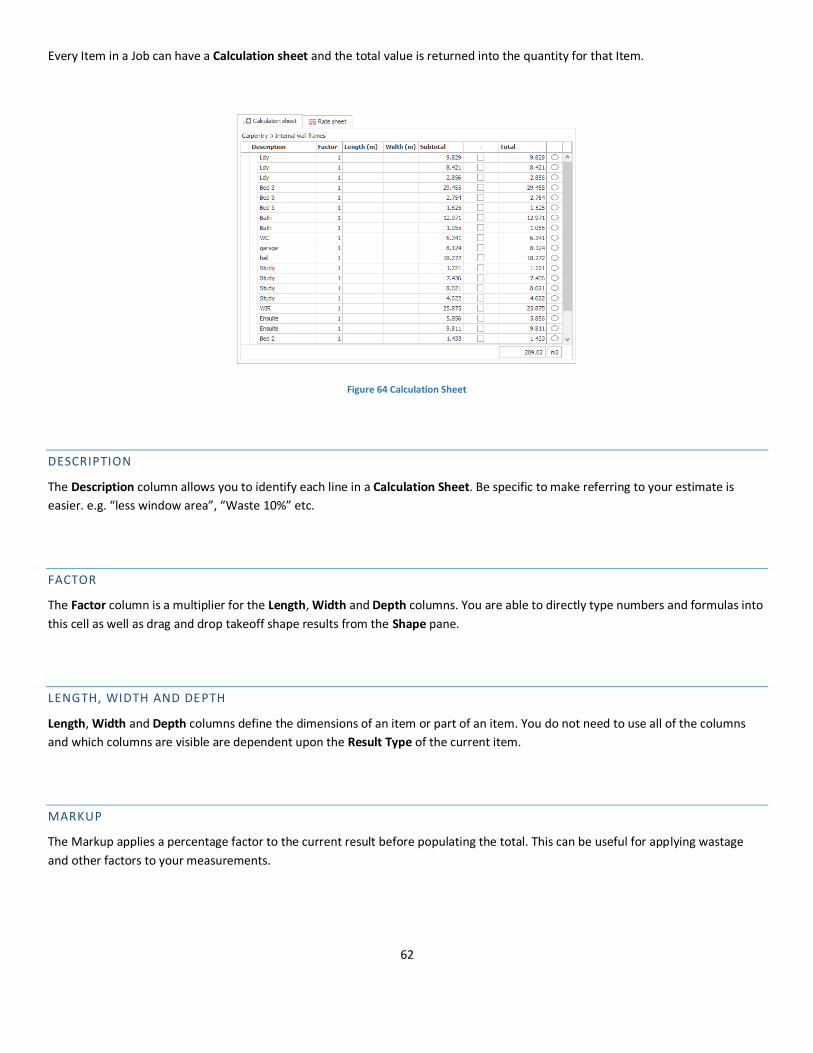
62
Every Item in a Job can have a Calculation sheet and the total value is returned into the quantity for that Item.
Figure 64 Calculation Sheet
DESCRIPTION
The Description column allows you to identify each line in a Calculation Sheet. Be specific to make referring to your estimate is
easier. e.g. “less window area”, “Waste 10%” etc.
FACTOR
The Factor column is a multiplier for the Length, Width and Depth columns. You are able to directly type numbers and formulas into
this cell as well as drag and drop takeoff shape results from the Shape pane.
LENGTH, WIDTH AND DEPTH
Length, Width and Depth columns define the dimensions of an item or part of an item. You do not need to use all of the columns
and which columns are visible are dependent upon the Result Type of the current item.
MARKUP
The Markup applies a percentage factor to the current result before populating the total. This can be useful for applying wastage
and other factors to your measurements.

63
TOTAL
Displays the total for each calculation item. This value cannot be changed directly, it is calculated based on the other columns in the
sheet. The sum of the Total column is displayed at the bottom of the Calculation sheet.
ROUNDING
The final result of a Calculation sheet can be rounded based on a number of Presets. These are all accessible in the Details pane of
the Calculation sheets parent Estimate Item.
RATE BREAKUP SHEET
The Rate Sheet is the sheet where the cost of an assembly can be built up from the separate components, e.g. an internal door
assembly, a concrete slab, a wardrobe, or anything that is made up of more than a single component. If an item is made up of only
one component, consider entering the rate directly into the Estimate sheet. The Rate sheet is sometimes called a Composite rate
sheet, as it is composed of multiple item. Rates can be built up from a mixture of materials and labour or materials only.
Figure 65 Rate sheet
DESCRIPTION
The description of the item to be included in the composite rate. There is no need to type in the full description of an item, but you
might not be the only person to read this information. This description can be copied from the price list.

64
THE + % COLUMN
If you click on the + sign the total of the quantity column will be divided into the total of the line total column, this will give the
resulting composite rate.
A common use of this +% column is for calculating a rate per m2 of flooring. Build up a rate of all the items that would be used in a
50m2 area of flooring, then by adding a + sign and a quantity of 50 the Composite Rate will be displayed for 1m2 of flooring. If you
click on the % sign the line item will calculate as a percentage of the line directly above. Such that if the Total of line 1 is 50 and line 2
has a value of 10 in the Qty field then the total would be 5.
MARKUP (%)
This adds a markup to the cost of the item. This can be used to give a discount to one item by typing a negative number. This field
will be blank if no markup or discount is required for an item. This markup is applied before subsequent markups and adjustments in
the Estimate sheet and for the overall Job.
MATHEMATICAL OPERATORS
With mathematical operators, you can add (+), subtract (-), multiple (*) or divide (/) the expression. The result of using mathematical
operators is a value. The results of these formula are, as tradition demands, displayed in Pink.
Expressions follow the normal algebraic rules:
1. Operations are performed from left to right.
2. The value between parentheses will be calculated first.
3. Multiplication and Division are performed.
4. Addition and subtraction operations are performed.
These can be entered in most numeric fields across the Estimate and its various sheets.
Operators Expression
+ addition
- subtraction

65
* multiplication
/ division
() parenthesis
Figure 66 Mathematical Operators
JOB MARKUP, ADJUSTMENTS AND SALES TAX
Default values can be setup for these in the Options window in the General tab. However they can also be overridden for each Job.
These will apply factors or add values onto the overall value for a Job and can be shown or be hidden in your reports.
How to open the Adjustment and sales tax window inside a Job:
1. Open your Job from the Job list in the Job Manager window
2. In the status bar of the Opened Job click on the number next to the Adjustment or Total after tax label.
3. Make any changes then click OK to confirm or Cancel to restore the previous value.
The Job Adjustment can be set as markup or discount by entering a positive or negative number as the Amount. You can also choose
the type of adjustment and calculate the total value using a Percent or a Fixed value.
The Sales tax is set as a percentage of the total Job value you are even able to give the Sales tax a custom Name that will appear in
the interface and on reports.

66

67
REPORTS
Cubit provides different ways for using data once you have finished inputting your Job, including standard and parametric reports.
Figure 67 Reports Group
STANDARD REPORTS
Cubit contains prebuilt reports that report at many different levels of an estimate, and tailored to Trades and Items, Rate Sheets,
Calc Sheets and takeoff. All different categories of reports come with a number of present options with the option to include
professional charting and images of the Viewport.
Figure 68 Reports Window
ALL REPORTS
To see all the reports that are in the system click the All Reports button in the Data tab on the ribbon.
Here you can Preview, Print or Customise the inbuilt reports and set which of your customised reports you want to have directly
accessible in your ribbon.

68
CHANGE WHICH REPORTS ARE SHOWN IN THE RIBBON
From the All Reports window in the list of reports click on the Checkbox in the Show in ribbon column so that it is showing a
checkmark for the report you want to access directly in the ribbon.
REPORT PREVIEW
To open a Preview of a Standard report in the Data tab in the Reports group on the ribbon click on one of the Report categories.
You will get a view of what your report will look like once printed. From here you can set a number of different options and are able
to export, print or directly email in a variety of formats including PDF and Microsoft Excel.
From the report preview there are a number of options that you can quickly define on the fly. We call this parametric reporting and
this is explained in the next section.
PARAMETRIC REPORTING
If you don’t have access to or don’t want to invest the time in full-blown Custom reports. There are a number of commonly
customised settings that you can tweak for different sort of reports.
These are predominately located inside the Preview for each report. From here you can quickly hide and show totals, markups, rates
different item levels, change the title and so on.
HEADERS AND FOOTERS
You can define a number of customised headers and footers for your reports and can use different templates for your different
reports should you wish.
To modify the header:
1. From within a Job click the Job tab in the ribbon
2. In the Cubit Options window click Reports
3. In the Logo group click Select… to find the file you want to use on your reports.
4. Click OK to close the Cubit Options window.
5. Click All Reports in the Reports group on the Data tab of the ribbon.

69
6. Choose a Default header template to use. The header templates that come preloaded are setup to position your logo on
different sides of the report. You can use one of these or create your own.
To create your own Header template:
1. From the All Reports window click … to open the Report headers window.
2. Click on the Header template in the list that you wish to customise.
3. Click Customise.
4. Make your changes in the Report designer, and save the template with a new name.
5. Click Close in the Reports header window.
6. Assign the header template that you have created. This can be as the default header, or you can override the default
header by selecting a new value in the Header column for one of the listed reports.
Modifying or creating your own custom footer template follows the same process.
CUSTOM REPORTS
Each of the inbuilt reports can be customised with our report designer.
To edit a report:
1. Click All Reports in the Repots group in the Data tab on the ribbon.
2. In the Reports window click on the report you want to edit then click the Customise button
3. After making changes in the report designer you can save the report or save the changes as a new report.
If you make a mistake with a report, you can select the report in the All Reports window and click Restore default.
For further information on our comprehensive custom report designer please see our reporting user documentation guide.

70
Figure 69 Report Designer
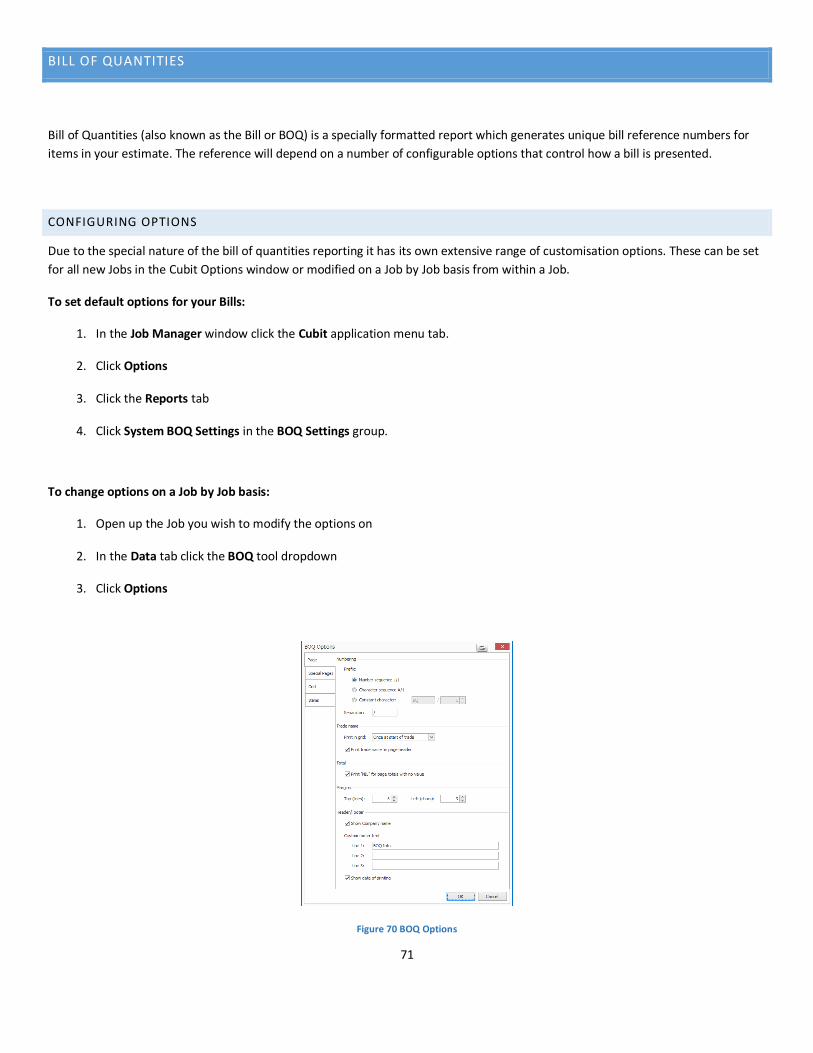
71
BILL OF QUANTITIES
Bill of Quantities (also known as the Bill or BOQ) is a specially formatted report which generates unique bill reference numbers for
items in your estimate. The reference will depend on a number of configurable options that control how a bill is presented.
CONFIGURING OPTIONS
Due to the special nature of the bill of quantities reporting it has its own extensive range of customisation options. These can be set
for all new Jobs in the Cubit Options window or modified on a Job by Job basis from within a Job.
To set default options for your Bills:
1. In the Job Manager window click the Cubit application menu tab.
2. Click Options
3. Click the Reports tab
4. Click System BOQ Settings in the BOQ Settings group.
To change options on a Job by Job basis:
1. Open up the Job you wish to modify the options on
2. In the Data tab click the BOQ tool dropdown
3. Click Options
Figure 70 BOQ Options
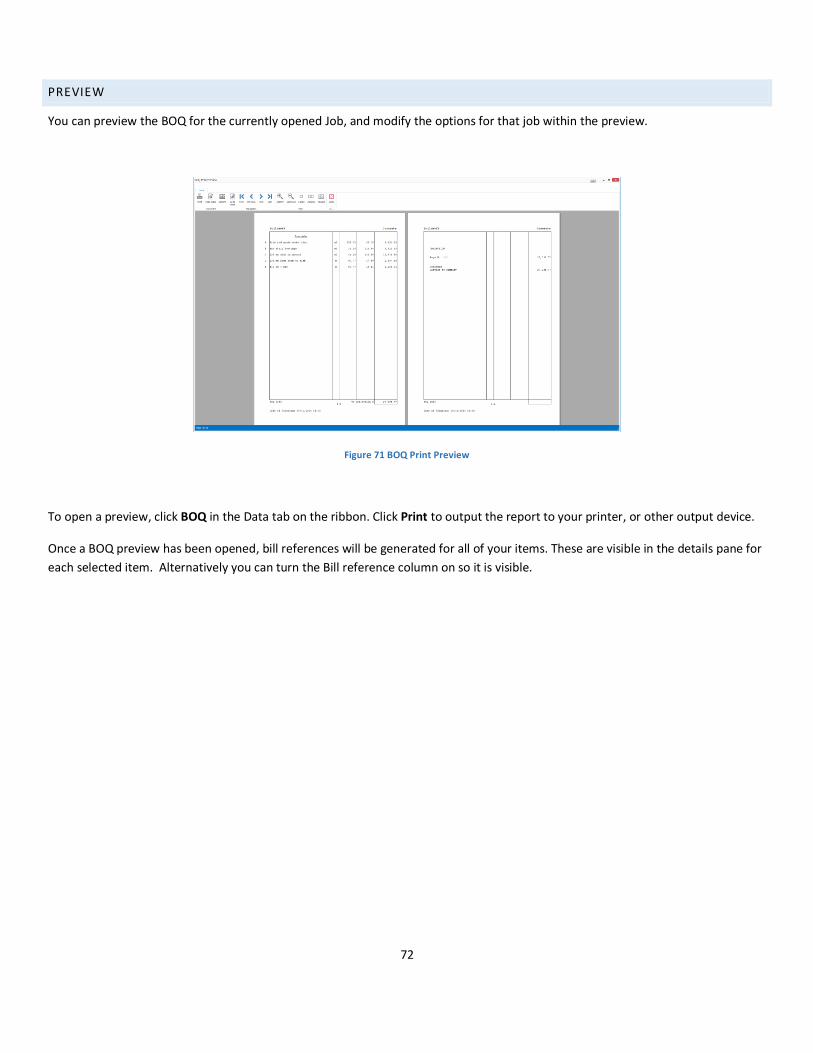
72
PREVIEW
You can preview the BOQ for the currently opened Job, and modify the options for that job within the preview.
Figure 71 BOQ Print Preview
To open a preview, click BOQ in the Data tab on the ribbon. Click Print to output the report to your printer, or other output device.
Once a BOQ preview has been opened, bill references will be generated for all of your items. These are visible in the details pane for
each selected item. Alternatively you can turn the Bill reference column on so it is visible.