curved back adirondack chair - chairman of the board
TRANSCRIPT

74 F I N E W O O D W O R K I N G
y grandfather, who is almost 90 and not as spry as heused to be, pointed out to me that the comfort of a chairisn’t just based on how good it feels when you sit in it but
also on how easy it is to get out of. A beanbag chair is a good casein point. Sitting in one might be as comfortable as being in thewomb; but getting out of one is about as difficult.
When I finished boat-building school, I sort of fell into theAdirondack-chair business by accident. The first chair was madeas a wedding present. The design was adapted from an old chairmy mother had bought at a yard sale. The chair was such a hit withthe newlyweds that they quickly wanted a few more. Word got
around that I was making the chairs, and the next thing I knew, Iwas in business. I’m not sure how many Adirondack chairs I’vemade by now, but it has to number in the thousands. I have pat-terns for all of the pieces and several simple jigs for the construc-tion. After all of the pieces are cut and sanded, it takes me about 45minutes to put a chair together.
Mint-julep arms and a comfortable slopeThere are as many different designs for Adirondack chairs as thereare mosquitoes in the Adirondack Mountains. All of the old chairshad arms wide enough to rest a drink on, and most of them had a
Inch-thickmahogany
will weather wellwith or without
a finish
Curved Back
AdirondackChair
Curved Back
AdirondackChair
MB Y S C O T T M A S I

M A Y / J U N E 1 9 9 9 75Drawings: Mark Sant’Angelo
flat seat and a flat back. Many of the newer designs employ curvesin the seat and the back.
An early prototype of my current chair was built with a deepcurve to the seat. The chair looked graceful, but to get out of it mygrandfather had to scootch way forward in the seat, grab the endsof the arms and hoist himself to his feet. In the process of hoisting,he pulled the chair’s back legs off the ground, and when he stoodup and let go of the chair, the legs crashed back to the ground.
It occurred to me that a flat seat would allow the sitter to be high-er off the ground and thus would make getting out of the chairmuch easier. Besides, people are factory equipped with a padded
seat and a bony back. The chair I now make has a gentle fannedand curved back that conforms to people’s unpadded backs and aflat seat that doesn’t have to conform to their padded bottoms.
Trace, cut, rout, sandIt’s best to trace all of the curved pieces on this chair—legs, arms,arm brackets and back stretchers—from patterns and then cutthem on a bandsaw. After roughing out, screw the curved patternsto the pieces with two drywall screws and then use a pattern-routing bit on a router table. For unpainted mahogany chairs, it’simportant to pay attention to what side the pattern is screwed to.
BACK CAMBER
At upper stretcher
At bottom stretcher
13⁄4 in.
101 ⁄16 in.
73⁄4 in.
Front leg
Rear leg
Arm
Armsupport Arm
bracket
Front legstretcher
Rear legstretcher
Back splat
20°
117°
58°
143 ⁄8 in.
381 ⁄2 in.
Bottom backstretcher
Middlebackstretcher
Upper backstretcher This comfortable chair, made of 1-in.-thick mahogany, has a curved back and a flat seat.
To prevent splinters, all exposed edges are chamfered with a 1 ⁄4-in. roundover bit, and allsurfaces are sanded. Screw holes are plugged with epoxy-coated bungs.
M A H O G A N Y A D I R O N D A C K C H A I R
21⁄4 in.
22 in.
231 ⁄2 in.
335 ⁄8 in.
31 in.
Bung
Stainless-steelsquare-drivescrew

76 F I N E W O O D W O R K I N G
For instance, be sure to screw the pattern to the underside of thearms so that you don’t have unsightly holes in the finished sur-faces. For painted chairs, where you can fill surfaces with marineputty before painting, the screw holes don’t matter as much.
The importance of sanding—Imagine that you’ve just taken thenew Stephen King novel and a tall glass of iced tea out to sit on thelawn for some summertime relaxing. You sit in your favoriteAdirondack chair, and “Yeow!” you get a splinter in your factory-equipped padding. There goes the afternoon. Adirondack chairsare meant to sit outside. Whether on a covered porch or set out inthe middle of a lawn, they see a lot of weather.Wetting and drying cycles can wreak havoc onwood: raising grain, raising splinters, raising theire of those people who get the splinters.
I spend a lot of time routing a 1⁄4-in. radius onall exposed edges and sanding the parts of mychairs before I even put them together. Andthen, after they are assembled, I sand them onefinal time. A good deal of the chairs I make getpainted. If you look around at outdoor paintedsurfaces, you’ll notice that paint usually fails atsharp edges where the paint is thinner. The cor-ner boards of a house are a good example. Onthe other hand, paint on rounded surfaces ismuch less likely to chip.
Trust your eyes and your fingersI want to say a few words about my assemblymethods. I don’t spend a lot of time making lay-out lines on the Adirondack chairs I build. Grant-ed, I’ve built a lot of these things, but I’ve always
trusted my eyes and my hands to guide me during assembly. Forinstance, rather than spending time measuring and finding centers,I’ll simply hold a piece in place, judging with my hand as towhether the piece is centered before I drill a hole and screw it inplace. I build the chair on a bench, and the flat surface ensures thatthe chair won’t rock when it’s all done.
It’s amazing how accurate your hands are if you’ll only trustthem. You can feel whether a reveal is equal faster than you can bymeasuring it, and I’ll bet my tactile tolerances are within 1⁄16 in., ifnot within 1⁄32 in. If I ever see anyone measuring my chairs with amicrometer instead of sitting in them and enjoying them, I’ll chasethem into the ocean with a stick.
Build the chair from the ground upIt may seem obvious, but I’ve found after making a thousand or sochairs that the way to put the things together is in three sections:first build the legs and seat; then the arms and supports; and thenthe back. Several simple spacing jigs facilitate assembly.
Legs and seat—Aside from the stretcher, which is let into the twofront legs, all of the pieces of the chair are butted and screwed toeach other. The front stretcher is cut on both edges at 20°—thesame angle at which the rear legs meet the front legs—so that thefirst slat on the seat sits flush on the back legs and on the frontstretcher. A block of wood cut to the distance between the insidedimension of the two front legs makes it easy to assemble the frontstretcher. Coat the ends of the stretcher with marine epoxy beforeyou screw it to the legs. The epoxy is incredibly strong, and as ageneral rule, I glue all major chair joints before fastening them withstainless-steel square-drive screws.
Once the stretcher is attached to the front legs, screw the back
Spaced out. Spacer blocks, attached to a longerpiece of wood, are used to set distances betweenseat slats. The curved slat (on the bench) conformsto the curve of the chair’s back.
Front stretcher is let into the front legs. Both long edges of thestretcher are ripped with the saw tilted 20°—the same bevel at whichthe rear legs meet the front legs. A simple jig (right) holds the front legsat the proper spacing.
M A Y / J U N E 1 9 9 9 77Photos: Jefferson Kolle
legs to the front ones right behind the frontstretcher and then attach the rear stretcher be-tween the back legs. The base of the chair willnow stand on its own, and it’s ready for the seatslats. To help achieve consistent spacing be-tween slats, use a length of scrap with 11⁄16-in.-thick spacer blocks screwed to the bottom.
Arms, brackets and supports—After the legsand seat slats have been screwed together, it’stime to turn to the arms and arm brackets and supports. The backsof the arms are held apart the proper distance by a piece that dou-bles as a middle back stretcher. The back stretcher’s front edge isbandsawn at 30°.
I coat the top end grain of the front legs with epoxy before at-taching the front of the arms with 21⁄2-in. screws. Epoxy on endgrain! I can hear you laughing in your beard. Contrary to what youmight believe, epoxy has amazing holding power on end grain. Ionce had to disassemble a finished chair, and after removing thescrews into the end grain, the arms still wouldn’t come off the legs.I used a lot of force pushing on the backs of the arms to break theglue bond, and when it finally broke, the wood in the arms brokebut not the glue joint. So much for woodworking heresy.
Once the arms and brackets have been attached, screw the armsupports in place so that they butt against the front edge of themiddle back stretcher. Then turn your attention to the curved back.
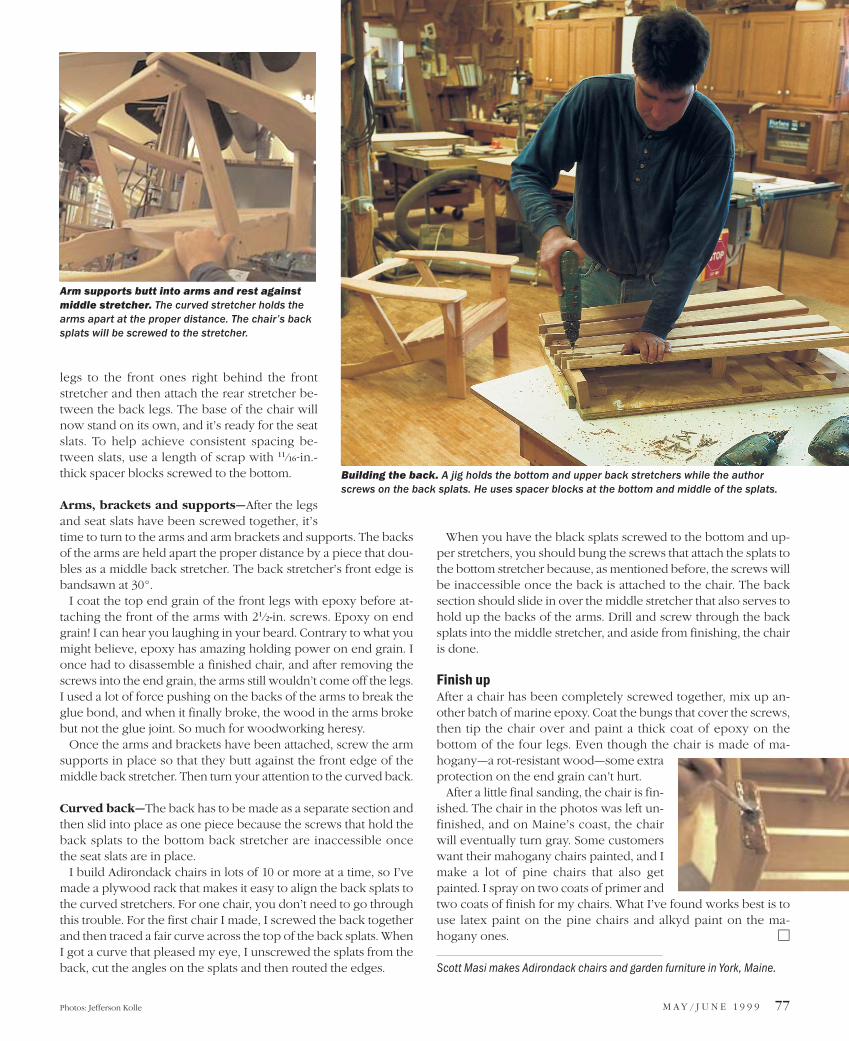
Curved back—The back has to be made as a separate section andthen slid into place as one piece because the screws that hold theback splats to the bottom back stretcher are inaccessible once the seat slats are in place.
I build Adirondack chairs in lots of 10 or more at a time, so I’vemade a plywood rack that makes it easy to align the back splats tothe curved stretchers. For one chair, you don’t need to go throughthis trouble. For the first chair I made, I screwed the back togetherand then traced a fair curve across the top of the back splats. WhenI got a curve that pleased my eye, I unscrewed the splats from theback, cut the angles on the splats and then routed the edges.
When you have the black splats screwed to the bottom and up-per stretchers, you should bung the screws that attach the splats tothe bottom stretcher because, as mentioned before, the screws willbe inaccessible once the back is attached to the chair. The backsection should slide in over the middle stretcher that also serves tohold up the backs of the arms. Drill and screw through the backsplats into the middle stretcher, and aside from finishing, the chairis done.
Finish upAfter a chair has been completely screwed together, mix up an-other batch of marine epoxy. Coat the bungs that cover the screws,then tip the chair over and paint a thick coat of epoxy on the bottom of the four legs. Even though the chair is made of ma-hogany—a rot-resistant wood—some extraprotection on the end grain can’t hurt.
After a little final sanding, the chair is fin-ished. The chair in the photos was left un-finished, and on Maine’s coast, the chairwill eventually turn gray. Some customerswant their mahogany chairs painted, and Imake a lot of pine chairs that also getpainted. I spray on two coats of primer andtwo coats of finish for my chairs. What I’ve found works best is touse latex paint on the pine chairs and alkyd paint on the ma-hogany ones. �
Scott Masi makes Adirondack chairs and garden furniture in York, Maine.
Arm supports butt into arms and rest againstmiddle stretcher. The curved stretcher holds thearms apart at the proper distance. The chair’s backsplats will be screwed to the stretcher.
Building the back. A jig holds the bottom and upper back stretchers while the authorscrews on the back splats. He uses spacer blocks at the bottom and middle of the splats.