custom forms guide - skywardsupport.skyward.com/deptdocs/corporate... · custom forms guide...
TRANSCRIPT
Custom Forms Guide
Overview
Accessing Custom Forms SetupStudent Custom FormsFamily Custom FormsSpecial Education Custom FormsResponse to Intervention Custom FormsSection 504
Building a Custom FormAdding a Custom Form RecordAdding Custom FieldsAdding a Basic Custom Screen
Building Other Custom ScreensAdvanced Custom FormsCustom HTML Forms
Using Skyward Fields on a Custom Form
Entering Data into Custom FormsStudent and Student Entity FormsFamily Forms Special Education FormsRTI FormsSection 504Data Entry Screen
Reporting Options Data MiningCustom Forms Report
Custom Forms Importer
CUSTOM FORMS GUIDE
Custom Forms Overview
What are Custom Forms?Custom Forms are screens used for data entry that are designed, built and maintained by district staff. They are used to track information for students and families when there is no designated place to enter the data already in Skyward. Once a Custom screen is created, youthen will have the capability to edit the screen and enter in the information. After the information is entered, you will have the capability to use Data Mining to report on it.
How are Custom Forms used?Custom Forms, as stated above are used to track data on students or families when there is not a designated location to enter it already in Skyward. Custom forms can be created for a number of areas including Students, Families, Special Education and Response to Intervention, and Section 504. Information is entered on the form through one of the regulardata entry screens, or it can be uploaded into the form through the Custom Forms Importer.
Any user with security access to one of the Custom Forms areas can enter data into all screens. If needed, individual screens can be further secured.
Forms can also be accessed and filled out by parents through Family Access Online Registration, Online Forms, or even the New Student Online Enrollment module.
Functionality described here may vary in availability depending upon your district/entity configuration.** Denotes Required Field to save screen.
CUSTOM FORMS GUIDE
Accessing Custom Forms SetupStudent Custom FormsFamily Custom FormsSpecial Education Custom FormsResponse to Intervention Custom FormsSection 504
Since Custom Forms are utilized in several different areas of the software, there are specific areas to access the Setup depending on the purpose. When creating a Custom Form ask yourself, “What is the purpose and to whom should the form be attached?”
To set up a Custom Form go to the Setup Configuration options under the appropriate area. A Custom Forms Setup link will be available.
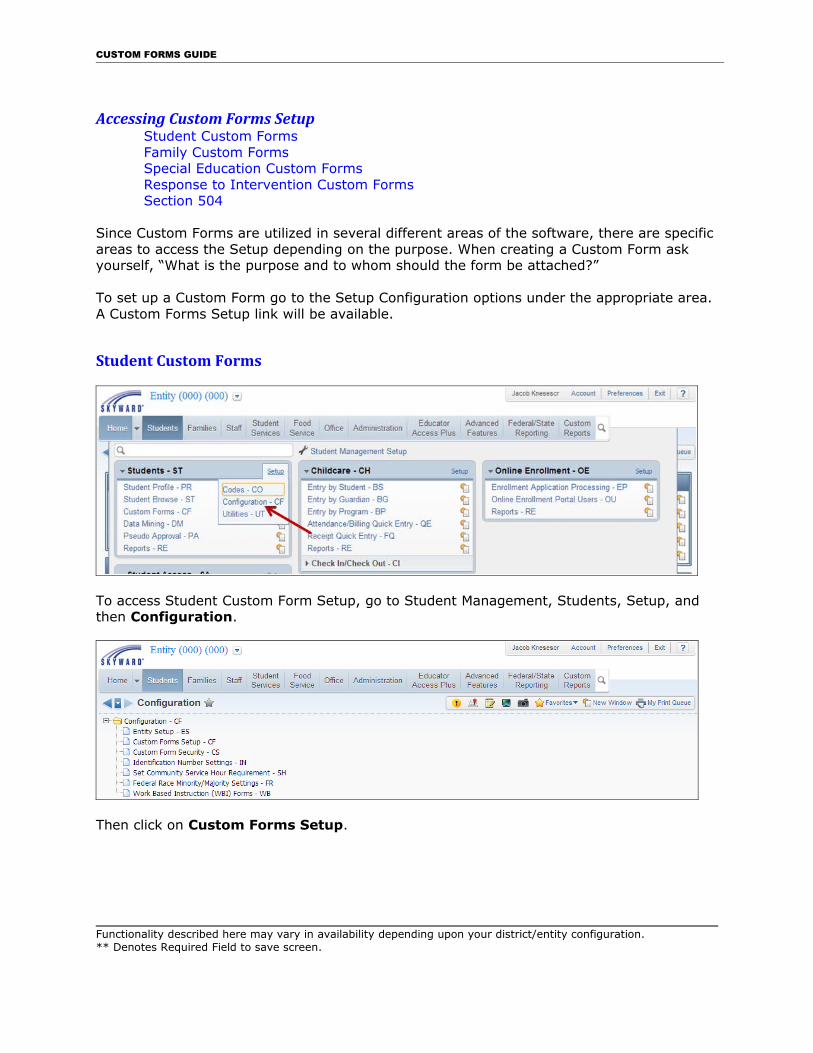
Student Custom Forms
To access Student Custom Form Setup, go to Student Management, Students, Setup, and then Configuration.
Then click on Custom Forms Setup.
Functionality described here may vary in availability depending upon your district/entity configuration.** Denotes Required Field to save screen.
CUSTOM FORMS GUIDE
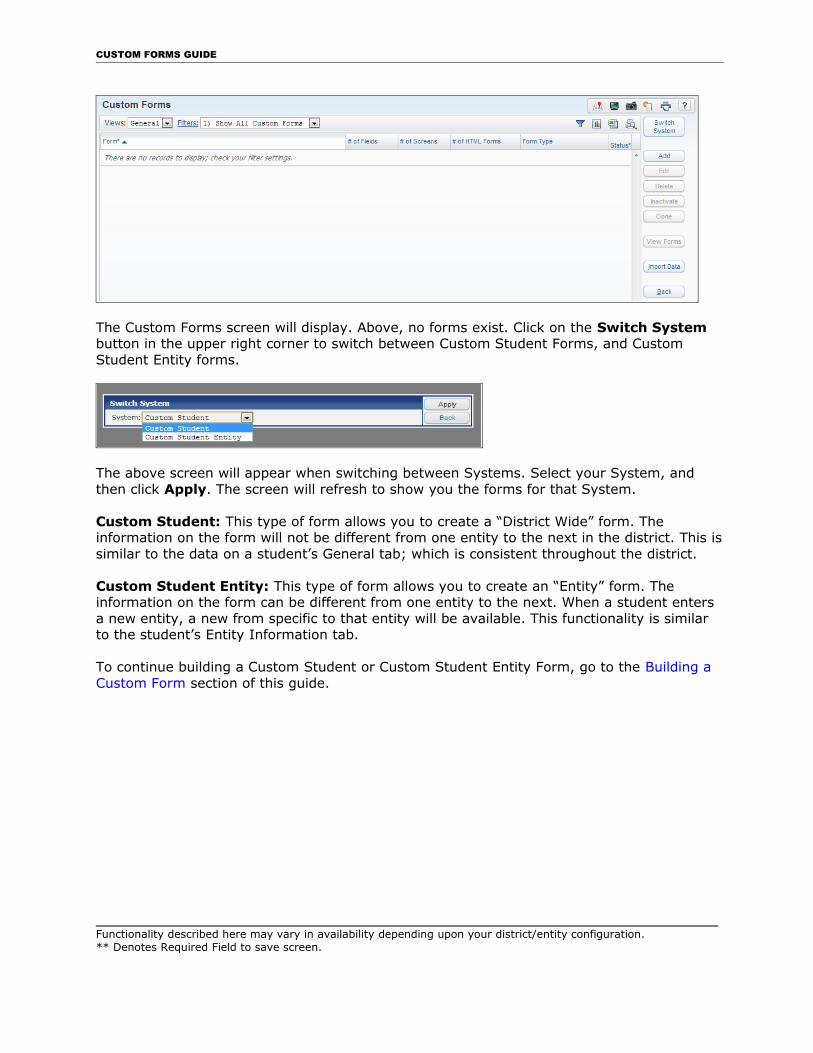
The Custom Forms screen will display. Above, no forms exist. Click on the Switch System button in the upper right corner to switch between Custom Student Forms, and Custom Student Entity forms.
The above screen will appear when switching between Systems. Select your System, and then click Apply. The screen will refresh to show you the forms for that System.
Custom Student: This type of form allows you to create a “District Wide” form. The information on the form will not be different from one entity to the next in the district. This issimilar to the data on a student’s General tab; which is consistent throughout the district.
Custom Student Entity: This type of form allows you to create an “Entity” form. The information on the form can be different from one entity to the next. When a student enters a new entity, a new from specific to that entity will be available. This functionality is similar to the student’s Entity Information tab.
To continue building a Custom Student or Custom Student Entity Form, go to the Building a Custom Form section of this guide.
Functionality described here may vary in availability depending upon your district/entity configuration.** Denotes Required Field to save screen.
CUSTOM FORMS GUIDE
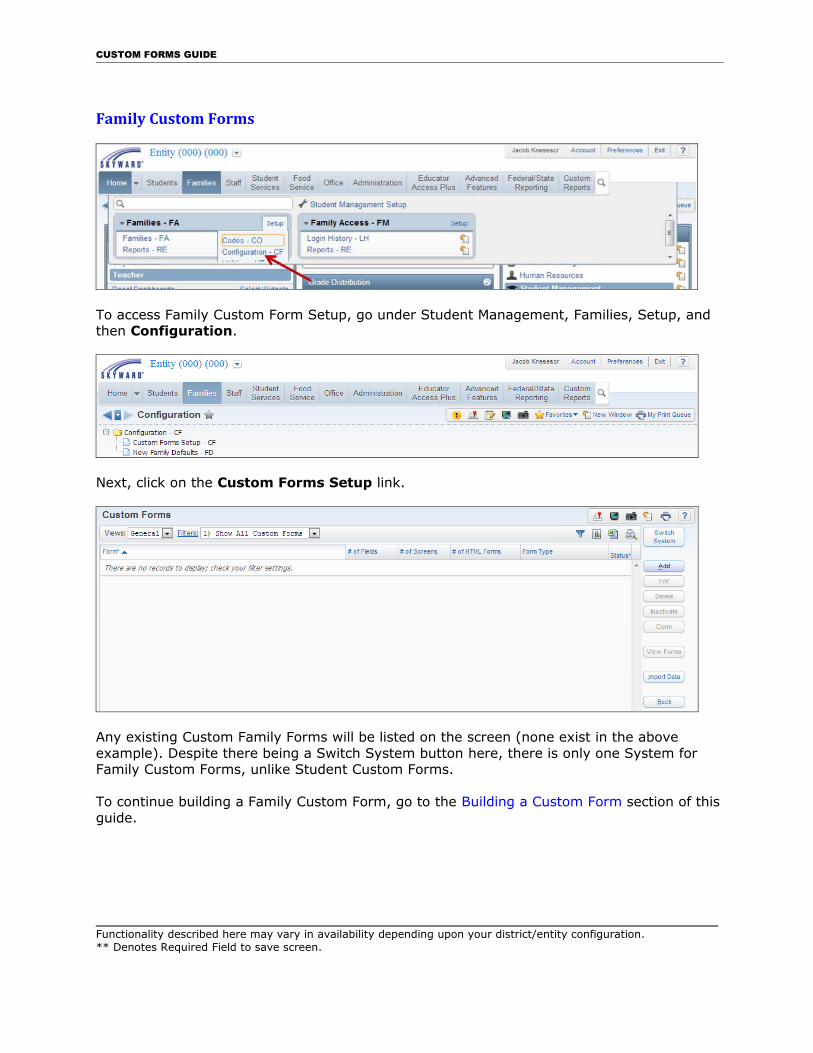
Family Custom Forms
To access Family Custom Form Setup, go under Student Management, Families, Setup, and then Configuration.
Next, click on the Custom Forms Setup link.
Any existing Custom Family Forms will be listed on the screen (none exist in the above example). Despite there being a Switch System button here, there is only one System for Family Custom Forms, unlike Student Custom Forms.
To continue building a Family Custom Form, go to the Building a Custom Form section of thisguide.
Functionality described here may vary in availability depending upon your district/entity configuration.** Denotes Required Field to save screen.
CUSTOM FORMS GUIDE
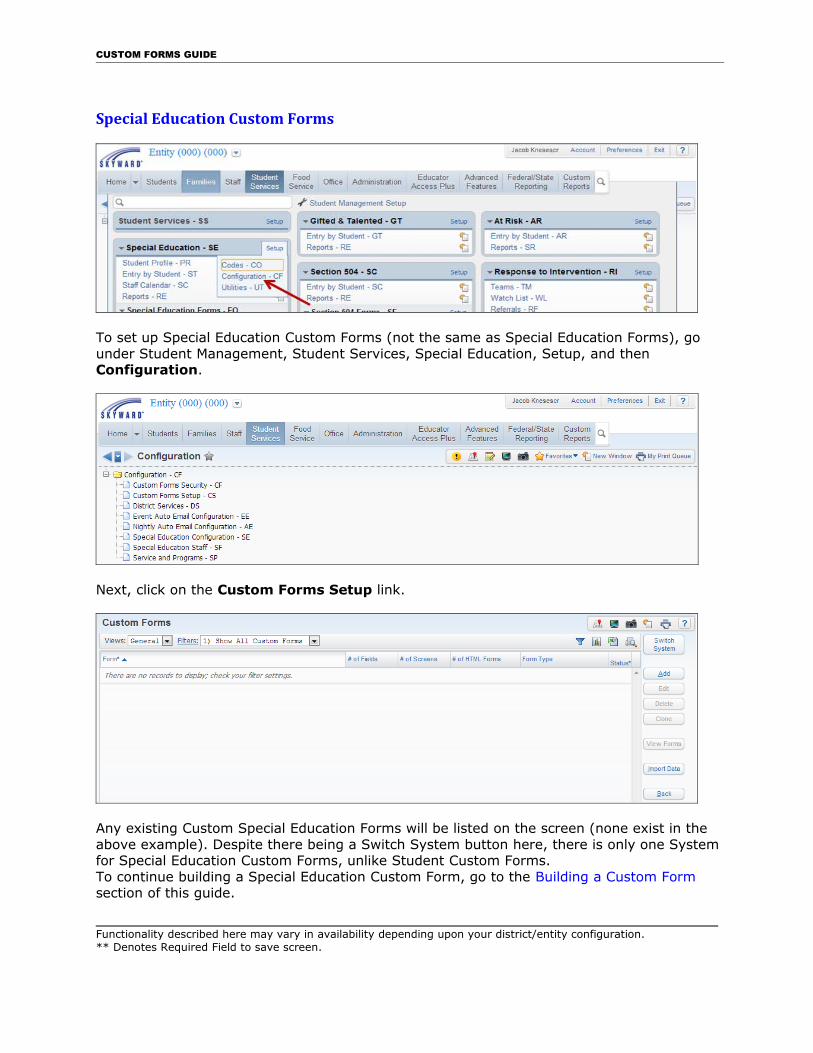
Special Education Custom Forms
To set up Special Education Custom Forms (not the same as Special Education Forms), go under Student Management, Student Services, Special Education, Setup, and then Configuration.
Next, click on the Custom Forms Setup link.
Any existing Custom Special Education Forms will be listed on the screen (none exist in the above example). Despite there being a Switch System button here, there is only one System for Special Education Custom Forms, unlike Student Custom Forms.To continue building a Special Education Custom Form, go to the Building a Custom Form section of this guide.
Functionality described here may vary in availability depending upon your district/entity configuration.** Denotes Required Field to save screen.
CUSTOM FORMS GUIDE
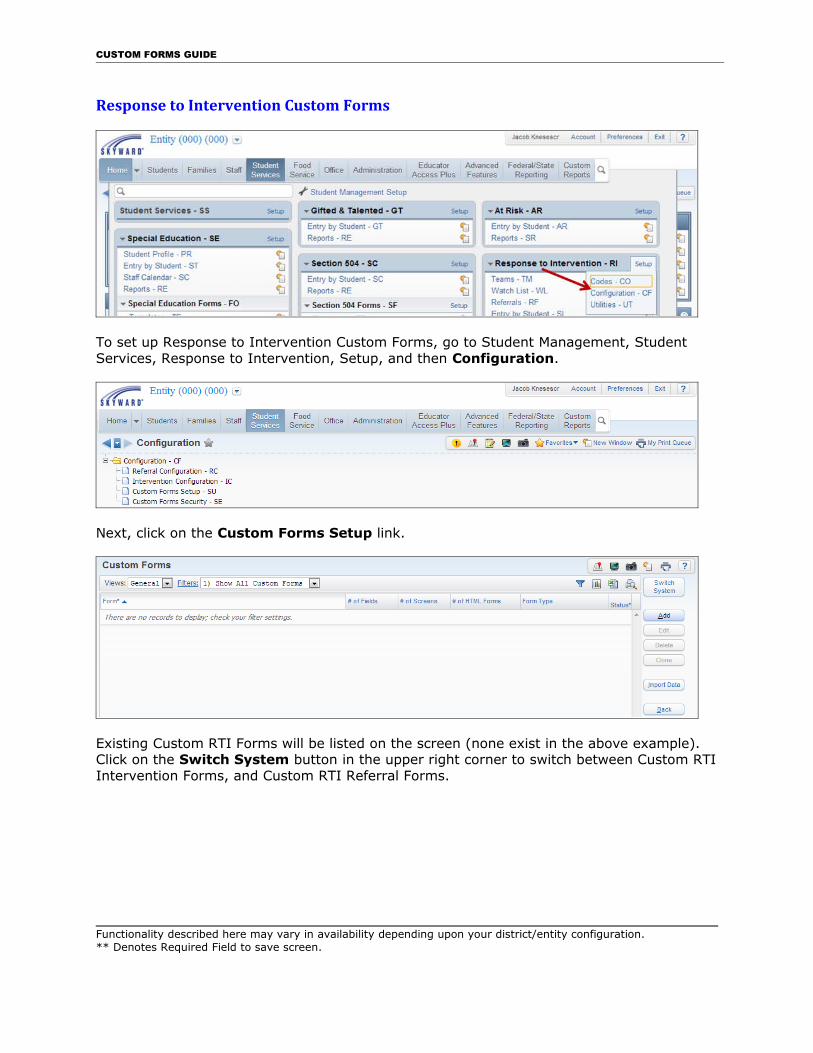
Response to Intervention Custom Forms
To set up Response to Intervention Custom Forms, go to Student Management, Student Services, Response to Intervention, Setup, and then Configuration.
Next, click on the Custom Forms Setup link.
Existing Custom RTI Forms will be listed on the screen (none exist in the above example). Click on the Switch System button in the upper right corner to switch between Custom RTI Intervention Forms, and Custom RTI Referral Forms.
Functionality described here may vary in availability depending upon your district/entity configuration.** Denotes Required Field to save screen.
CUSTOM FORMS GUIDE
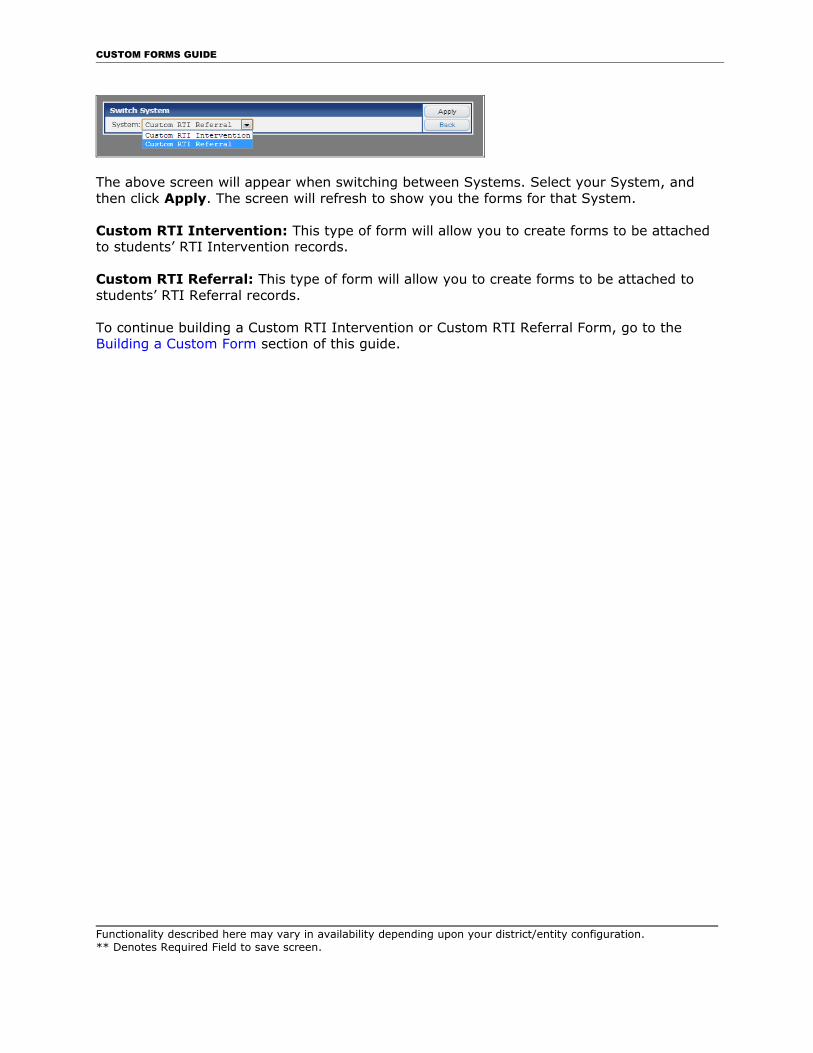
The above screen will appear when switching between Systems. Select your System, and then click Apply. The screen will refresh to show you the forms for that System.
Custom RTI Intervention: This type of form will allow you to create forms to be attached to students’ RTI Intervention records.
Custom RTI Referral: This type of form will allow you to create forms to be attached to students’ RTI Referral records.
To continue building a Custom RTI Intervention or Custom RTI Referral Form, go to the Building a Custom Form section of this guide.
Functionality described here may vary in availability depending upon your district/entity configuration.** Denotes Required Field to save screen.
CUSTOM FORMS GUIDE
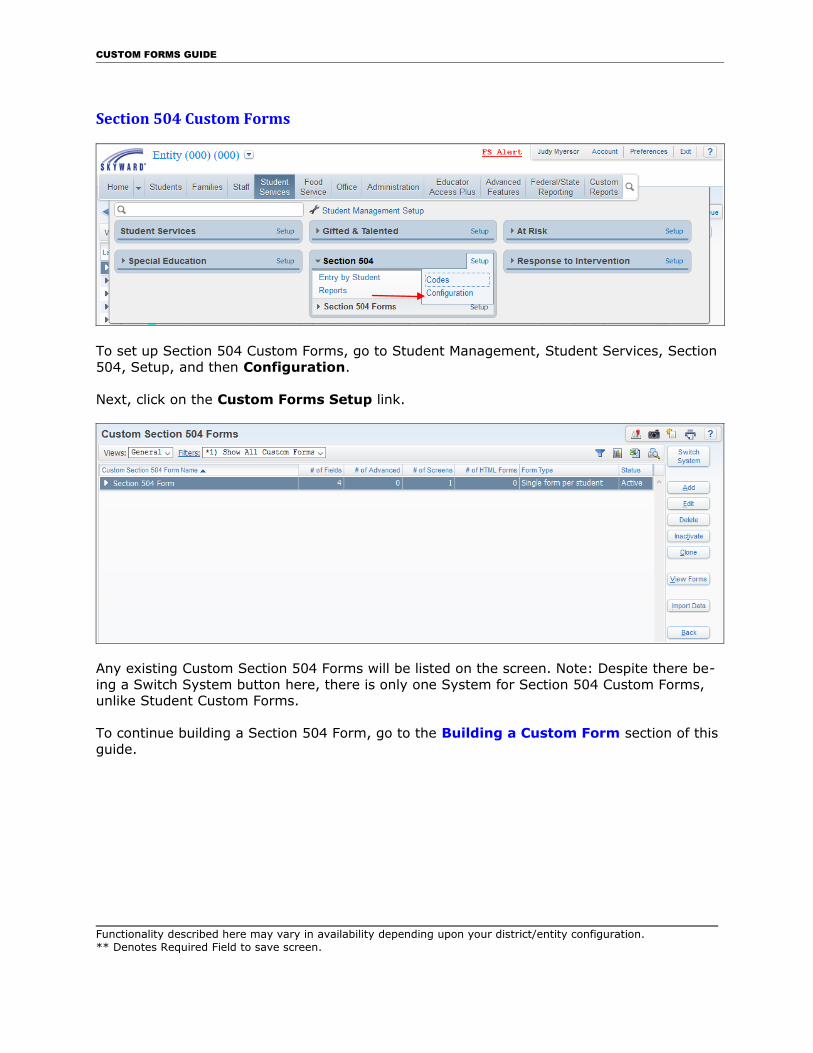
Section 504 Custom Forms
To set up Section 504 Custom Forms, go to Student Management, Student Services, Section 504, Setup, and then Configuration.
Next, click on the Custom Forms Setup link.
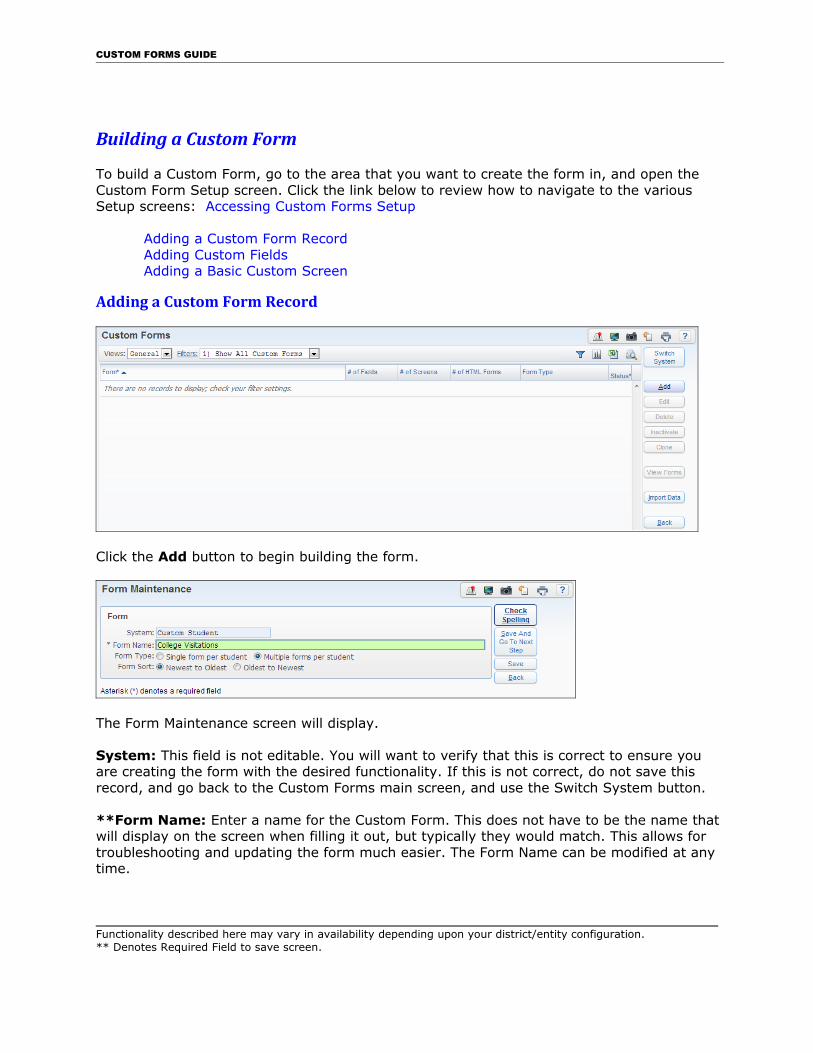
Any existing Custom Section 504 Forms will be listed on the screen. Note: Despite there be-ing a Switch System button here, there is only one System for Section 504 Custom Forms, unlike Student Custom Forms.
To continue building a Section 504 Form, go to the Building a Custom Form section of this guide.
Functionality described here may vary in availability depending upon your district/entity configuration.** Denotes Required Field to save screen.
CUSTOM FORMS GUIDE
Building a Custom Form
To build a Custom Form, go to the area that you want to create the form in, and open the Custom Form Setup screen. Click the link below to review how to navigate to the various Setup screens: Accessing Custom Forms Setup
Adding a Custom Form RecordAdding Custom FieldsAdding a Basic Custom Screen
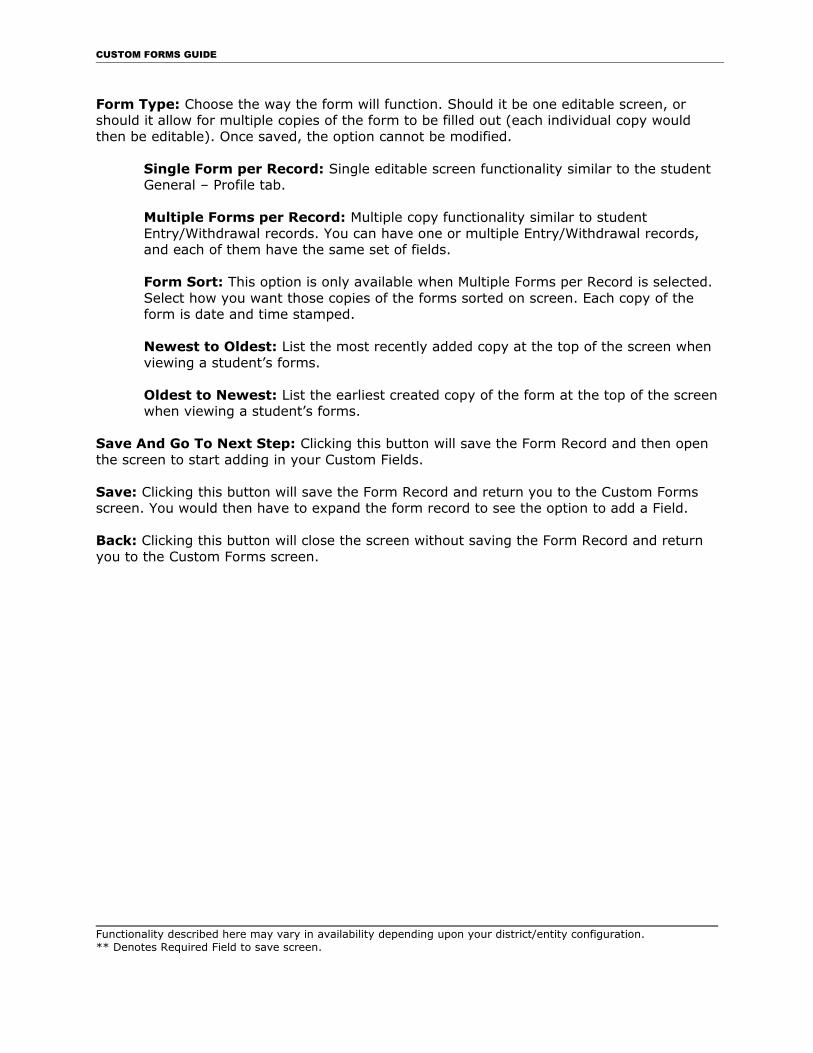
Adding a Custom Form Record
Click the Add button to begin building the form.
The Form Maintenance screen will display.
System: This field is not editable. You will want to verify that this is correct to ensure you are creating the form with the desired functionality. If this is not correct, do not save this record, and go back to the Custom Forms main screen, and use the Switch System button.
**Form Name: Enter a name for the Custom Form. This does not have to be the name that will display on the screen when filling it out, but typically they would match. This allows for troubleshooting and updating the form much easier. The Form Name can be modified at any time.
Functionality described here may vary in availability depending upon your district/entity configuration.** Denotes Required Field to save screen.
CUSTOM FORMS GUIDE
Form Type: Choose the way the form will function. Should it be one editable screen, or should it allow for multiple copies of the form to be filled out (each individual copy would then be editable). Once saved, the option cannot be modified.
Single Form per Record: Single editable screen functionality similar to the student General – Profile tab.
Multiple Forms per Record: Multiple copy functionality similar to student Entry/Withdrawal records. You can have one or multiple Entry/Withdrawal records, and each of them have the same set of fields.
Form Sort: This option is only available when Multiple Forms per Record is selected. Select how you want those copies of the forms sorted on screen. Each copy of the form is date and time stamped.
Newest to Oldest: List the most recently added copy at the top of the screen when viewing a student’s forms.
Oldest to Newest: List the earliest created copy of the form at the top of the screen when viewing a student’s forms.
Save And Go To Next Step: Clicking this button will save the Form Record and then open the screen to start adding in your Custom Fields.
Save: Clicking this button will save the Form Record and return you to the Custom Forms screen. You would then have to expand the form record to see the option to add a Field.
Back: Clicking this button will close the screen without saving the Form Record and return you to the Custom Forms screen.
Functionality described here may vary in availability depending upon your district/entity configuration.** Denotes Required Field to save screen.

CUSTOM FORMS GUIDE
Adding Custom Fields
After creating the form record, the Custom Fields to be filled out from the screen(s) need to be added. There are several different Data Types that can be used on fields, and each will bedescribed in detail below.
If you created the Custom Form Record without going to the next step, you will need to expand the record from the Custom Forms main screen and then click the Add Field button next to Custom Fields.
When adding fields, the following buttons will display on the screen to the right.
Save and Add Another Field: Click this button to save this field and open a new blank FieldMaintenance screen to create a new field.
Save and Clone to Another Field: Click this button to save this field and open a new Field Maintenance screen that will have all fields defaulted to the same values as the one you just saved.
Save and Go to Next Step: Click this button to save this field once all Custom Fields are created. It will then open up the Custom Screens builder screen.
Functionality described here may vary in availability depending upon your district/entity configuration.** Denotes Required Field to save screen.
CUSTOM FORMS GUIDE
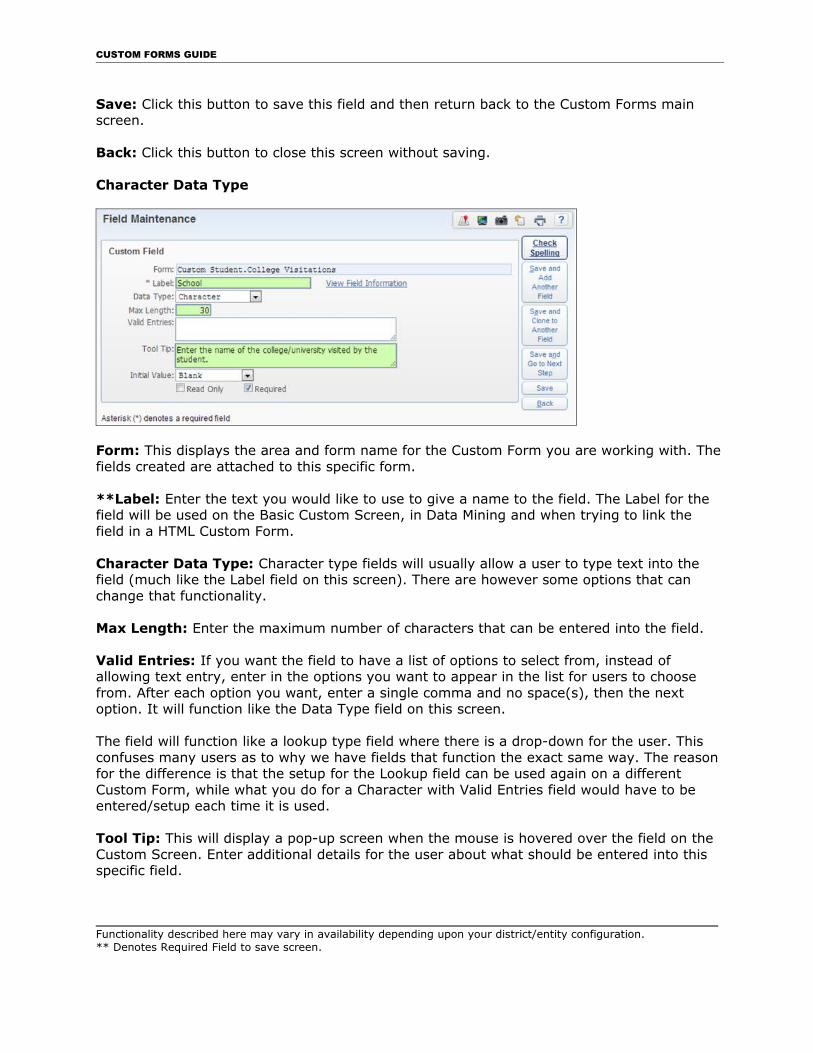
Save: Click this button to save this field and then return back to the Custom Forms main screen.
Back: Click this button to close this screen without saving.
Character Data Type
Form: This displays the area and form name for the Custom Form you are working with. Thefields created are attached to this specific form.
**Label: Enter the text you would like to use to give a name to the field. The Label for the field will be used on the Basic Custom Screen, in Data Mining and when trying to link the field in a HTML Custom Form.
Character Data Type: Character type fields will usually allow a user to type text into the field (much like the Label field on this screen). There are however some options that can change that functionality.
Max Length: Enter the maximum number of characters that can be entered into the field.
Valid Entries: If you want the field to have a list of options to select from, instead of allowing text entry, enter in the options you want to appear in the list for users to choose from. After each option you want, enter a single comma and no space(s), then the next option. It will function like the Data Type field on this screen.
The field will function like a lookup type field where there is a drop-down for the user. This confuses many users as to why we have fields that function the exact same way. The reason for the difference is that the setup for the Lookup field can be used again on a different Custom Form, while what you do for a Character with Valid Entries field would have to be entered/setup each time it is used.
Tool Tip: This will display a pop-up screen when the mouse is hovered over the field on the Custom Screen. Enter additional details for the user about what should be entered into this specific field.
Functionality described here may vary in availability depending upon your district/entity configuration.** Denotes Required Field to save screen.
CUSTOM FORMS GUIDE
Initial Value: Choose how you want the field to appear, or what you want the default value to be, when the form is first filled out for the student/family. As long as the Read Only optionis not selected, you will be able to change the field from this default value.
Blank: No data will appear in it initially.
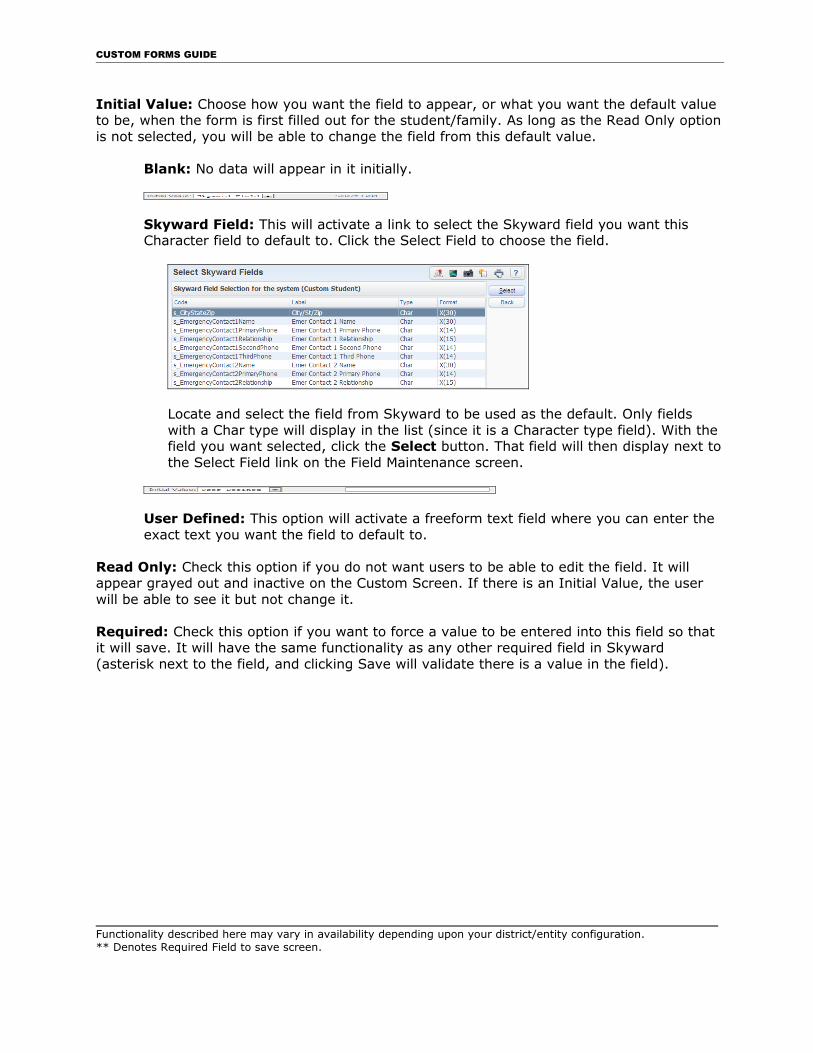
Skyward Field: This will activate a link to select the Skyward field you want this Character field to default to. Click the Select Field to choose the field.
Locate and select the field from Skyward to be used as the default. Only fields with a Char type will display in the list (since it is a Character type field). With the field you want selected, click the Select button. That field will then display next tothe Select Field link on the Field Maintenance screen.
User Defined: This option will activate a freeform text field where you can enter the exact text you want the field to default to.
Read Only: Check this option if you do not want users to be able to edit the field. It will appear grayed out and inactive on the Custom Screen. If there is an Initial Value, the user will be able to see it but not change it.
Required: Check this option if you want to force a value to be entered into this field so that it will save. It will have the same functionality as any other required field in Skyward (asterisk next to the field, and clicking Save will validate there is a value in the field).
Functionality described here may vary in availability depending upon your district/entity configuration.** Denotes Required Field to save screen.

CUSTOM FORMS GUIDE
Date Data Type
Form: This will display the area and form name for the Custom Form you are working with. The fields created are attached to this specific form.
**Label: Enter the text you would like to use to give a name to the field. The Label for the field will be used on the Basic Custom Screen, in Data Mining and when trying to link the field in a HTML Custom Form.
Date Data Type: Date type fields allow a user to enter a date, or select from the calendar icon next to the field. All normal Skyward date field functionality will work with Custom Form Date fields as well.
Format: This field cannot be edited. It displays the date formatting of the field.
Tool Tip: This will display a pop-up screen when the mouse is hovered over the field on the Custom Screen. Enter additional details for the user about what should be entered into this specific field.
Initial Value: Choose how you want the field to appear, or what you want the default value to be, when the form is first filled out for the student/family. There currently is no way to have a Custom Date field always default to the current date. As long as the Read Only optionis not selected, you will be able to change the field from this default value.
Blank: No data will appear in it initially.
Skyward Field: This will activate a link to select the Skyward field you want this Date field to default to. Click the Select Field to choose the field.
Functionality described here may vary in availability depending upon your district/entity configuration.** Denotes Required Field to save screen.
CUSTOM FORMS GUIDE
You can then find and select the field from Skyward to be used as the default. Only fields with a Date type will display in the list (since it is a Date type field). With the field you want selected, click the Select button. That field will then display next to the Select Field link on the Field Maintenance screen.
User Defined: This option will activate a Date field where you can enter the exact date you want the field to default to.
Read Only: Check this option if you do not want users to be able to edit the field. It will appear grayed out and inactive on the Custom Screen. If there is an Initial Value, the user will be able to see it but not change it.
Required: Check this option if you want to force a date to be entered into this field so that itwill save. It will have the same functionality as any other required field in Skyward (asterisk next to the field, and clicking Save will validate there is a value in the field).
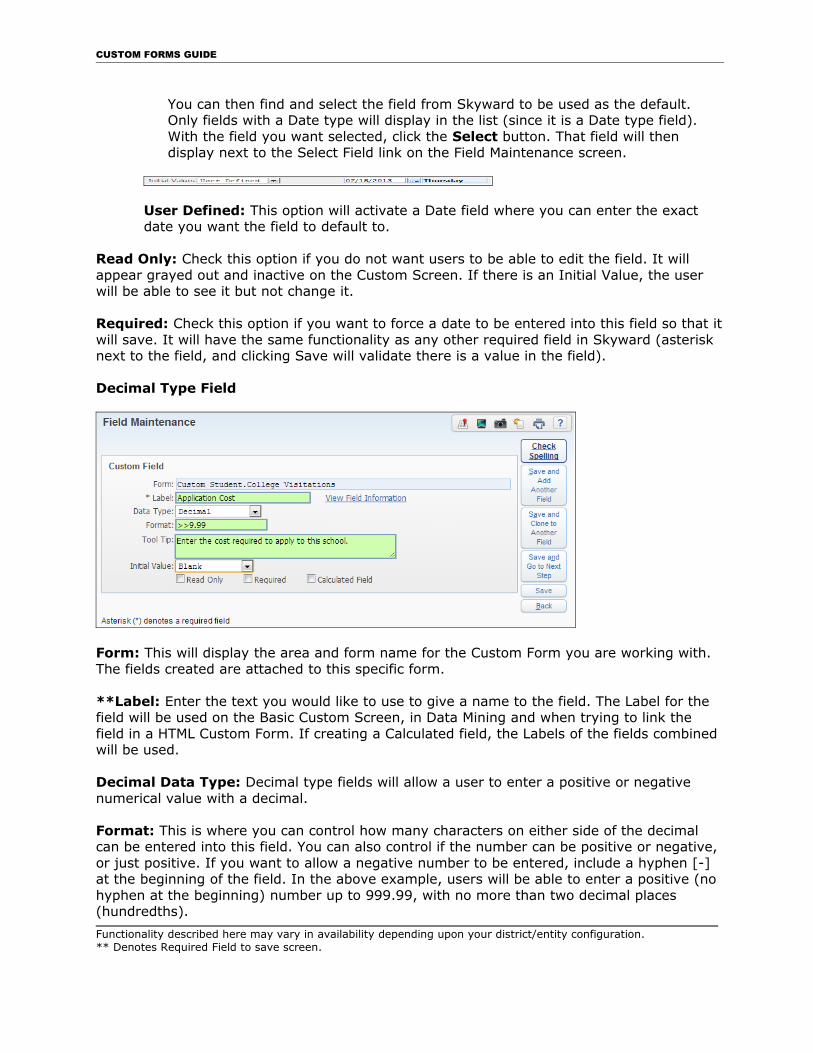
Decimal Type Field
Form: This will display the area and form name for the Custom Form you are working with. The fields created are attached to this specific form.
**Label: Enter the text you would like to use to give a name to the field. The Label for the field will be used on the Basic Custom Screen, in Data Mining and when trying to link the field in a HTML Custom Form. If creating a Calculated field, the Labels of the fields combined will be used.
Decimal Data Type: Decimal type fields will allow a user to enter a positive or negative numerical value with a decimal.
Format: This is where you can control how many characters on either side of the decimal can be entered into this field. You can also control if the number can be positive or negative, or just positive. If you want to allow a negative number to be entered, include a hyphen [-] at the beginning of the field. In the above example, users will be able to enter a positive (no hyphen at the beginning) number up to 999.99, with no more than two decimal places (hundredths).
Functionality described here may vary in availability depending upon your district/entity configuration.** Denotes Required Field to save screen.
CUSTOM FORMS GUIDE
Tool Tip: This will display a pop-up screen when the mouse is hovered over the field on the Custom Screen. Enter additional details for the user about what should be entered into this specific field.
Initial Value: Choose how you want the field to appear, or what you want the default value to be, when the form is first filled out for the student/family. As long as the Read Only optionis not selected, you will be able to change the field from this default value.
Blank: No data will appear in it initially.
Skyward Field: This will activate a link to select the Skyward field you want this Date field to default to. There currently are no Skyward decimal fields to set as a default value, so this option will not work on this type of field.
User Defined: This option will activate a field where you can enter the exact decimal value you want the field to default to. This will not look at the Format set up, and will work as a freeform text field, but when you click to save this screen you will get a message if it does not meet the formatting requirements.
Read Only: Check this option if you do not want users to be able to edit the field. It will appear grayed out and inactive on the Custom Screen. If there is an Initial Value, the user will be able to see it but not change it.
Required: Check this option if you want to force a value to be entered into this field so that it will save.
Calculated Field: Any numerical field (Decimal or Integer type) can be turned into a calculated field that will combine values from other Decimal or Integer fields using a formula.Only the one field that will have the combined values should have this option checked. The fields being used to calculate this field should not have this option checked. We will set one up at the end of the Integer Type Field section.
Functionality described here may vary in availability depending upon your district/entity configuration.** Denotes Required Field to save screen.
CUSTOM FORMS GUIDE
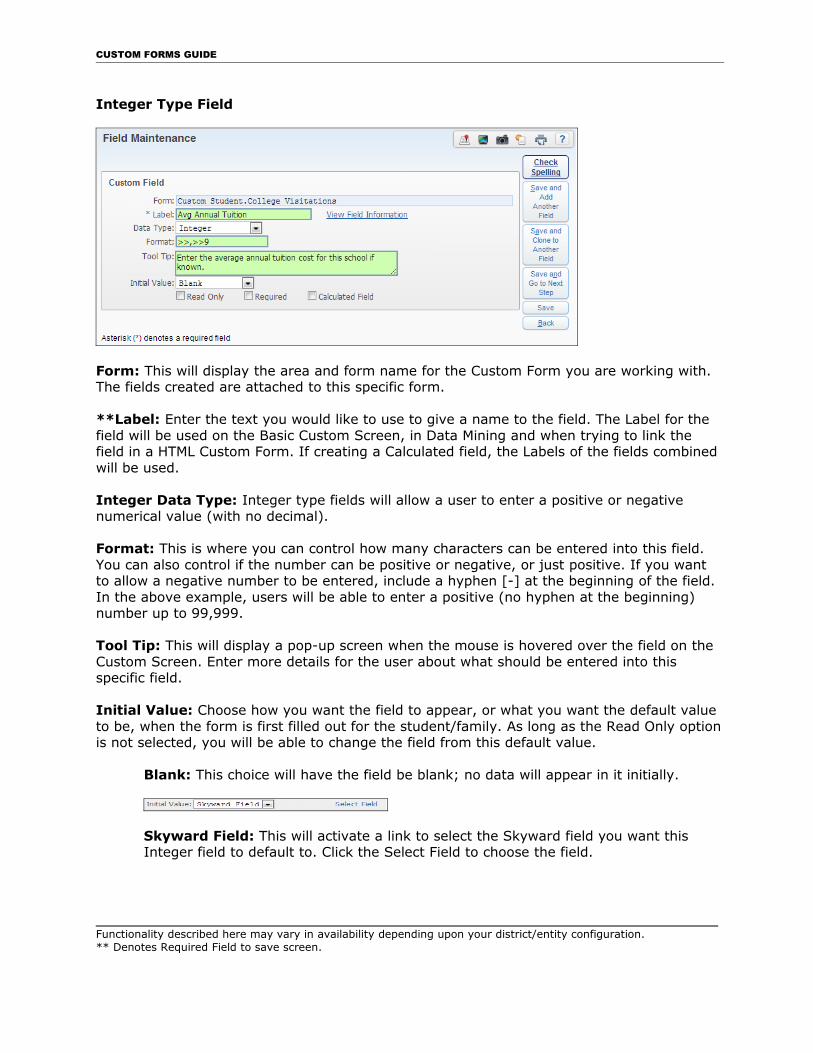
Integer Type Field
Form: This will display the area and form name for the Custom Form you are working with. The fields created are attached to this specific form.
**Label: Enter the text you would like to use to give a name to the field. The Label for the field will be used on the Basic Custom Screen, in Data Mining and when trying to link the field in a HTML Custom Form. If creating a Calculated field, the Labels of the fields combined will be used.
Integer Data Type: Integer type fields will allow a user to enter a positive or negative numerical value (with no decimal).
Format: This is where you can control how many characters can be entered into this field. You can also control if the number can be positive or negative, or just positive. If you want to allow a negative number to be entered, include a hyphen [-] at the beginning of the field. In the above example, users will be able to enter a positive (no hyphen at the beginning) number up to 99,999.
Tool Tip: This will display a pop-up screen when the mouse is hovered over the field on the Custom Screen. Enter more details for the user about what should be entered into this specific field.
Initial Value: Choose how you want the field to appear, or what you want the default value to be, when the form is first filled out for the student/family. As long as the Read Only optionis not selected, you will be able to change the field from this default value.
Blank: This choice will have the field be blank; no data will appear in it initially.
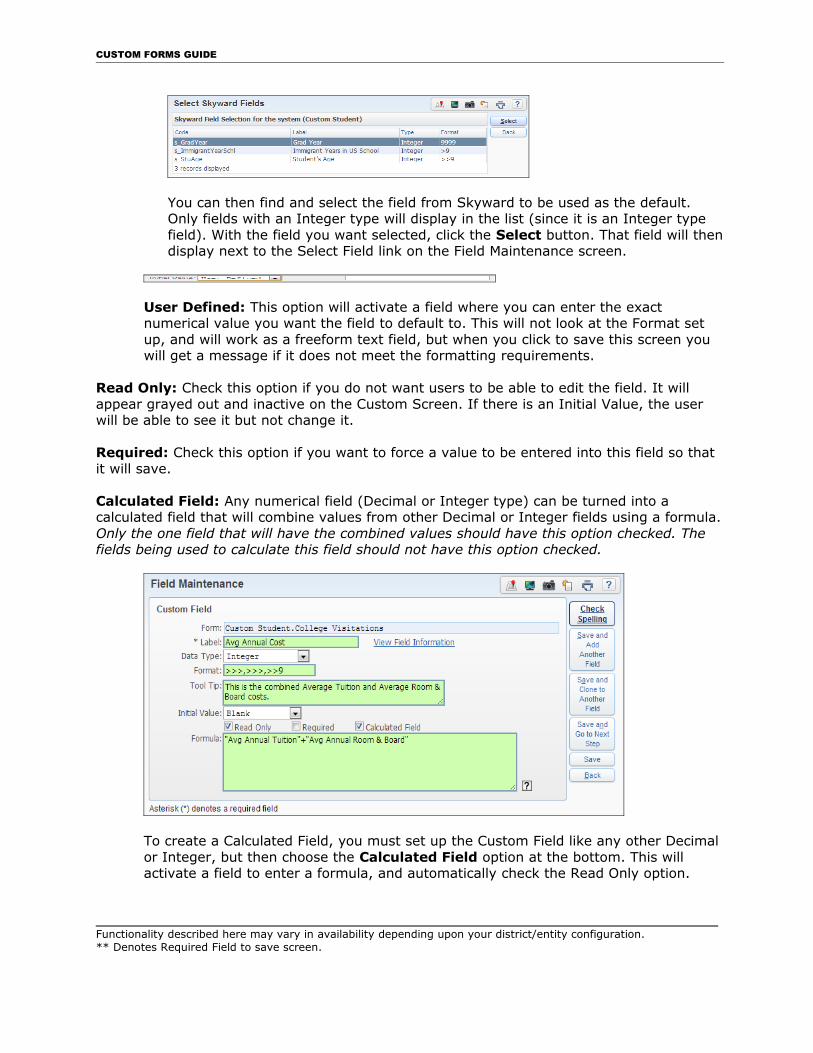
Skyward Field: This will activate a link to select the Skyward field you want this Integer field to default to. Click the Select Field to choose the field.
Functionality described here may vary in availability depending upon your district/entity configuration.** Denotes Required Field to save screen.
CUSTOM FORMS GUIDE
You can then find and select the field from Skyward to be used as the default. Only fields with an Integer type will display in the list (since it is an Integer type field). With the field you want selected, click the Select button. That field will thendisplay next to the Select Field link on the Field Maintenance screen.
User Defined: This option will activate a field where you can enter the exact numerical value you want the field to default to. This will not look at the Format set up, and will work as a freeform text field, but when you click to save this screen you will get a message if it does not meet the formatting requirements.
Read Only: Check this option if you do not want users to be able to edit the field. It will appear grayed out and inactive on the Custom Screen. If there is an Initial Value, the user will be able to see it but not change it.
Required: Check this option if you want to force a value to be entered into this field so that it will save.
Calculated Field: Any numerical field (Decimal or Integer type) can be turned into a calculated field that will combine values from other Decimal or Integer fields using a formula.Only the one field that will have the combined values should have this option checked. The fields being used to calculate this field should not have this option checked.
To create a Calculated Field, you must set up the Custom Field like any other Decimal or Integer, but then choose the Calculated Field option at the bottom. This will activate a field to enter a formula, and automatically check the Read Only option.
Functionality described here may vary in availability depending upon your district/entity configuration.** Denotes Required Field to save screen.
CUSTOM FORMS GUIDE
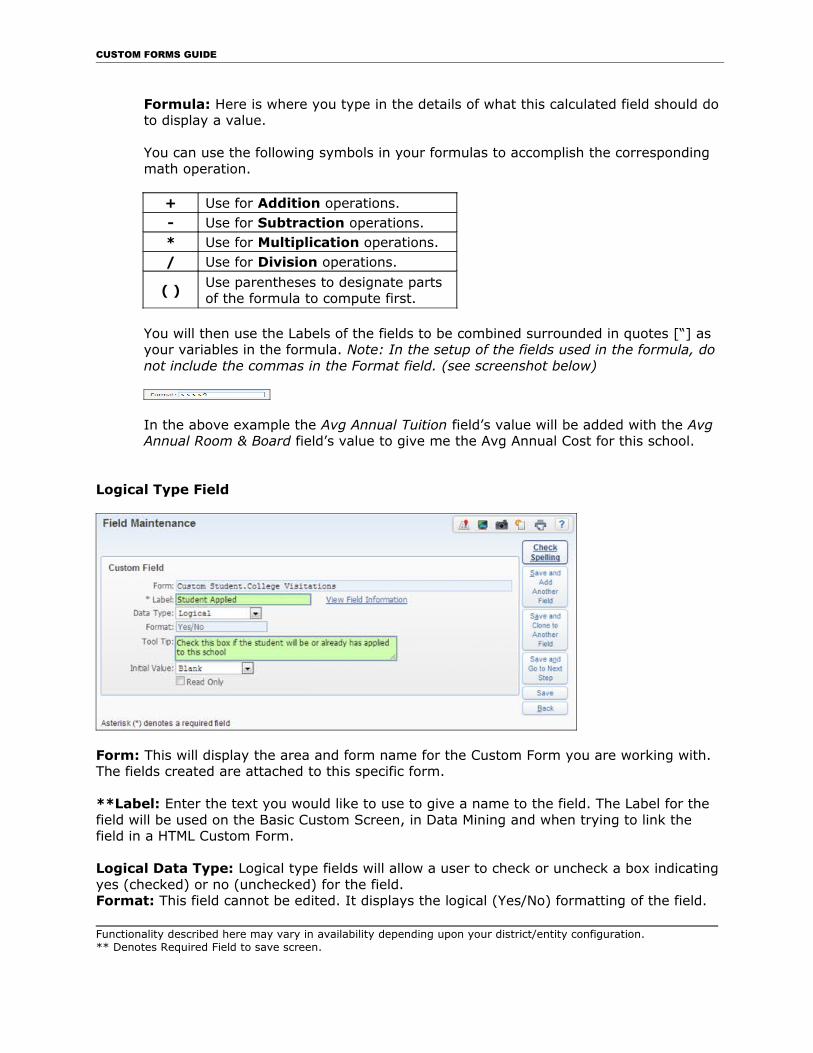
Formula: Here is where you type in the details of what this calculated field should do to display a value.
You can use the following symbols in your formulas to accomplish the corresponding math operation.
+ Use for Addition operations.- Use for Subtraction operations.* Use for Multiplication operations./ Use for Division operations.
( )Use parentheses to designate parts of the formula to compute first.
You will then use the Labels of the fields to be combined surrounded in quotes [“] as your variables in the formula. Note: In the setup of the fields used in the formula, do not include the commas in the Format field. (see screenshot below)
In the above example the Avg Annual Tuition field’s value will be added with the Avg Annual Room & Board field’s value to give me the Avg Annual Cost for this school.
Logical Type Field
Form: This will display the area and form name for the Custom Form you are working with. The fields created are attached to this specific form.
**Label: Enter the text you would like to use to give a name to the field. The Label for the field will be used on the Basic Custom Screen, in Data Mining and when trying to link the field in a HTML Custom Form.
Logical Data Type: Logical type fields will allow a user to check or uncheck a box indicating yes (checked) or no (unchecked) for the field.Format: This field cannot be edited. It displays the logical (Yes/No) formatting of the field.
Functionality described here may vary in availability depending upon your district/entity configuration.** Denotes Required Field to save screen.
CUSTOM FORMS GUIDE
Tool Tip: This will display a pop-up screen when the mouse is hovered over the field on the Custom Screen. Enter additional details for the user about what should be entered into this specific field. Often times it is good to enter a question in this field with a Yes/No response, and remind the user that checked means “Yes.”
Initial Value: Choose how you want the field to appear, or what you want the default value to be, when the form is first filled out for the student/family. As long as the Read Only optionis not selected, you will be able to change the field from this default value.
Blank: No data will appear in it initially.
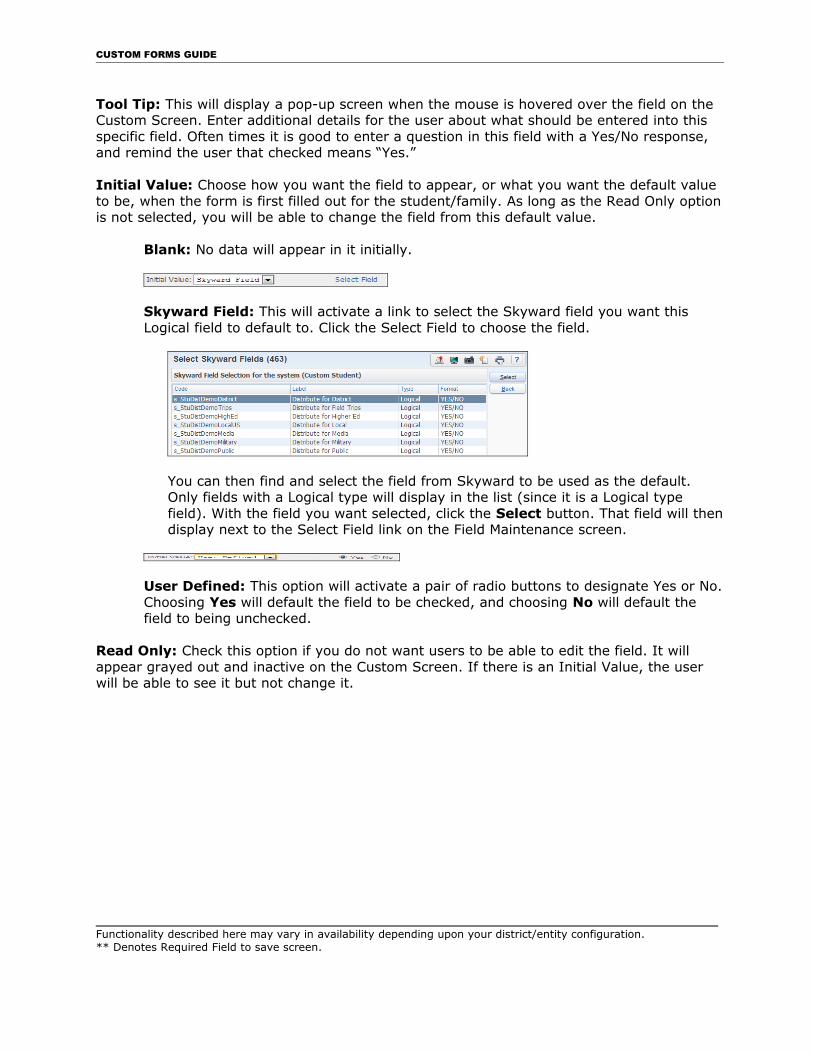
Skyward Field: This will activate a link to select the Skyward field you want this Logical field to default to. Click the Select Field to choose the field.
You can then find and select the field from Skyward to be used as the default. Only fields with a Logical type will display in the list (since it is a Logical type field). With the field you want selected, click the Select button. That field will thendisplay next to the Select Field link on the Field Maintenance screen.
User Defined: This option will activate a pair of radio buttons to designate Yes or No.Choosing Yes will default the field to be checked, and choosing No will default the field to being unchecked.
Read Only: Check this option if you do not want users to be able to edit the field. It will appear grayed out and inactive on the Custom Screen. If there is an Initial Value, the user will be able to see it but not change it.
Functionality described here may vary in availability depending upon your district/entity configuration.** Denotes Required Field to save screen.
CUSTOM FORMS GUIDE
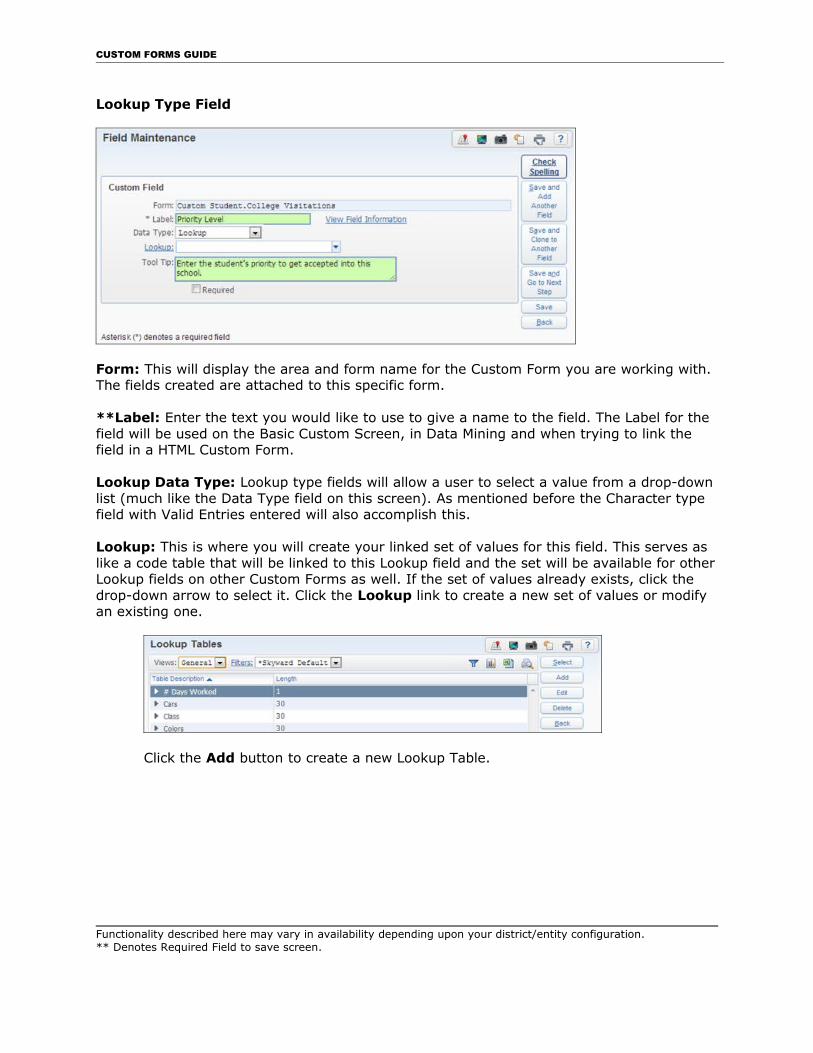
Lookup Type Field
Form: This will display the area and form name for the Custom Form you are working with. The fields created are attached to this specific form.
**Label: Enter the text you would like to use to give a name to the field. The Label for the field will be used on the Basic Custom Screen, in Data Mining and when trying to link the field in a HTML Custom Form.
Lookup Data Type: Lookup type fields will allow a user to select a value from a drop-down list (much like the Data Type field on this screen). As mentioned before the Character type field with Valid Entries entered will also accomplish this.
Lookup: This is where you will create your linked set of values for this field. This serves as like a code table that will be linked to this Lookup field and the set will be available for other Lookup fields on other Custom Forms as well. If the set of values already exists, click the drop-down arrow to select it. Click the Lookup link to create a new set of values or modify an existing one.
Click the Add button to create a new Lookup Table.
Functionality described here may vary in availability depending upon your district/entity configuration.** Denotes Required Field to save screen.
CUSTOM FORMS GUIDE
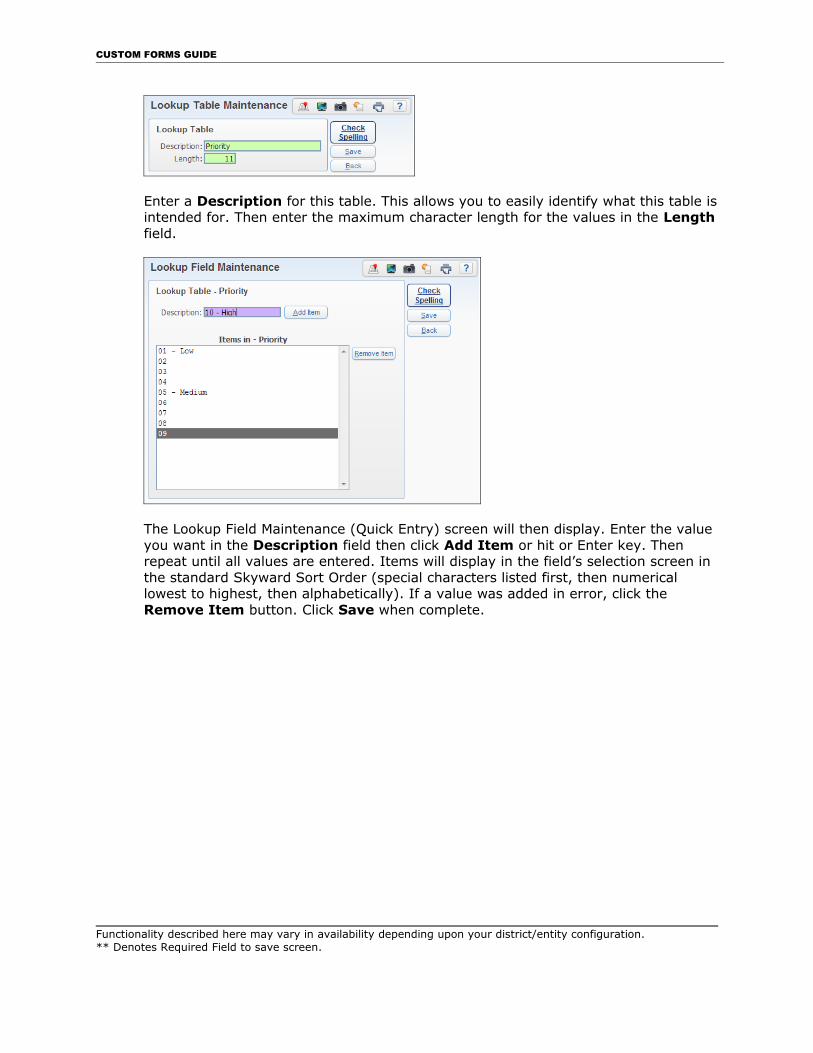
Enter a Description for this table. This allows you to easily identify what this table is intended for. Then enter the maximum character length for the values in the Length field.
The Lookup Field Maintenance (Quick Entry) screen will then display. Enter the value you want in the Description field then click Add Item or hit or Enter key. Then repeat until all values are entered. Items will display in the field’s selection screen in the standard Skyward Sort Order (special characters listed first, then numerical lowest to highest, then alphabetically). If a value was added in error, click the Remove Item button. Click Save when complete.
Functionality described here may vary in availability depending upon your district/entity configuration.** Denotes Required Field to save screen.
CUSTOM FORMS GUIDE
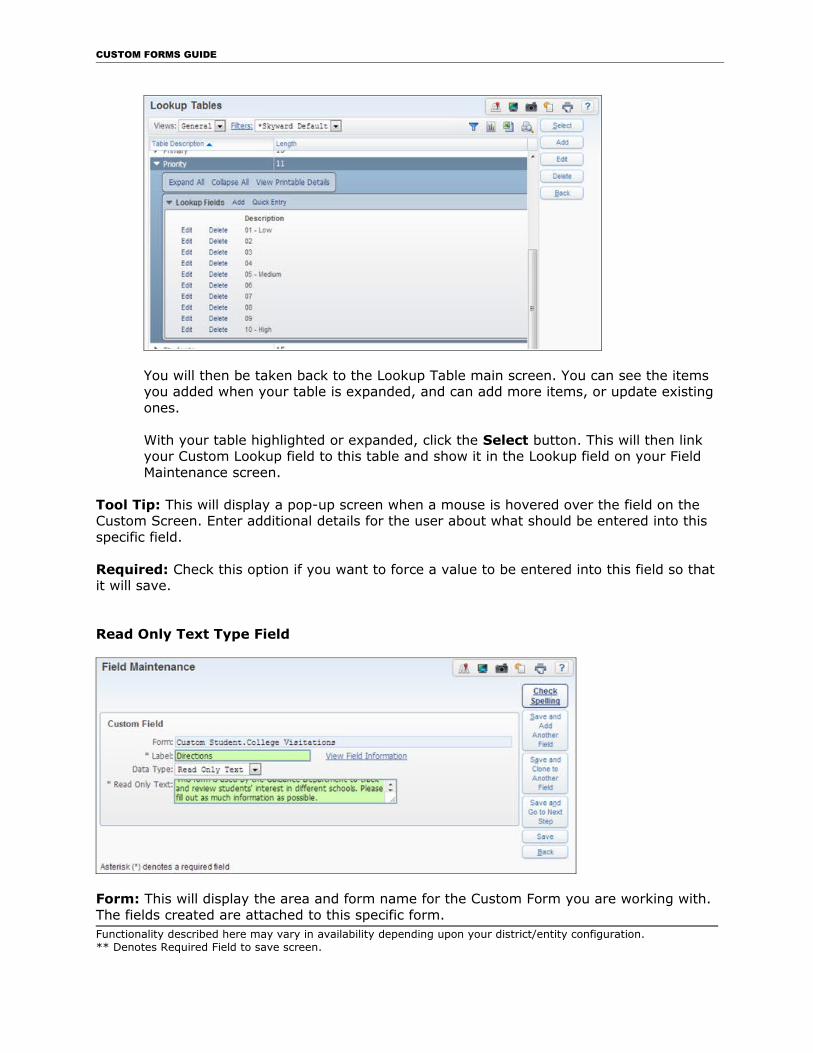
You will then be taken back to the Lookup Table main screen. You can see the items you added when your table is expanded, and can add more items, or update existing ones.
With your table highlighted or expanded, click the Select button. This will then link your Custom Lookup field to this table and show it in the Lookup field on your Field Maintenance screen.
Tool Tip: This will display a pop-up screen when a mouse is hovered over the field on the Custom Screen. Enter additional details for the user about what should be entered into this specific field.
Required: Check this option if you want to force a value to be entered into this field so that it will save.
Read Only Text Type Field
Form: This will display the area and form name for the Custom Form you are working with. The fields created are attached to this specific form.Functionality described here may vary in availability depending upon your district/entity configuration.** Denotes Required Field to save screen.
CUSTOM FORMS GUIDE
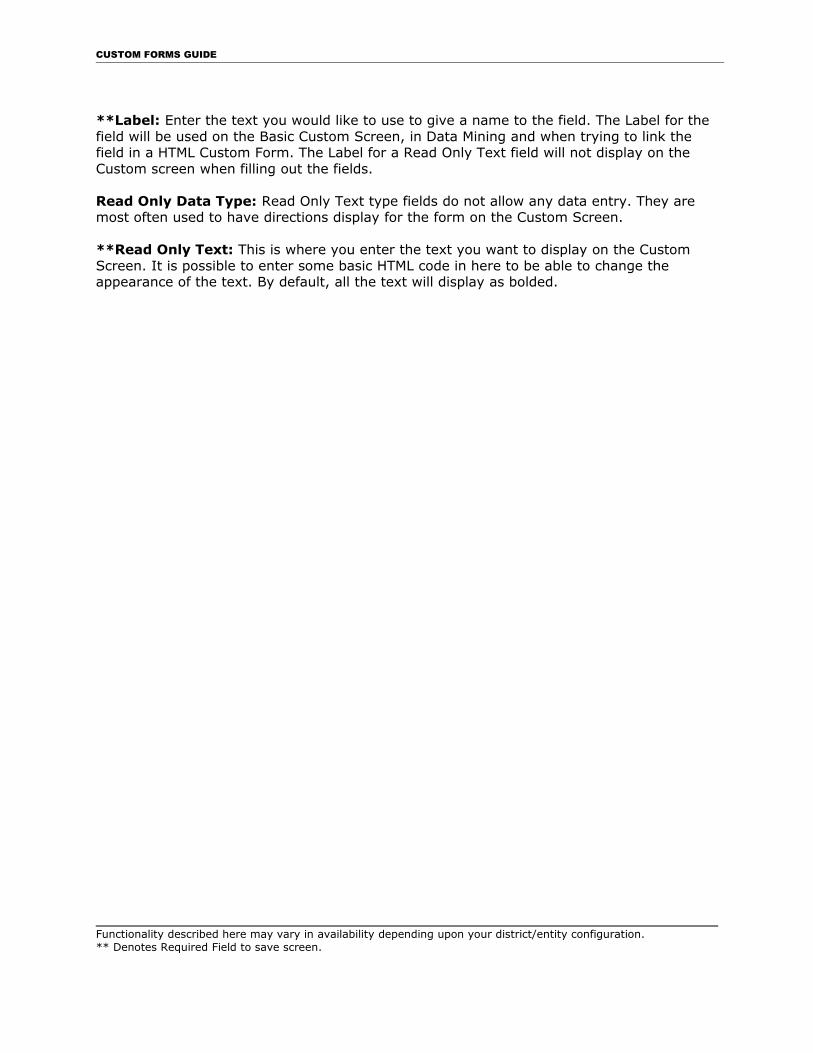
**Label: Enter the text you would like to use to give a name to the field. The Label for the field will be used on the Basic Custom Screen, in Data Mining and when trying to link the field in a HTML Custom Form. The Label for a Read Only Text field will not display on the Custom screen when filling out the fields.
Read Only Data Type: Read Only Text type fields do not allow any data entry. They are most often used to have directions display for the form on the Custom Screen.
**Read Only Text: This is where you enter the text you want to display on the Custom Screen. It is possible to enter some basic HTML code in here to be able to change the appearance of the text. By default, all the text will display as bolded.
Functionality described here may vary in availability depending upon your district/entity configuration.** Denotes Required Field to save screen.
CUSTOM FORMS GUIDE
Adding a Basic Custom Screen
Now that you have the Custom Form created and all of the Custom Fields built, next you will place those fields on a screen and layout the view for the user entering data into the form. There are three types of screens that can be built. We will focus on the Basic Custom Screen in this section, and describe more about the others in the Building Other Custom Screens section.
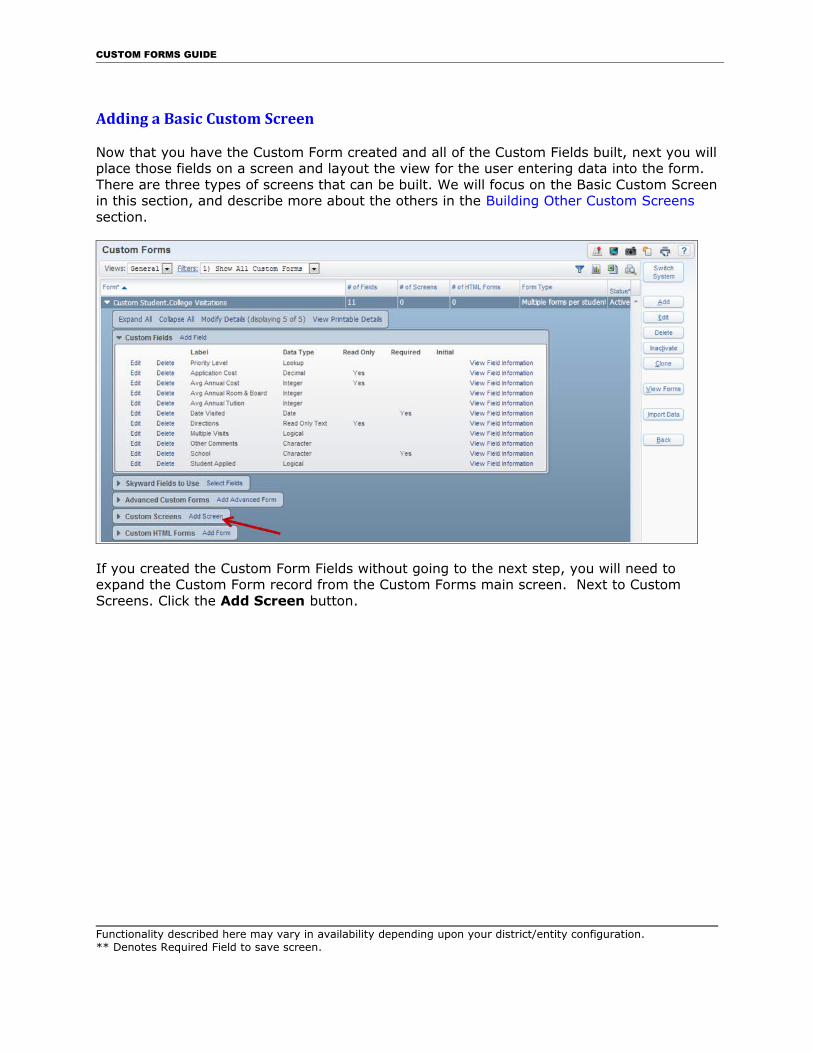
If you created the Custom Form Fields without going to the next step, you will need to expand the Custom Form record from the Custom Forms main screen. Next to Custom Screens. Click the Add Screen button.
Functionality described here may vary in availability depending upon your district/entity configuration.** Denotes Required Field to save screen.
CUSTOM FORMS GUIDE
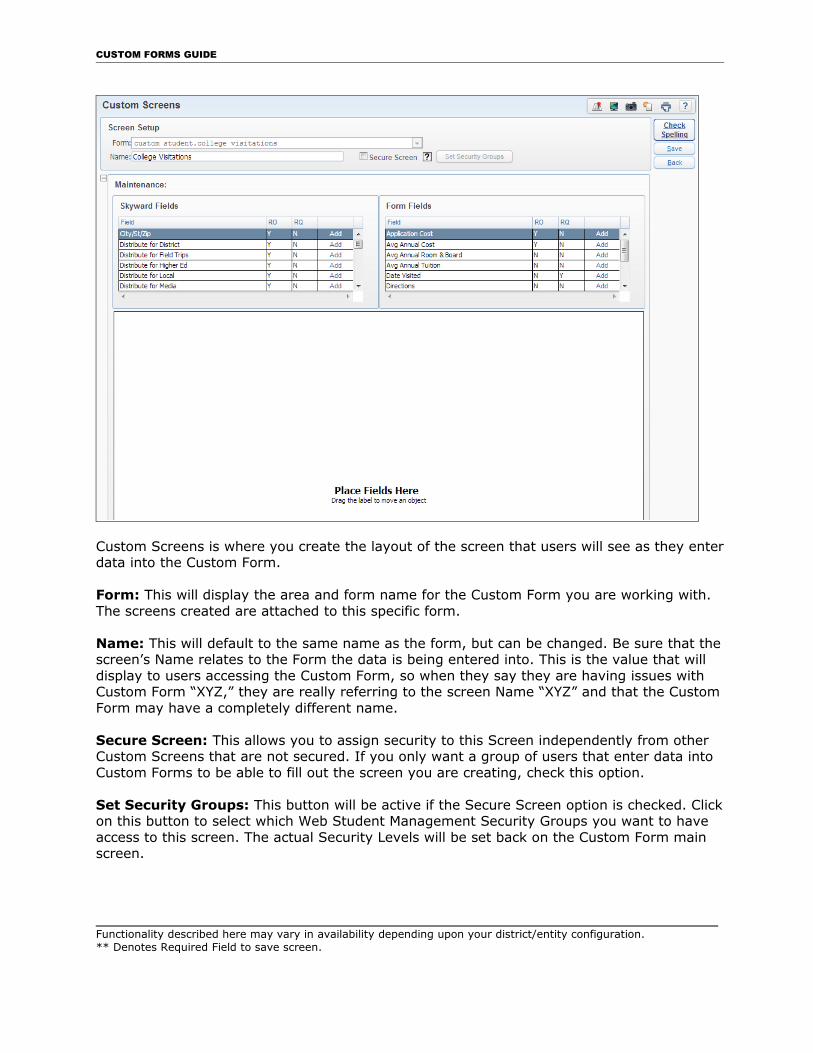
Custom Screens is where you create the layout of the screen that users will see as they enterdata into the Custom Form.
Form: This will display the area and form name for the Custom Form you are working with. The screens created are attached to this specific form.
Name: This will default to the same name as the form, but can be changed. Be sure that thescreen’s Name relates to the Form the data is being entered into. This is the value that will display to users accessing the Custom Form, so when they say they are having issues with Custom Form “XYZ,” they are really referring to the screen Name “XYZ” and that the CustomForm may have a completely different name.
Secure Screen: This allows you to assign security to this Screen independently from other Custom Screens that are not secured. If you only want a group of users that enter data into Custom Forms to be able to fill out the screen you are creating, check this option.
Set Security Groups: This button will be active if the Secure Screen option is checked. Clickon this button to select which Web Student Management Security Groups you want to have access to this screen. The actual Security Levels will be set back on the Custom Form main screen.
Functionality described here may vary in availability depending upon your district/entity configuration.** Denotes Required Field to save screen.
CUSTOM FORMS GUIDE
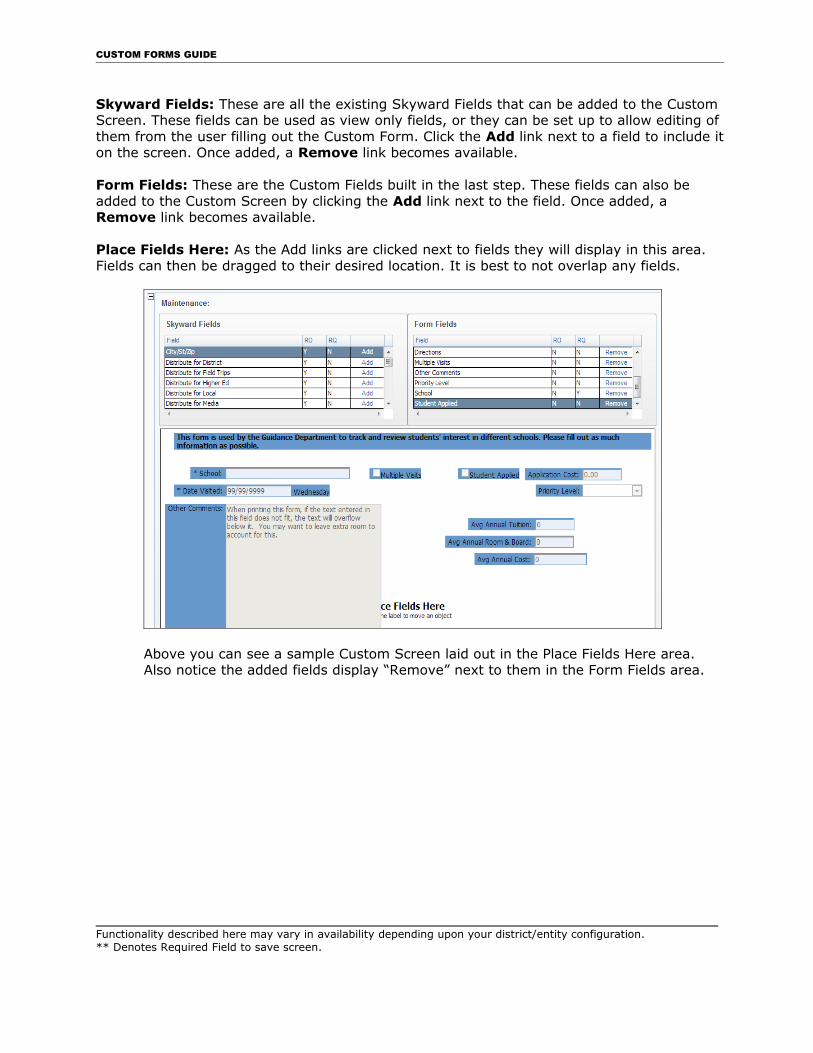
Skyward Fields: These are all the existing Skyward Fields that can be added to the Custom Screen. These fields can be used as view only fields, or they can be set up to allow editing of them from the user filling out the Custom Form. Click the Add link next to a field to include iton the screen. Once added, a Remove link becomes available.
Form Fields: These are the Custom Fields built in the last step. These fields can also be added to the Custom Screen by clicking the Add link next to the field. Once added, a Remove link becomes available.
Place Fields Here: As the Add links are clicked next to fields they will display in this area. Fields can then be dragged to their desired location. It is best to not overlap any fields.
Above you can see a sample Custom Screen laid out in the Place Fields Here area. Also notice the added fields display “Remove” next to them in the Form Fields area.
Functionality described here may vary in availability depending upon your district/entity configuration.** Denotes Required Field to save screen.

CUSTOM FORMS GUIDE
Scroll to the bottom of Custom Screens to access Browse Display Details. This area is available for users to choose which fields from the screen will display on a browse screen (i.e. Student Custom Forms browse – WS\ST\CF) when viewing the Custom Form records. The fields can then be ordered on how they should display from left to right. Below is an example from the screen above.
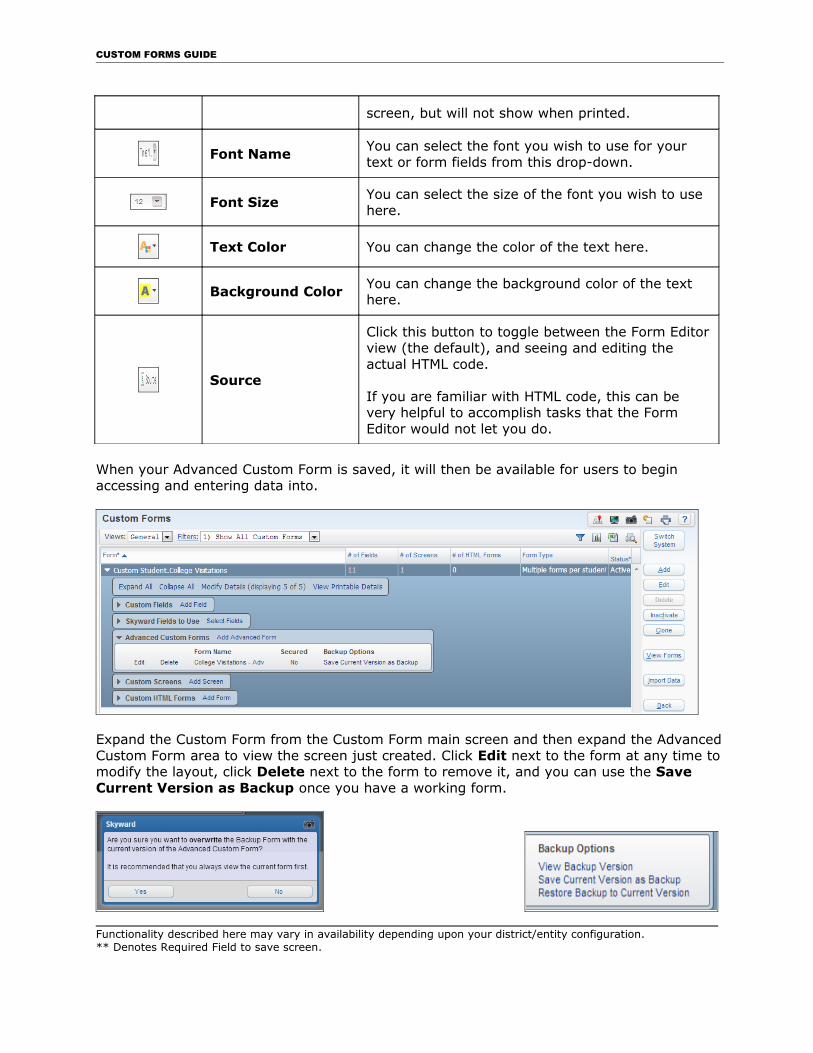
Now the Custom Screen can be saved. The screen will now be available to all users that havesecurity access to it. It can be filled out for the individual records, or set up to be used through another process (Online Registration, or Online Forms).
Functionality described here may vary in availability depending upon your district/entity configuration.** Denotes Required Field to save screen.
CUSTOM FORMS GUIDE
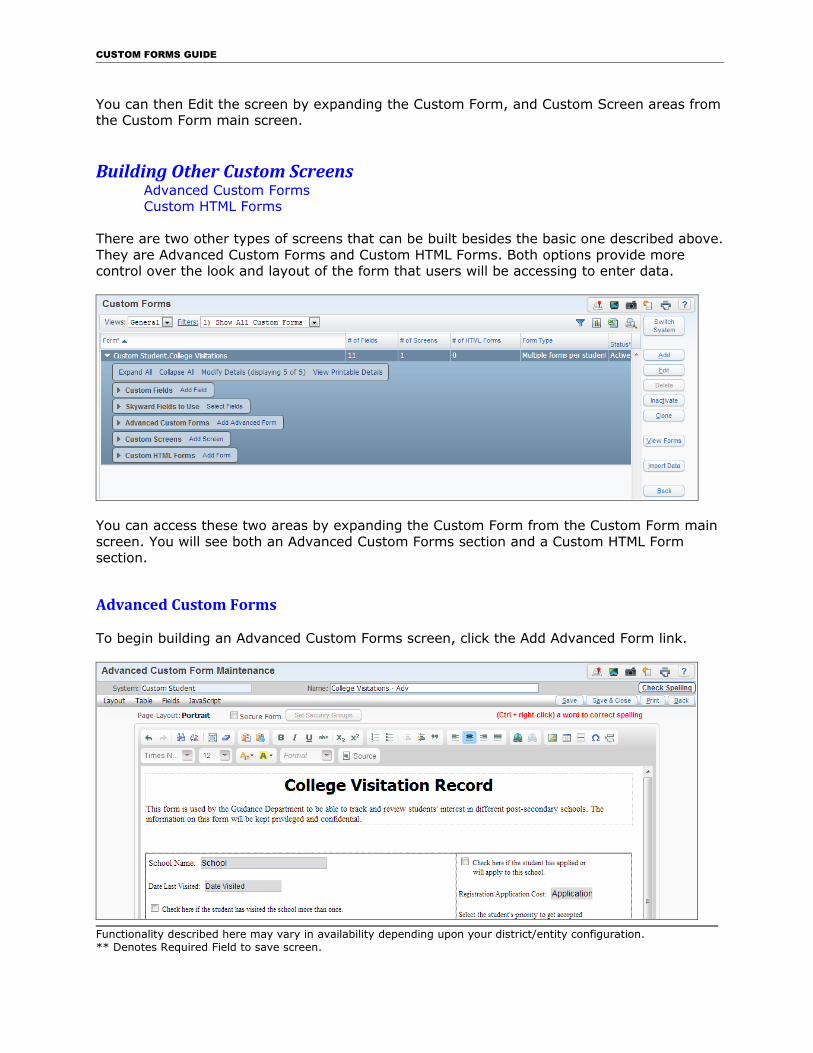
You can then Edit the screen by expanding the Custom Form, and Custom Screen areas fromthe Custom Form main screen.
Building Other Custom ScreensAdvanced Custom FormsCustom HTML Forms
There are two other types of screens that can be built besides the basic one described above.They are Advanced Custom Forms and Custom HTML Forms. Both options provide more control over the look and layout of the form that users will be accessing to enter data.
You can access these two areas by expanding the Custom Form from the Custom Form main screen. You will see both an Advanced Custom Forms section and a Custom HTML Form section.
Advanced Custom Forms
To begin building an Advanced Custom Forms screen, click the Add Advanced Form link.
Functionality described here may vary in availability depending upon your district/entity configuration.** Denotes Required Field to save screen.
CUSTOM FORMS GUIDE
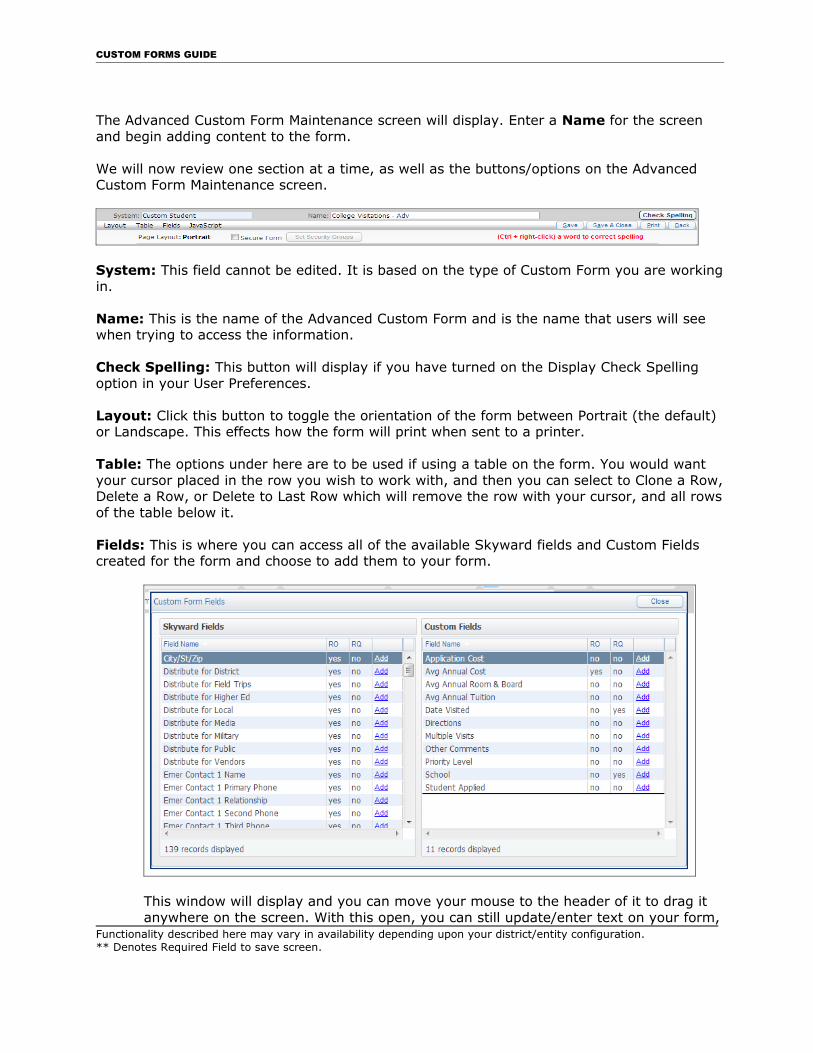
The Advanced Custom Form Maintenance screen will display. Enter a Name for the screen and begin adding content to the form.
We will now review one section at a time, as well as the buttons/options on the Advanced Custom Form Maintenance screen.
System: This field cannot be edited. It is based on the type of Custom Form you are workingin.
Name: This is the name of the Advanced Custom Form and is the name that users will see when trying to access the information.
Check Spelling: This button will display if you have turned on the Display Check Spelling option in your User Preferences.
Layout: Click this button to toggle the orientation of the form between Portrait (the default) or Landscape. This effects how the form will print when sent to a printer.
Table: The options under here are to be used if using a table on the form. You would want your cursor placed in the row you wish to work with, and then you can select to Clone a Row,Delete a Row, or Delete to Last Row which will remove the row with your cursor, and all rowsof the table below it.
Fields: This is where you can access all of the available Skyward fields and Custom Fields created for the form and choose to add them to your form.
This window will display and you can move your mouse to the header of it to drag it anywhere on the screen. With this open, you can still update/enter text on your form,
Functionality described here may vary in availability depending upon your district/entity configuration.** Denotes Required Field to save screen.
CUSTOM FORMS GUIDE
so moving it around can be very helpful so that you don’t have to constantly open andclose it.
You can see the two groups of fields, and next to each field there is the Add link, just like in the Basic Custom Screen. The difference here is that you need to have your cursor in the location on the form where you want the field to be when you choose to add it.
JavaScript: You can enter the code into this area instead of entering it into the Source. Adding JavaScript directly to the Source could cause the Advanced Custom Form to no longeropen. This can be used for something like adding an on screen alert.
Save: Use this to save your work without closing the screen.
Save & Close: Use this button to save your work, and close the screen to return to the Custom Form main screen.
Print: Click this button to create a printable version (a .PDF) of the form. This is helpful to verify that you are formatting the form to your liking.
Back: Click this to return to the Custom Form main screen without saving your work.
Page Layout: This is displaying the option set in the Layout area previously discussed.
Secure Form: This allows you to be able assign security to Advanced Custom Form independently from other Custom Screens that are not secured. If you only want a group of users that enter data into Custom Forms be able to fill out the Screen you are creating, check this option.
Set Security Groups: This button will be active if the Secure Form option is checked. Click on this button to be able to select which Web Student Management Security Groups you want to be access this screen. The actual Security Levels will be set back on the Custom Form main screen.
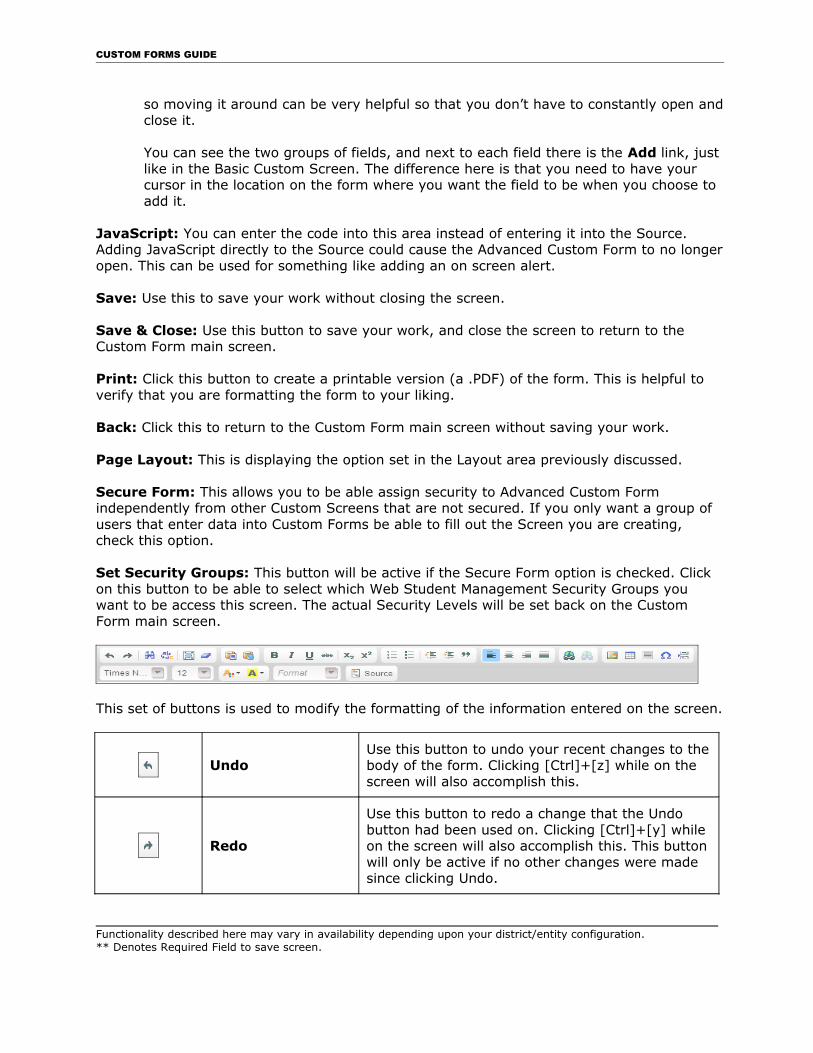
This set of buttons is used to modify the formatting of the information entered on the screen.
UndoUse this button to undo your recent changes to thebody of the form. Clicking [Ctrl]+[z] while on the screen will also accomplish this.
Redo
Use this button to redo a change that the Undo button had been used on. Clicking [Ctrl]+[y] while on the screen will also accomplish this. This buttonwill only be active if no other changes were made since clicking Undo.
Functionality described here may vary in availability depending upon your district/entity configuration.** Denotes Required Field to save screen.
CUSTOM FORMS GUIDE
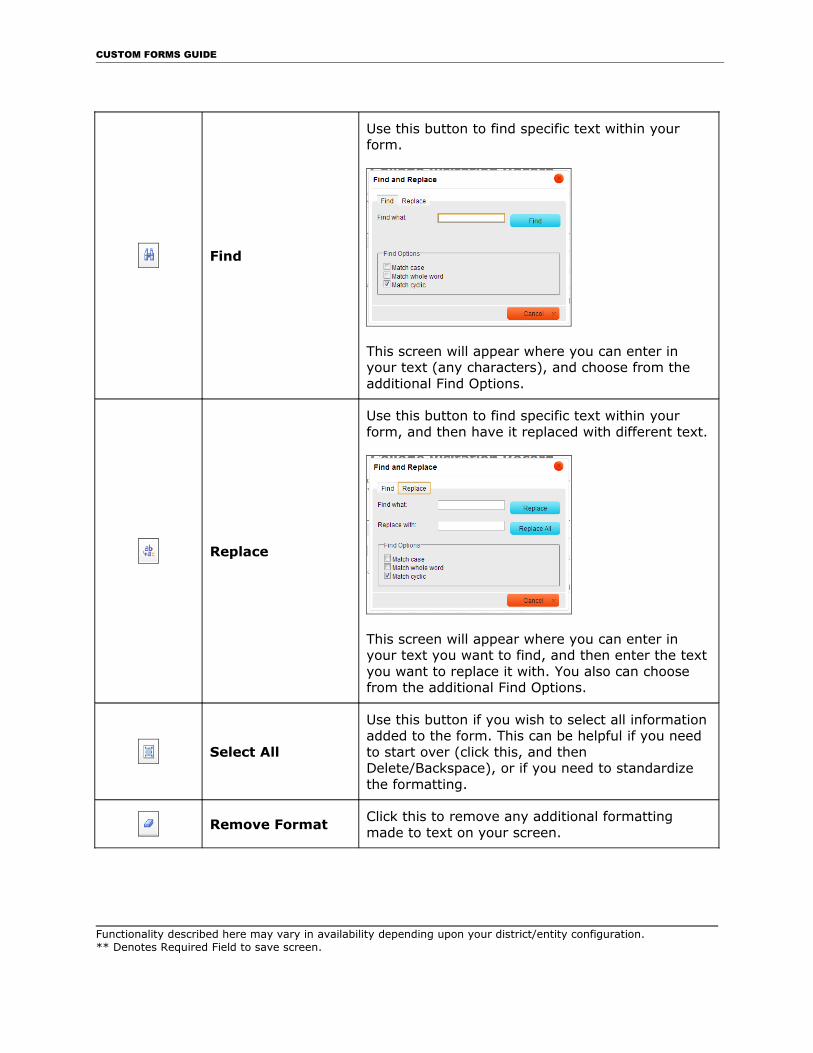
Find
Use this button to find specific text within your form.
This screen will appear where you can enter in your text (any characters), and choose from the additional Find Options.
Replace
Use this button to find specific text within your form, and then have it replaced with different text.
This screen will appear where you can enter in your text you want to find, and then enter the textyou want to replace it with. You also can choose from the additional Find Options.
Select All
Use this button if you wish to select all informationadded to the form. This can be helpful if you need to start over (click this, and then Delete/Backspace), or if you need to standardize the formatting.
Remove FormatClick this to remove any additional formatting made to text on your screen.
Functionality described here may vary in availability depending upon your district/entity configuration.** Denotes Required Field to save screen.
CUSTOM FORMS GUIDE
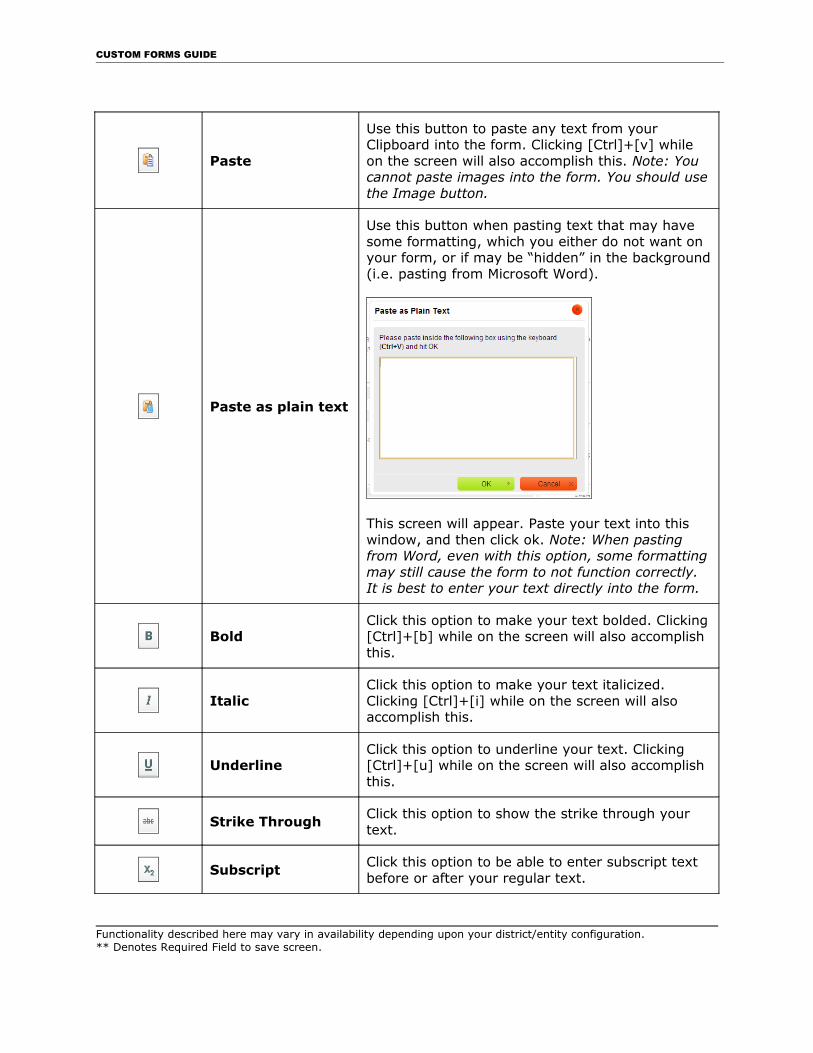
Paste
Use this button to paste any text from your Clipboard into the form. Clicking [Ctrl]+[v] while on the screen will also accomplish this. Note: You cannot paste images into the form. You should usethe Image button.
Paste as plain text
Use this button when pasting text that may have some formatting, which you either do not want on your form, or if may be “hidden” in the background(i.e. pasting from Microsoft Word).
This screen will appear. Paste your text into this window, and then click ok. Note: When pasting from Word, even with this option, some formattingmay still cause the form to not function correctly. It is best to enter your text directly into the form.
BoldClick this option to make your text bolded. Clicking[Ctrl]+[b] while on the screen will also accomplish this.
ItalicClick this option to make your text italicized. Clicking [Ctrl]+[i] while on the screen will also accomplish this.
UnderlineClick this option to underline your text. Clicking [Ctrl]+[u] while on the screen will also accomplish this.
Strike ThroughClick this option to show the strike through your text.
SubscriptClick this option to be able to enter subscript text before or after your regular text.
Functionality described here may vary in availability depending upon your district/entity configuration.** Denotes Required Field to save screen.

CUSTOM FORMS GUIDE
SuperscriptClick this option to be able to enter superscript text before or after your regular text.
Insert/Remove Numbered List
Click this option when you wish to start a new numbered list (the list will start indented from the regular alignment), or when you wish to end a numbered list.
Insert/Remove Bulleted List
Click this option when you wish to start a new bulleted list (the list will start indented from the regular alignment), or when you wish to end a bulleted list.
Decrease Indent
Use this button to move the alignment back to the right after increasing the indentation. This button will only be active on a line that the Increase Indent has been used on.
Increase Indent
Use this button to move the alignment away from the far left in about ½ inches. As text wraps from line to line, or return lines are entered the new lines will keep this indentation.
Block QuoteUse this option to create indented text with an extra line above and below the block
Align Left This aligns the paragraph along the left margin.
Center This aligns the paragraph evenly down the center of the form.
Align Right This aligns the paragraph along the right margin.
Justify
This aligns your text evenly along the left and rightmargins. This will increase the spacing between words on a line so that the start and end of it are at the margins. The last line of a paragraph will use normal spacing between words.
Functionality described here may vary in availability depending upon your district/entity configuration.** Denotes Required Field to save screen.
CUSTOM FORMS GUIDE
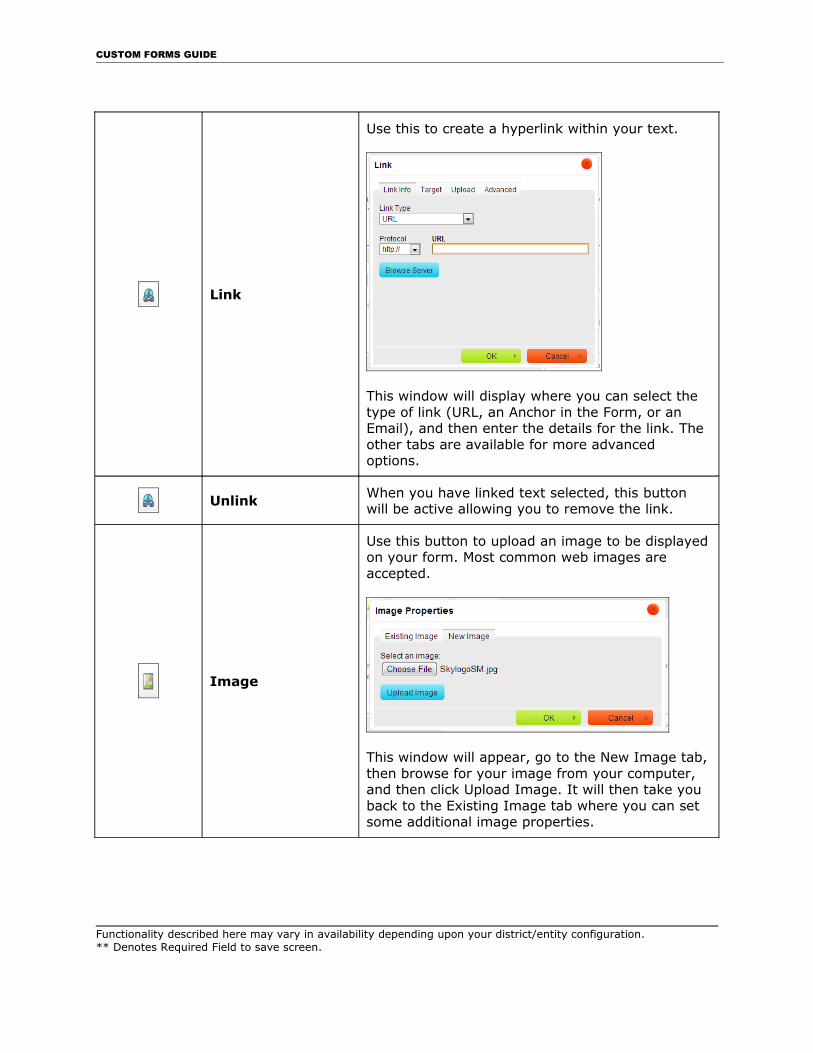
Link
Use this to create a hyperlink within your text.
This window will display where you can select the type of link (URL, an Anchor in the Form, or an Email), and then enter the details for the link. The other tabs are available for more advanced options.
Unlink When you have linked text selected, this button will be active allowing you to remove the link.
Image
Use this button to upload an image to be displayedon your form. Most common web images are accepted.
This window will appear, go to the New Image tab,then browse for your image from your computer, and then click Upload Image. It will then take you back to the Existing Image tab where you can set some additional image properties.
Functionality described here may vary in availability depending upon your district/entity configuration.** Denotes Required Field to save screen.
CUSTOM FORMS GUIDE
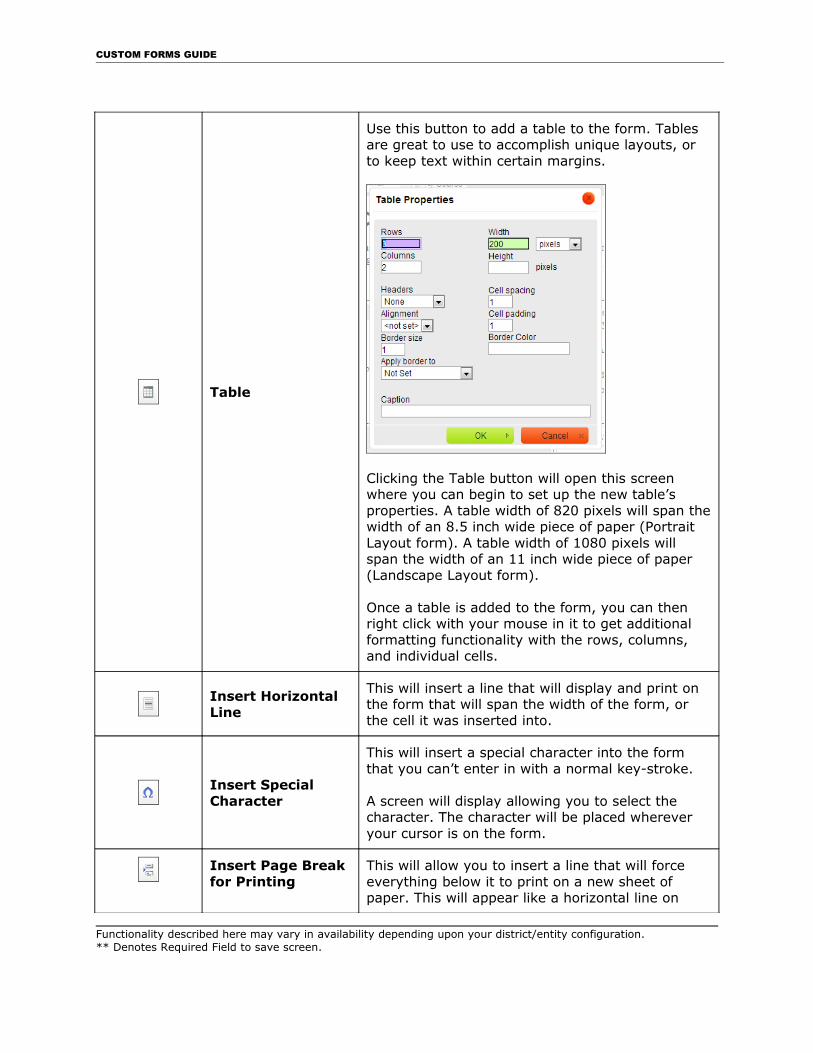
Table
Use this button to add a table to the form. Tables are great to use to accomplish unique layouts, or to keep text within certain margins.
Clicking the Table button will open this screen where you can begin to set up the new table’s properties. A table width of 820 pixels will span thewidth of an 8.5 inch wide piece of paper (Portrait Layout form). A table width of 1080 pixels will span the width of an 11 inch wide piece of paper (Landscape Layout form).
Once a table is added to the form, you can then right click with your mouse in it to get additional formatting functionality with the rows, columns, and individual cells.
Insert Horizontal Line
This will insert a line that will display and print on the form that will span the width of the form, or the cell it was inserted into.
Insert Special Character
This will insert a special character into the form that you can’t enter in with a normal key-stroke.
A screen will display allowing you to select the character. The character will be placed wherever your cursor is on the form.
Insert Page Break for Printing
This will allow you to insert a line that will force everything below it to print on a new sheet of paper. This will appear like a horizontal line on
Functionality described here may vary in availability depending upon your district/entity configuration.** Denotes Required Field to save screen.
CUSTOM FORMS GUIDE
screen, but will not show when printed.
Font NameYou can select the font you wish to use for your text or form fields from this drop-down.
Font SizeYou can select the size of the font you wish to use here.
Text Color You can change the color of the text here.
Background Color You can change the background color of the text here.
Source
Click this button to toggle between the Form Editorview (the default), and seeing and editing the actual HTML code.
If you are familiar with HTML code, this can be very helpful to accomplish tasks that the Form Editor would not let you do.
When your Advanced Custom Form is saved, it will then be available for users to begin accessing and entering data into.
Expand the Custom Form from the Custom Form main screen and then expand the AdvancedCustom Form area to view the screen just created. Click Edit next to the form at any time tomodify the layout, click Delete next to the form to remove it, and you can use the Save Current Version as Backup once you have a working form.
Functionality described here may vary in availability depending upon your district/entity configuration.** Denotes Required Field to save screen.

CUSTOM FORMS GUIDE
It will then prompt you to confirm the backup, and then give you the options you see on the image to the right with the form.
Functionality described here may vary in availability depending upon your district/entity configuration.** Denotes Required Field to save screen.
CUSTOM FORMS GUIDE
Custom HTML Forms
Custom HTML Forms require you to know HTML coding as you will have to create the HTML document that will be used to define the layout of the screen. The HTML document then also must be linked up with all of the Custom Form’s fields to function. Prior to Advanced Custom Forms being available, this was the only option for districts that wanted to have a more customized look to their Custom Form Screens.
Since Custom HTML Forms must be created outside of Skyward, we will start with some general tips to assist with the creation of the initial HTML document.
When using Custom HTML Forms, it is considered good practice to have your form and its elements fall between <form> tags (although some forms work without them). For documentation on HTML forms and their elements, resources can be found online.
Once the general layout of your HTML document is done, and you have the body text entered, you will then need to start linking the Custom Fields in the HTML.
Using Custom Fields
First, you will need to pay attention to the Data Type of your field to determine which Form Element you should use. You will also have to insert an underscore ( _ ) anywhere you put a space in the Label of the Custom Field when identifying the field in your HTML document. Tips for linking the different Data Type fields are below.
Character – This can be used as either a single text entry field or as a Selection List. To use it as a text entry field, create the field as you would for a regular custom form, and pull it into your HTML with the “input” element.
Example Code:
<input type=’text’ id='Text_Entry_Field' style='width:150px'>
To make it a Selection List, you would use the Valid Entries option when creating your Custom Field, which is treated as a Selection/Drop Down List, so you would use the “select” element.
Example Code:
<select id='Valid_Entries_Field' style='width:150px;' size=1>
Date – This would be incorporated into your HTML document by using an “input” element. Asa note, the date will be validated, but you should express to the users of your form that the format should follow the “MM/DD/YYYY” format, as to avoid frustration with validation.
Example Code:
<input type='text' id='Date_Field' style='width:150px'>
Functionality described here may vary in availability depending upon your district/entity configuration.** Denotes Required Field to save screen.
CUSTOM FORMS GUIDE
Decimal – These will also be pulled in with the “input” element, and will be validated as Decimal type data (i.e.: entering text will set off validation that it must be a number).
Example Code:
<input type='text' id='Decimal_Field' style='width:150px'>
Integer – These will also be pulled in with the “input” element, and will be validated as Integer type data (i.e.: entering text will set off validation that it must be a number).
Example Code:
<input type='text' id='Integer_Field' style='width:150px'>
Logical – This is a Yes/No field and is equated to a “Checkbox” field in Custom Forms. Note: Some individuals would like the option to use Radio buttons so that a user can only make one choice. Currently this is not available. As a work around, you can use a Selection/Drop Down list (either with Character Field with Valid Entries or the Lookup Field). To use the logical field, use this code (which includes a label attached to the checkbox).
Example Code:
<input type='checkbox' id='Logical_Field'><label id='Logical_Field_label' for='Logical_Field'>This is a label for the Logical Field (Checkbox)</label>
Lookup – Very similar to the Valid Entries option above, but these are set up with “Lookup Tables" that you can reuse (think Code Tables). Once created, they are implemented into your HTML document the same way.
Example Code:
<select id='Lookup_Field' style='width:150px;' size=1>
Read Only Text – Typically not used with Custom HTML Forms, as you can manually enter this in the Body of your HTML form.
Using Skyward Fields
Skyward Fields must first be selected under the Skyward Fields to Use area found under the Custom Form from the main screen. You will have to take note of its name under the “Code” column. These are typically fields that pull in information already in Skyward. Some of them have the capability to be edited (such as Gender) which will automatically update their corresponding field in Skyward when the form is saved.
They can be inserted anywhere in the body of your HTML document by using leading and trailing “##” symbols. Note: These fields can only be pulled once in your HTML document, rather than in multiple instances.
Functionality described here may vary in availability depending upon your district/entity configuration.** Denotes Required Field to save screen.
CUSTOM FORMS GUIDE
If we choose to use the “Student’s Name” Skyward Field, we can see that its code is ‘s_StuFullName’ which would be added to the HTML form as ‘##s_StuFullName##’ to pull that data.
Example Code:
The ##s_StuFullName## field can be inserted in line with the body text of the HTML document.
One thing to note is that if the Skyward Field is an editable field, such as Gender, it would bepulled in like a Custom Field, using a form element (in this case, a selection field).
Example Code:
<select id='s_StuGender' style='width:150px;' size=1>
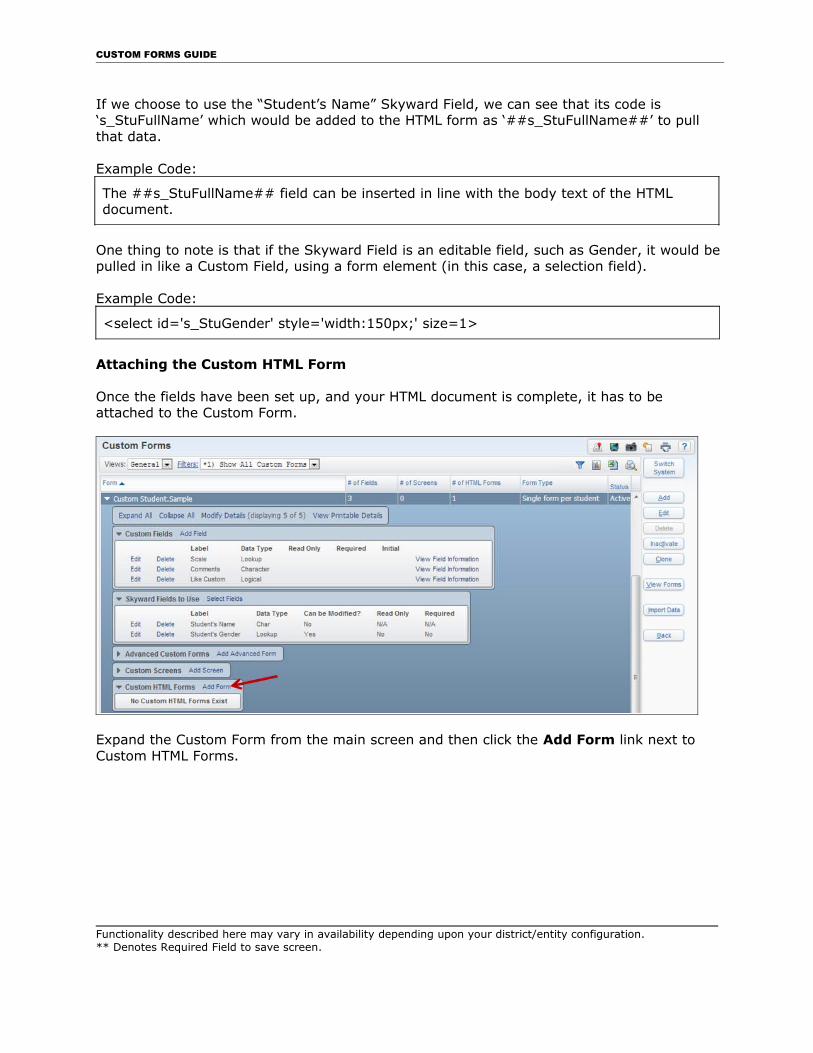
Attaching the Custom HTML Form
Once the fields have been set up, and your HTML document is complete, it has to be attached to the Custom Form.
Expand the Custom Form from the main screen and then click the Add Form link next to Custom HTML Forms.
Functionality described here may vary in availability depending upon your district/entity configuration.** Denotes Required Field to save screen.
CUSTOM FORMS GUIDE
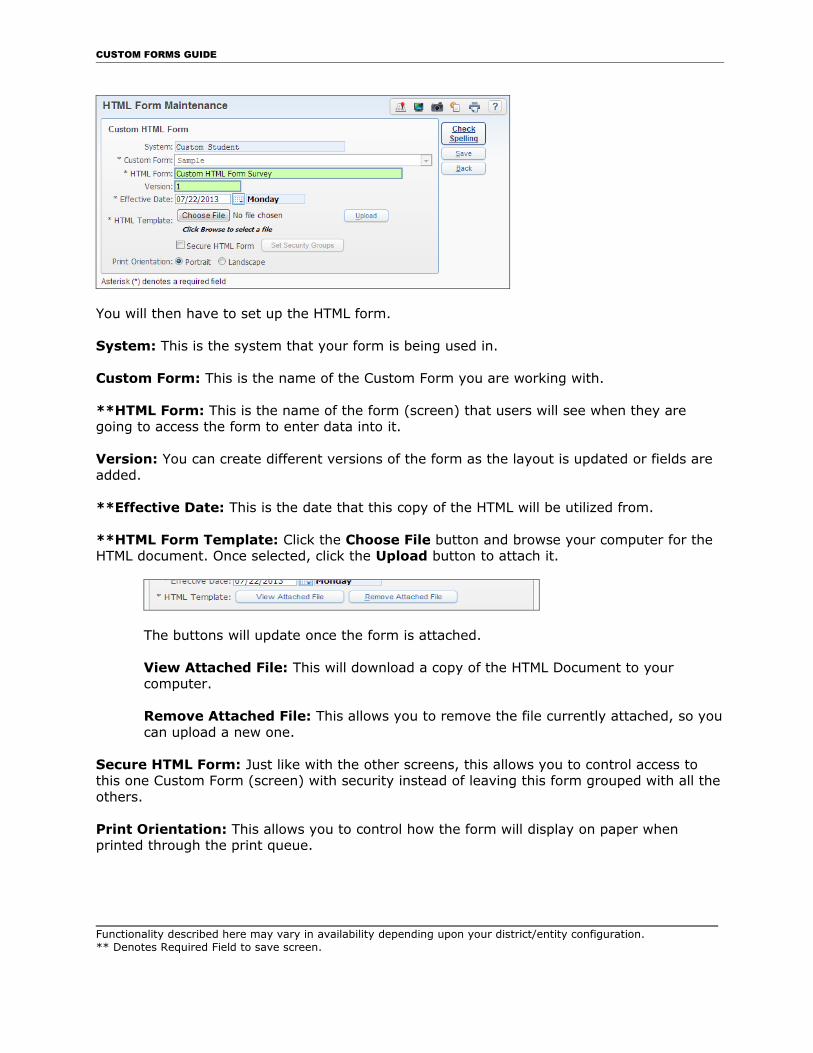
You will then have to set up the HTML form.
System: This is the system that your form is being used in.
Custom Form: This is the name of the Custom Form you are working with.
**HTML Form: This is the name of the form (screen) that users will see when they are going to access the form to enter data into it.
Version: You can create different versions of the form as the layout is updated or fields are added.
**Effective Date: This is the date that this copy of the HTML will be utilized from.
**HTML Form Template: Click the Choose File button and browse your computer for the HTML document. Once selected, click the Upload button to attach it.
The buttons will update once the form is attached.
View Attached File: This will download a copy of the HTML Document to your computer.
Remove Attached File: This allows you to remove the file currently attached, so youcan upload a new one.
Secure HTML Form: Just like with the other screens, this allows you to control access to this one Custom Form (screen) with security instead of leaving this form grouped with all theothers.
Print Orientation: This allows you to control how the form will display on paper when printed through the print queue.
Functionality described here may vary in availability depending upon your district/entity configuration.** Denotes Required Field to save screen.
CUSTOM FORMS GUIDE
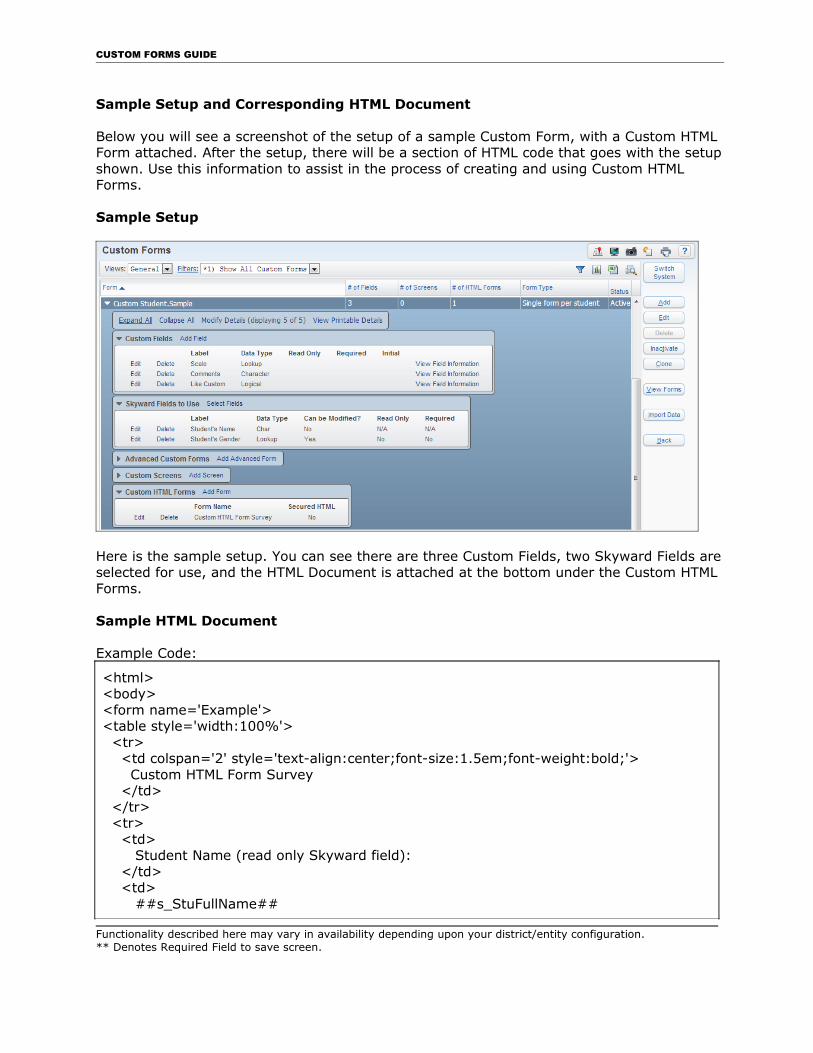
Sample Setup and Corresponding HTML Document
Below you will see a screenshot of the setup of a sample Custom Form, with a Custom HTML Form attached. After the setup, there will be a section of HTML code that goes with the setupshown. Use this information to assist in the process of creating and using Custom HTML Forms.
Sample Setup
Here is the sample setup. You can see there are three Custom Fields, two Skyward Fields areselected for use, and the HTML Document is attached at the bottom under the Custom HTML Forms.
Sample HTML Document
Example Code:
<html><body><form name='Example'><table style='width:100%'> <tr> <td colspan='2' style='text-align:center;font-size:1.5em;font-weight:bold;'> Custom HTML Form Survey </td> </tr> <tr> <td> Student Name (read only Skyward field): </td> <td> ##s_StuFullName##
Functionality described here may vary in availability depending upon your district/entity configuration.** Denotes Required Field to save screen.
CUSTOM FORMS GUIDE
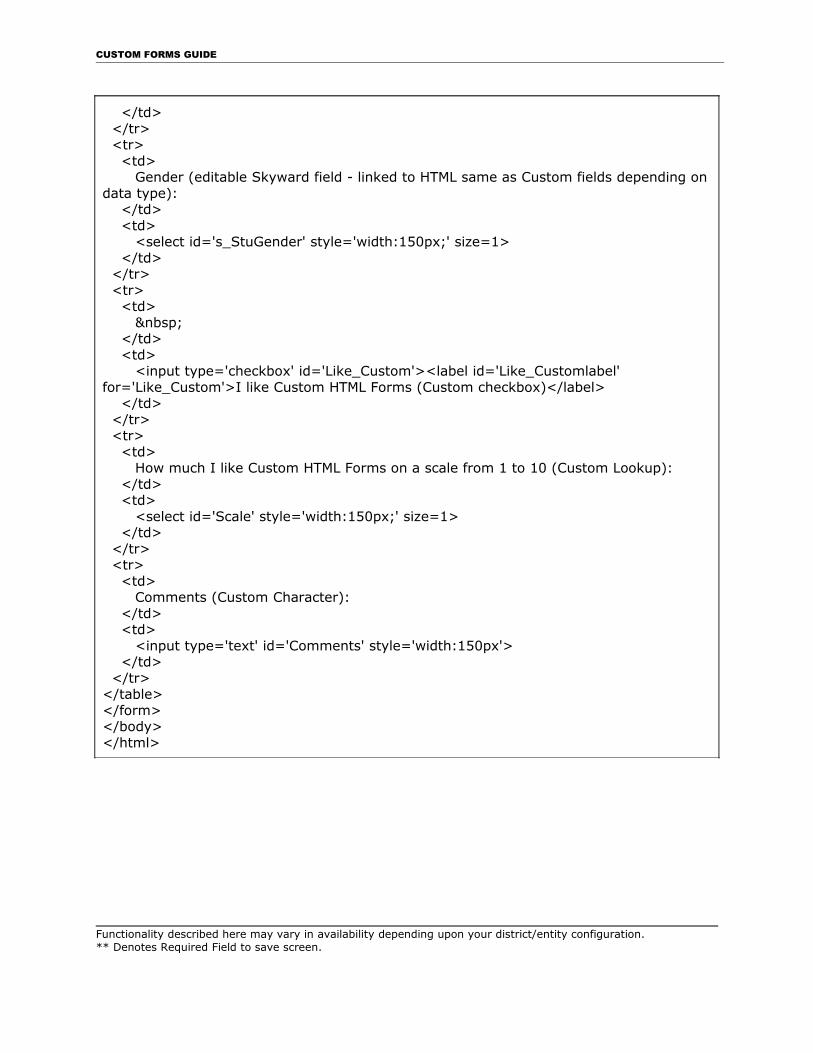
</td> </tr> <tr> <td> Gender (editable Skyward field - linked to HTML same as Custom fields depending ondata type): </td> <td> <select id='s_StuGender' style='width:150px;' size=1> </td> </tr> <tr> <td> </td> <td> <input type='checkbox' id='Like_Custom'><label id='Like_Customlabel' for='Like_Custom'>I like Custom HTML Forms (Custom checkbox)</label> </td> </tr> <tr> <td> How much I like Custom HTML Forms on a scale from 1 to 10 (Custom Lookup): </td> <td> <select id='Scale' style='width:150px;' size=1> </td> </tr> <tr> <td> Comments (Custom Character): </td> <td> <input type='text' id='Comments' style='width:150px'> </td> </tr></table></form></body></html>
Functionality described here may vary in availability depending upon your district/entity configuration.** Denotes Required Field to save screen.
CUSTOM FORMS GUIDE
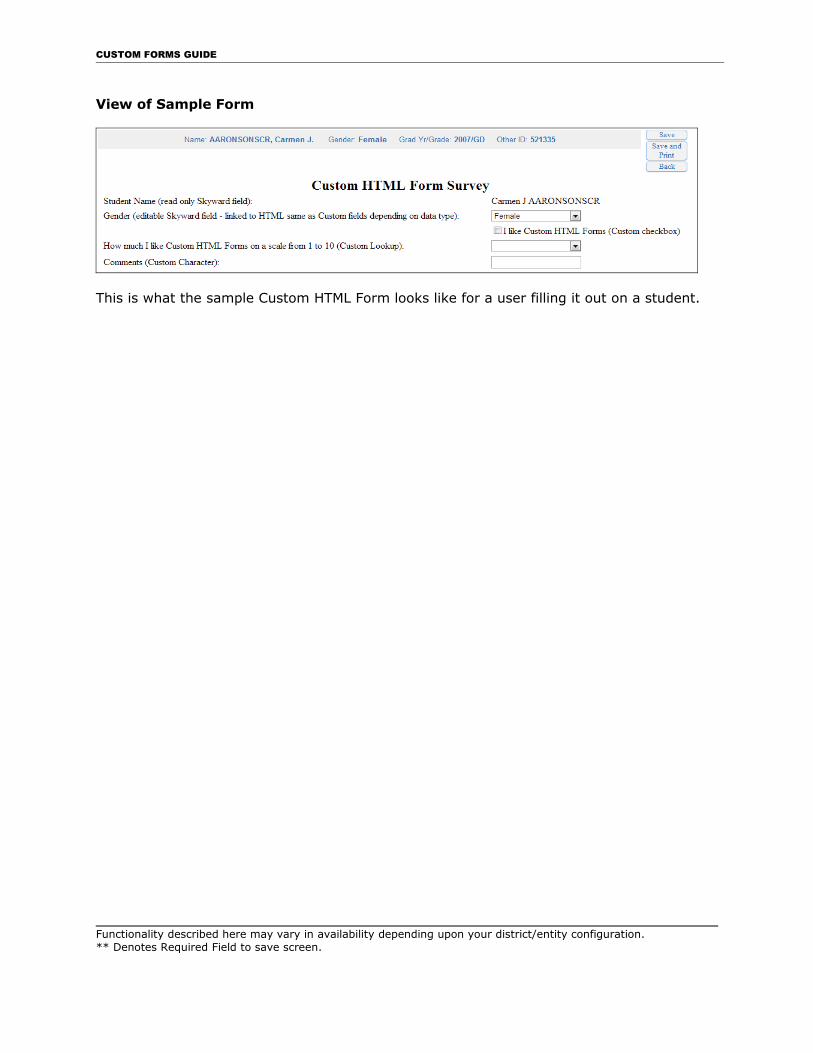
View of Sample Form
This is what the sample Custom HTML Form looks like for a user filling it out on a student.
Functionality described here may vary in availability depending upon your district/entity configuration.** Denotes Required Field to save screen.
CUSTOM FORMS GUIDE
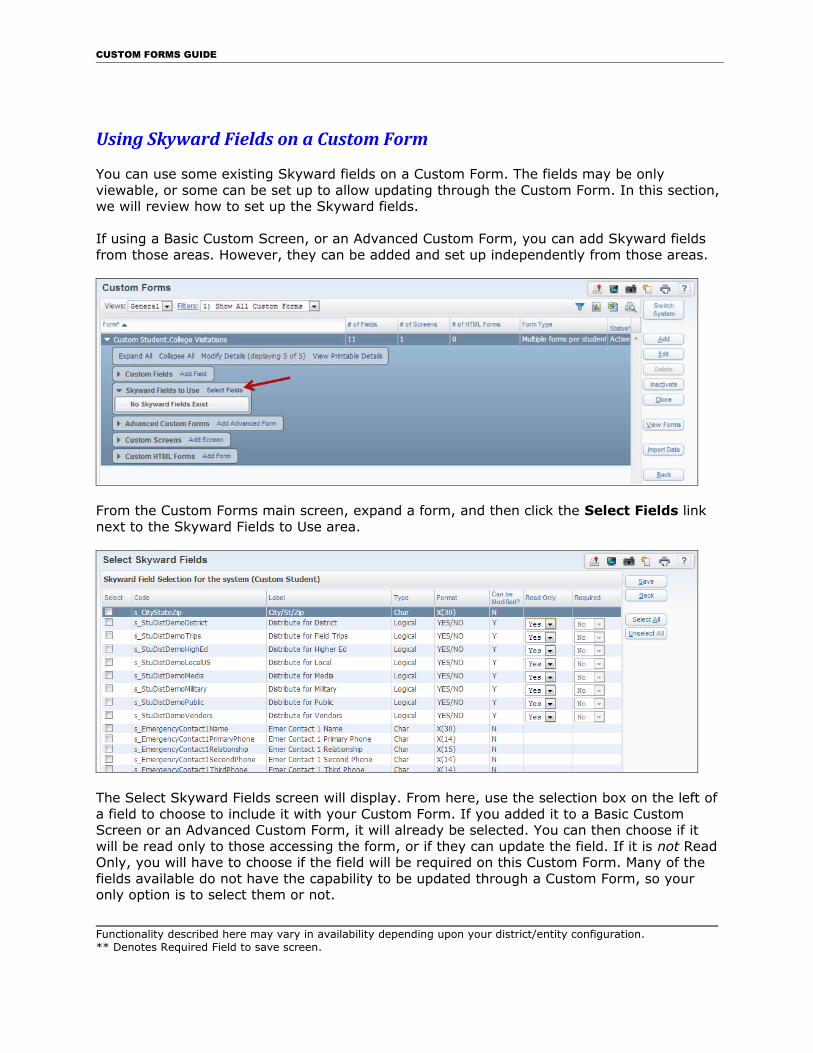
Using Skyward Fields on a Custom Form
You can use some existing Skyward fields on a Custom Form. The fields may be only viewable, or some can be set up to allow updating through the Custom Form. In this section,we will review how to set up the Skyward fields.
If using a Basic Custom Screen, or an Advanced Custom Form, you can add Skyward fields from those areas. However, they can be added and set up independently from those areas.
From the Custom Forms main screen, expand a form, and then click the Select Fields link next to the Skyward Fields to Use area.
The Select Skyward Fields screen will display. From here, use the selection box on the left of a field to choose to include it with your Custom Form. If you added it to a Basic Custom Screen or an Advanced Custom Form, it will already be selected. You can then choose if it will be read only to those accessing the form, or if they can update the field. If it is not Read Only, you will have to choose if the field will be required on this Custom Form. Many of the fields available do not have the capability to be updated through a Custom Form, so your only option is to select them or not.
Functionality described here may vary in availability depending upon your district/entity configuration.** Denotes Required Field to save screen.
CUSTOM FORMS GUIDE
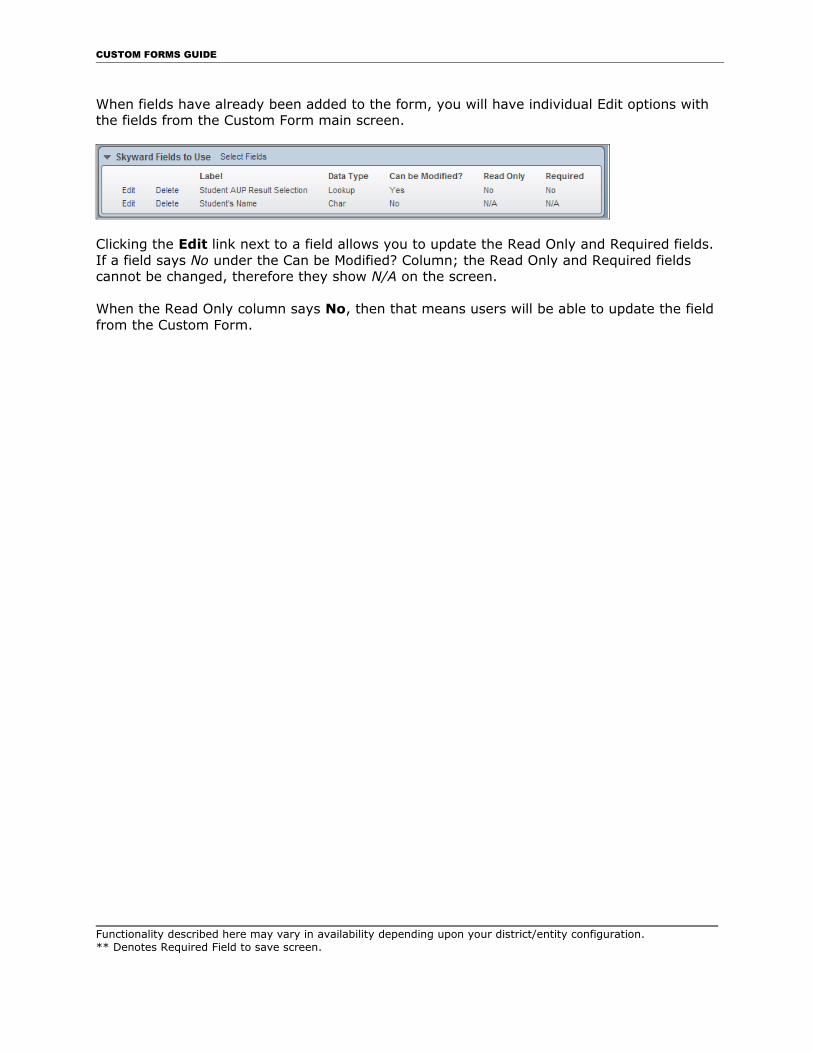
When fields have already been added to the form, you will have individual Edit options with the fields from the Custom Form main screen.
Clicking the Edit link next to a field allows you to update the Read Only and Required fields. If a field says No under the Can be Modified? Column; the Read Only and Required fields cannot be changed, therefore they show N/A on the screen.
When the Read Only column says No, then that means users will be able to update the field from the Custom Form.
Functionality described here may vary in availability depending upon your district/entity configuration.** Denotes Required Field to save screen.
CUSTOM FORMS GUIDE
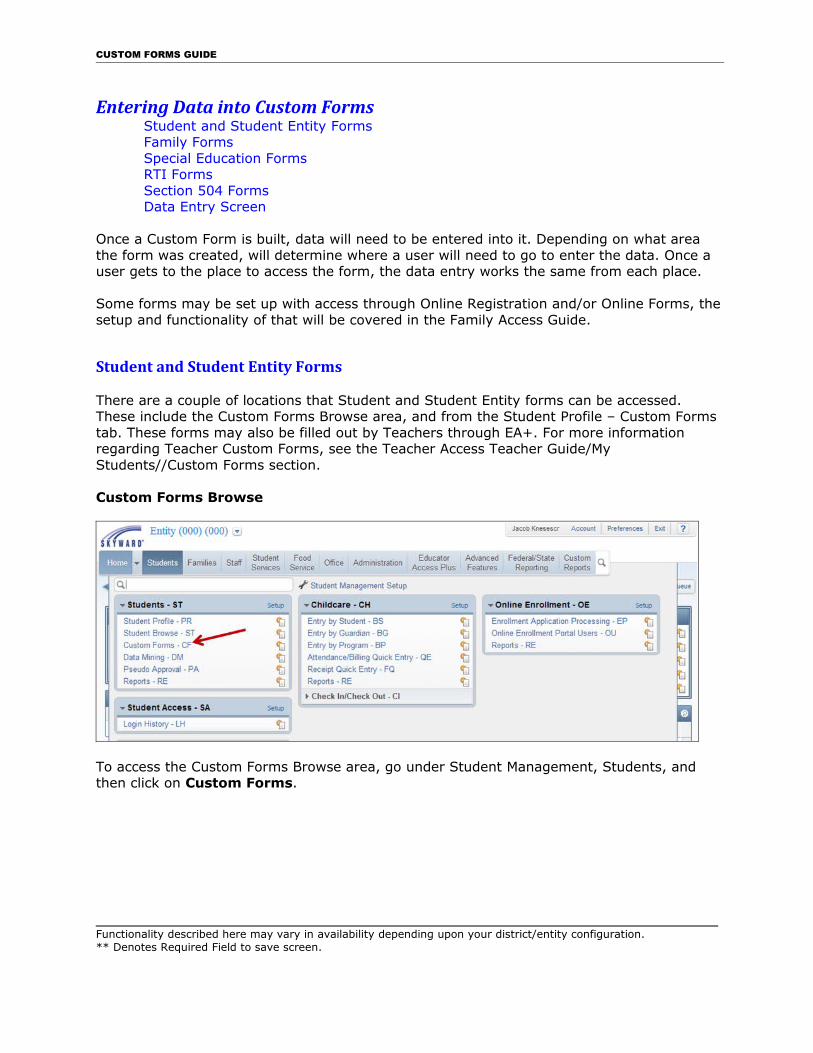
Entering Data into Custom FormsStudent and Student Entity FormsFamily Forms Special Education FormsRTI FormsSection 504 FormsData Entry Screen
Once a Custom Form is built, data will need to be entered into it. Depending on what area the form was created, will determine where a user will need to go to enter the data. Once a user gets to the place to access the form, the data entry works the same from each place.
Some forms may be set up with access through Online Registration and/or Online Forms, thesetup and functionality of that will be covered in the Family Access Guide.
Student and Student Entity Forms
There are a couple of locations that Student and Student Entity forms can be accessed. These include the Custom Forms Browse area, and from the Student Profile – Custom Forms tab. These forms may also be filled out by Teachers through EA+. For more information regarding Teacher Custom Forms, see the Teacher Access Teacher Guide/My Students//Custom Forms section.
Custom Forms Browse
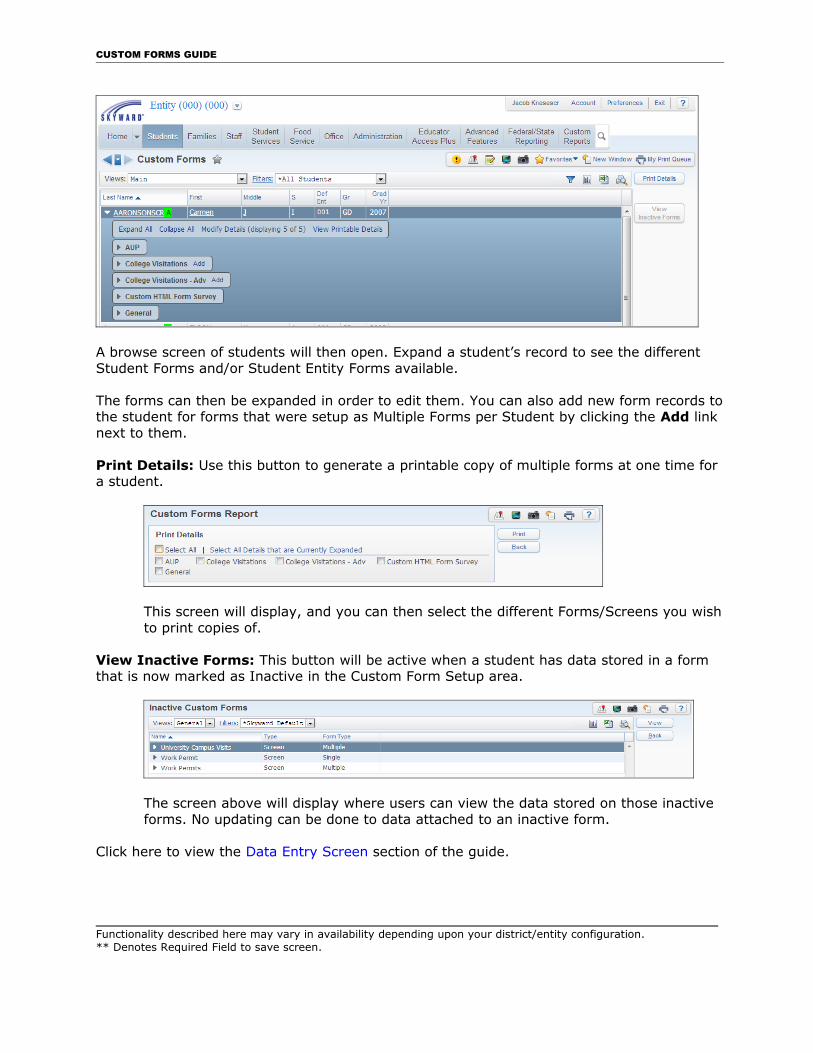
To access the Custom Forms Browse area, go under Student Management, Students, and then click on Custom Forms.
Functionality described here may vary in availability depending upon your district/entity configuration.** Denotes Required Field to save screen.
CUSTOM FORMS GUIDE
A browse screen of students will then open. Expand a student’s record to see the different Student Forms and/or Student Entity Forms available.
The forms can then be expanded in order to edit them. You can also add new form records tothe student for forms that were setup as Multiple Forms per Student by clicking the Add link next to them.
Print Details: Use this button to generate a printable copy of multiple forms at one time for a student.
This screen will display, and you can then select the different Forms/Screens you wishto print copies of.
View Inactive Forms: This button will be active when a student has data stored in a form that is now marked as Inactive in the Custom Form Setup area.
The screen above will display where users can view the data stored on those inactive forms. No updating can be done to data attached to an inactive form.
Click here to view the Data Entry Screen section of the guide.
Functionality described here may vary in availability depending upon your district/entity configuration.** Denotes Required Field to save screen.
CUSTOM FORMS GUIDE
Student Profile – Custom Forms Tab
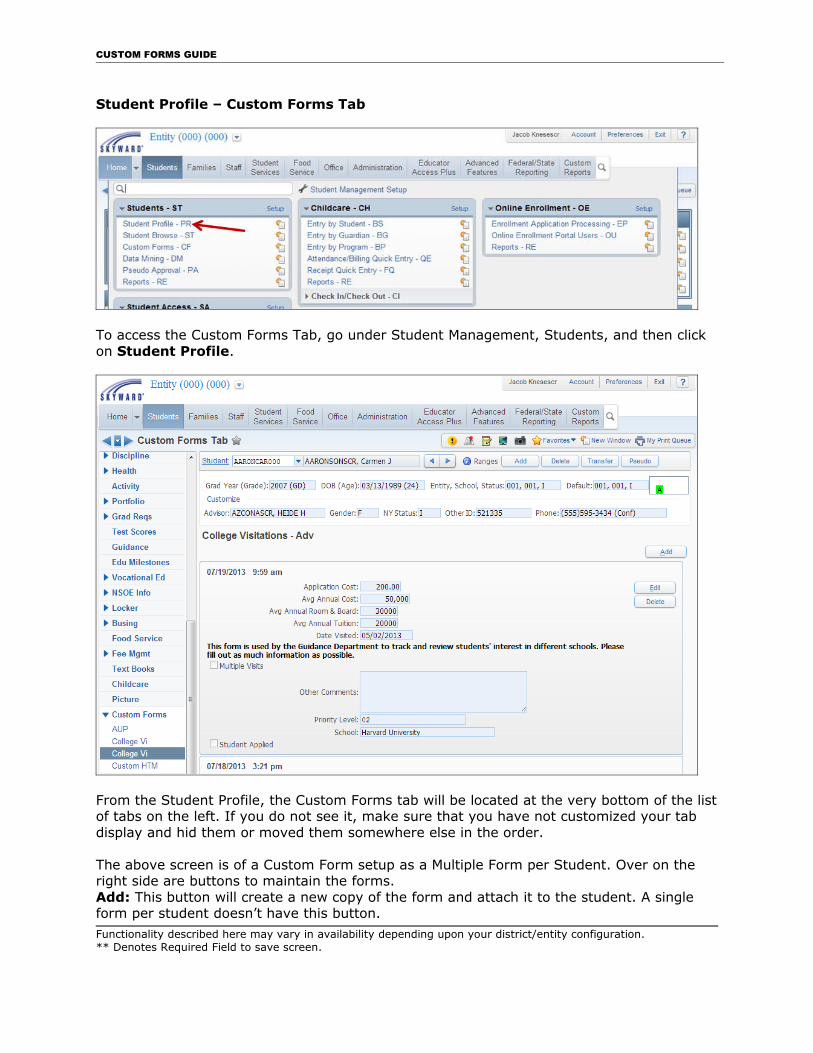
To access the Custom Forms Tab, go under Student Management, Students, and then click on Student Profile.
From the Student Profile, the Custom Forms tab will be located at the very bottom of the list of tabs on the left. If you do not see it, make sure that you have not customized your tab display and hid them or moved them somewhere else in the order.
The above screen is of a Custom Form setup as a Multiple Form per Student. Over on the right side are buttons to maintain the forms.Add: This button will create a new copy of the form and attach it to the student. A single form per student doesn’t have this button.Functionality described here may vary in availability depending upon your district/entity configuration.** Denotes Required Field to save screen.
CUSTOM FORMS GUIDE
Edit: You will notice with the multiple forms, each copy of the form will have its own Edit button. This allows you to modify the data on that one copy. Single forms per student will only have this button.
Delete: This button is only available for multiple forms per student, and each copy of the form will have its own button. This will remove the data stored for that copy of the custom form.
In the upper left corner of the multiple forms, you will see date and time stamps. This is based on when the record was attached (added) to the student, not the most recent edit time.
If a student has any data entered in an inactive form, there will be an Inactive Forms tab in the list down the left side at the end of the active forms/screens.
Click here to view the Data Entry Screen section of the guide.
Functionality described here may vary in availability depending upon your district/entity configuration.** Denotes Required Field to save screen.

CUSTOM FORMS GUIDE
Family Forms
Family Custom Forms, like Student, have two areas that data can be entered. The first area is under the Families browse screen, and the other is from the Student Profile – Family tab.
Families Browse
To get to the Family browse screen, go under Student Management, Families, and then click on Families.
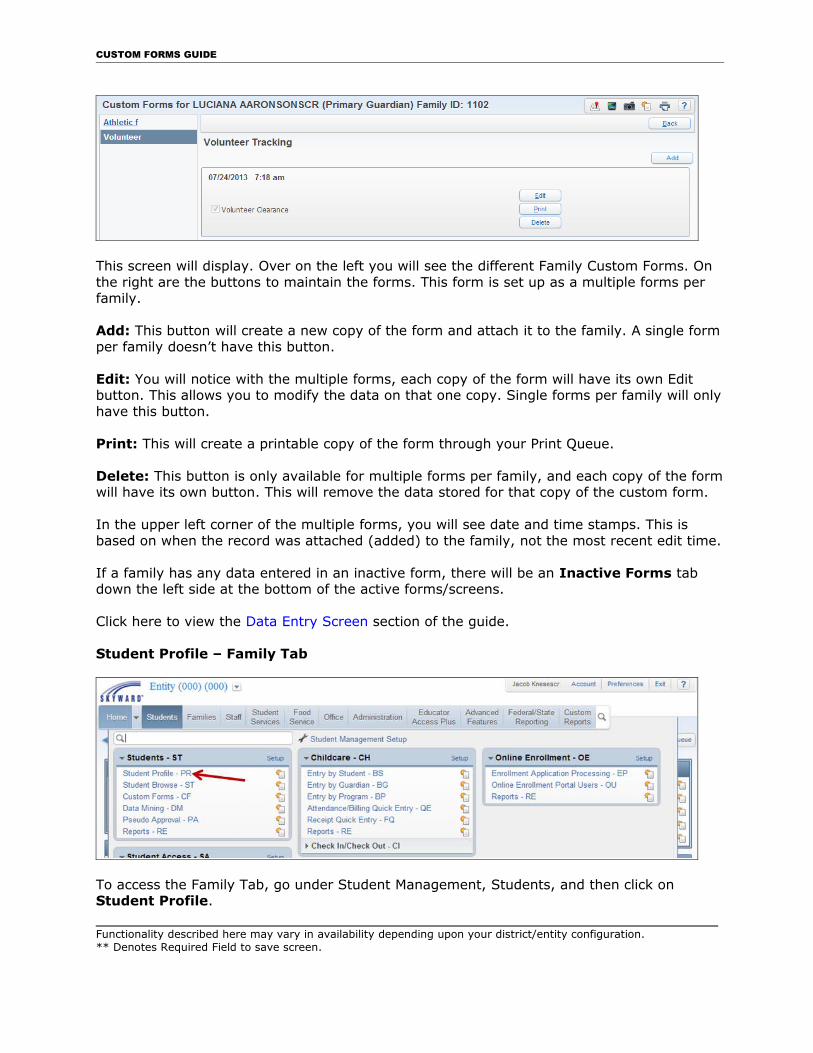
The Families browse displays a list of guardians and the Family IDs they are attached to, along with details of those family records. Over on the right side is a Custom Forms button,you can click this button to open a screen listing all the Custom Forms for the selected family.
Functionality described here may vary in availability depending upon your district/entity configuration.** Denotes Required Field to save screen.
CUSTOM FORMS GUIDE
This screen will display. Over on the left you will see the different Family Custom Forms. On the right are the buttons to maintain the forms. This form is set up as a multiple forms per family.
Add: This button will create a new copy of the form and attach it to the family. A single formper family doesn’t have this button.
Edit: You will notice with the multiple forms, each copy of the form will have its own Edit button. This allows you to modify the data on that one copy. Single forms per family will onlyhave this button.
Print: This will create a printable copy of the form through your Print Queue.
Delete: This button is only available for multiple forms per family, and each copy of the formwill have its own button. This will remove the data stored for that copy of the custom form. In the upper left corner of the multiple forms, you will see date and time stamps. This is based on when the record was attached (added) to the family, not the most recent edit time.
If a family has any data entered in an inactive form, there will be an Inactive Forms tab down the left side at the bottom of the active forms/screens.
Click here to view the Data Entry Screen section of the guide.
Student Profile – Family Tab
To access the Family Tab, go under Student Management, Students, and then click on Student Profile.
Functionality described here may vary in availability depending upon your district/entity configuration.** Denotes Required Field to save screen.
CUSTOM FORMS GUIDE
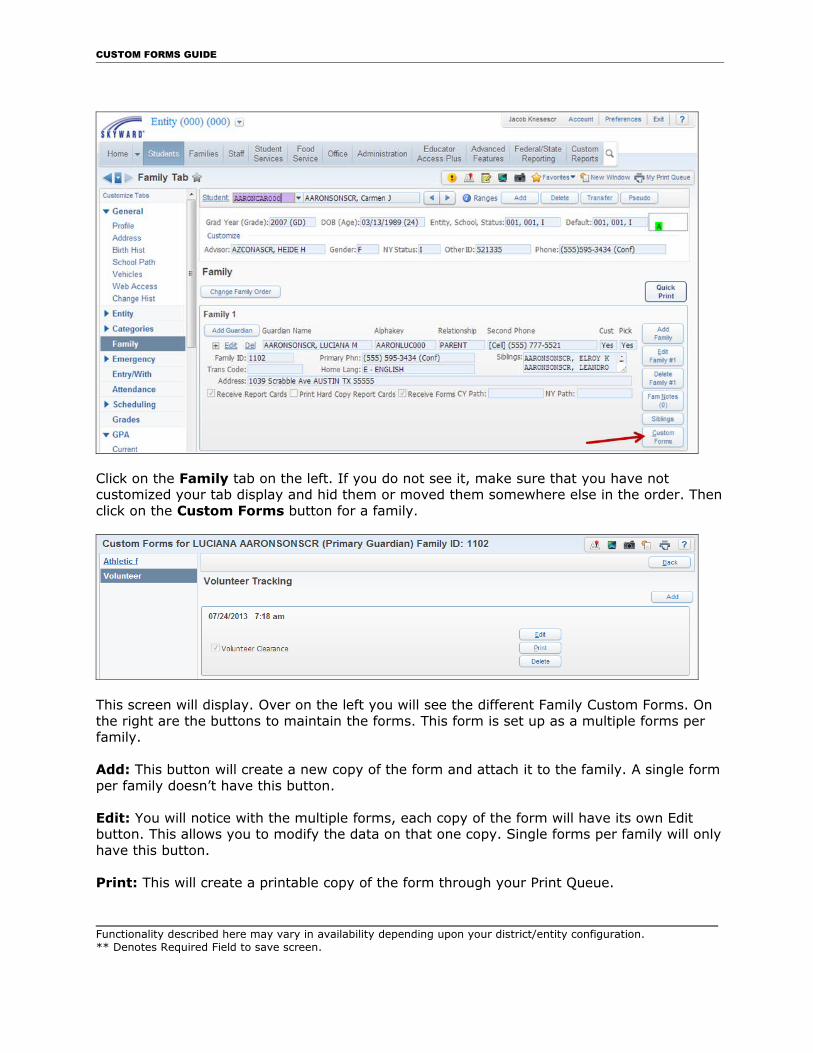
Click on the Family tab on the left. If you do not see it, make sure that you have not customized your tab display and hid them or moved them somewhere else in the order. Thenclick on the Custom Forms button for a family.
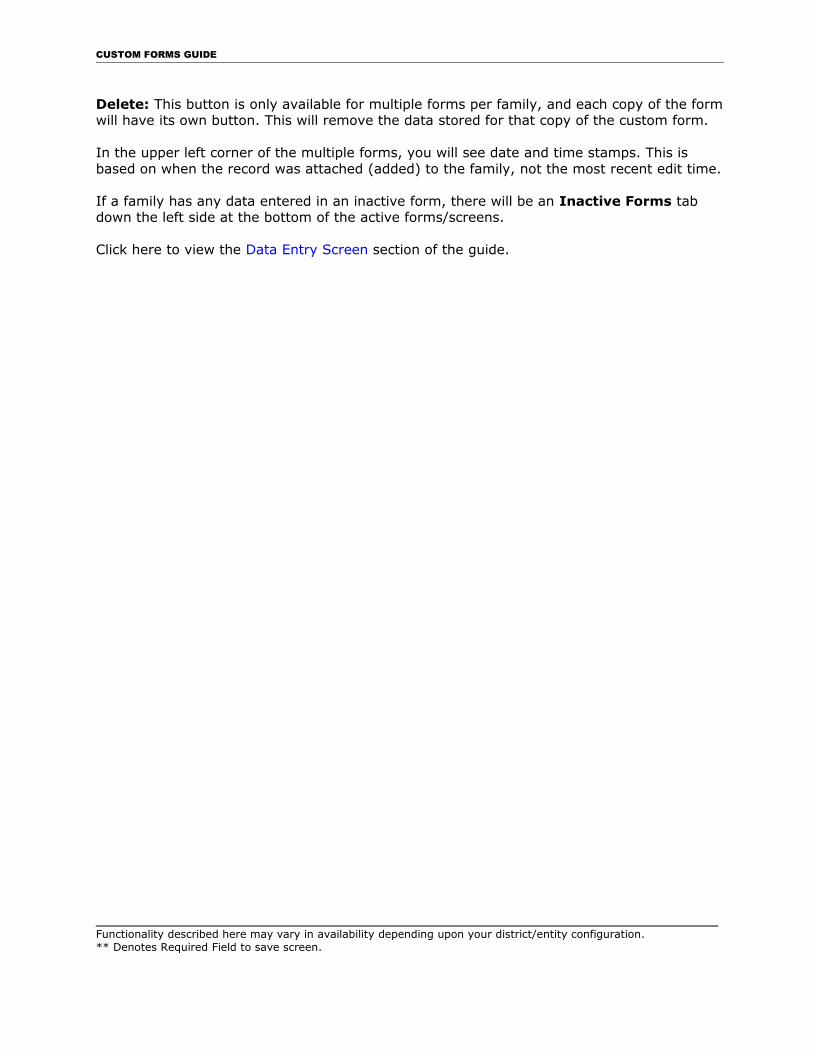
This screen will display. Over on the left you will see the different Family Custom Forms. On the right are the buttons to maintain the forms. This form is set up as a multiple forms per family.
Add: This button will create a new copy of the form and attach it to the family. A single formper family doesn’t have this button.
Edit: You will notice with the multiple forms, each copy of the form will have its own Edit button. This allows you to modify the data on that one copy. Single forms per family will onlyhave this button.
Print: This will create a printable copy of the form through your Print Queue.
Functionality described here may vary in availability depending upon your district/entity configuration.** Denotes Required Field to save screen.
CUSTOM FORMS GUIDE
Delete: This button is only available for multiple forms per family, and each copy of the formwill have its own button. This will remove the data stored for that copy of the custom form. In the upper left corner of the multiple forms, you will see date and time stamps. This is based on when the record was attached (added) to the family, not the most recent edit time.
If a family has any data entered in an inactive form, there will be an Inactive Forms tab down the left side at the bottom of the active forms/screens.
Click here to view the Data Entry Screen section of the guide.
Functionality described here may vary in availability depending upon your district/entity configuration.** Denotes Required Field to save screen.
CUSTOM FORMS GUIDE
Special Education Forms
This is referring to Special Education Custom Forms, not the module’s forms used on Evaluations and IEPs. There are two places that these Custom Forms can be accessed for data entry, the first is through the Special Education – Student Profile, and the other is through Special Education – Entry by Student.
Special Education – Student Profile
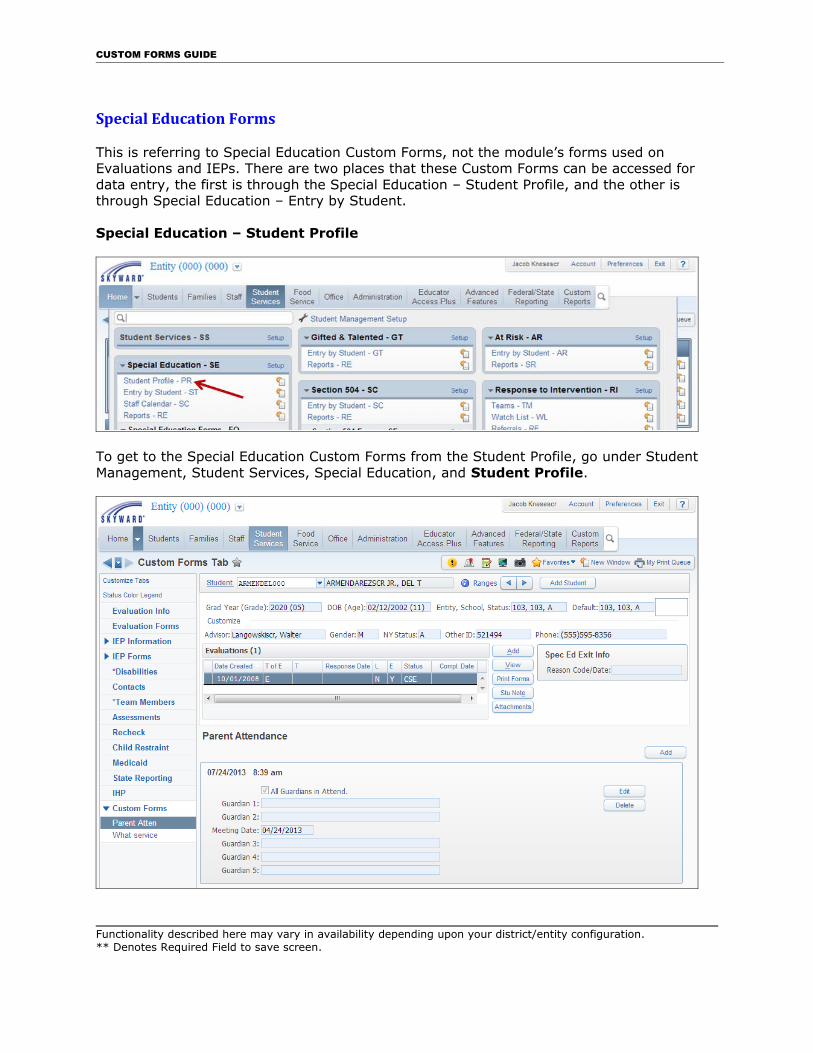
To get to the Special Education Custom Forms from the Student Profile, go under Student Management, Student Services, Special Education, and Student Profile.
Functionality described here may vary in availability depending upon your district/entity configuration.** Denotes Required Field to save screen.

CUSTOM FORMS GUIDE
Once in the Special Education – Student Profile, the Custom Forms tab will be at the very bottom on the left side.
The above screen is of a Custom Form setup as a Multiple Form per Student. Over on the right side are buttons to maintain the forms.
Add: This button will create a new copy of the form and attach it to the student. A single form per student doesn’t have this button.
Edit: You will notice with the multiple forms, each copy of the form will have its own Edit button. This allows you to modify the data on that one copy. Single forms per student will only have this button.
Delete: This button is only available for multiple forms per student, and each copy of the form will have its own button. This will remove the data stored for that copy of the custom form.
In the upper left corner of the multiple forms, you will see date and time stamps. This is based on when the record was attached (added) to the student, not the most recent edit time.
If a student has any data entered in an inactive form, there will be an Inactive Forms tab in the list down the left side at the end of the active forms/screens.
Click here to view the Data Entry Screen section of the guide.
Special Education – Entry by Student
To get to the Special Education Custom Forms from the Entry by Student screen, go under Student Management, Student Services, Special Education, and then Entry by Student.
Functionality described here may vary in availability depending upon your district/entity configuration.** Denotes Required Field to save screen.
CUSTOM FORMS GUIDE
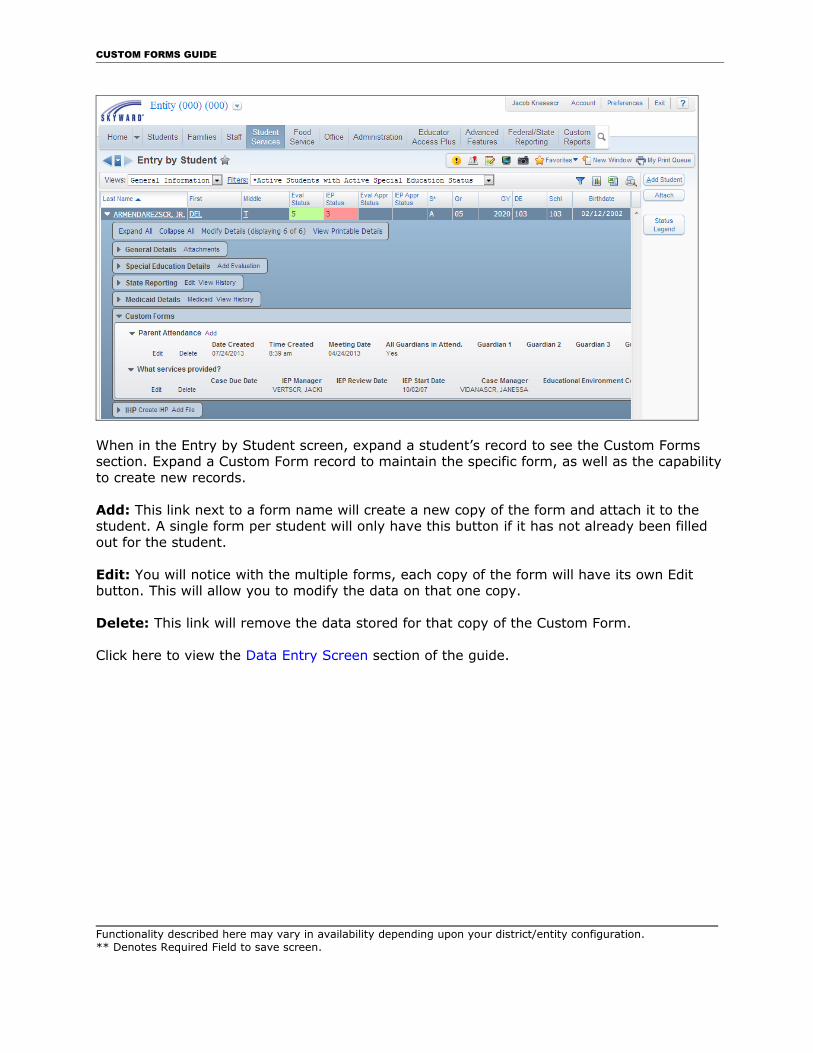
When in the Entry by Student screen, expand a student’s record to see the Custom Forms section. Expand a Custom Form record to maintain the specific form, as well as the capabilityto create new records.
Add: This link next to a form name will create a new copy of the form and attach it to the student. A single form per student will only have this button if it has not already been filled out for the student.
Edit: You will notice with the multiple forms, each copy of the form will have its own Edit button. This will allow you to modify the data on that one copy.
Delete: This link will remove the data stored for that copy of the Custom Form.
Click here to view the Data Entry Screen section of the guide.
Functionality described here may vary in availability depending upon your district/entity configuration.** Denotes Required Field to save screen.
CUSTOM FORMS GUIDE
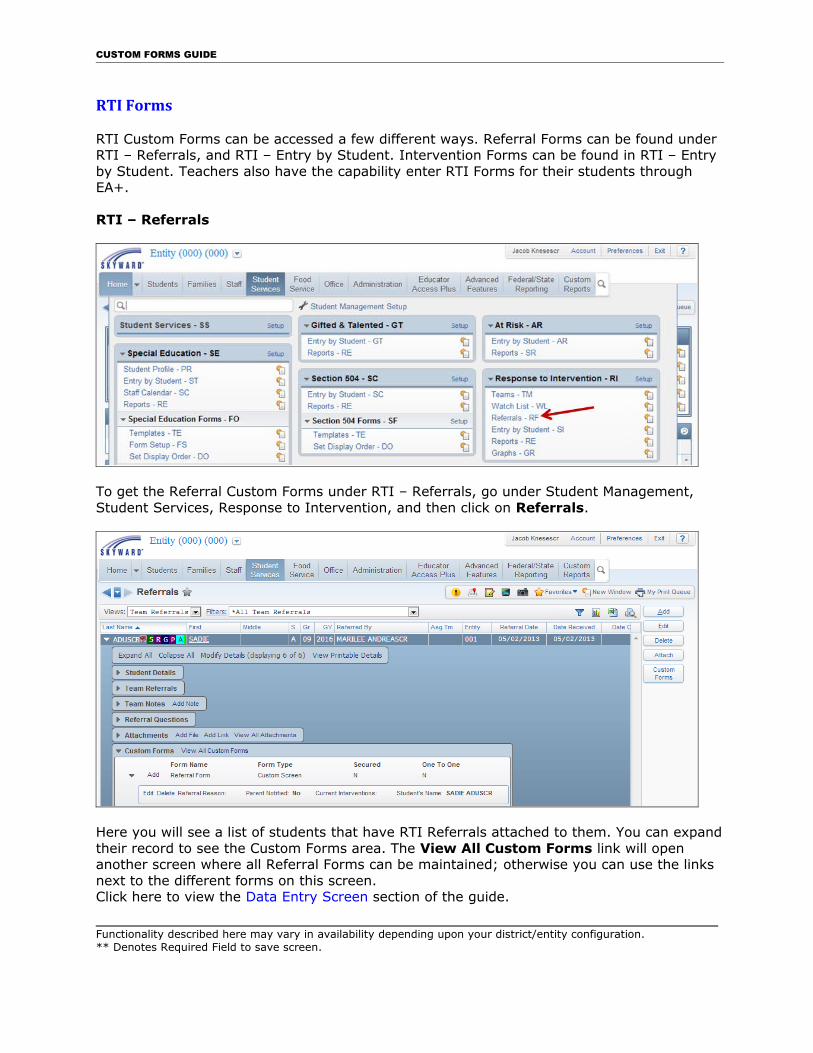
RTI Forms
RTI Custom Forms can be accessed a few different ways. Referral Forms can be found under RTI – Referrals, and RTI – Entry by Student. Intervention Forms can be found in RTI – Entry by Student. Teachers also have the capability enter RTI Forms for their students through EA+.
RTI – Referrals
To get the Referral Custom Forms under RTI – Referrals, go under Student Management, Student Services, Response to Intervention, and then click on Referrals.
Here you will see a list of students that have RTI Referrals attached to them. You can expandtheir record to see the Custom Forms area. The View All Custom Forms link will open another screen where all Referral Forms can be maintained; otherwise you can use the links next to the different forms on this screen.Click here to view the Data Entry Screen section of the guide.
Functionality described here may vary in availability depending upon your district/entity configuration.** Denotes Required Field to save screen.
CUSTOM FORMS GUIDE
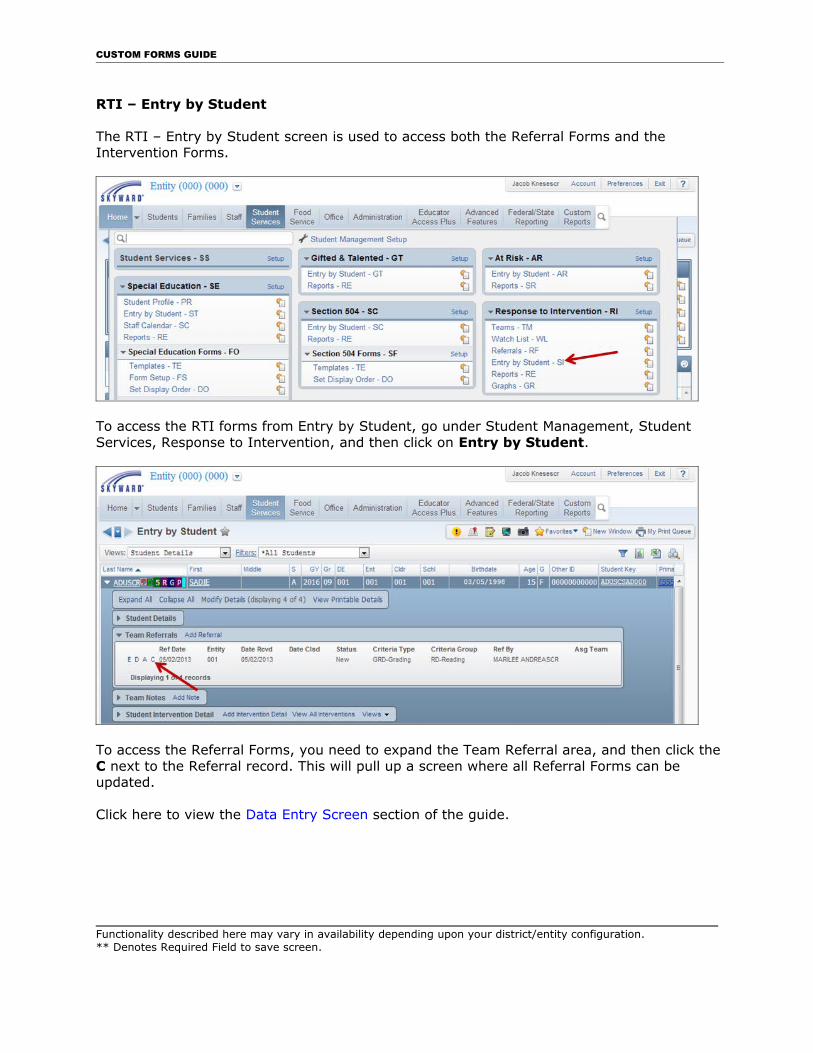
RTI – Entry by Student
The RTI – Entry by Student screen is used to access both the Referral Forms and the Intervention Forms.
To access the RTI forms from Entry by Student, go under Student Management, Student Services, Response to Intervention, and then click on Entry by Student.
To access the Referral Forms, you need to expand the Team Referral area, and then click theC next to the Referral record. This will pull up a screen where all Referral Forms can be updated.
Click here to view the Data Entry Screen section of the guide.
Functionality described here may vary in availability depending upon your district/entity configuration.** Denotes Required Field to save screen.

CUSTOM FORMS GUIDE
To access the Intervention Forms, expand the Student Intervention Detail section and then an Intervention. Forms may be accessed from the Custom Forms area. The View All Custom Forms link will open another screen where all Intervention Forms can be maintained; otherwise you can use the links next to the different forms on this screen.
Click here to view the Data Entry Screen section of the guide.
Functionality described here may vary in availability depending upon your district/entity configuration.** Denotes Required Field to save screen.
CUSTOM FORMS GUIDE
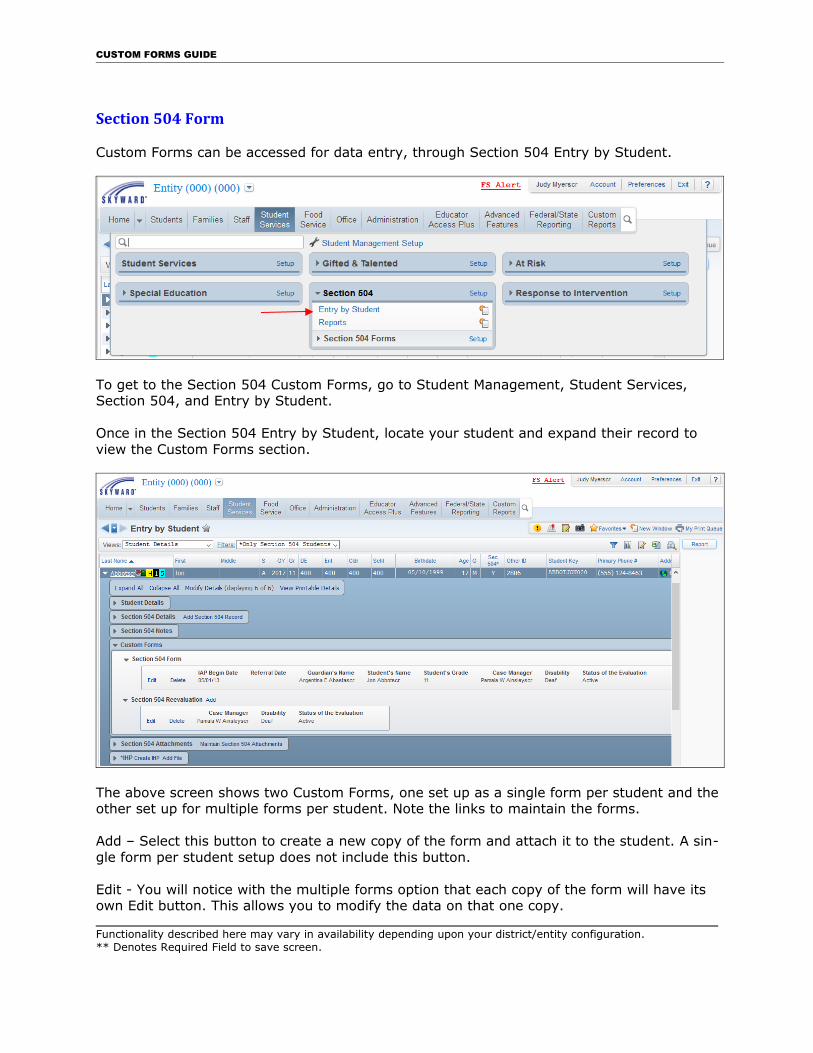
Section 504 Form
Custom Forms can be accessed for data entry, through Section 504 Entry by Student.
To get to the Section 504 Custom Forms, go to Student Management, Student Services, Section 504, and Entry by Student.
Once in the Section 504 Entry by Student, locate your student and expand their record to view the Custom Forms section.
The above screen shows two Custom Forms, one set up as a single form per student and the other set up for multiple forms per student. Note the links to maintain the forms.
Add – Select this button to create a new copy of the form and attach it to the student. A sin-gle form per student setup does not include this button.
Edit - You will notice with the multiple forms option that each copy of the form will have its own Edit button. This allows you to modify the data on that one copy.
Functionality described here may vary in availability depending upon your district/entity configuration.** Denotes Required Field to save screen.
CUSTOM FORMS GUIDE
Delete - This will remove the data stored for that copy of the custom form.
Click here to view the Data Entry Screen section of the guide.
Functionality described here may vary in availability depending upon your district/entity configuration.** Denotes Required Field to save screen.
CUSTOM FORMS GUIDE
Data Entry Screen
Once you have accessed a Custom Form from any of the areas previously discussed, you canthen begin to enter data. Each screen has a Save button that will save the changes and closethe screen. A Print/Save and Print which will save the updates and then create a printable version of the screen/form in the Print Queue, and a Back button that will close the screen without saving changes.
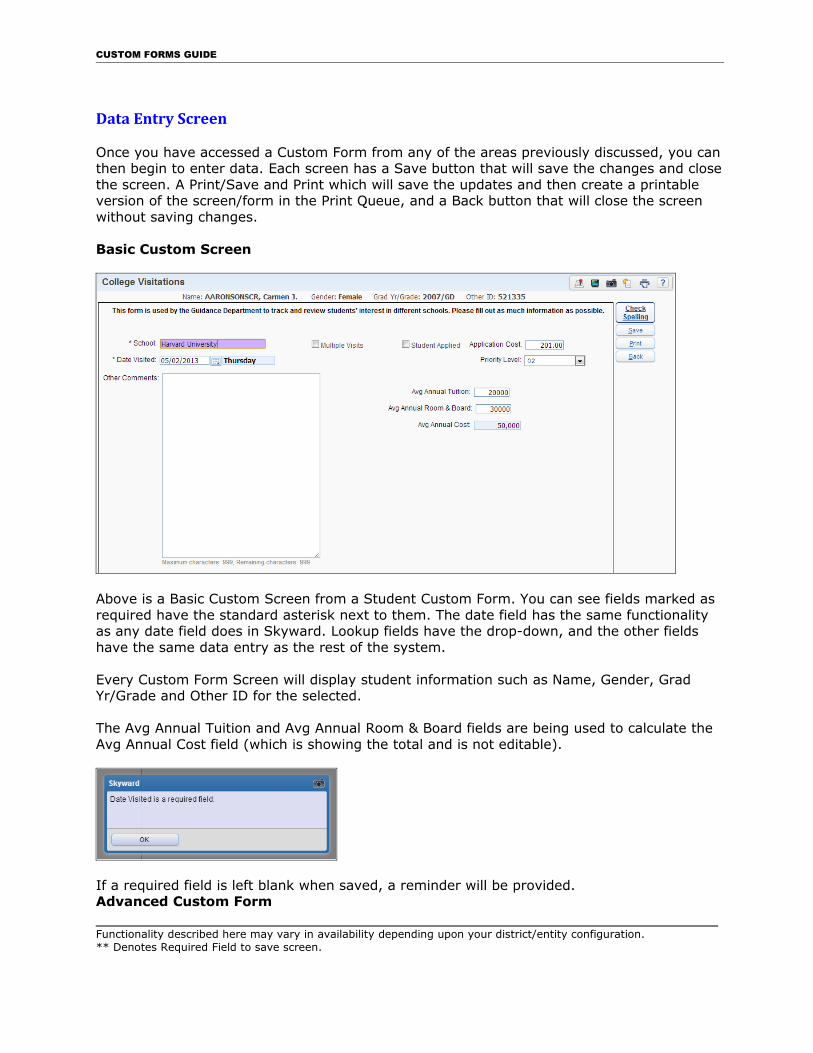
Basic Custom Screen
Above is a Basic Custom Screen from a Student Custom Form. You can see fields marked as required have the standard asterisk next to them. The date field has the same functionality as any date field does in Skyward. Lookup fields have the drop-down, and the other fields have the same data entry as the rest of the system.
Every Custom Form Screen will display student information such as Name, Gender, Grad Yr/Grade and Other ID for the selected.
The Avg Annual Tuition and Avg Annual Room & Board fields are being used to calculate the Avg Annual Cost field (which is showing the total and is not editable).
If a required field is left blank when saved, a reminder will be provided.Advanced Custom Form
Functionality described here may vary in availability depending upon your district/entity configuration.** Denotes Required Field to save screen.
CUSTOM FORMS GUIDE
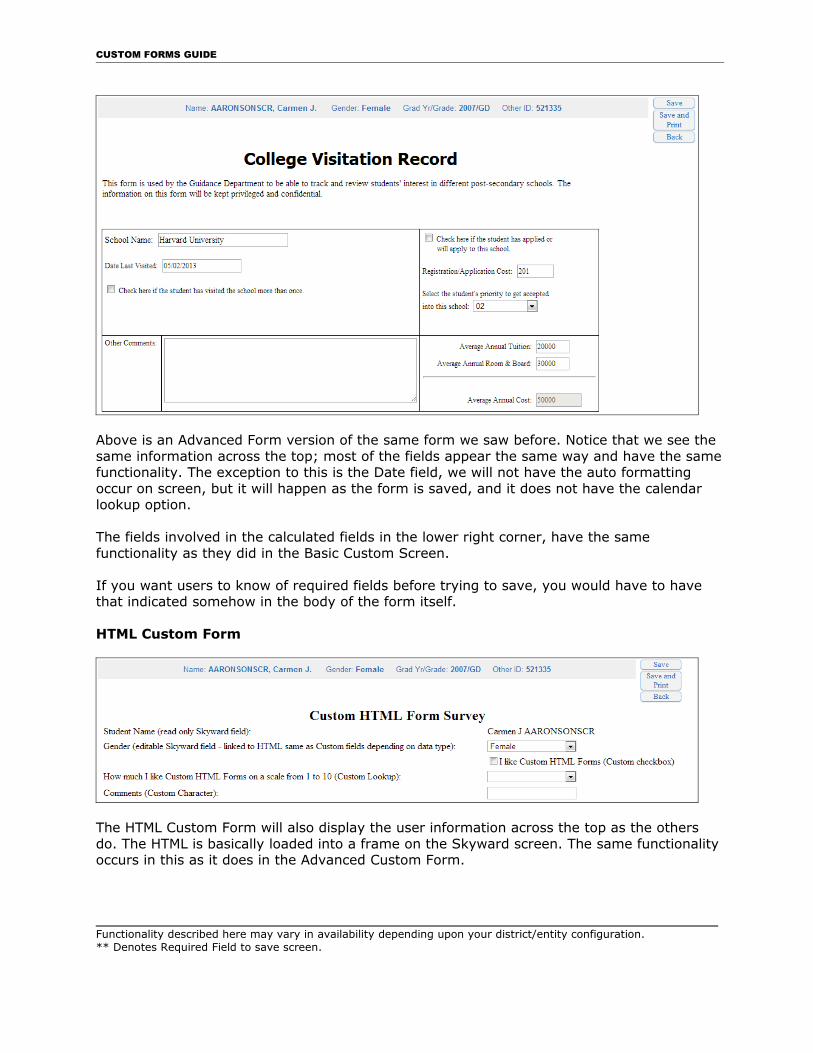
Above is an Advanced Form version of the same form we saw before. Notice that we see the same information across the top; most of the fields appear the same way and have the samefunctionality. The exception to this is the Date field, we will not have the auto formatting occur on screen, but it will happen as the form is saved, and it does not have the calendar lookup option.
The fields involved in the calculated fields in the lower right corner, have the same functionality as they did in the Basic Custom Screen.
If you want users to know of required fields before trying to save, you would have to have that indicated somehow in the body of the form itself.
HTML Custom Form
The HTML Custom Form will also display the user information across the top as the others do. The HTML is basically loaded into a frame on the Skyward screen. The same functionality occurs in this as it does in the Advanced Custom Form.
Functionality described here may vary in availability depending upon your district/entity configuration.** Denotes Required Field to save screen.
CUSTOM FORMS GUIDE
Reporting OptionsData MiningCustom Forms Report
The primary way to report on data in Custom Forms is by using Data Mining. However, you can also mass create copies of the screens/forms as if you were printing them individually from the Data Entry screen with a Student Report.
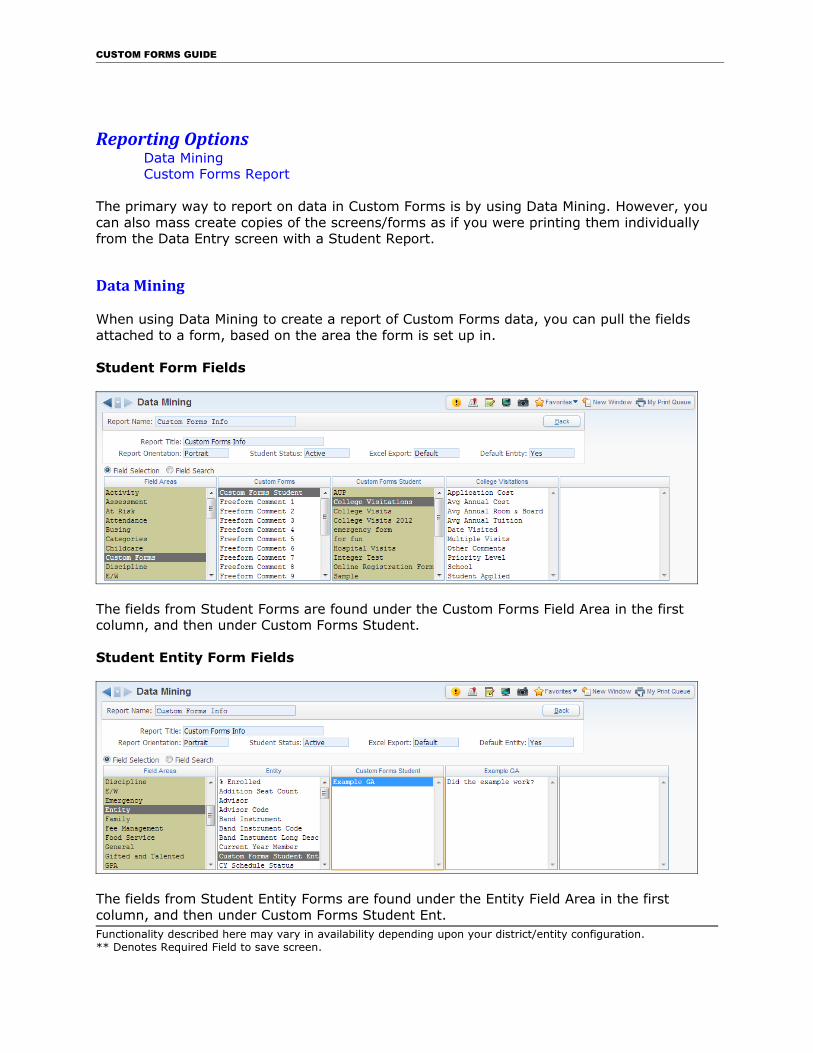
Data Mining
When using Data Mining to create a report of Custom Forms data, you can pull the fields attached to a form, based on the area the form is set up in.
Student Form Fields
The fields from Student Forms are found under the Custom Forms Field Area in the first column, and then under Custom Forms Student.
Student Entity Form Fields
The fields from Student Entity Forms are found under the Entity Field Area in the first column, and then under Custom Forms Student Ent.Functionality described here may vary in availability depending upon your district/entity configuration.** Denotes Required Field to save screen.
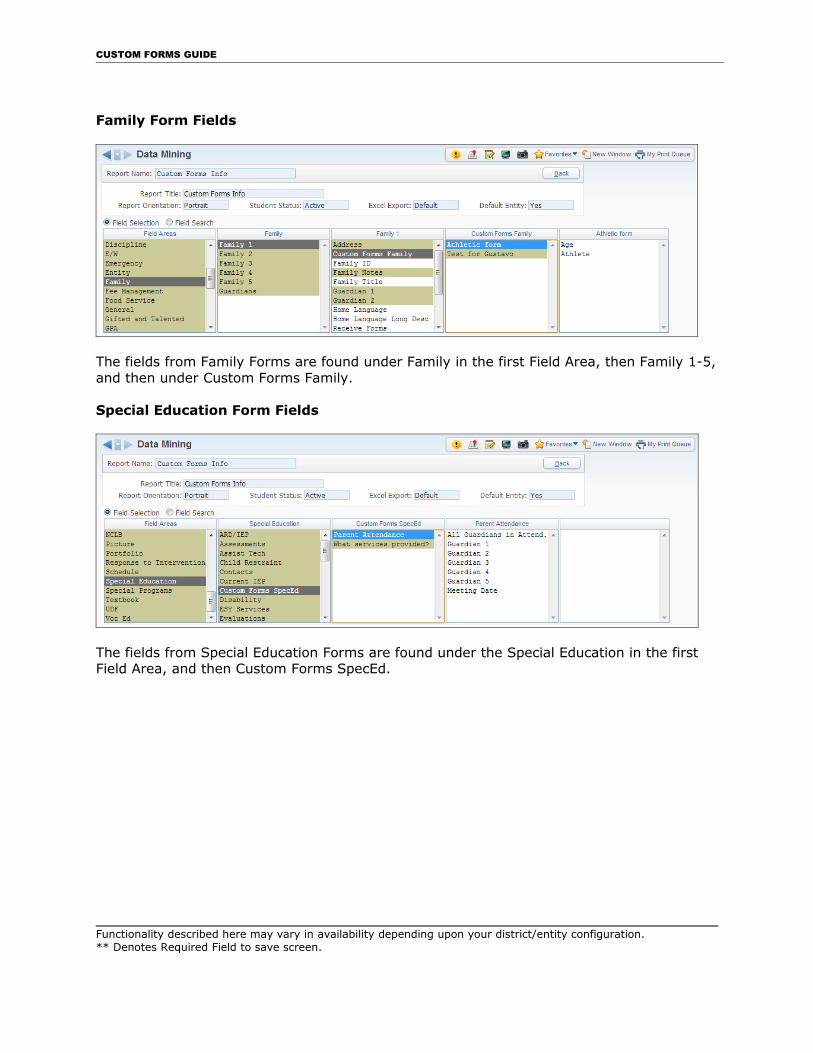
CUSTOM FORMS GUIDE
Family Form Fields
The fields from Family Forms are found under Family in the first Field Area, then Family 1-5, and then under Custom Forms Family.
Special Education Form Fields
The fields from Special Education Forms are found under the Special Education in the first Field Area, and then Custom Forms SpecEd.
Functionality described here may vary in availability depending upon your district/entity configuration.** Denotes Required Field to save screen.
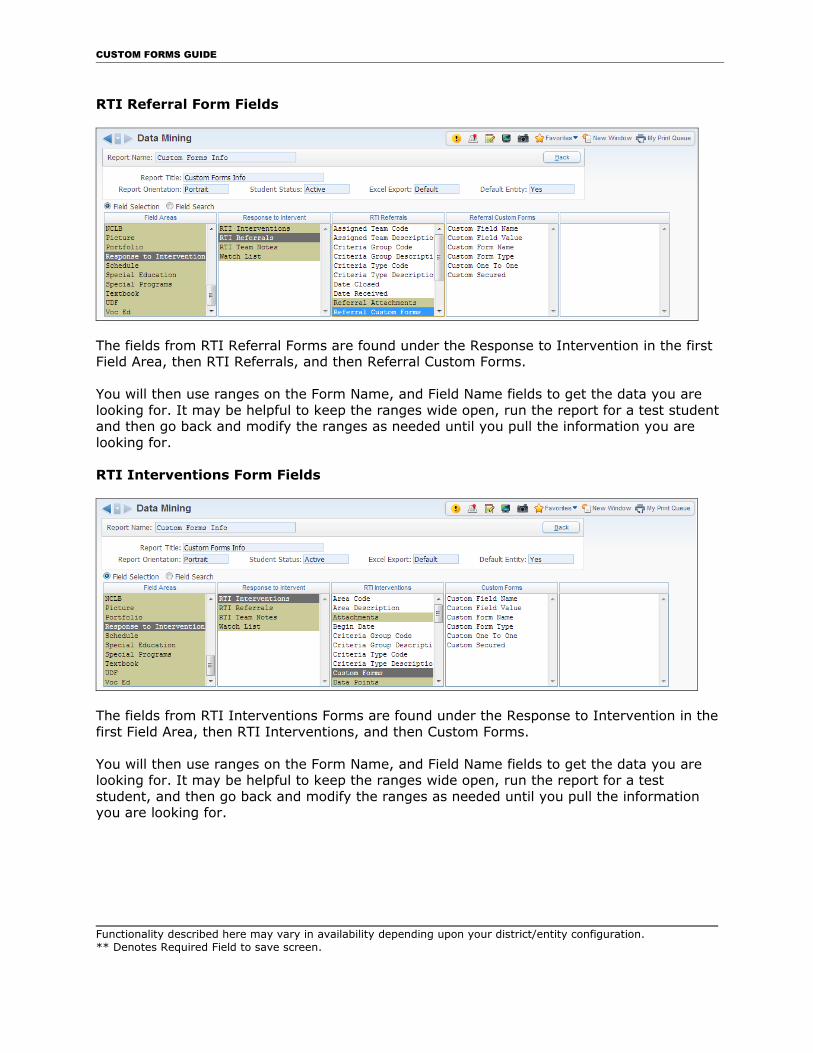
CUSTOM FORMS GUIDE
RTI Referral Form Fields
The fields from RTI Referral Forms are found under the Response to Intervention in the first Field Area, then RTI Referrals, and then Referral Custom Forms.
You will then use ranges on the Form Name, and Field Name fields to get the data you are looking for. It may be helpful to keep the ranges wide open, run the report for a test student and then go back and modify the ranges as needed until you pull the information you are looking for.
RTI Interventions Form Fields
The fields from RTI Interventions Forms are found under the Response to Intervention in the first Field Area, then RTI Interventions, and then Custom Forms.
You will then use ranges on the Form Name, and Field Name fields to get the data you are looking for. It may be helpful to keep the ranges wide open, run the report for a test student, and then go back and modify the ranges as needed until you pull the information you are looking for.
Functionality described here may vary in availability depending upon your district/entity configuration.** Denotes Required Field to save screen.
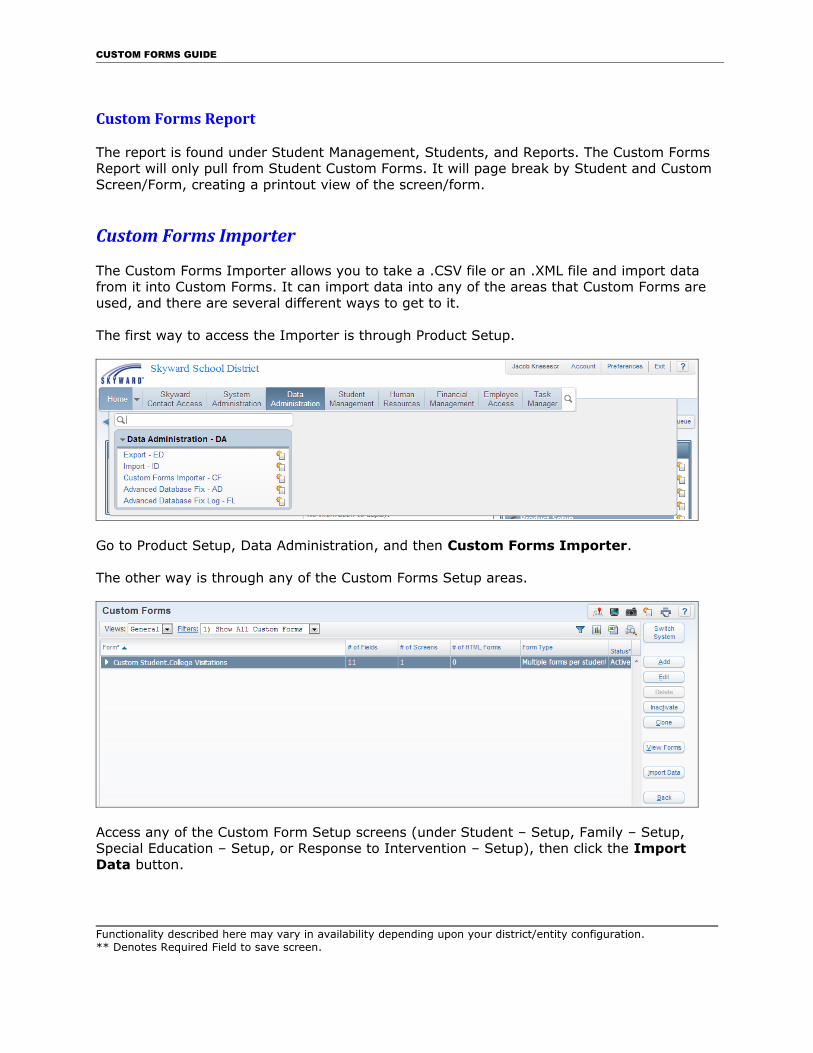
CUSTOM FORMS GUIDE
Custom Forms Report
The report is found under Student Management, Students, and Reports. The Custom Forms Report will only pull from Student Custom Forms. It will page break by Student and Custom Screen/Form, creating a printout view of the screen/form.
Custom Forms Importer
The Custom Forms Importer allows you to take a .CSV file or an .XML file and import data from it into Custom Forms. It can import data into any of the areas that Custom Forms are used, and there are several different ways to get to it.
The first way to access the Importer is through Product Setup.
Go to Product Setup, Data Administration, and then Custom Forms Importer.
The other way is through any of the Custom Forms Setup areas.
Access any of the Custom Form Setup screens (under Student – Setup, Family – Setup, Special Education – Setup, or Response to Intervention – Setup), then click the Import Data button.
Functionality described here may vary in availability depending upon your district/entity configuration.** Denotes Required Field to save screen.
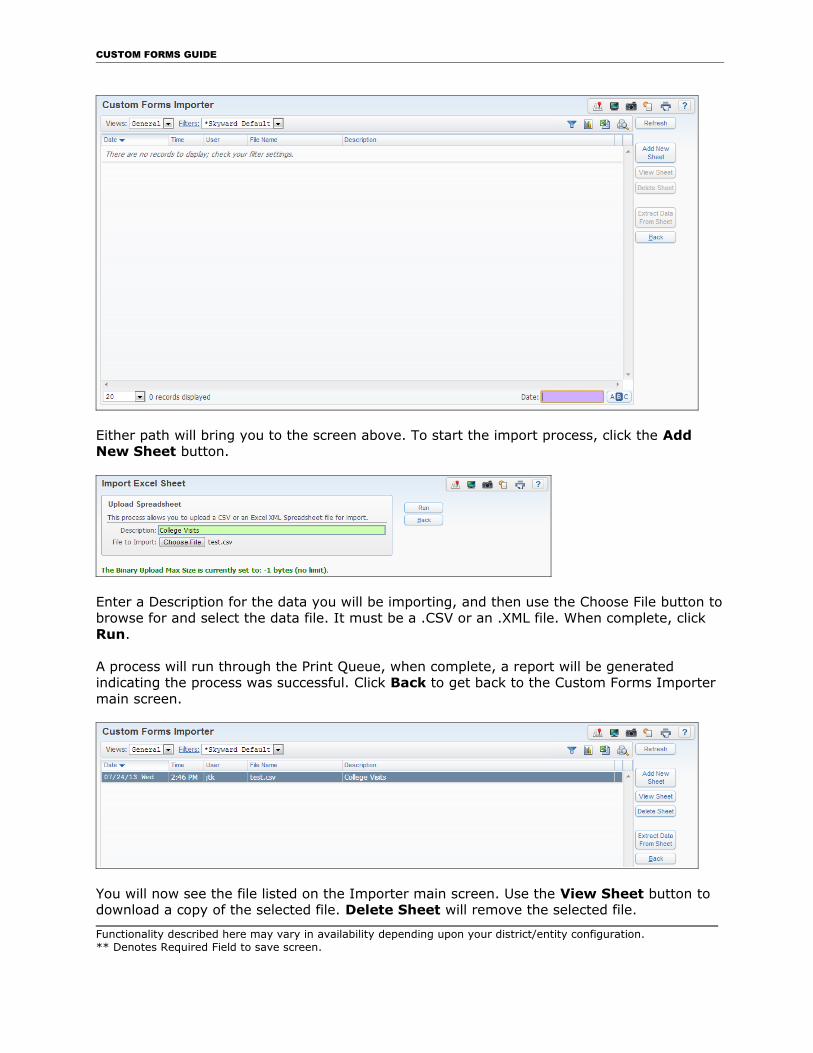
CUSTOM FORMS GUIDE
Either path will bring you to the screen above. To start the import process, click the Add New Sheet button.
Enter a Description for the data you will be importing, and then use the Choose File button tobrowse for and select the data file. It must be a .CSV or an .XML file. When complete, click Run.
A process will run through the Print Queue, when complete, a report will be generated indicating the process was successful. Click Back to get back to the Custom Forms Importer main screen.
You will now see the file listed on the Importer main screen. Use the View Sheet button to download a copy of the selected file. Delete Sheet will remove the selected file.
Functionality described here may vary in availability depending upon your district/entity configuration.** Denotes Required Field to save screen.

CUSTOM FORMS GUIDE
To continue with the import process, click the Extract Data from Sheet button.
On this screen we have to connect data from the file with the Custom Form and the Fields it will be imported into.
At the top are details about the file, including a preview of the first 4 lines of data from it.
In the Cross Reference File to Database area, you have to specify with column of data (Entry #) corresponds/connects to a field in Skyward. Choices include Namekey/Alphakey, or ID numbers. In this example, Entry 1 is cross referencing with the Alphakey.
Under the Select Placement of Data area, you have to connect the rest of the data to the Custom Form and Custom Fields. Do this by first selecting the Entry # from the Import field. Then choose what System the Custom Form is set up in. Next pick the Table or Custom Formthe Field is attached to. You should then see a list of the fields in the Field Name table. If youwere using a Student Entity Form, then the Entity field would be active. Lastly use the > arrow to move the connect Entry, System, Table, and Field over to the table on the right. You will then have to repeat this for each field.
Once all Fields are attached with an Entry #, click the Extract Selected Data From File button at the very bottom of the screen. A confirmation screen will appear.
A process will run, and when complete you can verify the results on the student/family records.
Functionality described here may vary in availability depending upon your district/entity configuration.** Denotes Required Field to save screen.