dashboard camera neoline -...
TRANSCRIPT

Dashboard CameraNEOLINE
seriesG-TECH X5x
User Manual


3
Dear Purchaser!
Thank you for acquiring Neoline G-TECH X5x dashboard camera. Please carefully read this manual to the end in order to correctly use the device and extend its service life. Retain User Manual to consult it if necessary in future.
CE Regulatory Notice The product herewith complies with the requirements of the Low Voltage Directive 2014/35/EU, the EMC Directive 2014/30/EU, battery directive 2006/66/EC, the R&TTE Directive 1999/5/EC and the RoHS Directive 2011/65/EC.
Content
1. Operational conditions ...........................................................................................................42. Technical specifications ..........................................................................................................63. List of Equipment .......................................................................................................................74. Description of Device and Indicators .................................................................................85. Installation of Dashboard Camera ...................................................................................106. Operation ...................................................................................................................................127. Troubleshooting ......................................................................................................................23

4
• Get acquainted with conditions of in-warranty service.
• Do not install or remove memory card when the dashboard camera is switched on to avoid
damage to the device and recorded video files.
• Only use high-quality microSD cards not lower than Class 10 supporting UHS-I protocol to
avoid recording dropouts and delayed images.
• Use of 8 GB to 64 GB card is recommended.
• Device should only be used with accessories from the delivery set. NEOLINE disclaims
responsibility for possible damages to the product in case accessories of third-party manu-
facturers are used.
• Do not expose the product to the effect of fire, moisture or chemically active substances
(petrol, solvents, reagents etc.).
• Disassembly or modification of the product is prohibited.
• NEOLINE shall not be held responsible for loss of data and/or damage, whether direct or
indirect, caused to the user or to a third party through improper use of the device or soft-
ware, incorrect installation, use of accessories not included in the delivery set.
• Format microSD card not rarer than once in two months to avoid damage of its file system.
• Observe temperature conditions of storage and operation (see technical specifications).
Do not allow lasting sun exposure of the device.
• This device is intended for use with a transparent windshield or light-colour heat-reflecting
film. Video recording quality will decrease in case the device is installed on a tinted glass or a
glass with dark heat-reflecting film.
• Camera holder is designed for a fixed mounting. Mount the camera so to obtain a
maximum field of view. It is PROHIBITRD to install the camera in a place where the device
can shade cover the vision and reduce the safety of driving. Neither Neoline nor their author-
ized partners shall be held responsible for whatever damage or loss of data as a result of
improper holder installation.
[ Operational Conditions ]

5
• In view of vehicle driving safety as well as in accordance with local legislation, do not make
manipulations with the device when driving a vehicle.
• Set the time zone prior to use of the device – time and date will be set automatically.
• Heating of front and rear camera housing as well as of basic module in operating mode is
a normality.
• Be careful during operation, do not allow dropping or squeezing of main unit, cameras,
external GPS antenna or microphone.
• Do not install the device components in a place wherefrom the airbags deploy.
• Correct operation of GPS module in a motor car with athermal windshield or with heated
windshield will require a correct installation of external GPS antenna. Since such windshields
contain a metal sputtering in their structure, correct operation of GPS module can be
disrupted.
• The time of search for satellites may increase depending on weather conditions, time of
day, terrain relief and design features of the motor car.
Be careful! Inoperability of the device caused by its incorrect installation can entail the
cancellation of warranty liabilities.
*List of installation service centers is available at www.neoline.ru
Manufacturer reserves the right to bring amendments in the equipment list, hardware and software of the device without prior notification.
Prior to commencement of use, it is assumed that you agree with the above provisions.

6
[ Technical Specifications ]
• Installation method: spaced• Video resolution
- main camera Full HD 1920*1080 (30k/s)- additional camera HD 1280*720 (30k/s)
• Viewing angle:- main camera: 130°- additional camera: 130°
• Video recording format: MP4• Bitrate:
- main camera: up to 9 Mb/s- additional camera: up to 7 Mb/s
• Built-in capacitor*• Support of MicroSD memory cards, class 10 +, UHS-1, 8 to 64 GB• Interval loop recording, min: 1/2/3• Automatic ON/OFF• Wi-Fi connection to smartphone• Temperature conditions:
- operation: -10°C to +70 С°- storage: -30°C to +80 С°
• Number plate stamp• Date/time stamp• Audio recording (upon connection of external microphone)• Built-in loudspeaker• G-sensor• Motion sensor• Parking mode• Input voltage: DC 12V/24V• Main unit mounting: Velcro strip with 3M, plastic ties, self-tapping screws• Camera mounting: 3M tape• Dimensions: 69*111*21 mm• Weight: 100 g
* Dashboard camera is designed for operation in a wide range of temperatures. Supercapacitor, in contrast with accumulator battery, is more durable and efficient in operation under low and high ambient tempera-tures. It is intended for a correct completion of current video file recording and not for offline operation of the dashboard camera.

7
[ List of Equipment ]
• Car dashboard camera Neoline G-Tech X5x – 1 piece• Front camera – 1 piece• Additional camera – 1 piece• Board network power cable – 1 piece• Plastic ties – 4 pcs• Self-driving screws – 4 pcs• Camera cable holder – 6 pcs• Wire connector – 2 pcs• Velcro strips with bi-adhesive tape – 1 piece• Microphone – 1 piece• Operation manual – 1 piece• Warranty card – 1 piece
Optionally (see list of equipment on individual packaging)• External GPS/GLONASS sensor* - 1 piece• Wire button to Lock files against override (not applied in models
G-Tech X52/X53 – 1 piece• Memory card – 1 piece
*Important! Do not install GPS antenna behind metal surfaces of motorcar: it will deteriorate satellite search performances and incorrect GPS operation. Correct choice of antenna installation place is most important for stable operation of GPS module. Recommended places for antenna installation in motorcar:– dashboard, as close as possible to windshield– behind rear view mirror– under trim lining of one of front pillars– with athermal or heated glass, antenna should be mounted into a special radiotransparent window on the windshield, which is free from metal lath or sput-tering– in special cases, antenna may be installed outside the motorcar passenger compartment
8
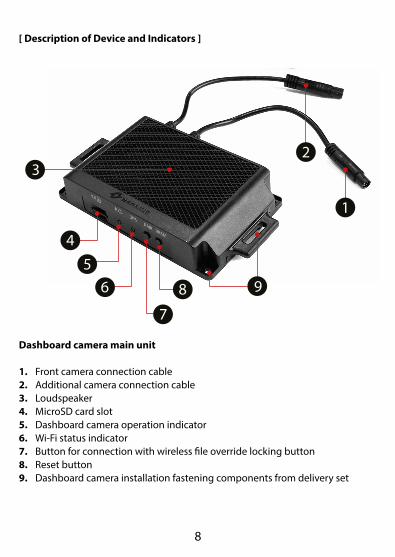
[ Description of Device and Indicators ]
Dashboard camera main unit
1. Front camera connection cable2. Additional camera connection cable3. Loudspeaker4. MicroSD card slot5. Dashboard camera operation indicator6. Wi-Fi status indicator7. Button for connection with wireless file override locking button8. Reset button9. Dashboard camera installation fastening components from delivery set
2
1
8 9
7
65
4
3

9
1. Power cable connector2. File override Locking wire button connector3. GPS/GLONASS sensor connector4. External microphone connector5. Front camera cable connector6. Additional camera cable connector
Light Indicators
1 2 3 4 5 6
Indicator
Wi-Fi status indicator
Dashboard camera operation indicator
Blue, blinking
Blue, constantly lighted
Red, constantly lighted
Blue, blinking
Blue, frequent blinking
Recording
Shock sensor has worked, current file is protected against override
Wi-Fi connection established
Search for GPS/GLONASS signal
Satellite communication established
Status Meaning

10
[ Installation of dashboard camera ]
Installation of dashboard camera main unitNote: prior to installation of dashboard camera main unit, identify its appropriate place in the motorcar so that you can hear voice commands of the device and have access for installation of updates. Recommended places for main unit instal-lation in the motorcar:– under steering column;– besides driver’s elbow rest;– under glove box.Important: If you have no experience in electric equipment installation, it is recommended to address the service center.
Installation Chart
1. Installation of main unit, for example, under steering shaft, glove box.2. Front camera mounting and camera cable pulling under lining.3. Additional camera mounting and camera cable pulling under lining.4. GPS/GLONASS sensor mounting and camera cable pulling under lining.

11
5. Microphone mounting and cable pulling under lining.6. Mounting of file locking wire button and cable pulling under lining.
Having provisionally identified the installation place, use fastening components from the delivery set.
Installation of Front and Additional Cameras
To ensure an optimal view, the camera should be mounted bedsides the rear vi-sion mirror on the centreline and top of the windshield (front camera) and on the centreline and top of the rear window (additional camera).
Position the lens so that the camera captures the image in proportion “30% sky/ 70% road” to reach the best filming results. Identify beforehand a precise place for camera installation since the holder is provided with 3M tape that is intended for a single use.
front cameraadditional camera

12
Power Connection
Only use power cable included in the product delivery set to supply the device.
Connect power supply wire in accordance with the diagram. Red (plus) wire should be connected to +12V terminal where voltage does not disappear after ignition is keyed off.Connect yellow wire to ACC +12V or to other connector where voltage will disappear after ignition is keyed off. Connect black (minus) wire with the motor car body.Connect cable into supply cable connector of the main Lock.
[ Operation ]
Preparation of the device
A. Insert MicroSD card into the memory card slot.Switch off the device before memory card installation and insert memory card until it is fully fixed.
Position MicroSD card against the slot as shown on figure below and insert until it goes click.

13
Card removal: carefully press the card and the remove from the slot.
IMPORTANT: Attempting to insert the card with a wrong side can damage the device and the card itself. Make sure the memory card is in correct position.
Warning: Do not apply too much effort when installing the memory card in or-der to avoid damage of the device. To install, insert MicroSD into the slot until it is fixed (goes click); if necessary, use a needle to seat the card. To remove the card, press on it until click and remove from the slot, use a needle if necessary.
Switching ON/OFF
Automatic ON
After car engine is started, the device automatically switches on.
Reset
If the device does not record and does not respond to commands when buttons are pressed, press RESET button.

14
Video Recording Mode
Four folders are created on microSD card for storage of various types of vide-ofiles: – Driving” folder is intended for storage of files recorded in regular mode;– “Event” folder is intended for storage of files recorded when the shock sensor works; file length is seconds before the event and 10 seconds thereafter;– “Motion” folder is intended for storage of files recorded in the parking mode;file length is 8 seconds before the event and 10 seconds thereafter.– “Protection” folder is intended for storage of files recorded when the file override Locking button is pressed. In the process of motion, you can Lock the file against override using the special wire or wireless button of file override Locking (depending on the delivery set). Important: pressing the button results in Locking of current videofile, the file length is determined by settings of the Loop Recording interval (see below).
Adjustment of Dashboard Camera
Adjustment of the dashboard camera is carried out via firmware application Neoline G-Tech X5x available for downloading in App Store and Play Market. Install the application on your smartphone prior to use of the dashboard camera and carry out its initial setting.
15
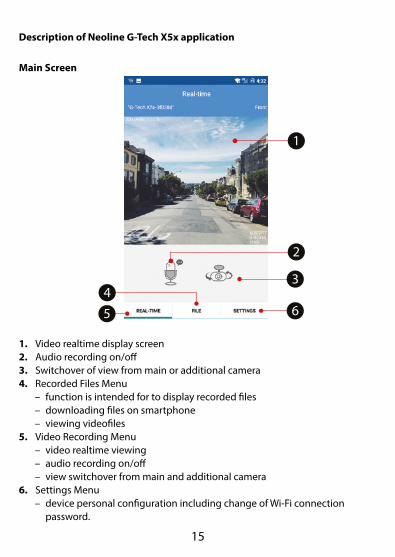
Description of Neoline G-Tech X5x application
Main Screen
1. Video realtime display screen2. Audio recording on/off3. Switchover of view from main or additional camera4. Recorded Files Menu
– function is intended for to display recorded files– downloading files on smartphone– viewing videofiles
5. Video Recording Menu– video realtime viewing– audio recording on/off– view switchover from main and additional camera
6. Settings Menu– device personal configuration including change of Wi-Fi connection
password.
1
2
3
654

16
Wi-Fi connection to Smartphone with Android OS
1. Run application G-Tech X5x on your smartphone2. Press OK in popup window3. Select your device from the list. Device name looks as follows: G-Tech X5x-
xxxxxx where 6 last symbols are the identifier of an individual device4. Enter password (factory password: 12345678) and press connection button5. When connection is established, press reset button on your smartphone6. Main screen of application will playback video in realtime.
1 2 3
654

17
Wi-Fi connection to Smartphone with iOS (Apple)
1. Run application G-Tech X5x on your smartphone2. Activate Wi-Fi on the smartphone3. Select your device from the list. Device name looks as follows: G-Tech X5x-
xxxxxx where 6 last symbols are the identifier of an individual device4. Enter password (factory password: 12345678) and press connection button5. Upon successful connection will be displayed opposite the device name6. Go back to main screen of application will playback video in realtime7. Main screen of application will display video in realtime.

18
List of Files Menu
1. List of files downloaded on the smartphone– the tab is intended to playback files downloaded on the smartphone– user can select required folder (Drive, Event, Motion, Protect)– press on the file to display it
2. Videofiles storage folders3. List of files in selected folder4. List of files on the dashboard camera memory card
– the tab is intended to playback files saved on the dashboard camera memory card
– can select required folder (Drive, Event, Motion, Protect) to playback file– press to save current file in the smartphone memory– files from main and additional cameras are downloaded separately
5. Button of file downloading into the smartphone
1
2
3
4
5

19
Playback and Deletion of Files
– Press on the file to playback it. Playback will start in full screen mode.– wipe screen sideways to delete the file. Confirm file deletion in appearing
window.
Transfer of Files into Social Networks and Other Services– Press the selected file and hold for 2 seconds. Select service in popup window
to transfer videofile.

20
Settings
Change Password – you can set your password to prevent unauthorized access to videofiles.
G-sensor Sensitivity in Normal Mode– acceleration sensor is provided in the dashboard camera to Lock videofiles
against override in case of road traffic accident. You can set the sensor sensitiv-ity at your own discretion taking into consideration the condition “the lower the value, the higher the sensitivity”. We recommend to retain factory settings. The Locked file will placed into Event folder, record length 18 seconds.
Loop Recording – can adjust file recording length in normal recording mode; when Drive folder
is full, the oldest iles will be rerecorded into new ones automatically.

21
Sound Level – when the main unit is installed, adjust sound level of the loudspeaker
Audio Recording – audio recording on/off: use this setting or a special function on the main
screen of application
Parking Motion Recording – activate this setting to save records of motion sensor in parking mode; vide-
ofiles will be saved in Motion folder; 8 seconds before event and 10 seconds thereafter shall be saved.
Recording Events at Parking – activate this setting to save records of shock sensor in parking mode; videofiles
will be saved in Event folder; 8 seconds before event and 10 seconds thereafter shall be saved
File Locking Sound – activates sound notification that the videofile is Locked asgainst override
Power Off – to prevent the motorcar battery from discharge, set the voltage threshold
value upon which the dashboard camera power supply will be disconnected in parking mode.
G-sensor Sensitivity in Parking Mode – shock sensor is provided in the dashboard camera to save records in case of
road traffic accidents or strikes on the motorcar body. You can set sensitivity of the sensor at your discretion taking into consideration the condition “the lower is the value, the higher is sensitivity”. This setting is only available upon active function “Recording Events at Parking”

22
Parking Mode Duration – to prevent the motorcar battery from discharge, you can set the dashboard
camera operation time in parking mode upon expiry of which the dashboard camera will switch off.
Time Zone – set time zone of your region
Voice Notifications – use this setting to enable/disable voice prompts
Formatting – use this setting to format memory card.Important! Formatting will permanently erase all files on the memory card. Save necessary files prior to formatting the memory card
Memory Card Areas – select appropriate for you partition of spaces on the memory card; a certain
memory space will be reserved for each folder.Important! Formatting of the memory card will be required upon change of its areas. Save necessary files prior to the change of areas.
SD card Formatting Reminder – use this setting to set spicify interval of reminders about necessity to format
the memory card. Important! It is recommended to format the memory card not rarer than once in 2 months.
Factory Settings – use this setting to restore factory settings
Device Information – viewing of device information

23
Application Information – viewing of application information
Settings Menu – Change Password: enter a new password and confirm it– G-sensor sensitivity in normal mode: 1 to 10– Loop Recording: 1 min/2 min/3 min– Sound Level: 1 to 5– Parking Motion Recording: ON/OFF– Parking Event Recording: ON/OFF– File Locking Sound: ON/OFF– Power Off: 11.5(23.5)V/11.7(23.7)V/11.9(23.9)V/12.1(24.1)V/12.3(24.3)V
(value in brackets is given for motorcars with 24V board network voltage)– G-sensor Sensitivity in Parking Mode: 1 to 10– Parking Mode Duration, hours: 6/12/24/36/48/OFF– Time Zone: -11 to +12 hours– Voice Notifications: ON/OFF– Number Plate Stamp. Enter the motorcar number plate. Only numbers and
Latin alphabet letters are allowed.– Formatting: in popup window whether confirm or cancel the memory card
formatting process– SD card Formatting Reminder: 1/2/3/4/6 months– Factory Settings: confirm or cancel the device reset to factory settings– Device Information: text information– Application Information: text information
Changes are possible in values of individual settings depending on version of the device software and of the application on your smartphone.
[ Troubleshooting ]If problems have occurred while following the operational conditions, use this section to solve them.

24
– Wi-Fi connection is impossibleCheck whether the password is correct. Switch off other, previously connected smartphone. Delete the network from the list in the telephone and try connec-tion once more.
– Photographing and video recording are impossibleCheck whether there is enough free space on the microSD card as well as whether the card is not locked.
– Recording self-stoppageToo large size of video files, only use highspeed microSD cards not lower than Class 10 of proven manufacturers.
– “error” message appears on the display upon attempt to view/ playback photo/video file
Uncompleted recording into file through file system error on the microSD card. Format the microSD card.
– Washed-out pictureCheck whether the lens is free of dirt, fingerprints. If not, wipe the lens with soft cloth before operation (use of special agents for care of optics is recommended in order to avoid damage of the objective lens surface).
– Darkened picture in photos of sky or waterHigh contrast in the scene will have impact on the exposure. Adjust the lens so that the camera captures the image in proportion “30% sky/ 70% road”
– Hangup (recording does not start, no connection to application, no response to change in settings)
Press button RESET for forced reload of the device.

Manufactured for ''Neolainas'' LTD Vilnius, LithuaniaMade in PRC
Official website: www.neoline.ruTechnical support: [email protected]
Operating temperature -10°C to +40°C
See individual packaging for information about the importer and authorized service organization
Limited Warranty: 24 month