dear 4-h rock climbers,
TRANSCRIPT


Dear 4-H Rock Climbers,
Welcome (or welcome back) to the Sauk County 4-H Rock Climbing Project! You’ve made a great choice by signing up for this project. The project meetings are incredible, the volunteer project leaders are amazing, and your experiences will be out of this world!
The goals of the Sauk County 4-H Rock Climbing Project are: • Participants will learn about and become involved in all aspects of the
sport of rock climbing. • Participants will learn and practice important life skills such as
leadership, trust, communication, and teamwork. • Participants will increase their awareness, knowledge, and
involvement in healthy lifestyle choices including an increase in physical activity.
• Participants will gain awareness and knowledge about the environment and practice environmentally friendly choices and low impact behavior.
• Participants will have the opportunity to progress through different levels of rock climbing skills and serve as youth leaders to other project members.
This project literature will outline different parts of the sport of rock climbing. In our monthly meetings, we will be covering much of the material in this book, but review the information prior to each meeting. A check-off sheet for your record book is also included. If you need additional copies of this manual, please print off copies at the Sauk County 4-H website at sauk.uwex.edu/4h/projectResources.html
We are looking forward to a great year!
See you on the rock,
Jessica Jens Sauk County 4-H Youth Development Agent

Nuts & Bolts Project Requirements 2 County Project Achievement Guidelines 2
Level 1 3 Level 2 4 Level 3 5 Level 4 6
Assumption of Risk Document 7-8 Health Form 9-10 Challenge by Choice 11 2007 Rock Climbing Project Leaders 12 2007 Project Meeting Dates & Locations 12 Map of Devil’s Lake State Park 13 Ideas for Environmental Stewardship Projects 14 Environmental Stewardship Record 15-16
Things You Need to Know Before You Climb Leave No Trace 17-18 Rock Climbing Vocabulary 19-20 Equipment 20 Knot Guide 21-27 Belay School 28-30 Climbing Communication 31 Safety First! 32-33 Pre-Climb Stretches & Exercises 34-35 Healthy Snack Receipes 36-37
Climbing Beta (Information) Yosemite Decimal System 38 Climbing Techniques 39-40 “Secret” Paths to the Climbing Sites 41-42
End-of-Year Reflection 43-44
References 45
1

Mandatory Rock Climbing Project Requirements Before you will be able to climb at a rock climbing project meeting,
you will need to:
1. Sign and return the Assumption of Risk document
2. Complete and return the health form 3. Demonstrate your ability to tie the Level 1
knots and coil. 4. Pass belay school
Rock Climbing Project Achievement Program
Each year, you will have the opportunity to achieve in the rock climbing project. Completing the achievement requirements is optional. You must complete the achievement levels in order and you can only complete one achievement level per 4-H year.
Benefits of successfully achieving in the rock climbing project include:
• The opportunity to progress to more advanced rock climbing techniques the following 4-H year in the next level of the rock climbing project.
• The opportunity to take on leadership roles in the following 4-H year
• End of the year recognition
2

Date Completed Leader Initials 1. Proficiently tie the following knots
and coils Overhand
Overhand on a bight Figure 8
Figure 8 Follow Through Double Fisherman
Butterfly Coil 2. Pass belay school: demonstrate proper
belay and back-up belay technique 3. Volunteer four (4) hours of work on
environmental stewardship activities and complete (& return) an environmental stewardship record for each project (p 15)
4. Demonstrate what you learned in the rock climbing project through a county fair entry, project talk, or demonstration on the club or county level.
5. Complete & return the end-of-year reflection page
Things you will learn in Rock Climbing Level 1 include:
Climbing communication & techniques Proper use of all rock climbing equipment How to belay other climbers Route selection & ratings Leave No Trace principles and environmental stewardship Stretching, aerobic training, and healthy eating
3

Date Completed Leader Initials 1. Proficiently tie the following knots,
hitches, and coils All knots & coils in Level 1
Water knot/Tape knot Figure-eight on a bight
Square Knot Girth Hitch
Bowline 2. Pass belay school: demonstrate proper
belay and back-up belay technique 3. Volunteer four (4) hours of work on
environmental stewardship activities and complete (& return) an environmental stewardship record for each project (p 15)
4. Demonstrate what you learned in the rock climbing project through a county fair entry, project talk, or demonstration on the club or county level.
5. Complete & return the end-of-year reflection page
Things you will learn in Rock Climbing Level 2 include:
Beginning skills for setting anchors Intermediate rock climbing skills The proper application of static and dynamic belays Route selection & ratings Leave No Trace principles and environmental stewardship Stretching, aerobic training, and healthy eating
4

Date Completed Leader Initials 1. Proficiently tie the following knots,
hitches, and coils All knots, hitches, and coils in Level 1 & 2
Double bight Figure 8 Clove Hitch
Flemish Bend (Figure 8 Bend) Munter Hitch
Prusik 2. Pass & help teach belay school:
demonstrate & teach proper belay and back-up belay techniques
3. Volunteer six (6) hours of work on environmental stewardship activities and complete (& return) an environmental stewardship record for each project (p 15)
4. Demonstrate what you learned in the rock climbing project through a county fair entry, project talk, or demonstration on the club or county level.
5. Complete & return the end-of-year reflection page
Things you will learn in Rock Climbing Level 3 include:
Helping set-up top-rope anchors Intermediate rock climbing skills How to belay with your non-dominate hand Rappelling on a belay Leave No Trace principles and environmental stewardship Stretching, aerobic training, and healthy eating
5

Date Completed Leader Initials 1. Proficiently tie the following
knots, hitches, and coils All knots, hitches, and coils in Levels 1, 2, & 3
Butterfly Autoblock
Trucker’s Hitch Mule Knot
Mountaineer’s Coil 2. Pass & help teach belay school:
demonstrate & teach proper belay and back-up belay techniques
3. Volunteer eight (8) hours of work on environmental stewardship activities and complete (& return) an environmental stewardship record for each project (p 15)
4. Demonstrate what you learned in the rock climbing project through a county fair entry, project talk, or demonstration on the club or county level.
5. Complete & return the end-of- year reflection page
Things you will learn in Rock Climbing Level 4 include:
Taking the lead in setting up top-rope anchors Advanced rock climbing skills: how to lead climb on a top-rope Escaping and reentering a belay Ascending a fixed rope Leave No Trace principles and environmental stewardship Stretching, aerobic training, and healthy eating
6

Wisconsin 4H Adventure Education Program Acknowledgment of Risks Document
Sauk County 4H Rock Climbing Project Dates: April 1 – October 30, 2008
I understand and acknowledge that the activity in which I (or the under age 18 participant) am about to voluntarily engage in as a participant has inherent risks, some known and some unanticipated, which could result in harm, injury (physical or mental), illness, disease, death, or damages to me (or to the under age 18 participant), or my property or to other third parties.
I understand and accept that the Wisconsin 4H Adventure Education Program activity noted above exposes the participant to many risks. Some of the risks which may be present or occur include, but are not limited to: • The hazards of traveling in steep terrain, including the potential of falling. • Rock hazards; including loose rocks falling from above, climbing or rappelling on unfamiliar,
steep, and sometimes unstable rock faces. • Using harnesses, ropes carabiners, and other climbing equipment. • Manmade objects falling from above including but not limited to ropes, carabiners, other
climbing gear, packs, cameras, and personal gear. • Acts or omissions, negligent or nonnegligent of Sauk County 4H whether in instruction,
selection of climbing routes or resting sites, protection, advice or otherwise. • Carrying ropes and other climbing equipment. • Hiking or walking in rugged terrain, including slippery rocks. • Injuries inflicted by animals, insects, reptiles or plants. • The forces of nature including lightning, weather changes, hypothermia, hyperthermia, sunburn,
high winds, and others not named. • The physical exertion associated with the outdoor activity. • Traveling in a vehicle not driven by the participant. • Consumption of food or drink.
To reduce the possibility of injuries, a number of safety standards are adhered to, including: • Each top rope anchor consists of three independent anchors, each which could individually
hold the weight of a climber. • The top rope anchors are constructed as equalized systems that minimize extension and
maintain redundancy. • Detailed equipment logs are maintained on all equipment. Equipment is retired when it has
exceeded its usable lifetime or a flaw is noted during regular inspections. • All equipment is inspected before and after each climbing program • All participants and facilitators are required to wear a helmet when they are belaying,
climbing, or are in the area of possible rock fall. • If a participant is not wearing a helmet, they must remain in or behind the designated staging
area until they have a helmet. • Participants must remove all jewelry (rings, earrings, necklaces, watches) and secure long
hair before climbing or belaying. • All climbers must tie in with a retraced figure eight knot and backup knot. • All harnesses (climber’s and belayer’s) are double checked for proper adjustments and all
buckles are doubled back before the climber may climb. • Participants may not climb until the proper communication dialog is completed between the
climber and belayer (“on belay?”… “belay is on”… “climbing?”… “climb on”)
7

• All participants and facilitators must be tied in when they are closer than a head’s length from the edge of a rock face.
• All participants must be aware of their proximately to the edge and not cross any boundaries set by the facilitators.
• All rock climbing gear used by the 4H Adventure Education Program is UIAA or CEN approved.
• When belaying, the “matchlockslide” (or “palms down”) technique must be used. The break hand may NEVER leave the rope.
• When rappelling, all participants are backup belayed and the belayer is anchored in at the top of the rappel.
I understand that this activity may subject me to rigorous physical exertion. I hereby state that I am in sufficient physical condition to accept a rigorous level of physical activity.
Prior to signing this document, I have had an adequate opportunity to read and understand it, have had an opportunity to ask questions about it, and any questions I have had have been answered to my satisfaction.
DATE: _____________________
PRINT PARTICIPANT’S NAME:
_________________________________________________________________________________
SIGNATURE OF PARTICIPANT:
_________________________________________________________________________________
IF UNDER AGE OF 18, SIGNATURE OF PARENT OR LEGAL GUARDIAN:
_________________________________________________________________________________
This form available on line at: sauk.uwex.edu/4h/forms.html
8

HEALTH STATEMENT Sauk County 4H Activity Participants
Name_____________________________________Grade (as of 9/04)_________________
Address __________________________________________________________________
Birth Date_____________________
Parent or Guardian: ________________________________________________________
Phone (day) :_____________________________Phone (night):_____________________
Cell Phone #: _____________________________
Please list a secondary contact for emergency purposes:
Name: ___________________________________________________________________
Phone: ___________________________________ Relationship: ___________________
Cell Phone #: _____________________________________________________________
1. Participant was advised by our physician: a) to limit physical exercise Yes No b) use a special diet Yes No c) to take a special medication Yes No ___ If any of the answers are "yes" give details:
2. The above participant: Is diabetic Yes No___ Has Allergies Yes No___ Has a heart condition Yes No___ Has respiratory disease Yes No___ Has other disability or impairment Yes No___
If any of the answers are "yes" give details:
3. Please list any long term medications (prescription & otc) taken by child:
4. Date of last Tetanus Shot: Month Year_______
9
5. Insurance Company: ______________________________________________________
Policy Number: _______________________________________________________
Primary Care Doctor: ___________________________________________________
Primary Care Doctor Phone Number: ______________________________________
I do hereby permit my son/daughter to attend and participate in this 4H activity. I do not hold the chaperone or Extension Agents, University Extension or State of Wisconsin responsible in case of accidental injury or illness.
I also further authorize medical treatment by a hospital or medical person in the event of accident or injury and hereby release all such persons from any such liability.
Signature of Parent or Guardian
______________________________________________________________
This form available on line at: sauk.uwex.edu/4h/forms.html
1 0

Zone of Disequilibrium
Comfort Zone
Panic Zone
All 4-H Rock Climbing activities and project meetings are facilitated with the “Challenge By Choice” philosophy.
The Challenge By Choice philosophy: All participants are encouraged to choose their own level of involvement including
physical, intellectual, and emotional in rock climbing project experiences. The choice is always up to the individual.
If, for any reason, an individual feels uncomfortable or uncertain about participating in an activity, that person may step back from the activity and not join in the action.
This choice does not imply that an individual may disappear or leave the group when adopting the Challenge by Choice credo. When an individual decides not to participate actively, that choice will be respected. But that person is asked to find some way of adding value to the group experience (such as encouraging other participants). The intent of Challenge by Choice is to allow participants to take on a less “active” role, but remain present with the group.
Challenge by choice offers a participant: 1. A chance to try potential difficult and/or frightening challenges in an atmosphere of
support and caring. 2. The opportunity to “back off” when performance pressures or self-doubt becomes
too strong, knowing that an opportunity for a future attempt will always be available. 3. A chance to try difficult tasks, recognizing that the attempt is more significant than
performance results. 4. Respect for their individual ideas and choices.
Keeping all of this in mind, rock climbing participants are always encouraged to push themsevels passed their comfort zone (but
not into their panic zone). By entering the “zone of disequilibrium” or “growth zone,” participants will increase their opportunities to learn and grow through the experience.
It’s easy for everyone, including myself, to continually participate in events and form our lives so that we are always
in our “comfort zone.”—physically, mentally, emotionally, intellectually, and spiritually. We all just set the cruise control
and keep going. Maybe this is because we are concerned about jumping into the panic zone, a zone of anxiety so great that we are only
concerned about getting out of it! But what we may forget is the great zone in between, the “Zone of Disequilibrium.” This is a zone where the outcome of our experiences is unknown. This is also the zone where we grow. We grow emotionally; we grow intellectually; we grow socially; and we grow in so many other ways as well.
1 1

Jessica & James Jens (795-2379) Jessica’s Office: 355-3255 Jessica’s cell phone: 393-6568 [email protected]
Ann & Jeff VogtSchaller (356-4114) [email protected] [email protected]
John & Judy Markestad Jarred & Melissa Burke Keith Bourne Michiel Lofton Larry Lariere
Date & Time Place Topic April 21 st (Mon) 6 – 8 p.m.
West Square Building, Baraboo
Orientation Meeting, t-shirts, Leave No Trace, knot tying, belay school
May 19 th (Mon) 5:30 – 8 p.m. Rain Date: May 26 th
Potty Rocks (E Bluff) Bouldering and Climbing Techniques; meet at the Elephant Rock parking lot
June 18 th (Wed.) 9 a.m. – 2:45 p.m.
Misery Rocks State Conference Rock Climb: Level 2-4 members are encouraged to come and help teach & belay state conference participants from 9 a.m. – 2:45 p.m. If you would like to help, contact Jessica for more details.
June 18 th (Wed.) 4:00 -7:00 pm No rain date
Misery Rocks Climbing Day: Meet at the south shore boaters’ parking lot or find us on the bluff.
June 30 th (Mon) 8:30 am – 4:00 pm
Leaning Tower (on top of east bluff)
Rock Climb for Washington Co. 4-H Camp: Level 2-4 members are encouraged to come and help teach & belay from 8:30 a.m. – 4 p.m. If you would like to help, contact Jessica for more details.
June 30 th (Mon) 4:00 – 7:00 pm No rain date
Leaning Tower (on top of east bluff)
Climbing Day: Meet at the CCC trail parking or find us on the bluff.
July 14 th (Mon) 5:30 – 8:00 pm Rain date: July 28 th
Elephant Rock Climbing Day: Meet at the Elephant Rock parking lot
July 31 st (Thurs) 8:30 am – 4:00 pm
Misery or Stetner’s Rock Climb for Sauk & Columbia Co. 4-H Camp: Level 2-4 members are encouraged to come and help teach & belay from 8:30 a.m. – 4 p.m. If you would like to help, contact Jessica for more details.
August 18 th (Mon) 5:30 – 8:00 pm Rain date: Aug. 25 th
The Pantry Climbing Day: Meet at the south shore boaters’ parking lot or find us on the bluff.
August 20 th (Wed) 8:30 am – 4:00 pm
The Guillotine (East Bluff) Rock Climb for Kenosha/Racine/Walworth Co. 4-H Camp: Level 2-4 members are encouraged to come and help teach & belay from 8:30 a.m. – 4 p.m. If you would like to help, contact Jessica for more details.
August 20 th (Wed) 4:00 – 7:00 pm No rain date
The Guillotine (East Bluff) Climbing Day: Meet at the CC trail parking or find us on the bluff.
September 13 th (Sat) 12:30 – 6 p.m. Rain Date: Sept. 20 th
Old Sandstone Area End of the summer potluck picnic and climb; Meet at the north end of the South Shore parking lot/picnic area for a picnic at 12:30 pm. After we eat, we will car pool to the Ice Age Trail parking lot on South Shore Road to climb at the Old Sandstone Area.
**All climbing days are at Devil’s Lake State Park, see maps on pages 12, 41 & 42 for more directions. Watch the Clover Comments for any changes/additions to this list of project meeting dates.
1 2

“Boaters” Parking Lot
“CCC Trail” Parking Lot
“Elephant Rock” Parking Lot
“South Shore” Parking Lot
Please note, you will need a park sticker to enter the park to gain access to either the “South Shore” or “Elephant Rock” parking lots. You do not need a park sticker to access the “Boaters,” ”Ice Age Trail” or “CCC Trail” parking lots, BUT you DO need a park sticker to park and leave your vehicle at ANY
parking lot within Devil’s Lake State Park. 1 3
“Ice Age Trail” parking lot

1 4
Webster’s Dictionary defines a steward as “one who acts as a supervisor or administrator, as of finances and property, for another or others.” Stewardship can also be defined as “taking care of something.” Environmental stewardship is taking care of our environment.
As outdoor enthusiasts and rock climbers, we use natural resources. It is important that we develop a respect for the environment and also “give back” to our natural world. One way to give back is to participate in environmental stewardship projects.
Environmental stewardship projects: • Help take care of our environment by reversing past human impact on our natural resources or
helping limit future impact. • Help us learn how we can change our behaviors to become better stewards of the environment. • Promote the revitalization or growth of native animal and plant species.
Some examples of environmental stewardship projects include: • Planting native trees • Collecting prairie seeds to help replant native prairie • Building and monitoring Bluebird houses • Collecting acorns to help grow oak trees that can be used to create oak savannas • Cleaning up rivers, lakes, roadsides, and trails of trash and debris • Pulling invasive species such as garlic mustard • Building nature, hiking, and biking trails to limit human impact
Youth of Sauk County are invited to participate in environmental stewardship projects through “Youth Environmental Projects of Sauk County” (YEPS).
Through learning-by-doing experiences, Y.E.P.S.: • Involves youth in countywide, service-learning environmental stewardship
projects. • Provides opportunities for youth to gain an appreciation of local natural
resources. • Teaches about human’s impact on the environment. • Fosters a lifelong commitment to earth stewardship. • Provides an opportunity for community groups and individuals to work together toward a
common goal of involving youth and families in the environment.
For more information about YEPS, visit the Sauk County 4-H website or watch future Clover Comments for announcements of upcoming YEPS projects. Participating in YEPS projects will help you fulfill the 4-8 hours of environmental stewardship needed to complete levels 1-4 of the rock climbing project achievement program.

1 5
Full Name: ___________________________________________________________
Address: ___________________________________________________________
Phone: ______________________ Age: ___________ Grade: ___________
Male/Female (circle one)
Please complete the following environmental stewardship evaluation. The results of the evaluation will be used to illustrate the impact of youth participation in environmental stewardship projects. Your participation in this evaluation is
voluntary and confidential to the extent allowed by law. Your responses will be combined with the responses of all other participants and you will not be individually identified on any report prepared. If you have questions, please contact Jessica
Jens at 355-3255 or [email protected]. Completion of this evaluation implies your consent to participate.
Date of Project: _______________ Amount of Hours Spent on Project:_________________
Location of Project: _________________________________________________________
Please write a paragraph to answer each of the following questions, use the back of the paper if needed. What did you do and why did you decide to participate in this project?
Why did this project help the environment?
What did you learn from working on this project?
Signature of an adult who testifies you completed this project:
______________________________________________________ Date: ________________
Relationship to participant: ___________________________________ Phone: _______________
This form available on line at: http://sauk.uwex.edu/4h/YEPS.html

1 6
The Sauk County 4-H Rock Climbing Project strictly follows the principles of Leave No Trace (LNT). All project leaders, members, parents, and visitors will be asked to follow LNT throughout the year.
What is the Leave No Trace program? Leave No Trace is a nationwide (and international) program designed to assist visitors with their decisions when they travel and camp on America's public lands. The program strives to educate visitors about the nature of their recreational impacts as well as techniques to prevent and minimize such impacts. Leave No Trace is best understood as an educational and ethical program, not as a set of rules and regulations.
What is Leave No Trace's mission? The mission of Leave No Trace is to promote and inspire responsible outdoor recreation through education, research and partnerships. The Leave No Trace program is focused specifically on human-powered (non-motorized) recreation. Find out more at www.lnt.org
Seven Principles of Leave No Trace
1. Plan Ahead and Prepare • Know the regulations and special concerns for the area you'll visit. • Prepare for extreme weather, hazards, and emergencies. • Schedule your trip to avoid times of high use. • Visit in small groups. Split larger parties into groups of 4-6. • Repackage food to minimize waste. • Use a map and compass to eliminate the use of marking paint, rock cairns or
flagging.
2. Travel and Camp on Durable Surfaces • Durable surfaces include established trails and campsites, rock, gravel, dry
grasses or snow. • Protect riparian areas by camping at least 200 feet from lakes and streams. • Good campsites are found, not made. Altering a site is not necessary.

1 7
In popular areas: • Concentrate use on existing trails and campsites. • Walk single file in the middle of the trail, even when wet or muddy. • Keep campsites small. Focus activity in areas where vegetation is absent. In pristine areas: • Disperse use to prevent the creation of campsites and trails. • Avoid places where impacts are just beginning.
3. Dispose of Waste Properly • Pack it in, pack it out. Inspect your campsite and rest areas for trash or spilled
foods. Pack out all trash, leftover food, and litter. Deposit solid human waste in catholes dug 6 to 8 inches deep at least 200 feet from water, camp, and trails. Cover and disguise the cathole when finished.
• Pack out toilet paper and hygiene products. • To wash yourself or your dishes, carry water 200 feet away from streams or
lakes and use small amounts of biodegradable soap. Scatter strained dishwater.
4. Leave What You Find • Preserve the past: examine, but do not touch, cultural or historic structures and
artifacts. • Leave rocks, plants and other natural objects as you find them. • Avoid introducing or transporting non-native species. • Do not build structures, furniture, or dig trenches.
5. Minimize Campfire Impacts • Campfires can cause lasting impacts to the backcountry. Use a lightweight stove
for cooking and enjoy a candle lantern for light. • Where fires are permitted, use established fire rings, fire pans, or mound fires. • Keep fires small. Only use sticks from the ground that can be broken by hand. • Burn all wood and coals to ash, put out campfires completely, then scatter cool
ashes.
6. Respect Wildlife • Observe wildlife from a distance. Do not follow or approach them. • Never feed animals. Feeding wildlife damages their health, alters natural
behaviors, and exposes them to predators and other dangers. • Protect wildlife and your food by storing rations and trash securely. • Control pets at all times, or leave them at home. • Avoid wildlife during sensitive times: mating, nesting, raising young, or winter.
7. Be Considerate of Other Visitors • Respect other visitors and protect the quality of their experience. • Be courteous. Yield to other users on the trail. • Step to the downhill side of the trail when encountering pack stock. • Take breaks and camp away from trails and other visitors. • Let nature's sounds prevail. Avoid loud voices and noises

1 8
Anchor: Point where the rope is secured to the rock with either fixed bolts, rocks, trees or non-fixed gear to provide protection against a fall.
ATC: Air Traffic Controller. A popular belaying and rappelling device which, when used in conjunction with a locking carabiner, provides a safety brake on the rope.
Belay: Safety technique in which a stationary climber provides protection, by means of ropes, anchors and braking devices, to an ascending partner.
Belay Device: A forged metal device of various configurations through which a climbing rope is threaded and then linked to a carabiner in order to provide friction to brake a fall.
Belay Station: A stance on a rock face of varying degrees of discomfort from which a climber provides roped protection for his or her ascending partner.
Beta: Insider information about a climb. Running or auto beta is someone telling you how to do the moves as you go.
Bomber: Has extremely high quality and dependability. Usually refers to a handhold, but can also describe a piece of equipment, a campsite or any generally positive or beneficial item or state of being.
Boulder: To climb lateral short routes on low-lying rocks without rope, but with the assistance of spotters.
Bucket: 1) A handhold large enough to latch the entire hand onto — as with the lip of a bucket. 2) Another name for a helmet, as in “brain bucket” or just “bucket.”
Buttress: A rock formation that projects out from the line of a face.
Cam: Generic term for mechanical spring-loaded devices of varying sizes and manufacture (Friends, Camalots, TCUs, etc) which can be inserted in cracks to secure a climbing rope.
Chalk: Powdered magnesium carbonate used by climbers to dry sweaty hands.
Chimney: A crack large enough to climb inside of.
Crux: The most difficult section of a climbing route.
1 9
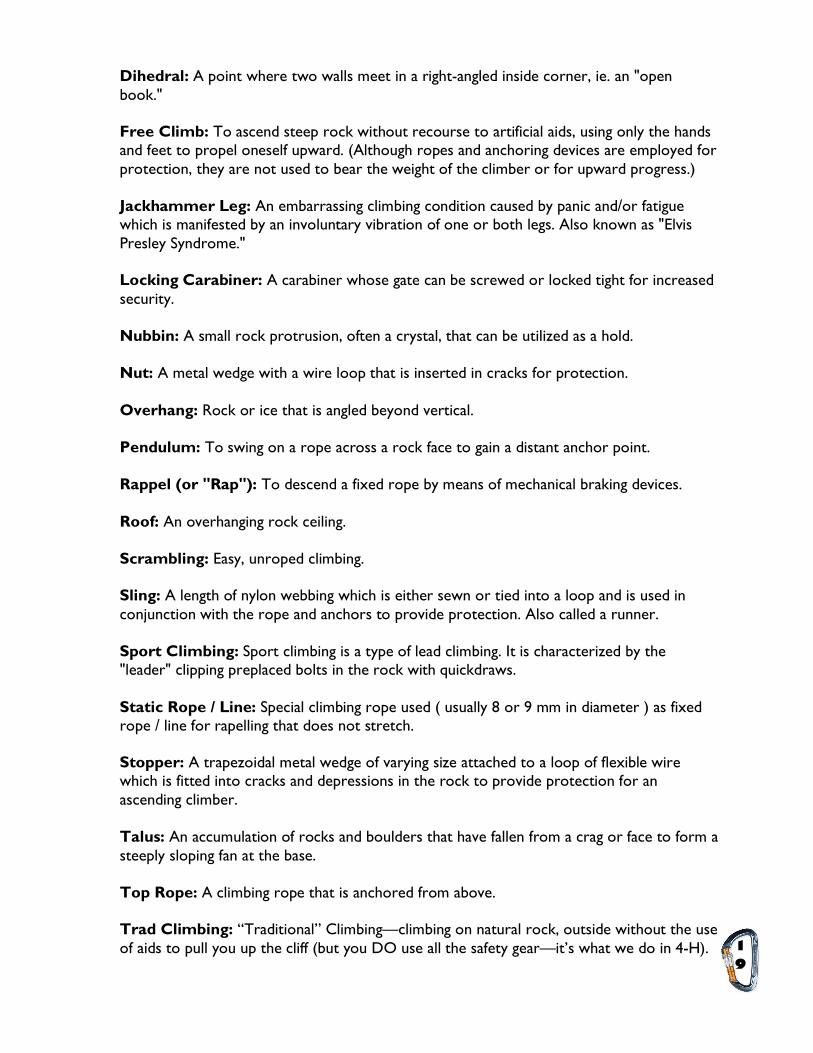
Dihedral: A point where two walls meet in a right-angled inside corner, ie. an "open book."
Free Climb: To ascend steep rock without recourse to artificial aids, using only the hands and feet to propel oneself upward. (Although ropes and anchoring devices are employed for protection, they are not used to bear the weight of the climber or for upward progress.)
Jackhammer Leg: An embarrassing climbing condition caused by panic and/or fatigue which is manifested by an involuntary vibration of one or both legs. Also known as "Elvis Presley Syndrome."
Locking Carabiner: A carabiner whose gate can be screwed or locked tight for increased security.
Nubbin: A small rock protrusion, often a crystal, that can be utilized as a hold.
Nut: A metal wedge with a wire loop that is inserted in cracks for protection.
Overhang: Rock or ice that is angled beyond vertical.
Pendulum: To swing on a rope across a rock face to gain a distant anchor point.
Rappel (or "Rap"): To descend a fixed rope by means of mechanical braking devices.
Roof: An overhanging rock ceiling.
Scrambling: Easy, unroped climbing.
Sling: A length of nylon webbing which is either sewn or tied into a loop and is used in conjunction with the rope and anchors to provide protection. Also called a runner.
Sport Climbing: Sport climbing is a type of lead climbing. It is characterized by the "leader" clipping preplaced bolts in the rock with quickdraws.
Static Rope / Line: Special climbing rope used ( usually 8 or 9 mm in diameter ) as fixed rope / line for rapelling that does not stretch.
Stopper: A trapezoidal metal wedge of varying size attached to a loop of flexible wire which is fitted into cracks and depressions in the rock to provide protection for an ascending climber.
Talus: An accumulation of rocks and boulders that have fallen from a crag or face to form a steeply sloping fan at the base.
Top Rope: A climbing rope that is anchored from above.
Trad Climbing: “Traditional” Climbing—climbing on natural rock, outside without the use of aids to pull you up the cliff (but you DO use all the safety gear—it’s what we do in 4-H).

2 0
Nut Hexes
Dynamic Ropes: Dynamic ropes slightly stretch or give when a load is placed on it. This helps protect the internal organs of a climber when he/she falls. A dynamic rope is made out of two layers, the kern and mantel. The kern is the core of the rope and is made of plaited nylon filaments. This is what gives the rope its strength.
Surrounding the kern is the mantle. This is what protects the kern from kinks and abrasions. The mantel is made of woven nylon filaments. Dynamic ropes come in a variety of widths ranging from 9-11 millimeters. We use 11 mm dynamic ropes.
Harness: The rock climbing harness is a very important piece of equipment! The harness fits around your waist and around both legs. You “hang” in the harness when you are being lowered to the ground, and the rope and harness “catch” you when you fall. Harnesses come in a variety of styles and sizes. Full body harnesses are also available for our smaller 4- H members. Full-body harnesses are designed for children or adults with narrow waists and hips. The harness holds shoulders as well as legs, preventing you from slipping out should you rotate upside down during a fall. Since full-body harnesses have a higher tie-in point than seat harnesses, they reduce the chance of flipping over backward in the first place.
Helmet (aka Bucket): All climbers, belayers, and spectators in the rock fall area of a climb must wear Helmets. Rock climbing helmets protect a climber from falling objects from above.
Climbing Shoes: The shoes you wear when rock climbing do more than simply protect your feet. They also help you grab onto, hold and interact with the rock. Different rock shoes are designed to perform best in different situations.
Belay Device: A forged metal device of various configurations through
which a climbing rois threaded and then linked to a carabiner in order to provide friction to brake a fall.
Carabiner (or Biner): Forged aluminum or steel devices of various shapes (oval, D-ring, etc.) with a spring-loaded gate through which a climbing rope can be threaded. The most basic all-around tool on a climber's rack, they are used variously for such activities as belaying, rappelling, and clipping into anchors.
Protection (or Pro): Any anchor (such as a nut, hex, or camming device) used during a climb to prevent a fall.
Webbing: Flat nylon tape or tubing used for slings.
Active Camming Device TriCam

2 1
Knot tying is a foundational skill in the sport of rock climbing. We would not be able to climb if we did not know how to correctly tie our knots! Each year, you will learn more and more knots. You will probably be surprised when you realize how often you will use these knots throughout your
life—and not only in rock climbing!
Knot Terminology
Overhand Knot: The basic knot that most everyone uses to tie shoe laces. This knot is used as a foundation for many more advanced and useful knots.
Working End of the Rope
Standing End of the Rope
Bight
Loops

2 2
Overhand on a bight: A great knot that is used to provide a place to “clip in” to and is also used to set up top rope anchors.
Figure 8: Another foundation knot of rock climbing. Learn it and learn it well!
Figure 8 Follow Through: This is “the” knot to know. This is the knot you will use to tie into the climbing rope EVERY time your climb.
Double Fisherman: This is used to tie two ropes together. One of these knots is used as a back-up knot to your figure 8 follow through when you tie in. Another knot you need to know very well.

2 3
Water knot/Tape knot: When you need to tie two pieces of webbing together, this is your knot!
Figure 8 on a Bight: Same uses as the overhand on a bight, but a this knot is a bit stronger.
Square Knot: After you have the a butterfly coiled rope, use this knot to tie the two loose ends together around your waist—now you have a climbing rope backpack!
Girth Hitch: A very simple hitch commonly used to secure webbing to a tree or rock in a top rope anchor set-up.

2 4
Bowline: This well-used universal knot is used in rock climbing to tie a rope to a tree or rock as part of a belay or top rope anchor.
Double Bight Figure 8: The bunny rabbit knot! Besides being a fun “trick” knot, it can be used in anchor set-ups.
Clove Hitch: An easy to adjust hitch that can be used to equalize an anchor set-up.

2 5
Flemish Bend (Figure 8 Bend): A reliable way to connect two ends of a rope together and form a secure union.
Munter Hitch: A belay knot through which the rope slides when pulled in one direction and brakes when pulled in the other.
Prusik Knot: The good old prusik knot is very, very useful. All you need is a loop of cord which you can make using 6 or 7mm accessory cord and a double fisherman's knot. This is a sliding friction knot that, when loaded, will lock on a rope. It is used when climbing a rope or when locking off the belay system.

2 6
Butterfly: A really fun knot to tie that is used to make a loop in the middle of a rope…without having to find either end of the rope! It can also be used when you need three separate directions of pull from one location in an anchor set-up. There are two ways to tie this knot, here’s one way: (Ask Jessica about the other way.)
Autoblock: This sliding friction hitch is made with a biner and a sewn sling or small loop of webbing. It is another hitch that can be used to ascend a fixed rope.
Trucker’s Hitch: The ultimate hitch to use when you want a tight clothesline at your campsite or when you are pulling a tarp nice and tight on a rainy day.
1. Tie off one end to a stationary object 2. Tie a overhand on a bight in the line to form a loop 3. Pull free end of the rope around another stationary object. 4. Pull a bite of rope through the loop and secure with two half hitches

2 7
Mule Knot: This knot is used to lock off a belay in case there is some type of emergency and you need to get off belay with a climber still on the route (escaping the belay). The overhand backup is necessary to prevent the Mule knot from untying.
1. From the belayer's perspective, lock the belay device with your brake hand (for this example, assume the brake had is your right hand).
2. Loop the slack (behind your brake hand) through the locking carabiner on your harness from right to left.
3. Feed the slack under and back to the right of the loaded rope. 4. Form a loop (half-twist - clockwise). 5. Take another bight of the slack and feed it under and to the left of the loaded rope. 6. Form a loop in this bight of rope (half-twist counter-clockwise). 7. Feed this second loop (the left loop) over the loaded rope and through the first loop. 8. Tighten the knot formed with the two loops, leaving a tail. 9. Using the tail, tie an overhand knot on the loaded rope.

2 8
Belaying the 4-H Way By Jeff VogtSchaller
Belaying is the process of handling the safety rope attached to the climber in such a way as to provide maximum safety for the climber with the minimum of interference. The method we use in 4H is a safety rope securely tied to the climber’s rock-climbing harness. The safety rope goes from the climber to an anchor at the top of the climb and then back down to a belayer on the ground. When a climber falls they fall about six inches before the rope starts to stop them. The climbing rope has a fair amount of elasticity. This elasticity decelerates the climber to a stop in another six to eight inches. A normal fall is about a foot to a smooth stop. This method makes rock climbing an inherently safe sport.
The Anchor The belay set up starts at the top of the cliff. Here we anchor the rope with at least three equalized pieces of “protection”. This protection can be large, immovable boulders, large trees, or pieces of specialized rock climbing hardware (“nuts”) that fit into cracks in the cliff. Each individual piece is strong enough to support the climber. We attach at least three pieces together, using one inch tubular nylon webbing and carabineers, so that the load is equalized with each piece supporting one third of the load.
The climbing rope is attached to the climber, goes through the two locking carabineers attached to the top anchors, and then goes back down to the bottom of the climb where it is handled by the “belayer”
The Belayer The belayer is the person who handles the rope that comes down from the top anchors. The belayer is responsible for keeping all slack out of the rope but not keeping so tight a rope on the climber that the rope becomes a distraction.
The belayer stands at the bottom of the climb and her/his climbing harness is attached to an anchor – a tree, boulder, or “nut” – to prevent being unbalanced by a heavier climber.
The rope that comes down from the top anchor above goes through a belay device attached to the front of the belayer’s harness. This belay device allows easy movement of the climbing rope but “locks” the rope if put under sudden tension when the climber falls. The belay device is very simple to use and very safe.

2 9
Belay Technique The rope comes down from the top anchor, goes through the belay device on the front of the belayer’s harness and exits the device to the belayer’s right side. The belayer takes this end of the rope in her/his right hand, palm down. As long as the belayer is “on belay”, this hand never opens! The belayer’s left hand controls the movement of the rope. The left hand is moved to wherever it is needed. The right hand never opens! (You will be taught in Belay School exactly how your left hand handles the rope.) When the climber falls (and the climber will fall) all the belayer has to do is close her/his right hand and place it on her right hip. This will lock the rope in the belay device and allow a ninety pound belayer to easily hold a two hundred pound climber.
The Dialog Rock climbing is an international sport. Early on in mountaineering (rock climbing is a part of the larger sport of mountaineering) it became obvious that a standard set of commands should be used by climbers and belayers to prevent accidents. All climbers in the world use the following commands.
At the bottom of the climb, the climber ties into the safety rope and the belayer attaches to the belay anchor and feeds the rope from above through the belay device. The climber and belayer then check each other’s harnesses, knots, and anchors. When both are satisfied with the safety of the setup they begin the dialog.
The dialog is a contract between the climber and the belayer. The climber promises to climb safely and notify the belayer of problems. The belay promises to never remove her/his right “brake” hand from the rope and to be attentive to the climber. The dialog goes like this:
The climber goes to the base of the climb, looks back at the belayer and asks, “On Belay?” If the belayer is ready in every way she responds, “Belay is on!” The climber readies herself and says, “Climbing!” The belay responds with, “Climb on!” and the climber then begins to ascend.

3 0
There are also standard dialogs that are used between climber and belayer during a climb.
At times the climber needs to move horizontally or needs to adjust the rope. The climber can ask her belayer to give her a little extra rope to complete the move. The climber finds a secure place to stand and calls down to her belayer, “Slack!”.
The belayer responds with, “Slack! Thank you!”. The belayer is still on belay! She simply helps feed the rope back through the belay device at the rate the climber pulls. She only back feeds the amount the climber pulls through and takes it back as soon as the move is done!
Sometimes the climber may feel the belayer has allowed too much extra rope to accumulate and he will call down, “Up Rope!”. (Never, never, never “take up the slack”!). The belayer will pull the offending extra rope through the belay device and reply, “Up Rope! Thank you!”.
A nervous (or tired) climber may want the secure feeling of a tight rope. He can call down to his belayer, “Tension!”. The belayer removes all slack from the rope, pulls it tight and responds with, “Tension Thank you”.
When the climber falls (and the climber will fall) he may yell, “Falling!!!” to which the belayer may respond, “Whoa!, Yikes!, or OOF!” as he feels the need.
On very rare occasions a climber may dislodge and drop something. Everything (except the rope) that falls off a climb is a ROCK and the climber will yell “ROCK!”. The belayer doesn’t respond, just keeps her head down! All climbers and belayers wear helmets. Better to get a rock or debris on the helmet than look up and getting it in the face!
When the climber is ready to be lowered to the ground, he will say “Ready to Ride!” The belayer responds, “Ride on” and lowers the climber to the ground by releasing (but not letting go) his grip slightly with the brake hand.
At the end of the climb, when the climber is away from the cliff edge on top or back on the ground at the bottom, he will turn to his belayer and say, “Off belay”. The belayer responds, “Belay is off” and the belayer may now remove his right hand from the rope and relax.

3 1
Communication is the key to climbing safely. Communication between the belayer and climber is a contract. It is important that we all use the same verbal contract and we follow it during EVERY climb. You will need to know both part of the communication tree: the climber and the belayer.
This communication will be an integral part of belay school.
Belayer’s Communication
Climber’s Communication
“On belay?” “Belay is on.”
“Climbing.”
“Climb on.”
“Thank you.”
“ROCK!”
“Up rope.”
“Slack.”
“Falling.”
“Ride on!” “Ready to ride!”
“Belay is off.”
“Off Belay.”
“Thank-you.”
The climber
does not begin
climbing until this entire
sequence is
complete.
Communicat- ion used
during the climb
Used when the climber
is done climbing and
wants to come down
Communication used when the
climb is complete and the climber is
safely on the ground

3 2
Did you know that, according to annual accident rates, rock climbing is safer than a lot of activities, including hang gliding, scuba diving, being anaesthetized for a surgery, and WAY safer than giving birth (statistics from Britain’s Health & Safety Commission)! Although risk is involved in everything we do, including rock climbing, we can minimize (although not eliminate) most inherent risks of rock climbing.
SAFETY RULES OF ROCK CLIMBING
1. Never step on the rope!
2. Never step on the rope!
3. Never step on the rope! Why, you ask? The climbing rope is what keeps you from falling. It is your friend, not your enemy. When we step on the rope, debris infiltrates the rope. It damages the outside layer (mantel) and the inside layer (kern). Not only does this weaken the rope, it decreases how long we can use the rope. Not only are ropes our friends and keep us from falling, they are very expensive too.
4. Wear your harness OVER your clothes! All shirts/jackets must be tucked into your harness. If you can not see your harness, you can not tell if it is on right and double backed.
5. Double back your harness! Professional climbers have fallen because they did not double back their climbing harness. “If you see red, you’re dead!” Make sure you double back every buckle on your harness (waist and legs).

3 3
6. Wear your helmet and wear it correctly! Your helmet protects your noggin from falling rocks and from bashing it on overhangs while you climb.
7. Tie back long hair! Believe me, you do not want to get your hair stuck in the ATC while you are belaying or on the rock when you are climbing.
8. Remove all jewelry (rings, necklaces, long/big/hoop earrings). People have lost fingers from their ring becoming stuck on a rock. All jewelry while rock climbing is dangerous.
9. Stay at least one body length away from the edge! A simple trip and you could be falling over the edge. If you need to get closer than a bodies length, you must be tied in and on a belay.
10. Never let go with your break hand while belaying!
11.Double check your carabineer to make sure it is locked when you are belaying!
12. All ropes and webbing are checked after EACH climbing day! Every inch of every climbing rope is checked for wear. Ropes that have evidence of unacceptable wear are retired immediately. Each piece of webbing is checked for evidence of wear.
Bandannas do not count as helmets!
Webbing that has been checked and daisy chained…it’s ready to be stored for the next
climb!

3 4
Just like any other sport, the more you practice and prepare your body the better you will be. During our project meetings, you will hike up steep inclines to the climbing sites. The act of climbing will use muscles you may never thought you had. So now is the time to start working on the following exercises:
Aerobic Conditioning: Although climbing is not considered an aerobic sport (the heart rate does not get into the 75%-85% aerobic training range), your heart rate does increase to the fat- burning range, which is around 60% of your maximum heart rate. We will also be climbing steep, long trails to the climbing sites. Training your lung capacity is very beneficial to you as a rock climber, especially for endurance training and recovery. Building up an aerobic base will help a climber of any ability. To build up your healthy aerobic base, there are many activities you can participate in.
These activities should be performed at least four days per week for a minimum of thirty minutes per day. Many you are probably doing right now:
Hiking Running Walking
Dance Playing sports Biking
Stretching: One of the best things you can do to become a better climber is to work on your flexibility. Stretching Is the best form of injury prevention. Stretching will also help you maintain good posture and efficient movements on the rock. You should stretch a minimum of four days per week, although stretching every day is ideal. Take each stretch to the point of discomfort (not pain) and hold for 15- 30 seconds. Repeat each stretch two to five times. Each time an area is stretched, it will become slightly more flexible. We will stretch at the beginning of each project meeting. Try these stretches at home:
Forearm: Extend the arm straight out in front of the body, palm down, and elbow slightly bent. With the other hand, pull the stretched hand toward the sky. Fingers: Your finger tendons take a lot of abuse from climbing. Extend the right hand in front of the body, pointing the index finger straight up. Now take the middle two fingers of the left hand and cradle the first joint on the right index finger. Now take the index finger of the left hand and place it on the pad of the right index finger, stretching it gently until the finger is straight. Shoulders: Pull the left arm across the body, hug it in close with the right arm to stretch out the left shoulder ; repeat with other arm. Neck: Sitting up straight, tilt the head to the left, ear to the shoulder, dropping the right shoulder toward the floor.

3 5
Abdominals: While lying flat, face down, prop the upper body up on the hands. Arch the back and push the torso upward, stretching the head toward the ceiling, and keeping the pelvis and hips touching the floor. Hamstrings: With the feet close together, lean forward toward the ground, and let the weight of the upper body bring the torso close to the legs. Try to touch the floor with the hands. If this is not possible, cross one leg in front of the other and hug the legs in with the arms to stretch the backs of the legs. An added benefit of this exercise is stretching the lower back and shoulder muscles. Hip Flexor: Bend down so that the right knee is on the ground, the right leg extended behind the body, and the weight of the body straight up from the right knee. The upper left leg extends straight in front of the body, the foot flat on the ground and the left knee directly over the ankle. Tilt the hips forward and lift the chest up, pushing forward through the front of the right leg to feel a stretch through the hip flexor. Calves: Facing a wall, take the feet approximately 3 feet away from the wall but still together, and keep the hands on the wall. With the legs straight, lean into the wall, keeping the heels on the floor. To stretch each calf individually, cross the left foot over the right ankle and put more pressure on the right leg, stretching closer to the wall. Gluteus Maximus/Hips: Stand on the left leg and cross the right foot above the left knee. Sit back into the right hip, pushing with most of the body weight. Inner Thighs: Sit on the floor with the legs spread apart in a “V.” Flex the feet so that the toes are pointing upward to the ceiling. Lean the body forward, toward the floor, and try to get the torso as close to the floor as possible. Obliques: With the legs spread apart on the floor, feet flexed, lean the body over the left leg, torso facing sideways. Take the right arm over the body toward the left foot, stretching the outer abdominals. Now turn and face the leg, stretching both hands toward the foot.
Weight Training: Is weight training beneficial to climbers? Some people will say “yes,” and some people will say “no.” But, maintaining good muscular strength will help you perform activities without fatigue,
residual soreness, or risk of injury. Regularly participating in aerobic activities will assist you in maintaining a good level of muscular strength.
If you feel that weight training would be beneficial to you, make sure you seek instruction from a qualified adult. Take care not to overwork your muscles. Be sure to stretch your muscles during weight training and climbing to keep them elongated. If your muscles do not get stretched, they can become shortened, and you will not have full range of motion or power with them. The best way to weight train for climbing is using light weights with a lot of repetition. This will develop muscular endurance rather than bulk. Specific areas you can work when you are not climbing are:
Triceps Back Legs Abdominals

3 6
Climbing makes you hungry! It’s always a good idea to bring along some snacks to each climbing day. Even if we are only on the rock for an hour or two, chances are you’ll get
the munchies. Here are some great, healthy snack recipes. Try one, two, or all of them. Remember, healthy climbers are good climbers!
Ann’s Radical Rad-Trad Cookies These cookies are a favorite among Sauk County 4-H rock climbers. This takes 15 minutes to prep and 30 minutes to bake. Make 2-3 dozen cookies and is easily doubled or tripled to feed
all the hungry climbers in our project!
1 C brown sugar 1/2 C butter 1/2 C shortening 1 tsp baking soda 1/2 tsp cinnamon 1 tsp vanilla 1 tsp baking powder 1 tsp salt
2 large eggs 3 C old-fashioned oats 1 C whole wheat flour 1 C raisins or dried cranberries 1/2 C sunflower seeds 1/2 C chocolate chips 1/2 C wheat germ
Heat oven to 350 degrees. Mix all ingredients except oats, flour, nuts, and raisins. Stir in oats, flour, nuts, and raisins! Drop dough by rounded teaspoonfuls (or a #1 ice cream scoop) 2" apart onto an ungreased cookie sheet. Bake 9-11 minutes until light brown. Remove onto wire rack to cool. Pack in day pack, drive to Elephant Rock parking lot at DL SP. Hike up to climbing area. Climb. Eat cookies.
Fruit and Nut Bars
1 1/2 C. granola 1/2 C. Spanish peanuts 1/2 C. miniature candy-coated chocolate candies (or miniature chocolate chips)
1/2 C. dried currants 1 C. dried prunes 1/2 C. dried apricots 1/4 C. dried blueberries
In large bowl, combine granola, peanuts, candies and currants. Set aside. In food processor, combine prunes, apricots and blueberries. Process until smooth. Add processed fruit to granola mixture. Mix well. Form about 1/3 cup mixture into a tightly packed 4-by-1 1/2-by- 3/4-inch bar. Place bar on prepared baking sheet. Repeat with remaining mixture. Let bars air-dry overnight on kitchen counter. Store bars in airtight container between sheets of wax paper. Makes 10 bars Source: Vegetarian Times. Nutrition data, per bar: Calories 255 (37 percent from fat); fat 10.5 g (sat 2.7 g, mono 3.7 g, poly 3.8 g); protein 6 g; carbohydrates 39 g; fiber 5.17 g; cholesterol 0 mg; sodium 17 mg; calcium 48 mg.

3 7
Super Bars with Dried Fruit and Peanut Butter
Nonstick vegetable oil spray 3 C. puffed whole grain cereal (such as Kashi) 1/4 C. walnuts, chopped 1/4 C. chopped pitted dates 1/4 C. dried tart cherries
1/2 C. raisins 1/3 C. creamy peanut butter or almond butter 1/4 C. honey 1/4 C. light corn syrup
Preheat oven to 350 degrees. Spray a 9-inch square metal baking pan with nonstick spray. Mix cereal, walnuts, dates, cherries and raisins in a medium bowl. Combine peanut butter, honey and corn syrup in a heavy small saucepan. Bring to a boil, whisking constantly until mixture bubbles vigorously and thicken slightly, about one minute. Pour peanut butter mixture over the cereal mixture in the bowl; stir to blend. Transfer the mixture in a prepared pan; press to compact. Bake until just golden around edges, about 10 minutes. Cool completely. Cut into nine bars.
Can be prepared three days ahead. Store in a single layer between sheets of foil in an airtight container at room temperature.
Each bar contains: 235 calories; 7 grams fat; 5 grams protein; 38 grams carbohydrates; no cholesterol; 3 grams fiber.
PBR Energy Bars
1/2 C. butter or margarine, softened 1 C. packed light brown sugar 2 egg 1 t. vanilla extract 1/3 C. cocoa 1/4 C. milk 1 C. whole-wheat flour
1/4 C. nonfat dry milk powder 1/4 C. wheat germ 1/2 t. baking powder 1/4 t. baking soda 1 2/3 C. (10-oz. package) peanut- butter chips 1/2 C. raisins
Heat oven to 350° F. Grease 13-by-9-inch baking pan. Beat butter, brown sugar, eggs and vanilla in large bowl until light and fluffy. Blend in cocoa and milk. Stir together whole-wheat flour, nonfat dry milk powder, wheat germ, baking powder and baking soda; add to butter mixture, beating until well blended. Stir in peanut-butter chips and raisins. Spread batter evenly into prepared pan. Bake 30-35 minutes or until bars begin to pull away from sides of pan. Cool completely in pan on wire rack. Cut into bars. Makes 36 bars.
Source: Hershey's Kitchens.
Nutrition data, per bar: Calories 123 (42 percent from fat); fat 5.7 g (sat 3.1 g, mono 1.4 g, poly 1 g); protein 3 g; carbohydrates 15 g; fiber .94 g; cholesterol 20 mg; sodium 72 mg; calcium 33 mg.

3 8
The Yosemite Decimal System (YDS) is a numerical system for rating the difficulty of walks, hikes, and climbs, primarily used for mountaineering in the United States. The rock climbing (5.x) portion of the scale is the primary climb grading system used in the United States.
The class of a route is derived from its "crux" or hardest move. If you hike a class 2 trail from point A to point B, and are required to scale a 20 foot wall of rock (class 4) along the way, then you hiked a class 4 trail regardless how long you were exposed to the class 4 move.
As described in the climbing textbook Mountaineering: The Freedom of the Hills:
The five classes of climbs are: Class 1: Hiking Class 2: Simple scrambling, with possible occasional use of the hands. Class 3: Scrambling, a rope can be carried but is usually not required. Class 4: Simple climbing, with exposure. A rope is often used. Natural protection can be easily found. Falls may well be fatal. Class 5: Technical free climbing. Climbing involves rope, belaying, and other protection hardware for safety.
Class 5 is further divided: Ratings are established by a lead climber; the follower or top- roped climber has a somewhat easier climb.
5.0 to 5.4: There are two hand and two footholds for every move; the holds become progressively smaller as the number increases. 5.5 to 5.6: The two hand and two footholds are there, obvious to the experienced, but not necessarily so to the beginner. 5.7: The move is missing one hand or foothold. 5.8: The move is missing two holds of the four, or missing only one but is very strenuous. 5.9: The move has only one reasonable hold which may be for either a foot or a hand. 5.10: No hand or footholds. The choices are to pretend a hold is there, pray a lot, or go home. 5.11: After thorough inspection you conclude this move is obviously impossible; however, occasionally someone actually accomplishes it. Since there is nothing for a handhold, grab it with both hands. 5.12: The surface is as smooth as glass and vertical. No one has really ever made this move, although a few claim they have. 5.13: This is identical to 5.12 except it is located under an overhanging rock.

3 9
By Jeff VogtSchaller
So now you know how to belay, know all your dialog, know how to tie knots, and know safety on the hill. The project is Rock Climbing! Let's
learn how to climb!
There you are, standing at the bottom of the climb. You just did the dialog with your belayer. Your belayer just told you to "Climb On!". What do you do? Well, you just find some hand holds up as high as possible and pull yourself up, right? Maybe, but probably not.
Climbing is done almost entirely with the feet. Hands are used mostly for balance. Rock climbing is a dance not a wrestle. Good rock climbers are always looking down looking for foot holds.
Proper climbing style can look a bit odd. Usually your hands are somewhere at about shoulder lever with your body (and butt) well out from the rock face. This pushes your feet in against the rock. Friction is your friend.
The two most common style of climbing used at Devil’s Lake are crack climbing and "face" climbing.
Crack climbing is exactly what it sounds like; climbing a crack. The technique is usually to put your hand in the crack and then make a fist. Depending on the width of the crack, your fist is probably now too big to pop out of the crack and you can lean back, pulling on you jammed fist while you work you feet higher in the crack. Your feet can often be stuffed into the crack by turning your foot sideways and then twisting your foot straight and standing up (much easier to demonstrate than explain). There are many variations of jamming hands, fingers, arms, legs, and feet into cracks (heads are frowned upon).
Face climbing involves climbing up bumps, ledges, and knobs on a "smooth" rock face. Face climbing is usually more elegant than crack
climbing - more dance, less wrestle. Smooth climbing means finding a toe/foot hold, a hand hold and then pulling you center of mass (your belly button) over top of your foot and then standing up. Your body zig-zags up the face. Move a foot, pull your weight over it, stand up, move a foot, pull your weight over it, stand up.

4 0
Remember that a "push" hold is almost always better than a "pull" hold. The next hand hold might be under an bulge. The next foot hold might be on the wall behind you (very common at Devil's Lake). When the going gets easy on a climb, stop and rest! You can't rest where the climbing is hard! And, the most important rule of climbing, enjoy the view!
Commonly Used Climbing Moves:
Crank: To pull on a hold with maximum force; to expend total effort in any endeavor.
Dead Hang: To hang from a handhold with arms straight so body weight is supported by the skeleton rather than arm muscles.
Downclimb: To descend a mountain or a rock face without weighting a rope; often accomplished without protection, and hence potentially the most dangerous part of a climb.
Chimney: A chimney is a crack large enough to climb in. To “chimney” is to create counterforces by pressing with your back and hands against one side of the chimney and with the soles of your feet against the other side.
Edging: Chimbing where thin edges of the climbing shoes are used to stand on small footholds.
Fingerlock: A crack climbing technique where the fingers are wedged into a crack for grip on the rock.
Fist Jam: Similar to a fingerlock except that the entire fist is wedged into a crack.
Jamming: A technique for climbing cracks in which the fingers, hands, or feet are wedged inside a rock crack to gain purchase and facilitate upward progress.
Jam Crack: A crack which is wide enough to accommodate a hand, fist, arm, foot, or elbow (or combination thereof).
Jug Hold: A handhold so secure that it can be grasped like a jug handle. Also known as a "Bomber."
Layback (Lieback): A technique wherein a climber's hands are positioned to pull on one side of a crack while the feet push in opposition from the other, facilitating a crablike advance up the rock.
Mantel: A technique wherein a climber grasps a hold waist-level and powers the body upward with minimal assistance from the feet. (From "mantelpiece.")
Match: To grasp a hold with both hands, or to place the feet side by side on the rock.
Smearing: A technique of applying to a rock slab as much of the sticky sole of the climbing shoe as possible to achieve maximum friction.
Stemming: A move using both legs to counter-pressure against each other. This technique is normally used in corners or dihedrals.
Traverse: Moving sideways across a section of terrain instead of directly up or down.
Undercling: A usually awkward and tenuous hold that requires applying upward pressure on a downward facing hold.

4 1
Okay, the secret paths really are not that secret. You’ve probably seen them when you are hiking at Devil’s Lake. These trails are not main hiking paths, nor are they on a park map, but they will take you to where we need to go. If you are trying to find our group these direction may (or may not) help you out.
The puppy paw print is gone. It was removed in the summer of 2007. L
4 2
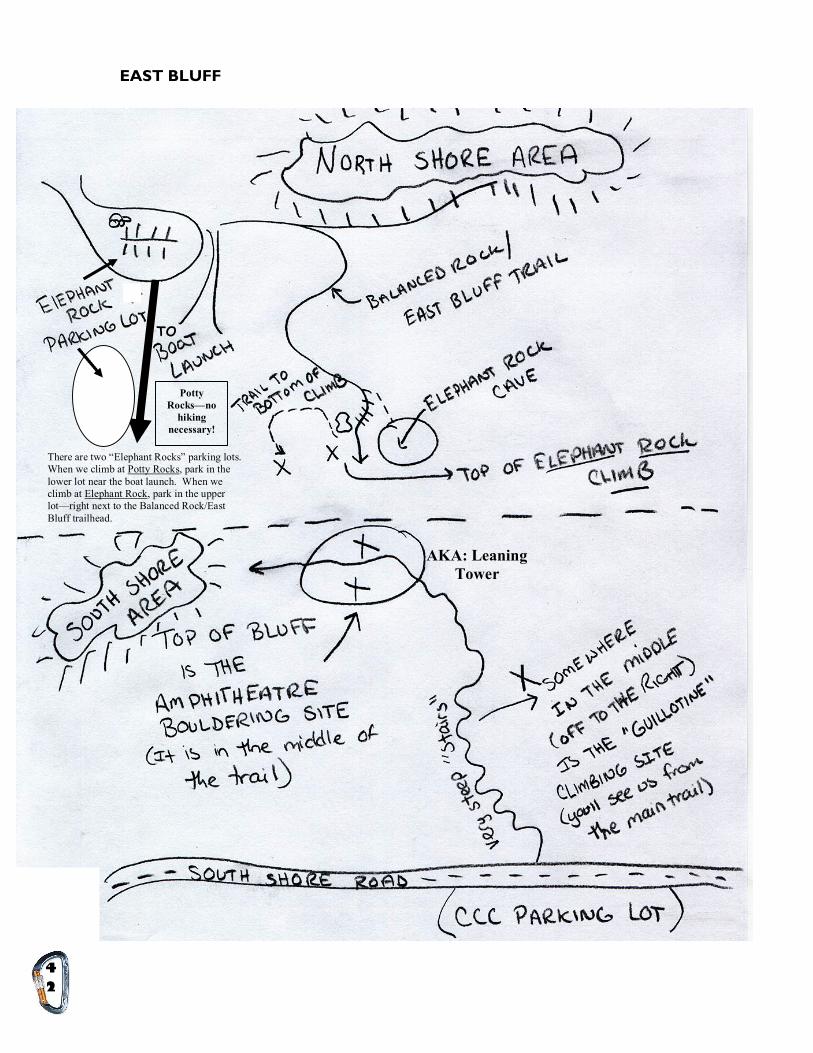
EAST BLUFF
Potty Rocks—no hiking
necessary!
There are two “Elephant Rocks” parking lots. When we climb at Potty Rocks, park in the lower lot near the boat launch. When we climb at Elephant Rock, park in the upper lot—right next to the Balanced Rock/East Bluff trailhead.
TO
AKA: Leaning Tower

4 3
Sauk County 4-H Rock Climbing Project End-of-Year Reflection - 2008
Now that the rock climbing year is over, it’s a great time to look back and realize what you have learned and how you have grown through the rock climbing project. Please complete the following reflective activity and turn it into the Sauk County UW- Extension Office by November 1 st . Thank you!
Please complete the following 4-H rock climbing project evaluation. The results of the evaluation will be used to illustrate the impact of youth participation in 4-H rock climbing project. Your participation in this evaluation is voluntary and confidential to the extent allowed by law. Your responses will be combined with the responses of all other participants and you will not be
individually identified on any report prepared. If you have questions, please contact Jessica Jens at 355-3255 or [email protected]. Completion of this evaluation implies your consent to participate.
Your Age: _____________________ Male/Female (please circle one)
How many years have you been in 4-H? _____________________
How many years have you participated in the rock climbing project? _________
1. What did you like the most about the rock climbing project? Why?
2. What would you change or improve about the rock climbing project? How would you make the changes you suggest?
3. Looking at the list below, please circle all of the life skills that you feel you either learned or developed through your participation in the rock climbing project:
Leadership
Social Skills
Trust
Teamwork
Self-motivation
Self-responsibility
Healthy Lifestyle Choices
Critical Thinking
Goal Setting
Communication
Cooperation
Social Skills

4 4
4. Pick one life skill that you circled in the previous question and give an example of how you learned or developed that skill through your participation in the rock climbing project.
Please circle the choice that best answers each question below.
5. I learned hard skills associated with the sport of rock climbing (i.e.: belaying, knot tying, climbing techniques, etc.)
Strongly Agree Agree Not Sure Disagree Strongly Disagree
6. I learned about healthy lifestyle choices (exercising & healthy eating).
Strongly Agree Agree Not Sure Disagree Strongly Disagree
7. I learned about the environment and how human’s positively and negatively affect our natural resources.
Strongly Agree Agree Not Sure Disagree Strongly Disagree
8. The rock climbing project book was useful to me.
Strongly Agree Agree Not Sure Disagree Strongly Disagree
9. The rock climbing leaders were friendly, supportive, and encouraged me to do my best.
Strongly Agree Agree Not Sure Disagree Strongly Disagree
10. Please comment on the rock climbing leaders. Feel write in detail about what you liked and ways they could improve their leadership.
11.Thank you for reflecting on your year in the rock climbing project! Feel free to add any additional comments in this space or add additional pages as needed.
This form is available on line at: http://www.uwex.edu/ces/cty/sauk/4h/forms.html

Budworth, G. (2003) The ultimate encyclopedia of knots & ropework. London: Hermes House.
Cherilla, K. EverestNews.com lesson plan 19: climbing vocabulary. Available on-line: http://www.k2news.com/lesson19.htm
Chockstone website: http://www.chockstone.org/chockstone.asp
Hannah’s Bakery. Healthy cookie recipes. Available online: http://www.thatsmyhome.com/hannahs/cookies/Health_Cookies.htm
Hurni, M. (2003) Coaching climbing. Guilford, Connecticut: Falcon.
Johnston, T. & Hallden, M. (1995) Rock climbing basics. Mechanicsburg, PA: Stockpole Books.
Leave No Trace Center for Outdoor Ethics. Available on-line: http://www.lnt.org
Powers, P. (1993) Wilderness mountaineering. Mechanicsburg, PA: Stockpole Books.
Rohnke, K, Tait, C, & Wall, J. (1994) The complete ropes course manual. Dubuque, Iowa: Kendall/Hunt Publishing.
Ropers Knot Page: http://www.realknots.com/knots/index.htm#hitches
The Mountaineers. Mountaineering: the freedom of the hills, 6 th Edition. Seattle, Washington. ISBN # 0898864267

Sauk County 4-H Rock Climbing Project Guidebook
Created By: Jessica Jens
Sauk County 4-H Youth Development Agent University of Wisconsin-Extension
Contributors: Jeff VogtSchaller, Sauk County 4-H Adult Volunteer Leader Ann VogtSchaller, Sauk County 4-H Adult Volunteer Leader
Review By: The 2004-05 Sauk County 4-H Rock Climbing Leaders:
Jeff & Ann VogtSchaller Jarred & Melissa Burke John & Judy Markestad
Keith Bourne Becca & Chris Kates
Michiel Lofton Ann Z-K
March 2005 Revised November 2005, December 2006
This Project Guidebook was Awarded:
The 2006 Wisconsin Association of 4-H Youth Development Educators Communicator Award for an Educational Piece
&
The 2006 Regional & National Communicator Award for an Education Piece from the
National Association of Extension 4-H Agents
University of WisconsinExtension, U.S. Department of Agriculture and Wisconsin counties cooperating. UW Extension provides equal opportunities in employment and programming, including Title IX and ADA. Please make requests for reasonable accommodations to ensure equal access to educational programs as early as possible (10 days is reasonable) preceding the scheduled program, service or activity. Call (608) 2243700 to request an accommodation.
Issued in furtherance of Cooperative Extension work, acts of May 8, and June 30, 1914, in cooperation with the U.S. Department of Agriculture.
Copyright 2005 Board of Regents of the University of Wisconsin System, Division of Cooperative Extension of the University of WisconsinExtension.