demo guide - citrix 1 demo guide smartaccess and smartcontrol with netscaler gateway and...
TRANSCRIPT

111Citrix.com 1Citrix.com
Demo Guide SmartAccess and SmartControl with NetScaler Gateway and XenApp/XenDesktop
Demo Guide: SmartAccess and SmartControl V1

22
Demo Guide: SmartAccess and SmartControl V1
Citrix.com
Table of Contents
Overview ..............................................................................................................................................................3
Configuring SmartAccess and SmartControl in a demo environment ..................................................4
Prerequisites .......................................................................................................................................................5
Scenario 1: Configuring SmartAccess without NetScaler Gateway ......................................................6
Disabling client clipboard redirection ...........................................................................................................6
Disabling removable drive redirection .......................................................................................................... 7
Creating the policy ............................................................................................................................................ 7
Demonstrating default client clipboard and removable drive redirection ......................................... 12
Applying the SmartAccess policy................................................................................................................. 13
Scenario 2: Configuring SmartAccess and SmartControl with NetScaler Gateway ........................ 14
Integrating NetScaler Gateway with XenApp and XenDesktop ............................................................ 14
Configuring NetScaler Gateway policies to enable SmartAccess and SmartControl ......................26
Scenario 2-A: SmartAccess with NetScaler Gateway ............................................................................33
Associating the session policy with the access policy ...........................................................................33
Demonstrating default client clipboard and removable drive redirection .........................................36
Applying the SmartAccess policy.................................................................................................................37
Scenario 2-B: SmartControl with NetScaler Gateway........................................................................... 38
Creating the MAC address policy ................................................................................................................ 39
Creating the SmartControl policy ................................................................................................................43
Setting up binding for the session and ICA policies ................................................................................49
Demonstrating default client drive redirection ........................................................................................54
Applying the session and ICA policies ........................................................................................................54
Appendix: Installing NetScaler Gateway ...................................................................................................55
Downloading the NetScaler Gateway appliance ......................................................................................55
Setting up NetScaler Gateway ......................................................................................................................55
Changing the landing page date ................................................................................................................. 59
About the author ............................................................................................................................................. 60

3
This guide shows Citrix sales engineers, presales professionals, and partners how to integrate NetScaler Gateway with XenApp and XenDesktop to demonstrate SmartAccess and SmartControl features. Customers can then try these features in their test environments to understand the value of this integration.
SmartAccess is a feature that allows XenApp and XenDesktop policies to be intelligently applied based on different conditions such as the user’s location, IP address range, delivery group, device type, and installed applications. SmartAccess can be applied both with and without NetScaler Gateway integration. However, SmartAccess policies triggered using SmartGroups and endpoint analysis (EPA) at the NetScaler Gateway provide
greater control with network-level awareness. The policy decision for Independent Computing Architecture (ICA) sessions occurs on the XenApp or XenDesktop servers. SmartControl, a NetScaler feature, allows these decisions to be made at the edge of your network, blocking access to resources when a user has not yet gained access to the corporate network.
SmartAccess and SmartControl policies can be defined concurrently, and the most restrictive policy set will apply. In this document, we’ll use the term SmartAccess to refer to both SmartAccess and SmartControl capabilities unless otherwise noted.
SmartAccess and SmartControl Feature Comparison
Overview
Feature SmartAccess SmartControl
Resource access restriction based on EPA • •
Verification of required security measures enabled on devices
• •
Restriction of access to resources based on Active Directory (AD) identity or group membership
•
Single point of configuration for all XenApp and XenDesktop servers behind the NetScaler Gateway
•
Application-based single sign on (SSO) •
3Citrix.com
Demo Guide: SmartAccess and SmartControl V1

4Citrix.com | Demo Guide: SmartAccess and SmartControl V1 4
We cover configurations in two scenarios:
1. SmartAccess without NetScaler Gateway2. SmartAccess and SmartControl with NetScaler Gateway
Setup Preparation Flowchart
Configuring SmartAccess and SmartControl in a demo environment
Set up XenApp/XenDesktop core infrastructure
Run the demo
Network-level SmartAccess?
Configure NetScaler Gateway virtual servers
No additional configuration required
Complete integration between StoreFront and NetScaler
Create session policies on NetScaler
Select NetScaler authorization in StoreFront
Create SmartAccess policies in Studio and ensure match with NetScaler
policy name if used
Yes
No
4Citrix.com

5Citrix.com | Demo Guide: SmartAccess and SmartControl V1 5
SmartAccess is supported in NetScaler 8.0. SmartControl requires NetScaler Gateway 11.0.65.x or higher.
We used XenApp 7.8 and XenDesktop 7.8 with StoreFront 3.1 and NetScaler Gateway 11.0 Build 65.31 to create the examples in this guide. In production, we recommend these components be installed on separate and redundant servers. For the purpose of demonstration, we installed all components on a single server running on Citrix XenServer 6.2.
Use the following worksheet to collect all the information required for configuration.
You also need the certificate file for the NetScaler appliance (in CER format) and the RSA key used to generate it. Copy these into the /nsconfig/ssl folder on the NetScaler appliance.
Worksheet for Component Prerequisites
Prerequisites
Component IP address Subnet FQDN
Desktop Delivery Controller
StoreFront
Gateway VIP
Gateway SIP
DNS Server
5Citrix.com
6Citrix.com | Demo Guide: SmartAccess and SmartControl V1 6
In this section, you see how to set up policies to restrict or allow user actions based on dynamic conditions. For example, if an end user’s machine meets corporate security compliance, full access is allowed; otherwise, copying files is restricted. The EPA usually looks for anti-virus software or an updated signature file. For the sake of simplicity, we simulate compliance using presence of a text file called OnClientMachine.txt.
To demonstrate setting up policies, we’ll cover disabling client clipboard redirection and disabling removable drive redirection.
Disabling client clipboard redirection
This represents a typical use case of not allowing users to copy items from their Citrix sessions to their client machines and vice versa.
In the default setup, a user would be able to copy text from the client machine to the Citrix session and back. So you want to first show that the user is able to copy text from the client machine into the session, and then copy different text out of the session and save it on the client machine.
Then you apply the policy to disable the client clipboard redirection based on a dynamic condition and check for the following conditions in various tests:
•Access to features: Shared desktops should not be allowed access to some file transfer features that are available to dedicated desktops.
•Whether the client machine has a particular file on its hard drive: The same can be extended to the presence of particular version or higher of an anti-virus or a firewall application. A more restrictive policy is applied to clients that don’t have the file.
•The media access control (MAC) address of a machine: Company devices have specific MAC address ranges, and the administrator can set restriction in such a way that only company-issued devices have access to particular resources.
Finally, you demonstrate that the ability to copy from the client machine into the session or from the session to the client machine has been disabled.
Scenario 1: Configuring SmartAccess without NetScaler Gateway
6Citrix.com

7Citrix.com | Demo Guide: SmartAccess and SmartControl V1 7
Disabling removable drive redirection
This serves as a typical use case of blocking a user’s access to contents of USB drives within Citrix sessions.
In the default setup, users may have the ability to access the files present in a removable device such as a USB stick or external hard drive. Before you make changes, you demonstrate that the user should be able to read the contents of a USB drive connected to the client machine within a Citrix session.
Then you apply the policy to disable the removable drive redirection.
Finally, you demonstrate that the ability to access removable devices from the client machine in the session has been blocked.
Creating the policy
1. On the Desktop Delivery Controller (DDC), open a PowerShell window and run the command asnp citrix*
2. Run the command Set-BrokerSite -TrustRequestsSentToTheXmlServicePort $true
3. Open Citrix Studio and click Policies in the
left pane. Select Create Policy from the Actions pane on the right.
2
3
7Citrix.com

8Citrix.com | Demo Guide: SmartAccess and SmartControl 8
For this demonstration, you next restrict clipboard copy and paste operations between the session and the client.
1. Type Clipboard in the search box to locate the Client Clipboard Redirection policy.
2. Click Select to the right of the policy. 3. Choose Prohibited to restrict client
clipboard redirection, and click OK.
2
3
8Citrix.com

9Citrix.com | Demo Guide: SmartAccess and SmartControl V1 9
You can make several settings in the same policy. You’ll do this next by disabling redirection of removable devices connected to the client into the session; as a result, USB drives connected to the client machine won’t be available in the session.
1. Type removable in the search box to locate the Client Removable Drives policy.
2. Click Select to the right of the policy.
3. Choose Prohibited to restrict redirection of removeable devices to the client, and click OK.
4. Click Next.
Unlike policy engines from other solutions, the Citrix policy engine allows granular and “smart” assignment of policies. Policies may be applied to all users, of course, but that option is rarely used in production. Generally, policies are applied to a delivery group, an Active Directory organizational unit (OU), or a specifc user or group in the active directory. You can get more granular, choosing to assign a policy only if the client machine connects within a specific IP address range, has specific client names, or contains a tag assigned to particular users. You can assign the policy based on an access policy, which is applicable in the NetScaler Gateway scenario.
3
9Citrix.com

10Citrix.com | Demo Guide: SmartAccess and SmartControl V1 10
Here, you’ll assign the policy you created to a delivery group type, Shared Desktops. This restriction will apply to all delivery groups that advertise hosted shared desktops (HSDs) irrespective of the group names.
1. Click Assign in Delivery Group type section, and click Next.
1
10Citrix.com

11Citrix.com | Demo Guide: SmartAccess and SmartControl V1 11
2. Select Shared Desktop in the drop-down menu, and click OK.
3. Give the policy a name (for example,
clipBoardAndUSBDisabledForShared-Desktops). Select the Enable Policy check box, and click Finish.
4. On the Summary page, verify that the Assigned to setting is set to Delivery Group type and has the correct type configured in it. Don’t click Finish just yet.
2
3
11Citrix.com

12Citrix.com | Demo Guide: SmartAccess and SmartControl V1
Demonstrating default client clipboard and removable drive redirection To show the behavior of both two-way clipboard redirection and removable drive redirection before you apply the policy, move to a client machine from which a Citrix session can be started to the DDC you just configured.
1. Create a file named OnClientMachine.txt on the desktop.
2. Open the file in a notepad app, type info on client machine, and save the file.
3. Log on to the StoreFront associated with the configured DDC as user1, and start an HSD session.
4. Copy the text from the OnClientMachine.txt file on the desktop in the client machine.
5. Open a notepad app within the Citrix HSD session, and press Ctrl+V to paste in the copied text. The text “info on client ma-chine” appears in the file, showing that a user can copy data into the session.
6. Delete the text.
7. Type info on session machine into the notepad file within the HSD session, and copy the text.
8. Save the file as OnSessionMachine.txt, and minimize the session.
9. Return to the client machine, and in the notepad app press Ctrl+V to paste in the text. The text “info on session machine” appears in the OnClientMachine.txt file, showing the user can copy data from the session to the client as well.
10. Close the notepad app without saving the file.
11. Connect a USB drive to the client machine.
12. Open My Computer within the session. The USB drive connected to the client machine should show up with a separate drive let-ter in the Devices with Removable Storage section in Explorer.
13. Double-click the drive to display the con-tents of the drive, showing that removable device redirection is working.
14. Log off from the session and StoreFront.
15. Close the browser.
16. Disconnect the USB drive.

13Citrix.com | Demo Guide: SmartAccess and SmartControl V1
Applying the SmartAccess policy
Now you verify the results of the SmartAccess policy you created.
1. Return to the DDC, and in the Edit poli-cy dialog box, click Finish to create the policy. After the policy has been created, it appears in the listing.
2. Open the file OnClientMachine.txt on the
client machine, and copy the text “info on client machine” from it.
3. Log on to the same StoreFront as user1 again, and start the same HSD resource as before.
4. Open the OnSessionMachine.txt file on the session machine, and press Ctrl+V to try to paste text into it. The text “info on client machine” can’t be pasted into the file because clipboard redirection has been blocked from the client to the session.
5. Copy the text “info on session machine” present in the OnSessionMachine.txt file.
6. Minimize the session, and open the OnClientMachine.txt file. Press Ctrl+V to try to paste in the text. Instead of “info on session machine,” a second line of “info on client machine” appears, showing that clipboard redirection has been blocked from the session to the client.
7. Connect the USB drive to the client machine.
8. Open My Computer within the session. Check the Devices with Removable Storage section. The USB drive connected to the client machine doesn’t appear in this sec-tion because removable device redirection has been blocked as well.
9. Disconnect the USB drive.
10. Log off from the session and StoreFront. Close the browser.
Now when any user logs on to an HSD, they won’t be able to copy and paste from within the session to the client machine or vice versa, and any removable devices connected to the client won’t be redirected into the session. However, if the same user logs on to a published app or a Windows 7 desktop, copy and paste will work between endpoint and the resource, and removable devices will be accessible.
1

14Citrix.com | Demo Guide: SmartAccess and SmartControl V1 14
Before we take you through making settings changes on the NetScaler Gateway, ensure you have a NetScaler Gateway installed. If you don’t have the NetScaler Gateway installed and configured, see the Appendix for instructions. Note: You need the Platinum version of NetScaler with universal licenses for the feature to work.
Integrating NetScaler Gateway with XenApp and XenDesktop
You first need to establish secure HDX communication between the NetScaler Gateway and the StoreFront server.
1. Open a web browser, and type the IP address/URL of the NetScaler administration console in the address bar.
2. Log on with your credentials (for example, nsroot/nsroot).
Next, you create a PFX file from the certificate so that it can be provided in the XenApp and XenDesktop integration dialog box.
1. In the NetScaler management console, select Traffic management and SSL.
2. Click Export PKCS#12.
Scenario 2: Configuring SmartAccess and SmartControl with NetScaler Gateway
2
14Citrix.com

15Citrix.com | Demo Guide: SmartAccess and SmartControl V1 15
3. Provide a name for the PFX certificate to be created, and the certificate (CER) file and the RSA key that you copied into the /nsconfig/ssl directory. Create an export password, and then click OK.
4. Switch to the main page of the Configuration tab in the NetScaler Gateway administration console.
5. Under Integrate with Citrix Products in the left pane, click XenApp and XenDesktop, and then click Get Started.
3
5
15Citrix.com

16Citrix.com | Demo Guide: SmartAccess and SmartControl V1 16
6. Select StoreFront from the drop-down menu, and click Continue.
6
16Citrix.com

17Citrix.com | Demo Guide: SmartAccess and SmartControl V1 17
In the next screen, you create the virtual server that will function as the front end for the StoreFront.
1. Type the IP address for the virtual IP (VIP), leave the port set to 443, and provide a name for the virtual server (for example, VirtServer1). Click Continue.
2. In the NetScaler Gateway Settings page under Server Certificate, click the drop-down arrow next to Browse, select Appliance, and click Browse. Find the PFX file you created, and provide the export password you gave when exporting the certificate in PFX format. Click Continue.
2
1
17Citrix.com

18Citrix.com | Demo Guide: SmartAccess and SmartControl V1 18
In the following screen, you need to add the primary authentication method for the virtual server. For this demonstration, use Active Directory.
1. Select Active Directory/LDAP from the drop-down menu.
2. Type the IP address of the AD server. Keep the default port and time-out settings.
3. Type the base DN of the AD server in the following format: cn=users,dc=example,dc=com
4. Type the AD administrator name in the following format: [email protected]
5. Type sAMAccountName in the Server Logon Name Attribute text box.
6. Type the password of the AD administrator in the Password and Confirm Password text boxes. Click Continue.
6
18Citrix.com

19Citrix.com | Demo Guide: SmartAccess and SmartControl V1 19
In the next screen, provide information about the StoreFront.
1. Type the StoreFront fully qualified domain name (FQDN).
2. In the Site Path text box, provide the path of the website under the StoreFront FQDN. By default, it is /citrix/StoreWeb.
3. In the Single Sign on Domain text box, type the AD domain name.
4. Provide a name for the store.
5. In the Secure Ticket Authority Server text box, type the FQDN of the DDC starting with http:// (unless your STA server is running on HTTPS, which is not the default setting).
6. Type the StoreFront IP address in the StoreFront Server text box.
7. Change the protocol and port settings if you are using HTTPS on the StoreFront server.
8. Click Continue.
8
19Citrix.com

20Citrix.com | Demo Guide: SmartAccess and SmartControl V1 20
In the next screen, provide more information about the XenApp/XenDesktop setup.
1. Specify XenApp, XenDesktop, or Both from the drop-down menu. This example uses XenDesktop.
2. Provide the DDC server IP address. Leave the service port value at 80
3. Select the Validate Credentials check box.
4. Type the user name and password of the administrator of the DDC, and then click Continue.
This completes the integration of XenApp and XenDesktop with the NetScaler Gateway appliance on the appliance side.
You created a virtual server (vServer) on the NetScaler Gateway that communicates with the StoreFront server. You can now access the server using the URL https://<NetScalerVIPFQDN>.
Note: You need to add the IP and host name pair of the NetScaler VIP FQDN to the etc/hosts file of the client and the StoreFront server to address it directly. Also ensure that the root CA certificate has been added to all the machines in the domain.
4
20Citrix.com

21Citrix.com | Demo Guide: SmartAccess and SmartControl V1 21
You need to make a few changes on the StoreFront to associate it with the NetScaler Gateway.
1. Log on to the server running Citrix StoreFront, and start the application.
2. Select Authentication in the left pane. Click Add/Remove Methods in the Actions pane.
3. Select Domain pass-through and
Pass-through from NetScaler Gateway. Click OK.
2
3
21Citrix.com

22Citrix.com | Demo Guide: SmartAccess and SmartControl V1 22
A list of authentication methods appears. 4. Click NetScaler Gateway in the left
pane. Then click Add NetScaler Gateway Appliance in the Actions pane.
4
22Citrix.com

23Citrix.com | Demo Guide: SmartAccess and SmartControl V1 23
5. Provide a display name for the NetScaler Gateway.
6. In the NetScaler Gateway URL and the Callback URL text boxes, type https://<FQDNofNetScalerGateway>.
7. Select 10.0 (Build 69.4) or later from the Version drop-down menu. Leave the Logon type as Domain.
8. Optional: Type the subnet IP set for the NetScaler Gateway in the Subnet IP address text box.
9. Click Next.
10. On the Secure Ticket Authority (STA) page, click Add.
11. In the Secure Ticket Authority URLs text box, type http://<FQDNofDDC> (unless the STA server is running on https, which is not the default setting).
8
11
23Citrix.com

24Citrix.com | Demo Guide: SmartAccess and SmartControl V1 24
12. Click OK, and then click Create. A confirmation message displays.
13. Click Finish. The new appliance now appears in StoreFront.
12
13
24Citrix.com

25Citrix.com | Demo Guide: SmartAccess and SmartControl V1 25
Next, enable remote access to the stores.
1. Click Stores in the left pane. Click Enable Remote Access from the Store Service menu in the right pane.
2. Choose No VPN tunnel next to Remote
access. Select the check box next to the NetScaler Gateway you added, and click OK.
This completes the integration of StoreFront with the NetScaler Gateway virtual server.
Note: You need to add the IP and host name pair of the NetScaler VIP FQDN to the etc/hosts file of the clients and the StoreFront server to address it directly. Also ensure that the root CA certificate has been added to all the machines in the domain.
1
2
25Citrix.com

26Citrix.com | Demo Guide: SmartAccess and SmartControl V1 26
Configuring NetScaler Gateway policies to enable SmartAccess and SmartControl
The next step is to create a session policy on the NetScaler Gateway. The policy will assign any session to a SmartGroup based on whether it satisfies the criteria you want to check.
Then you can associate this policy with the SmartAccess session policy in Citrix Studio. This results in the policy you define in Citrix Studio being applied to all sessions that match your criteria.
1. Log on to the NetScaler Gateway administration webpage, and select the Configuration tab.
2. Expand NetScaler Gateway in the left pane, and select Virtual Servers.
2
26Citrix.com

27Citrix.com | Demo Guide: SmartAccess and SmartControl V1 27
3. Select the server you created, and click Edit. 4. Scroll to the bottom of the page to display
the Policies section.
3
4
27Citrix.com

28Citrix.com | Demo Guide: SmartAccess and SmartControl V1 28
5. Click + on the right. Click Continue in the Policy Type dialog box.
6. A list of existing session policies appears. Click Add Binding.
7. Click + next to the Select Policy text box. Provide the name of the session policy.
6
7
28Citrix.com

29Citrix.com | Demo Guide: SmartAccess and SmartControl V1 29
8. Click + next to the Profile text box. Provide the name of the profile.
9. Select the Security tab, and choose the check box next to SmartGroup. Provide a name for the SmartGroup (HasAppXGroup in the example), and then click Create.
9
8
29Citrix.com

30Citrix.com | Demo Guide: SmartAccess and SmartControl V1 30
10. You are returned to the Session Policy page. Click Expression Editor on the right.
11. In the dialog box that opens, choose Client
Security from the Select Expression Type drop-down menu. From the Component drop-down menu, select File.
Note: You are verifying that a file exists as a simple demonstration that the EPA check looks at the client machine. In a deployment scenario, you can use the same type of policy to search for particular applications or particular versions of an application.
10
11
30Citrix.com

31Citrix.com | Demo Guide: SmartAccess and SmartControl V1 31
12. Type the path of the file that you wish to check in the Name text box (add an extra slash to each backslash in the path). In this example, assuming the OS is Windows, look for the file you created previously, OnClientMachine.txt. Typing C:\\OnClientMachine.txt, the resulting expression will be CLIENT.FILE('C:\\\\OnClientMachine.txt') EXISTS.
13. Ensure that there are four slashes for each actual slash in a Windows path in the resulting expression. Click Create to create the session policy.
14. The Policy Binding dialog box reappears.
Set a priority of 110 and click Bind.
14
13
31Citrix.com

32Citrix.com | Demo Guide: SmartAccess and SmartControl V1 32
15. The resulting session policy is now listed in the Policy Binding page. Click Close.
16. Note the session policies count is now
incremented by 1. Click Done at the bottom of the page.
This completes the steps in common for preparing NetScaler Gateway integration with either SmartAccess or SmartControl. We’ll look at the specific process for enabling SmartAccess next.
15
16
32Citrix.com
33Citrix.com | Demo Guide: SmartAccess and SmartControl V1 33
In this section, you repeat the test of blocking client clipboard and removable USB redirection from the sessions performed in scenario 1. However, by setting up the rule at the NetScaler level, you can apply it to all connections, not just from shared desktops.
You first set up the policy without applying it. To test the environment’s default behavior, you start a virtual desktop infrastructure (VDI) session using NetScaler Gateway and show that data can be copied between a client machine and the Citrix VDI session and vice versa.
Next, you attach a USB drive to the client machine to validate that the drive’s contents are being redirected. Then you log off from the session and NetScaler Gateway, and disconnect the USB drive from the client machine.
Finally, you apply the policy and show that both client clipboard and removable USB redirection are being blocked in the Citrix VDI session.
Associating the session policy with the access policy
To enable SmartAccess with NetScaler Gateway, you need to associate the newly created session policy on the NetScaler Gateway server with the access policy in Citrix Studio.
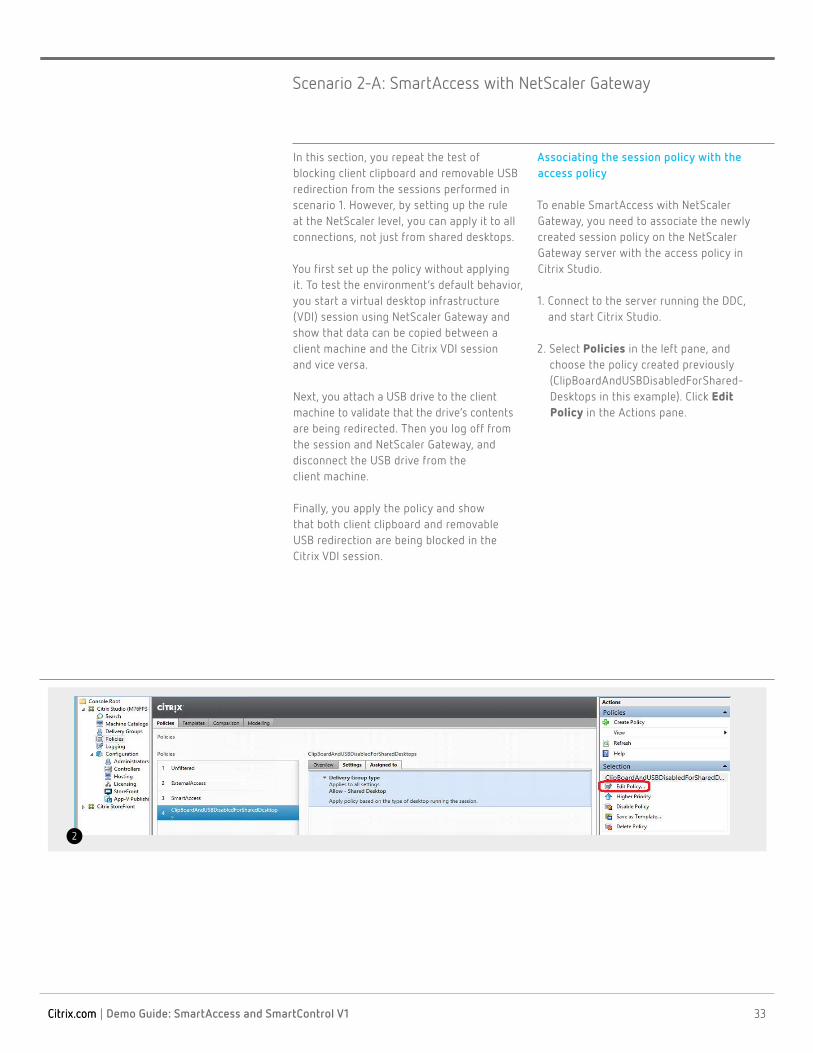
1. Connect to the server running the DDC, and start Citrix Studio.
2. Select Policies in the left pane, and choose the policy created previously (ClipBoardAndUSBDisabledForShared- Desktops in this example). Click Edit Policy in the Actions pane.
Scenario 2-A: SmartAccess with NetScaler Gateway
2
33Citrix.com

34Citrix.com | Demo Guide: SmartAccess and SmartControl V1 34
3. Click Next on the Settings page.
4. Click Unassign next to Delivery Group type, and then Assign next to Access control.
5. Type the name of the NetScaler Gateway virtual server, _XD_ followed by the name you gave the virtual server when you created it (_XD_VirtServer1 in this example), in the NetScaler Gateway farm name text box. Type the session policy name (HasApplication in this example) in the Access condition text box. Click OK and Next.
4
5
34Citrix.com

35Citrix.com | Demo Guide: SmartAccess and SmartControl V1 35
6. On the Summary page, verify that the Assigned to setting is set to Access control and shows the virtual server and session policy configured in it. Don’t click Finish just yet.
7. Create a file named C:\test.txt on the client machine to force the EPA check to succeed.
6
35Citrix.com

36Citrix.com | Demo Guide: SmartAccess and SmartControl V1 36
Demonstrating default client clipboard and removable drive redirection
Next, you show how client clipboard and removable drive redirection behaves prior to applying the policy.
1. Open the file C:\OnClientMachine.txt from the client machine, and copy the text “info on client machine.”
2. Open a browser and log on to the NetScaler Gateway as user1. An EPA check runs before the resources are loaded. (You may be asked to download the EPA application if it’s the first time you are running the EPA from the browser and client you are on.)
3. Start a dedicated VDI session.
4. In the VDI session, open a notepad app, and press Ctrl+V to paste in the copied text. The text “info on client machine” appears in the file, showing that a user can copy data into the session. Delete the text.
5. Type info on session machine into the notepad app. Copy the text, and save the file as OnSessionMachine.txt on the desktop. Minimize the Citrix session.
6. In a notepad app on the client machine, press Ctrl+V to paste in the copied text. The text “info on session machine” appears in the file, proving two-way clipboard redirection is working.
7. Connect a USB drive containing data onto the client machine.
8. Open the Citrix session again and check File Explorer to see the USB drive and access its contents, showing USB redirection is working.
9. Disconnect the USB drive from the client machine.
10. Log off from the session and StoreFront. Close the browser.
36Citrix.com

37Citrix.com | Demo Guide: SmartAccess and SmartControl V1 37
Applying the SmartAccess policy
Now apply the SmartAccess policy you created to see how it affects client clipboard and removable drive redirection.
1. Return to the DDC. In the Edit policy dialog box, click Finish to create the policy.
2. Open the file C:\OnClientMachine.txt on the client machine, and copy the text “info on client machine” from it.
3. Open a browser, and log on to the
NetScaler Gateway as user1. An EPA check runs before the resources are loaded.
4. Start the same dedicated VDI session as before.
5. Open the OnSessionMachine.txt file in the VDI session in a notepad app, and press Ctrl+V to try to paste in the copied text. The text can’t be pasted into the session file.
6. Copy the text “info on session machine” from the OnSessionMachine.txt file. Save the file. Minimize the Citrix session.
7. In the OnClientMachine.txt file on the client machine, press Ctrl+V to try to paste in the text copied from the session machine. A second line of “info on client machine” appears instead, proving two-way clipboard redirection has been blocked.
8. Connect a USB drive containing data to the client machine. Open the Citrix session window and check File Explorer. The USB drive won’t appear in the window because USB redirection is blocked.
9. Disconnect the USB device.
10. Log off from the session and StoreFront. Close the browser.
Now for every session started from an Windows endpoint that has the file C:\test.txt, clipboard and removable device redirection will be disabled.
Next, we’ll cover the specific process for enabling SmartControl.
37Citrix.com

38Citrix.com | Demo Guide: SmartAccess and SmartControl V1 38
SmartAccess requires changes to be made on each DDC. When the administrator wants to make access policy decisions for the entire farm, they can use SmartControl to make the changes in a central location that would apply to the entire farm.
With SmartControl, you define the set of restrictions to be applied to a session when a user or session meets a policy criteria at the NetScaler Gateway itself.
SmartControl policies are designed not to enable any type of access if prohibited at the individual DDC level. The options are to default to the policy setting at the DDC level or prohibit a certain access even if it is allowed at the DDC. This provides more restrictive settings between the NetScaler Gateway and the DDC to be applied to the session.
Note: SmartContol currently provides a subset of access policies that are available from Citrix Studio.
Prior to enabling SmartControl with NetScaler Gateway, make sure you’ve completed the integration steps described at the beginning of Scenario 2.
Instead of blocking client clipboard and removable drive redirection, we cover something different in this example: disabling the redirection of hard drives from a Windows client machine to a session based on the MAC address of the client machine. You check the MAC address against a list you specify.
First, you set up the policy but don’t apply it. To test that the SmartControl policy is not yet applied, you start a VDI session using NetScaler Gateway and show that data in the client machine’s hard drive can be accessed within the Citrix VDI session if the machine has a specific MAC address.
Then you log off from the session and NetScaler Gateway, apply the policy, and restart the session using the NetScaler Gateway. As a result of applying the policy, the client’s hard drive won’t be accessible.
Scenario 2-B: SmartControl with NetScaler Gateway
38Citrix.com

39Citrix.com | Demo Guide: SmartAccess and SmartControl V1 39
Creating the MAC address policy
1. Log on to the NetScaler Gateway administration console.
2. Navigate to the Configuration page.
3. Click NetScaler Gateway in the left pane, click Policies, and click Session. Under Session Policies, click Add.
4. Provide a name for the session policy (for example, CheckMACAddr). Click + next to the Profile text box.
5. Provide a name for the Session profile.
Click the Security tab, select the check box next to Smartgroup, and type MACAddrFlagged in the text box. Click Create.
4
5
39Citrix.com

40Citrix.com | Demo Guide: SmartAccess and SmartControl V1 40
6. The Create NetScaler Gateway Session Policy dialog box reappears. Click OPSWAT EPA Editor.
7. Select Windows from the first drop-down menu under Expression Editor. Select MAC Address from the second.
6
7
40Citrix.com

41Citrix.com | Demo Guide: SmartAccess and SmartControl V1 41
8. Click + next to the text box
9. In the Create Product Scans dialog box, in the blank text box to the far right of the MAC address label, type two MAC addresses, separated only by a comma, of network cards on the test client machine. Ensure that NetScaler Gateway is accessed through one of these MAC addresses. Click OK.
9
41Citrix.com

42Citrix.com | Demo Guide: SmartAccess and SmartControl V1 42
10. Verify the expression editor shows a preview expression similar to the one displayed in the following figure. Click Done.
11. Click Create. Notice the session policies
list includes the newly created policy.
10
11
42Citrix.com

43Citrix.com | Demo Guide: SmartAccess and SmartControl V1 43
Creating the SmartControl policy
Now create an ICA policy on the NetScaler Gateway to prohibit client hard drive redirection. This is a SmartControl policy because it is applied across all DDCs behind this NetScaler Gateway.
1. Click ICA under Session in the left pane. 2. Under the ICA Policies tab, click Add.
1
2
43Citrix.com

44Citrix.com | Demo Guide: SmartAccess and SmartControl V1 44
3. Provide a name for the ICA policy (for example, ClientDriveRedirectDisablePolicy). Click + next to the Action text box.
4. In the Create ICA Action dialog box,
provide a name for the action (for example, ClientDriveRedirectDisableAction). Click + next to the ICA Access Profile text box.
4
3
44Citrix.com

45Citrix.com | Demo Guide: SmartAccess and SmartControl V1 45
5. Provide a name for the ICA Access Profile (for example, ClientDriveRedirectDisable-Profile). Except for Client Drive Redirection, select Default from all the remaining drop-down menus. This will allow all the policies apart from Client Drive Redirection to remain at the setting made at the DDC level. Client drive redirection will be disabled regardless of whether it is disabled at the individual DDC level. Click Create.
6. The Create ICA Action dialog box
reappears. Click Create.
5
6
45Citrix.com

46Citrix.com | Demo Guide: SmartAccess and SmartControl V1 46
7. In the Create ICA Policy dialog box, click Expression Editor.
8. From the drop-down menu in the Expression Editor dialog box, select HTTP.
7
8
46Citrix.com

47Citrix.com | Demo Guide: SmartAccess and SmartControl V1 47
9. In the next two drop-down menus, select REQ and USER. In the fourth drop-down menu, select IS_MEMBER_OF(String). Click Done.
9
47Citrix.com

48Citrix.com | Demo Guide: SmartAccess and SmartControl V1 48
10. In the Expression text box, type the name of the SmartGroup you created, enclosed in quotation marks, in place of String inside the parentheses (for example,
“MACAddrFlagged”). Click Create.
11. Notice the ICA policies list now includes the newly created policy.
10
11
48Citrix.com

49Citrix.com | Demo Guide: SmartAccess and SmartControl V1 49
Setting up binding for the session and ICA policies
1. Click Virtual Server in the left menu. Select the server you created, and click Edit.
2. Scroll down to the bottom of the page. Click + next to Policies.
2
1
49Citrix.com

50Citrix.com | Demo Guide: SmartAccess and SmartControl V1 50
3. Click Add Binding. 4. Set Priority to 120. Click > next to the
Select Policy text box.
3
4
50Citrix.com

51Citrix.com | Demo Guide: SmartAccess and SmartControl V1 51
5. Click Continue in the Choose Type dialog box. In the Session policies dialog box, choose CheckMACAddr. Click Select.
6. The list now shows the CheckMACAddr
policy. Click Close.
5
6
51Citrix.com

52Citrix.com | Demo Guide: SmartAccess and SmartControl V1 52
7. Click + next to the Policies text box again. In the Choose Policy drop-down menu, select ICA. Click Continue.
8. In the Policy Binding section, click > next
to the Select Policy text box.
7
8
52Citrix.com

53Citrix.com | Demo Guide: SmartAccess and SmartControl V1 53
9. Choose the radio button next to the policy you created to disable client drive redirection. Click Select.
10. Set Priority to 130. Don’t click Bind
just yet.
9
10
53Citrix.com

54Citrix.com | Demo Guide: SmartAccess and SmartControl V1 54
Demonstrating default client drive redirection
With the newly created policy not yet bound, show that client drive redirection works.
1. Open the NetScaler Gateway webpage in a browser from a Windows client machine that has one of the MAC addresses you added to the list.
2. Log on as user1. An EPA check then runs on the machine. When the resources are shown in StoreFront, start a dedicated VDI session.
3. Open File Explorer in the session, and check the hard disk drives section. The hard drives on the client device appear as drives in the session, showing client drive redirection is working.
4. Log off from the session and StoreFront. Close the browser.
Applying the session and ICA policies
Now verify client drive redirection is disabled when you apply the session and ICA policies.
1. Return to the NetScaler Gateway configuration page in the browser, and click Bind. The Policies list now shows an additional entry, VPN Virtual Server ICA Policy Binding, under ICA Request Policies. Click Done.
2. Open the NetScaler Gateway webpage in
the browser on the same client machine.
3. Log on as user1. An EPA check then runs on the machine. When the resources appear in StoreFront, start the same dedicated VDI session as before.
4. Open File Explorer in the session, and check the hard disk drives section. None of the hard drives from the client device are listed because client drive redirection is disabled.
1
54Citrix.com

55Citrix.com | Demo Guide: SmartAccess and SmartControl V1 55
Downloading the NetScaler Gateway appliance
1. On Citrix.com, select the Downloads tab. Choose NetScaler Gateway from the product drop-down menu.
2. Under 11.0 > Firmware, select NetScaler Gateway 11.0 Build 65 or later.
3. Choose the appropriate VPX appliance based on the hypervisor that the demo setup is hosted on, and click Download File.
4. Accept the license to start the download.
Setting up NetScaler Gateway
1. Import the appliance to the hypervisor, and start the virtual machine (VM).
2. When prompted, provide the IP address and netmask for the administration console of the NetScaler appliance. Type the appropriate values, and save the setting.
3. After installation is complete, open a web browser, and type the IP address of the administration console into the address bar.
4. Log on with the credentials nsroot/nsroot. The first-time logon configuration dialog box appears.
Appendix: Installing NetScaler Gateway
4b
55Citrix.com

56Citrix.com | Demo Guide: SmartAccess and SmartControl V1 56
5. Select the Subnet IP address section, and provide the required IP for internal communication behind the NetScaler Gateway. For the purposes of this demo, you can use the same subnet provided for configuring the NetScaler administration console settings.
6. Click Done to return to the first-time logon configuration dialog box. Select Hostname, DNS IP Address, and Time Zone.
6
5
56Citrix.com

57Citrix.com | Demo Guide: SmartAccess and SmartControl V1 57
7. Specify the values for host name and DNS IP address, and select the time zone you want to set for the NetScaler appliance.
8. Click Done.
9. In the first-time logon configuration dialog box, click Licenses. Provide the license: Either upload a license file or supply a serial number or activation code.
7
9
57Citrix.com
58Citrix.com | Demo Guide: SmartAccess and SmartControl V1 58
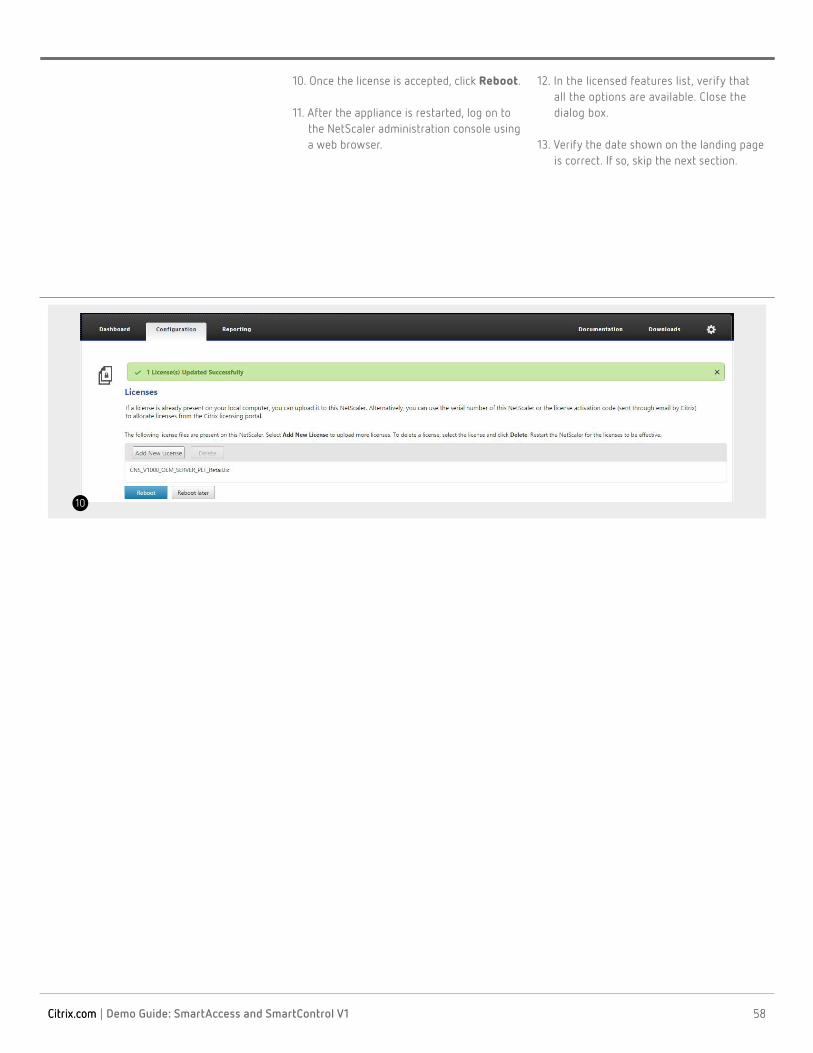
10. Once the license is accepted, click Reboot. 11. After the appliance is restarted, log on to
the NetScaler administration console using a web browser.
12. In the licensed features list, verify that all the options are available. Close the dialog box.
13. Verify the date shown on the landing page is correct. If so, skip the next section.
10
58Citrix.com

59Citrix.com | Demo Guide: SmartAccess and SmartControl V1 59
Changing the landing page date
1. Log on to the NetScaler appliance using PuTTY.
2. Type nsroot and nsroot for user name and password.
3. Type shell followed by the date command in the following format: date [[[[[cc]yy]mm]dd]HH]MM (for example, date 201603061226 i sets the date to 12:26 p.m. on March 6, 2016).
4. Press Enter and type exit.
5. Log off from the session.
4
59Citrix.com

60Citrix.com | Demo Guide: SmartAccess and SmartControl V1
About the authorMayank Singh, a Citrix Certified Administrator, has worked at Citrix for more than four years. He is a virtualization industry veteran whose experience includes several years wearing various hats at a storage virtualization startup. He currently works as a product marketing manager in the Technical Marketing team for the Windows Application Delivery Business Unit.
Enterprise SalesNorth America | 800-424-8749 Worldwide | +1 408-790-8000
LocationsCorporate Headquarters | 851 Cypress Creek Road, Fort Lauderdale, FL 33309, United States Silicon Valley | 4988 Great America Parkway, Santa Clara, CA 95054, United States
© 2016 All rights reserved. Citrix, the Citrix logo, and other marks appearing herein are property of Citrix Systems, Inc. and/or one or more of its subsidiaries, and may be registered with the U.S. Patent and Trademark Office and in other countries. All other marks are the property of their respective owner(s).