development and alumni relations systems (dars)
TRANSCRIPT

1
Events Emails and Mailings
(DARS Version 2.9)
Manual Version 1
Development and Alumni Relations Systems (DARS)

2
Table of Contents
1. Introduction .................................................................................................................. 3 1.1 Intended Audience .............................................................................................................. 3
1.2 Using this Manual ............................................................................................................... 3
1.3 Conventions ........................................................................................................................ 3
1.4 Naming Conventions........................................................................................................... 3
2. Event E/Mailing Overview ............................................................................................ 4
2.1 Event E/Mail Workflow ........................................................................................................ 5
3. Create Queries .............................................................................................................. 6 3.1 Queries for Pre or Post Event E/Mails ................................................................................ 6
3.2 Queries for Event Documentation ....................................................................................... 6
4. Create an E/Mail Package ............................................................................................ 7
4.1 Export Definitions ................................................................................................................ 7
4.1.1 Export Definitions Criteria .................................................................................... 10
4.1.2 Address Formatting .............................................................................................. 12
4.1.3 Generate a Header File for an Export Definition.................................................. 12
4.1 Create an Event Letter Template ...................................................................................... 13
4.1.1 Creating Template in MS Word ........................................................................... 13
4.1.2 Editing Date Fields ............................................................................................... 15
4.2 Packages .......................................................................................................................... 15
4.2.1 View and Manage Packages ............................................................................... 15
4.2.2 Add Mail Package Letter ...................................................................................... 16
4.2.3 Add Email Package Message .............................................................................. 16
4.2.4 Add Additional Documents................................................................................... 19
4.2.5 Add a Mail or Email Package ............................................................................... 19
4.2.6 Attach a Document to the Package ..................................................................... 21
5. Add E/Mail to Event .................................................................................................... 22 5.1 Add Invitations .................................................................................................................. 22
5.1.1 Edit Invitations ...................................................................................................... 23
5.2 Add Invitees/Recipients .................................................................................................... 23
5.2.1 Add Individual Constituents to the Invitee List ..................................................... 23
5.2.2 Add Multiple Constituents to the Invitee List ........................................................ 24
5.2.3 Copy Invitees from Previous Events .................................................................... 25
5.2.4 View/Export the Invitee List.................................................................................. 26
5.2.5 Delete an Invitee .................................................................................................. 26
5.2.6 Viewing Invitation Statistics.................................................................................. 26
6. Send Invitations ......................................................................................................... 27
6.1 Provide Mailing List to Mailing House ............................................................................... 27
6.2 Sending Invitations using DARS ....................................................................................... 27
7. Manage Invitees ......................................................................................................... 29 7.1.1 Mark an Invitee as Declined................................................................................. 29
8. Data Protection ........................................................................................................... 30
9. Further Help and Information .................................................................................... 31
9.1 DARS Support Centre....................................................................................................... 31
9.2 DARS Project .................................................................................................................... 31
9.3 Additional DARS Documentation ...................................................................................... 31
9.4 Business Services and Projects ....................................................................................... 31
9.5 BSP Training ..................................................................................................................... 32
10. Document Information ............................................................................................... 33
3
1. Introduction This manual is designed to support the Events training course, specifically in sending pre and post Event emails and mailings. When this manual is completed and published, the contents will be copied back to the Events manual.
1.1 Intended Audience
You will require the DARS Events role to access and use the functionality described in this manual. If you are unsure of your role and access rights, please contact the DARS helpdesk.
It is assumed that you already have a good basic knowledge of DARS and the functionality and processes covered in the DARS001 Fundamentals 1 and DARS002 Fundamentals 2 courses.
You should also be able to use Microsoft Word‟s Mail Merge function
1.2 Using this Manual
Please think twice before printing this document. If a printed copy is necessary, ensure it is printed double-sided and always recycle old versions.
1.3 Conventions
The conventions and icons used in this manual are described below:
Indicates additional useful information.
Indicates an important piece of information, take particular care to
read the information in these boxes.
Bold Text Indicates menu names and window titles.
[F4] Keys on the keyboard are indicated in bold in square brackets [ ].
File > Open Moves through a navigation path are indicated with a >. In this case
you would click on the File menu, then select Open
1.4 Naming Conventions
DARS is used in varied group of areas and hundreds of different users across the Collegiate University. It is therefore very important that any item you add to the system follow a naming convention in order to be able to find the item again and too quickly identify the owner and title of the item. It is also very important that anyone entering data such as phone numbers follow the same format.
Note: It is very important that any item added to the system follows the naming conventions and formats at http://www.admin.ox.ac.uk/dars/documents/.

4
2. Event E/Mailing Overview
Creating and sending pre and post Event emails and mailings, utilises the Marketing and Communications, Events and Query functionality in DARS. This manual covers the processes in the flowchart below, up to the „Merge outside of Event required?‟ decision.
Event e/mailings (pre or post-registration) are communications sent to invitees and registered constituents. Pre-registration e/mailings include Save the Date letters and Invitations. Post-registration e/mailings can include Joining instructions and other communications regarding individual sub-events. Event e/mailings are created using the Marketing and Communications and Events areas, and sent from the Events area.
Event Documentation includes documentation created for the event, rather than for individual constituents, such as Name Labels, Badges, Place Cards, Address Labels and Printed Envelopes. These can be created using the Marketing and Communications > Manage correspondence functionality, or alternatively, registrant lists can be exported from DARS and used in an external mail merge process. See the Managing Events Documentation QRG for further information.
Note: All Event e/mailings, whether an invitation or other pre/post-Event mailing, are referred to and added as „Invitations‟ in the Events area of DARS. However, documentation such as name labels or place cards can be created externally or using the Manage Correspondence functionality – see below.
Note: Whenever you send an Event invitation, the constituent‟s communications page is updated with a record of the e/mail. This is important when you are sending Save the Date letters, Invitations and Event joining instruction emails, for example. However you may not wish to record a mailing label or place name card on each individual record, so rather than using the Event Invitation process, you can run a Correspondence process without marking Constituent records.

5
2.1 Event E/Mail Workflow
Creating and sending Event emails is a multi-step process involving the Analysis, Marketing and Communications, and Events functionality areas.
The steps and processes outlined in this manual apply to pre and post event mailings or e-mailings. For example you could create a Save the Date letter to be sent to potential invitees, or a post-registration email advising the registrant of Event specific details.
From Analysis:
1. Create one or more queries to select invitees/recipients
From Marketing and Communications:
2. Create an export definition
3. Generate a header file (for mailings only)
4. For mailings: Create and add letter content
a. Create letter template in MS Word
b. Add letter template to DARS
5. For emailings: Create email message template in DARS
6. Add any additional documents, attachments/inserts – as required
7. Create email and/or mail package
From Events:
8. Add an invitation to the event (including package created above)
9. Add invitees to the invitation (individually or using queries created above)
10. Send the invitation
11. Track responses and add additional invitees – if relevant
Create e/mail
packages
Add Invitation
to Event
Add Invitees / recipients
Send Email / Mail
Track responses
Manage invitees

6
3. Create Queries
3.1 Queries for Pre or Post Event E/Mails
From Analysis > Query create one or more queries (and save as selections) to select and add invitees/recipients to the Event invitation/s. See the Fundamentals 2 manual for further information on creating queries.
For example, for a pre-registration e/mailing, such as a Save the Date letter, you are likely to select all potential invitees. However, for a multi-level event post-registration e/mailing you might create a query to select all who registered for the main event only, and another query to select all who registered for a particular sub event such as a dinner. These queries can then be used to add invitees to the invitee list of the relevant invitation.
3.2 Queries for Event Documentation
Whenever you send an Event Invitation, the constituent‟s communications page is updated with a record of the „invitation‟. This is important when you are sending Save the Date letters, Invitations and Event joining instruction emails, for example. However it is not likely you will want to record the creating of a mailing label or place name card on each individual record; so rather than using the Invitation process, you can run a Correspondence process without marking Constituent records.
Even though you are not likely to be using the Events Invitation process to create name labels or place cards, you can still use Event invitee or registrant queries (as per previous section) to generate lists for address labels or place name cards. Those queries can then be used in the Manage correspondence process or the results can be downloaded for use in an external mail merge process. See the Managing Event Document QRG and the Manage Bulk Correspondence manual for further information.
Remember: All Event e/mailings, whether an invitation, or other pre/post-Event mailing, are referred to and added as „invitations‟ in the Events area of DARS.

7
4. Create an E/Mail Package
Email or Mail packages are created in the Marketing and Communications area of DARS, and are required when adding Invitations to Events. Remember that all Event pre or post e/mailings in DARS are added as Invitations.
The first step in creating an e/mail package is to create an Export Definition, if no suitable one exists already.
4.1 Export Definitions
The export definition determines the fields included in an export file for an Event e/mailing, such as for merging with MS Word or an email application. You can create as many different definitions as you need and they can be reused as needed.
1. From the Marketing and Communications functional area, click Export definitions under the Packages section. The Export Definitions page opens, with Direct marketing definitions displayed by default. You can filter this screen by Type or Site and/or click on a heading title, such as Name, to sort the list.
2. There may already be standard Event Email and Mail export definitions available for your site, and these should be used wherever possible. Check with your Super User if unsure.
Scroll through the list, select the required definition and click on to check the design. Close the definition without saving
3. To create a new export definition based an existing one, select it and click on .
Note: Export definitions created for Event invitations are Direct Marketing export definitions. Some Event information is available under the Constituent Marketing Information > Constituent > Invitee, and Registrant nodes. Any information not available in those nodes, or not in correct format for purposes of your letter/email message, will need to be added or edited directly in the letter or message template.
Note: Once you create an Export Definition take care in editing it, particularly if it is currently in use as it may cause other Events or Marketing Efforts to fail. When you create an export definition, the available export fields are based on the applicable query view.
Note: It is recommended that each Site set up their own Standard Definitions the first time they use the functionality.

8
a. First, click on File > Save as, and save with a new name, to ensure you don‟t overwrite the original.
b. Edit the fields as required. See from step 4 below for instructions.
To change the properties, click on File > Properties or [F4], then select the Options tab. Change details as required. You should tick all options. Use field names, and Use short names are important because in many instances you will be adding fields to a definition where the resulting field name will be very long.
Note: If the is unchecked and greyed out, you should create a new definition rather than editing the selected definition.
c. Click .
4. To add a new definition from the Export Definitions page, click . The New Export Definition dialogue box opens.
5. This screen is very similar to the Query builder (Note though that the filtering does not work in the same way that the query filtering does).
Note: Export Definitions use a cascading filtering system. For example, if the revenue fields (in the screenshot below) are blank then the application details fields below will also be blank; if the revenue fields are not blank, the application details can still be blank because the application details area filters itself and any child nodes below.
6. To add a field to the Selected Fields pane:
a. Navigate (click on as required) to and select the node (click on the word, not just the +) in the Field Explorer pane. The fields available under the node will appear in the middle pane.

9
b. Drag (or double click) the required field from the middle pane to the Selected Fields pane.
Important: There are specially formatted fields available for the University – see Address Formatting for further information. If unsure of which format to use, check with your local Super User.
Important: Export definitions to be used in emails must include the Direct Marketing Effort Export > Finder number, and Constituent Marketing Information > Name and Email address fields. See Selected Fields example in Step 4 above.
7. If you add a one-to-many field to the Selected Fields pane, the Criteria for dialogue box opens – see next section for further information.
8. In the Selected Fields pane, adjust the selected fields as necessary.
To remove a field, select the field and click .
You can also right mouse click over a field to change the name of the field in its column header in the export file. You should rename any field names that are going to be more than 40 characters long. For example, the field Direct Marketing Effort Export\Constituent Marketing Information\Constituent\Addressee and Salutation\Primary salutation – should be renamed to Salutation.
9. Select the tabs if you wish to change the column order or sort order for rows.
a. On the Column order tab you can move the order or the columns, or click
on to Change Column Headings – as above.
b. On the Sort order for rows tab, you can add as many fields as required to the Sort Fields pane, and delete, move and change sort ascending/descending order as required.
Important: Ensure all required fields are added, and relevant sorting options applied, before you save the definition and attach it to a letter template. If anything is changed in the definition after it is attached, the letter must be re-created.
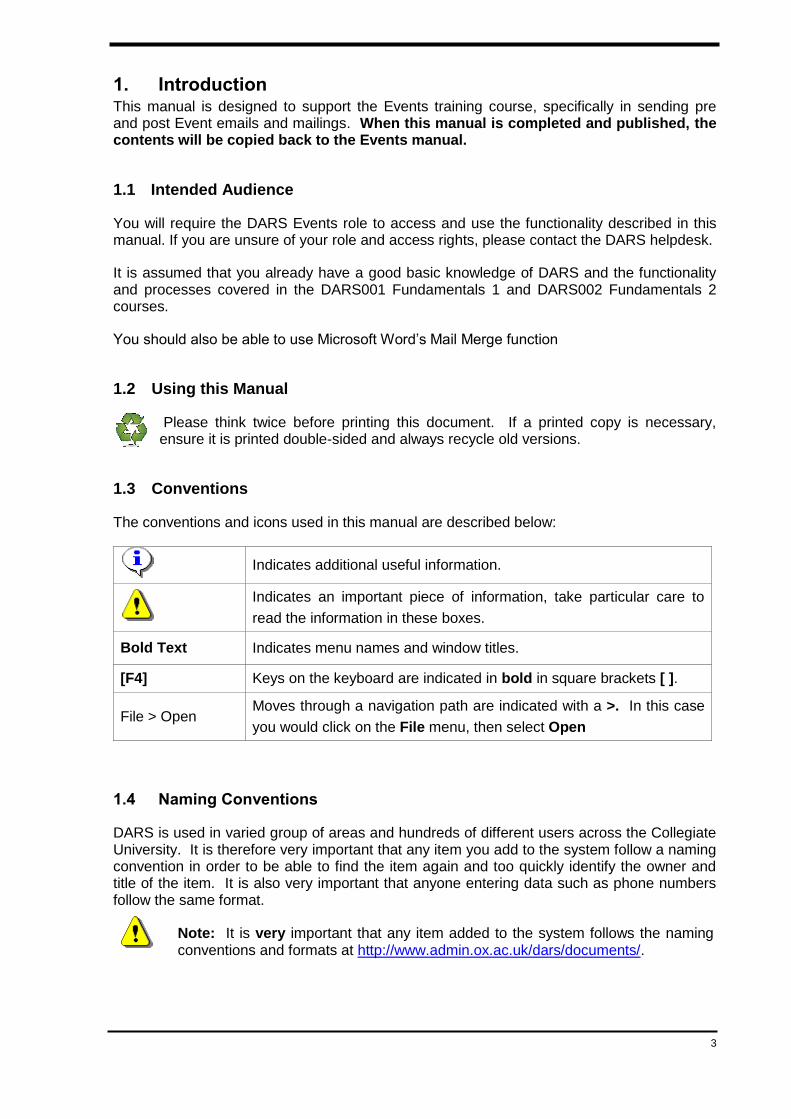
10. When the Export Definition is complete, click on File > Properties (or press [F4]) and
select the Options tab. Note: if you click on before this step, you will still need to go to the Properties box to select the additional options.
10
a. Enter a name using the DARS Naming Conventions.
b. Enter a description to further describe what the definition is for.
c. Tick all options as per screen shot above. The „Use field names...‟, and „Use short names...‟ options are important because in many instances you will have added fields to the definition where the resulting field name is very long.
d. Select the relevant site.
e. Click .
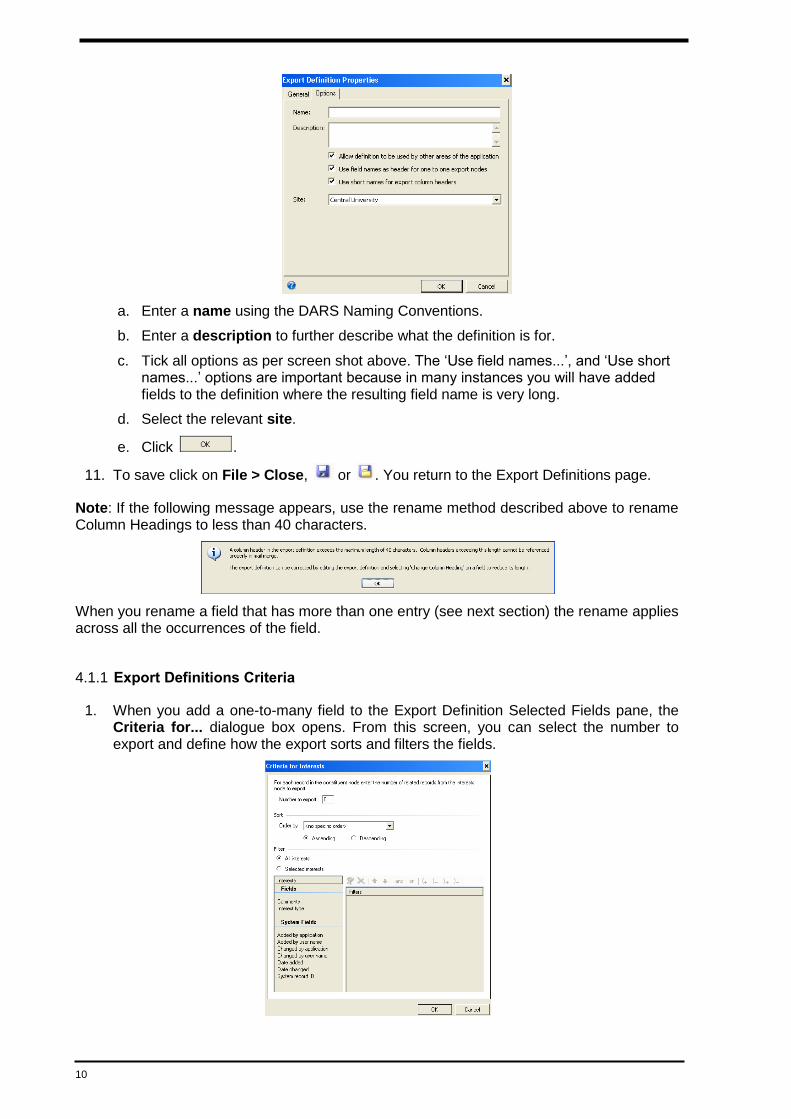
11. To save click on File > Close, or . You return to the Export Definitions page.
Note: If the following message appears, use the rename method described above to rename Column Headings to less than 40 characters.
When you rename a field that has more than one entry (see next section) the rename applies across all the occurrences of the field.
4.1.1 Export Definitions Criteria
1. When you add a one-to-many field to the Export Definition Selected Fields pane, the Criteria for... dialogue box opens. From this screen, you can select the number to export and define how the export sorts and filters the fields.

11
2. Enter the number to export. This number refers to the node or record that contains the field. For example, if you select Interests (under Constituent), the number to export refers to the number of records from the Interests node, in relation to each record in the Constituent node.
In the Interests example, if you only wanted to export records of constituents with a specific interest you would enter 1 as the number to export and then set a filter – as shown below.
When you add another field to the same node, the Criteria screen does not appear again. To access the screen, right click the node and select Edit Filter.
3. Select the field to sort or order by. This sorts the one-to-many records for one column in the export output. For example, when you define the Appeal benefits for a direct marketing export definition, if you sort by Gift amount, the addresses appear in order by gift amount on the output line for a revenue record.
4. Select whether to sort in ascending or descending order.
5. To filter by fields, under Filter, select <field>.
6. Drag the relevant field to the Filters pane. The Apply Criteria to dialogue box opens.
a. Select how to apply the criteria. For example, you can select “Greater Than.”
b. Enter the value/s for the criteria. For example, to apply criteria to Balance, where you selected “Greater Than,” you can enter “0”. The export definition will filter to include only records where the balance is greater than 0.
c. Click . You return to the Criteria screen.
7. Click . You return to the New Export Definition screen.
Refer to the Marketing and Communications manual for further information on Export Definitions.

12
4.1.2 Address Formatting
There are a number of different address nodes and fields that can be included in an Export Definition to ensure that the country specific format of the address is exported and can be used (without further manipulation) in external applications such as Microsoft Word mail merge.
The standard „full address‟ field formats country specific addresses, however it includes all the address lines in one field. This is perfectly usable, for example, if you are creating your own mail merge in MS Word.
However, some third party fulfilment houses require the address lines to be split into separate fields. There may also be circumstances where you might want to use separate address lines. If the address lines you are exporting should be split, use the fields under the Formatted Address Lines node.
4.1.3 Generate a Header File for an Export Definition
An Export Definition for a Mailing package allows DARS to merge data to MS Word. To use the fields of an Event Mail Export Definition to set up the MS Word template (mail merge document) you need to generate a Header File. The Header File will be exported in *.csv format.
1. Navigate to the Export Definitions page as per previous section.
2. Select the definition for which to generate a Header File, and click . The Generate header file dialogue box opens.
3. In the Header file field, click the to browse to the location to save the file.
a. Enter a name in the File name field and click .
4. Click . A message will appear giving you the option to open the .csv file.
It is a good idea to open and check the file, to ensure you will be merging the required fields. However, if something is incorrect you should re-generate the file rather than make any changes to the .csv file – as DARS generates the file based on the field headings it will use during merging processes.
Note: This is one of the only .csv files where it is OK to open it directly in Excel. Excel drops leading zeros on fields such as zip codes and phone numbers, if the .csv file you have downloaded from DARS includes such fields, you should not open it directly in to Excel, but import it instead to preserve leading zeros. Refer to the Importing .csv Files to Excel section in the Exporting Data manual for further information.
13
4.1 Create an Event Letter Template
Outlined below is the process to create an MS Word merge document to store as a Direct Marketing Letter in the Marketing and Communications > Letters and Documents section, for use in Mailing Packages for Events.
The process involves the following steps:
1. Create or edit an Export Definition. (See the Export Definitions section.)
2. Generate a Header file to download the export definition fields in a .csv file. (See the Generate a Header File for an Export Definition section.)
3. Create a letter template as a mail merge document in MS Word, inserting required merge fields using the .csv created in step 2. Set the document back to a normal MS Word document before saving. Covered in this section.
4. Add the letter template as a Direct Marketing letter, to the Marketing and Communications > Letters and Documents > Letters tab. See Add Mail Package Letter.
4.1.1 Creating Template in MS Word
The following steps give a brief outline of the process of creating a letter template in MS Word. For further assistance refer to MS Word Help files.
1. Prior to setting up the template, create a Header File. This will be used to add the merge field/s to the document. Refer to Generate a Header File for an Export Definition section.
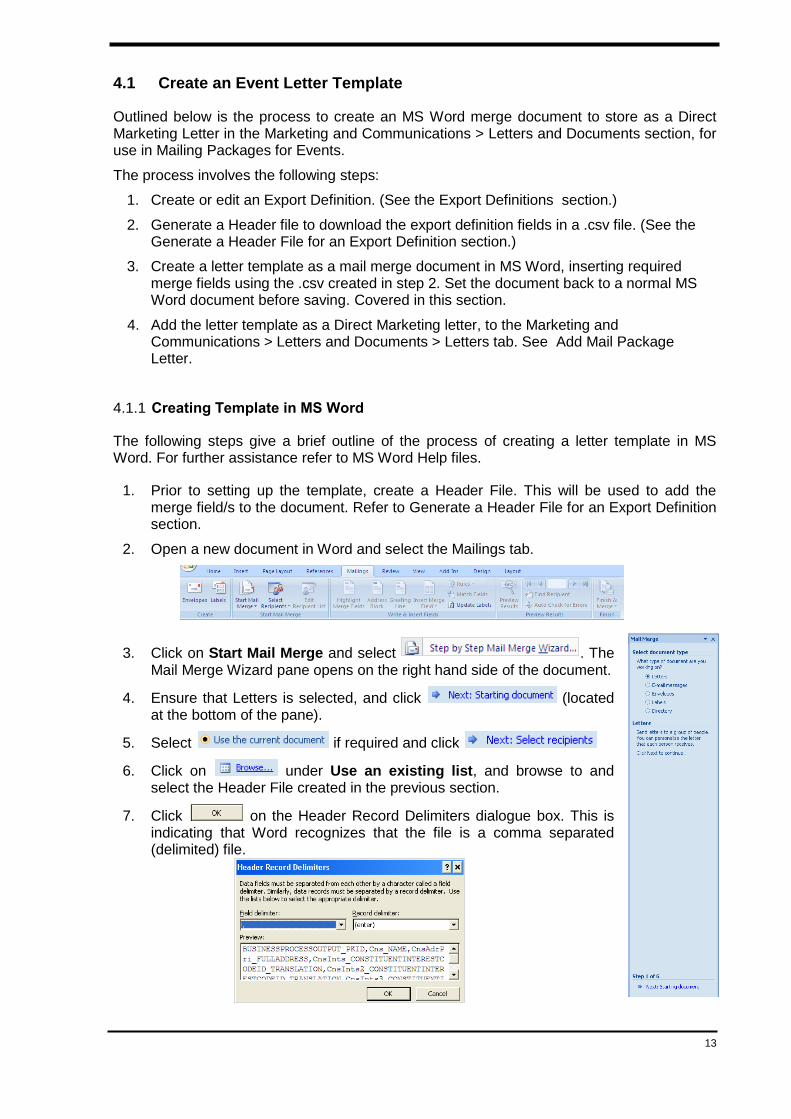
2. Open a new document in Word and select the Mailings tab.
3. Click on Start Mail Merge and select . The Mail Merge Wizard pane opens on the right hand side of the document.
4. Ensure that Letters is selected, and click (located at the bottom of the pane).
5. Select if required and click
6. Click on under Use an existing list, and browse to and select the Header File created in the previous section.
7. Click on the Header Record Delimiters dialogue box. This is indicating that Word recognizes that the file is a comma separated (delimited) file.

14
8. Click on the Mail Merge Recipients dialogue box. These are just the merge field headings, and are all that we need at this stage. The actual data will be merged during the Invitation process.
9. Click on .
10. Add document text and insert the required merge fields.
a. To insert merge fields: click at the position you want the field to appear, click on „Insert Merge Field‟ (on the Mailings tab) and select the required field. It should appear in the location in the document.
Note: If you include a DARS date field in the template, it may be merged to MS Word with a time stamp added. See Editing Date Fields for further information.
11. To add the current date from MS Word, select the Insert tab > , and select the required date format.
12. Conditional rules can also be added in Word: click on . This functionality is outside the scope of this document. Refer to Word Help for further information.
13. When all text and required fields are added to the template, click on and select
. This ensures that DARS can merge the fields seamlessly to MS Word.
14. Save the document, following the DARS Naming Convention.
15. Close the document.
Important: If you edit or change the Export definition, you will need to revise the letter.

15
4.1.2 Editing Date Fields
DARS date fields may merge with a time stamp added. For example; if the revenue date field „CnsRev_DATE‟ is added to the letter template, and a revenue donation dated 25/05/09 is being referenced in the letter, the date may display as 25/05/2009 00:00:00.
You can edit the field code of the letter template (or when the data is merged), so that the date displays in the correct format.
1. Right mouse click over the merged field and select Toggle Field Codes.
2. The merge field code displays .
3. Click between the end of the field and the „}‟ and add what is called a Switch „\@‟. Then add the date format required, in double quotation marks. So for this example you might add \@ “dd MMMM yyyy”.
The resulting merge field is .
See MS Word Help [F1] for further examples of Switches for Date formatting.
4. To display the merged data, right click on the field again and select Update Field or Toggle Field Codes.
5. The date in the example displays as 25 May 2009.
4.2 Packages
A Package can contain a letter or email message and any other attachments or inserts that will be sent to the Event invitees.
Packages do not need to have any letters, emails or other attachments. However, if you do plan to include any of these items in a package then you must add them to DARS before creating the package. See Add Mail Package Letter and Add Email Package Message for further information.
If you are including a letter in a Mail Package, the letter must be in MS Word format.
4.2.1 View and Manage Packages
1. From Marketing and Communications, click Packages > View packages. The Packages page opens.

16
2. To see specific packages you can filter the list using criteria such as channel or
category. Select the required criteria and click . If you cannot see the filter bar,
click on the button. To display all packages in the grid, click .
3. The Detail section at the bottom of the screen provides additional information about each package including cost, channel, content, and export definition. If the Details
section is not showing, select the package and click Show Details.
4. To view more information about a package, select it and click .
Refer to the Marketing and Communications manual for further information on Packages, Letters/Email messages and other documents/attachments.
4.2.2 Add Mail Package Letter
1. From Marketing and Communications, click Letters and documents, under Packages.
2. Click Add a direct marketing letter. The Add direct marketing letter dialogue box opens.
3. Enter a unique Name and Description to help identify the letter. Remember to follow the DARS Naming Conventions – see Naming Conventions for further information.
4. In the Export definition field, select the export definition to use with the letter. The export definition determines the fields available to merge with the MS Word template.
To view the fields that will be available to merge, click on .
5. In the Word template field, click Choose file and browse to the MS Word
document to use as the template. To use a different file, click Clear file.
6. Click . The Letters and Documents page opens with the new letter added to the Letters tab.
7. To view/update the letter template, select the letter and click or
as required.
4.2.3 Add Email Package Message
Before you can create an email message, your DARS user account must be linked to a NetCommunity user account. If you cannot access the Add a direct marketing email functionality – see below - then you should contact the DARS helpdesk.
Note: Before you can add a letter, you need to have created a template for the letter in MS Word. The program can then merge information from your database with the template to generate letters specific to each recipient. See Create an Event Letter Template for further information.

17
1. From Marketing and Communication, click Email Marketing under Packages.
Then click Add a direct marketing email. The Add Email dialogue box opens.
2. Select an email export definition. The export definition defines the merge fields available in the email.
To check the fields in the export definition, or to create a new one cancel this dialogue box and return to the Export Definitions page.
3. Click . The Add email template screen opens.
4. Enter a name for the email message using the DARS Naming Convention.
5. Enter a description to help identify the purpose of the email.
6. Under Mailing options, add a descriptive, appropriate subject line.
7. Add the From address, From name, Reply address and Failure notification address, following department or college guidelines. See your Super User for further advice.
8. Using the design screen, compose the email message.
a. The first row of design options includes standard print, copy, paste, spell check and insert symbol icons,
Note: Email messages must include links to the Privacy Policy and a page where users can update their email preferences. These links are included on the Alumni Web (NetCommunity) pages.
A standard footer template with these links and other wording is currently being developed and will be distributed when ready. Check with your Super User for further details.
Note: The selected definition must include the Direct Marketing Effort Export > Finder number, and Constituent Marketing Information > Name and Email address fields. See Export Definitions for further information.

18
as well as the insert link icon which you will use to insert the links to the mandatory Privacy Policy and Email preference pages.
b. The last row of design options includes font
formatting options and the merge fields icon. Click on this icon to display the list of merge fields available.
i. To add a merge field to the email message, click and drag it from the list to the required position in the body of the email message.
ii. Email messages must include the Finder number, Name, and Email address fields.
iii. Click to close the list.
c. Add links to the Privacy Policy and Email preference page. This is mandatory.
i. To include links, click on the insert link icon in the first row of the design options. The links selection box opens.
ii. Select the relevant link – for your site – and click . You may have to scroll down the links box to see the insert button.
iii. Do this for each required link.
iv. Click to close the box.
9. When the message is complete, click to preview.
10. Click .
Note: In future, there will be pre-defined footer templates that will automatically include these links. Check with your Super User.
Important: The preview function allows you to check that the text, images and links appear correctly and work. However before sending any emails to constituents, you should send a test one to your own email address to check that everything works when sent out. See Send Invitations for further information.

19
4.2.4 Add Additional Documents
Your packages may also include documentation such as newsletters or electronic copies of card invitations. When you add a document, you can enter its cost. The program can use this cost to calculate the cost of packages that use the document, which can then be used to calculate the total cost of an event or marketing effort. You can associate a digital file with events or marketing documents. You can save the digital file as an attachment stored on your server or link to a digital file outside of your database. Because a document may not have a digital file, you are not required to associate a digital file to a document.
1. Navigate to the Letters and documents page – as per previous instructions - and
click on View letters and documents.
2. From the Letters and documents page, click on the Documents tab, and click on
. The Add document dialogue box opens.
3. Enter a unique Name to help identify the document. Remember to follow the DARS naming conventions – see Naming Conventions for further information.
4. Enter a Description to further help identify the document.
5. To restrict use of the document you can select a specific Site.
6. In the Cost field, enter the cost for the document – if relevant. Select whether the cost is per piece, response, or marketing effort (use for Events). To not include the document in the overall cost of a package or marketing effort, select „Do not include‟. If you select „Per marketing effort‟, the program distributes the cost across all packages that use the document within a marketing effort.
7. Select the document Type, if you want to group the document with similar ones. Your system administrator configures the available document types.
8. Under Document you can add an external link to the document, such as to a website or network location, or attach an electronic file to the document record in DARS.
a. To add a website URL or network location, select Media link and enter the web
address or network path. To access the entered location, click . Note: do not link to a file on your local hard drive, as other users cannot access it.
b. To attach a file, such as an MS Word document (*.doc) or a *.pdf document, select
Attachment and click to browse to the file. To view the attached file, click .
9. Click . The Letters and Documents page opens to the Documents tab.
4.2.5 Add a Mail or Email Package
You must create a package for every separate invitation or other pre/post event email or mailing, you wish to send. However, you can use the same package more than once.

20
You add packages for communications that you intend to send by email or mail. When you add a package, enter as much details as possible including a description to help identify the package and a source code to help analyze its effectiveness.
1. From Marketing and Communications, click Packages, then Add a mail
package or Add an email package. The Add (e)mail package dialogue box opens.
2. Enter a unique Name using the DARS Naming Conventions.
3. Enter a Description to further help identify the package.
4. To restrict use of the package you can select a specific Site.
5. If you want to group the package with similar ones, select a package Category.
6. To help track the effectiveness of the package, select a Package code format and enter a 3 digit code in the text box to the right. If unsure, check with your Super User.
7. Under Costs, enter the base cost (the cost before you include content) for the package. Select whether the cost is per piece, response, or marketing effort (use for Events). To not include the package in the overall cost of the marketing effort, select „Do not include‟.
8. Under Primary content, search for and select the Letter or Message to include in the package. Once selected, the Export definition field is automatically populated with the associated export definition.
9. Click . The Packages [package name] page opens. From there you can add further Documentation, Creatives and Materials and Expenses. Refer to the Add Additional Documents section, or the Marketing and Communications manual for further information.

21
4.2.6 Attach a Document to the Package
1. From Marketing and Communications, click Packages.
2. Select your package from the list under - if applicable
OR
Click on View Packages, find your package in the list and double click it (or select it
and click on ).
3. The Packages [package name] page opens. Select the Documents tab.
4. Click . The Marketing Document Search screen opens.
5. Search for and select the relevant document. Click . The document is now attached to the package
You will now go to the Events functional area for the rest of the Event email/mailing process.

22
5. Add E/Mail to Event
From an Event record you can add one or more e/mailings to an event, as well as manage existing e/mailings and link to invitee (recipient) lists. Event e/mailings are added as Invitations on the Invitations Tab of the Event record. Invitations can be sent through multiple channels including both mail and email.
When you add an Invitation, you select the Packages created in the Marketing and Communications functional area to use with the Invitation for the selected channels.
You can also specify which addresses, name formats, and packages to use for specific invitees.
5.1 Add Invitations
Both pre and post Event e/mailings are added as Invitations on the Invitations Tab of the Event record.
1. From the Events functional area, navigate to the event you wish to add an invitation to.
(Either click Event search, or select the event from , if listed there.)
2. From the Event record page, select the Invitations tab.
3. Click on . The Add an invitation dialog box opens.
4. General tab
a. Name: Enter a name for the invitation, such as „Initial Invite‟ or „Save the date‟.
b. Description: Enter a long description for the invitation.
c. Mail Date: Enter the date you expect the invitations to be sent/processed.
23
d. Results: Do not create a selection from results if you are using a previously created query as this will duplicate the selection.
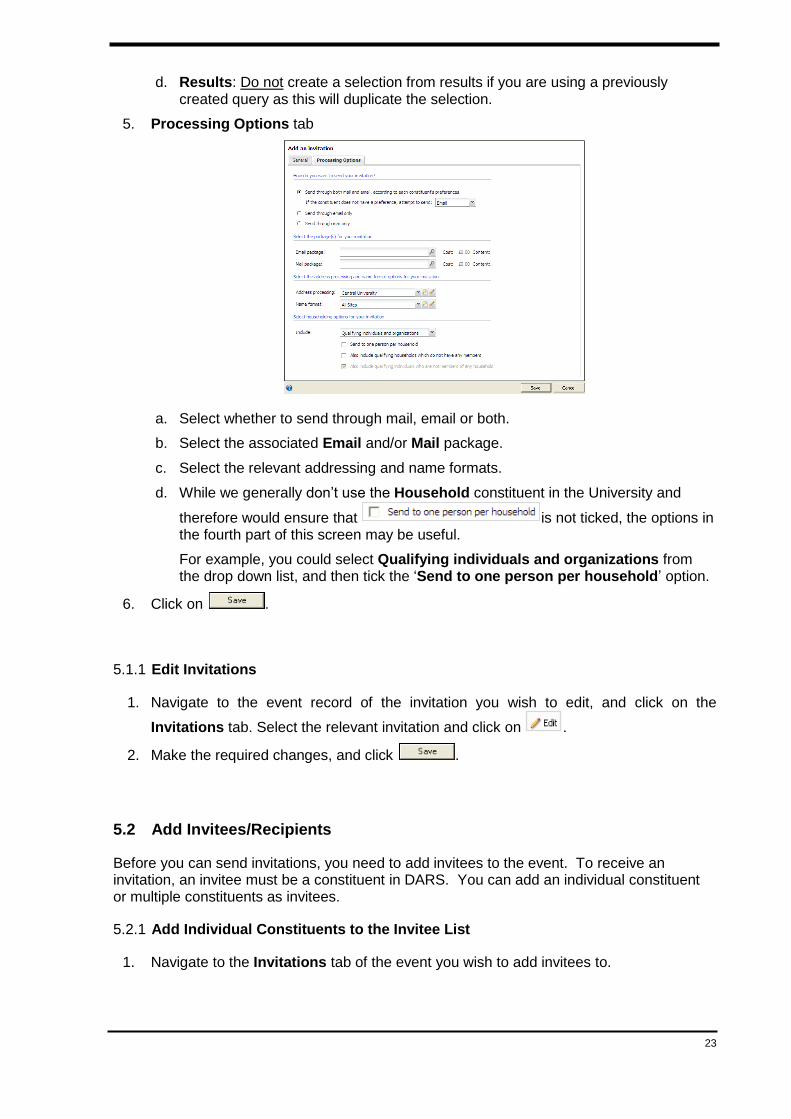
5. Processing Options tab
a. Select whether to send through mail, email or both.
b. Select the associated Email and/or Mail package.
c. Select the relevant addressing and name formats.
d. While we generally don‟t use the Household constituent in the University and
therefore would ensure that is not ticked, the options in the fourth part of this screen may be useful.
For example, you could select Qualifying individuals and organizations from the drop down list, and then tick the „Send to one person per household‟ option.
6. Click on .
5.1.1 Edit Invitations
1. Navigate to the event record of the invitation you wish to edit, and click on the
Invitations tab. Select the relevant invitation and click on .
2. Make the required changes, and click .
5.2 Add Invitees/Recipients
Before you can send invitations, you need to add invitees to the event. To receive an invitation, an invitee must be a constituent in DARS. You can add an individual constituent or multiple constituents as invitees.
5.2.1 Add Individual Constituents to the Invitee List
1. Navigate to the Invitations tab of the event you wish to add invitees to.

24
2. From the list, highlight the relevant invitation and click on . The Event Invitation page opens.
3. Click on > . The Add an Invitee dialogue box opens.
a. Click on the to search for and select the constituent.
b. Click on .
4. Repeat the process for all of the constituents you wish to add.
5.2.2 Add Multiple Constituents to the Invitee List
If you have a lot of constituents to invite, for example all graduates from a particular year, you could create a query selection to add them – rather than adding them individually. You can create a selection before or during the add process. Refer to Create Queries and the Fundamentals 2 manual for information on creating selections.
1. Navigate to the Event Invitation page as per previous instructions.
2. Click on > . The Add multiple invitees dialog box opens.
3. Click on to search for the selection you wish to use.
To create a new selection, from the Selection Search screen click on . Refer to Create Queries and the Fundamentals 2 manual for further information.
4. Click on to check or edit the selection.
Important: Solicit codes and exclusions must be included. Exclusions can be added into the (query) selection specifically and using existing system suppressions; as well as via the Exclusions dialogue box below.

25
5. Click the button.
a. Enter the relevant date.
b. Select the required Solicit codes.
c. Check both the Exclude... options.
d. Under Required exclusions, select all required Solicit codes.
6. Click on .
5.2.3 Copy Invitees from Previous Events
This option is useful in the case of an event which you run on a regular basis and may wish to include the same invitee list.
1. Navigate to the Invitee List or Event Invitation page of the invitation you wish to copy invitees to, as per previous instructions.
2. Click on . The Copy invitees dialog box opens.
a. Copy from: Search for and select the Event you wish to copy invitees from.
b. Invitation: Select the relevant invitation from the drop-down list.
c. Select whether you want to include registered and/or declined invitees
3. Click .

26
5.2.4 View/Export the Invitee List
The Invitee list page displays a list of all invitees for all invitations added to the Event. The Event Invitation page displays a list of invitees for that specific invitation.
You can also download lists, using the process described below, from the Registrants tab and the Invitation tab>Event Invitation>Invitees tab and Mailing Export tab. See the Managing Event Documentation QRG for further information.
1. Navigate to the Invitation tab of the Event.
2. Click to go to the Invitee list, OR click to go to the Event Invitation page of the selected invitation.
3. Use the filter area to view specific invitees, or to view the full list of invitees.
4. To open a constituent record, select them from the list and click on .
5. To export the list to Excel. Right mouse click over the list and select .
5.2.5 Delete an Invitee
1. Navigate to the invitee list of the Event you want to delete an invitee from.
2. Select the invitee from the list and click on .
3. Click on to confirm.
5.2.6 Viewing Invitation Statistics
The invitee list of an invitation only shows a maximum of 500 regardless of how many have actually been invited. To view more accurate figures:
1. Navigate to the Invitations tab of the event you wish to view invitation statistics for and
click on . The Invitee list page opens.
2. The information section in the top left corner includes number not yet invited, invited with no response, registered, declined and total.

27
6. Send Invitations
Before sending invitations you should check the invitee addresses and details. To do this you can use the download output file option – see details at step 6 in Sending Invitations using DARS. In addition, with email invitations you should send the invitation initially to just your own and/or a colleague‟s email address – to check content and links in the email - before sending to external recipients.
6.1 Provide Mailing List to Mailing House
If an external third party – such as a mailing house – will be sending the invitation/event mailing, you can use the download output file option (see step 6 in next section) to generate the mailing list.
Important: You can download lists of invitees and/or registrants from various tabs in the Event record, however those lists are just that, lists, and no more. To ensure that an invitation or other Event communication is added to a constituent‟s record you should use the invitation process and download the mailing list as per step 6 below.
Refer to the Managing Events Documentation QRG for further information on creating Event documentation such as name badges, mailing labels and place cards.
6.2 Sending Invitations using DARS
1. Navigate to the Invitations tab of the Event you wish to send invitations for, as per previous instructions.
2. Select the relevant invitation from the list, and click on . The Send invitation dialogue box opens. This is the same as the Add invitation dialogue box.
Note: You can also send invitations from the Event Invitation page by clicking on
[invitation to invitees] in the Task pane
3. On the General tab, select the date you want the Mail or Email sent.
a. Under Results: Do not create a selection from results if you are using a previously created query as this will duplicate the selection.
4. Check details on the Processing Options tab.
5. When ready, click on to process the invitation. When completed the process screen updates to show similar information to the screen shot below.
6. Before merging letters or sending emails, download the output file and check details such as names and addresses. You can also use this download for sending to an external mailing house, if applicable. The output will be saved as a .csv file – see important note below. For a simple e/mail out you would choose a single file

28
download. Refer to the Marketing and Communications manual for more information on the output file options.
Important: Excel drops leading zeros from zip codes and phone numbers. To maintain the integrity of such numbers you should import the file into Excel rather than opening it directly into Excel. Refer to the Importing .csv Files to Excel section in the Exporting Data manual for further information.
a. Click and select single, multiple or grouped files. The Save As screen opens. Name the file and select the location to save it.
b. Click . When completed, a message appears asking if you want to open
the output file - click . If the data you have exported includes zip codes or phone numbers, you should import the file into Excel, rather than opening it directly. Refer to the important information above.
Note: Remember to re-save as a .csv file if you wish to use the file in other DARS processes.
If you find that you need to make changes to the recipients or output field options, you will need to run some of the processes again. For example, you may need to revise your original export definition or multiple invitees selection, or change the status of some of the invitees. Once those revisions are completed, you then need to run the Send process again, and download the revised output file – for a final check.
Important: Always check that the output file is correct before going through the next steps.
7. For mail invitations click on to run the merge process.
8. To send an email invitation, click on .
Important: Before sending an invitation to external email addresses, you should process and send a single email invitation – to your own and/or colleague‟s email address – to check content and links.
a. Select a start date and time that you want the email/s to be sent, and check the correct Package is attached.
b. When ready, click .
9. Click on to check the email job status.

29
7. Manage Invitees
From the Event Invitation or Invitees list page, you can manage the status of the invitees including:
Track responses from invitees.
Register invitees (see next section).
Add more invitees (see Add Invitees).
Generate the invitation for additional invitees (see
30
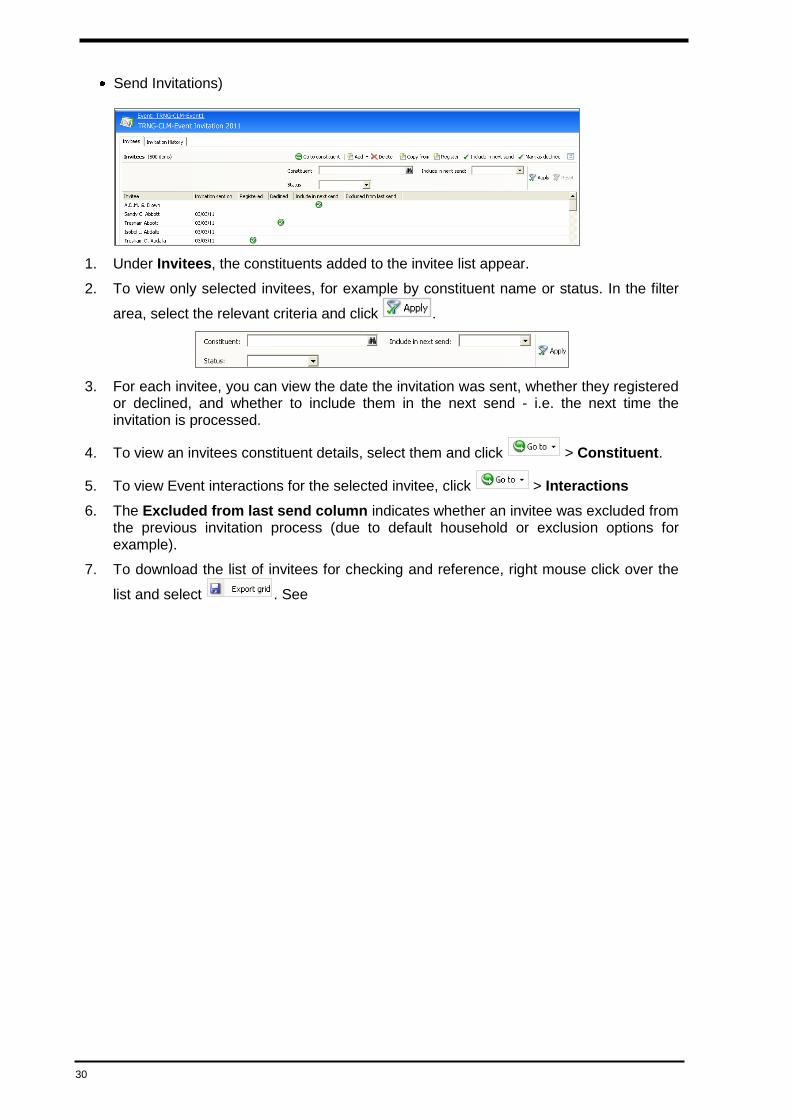
Send Invitations)
1. Under Invitees, the constituents added to the invitee list appear.
2. To view only selected invitees, for example by constituent name or status. In the filter
area, select the relevant criteria and click .
3. For each invitee, you can view the date the invitation was sent, whether they registered or declined, and whether to include them in the next send - i.e. the next time the invitation is processed.
4. To view an invitees constituent details, select them and click > Constituent.
5. To view Event interactions for the selected invitee, click > Interactions
6. The Excluded from last send column indicates whether an invitee was excluded from the previous invitation process (due to default household or exclusion options for example).
7. To download the list of invitees for checking and reference, right mouse click over the
list and select . See

31
8. View/Export the Invitee List for further information.
7.1.1 Mark an Invitee as Declined
You can mark an invitee as declined either prior to registering or once they have registered.
1. Navigate to the invitee list of the Event you want to mark invitees as declined for, as per previous instructions.
2. Select the relevant invitee, and click on .
3. Click on to confirm.
The invitee list is updated.

32
8. Data Protection
As you are aware, the Data Protection Act covers most of the data held on DARS. Please ensure you are familiar with the information on the following websites:
University Policy on Data Protection
Users should familiarise themselves with the University‟s policy on Data Protection by reading the information available at:
Website: www.admin.ox.ac.uk/councilsec/dp/policy.shtml
University Data Protection Officer
Further information about the Data Protection Act can be obtained from the website of the University‟s Data Protection Officer:
Website: www.admin.ox.ac.uk/councilsec/dp
Regulations relating to the use of Information Technology Facilities
All university members should adhere to the following regulations when using IT facilities:
Website: www.admin.ox.ac.uk/statutes/regulations/196-052.shtml
Data Protection & DARS
The DARS Participation Agreement and Data Access Protocol can be downloaded from the DARS Website:
Website: www.admin.ox.ac.uk/dars

33
9. Further Help and Information
9.1 DARS Support Centre
Contact DARS Support if you are a member of staff and have any problems or need help using the system:
Tel: 01865 612300
Fax: 01865 284880
Email: [email protected]
Hours: Monday to Friday 8.30am to 5pm (UK time), excluding public holidays and University closure days.
Website: http://www.admin.ox.ac.uk/dars/dars_helpdesk/
9.2 DARS Project
An overview and further details about the DARS project can be found at:
Website: http://www.admin.ox.ac.uk/dars
9.3 Additional DARS Documentation
The DARS website contains a library of information about the project, key process and the weekly circular:
Documents Underpinning DARS http://www.admin.ox.ac.uk/dars/documents/
Frequently Asked Questions http://www.admin.ox.ac.uk/dars/faqs/
Circular http://www.admin.ox.ac.uk/dars/circular/
Director of Development List for clearance requests
http://www.admin.ox.ac.uk/dars/about/security/
9.4 Business Services and Projects
Business Services and Projects is part of University Administration and Services (UAS). We aim to strengthen and support the University's strategy and objectives by working in partnership with the rest of UAS, in the following areas:
Professional project planning, management & implementation, using a tried and tested project methodology.
IT Systems Development Programmes.
Customer Services and Applications Support, e.g. Student Systems support and helpdesks. On the left menu of the website is an overview of our main helpdesks.
Infrastructure and technical systems support
Website: http://www.admin.ox.ac.uk/bsp
Email: [email protected]

34
9.5 BSP Training
The BSP Training Team design and deliver training courses and produce learning materials in order to maximise the effective use of new business systems. This is achieved by working closely with the project and business teams to identify the end users and training requirements associated with using new systems.
For further information about the training and services we offer:
Website: http://www.admin.ox.ac.uk/bsp/bsptrain.shtml
Email: [email protected]

35
10. Document Information
This document is subject to change – amendments will be apparent from a change in version numbering.
Revision Changes
Revision Date
Version Number
Summary of Changes Changed By
26/05/11 0.1 Copied invitations sections from the Event manual.
CLM2
09/09/11 Began updates to wording, headings CLM2
28/11/11 0.2 Final draft 2.9 updates to images, wording and steps.
Distributed for feedback.
CLM2
0.3 Various updates following feedback CLM2
0.4 Various updates following feedback CLM2
04/01/12 0.5 Various updates following feedback CLM2
0.6 Various updates following feedback CLM2
17/02/12 0.7 Further updates following testing and feedback, particularly in regard to Event documentation and downloading Excel and .csv files.
CLM2
17/02/12 1 Training team and BSP logo removed.
Final version handed over to BAU
CLM2