download user guide - meta motion
TRANSCRIPT
Copyright © 2009 AnthroTronix, Inc. All rights reserved. No part of this User’s Guide, software or hardware may be copied, reproduced, translated, or reduced to any electronic medium or machine-readable format without the written consent of AnthroTronix, Inc. All trademarks and trade names are the respective property of their owners.
Version 1.0.1 July 2009

2
TABLE OF CONTENTS
1. INTRODUCTION ..............................................................................................................................................4
2. CONTENTS ........................................................................................................................................................4
3. QUICK START ..................................................................................................................................................5
3.1 SOFTWARE INSTALLATION ...........................................................................................................................5 3.1.1 Installing AcceleGlove Drivers ................................................................................................................5 3.1.2 Installing the AcceleGlove Visualizer ......................................................................................................5 3.1.3 Installing the Software Development Kit (SDK) Files in Windows..........................................................5 3.1.4 Installing the Software Development Kit (SDK) Files on Mac OS X .......................................................6 3.1.5 Installing the Software Development Kit (SDK) Files on Linux...............................................................7
3.2 PLUGGING IN THE ACCELEGLOVE................................................................................................................8 3.3 CONFIGURING THE SERIAL PORT..................................................................................................................8 3.4 PUTTING ON THE ACCELEGLOVE .................................................................................................................9 3.5 STARTING THE ACCELEGLOVE VISUALIZER ................................................................................................9 3.6 VERIFYING OPERATION USING THE VISUALIZER ..........................................................................................9
4. HOW THE ACCELEGLOVE WORKS ........................................................................................................10
4.1 MAPPING THE SENSORS ..............................................................................................................................11 4.2 ACCELEGLOVE CALIBRATION ....................................................................................................................11
5. ACCELEGLOVE COMMUNICATIONS PROTOCOL..............................................................................12
6. USING THE ACCELEGLOVE VISUALIZER.............................................................................................13
6.1 ACCELEGLOVE VISUALIZER INTRODUCTION ..............................................................................................13 6.2 ACCELEGLOVE VISUALIZER BASICS...........................................................................................................14 6.3 VIEWING TWO OR MORE ACCELEGLOVES..................................................................................................16 6.4 RECOGNIZING GESTURES............................................................................................................................16 6.5 TRAINING NEW GESTURES..........................................................................................................................18
6.5.1 Expected Volumes and Performance......................................................................................................18 6.5.2 Creating a New Library .........................................................................................................................18 6.5.3 Recording and Modifying Gestures........................................................................................................19 6.5.4 Building the Gesture Library Model ......................................................................................................20
6.6 ANALYZE, CAPTURE, AND OUTPUT DATA ..................................................................................................21 6.7 SHARING, SAVING, AND LOADING LIBRARIES.............................................................................................23
7. USING THE SOFTWARE DEVELOPMENT KIT (SDK) ..........................................................................24
7.1 GUIDE CONVENTIONS ................................................................................................................................24 7.1.1 Example Code Format ...........................................................................................................................24 7.1.2 Code Comments Format ........................................................................................................................24 7.1.3 Notes Format..........................................................................................................................................24
7.2 SDK OVERVIEW ........................................................................................................................................24 7.2.1 SDK Components ...................................................................................................................................25
8. INTRODUCTION TO THE JAVA API FOR WINDOWS..........................................................................27
8.1 RAW DATA STREAM API ...........................................................................................................................27

3
8.1.1 Example Application ..............................................................................................................................30 8.1.2 Using the Raw Data Stream API to Build the Visualizer .......................................................................31
8.2 GESTURE API ..............................................................................................................................................31 8.2.1 Defining Your Own Gestures .................................................................................................................32 8.2.2 Defining Your Own Gestures Example Application...............................................................................38 8.2.3 Using Predefined Gestures.....................................................................................................................41 8.2.4 Predefined Gestures Example Application.............................................................................................41
9. MICROCONTROLLER INPUTS ..................................................................................................................43
10. SPECIFICATIONS AND WARRANTY........................................................................................................45
10.1 ACCELEGLOVE SPECIFICATIONS.................................................................................................................45 10.2 WARRANTY ................................................................................................................................................46
10.2.1 30-Day Customer Satisfaction Assurance..............................................................................................46 10.2.2 Product Warranty: 90 Days ...................................................................................................................46 10.2.3 Filing a Warranty Claim........................................................................................................................46
11. APPENDIX........................................................................................................................................................47
11.1 TERMS AND DEFINITIONS............................................................................................................................47 11.2 CALIBRATION .............................................................................................................................................47
4
1. INTRODUCTION The AcceleGlove™ is a complete development solution for adding hand-motion input or control to a range of applications in the fields of Robotics, Medical Rehabilitation and Telemedicine, Training, Gaming, and Virtual Reality/Simulation environments. The AcceleGlove™ product kit includes:
An instrumented glove that captures and outputs hand and finger position and motion data. A Java software development kit that allows developers to “hand-enable” their own applications. An application with a graphical user interface – Visualizer – for training, runtime, and
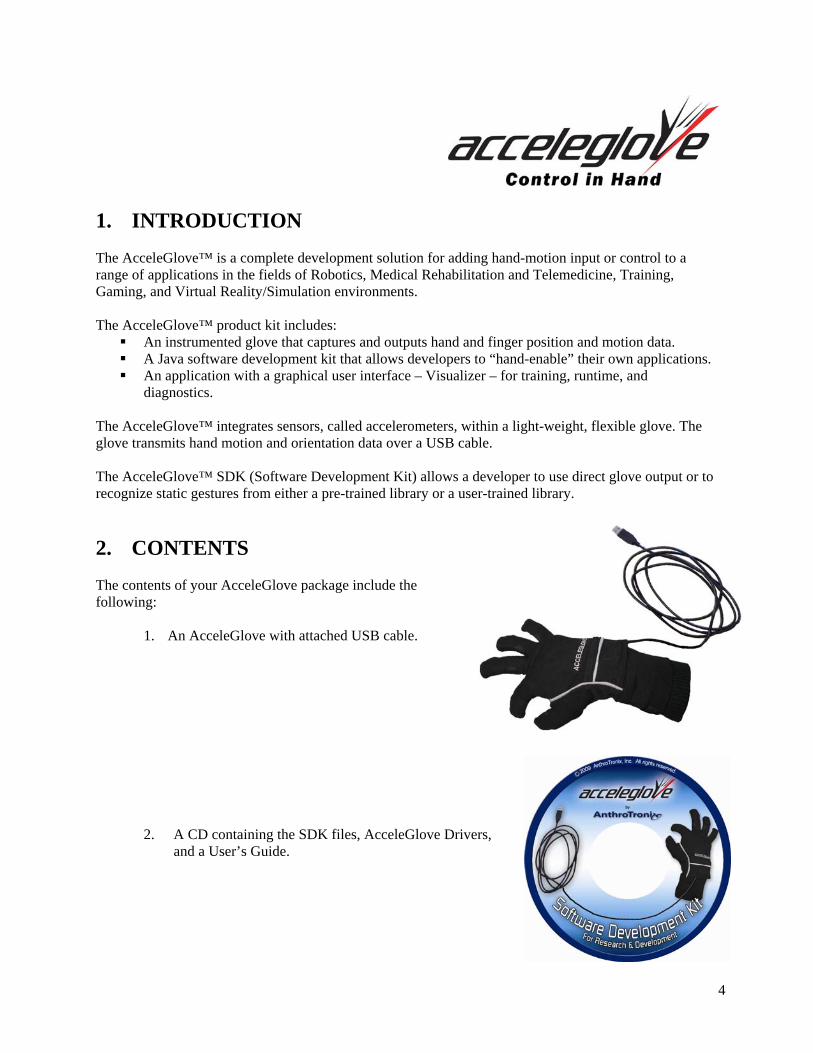
diagnostics. The AcceleGlove™ integrates sensors, called accelerometers, within a light-weight, flexible glove. The glove transmits hand motion and orientation data over a USB cable. The AcceleGlove™ SDK (Software Development Kit) allows a developer to use direct glove output or to recognize static gestures from either a pre-trained library or a user-trained library. 2. CONTENTS The contents of your AcceleGlove package include the following:
1. An AcceleGlove with attached USB cable.
2. A CD containing the SDK files, AcceleGlove Drivers,
and a User’s Guide.

5
3. QUICK START 3.1 Software Installation When you open the AcceleGlove Software Development Kit CD, you will see four folders:
1. Drivers 2. SDK 3. User’s Guide 4. Visualizer
3.1.1 Installing AcceleGlove Drivers A software driver is needed for the AcceleGlove to communicate with the computer. Windows - A low-level hardware driver is included in the Driver folder on the SDK CD. Open the Windows subfolder and double-click on the CDM 2.04.16.exe file (\Drivers\Windows\CDM 2.04.16.exe). The AcceleGlove can now be connected and data accessed through the USB interface using the AcceleGlove Communications Protocol described in Section 5. Mac OS X - A low-level hardware driver is included in the Driver folder on the SDK CD. FTDIUSBSerialDriver_vx.dmg installs the driver in the Mac OS kernel. The AcceleGlove can now be connected and data accessed through the USB interface using the AcceleGlove Communications Protocol described in Section 5. Linux - Most Linux distribution kernels include the driver for the AcceleGlove hardware. Plug the AcceleGlove in the USB port and then use lsmod to determine if the ftdi_sio driver loaded. If your distribution did not load the driver, it can be found in the Driver folder on the SDK CD. The AcceleGlove data is then accessible through the USB interface using the AcceleGlove Communications Protocol described in Section 5. 3.1.2 Installing the AcceleGlove Visualizer Windows - Open the AcceleGlove Visualizer folder and then the Windows folder. Double-click on the Install AcceleGlove Visualizer executable file ‘AcceleGlove Visualizer.exe’ and follow the installation instructions. Mac OS X - Open the AcceleGlove Visualizer folder and then the Mac OS folder. Open the AcceleGloveVisualizer.dmg disk image and drag the Visualizer icon to your applications folder. Linux - Open the AcceleGlove Visualizer folder and then the Linux folder. Copy the AcceleGloveVisualizer.tar.bz2 to a target directory. Run ‘tar xjf AcceleGloveVisualizer.tar.bz2’. 3.1.3 Installing the Software Development Kit (SDK) Files in Windows The SDK folder on the CD contains the following files required for Windows installation:

6
Common folder that contains: AcceleGloveSDK.jar h2-1.1.115.jar RXTXcomm.jar Database folder that contains: DatabaseUtils.props db folder with predefined gesture libraries Windows folder that contains: AcceleGloveSDK-Win.jar registry.jar rxtxSerial.dll ICE_JNIRegistry.dll
Step 1: Copy rxtxSerial.dll and ICE_JNIRegistry.dll to %JAVA_HOME%\lib\ext. (%JAVA_HOME% is the folder where the JRE is installed on your system.) Alternatively, you may set the java.library.path property to point to the folder containing the dll’s when running java. Example: java -Djava.library.path=/MyPathToTheSDK/Windows/ -jar MyJarToRun.jar Step 2: Add the 5 .jar files (AcceleGloveSDK.jar, h2-1.1.115.jar, RXTXcomm.jar,
AcceleGloveSDK-Win.jar, and registry.jar) to your project libraries. Alternatively, you may copy the files to any location on the Java CLASSPATH. Step 3: Copy the DatabaseUtils.props and db folder to your project base. 3.1.4 Installing the Software Development Kit (SDK) Files on Mac OS X The SDK folder on the CD contains the following files required for Mac OS X installation:
Common folder that contains: AcceleGloveSDK.jar h2-1.1.115.jar RXTXcomm.jar Database folder that contains: DatabaseUtils.props db folder with predefined gesture libraries Mac OS X folder that contains: AcceleGloveSDK-OSX.jar librxtxSerial.jnilib
Step 1: Install the RXTX JNI Serial Libraries. Copy librxtxSerial.jnilib to /Library/Java/Extensions/.

7
Alternatively, you may set the java.library.path property to point to the correct location when running Java. Example: java -Djava.library.path=/MyPathToTheSDK/OSX/ -jar MyJarToRun.jar Step 2: Copy the 4 jar files (AcceleGloveSDK.jar, h2-1.1.115.jar, RXTXcomm.jar,
AcceleGloveSDK-OSX.jar) to your Library/Java folder. Alternatively, you may copy the jar files to any location on the Java CLASSPATH. Step 3: Copy the db folder and DatabaseUtils.props from the Database directory to your project
base. 3.1.5 Installing the Software Development Kit (SDK) Files on Linux The SDK folder on the CD contains the following files required for Linux installation:
Common folder that contains: AcceleGloveSDK.jar h2-1.1.115.jar RXTXcomm.jar Database folder that contains: DatabaseUtils.props db folder that contains predefined gesture libraries Linux folder that contains: AcceleGloveSDK-Linux.jar JNI folder
i686 folder librxtxSerial.so
x86_64 folder librxtxSerial.so
Step 1: Install the correct RXTX JNI Serial libraries. If you are using a 32-bit version of Java (check output of “java -version”), use the librxtxSerial.so in JNI/i686/. If you are using a 64-bit version of Java, use the librxtxSerial.so in JNI/x86_64/. Copy the appropriate librxtxSerial.so to $JAVA_HOM/jre/lib/ext. Alternatively, you may set the java.library.path property to point to the correct location when running Java. Example: java -Djava.library.path=/MyPathToTheSDK/JNI/i686/ -jar MyJarToRun.jar Step 2: Copy the jar files to $JAVA_HOME/jre/lib. Alternatively, you may copy the jar files to any location on the Java CLASSPATH. Step 3: Copy the db folder and DatabaseUtils.props from the Database directory to your project base.

8
3.2 Plugging In the AcceleGlove Plug the AcceleGlove USB cable into a USB port on your computer (Figure 1). The USB cable connects to the AcceleGlove via a mini-B connector underneath the “pocket” on the backside of the glove. The USB cable should already be connected to the AcceleGlove. You can plug in and view more than one AcceleGlove at a time as described in Section 6.3.
Figure 1 – AcceleGlove™ - Computer connection
3.3 Configuring the Serial Port Note: This is only necessary for HyperTerminal use. (See Figure 2) Baud Rate: 38400 Data Bits: 8 Stop Bits: 1 No Parity, No Flow Control
Figure 2 – COM port settings for AcceleGlove communication (shown using HyperTerminal)

9
3.4 Putting on the AcceleGlove When putting on the AcceleGlove, it is important to adjust each of the four fingers such that the seam at the end of each finger opening is positioned at the first joint from the end of your fingertip (Figure 3). Your entire fingernail should be exposed. This properly positions each finger sensor on the second segment of your finger.
Figure 3 – Electronics layout (top view, right hand)
3.5 Starting the AcceleGlove Visualizer Windows - Click on the Start Menu, select All Programs, select AcceleGlove Visualizer, and click on AcceleGlove Visualizer. The Visualizer will then start. Suggestion: Create a shortcut icon for your Desktop. MAC OS X - Under Applications, open the AcceleGlove Visualizer folder and double-click on the AcceleGlove Visualizer application. The Visualizer will then start. Linux - Open a terminal, change the directory to the location of the AcceleGlove Visualizer application, and run AcceleGloveVisualizer.sh. The Visualizer will then start. If the glove is not plugged into a USB port on your computer, an error message, “Error opening glove: Could not find available glove,” will appear. Otherwise, the AcceleGlove COM port will be detected automatically and will be noted at the top of the Visualizer screen. 3.6 Verifying Operation Using the Visualizer The AcceleGlove Visualizer allows you to view the plotting of the output values of each AcceleGlove accelerometer’s reading along the X, Y, and Z axes versus time. Once you have plugged in the glove and started the Visualizer, you can quickly verify that your glove and software are installed and working properly.

10
Figure 4 – Visualizer
As in Figure 4, you should be able to move finger and hand orientation and see the values change. Learn more about the AcceleGlove sensors, communications, and AcceleGlove Visualizer by reading the additional sections in the User’s Guide. 4. HOW THE ACCELEGLOVE WORKS The AcceleGlove has six small accelerometers – one for each finger and one for the back of the hand – integrated into the glove to detect finger and hand position and motion. Each accelerometer has three sensing elements, corresponding to the X, Y, and Z signals output from the AcceleGlove. If your hand is horizontal, the Z-sensing element is oriented along an axis (the “gravity vector”) that is perpendicular to the Earth’s surface. X and Y both lay in a plane that is perpendicular to the Z-axis, offset from each other by 90 degrees (Figure 5).

11
Figure 5 – AcceleGlove output signal convention (top view, right hand)
Tilting the AcceleGlove away from level about the Y-axis (hand supination or pronation) or accelerating the hand in the X-direction will result in a change of the accelerometer signal on the X-axis. Similarly, a signal response will occur on the Y-axis when the hand is tilted up and down around the X-axis (wrist flexion or extension), or moved with acceleration in the Y-direction. The Z-axis will register a response when the hand is accelerated up and down or is rotated about the X-axis and/or Y-axis. 4.1 Mapping the Sensors Figure 6 shows the sensor mappings and corresponding position of the returned sensor values in either the raw data string or the API array. The right and left hand sensor positions are identical, in that A= Thumb, B=Index finger, etc. This is described in further detail in the USB protocol and Java API sections.
Figure 6 – Sensor Positions
4.2 AcceleGlove Calibration The AcceleGlove is pre-calibrated out-of-the-box for a default range of gestural accelerations mapped from 0 to 255. Recalibrating the AcceleGlove will allow you to refine the range of accelerations. This would be useful if there is a problem with the factory calibration or if the user wants to change the range of acceleration the glove detects. The value of the Y offset value is close to 490. The X and Z offset values range from 200 to 250. Recalibration might cause the AcceleGlove to no longer work with any recorded gesture libraries (for more on calibration, see Section 11.2 of the Appendix).

12
5. ACCELEGLOVE COMMUNICATIONS PROTOCOL The data from the glove can be accessed from:
The glove query communication protocol The Java library API
This section documents the glove query communication protocol. The AcceleGlove uses a simple USB query communications protocol in which the computer software queries the AcceleGlove via single character strings. The data returned can be in string or binary (byte) format. The query characters are the following: "a", "b", "w", "r", “p”, “t”, “e”, “x”, and "k". The protocol is designed to support a future arm tracking plug-in hardware component, so many of the query commands also return the extra ‘arm link’ values. Using a terminal emulator, such as HyperTerminal (Windows XP) or MacWise (Mac OS X), you can test and calibrate the glove using this protocol. From a script or custom application of your own, you can access the raw and calibrated glove data. Command Name: ASCII Query (calibrated values) Query String: a Description: Queries the glove for the current calibrated sensor readings. The glove responds with a stream of 25 space-separated calibrated values in ASCII format, 25 values total (18 values for glove + 7 values for arm link). When the arm link is not connected, the 7 arm link values will be zeros. The values will be returned in the following order (left to right): thumb, index, middle, ring, pinky, hand, arm link. Command Name: Binary Query (calibrated values) Query String: b Description: The glove responds with a stream of 26 values, each a single byte. A total of 26 bytes (18 bytes for the glove + 8 for the arm link) will be sent. The order of the readings is the same as for the ASCII Query command. Command Name: ASCII Raw Query Query String: w Description: Queries the glove for the current raw (uncalibrated) sensor readings. The glove will respond with 25 space-separated raw sensor readings as ASCII text. The order of the readings is the same as for the ASCII Query command. Values are between 0 and 1023 inclusive. Command Name: Binary Raw Query (raw values) Query String: r Description: The glove responds with a stream of 26 raw (uncalibrated) values, 2 bytes per value for the glove and 1 byte per value for the arm link. Therefore, a total of 44 bytes (36 bytes for the glove + 8 for the arm link) will be sent. When the arm link is not connected, the 8 arm link values will be zeros. Command Name: Set Periodic Delay Query String: t Description: When "t" is sent to the glove, the glove waits for the user to provide a time value as a 16-bit integer, between 0 and 65,535, representing the wait time in milliseconds between each read/send loop, for "periodic" mode.

13
Command Name: Enter Periodic Mode Query String: p Description: When "p” is sent to the glove, the glove enters in "periodic" mode. The glove will enter a read/send loop with a wait time between loops specified by the “t” command. The default “t” wait time is 1 millisecond. In periodic mode, the glove will send raw (uncalibrated) values, 2 bytes per value, for a total of 44 bytes (36 bytes for the glove + 8 for arm link inputs). When the arm link is not connected, the 8 arm link values will be zeros. Command Name: ASCII Auxiliary Input Query Query String: e Description: This command queries the glove for the 8 auxiliary microcontroller input readings. The glove responds with 8 values in ASCII format corresponding to the values from the 8 auxiliary inputs. Command Name: Binary Auxiliary Input Query Query String: x Description: This command is the same as the Auxiliary Input Query, except that the data are sent as 8 bytes instead of ASCII formatted. Command Name: Enter Calibration Mode Query String: k Description: Causes the glove to enter calibration mode. (See Calibration section above for more information.) Command Name: Firmware Version Query String: v Description: Causes the glove to return a text string of the version number of the firmware. Command String AcceleGlove response Mode
a 26 ASCII values Calibrated b 26 byte values Calibrated w 26 ASCII values Uncalibrated r 26 values (36 two byte + 8 one byte) Uncalibrated p (Loop) 25 byte values then wait ‘t’ milliseconds Uncalibrated/Periodic t Set periodic wait, in milliseconds (2 byte int) Periodic e 8 ASCII auxiliary input values Auxiliary x 8 byte auxiliary input values Auxiliary k Enter Calibration mode Calibration v ASCII string of firmware version number N/A
Figure 7 – AcceleGlove communication commands
6. USING THE ACCELEGLOVE VISUALIZER 6.1 AcceleGlove Visualizer Introduction The AcceleGlove Visualizer is a multi-purpose application that works with the AcceleGlove. It provides the ability to view the output values of each accelerometer’s readings along the X, Y, and Z axes (Figure 8). The Visualizer also can be used to capture and define gesture libraries, recognize gestures, and display gesture recognition probability, data output, and diagnostics.

14
The AcceleGlove Visualizer application was developed using the AcceleGlove SDK API. The source code for both a simple Visualizer and the full version can be found on the SDK CD and can be used by developers as an example application.
Figure 8 – AcceleGlove Visualizer 6.2 AcceleGlove Visualizer Basics Windows - Click on the Start Menu, select All Programs, select AcceleGlove Visualizer, and click on AcceleGlove Visualizer. The Visualizer will then start. Suggestion: Create a shortcut icon for your Desktop. MAC OS X - Under Applications, open the AcceleGlove Visualizer folder, and double-click on the AcceleGlove Visualizer application. The Visualizer will then start. Linux - Open a terminal, change the directory to the location of the AcceleGlove Visualizer application, and run AcceleGloveVisualizer.sh. The Visualizer will then start.

15
If the glove is not plugged into a USB port on your computer, an error message, “Error opening glove: Could not find available glove,” will appear. Otherwise, the AcceleGlove serial port will be detected automatically and will be noted at the top of the Visualizer screen. The AcceleGlove Visualizer allows you to view the output values of each AcceleGlove accelerometer’s reading along the X, Y, and Z axes versus time. Learn more about the AcceleGlove sensors, communications, and AcceleGlove Visualizer by reading the additional sections in the User’s Guide.
Figure 9 – Visualizer Main Screen
The main screen of the AcceleGlove Visualizer displays data being streamed from the AcceleGlove (Figure 9). The far left side of the chart displays each of the AcceleGlove’s accelerometer names (e.g., “Index” for the Index finger, etc.). Within the chart area, the X, Y, and Z axis data are plotted in the corresponding colors shown in the legend (X- Red, Y-Green, and Z-Yellow). The scale displayed on the left (0 – 255) is the factory default data range to which the AcceleGlove accelerometers are calibrated (for more on calibration, see Section 11.2 of the Appendix). Along the bottom of each chart is the number of data samples captured from the start of the session. Displayed to the right of the accelerometer window is the name of the Gesture Library, the last gesture recognized (if one has been loaded), and probability settings.

16
6.3 Viewing Two or More AcceleGloves To view or analyze the data from more than one AcceleGlove, you can open a second session of the AcceleGlove Visualizer. To do this, select New Visualizer from the File Menu. Use this function when more than one AcceleGlove is plugged in, and you want to read data from a pair of gloves. 6.4 Recognizing Gestures The AcceleGlove Visualizer can be helpful in capturing and then recognizing gestures. First, we will review how to recognize a gesture using a predefined library. A predefined library of the American Sign Language (ASL) alphabet is included in the AcceleGlove CD. To see how to position your hand to make these gestures, reference Section 8.2.3 Using Predefined Gestures. Step 1: From the File Menu select Open Library. Select a library from the list and click OK (Figure 10).
Figure 10 – Selecting a gesture library
The library selected will now be loaded. Each gesture within that library will be displayed in the Gestures list in the right panel of the Visualizer Main Screen.

17
Step 2: From the Right Panel of the Main Screen (Figure 11), select Recognize Gesture.
Figure 11 – Visualizer Main Screen
Step 3: Make the Gesture With the AcceleGlove. The AcceleGlove Visualizer will recognize and display the name of the gesture being made (see Last Gesture) along with the probability that this is the gesture being made. There is a user-settable probability acceptance threshold that tunes the recognition engine to be more or less discriminating. Only gestures above the probability acceptance threshold will be displayed and reported. For example, if the filter is set to 90%, only gestures that achieve between 90% and 100% probability will be displayed as recognized gestures (Figure 12). By default, the probability acceptance threshold filter is set to 0 to show all the possible matches. Depending on user experience, typical acceptable recognition probabilities are generally in the range of 40% – 60%. Step 4: Click Stop Gesture Recognition.

18
Figure 12 – Recognizing Gesture
6.5 Training New Gestures New gestures can be trained by capturing one or more instances of the gesture. When there are multiple instances recorded of the same gesture, recognition reliability is high because the system is matching against multiple samples. 6.5.1 Expected Volumes and Performance While there are no data limitations in terms of the number of gestures that can be captured and saved to a library, it should be understood that the more gestures that are captured (samples or training instances), the longer it will take to build the predictive model. For example, on a typical modern CPU, it will take 30 seconds to build a 20-gesture model, and it will take 83 minutes to build a 200-gesture model. 6.5.2 Creating a New Library In order to train new gestures, you must first create a library in which to store them.

19
Step 1: From the Windows Menu, select Open Library Editor (Figure 13).
Figure 13 – Open Library Editor
Step 2: From the Library Editor File Menu, select New Library. Click Rename to give the library a new name. 6.5.3 Recording and Modifying Gestures Step 1: Click the “+” at the bottom of the Library Editor to add a new gesture. Step 2: Make the gesture with the AcceleGlove and while making the gesture click Capture (Figure 14).
Figure 14 – Capturing a new gesture
Step 4: Give the gesture a name.
Note: The gesture library model must be built (Section 6.5.4) before gestures can be recognized.

20
Step 5: To edit the gesture, select the gesture then click Edit.
Figure 15 – Gesture Samples
The Gesture Editor Window opens (Figure 15). To add additional samples to your existing gesture, make the gesture and while making the gesture
click the “+”. Click Rename to change the name of the gesture, if desired. Once the additional samples have been captured, you must again build the gesture library model
(Section 6.5.4). Click the [X] in the upper right corner to close the Gesture Editor window once finished. Click the [X] in the upper right corner to close the Library Editor window once finished.
Note: You must record at least two gestures for the system to build a gesture library model. 6.5.4 Building the Gesture Library Model In order for the Visualizer to recognize your gestures, you must build the corresponding predictive model from the trained instances. To do this, select Build Model from the Library Editor File Menu (Figure 16). Step 1: From the Windows Menu, select the Library Editor.

21
Figure 16 – Build Model Step 2: From the Library Editor File Menu, select Build Model. If the library that opens (the last library opened) is not the library you wish to build, first select Open Library, then select the desired library, and return to select Build Model. Once the model is built, you can follow the instructions in Section 6.4 Recognizing Gestures.
6.6 Analyze, Capture, and Output Data Another capability of the AcceleGlove Visualizer is to analyze and export data captured from the AcceleGlove. To Analyze Gesture Recognition Data: Step 1: Be sure you have selected and loaded a library (From the File Menu, select Open Library). Step 2: From the Windows Menu, select Analyze Gesture Data.

22
Figure 17 – Gesture Data Analyzer
The gestures for the selected library are displayed on the left panel of the Gesture Data Analyzer window (Figure 17). The data set for each gesture in the library is plotted in the graph to the right. Each gesture is displayed in a different color, allowing you to easily compare the probability of occurrence of the gesture being made to the probability of occurrence to other gestures in the library. The data displayed at the bottom of the graph is the number of samples received from the AcceleGlove since the start of the analyzer session. To Record Data: Step 1: From the Record Menu, Select Start Recording. Based on configuration options set in the recording options (defined below), the data stream will begin to record (Figure 18). Step 2: Click Stop Recording.
Figure 18 – Recording Status

23
This will output the data into a comma-separated variable (.csv) file, which can be imported into Microsoft Excel. The Recording Options let you determine what type of data you want to record, the time options, and where you want to store the captured data.
Figure 19 – Recording Options
What to Record includes the option to select one or more of the following for output: Glove Data (sample count and the value of each accelerometer), Recognized Gestures (the name of the gesture recognized and probability), or Gesture Analysis (probabilities for all gestures). In addition, you can choose to capture sample count and/or time and specify the directory to which you would like to record the data file. If you specify the directory, files will be named automatically.
6.7 Sharing, Saving, and Loading Libraries You may wish to share Gesture Libraries or move them from environment to environment. Under the Library Editor File Menu, use the Import and Export options to export a library from one environment and import to another (Figure 20).
Figure 20 – Import Gesture Library

24
7. USING THE SOFTWARE DEVELOPMENT KIT (SDK) Note: Be sure to have installed the files as addressed in Section 3.1 to use the SDK. 7.1 Guide Conventions 7.1.1 Example Code Format Example code is presented in the following font: package mypackage; import java.util.LinkedList; public class MyIntStack { private final LinkedList fStack; public MyIntStack() { fStack = new LinkedList(); } 7.1.2 Code Comments Format Comments are presented in the following format: /* * This is a sample comment */ 7.1.3 Notes Format Note: Will be formatted in a box and in blue. 7.2 SDK Overview The AcceleGlove SDK Version 1.0.1 provides the necessary software for developers to interface with the AcceleGlove, as well as build gesture libraries and recognize gestures. Figure 21 provides an architectural overview of the SDK. The data streamed from the AcceleGlove can be accessed in raw form (string) by using one of the hardware drivers provided and the AcceleGlove protocol, or by using the Java API. The Java API runs on Windows XP, Windows Vista, Mac OS X, or Linux operating systems. JRE (Java Runtime Environment) 5 or higher is required (and distributed with the SDK). Any Java IDE (such as Eclipse) can be used for development. The AcceleGlove SDK provides two Java API sets: A “Raw DataStream API” that accesses the X, Y, Z axis values, and a “Gestures” API that uses the raw data stream to create and access gestures. Sample source code is provided to demonstrate how each API can be used. Note: Currently, a gesture includes handshape and palm orientation. Shoulder, elbow, and upper arm sensors are planned for a future release and will be added to the Gestures API.

25
In addition, the Visualizer application, which also uses the API, is provided in both compiled and source forms.
Figure 21 – SDK Component Diagram
7.2.1 SDK Components The components provided with the SDK include:
Common Components:
Component Description
AcceleGloveSDK.jar Library of class for glove interface, and gesture recognition Includes the WEKA machine learning library
h2-1.1.115.jar H2 Database used to store gesture library information
RXTXcomm.jar The RXTX serial port library

26
Database Components:
Component Description
DatabaseUtils.props Properties used to locate the gesture database
db folder Predefined Gesture libraries
Examples Source of the AcceleGlove Visualizer, and other example applications
Windows ONLY Components:
Component Description
AcceleGloveSDK-Win.jar Library to support detection of AcceleGloves
RXTXSerial.dll JNI Library to support RXTX library
registry.jar Library to support registry functions in AcceleGloveSDK-Win.jar
ICS_JNIRegistry.dll JNI Library to support registry.jar
Mac OS X ONLY Components:
Component Description
AcceleGloveSDK-OSX.jar Library to support detection of AcceleGloves
librxtxSerial.jnilib JNI Library to support RXTX library
Linux ONLY Components:
Component Description
AcceleGloveSDK-Linux.jar Library to support detection of AcceleGloves
JNI/i686/librxtxSerial.so JNI Library to support RXTX library. (For 32 bit java)
JNI/x86_64/librxtxSerial.so JNI Library to support RXTX library. (For 64 bit java)

27
8. INTRODUCTION TO THE JAVA API FOR WINDOWS The SDK provides a predefined library of functions for those developers working in Java. In the AcceleGlove SDK Version 1.0.1, the following overall capabilities are provided:
• Data analysis, data stream capture, and gesture capture through use of the Visualizer. • The ability to access the raw datastream from the AcceleGlove. • The ability to access predefined gestures. • The ability for developers to define gestures, add these to a library, and then access their own
gestures. • Support for multiple active gesture libraries. • The ability to combine libraries (allowing for gestures to be captured on separate environments
and then combined into a single library). • Output of the percentage of accuracy (compares the gesture in the library to the gesture being
recognized). • Source code examples. The diagram shown in Figure 22 illustrates the classes and functions supported by the API.
Figure 22 – Class Diagram
8.1 Raw Data Stream API The following provides the functions of the Raw Data Stream API set (Glove and Handshape classes). Using this API, a developer can access the collection of data from all sensors or individual sensors. Object: Glove

28
Function Syntax Return Value Description
Glove Glove() Glove constructor takes no arguments and searches for a glove that was previously installed and currently connected, and then it will open its port. If multiple gloves are connected, then the constructor will open an arbitrary one, and bind the glove object to that glove. When another object is instantiated, it will pick an unbound glove, and bind it to the new object.
Glove Glove(String port) Glove constructor takes port name to which the glove variable is to be bound.
Close close() This function closes the connection between the application and the glove port.
getGlovePortName getGlovePortName() String This function returns the port name to which the glove object is bound.
captureHandshape captureHandshape() Handshape class This function returns an object of type Handshape that represents the sensor readings at the time the function was called.
addGloveConnectionListener
addGloveConnectionListener (l)
This function adds connection listener to the glove object.
removeGloveConnectionListener
removeGloveConnectionListener (l)
This function removes the connection listener from the glove object.
getGloveStatus getGloveStatus () GloveConnectionStatus This function returns the glove status (“CONNECTED", "DISCONNECTED").
Object: Handshape
Function Syntax Return Value Description
Handshape Handshape() Handshape class constructor
getSensorReadingForAxis getSensorReadingForAxis(Handshape.Sensor s, Handshape.Axis a)
Int This function takes the Sensor location (e.g., THUMB) and required Axis (e.g., X) as parameters and returns the integer value that represents the sensor value in the required axis.

29
getSensorReadings getSensorReadings (Handshape.Sensor s)
array of integer This function takes the sensor location as an argument and returns an integer array that represents the sensor values in the (X, Y, Z) axes in this order.
getAxisReadings getAxisReadings(Handshape.Axis a)
array of integer This function takes the axis as an argument and returns an integer array that represents the value of (THUMB, INDEX, MIDDLE, RING, PINKY, PALM) sensors in this order for the given axis.
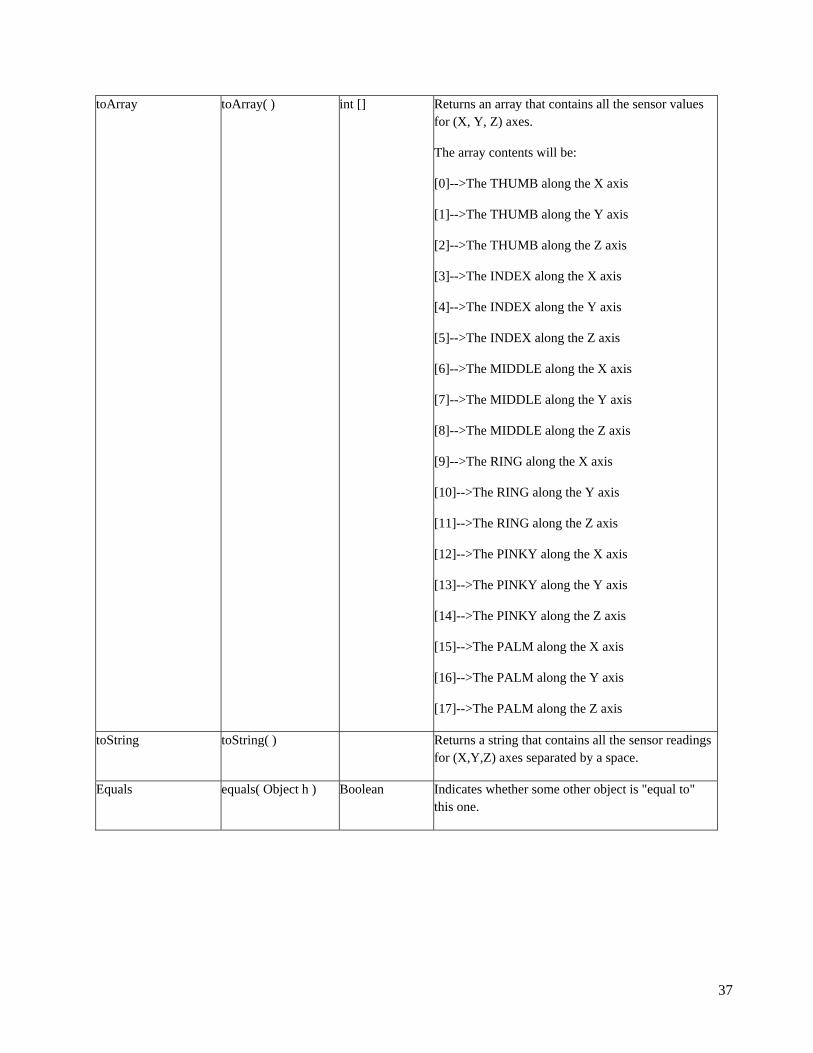
toArray toArray() array of integer This function returns an array which contains all the sensor values for (X, Y, Z) axes. The array contents will be:
[0]--> The THUMB along the X axis
[1]--> The THUMB along the Y axis
[2]--> The THUMB along the Z axis
[3]--> The INDEX along the X axis
[4]--> The INDEX along the Y axis
[5]--> The INDEX along the Z axis
[6]--> The MIDDLE along the X axis
[7]--> The MIDDLE along the Y axis
[8]--> The MIDDLE along the Z axis
[9]--> The RING along the X axis
[10]--> The RING along the Y axis
[11]--> The RING along the Z axis
[12]--> The PINKY along the X axis
[13]--> The PINKY along the Y axis
[14]--> The PINKY along the Z axis
[15]--> The PALM along the X axis
[16]--> The PALM along the Y axis
[17]--> The PALM along the Z axis
toString toString() String This function returns a string that contains all the sensor readings for (X,Y,Z) axes separated by a space.

30
Object: GloveConnectionEvent
Function Syntax Return Value Description
GloveConnectionEvent GloveConnectionEvent(Object source, GloveConnectionStatus)
GloveConnectionEvent constructor
gloveConnectionStatus gloveConnectionStatus()
GloveConnectionStatus class
Object: GloveConnectionStatus
Function Syntax Return Value Description
GloveConnectionStatus GloveConnectionStatus(String Status)
GloveConnectionStatus constructor
toString toString() String This function returns a string representation of the glove status.
8.1.1 Example Application The following example prints a string that represents the entire sensor values for (X, Y, Z) axes for the current handshape: import com.idrt.Glove; import com.idrt.GloveConnectionEvent; import com.idrt.GloveConnectionListener; import com.idrt.Handshape; import com.idrt.Glove.GloveIOException; import com.idrt.Handshape.HandshapeException; /** * Opens a connection to the AcceleGlove and prints the current accelerometer * values to the console. * */ public class AcceleGloveExample implements GloveConnectionListener { public AcceleGloveExample() { Handshape h; try { // Create connection to the AcceleGlove Glove g = new Glove(); g.addGloveConnectionListener(this); for (;;) { // Print current accelerometer values h = g.captureHandshape(); System.out.println(h.toString()); } } catch (GloveIOException e) {

31
e.printStackTrace(); } catch (HandshapeException e) { e.printStackTrace(); } } /** * Close the glove object when the glove is disconnected. */ public void statusReceived(GloveConnectionEvent event) { Glove g = (Glove) event.getSource(); g.close(); System.out.println("The Glove is disconnected"); System.exit(0); } public static void main(String[] args) { new AcceleGloveExample(); } } 8.1.2 Using the Raw Data Stream API to Build the Visualizer The Visualizer is an example application that uses the API. The source code is located in the AcceleGlove Visualizer folder.
In order to run this example using the Eclipse IDE, perform the following steps:
1. Open Eclipse.
2. Create a new project from File New JAVA Project.
3. Write the Project name (e.g., AcceleGloveVisualizer) and choose “Create project from existing source”; then browse to the location of the AcceleGloveVisualizer folder and click Next. 4. Select the Libraries tab and add the jars under AcceleGloveVisualizer\lib to your project; then click Finish.
5. Build the project and run “AcceleGloveVisualizer.Java” as a Java Application.
Note: The SDK package should be installed as described in Sections 3.1.3 (Windows), 3.1.4 (Mac OS X) or 3.1.5 (Linux). 8.2 Gesture API The Gesture API set includes the ability to define your own gestures (handshape and palm orientation) by capturing samples and using these samples to train and build the predictive model. Using the API, gestures can be added to one or more libraries.

32
8.2.1 Defining Your Own Gestures Object: Gesture
Function Syntax Return Value Description
Gesture Gesture( String name )
Constructs an empty gesture with the specified name. This gesture will not be added to the gesture library until adding the samples that represents the gesture in different sample orientations.
Gesture Gesture( String name, List<Handshape> samples )
Constructs a gesture with the specified name and the specified list of handshapes that represents the gesture in different sample orientations.
addSamples addSamples( List<Handshape> samples )
Adds a list of handshapes that represents the data samples of the gesture in different sample orientations.
addSamples addSample( Handshape h )
Adds a single handshape sample to the gesture.
removeSamples removeSamples( List<Handshape> samples )
Removes a list of handshapes from the sample data of the gesture.
removeSample removeSample( Handshape h )
Removes single handshape from the sample data of the gesture.
getSamples getSamples( ) List<handshape> Returns a list of handshapes that represent the gesture in different sample.
setName setName( String newName )
Renames the gesture with the specified name or throws an exception if the new gesture name already exists.
getName getName( ) String Returns the name of the gesture.
deleteGesture deleteGesture( Gesture g )
A static function that deletes the gesture.
getAvailableGestures getAvailableGestures( )
List<String> Returns a list of the available gestures.
equals equals( Object o ) Boolean Indicates whether some other object is "equal to" this one.

33
Object: Library
Function Syntax Return Value Description
loadLibrary loadLibrary( File f, boolean loadModel )
Library Loads the library data samples and its model from the specified file if the loadModel flag is true; otherwise, loads the library data samples only.
loadLibrary loadLibrary( InputStream in, boolean loadModel )
Library Loads the library data samples and its model from the specified input stream if loadModel flag is true; otherwise, it loads the library data samples only.
createLibrary createLibrary( String name )
Library Creates a new library with the specified name.
setName setName( String newName )
Sets the name of the library with the new name.
getName getName( ) String Returns the library name.
addGesture addGesture( Gesture gesture )
Adds the gesture to the library.
removeGesture removeGesture( Gesture gesture )
Deletes the specified gesture from the library.
removeAllGestures removeAllGestures( ) Deletes all gestures defined in the library.
interpretHandshape interpretHandshape( Handshape h )
GestureProbability
Interprets the specified handshape to the corresponding gesture. The input handshape does not have to be one of the samples defined for the gesture. The interpretation is done through learning from the samples and inferring with which gesture the given handshape is associated.
interpretHandshapes interpretHandshapes( List<Handshape> data )
List<GestureProbability>
Interprets the specified handshapes to their corresponding gestures.
getGestures getGestures( ) List<Gesture> Returns a list of gestures that represents all the gestures defined in the library.
buildModel buildModel( LibraryBuildModelListener l )
Builds the predictive model of the library.

34
saveLibrary saveLibrary( File f, boolean saveModel )
Saves the existing library data samples and its model to the specified file if the saveModel flag sets to true; otherwise, saves the library data samples only.
saveLibrary saveLibrary( OutputStream out, boolean saveModel
Saves the existing library data samples and its model to the specified output stream if the saveModel flag is true; otherwise, it saves the library data samples only.
deleteLibrary deleteLibrary ( Library lib )
saveLibrary Static function that deletes the specified library.
evaluateModel evaluateModel( List<Handshape> data, List<String> expectedGestures )
ModelEvaluation Evaluates the new data using the generated model.
getHandshapeDistribution
getHandshapeDistribution( Handshape h )
List<GestureProbability>
Represents the probability that each gesture is the interpretation of the input handshape.
getAvailableLibraries getAvailableLibraries( )
List<String> Static function that returns a list of available libraries.
getLibraryName getLibraryName( File f )
String Static function that returns a name of the library.
equals equals ( Object o ) boolean Indicates whether some other object is "equal to" this one.
isModelSynchronized isModelSynchronized( )
boolean Checks whether the library predictive model is built or not. Also checks whether or not the predictive model is synchronized with the training data.
Object: GestureProbability Function Syntax Return Value Description
GestureProbability GestureProbability( Gesture g, double p )
Constructs the GestureProbability with the given gesture and probability.
getGesture getGesture( ) Gesture Returns a gesture.
getProbability getProbability( ) Double Returns a probability.

35
Object: ModelEvaluation Function Syntax Return Value Description
getTotalEvaluatedInstances
getTotalEvaluatedInstances( )
Int Returns an integer that represents the total number of instances that were evaluated.
getCorrectlyClassifiedInstances
getCorrectlyClassifiedInstances( )
Int Returns an integer that represents the number of instances that were correctly classified.
getIncorrectlyClassifiedInstances
getIncorrectlyClassifiedInstances( )
Int Returns an integer that represents the number of instances that were incorrectly classified.
getKappaStatistic getKappaStatistic( ) Double Returns a double that represents the Kappa statistics.
getMeanAbsoluteError getMeanAbsoluteError( )
double Returns a double that represents the mean absolute error.
getRootMeanAbsoluteError
getRootMeanAbsoluteError( )
Double Returns a double that represents the root of the squared mean error.
getRelativeAbsoluteError
getRelativeAbsoluteError( )
Double Returns a double that represents the relative absolute error.
getRootRelativeAbsoluteError
getRootRelativeAbsoluteError( )
Double Returns a double that represents the root of the squared relative error.
Object: Glove Function Syntax Return Value Description
Glove Glove( ) Constructs an empty glove. It searches for a glove that was previously installed and currently connected, and then it will open its port. If multiple gloves are connected, then the constructor will open an arbitrary one and bind the glove object to that glove. When another object is instantiated, it will pick an unbound glove and bind it to the new object.
Glove Glove ( String port ) Constructs a glove with the specified port name.
Close close( ) Closes the connection between the application and the glove port.
getGlovePortName getGlovePortName ( )
String Returns the port name to which the glove object is pound.
captureHandshape captureHandshape ( ) Handshape Returns an object of type Handshape that represents the sensor.

36
addGloveConnectionListener
addGloveConnectionListener( GloveConnectionListener l )
Adds connection listener to the glove object.
removeGloveConnectionListener
removeGloveConnectionListener( GloveConnectionListener l )
Removes the connection listener from the glove object.
getGloveStatus getGloveStatus( ) GloveConnectionStatus
Returns the glove status ("CONNECTED", "DISCONNECTED", "CLOSED").
Object: Handshape Function Syntax Return Value Description
Handshape Handshape ( int [] readings )
Constructs the handshape with the specified array of integers.
getSensorReadingForAxis
getSensorReadingForAxis ( Sensor s, Axis a )
Int Returns the integer value that represents the sensor value in the specified axis.
getSensorReadings
getSensorReadings( Sensor s )
int [] Returns an array of integers that represents the sensor values in the (X, Y, Z) axes in this order.
getAxisReadings getAxisReadings ( Axis a )
int [] Returns an integer array that represents the value of (THUMB, INDEX, MIDDLE, RING, PINKY, PALM) sensors in this order for the given axis.
37
toArray toArray( ) int [] Returns an array that contains all the sensor values for (X, Y, Z) axes.
The array contents will be:
[0]-->The THUMB along the X axis
[1]-->The THUMB along the Y axis
[2]-->The THUMB along the Z axis
[3]-->The INDEX along the X axis
[4]-->The INDEX along the Y axis
[5]-->The INDEX along the Z axis
[6]-->The MIDDLE along the X axis
[7]-->The MIDDLE along the Y axis
[8]-->The MIDDLE along the Z axis
[9]-->The RING along the X axis
[10]-->The RING along the Y axis
[11]-->The RING along the Z axis
[12]-->The PINKY along the X axis
[13]-->The PINKY along the Y axis
[14]-->The PINKY along the Z axis
[15]-->The PALM along the X axis
[16]-->The PALM along the Y axis
[17]-->The PALM along the Z axis
toString toString( ) Returns a string that contains all the sensor readings for (X,Y,Z) axes separated by a space.
Equals equals( Object h ) Boolean Indicates whether some other object is "equal to" this one.

38
Object: GloveConnectionEvent Function Syntax Return Value Description
GloveConnectionEvent
GloveConnectionEvent( Object source, GloveConnectionStatus gloveConnectionStatus )
Constructs the GloveConnectionEvent with the source of the event and the connection status of the glove.
gloveConnectionStatus gloveConnectionStatus( )
GloveConnectionStatus
Returns the glove connection status.
Object: GloveConnectionStatus Function Syntax Return Value Description
GloveConnectionStatus
GloveConnectionStatus( String status )
Constructs the GloveConnectionStatus with the specified status.
toString toString( ) String Returns a string representation of the object.
8.2.2 Defining Your Own Gestures Example Application import java.io.BufferedReader; import java.io.IOException; import java.io.InputStreamReader; import java.util.ArrayList; import java.util.Vector; import com.idrt.Gesture; import com.idrt.GestureProbability; import com.idrt.Glove; import com.idrt.Handshape; import com.idrt.Library; import com.idrt.LibraryBuildModelListener; import com.idrt.Gesture.GestureException; import com.idrt.Glove.GloveIOException; import com.idrt.Handshape.HandshapeException; import com.idrt.Library.LibraryException; /** * Prompts the user to create a new library and add gestures to it. * The library is automatically saved in the database. * */ public class AcceleGloveExample { public static void main(String[] args) { String gestureName = null, libraryName = null, input = null; Vector<Handshape> samples = new Vector<Handshape>(); Handshape h; Glove g;

39
Library library; Gesture gesture = null; BufferedReader b = new BufferedReader(new InputStreamReader(System.in)); try { System.out.println("Please enter the library name : "); libraryName = b.readLine(); // Create library and add to database library = Library.createLibrary(libraryName); // Open glove g = new Glove(); // Prompt user for gestures // (must capture at least 2 gestures to build library) do { System.out.println("Please enter the gesture name : "); gestureName = b.readLine(); System.out.println("Waiting for the gesture \"" + gestureName + "\" samples ...."); System.out.println("Start ----------- "); samples.clear(); do { // Get current handshape and add it to the list of samples h = g.captureHandshape(); samples.add(h); System.out.println("Gesture sample captured"); System.out.println("Press Enter to capture the next " + "gesture sample using the AcceleGlove or type " + "\"n\" to enter the next gesture ...."); input = b.readLine(); } while (input.compareTo("n") != 0); System.out.println("Done ----------- "); // Done gathering samples for gesture, ask user if they want // to add another gesture System.out.println("Press Enter to enter the next gesture " + "name or type \"e\" to Build \"" + libraryName + "\" library"); // Add gesture to library gesture = new Gesture(gestureName, samples); library.addGesture(gesture); input = b.readLine(); } while (input.compareTo("e") != 0); System.out.println("Model building started"); // Build library model and print out progress library.buildModel(new LibraryBuildModelListener() { /** * libraryBuildProgress is called during the model building * process. This simply prints out each progress update to * the console. */ public void libraryBuildProgress(String arg0, double progress) { System.out.println(progress); } }); System.out.println("Model building done"); samples.clear();

40
// Prompt the user for gestures to analyze against the library System.out.println("Capture new samples to be tested"); do { // Get current handshape and add it to the list of samples h = g.captureHandshape(); samples.add(h); System.out.println("Press Enter to add new sample or type " + "\"e\" to evaluate the captured samples"); input = b.readLine(); } while (input.compareTo("e") != 0); System.out.println("Interpreting the samples"); // Analyze gestures against library and get the resulting // gesture probabilities ArrayList<GestureProbability> gestureProbabilities = (ArrayList<GestureProbability>) library.interpretHandshapes(samples); int i = 0; for (GestureProbability gp : gestureProbabilities) { System.out.println("Sample values : " + samples.elementAt(i) + " --> Corresponding gesture name : " + gp.getGesture().getName() + "Probability : " + gp.getProbability()); i++; } System.out.println("Interpreting the samples done"); // close the glove g.close(); } catch (IOException e) { e.printStackTrace(); } catch (HandshapeException e) { e.printStackTrace(); } catch (GloveIOException e) { e.printStackTrace(); } catch (GestureException e) { e.printStackTrace(); } catch (LibraryException e) { e.printStackTrace(); } } }

41
8.2.3 Using Predefined Gestures The gestures shown in Figure 23 have been pre-recorded and can be recognized by the AcceleGlove.
Figure 23 – ASL Fingerspelling Library
8.2.4 Predefined Gestures Example Application import java.io.BufferedReader; import java.io.File; import java.io.IOException; import java.io.InputStreamReader; import com.idrt.Gesture; import com.idrt.GestureProbability; import com.idrt.Glove; import com.idrt.Handshape; import com.idrt.Library; import com.idrt.LibraryBuildModelListener; import com.idrt.Gesture.GestureException; import com.idrt.Glove.GloveIOException; import com.idrt.Handshape.HandshapeException; import com.idrt.Library.LibraryException; /** * Loads the ASL Library from the database or the .aglib file and evaluates * handshapes. * */ public class AcceleGloveExample { public static void main(String[] args) {

42
BufferedReader b = new BufferedReader(new InputStreamReader(System.in)); Glove g; Handshape h; Library library; GestureProbability gp; String libName = new String("ASL"); try { // If the library is already in the database if (Library.getAvailableLibraries().contains(libName)) { // Load library from database library = Library.loadLibrary(libName); } else { // Load the .aglib (assuming it is in the project directory) // without importing the library model library = Library.loadLibrary(new File(libName + ".aglib"), false); } // Build library model and print out progress System.out.println("Library model building started"); library.buildModel(new LibraryBuildModelListener() { /** * libraryBuildProgress is called during the model building * process. This simply prints out each progress update to the * console. */ public void libraryBuildProgress(String arg0, double progress) { System.out.println(progress); } }); System.out.println("Model building done"); System.out.println("Loaded gestures:"); for (Gesture gesture : library.getGestures()) System.out.println(gesture.getName()); // Open AcceleGlove g = new Glove(); System.out .println("Press Enter to evaluate current handshape, " + "press 'x' to exit"); while (b.readLine().compareTo("x") != 0) // until "x" is pressed { h = g.captureHandshape(); gp = library.interpretHandshape(h); System.out.println("Sample values : " + h.toString() + " --> Corresponding gesture name : " + gp.getGesture().getName() + " Probability : " + gp.getProbability()); } System.out.println("Closing."); // Close glove g.close();
43
} catch (LibraryException e) { e.printStackTrace(); } catch (GloveIOException e) { e.printStackTrace(); } catch (IOException e) { e.printStackTrace(); } catch (HandshapeException e) { e.printStackTrace(); } catch (GestureException e) { e.printStackTrace(); } } } 9. MICROCONTROLLER INPUTS
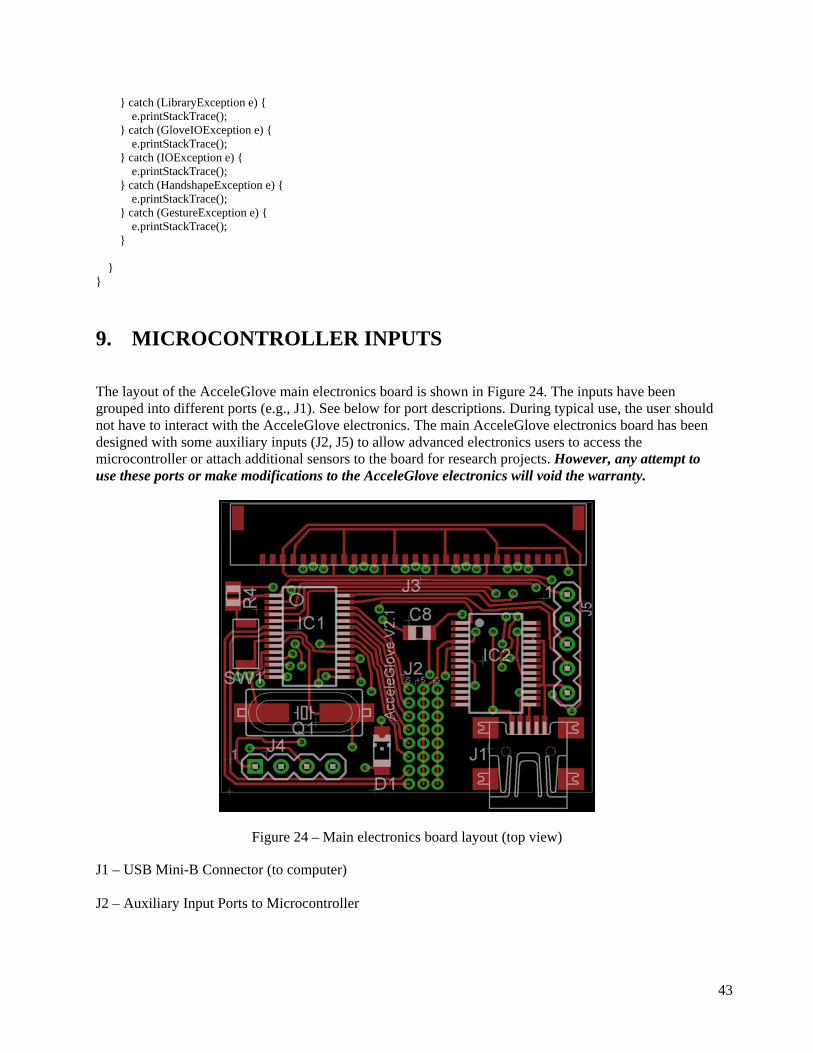
The layout of the AcceleGlove main electronics board is shown in Figure 24. The inputs have been grouped into different ports (e.g., J1). See below for port descriptions. During typical use, the user should not have to interact with the AcceleGlove electronics. The main AcceleGlove electronics board has been designed with some auxiliary inputs (J2, J5) to allow advanced electronics users to access the microcontroller or attach additional sensors to the board for research projects. However, any attempt to use these ports or make modifications to the AcceleGlove electronics will void the warranty.
Figure 24 – Main electronics board layout (top view)
J1 – USB Mini-B Connector (to computer) J2 – Auxiliary Input Ports to Microcontroller

44
The AcceleGlove provides extra (auxiliary) inputs to allow designers and researchers to integrate additional sensors with the glove’s six accelerometers. These inputs can be accessed at port J2 (3x8 block of through-holes) on the main board. Referring to the layout figure above, the first column on the left (signal column) is where the auxiliary inputs should be connected – the hole second from the bottom is an analog input, and the rest are digital inputs. The AcceleGlove also can provide limited power to additional sensors via the middle column, which is connected to the USB +5V supply. The rightmost column of through-holes is connected to Ground. Be aware that any modifications to the AcceleGlove electronics will void the warranty. J3 – Connection Out to Finger Accelerometer Boards J4 – Arm Link Connector This 4-pin connector is designed to connect to an additional arm motion capture device, which is still being developed. J5 – Programming Header These five pins allow researchers direct access to the microcontroller (PIC16F876A) in order to re-program it. Be aware that reprogramming the AcceleGlove microcontroller will void the warranty. The port pinout is as follows: Pin 1: MCLR Pin 2: VDD (+5V) Pin 3: PGD (data) Pin 4: PGC (clock) Pin 5: GND (ground) SW1 Reset Switch Do not use the reset switch. Pressing the reset switch will reboot the AcceleGlove. The reset switch should only be used when updating firmware.

45
10. SPECIFICATIONS AND WARRANTY 10.1 AcceleGlove Specifications Sensors: Six 3-Axis Micro Electromechanical Accelerometers Sensor Positioning: One Accelerometer On The Back Of Each Finger And Thumb One Accelerometer On The Back Of The Hand Material: Nylon / Lycra mix Computer Interface: USB Virtual Serial Port Port Settings: 38400 bps, 8 data bits, no parity, 1 stop bit, no flow control Supply Voltage: 5V DC (Via USB port) Output Signal Resolution: 8 to 10-bit Range:
Orientation: 180 Degrees Acceleration: +/- 1.5g
Sensitivity: .0287 m/s2 Sampling Rate (max): 35 Hz (630 axes per second) 8 Auxiliary I/O: 7 Digital inputs
1 Analog input Weight: 54 grams (size large) System Requirements:
OS: Windows 2000/XP/Vista, MAC OS X (10.4 or higher, Intel-based), Linux (Kernel 2.6.9 or higher)
RAM: 512MB or more Java Runtime Environment (JRE): Version 5 or higher

46
10.2 Warranty
10.2.1 30-Day Customer Satisfaction Assurance If for any reason you are not satisfied with this product, please contact your supplier to see if they can assist you. If they are unable to resolve your issue, you may return the product within 30 days undamaged and in its original packaging for a full refund of the purchase price. The refund will be issued once the product has been received and declared complete and undamaged. The purchaser is responsible for all shipping costs. 10.2.2 Product Warranty: 90 Days This product warranty goes to the original purchaser. The AcceleGlove and SDK are warranted to be free of defects in materials and workmanship for a period of 90 days from the original date of purchase. During the warranty period, we will repair or replace components that are defective with new, refurbished, or reconditioned parts. Exclusions:
This warranty is provided for private, non-commercial use only.
This warranty is void under the following conditions: a) Misuse of the product, or b) Unauthorized modification of the product, or c) Violation of the product license.
10.2.3 Filing a Warranty Claim A. Do not return the product without first contacting your supplier. Your supplier will assist you in
determining if a return is required.
B. Your supplier will issue you a return authorization number to be included with the returned product. Do not return the product without this authorization number written ON THE OUTSIDE of the packaging.
C. Package the product to be returned, as well as all parts, software, and documentation, securely in the
original packaging.
D. Include the following information: Contact Name, Address, Telephone Number, and E-mail Reason for the return Original Bill of Sale Return Authorization Number
E. Ship the product prepaid to your supplier. The supplier will not be responsible for any mailing or
shipping charges, and will not accept any COD shipments. The supplier is not responsible for any damages that may occur during shipping.

47
11. APPENDIX 11.1 Terms and Definitions Handshape: For the purpose of the SDK, the term handshape is being used to define the collective positions of the fingers to form a specific shape with the hand (e.g., a thumbs-up or fist). The Handshape class and AcceleGlove also have the ability to capture the palm orientation, and therefore, handshape is extended to mean the collective positions of the fingers, in addition to the orientation of the palm. For example, thumbs-up and thumbs-down, while sharing the same collective positions of the fingers, have different palm orientations and, therefore, are considered different handshapes. Gesture: A gesture is an occurrence of a handshape including the palm orientation. Dynamic Gesture: A dynamic gesture adds motion to the gesture. For example, the starting position of a dynamic gesture might be a thumbs-up and the ending position, a thumbs-down. It is the capture of the entire range of positions or gestures that make up a dynamic gesture. This can include the same handshape with multiple palm orientations (thumbs-up to thumbs-down) or changes in handshape and palm orientation (thumbs-up to thumbs-down to a fist). Sample: The collection of data from each accelerometer. For a gesture, a single sample would include three data values for each of six accelerometers. It is common to capture multiple samples of a single gesture to improve the probability of detection as the data values will vary slightly with minor changes to the position of the fingers and palm. Gesture Library: A collection of gestures, each gesture having one or more samples (sets of data). Model: The predictive model that is generated using the data captured from the AcceleGlove’s accelerometers to read the data from the glove to determine if, in fact, the occurrence of the gesture has happened. 11.2 Calibration Calibration: To recalibrate the AcceleGlove, you must use a terminal emulator, such as HyperTerminal (Windows XP) as shown in Figure 25 or MacWise (Mac OS X), and configure the port as described in the AcceleGlove Protocol section (38400 bps, 8 Data Bits, No Parity, 1 Stop Bit, No Flow Control). Once connected, press “k” to enter calibration mode. The calibrated value equals the offset value minus the raw value. The value of the Y offset is close to 490; the X and Y offset values range from 200 to 250. Command Name: Calibration Command String: k Command Description: When “k” is sent to the AcceleGlove, the glove enters the calibration routine, answering with a MENU (see screenshot below).

48
Figure 25 – Calibration routine screenshot (shown using HyperTerminal) First, choose whether you want to calibrate all axes of all accelerometers at once (“a”), all X axes of all accelerometers at once (“x”), all Y axes of all accelerometers at once (“y”), or all Z axes of all accelerometers at once (“z”). Sending “d” will display all offset values; sending “e” will exit the calibration routine. Once a calibration option has been selected, another menu is presented. Select from among clearing calibration offset values (clear), displaying offset values (read), starting calibration (calibrate), and exiting the calibration routine (exit). It will probably make the calibration process easier and more precise if you first use Scotch or painters tape to tape the glove to a moveable flat surface (such as a piece of cardboard). When taping down the glove, make sure to align all fingers straight (along the X axis). If “all_axes” was previously selected: Once “calibrate” is chosen, slowly rotate the entire glove +90 and then -90 degrees (from horizontal) about both the X and Y axes (one at a time). Then, to calibrate the Z axis, slowly rotate the glove such that it is completely upside down. If “x_axes” was previously selected: Once “calibrate” is chosen, slowly rotate the glove +90 and then -90 degrees (from horizontal) about the X axis (same as supination / pronation movements). Press any button other than “k” to save and exit this calibration. If “y_axes” was previously selected: Once “calibrate” is chosen, slowly rotate the glove +90 and then -90 degrees (from horizontal) about the Y axis (same as wrist flexion / extension movements). Press any button other than “k” to save and exit this calibration. If “z_axes” was previously selected: Once “calibrate” is chosen, slowly rotate the glove such that it is completely upside down. Press any button other than “k” to save and exit this calibration.

49
To set the correct offset values during calibration, make sure to rotate the full 90 degrees (or 180 degrees / upside down for Z) in either direction, aligning each axis with gravity. The offset values correspond to the maximum values reached by each axis.