dpd shipping
TRANSCRIPT
DPD Shipping Direct printing and automatic shipment import
DPD Shipping 1
Contents 1 General information 1
2 Labels printing in PDF format 2
3 Printing directly from printers 3
4 Import pattern settings 7
1 General information
This document is intended for registered customers of the DPD company with an assigned customer number.
The document will introduce you to printing of shipping labels and shipments uploading through an
import file.
It contains tips and screenshots of DPD Shipping web application (further on referred to as “application”).
You can run the application directly at https://shipping.dpdgroup.com/login.
For a smooth functioning of the application, it is necessary to meet the following requirements:
1. Internet connection
Supported web browsers:
• Mozilla Firefox
• Google Chrome
• Microsoft Edge
• Opera
• Safari
2. PDF Reader (Adobe Reader, PDF Creator, Foxit Reader etc.)
Recommended configuration of your personal computer:
• MS Windows 7 and higher
• 4GB of RAM operation memory
• Dual-core processor of 2GH frequency
• Free disk space of 16GB
Warning: the application cannot be used on smartphones.
The application automatically generates labels in PDF format. The user does not need to set anything.
PDF labels can be generated in A4 or A6 size.
• A6 size has the following dimensions: 10x15 cm
• For A4 size, 4 labels are generated per page.
For A6 size, we recommend you to borrow a printer from DPD, or possibly to purchase a printer supporting the
dimensions of our shipping labels and communicating by ZPL/EPL script.
We also recommend you to consult your specific case with the DPD technical support.
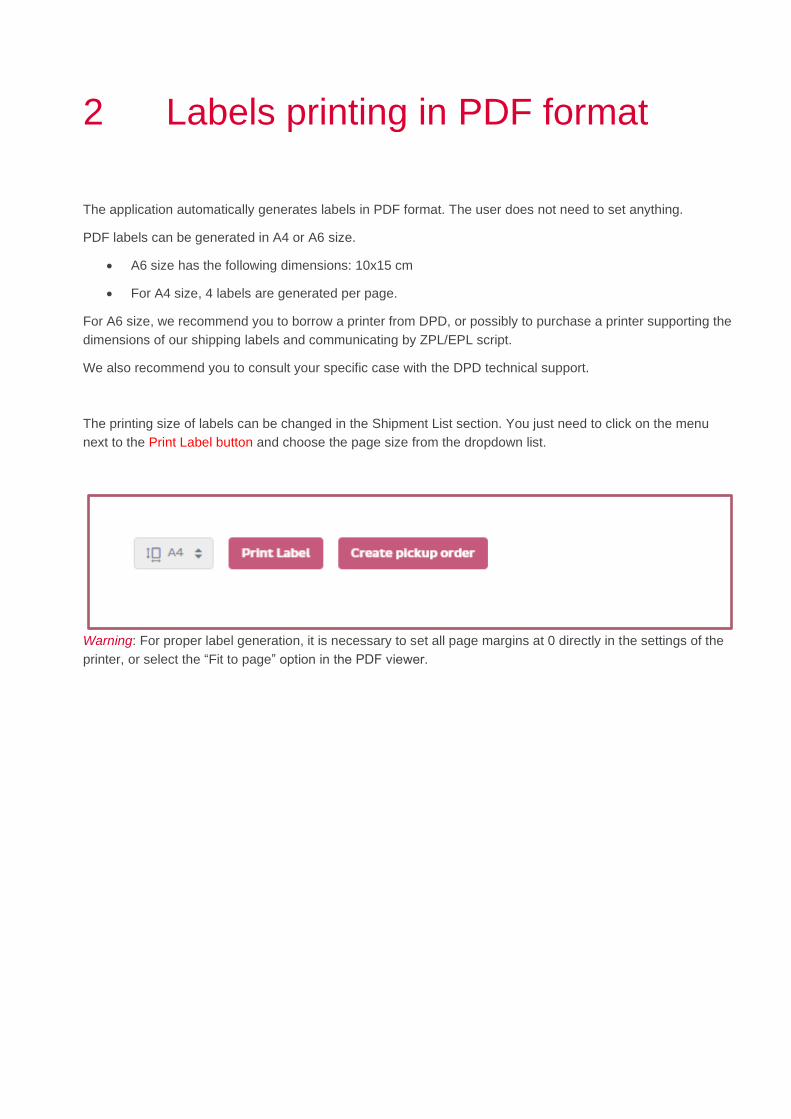
The printing size of labels can be changed in the Shipment List section. You just need to click on the menu
next to the Print Label button and choose the page size from the dropdown list.
Warning: For proper label generation, it is necessary to set all page margins at 0 directly in the settings of the
printer, or select the “Fit to page” option in the PDF viewer.
2 Labels printing in PDF format
3 Printing directly from printers Another way of generating shipping labels is a direct printing. It means sending shipping labels directly to a
printer.
Each user has its own separate setting. The printer needs to be installed to the given PC. We do not
recommend to have a remote printer connection.
To set the printer correctly, a few steps need to be taken.
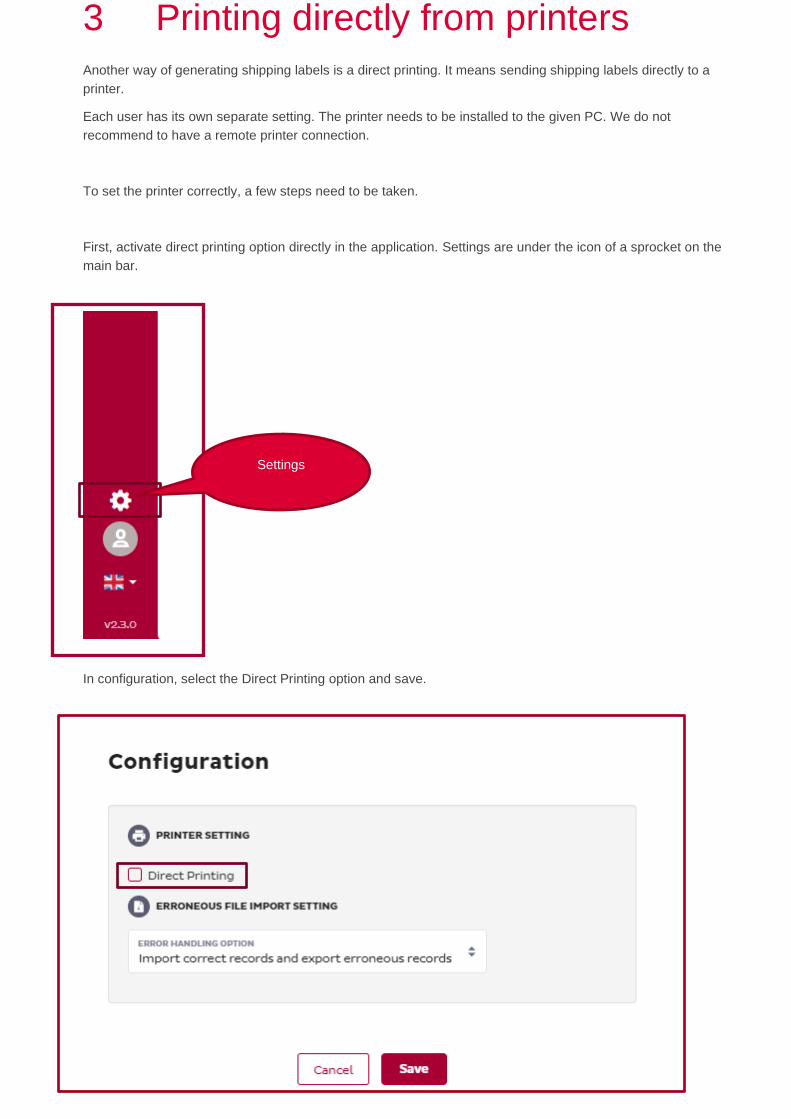
First, activate direct printing option directly in the application. Settings are under the icon of a sprocket on the
main bar.
In configuration, select the Direct Printing option and save.
Settings
Besides manual data import, the application also enables automatic data import and automatic label
printing.
Automatic data import means that the app downloads and uploads a file into the application in a set interval.
For functioning of the standard or automatic data import, it is necessary to set the import pattern.
The import pattern can be set by our technical support, or you can set it on your own directly in the application.
For proper functioning of the import, it is necessary to meet several requirements:
• Required fields
• Number of columns, including the empty ones
• Allowed values
• Column order
• Source file format
• Valid address of the consignee
• Valid service code
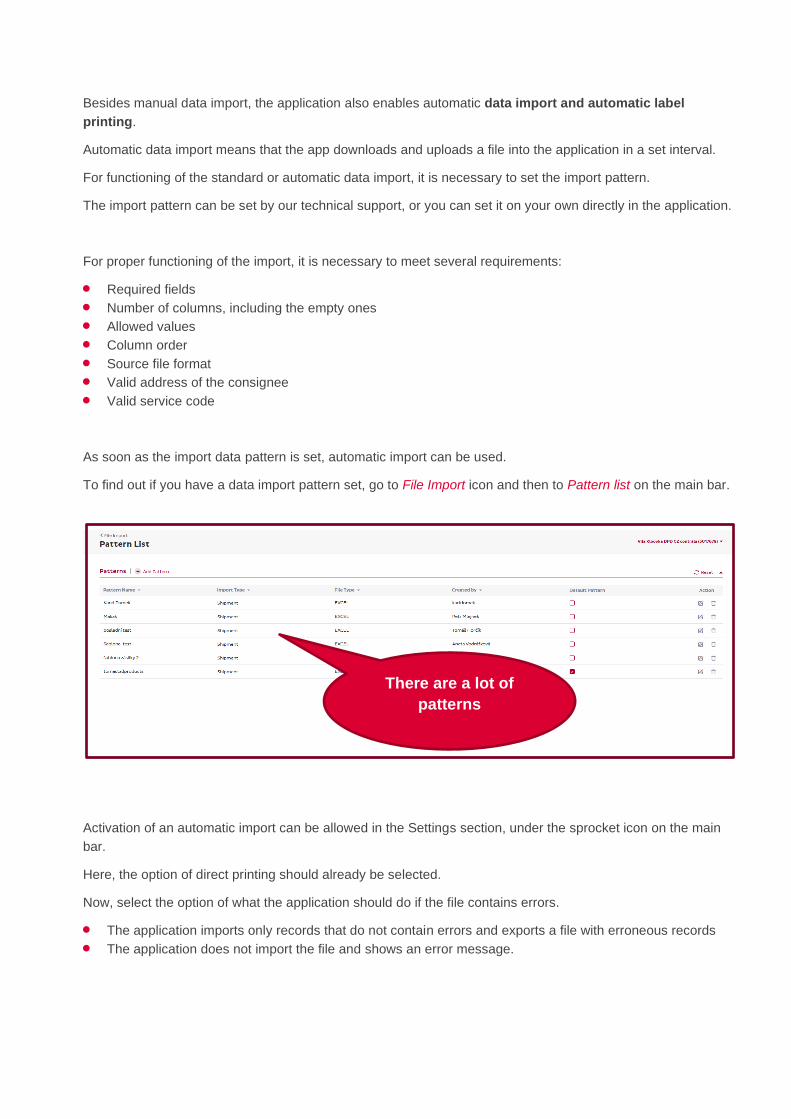
As soon as the import data pattern is set, automatic import can be used.
To find out if you have a data import pattern set, go to File Import icon and then to Pattern list on the main bar.
Activation of an automatic import can be allowed in the Settings section, under the sprocket icon on the main
bar.
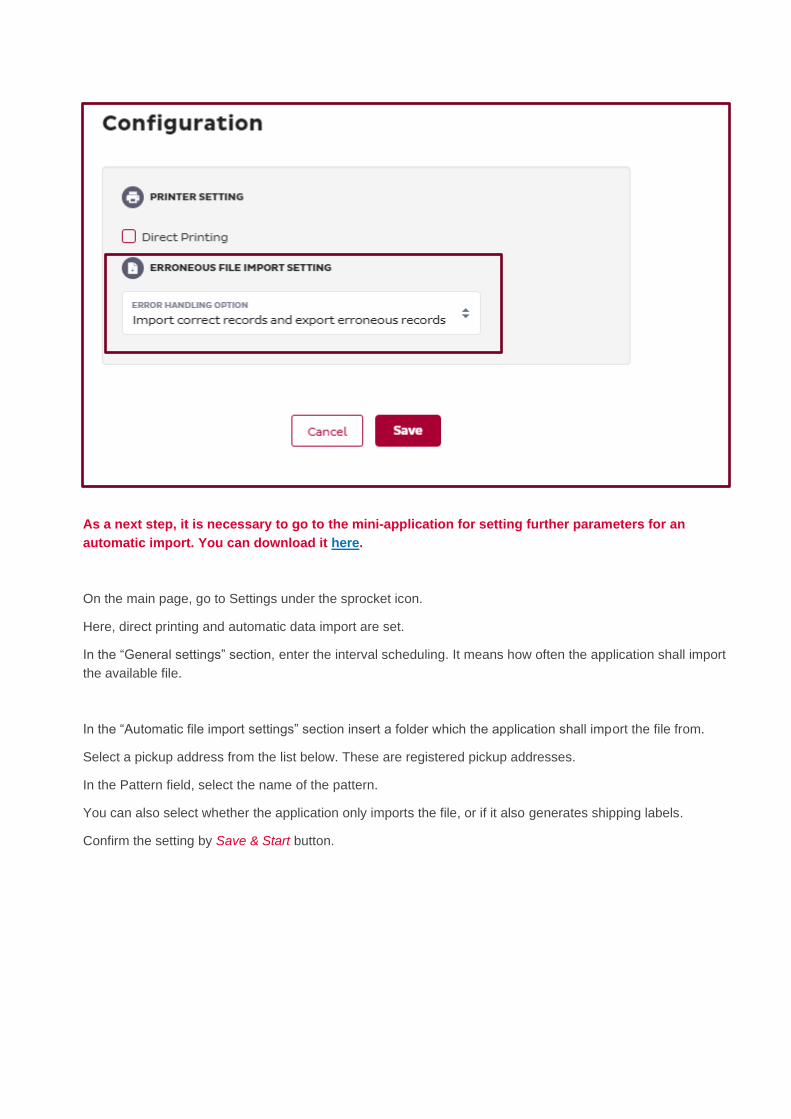
Here, the option of direct printing should already be selected.
Now, select the option of what the application should do if the file contains errors.
• The application imports only records that do not contain errors and exports a file with erroneous records
• The application does not import the file and shows an error message.
There are a lot of
patterns
As a next step, it is necessary to go to the mini-application for setting further parameters for an
automatic import. You can download it here.
On the main page, go to Settings under the sprocket icon.
Here, direct printing and automatic data import are set.
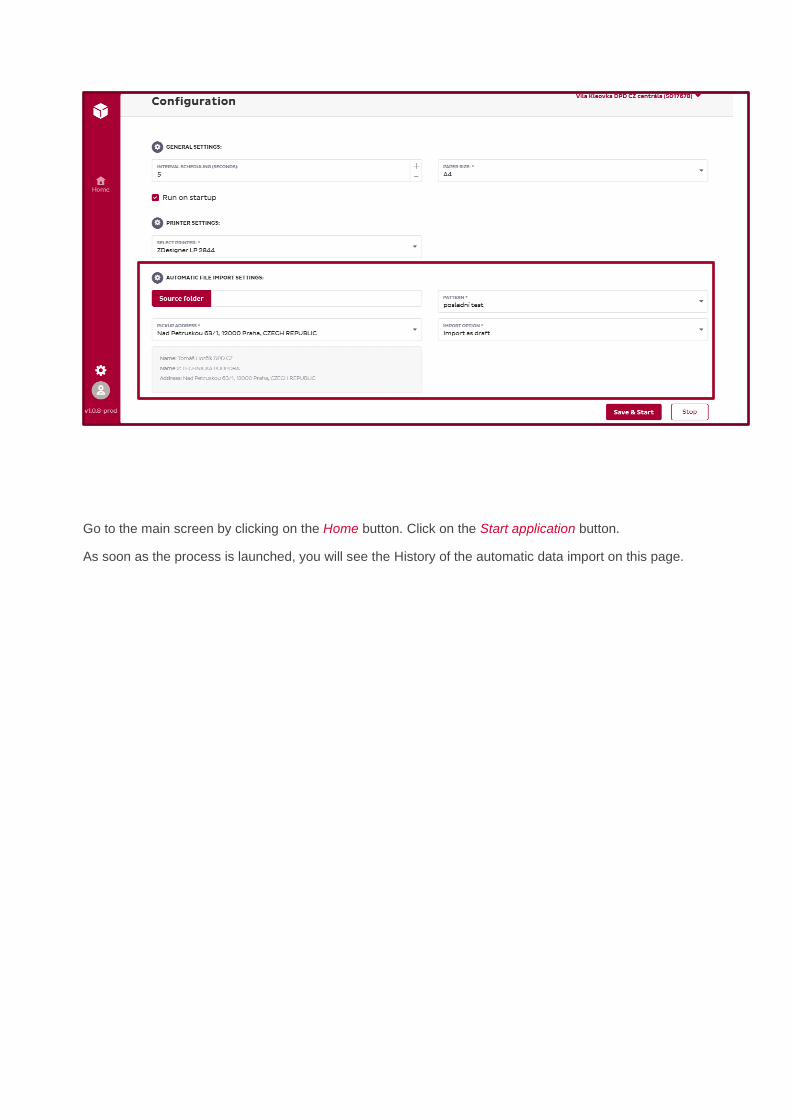
In the “General settings” section, enter the interval scheduling. It means how often the application shall import
the available file.
In the “Automatic file import settings” section insert a folder which the application shall import the file from.
Select a pickup address from the list below. These are registered pickup addresses.
In the Pattern field, select the name of the pattern.
You can also select whether the application only imports the file, or if it also generates shipping labels.
Confirm the setting by Save & Start button.
Go to the main screen by clicking on the Home button. Click on the Start application button.
As soon as the process is launched, you will see the History of the automatic data import on this page.
The new import pattern can be set directly in the application. The section for setting a new pattern is found
under the File Import icon, under File Pattern Creation bookmark.
A detailed description of individual fields is provided below:
• Name: insert a name of your pattern.
• Import type: Shipments import or address book import.
• File type: Excel or Csv/Txt.
• Has header: the first line in the file is ignored in the import.
• Default Pattern: default pattern, displays in the first place.
• Grey box: drag your file here.
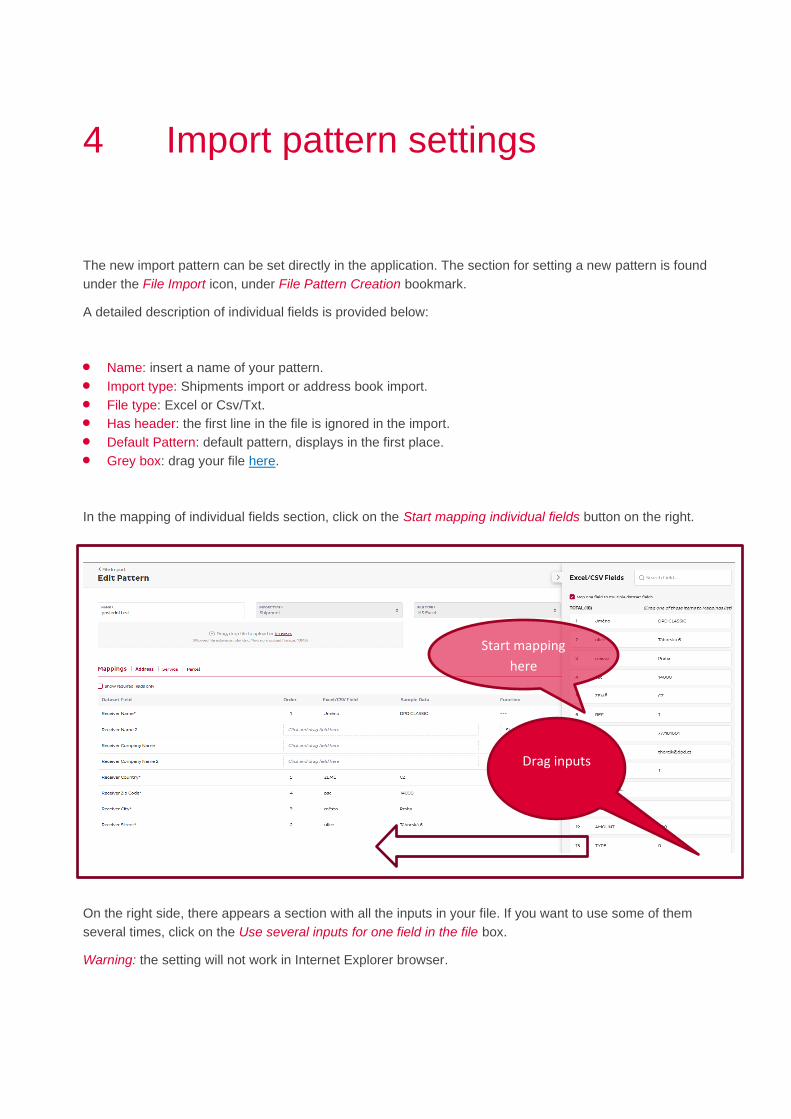
In the mapping of individual fields section, click on the Start mapping individual fields button on the right.
On the right side, there appears a section with all the inputs in your file. If you want to use some of them
several times, click on the Use several inputs for one field in the file box.
Warning: the setting will not work in Internet Explorer browser.
4 Import pattern settings
Start mapping
here
Drag inputs
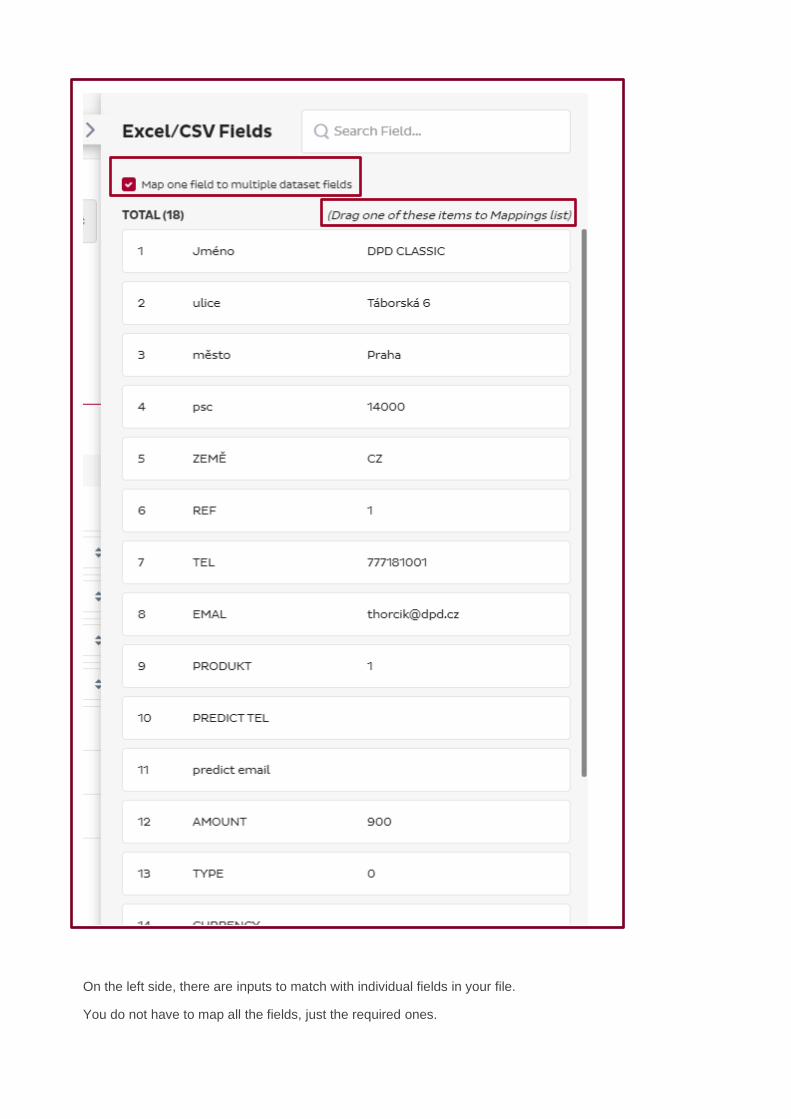
On the left side, there are inputs to match with individual fields in your file.
You do not have to map all the fields, just the required ones.
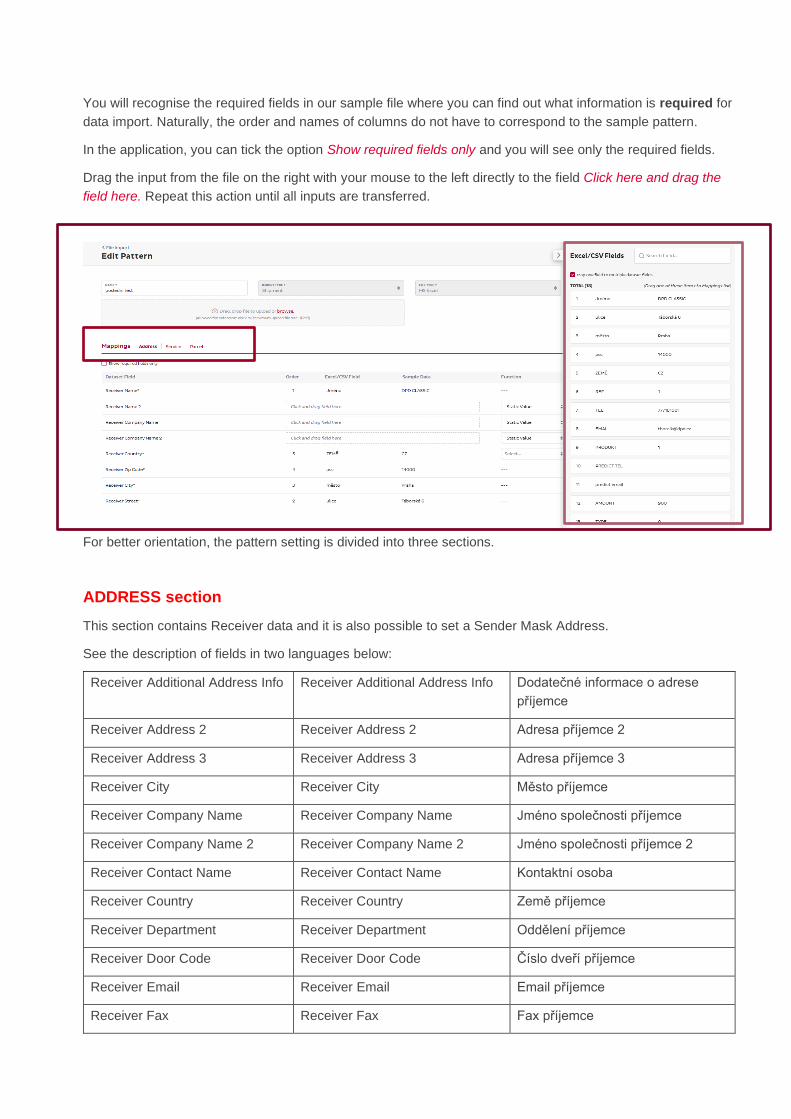
You will recognise the required fields in our sample file where you can find out what information is required for
data import. Naturally, the order and names of columns do not have to correspond to the sample pattern.
In the application, you can tick the option Show required fields only and you will see only the required fields.
Drag the input from the file on the right with your mouse to the left directly to the field Click here and drag the
field here. Repeat this action until all inputs are transferred.
For better orientation, the pattern setting is divided into three sections.
ADDRESS section
This section contains Receiver data and it is also possible to set a Sender Mask Address.
See the description of fields in two languages below:
Receiver Additional Address Info Receiver Additional Address Info Dodatečné informace o adrese
příjemce
Receiver Address 2 Receiver Address 2 Adresa příjemce 2
Receiver Address 3 Receiver Address 3 Adresa příjemce 3
Receiver City Receiver City Město příjemce
Receiver Company Name Receiver Company Name Jméno společnosti příjemce
Receiver Company Name 2 Receiver Company Name 2 Jméno společnosti příjemce 2
Receiver Contact Name Receiver Contact Name Kontaktní osoba
Receiver Country Receiver Country Země příjemce
Receiver Department Receiver Department Oddělení příjemce
Receiver Door Code Receiver Door Code Číslo dveří příjemce
Receiver Email Receiver Email Email příjemce
Receiver Fax Receiver Fax Fax příjemce
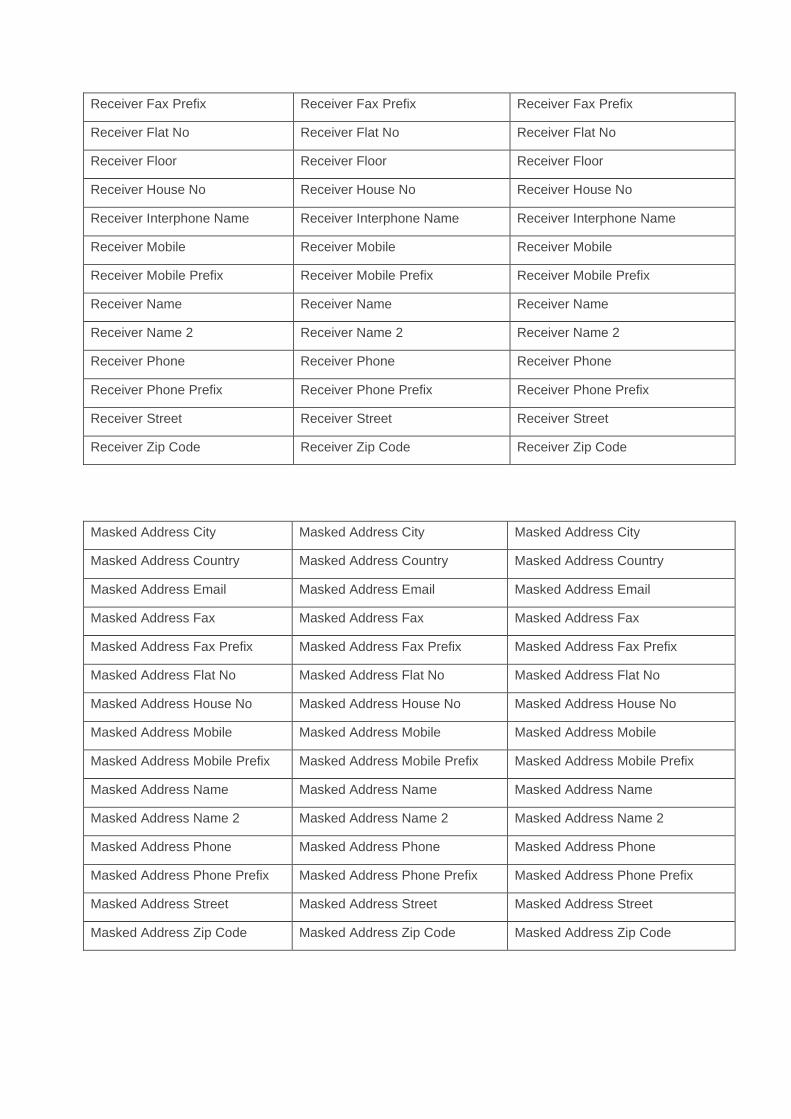
Receiver Fax Prefix Receiver Fax Prefix Receiver Fax Prefix
Receiver Flat No Receiver Flat No Receiver Flat No
Receiver Floor Receiver Floor Receiver Floor
Receiver House No Receiver House No Receiver House No
Receiver Interphone Name Receiver Interphone Name Receiver Interphone Name
Receiver Mobile Receiver Mobile Receiver Mobile
Receiver Mobile Prefix Receiver Mobile Prefix Receiver Mobile Prefix
Receiver Name Receiver Name Receiver Name
Receiver Name 2 Receiver Name 2 Receiver Name 2
Receiver Phone Receiver Phone Receiver Phone
Receiver Phone Prefix Receiver Phone Prefix Receiver Phone Prefix
Receiver Street Receiver Street Receiver Street
Receiver Zip Code Receiver Zip Code Receiver Zip Code
Masked Address City Masked Address City Masked Address City
Masked Address Country Masked Address Country Masked Address Country
Masked Address Email Masked Address Email Masked Address Email
Masked Address Fax Masked Address Fax Masked Address Fax
Masked Address Fax Prefix Masked Address Fax Prefix Masked Address Fax Prefix
Masked Address Flat No Masked Address Flat No Masked Address Flat No
Masked Address House No Masked Address House No Masked Address House No
Masked Address Mobile Masked Address Mobile Masked Address Mobile
Masked Address Mobile Prefix Masked Address Mobile Prefix Masked Address Mobile Prefix
Masked Address Name Masked Address Name Masked Address Name
Masked Address Name 2 Masked Address Name 2 Masked Address Name 2
Masked Address Phone Masked Address Phone Masked Address Phone
Masked Address Phone Prefix Masked Address Phone Prefix Masked Address Phone Prefix
Masked Address Street Masked Address Street Masked Address Street
Masked Address Zip Code Masked Address Zip Code Masked Address Zip Code
In the address section, the following fields are required:
• Receiver name
• Receiver Street and Flat/House No.
• City
• Zip code: number without spaces. In some countries, zip code may also include letters.
• Receiver country: Numeric code / Aplha code
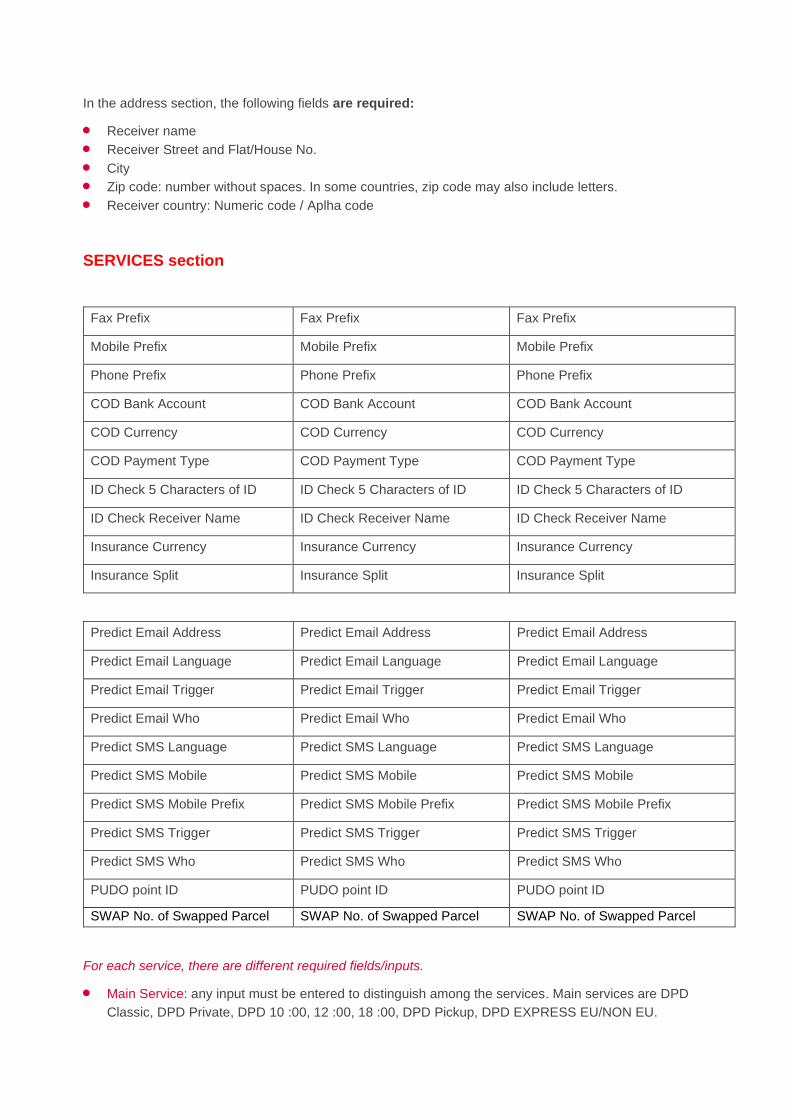
SERVICES section
Fax Prefix Fax Prefix Fax Prefix
Mobile Prefix Mobile Prefix Mobile Prefix
Phone Prefix Phone Prefix Phone Prefix
COD Bank Account COD Bank Account COD Bank Account
COD Currency COD Currency COD Currency
COD Payment Type COD Payment Type COD Payment Type
ID Check 5 Characters of ID ID Check 5 Characters of ID ID Check 5 Characters of ID
ID Check Receiver Name ID Check Receiver Name ID Check Receiver Name
Insurance Currency Insurance Currency Insurance Currency
Insurance Split Insurance Split Insurance Split
Predict Email Address Predict Email Address Predict Email Address
Predict Email Language Predict Email Language Predict Email Language
Predict Email Trigger Predict Email Trigger Predict Email Trigger
Predict Email Who Predict Email Who Predict Email Who
Predict SMS Language Predict SMS Language Predict SMS Language
Predict SMS Mobile Predict SMS Mobile Predict SMS Mobile
Predict SMS Mobile Prefix Predict SMS Mobile Prefix Predict SMS Mobile Prefix
Predict SMS Trigger Predict SMS Trigger Predict SMS Trigger
Predict SMS Who Predict SMS Who Predict SMS Who
PUDO point ID PUDO point ID PUDO point ID
SWAP No. of Swapped Parcel SWAP No. of Swapped Parcel SWAP No. of Swapped Parcel
For each service, there are different required fields/inputs.
• Main Service: any input must be entered to distinguish among the services. Main services are DPD
Classic, DPD Private, DPD 10 :00, 12 :00, 18 :00, DPD Pickup, DPD EXPRESS EU/NON EU.
• For DPD Classic service, you can fill in the email address in the file or telephone number in the address
section. These data are not required.
• For DPD Private service, it is necessary to fill in a telephone number or email address in the remaining
fields. The telephone prefix must be filled in separately. These data must not be used for the DPD Classic
service. If you combine these two services, then if DPD Classic service is filled in the line, the columns for
prediction of DPD Private service must remain empty.
• Cash on delivery (COD): the amout must be filled in in order to activate the cash on delivery. Furthermore,
it is necessary to fill in a type of payment. It means that the amout must be paid in cash or by card. For
cash on delivery, it is necessary to fill in the COD reference.
When setting the import pattern, choose defaut settings for splitting the COD amount, currency and bank
account. These inputs will be filled in automaticaly and do not need to be stated in the file.
• DPD Pickup: Just fill in the column of the Pickup point ID. This activates the service. For this service, it is
necessary to fill in the Phone Prefix field separately.
• Check ID: for activating this service, it is necessary to fill in the two other columns. One for the parcel
Receiver Name and a second one with 5 last characters of the ID.
• Swap: for activating and successul uploading of the service, fill in the next column the number of swapped
parcels.
• High Insurance: for this service, fill in the amount in the next field. In pattern settings, choose the insurance
currency. Just select the currency in import pattern settings.
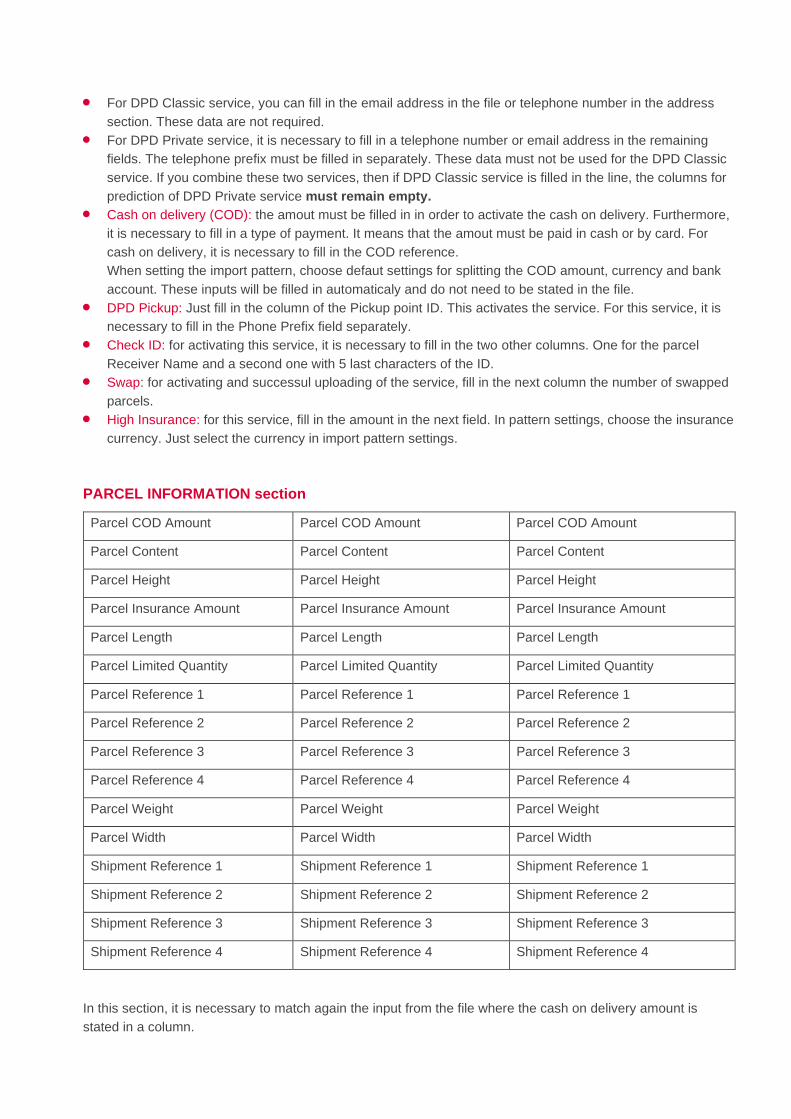
PARCEL INFORMATION section
Parcel COD Amount Parcel COD Amount Parcel COD Amount
Parcel Content Parcel Content Parcel Content
Parcel Height Parcel Height Parcel Height
Parcel Insurance Amount Parcel Insurance Amount Parcel Insurance Amount
Parcel Length Parcel Length Parcel Length
Parcel Limited Quantity Parcel Limited Quantity Parcel Limited Quantity
Parcel Reference 1 Parcel Reference 1 Parcel Reference 1
Parcel Reference 2 Parcel Reference 2 Parcel Reference 2
Parcel Reference 3 Parcel Reference 3 Parcel Reference 3
Parcel Reference 4 Parcel Reference 4 Parcel Reference 4
Parcel Weight Parcel Weight Parcel Weight
Parcel Width Parcel Width Parcel Width
Shipment Reference 1 Shipment Reference 1 Shipment Reference 1
Shipment Reference 2 Shipment Reference 2 Shipment Reference 2
Shipment Reference 3 Shipment Reference 3 Shipment Reference 3
Shipment Reference 4 Shipment Reference 4 Shipment Reference 4
In this section, it is necessary to match again the input from the file where the cash on delivery amount is
stated in a column.
The same applies if you use the High Insurance service. The amount also needs to be matched again in this
section.
The reason for this is to divide the data among individual parcels.
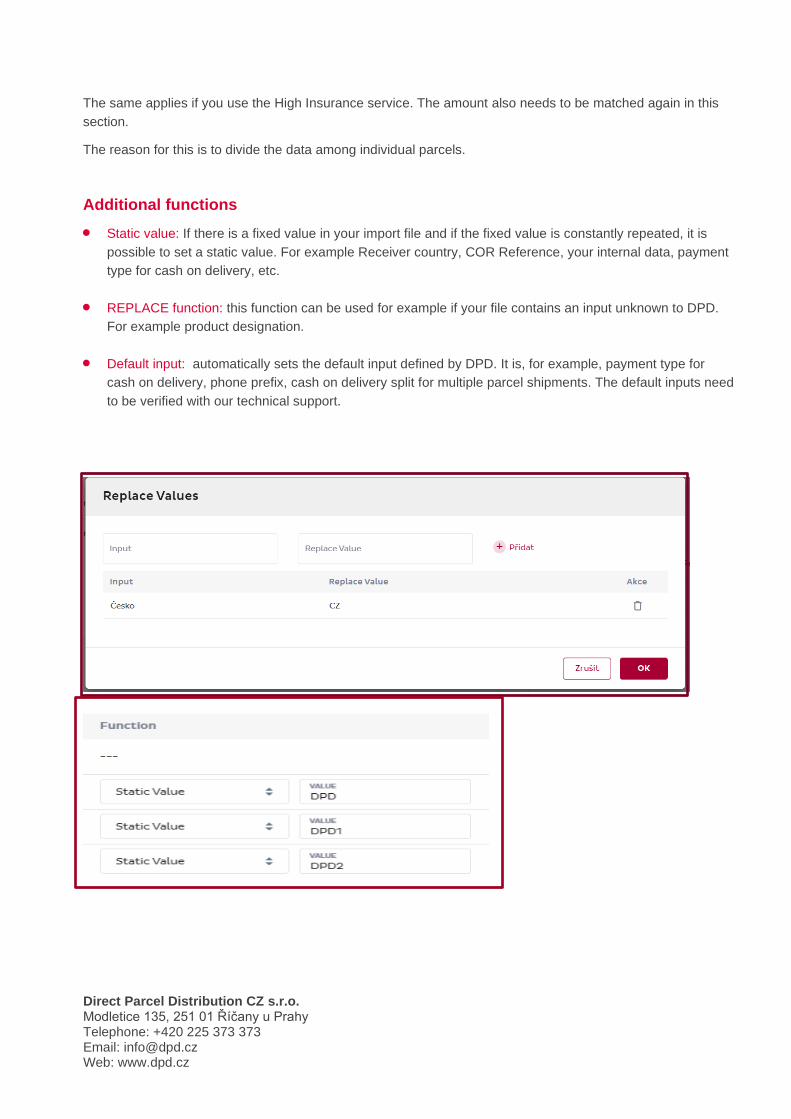
Additional functions
• Static value: If there is a fixed value in your import file and if the fixed value is constantly repeated, it is
possible to set a static value. For example Receiver country, COR Reference, your internal data, payment
type for cash on delivery, etc.
• REPLACE function: this function can be used for example if your file contains an input unknown to DPD.
For example product designation.
• Default input: automatically sets the default input defined by DPD. It is, for example, payment type for
cash on delivery, phone prefix, cash on delivery split for multiple parcel shipments. The default inputs need
to be verified with our technical support.
Direct Parcel Distribution CZ s.r.o. Modletice 135, 251 01 Říčany u Prahy Telephone: +420 225 373 373 Email: [email protected] Web: www.dpd.cz