draping period costumes
TRANSCRIPT
Draping Period Costumes: Classical Greek to Victorian
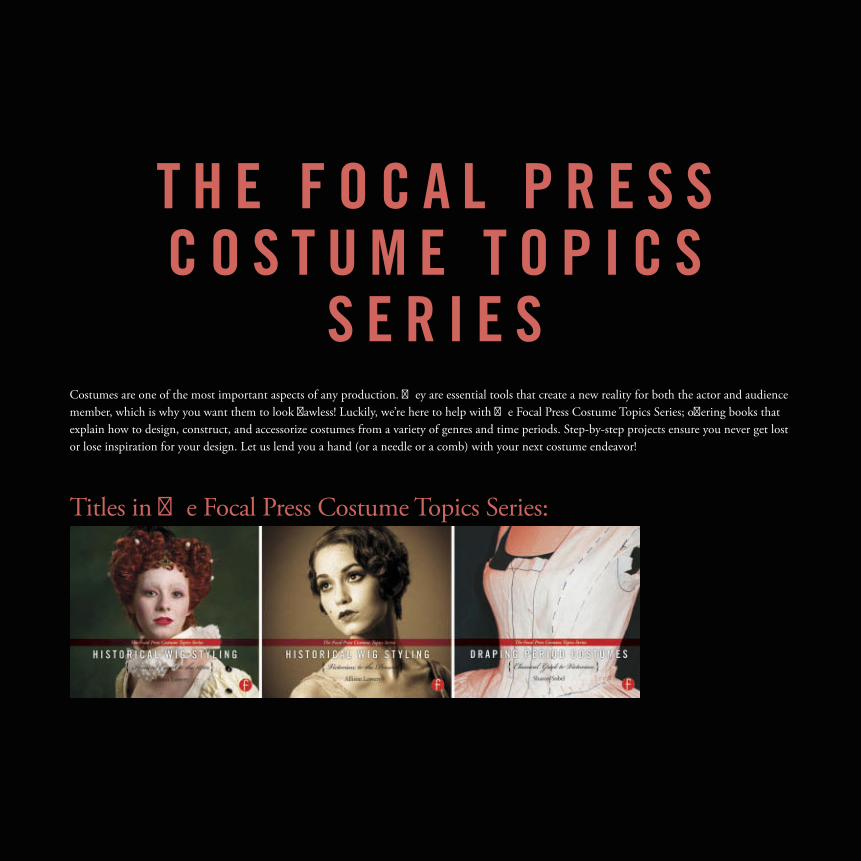
T H E F O C A L P R E S S C O S T U M E T O P I C S
S E R I E SCostumes are one of the most important aspects of any production. Th ey are essential tools that create a new reality for both the actor and audience member, which is why you want them to look fl awless! Luckily, we’re here to help with Th e Focal Press Costume Topics Series; off ering books that explain how to design, construct, and accessorize costumes from a variety of genres and time periods. Step-by-step projects ensure you never get lost or lose inspiration for your design. Let us lend you a hand (or a needle or a comb) with your next costume endeavor!
Titles in Th e Focal Press Costume Topics Series:
Draping Period Costumes: Classical Greek to Victorian
Sharon Sobel

First published 2013 by Focal Press 70 Blanchard Rd Suite 402 Burlington, MA 01803
Simultaneously published in the UK by Focal Press 2 Park Square, Milton Park, Abingdon, Oxon OX14 4RN
Focal Press is an imprint of the Taylor & Francis Group, an informa business
© 2013 Taylor & Francis
Th e right of Sharon Sobel to be identifi ed as author of this work has been asserted by her in accordance with sections 77 and 78 of the Copyright, Designs and Patents Act 1988.
All rights reserved. No part of this book may be reprinted or reproduced or utilised in any form or by any electronic, mechanical, or other means, now known or hereafter invented, including photocopying and recording, or in any information storage or retrieval system, without permission in writing from the publishers.
Notices Knowledge and best practice in this fi eld are constantly changing. As new research and experience broaden our understanding, changes in research methods, professional practices, or medical treatment may become necessary.
Practitioners and researchers must always rely on their own experience and knowledge in evaluating and using any information, methods, compounds, or experiments described herein. In using such information or methods they should be mindful of their own safety and the safety of others, including parties for whom they have a professional responsibility.
Product or corporate names may be trademarks or registered trademarks, and are used only for identifi cation and explanation without intent to infringe.
Library of Congress Cataloging-in-Publication Data Sobel, Sharon, 1959- Draping period costumes : classical Greek to Victorian / Sharon Sobel. pages cm ISBN 978-0-240-82133-7 (paper back)—ISBN 978-0-240-82152-8 (ebk.) 1. Dressmaking. 2. Costume—History—Medieval, 500-1500. 3. Clothing and dress—Rome—History. 4. Clothing and dress—Greece—History. 5. Clothing and dress—Europe—History. 6. Dress forms. I. Title. TT520.S726 2013 646’.30902—dc23 2012040003
ISBN: 978-0-240-82133-7 (hbk)ISBN: 978-0-240-82152-8 (ebk)
Typeset in Adobe Garamond Pro Project Managed and Typeset by: diacriTech

{ dedication } for my parents

{ contents }
Acknowledgments xIntroduction xi
Chapter 1 Getting Started 1
Setting Up 2
Th e Proper Dress Form 2
Measurements 2
*Adapting the Dress Form 5
Proper Care of Your Dress Form 7
Draping Basics 7
Tools and Equipment 7
Fabric 7
Straight of Grain 7
Listen to What the Fabric Is Telling You 8
Start with a Fitted Sloper 8
Transferring Your Pattern to Paper 13
Chapter 2 Early, Unstructured Garments 17
Ancient Greek Costume 18
Th e Greek Doric Chiton (kee-ton) 18
Th e Greek Himation (hih-mah-tee-on) 22
Th e Greek Doric Peplos 25
Th e Greek Ionic Chiton 29
Th e Greek Diplas (or Diplax) 32
Roman Costume 34
Th e Roman Tunic 34
Th e Roman Toga 35

Byzantine Costume 37
Th e Byzantine Tunic 37
Th e Byzantine Paludamentum 38
Early Gothic Costume 39
Early Gothic Tunics 39
Early Gothic Overgarments 39
Chapter 3 Cut and Shaped to Fit: Th e Gothic Period 41
Th e Man’s Padded Doublet 42
Th e Man’s Fitted Cotehardie 45
Th e Man’s Pleated Jerkin 48
Th e Standing Collar 52
Th e Woman’s Fitted Gown (Cote or Kirtle) 54
Th e Unisex Houppelande (A-Line Gown) 59
Woman’s High-Waisted Gown (Houppelande) with Fitted Bodice 62
Chapter 4 Th e Height of Artifi cial Silhouette 65
A Woman’s Elizabethan Bodice 66
A Man’s Elizabethan Doublet with a Padded Peascod Belly 69
Th e Man’s Elizabethan Jerkin 73
Chapter 5 Th e Men Return to Softness… 75
Draping an Early-Seventeenth-Century (Cavalier) Slashed Doublet with a Waist Seam 76
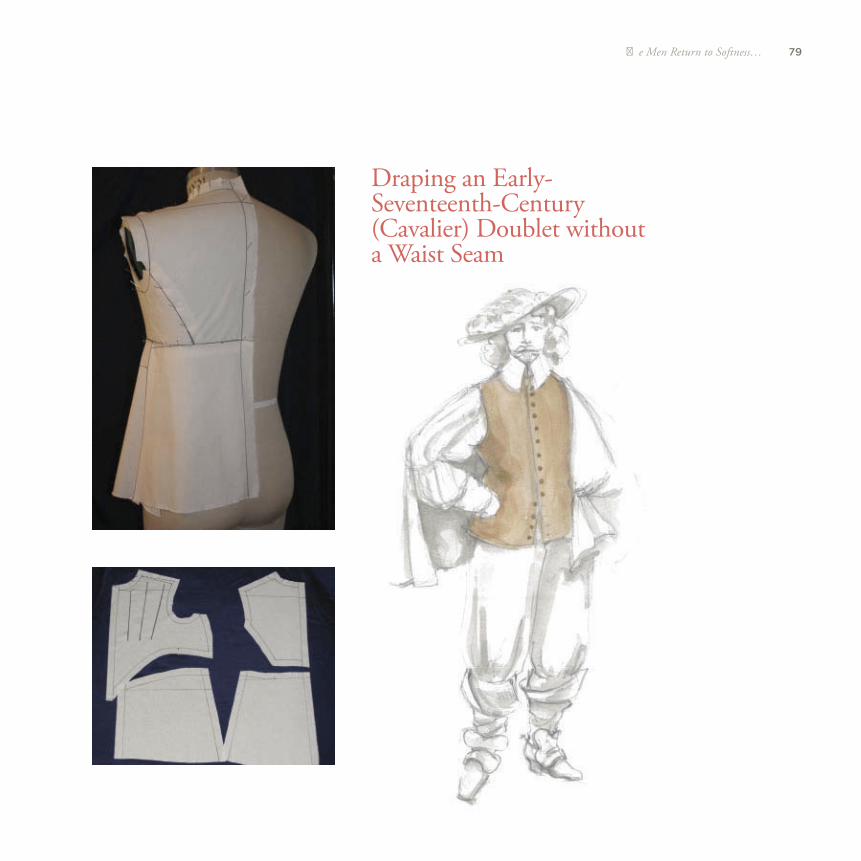
Draping an Early-Seventeenth-Century (Cavalier) Doublet without a Waist Seam 79
Th e Birth of the Coat and Vest 81
Draping a Late-Seventeenth-Century Coat 82
viiContents

viii Contents
Chapter 6 . . . While the Women Remain Tightly Corseted 85
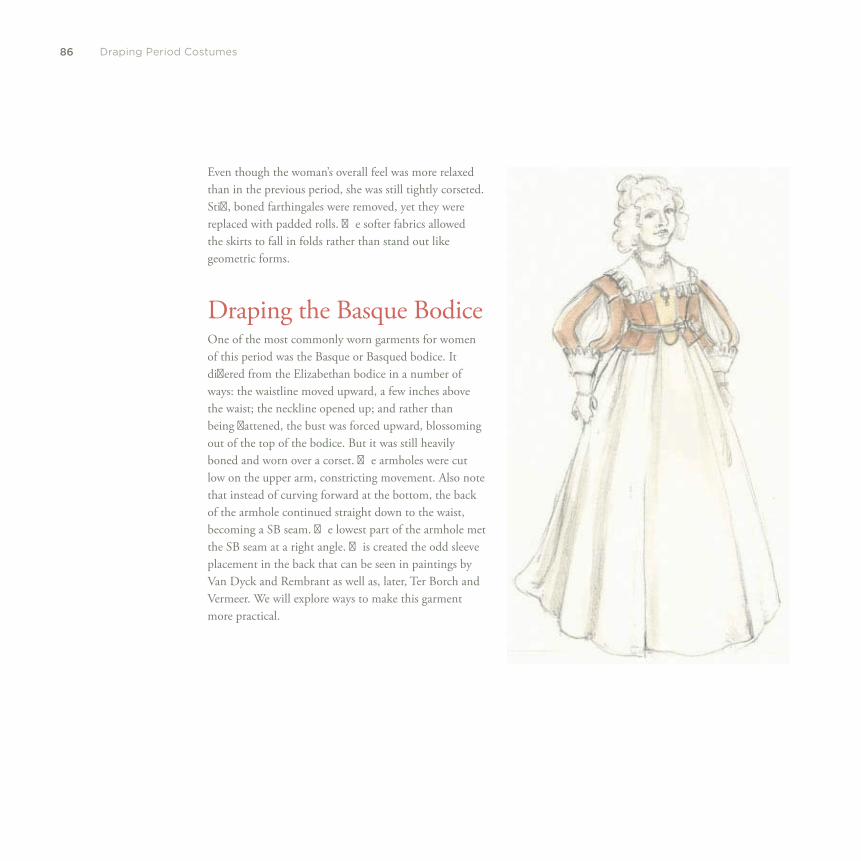
Draping the Basque Bodice 86
Draping the Mid-Seventeenth-Century Bodice 93
Skirts 96
Draping the Late-Seventeenth-Century (Restoration) Mantua 97
Chapter 7 Introduction of Tailoring to the Man’s Costume 105
Draping an Early-Eighteenth-Century Coat 106
Draping a Mid-Eighteenth-Century Coat 110
Draping an Eighteenth-Century Vest (Waistcoat) 114
Chapter 8 Variety of Silhouette in Eighteenth-Century Women’s Costumes 115
Draping the Robe a l’Anglaise 116
Draping the Robe a la Francaise or Watteau-Backed Gown 123
Draping the Sack (Sacque) Gown 126
Chapter 9 Neoclassical Elegance 131
Draping a Chemise Gown 132
Draping an Open Robe or Over Gown 136
Draping a Double-Breasted Spencer Jacket 142
Chapter 10 Revolutionary Menswear 149
Draping a Late-Eighteenth-Century Coat 150
Draping an Early-Nineteenth-Century Coat 151
Draping an Early-Nineteenth-Century Waistcoat 156
Single-Breasted Waistcoat with Collar Cut-in-One with Body 157
Double-Breasted Waistcoat with Shawl Collar 158

ixContents
Chapter 11 Romantic Womenswear 161
Draping an 1820s Gown 162
Draping an 1830s Bodice 165
Draping an 1840s Bodice 168
Draping a Mid-Nineteenth-Century Bodice 170
Chapter 12 Th e Victorian Gentleman 173
Draping the Mid-Nineteenth-Century Frock Coat 174
Draping the Mid-Nineteenth-Century Morning Coat 180
Draping the Mid-Nineteenth-Century Tail Coat 181
Draping the Sack Coat and the Norfolk Jacket 183
Chapter 13 Th e Victorian Lady 187
Draping an 1860s Jacket Bodice 188
A Brief Word about Bustles 192
Draping a Capelet To Be Worn over a High Bustle 194
Draping a “Mermaid” or “Fishtail” Gown 196
Draping a Low Bustle Gown 201
Index 209
Although a great deal of this book was created by me typing or draping or photographing (or tearing my hair out) alone in a small room, there were many people who made invaluable contributions throughout the process and deserve much credit.
Obviously, thanks go to Stacey Walker, my Acquisitions Editor (and on again–off again Editorial Project Manager) at Focal Press: fi rst, for off ering me the contract for this book; second, for her vision, her encouragement, and her intrepid spirit. Th anks, also, to my fi nal Editorial Project Manager, Meagan White, for picking up the pieces at the end. Many, many thanks to my Technical Editor and “long-lost” friend Karen Anselm for letting me literally read her to sleep with my early chapters.
Enormous gratitude to the wonderful women at Period Corsets by Kaufman-Davis Studios: Susan Davis, Rebecca Kaufman, and Hilary Specht. Th is book could not have been done without their generosity and commitment to the project. If you like what you see, buy their corsets!
At University of Nebraska at Omaha (UNO), my home institution, there are a number of colleague-friends who have helped me out along the way. Mary Laura Farnam and Nancy Schlesiger of the UNO Offi ce of Sponsored Research have been invaluable mentors in the world of grants and grant-writing as well as constant supporters. Th anks also to the UNO University Committee for Research and Creative Activity for grant support in putting together my book proposal. Th e Chair of the UNO Department of Th eatre, D. Scott Glasser, and the Dean of UNO College of Com-munication, Fine Arts and Media, Dr. Gail Baker, gave me the precious gift of time to fi nish this project. I am deeply indebted to them both. I off er boundless appreciation to Costume Shop Manager and dear friend Charleen J. B. Willoughby, my partner in crimes of fabric. Many thanks to my students, who constantly challenge me by asking all the right questions. And a very special thank you to my toga model, Charles Fisher.
Formerly at UNO, multi-hyphenate Ron Zank pushed me when I needed pushing, entertained me when I needed entertaining, and generally kept me (relatively) sane. Long before me at UNO, but happily with me now, much appreciation to Rob Urbinati for his editorial suggestions, as well as his ear, his arm, and his friendship.
I’m grateful to the many friends I’ve made thru the Kennedy Center American College Th eatre Festival, United States Institute of Th eatre Technology, and Association for Th eatre in Higher Education, who always make me feel like I have something important to off er.
Many thanks to my friend and colleague Julia Bennett, who asked for this book. Th anks to my CMU posse, Howard Tsvi Kaplan and Nancy Palmatier, for their great friendship and their great ideas, which I stole for this
book. Th anks also to Mitchell Bloom, for the same (as well as, in advance, for the great book party he’s going to throw me). My brother Jonathan made it possible for me to escape the day-to-day responsibilities of my life in Omaha and fi nish this book. My sister
Martha helped me re-center with much-needed games of Scrabble. My dear, dear mother, Eileen, is my greatest supporter and my rock. My father (may his memory be for a blessing) Lester A. Sobel, instilled in me a love of language and theatre. My family has always made me feel that I could do anything I set out to do. I love you all.
Last, but fi rst, I could not have written this book without the mentorship of Lynda Lou Salsbury Luft, who handed me the map and sent me on the journey. Sincere thanks.
— Sharon Sobel
{ acknowledgments }
Th ere are many fi ne books on the market that demonstrate fl at- patterning (drafting) for contemporary clothing as well as for period garments. Th ere are also some costume construction books that devote a few pages or even a chapter to draping. Th ere seems, however, to be a dearth of books that solely and completely instruct in the art of draping period garments.
In many cases, fl at-patterning is the more appropriate method for creating particular parts of a period costume—skirts, pants, and sleeves, for example. Even bodices, doublets, and other garments that clothe the torso may be fl at-patterned. However, there are times when your work will call for draping. Communicating with a costume designer often necessitates a three-dimensional mock-up on a dress form. Th ere are times when a costume designer will want to tweak or change style lines on a garment once they see it in three dimensions. Having your mock-up pinned to the form in its early stages is quicker and easier to adapt that drafting a fl at pattern, cutting it out of muslin, and sewing it. And it is certainly more effi cient than waiting until the garment is on a live model. It also provides the opportunity for greater creativity and adaptation as well as a better understanding of what your fabric will and won’t do.
In the reconstruction of period costumes, a copy of an original pat-tern is sometimes used. Two very good reasons to drape a period costume rather than using a period pattern are fi t and comfort. Th e construction of garments in earlier centuries often constricted movement, especially in the area of the armhole. Th e very diff erent size and proportions of contemporary people compared to those in previous centuries also makes the use of period patterns diffi cult. A well-draped garment can give the impression of period accuracy while permitting the wearer greater free-dom of movement.
Draping might be considered an art, rather than a science that uses formulas and numbers. Perhaps that is why writers have shied away from
publishing on this topic. It is my contention that with a little guidance and a few simple rules and formulas, art can be achieved.
Th is book is by no means exhaustive. I have chosen to include a few representative examples from each period. Hopefully the process of draping those examples will make it easier for you to drape whatever I may have left out. It is also possible that a later technique will inform your draping of an earlier garment. If you come to a bit of a road block, skim ahead or behind.
What Draping Period Costumes is not:
• A costume history text. Each chapter will give a brief overview of changes within fashion; for greater depth, look to a more defi nitive text.
• A replacement for other costume construction books that came before. Use every resource at your disposal. You will be a better draper for it.
• A book on sewing techniques. Th is text assumes that the reader has at least intermediate sewing and construction skills.
I encourage you to make this book just one part of your library. Its purpose is to be used in conjunction with other costume construction books, costume history books, and primary research—reproductions of works of art from the time period you are draping.
Whether you are a professional draper for fi lm, theatre, opera, or historic reconstruction, a fashion designer, a student, or a creative anach-ronist, this book should provide you with some helpful hints and hope-fully a greater understanding of and appreciation for the art of draping period costumes. If you are already an experienced draper you don’t need this book. But you might pick up a few tricks or discover a new approach or two. And if you feel that you have a better way of draping a particular garment, please do not hesitate to share it with me—I am always open to improving my draping technique!
{ introduction }


one
G E T T I N G S T A R T E D
2 Draping Period Costumes
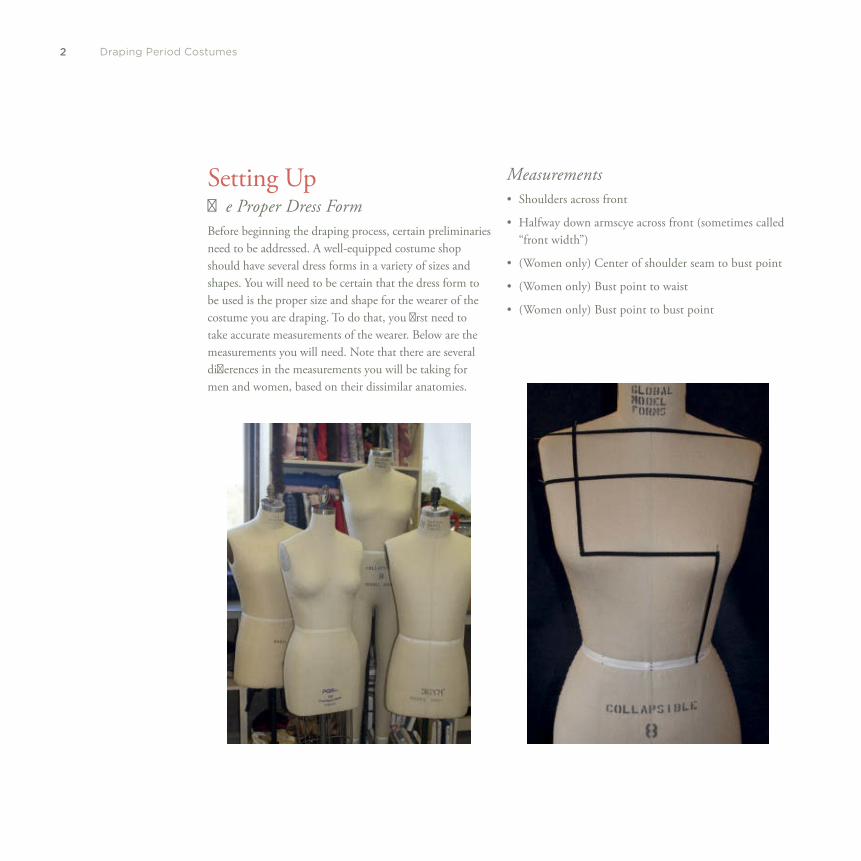
Setting Up Th e Proper Dress Form Before beginning the draping process, certain preliminaries need to be addressed. A well-equipped costume shop should have several dress forms in a variety of sizes and shapes. You will need to be certain that the dress form to be used is the proper size and shape for the wearer of the costume you are draping. To do that, you fi rst need to take accurate measurements of the wearer. Below are the measurements you will need. Note that there are several diff erences in the measurements you will be taking for men and women, based on their dissimilar anatomies.
Measurements • Shoulders across front
• Halfway down armscye across front (sometimes called “front width”)
• (Women only) Center of shoulder seam to bust point
• (Women only) Bust point to waist
• (Women only) Bust point to bust point
3Getting Started
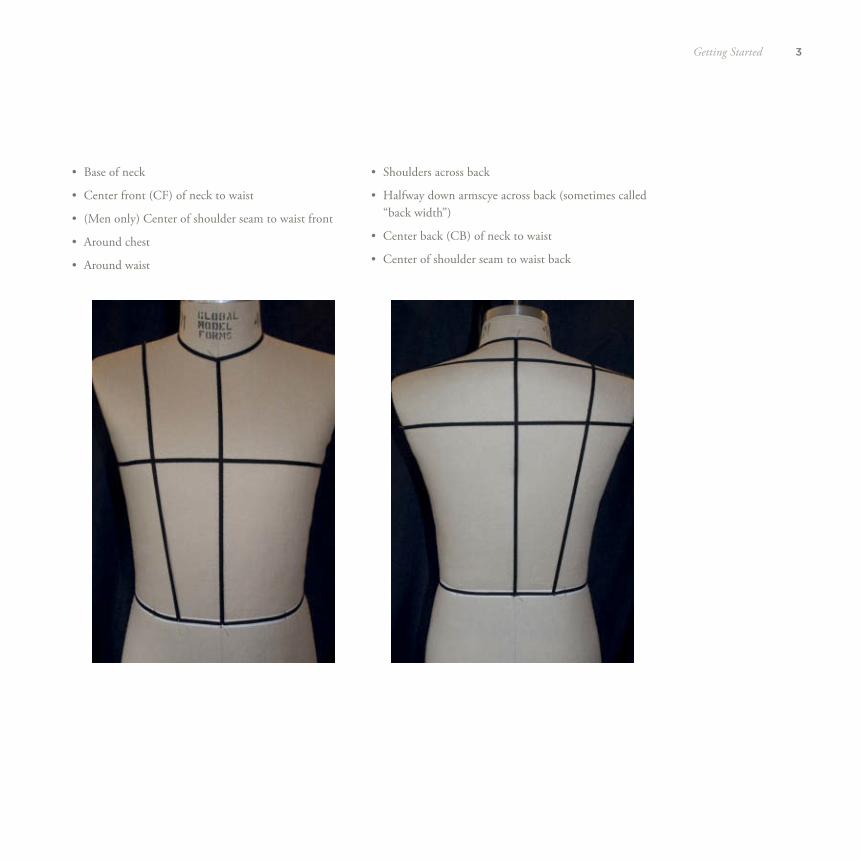
• Base of neck
• Center front (CF) of neck to waist
• (Men only) Center of shoulder seam to waist front
• Around chest
• Around waist
• Shoulders across back
• Halfway down armscye across back (sometimes called “back width”)
• Center back (CB) of neck to waist
• Center of shoulder seam to waist back
4 Draping Period Costumes
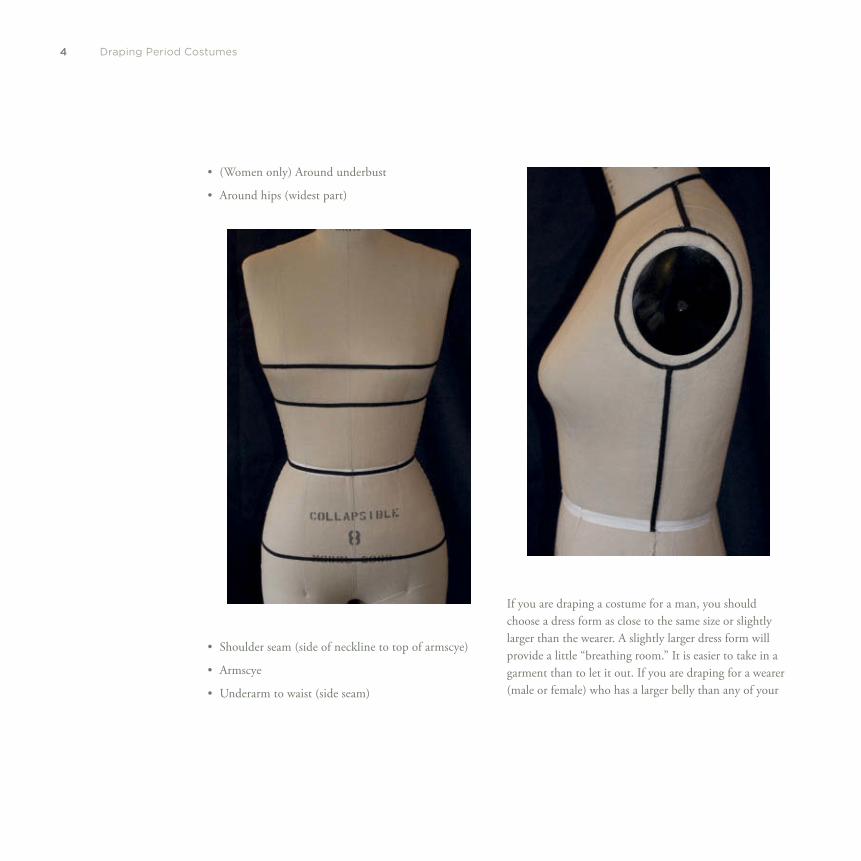
• (Women only) Around underbust
• Around hips (widest part)
• Shoulder seam (side of neckline to top of armscye)
• Armscye
• Underarm to waist (side seam)
If you are draping a costume for a man, you should choose a dress form as close to the same size or slightly larger than the wearer. A slightly larger dress form will provide a little “breathing room.” It is easier to take in a garment than to let it out. If you are draping for a wearer (male or female) who has a larger belly than any of your
5Getting Started
dress forms, you can “build up” the dress form with batting * or, if one of the correct size is available, you can put a fat suit on your dress form.
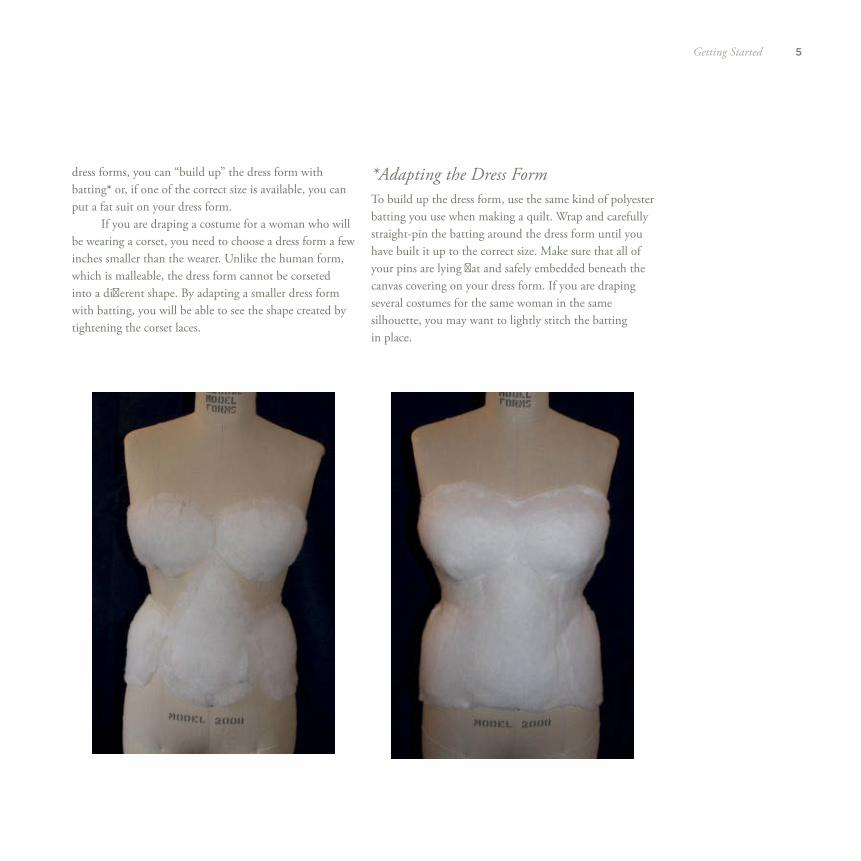
If you are draping a costume for a woman who will be wearing a corset, you need to choose a dress form a few inches smaller than the wearer. Unlike the human form, which is malleable, the dress form cannot be corseted into a diff erent shape. By adapting a smaller dress form with batting, you will be able to see the shape created by tightening the corset laces.
*Adapting the Dress Form To build up the dress form, use the same kind of polyester batting you use when making a quilt. Wrap and carefully straight-pin the batting around the dress form until you have built it up to the correct size. Make sure that all of your pins are lying fl at and safely embedded beneath the canvas covering on your dress form. If you are draping several costumes for the same woman in the same silhouette, you may want to lightly stitch the batting in place.
6 Draping Period Costumes
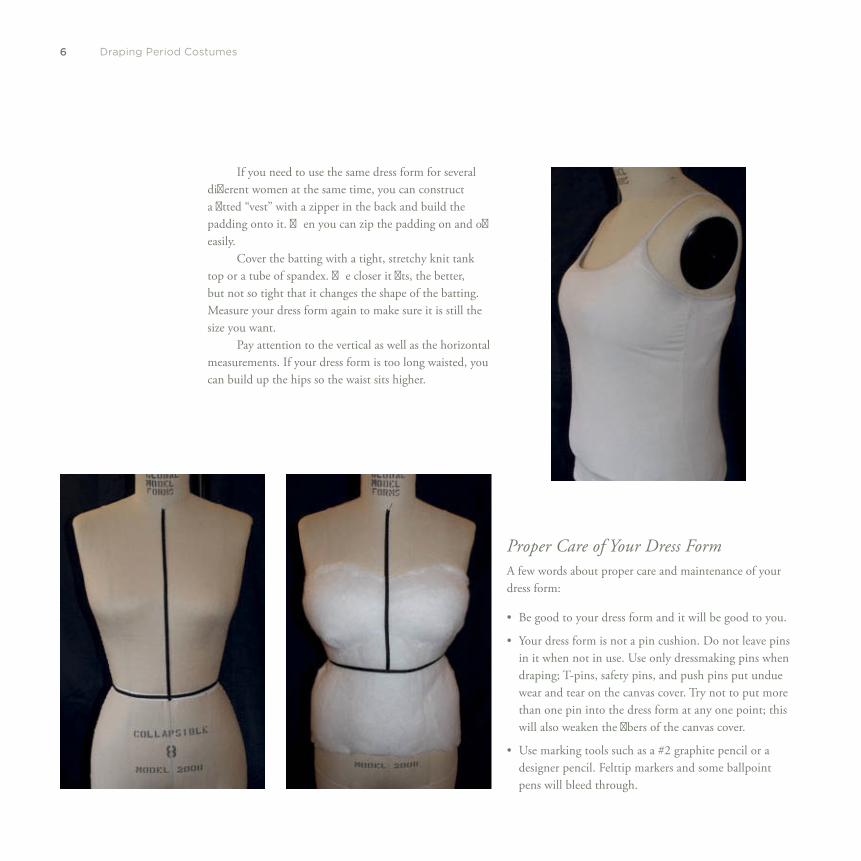
If you need to use the same dress form for several diff erent women at the same time, you can construct a fi tted “vest” with a zipper in the back and build the padding onto it. Th en you can zip the padding on and off easily.
Cover the batting with a tight, stretchy knit tank top or a tube of spandex. Th e closer it fi ts, the better, but not so tight that it changes the shape of the batting. Measure your dress form again to make sure it is still the size you want.
Pay attention to the vertical as well as the horizontal measurements. If your dress form is too long waisted, you can build up the hips so the waist sits higher.
Proper Care of Your Dress Form A few words about proper care and maintenance of your dress form:
• Be good to your dress form and it will be good to you.
• Your dress form is not a pin cushion. Do not leave pins in it when not in use. Use only dressmaking pins when draping; T-pins, safety pins, and push pins put undue wear and tear on the canvas cover. Try not to put more than one pin into the dress form at any one point; this will also weaken the fi bers of the canvas cover.
• Use marking tools such as a #2 graphite pencil or a designer pencil. Felttip markers and some ballpoint pens will bleed through.
7Getting Started
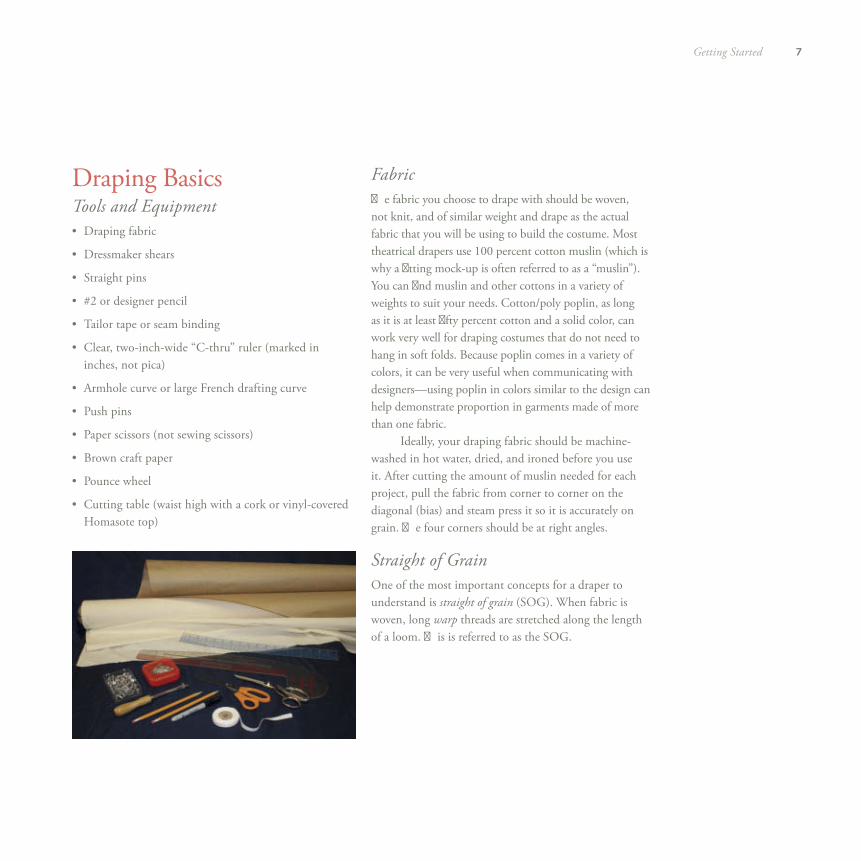
Draping Basics Tools and Equipment • Draping fabric
• Dressmaker shears
• Straight pins
• #2 or designer pencil
• Tailor tape or seam binding
• Clear, two-inch-wide “C-thru” ruler (marked in inches, not pica)
• Armhole curve or large French drafting curve
• Push pins
• Paper scissors (not sewing scissors)
• Brown craft paper
• Pounce wheel
• Cutting table (waist high with a cork or vinyl-covered Homasote top)
Fabric Th e fabric you choose to drape with should be woven, not knit, and of similar weight and drape as the actual fabric that you will be using to build the costume. Most theatrical drapers use 100 percent cotton muslin (which is why a fi tting mock-up is often referred to as a “muslin”). You can fi nd muslin and other cottons in a variety of weights to suit your needs. Cotton/poly poplin, as long as it is at least fi fty percent cotton and a solid color, can work very well for draping costumes that do not need to hang in soft folds. Because poplin comes in a variety of colors, it can be very useful when communicating with designers—using poplin in colors similar to the design can help demonstrate proportion in garments made of more than one fabric.
Ideally, your draping fabric should be machine-washed in hot water, dried, and ironed before you use it. After cutting the amount of muslin needed for each project, pull the fabric from corner to corner on the diagonal (bias) and steam press it so it is accurately on grain. Th e four corners should be at right angles.
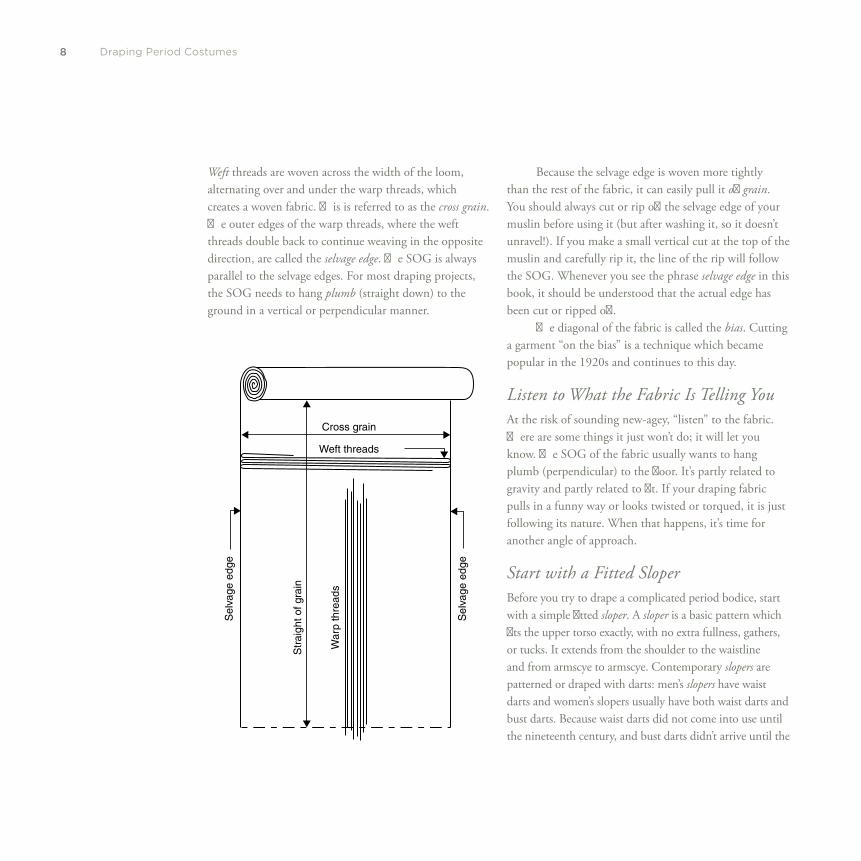
Straight of Grain One of the most important concepts for a draper to understand is straight of grain (SOG). When fabric is woven, long warp threads are stretched along the length of a loom. Th is is referred to as the SOG.
8 Draping Period Costumes
Weft threads are woven across the width of the loom, alternating over and under the warp threads, which creates a woven fabric. Th is is referred to as the cross grain . Th e outer edges of the warp threads, where the weft threads double back to continue weaving in the opposite direction, are called the selvage edge . Th e SOG is always parallel to the selvage edges. For most draping projects, the SOG needs to hang plumb (straight down) to the ground in a vertical or perpendicular manner.
Because the selvage edge is woven more tightly than the rest of the fabric, it can easily pull it off grain . You should always cut or rip off the selvage edge of your muslin before using it (but after washing it, so it doesn’t unravel!). If you make a small vertical cut at the top of the muslin and carefully rip it, the line of the rip will follow the SOG. Whenever you see the phrase selvage edge in this book, it should be understood that the actual edge has been cut or ripped off .
Th e diagonal of the fabric is called the bias . Cutting a garment “on the bias” is a technique which became popular in the 1920s and continues to this day.
Listen to What the Fabric Is Telling You At the risk of sounding new-agey, “listen” to the fabric. Th ere are some things it just won’t do; it will let you know. Th e SOG of the fabric usually wants to hang plumb (perpendicular) to the fl oor. It’s partly related to gravity and partly related to fi t. If your draping fabric pulls in a funny way or looks twisted or torqued, it is just following its nature. When that happens, it’s time for another angle of approach.
Start with a Fitted Sloper Before you try to drape a complicated period bodice, start with a simple fi tted sloper . A sloper is a basic pattern which fi ts the upper torso exactly, with no extra fullness, gathers, or tucks. It extends from the shoulder to the waistline and from armscye to armscye. Contemporary slopers are patterned or draped with darts: men’s slopers have waist darts and women’s slopers usually have both waist darts and bust darts. Because waist darts did not come into use until the nineteenth century, and bust darts didn’t arrive until the
Cross grain
Weft threads
Str
aigh
t of g
rain
Sel
vage
edg
e
Sel
vage
edg
e
War
p th
read
s
9Getting Started
1950s, we will practice draping a sloper that has princess seams, which have been in use for hundreds of years.
We will be using a woman’s dress form because its shape is a little more complicated than a man’s. Once you master draping a basic sloper on the woman’s dress form, draping on the man’s will be easy.
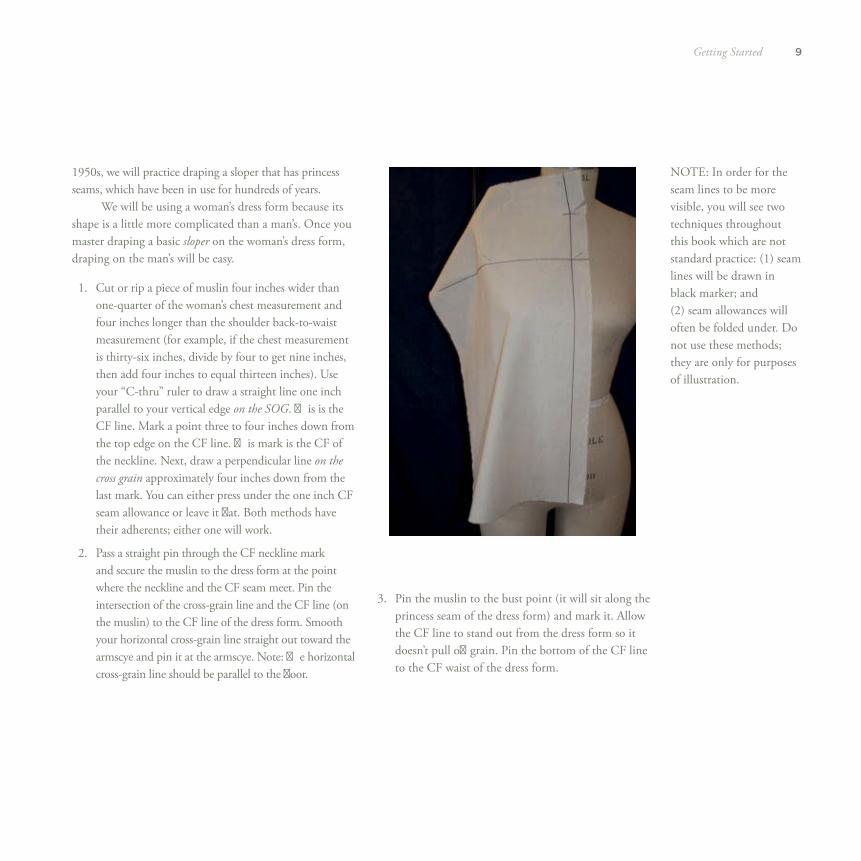
1. Cut or rip a piece of muslin four inches wider than one-quarter of the woman’s chest measurement and four inches longer than the shoulder back-to-waist measurement (for example, if the chest measurement is thirty-six inches, divide by four to get nine inches, then add four inches to equal thirteen inches). Use your “C-thru” ruler to draw a straight line one inch parallel to your vertical edge on the SOG . Th is is the CF line. Mark a point three to four inches down from the top edge on the CF line. Th is mark is the CF of the neckline. Next, draw a perpendicular line on the cross grain approximately four inches down from the last mark. You can either press under the one inch CF seam allowance or leave it fl at. Both methods have their adherents; either one will work.
2. Pass a straight pin through the CF neckline mark and secure the muslin to the dress form at the point where the neckline and the CF seam meet. Pin the intersection of the cross-grain line and the CF line (on the muslin) to the CF line of the dress form. Smooth your horizontal cross-grain line straight out toward the armscye and pin it at the armscye. Note: Th e horizontal cross-grain line should be parallel to the fl oor.
3. Pin the muslin to the bust point (it will sit along the princess seam of the dress form) and mark it. Allow the CF line to stand out from the dress form so it doesn’t pull off grain. Pin the bottom of the CF line to the CF waist of the dress form.
NOTE: In order for the seam lines to be more visible, you will see two techniques throughout this book which are not standard practice: (1) seam lines will be drawn in black marker; and (2) seam allowances will often be folded under. Do not use these methods; they are only for purposes of illustration.
10 Draping Period Costumes
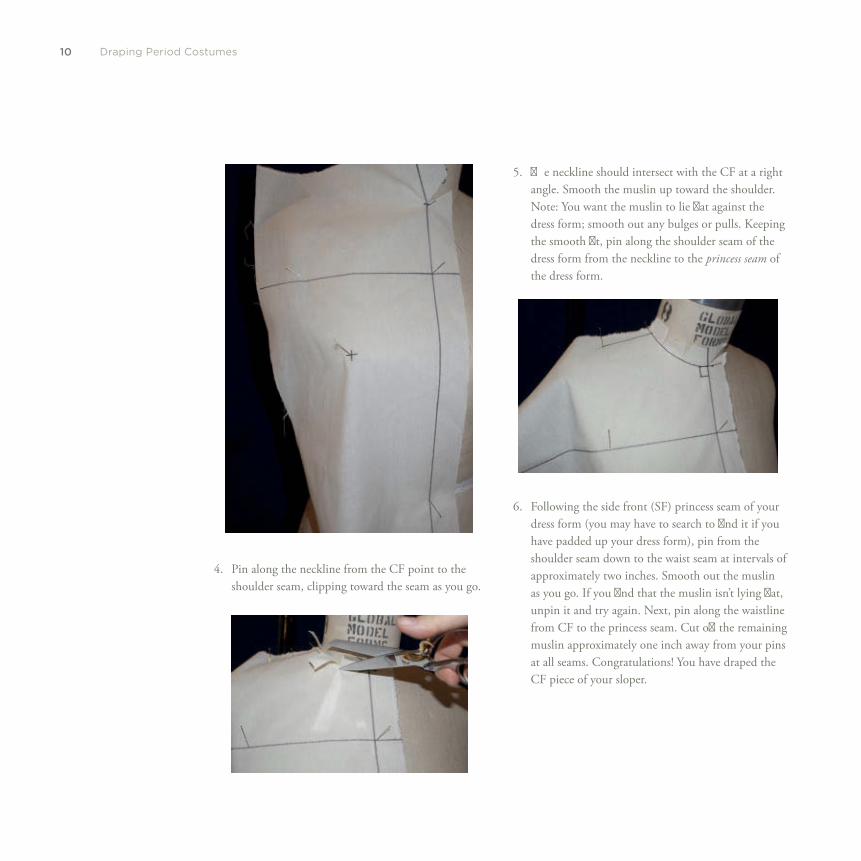
4. Pin along the neckline from the CF point to the shoulder seam, clipping toward the seam as you go.
5. Th e neckline should intersect with the CF at a right angle. Smooth the muslin up toward the shoulder. Note: You want the muslin to lie fl at against the dress form; smooth out any bulges or pulls. Keeping the smooth fi t, pin along the shoulder seam of the dress form from the neckline to the princess seam of the dress form.
6. Following the side front (SF) princess seam of your dress form (you may have to search to fi nd it if you have padded up your dress form), pin from the shoulder seam down to the waist seam at intervals of approximately two inches. Smooth out the muslin as you go. If you fi nd that the muslin isn’t lying fl at, unpin it and try again. Next, pin along the waistline from CF to the princess seam. Cut off the remaining muslin approximately one inch away from your pins at all seams. Congratulations! You have draped the CF piece of your sloper.
11Getting Started
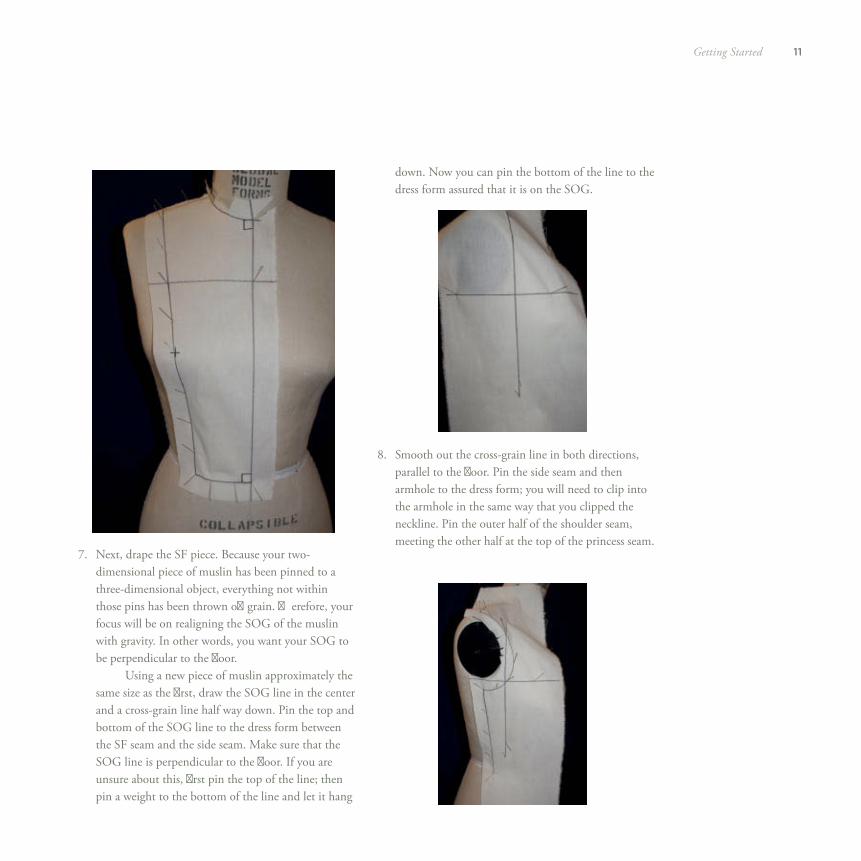
7. Next, drape the SF piece. Because your two-dimensional piece of muslin has been pinned to a three-dimensional object, everything not within those pins has been thrown off grain. Th erefore, your focus will be on realigning the SOG of the muslin with gravity. In other words, you want your SOG to be perpendicular to the fl oor.
Using a new piece of muslin approximately the same size as the fi rst, draw the SOG line in the center and a cross-grain line half way down. Pin the top and bottom of the SOG line to the dress form between the SF seam and the side seam. Make sure that the SOG line is perpendicular to the fl oor. If you are unsure about this, fi rst pin the top of the line; then pin a weight to the bottom of the line and let it hang
down. Now you can pin the bottom of the line to the dress form assured that it is on the SOG.
8. Smooth out the cross-grain line in both directions, parallel to the fl oor. Pin the side seam and then armhole to the dress form; you will need to clip into the armhole in the same way that you clipped the neckline. Pin the outer half of the shoulder seam, meeting the other half at the top of the princess seam.
12 Draping Period Costumes
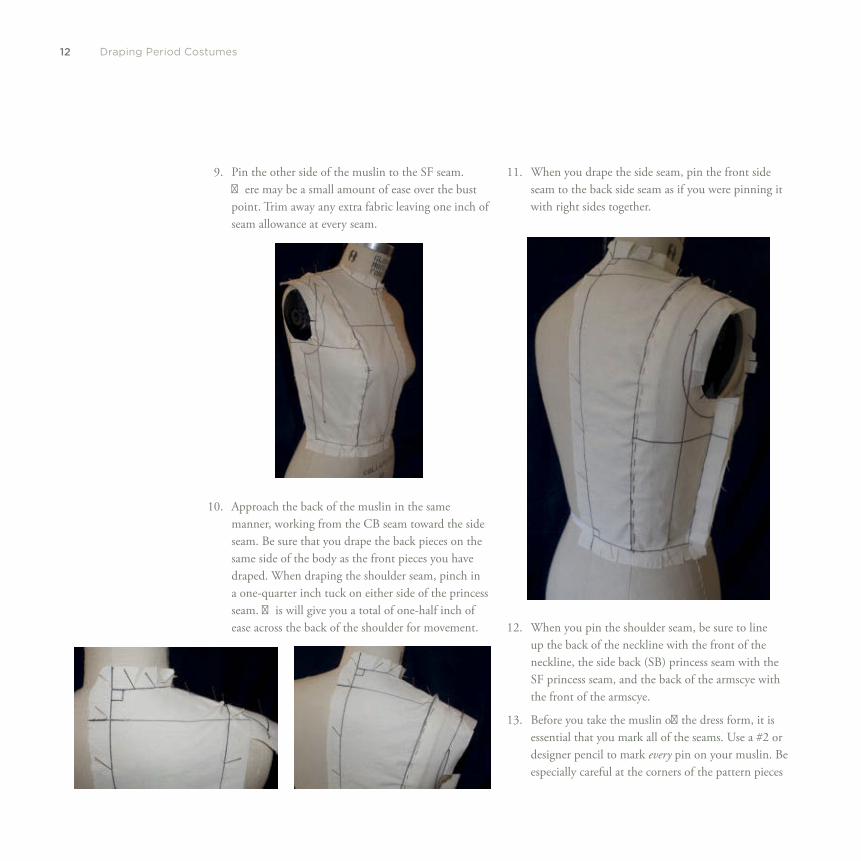
9. Pin the other side of the muslin to the SF seam. Th ere may be a small amount of ease over the bust point. Trim away any extra fabric leaving one inch of seam allowance at every seam.
10. Approach the back of the muslin in the same manner, working from the CB seam toward the side seam. Be sure that you drape the back pieces on the same side of the body as the front pieces you have draped. When draping the shoulder seam, pinch in a one-quarter inch tuck on either side of the princess seam. Th is will give you a total of one-half inch of ease across the back of the shoulder for movement.
11. When you drape the side seam, pin the front side seam to the back side seam as if you were pinning it with right sides together.
12. When you pin the shoulder seam, be sure to line up the back of the neckline with the front of the neckline, the side back (SB) princess seam with the SF princess seam, and the back of the armscye with the front of the armscye.
13. Before you take the muslin off the dress form, it is essential that you mark all of the seams. Use a #2 or designer pencil to mark every pin on your muslin. Be especially careful at the corners of the pattern pieces
13Getting Started
(i.e., where the shoulder seam meets the armscye). Mark several matching points (sometimes referred to as registration marks) on either side of the front princess seam. Now you can unpin and remove your draped muslin sloper.
Transferring Your Pattern to Paper In the fashion industry, patterning paper (white with blue dots or little stars) is often used to create the fl at pattern. Most theatrical costume shops use brown craft paper instead because it is much less expensive and easier to fi nd. Brown craft paper is what is used by most professional and educational theatrical costume shops.
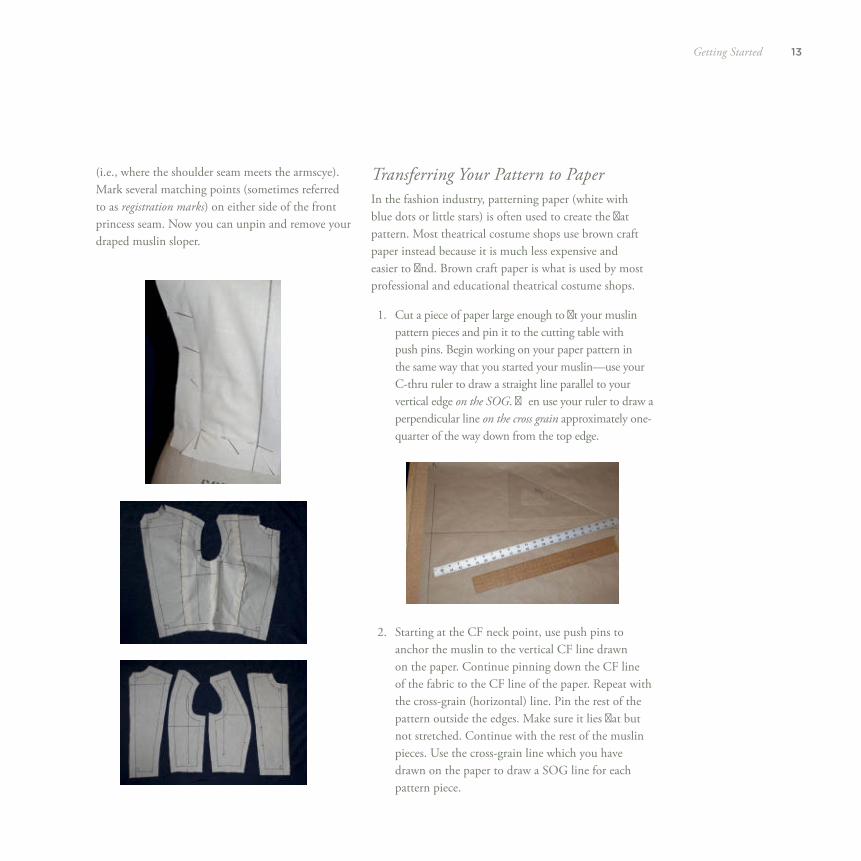
1. Cut a piece of paper large enough to fi t your muslin pattern pieces and pin it to the cutting table with push pins. Begin working on your paper pattern in the same way that you started your muslin—use your C-thru ruler to draw a straight line parallel to your vertical edge on the SOG . Th en use your ruler to draw a perpendicular line on the cross grain approximately one-quarter of the way down from the top edge.
2. Starting at the CF neck point, use push pins to anchor the muslin to the vertical CF line drawn on the paper. Continue pinning down the CF line of the fabric to the CF line of the paper. Repeat with the cross-grain (horizontal) line. Pin the rest of the pattern outside the edges. Make sure it lies fl at but not stretched. Continue with the rest of the muslin pieces. Use the cross-grain line which you have drawn on the paper to draw a SOG line for each pattern piece.
14 Draping Period Costumes
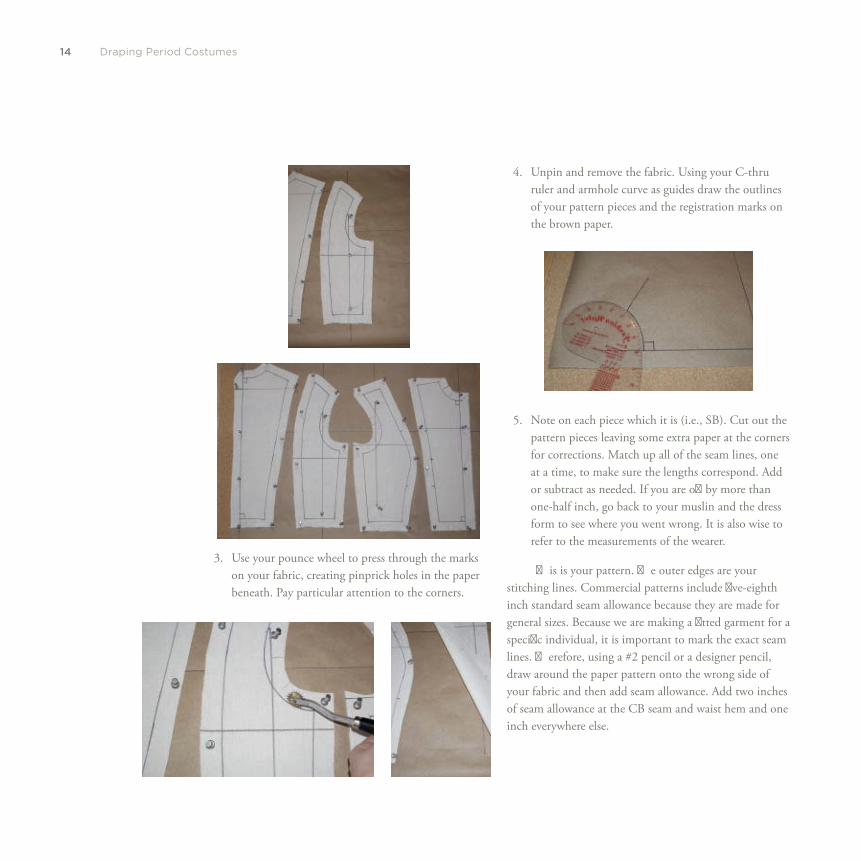
3. Use your pounce wheel to press through the marks on your fabric, creating pinprick holes in the paper beneath. Pay particular attention to the corners.
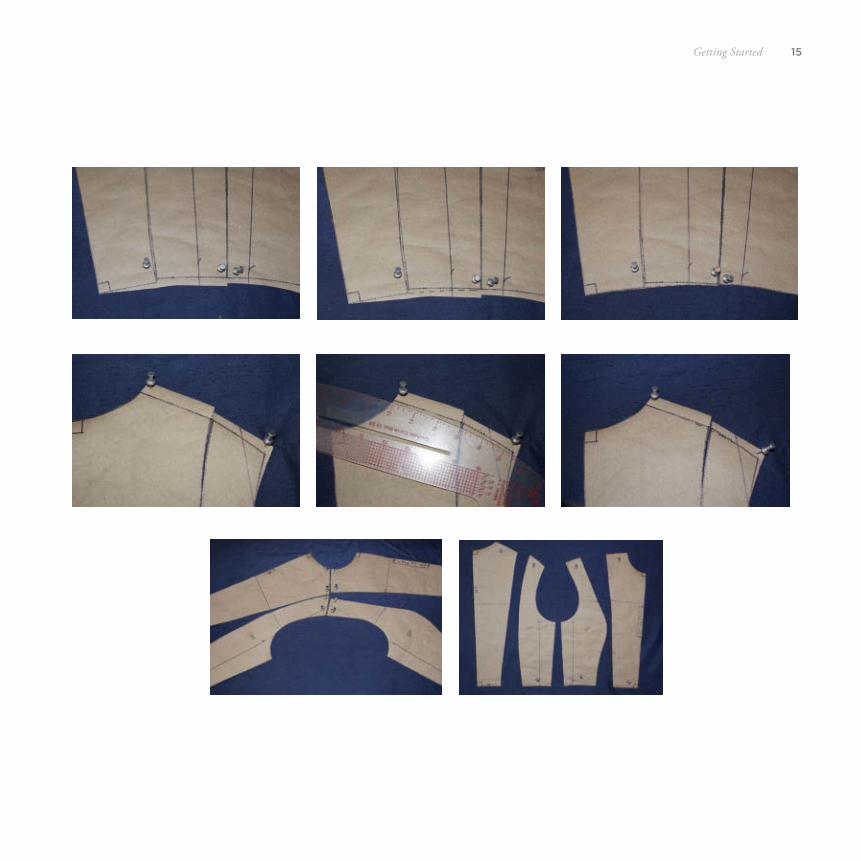
4. Unpin and remove the fabric. Using your C-thru ruler and armhole curve as guides draw the outlines of your pattern pieces and the registration marks on the brown paper.
5. Note on each piece which it is (i.e., SB). Cut out the pattern pieces leaving some extra paper at the corners for corrections. Match up all of the seam lines, one at a time, to make sure the lengths correspond. Add or subtract as needed. If you are off by more than one-half inch, go back to your muslin and the dress form to see where you went wrong. It is also wise to refer to the measurements of the wearer.
Th is is your pattern. Th e outer edges are your stitching lines. Commercial patterns include fi ve-eighth inch standard seam allowance because they are made for general sizes. Because we are making a fi tted garment for a specifi c individual, it is important to mark the exact seam lines. Th erefore, using a #2 pencil or a designer pencil, draw around the paper pattern onto the wrong side of your fabric and then add seam allowance. Add two inches of seam allowance at the CB seam and waist hem and one inch everywhere else.
15Getting Started
16 Draping Period Costumes
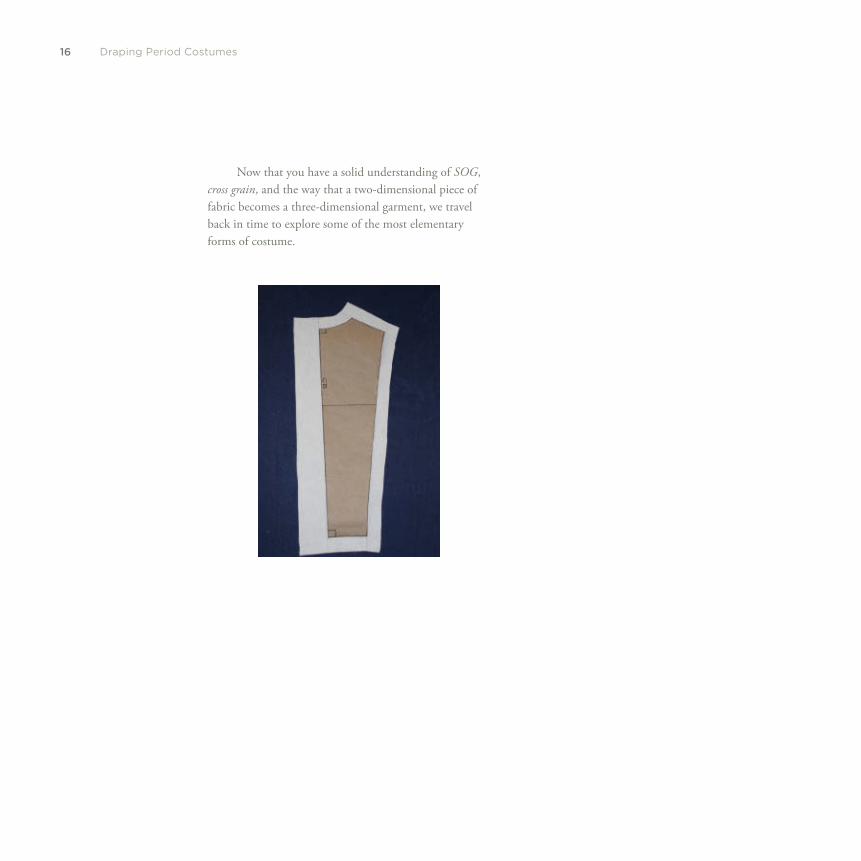
Now that you have a solid understanding of SOG , cross grain , and the way that a two-dimensional piece of fabric becomes a three-dimensional garment, we travel back in time to explore some of the most elementary forms of costume.

two
E A R L Y , U N S T R U C T U R E D G A R M E N T S
18 Draping Period Costumes
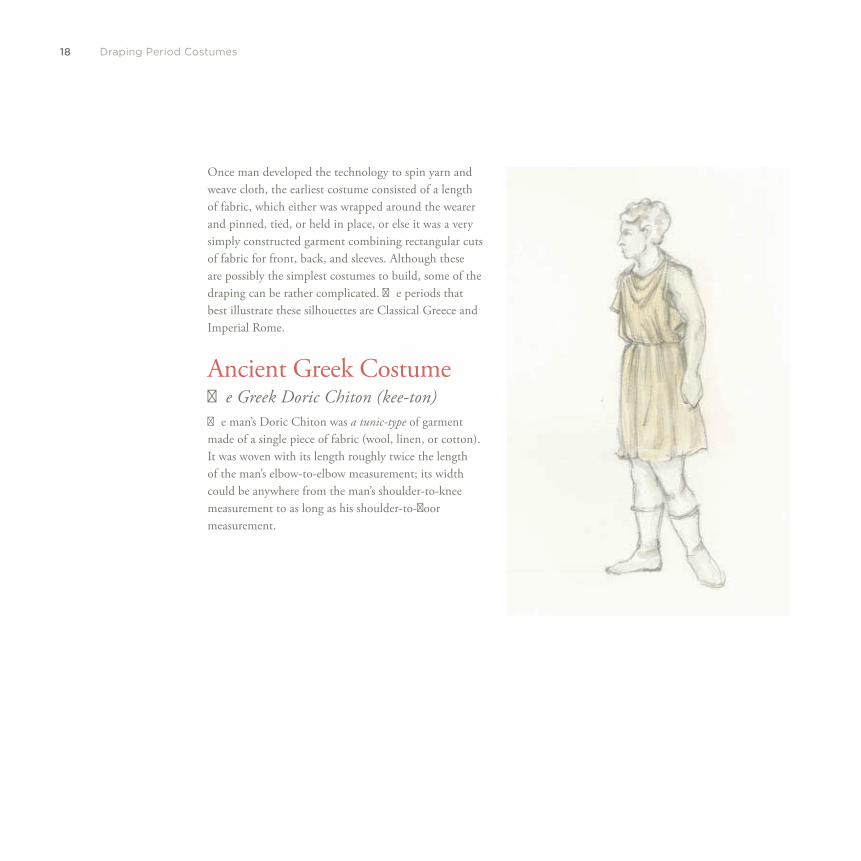
Once man developed the technology to spin yarn and weave cloth, the earliest costume consisted of a length of fabric, which either was wrapped around the wearer and pinned, tied, or held in place, or else it was a very simply constructed garment combining rectangular cuts of fabric for front, back, and sleeves. Although these are possibly the simplest costumes to build, some of the draping can be rather complicated. Th e periods that best illustrate these silhouettes are Classical Greece and Imperial Rome.
Ancient Greek Costume Th e Greek Doric Chiton (kee-ton) Th e man’s Doric Chiton was a tunic-type of garment made of a single piece of fabric (wool, linen, or cotton). It was woven with its length roughly twice the length of the man’s elbow-to-elbow measurement; its width could be anywhere from the man’s shoulder-to-knee measurement to as long as his shoulder-to-fl oor measurement.

19Early, Unstructured Garments
1. Wrap the fabric around the body (under the arms) with the opening at the side.
2. Pin the fabric from front to back at one or both shoulders.
3. Tie with a sash at the waist to hold the garment closed and control fullness.
Back
Front
Straight of grain
Sh
ou
lde
r to
kn
ee
Elbow to elbow
(Double)
20 Draping Period Costumes
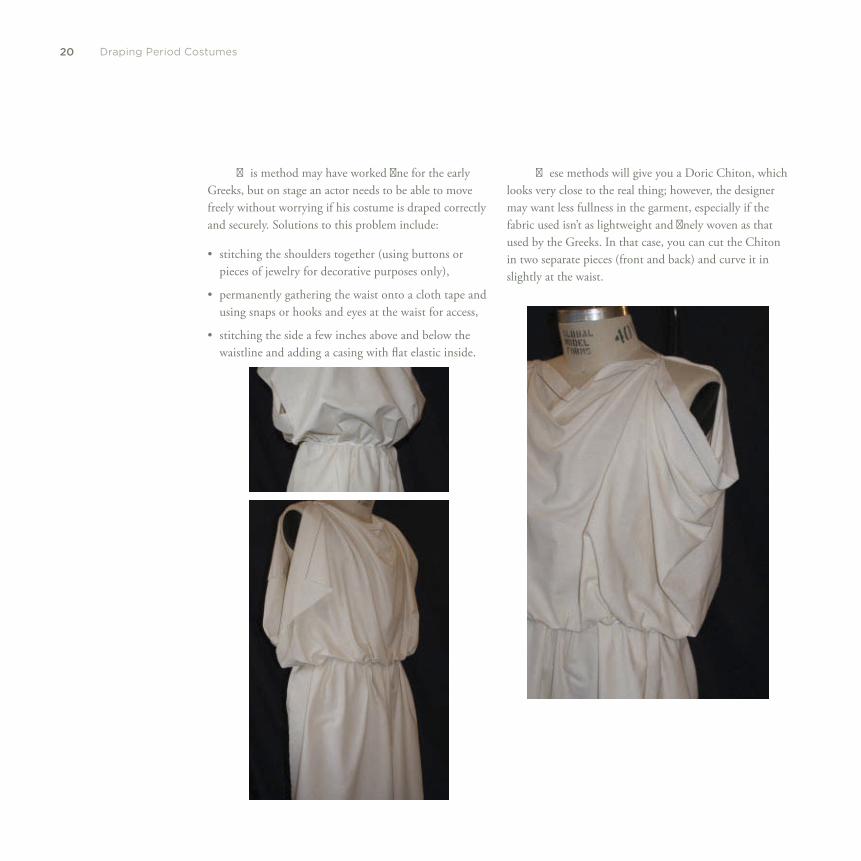
Th is method may have worked fi ne for the early Greeks, but on stage an actor needs to be able to move freely without worrying if his costume is draped correctly and securely. Solutions to this problem include:
• stitching the shoulders together (using buttons or pieces of jewelry for decorative purposes only),
• permanently gathering the waist onto a cloth tape and using snaps or hooks and eyes at the waist for access,
• stitching the side a few inches above and below the waistline and adding a casing with fl at elastic inside.
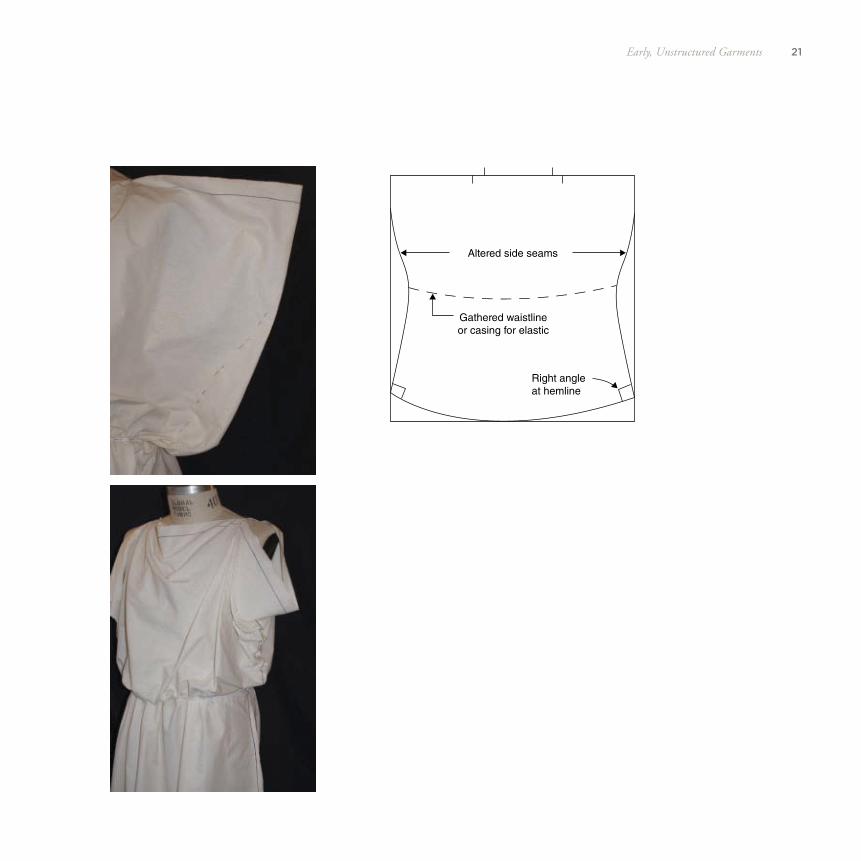
Th ese methods will give you a Doric Chiton, which looks very close to the real thing; however, the designer may want less fullness in the garment, especially if the fabric used isn’t as lightweight and fi nely woven as that used by the Greeks. In that case, you can cut the Chiton in two separate pieces (front and back) and curve it in slightly at the waist.
21Early, Unstructured Garments
Altered side seams
Gathered waistline
or casing for elastic
Right angle
at hemline

22 Draping Period Costumes
Straight of grain
Th e Greek Himation (hih-mah-tee-on) Th e man’s Himation could be worn over the Chiton or by itself with nothing underneath. Th e woman always wore the Himation as an outer garment. It, too, was a rectangular piece of fabric—also wool, linen, or cotton—but of greater proportions. Th e Himation was woven to a width equal to a man’s height by a length of three times the man’s height.
Because the average man of our time is approximately six-feet tall (seventy-two inches), and it is rare to fi nd appropriate fabric that wide, sixty-inch-wide fabric is commonly used. If the design indicates, a decorative border can be sewn to one or both of the selvedge edges to supplement the width. A lightweight summer wool works very well and provides a beautiful drape. Th e Himation can be draped in a variety of ways. Th is is an example of the simplest:
1. Begin with one end hanging from the shoulder to the ankle in front. Tie a sash of cord or cloth tape around the waist over the fabric hanging in front. For use on stage, this section of fabric can be stitched permanently to the sash.
2. Pleat up the fabric along the shoulder seam and pin it to a piece of wide grosgrain ribbon or other stabilizer underneath. Allow twelve to twenty-four inches (depending on the design) to hang free.
23Early, Unstructured Garments
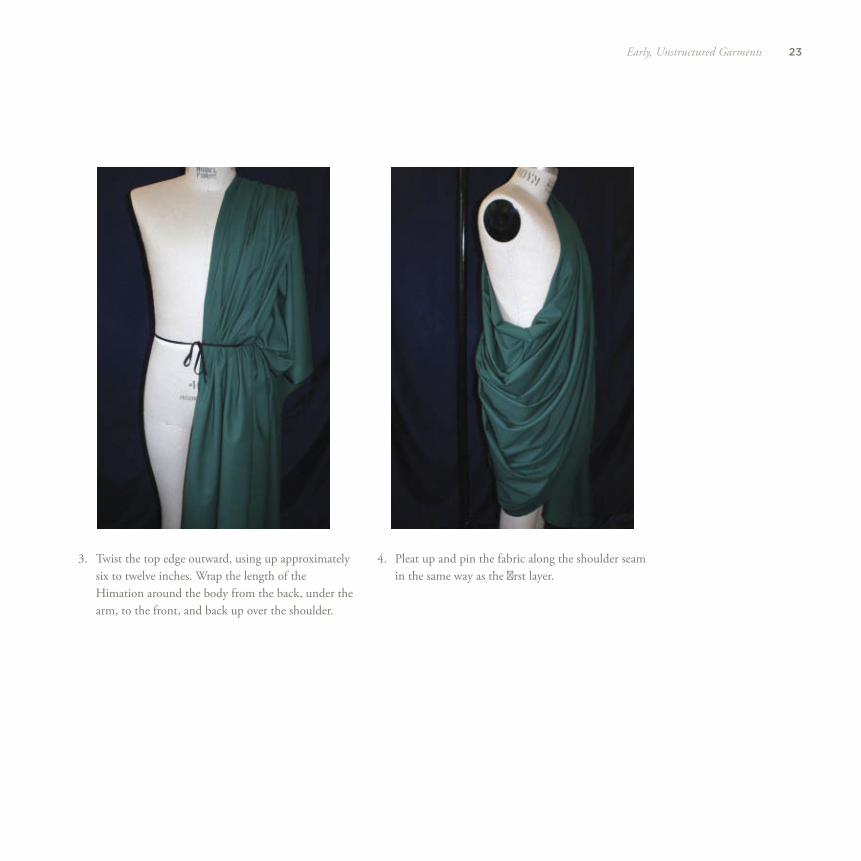
3. Twist the top edge outward, using up approximately six to twelve inches. Wrap the length of the Himation around the body from the back, under the arm, to the front, and back up over the shoulder.
4. Pleat up and pin the fabric along the shoulder seam in the same way as the fi rst layer.
24 Draping Period Costumes

25Early, Unstructured Garments
Th e Greek Doric Peplos Th e Doric Peplos is the most common woman’s garment seen in classical Greek art. Like the men’s garments of this period, it was made of one continuous piece of fabric woven to the desired size. Th e length was at least twice the woman’s elbow-to-elbow measurement; the width was her neck-to-fl oor measurement plus enough extra to fold over at the top edge to form a fl ap ( apotygma ).
Elbow to elbow
(Double)
Should
er
to flo
or
Fold line
Because the standard width of appropriate contemporary fabrics is sixty inches at the most, judicious seaming will be necessary. One option is to cut two pieces of fabric on the SOG and seam them together at one or both sides. Because the upper fl ap will cause the wrong side of the fabric to show, it is advisable to use a fl at fell seam.
A second option, one that works very nicely with fabrics that have border prints, is to cut the garment on the cross grain, seaming two pieces together at the waist, with the wrong side of the upper piece facing out. When the fl ap is folded over, the right side will be facing out. Because the waistline will be gathered, the seam will disappear into the gathers.
26 Draping Period Costumes
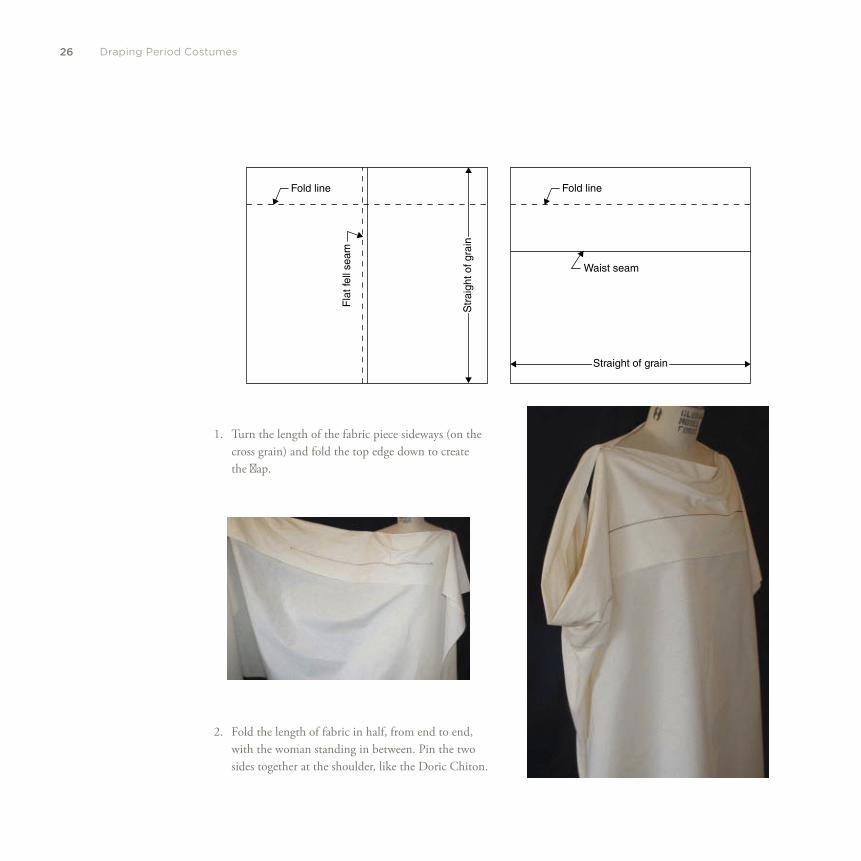
2. Fold the length of fabric in half, from end to end, with the woman standing in between. Pin the two sides together at the shoulder, like the Doric Chiton.
Str
aig
ht of gra
in
Fla
t fe
ll seam
Fold line
Straight of grain
Fold line
Waist seam
1. Turn the length of the fabric piece sideways (on the cross grain) and fold the top edge down to create the fl ap.
27Early, Unstructured Garments
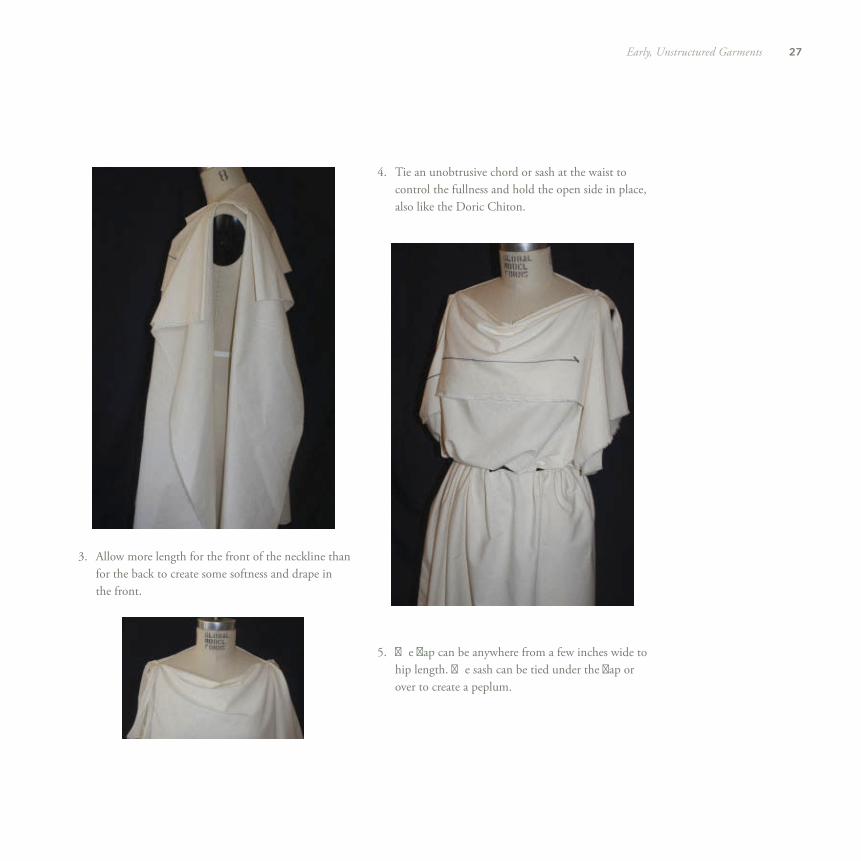
3. Allow more length for the front of the neckline than for the back to create some softness and drape in the front.
5. Th e fl ap can be anywhere from a few inches wide to hip length. Th e sash can be tied under the fl ap or over to create a peplum.
4. Tie an unobtrusive chord or sash at the waist to control the fullness and hold the open side in place, also like the Doric Chiton.
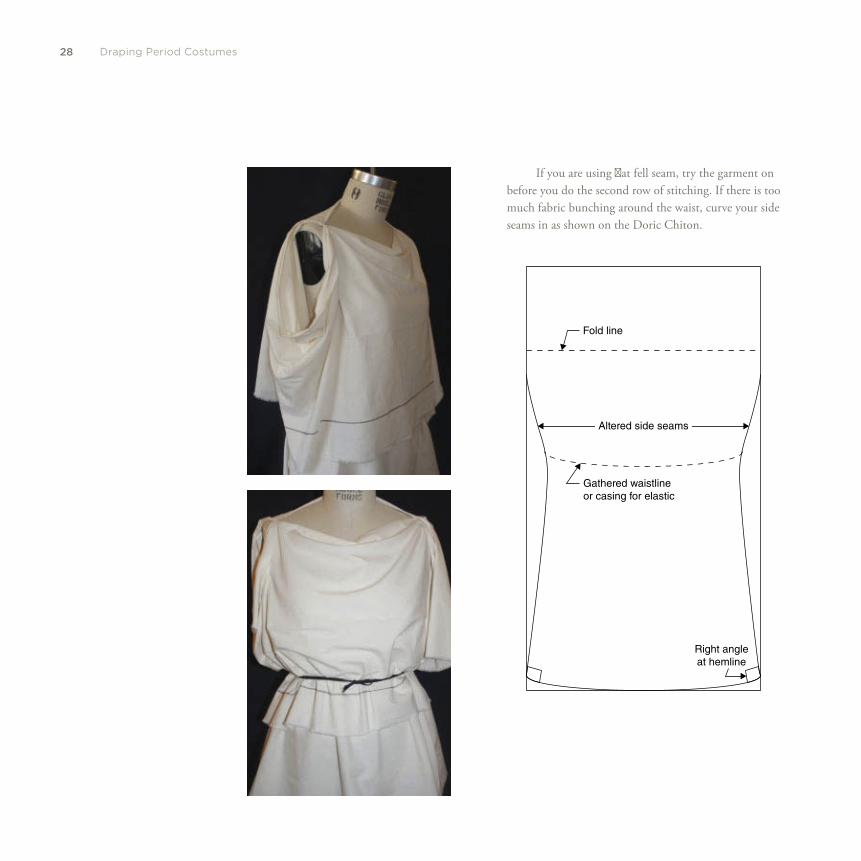
28 Draping Period Costumes
Altered side seams
Fold line
Gathered waistline
or casing for elastic
Right angle
at hemline
If you are using fl at fell seam, try the garment on before you do the second row of stitching. If there is too much fabric bunching around the waist, curve your side seams in as shown on the Doric Chiton.
29Early, Unstructured Garments
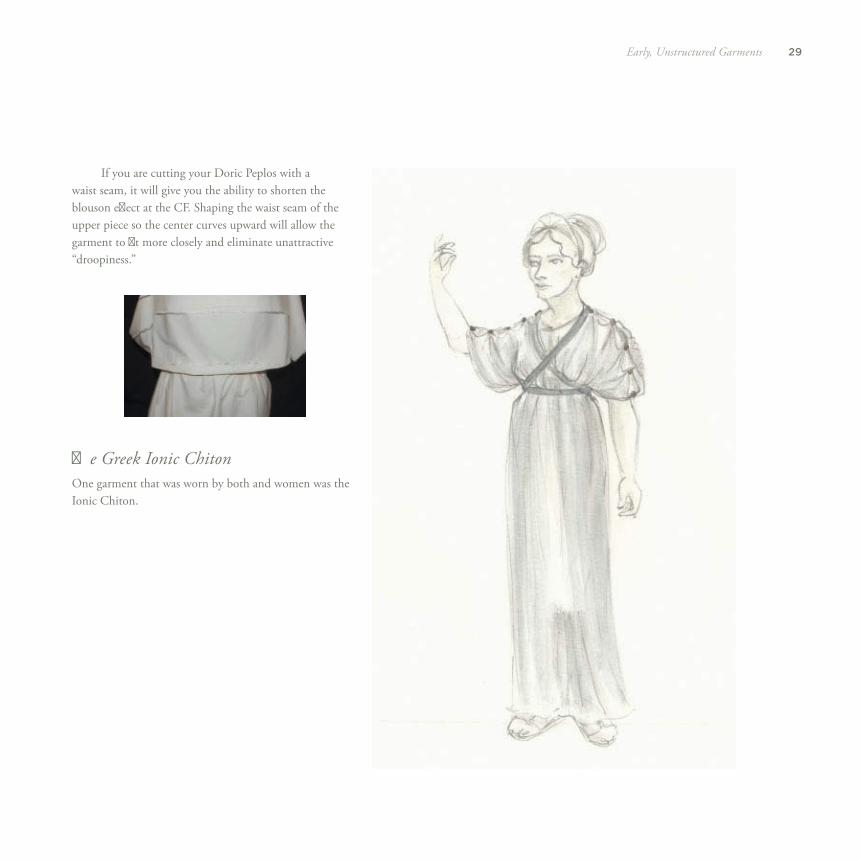
If you are cutting your Doric Peplos with a waist seam, it will give you the ability to shorten the blouson eff ect at the CF. Shaping the waist seam of the upper piece so the center curves upward will allow the garment to fi t more closely and eliminate unattractive “droopiness.”
Th e Greek Ionic Chiton One garment that was worn by both and women was the Ionic Chiton.
30 Draping Period Costumes
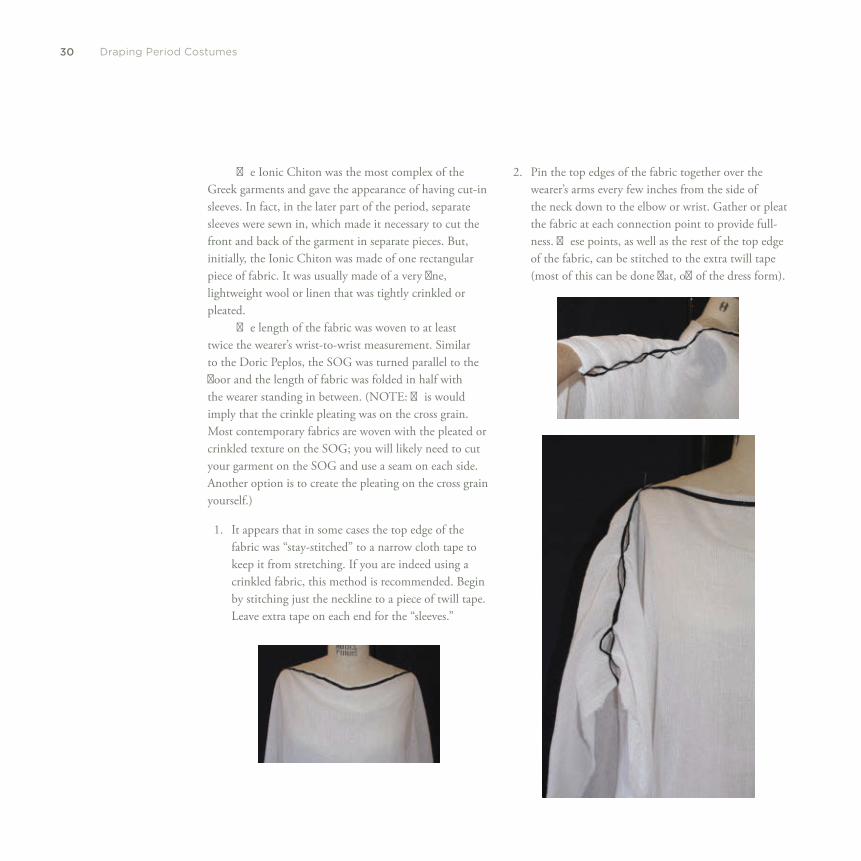
2. Pin the top edges of the fabric together over the wearer’s arms every few inches from the side of the neck down to the elbow or wrist. Gather or pleat the fabric at each connection point to provide full-ness. Th ese points, as well as the rest of the top edge of the fabric, can be stitched to the extra twill tape (most of this can be done fl at, off of the dress form).
Th e Ionic Chiton was the most complex of the Greek garments and gave the appearance of having cut-in sleeves. In fact, in the later part of the period, separate sleeves were sewn in, which made it necessary to cut the front and back of the garment in separate pieces. But, initially, the Ionic Chiton was made of one rectangular piece of fabric. It was usually made of a very fi ne, lightweight wool or linen that was tightly crinkled or pleated.
Th e length of the fabric was woven to at least twice the wearer’s wrist-to-wrist measurement. Similar to the Doric Peplos, the SOG was turned parallel to the fl oor and the length of fabric was folded in half with the wearer standing in between. (NOTE: Th is would imply that the crinkle pleating was on the cross grain. Most contemporary fabrics are woven with the pleated or crinkled texture on the SOG; you will likely need to cut your garment on the SOG and use a seam on each side. Another option is to create the pleating on the cross grain yourself.)
1. It appears that in some cases the top edge of the fabric was “stay-stitched” to a narrow cloth tape to keep it from stretching. If you are indeed using a crinkled fabric, this method is recommended. Begin by stitching just the neckline to a piece of twill tape. Leave extra tape on each end for the “sleeves.”
31Early, Unstructured Garments
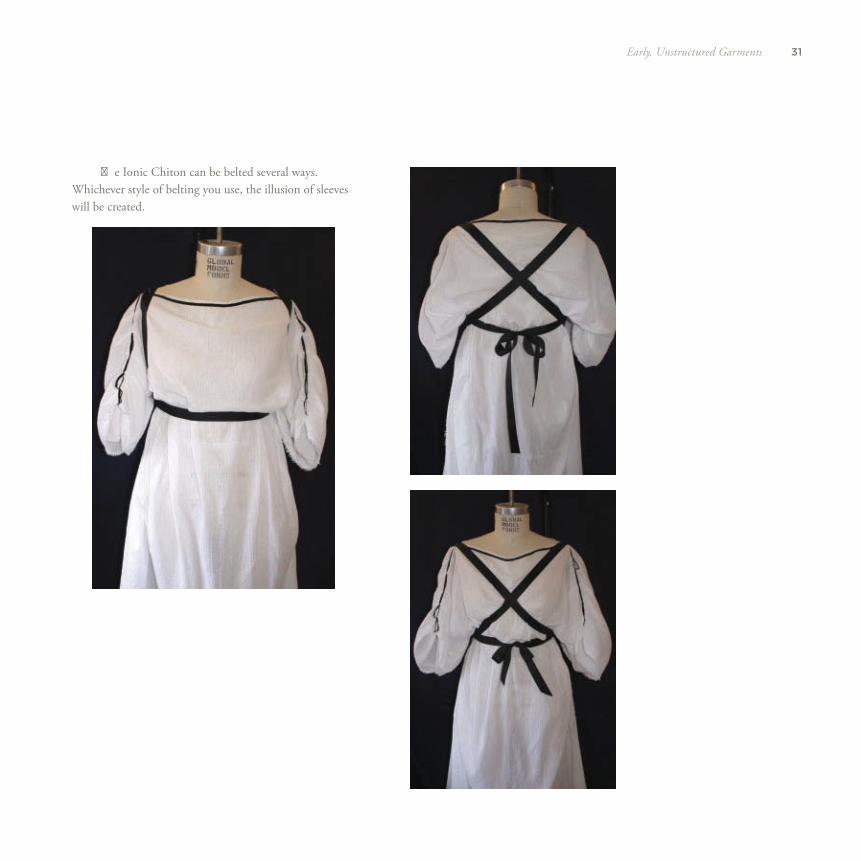
Th e Ionic Chiton can be belted several ways. Whichever style of belting you use, the illusion of sleeves will be created.
32 Draping Period Costumes
Th e belting of the Ionic Chiton will cause it to bunch in some places and hang unevenly in others. You can make alterations in the same way as for the Doric Chiton or Doric Peplos. In order to do this you will need to cut your garment with both side seams.
If you prefer more structure and permanence, the Doric Chiton, the Doric Peplos, and the Ionic Peplos can all be built or snapped to a fi tted underbodice at the shoulders.
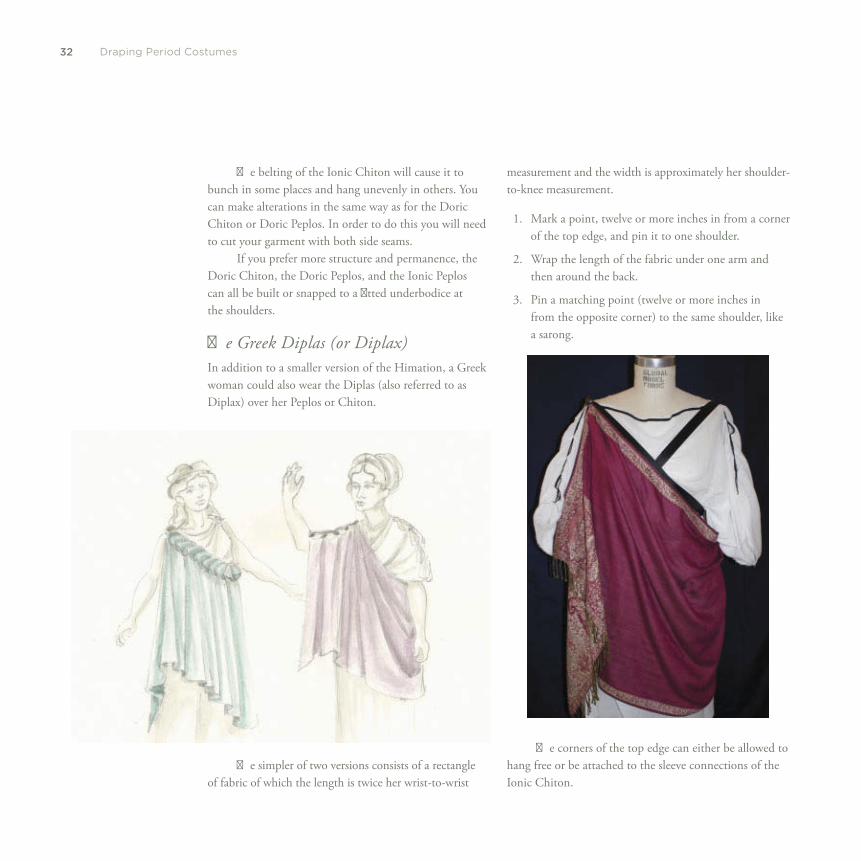
Th e Greek Diplas (or Diplax) In addition to a smaller version of the Himation, a Greek woman could also wear the Diplas (also referred to as Diplax) over her Peplos or Chiton.
Th e simpler of two versions consists of a rectangle of fabric of which the length is twice her wrist-to-wrist
measurement and the width is approximately her shoulder-to-knee measurement.
1. Mark a point, twelve or more inches in from a corner of the top edge, and pin it to one shoulder.
2. Wrap the length of the fabric under one arm and then around the back.
3. Pin a matching point (twelve or more inches in from the opposite corner) to the same shoulder, like a sarong.
Th e corners of the top edge can either be allowed to hang free or be attached to the sleeve connections of the Ionic Chiton.
33Early, Unstructured Garments
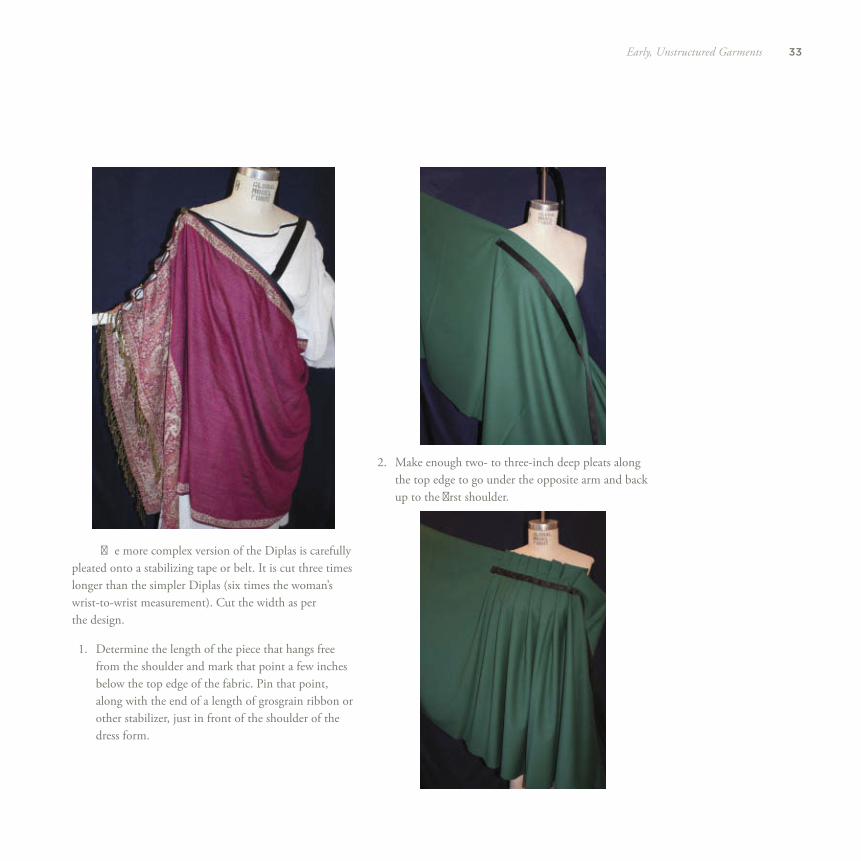
Th e more complex version of the Diplas is carefully pleated onto a stabilizing tape or belt. It is cut three times longer than the simpler Diplas (six times the woman’s wrist-to-wrist measurement). Cut the width as per the design.
1. Determine the length of the piece that hangs free from the shoulder and mark that point a few inches below the top edge of the fabric. Pin that point, along with the end of a length of grosgrain ribbon or other stabilizer, just in front of the shoulder of the dress form.
2. Make enough two- to three-inch deep pleats along the top edge to go under the opposite arm and back up to the fi rst shoulder.
34 Draping Period Costumes
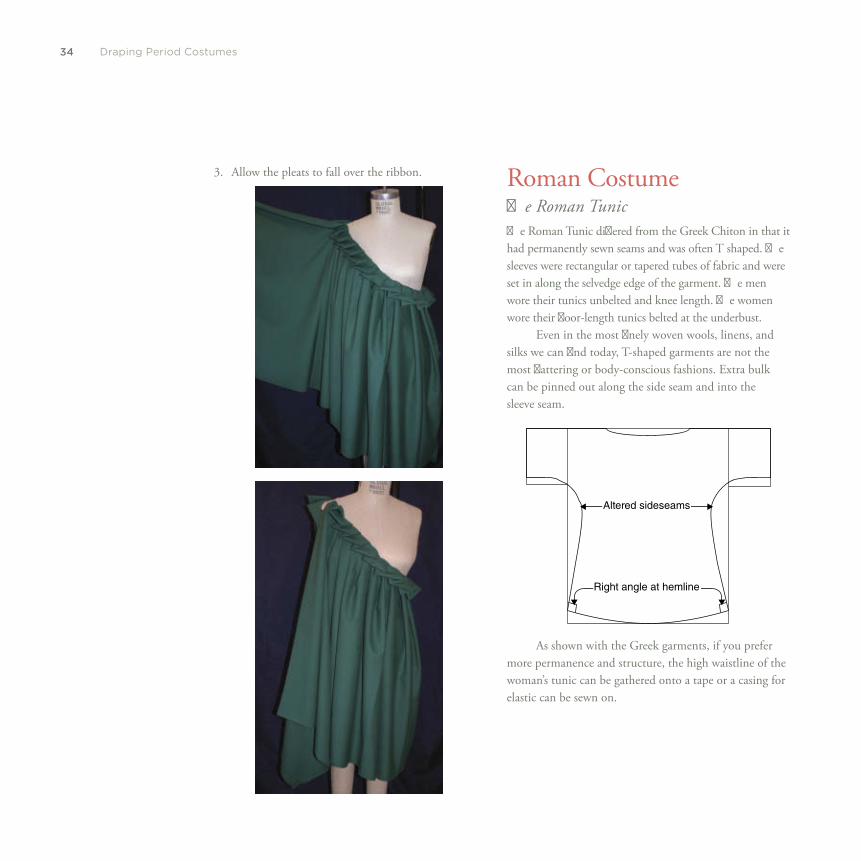
3. Allow the pleats to fall over the ribbon. Roman Costume Th e Roman Tunic Th e Roman Tunic diff ered from the Greek Chiton in that it had permanently sewn seams and was often T shaped. Th e sleeves were rectangular or tapered tubes of fabric and were set in along the selvedge edge of the garment. Th e men wore their tunics unbelted and knee length. Th e women wore their fl oor-length tunics belted at the underbust.
Even in the most fi nely woven wools, linens, and silks we can fi nd today, T-shaped garments are not the most fl attering or body-conscious fashions. Extra bulk can be pinned out along the side seam and into the sleeve seam.
Altered sideseams
Right angle at hemline
As shown with the Greek garments, if you prefer more permanence and structure, the high waistline of the woman’s tunic can be gathered onto a tape or a casing for elastic can be sewn on.
35Early, Unstructured Garments
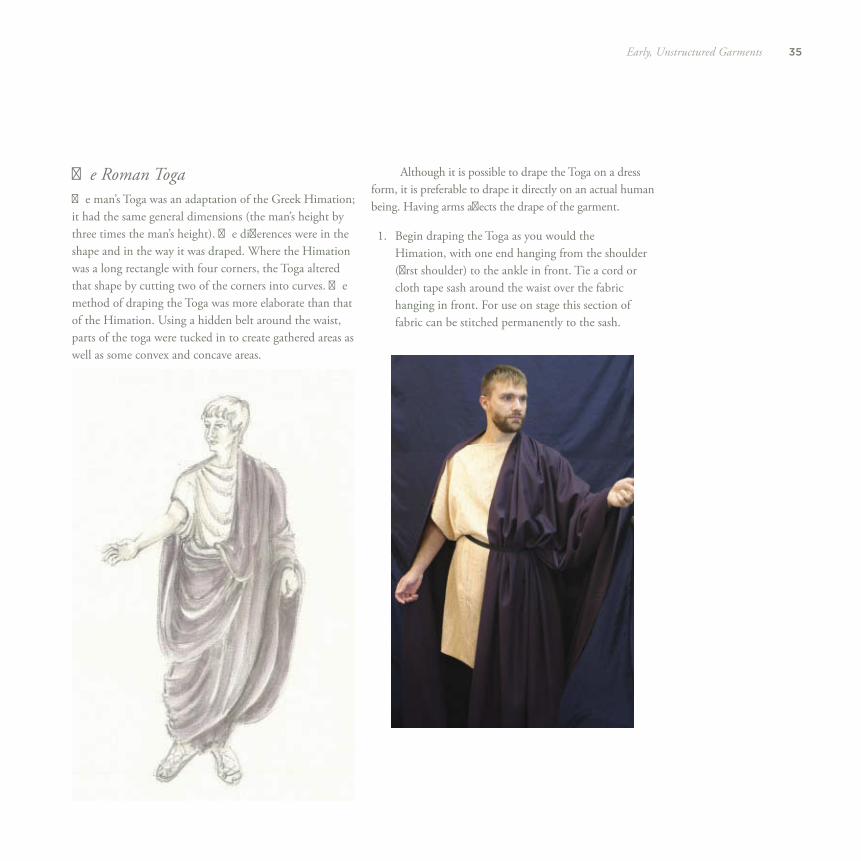
Th e Roman Toga Th e man’s Toga was an adaptation of the Greek Himation; it had the same general dimensions (the man’s height by three times the man’s height). Th e diff erences were in the shape and in the way it was draped. Where the Himation was a long rectangle with four corners, the Toga altered that shape by cutting two of the corners into curves. Th e method of draping the Toga was more elaborate than that of the Himation. Using a hidden belt around the waist, parts of the toga were tucked in to create gathered areas as well as some convex and concave areas.
Although it is possible to drape the Toga on a dress form, it is preferable to drape it directly on an actual human being. Having arms aff ects the drape of the garment.
1. Begin draping the Toga as you would the Himation, with one end hanging from the shoulder (fi rst shoulder) to the ankle in front. Tie a cord or cloth tape sash around the waist over the fabric hanging in front. For use on stage this section of fabric can be stitched permanently to the sash.

36 Draping Period Costumes
2. Pull the inner selvage edge down to create a pouch in front. Th e casual pleats that drape over the shoulder can be stitched permanently to a length of grosgrain to stabilize it.
3. Wrap the inner selvage edge around the back and over the opposite shoulder. Locate the center line of the warp of the fabric (the direction of the SOG) and fold it inward, pulling it out from behind the dress form. Leaving enough slack for the inner selvage edge to hang down to the knee, tuck the folded center line into the sash.
37Early, Unstructured Garments
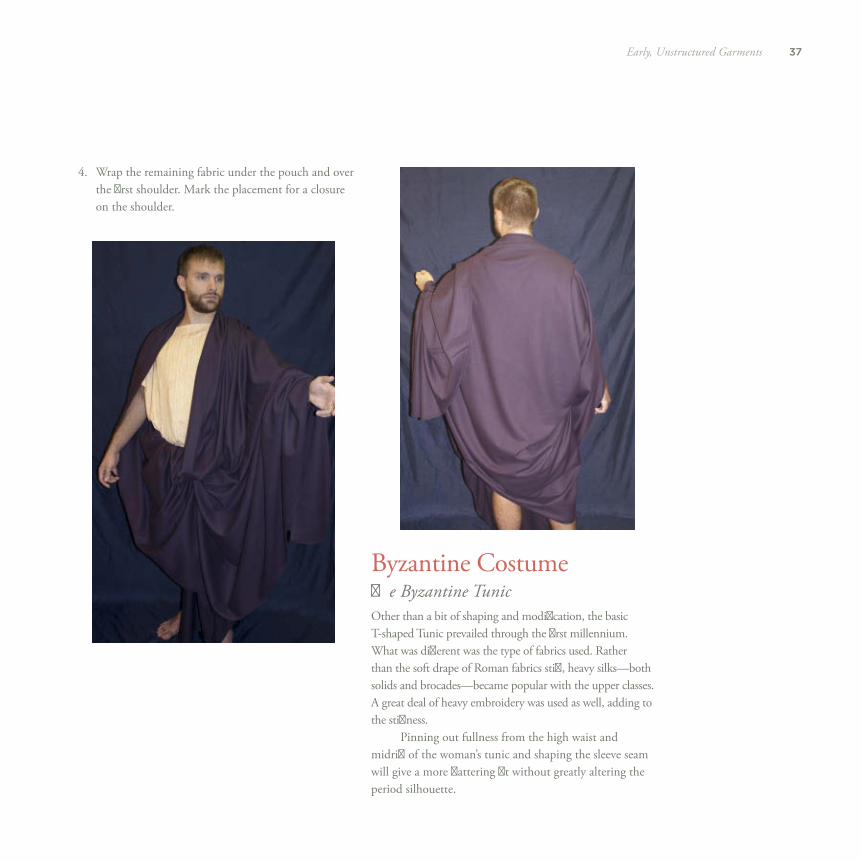
4. Wrap the remaining fabric under the pouch and over the fi rst shoulder. Mark the placement for a closure on the shoulder.
Byzantine Costume Th e Byzantine Tunic Other than a bit of shaping and modifi cation, the basic T-shaped Tunic prevailed through the fi rst millennium. What was diff erent was the type of fabrics used. Rather than the soft drape of Roman fabrics stiff , heavy silks—both solids and brocades—became popular with the upper classes. A great deal of heavy embroidery was used as well, adding to the stiff ness.
Pinning out fullness from the high waist and midriff of the woman’s tunic and shaping the sleeve seam will give a more fl attering fi t without greatly altering the period silhouette.
38 Draping Period Costumes
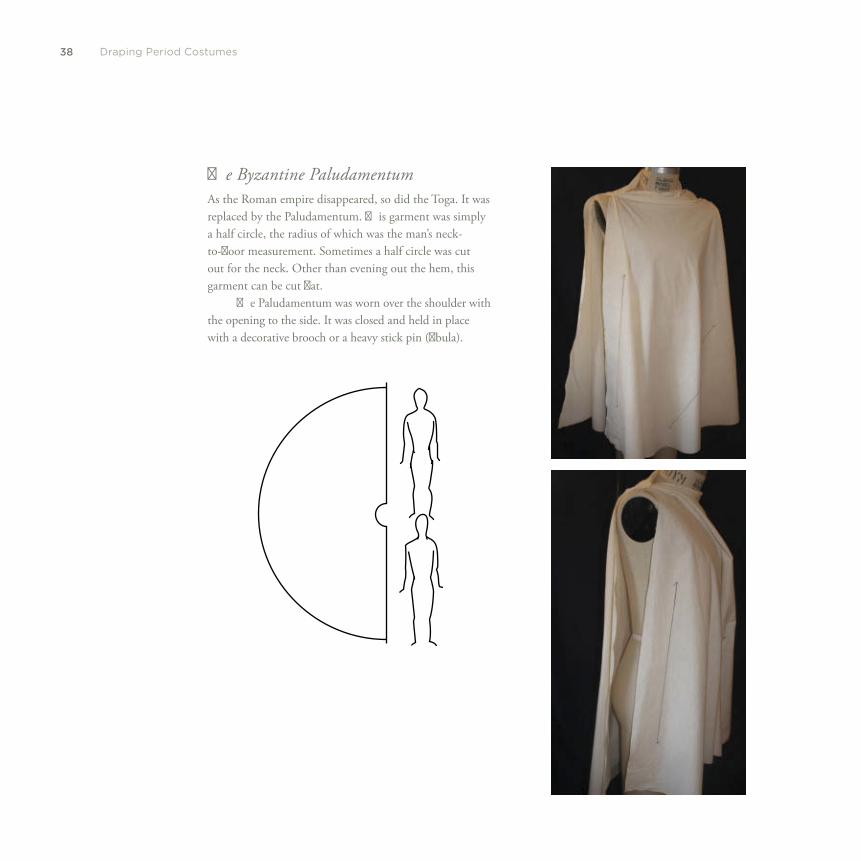
Th e Byzantine Paludamentum As the Roman empire disappeared, so did the Toga. It was replaced by the Paludamentum. Th is garment was simply a half circle, the radius of which was the man’s neck-to-fl oor measurement. Sometimes a half circle was cut out for the neck. Other than evening out the hem, this garment can be cut fl at.
Th e Paludamentum was worn over the shoulder with the opening to the side. It was closed and held in place with a decorative brooch or a heavy stick pin (fi bula).
39Early, Unstructured Garments
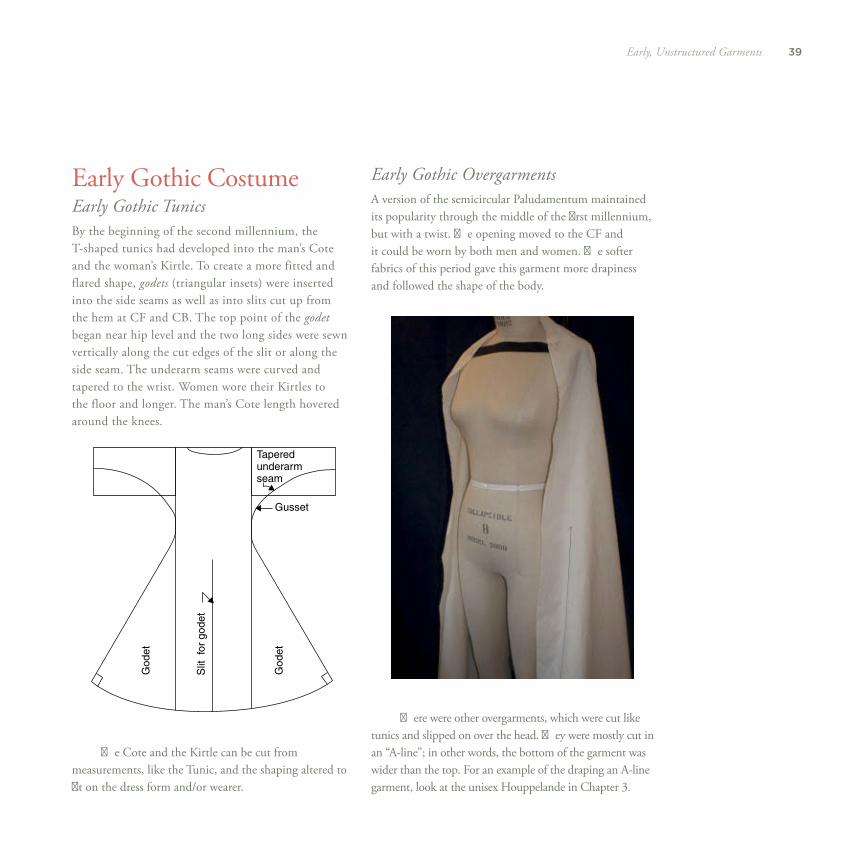
Early Gothic Costume Early Gothic Tunics By the beginning of the second millennium, the T-shaped tunics had developed into the man’s Cote and the woman’s Kirtle. To create a more fitted and flared shape, godets (triangular insets) were inserted into the side seams as well as into slits cut up from the hem at CF and CB. The top point of the godet began near hip level and the two long sides were sewn vertically along the cut edges of the slit or along the side seam. The underarm seams were curved and tapered to the wrist. Women wore their Kirtles to the floor and longer. The man’s Cote length hovered around the knees.
Th e Cote and the Kirtle can be cut from measurements, like the Tunic, and the shaping altered to fi t on the dress form and/or wearer.
Early Gothic Overgarments A version of the semicircular Paludamentum maintained its popularity through the middle of the fi rst millennium, but with a twist. Th e opening moved to the CF and it could be worn by both men and women. Th e softer fabrics of this period gave this garment more drapiness and followed the shape of the body.
Th ere were other overgarments, which were cut like tunics and slipped on over the head. Th ey were mostly cut in an “A-line”; in other words, the bottom of the garment was wider than the top. For an example of the draping an A-line garment, look at the unisex Houppelande in Chapter 3 .
Gusset
Godet
Godet
Slit
fo
r godet
Taperedunderarmseam


three
C U T A N D S H A P E D T O F I T : T H E G O T H I C
P E R I O D
42 Draping Period Costumes
Beginning in the fourteenth century, costume for both men and women developed a more fi tted silhouette. Seams followed the line of the body; sleeves were shaped and fi tted into armholes. Because of this new shaping, belts were used more for decorative eff ect than for controlling fullness. Most of the men’s garments were relatively short, so they covered their legs with tightly fi tted hose, usually made of wool and cut out of woven, not knit, cloth.
Th e soft, drapy quality of the fabrics, which began during the early Gothic period, continued through the fi fteenth century, especially for the women. Some helpful visual research can be found in the illuminated manuscripts of this period, including Les Tres Riche Heures du Duc de Berry by the Limbourg brothers and Lancelot du Lac .
Th e Man’s Padded Doublet Men began wearing a fi tted, often padded, undervest. Th is garment was called, variously, the Doublet, Pourpoint, Gipon, or Paltock. Regardless of what it is called (for our purposes, I will use the term Doublet), it is the fi rst garment we will pattern completely by draping on the dress form. Th e Doublet has three layers—the fi tted underlayer, the padded middle layer, and the top layer of “fashion fabric.”
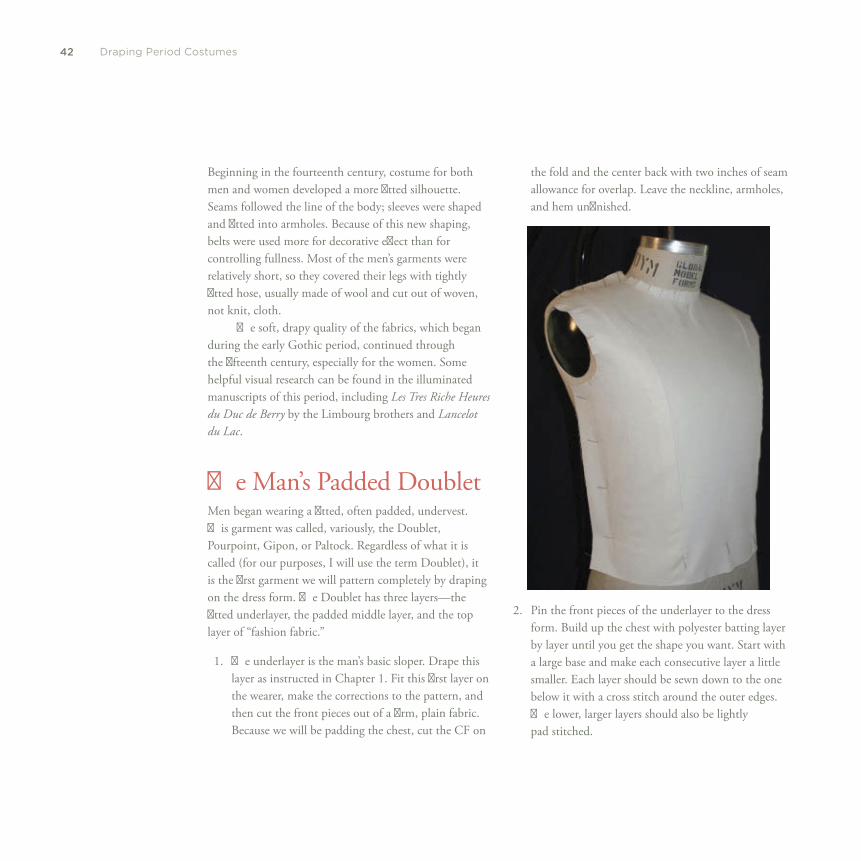
1. Th e underlayer is the man’s basic sloper. Drape this layer as instructed in Chapter 1 . Fit this fi rst layer on the wearer, make the corrections to the pattern, and then cut the front pieces out of a fi rm, plain fabric. Because we will be padding the chest, cut the CF on
the fold and the center back with two inches of seam allowance for overlap. Leave the neckline, armholes, and hem unfi nished.
2. Pin the front pieces of the underlayer to the dress form. Build up the chest with polyester batting layer by layer until you get the shape you want. Start with a large base and make each consecutive layer a little smaller. Each layer should be sewn down to the one below it with a cross stitch around the outer edges. Th e lower, larger layers should also be lightly pad stitched.
43Cut and Shaped to Fit: Th e Gothic Period
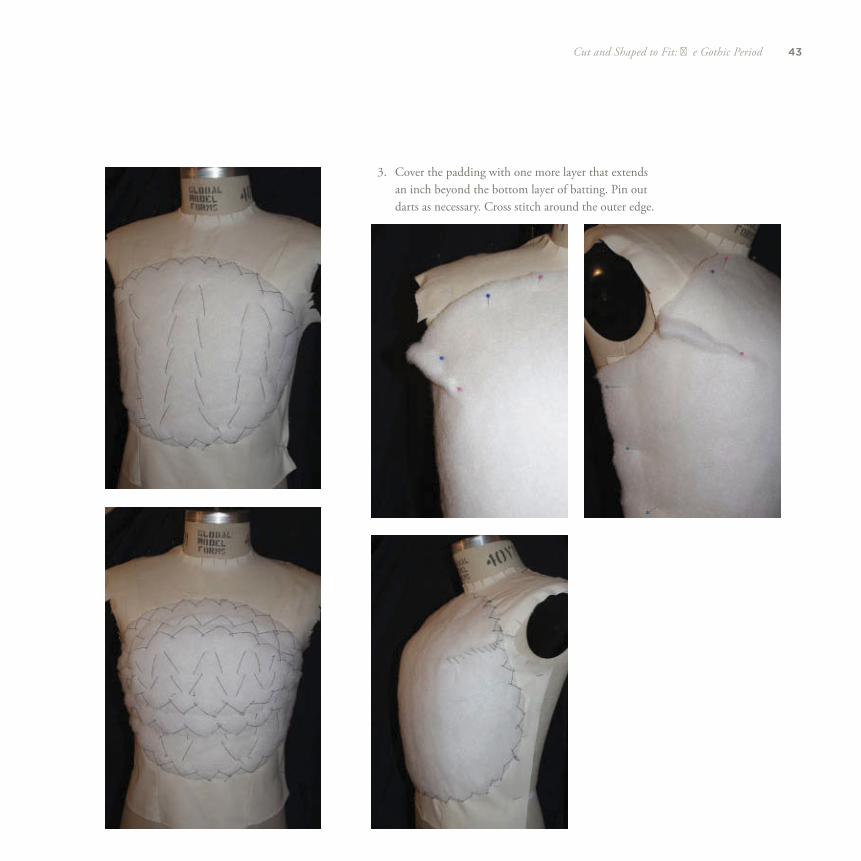
3. Cover the padding with one more layer that extends an inch beyond the bottom layer of batting. Pin out darts as necessary. Cross stitch around the outer edge.

44 Draping Period Costumes
4. Temporarily pin a length of one-quarter-inch-wide twill tape from the CF neck to the CF waist to relocate the center line, which is now hidden by the layers of batting.
5. Drape the top layer over the fi rst two layers as if you were draping another fi tted sloper. Instead of draping princess seams, shape the center front and side seams. Th e CF edge will curve out beyond the CF straight-of-grain line at the chest and back in at the waist. Th e side seams will curve in at the waist. If you have only sewn contemporary clothing, this will seem very wrong, but it was a very common way of fi tting clothing before the twentieth century.
45Cut and Shaped to Fit: Th e Gothic Period
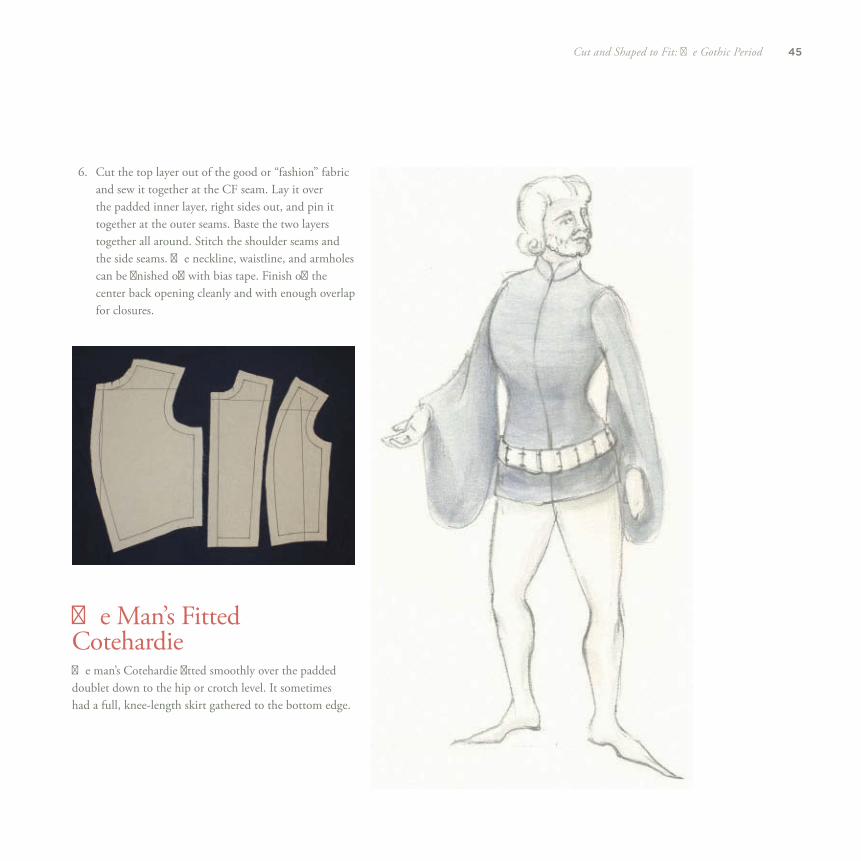
6. Cut the top layer out of the good or “fashion” fabric and sew it together at the CF seam. Lay it over the padded inner layer, right sides out, and pin it together at the outer seams. Baste the two layers together all around. Stitch the shoulder seams and the side seams. Th e neckline, waistline, and armholes can be fi nished off with bias tape. Finish off the center back opening cleanly and with enough overlap for closures.
Th e Man’s Fitted Cotehardie Th e man’s Cotehardie fi tted smoothly over the padded doublet down to the hip or crotch level. It sometimes had a full, knee-length skirt gathered to the bottom edge.
46 Draping Period Costumes
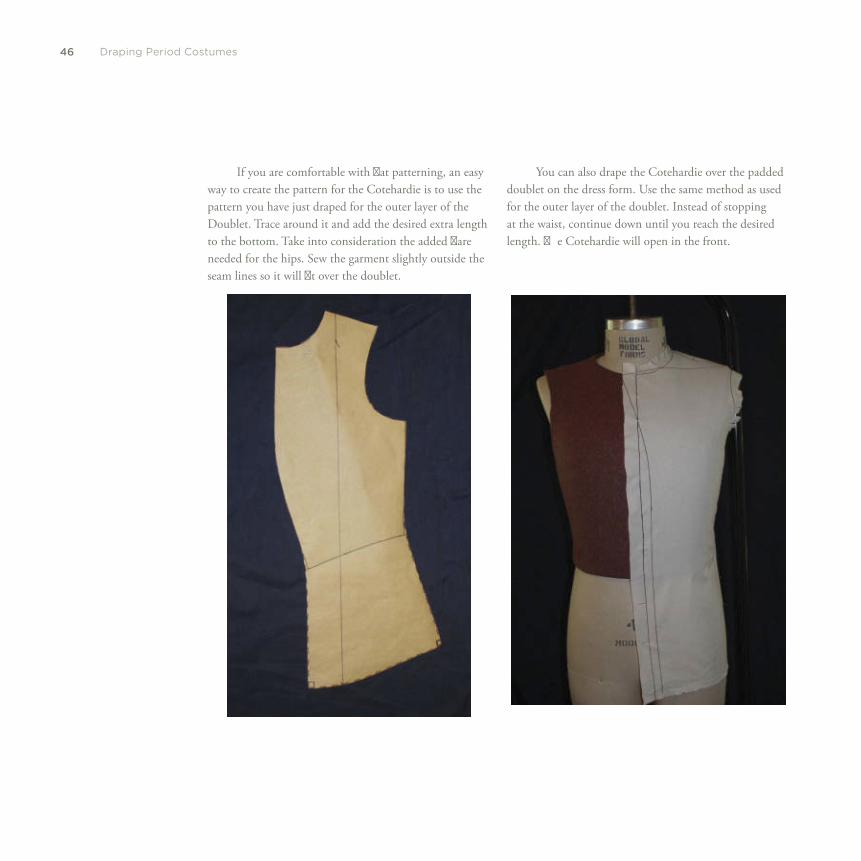
If you are comfortable with fl at patterning, an easy way to create the pattern for the Cotehardie is to use the pattern you have just draped for the outer layer of the Doublet. Trace around it and add the desired extra length to the bottom. Take into consideration the added fl are needed for the hips. Sew the garment slightly outside the seam lines so it will fi t over the doublet.
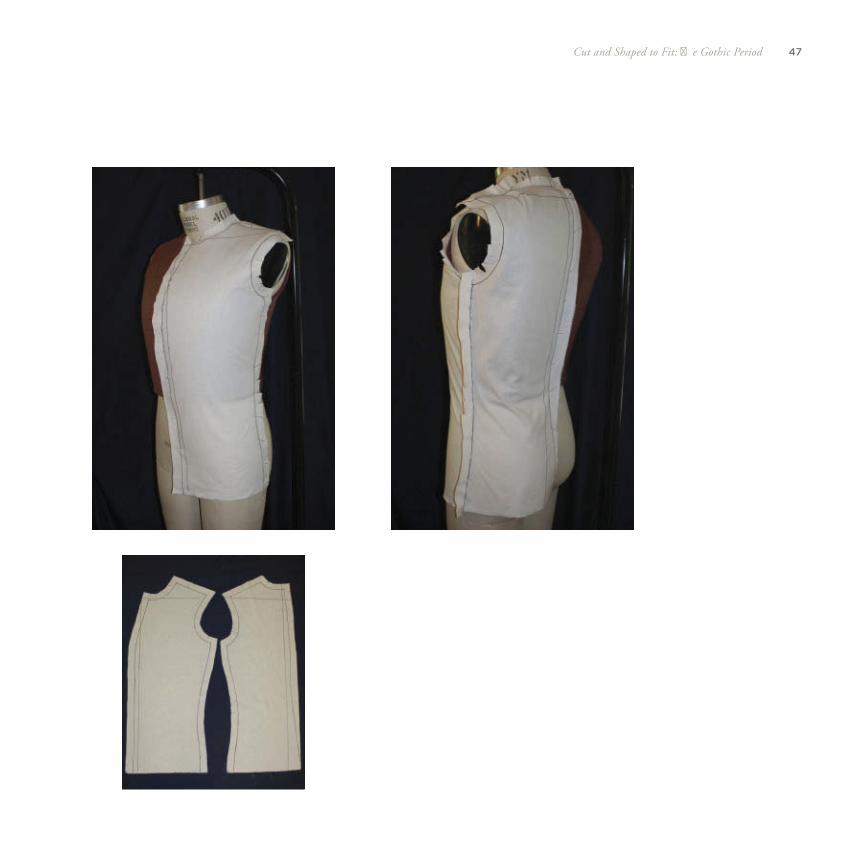
You can also drape the Cotehardie over the padded doublet on the dress form. Use the same method as used for the outer layer of the doublet. Instead of stopping at the waist, continue down until you reach the desired length. Th e Cotehardie will open in the front.
47Cut and Shaped to Fit: Th e Gothic Period
48 Draping Period Costumes
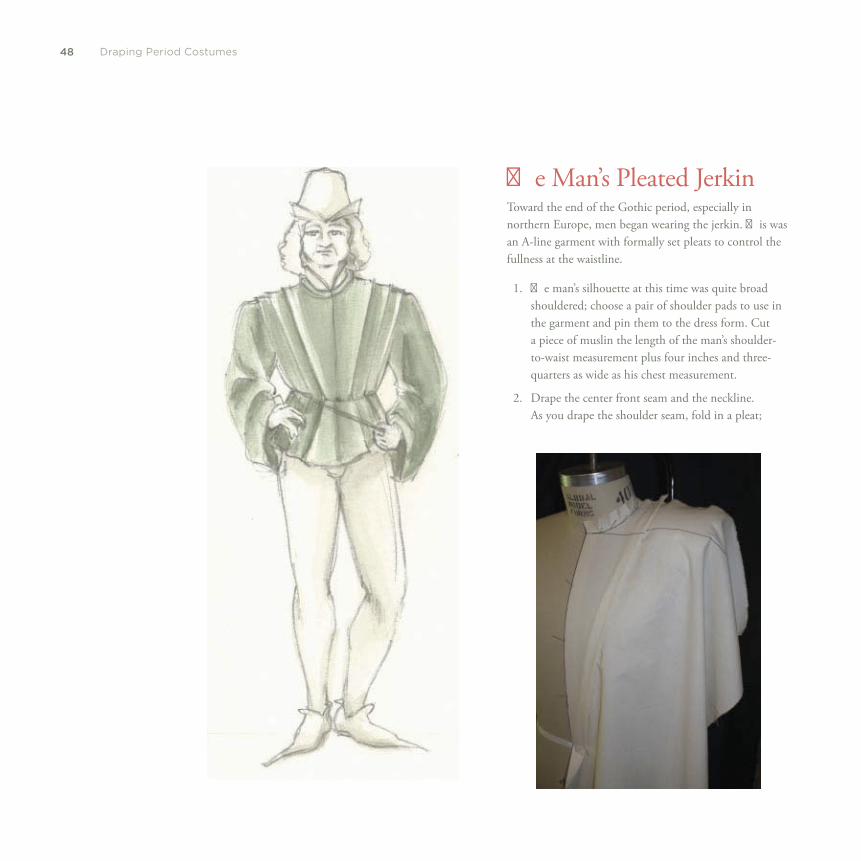
Th e Man’s Pleated Jerkin Toward the end of the Gothic period, especially in northern Europe, men began wearing the jerkin. Th is was an A-line garment with formally set pleats to control the fullness at the waistline.
1. Th e man’s silhouette at this time was quite broad shouldered; choose a pair of shoulder pads to use in the garment and pin them to the dress form. Cut a piece of muslin the length of the man’s shoulder-to-waist measurement plus four inches and three-quarters as wide as his chest measurement.
2. Drape the center front seam and the neckline. As you drape the shoulder seam, fold in a pleat;
49Cut and Shaped to Fit: Th e Gothic Period
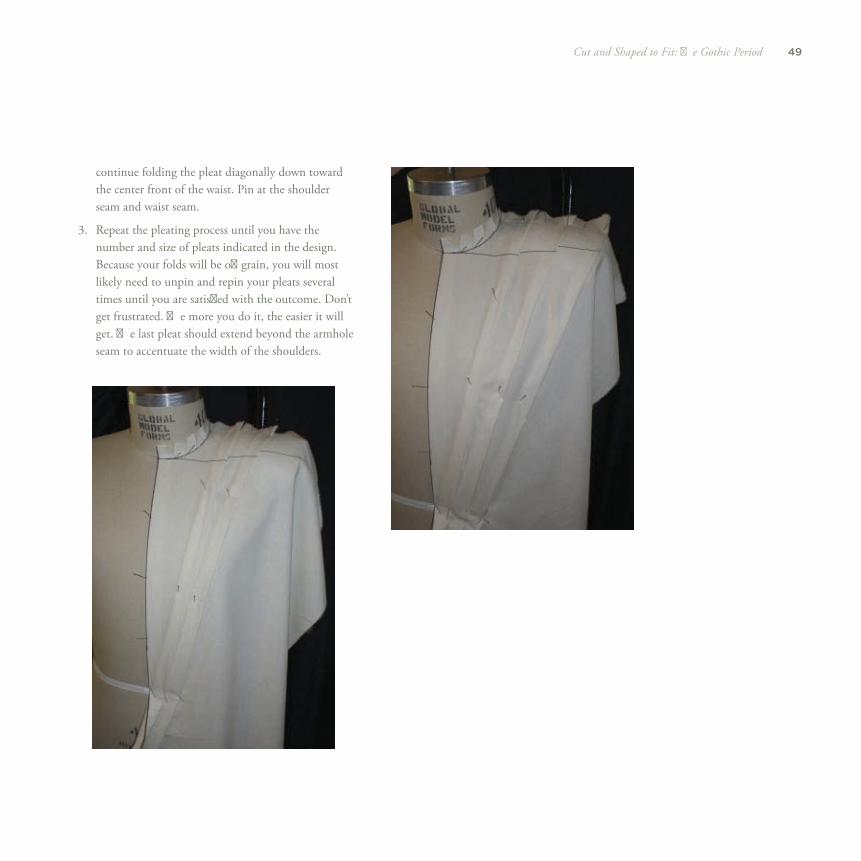
continue folding the pleat diagonally down toward the center front of the waist. Pin at the shoulder seam and waist seam.
3. Repeat the pleating process until you have the number and size of pleats indicated in the design. Because your folds will be off grain, you will most likely need to unpin and repin your pleats several times until you are satisfi ed with the outcome. Don’t get frustrated. Th e more you do it, the easier it will get. Th e last pleat should extend beyond the armhole seam to accentuate the width of the shoulders.
50 Draping Period Costumes
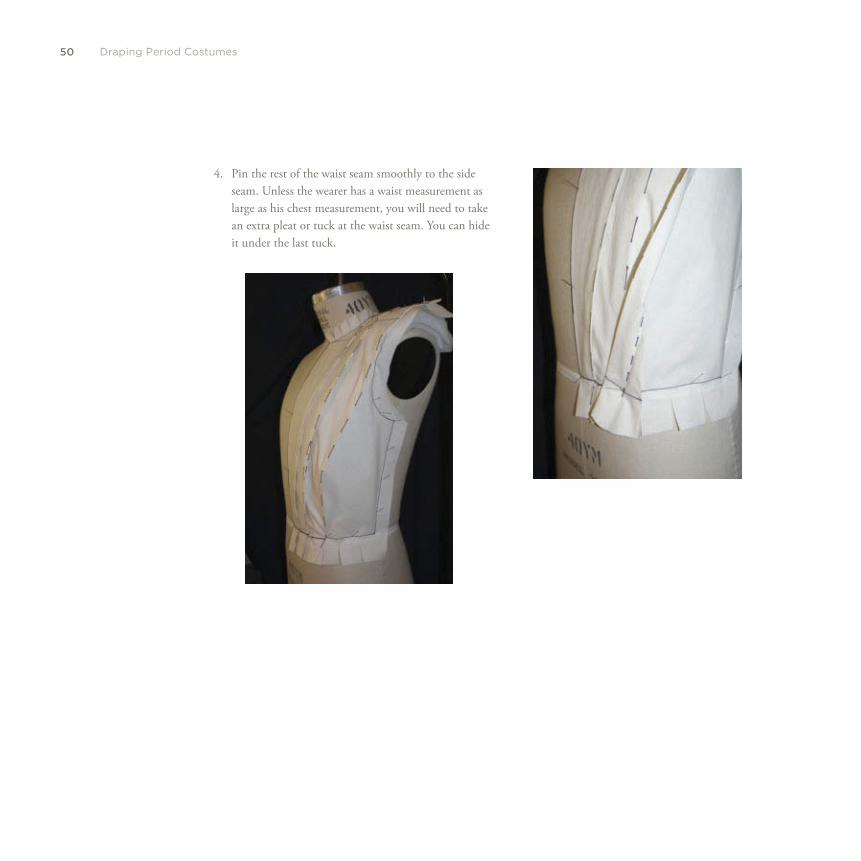
4. Pin the rest of the waist seam smoothly to the side seam. Unless the wearer has a waist measurement as large as his chest measurement, you will need to take an extra pleat or tuck at the waist seam. You can hide it under the last tuck.
51Cut and Shaped to Fit: Th e Gothic Period
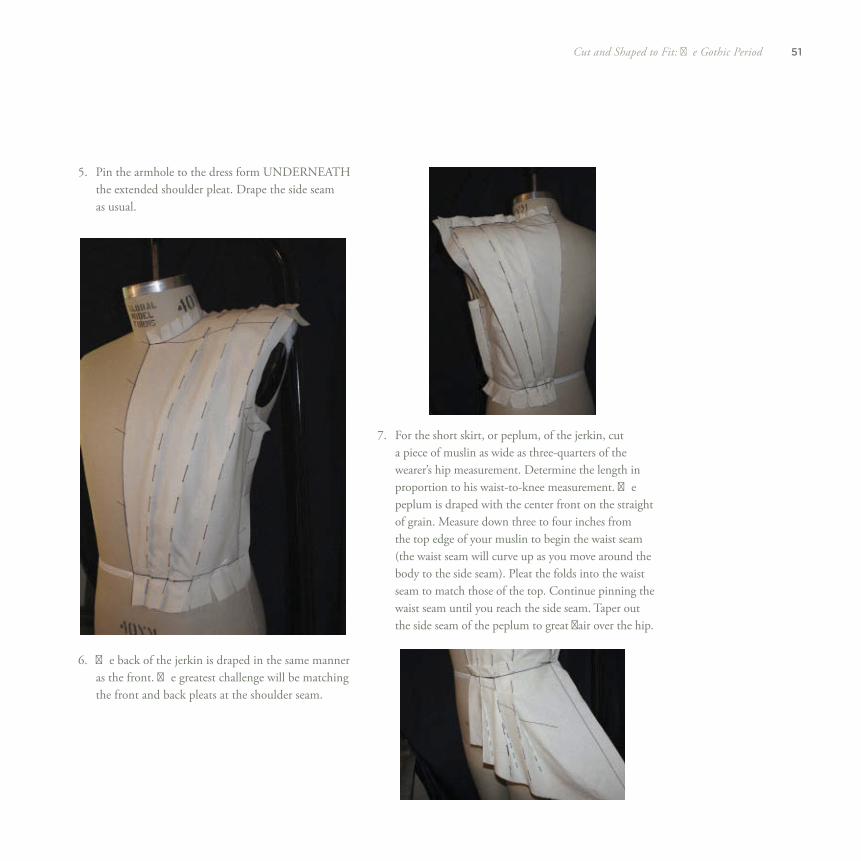
5. Pin the armhole to the dress form UNDERNEATH the extended shoulder pleat. Drape the side seam as usual.
6. Th e back of the jerkin is draped in the same manner as the front. Th e greatest challenge will be matching the front and back pleats at the shoulder seam.
7. For the short skirt, or peplum, of the jerkin, cut a piece of muslin as wide as three-quarters of the wearer’s hip measurement. Determine the length in proportion to his waist-to-knee measurement. Th e peplum is draped with the center front on the straight of grain. Measure down three to four inches from the top edge of your muslin to begin the waist seam (the waist seam will curve up as you move around the body to the side seam). Pleat the folds into the waist seam to match those of the top. Continue pinning the waist seam until you reach the side seam. Taper out the side seam of the peplum to great fl air over the hip.
52 Draping Period Costumes
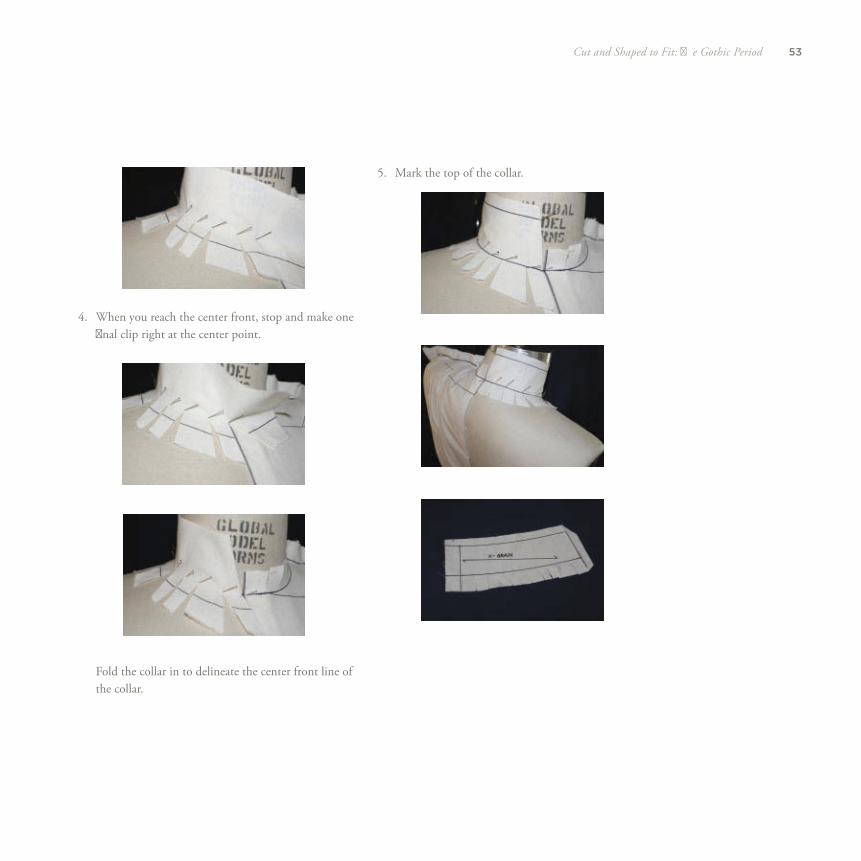
3. Pin the neckline of the collar smoothly to the neckline of the jerkin. As you move around toward the front, you will notice that your pinning line is moving away from your drawn line. Clip into this expanding seam allowance as you pin to keep the collar fi tting smoothly.
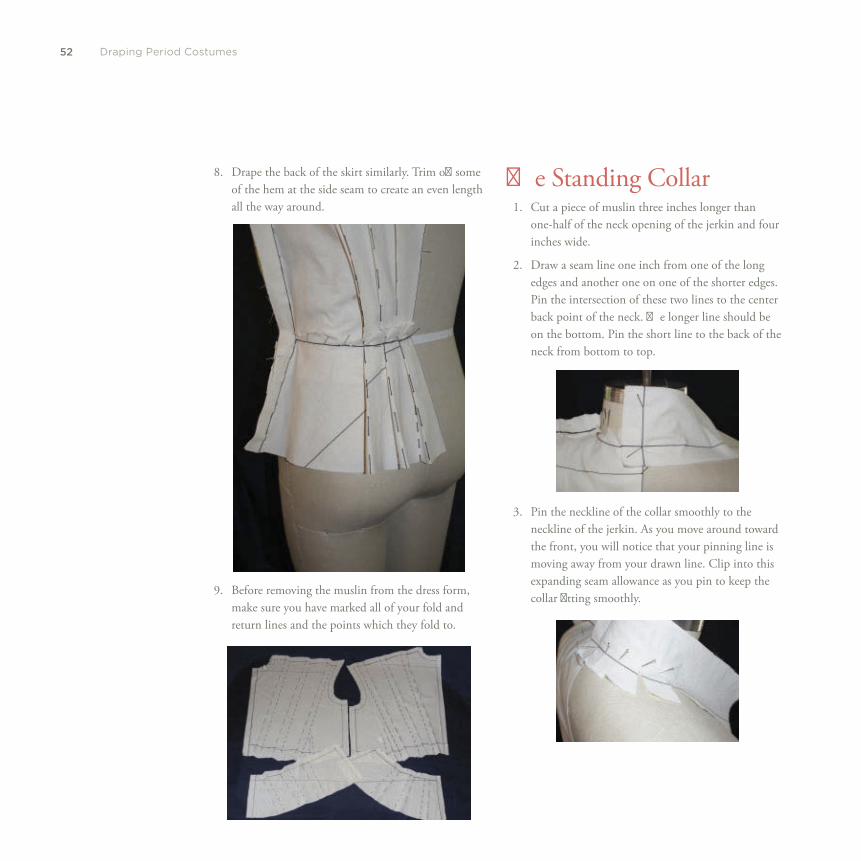
8. Drape the back of the skirt similarly. Trim off some of the hem at the side seam to create an even length all the way around.
9. Before removing the muslin from the dress form, make sure you have marked all of your fold and return lines and the points which they fold to.
Th e Standing Collar 1. Cut a piece of muslin three inches longer than
one-half of the neck opening of the jerkin and four inches wide.
2. Draw a seam line one inch from one of the long edges and another one on one of the shorter edges. Pin the intersection of these two lines to the center back point of the neck. Th e longer line should be on the bottom. Pin the short line to the back of the neck from bottom to top.
53Cut and Shaped to Fit: Th e Gothic Period
4. When you reach the center front, stop and make one fi nal clip right at the center point.
5. Mark the top of the collar.
Fold the collar in to delineate the center front line of the collar.
54 Draping Period Costumes
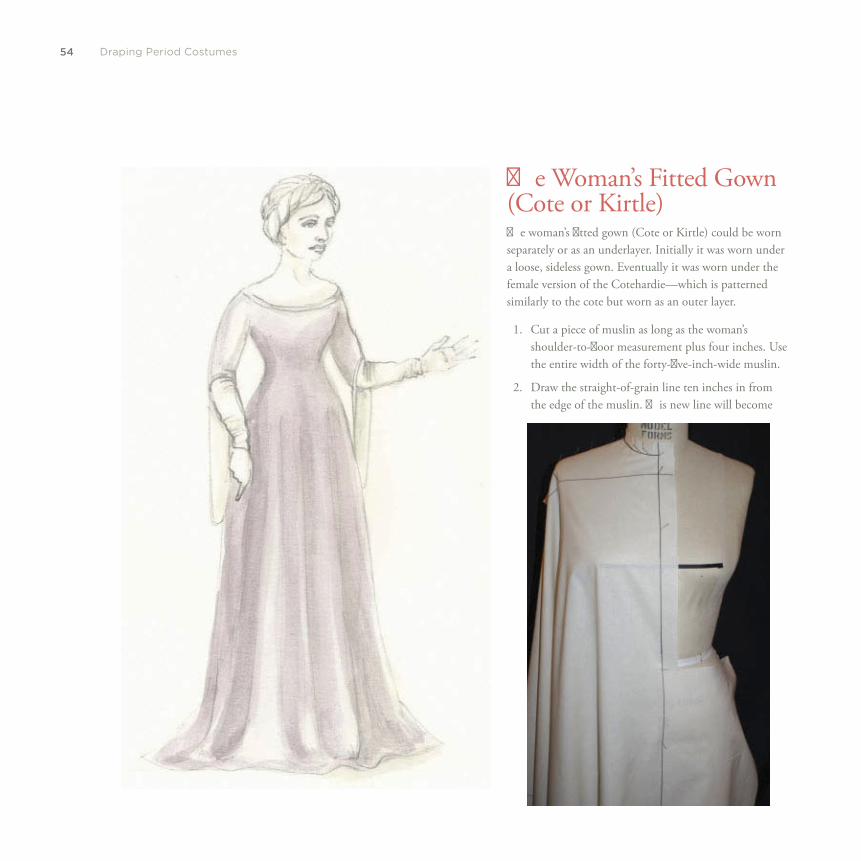
Th e Woman’s Fitted Gown (Cote or Kirtle) Th e woman’s fi tted gown (Cote or Kirtle) could be worn separately or as an underlayer. Initially it was worn under a loose, sideless gown. Eventually it was worn under the female version of the Cotehardie—which is patterned similarly to the cote but worn as an outer layer.
1. Cut a piece of muslin as long as the woman’s shoulder-to-fl oor measurement plus four inches. Use the entire width of the forty-fi ve-inch-wide muslin.
2. Draw the straight-of-grain line ten inches in from the edge of the muslin. Th is new line will become
55Cut and Shaped to Fit: Th e Gothic Period
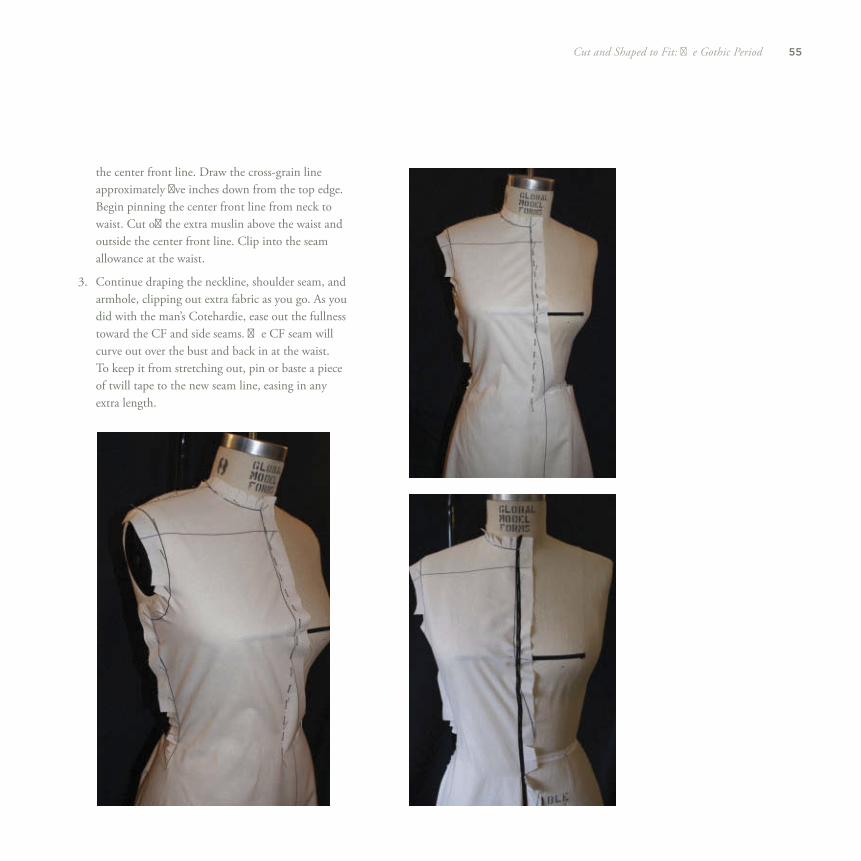
the center front line. Draw the cross-grain line approximately fi ve inches down from the top edge. Begin pinning the center front line from neck to waist. Cut off the extra muslin above the waist and outside the center front line. Clip into the seam allowance at the waist.
3. Continue draping the neckline, shoulder seam, and armhole, clipping out extra fabric as you go. As you did with the man’s Cotehardie, ease out the fullness toward the CF and side seams. Th e CF seam will curve out over the bust and back in at the waist. To keep it from stretching out, pin or baste a piece of twill tape to the new seam line, easing in any extra length.
56 Draping Period Costumes
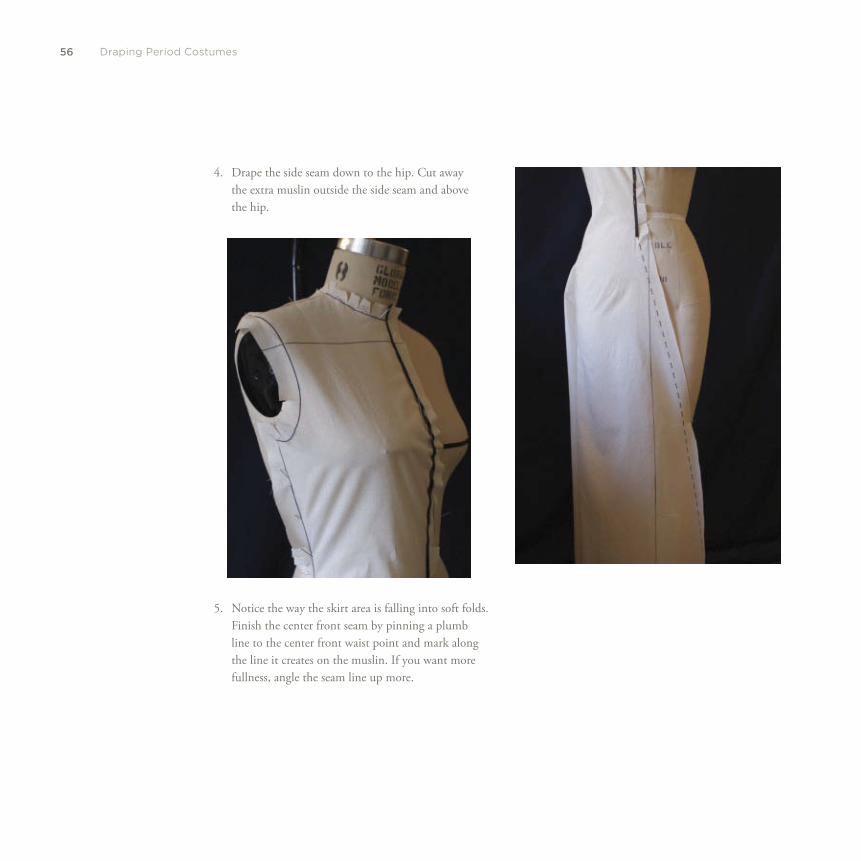
5. Notice the way the skirt area is falling into soft folds. Finish the center front seam by pinning a plumb line to the center front waist point and mark along the line it creates on the muslin. If you want more fullness, angle the seam line up more.
4. Drape the side seam down to the hip. Cut away the extra muslin outside the side seam and above the hip.
57Cut and Shaped to Fit: Th e Gothic Period
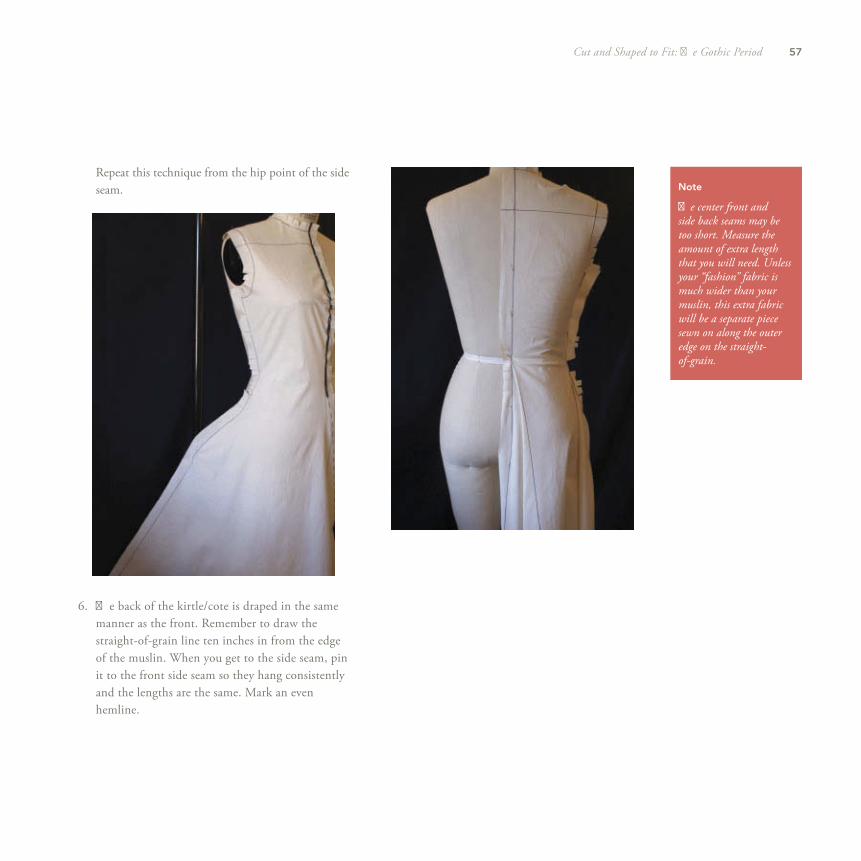
6. Th e back of the kirtle/cote is draped in the same manner as the front. Remember to draw the straight-of-grain line ten inches in from the edge of the muslin. When you get to the side seam, pin it to the front side seam so they hang consistently and the lengths are the same. Mark an even hemline.
Note
Th e center front and side back seams may be too short. Measure the amount of extra length that you will need. Unless your “fashion” fabric is much wider than your muslin, this extra fabric will be a separate piece sewn on along the outer edge on the straight-of-grain.
Repeat this technique from the hip point of the side seam.
58 Draping Period Costumes
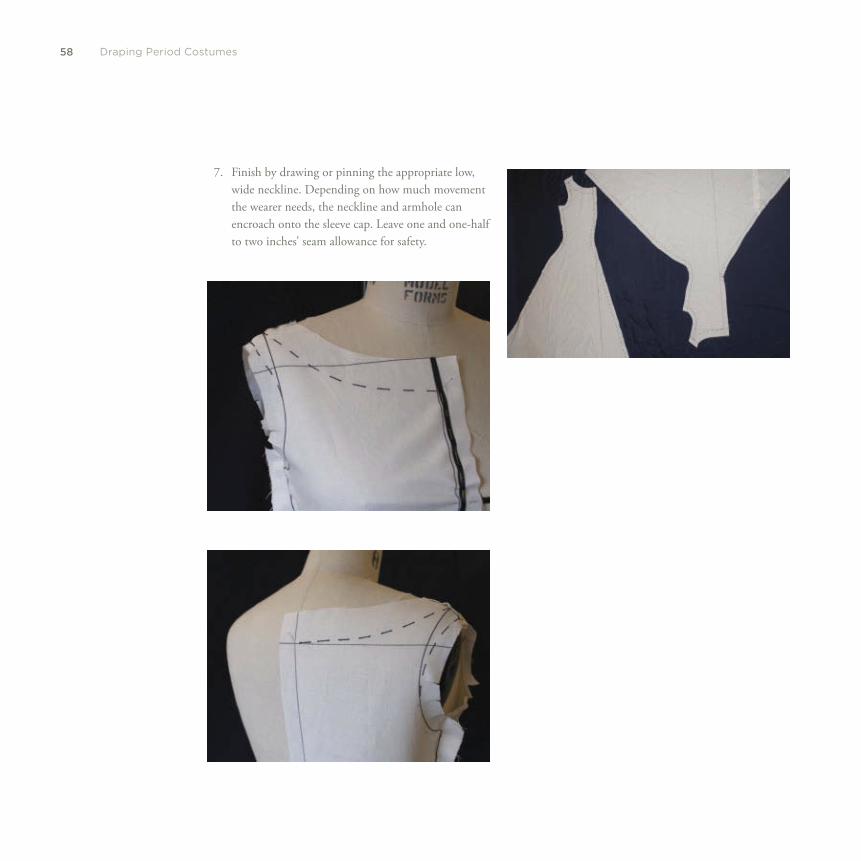
7. Finish by drawing or pinning the appropriate low, wide neckline. Depending on how much movement the wearer needs, the neckline and armhole can encroach onto the sleeve cap. Leave one and one-half to two inches’ seam allowance for safety.
59Cut and Shaped to Fit: Th e Gothic Period
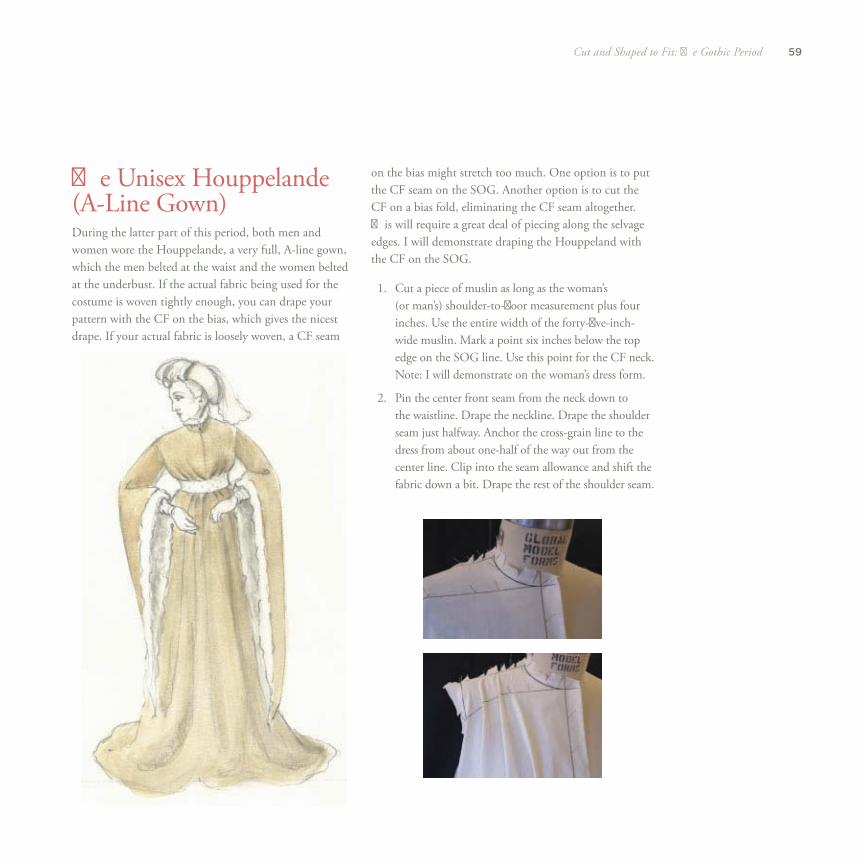
Th e Unisex Houppelande (A-Line Gown) During the latter part of this period, both men and women wore the Houppelande, a very full, A-line gown, which the men belted at the waist and the women belted at the underbust. If the actual fabric being used for the costume is woven tightly enough, you can drape your pattern with the CF on the bias, which gives the nicest drape. If your actual fabric is loosely woven, a CF seam
on the bias might stretch too much. One option is to put the CF seam on the SOG. Another option is to cut the CF on a bias fold, eliminating the CF seam altogether. Th is will require a great deal of piecing along the selvage edges. I will demonstrate draping the Houppeland with the CF on the SOG.
1. Cut a piece of muslin as long as the woman’s (or man’s) shoulder-to-fl oor measurement plus four inches. Use the entire width of the forty-fi ve-inch-wide muslin. Mark a point six inches below the top edge on the SOG line. Use this point for the CF neck. Note: I will demonstrate on the woman’s dress form.
2. Pin the center front seam from the neck down to the waistline. Drape the neckline. Drape the shoulder seam just halfway. Anchor the cross-grain line to the dress from about one-half of the way out from the center line. Clip into the seam allowance and shift the fabric down a bit. Drape the rest of the shoulder seam.
60 Draping Period Costumes
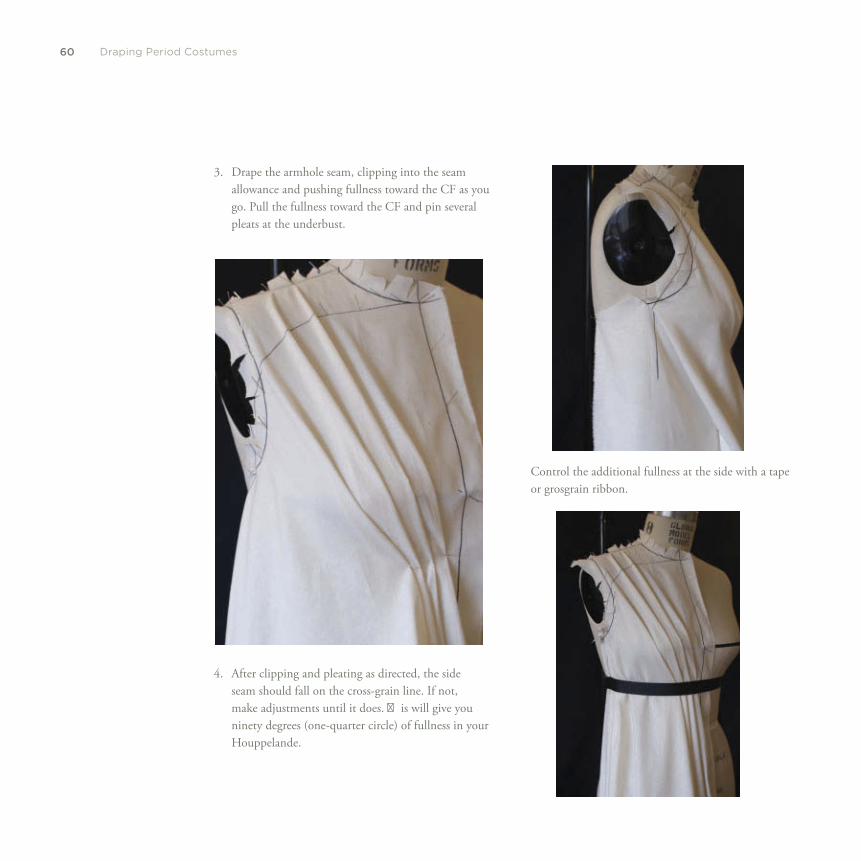
4. After clipping and pleating as directed, the side seam should fall on the cross-grain line. If not, make adjustments until it does. Th is will give you ninety degrees (one-quarter circle) of fullness in your Houppelande.
Control the additional fullness at the side with a tape or grosgrain ribbon.
3. Drape the armhole seam, clipping into the seam allowance and pushing fullness toward the CF as you go. Pull the fullness toward the CF and pin several pleats at the underbust.
61Cut and Shaped to Fit: Th e Gothic Period
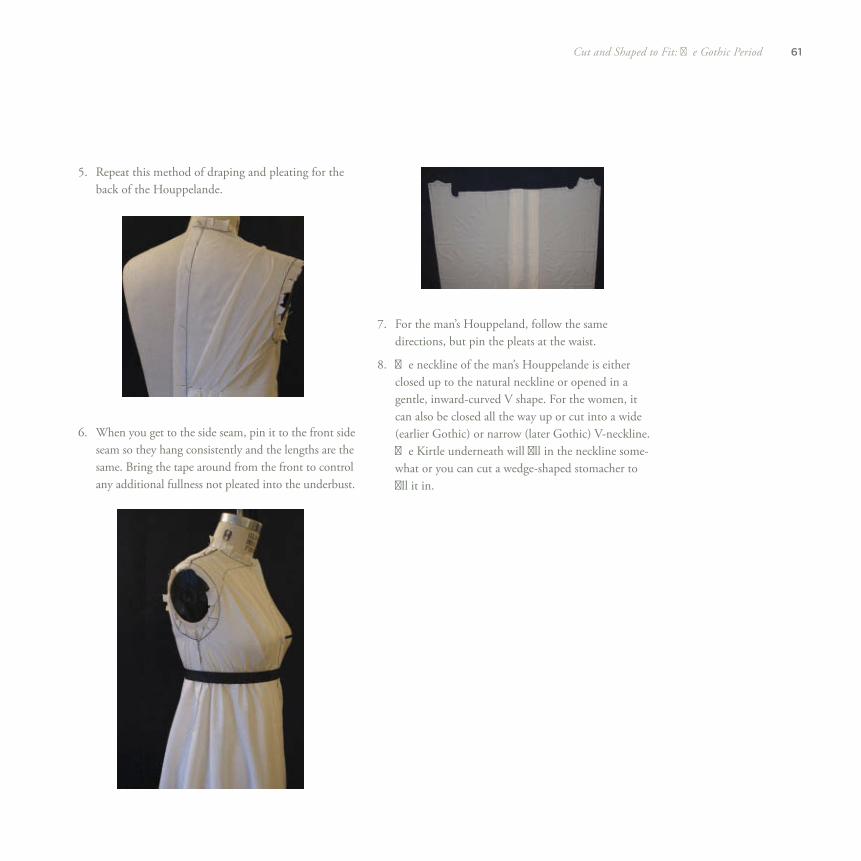
5. Repeat this method of draping and pleating for the back of the Houppelande.
7. For the man’s Houppeland, follow the same directions, but pin the pleats at the waist.
8. Th e neckline of the man’s Houppelande is either closed up to the natural neckline or opened in a gentle, inward-curved V shape. For the women, it can also be closed all the way up or cut into a wide (earlier Gothic) or narrow (later Gothic) V-neckline. Th e Kirtle underneath will fi ll in the neckline some-what or you can cut a wedge-shaped stomacher to fi ll it in.
6. When you get to the side seam, pin it to the front side seam so they hang consistently and the lengths are the same. Bring the tape around from the front to control any additional fullness not pleated into the underbust.

62 Draping Period Costumes
Woman’s High-Waisted Gown (Houppelande) with Fitted Bodice Toward the end of the Gothic period, the high-waisted silhouette of the woman’s belted Houppeland lost the soft folds in the upper portion. Th e bodice was, for the fi rst time, cut separately from the skirt. Th is allowed for a more controlled fi t above and more fullness in the skirt.
1. Cut a piece of muslin four inches shorter than the woman’s shoulder-to-waist measurement and as wide as one-quarter of her chest measurement plus four inches.
2. Pin the center front seam at the neckline, to the center of the bust point tape, and at the underbust. Drape the neckline, the shoulder seam, and the side seam. Pin the high waist seam from the side seam until just before you are below the bust point. Repeat from center front.
63Cut and Shaped to Fit: Th e Gothic Period
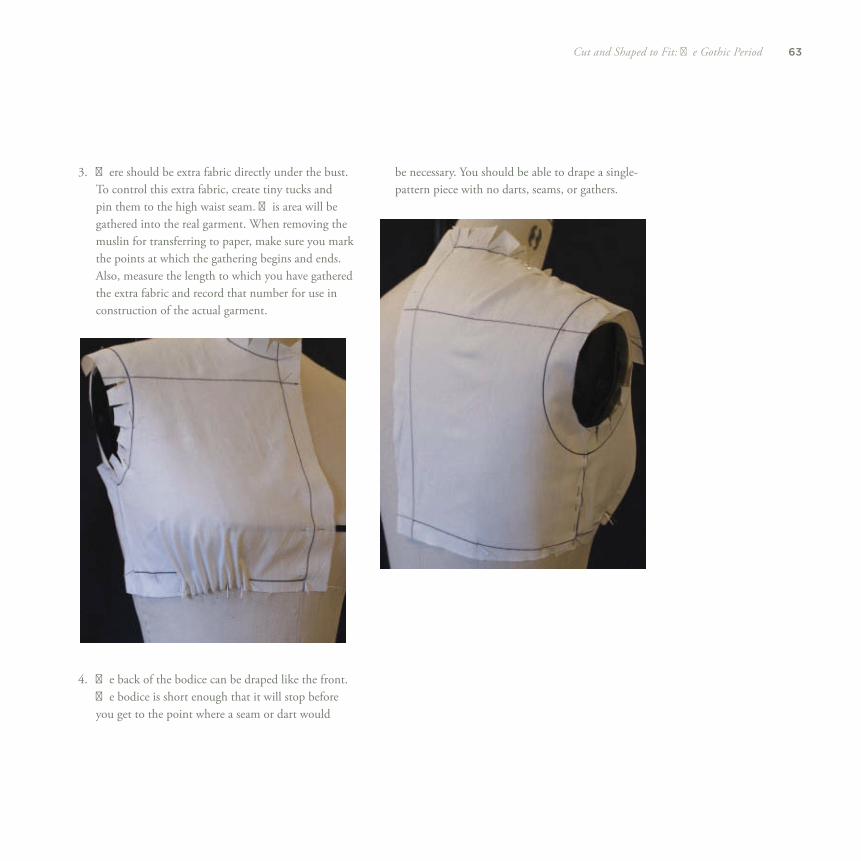
3. Th ere should be extra fabric directly under the bust. To control this extra fabric, create tiny tucks and pin them to the high waist seam. Th is area will be gathered into the real garment. When removing the muslin for transferring to paper, make sure you mark the points at which the gathering begins and ends. Also, measure the length to which you have gathered the extra fabric and record that number for use in construction of the actual garment.
4. Th e back of the bodice can be draped like the front. Th e bodice is short enough that it will stop before you get to the point where a seam or dart would
be necessary. You should be able to drape a single-pattern piece with no darts, seams, or gathers.
64 Draping Period Costumes
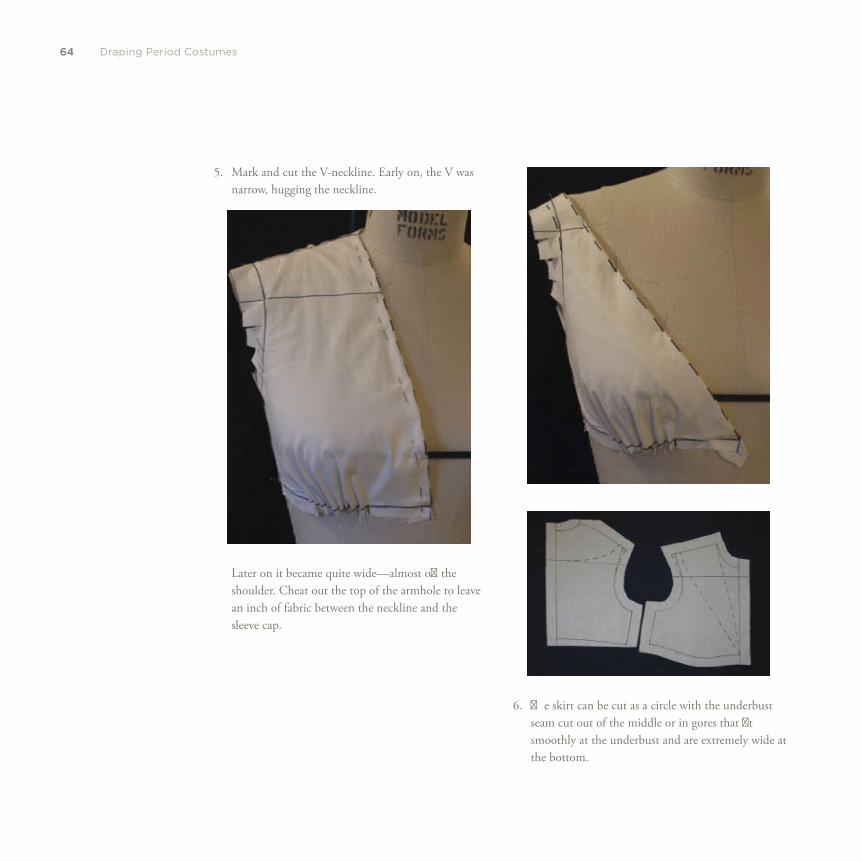
Later on it became quite wide—almost off the shoulder. Cheat out the top of the armhole to leave an inch of fabric between the neckline and the sleeve cap.
6. Th e skirt can be cut as a circle with the underbust seam cut out of the middle or in gores that fi t smoothly at the underbust and are extremely wide at the bottom.
5. Mark and cut the V-neckline. Early on, the V was narrow, hugging the neckline.
four
T H E H E I G H T O F A R T I F I C I A L
S I L H O U E T T E
66 Draping Period Costumes
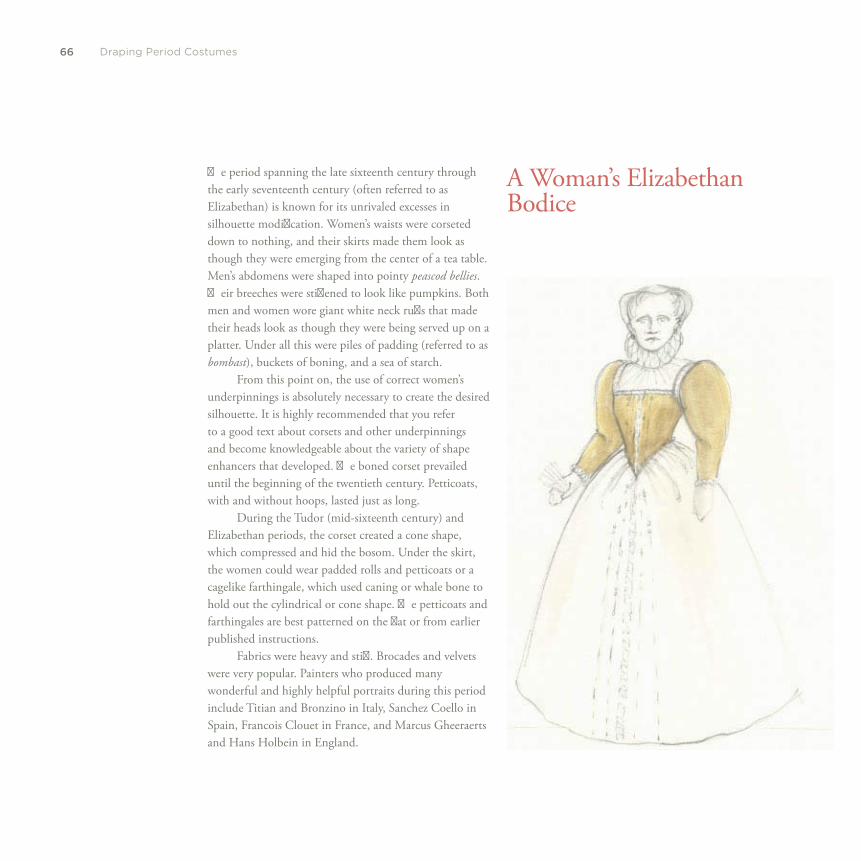
Th e period spanning the late sixteenth century through the early seventeenth century (often referred to as Elizabethan) is known for its unrivaled excesses in silhouette modifi cation. Women’s waists were corseted down to nothing, and their skirts made them look as though they were emerging from the center of a tea table. Men’s abdomens were shaped into pointy peascod bellies . Th eir breeches were stiff ened to look like pumpkins. Both men and women wore giant white neck ruff s that made their heads look as though they were being served up on a platter. Under all this were piles of padding (referred to as bombast ), buckets of boning, and a sea of starch.
From this point on, the use of correct women’s underpinnings is absolutely necessary to create the desired silhouette. It is highly recommended that you refer to a good text about corsets and other underpinnings and become knowledgeable about the variety of shape enhancers that developed. Th e boned corset prevailed until the beginning of the twentieth century. Petticoats, with and without hoops, lasted just as long.
During the Tudor (mid-sixteenth century) and Elizabethan periods, the corset created a cone shape, which compressed and hid the bosom. Under the skirt, the women could wear padded rolls and petticoats or a cagelike farthingale, which used caning or whale bone to hold out the cylindrical or cone shape. Th e petticoats and farthingales are best patterned on the fl at or from earlier published instructions.
Fabrics were heavy and stiff . Brocades and velvets were very popular. Painters who produced many wonderful and highly helpful portraits during this period include Titian and Bronzino in Italy, Sanchez Coello in Spain, Francois Clouet in France, and Marcus Gheeraerts and Hans Holbein in England.
A Woman’s Elizabethan Bodice
67Th e Height of Artifi cial Silhouette
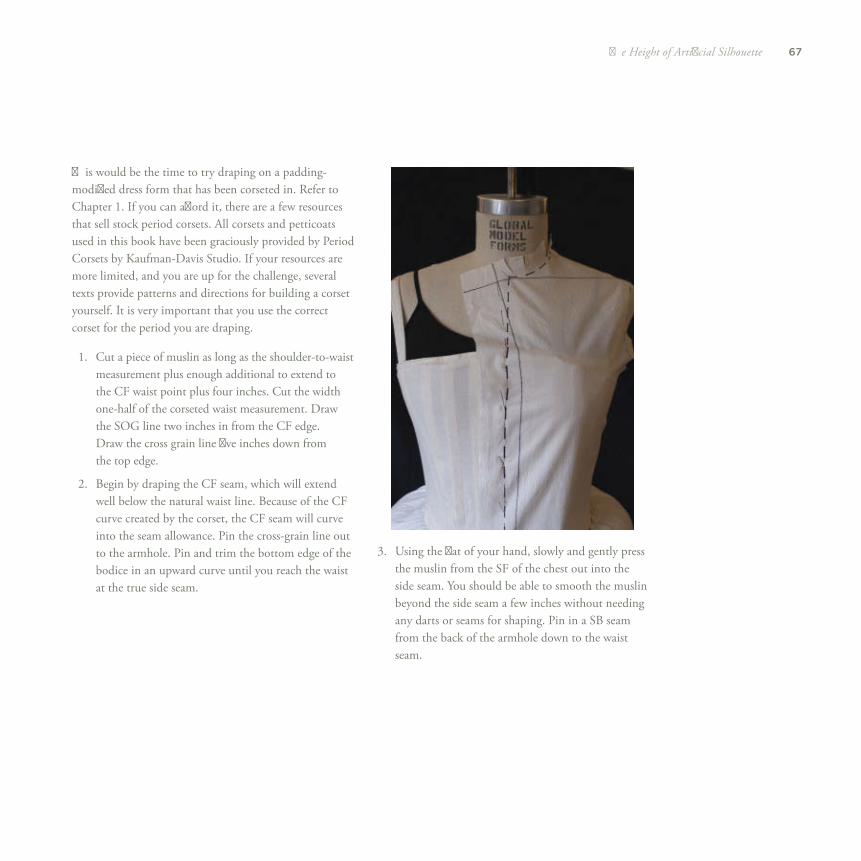
Th is would be the time to try draping on a padding-modifi ed dress form that has been corseted in. Refer to Chapter 1 . If you can aff ord it, there are a few resources that sell stock period corsets. All corsets and petticoats used in this book have been graciously provided by Period Corsets by Kaufman-Davis Studio. If your resources are more limited, and you are up for the challenge, several texts provide patterns and directions for building a corset yourself. It is very important that you use the correct corset for the period you are draping.
1. Cut a piece of muslin as long as the shoulder-to-waist measurement plus enough additional to extend to the CF waist point plus four inches. Cut the width one-half of the corseted waist measurement. Draw the SOG line two inches in from the CF edge. Draw the cross grain line fi ve inches down from the top edge.
2. Begin by draping the CF seam, which will extend well below the natural waist line. Because of the CF curve created by the corset, the CF seam will curve into the seam allowance. Pin the cross-grain line out to the armhole. Pin and trim the bottom edge of the bodice in an upward curve until you reach the waist at the true side seam.
3. Using the fl at of your hand, slowly and gently press the muslin from the SF of the chest out into the side seam. You should be able to smooth the muslin beyond the side seam a few inches without needing any darts or seams for shaping. Pin in a SB seam from the back of the armhole down to the waist seam.
68 Draping Period Costumes
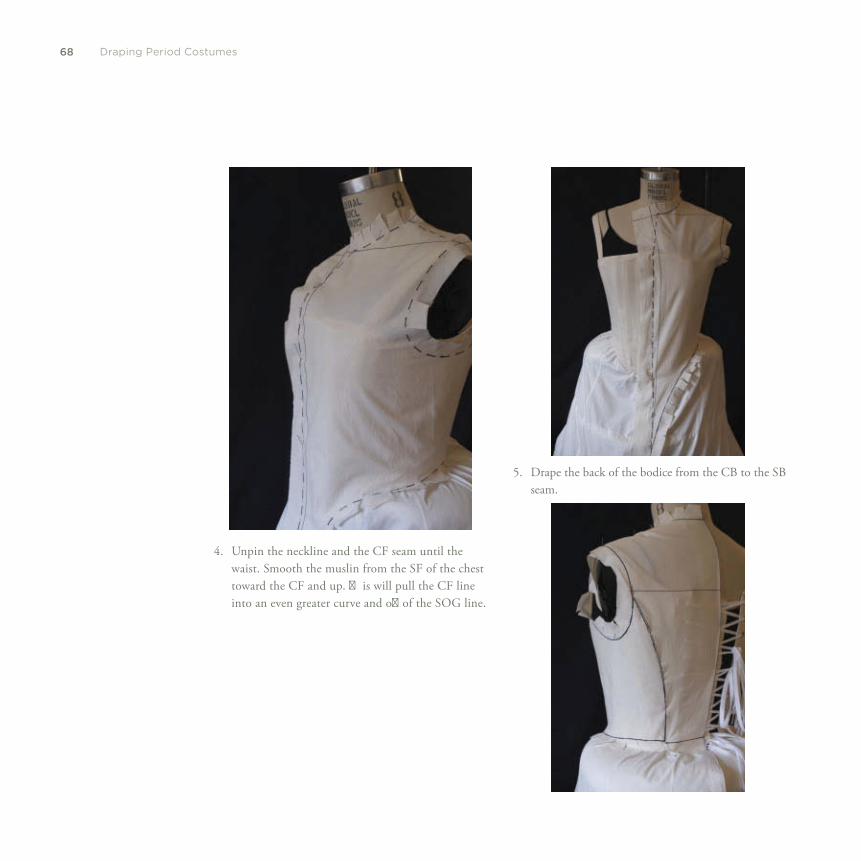
4. Unpin the neckline and the CF seam until the waist. Smooth the muslin from the SF of the chest toward the CF and up. Th is will pull the CF line into an even greater curve and off of the SOG line.
5. Drape the back of the bodice from the CB to the SB seam.

69Th e Height of Artifi cial Silhouette
6. Depending on the design, you can either drape a standing collar or mark and cut out an open neck-line. During the Tudor and Elizabethan periods, women’s necklines were often a low, wide square, which could have an upward curve at the CF. Sometimes the back of the neckline came to a point between the shoulder blades. To create the widest neckline possible, you can extend the armhole out a little in order to maintain a full inch of “shoulder strap” on which to sew the sleeve.
During this period and up until the middle of the nineteenth century, most skirts were made from straight lengths of fabric. Th e fabric can be either turned on the cross grain (if it is wide enough to reach from waist to hem plus room for petticoats) or several pieces of fabric, cut on the SOG, and sewn together along the selvedge edges. A good standard for a nice, full skirt is fi ve yards around the hem.
70 Draping Period Costumes
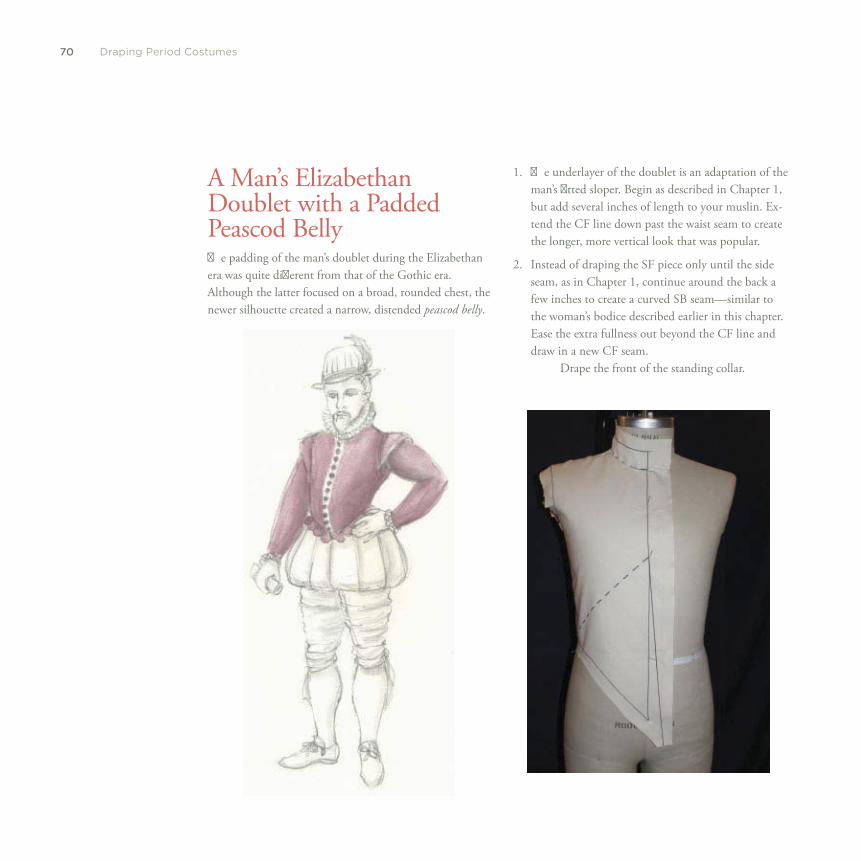
A Man’s Elizabethan Doublet with a Padded Peascod Belly Th e padding of the man’s doublet during the Elizabethan era was quite diff erent from that of the Gothic era. Although the latter focused on a broad, rounded chest, the newer silhouette created a narrow, distended peascod belly .
1. Th e underlayer of the doublet is an adaptation of the man’s fi tted sloper. Begin as described in Chapter 1 , but add several inches of length to your muslin. Ex-tend the CF line down past the waist seam to create the longer, more vertical look that was popular.
2. Instead of draping the SF piece only until the side seam, as in Chapter 1 , continue around the back a few inches to create a curved SB seam—similar to the woman’s bodice described earlier in this chapter. Ease the extra fullness out beyond the CF line and draw in a new CF seam.
Drape the front of the standing collar.
71Th e Height of Artifi cial Silhouette
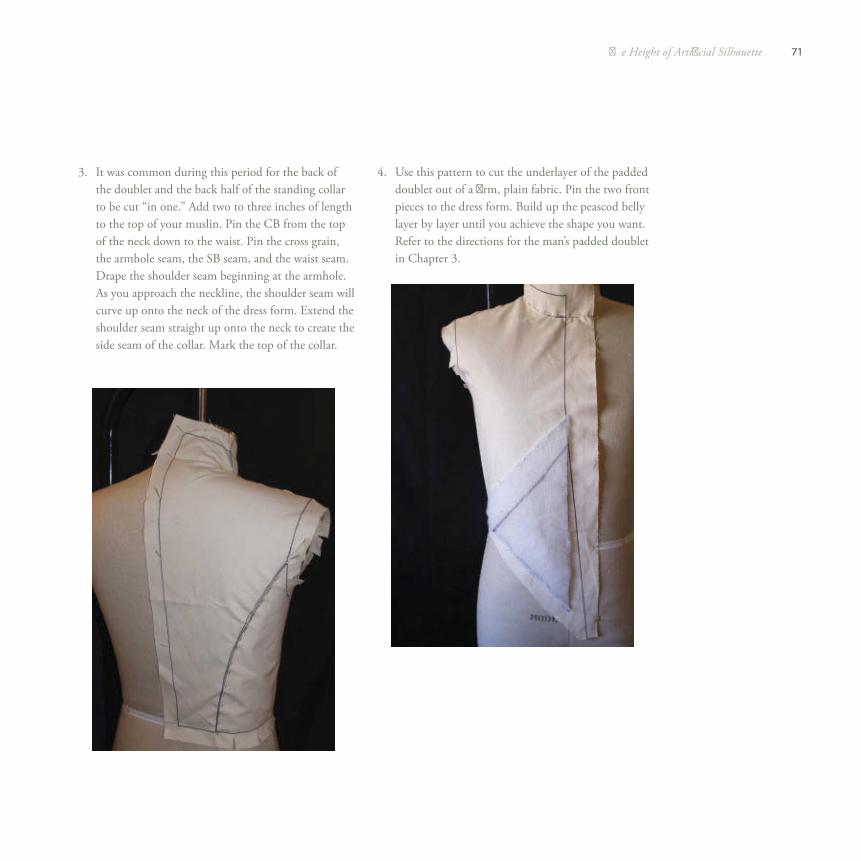
3. It was common during this period for the back of the doublet and the back half of the standing collar to be cut “in one.” Add two to three inches of length to the top of your muslin. Pin the CB from the top of the neck down to the waist. Pin the cross grain, the armhole seam, the SB seam, and the waist seam. Drape the shoulder seam beginning at the armhole. As you approach the neckline, the shoulder seam will curve up onto the neck of the dress form. Extend the shoulder seam straight up onto the neck to create the side seam of the collar. Mark the top of the collar.
4. Use this pattern to cut the underlayer of the padded doublet out of a fi rm, plain fabric. Pin the two front pieces to the dress form. Build up the peascod belly layer by layer until you achieve the shape you want. Refer to the directions for the man’s padded doublet in Chapter 3 .
72 Draping Period Costumes
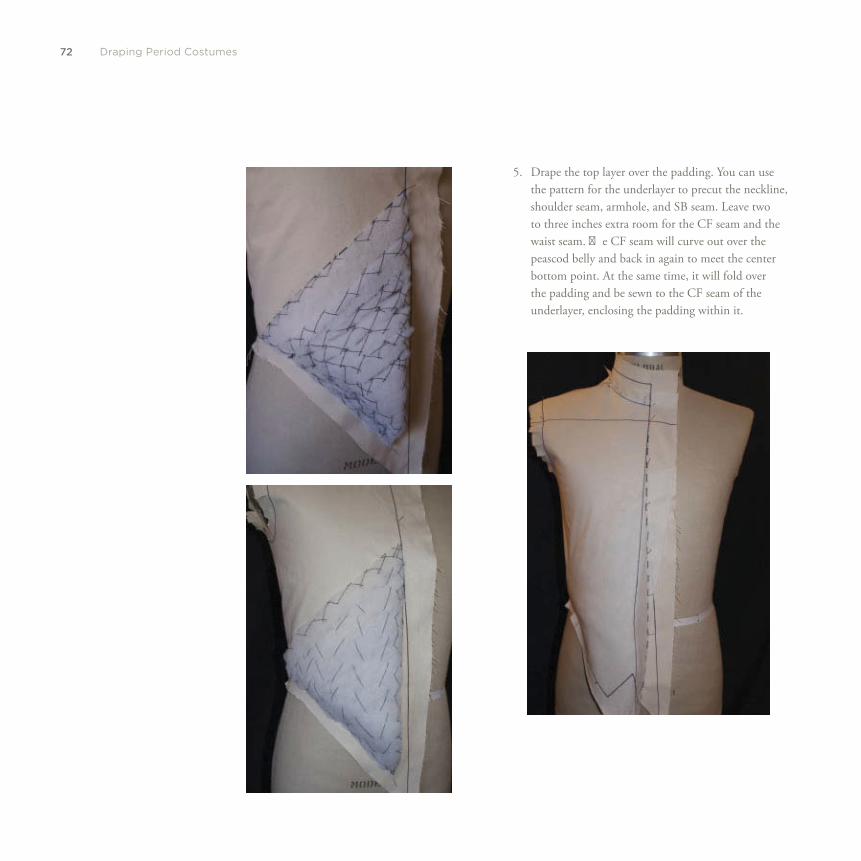
5. Drape the top layer over the padding. You can use the pattern for the underlayer to precut the neckline, shoulder seam, armhole, and SB seam. Leave two to three inches extra room for the CF seam and the waist seam. Th e CF seam will curve out over the peascod belly and back in again to meet the center bottom point. At the same time, it will fold over the padding and be sewn to the CF seam of the underlayer, enclosing the padding within it.

73Th e Height of Artifi cial Silhouette
6. To accommodate the padding at the waist seam, you will need to do some gathering and perhaps a dart.
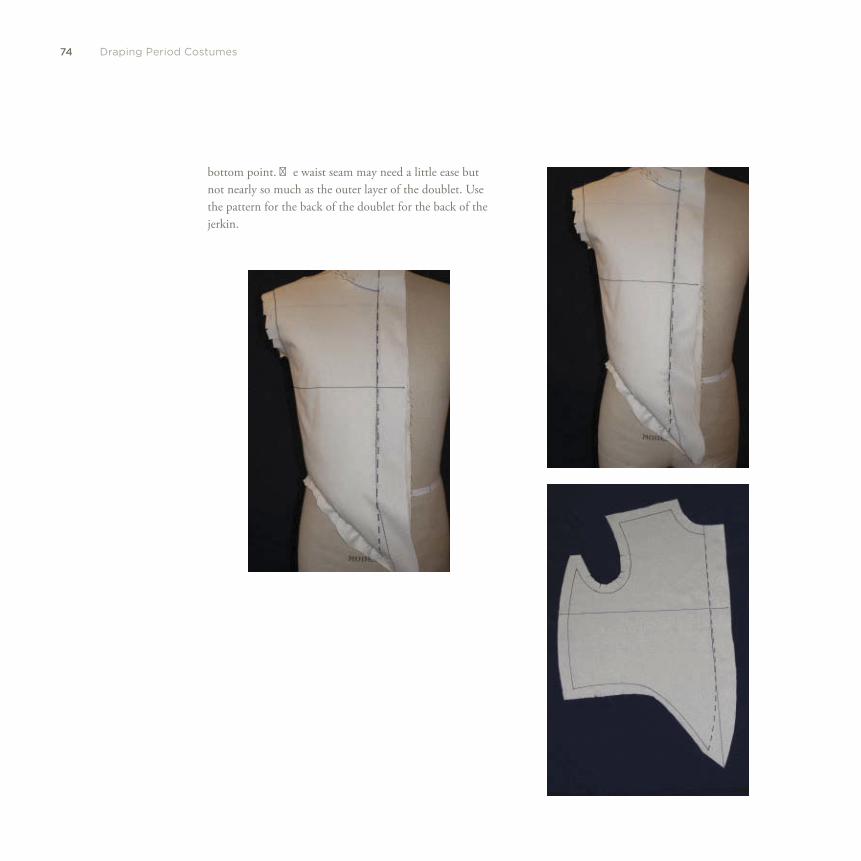
Th e Man’s Elizabethan Jerkin Th e jerkin was worn over the padded doublet; therefore, you will drape it over the padded doublet. It should lay smoothly over the padding. As with the top layer of the padded doublet, you can use the pattern for the underlayer to precut the neckline, shoulder seam, armhole, and SB seam, allowing a little bit of extra room to accommodate the doublet underneath. Allow the CF seam to curve out over the padding and back in to the
74 Draping Period Costumes
bottom point. Th e waist seam may need a little ease but not nearly so much as the outer layer of the doublet. Use the pattern for the back of the doublet for the back of the jerkin.
fi ve
T H E M E N R E T U R N T O S O F T N E S S …
76 Draping Period Costumes
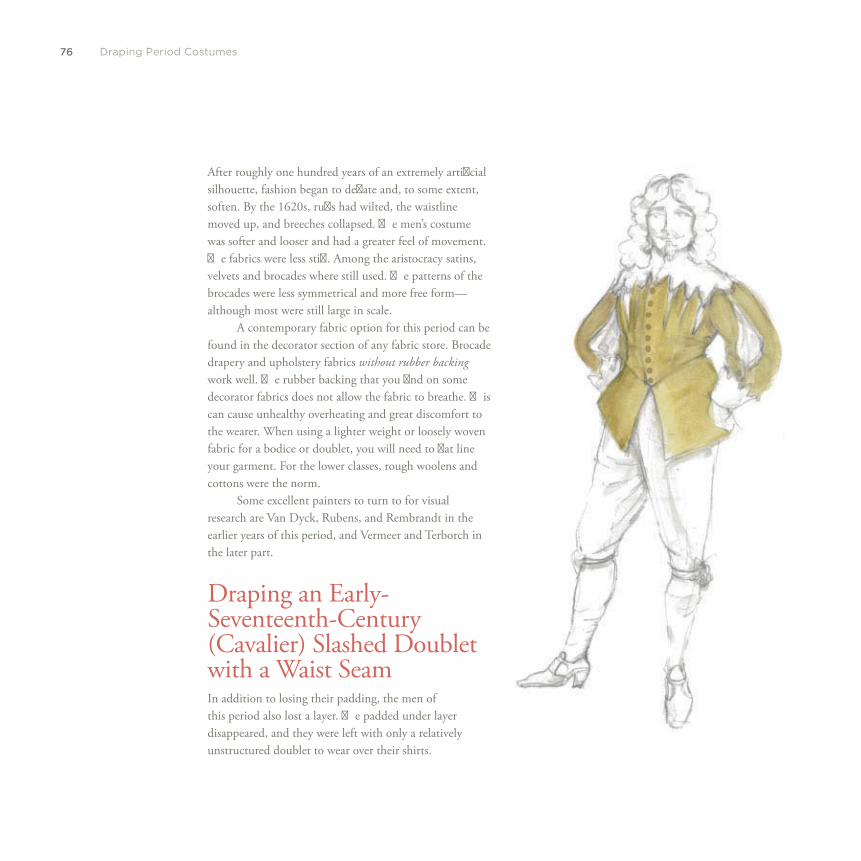
After roughly one hundred years of an extremely artifi cial silhouette, fashion began to defl ate and, to some extent, soften. By the 1620s, ruff s had wilted, the waistline moved up, and breeches collapsed. Th e men’s costume was softer and looser and had a greater feel of movement. Th e fabrics were less stiff . Among the aristocracy satins, velvets and brocades where still used. Th e patterns of the brocades were less symmetrical and more free form—although most were still large in scale.
A contemporary fabric option for this period can be found in the decorator section of any fabric store. Brocade drapery and upholstery fabrics without rubber backing work well. Th e rubber backing that you fi nd on some decorator fabrics does not allow the fabric to breathe. Th is can cause unhealthy overheating and great discomfort to the wearer. When using a lighter weight or loosely woven fabric for a bodice or doublet, you will need to fl at line your garment. For the lower classes, rough woolens and cottons were the norm.
Some excellent painters to turn to for visual research are Van Dyck, Rubens, and Rembrandt in the earlier years of this period, and Vermeer and Terborch in the later part.
Draping an Early-Seventeenth-Century (Cavalier) Slashed Doublet with a Waist Seam In addition to losing their padding, the men of this period also lost a layer. Th e padded under layer disappeared, and they were left with only a relatively unstructured doublet to wear over their shirts.
77Th e Men Return to Softness…
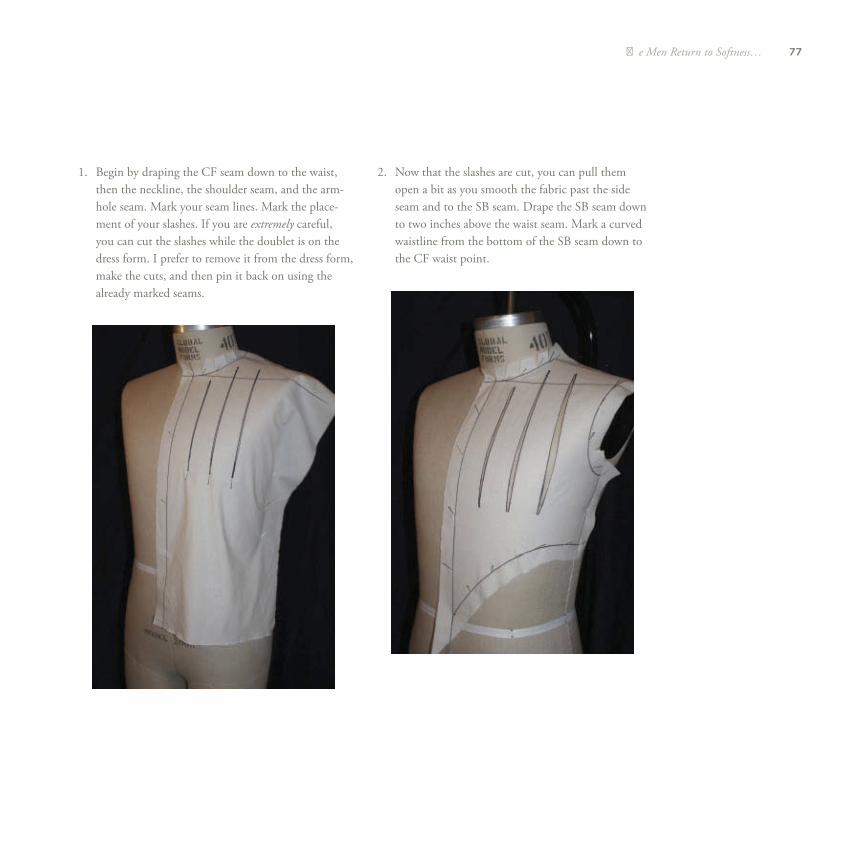
1. Begin by draping the CF seam down to the waist, then the neckline, the shoulder seam, and the arm-hole seam. Mark your seam lines. Mark the place-ment of your slashes. If you are extremely careful, you can cut the slashes while the doublet is on the dress form. I prefer to remove it from the dress form, make the cuts, and then pin it back on using the already marked seams.
2. Now that the slashes are cut, you can pull them open a bit as you smooth the fabric past the side seam and to the SB seam. Drape the SB seam down to two inches above the waist seam. Mark a curved waistline from the bottom of the SB seam down to the CF waist point.
78 Draping Period Costumes
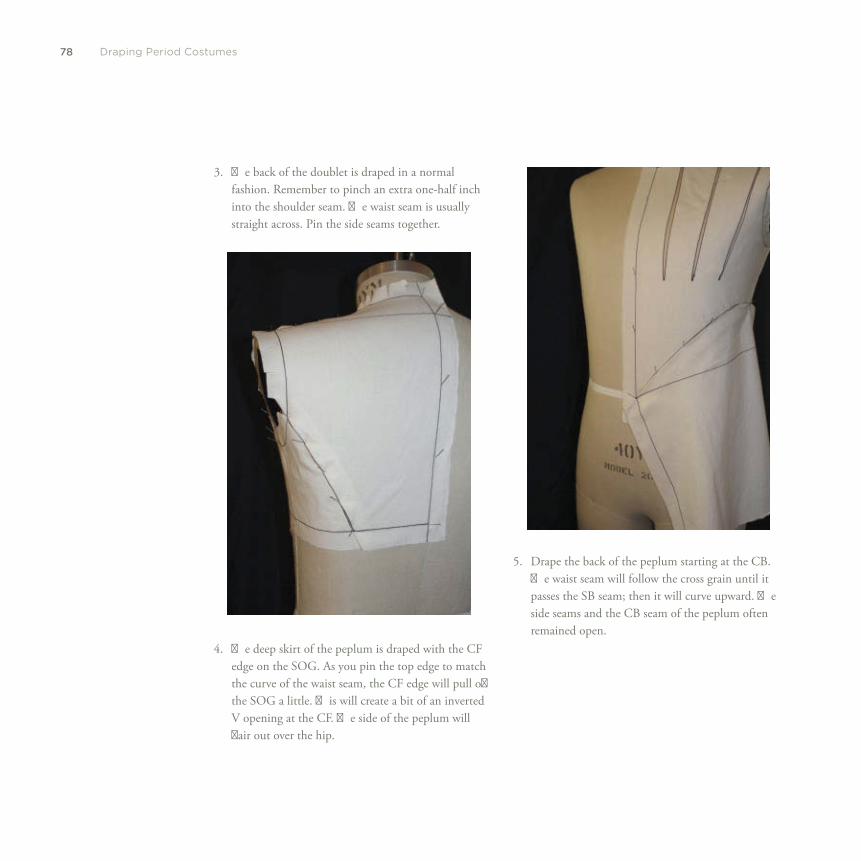
3. Th e back of the doublet is draped in a normal fashion. Remember to pinch an extra one-half inch into the shoulder seam. Th e waist seam is usually straight across. Pin the side seams together.
4. Th e deep skirt of the peplum is draped with the CF edge on the SOG. As you pin the top edge to match the curve of the waist seam, the CF edge will pull off the SOG a little. Th is will create a bit of an inverted V opening at the CF. Th e side of the peplum will fl air out over the hip.
5. Drape the back of the peplum starting at the CB. Th e waist seam will follow the cross grain until it passes the SB seam; then it will curve upward. Th e side seams and the CB seam of the peplum often remained open.
79Th e Men Return to Softness…
Draping an Early-Seventeenth-Century (Cavalier) Doublet without a Waist Seam
80 Draping Period Costumes
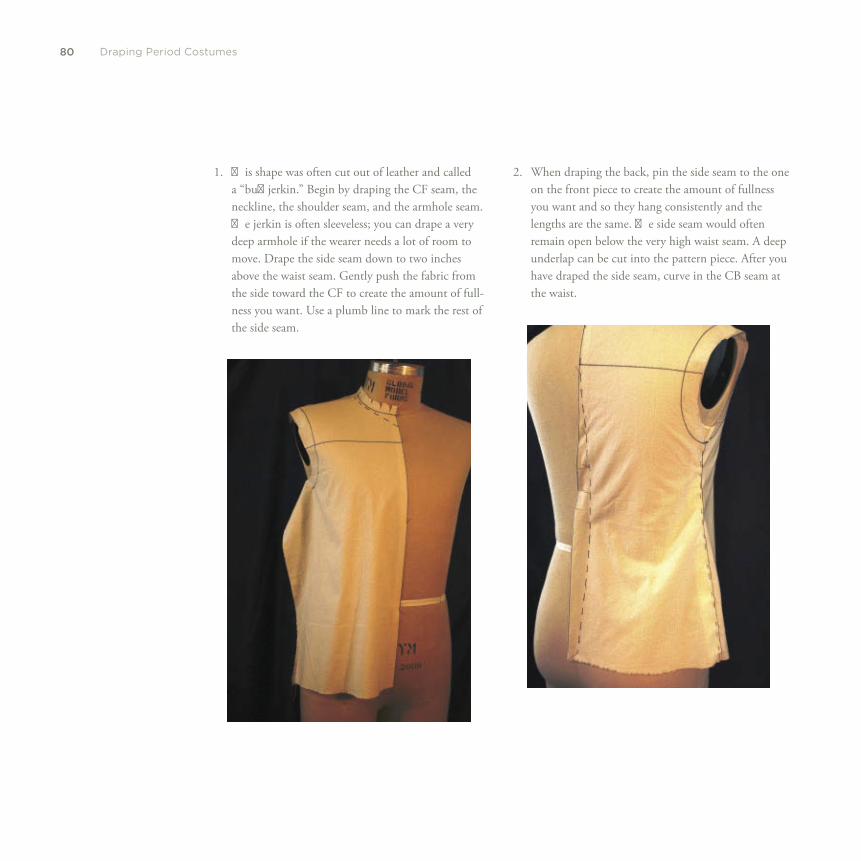
1. Th is shape was often cut out of leather and called a “buff jerkin.” Begin by draping the CF seam, the neckline, the shoulder seam, and the armhole seam. Th e jerkin is often sleeveless; you can drape a very deep armhole if the wearer needs a lot of room to move. Drape the side seam down to two inches above the waist seam. Gently push the fabric from the side toward the CF to create the amount of full-ness you want. Use a plumb line to mark the rest of the side seam.
2. When draping the back, pin the side seam to the one on the front piece to create the amount of fullness you want and so they hang consistently and the lengths are the same. Th e side seam would often remain open below the very high waist seam. A deep underlap can be cut into the pattern piece. After you have draped the side seam, curve in the CB seam at the waist.
81Th e Men Return to Softness…
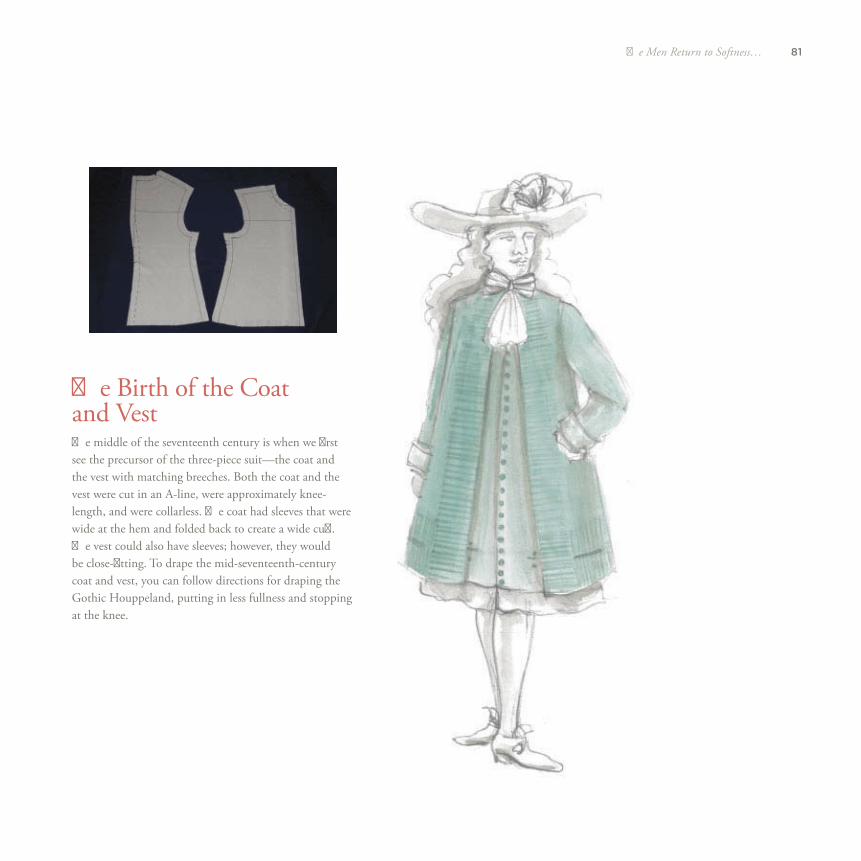
Th e Birth of the Coat and Vest Th e middle of the seventeenth century is when we fi rst see the precursor of the three-piece suit—the coat and the vest with matching breeches. Both the coat and the vest were cut in an A-line, were approximately knee-length, and were collarless. Th e coat had sleeves that were wide at the hem and folded back to create a wide cuff . Th e vest could also have sleeves; however, they would be close-fi tting. To drape the mid-seventeenth-century coat and vest, you can follow directions for draping the Gothic Houppeland, putting in less fullness and stopping at the knee.
82 Draping Period Costumes
Draping a Late-Seventeenth-Century Coat
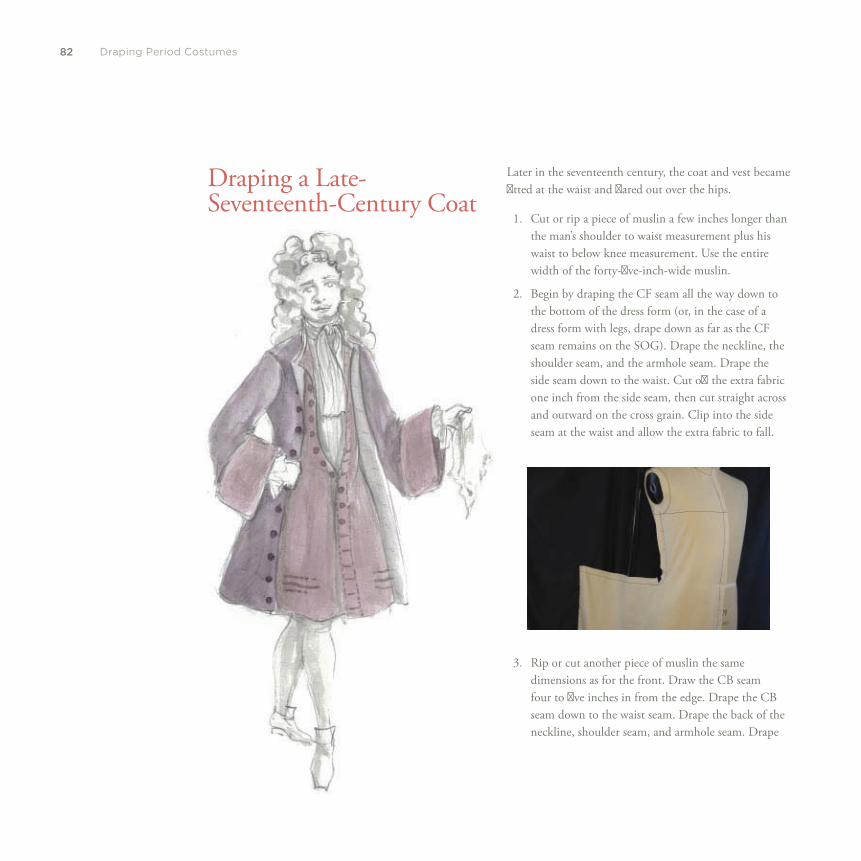
Later in the seventeenth century, the coat and vest became fi tted at the waist and fl ared out over the hips.
1. Cut or rip a piece of muslin a few inches longer than the man’s shoulder to waist measurement plus his waist to below knee measurement. Use the entire width of the forty-fi ve-inch-wide muslin.
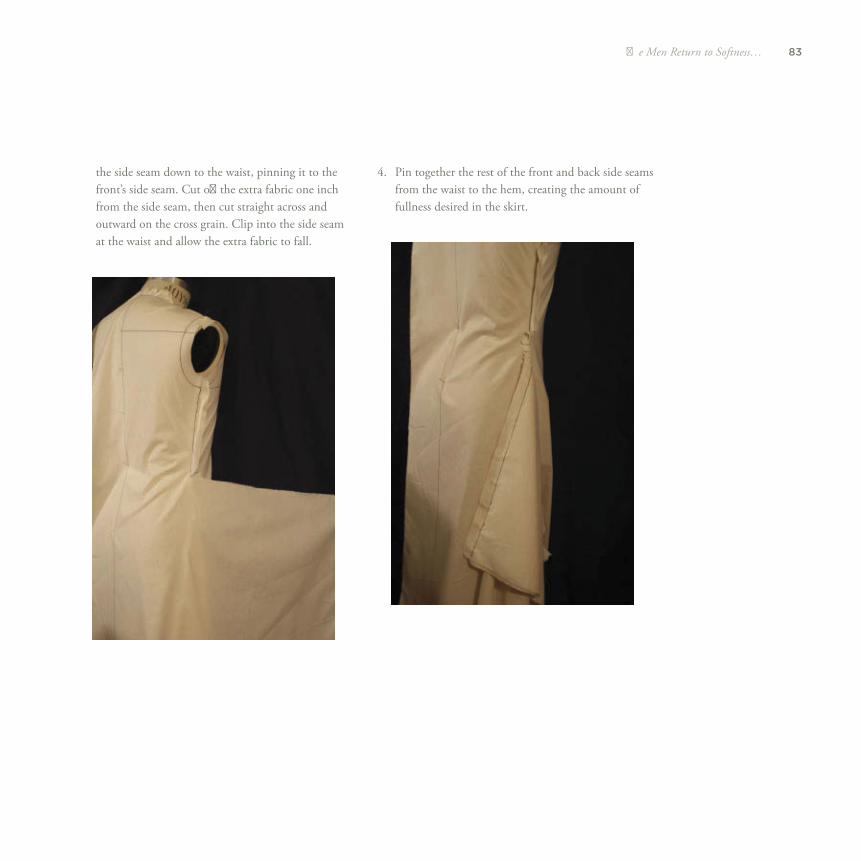
2. Begin by draping the CF seam all the way down to the bottom of the dress form (or, in the case of a dress form with legs, drape down as far as the CF seam remains on the SOG). Drape the neckline, the shoulder seam, and the armhole seam. Drape the side seam down to the waist. Cut off the extra fabric one inch from the side seam, then cut straight across and outward on the cross grain. Clip into the side seam at the waist and allow the extra fabric to fall.
3. Rip or cut another piece of muslin the same dimensions as for the front. Draw the CB seam four to fi ve inches in from the edge. Drape the CB seam down to the waist seam. Drape the back of the neckline, shoulder seam, and armhole seam. Drape
83Th e Men Return to Softness…
the side seam down to the waist, pinning it to the front’s side seam. Cut off the extra fabric one inch from the side seam, then cut straight across and outward on the cross grain. Clip into the side seam at the waist and allow the extra fabric to fall.
4. Pin together the rest of the front and back side seams from the waist to the hem, creating the amount of fullness desired in the skirt.
84 Draping Period Costumes
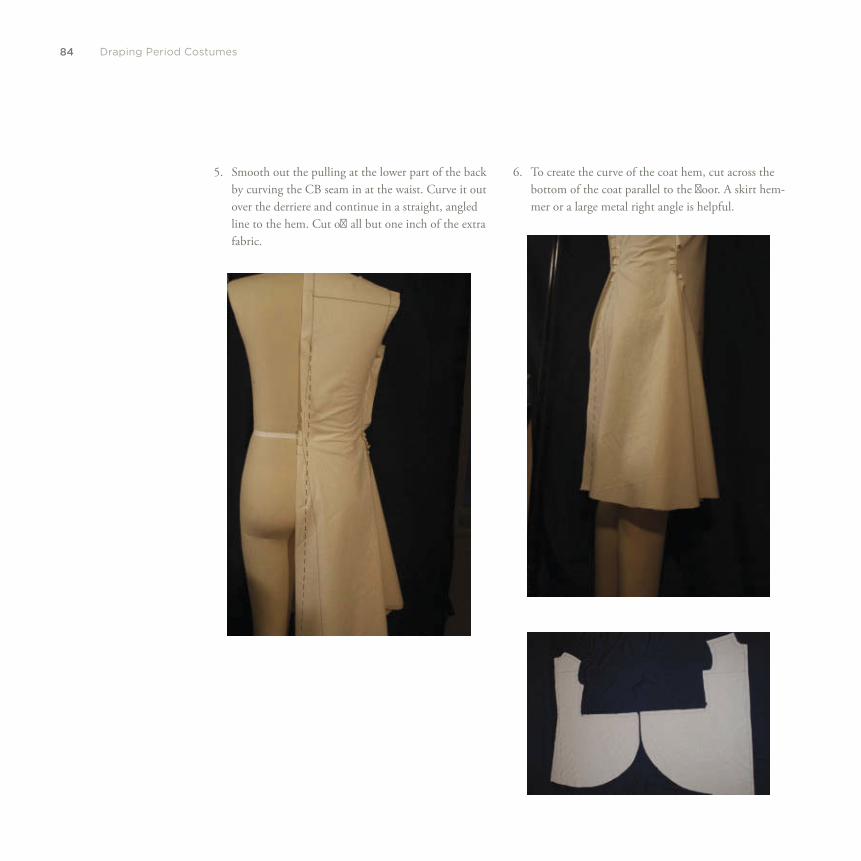
5. Smooth out the pulling at the lower part of the back by curving the CB seam in at the waist. Curve it out over the derriere and continue in a straight, angled line to the hem. Cut off all but one inch of the extra fabric.
6. To create the curve of the coat hem, cut across the bottom of the coat parallel to the fl oor. A skirt hem-mer or a large metal right angle is helpful.

six
. . . W H I L E T H E W O M E N R E M A I N T I G H T L Y
C O R S E T E D
86 Draping Period Costumes
Even though the woman’s overall feel was more relaxed than in the previous period, she was still tightly corseted. Stiff , boned farthingales were removed, yet they were replaced with padded rolls. Th e softer fabrics allowed the skirts to fall in folds rather than stand out like geometric forms.
Draping the Basque Bodice One of the most commonly worn garments for women of this period was the Basque or Basqued bodice. It diff ered from the Elizabethan bodice in a number of ways: the waistline moved upward, a few inches above the waist; the neckline opened up; and rather than being fl attened, the bust was forced upward, blossoming out of the top of the bodice. But it was still heavily boned and worn over a corset. Th e armholes were cut low on the upper arm, constricting movement. Also note that instead of curving forward at the bottom, the back of the armhole continued straight down to the waist, becoming a SB seam. Th e lowest part of the armhole met the SB seam at a right angle. Th is created the odd sleeve placement in the back that can be seen in paintings by Van Dyck and Rembrant as well as, later, Ter Borch and Vermeer. We will explore ways to make this garment more practical.
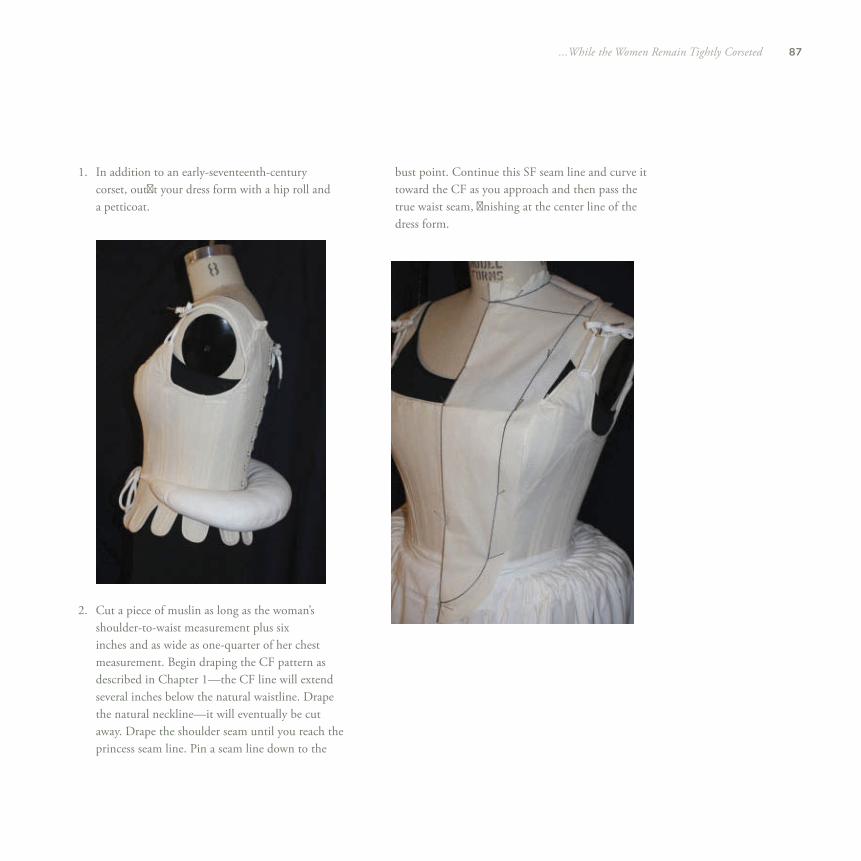
87...While the Women Remain Tightly Corseted
1. In addition to an early-seventeenth-century corset, outfi t your dress form with a hip roll and a petticoat.
2. Cut a piece of muslin as long as the woman’s shoulder-to-waist measurement plus six inches and as wide as one-quarter of her chest measurement. Begin draping the CF pattern as described in Chapter 1 —the CF line will extend several inches below the natural waistline. Drape the natural neckline—it will eventually be cut away. Drape the shoulder seam until you reach the princess seam line. Pin a seam line down to the
bust point. Continue this SF seam line and curve it toward the CF as you approach and then pass the true waist seam, fi nishing at the center line of the dress form.
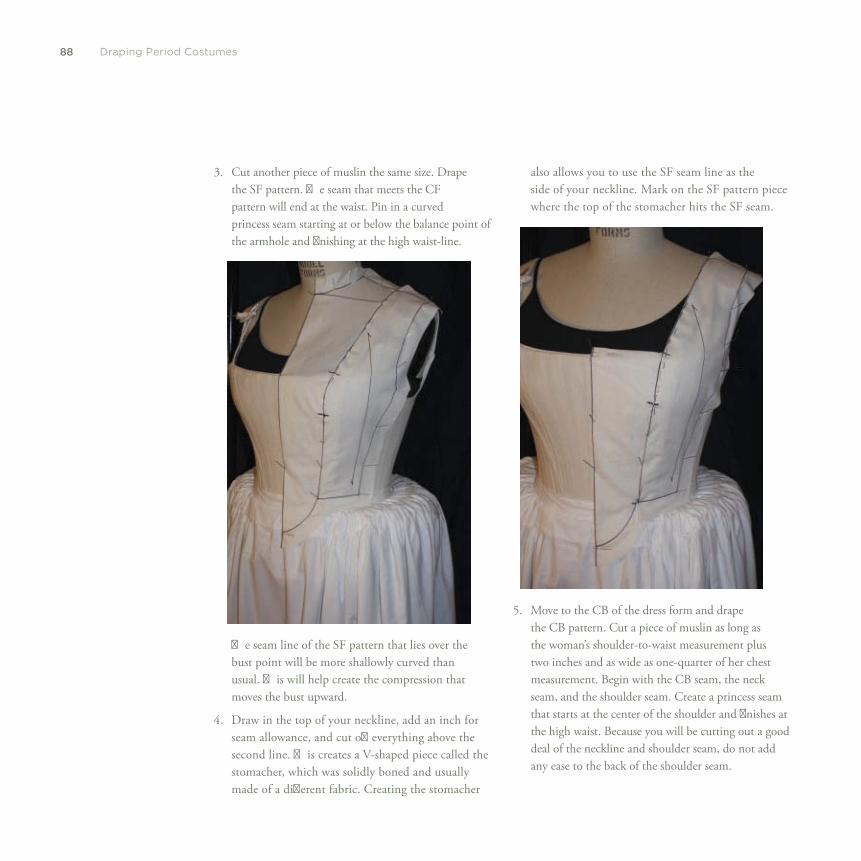
88 Draping Period Costumes
3. Cut another piece of muslin the same size. Drape the SF pattern. Th e seam that meets the CF pattern will end at the waist. Pin in a curved princess seam starting at or below the balance point of the armhole and fi nishing at the high waist-line.
Th e seam line of the SF pattern that lies over the bust point will be more shallowly curved than usual. Th is will help create the compression that moves the bust upward.
4. Draw in the top of your neckline, add an inch for seam allowance, and cut off everything above the second line. Th is creates a V-shaped piece called the stomacher, which was solidly boned and usually made of a diff erent fabric. Creating the stomacher
also allows you to use the SF seam line as the side of your neckline. Mark on the SF pattern piece where the top of the stomacher hits the SF seam.
5. Move to the CB of the dress form and drape the CB pattern. Cut a piece of muslin as long as the woman’s shoulder-to-waist measurement plus two inches and as wide as one-quarter of her chest measurement. Begin with the CB seam, the neck seam, and the shoulder seam. Create a princess seam that starts at the center of the shoulder and fi nishes at the high waist. Because you will be cutting out a good deal of the neckline and shoulder seam, do not add any ease to the back of the shoulder seam.
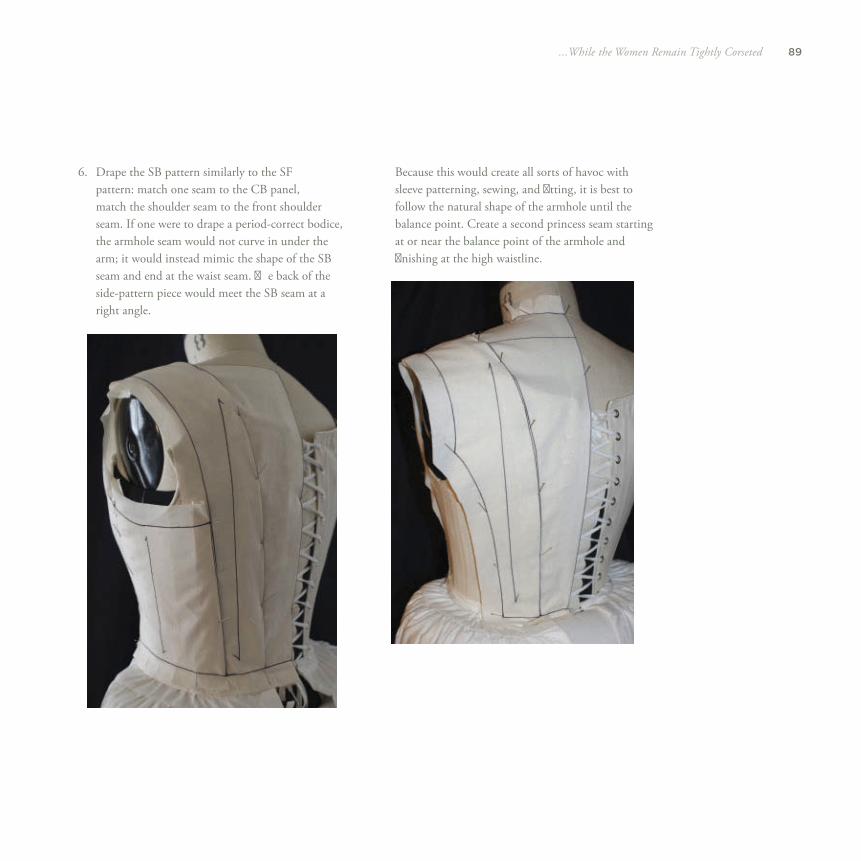
89...While the Women Remain Tightly Corseted
6. Drape the SB pattern similarly to the SF pattern: match one seam to the CB panel, match the shoulder seam to the front shoulder seam. If one were to drape a period-correct bodice, the armhole seam would not curve in under the arm; it would instead mimic the shape of the SB seam and end at the waist seam. Th e back of the side-pattern piece would meet the SB seam at a right angle.
Because this would create all sorts of havoc with sleeve patterning, sewing, and fi tting, it is best to follow the natural shape of the armhole until the balance point. Create a second princess seam starting at or near the balance point of the armhole and fi nishing at the high waistline.
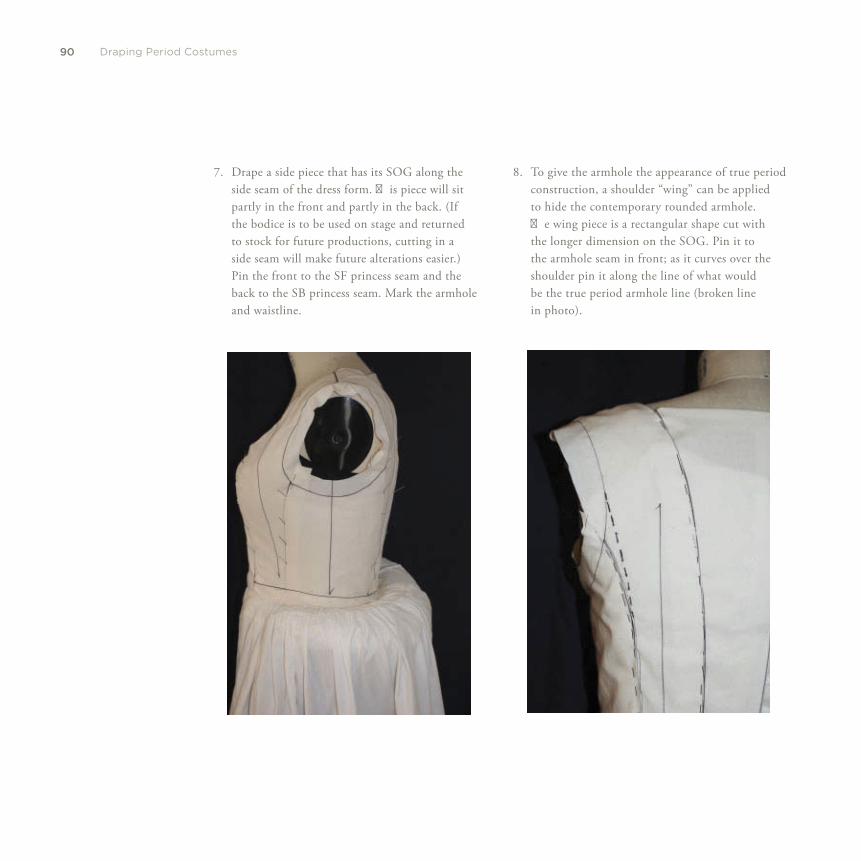
90 Draping Period Costumes
7. Drape a side piece that has its SOG along the side seam of the dress form. Th is piece will sit partly in the front and partly in the back. (If the bodice is to be used on stage and returned to stock for future productions, cutting in a side seam will make future alterations easier.) Pin the front to the SF princess seam and the back to the SB princess seam. Mark the armhole and waistline.
8. To give the armhole the appearance of true period construction, a shoulder “wing” can be applied to hide the contemporary rounded armhole. Th e wing piece is a rectangular shape cut with the longer dimension on the SOG. Pin it to the armhole seam in front; as it curves over the shoulder pin it along the line of what would be the true period armhole line (broken line in photo).
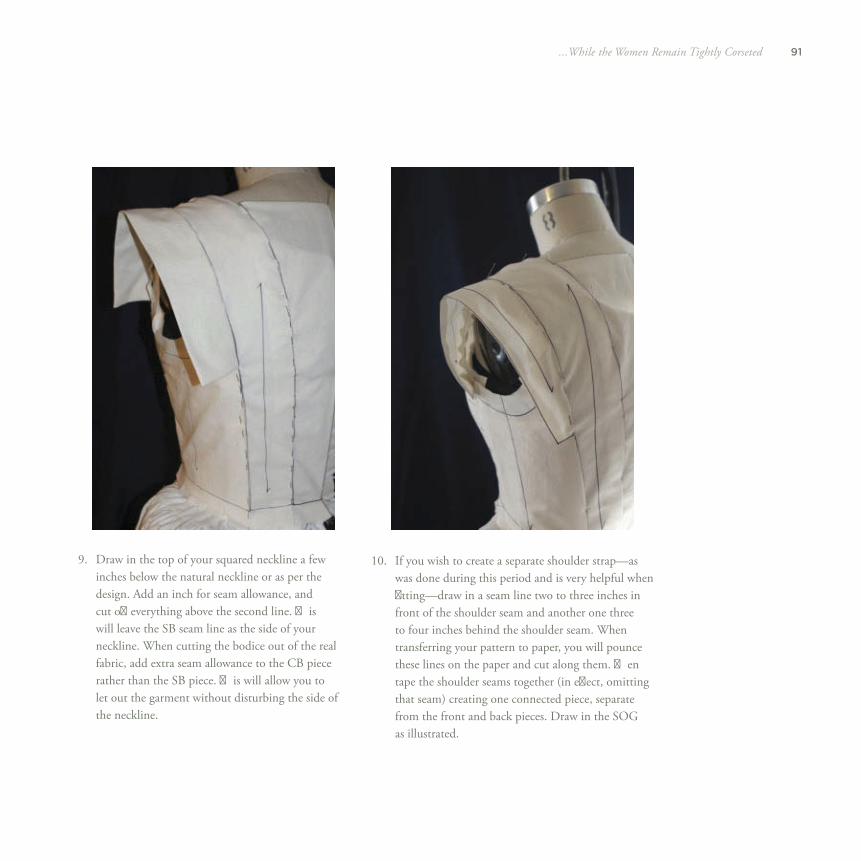
91...While the Women Remain Tightly Corseted
9. Draw in the top of your squared neckline a few inches below the natural neckline or as per the design. Add an inch for seam allowance, and cut off everything above the second line. Th is will leave the SB seam line as the side of your neckline. When cutting the bodice out of the real fabric, add extra seam allowance to the CB piece rather than the SB piece. Th is will allow you to let out the garment without disturbing the side of the neckline.
10. If you wish to create a separate shoulder strap—as was done during this period and is very helpful when fi tting—draw in a seam line two to three inches in front of the shoulder seam and another one three to four inches behind the shoulder seam. When transferring your pattern to paper, you will pounce these lines on the paper and cut along them. Th en tape the shoulder seams together (in eff ect, omitting that seam) creating one connected piece, separate from the front and back pieces. Draw in the SOG as illustrated.
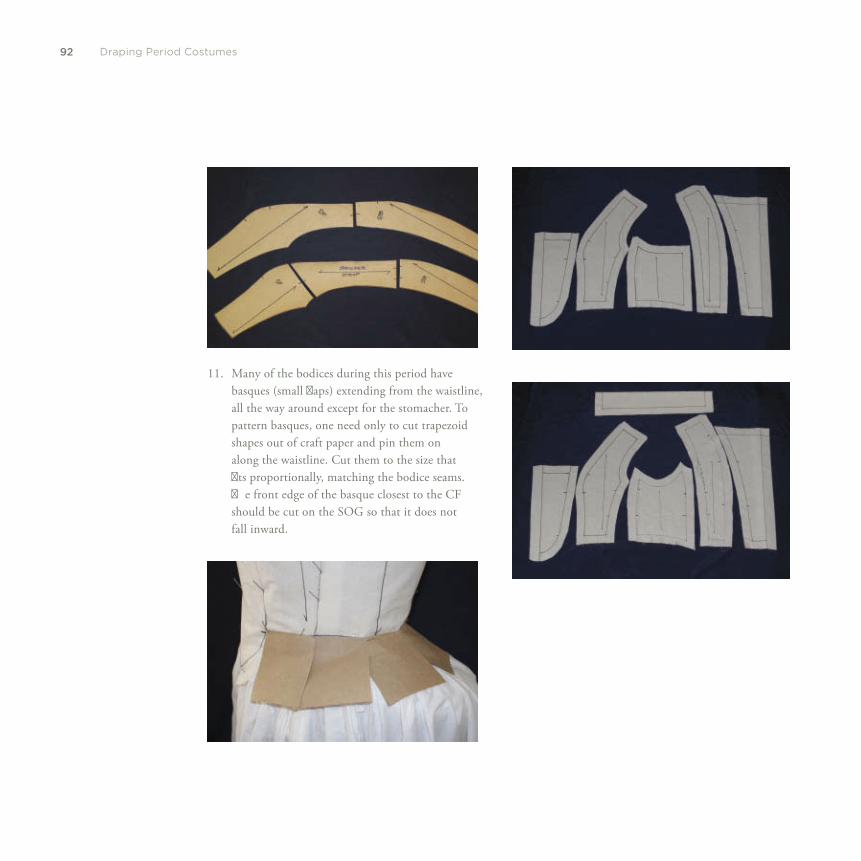
92 Draping Period Costumes
11. Many of the bodices during this period have basques (small fl aps) extending from the waistline, all the way around except for the stomacher. To pattern basques, one need only to cut trapezoid shapes out of craft paper and pin them on along the waistline. Cut them to the size that fi ts proportionally, matching the bodice seams. Th e front edge of the basque closest to the CF should be cut on the SOG so that it does not fall inward.
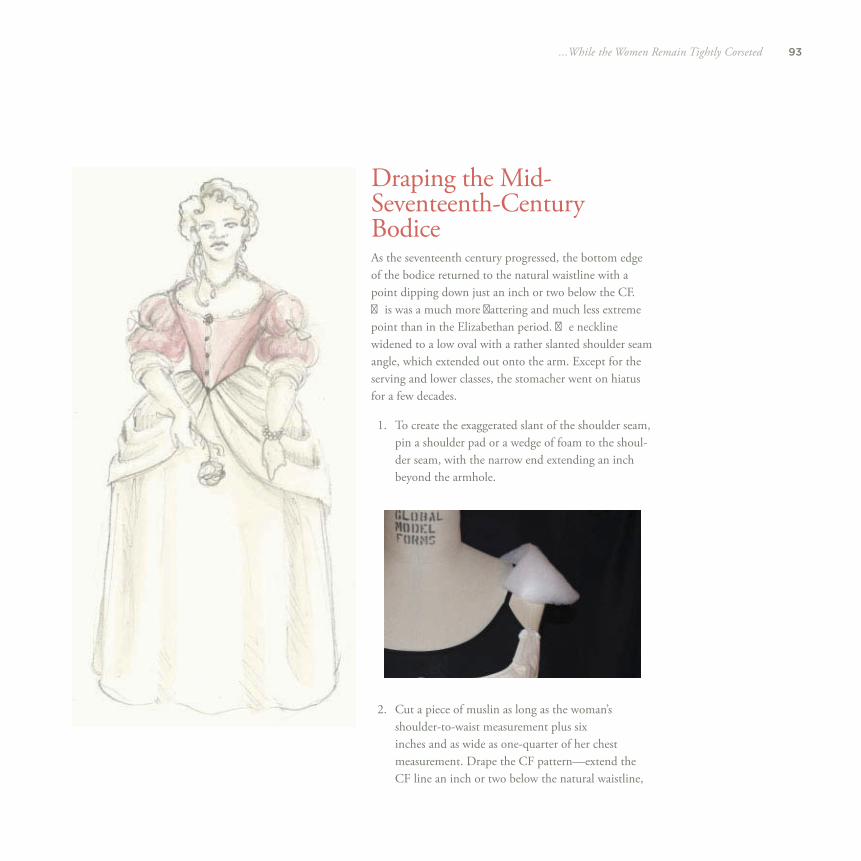
93...While the Women Remain Tightly Corseted
Draping the Mid-Seventeenth-Century Bodice As the seventeenth century progressed, the bottom edge of the bodice returned to the natural waistline with a point dipping down just an inch or two below the CF. Th is was a much more fl attering and much less extreme point than in the Elizabethan period. Th e neckline widened to a low oval with a rather slanted shoulder seam angle, which extended out onto the arm. Except for the serving and lower classes, the stomacher went on hiatus for a few decades.
1. To create the exaggerated slant of the shoulder seam, pin a shoulder pad or a wedge of foam to the shoul-der seam, with the narrow end extending an inch beyond the armhole.
2. Cut a piece of muslin as long as the woman’s shoulder-to-waist measurement plus six inches and as wide as one-quarter of her chest measurement. Drape the CF pattern—extend the CF line an inch or two below the natural waistline,
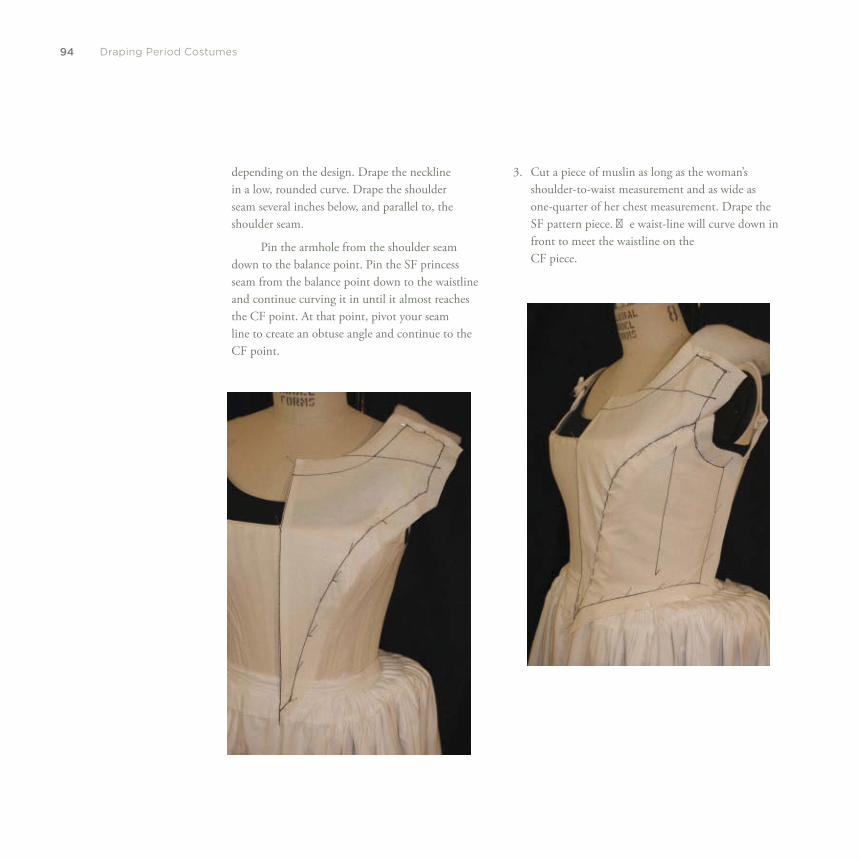
94 Draping Period Costumes
depending on the design. Drape the neckline in a low, rounded curve. Drape the shoulder seam several inches below, and parallel to, the shoulder seam.
Pin the armhole from the shoulder seam down to the balance point. Pin the SF princess seam from the balance point down to the waistline and continue curving it in until it almost reaches the CF point. At that point, pivot your seam line to create an obtuse angle and continue to the CF point.
3. Cut a piece of muslin as long as the woman’s shoulder-to-waist measurement and as wide as one-quarter of her chest measurement. Drape the SF pattern piece. Th e waist-line will curve down in front to meet the waistline on the CF piece.

95...While the Women Remain Tightly Corseted
4. Drape the CB seam down to the natural waist seam. Drape the neckline in a low, rounded curve. Drape the shoulder seam several inches below, and parallel to, the shoulder seam. Pin the armhole down to the balance point. Pin the princess seam down to the same level as the bottom of the CB seam.
5. Drape the SB pattern piece.
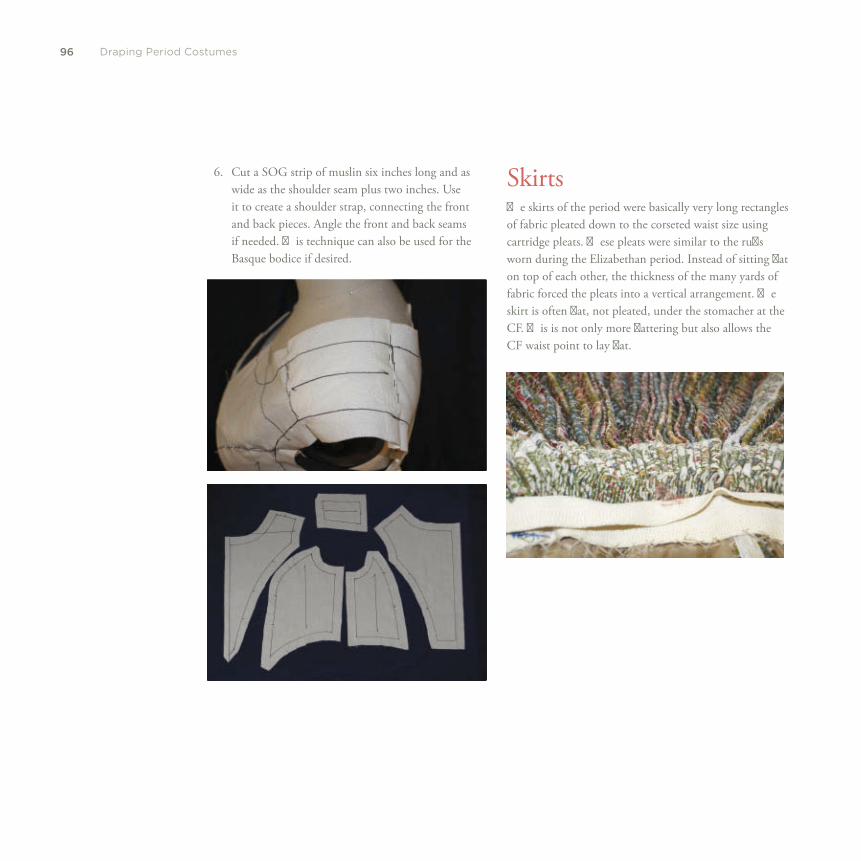
96 Draping Period Costumes
6. Cut a SOG strip of muslin six inches long and as wide as the shoulder seam plus two inches. Use it to create a shoulder strap, connecting the front and back pieces. Angle the front and back seams if needed. Th is technique can also be used for the Basque bodice if desired.
Skirts Th e skirts of the period were basically very long rectangles of fabric pleated down to the corseted waist size using cartridge pleats. Th ese pleats were similar to the ruff s worn during the Elizabethan period. Instead of sitting fl at on top of each other, the thickness of the many yards of fabric forced the pleats into a vertical arrangement. Th e skirt is often fl at, not pleated, under the stomacher at the CF. Th is is not only more fl attering but also allows the CF waist point to lay fl at.
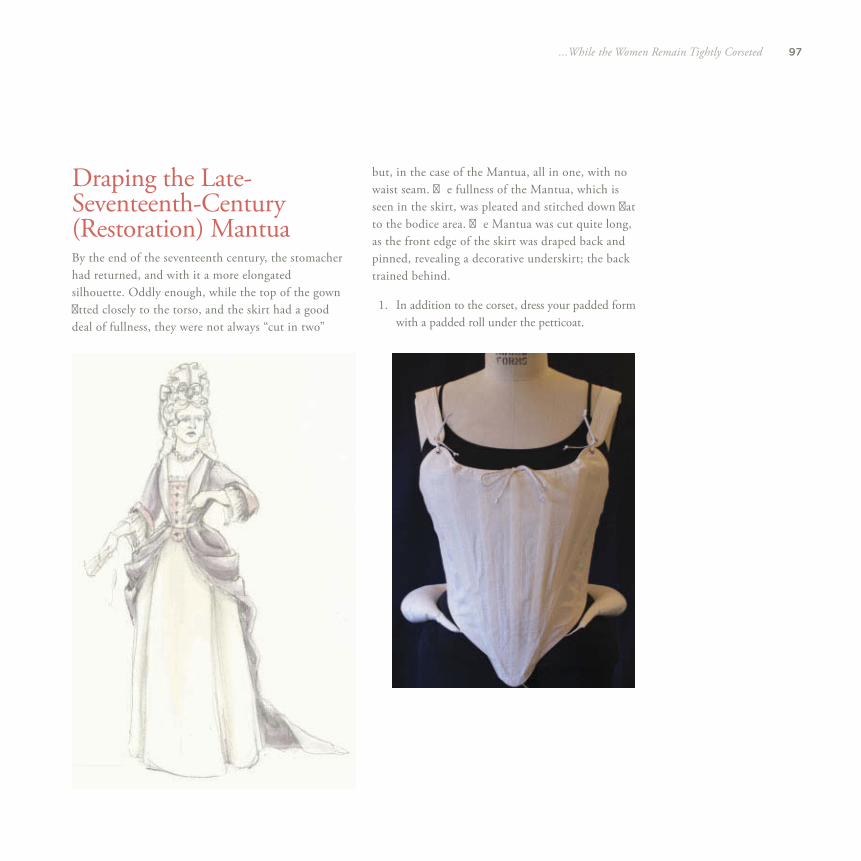
97...While the Women Remain Tightly Corseted
but, in the case of the Mantua, all in one, with no waist seam. Th e fullness of the Mantua, which is seen in the skirt, was pleated and stitched down fl at to the bodice area. Th e Mantua was cut quite long, as the front edge of the skirt was draped back and pinned, revealing a decorative underskirt; the back trained behind.
1. In addition to the corset, dress your padded form with a padded roll under the petticoat.
Draping the Late-Seventeenth-Century (Restoration) Mantua By the end of the seventeenth century, the stomacher had returned, and with it a more elongated silhouette. Oddly enough, while the top of the gown fi tted closely to the torso, and the skirt had a good deal of fullness, they were not always “cut in two”
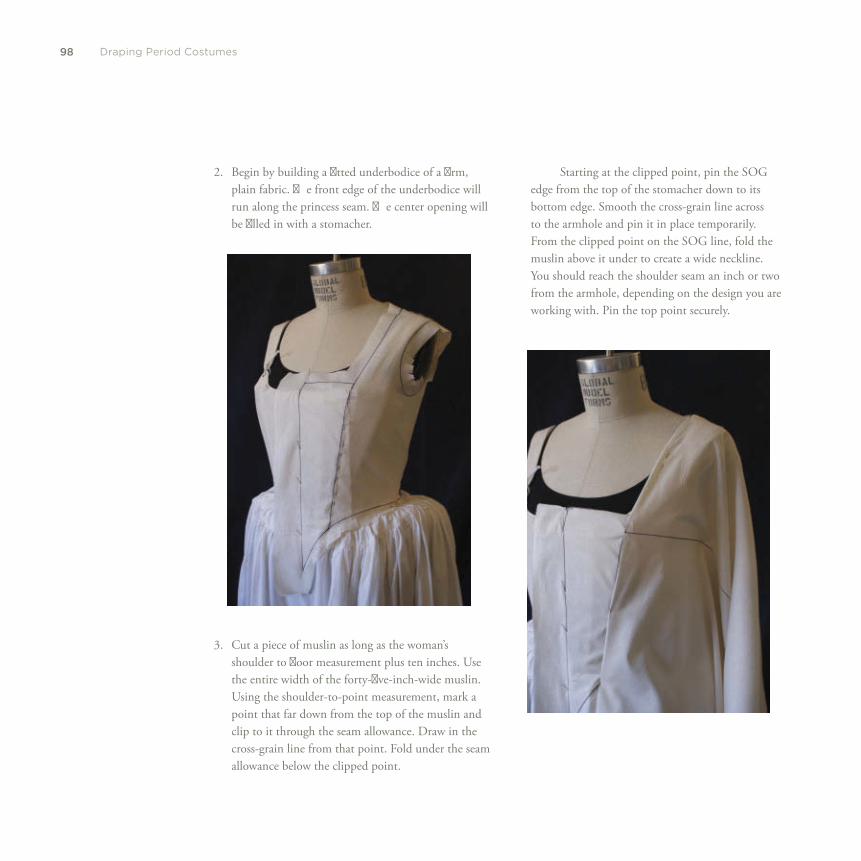
98 Draping Period Costumes
2. Begin by building a fi tted underbodice of a fi rm, plain fabric. Th e front edge of the underbodice will run along the princess seam. Th e center opening will be fi lled in with a stomacher.
3. Cut a piece of muslin as long as the woman’s shoulder to fl oor measurement plus ten inches. Use the entire width of the forty-fi ve-inch-wide muslin. Using the shoulder-to-point measurement, mark a point that far down from the top of the muslin and clip to it through the seam allowance. Draw in the cross-grain line from that point. Fold under the seam allowance below the clipped point.
Starting at the clipped point, pin the SOG edge from the top of the stomacher down to its bottom edge. Smooth the cross-grain line across to the armhole and pin it in place temporarily. From the clipped point on the SOG line, fold the muslin above it under to create a wide neckline. You should reach the shoulder seam an inch or two from the armhole, depending on the design you are working with. Pin the top point securely.
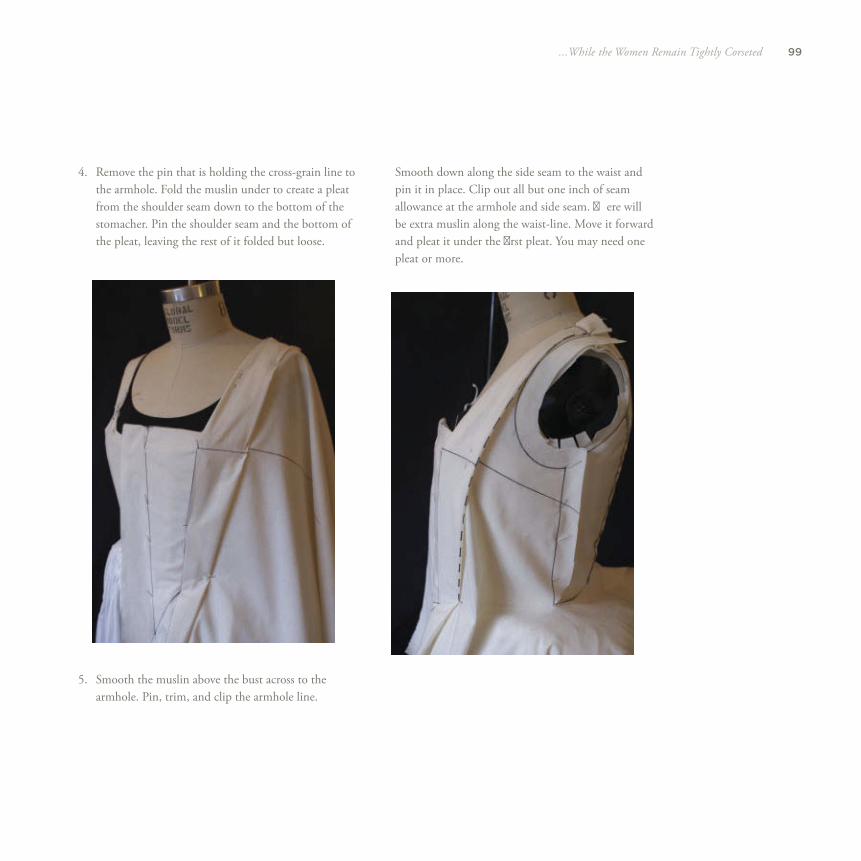
99...While the Women Remain Tightly Corseted
4. Remove the pin that is holding the cross-grain line to the armhole. Fold the muslin under to create a pleat from the shoulder seam down to the bottom of the stomacher. Pin the shoulder seam and the bottom of the pleat, leaving the rest of it folded but loose.
5. Smooth the muslin above the bust across to the armhole. Pin, trim, and clip the armhole line.
Smooth down along the side seam to the waist and pin it in place. Clip out all but one inch of seam allowance at the armhole and side seam. Th ere will be extra muslin along the waist-line. Move it forward and pleat it under the fi rst pleat. You may need one pleat or more.
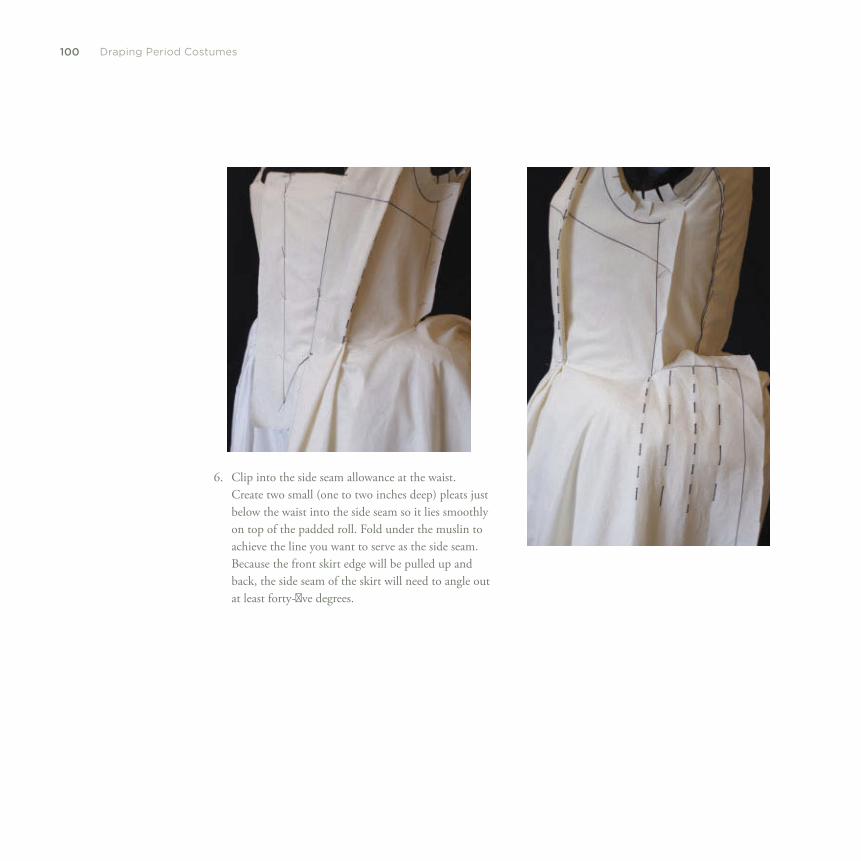
100 Draping Period Costumes
6. Clip into the side seam allowance at the waist. Create two small (one to two inches deep) pleats just below the waist into the side seam so it lies smoothly on top of the padded roll. Fold under the muslin to achieve the line you want to serve as the side seam. Because the front skirt edge will be pulled up and back, the side seam of the skirt will need to angle out at least forty-fi ve degrees.
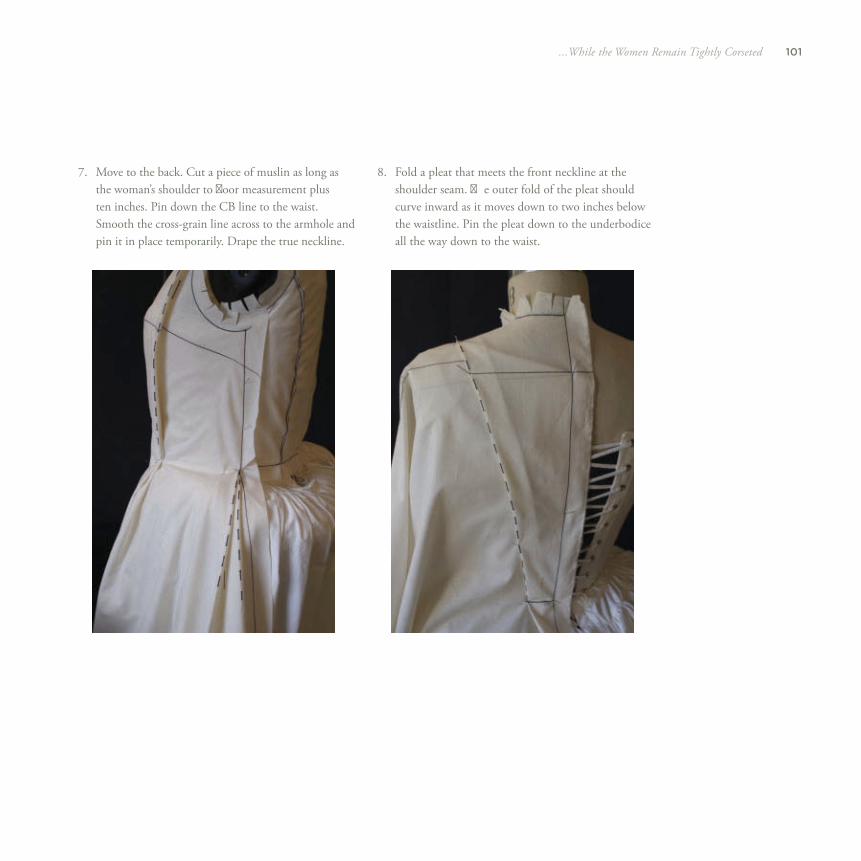
101...While the Women Remain Tightly Corseted
7. Move to the back. Cut a piece of muslin as long as the woman’s shoulder to fl oor measurement plus ten inches. Pin down the CB line to the waist. Smooth the cross-grain line across to the armhole and pin it in place temporarily. Drape the true neckline.
8. Fold a pleat that meets the front neckline at the shoulder seam. Th e outer fold of the pleat should curve inward as it moves down to two inches below the waistline. Pin the pleat down to the underbodice all the way down to the waist.
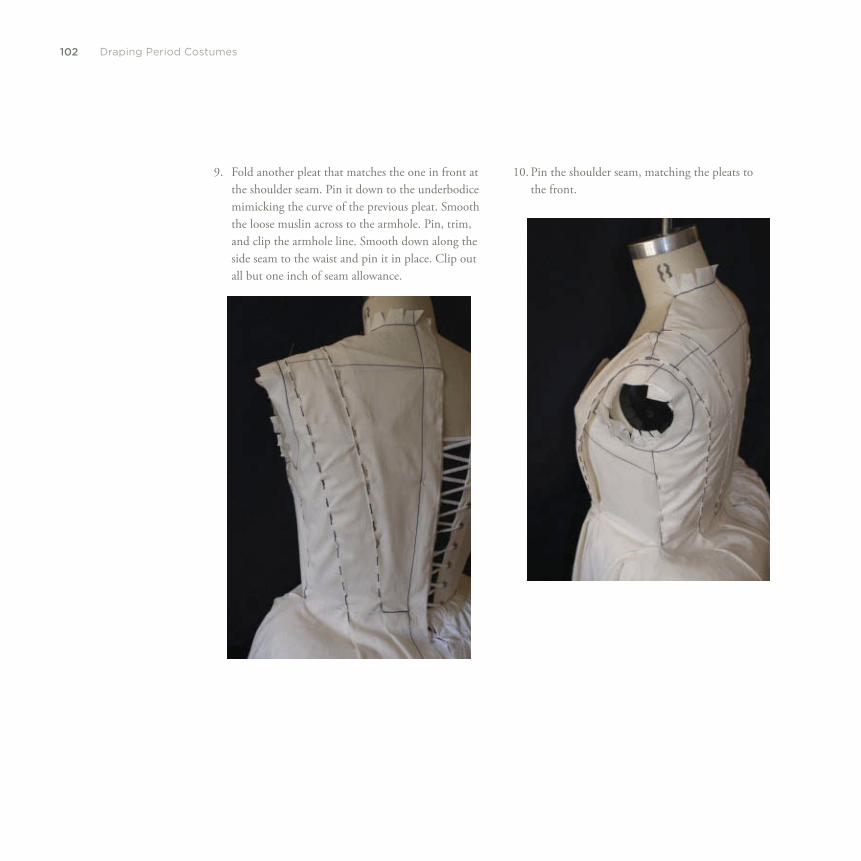
102 Draping Period Costumes
9. Fold another pleat that matches the one in front at the shoulder seam. Pin it down to the underbodice mimicking the curve of the previous pleat. Smooth the loose muslin across to the armhole. Pin, trim, and clip the armhole line. Smooth down along the side seam to the waist and pin it in place. Clip out all but one inch of seam allowance.
10. Pin the shoulder seam, matching the pleats to the front.
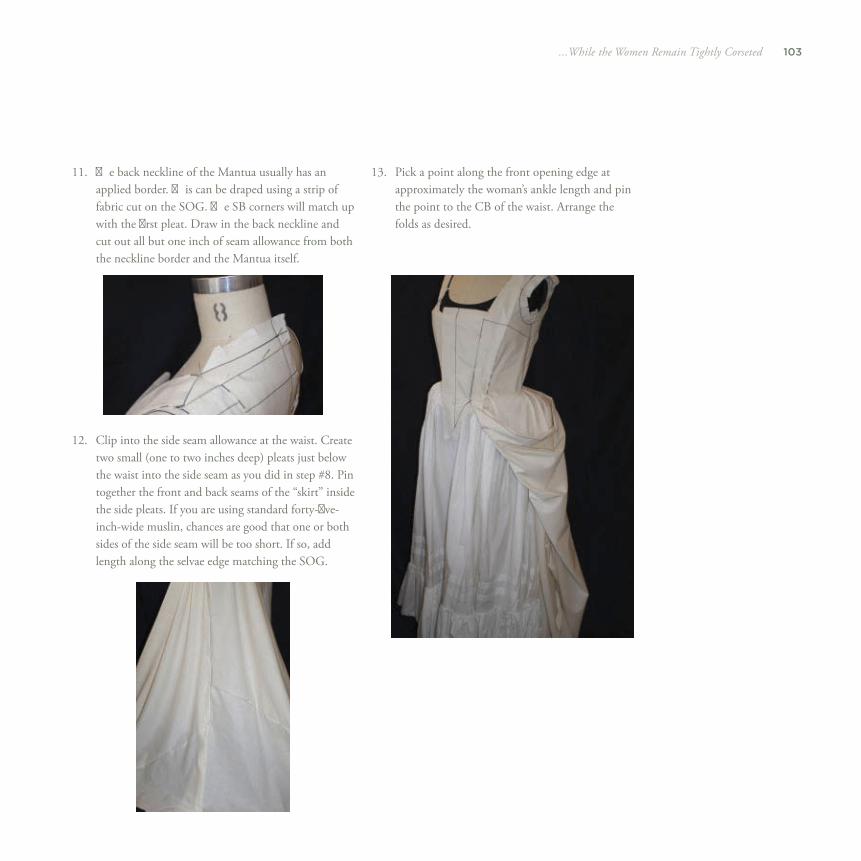
103...While the Women Remain Tightly Corseted
12. Clip into the side seam allowance at the waist. Create two small (one to two inches deep) pleats just below the waist into the side seam as you did in step #8. Pin together the front and back seams of the “skirt” inside the side pleats. If you are using standard forty-fi ve-inch-wide muslin, chances are good that one or both sides of the side seam will be too short. If so, add length along the selvae edge matching the SOG.
13. Pick a point along the front opening edge at approximately the woman’s ankle length and pin the point to the CB of the waist. Arrange the folds as desired.
11. Th e back neckline of the Mantua usually has an applied border. Th is can be draped using a strip of fabric cut on the SOG. Th e SB corners will match up with the fi rst pleat. Draw in the back neckline and cut out all but one inch of seam allowance from both the neckline border and the Mantua itself.
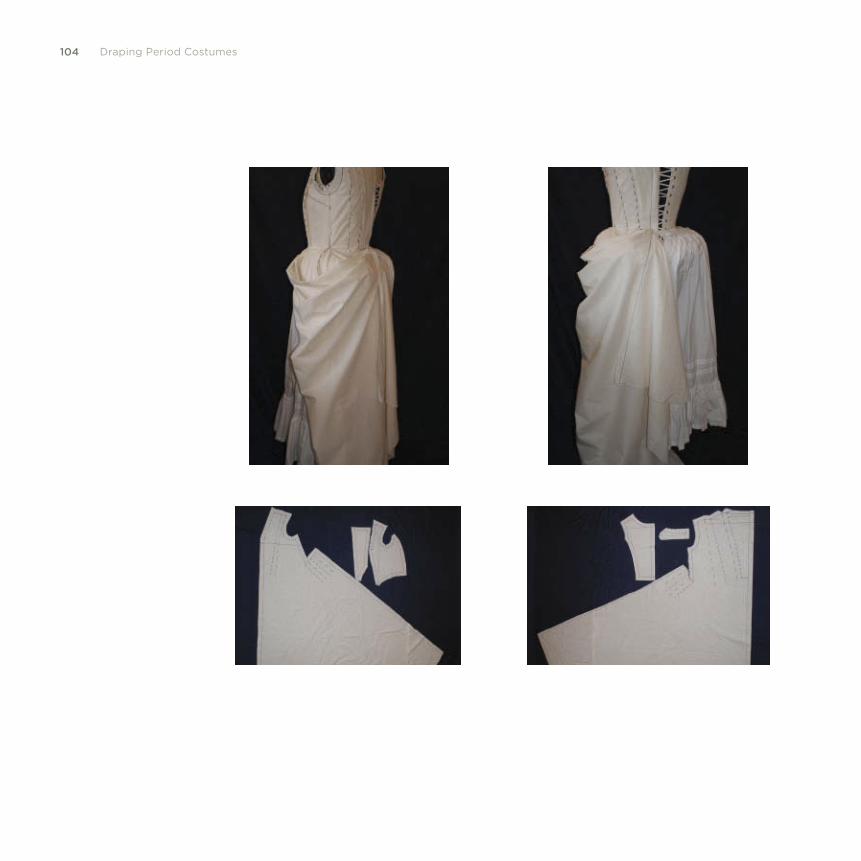
104 Draping Period Costumes
seven
T H E I N T R O D U C T I O N O F T A I L O R I N G T O T H E
M A N ’ S C O S T U M E
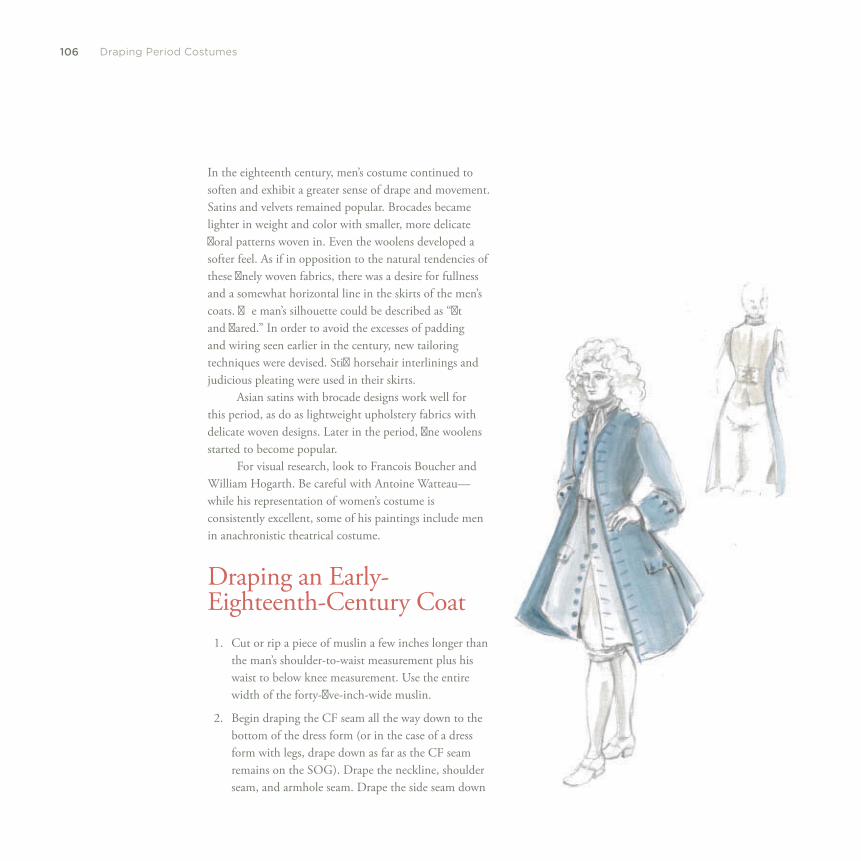
106 Draping Period Costumes
In the eighteenth century, men’s costume continued to soften and exhibit a greater sense of drape and movement. Satins and velvets remained popular. Brocades became lighter in weight and color with smaller, more delicate fl oral patterns woven in. Even the woolens developed a softer feel. As if in opposition to the natural tendencies of these fi nely woven fabrics, there was a desire for fullness and a somewhat horizontal line in the skirts of the men’s coats. Th e man’s silhouette could be described as “fi t and fl ared.” In order to avoid the excesses of padding and wiring seen earlier in the century, new tailoring techniques were devised. Stiff horsehair interlinings and judicious pleating were used in their skirts.
Asian satins with brocade designs work well for this period, as do as lightweight upholstery fabrics with delicate woven designs. Later in the period, fi ne woolens started to become popular.
For visual research, look to Francois Boucher and William Hogarth. Be careful with Antoine Watteau—while his representation of women’s costume is consistently excellent, some of his paintings include men in anachronistic theatrical costume.
Draping an Early-Eighteenth-Century Coat 1. Cut or rip a piece of muslin a few inches longer than
the man’s shoulder-to-waist measurement plus his waist to below knee measurement. Use the entire width of the forty-fi ve-inch-wide muslin.
2. Begin draping the CF seam all the way down to the bottom of the dress form (or in the case of a dress form with legs, drape down as far as the CF seam remains on the SOG). Drape the neckline, shoulder seam, and armhole seam. Drape the side seam down
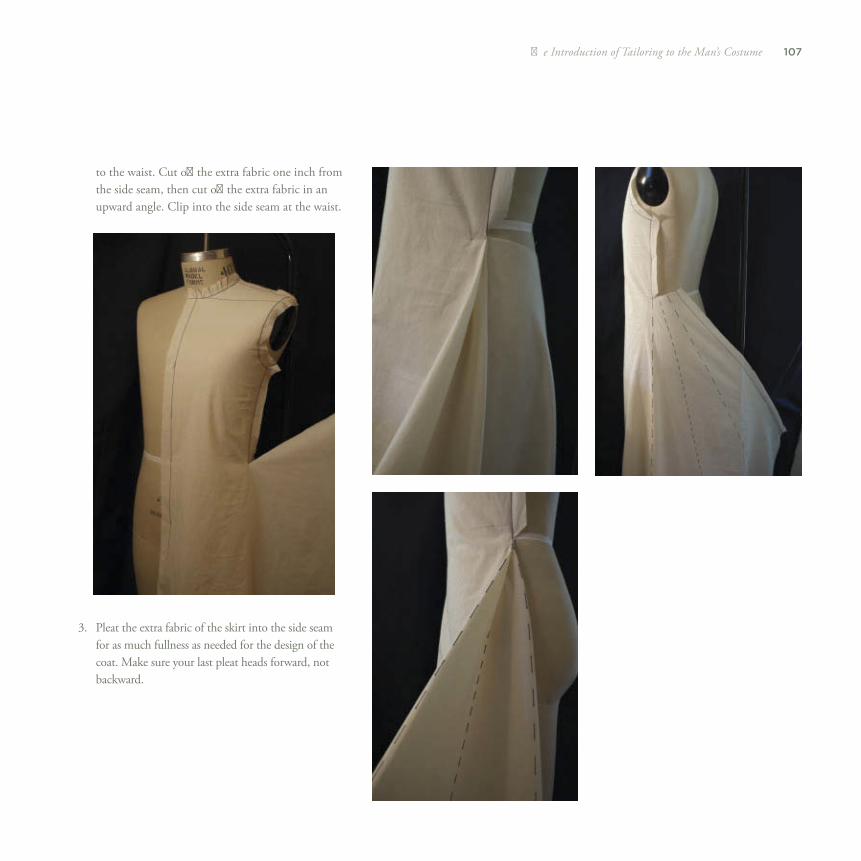
107Th e Introduction of Tailoring to the Man’s Costume
to the waist. Cut off the extra fabric one inch from the side seam, then cut off the extra fabric in an upward angle. Clip into the side seam at the waist.
3. Pleat the extra fabric of the skirt into the side seam for as much fullness as needed for the design of the coat. Make sure your last pleat heads forward, not backward.
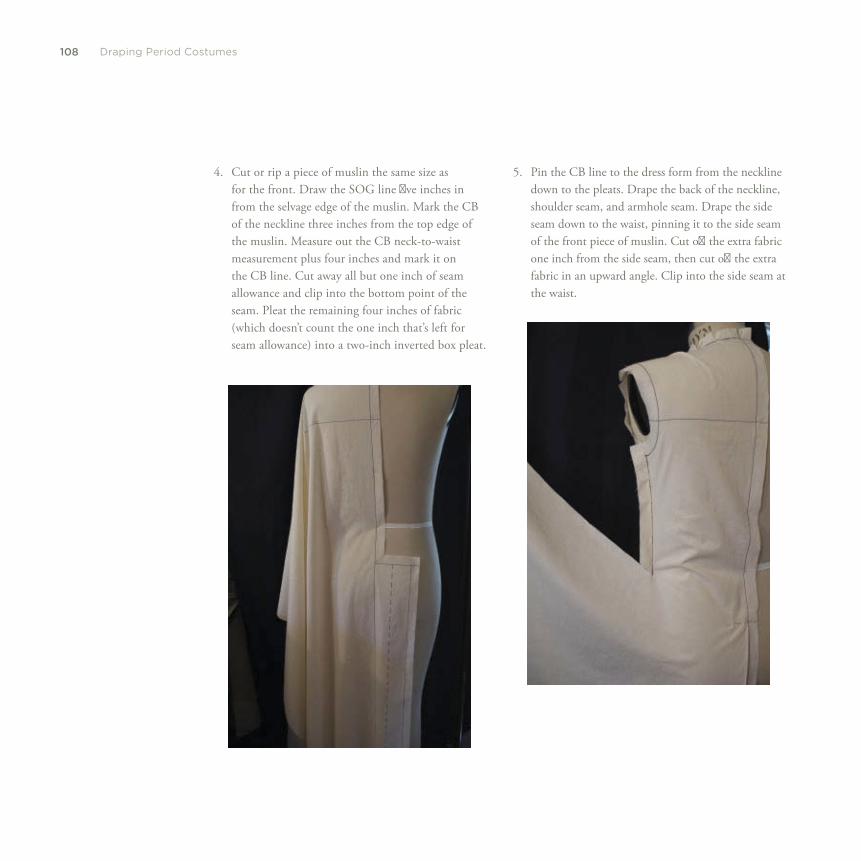
108 Draping Period Costumes
4. Cut or rip a piece of muslin the same size as for the front. Draw the SOG line fi ve inches in from the selvage edge of the muslin. Mark the CB of the neckline three inches from the top edge of the muslin. Measure out the CB neck-to-waist measurement plus four inches and mark it on the CB line. Cut away all but one inch of seam allowance and clip into the bottom point of the seam. Pleat the remaining four inches of fabric (which doesn’t count the one inch that’s left for seam allowance) into a two-inch inverted box pleat.
5. Pin the CB line to the dress form from the neckline down to the pleats. Drape the back of the neckline, shoulder seam, and armhole seam. Drape the side seam down to the waist, pinning it to the side seam of the front piece of muslin. Cut off the extra fabric one inch from the side seam, then cut off the extra fabric in an upward angle. Clip into the side seam at the waist.
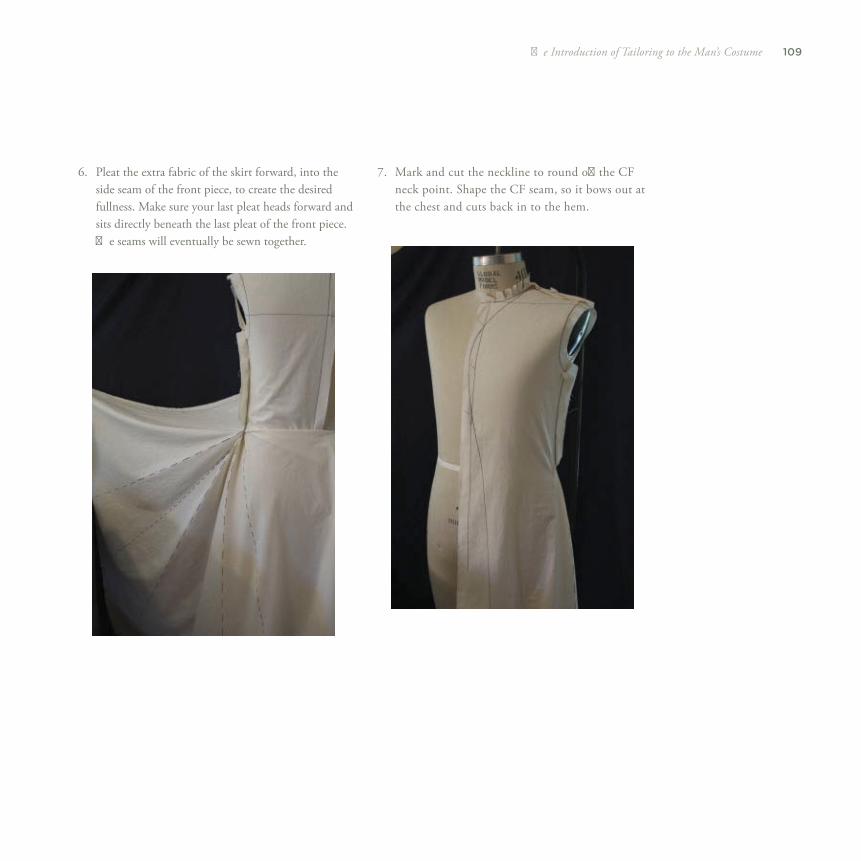
109Th e Introduction of Tailoring to the Man’s Costume
6. Pleat the extra fabric of the skirt forward, into the side seam of the front piece, to create the desired fullness. Make sure your last pleat heads forward and sits directly beneath the last pleat of the front piece. Th e seams will eventually be sewn together.
7. Mark and cut the neckline to round off the CF neck point. Shape the CF seam, so it bows out at the chest and cuts back in to the hem.
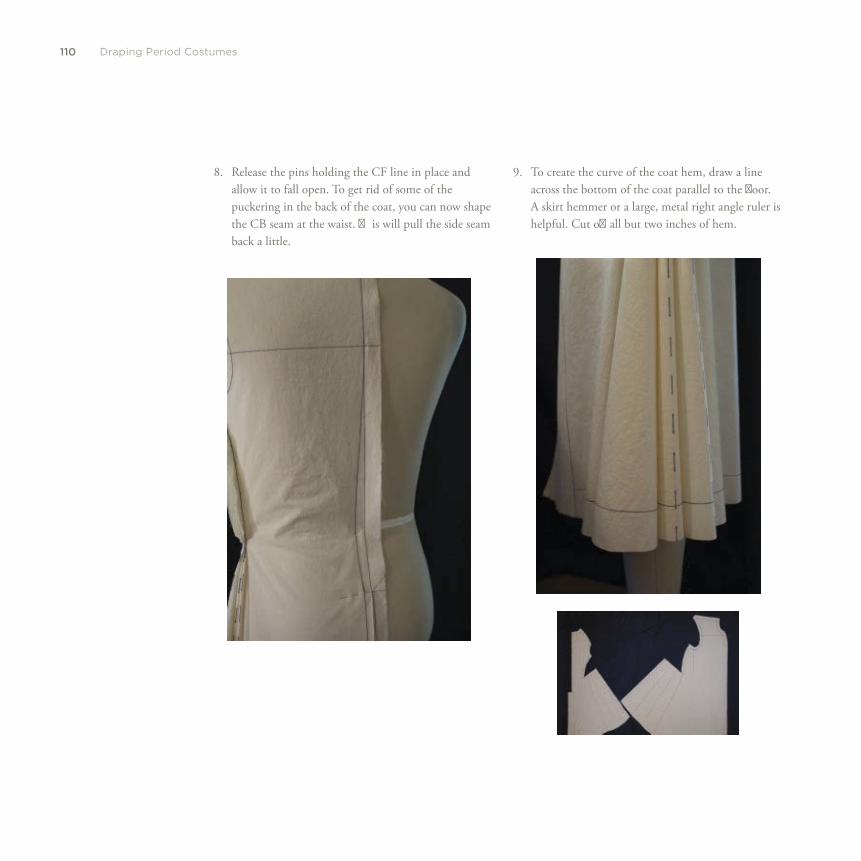
110 Draping Period Costumes
8. Release the pins holding the CF line in place and allow it to fall open. To get rid of some of the puckering in the back of the coat, you can now shape the CB seam at the waist. Th is will pull the side seam back a little.
9. To create the curve of the coat hem, draw a line across the bottom of the coat parallel to the fl oor. A skirt hemmer or a large, metal right angle ruler is helpful. Cut off all but two inches of hem.
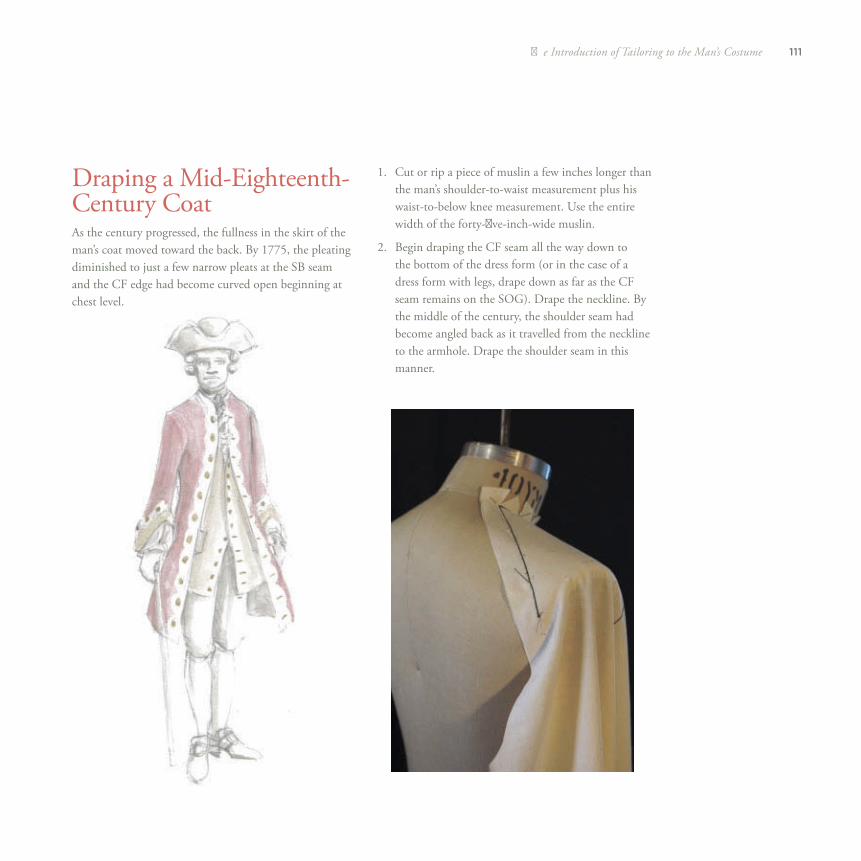
111Th e Introduction of Tailoring to the Man’s Costume
Draping a Mid-Eighteenth-Century Coat As the century progressed, the fullness in the skirt of the man’s coat moved toward the back. By 1775, the pleating diminished to just a few narrow pleats at the SB seam and the CF edge had become curved open beginning at chest level.
1. Cut or rip a piece of muslin a few inches longer than the man’s shoulder-to-waist measurement plus his waist-to-below knee measurement. Use the entire width of the forty-fi ve-inch-wide muslin.
2. Begin draping the CF seam all the way down to the bottom of the dress form (or in the case of a dress form with legs, drape down as far as the CF seam remains on the SOG). Drape the neckline. By the middle of the century, the shoulder seam had become angled back as it travelled from the neckline to the armhole. Drape the shoulder seam in this manner.
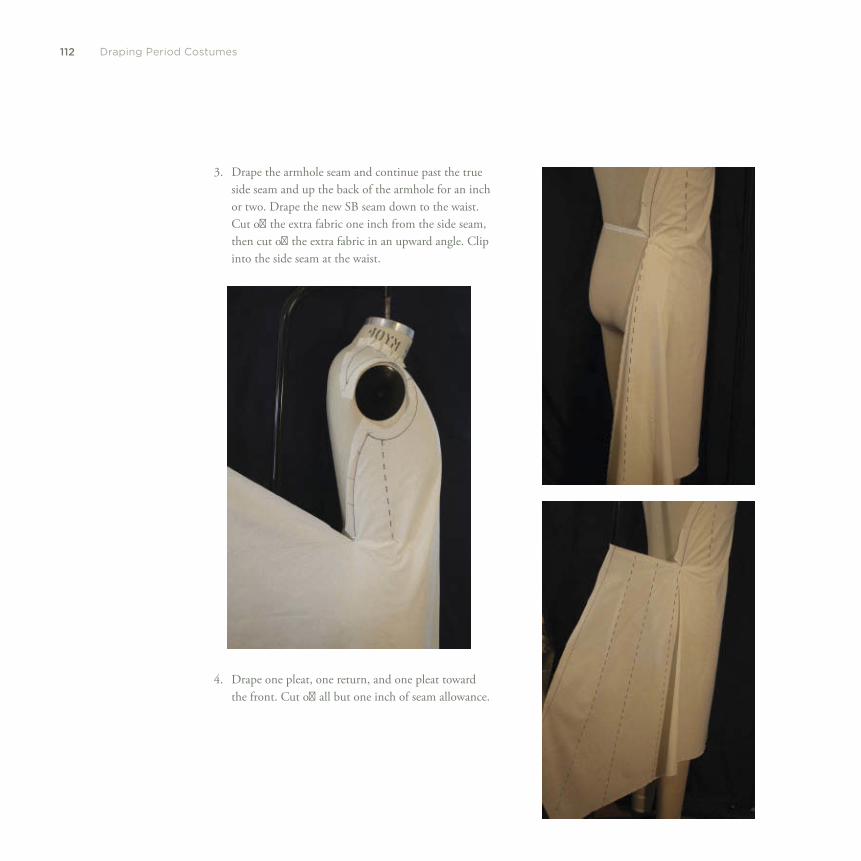
112 Draping Period Costumes
3. Drape the armhole seam and continue past the true side seam and up the back of the armhole for an inch or two. Drape the new SB seam down to the waist. Cut off the extra fabric one inch from the side seam, then cut off the extra fabric in an upward angle. Clip into the side seam at the waist.
4. Drape one pleat, one return, and one pleat toward the front. Cut off all but one inch of seam allowance.
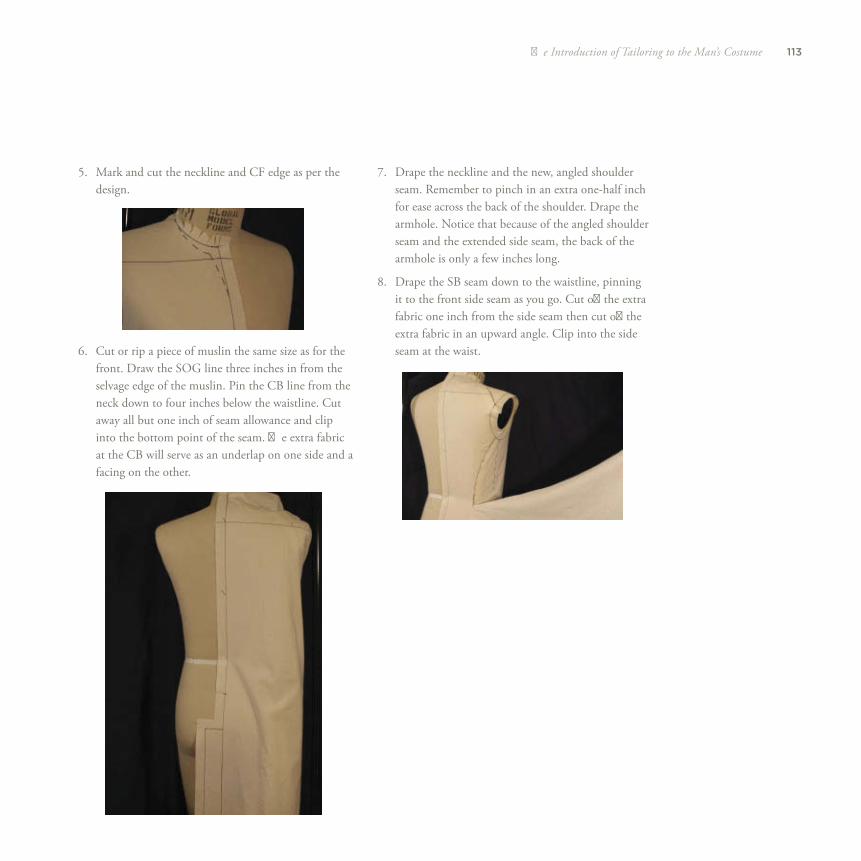
113Th e Introduction of Tailoring to the Man’s Costume
5. Mark and cut the neckline and CF edge as per the design.
6. Cut or rip a piece of muslin the same size as for the front. Draw the SOG line three inches in from the selvage edge of the muslin. Pin the CB line from the neck down to four inches below the waistline. Cut away all but one inch of seam allowance and clip into the bottom point of the seam. Th e extra fabric at the CB will serve as an underlap on one side and a facing on the other.
7. Drape the neckline and the new, angled shoulder seam. Remember to pinch in an extra one-half inch for ease across the back of the shoulder. Drape the armhole. Notice that because of the angled shoulder seam and the extended side seam, the back of the armhole is only a few inches long.
8. Drape the SB seam down to the waistline, pinning it to the front side seam as you go. Cut off the extra fabric one inch from the side seam then cut off the extra fabric in an upward angle. Clip into the side seam at the waist.

114 Draping Period Costumes
10. Create the curve of the coat hem as directed in in-struction #8 for the early-eighteenth-century coat. As with the early-eighteenth-century coat, the CB seam can be curved in at the waist for a tighter fi t.
Draping an Eighteenth-Century Vest (Waistcoat) Draping the man’s vest or waistcoat is very similar to draping the man’s coat. Th ere are, however, several important diff erences. Th e foremost, which makes it much easier to drape, is the vest’s lack of pleats. Instead of pleats, the side seams can remain open from waist to hem. Other diff erences are as follows:
• The vest may or may not have sleeves. If there are no sleeves, you can cut the armholes larger for greater comfort.
• Th e vest is shorter than the coat. Early on the diff er-ence was not more than an inch or two. By the middle of the eighteenth century, the bottom of the vest sits at hip length or above.
• Th e vest is more likely to be worn closed than the coat is.
• Th e back of the vest is sometimes only waist length or a few inches longer. It is also often cut out of a plainer, less expen-sive fabric. Take this into consideration when estimating yardages. It could either save you some money or allow you to aff ord to spend a little more on your “fashion” fabric.
• If the back is cut at full length, there will be no pleats or underlap in the skirt.
9. Drape one return, one pleat, and one return forward to match up with the pleats on the front piece.

eight
V A R I E T Y O F S I L H O U E T T E I N
E I G H T E E N T H - C E N T U R Y W O M E N ’ S C O S T U M E S
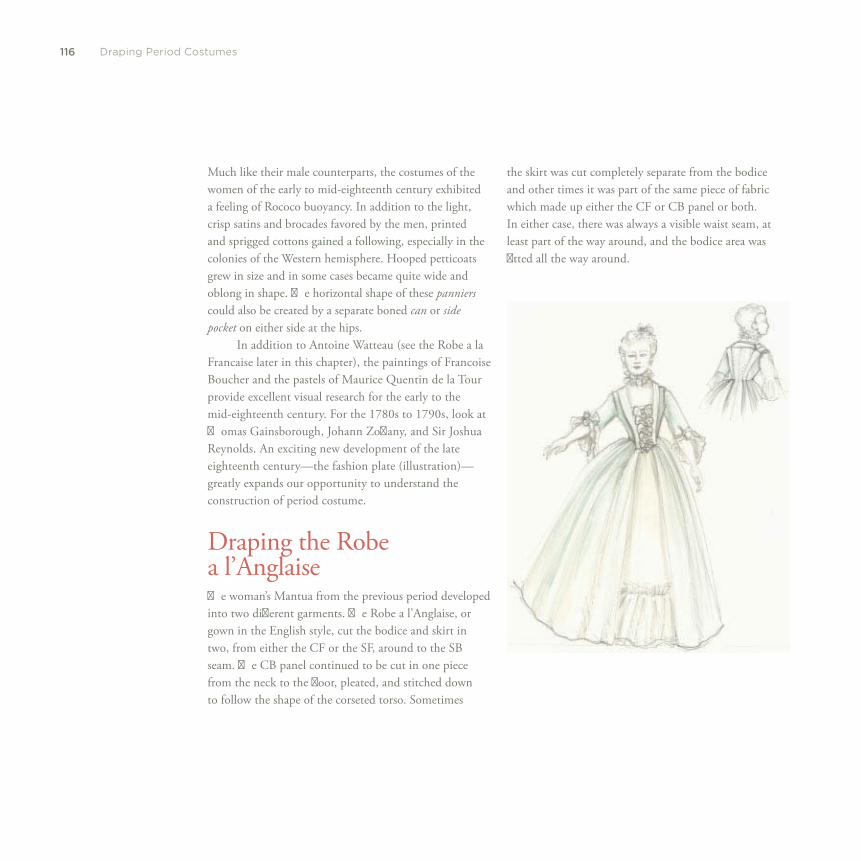
116 Draping Period Costumes
the skirt was cut completely separate from the bodice and other times it was part of the same piece of fabric which made up either the CF or CB panel or both. In either case, there was always a visible waist seam, at least part of the way around, and the bodice area was fi tted all the way around.
Much like their male counterparts, the costumes of the women of the early to mid-eighteenth century exhibited a feeling of Rococo buoyancy. In addition to the light, crisp satins and brocades favored by the men, printed and sprigged cottons gained a following, especially in the colonies of the Western hemisphere. Hooped petticoats grew in size and in some cases became quite wide and oblong in shape. Th e horizontal shape of these panniers could also be created by a separate boned can or side pocket on either side at the hips.
In addition to Antoine Watteau (see the Robe a la Francaise later in this chapter), the paintings of Francoise Boucher and the pastels of Maurice Quentin de la Tour provide excellent visual research for the early to the mid-eighteenth century. For the 1780s to 1790s, look at Th omas Gainsborough, Johann Zoff any, and Sir Joshua Reynolds. An exciting new development of the late eighteenth century—the fashion plate (illustration)—greatly expands our opportunity to understand the construction of period costume.
Draping the Robe a l’Anglaise Th e woman’s Mantua from the previous period developed into two diff erent garments. Th e Robe a l’Anglaise, or gown in the English style, cut the bodice and skirt in two, from either the CF or the SF, around to the SB seam. Th e CB panel continued to be cut in one piece from the neck to the fl oor, pleated, and stitched down to follow the shape of the corseted torso. Sometimes
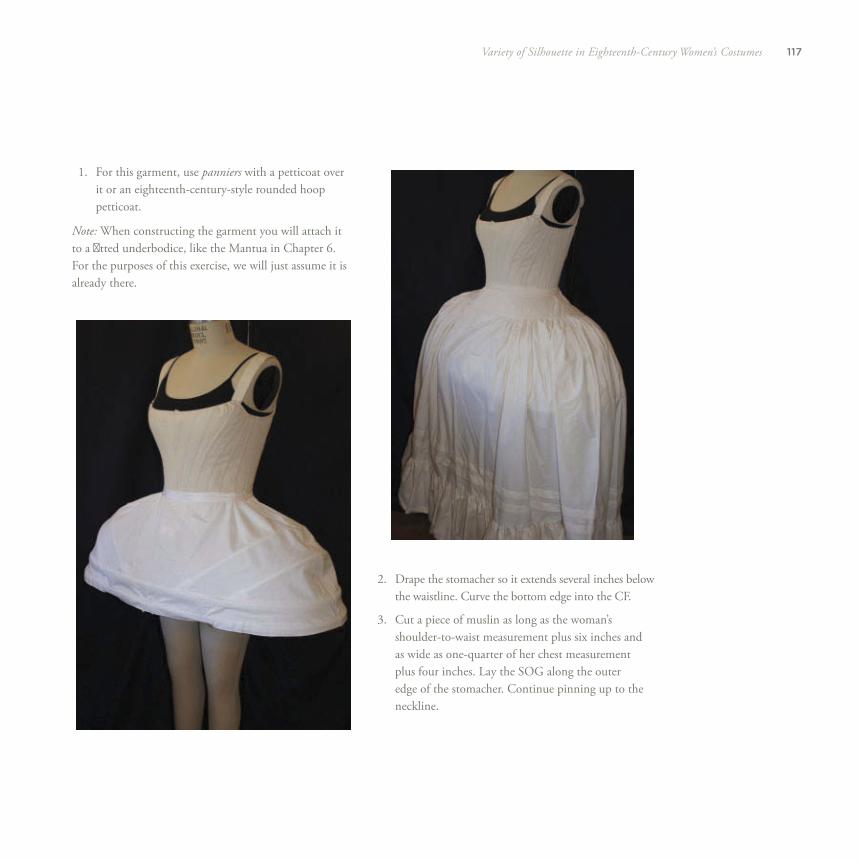
117Variety of Silhouette in Eighteenth-Century Women’s Costumes
2. Drape the stomacher so it extends several inches below the waistline. Curve the bottom edge into the CF.
3. Cut a piece of muslin as long as the woman’s shoulder-to-waist measurement plus six inches and as wide as one-quarter of her chest measurement plus four inches. Lay the SOG along the outer edge of the stomacher. Continue pinning up to the neckline.
Note: When constructing the garment you will attach it to a fi tted underbodice, like the Mantua in Chapter 6 . For the purposes of this exercise, we will just assume it is already there.
1. For this garment, use panniers with a petticoat over it or an eighteenth-century-style rounded hoop petticoat.
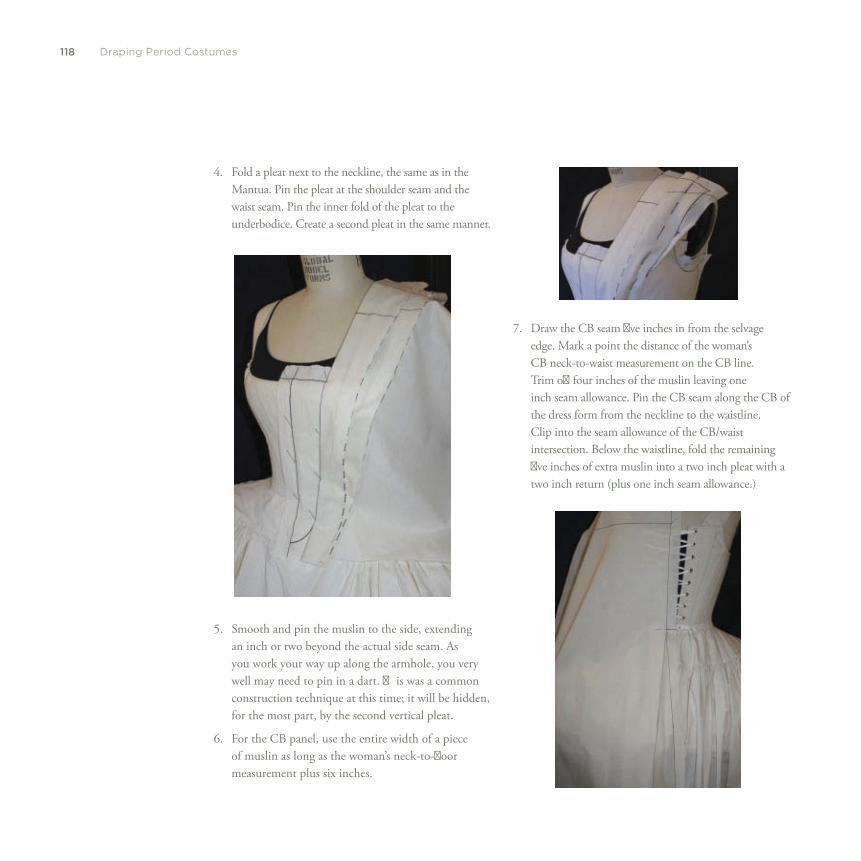
118 Draping Period Costumes
4. Fold a pleat next to the neckline, the same as in the Mantua. Pin the pleat at the shoulder seam and the waist seam. Pin the inner fold of the pleat to the underbodice. Create a second pleat in the same manner.
7. Draw the CB seam fi ve inches in from the selvage edge. Mark a point the distance of the woman’s CB neck-to-waist measurement on the CB line. Trim off four inches of the muslin leaving one inch seam allowance. Pin the CB seam along the CB of the dress form from the neckline to the waistline. Clip into the seam allowance of the CB/waist intersection. Below the waistline, fold the remaining fi ve inches of extra muslin into a two inch pleat with a two inch return (plus one inch seam allowance.)
5. Smooth and pin the muslin to the side, extending an inch or two beyond the actual side seam. As you work your way up along the armhole, you very well may need to pin in a dart. Th is was a common construction technique at this time; it will be hidden, for the most part, by the second vertical pleat.
6. For the CB panel, use the entire width of a piece of muslin as long as the woman’s neck-to-fl oor measurement plus six inches.
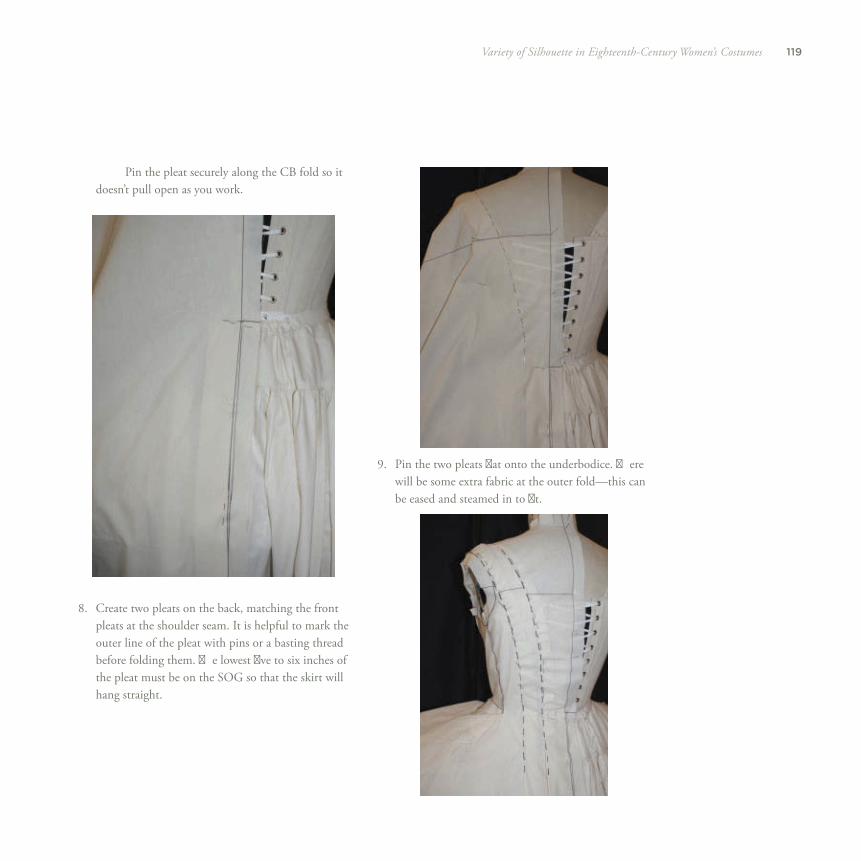
119Variety of Silhouette in Eighteenth-Century Women’s Costumes
Pin the pleat securely along the CB fold so it doesn’t pull open as you work.
8. Create two pleats on the back, matching the front pleats at the shoulder seam. It is helpful to mark the outer line of the pleat with pins or a basting thread before folding them. Th e lowest fi ve to six inches of the pleat must be on the SOG so that the skirt will hang straight.
9. Pin the two pleats fl at onto the underbodice. Th ere will be some extra fabric at the outer fold—this can be eased and steamed in to fi t.
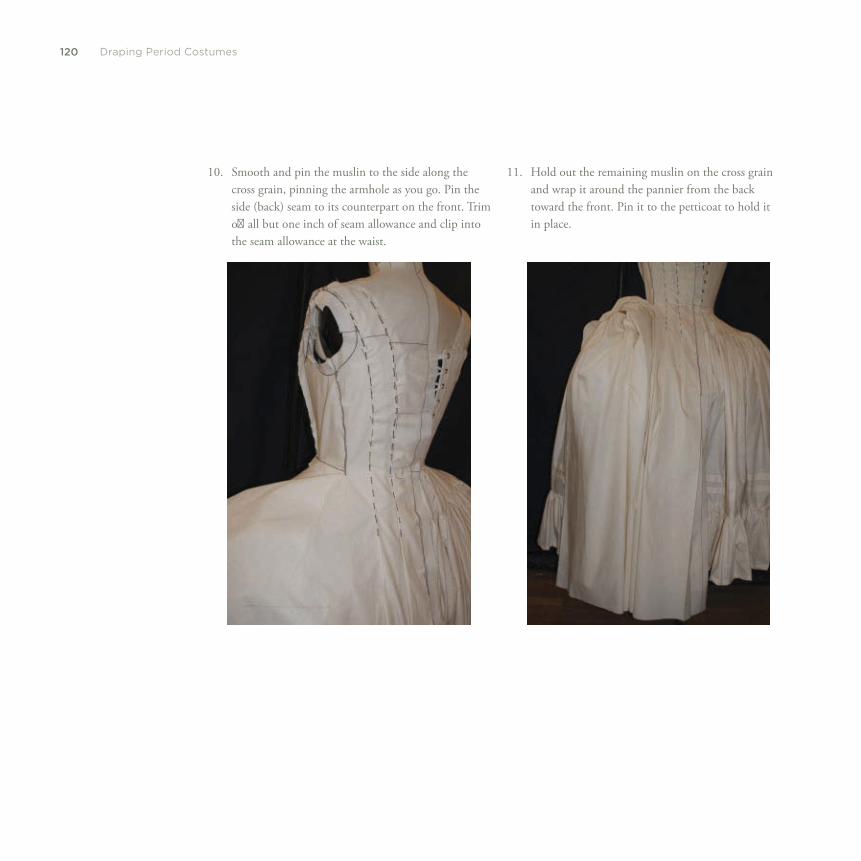
120 Draping Period Costumes
10. Smooth and pin the muslin to the side along the cross grain, pinning the armhole as you go. Pin the side (back) seam to its counterpart on the front. Trim off all but one inch of seam allowance and clip into the seam allowance at the waist.
11. Hold out the remaining muslin on the cross grain and wrap it around the pannier from the back toward the front. Pin it to the petticoat to hold it in place.
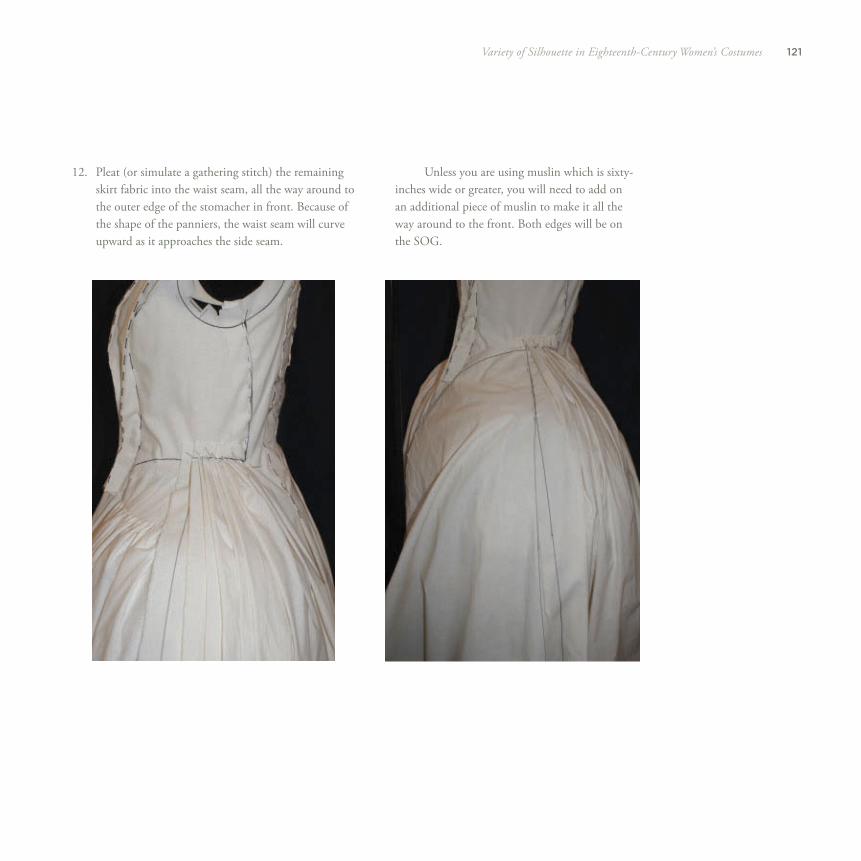
121Variety of Silhouette in Eighteenth-Century Women’s Costumes
12. Pleat (or simulate a gathering stitch) the remaining skirt fabric into the waist seam, all the way around to the outer edge of the stomacher in front. Because of the shape of the panniers, the waist seam will curve upward as it approaches the side seam.
Unless you are using muslin which is sixty-inches wide or greater, you will need to add on an additional piece of muslin to make it all the way around to the front. Both edges will be on the SOG.
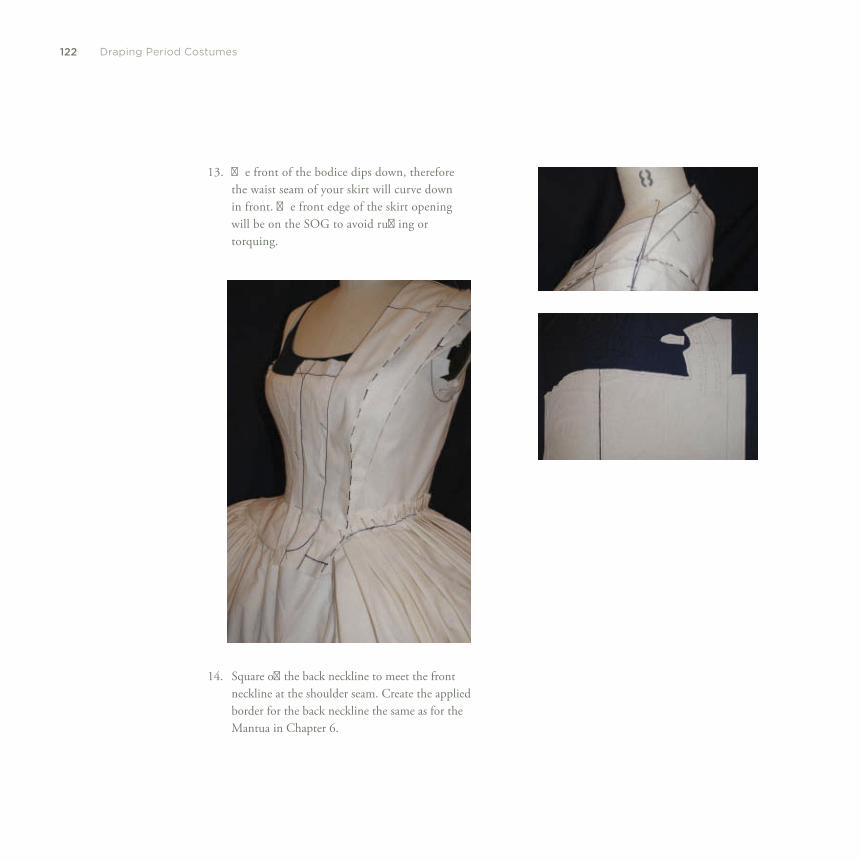
122 Draping Period Costumes
13. Th e front of the bodice dips down, therefore the waist seam of your skirt will curve down in front. Th e front edge of the skirt opening will be on the SOG to avoid ruffl ing ortorquing.
14. Square off the back neckline to meet the front neckline at the shoulder seam. Create the applied border for the back neckline the same as for the Mantua in Chapter 6 .

123Variety of Silhouette in Eighteenth-Century Women’s Costumes
Draping the Robe a la Francaise or Watteau-Backed Gown Th e Robe a la Francaise (gown in the French style) or Watteau-backed gown (called that in reference to the popular French painter Antoine Watteau) was cut similarly to the Robe a l’Anglaise. Th e front and sides of the bodice were cut separately from the skirt and the CB panel was cut “in one.” However, the CB panel of the Francaise was arranged into a series of box pleats falling from the square neckline and allowed to hang
loose, like a cape. A fi tted lining underneath the cape held the bodice in place.
1. For this garment use an appropriate oblong hooped petticoat/pannier or cans. Follow directions #1 through #5 for the Robe a l’Anglaise.
2. In addition to the fi tted underbodice for the front, drape a fi tted underbodice for the back as well. Use the same neckline as for the back of the Robe a l’Anglaise.
3. For the CB panel, use the entire width of a piece of muslin as long as the woman’s neck-to-fl oor measurement plus six inches. Pin the CB seam to the dress form from the neckline until just before the top of the corset. Pin the CB seam to the petticoat at hip level. Following the cross-grain line, fold one large box pleat with two returns (one on
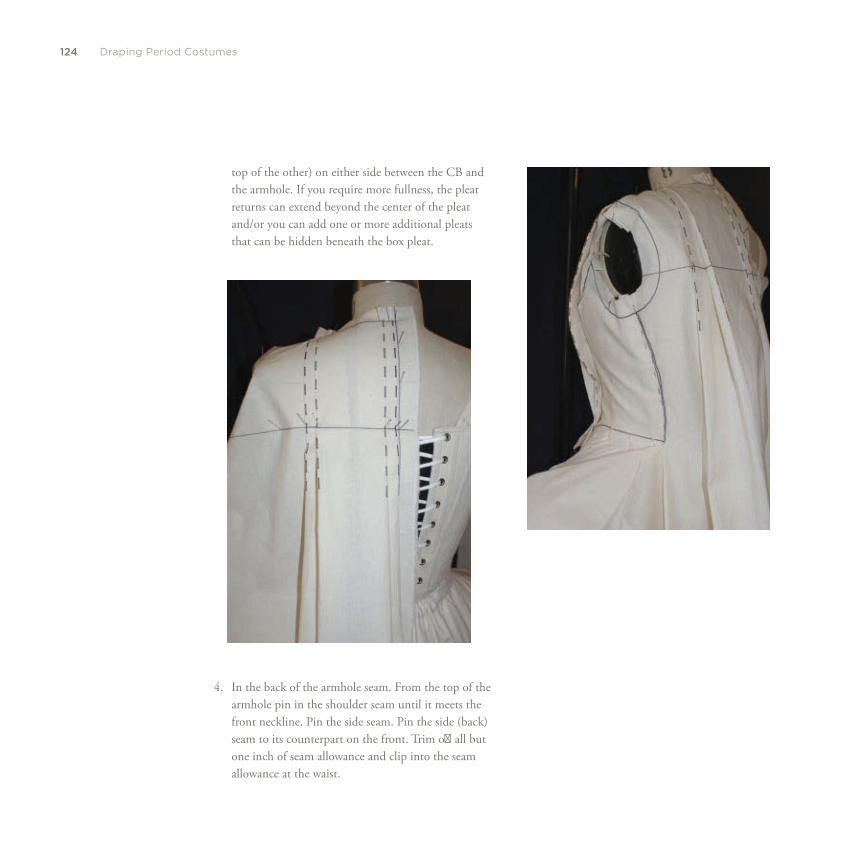
124 Draping Period Costumes
4. In the back of the armhole seam. From the top of the armhole pin in the shoulder seam until it meets the front neckline. Pin the side seam. Pin the side (back) seam to its counterpart on the front. Trim off all but one inch of seam allowance and clip into the seam allowance at the waist.
top of the other) on either side between the CB and the armhole. If you require more fullness, the pleat returns can extend beyond the center of the pleat and/or you can add one or more additional pleats that can be hidden beneath the box pleat.
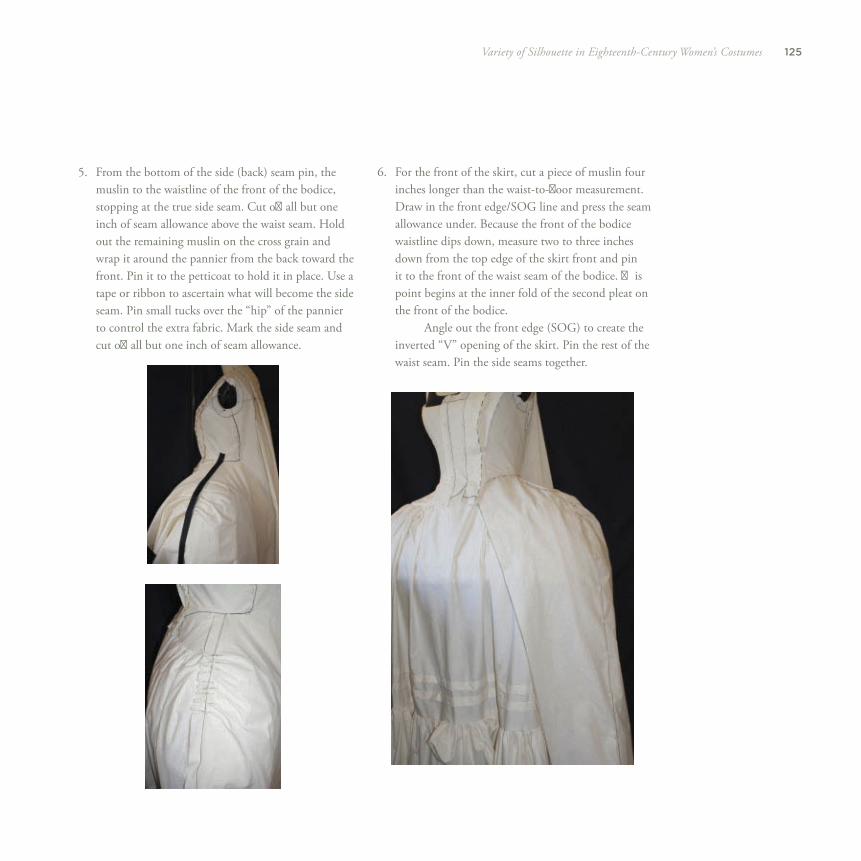
125Variety of Silhouette in Eighteenth-Century Women’s Costumes
5. From the bottom of the side (back) seam pin, the muslin to the waistline of the front of the bodice, stopping at the true side seam. Cut off all but one inch of seam allowance above the waist seam. Hold out the remaining muslin on the cross grain and wrap it around the pannier from the back toward the front. Pin it to the petticoat to hold it in place. Use a tape or ribbon to ascertain what will become the side seam. Pin small tucks over the “hip” of the pannier to control the extra fabric. Mark the side seam and cut off all but one inch of seam allowance.
6. For the front of the skirt, cut a piece of muslin four inches longer than the waist-to-fl oor measurement. Draw in the front edge/SOG line and press the seam allowance under. Because the front of the bodice waistline dips down, measure two to three inches down from the top edge of the skirt front and pin it to the front of the waist seam of the bodice. Th is point begins at the inner fold of the second pleat on the front of the bodice.
Angle out the front edge (SOG) to create the inverted “V” opening of the skirt. Pin the rest of the waist seam. Pin the side seams together.
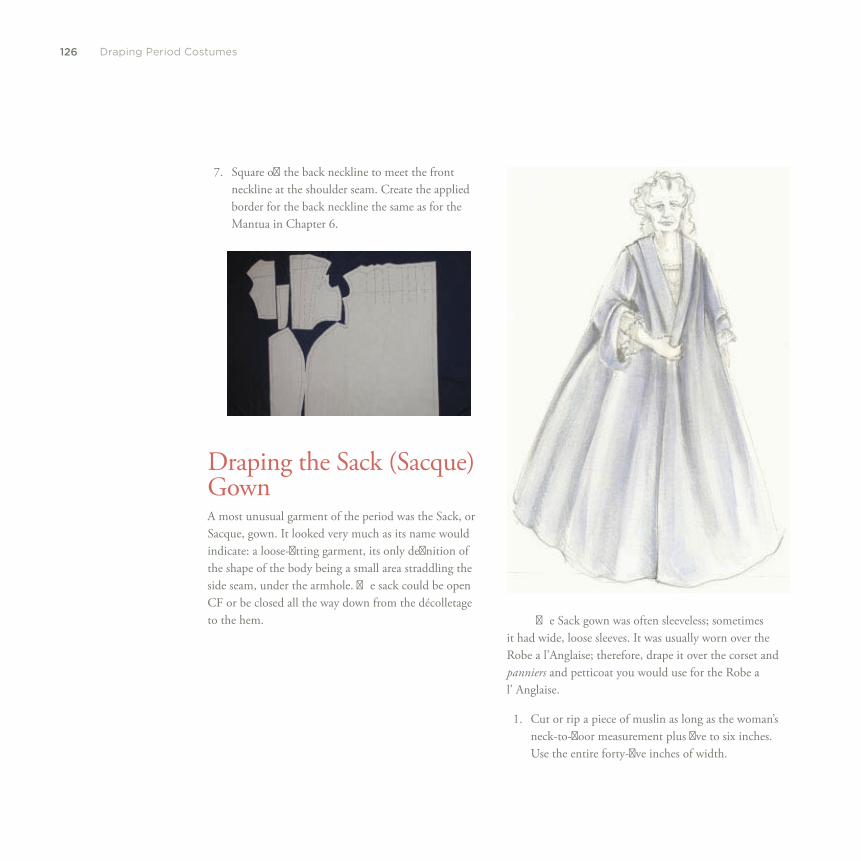
126 Draping Period Costumes
7. Square off the back neckline to meet the front neckline at the shoulder seam. Create the applied border for the back neckline the same as for the Mantua in Chapter 6 .
Draping the Sack (Sacque) Gown A most unusual garment of the period was the Sack, or Sacque, gown. It looked very much as its name would indicate: a loose-fi tting garment, its only defi nition of the shape of the body being a small area straddling the side seam, under the armhole. Th e sack could be open CF or be closed all the way down from the décolletage to the hem. Th e Sack gown was often sleeveless; sometimes
it had wide, loose sleeves. It was usually worn over the Robe a l’Anglaise; therefore, drape it over the corset and panniers and petticoat you would use for the Robe a l’ Anglaise.
1. Cut or rip a piece of muslin as long as the woman’s neck-to-fl oor measurement plus fi ve to six inches. Use the entire forty-fi ve inches of width.
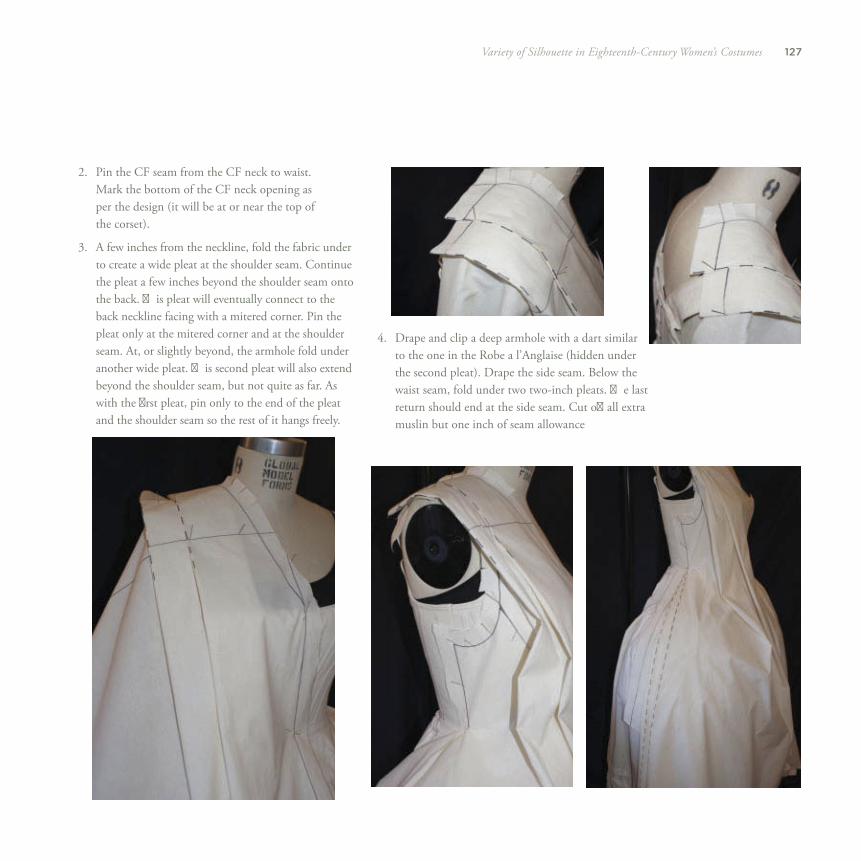
127Variety of Silhouette in Eighteenth-Century Women’s Costumes
2. Pin the CF seam from the CF neck to waist. Mark the bottom of the CF neck opening as per the design (it will be at or near the top of the corset).
3. A few inches from the neckline, fold the fabric under to create a wide pleat at the shoulder seam. Continue the pleat a few inches beyond the shoulder seam onto the back. Th is pleat will eventually connect to the back neckline facing with a mitered corner. Pin the pleat only at the mitered corner and at the shoulder seam. At, or slightly beyond, the armhole fold under another wide pleat. Th is second pleat will also extend beyond the shoulder seam, but not quite as far. As with the fi rst pleat, pin only to the end of the pleat and the shoulder seam so the rest of it hangs freely.
4. Drape and clip a deep armhole with a dart similar to the one in the Robe a l’Anglaise (hidden under the second pleat). Drape the side seam. Below the waist seam, fold under two two-inch pleats. Th e last return should end at the side seam. Cut off all extra muslin but one inch of seam allowance
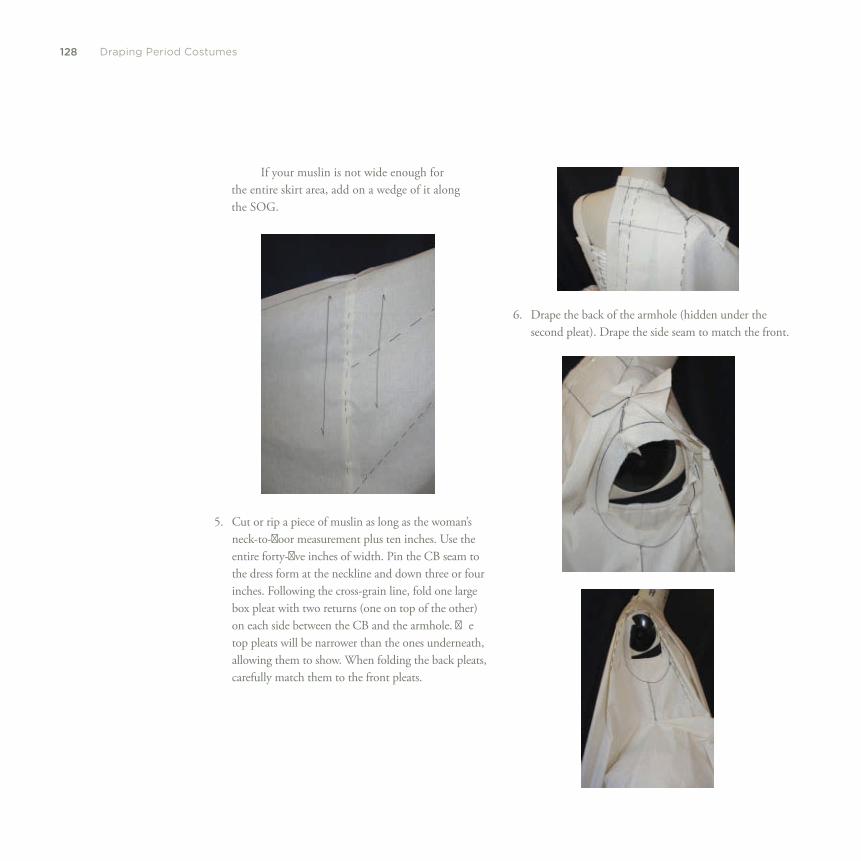
128 Draping Period Costumes
If your muslin is not wide enough for the entire skirt area, add on a wedge of it along the SOG.
5. Cut or rip a piece of muslin as long as the woman’s neck-to-fl oor measurement plus ten inches. Use the entire forty-fi ve inches of width. Pin the CB seam to the dress form at the neckline and down three or four inches. Following the cross-grain line, fold one large box pleat with two returns (one on top of the other) on each side between the CB and the armhole. Th e top pleats will be narrower than the ones underneath, allowing them to show. When folding the back pleats, carefully match them to the front pleats.
6. Drape the back of the armhole (hidden under the second pleat). Drape the side seam to match the front.
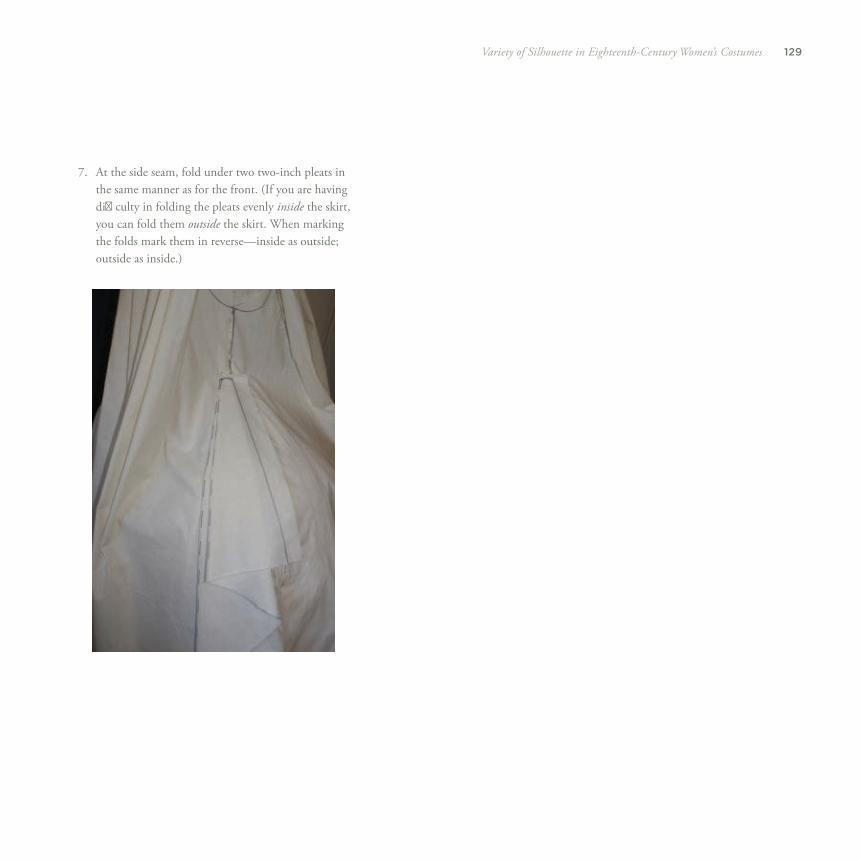
129Variety of Silhouette in Eighteenth-Century Women’s Costumes
7. At the side seam, fold under two two-inch pleats in the same manner as for the front. (If you are having diffi culty in folding the pleats evenly inside the skirt, you can fold them outside the skirt. When marking the folds mark them in reverse—inside as outside; outside as inside.)

130 Draping Period Costumes
Pin the side seams together starting at the top and fl aring out over the boned petticoat. Trim away all but one inch of seam allowance.
8. Match up the length of the front and back side seams, trimming off extra hem on back piece gradually so it creates a train in the back.
9. Create the applied border for the back neckline the same as for the Mantua in Chapter 6 .

nine
N E O C L A S S I C A L E L E G A N C E
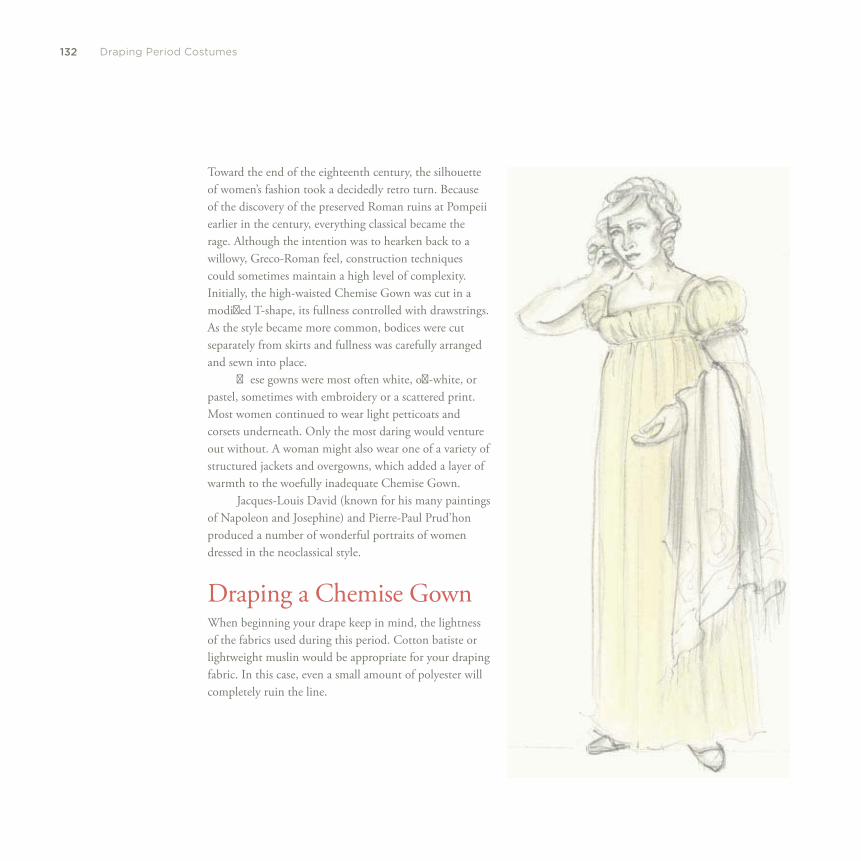
132 Draping Period Costumes
Toward the end of the eighteenth century, the silhouette of women’s fashion took a decidedly retro turn. Because of the discovery of the preserved Roman ruins at Pompeii earlier in the century, everything classical became the rage. Although the intention was to hearken back to a willowy, Greco-Roman feel, construction techniques could sometimes maintain a high level of complexity. Initially, the high-waisted Chemise Gown was cut in a modifi ed T-shape, its fullness controlled with drawstrings. As the style became more common, bodices were cut separately from skirts and fullness was carefully arranged and sewn into place.
Th ese gowns were most often white, off -white, or pastel, sometimes with embroidery or a scattered print. Most women continued to wear light petticoats and corsets underneath. Only the most daring would venture out without. A woman might also wear one of a variety of structured jackets and overgowns, which added a layer of warmth to the woefully inadequate Chemise Gown.
Jacques-Louis David (known for his many paintings of Napoleon and Josephine) and Pierre-Paul Prud’hon produced a number of wonderful portraits of women dressed in the neoclassical style.
Draping a Chemise Gown When beginning your drape keep in mind, the lightness of the fabrics used during this period. Cotton batiste or lightweight muslin would be appropriate for your draping fabric. In this case, even a small amount of polyester will completely ruin the line.
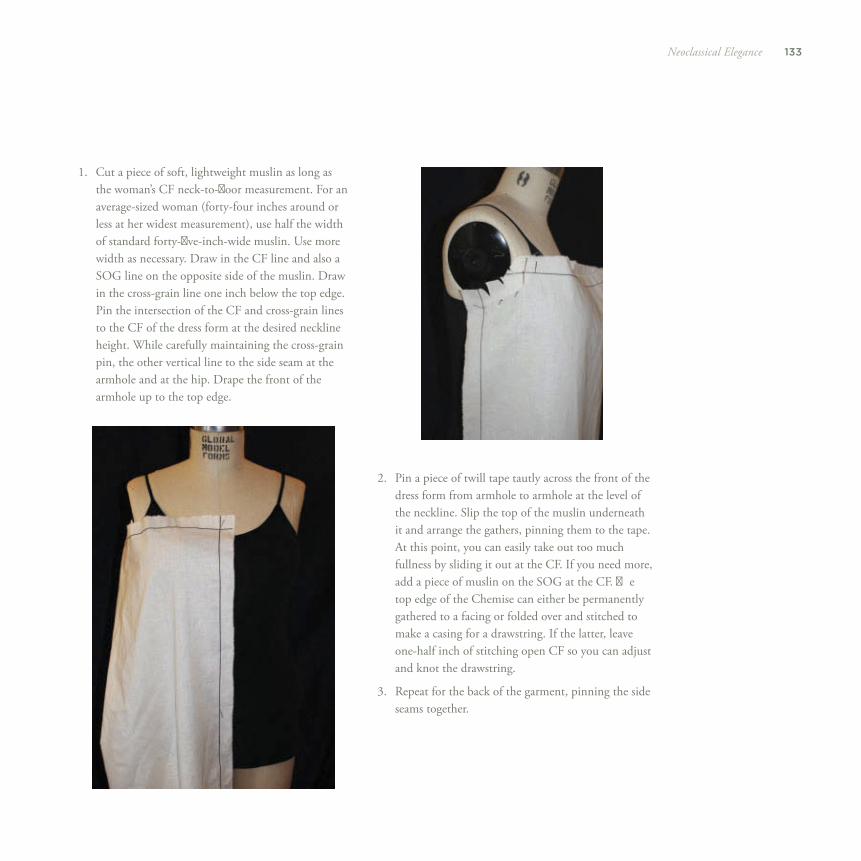
133Neoclassical Elegance
1. Cut a piece of soft, lightweight muslin as long as the woman’s CF neck-to-fl oor measurement. For an average-sized woman (forty-four inches around or less at her widest measurement), use half the width of standard forty-fi ve-inch-wide muslin. Use more width as necessary. Draw in the CF line and also a SOG line on the opposite side of the muslin. Draw in the cross-grain line one inch below the top edge. Pin the intersection of the CF and cross-grain lines to the CF of the dress form at the desired neckline height. While carefully maintaining the cross-grain pin, the other vertical line to the side seam at the armhole and at the hip. Drape the front of the armhole up to the top edge.
2. Pin a piece of twill tape tautly across the front of the dress form from armhole to armhole at the level of the neckline. Slip the top of the muslin underneath it and arrange the gathers, pinning them to the tape. At this point, you can easily take out too much fullness by sliding it out at the CF. If you need more, add a piece of muslin on the SOG at the CF. Th e top edge of the Chemise can either be permanently gathered to a facing or folded over and stitched to make a casing for a drawstring. If the latter, leave one-half inch of stitching open CF so you can adjust and knot the drawstring.
3. Repeat for the back of the garment, pinning the side seams together.
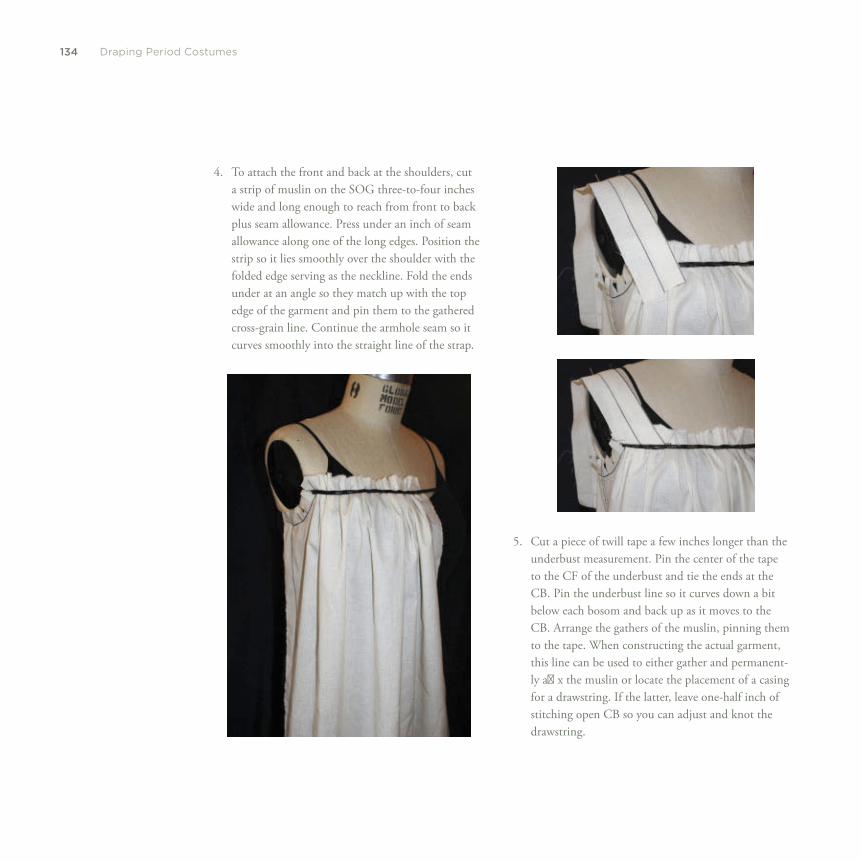
134 Draping Period Costumes
5. Cut a piece of twill tape a few inches longer than the underbust measurement. Pin the center of the tape to the CF of the underbust and tie the ends at the CB. Pin the underbust line so it curves down a bit below each bosom and back up as it moves to the CB. Arrange the gathers of the muslin, pinning them to the tape. When constructing the actual garment, this line can be used to either gather and permanent-ly affi x the muslin or locate the placement of a casing for a drawstring. If the latter, leave one-half inch of stitching open CB so you can adjust and knot the drawstring.
4. To attach the front and back at the shoulders, cut a strip of muslin on the SOG three-to-four inches wide and long enough to reach from front to back plus seam allowance. Press under an inch of seam allowance along one of the long edges. Position the strip so it lies smoothly over the shoulder with the folded edge serving as the neckline. Fold the ends under at an angle so they match up with the top edge of the garment and pin them to the gathered cross-grain line. Continue the armhole seam so it curves smoothly into the straight line of the strap.
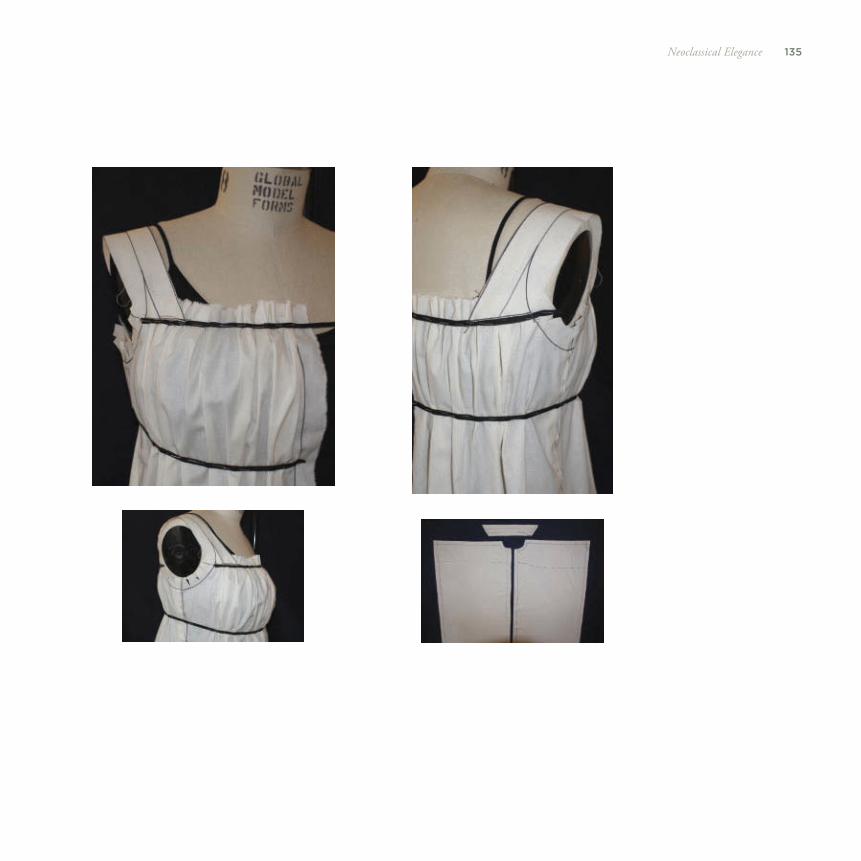
135Neoclassical Elegance
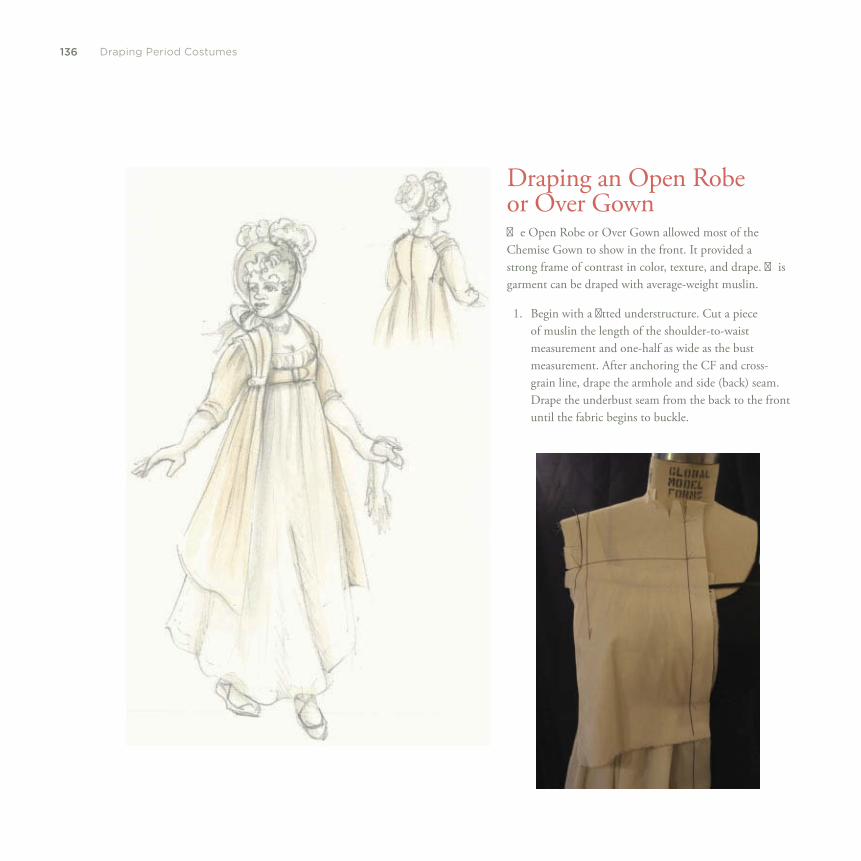
136 Draping Period Costumes
Draping an Open Robe or Over Gown Th e Open Robe or Over Gown allowed most of the Chemise Gown to show in the front. It provided a strong frame of contrast in color, texture, and drape. Th is garment can be draped with average-weight muslin.
1. Begin with a fi tted understructure. Cut a piece of muslin the length of the shoulder-to-waist measurement and one-half as wide as the bust measurement. After anchoring the CF and cross-grain line, drape the armhole and side (back) seam. Drape the underbust seam from the back to the front until the fabric begins to buckle.
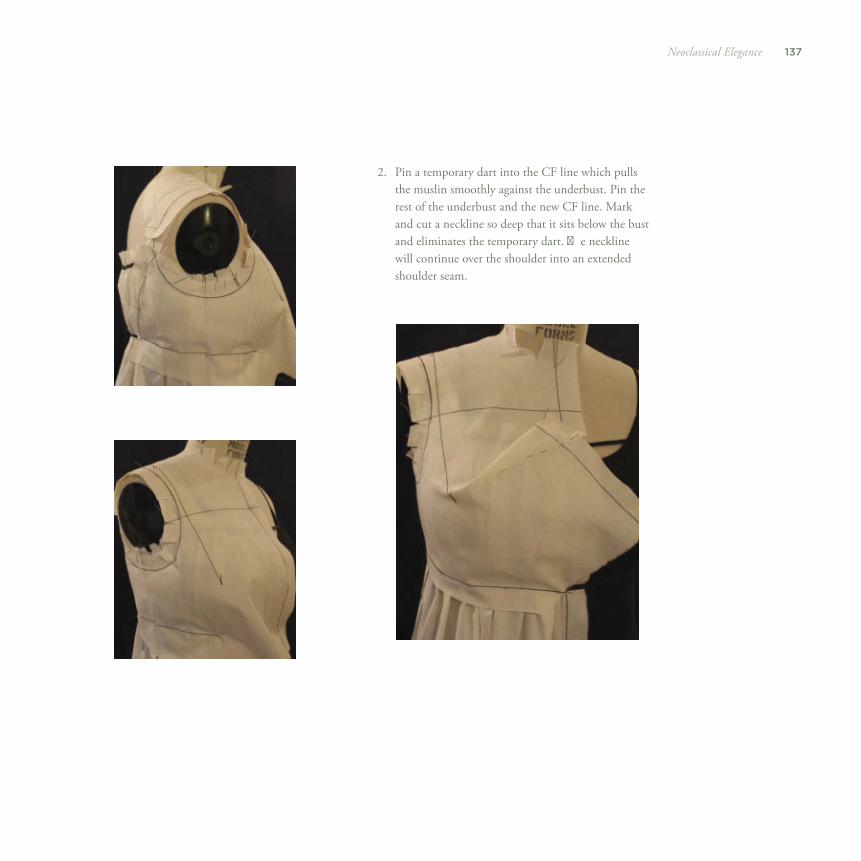
137Neoclassical Elegance
2. Pin a temporary dart into the CF line which pulls the muslin smoothly against the underbust. Pin the rest of the underbust and the new CF line. Mark and cut a neckline so deep that it sits below the bust and eliminates the temporary dart. Th e neckline will continue over the shoulder into an extended shoulder seam.
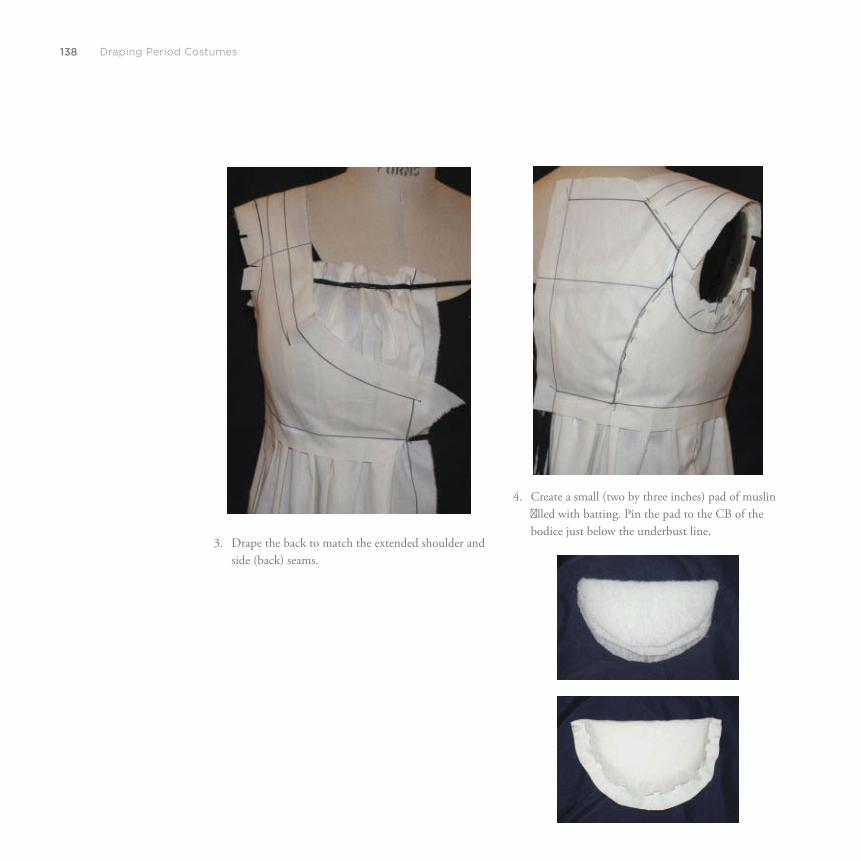
138 Draping Period Costumes
3. Drape the back to match the extended shoulder and side (back) seams.
4. Create a small (two by three inches) pad of muslin fi lled with batting. Pin the pad to the CB of the bodice just below the underbust line.
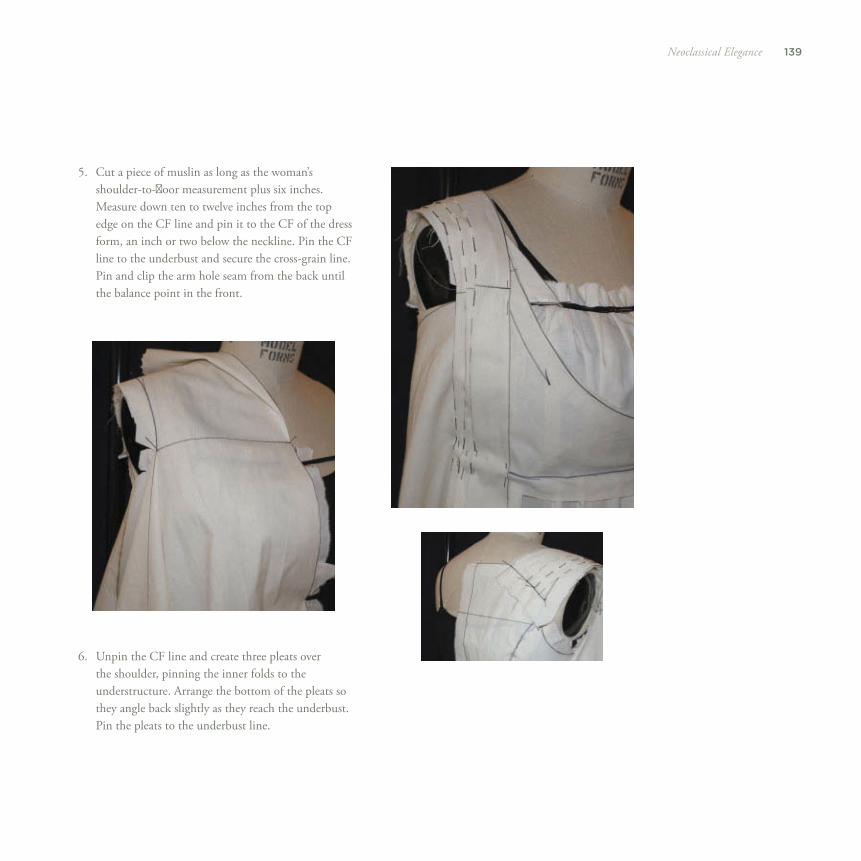
139Neoclassical Elegance
5. Cut a piece of muslin as long as the woman’s shoulder-to-fl oor measurement plus six inches. Measure down ten to twelve inches from the top edge on the CF line and pin it to the CF of the dress form, an inch or two below the neckline. Pin the CF line to the underbust and secure the cross-grain line. Pin and clip the arm hole seam from the back until the balance point in the front.
6. Unpin the CF line and create three pleats over the shoulder, pinning the inner folds to the understructure. Arrange the bottom of the pleats so they angle back slightly as they reach the underbust. Pin the pleats to the underbust line.
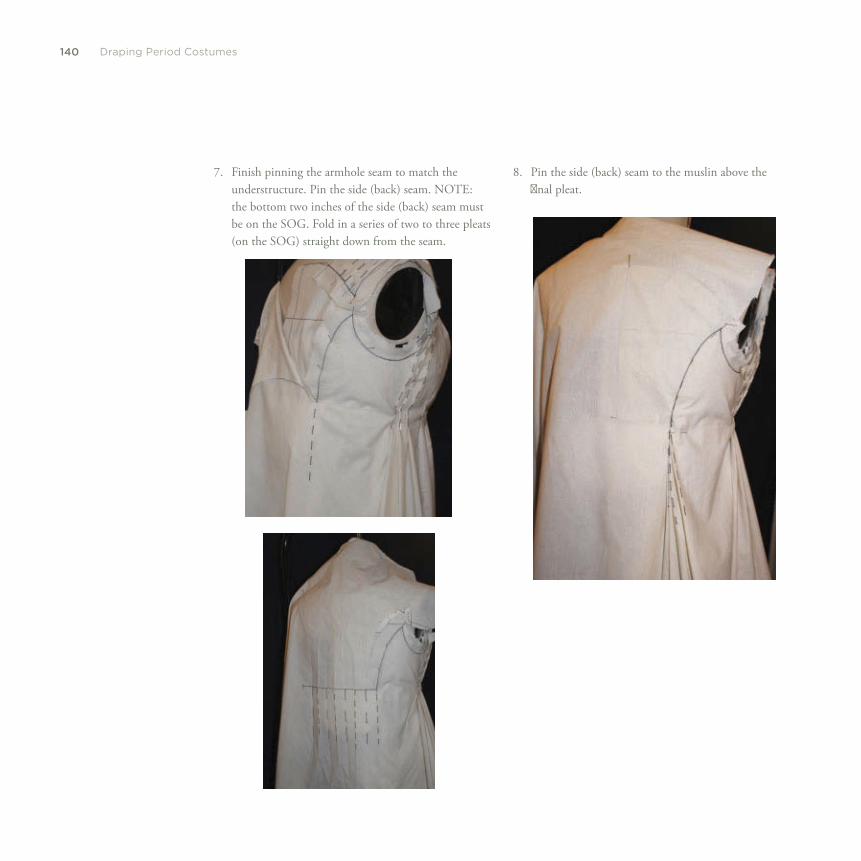
140 Draping Period Costumes
8. Pin the side (back) seam to the muslin above the fi nal pleat.
7. Finish pinning the armhole seam to match the understructure. Pin the side (back) seam. NOTE: the bottom two inches of the side (back) seam must be on the SOG. Fold in a series of two to three pleats (on the SOG) straight down from the seam.
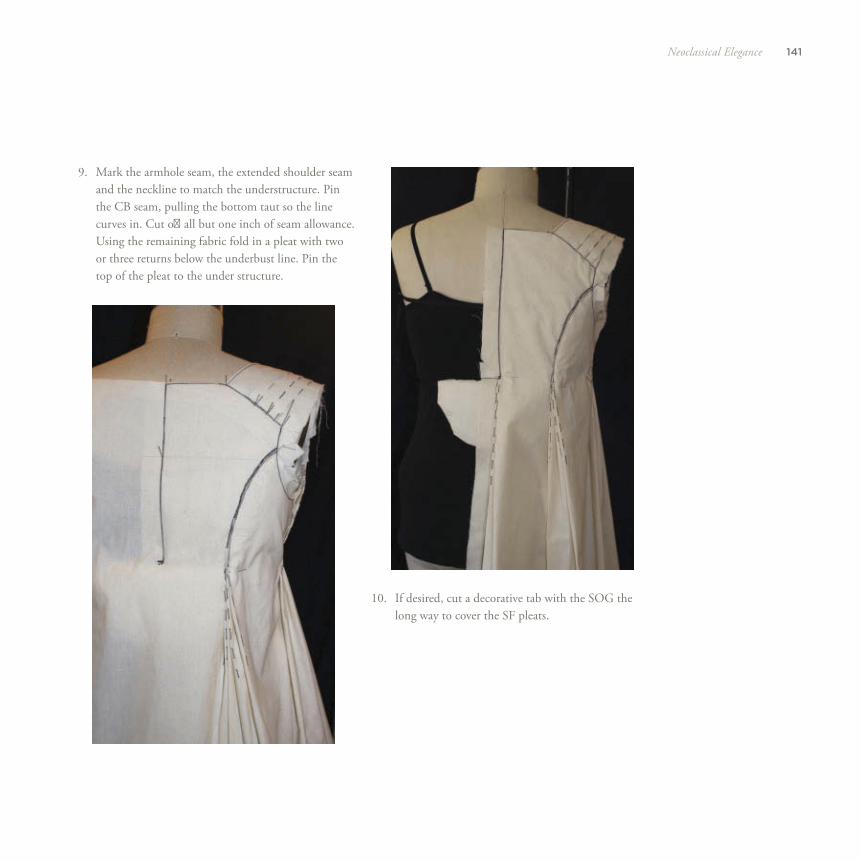
141Neoclassical Elegance
9. Mark the armhole seam, the extended shoulder seam and the neckline to match the understructure. Pin the CB seam, pulling the bottom taut so the line curves in. Cut off all but one inch of seam allowance. Using the remaining fabric fold in a pleat with two or three returns below the underbust line. Pin the top of the pleat to the under structure.
10. If desired, cut a decorative tab with the SOG the long way to cover the SF pleats.
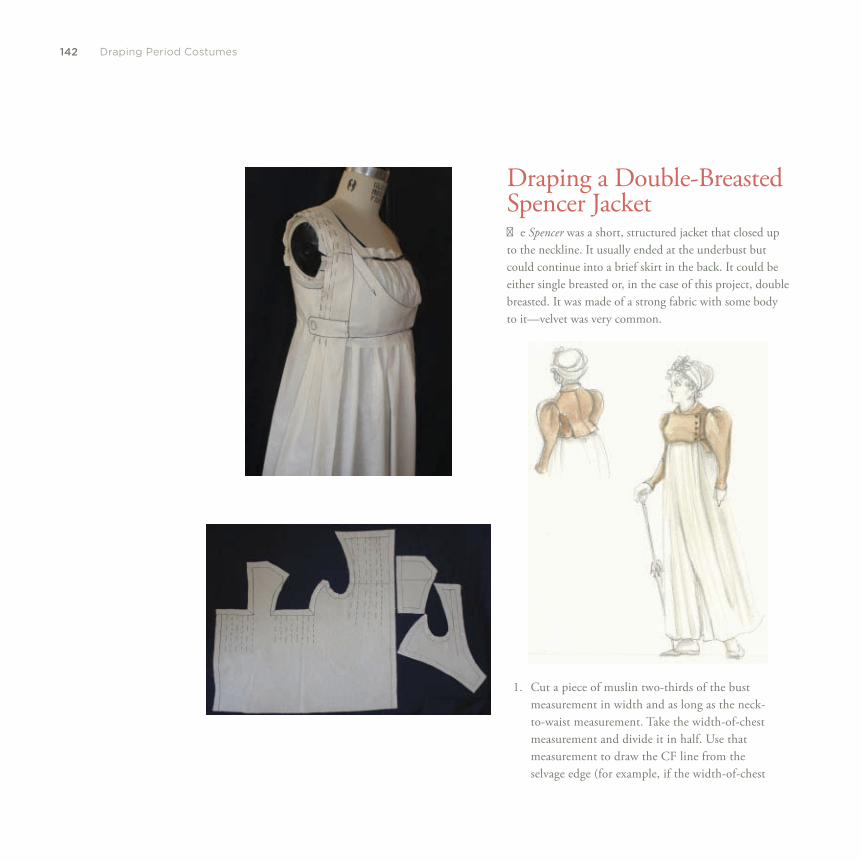
142 Draping Period Costumes
Draping a Double-Breasted Spencer Jacket Th e Spencer was a short, structured jacket that closed up to the neckline. It usually ended at the underbust but could continue into a brief skirt in the back. It could be either single breasted or, in the case of this project, double breasted. It was made of a strong fabric with some body to it—velvet was very common.
1. Cut a piece of muslin two-thirds of the bust measurement in width and as long as the neck-to-waist measurement. Take the width-of-chest measurement and divide it in half. Use that measurement to draw the CF line from the selvage edge (for example, if the width-of-chest
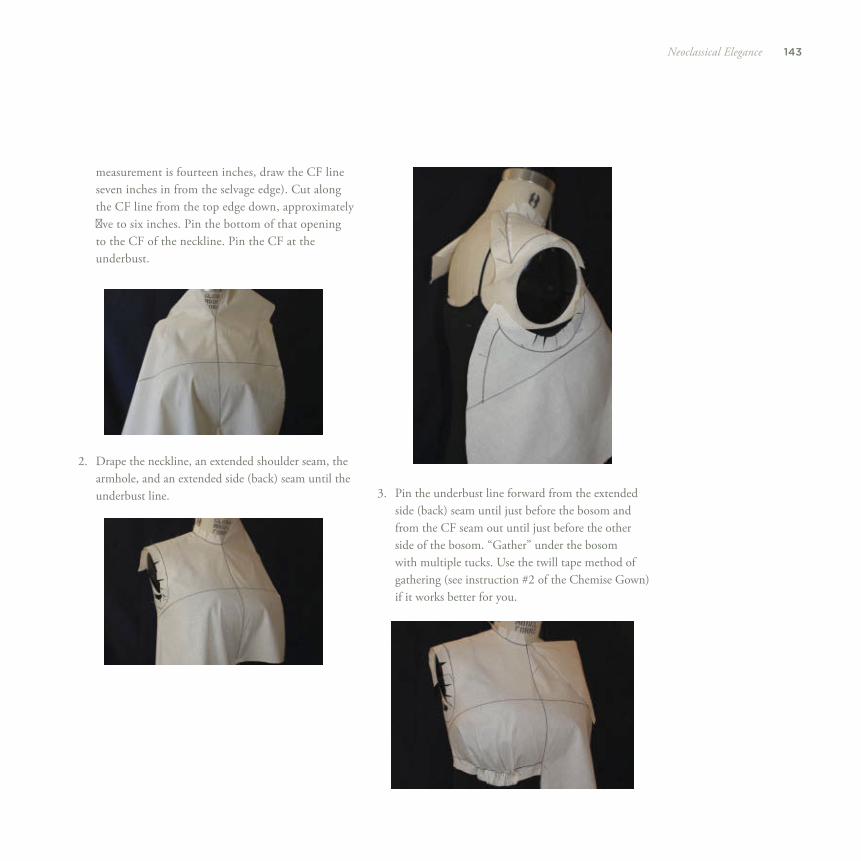
143Neoclassical Elegance
2. Drape the neckline, an extended shoulder seam, the armhole, and an extended side (back) seam until the underbust line. 3. Pin the underbust line forward from the extended
side (back) seam until just before the bosom and from the CF seam out until just before the other side of the bosom. “Gather” under the bosom with multiple tucks. Use the twill tape method of gathering (see instruction #2 of the Chemise Gown) if it works better for you.
measurement is fourteen inches, draw the CF line seven inches in from the selvage edge). Cut along the CF line from the top edge down, approximately fi ve to six inches. Pin the bottom of that opening to the CF of the neckline. Pin the CF at the underbust.

144 Draping Period Costumes
5. When draping the back, fi rst pin on the muslin-covered padding created in step #4 of the Open Robe. Cut a piece of muslin as long as the back shoulder-to-waist measurement and as wide as one-quarter of the chest measurement. Drape the CB seam, neckline, extended shoulder seam, armhole, and side (back) seam. Extend the side (back) seam line down by folding it under to create half of a pleat.
4. Repeat this method for the other side of the underbust line or transfer your markings over.Mark the top and SF opening edge as per the design.
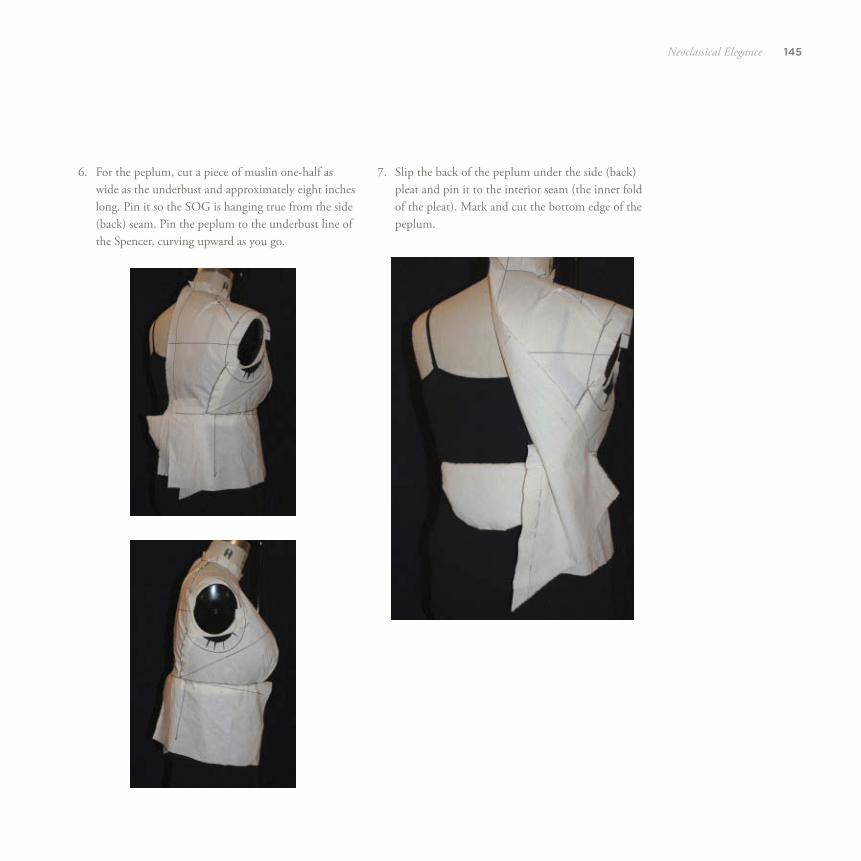
145Neoclassical Elegance
6. For the peplum, cut a piece of muslin one-half as wide as the underbust and approximately eight inches long. Pin it so the SOG is hanging true from the side (back) seam. Pin the peplum to the underbust line of the Spencer, curving upward as you go.
7. Slip the back of the peplum under the side (back) pleat and pin it to the interior seam (the inner fold of the pleat). Mark and cut the bottom edge of the peplum.
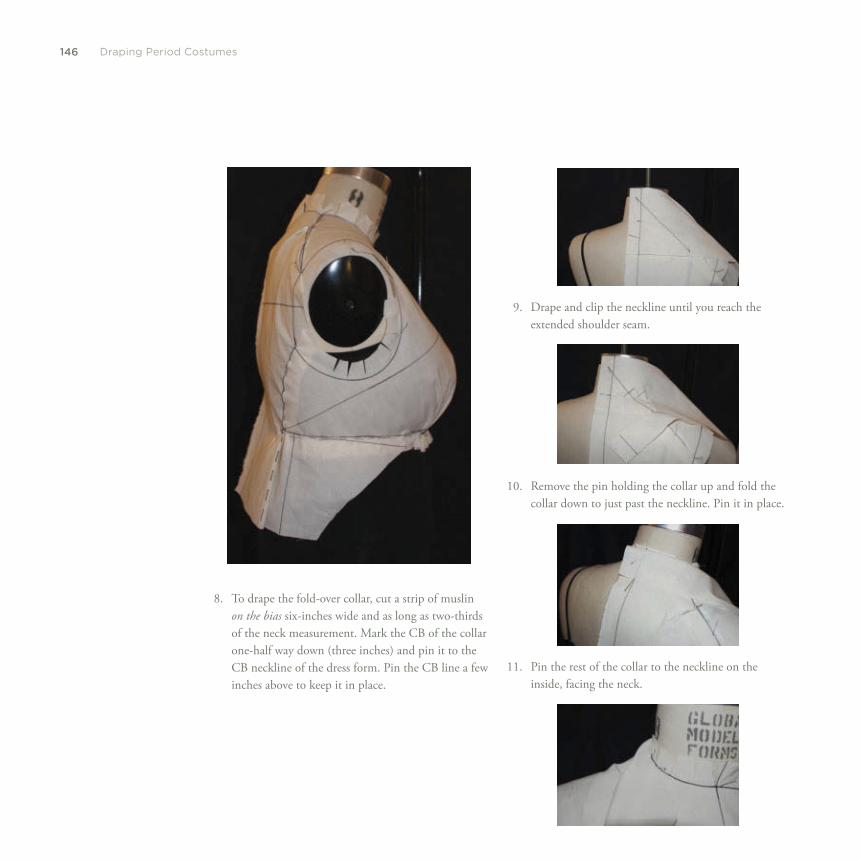
146 Draping Period Costumes
8. To drape the fold-over collar, cut a strip of muslin on the bias six-inches wide and as long as two-thirds of the neck measurement. Mark the CB of the collar one-half way down (three inches) and pin it to the CB neckline of the dress form. Pin the CB line a few inches above to keep it in place.
9. Drape and clip the neckline until you reach the extended shoulder seam.
10. Remove the pin holding the collar up and fold the collar down to just past the neckline. Pin it in place.
11. Pin the rest of the collar to the neckline on the inside, facing the neck.
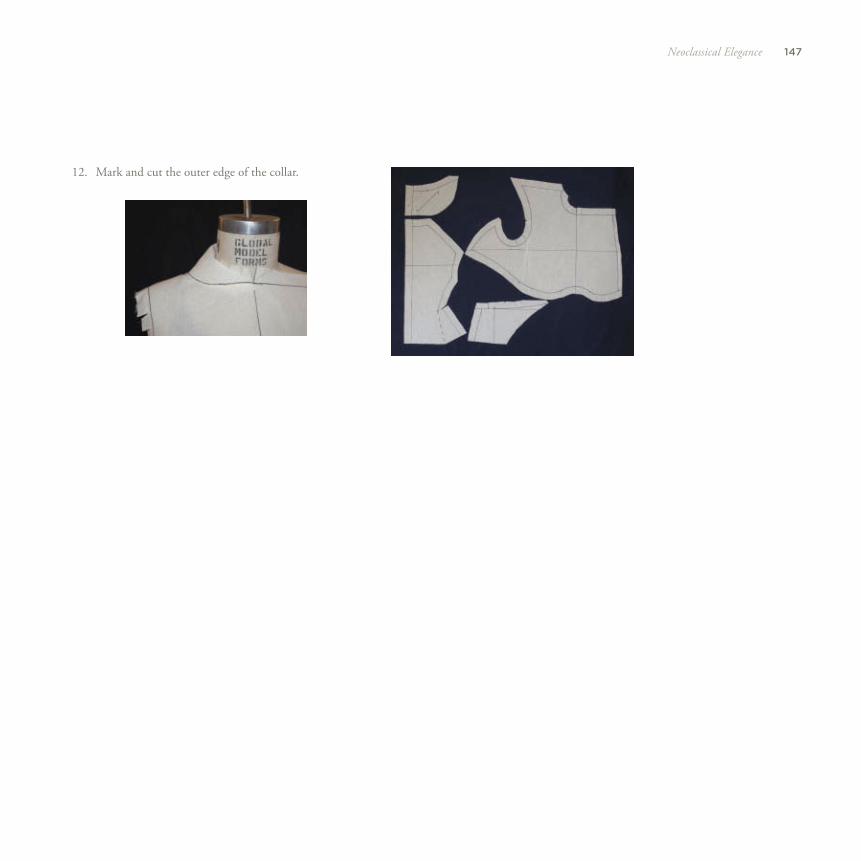
147Neoclassical Elegance
12. Mark and cut the outer edge of the collar.


ten
R E V O L U T I O N A R Y M E N S W E A R
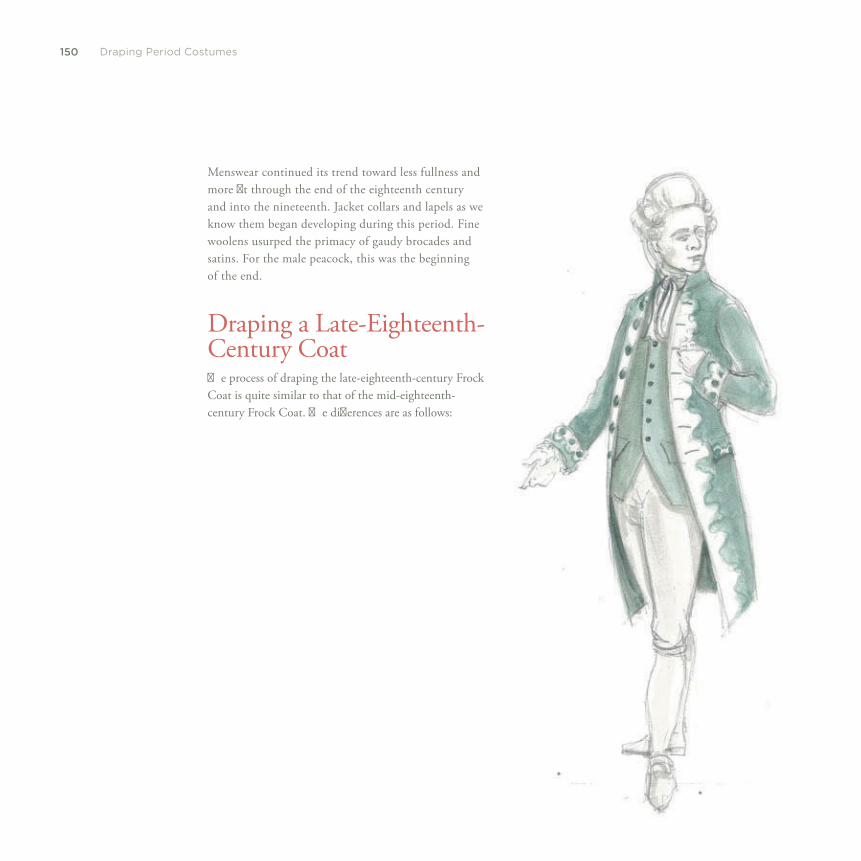
150 Draping Period Costumes
Menswear continued its trend toward less fullness and more fi t through the end of the eighteenth century and into the nineteenth. Jacket collars and lapels as we know them began developing during this period. Fine woolens usurped the primacy of gaudy brocades and satins. For the male peacock, this was the beginning of the end.
Draping a Late- Eighteenth-Century Coat Th e process of draping the late-eighteenth-century Frock Coat is quite similar to that of the mid-eighteenth-century Frock Coat. Th e diff erences are as follows:
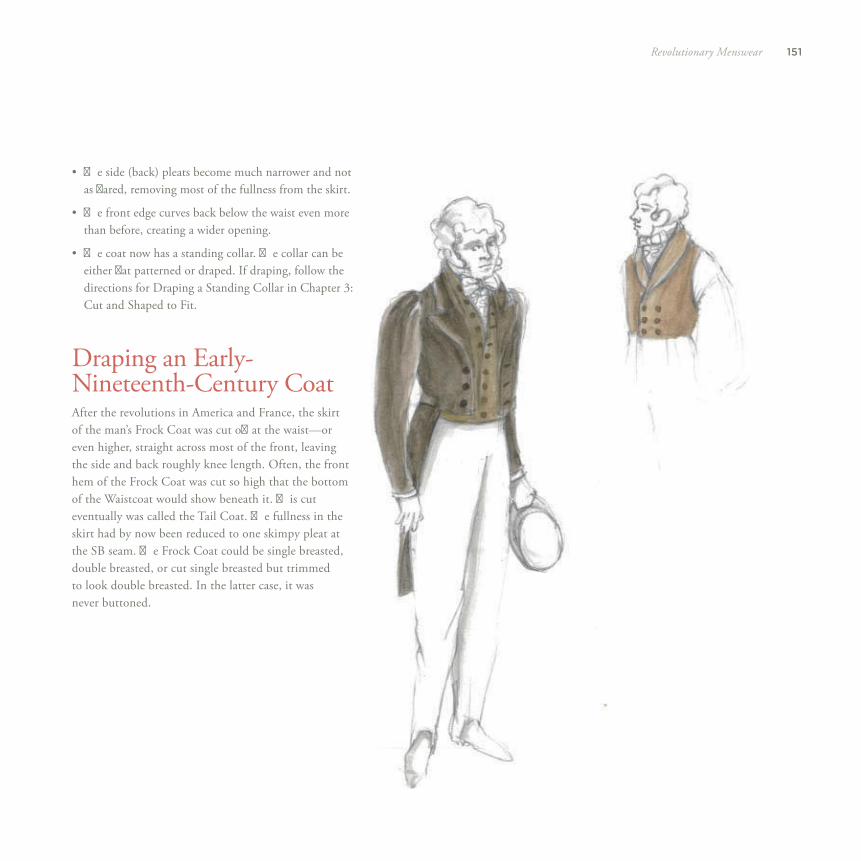
151Revolutionary Menswear
• Th e side (back) pleats become much narrower and not as fl ared, removing most of the fullness from the skirt.
• Th e front edge curves back below the waist even more than before, creating a wider opening.
• Th e coat now has a standing collar. Th e collar can be either fl at patterned or draped. If draping, follow the directions for Draping a Standing Collar in Chapter 3 : Cut and Shaped to Fit.
Draping an Early-Nineteenth-Century Coat After the revolutions in America and France, the skirt of the man’s Frock Coat was cut off at the waist—or even higher, straight across most of the front, leaving the side and back roughly knee length. Often, the front hem of the Frock Coat was cut so high that the bottom of the Waistcoat would show beneath it. Th is cut eventually was called the Tail Coat. Th e fullness in the skirt had by now been reduced to one skimpy pleat at the SB seam. Th e Frock Coat could be single breasted, double breasted, or cut single breasted but trimmed to look double breasted. In the latter case, it was never buttoned.
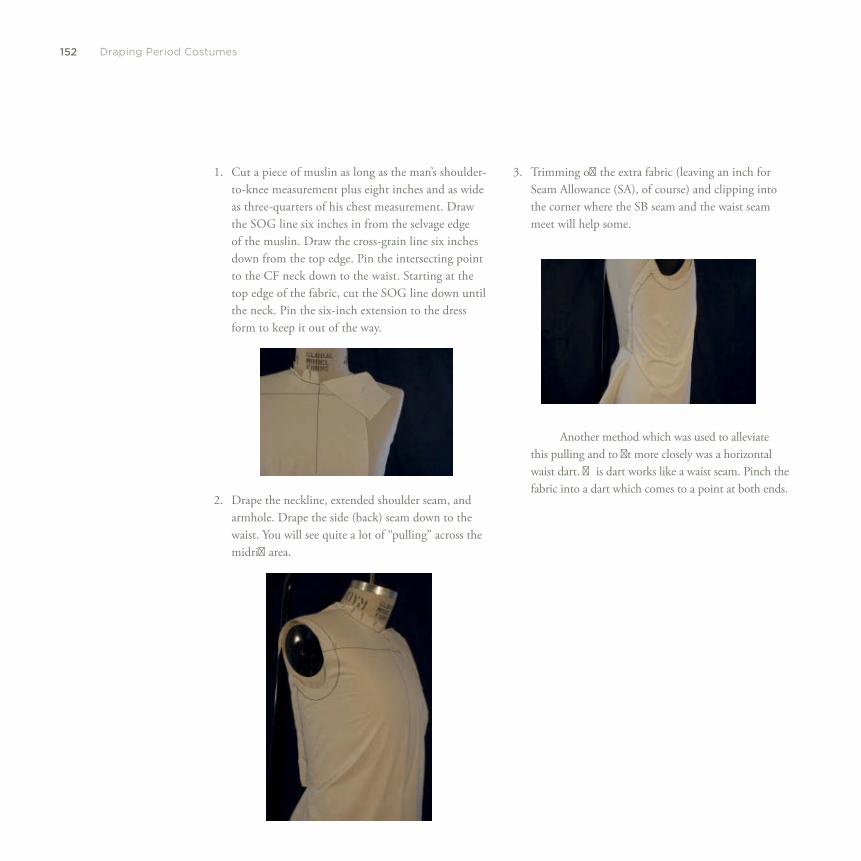
152 Draping Period Costumes
1. Cut a piece of muslin as long as the man’s shoulder-to-knee measurement plus eight inches and as wide as three-quarters of his chest measurement. Draw the SOG line six inches in from the selvage edge of the muslin. Draw the cross-grain line six inches down from the top edge. Pin the intersecting point to the CF neck down to the waist. Starting at the top edge of the fabric, cut the SOG line down until the neck. Pin the six-inch extension to the dress form to keep it out of the way.
2. Drape the neckline, extended shoulder seam, and armhole. Drape the side (back) seam down to the waist. You will see quite a lot of “pulling” across the midriff area.
3. Trimming off the extra fabric (leaving an inch for Seam Allowance (SA), of course) and clipping into the corner where the SB seam and the waist seam meet will help some.
Another method which was used to alleviate this pulling and to fi t more closely was a horizontal waist dart. Th is dart works like a waist seam. Pinch the fabric into a dart which comes to a point at both ends.
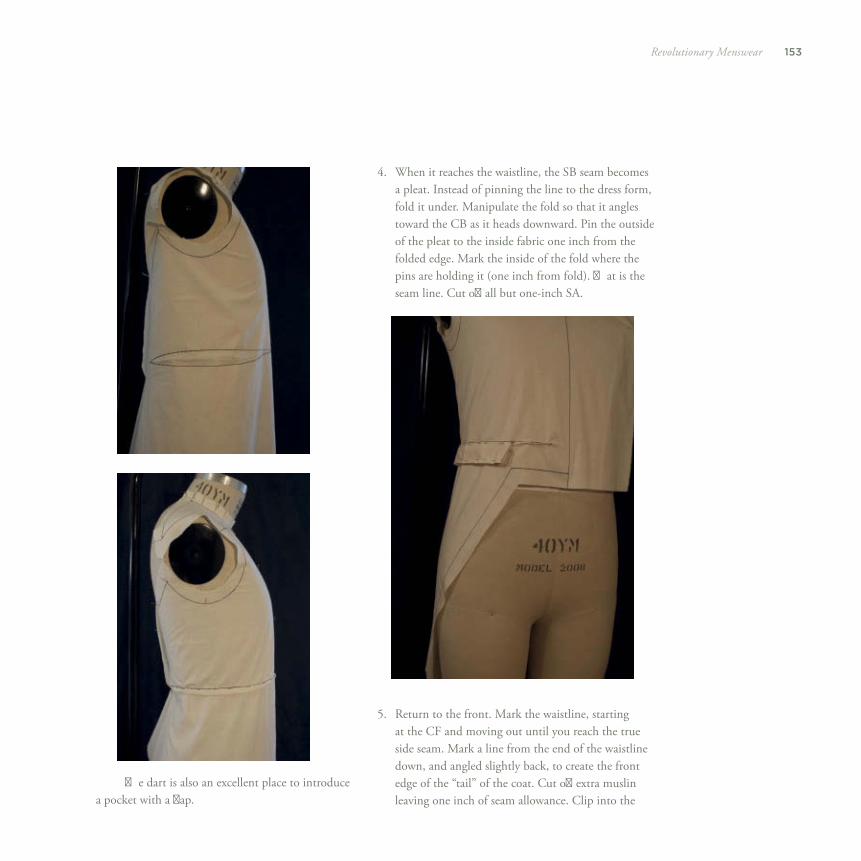
153Revolutionary Menswear
Th e dart is also an excellent place to introduce a pocket with a fl ap.
4. When it reaches the waistline, the SB seam becomes a pleat. Instead of pinning the line to the dress form, fold it under. Manipulate the fold so that it angles toward the CB as it heads downward. Pin the outside of the pleat to the inside fabric one inch from the folded edge. Mark the inside of the fold where the pins are holding it (one inch from fold). Th at is the seam line. Cut off all but one-inch SA.
5. Return to the front. Mark the waistline, starting at the CF and moving out until you reach the true side seam. Mark a line from the end of the waistline down, and angled slightly back, to create the front edge of the “tail” of the coat. Cut off extra muslin leaving one inch of seam allowance. Clip into the
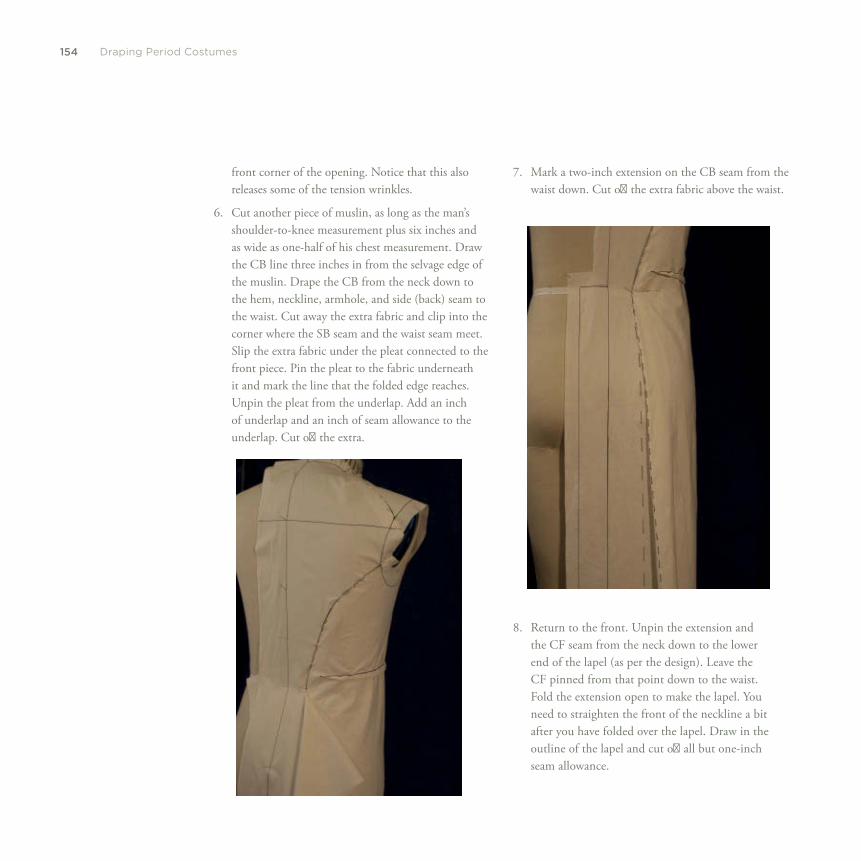
154 Draping Period Costumes
front corner of the opening. Notice that this also releases some of the tension wrinkles.
6. Cut another piece of muslin, as long as the man’s shoulder-to-knee measurement plus six inches and as wide as one-half of his chest measurement. Draw the CB line three inches in from the selvage edge of the muslin. Drape the CB from the neck down to the hem, neckline, armhole, and side (back) seam to the waist. Cut away the extra fabric and clip into the corner where the SB seam and the waist seam meet. Slip the extra fabric under the pleat connected to the front piece. Pin the pleat to the fabric underneath it and mark the line that the folded edge reaches. Unpin the pleat from the underlap. Add an inch of underlap and an inch of seam allowance to the underlap. Cut off the extra.
7. Mark a two-inch extension on the CB seam from the waist down. Cut off the extra fabric above the waist.
8. Return to the front. Unpin the extension and the CF seam from the neck down to the lower end of the lapel (as per the design). Leave the CF pinned from that point down to the waist. Fold the extension open to make the lapel. You need to straighten the front of the neckline a bit after you have folded over the lapel. Draw in the outline of the lapel and cut off all but one-inch seam allowance.
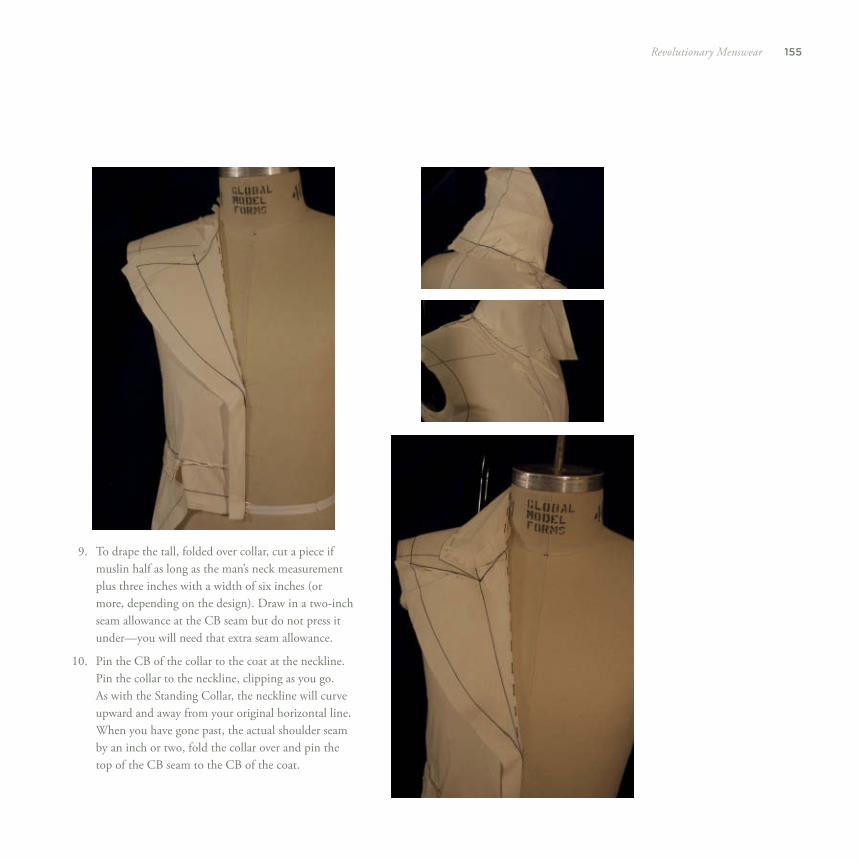
155Revolutionary Menswear
9. To drape the tall, folded over collar, cut a piece if muslin half as long as the man’s neck measurement plus three inches with a width of six inches (or more, depending on the design). Draw in a two-inch seam allowance at the CB seam but do not press it under—you will need that extra seam allowance.
10. Pin the CB of the collar to the coat at the neckline. Pin the collar to the neckline, clipping as you go. As with the Standing Collar, the neckline will curve upward and away from your original horizontal line. When you have gone past, the actual shoulder seam by an inch or two, fold the collar over and pin the top of the CB seam to the CB of the coat.
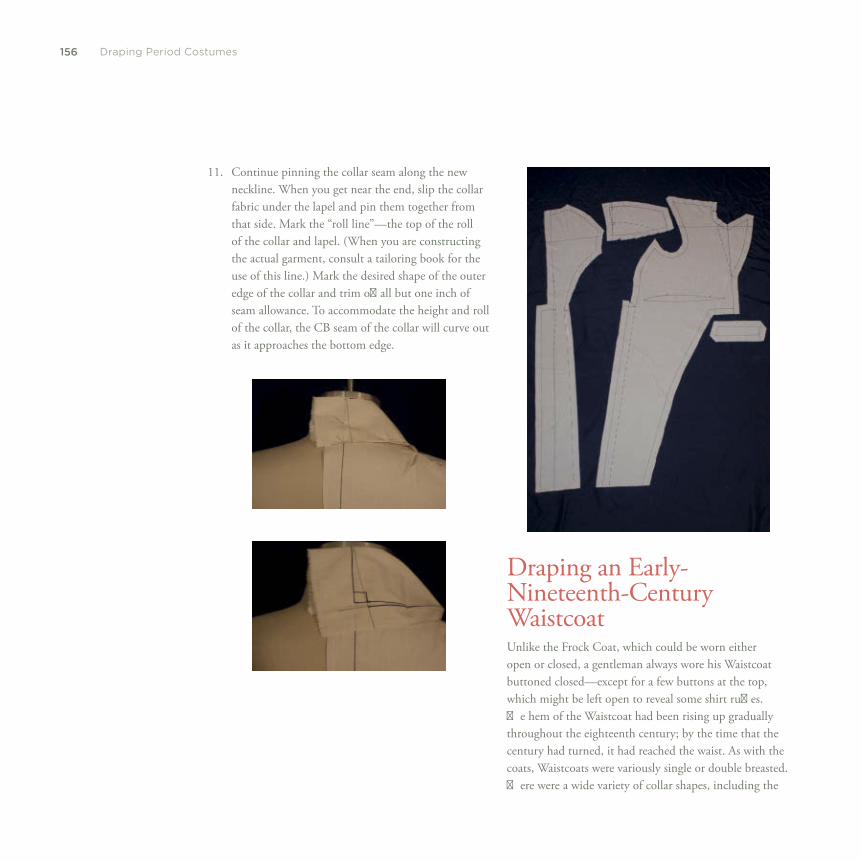
156 Draping Period Costumes
11. Continue pinning the collar seam along the new neckline. When you get near the end, slip the collar fabric under the lapel and pin them together from that side. Mark the “roll line”—the top of the roll of the collar and lapel. (When you are constructing the actual garment, consult a tailoring book for the use of this line.) Mark the desired shape of the outer edge of the collar and trim off all but one inch of seam allowance. To accommodate the height and roll of the collar, the CB seam of the collar will curve out as it approaches the bottom edge.
Draping an Early-Nineteenth-Century Waistcoat Unlike the Frock Coat, which could be worn either open or closed, a gentleman always wore his Waistcoat buttoned closed—except for a few buttons at the top, which might be left open to reveal some shirt ruffl es. Th e hem of the Waistcoat had been rising up gradually throughout the eighteenth century; by the time that the century had turned, it had reached the waist. As with the coats, Waistcoats were variously single or double breasted. Th ere were a wide variety of collar shapes, including the
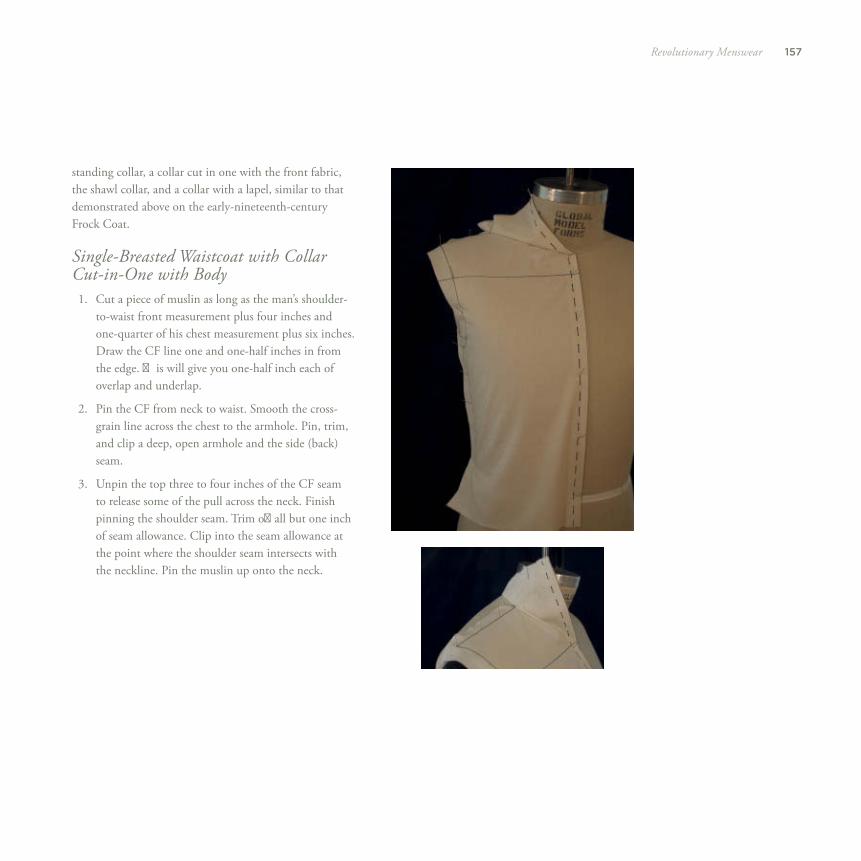
157Revolutionary Menswear
standing collar, a collar cut in one with the front fabric, the shawl collar, and a collar with a lapel, similar to that demonstrated above on the early-nineteenth-century Frock Coat.
Single-Breasted Waistcoat with Collar Cut-in-One with Body 1. Cut a piece of muslin as long as the man’s shoulder-
to-waist front measurement plus four inches and one-quarter of his chest measurement plus six inches. Draw the CF line one and one-half inches in from the edge. Th is will give you one-half inch each of overlap and underlap.
2. Pin the CF from neck to waist. Smooth the cross-grain line across the chest to the armhole. Pin, trim, and clip a deep, open armhole and the side (back) seam.
3. Unpin the top three to four inches of the CF seam to release some of the pull across the neck. Finish pinning the shoulder seam. Trim off all but one inch of seam allowance. Clip into the seam allowance at the point where the shoulder seam intersects with the neckline. Pin the muslin up onto the neck.
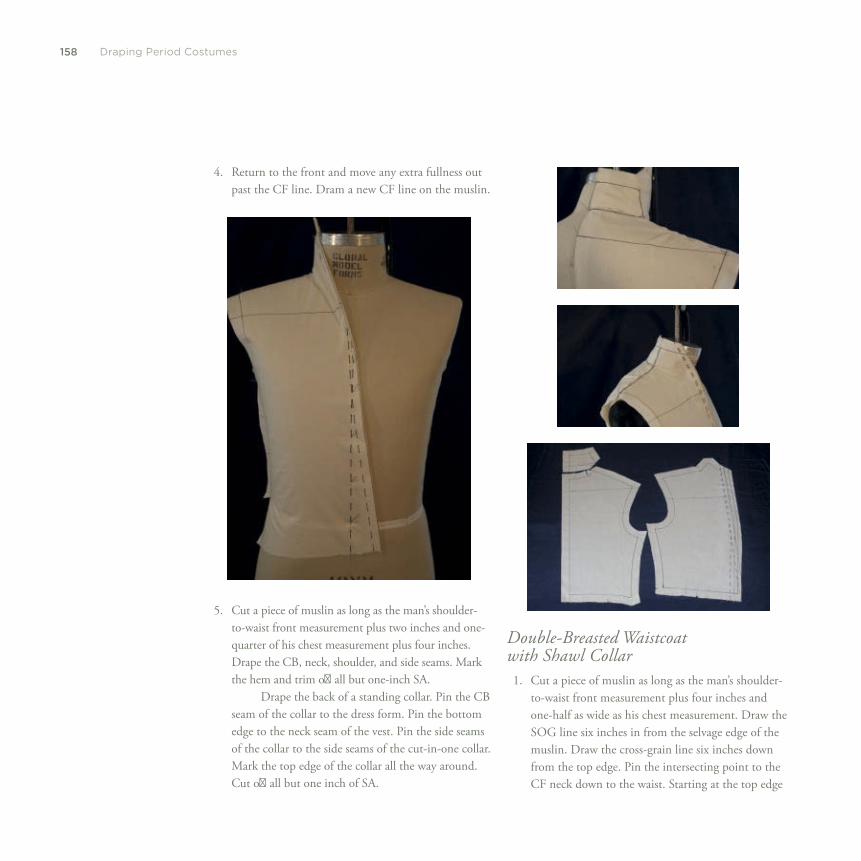
158 Draping Period Costumes
4. Return to the front and move any extra fullness out past the CF line. Dram a new CF line on the muslin.
5. Cut a piece of muslin as long as the man’s shoulder-to-waist front measurement plus two inches and one-quarter of his chest measurement plus four inches. Drape the CB, neck, shoulder, and side seams. Mark the hem and trim off all but one-inch SA.
Drape the back of a standing collar. Pin the CB seam of the collar to the dress form. Pin the bottom edge to the neck seam of the vest. Pin the side seams of the collar to the side seams of the cut-in-one collar. Mark the top edge of the collar all the way around. Cut off all but one inch of SA.
Double-Breasted Waistcoat with Shawl Collar 1. Cut a piece of muslin as long as the man’s shoulder-
to-waist front measurement plus four inches and one-half as wide as his chest measurement. Draw the SOG line six inches in from the selvage edge of the muslin. Draw the cross-grain line six inches down from the top edge. Pin the intersecting point to the CF neck down to the waist. Starting at the top edge
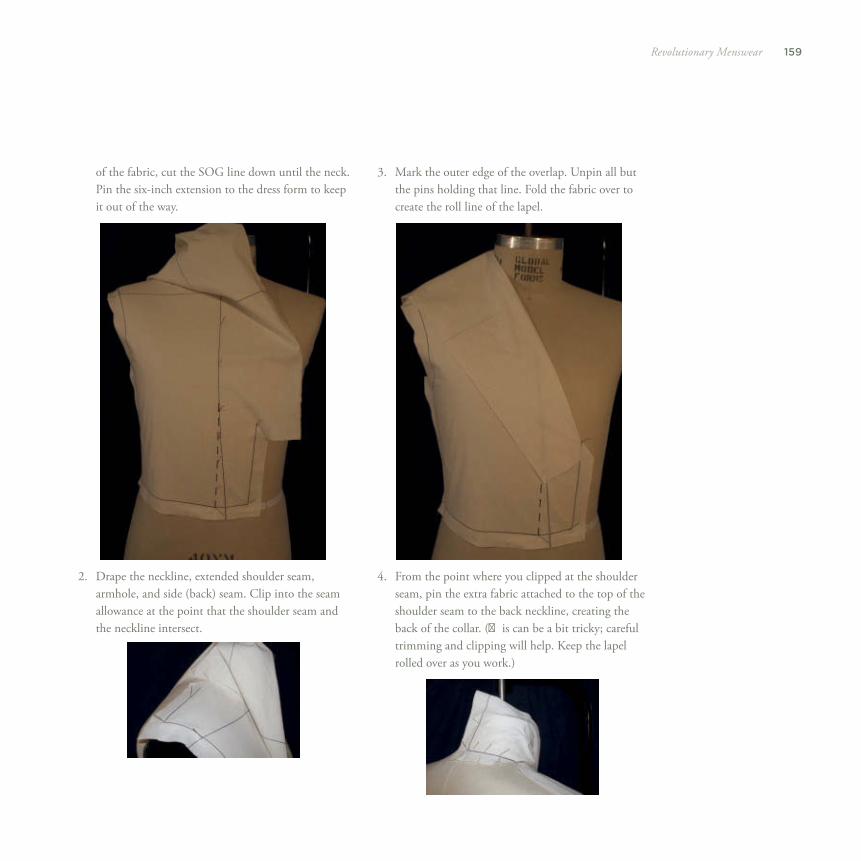
159Revolutionary Menswear
3. Mark the outer edge of the overlap. Unpin all but the pins holding that line. Fold the fabric over to create the roll line of the lapel.
4. From the point where you clipped at the shoulder seam, pin the extra fabric attached to the top of the shoulder seam to the back neckline, creating the back of the collar. (Th is can be a bit tricky; careful trimming and clipping will help. Keep the lapel rolled over as you work.)
of the fabric, cut the SOG line down until the neck. Pin the six-inch extension to the dress form to keep it out of the way.
2. Drape the neckline, extended shoulder seam, armhole, and side (back) seam. Clip into the seam allowance at the point that the shoulder seam and the neckline intersect.
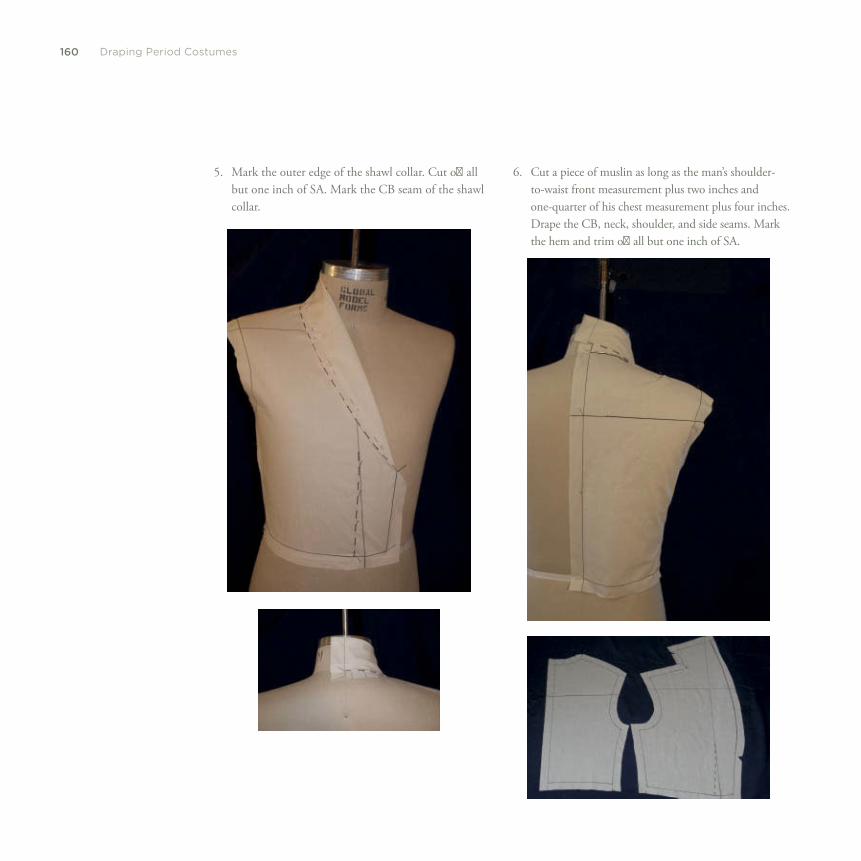
160 Draping Period Costumes
5. Mark the outer edge of the shawl collar. Cut off all but one inch of SA. Mark the CB seam of the shawl collar.
6. Cut a piece of muslin as long as the man’s shoulder-to-waist front measurement plus two inches and one-quarter of his chest measurement plus four inches. Drape the CB, neck, shoulder, and side seams. Mark the hem and trim off all but one inch of SA.

eleven
R O M A N T I C W O M E N S W E A R

162 Draping Period Costumes
Th e Industrial Revolution of the nineteenth century encouraged greater and more frequent adaptations in fashion. Factories produced fabrics and trim more quickly, the sewing machine was introduced, and clothing was mass produced. Swifter methods of communication spread images of the latest fashions among regions, countries, and continents.
Th e paintings and pencil drawings of Jean-Auguste-Dominique Ingres continue to be an excellent source of visual research throughout the fi rst half of the nineteenth century. Reproductions of (and actual) fashion plates from this period can be easily found.
Draping an 1820s Gown Th e 1820s marked the return of the tight, fi tted silhouette in women’s bodices. Th e high waistline lingered for a few more years, but the skirts regained the structure and volume that had been abandoned in the previous era.
Th e variety of decorations and style lines on the bodice was endless. Pleats, tucks, vertical and horizontal gathers, surplice wraps, and intricate piecing and seaming abounded. It would be impossible to demonstrate even a small fraction. However, once you have draped a fi tted understructure, you can apply any number of techniques on top of it.
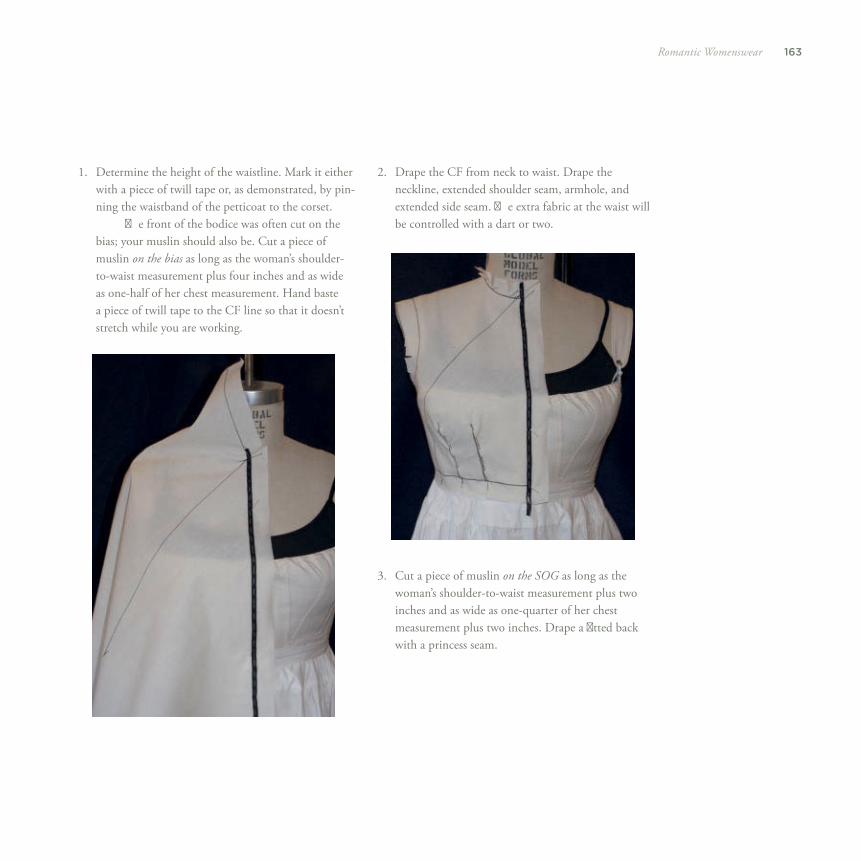
163Romantic Womenswear
1. Determine the height of the waistline. Mark it either with a piece of twill tape or, as demonstrated, by pin-ning the waistband of the petticoat to the corset.
Th e front of the bodice was often cut on the bias; your muslin should also be. Cut a piece of muslin on the bias as long as the woman’s shoulder-to-waist measurement plus four inches and as wide as one-half of her chest measurement. Hand baste a piece of twill tape to the CF line so that it doesn’t stretch while you are working.
2. Drape the CF from neck to waist. Drape the neckline, extended shoulder seam, armhole, and extended side seam. Th e extra fabric at the waist will be controlled with a dart or two.
3. Cut a piece of muslin on the SOG as long as the woman’s shoulder-to-waist measurement plus two inches and as wide as one-quarter of her chest measurement plus two inches. Drape a fi tted back with a princess seam.
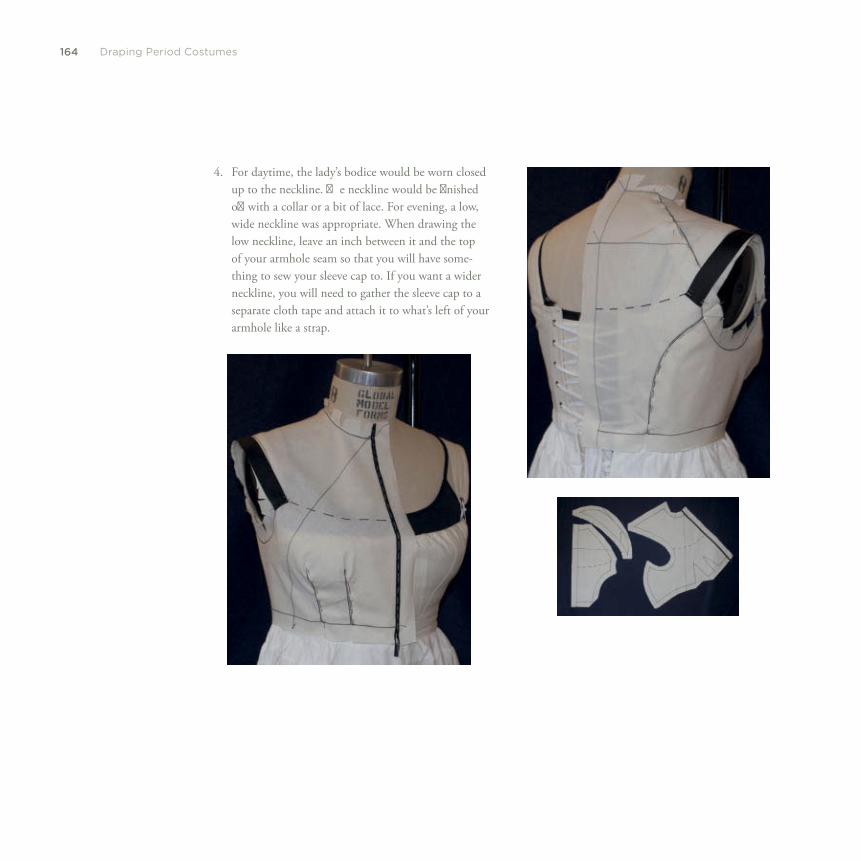
164 Draping Period Costumes
4. For daytime, the lady’s bodice would be worn closed up to the neckline. Th e neckline would be fi nished off with a collar or a bit of lace. For evening, a low, wide neckline was appropriate. When drawing the low neckline, leave an inch between it and the top of your armhole seam so that you will have some-thing to sew your sleeve cap to. If you want a wider neckline, you will need to gather the sleeve cap to a separate cloth tape and attach it to what’s left of your armhole like a strap.
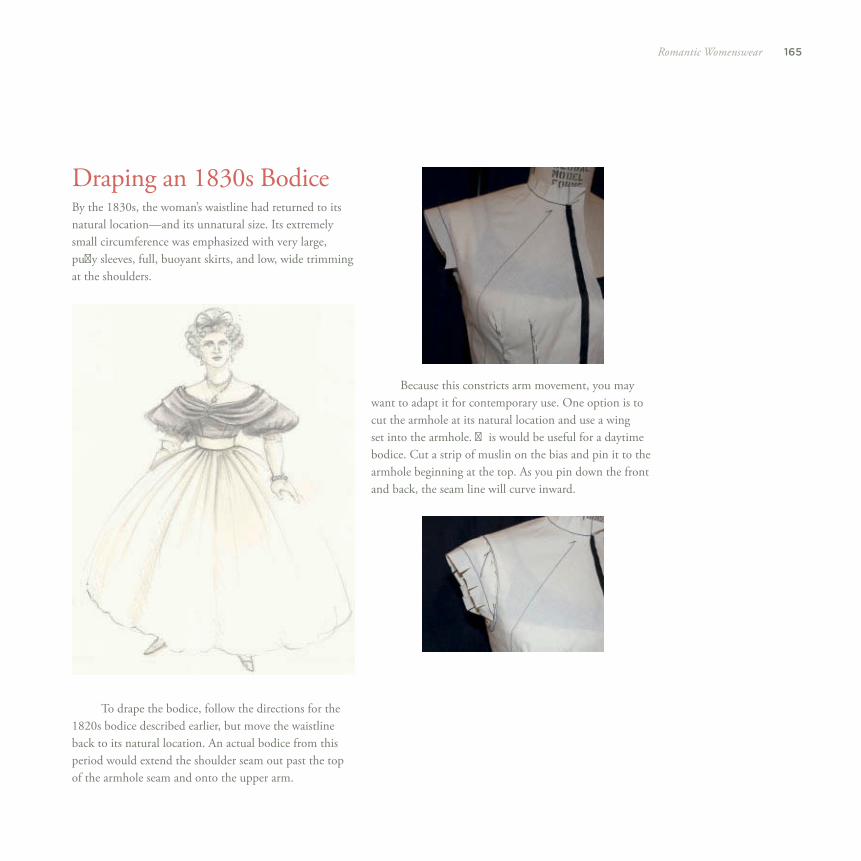
165Romantic Womenswear
Draping an 1830s Bodice By the 1830s, the woman’s waistline had returned to its natural location—and its unnatural size. Its extremely small circumference was emphasized with very large, puff y sleeves, full, buoyant skirts, and low, wide trimming at the shoulders.
To drape the bodice, follow the directions for the 1820s bodice described earlier, but move the waistline back to its natural location. An actual bodice from this period would extend the shoulder seam out past the top of the armhole seam and onto the upper arm.
Because this constricts arm movement, you may want to adapt it for contemporary use. One option is to cut the armhole at its natural location and use a wing set into the armhole. Th is would be useful for a daytime bodice. Cut a strip of muslin on the bias and pin it to the armhole beginning at the top. As you pin down the front and back, the seam line will curve inward.
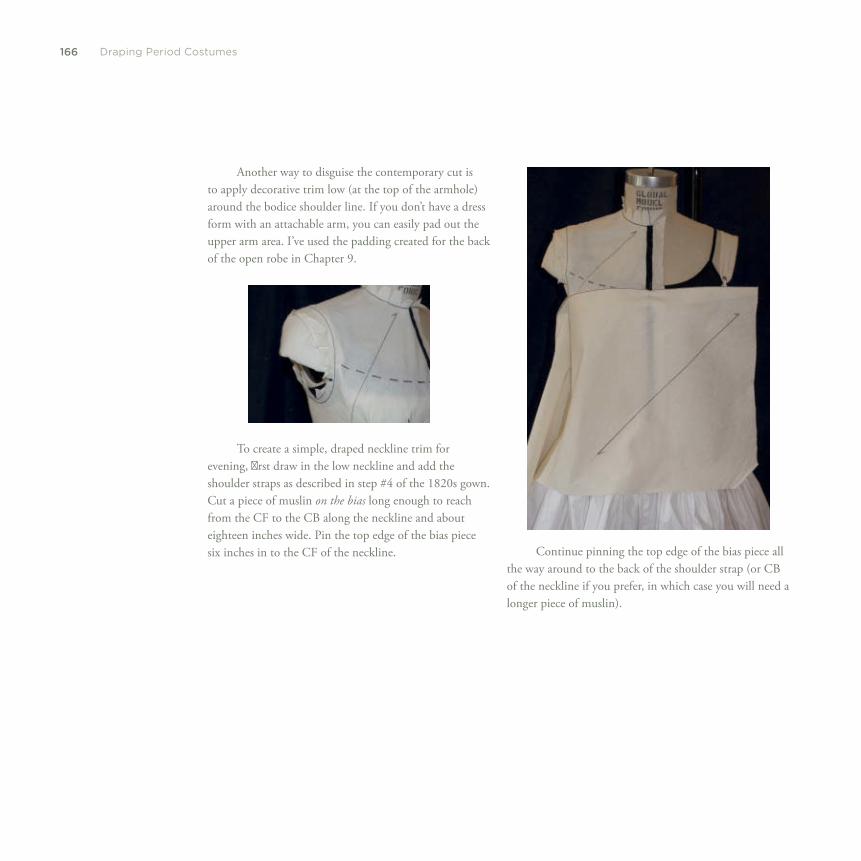
166 Draping Period Costumes
Another way to disguise the contemporary cut is to apply decorative trim low (at the top of the armhole) around the bodice shoulder line. If you don’t have a dress form with an attachable arm, you can easily pad out the upper arm area. I’ve used the padding created for the back of the open robe in Chapter 9 .
To create a simple, draped neckline trim for evening, fi rst draw in the low neckline and add the shoulder straps as described in step #4 of the 1820s gown. Cut a piece of muslin on the bias long enough to reach from the CF to the CB along the neckline and about eighteen inches wide. Pin the top edge of the bias piece six inches in to the CF of the neckline. Continue pinning the top edge of the bias piece all
the way around to the back of the shoulder strap (or CB of the neckline if you prefer, in which case you will need a longer piece of muslin).
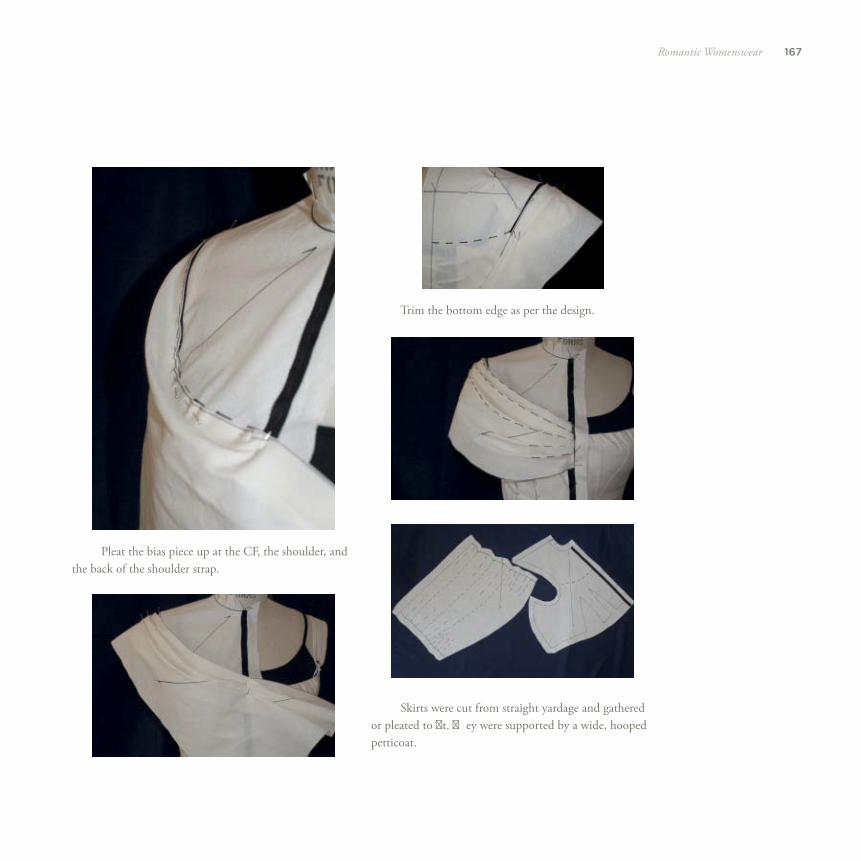
167Romantic Womenswear
Pleat the bias piece up at the CF, the shoulder, and the back of the shoulder strap.
Trim the bottom edge as per the design.
Skirts were cut from straight yardage and gathered or pleated to fi t. Th ey were supported by a wide, hooped petticoat.

168 Draping Period Costumes
Draping an 1840s Bodice Th e low, wide shoulder line which began in the 1840s continued to descend down onto the top of the women’s arms. Th is gave the shoulders a sloped appearance. Th e feeling of elongation that this produces was emphasized by the waistline, which dropped below the natural waist. It also extended to a point at the CF. With the invention of photography at the end of the 1830s, photographic portraits become an important visual resource for costume research.
As with the 1830s bodice, you can create the appearance of the low, sloped shoulder line while still maintaining mobility in the arm.
1. Cut a piece of muslin as long as the woman’s shoulder-to-waist measurement plus six inches and as wide as one-quarter of her chest measurement plus four inches. Cut the muslin on the SOG from now on. Drape the CF from neck to waist plus four inches below. Drape the neckline, extended shoulder seam, armhole, and extended side seam (plus one inch below). Create two long, slightly curved darts to fi t. Mark the desired bottom edge.
2. Cut a piece of muslin as long as the woman’s shoulder-to-waist measurement plus two inches and as wide as one-quarter of her chest measurement plus two inches. Drape a fi tted back.
3. Cut a strip of muslin on the bias . Pin the center to the top of the armhole. Pin down the front of the bodice along the bias “wing” to the dart that is closer to the side. Pin down along the dart for a few inches. Pin down the back at a similar angle and length.
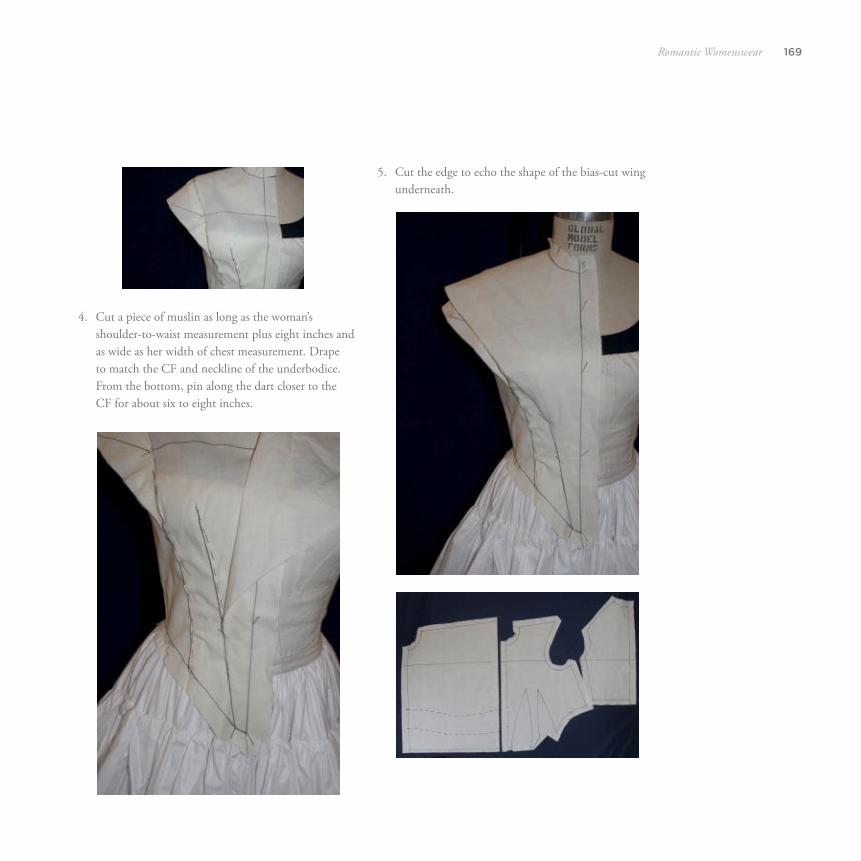
169Romantic Womenswear
4. Cut a piece of muslin as long as the woman’s shoulder-to-waist measurement plus eight inches and as wide as her width of chest measurement. Drape to match the CF and neckline of the underbodice. From the bottom, pin along the dart closer to the CF for about six to eight inches.
5. Cut the edge to echo the shape of the bias-cut wing underneath.
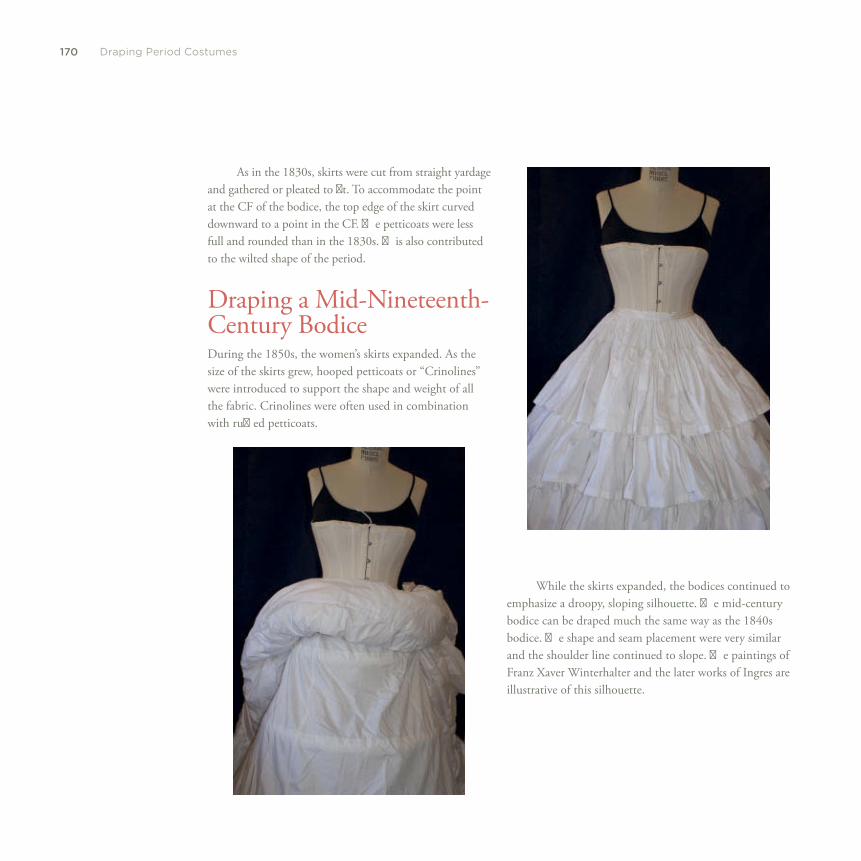
170 Draping Period Costumes
As in the 1830s, skirts were cut from straight yardage and gathered or pleated to fi t. To accommodate the point at the CF of the bodice, the top edge of the skirt curved downward to a point in the CF. Th e petticoats were less full and rounded than in the 1830s. Th is also contributed to the wilted shape of the period.
Draping a Mid-Nineteenth-Century Bodice During the 1850s, the women’s skirts expanded. As the size of the skirts grew, hooped petticoats or “Crinolines” were introduced to support the shape and weight of all the fabric. Crinolines were often used in combination with ruffl ed petticoats.
While the skirts expanded, the bodices continued to emphasize a droopy, sloping silhouette. Th e mid-century bodice can be draped much the same way as the 1840s bodice. Th e shape and seam placement were very similar and the shoulder line continued to slope. Th e paintings of Franz Xaver Winterhalter and the later works of Ingres are illustrative of this silhouette.
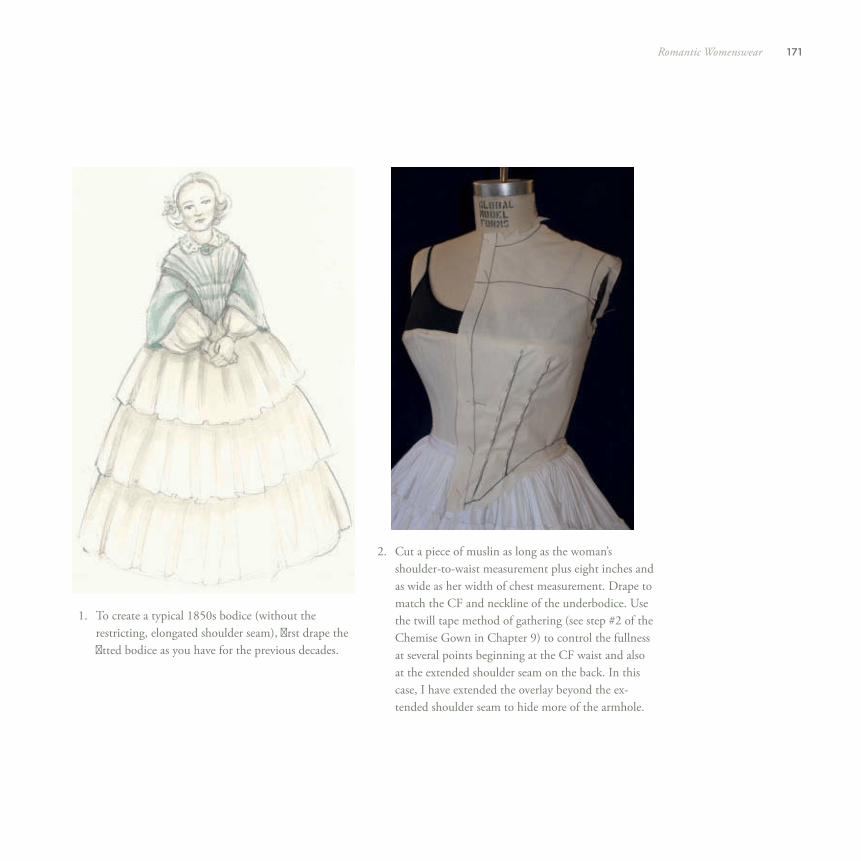
171Romantic Womenswear
1. To create a typical 1850s bodice (without the restricting, elongated shoulder seam), fi rst drape the fi tted bodice as you have for the previous decades.
2. Cut a piece of muslin as long as the woman’s shoulder-to-waist measurement plus eight inches and as wide as her width of chest measurement. Drape to match the CF and neckline of the underbodice. Use the twill tape method of gathering (see step #2 of the Chemise Gown in Chapter 9 ) to control the fullness at several points beginning at the CF waist and also at the extended shoulder seam on the back. In this case, I have extended the overlay beyond the ex-tended shoulder seam to hide more of the armhole.

172 Draping Period Costumes
twelve
T H E V I C T O R I A N G E N T L E M A N
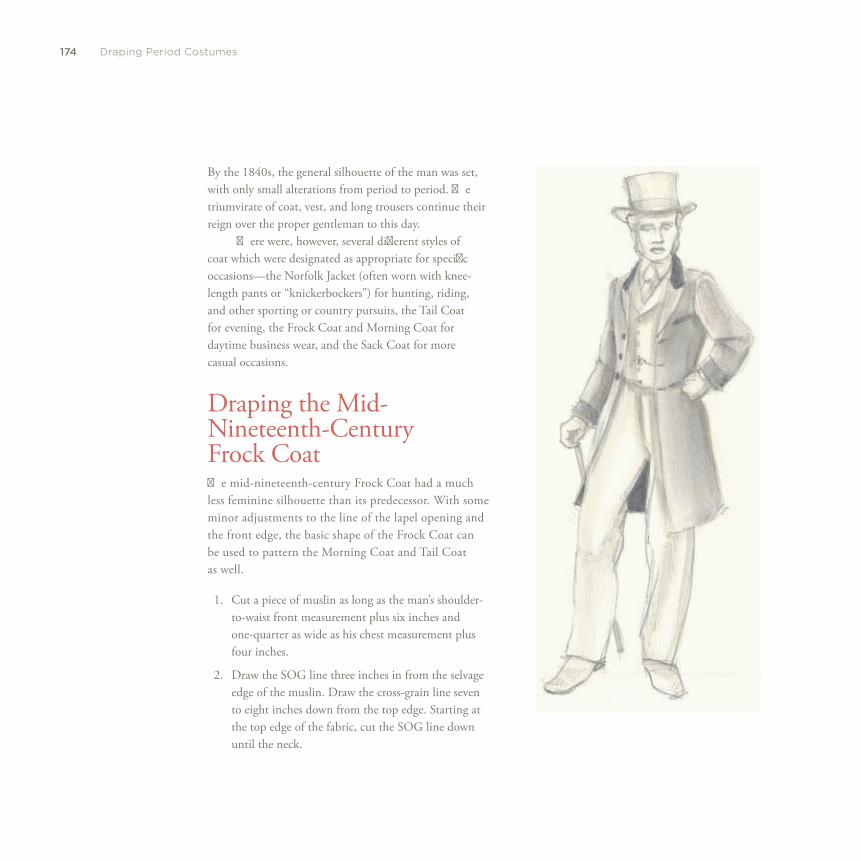
174 Draping Period Costumes
By the 1840s, the general silhouette of the man was set, with only small alterations from period to period. Th e triumvirate of coat, vest, and long trousers continue their reign over the proper gentleman to this day.
Th ere were, however, several diff erent styles of coat which were designated as appropriate for specifi c occasions—the Norfolk Jacket (often worn with knee-length pants or “knickerbockers”) for hunting, riding, and other sporting or country pursuits, the Tail Coat for evening, the Frock Coat and Morning Coat for daytime business wear, and the Sack Coat for more casual occasions.
Draping the Mid-Nineteenth-Century Frock Coat Th e mid-nineteenth-century Frock Coat had a much less feminine silhouette than its predecessor. With some minor adjustments to the line of the lapel opening and the front edge, the basic shape of the Frock Coat can be used to pattern the Morning Coat and Tail Coat as well.
1. Cut a piece of muslin as long as the man’s shoulder-to-waist front measurement plus six inches and one- quarter as wide as his chest measurement plus four inches.
2. Draw the SOG line three inches in from the selvage edge of the muslin. Draw the cross-grain line seven to eight inches down from the top edge. Starting at the top edge of the fabric, cut the SOG line down until the neck.
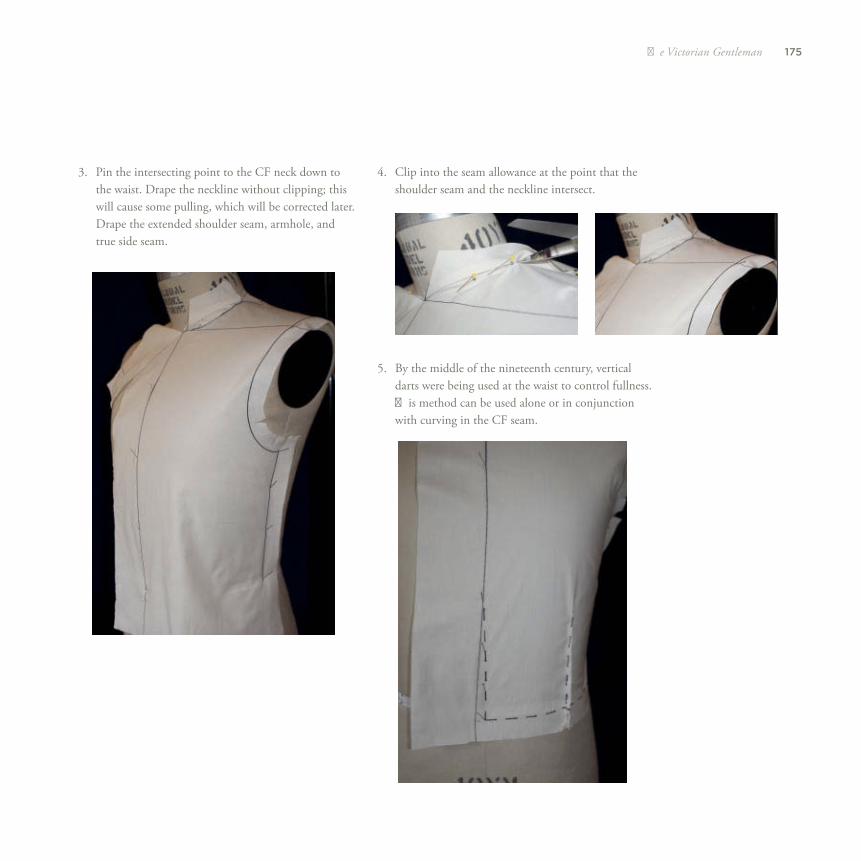
175Th e Victorian Gentleman
3. Pin the intersecting point to the CF neck down to the waist. Drape the neckline without clipping; this will cause some pulling, which will be corrected later. Drape the extended shoulder seam, armhole, and true side seam.
4. Clip into the seam allowance at the point that the shoulder seam and the neckline intersect.
5. By the middle of the nineteenth century, vertical darts were being used at the waist to control fullness. Th is method can be used alone or in conjunction with curving in the CF seam.
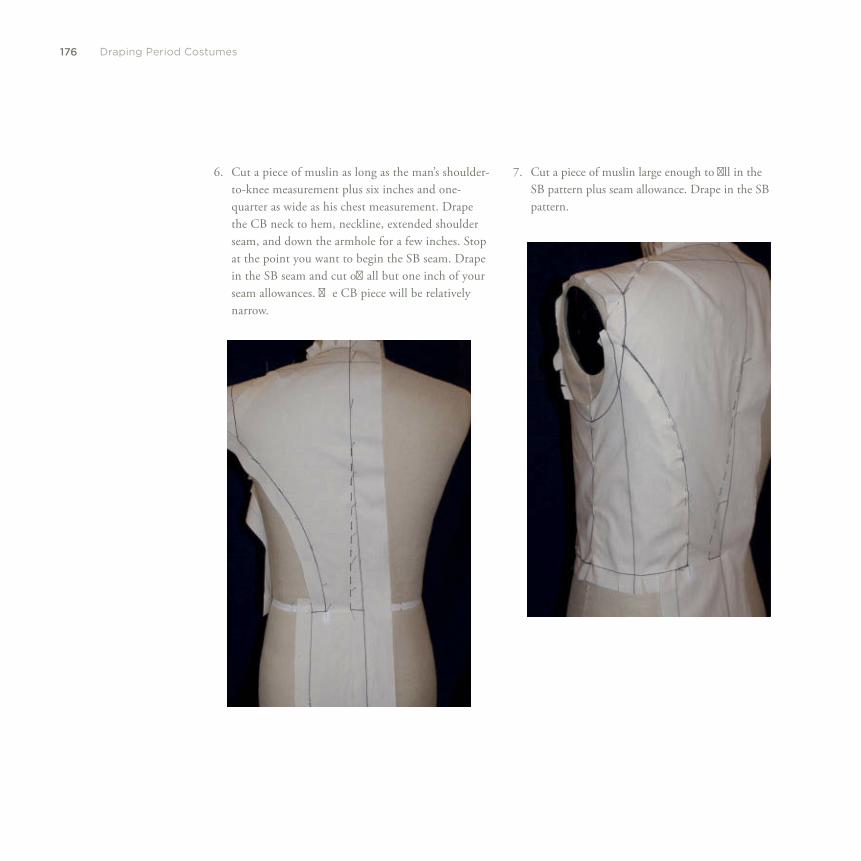
176 Draping Period Costumes
6. Cut a piece of muslin as long as the man’s shoulder-to-knee measurement plus six inches and one-quarter as wide as his chest measurement. Drape the CB neck to hem, neckline, extended shoulder seam, and down the armhole for a few inches. Stop at the point you want to begin the SB seam. Drape in the SB seam and cut off all but one inch of your seam allowances. Th e CB piece will be relatively narrow.
7. Cut a piece of muslin large enough to fi ll in the SB pattern plus seam allowance. Drape in the SB pattern.

177Th e Victorian Gentleman
8. Return to the front. Move the line of pins from the CF line out one-half inch.
Determine where the roll line will be, remove the pins above that point, and fold down the lapel.
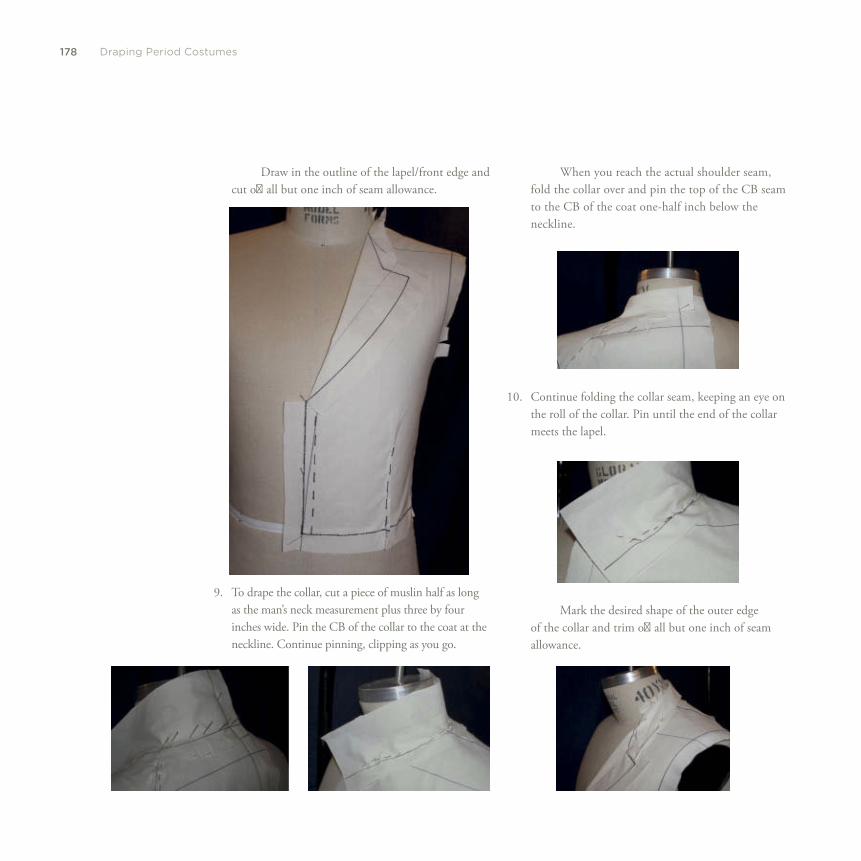
178 Draping Period Costumes
Draw in the outline of the lapel/front edge and cut off all but one inch of seam allowance.
9. To drape the collar, cut a piece of muslin half as long as the man’s neck measurement plus three by four inches wide. Pin the CB of the collar to the coat at the neckline. Continue pinning, clipping as you go.
When you reach the actual shoulder seam, fold the collar over and pin the top of the CB seam to the CB of the coat one-half inch below the neckline.
10. Continue folding the collar seam, keeping an eye on the roll of the collar. Pin until the end of the collar meets the lapel.
Mark the desired shape of the outer edge of the collar and trim off all but one inch of seam allowance.
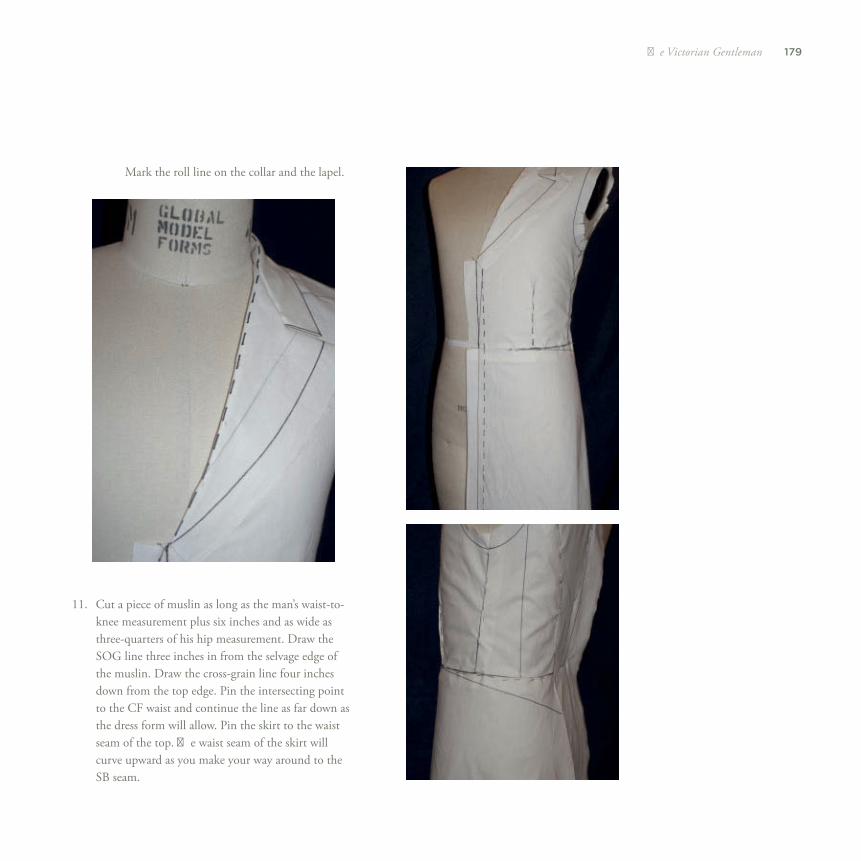
179Th e Victorian Gentleman
Mark the roll line on the collar and the lapel.
11. Cut a piece of muslin as long as the man’s waist-to-knee measurement plus six inches and as wide as three-quarters of his hip measurement. Draw the SOG line three inches in from the selvage edge of the muslin. Draw the cross-grain line four inches down from the top edge. Pin the intersecting point to the CF waist and continue the line as far down as the dress form will allow. Pin the skirt to the waist seam of the top. Th e waist seam of the skirt will curve upward as you make your way around to the SB seam.
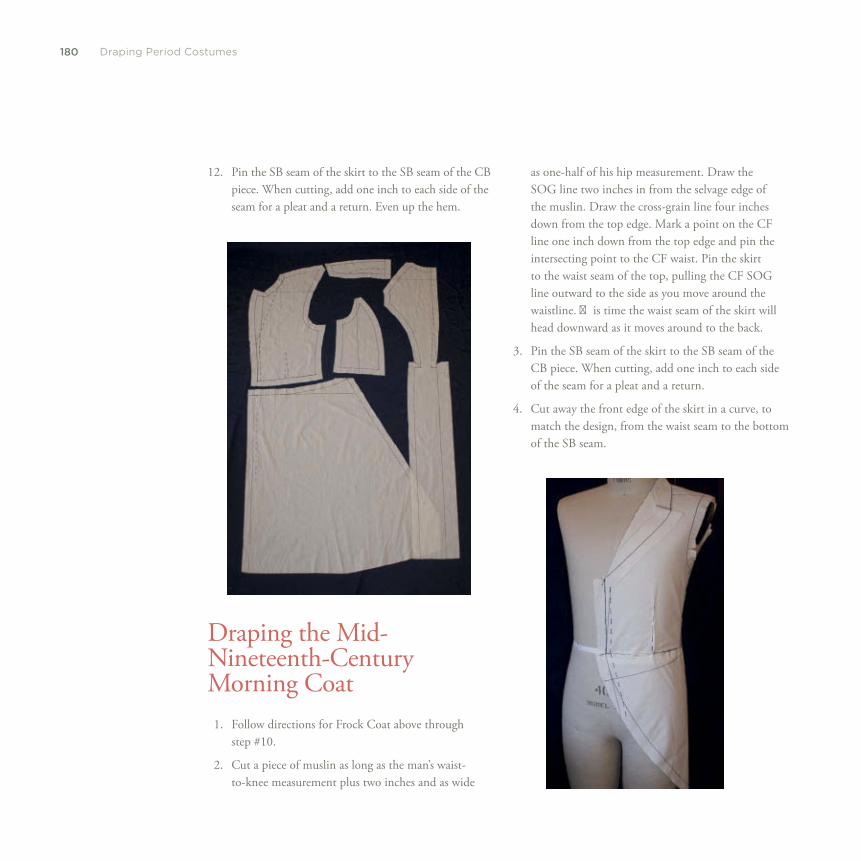
180 Draping Period Costumes
12. Pin the SB seam of the skirt to the SB seam of the CB piece. When cutting, add one inch to each side of the seam for a pleat and a return. Even up the hem.
Draping the Mid-Nineteenth-Century Morning Coat 1. Follow directions for Frock Coat above through
step #10.
2. Cut a piece of muslin as long as the man’s waist-to-knee measurement plus two inches and as wide
as one-half of his hip measurement. Draw the SOG line two inches in from the selvage edge of the muslin. Draw the cross-grain line four inches down from the top edge. Mark a point on the CF line one inch down from the top edge and pin the intersecting point to the CF waist. Pin the skirt to the waist seam of the top, pulling the CF SOG line outward to the side as you move around the waistline. Th is time the waist seam of the skirt will head downward as it moves around to the back.
3. Pin the SB seam of the skirt to the SB seam of the CB piece. When cutting, add one inch to each side of the seam for a pleat and a return.
4. Cut away the front edge of the skirt in a curve, to match the design, from the waist seam to the bottom of the SB seam.
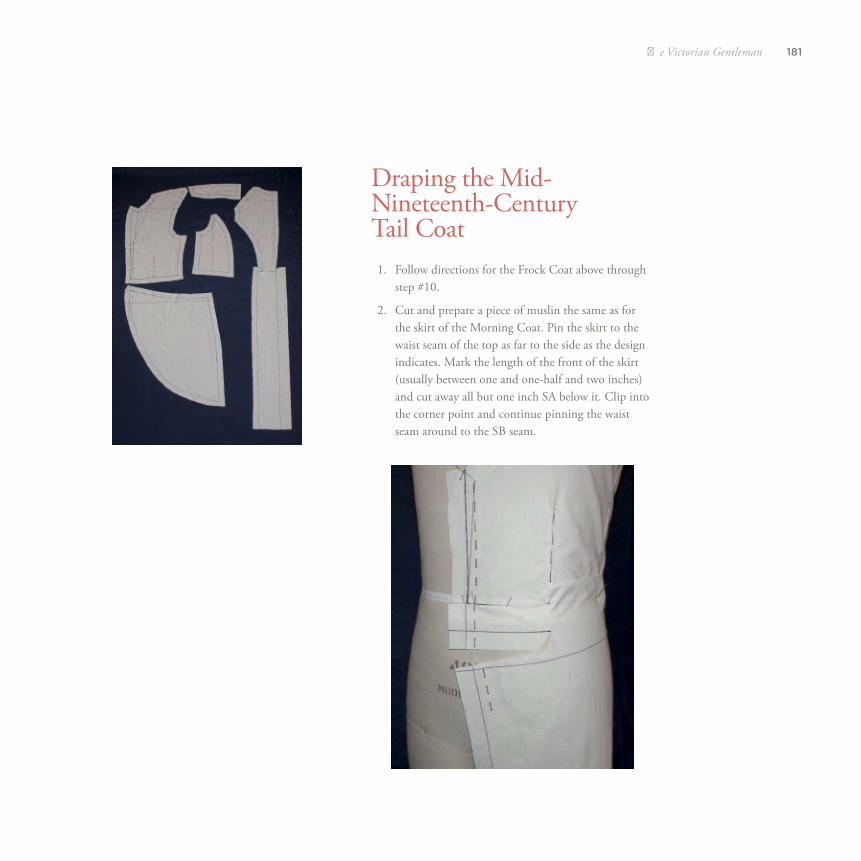
181Th e Victorian Gentleman
Draping the Mid-Nineteenth-Century Tail Coat 1. Follow directions for the Frock Coat above through
step #10.
2. Cut and prepare a piece of muslin the same as for the skirt of the Morning Coat. Pin the skirt to the waist seam of the top as far to the side as the design indicates. Mark the length of the front of the skirt (usually between one and one-half and two inches) and cut away all but one inch SA below it. Clip into the corner point and continue pinning the waist seam around to the SB seam.
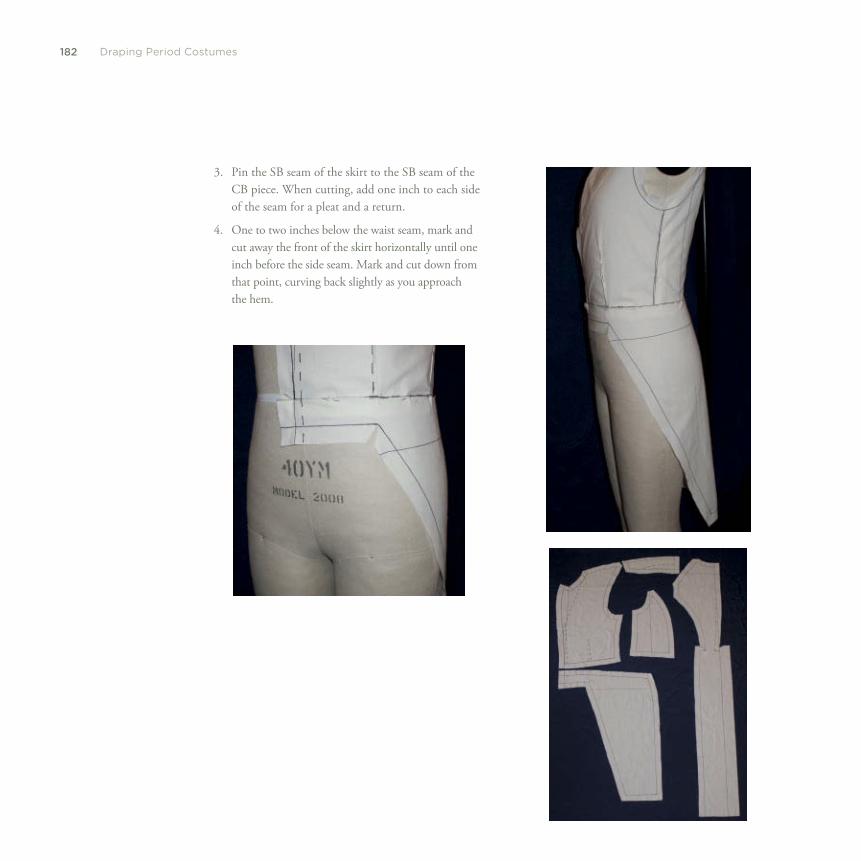
182 Draping Period Costumes
3. Pin the SB seam of the skirt to the SB seam of the CB piece. When cutting, add one inch to each side of the seam for a pleat and a return.
4. One to two inches below the waist seam, mark and cut away the front of the skirt horizontally until one inch before the side seam. Mark and cut down from that point, curving back slightly as you approach the hem.
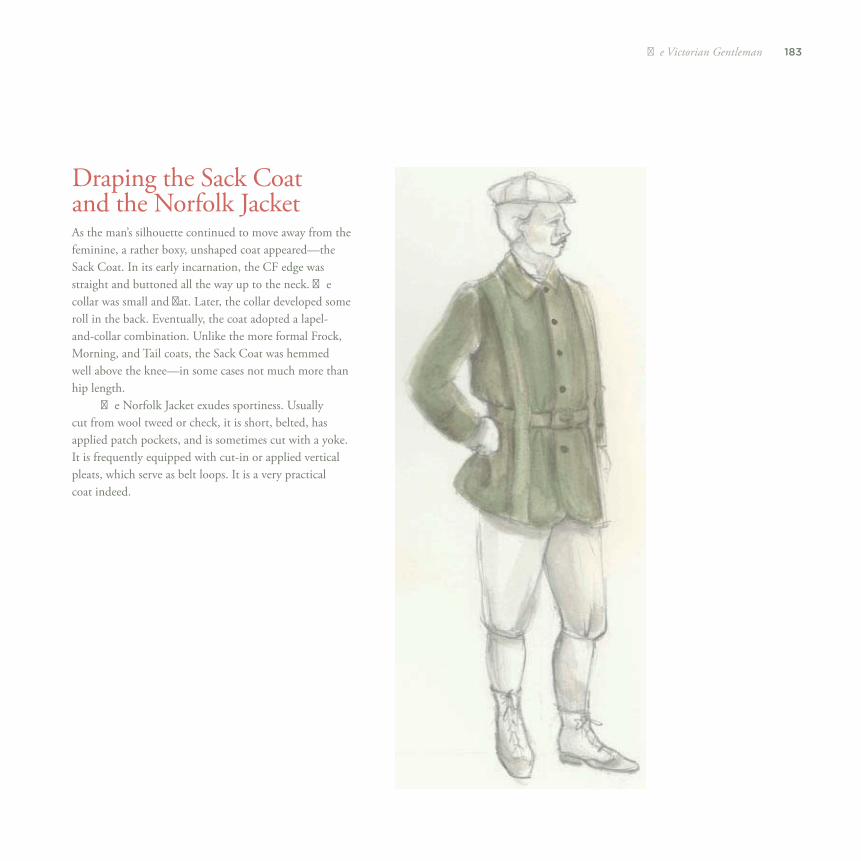
183Th e Victorian Gentleman
Draping the Sack Coat and the Norfolk Jacket As the man’s silhouette continued to move away from the feminine, a rather boxy, unshaped coat appeared—the Sack Coat. In its early incarnation, the CF edge was straight and buttoned all the way up to the neck. Th e collar was small and fl at. Later, the collar developed some roll in the back. Eventually, the coat adopted a lapel-and-collar combination. Unlike the more formal Frock, Morning, and Tail coats, the Sack Coat was hemmed well above the knee—in some cases not much more than hip length.
Th e Norfolk Jacket exudes sportiness. Usually cut from wool tweed or check, it is short, belted, has applied patch pockets, and is sometimes cut with a yoke. It is frequently equipped with cut-in or applied vertical pleats, which serve as belt loops. It is a very practical coat indeed.
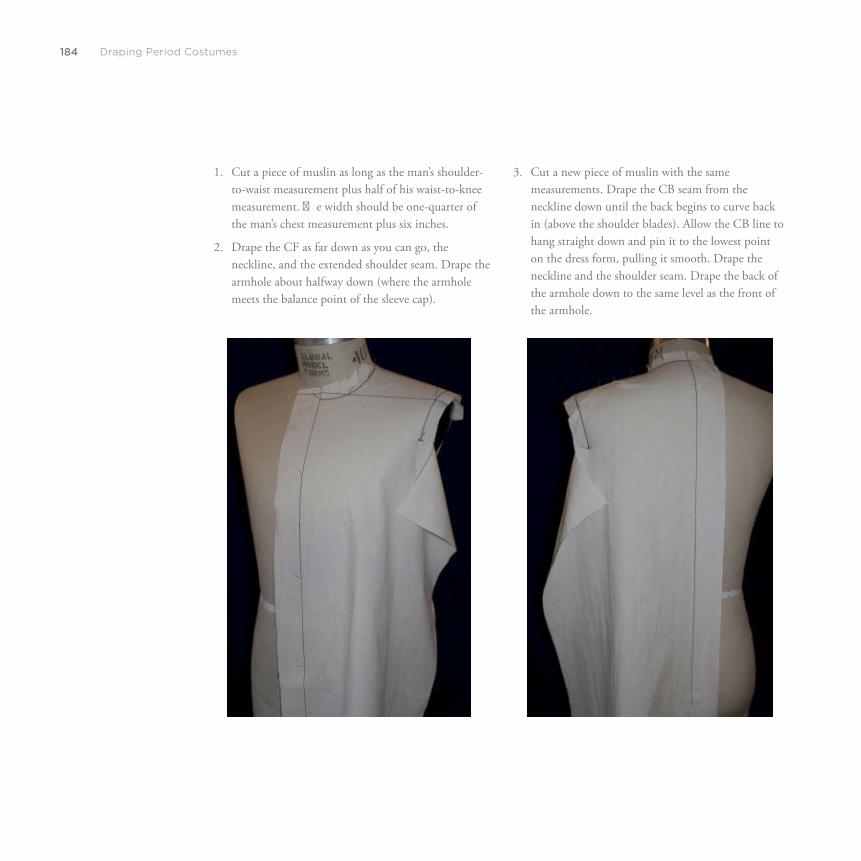
184 Draping Period Costumes
1. Cut a piece of muslin as long as the man’s shoulder-to-waist measurement plus half of his waist-to-knee measurement. Th e width should be one-quarter of the man’s chest measurement plus six inches.
2. Drape the CF as far down as you can go, the neckline, and the extended shoulder seam. Drape the armhole about halfway down (where the armhole meets the balance point of the sleeve cap).
3. Cut a new piece of muslin with the same measurements. Drape the CB seam from the neckline down until the back begins to curve back in (above the shoulder blades). Allow the CB line to hang straight down and pin it to the lowest point on the dress form, pulling it smooth. Drape the neckline and the shoulder seam. Drape the back of the armhole down to the same level as the front of the armhole.
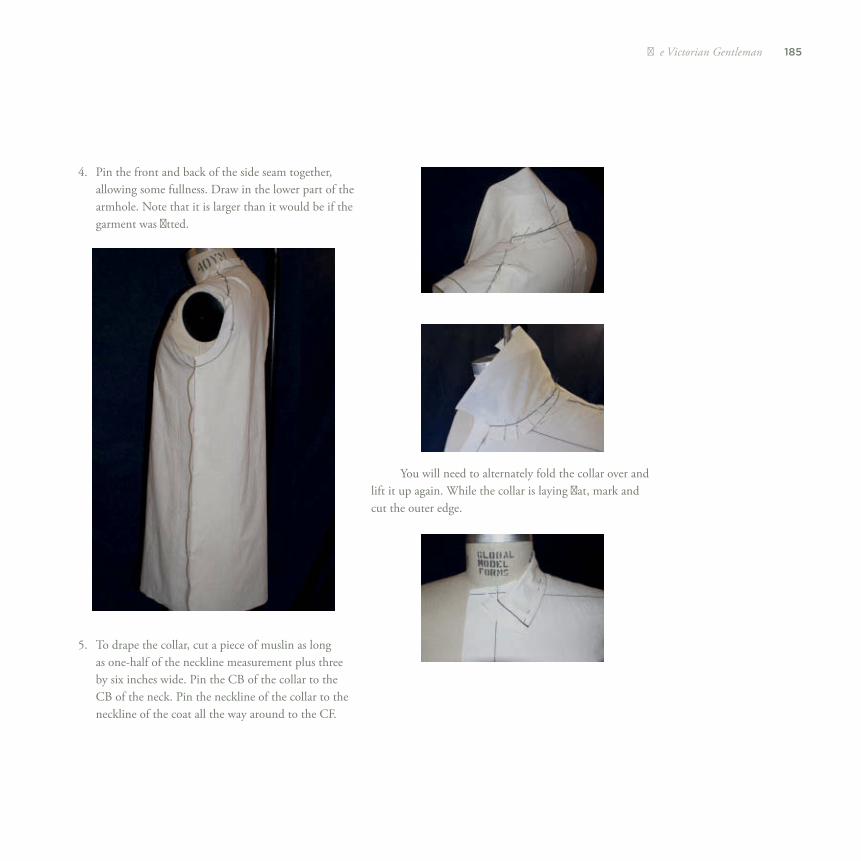
185Th e Victorian Gentleman
4. Pin the front and back of the side seam together, allowing some fullness. Draw in the lower part of the armhole. Note that it is larger than it would be if the garment was fi tted.
5. To drape the collar, cut a piece of muslin as long as one-half of the neckline measurement plus three by six inches wide. Pin the CB of the collar to the CB of the neck. Pin the neckline of the collar to the neckline of the coat all the way around to the CF.
You will need to alternately fold the collar over and lift it up again. While the collar is laying fl at, mark and cut the outer edge.
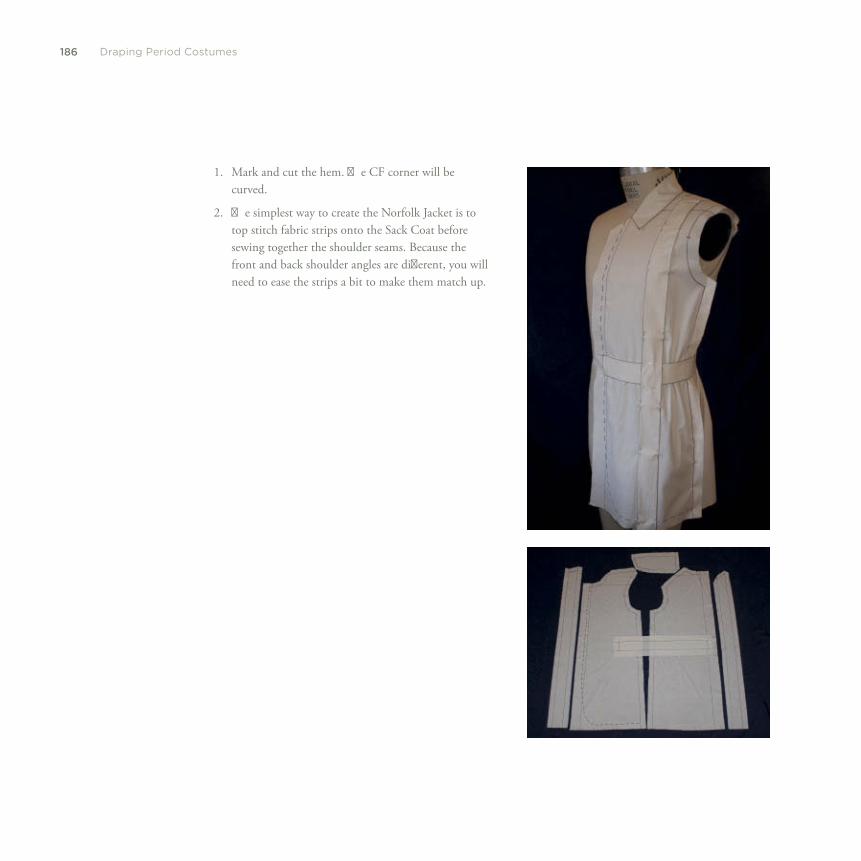
186 Draping Period Costumes
1. Mark and cut the hem. Th e CF corner will be curved.
2. Th e simplest way to create the Norfolk Jacket is to top stitch fabric strips onto the Sack Coat before sewing together the shoulder seams. Because the front and back shoulder angles are diff erent, you will need to ease the strips a bit to make them match up.
thirt een
T H E V I C T O R I A N L A D Y
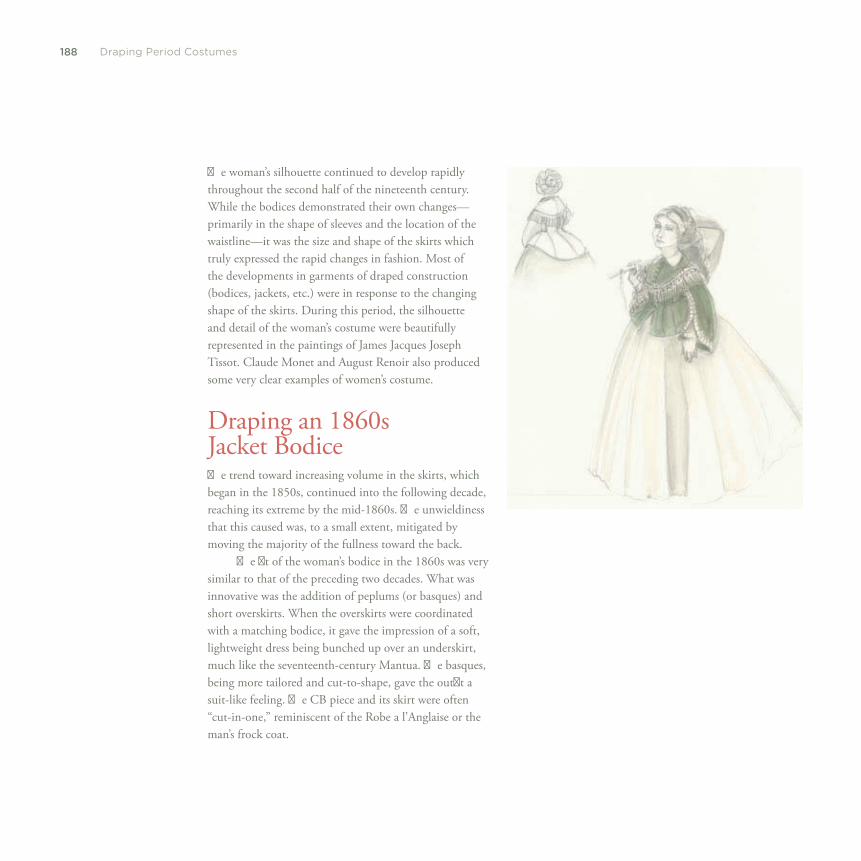
188 Draping Period Costumes
Th e woman’s silhouette continued to develop rapidly throughout the second half of the nineteenth century. While the bodices demonstrated their own changes—primarily in the shape of sleeves and the location of the waistline—it was the size and shape of the skirts which truly expressed the rapid changes in fashion. Most of the developments in garments of draped construction (bodices, jackets, etc.) were in response to the changing shape of the skirts. During this period, the silhouette and detail of the woman’s costume were beautifully represented in the paintings of James Jacques Joseph Tissot. Claude Monet and August Renoir also produced some very clear examples of women’s costume.
Draping an 1860s Jacket Bodice Th e trend toward increasing volume in the skirts, which began in the 1850s, continued into the following decade, reaching its extreme by the mid-1860s. Th e unwieldiness that this caused was, to a small extent, mitigated by moving the majority of the fullness toward the back.
Th e fi t of the woman’s bodice in the 1860s was very similar to that of the preceding two decades. What was innovative was the addition of peplums (or basques) and short overskirts. When the overskirts were coordinated with a matching bodice, it gave the impression of a soft, lightweight dress being bunched up over an underskirt, much like the seventeenth-century Mantua. Th e basques, being more tailored and cut-to-shape, gave the outfi t a suit-like feeling. Th e CB piece and its skirt were often “cut-in-one,” reminiscent of the Robe a l’Anglaise or the man’s frock coat.
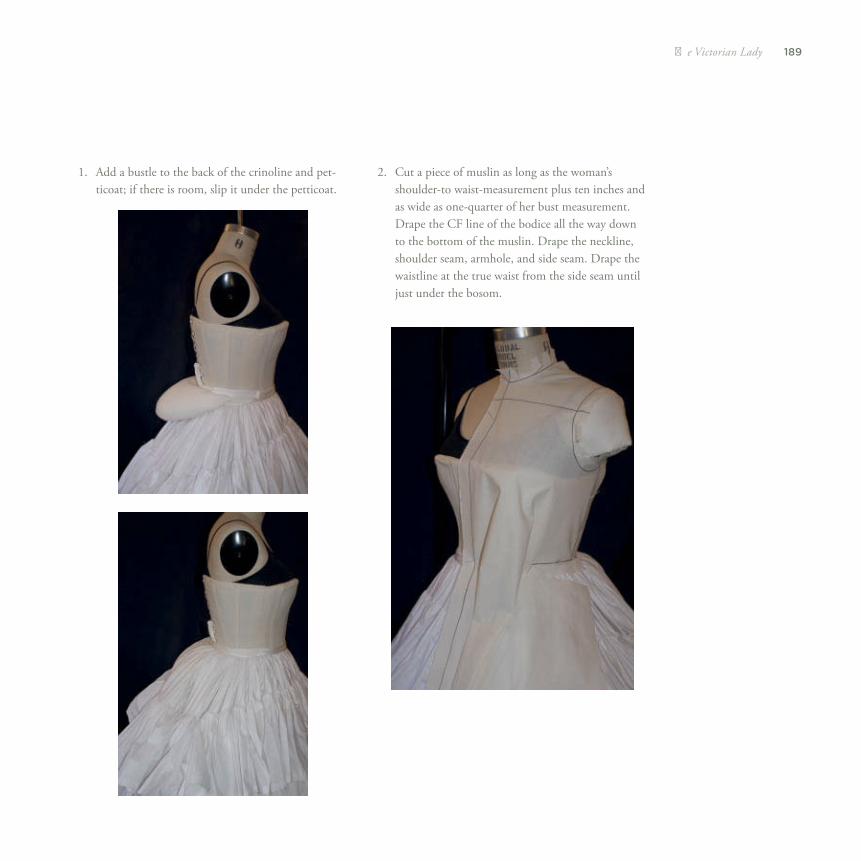
189Th e Victorian Lady
1. Add a bustle to the back of the crinoline and pet-ticoat; if there is room, slip it under the petticoat.
2. Cut a piece of muslin as long as the woman’s shoulder-to waist-measurement plus ten inches and as wide as one-quarter of her bust measurement. Drape the CF line of the bodice all the way down to the bottom of the muslin. Drape the neckline, shoulder seam, armhole, and side seam. Drape the waistline at the true waist from the side seam until just under the bosom.
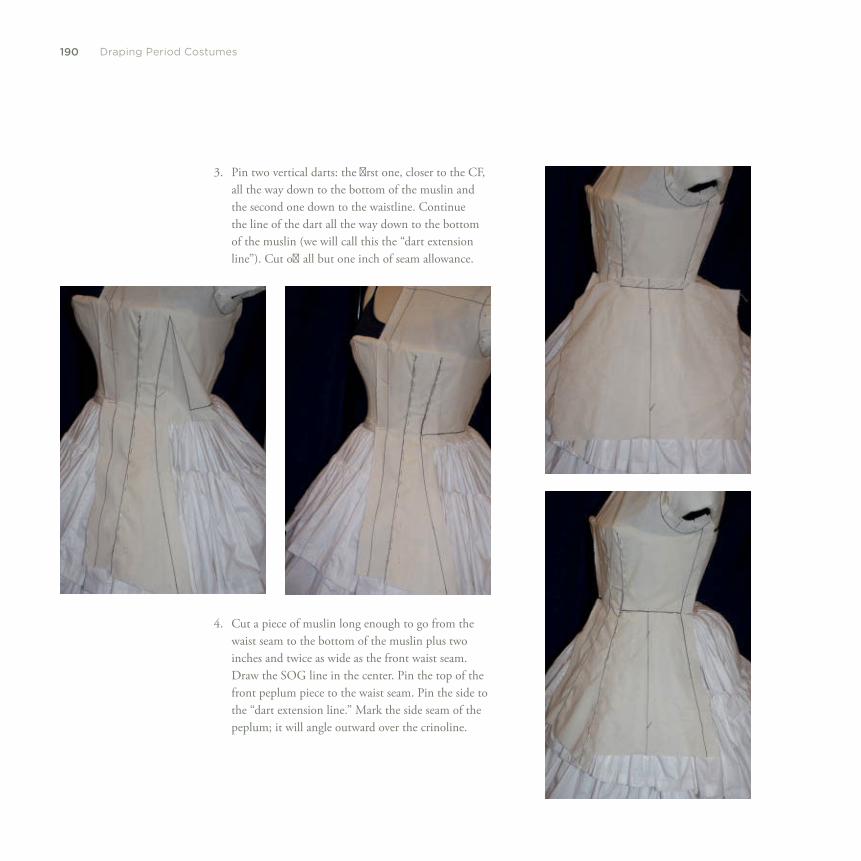
190 Draping Period Costumes
3. Pin two vertical darts: the fi rst one, closer to the CF, all the way down to the bottom of the muslin and the second one down to the waistline. Continue the line of the dart all the way down to the bottom of the muslin (we will call this the “dart extension line”). Cut off all but one inch of seam allowance.
4. Cut a piece of muslin long enough to go from the waist seam to the bottom of the muslin plus two inches and twice as wide as the front waist seam. Draw the SOG line in the center. Pin the top of the front peplum piece to the waist seam. Pin the side to the “dart extension line.” Mark the side seam of the peplum; it will angle outward over the crinoline.
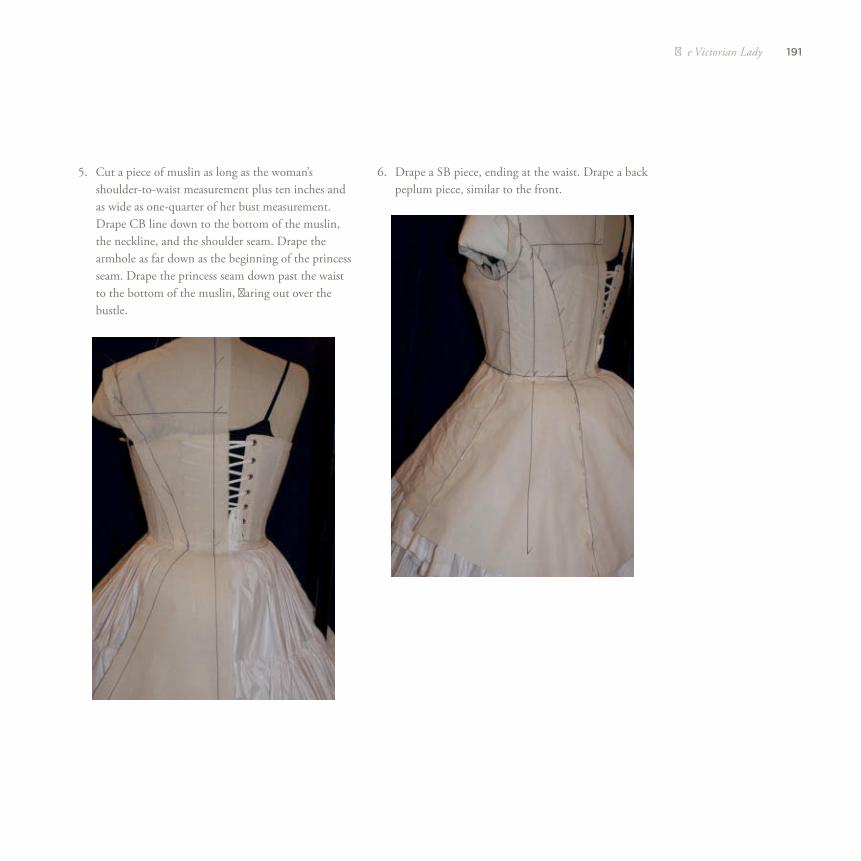
191Th e Victorian Lady
5. Cut a piece of muslin as long as the woman’s shoulder-to-waist measurement plus ten inches and as wide as one-quarter of her bust measurement. Drape CB line down to the bottom of the muslin, the neckline, and the shoulder seam. Drape the armhole as far down as the beginning of the princess seam. Drape the princess seam down past the waist to the bottom of the muslin, fl aring out over the bustle.
6. Drape a SB piece, ending at the waist. Drape a back peplum piece, similar to the front.
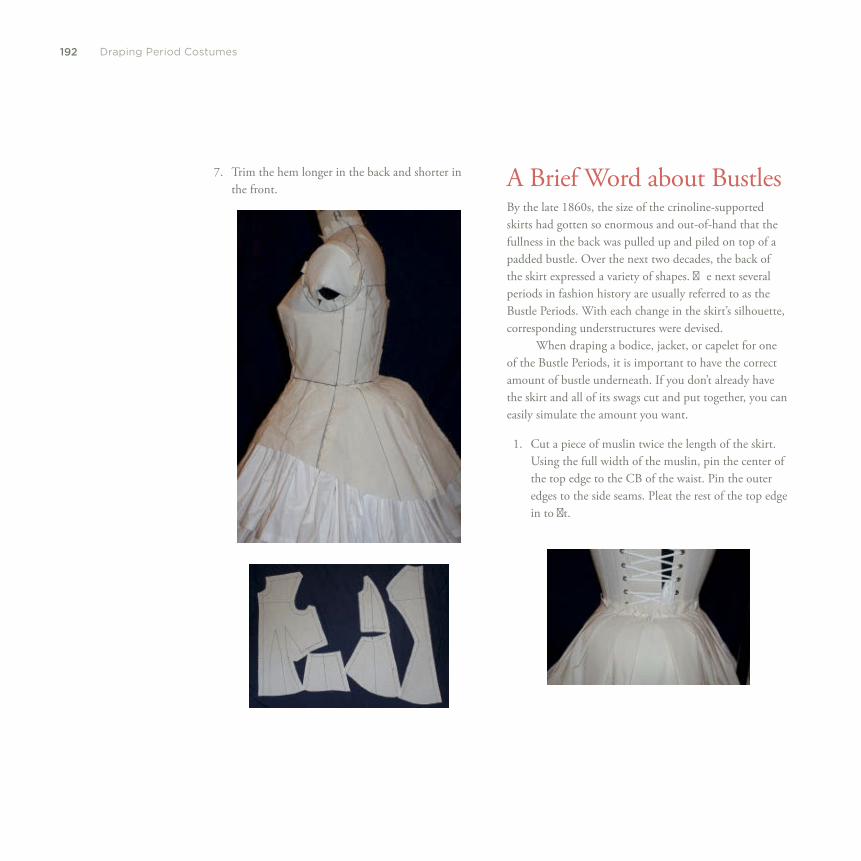
192 Draping Period Costumes
A Brief Word about Bustles By the late 1860s, the size of the crinoline-supported skirts had gotten so enormous and out-of-hand that the fullness in the back was pulled up and piled on top of a padded bustle. Over the next two decades, the back of the skirt expressed a variety of shapes. Th e next several periods in fashion history are usually referred to as the Bustle Periods. With each change in the skirt’s silhouette, corresponding understructures were devised.
When draping a bodice, jacket, or capelet for one of the Bustle Periods, it is important to have the correct amount of bustle underneath. If you don’t already have the skirt and all of its swags cut and put together, you can easily simulate the amount you want.
1. Cut a piece of muslin twice the length of the skirt. Using the full width of the muslin, pin the center of the top edge to the CB of the waist. Pin the outer edges to the side seams. Pleat the rest of the top edge in to fi t.
7. Trim the hem longer in the back and shorter in the front.

193Th e Victorian Lady
2. Pick a point about six inches below the CB waist and fold it up above the waist. Pin the muslin to the petticoat beneath just below the waist.
3. Fold in the sides, taking up about four inches of fabric total on each side, and pin in place.
4. Repeat until you have the correct amount of volume. Depending on where you begin and end the pleating, and how close together you place the pleats, you can create a shape to suit any of the Bustle Periods.
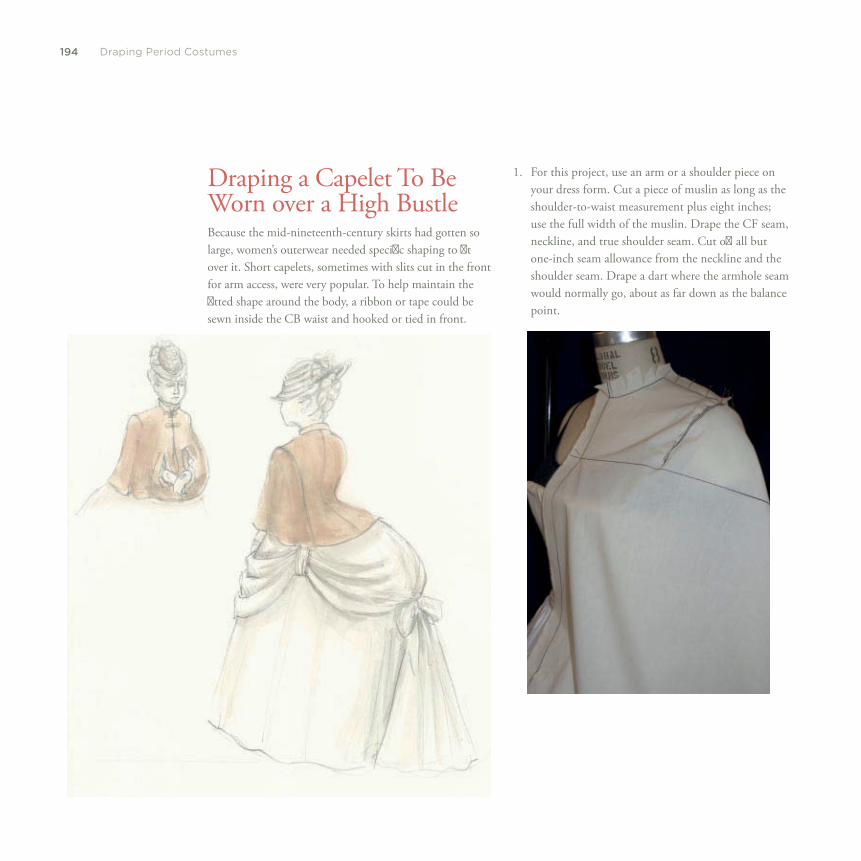
194 Draping Period Costumes
1. For this project, use an arm or a shoulder piece on your dress form. Cut a piece of muslin as long as the shoulder-to-waist measurement plus eight inches; use the full width of the muslin. Drape the CF seam, neckline, and true shoulder seam. Cut off all but one-inch seam allowance from the neckline and the shoulder seam. Drape a dart where the armhole seam would normally go, about as far down as the balance point.
Draping a Capelet To Be Worn over a High Bustle Because the mid-nineteenth-century skirts had gotten so large, women’s outerwear needed specifi c shaping to fi t over it. Short capelets, sometimes with slits cut in the front for arm access, were very popular. To help maintain the fi tted shape around the body, a ribbon or tape could be sewn inside the CB waist and hooked or tied in front.

195Th e Victorian Lady
2. Continue the line of the dart over the shoulder and toward the back to drape a sleeve cap; this line will turn into a princess seam. Stop when you reach the waistline.
3. Cut a piece of muslin as long as the shoulder-to-waist measurement plus fi fteen inches; use about half the width of the muslin. Drape the CB line to the bottom of the muslin, the neckline, and the shoulder seam (with the extra one-half-inch tuck for ease). Drape the armhole/princess seam to match the front piece. Continue from the waist down to the bottom of the muslin, fl aring out as needed.
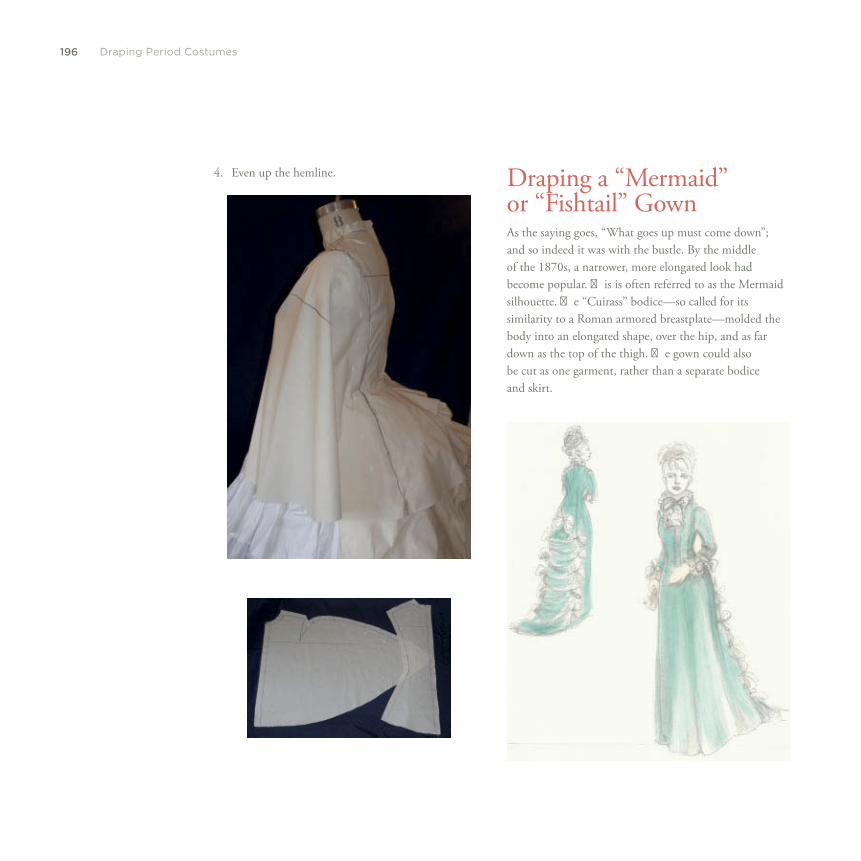
196 Draping Period Costumes
4. Even up the hemline. Draping a “Mermaid” or “Fishtail” Gown As the saying goes, “What goes up must come down”; and so indeed it was with the bustle. By the middle of the 1870s, a narrower, more elongated look had become popular. Th is is often referred to as the Mermaid silhouette. Th e “Cuirass” bodice—so called for its similarity to a Roman armored breastplate—molded the body into an elongated shape, over the hip, and as far down as the top of the thigh. Th e gown could also be cut as one garment, rather than a separate bodice and skirt.
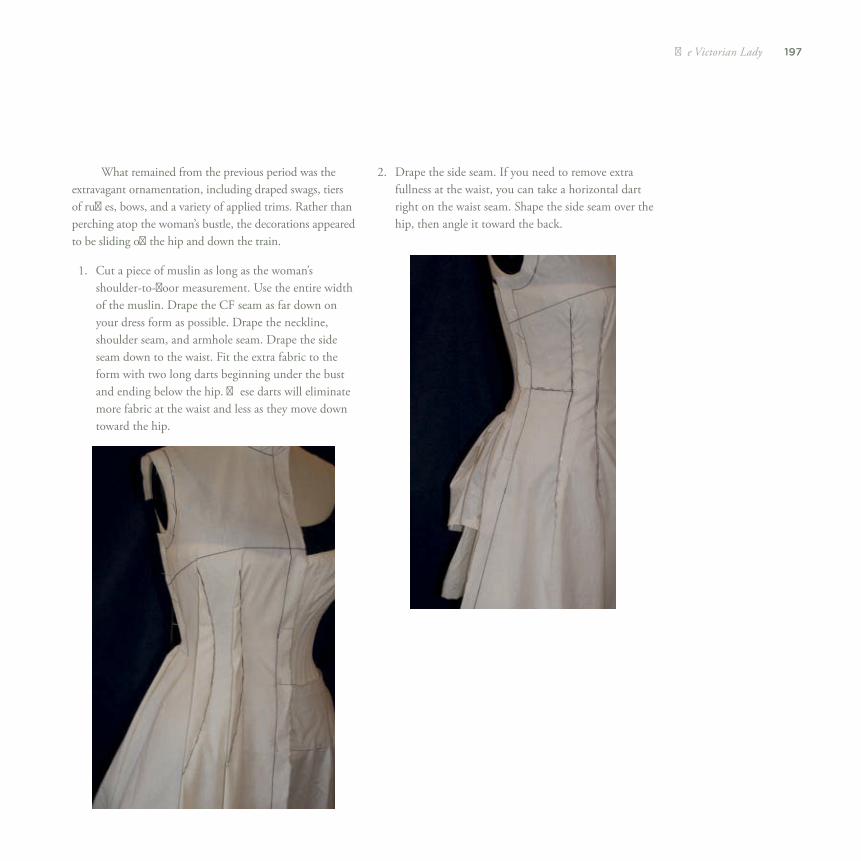
197Th e Victorian Lady
What remained from the previous period was the extravagant ornamentation, including draped swags, tiers of ruffl es, bows, and a variety of applied trims. Rather than perching atop the woman’s bustle, the decorations appeared to be sliding off the hip and down the train.
1. Cut a piece of muslin as long as the woman’s shoulder-to-fl oor measurement. Use the entire width of the muslin. Drape the CF seam as far down on your dress form as possible. Drape the neckline, shoulder seam, and armhole seam. Drape the side seam down to the waist. Fit the extra fabric to the form with two long darts beginning under the bust and ending below the hip. Th ese darts will eliminate more fabric at the waist and less as they move down toward the hip.
2. Drape the side seam. If you need to remove extra fullness at the waist, you can take a horizontal dart right on the waist seam. Shape the side seam over the hip, then angle it toward the back.
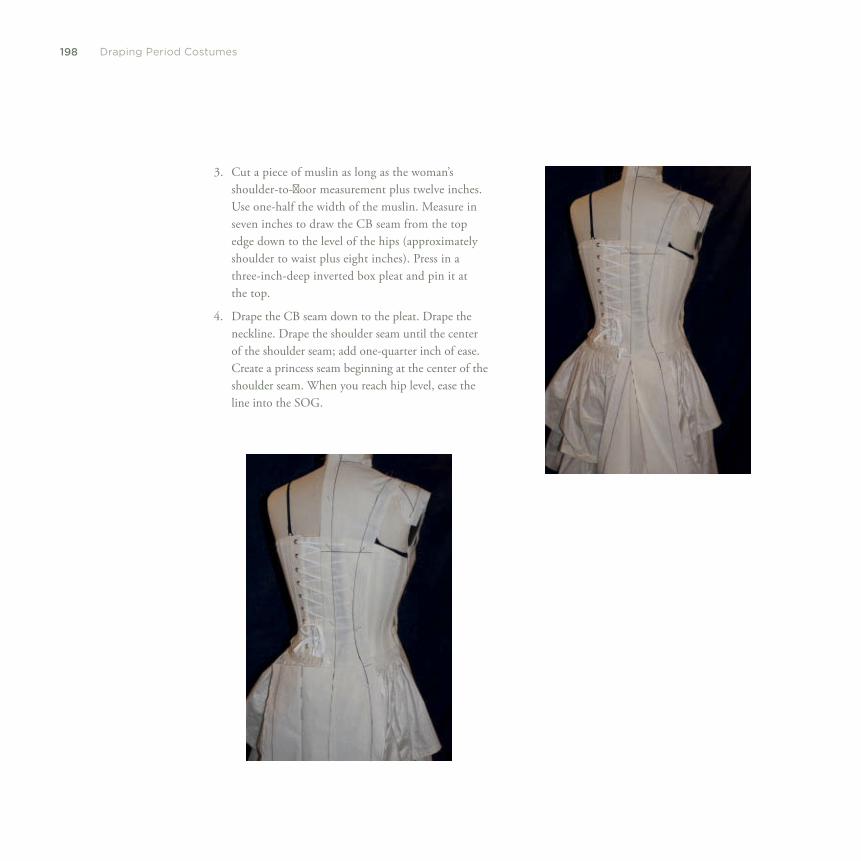
198 Draping Period Costumes
3. Cut a piece of muslin as long as the woman’s shoulder-to-fl oor measurement plus twelve inches. Use one-half the width of the muslin. Measure in seven inches to draw the CB seam from the top edge down to the level of the hips (approximately shoulder to waist plus eight inches). Press in a three-inch-deep inverted box pleat and pin it at the top.
4. Drape the CB seam down to the pleat. Drape the neckline. Drape the shoulder seam until the center of the shoulder seam; add one-quarter inch of ease. Create a princess seam beginning at the center of the shoulder seam. When you reach hip level, ease the line into the SOG.
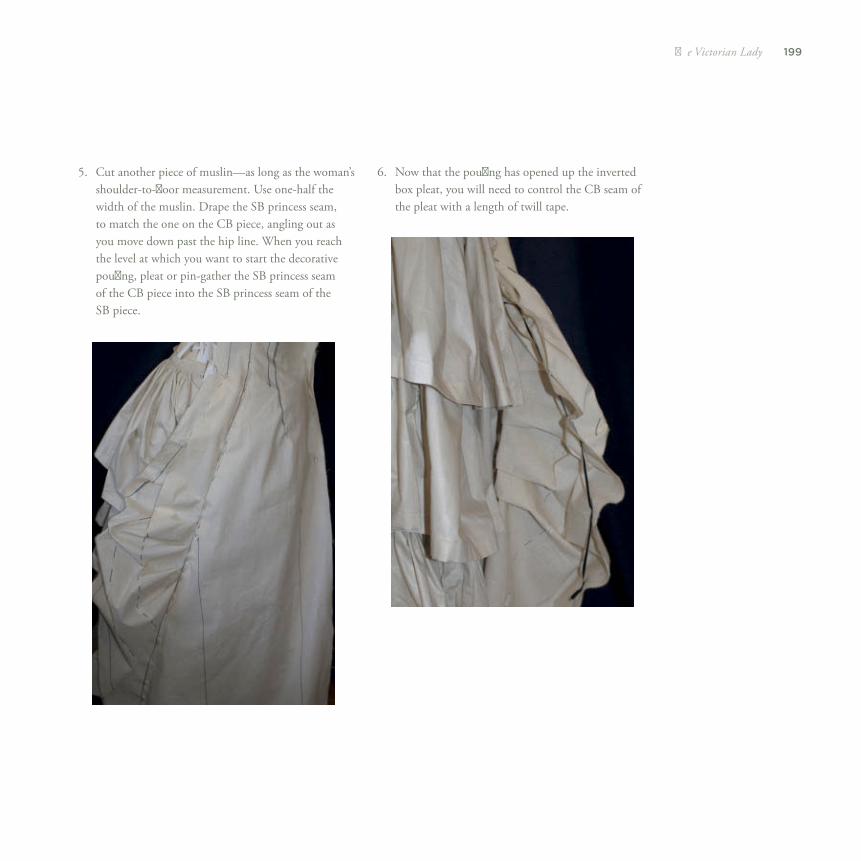
199Th e Victorian Lady
5. Cut another piece of muslin—as long as the woman’s shoulder-to-fl oor measurement. Use one-half the width of the muslin. Drape the SB princess seam, to match the one on the CB piece, angling out as you move down past the hip line. When you reach the level at which you want to start the decorative poufi ng, pleat or pin-gather the SB princess seam of the CB piece into the SB princess seam of the SB piece.
6. Now that the poufi ng has opened up the inverted box pleat, you will need to control the CB seam of the pleat with a length of twill tape.
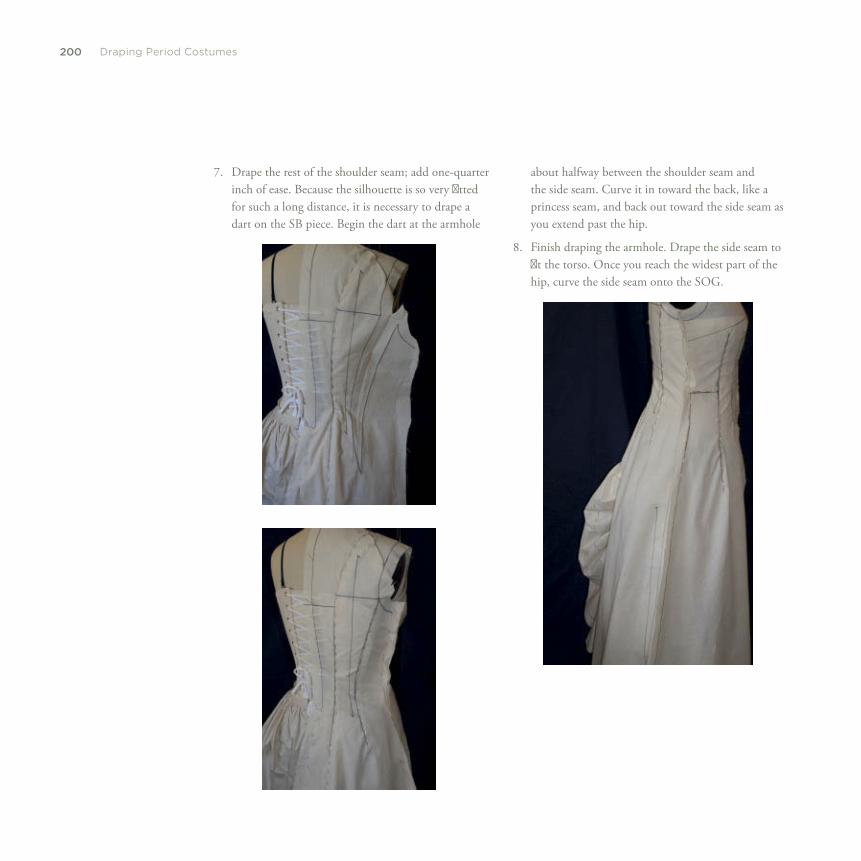
200 Draping Period Costumes
7. Drape the rest of the shoulder seam; add one-quarter inch of ease. Because the silhouette is so very fi tted for such a long distance, it is necessary to drape a dart on the SB piece. Begin the dart at the armhole
about halfway between the shoulder seam and the side seam. Curve it in toward the back, like a princess seam, and back out toward the side seam as you extend past the hip.
8. Finish draping the armhole. Drape the side seam to fi t the torso. Once you reach the widest part of the hip, curve the side seam onto the SOG.

201Th e Victorian Lady
For the Cuirass Bodice, follow the same instructions, stopping at the hip-length hem line. Instead of draping a dart in the SB piece, you can cut it into two separate pieces.
Draping a Low Bustle Gown Not ones to leave well enough alone, fashionable women of the later 1880s revived the bustle. Unlike the earlier bustle, where the greatest accumulation of fabric sat up in the small of the woman’s back, the low bustle sat below the waistline. Th ere could be various
bustle understructures: several rows of horsehair ruffl es (either attached to its own separate cord or sewn to a petticoat), a wire cagelike contraption, or curved strips of spring steel sewn into casings in the back of the petticoat. All of these focused the skirt volume in the back, leaving the front and sides relatively slim and close to the body.
Th ese are two examples of contemporary reproductions of bustle petticoats:

202 Draping Period Costumes
Th e bodice lost its elongated, hip-skimming shape and the waistline moved back up to its natural location with extended points in the front and sometimes in the back. Th e elaborately draped swags and overskirts maintained their high level of extravagance.
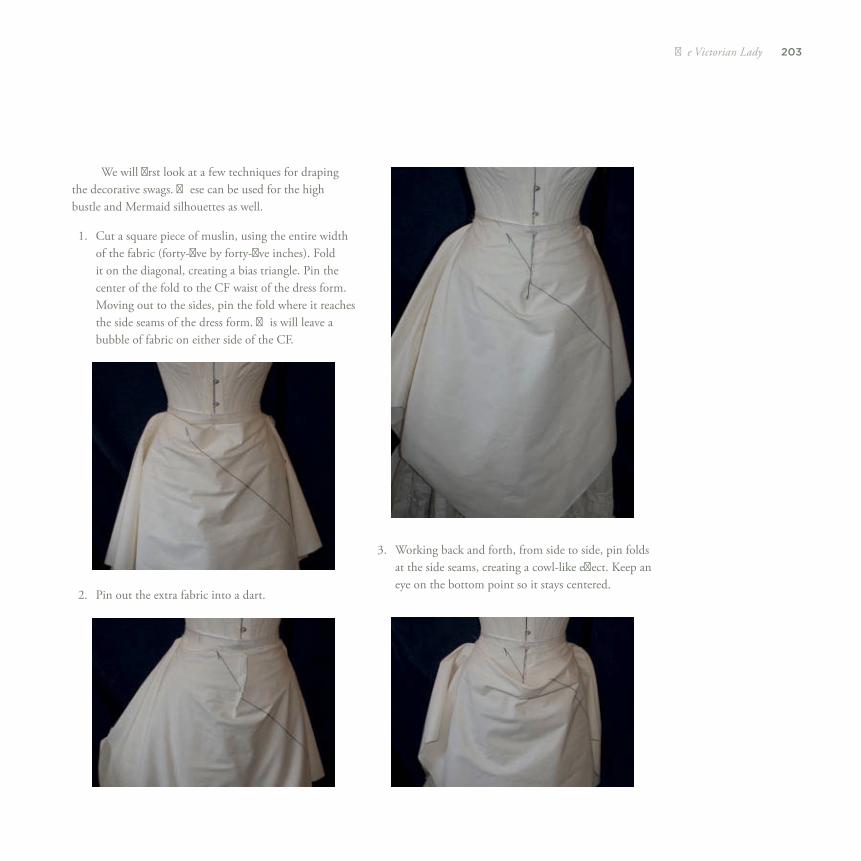
203Th e Victorian Lady
We will fi rst look at a few techniques for draping the decorative swags. Th ese can be used for the high bustle and Mermaid silhouettes as well.
1. Cut a square piece of muslin, using the entire width of the fabric (forty-fi ve by forty-fi ve inches). Fold it on the diagonal, creating a bias triangle. Pin the center of the fold to the CF waist of the dress form. Moving out to the sides, pin the fold where it reaches the side seams of the dress form. Th is will leave a bubble of fabric on either side of the CF.
2. Pin out the extra fabric into a dart.
3. Working back and forth, from side to side, pin folds at the side seams, creating a cowl-like eff ect. Keep an eye on the bottom point so it stays centered.
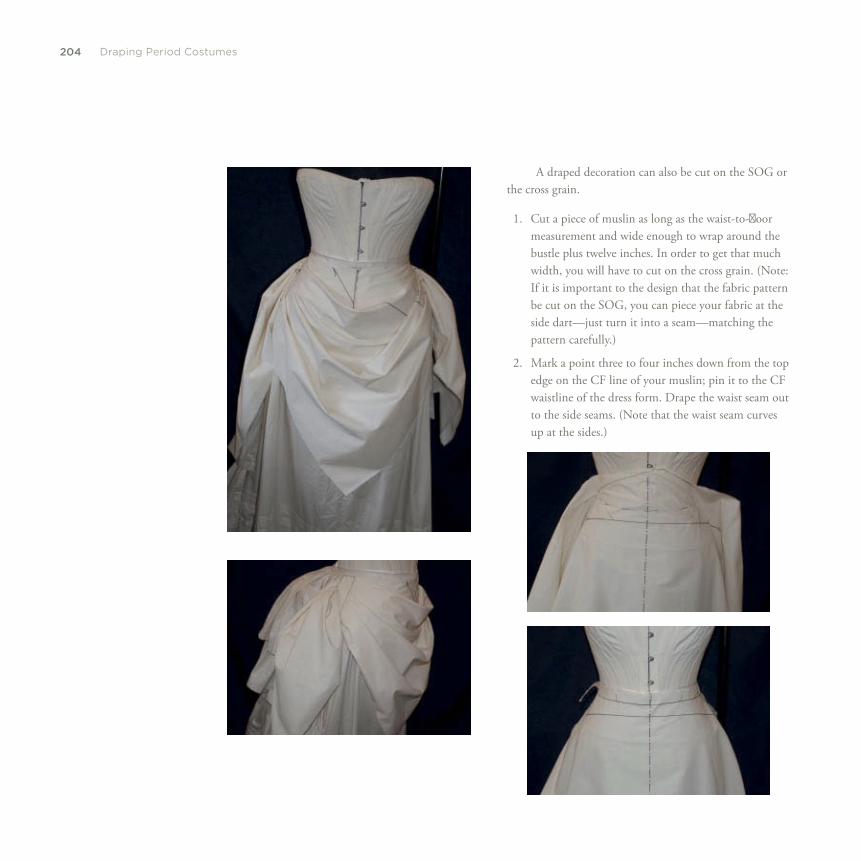
204 Draping Period Costumes
A draped decoration can also be cut on the SOG or the cross grain.
1. Cut a piece of muslin as long as the waist-to-fl oor measurement and wide enough to wrap around the bustle plus twelve inches. In order to get that much width, you will have to cut on the cross grain. (Note: If it is important to the design that the fabric pattern be cut on the SOG, you can piece your fabric at the side dart—just turn it into a seam—matching the pattern carefully.)
2. Mark a point three to four inches down from the top edge on the CF line of your muslin; pin it to the CF waistline of the dress form. Drape the waist seam out to the side seams. (Note that the waist seam curves up at the sides.)

205Th e Victorian Lady
3. Drape a curved dart at the side seam to bring the top edge back up to the waist. Th e dart will hold the drape quite far out from the dress form. Drape the back of the waist seam.
4. Fold and pin a series of pleats along the CF line.
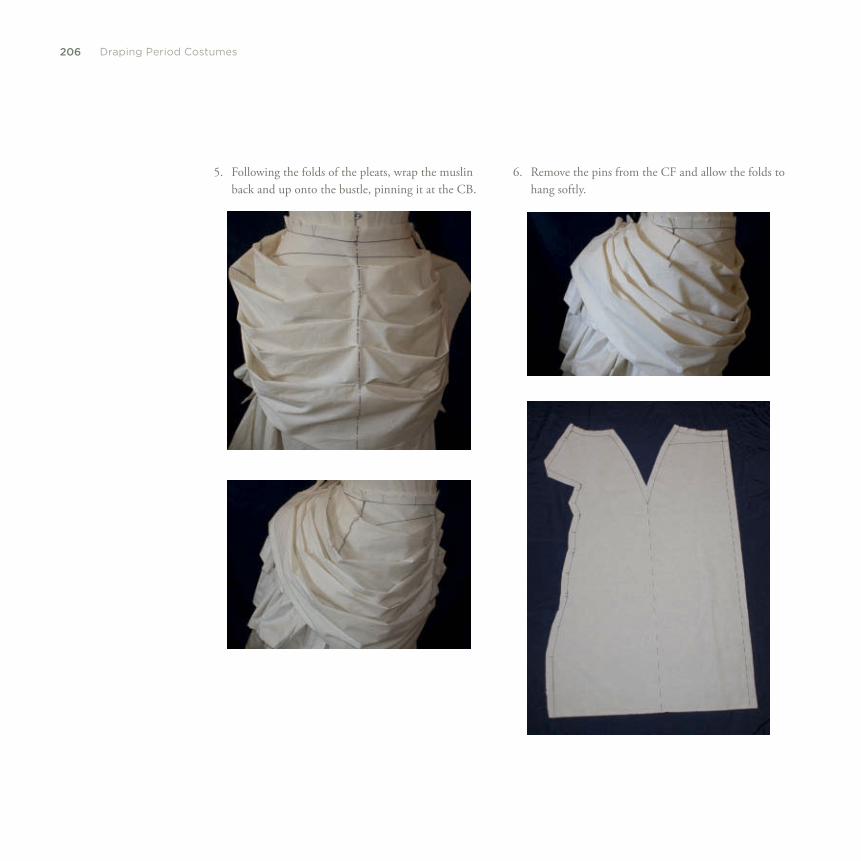
206 Draping Period Costumes
5. Following the folds of the pleats, wrap the muslin back and up onto the bustle, pinning it at the CB.
6. Remove the pins from the CF and allow the folds to hang softly.
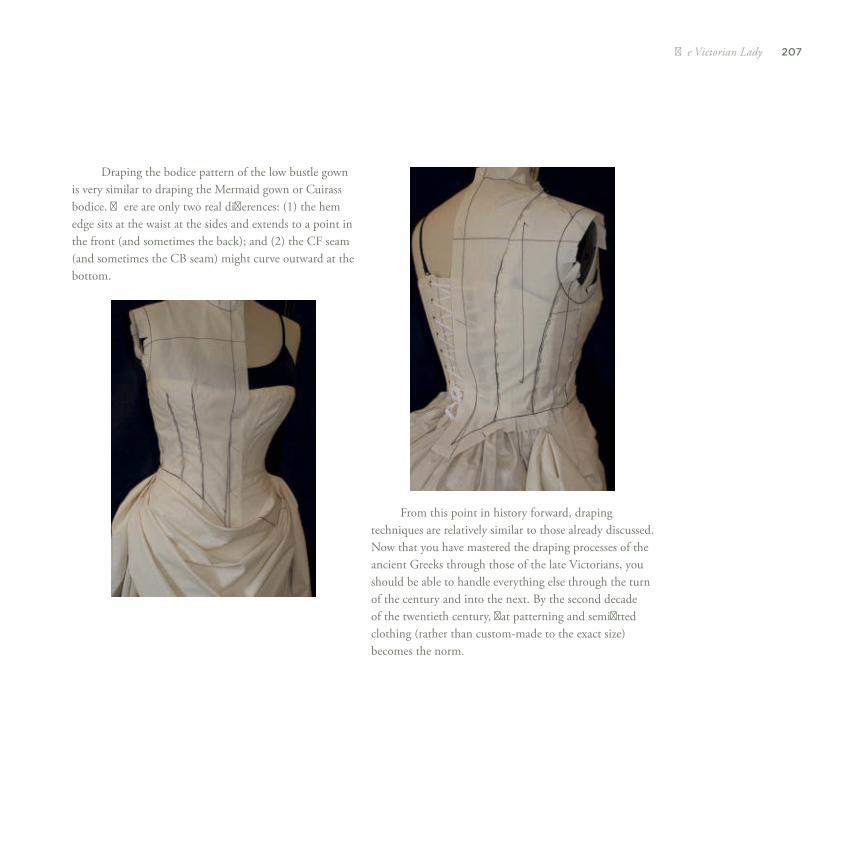
207Th e Victorian Lady
Draping the bodice pattern of the low bustle gown is very similar to draping the Mermaid gown or Cuirass bodice. Th ere are only two real diff erences: (1) the hem edge sits at the waist at the sides and extends to a point in the front (and sometimes the back); and (2) the CF seam (and sometimes the CB seam) might curve outward at the bottom.
From this point in history forward, draping techniques are relatively similar to those already discussed. Now that you have mastered the draping processes of the ancient Greeks through those of the late Victorians, you should be able to handle everything else through the turn of the century and into the next. By the second decade of the twentieth century, fl at patterning and semifi tted clothing (rather than custom-made to the exact size) becomes the norm.

A
A-line garment 48 A-line gown 58–61 ancient Greek costume: Greek Diplas 32–4;
Greek Doric Chiton 18–21; Greek Doric Peplos 25–9; Greek Himation 22–4; Greek Ionic Chiton 29–32
armhole: draping 59, 184 artifi cial silhouette: man’s Elizabethan doublet
70–3; man’s Elizabethan jerkin 73–4; woman’s Elizabethan bodice 66–9
B
back neckline: applied border for 122, 126, 130
Basque bodice, draping 86–92 batting, in dress form 5, 6 belting, of Ionic Chiton 31, 32 bias 8 bodice 66–9, 116, 123, 125; Basque 86–92;
draping an 1830s 165–7; draping an 1840s 168–70; high-waisted gown with fi tted 62–4; mid-nineteenth-century 170–2; seventeenth-century 93–6; woman’s Elizabethan 66–9
Boucher, Francois 106, 116 brocades 76, 106 brown craft paper 13 buff jerkin 80 bust darts 8–9 Byzantine costume 37–8 Byzantine Paludamentum 38 Byzantine Tunic 37
C
cartridge pleats 96 cavalier doublet see doublet center back (CB) 134, 166; of collar, pinning
178; panel 116, 118, 123; seam 118, 123, 128
center front (CF) 10, 133, 163, 166–71; on bias 58; line 9, 110, 137, 139; neck point 13, 109, 175; pattern 93; seam, draping 67, 72, 77, 80, 82; and side seams 55
Chemise Gown 132–6 Clouet, Francois 66 coat: birth of 81; draping of 82–4; early-
eighteenth-century 106–10; early-nineteenth-century 151–6; Frock Coat 174–80; mid-eighteenth-century 111–14; Morning Coat 180–1; Sack Coat and Norfolk Jacket 183–6; Tail Coat 181–2
Coello, Sanchez 66 collar: draping 178, 185; jacket 150; shawl,
double-breasted waistcoat with 158–60; standing 52–3
commercial patterns 14 contemporary fabrics, standard width of 25 contemporary slopers 8 corset 97; draping period 67–9; early-
seventeenth-century 87 costume: Byzantine 37–8; early Gothic 39; of
men 4, 76, 106; Roman 35–7; solutions for secure 20; of women 4, 106
Cotehardie 45–7 cote/kirtle 54–7 Cotton batiste 132 cotton/poly poplin 7 crinkled fabric 30 crinolines 170 cross grain 8, 69, 70 cross-grain 9, 11, 13, 55, 67; for Frock Coat
174, 179; for Morning Coat 180 C-thru ruler 9, 13, 14
D
darts 8–9 David, Jacques-Louis 132 de la Tour, Maurice Quentin 116
Diplas 32–4 Diplax see Diplas Doric Chiton 18–21 Doric Peplos 25–9 double-breasted Spencer jacket 142–7 double-breasted waistcoat with shawl collar
158–60 doublet: man’s Elizabethan 70–3; padded
42–5; with waist seam 76–9; without waist seam 79–80
draping process: dress forms in 2; dressmaking pins for 6; fabric 7, 8; marking tools for 6; measuring dress forms for 2–5; pattern to paper, transferring 13–16; sloper, fi tted 8–13; SOG 7–8; tools and equipment in 7
dress forms 2; adapting 5–6; care and maintenance of 6; draping Cotehardie on 46; draping Toga on 35–7; measuring 2–5; woman, draping sloper on 9–13
dressmaking pins, for draping 6
E
early Gothic costume 39 early Gothic overgarments 39 early Gothic tunics 39 early-nineteenth-century: coat 151–6;
waistcoat, draping an 156–60 eighteenth century: Chemise Gown 132–5;
coat 106–14; men’s costume 106 Elizabethan bodice 66–9, 86 Elizabethan doublet 70–3 Elizabethan jerkin 73–4 embroidery 37
F
fabric draping 7, 8, 66, 69 fabrics: for Gothic overgarments, softer 39;
measuring length of 57, 63; pleat 30;
{ index }
210 Index
rectangle of 32; soft, drapy quality of 42; standard width of contemporary 25; wraping 37
farthingale 66 fl at fell seam 28 fl at patterning 46 Frock Coat 156; late-eighteenth-century
vs. mid-eighteenth-century 150–1; mid-nineteenth-century, draping 174–80
G
Gainsborough, Th omas 116 garments: A-line 48; Greek 34; men’s 42 gathering: twill tape method of 143 Gheeraerts, Marcus 66 godets 39 Gothic costume, early 39 Gothic Houppeland 81 Gothic overgarments, early 39 Gothic period: collar, standing 52–3;
Cotehardie 45–7; cote/kirtle 54–7; high-waisted gown 62–4; padded doublet 42–5; pleated jerkin 48–52; unisex houppelande 58–61
Gothic tunics, early 39 gown: A-line 58–61; draping an 1820s
162–4; low bustle 201–7; “Mermaid”/“Fishtail” 196–201; sack, draping 126–30; Watteau-backed 123–6; woman’s fi tted 54–8; woman’s high-waisted 62–4
Greek Diplas 32–4 Greek Doric Chiton 18–21 Greek Doric Peplos 25–9 Greek Himation 22–4 Greek Ionic Chiton 29–32
H
high-waisted gown: with fi tted bodice 62–4 Himation 22–4
Hogarth, William 106 Holbein, Hans 66 Houppelande 62–4; unisex 58–61
I
Industrial Revolution: of nineteenth century 162
Ingres, Jean-Auguste-Dominique 162 inner selvage edge, wraping 36 Ionic Chiton 29–32
J
jacket: collars and lapels 150; double-breasted Spencer 142–7
jerkin 80; man’s Elizabethan 73–4; pleated 48–52
K
Kaufman-Davis Studio 67 kirtle/cote 54–7
L
late-eighteenth-century coat: vs. mid-eighteenth-century coat 150–1
M
man’s coat, draping 114 man’s vest 114 Mantua, draping 97–104 marking tools, for draping 6 mid-nineteenth-century bodice 170–2 mid-nineteenth-century coat, draping: Frock
Coat 174–80; late-eighteenth-century coat vs. 150–1; Morning Coat 180; Tail Coat 181–2
Monet, Claude 188 Morning Coat 174; mid-nineteenth-century,
draping 180
muslin 7, 137, 157, 158, 160; on bias 163, 165, 166; double-breasted Spencer jacket 142–7; folding 98–100; Open Robe 136–41; on SOG 95, 163, 168
N
neckline: center front seam at, pinning 62; of Houppelande 61; pinning 52
nineteenth century: Industrial Revolution of 162
Norfolk Jacket 174; draping 183–6
O
Open Robe Gown 136–41 Over Gown see Open Robe Gown
P
padded doublet 42–5 Paludamentum 38 panniers 116, 124, 126 paper, patterning 13–16 peascod belly 66; man’s Elizabethan doublet
with 70–3 peplum 51, 144–5 petticoats 120, 126, 129, 167, 170; corsets and
67; hooped 116; padded rolls and 66; pinning 123, 124; waistband of 163
pinning: CB of collar to coat 178; continue 13, 51, 156, 166; Frock Coat 175; petticoats 123, 124; SB seam of skirt 180; Tail Coat 181–2; waist seam of skirt 179, 181
pleat 117, 118, 121, 124, 127; cartridge 96; creation of 99–101; process 49
princess seam 87–9, 191; pinning 95; SB 199; SF 10, 90, 94
Prud’hon, Pierre-Paul 132

211Index
R
registration marks, on seams 13 Rembrandt 76, 86 Renoir, August 188 Reynolds, Joshua 116 Robe a la Francaise 123–6 Robe a l’Anglaise 116–23, 126 roll line 156, 177, 179 Roman costume 34–7 Roman Toga 35–7 Roman Tunic 34 rubber backing 76 Rubens 76
S
SA see Seam allowance Sack Coat 174; draping 183–6 Sack gown 126–30 Sacque 126–30 SB seam see side back seam Seam allowance (SA) 152, 153,
158, 160 seams 42; CF 55, 56, 58; draping shoulder 48,
59; line 9, 14; pinning waist 49, 51; side 61
selvage edge 8 seventeenth-century: bodice 93–6; coat 82–4;
Mantua 97–104 seventeenth-century doublet 76–81; with
waist seam 76–9; without waist seam 79–80
SF see side front shawl collar: double-breasted waistcoat with
158–60 shoulder seam 87, 91; creation of 93–5;
draping 12, 48, 59, 71–3
side back (SB) seam 89, 151, 154; Frock Coat draping in 176; of skirt, pinning 180
side front (SF) 89; pattern, seam line of 88; piece, draping 11; princess seam, of dress form 10
side seam 61; draping 12, 82–3, 126, 127, 129; pinning 57, 124
silhouette, artifi cial see artifi cial silhouette single-breasted waistcoat: with collar cut-in-one
with body 157–8 skirt hemmer 110 skirts 96 slashed doublet see doublet sleeve seam, shaping 37 sloper, fi tted 8–13 SOG see straight of grain standing collar 52–3 stomacher 88, 92, 93, 97 straight of grain (SOG) 7–8, 67–9, 122,
125, 158; CF line and 133; crinkled texture on 30; decorative tab with 141; for Frock Coat 174, 179; for Morning Coat 180; muslin on 163, 168; pinning 98, 144
T
Tail Coat 151, 174; mid-nineteenth-century, draping 181–2
temporary dart 137 Ter Borch 76, 86 Tissot, James Jacques Joseph 188 Toga: draping 35–7 T-shaped garments 34 T-shaped tunics 39
tunic: Byzantine 37; early Gothic 39; Roman 34 twill tape method, of gathering 143
U
underarm seams 39 unisex Houppelande 58–61
V
Van Dyck 76, 86 Vermeer 76, 86 vertical darts 175 vest, birth of 81
W
waistcoat 114; double-breasted 158–60; early-nineteenth-century, draping an 156–7; single-breasted 157–8
waist darts 8 waistline 86, 92–4, 165, 168; height of 163 waist seam 67, 71–4; doublet with and
without 76–80; pinning 49, 51; shaping 29; of skirt, pinning 179, 181
Watteau, Antoine 106, 116, 123 Watteau-backed gown 123–6 weft threads 8 Winterhalter, Franz Xaver 170 woman’s dress forms, draping sloper on
9–13 women’s costume 106 woven fabric 8
Z
Zoff any, Johann 116