drum direktor user guide - kontakt instruments · drum direktor user guide drum direktor :...
TRANSCRIPT
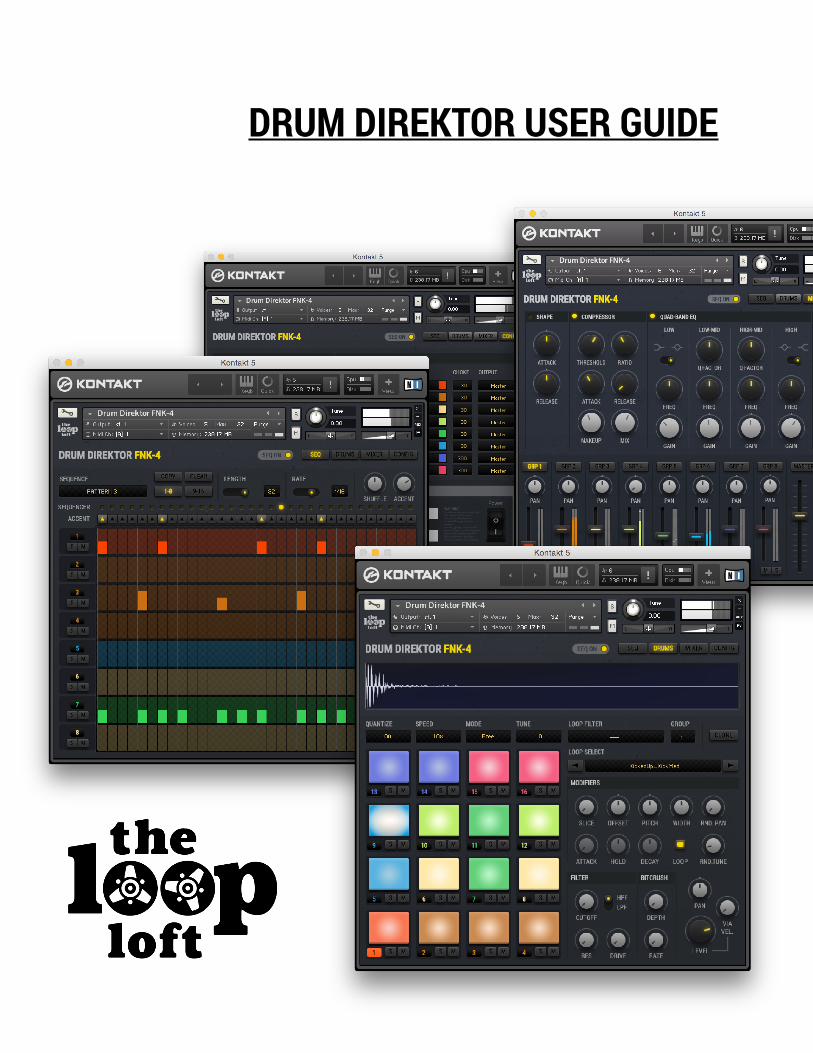
DRUM DIREKTOR USER GUIDE
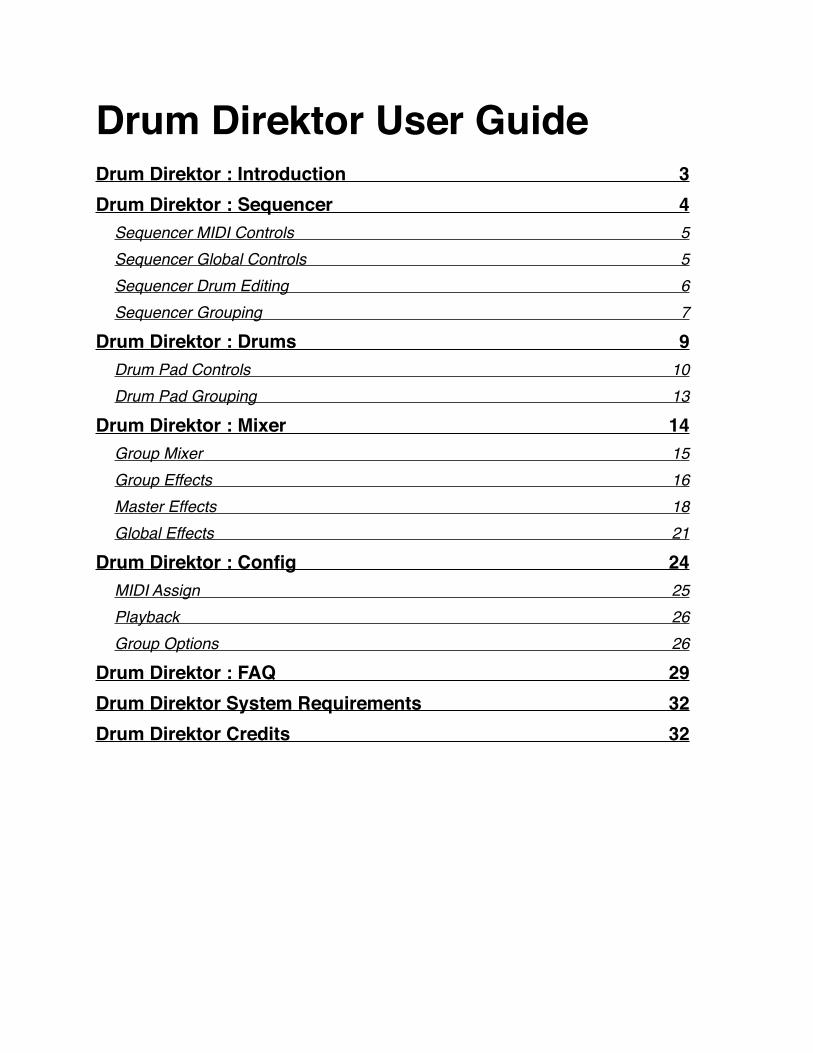
Drum Direktor User GuideDrum Direktor : Introduction 3 Drum Direktor : Sequencer 4
Sequencer MIDI Controls 5 Sequencer Global Controls 5 Sequencer Drum Editing 6 Sequencer Grouping 7
Drum Direktor : Drums 9 Drum Pad Controls 10 Drum Pad Grouping 13
Drum Direktor : Mixer 14 Group Mixer 15 Group Effects 16 Master Effects 18 Global Effects 21
Drum Direktor : Config 24 MIDI Assign 25 Playback 26 Group Options 26
Drum Direktor : FAQ 29 Drum Direktor System Requirements 32 Drum Direktor Credits 32
Drum Direktor : IntroductionThank-you for purchasing Drum Direktor from The Loop Loft. Drum Direktor is a sample/loop based instrument for Kontakt 5.2.1 and above which was designed from the ground up to make interacting with and creating music using drum loops a seamless and intuitive process. One of the main goals of the instrument is to create a method of interacting with loops that could work inside of and enhance, many different workflows. Some of the highlight features of the instrument include
• Internal 32 Step Sequencer with 8 recallable patterns that allow for the simultaneous sequencing of loops and samples within a single instrument. Shuffle, Global Accent, Step Dynamics, Per group Sequencer Precedence and a convenient layout of Solo, Mute and Drum Loop auditioning all make sequencing patterns within Drum Direktor a natural and fast process.
• Flexible grouping architecture which allows for sophisticated organization and structure of drum loops and samples with easily identifiable colors and workflow features usually reserved for dedicated hardware workstations.
• Powerful Drum Pad infrastructure which allows for 16 simultaneous loops or samples from a collection of over 300 to be played and sequenced simultaneously with a clear waveform overview and playback positioning.
• A feature rich tools set of tools for processing each individual Drum Pad. Users have the ability to set playback quantization, playback speed, sampler mode, slice start time, pitch, stereo width, randomization, filtering, distortion, velocity, volume and pan on each of the individual 16 Drum Pads.
• A dedicated mixer for processing each of the 8 individual drum groups with high quality internal effects which include a Transient Shaper and Compressor/EQ modelled after a famous Solid State Console.
• Global Effects for Delay, Reverb and a powerful Tape Machine which allows for quick and powerful tone shaping. The Drum Direktor Tape Machine matches the quality and workflow of mixing drums to a multi-track tape machine in a fast and easy to use custom design.
• Internal master bus processors including EQ, Compression, Filtering and Distortion for a polished mix ready sound without ever having to use external effects or plugins.
• Powerful MIDI mapping controls for configuring Drum Direktor to behave exactly the way you want to work with your existing MIDI controllers.
• Highly customizable group options including user definable colors, choke times and external output for further processing and mixing within your favourite DAW software.
• Low RAM and CPU usage options for compatibility with a wide range of systems.
page 2

Drum Direktor : Sequencer
Drum Direktor features an intuitive step sequencer which allows for the simultaneous layering of loops and samples across all 16 Drum Pads. The sequencer is controlled via external MIDI messages and allows for instantaneous starting, stopping and switching of Loops, Samples and Patterns.
Sequencer MIDI Controls 5 Sequencer Global Controls 5 Sequencer Drum Editing 6 Sequencer Grouping 7
page 2
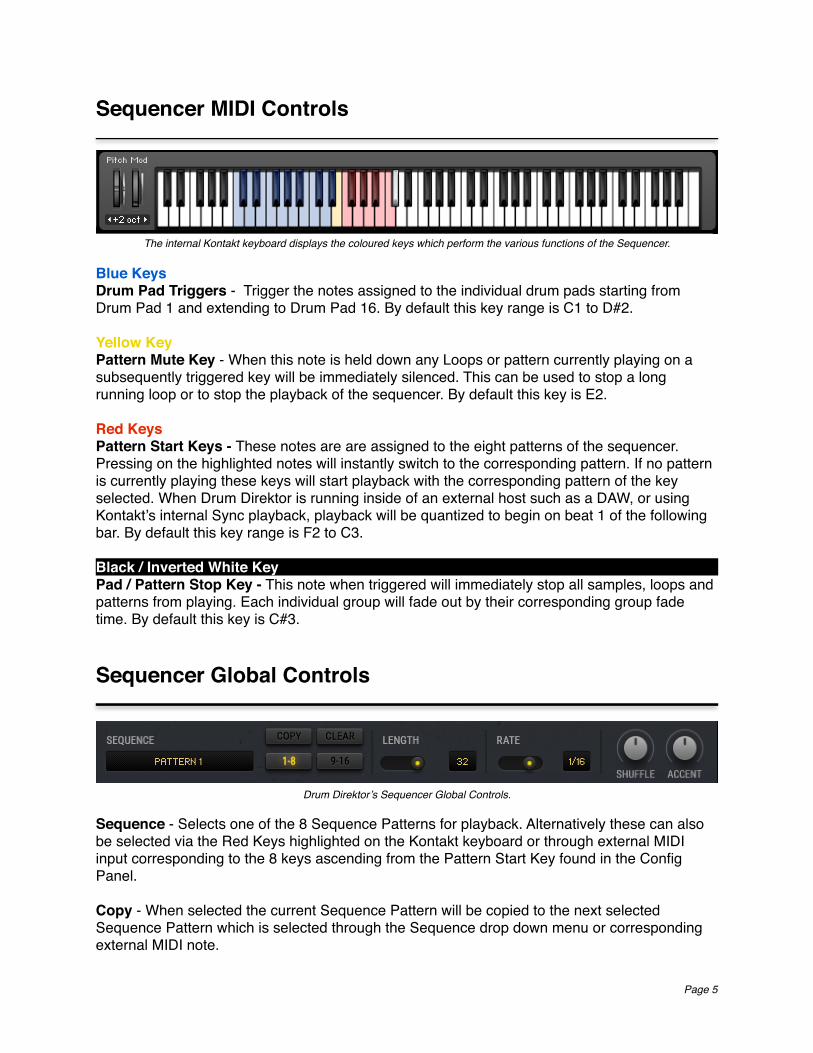
Sequencer MIDI Controls
Blue KeysDrum Pad Triggers - Trigger the notes assigned to the individual drum pads starting from Drum Pad 1 and extending to Drum Pad 16. By default this key range is C1 to D#2.
Yellow KeyPattern Mute Key - When this note is held down any Loops or pattern currently playing on a subsequently triggered key will be immediately silenced. This can be used to stop a long running loop or to stop the playback of the sequencer. By default this key is E2.
Red KeysPattern Start Keys - These notes are are assigned to the eight patterns of the sequencer. Pressing on the highlighted notes will instantly switch to the corresponding pattern. If no pattern is currently playing these keys will start playback with the corresponding pattern of the key selected. When Drum Direktor is running inside of an external host such as a DAW, or using Kontakt’s internal Sync playback, playback will be quantized to begin on beat 1 of the following bar. By default this key range is F2 to C3.
Black / Inverted White KeyPad / Pattern Stop Key - This note when triggered will immediately stop all samples, loops and patterns from playing. Each individual group will fade out by their corresponding group fade time. By default this key is C#3.
Sequencer Global Controls
Sequence - Selects one of the 8 Sequence Patterns for playback. Alternatively these can also be selected via the Red Keys highlighted on the Kontakt keyboard or through external MIDI input corresponding to the 8 keys ascending from the Pattern Start Key found in the Config Panel.
Copy - When selected the current Sequence Pattern will be copied to the next selected Sequence Pattern which is selected through the Sequence drop down menu or corresponding external MIDI note.
Page �5
The internal Kontakt keyboard displays the coloured keys which perform the various functions of the Sequencer.
Drum Direktor’s Sequencer Global Controls.
Clear - Clears all steps and Globals Accent for the currently selected pattern.
1-8 - Displays Drum Pads 1-8 for Sequence Editing.
9-16 - Displays Drum Pads 9-16 for Sequence Editing.
Length - Determines the Length of the Step Sequencer between 1 and 32 Steps. Controllable via the length slider or by clicking and dragging up/down on the numerical representation of steps.
Rate - Sets the synchronized rate the Sequencer takes to progress between each step. Adjustable between 1/1, 1/2, 1/4, 1/8, 1/16 and 1/32 time values.
Shuffle - Sets the shuffle and groove of the Step Sequencer. The centre position will cause the sequencer to play with a straight timing. Values to the right push each 1/8 note further behind the beat and values to left rush each 1/8 note ahead of the beat.
Accent - Determines the Volume increase for steps that have Global Accent enabled. When set to the lowest position Global Accent will have no volume increase to corresponding steps.
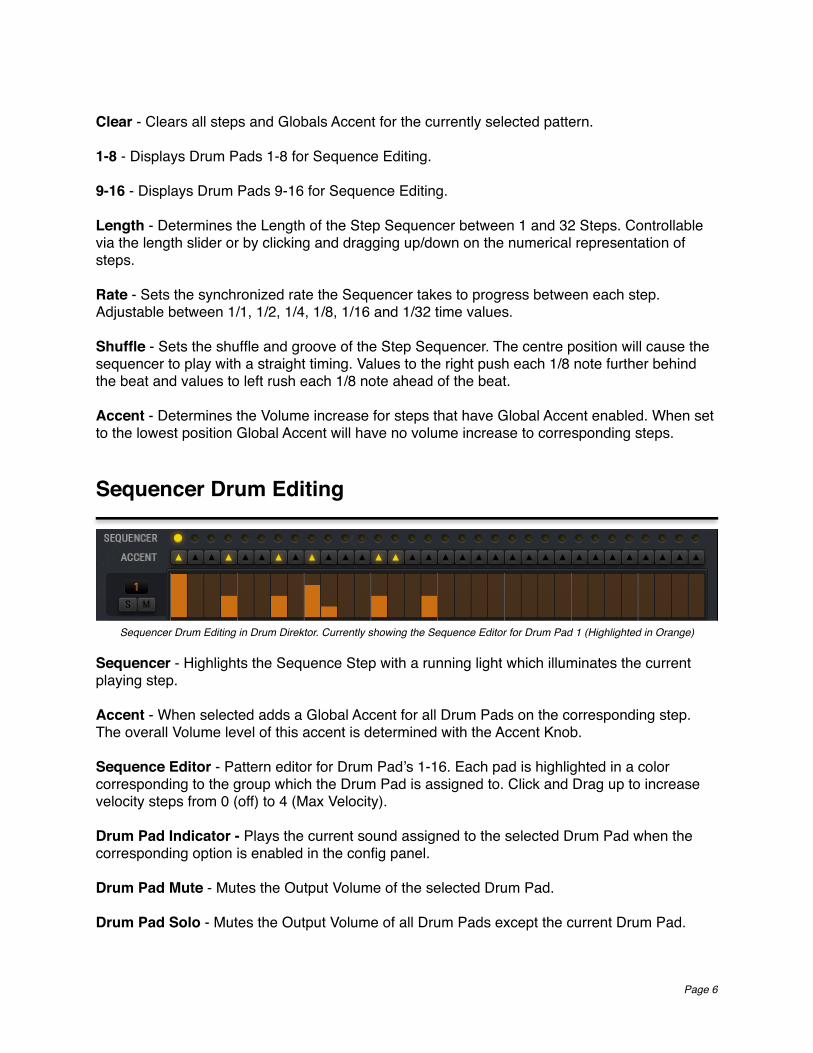
Sequencer Drum Editing
Sequencer - Highlights the Sequence Step with a running light which illuminates the current playing step.
Accent - When selected adds a Global Accent for all Drum Pads on the corresponding step. The overall Volume level of this accent is determined with the Accent Knob.
Sequence Editor - Pattern editor for Drum Pad’s 1-16. Each pad is highlighted in a color corresponding to the group which the Drum Pad is assigned to. Click and Drag up to increase velocity steps from 0 (off) to 4 (Max Velocity).
Drum Pad Indicator - Plays the current sound assigned to the selected Drum Pad when the corresponding option is enabled in the config panel.
Drum Pad Mute - Mutes the Output Volume of the selected Drum Pad.
Drum Pad Solo - Mutes the Output Volume of all Drum Pads except the current Drum Pad.
Page �6
Sequencer Drum Editing in Drum Direktor. Currently showing the Sequence Editor for Drum Pad 1 (Highlighted in Orange)
Sequencer Grouping
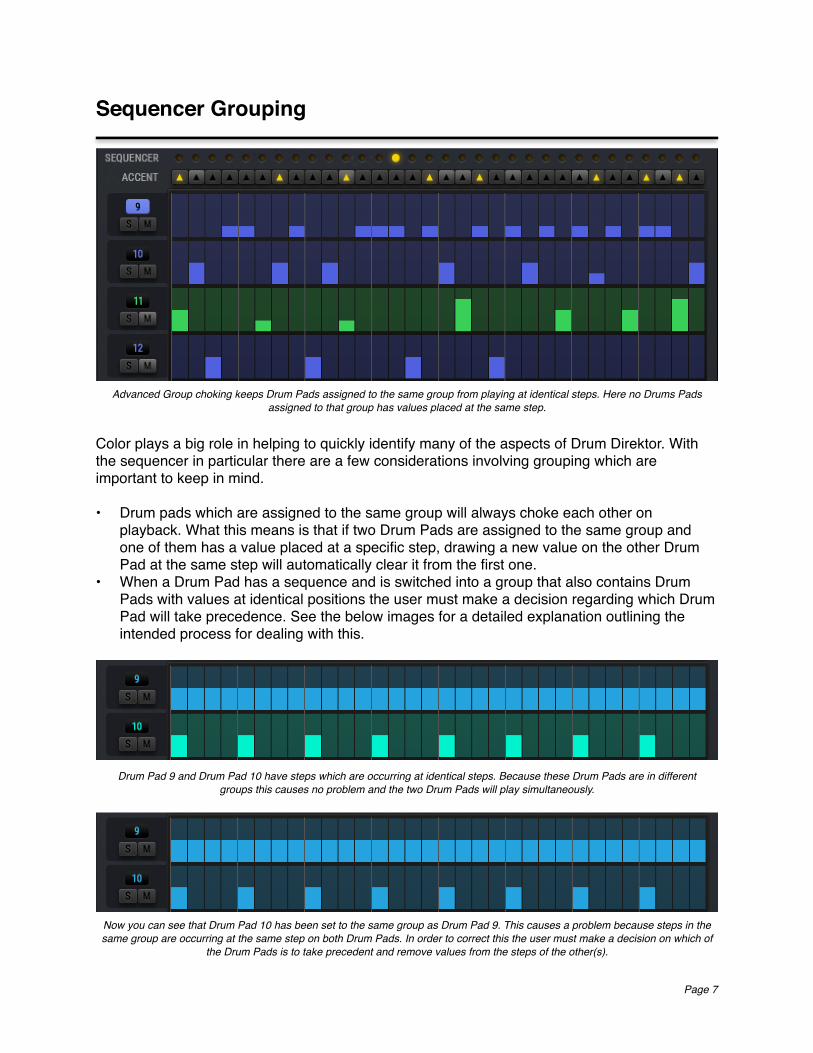
Color plays a big role in helping to quickly identify many of the aspects of Drum Direktor. With the sequencer in particular there are a few considerations involving grouping which are important to keep in mind.
• Drum pads which are assigned to the same group will always choke each other on playback. What this means is that if two Drum Pads are assigned to the same group and one of them has a value placed at a specific step, drawing a new value on the other Drum Pad at the same step will automatically clear it from the first one.
• When a Drum Pad has a sequence and is switched into a group that also contains Drum Pads with values at identical positions the user must make a decision regarding which Drum Pad will take precedence. See the below images for a detailed explanation outlining the intended process for dealing with this.
Page �7
Advanced Group choking keeps Drum Pads assigned to the same group from playing at identical steps. Here no Drums Pads assigned to that group has values placed at the same step.
Drum Pad 9 and Drum Pad 10 have steps which are occurring at identical steps. Because these Drum Pads are in different groups this causes no problem and the two Drum Pads will play simultaneously.
Now you can see that Drum Pad 10 has been set to the same group as Drum Pad 9. This causes a problem because steps in the same group are occurring at the same step on both Drum Pads. In order to correct this the user must make a decision on which of
the Drum Pads is to take precedent and remove values from the steps of the other(s).
Page �8
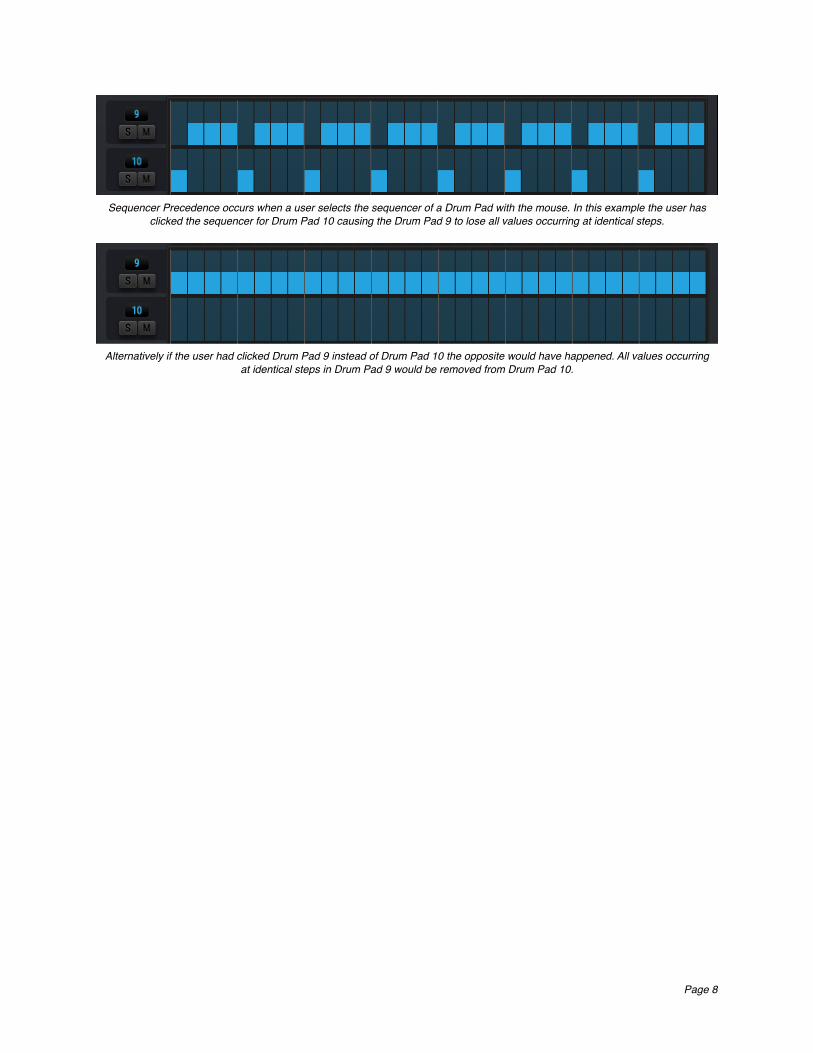
Sequencer Precedence occurs when a user selects the sequencer of a Drum Pad with the mouse. In this example the user has clicked the sequencer for Drum Pad 10 causing the Drum Pad 9 to lose all values occurring at identical steps.
Alternatively if the user had clicked Drum Pad 9 instead of Drum Pad 10 the opposite would have happened. All values occurring at identical steps in Drum Pad 9 would be removed from Drum Pad 10.
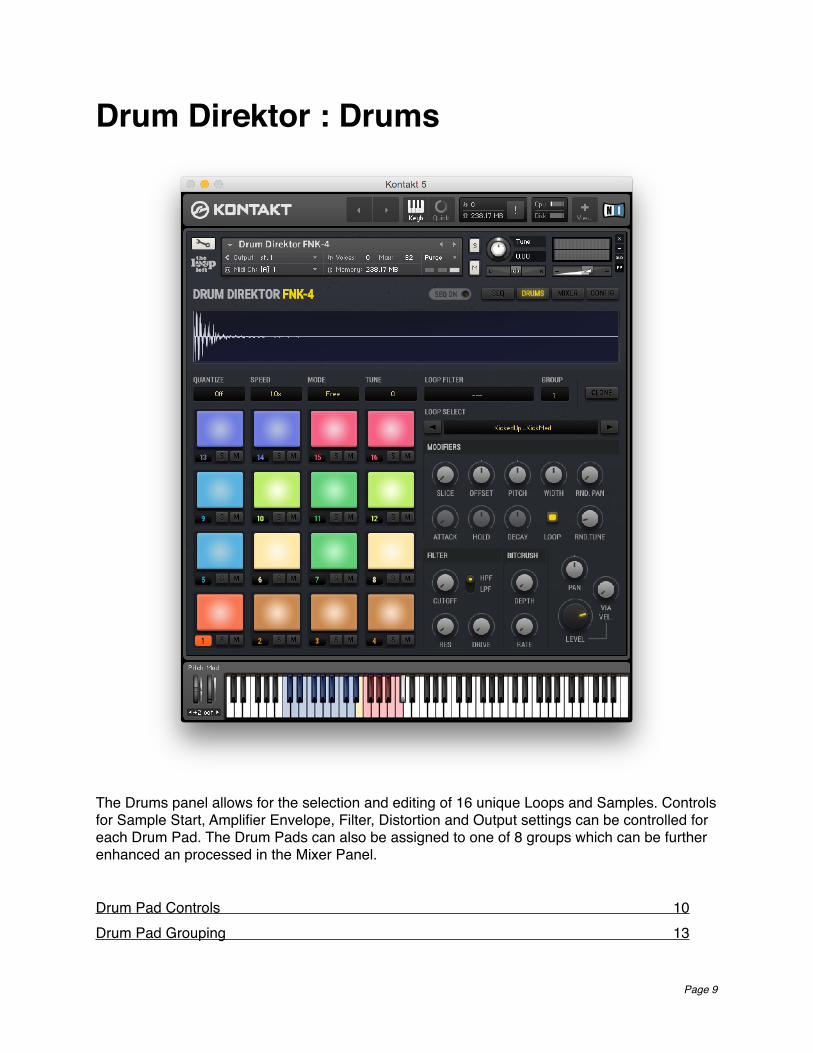
Drum Direktor : Drums
The Drums panel allows for the selection and editing of 16 unique Loops and Samples. Controls for Sample Start, Amplifier Envelope, Filter, Distortion and Output settings can be controlled for each Drum Pad. The Drum Pads can also be assigned to one of 8 groups which can be further enhanced an processed in the Mixer Panel.
Drum Pad Controls 10 Drum Pad Grouping 13
Page �9
Drum Pad Controls
Drum Pad OptionsWaveform Overview - Displays the overview of the currently selected Drum Pads waveform.
Quantize - When synchronized to a host the currently select pad will quantize it's playback timing to the selected value. This is ideal for live performing when it would be desirable to have the playback of a loop or sample begin on a specific beat. The options include 1/1, 1/2, 1/4, 1/8 and 1/16.
Speed - Sets the playback speed of the currently selected loop. 0.5X, 1.0X and 2.0X speed. This can be useful for correctly synchronizing the speed of a loop to double or half time tempos. i.e. : Your song may be in 90BPM but you would like to set your projects tempo 180BPM for a double time metronome. In this case the loops will play at double the expected speed but they can be adjusted to play in the correct speed by selecting “0.5x” from the speed option. This option is only active when the Mode is set to Sync.
Mode - Sets the Sampler Mode for the currently selected loop.
Sync - Synchronizes playback to the host tempo. When using the Speed parameter playback can be set to half, normal,or double time.
Free - Plays at the original speed. This is most useful for playing back samples and breakbeat style one shots from loops without any time-stretching.
Vintage - Plays at the original speed and models the sound of a classic sampler. Like the free mode this is most useful for playing back samples and breakbeat style one shots from loops without any time-stretching. Vintage differs from free mode by lowering the bit depth and matching the tuning artifacts of vintage samplers. This mode is ideal for recreating classic drum sounds found in electronic music styles prominent throughout the 80s and 90s.
Tune - Changes the pitch of the drum pad precisely by +/- 12 semitones.
Page �10
Loop SelectLoop Filter - Filters the Loop Select to only display a specific category of loops and samples.
Group - Assigns the currently selected pad to one of the 8 loop groups. When the group is adjusted the color of the pad will visually adjust to match the color of the selected group.
Clone - When enabled the current drum pad settings will be copied to the next selected drum pad. When used in combination with “Select on Note” in the Config panel MIDI notes can be used to quickly copy settings between Drum Pads.
Previous Loop - Selects the previous loop in the Loop List.
Next Loop - Selects the next loop int the Loop List.
Loop Select - Selects the assigned loop for the currently selected pad.
ModifiersSlice - Moves the sample start position of the current Drum Sample to the next or previous transient. The slice marker is visible in the Waveform Overview as a solid line which matches the color of the Drum Pad Group.
Offset - Moves the sample start position of the current Drum Sample by a finer value. This can be useful for selecting drum hits
not mapped to the slices or for creating new and interesting rhythms.
Pitch - Changes the pitch of the drum pad by +/- 1200 cents. Similar in function to the tune option but instead of changing by semitone it allows for finer increments of tune.
Width - Adjusts the stereo width of current drum pad from 0% (mono) to 200%.
Rnd. Pan - Randomizes the pan position of the currently selected drum pad within 0-100%.
Attack - Adjusts the Attack Time of the currently selected drum pad.
Hold - Adjusts the Hold Time of the currently selected drum pad.
Decay - Adjusts the Decay Time of the currently selected drum pad.
Loop / One Shot - When enabled the Attack, Hold and Decay settings are bypassed. Loops will play continuously until stopped and Samples will play for their entire duration.
Rnd. Tune - Randomizes the tune of the currently selected drum pad within +/- 100 cents.
Page �11
FilterCutoff - Adjusts the Filter Cutoff Frequency of the currently selected Drum Pad Filter. When set to HPF the off position is fully counter clockwise. When set to LPF the off position is fully clockwise.
Res - Adjusts the Filter Resonance of the currently selected drum pad. With a value greater than 0, this control will boost a small frequency range around the cutoff frequency.
Drive - Adjusts the Filter drive of the currently selected drum pad. which controls the amplitude increase after the filter. This control can be used to compensate for amplitude reduction due to the filter, or to increase the soft saturation of the effect.
HPF / LPF - Toggles between HPF and LPF filters. Note that the cutoff frequency dynamically adjusts when switching styles.
Bit CrushDepth - Adjusts the Bit-Depth of the currently selected drum pad within 24-1 Bit by re-quantizing the signal. Fractional bit levels (such as 12.4 bits) are possible and can add considerable “grit”. Audio CDs have a quantization depth of 16 bits, old samplers frequently used 8 or 12 bits, and 4 bits evoke memories of countless irritating children’s toys.
Rate - Adjusts the Sample Rate of the currently selected drum pad within 44100-50Hz by resampling the signal to an adjustable sample rate. The resampling is done without any kind of (usually mandatory) low-pass filtering, which causes all kinds of wonderful aliasing artifacts. At 50 Hz not much of the original signal will be left.
Output Controls
Pan - Adjusts the Pan Position of the currently selected drum pad.
Level - Adjusts the Output Volume of the currently selected drum pad.
Level Via Vel. - Determines the Velocity Sensitivity of the Output Volume for the currently selected drum pad.
Page �12
Drum Pad Grouping
Each Drum Pad belongs to one of eight drum groups. These groups determine the following behaviors for the drum pads …• The color of the Drum Pad and Group Mixer Track components determined by the Group
Settings section of the Config Panel.• The mixer channel that the Drum Pad will be output to.• The Choke Group the Drum Pad is assigned to. Only one Drum Pad per group may play
simultaneously. This means Drum Pads which belong to the same choke group will mute all other Drum Pads in the same group when played. The time that the other Drum Pads will take to Fade Out is determined by the Choke Time found in the Config Panel
Page �13
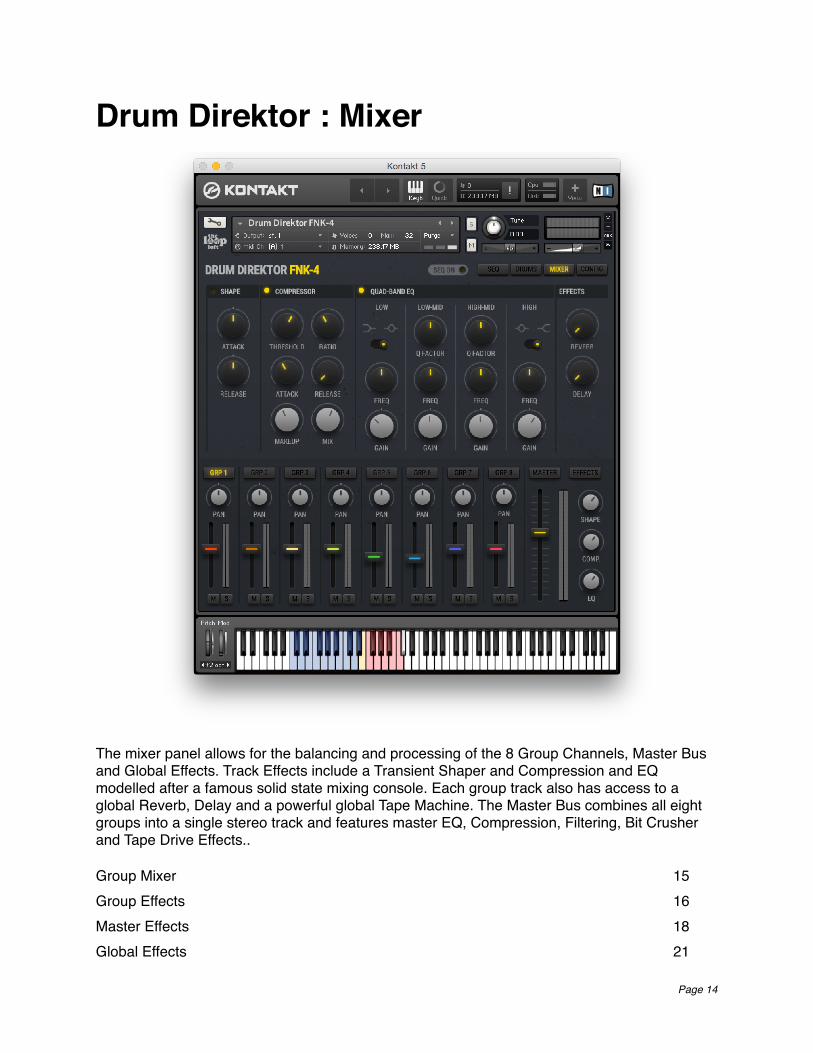
Drum Direktor : Mixer
The mixer panel allows for the balancing and processing of the 8 Group Channels, Master Bus and Global Effects. Track Effects include a Transient Shaper and Compression and EQ modelled after a famous solid state mixing console. Each group track also has access to a global Reverb, Delay and a powerful global Tape Machine. The Master Bus combines all eight groups into a single stereo track and features master EQ, Compression, Filtering, Bit Crusher and Tape Drive Effects..
Group Mixer 15 Group Effects 16 Master Effects 18 Global Effects 21
Page �14
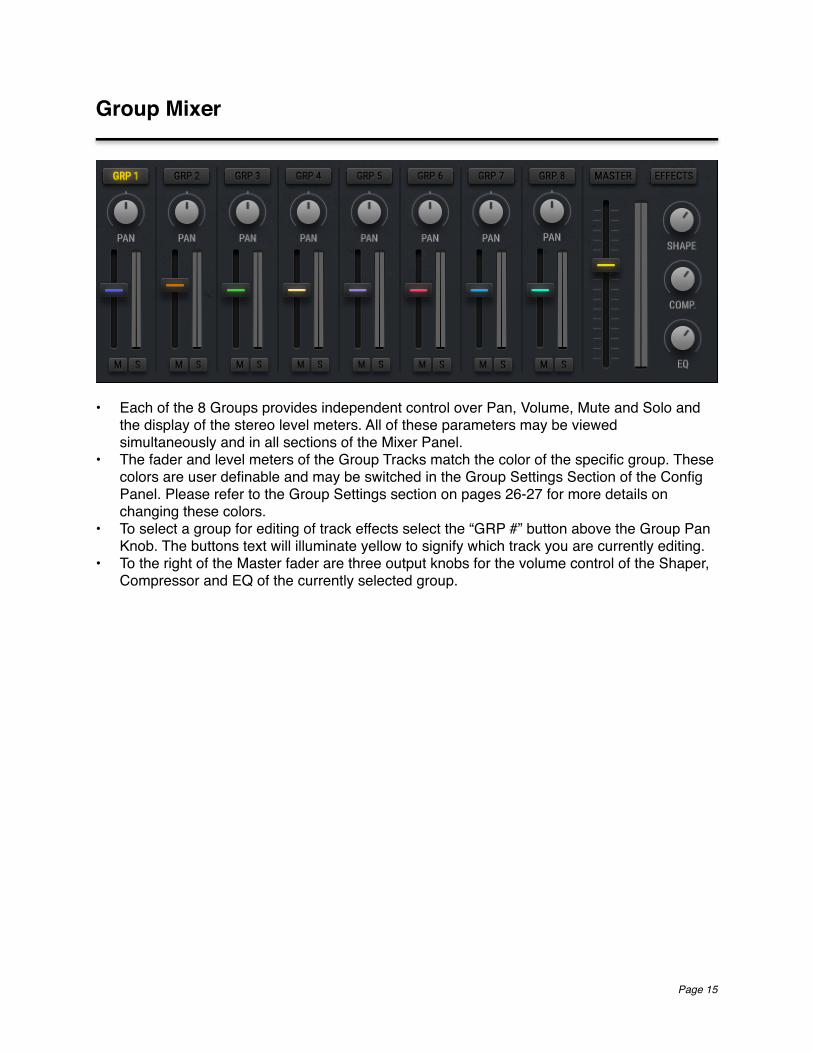
Group Mixer
• Each of the 8 Groups provides independent control over Pan, Volume, Mute and Solo and the display of the stereo level meters. All of these parameters may be viewed simultaneously and in all sections of the Mixer Panel.
• The fader and level meters of the Group Tracks match the color of the specific group. These colors are user definable and may be switched in the Group Settings Section of the Config Panel. Please refer to the Group Settings section on pages 26-27 for more details on changing these colors.
• To select a group for editing of track effects select the “GRP #” button above the Group Pan Knob. The buttons text will illuminate yellow to signify which track you are currently editing.
• To the right of the Master fader are three output knobs for the volume control of the Shaper, Compressor and EQ of the currently selected group.
Page �15
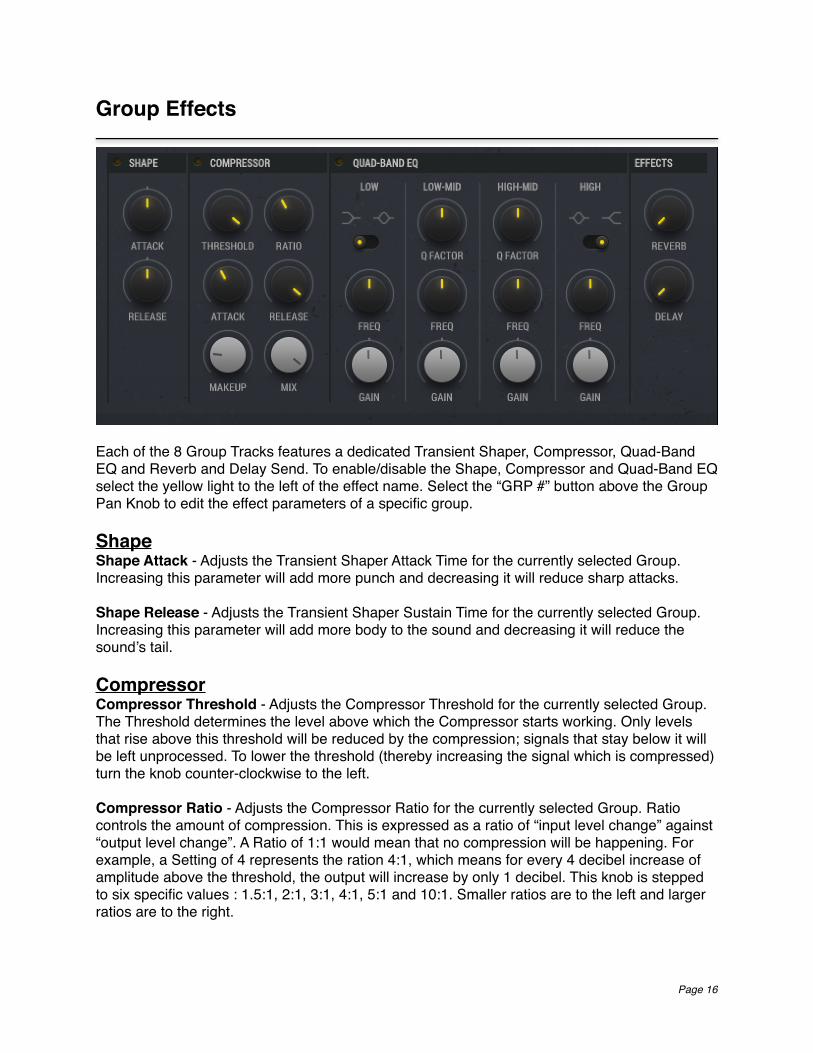
Group Effects
Each of the 8 Group Tracks features a dedicated Transient Shaper, Compressor, Quad-Band EQ and Reverb and Delay Send. To enable/disable the Shape, Compressor and Quad-Band EQ select the yellow light to the left of the effect name. Select the “GRP #” button above the Group Pan Knob to edit the effect parameters of a specific group.
ShapeShape Attack - Adjusts the Transient Shaper Attack Time for the currently selected Group. Increasing this parameter will add more punch and decreasing it will reduce sharp attacks.
Shape Release - Adjusts the Transient Shaper Sustain Time for the currently selected Group. Increasing this parameter will add more body to the sound and decreasing it will reduce the sound’s tail.
CompressorCompressor Threshold - Adjusts the Compressor Threshold for the currently selected Group. The Threshold determines the level above which the Compressor starts working. Only levels that rise above this threshold will be reduced by the compression; signals that stay below it will be left unprocessed. To lower the threshold (thereby increasing the signal which is compressed) turn the knob counter-clockwise to the left.
Compressor Ratio - Adjusts the Compressor Ratio for the currently selected Group. Ratio controls the amount of compression. This is expressed as a ratio of “input level change” against “output level change”. A Ratio of 1:1 would mean that no compression will be happening. For example, a Setting of 4 represents the ration 4:1, which means for every 4 decibel increase of amplitude above the threshold, the output will increase by only 1 decibel. This knob is stepped to six specific values : 1.5:1, 2:1, 3:1, 4:1, 5:1 and 10:1. Smaller ratios are to the left and larger ratios are to the right.
Page �16
Compressor Attack - Adjusts the Compressor Attack Time for the currently selected Group. Attack determines how long the Compressor will take to reach the full Ratio value after an input signal exceeds the Threshold level.
Compressor Release - Adjusts the Compressor Release Time for the currently selected Group. Release adjusts the time the compressor will take to fall back to non-compression after the input signal falls below the threshold.
Compressor Makeup - Adjusts the Compressor Makeup for the currently selected Group. Makeup controls the output gain of the compressed signal. Because compression lowers the volume of loud sections of audio the makeup is used to compensate for the gain reduction of the effect.
Compressor Mix - Adjusts the Compressor Mix for the currently selected Group. Compressor Mix controls the dry/wet mix of the compressor. This can be used to create a parallel compression style routing, which increases the quieter signals rather than reducing the louder ones. At a setting of 100% you will only hear the compressed signal, at a setting of 0% you will only hear the unprocessed input signal.
Quad Band EQQuad-Band EQ Low Bell / Shelf - Adjusts the EQ Low Band Shape between Bell and Shelf for the currently selected Group. When turned to the left the band becomes a shelf. When turned to the right the band becomes a bell.
Quad-Band EQ Low Freq - Adjusts the EQ Low Band Frequency for the currently selected Group. The frequency range is adjustable between 40Hz and 600Hz.
Quad-Band EQ Low Gain - Adjusts the EQ Low Band Gain for the currently selected Group. The gain range is adjustable between -20dB and +20dB.
Quad-Band EQ Low-Mid Q Factor - Adjusts the EQ Low Mid Band Q for the currently selected Group. For most EQs, the higher the quality, the narrower the frequency band, but with this EQ the control is reversed to match the hardware it emulates and becomes a bandwidth control.
Quad-Band EQ Low-Mid Freq - Adjusts the EQ Low Mid Band Frequency for the currently selected Group. The frequency range is adjustable between 200Hz and 2500Hz.
Quad-Band EQ Low-Mid Gain - Adjusts the EQ Low Mid Band Gain for the currently selected Group. The gain range is adjustable between -20dB and +20dB.
Quad-Band EQ High-Mid Q Factor - Adjusts the EQ Low Mid Band Q for the currently selected Group. For most EQs, the higher the quality, the narrower the frequency band, but with this EQ the control is reversed to match the hardware it emulates and becomes a bandwidth control.
Quad-Band EQ High-Mid Freq - Adjusts the EQ High Mid Band Frequency for the currently selected Group. The frequency range is adjustable between 600Hz and 7000Hz.
Page �17
Quad-Band EQ High-Mid Gain - Adjusts the EQ High Mid Band Gain for the currently selected Group. The gain range is adjustable between -20dB and +20dB.
Quad-Band EQ High Bell / Shelf - Adjusts the EQ High Band Shape between Bell and Shelf for the currently selected Group. When turned to the right the band becomes a shelf. When turned to the left the band becomes a bell.
Quad-Band EQ High Freq - Adjusts the EQ High Band Frequency for the currently selected Group. The frequency range is adjustable between 1500Hz and 22000Hz.
Quad-Band EQ High Gain - Adjusts the EQ High Band Gain for the currently selected Group. The gain range is adjustable between -20dB and +20dB.
Send Effects
Effects Reverb Send - Adjusts the Reverb Send for the currently selected Group.
Effects Delay Send - Adjusts the Delay Send for the currently selected Group.
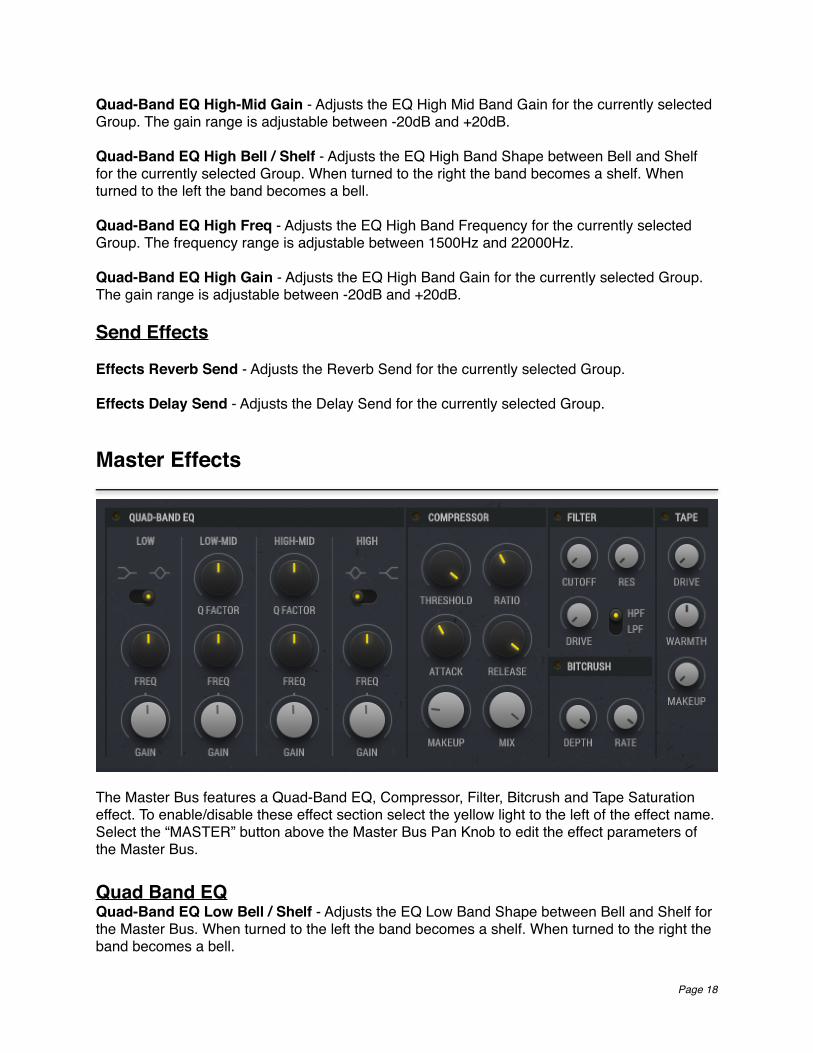
Master Effects
The Master Bus features a Quad-Band EQ, Compressor, Filter, Bitcrush and Tape Saturation effect. To enable/disable these effect section select the yellow light to the left of the effect name. Select the “MASTER” button above the Master Bus Pan Knob to edit the effect parameters of the Master Bus.
Quad Band EQQuad-Band EQ Low Bell / Shelf - Adjusts the EQ Low Band Shape between Bell and Shelf for the Master Bus. When turned to the left the band becomes a shelf. When turned to the right the band becomes a bell.
Page �18
Quad-Band EQ Low Freq - Adjusts the EQ Low Band Frequency for the Master Bus. The frequency range is adjustable between 40Hz and 600Hz.
Quad-Band EQ Low Gain - Adjusts the EQ Low Band Gain for the Master Bus. The gain range is adjustable between -20dB and +20dB.
Quad-Band EQ Low-Mid Q Factor - Adjusts the EQ Low Mid Band Q for the Master Bus. For most EQs, the higher the quality, the narrower the frequency band, but with this EQ the control is reversed to match the hardware it emulates and becomes a bandwidth control.
Quad-Band EQ Low-Mid Freq - Adjusts the EQ Low Mid Band Frequency for the Master Bus. The frequency range is adjustable between 200Hz and 2500Hz.
Quad-Band EQ Low-Mid Gain - Adjusts the EQ Low Mid Band Gain for the Master Bus. The gain range is adjustable between -20dB and +20dB.
Quad-Band EQ High-Mid Q Factor - Adjusts the EQ Low Mid Band Q for the Master Bus. For most EQs, the higher the quality, the narrower the frequency band, but with this EQ the control is reversed to match the hardware it emulates and becomes a bandwidth control.
Quad-Band EQ High-Mid Freq - Adjusts the EQ High Mid Band Frequency for the Master Bus. The frequency range is adjustable between 600Hz and 7000Hz.
Quad-Band EQ High-Mid Gain - Adjusts the EQ High Mid Band Gain for the Master Bus. The gain range is adjustable between -20dB and +20dB.
Quad-Band EQ High Bell / Shelf - Adjusts the EQ High Band Shape between Bell and Shelf for the Master Bus. When turned to the right the band becomes a shelf. When turned to the left the band becomes a bell.
Quad-Band EQ High Freq - Adjusts the EQ High Band Frequency for the Master Bus. The frequency range is adjustable between 1500Hz and 22000Hz.
Quad-Band EQ High Gain - Adjusts the EQ High Band Gain for the Master Bus. The gain range is adjustable between -20dB and +20dB.
CompressorCompressor Threshold - Adjusts the Compressor Threshold for the Master Bus. The Threshold determines the level above which the Compressor starts working. Only levels that rise above this threshold will be reduced by the compression; signals that stay below it will be left unprocessed. To lower the threshold (thereby increasing the signal which is compressed) turn the knob counter-clockwise to the left.
Compressor Ratio - Adjusts the Compressor Ratio for the Master Bus. Ratio controls the amount of compression. This is expressed as a ratio of “input level change” against “output level change”. A Ratio of 1:1 would mean that no compression will be happening. For example, a Setting of 4 represents the ration 4:1, which means for every 4 decibel increase of amplitude above the threshold, the output will increase by only 1 decibel. This knob is stepped to six
Page �19
specific values : 1.5:1, 2:1, 3:1, 4:1, 5:1 and 10:1. Smaller ratios are to the left and larger ratios are to the right.
Compressor Attack - Adjusts the Compressor Attack Time for the Master Bus. Attack determines how long the Compressor will take to reach the full Ratio value after an input signal exceeds the Threshold level.
Compressor Release - Adjusts the Compressor Release Time for the Master Bus. Release adjusts the time the compressor will take to fall back to non-compression after the input signal falls below the threshold.
Compressor Makeup - Adjusts the Compressor Makeup for the Master Bus. Makeup controls the output gain of the compressed signal. Because compression lowers the volume of loud sections of audio the makeup is used to compensate for the gain reduction of the effect.
Compressor Mix - Adjusts the Compressor Mix for the Master Bus. Compressor Mix controls the dry/wet mix of the compressor. This can be used to create a parallel compression style routing, which increases the quieter signals rather than reducing the louder ones. At a setting of 100% you will only hear the compressed signal, at a setting of 0% you will only hear the unprocessed input signal.
FilterCutoff - Adjusts the Filter Cutoff Frequency for the Master Bus. When set to HPF the off position is fully counter clockwise. When set to LPF the off position is fully clockwise.
Res - Adjusts the Filter Resonance for the Master Bus. With a value greater than 0, this control will boost a small frequency range around the cutoff frequency.
Drive - Adjusts the Filter drive for the Master Bus which controls the amplitude increase after the filter. This control can be used to compensate for amplitude reduction due to the filter, or to increase the soft saturation of the effect.
HPF / LPF - Toggles between HPF and LPF filters. Note that the cutoff frequency dynamically adjusts when switching styles.
Bit CrushDepth - Adjusts the Bit-Depth for the Master Bus within 24-1 Bit by re-quantizing the signal. Fractional bit levels (such as 12.4 bits) are possible and can add considerable “grit”. Audio CDs have a quantization depth of 16 bits, old samplers frequently used 8 or 12 bits, and 4 bits evoke memories of countless irritating children’s toys.
Rate - Adjusts the Sample Rate for the Master Bus within 44100-50Hz by resampling the signal to an adjustable sample rate. The resampling is done without any kind of (usually mandatory) low-pass filtering, which causes all kinds of wonderful aliasing artifacts. At 50 Hz not much of the original signal will be left.
Page �20
TapeDrive - Adjusts the Drive for the Master Bus Tape Saturator which increases the amount of tape distortion and compression. This parameter is able to shape the sound from subtle saturation to heavy fuzz and distortion. The Drive ranges from 0dB to +48dB.
Warmth - Adjusts the Warmth for the Master Bus Tape Saturator. The centre position has a neutral sound and Values to the left accentuate the high end and values to the right accentuate the low end.
Makeup - Adjusts the Output for the Master Bus Tape Saturator. Because the Tape effect can lower or increase the volume based on the amount of Drive the Makeup can be used to compensate the volume. The Makeup ranges from -12dB to +24dB.
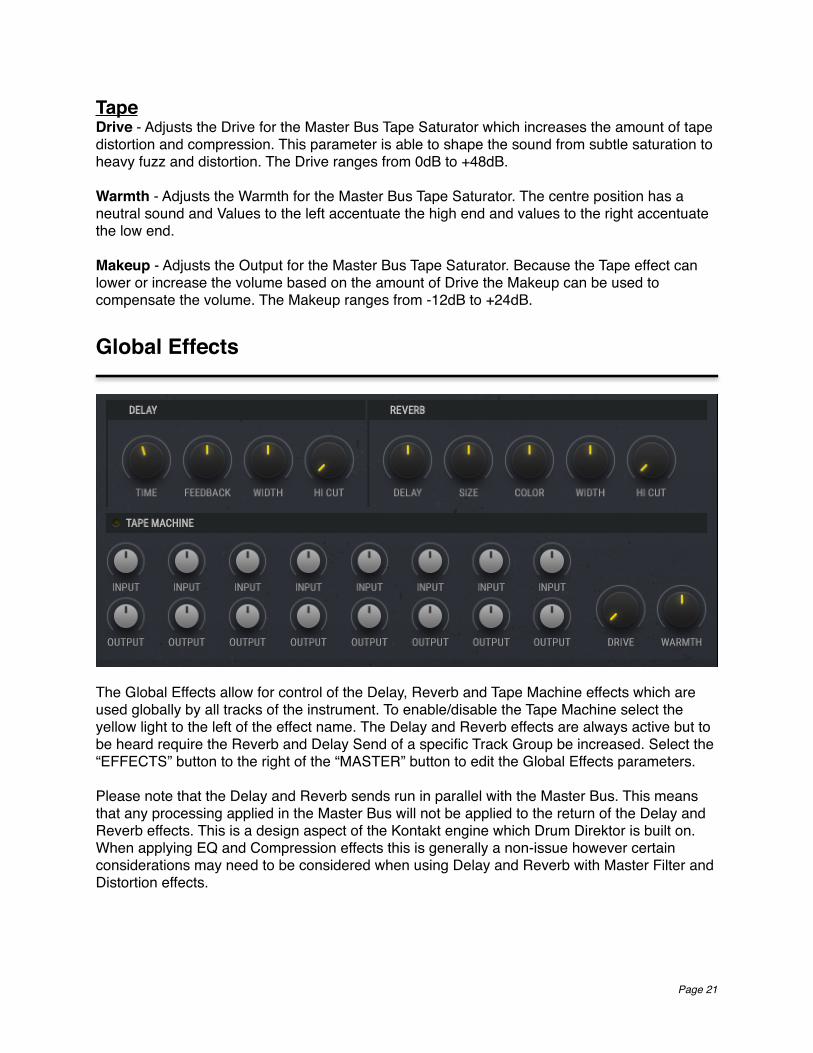
Global Effects
The Global Effects allow for control of the Delay, Reverb and Tape Machine effects which are used globally by all tracks of the instrument. To enable/disable the Tape Machine select the yellow light to the left of the effect name. The Delay and Reverb effects are always active but to be heard require the Reverb and Delay Send of a specific Track Group be increased. Select the “EFFECTS” button to the right of the “MASTER” button to edit the Global Effects parameters.
Please note that the Delay and Reverb sends run in parallel with the Master Bus. This means that any processing applied in the Master Bus will not be applied to the return of the Delay and Reverb effects. This is a design aspect of the Kontakt engine which Drum Direktor is built on. When applying EQ and Compression effects this is generally a non-issue however certain considerations may need to be considered when using Delay and Reverb with Master Filter and Distortion effects.
Page �21
DelayTime - Adjusts the synchronized Delay Time for the Master Delay Effect. Longer times are to the left and shorter times are to the right.
Feedback - Adjusts the Feedback for the Master Delay Effect. Feedback is the amount of the output signal that’s being fed back into the input of the delay line, thereby creating a series of echoes that gradually fade into silence.
Width - Adjusts the Stereo Ping-Pong for the Master Delay Effect. A Ping-Pong is a delay effect that is created by alternating echos between the left and the right side of the stereo panorama. Higher values will result in wider panning; at 100, signals alternate between the far left and far right channel.
Hi Cut - Adjusts the Filter for the Master Delay Effect. Attenuates high frequencies in the delayed signal. Turning this control clockwise will increase the damping effect. If you have set a feedback level, the signal will gradually lose more high frequency content with each repetition. ReverbDelay - Adjusts the Pre-Delay for the Master Reverb Effect which Introduces a short delay between the direct signal and the reverb trail build-up. This corresponds to the natural reverberation behavior of large rooms, where a short time elapses before the first reflection of a sound wave returns from a wall.
Size - Adjusts the Size of the simulated room for the Master Reverb Effect. This affects the duration of the reverb trail.
Color - Adjusts the Colour for the Master Reverb Effect. This control allows you to adjust the construction material of the simulated room and, consequently, the color of the reverb trail. Low values simulate softer surfaces like wood, while high values simulate the reflection behavior of hard surfaces like concrete.
Width - Adjusts the Stereo Width for the Master Reverb Effect. Higher values increase the stereo base width of the output signal. Lower values simulate a closer distance to the sound source.
Hi Cut - Adjusts the Filter for the Master Reverb Effect. Useful for simulating the absorption that takes place in rooms due to furnishings, people, or acoustic treatments affecting the reflection behavior.
Tape MachineInput - Adjusts the signal which is sent from the output of an individual group to the Tape Machine effect. Similar to the drive for the Master Bus Tape Saturator this increases the amount of tape distortion and compression. This parameter is able to shape the sound from subtle saturation to heavy fuzz and distortion. The Input range is dynamic based on the position of the Drive Knob.
Output - Adjusts the Group Output of the signal from the Tape Saturator. Because the Tape effect can lower or increase the volume based on the amount of Drive or Input the Makeup can be used to compensate the volume. The Makeup ranges from off to +24dB.
Page �22
Drive - Adjusts the Input signal of all tracks globally. This can be used to adjust the Input on all Group Tracks globally. The Drive knob is ideal for making large shifts to the tone of the tape machine in combination with the individual Input controls which can be used for fine tuning the level of saturation.
Warmth - Adjusts the Warmth for the Master Bus Tape Saturator. The centre position has a neutral sound and Values to the left accentuate the high end and values to the right accentuate the low end.
Page �23
Drum Direktor : Config
The config panel allows for the configuration of MIDI, Playback and Group Settings. These settings can be considered Advanced and in most cases would be unnecessary for users to interact with unless so desired.
MIDI Assign 25 Playback 26 Group Options 26
Page �24
MIDI Assign
Pad Start - When the button to the right of this title is selected the next received MIDI note and the following 15 notes will become the triggers for the Drum Pads. Triggering one of these notes from a MIDI controller will trigger playback from the corresponding Drum Pad. The MIDI note which is the base trigger for the 16 Drum Pads is displayed to the left of this button. Alternatively you may also click the name of the Note and select the desired MIDI Note from the dropdown menu.
Pad / Pattern Stop - When the button to the right of this title is selected the next received MIDI note will become the Pad / Pattern Stop Key. The Pad / Pattern Stop Key will immediately stop any loop, sample or pattern while it is held down and the corresponding MIDI note to trigger a Drum Pad or Pattern is entered from an external MIDI controller or Kontakt’s internal keyboard. This works similar to the Mute or Choke button found on some hardware Drum Samplers. The MIDI note which is the trigger for the Pad / Pattern Stop Key is displayed to the left of this button. Alternatively you may also click the name of the Note and select the desired MIDI Note from the dropdown menu.
Pattern Start - When the button to the right of this title is selected the next received MIDI note and the following 7 notes will become the triggers for starting the playback and switching the Sequence Patterns. Depending on the current state of the sequencer triggering one of these notes from a MIDI controller will have one of multiple outcomes.
• If external Sequencer / DAW is not playing and the Pattern Start Note is received while the internal sequencer is not yet playing - Playback of the sequencer will start immediately on the pattern which corresponds to the MIDI Note received.
• If external Sequencer / DAW is not playing and the Pattern Start Note is received while the internal sequencer is playing - Playback of the internal sequencer will continue at it’s current step position but will switch immediately to the pattern which corresponds to the MIDI Note received.
• If external Sequencer / DAW is playing and the Pattern Start Note is received while the internal sequencer is not yet playing - Playback of the sequencer will at the down beat of the upcoming bar on the pattern which corresponds to the MIDI Note received.
• If external Sequencer / DAW is playing and the Pattern Start Note is received while the internal sequencer is playing - Playback of the internal sequencer will continue at it’s current step position but will switch immediately to the pattern which corresponds to the MIDI Note received.
Stop All - When the button to the right of this title is selected the next received MIDI note will become the Stop All Key which stops playback of all patterns and running loops. When this note is received from a MIDI controller or the Kontakt keyboard playback of the internal sequencer and all running loops will be immediately stopped. The MIDI note which is the trigger for the Stop All Key is displayed to the left of this button. Alternatively you may also click the name of the Note and select the desired MIDI Note from the dropdown menu.
Page �25
Playback
Select on Note - When selected playing a Drum Pad MIDI note will select the corresponding Drum Pad in the Drums Panel. This is a useful feature for quickly building rhythms and selecting patterns. It is enabled by default but is generally not the desired function when editing the Drum Pads and playing back a MIDI sequence from a Host / DAW in realtime.
Play Note on Click - When selected clicking a Drum Pad will play the Sample assigned to that pad. This can be useful for auditioning the sound of a Drum Pad without a MIDI controller. In some situations this may not be the desired behaviour and the option exists to disable it. By default it is enabled.
Display Play Cursor - Disables the waveform Play Cursor when the Drums Panel. Because the playback of the Play Cursor can cause considerably high CPU usage the option exists to disable this behaviour.
Group Options
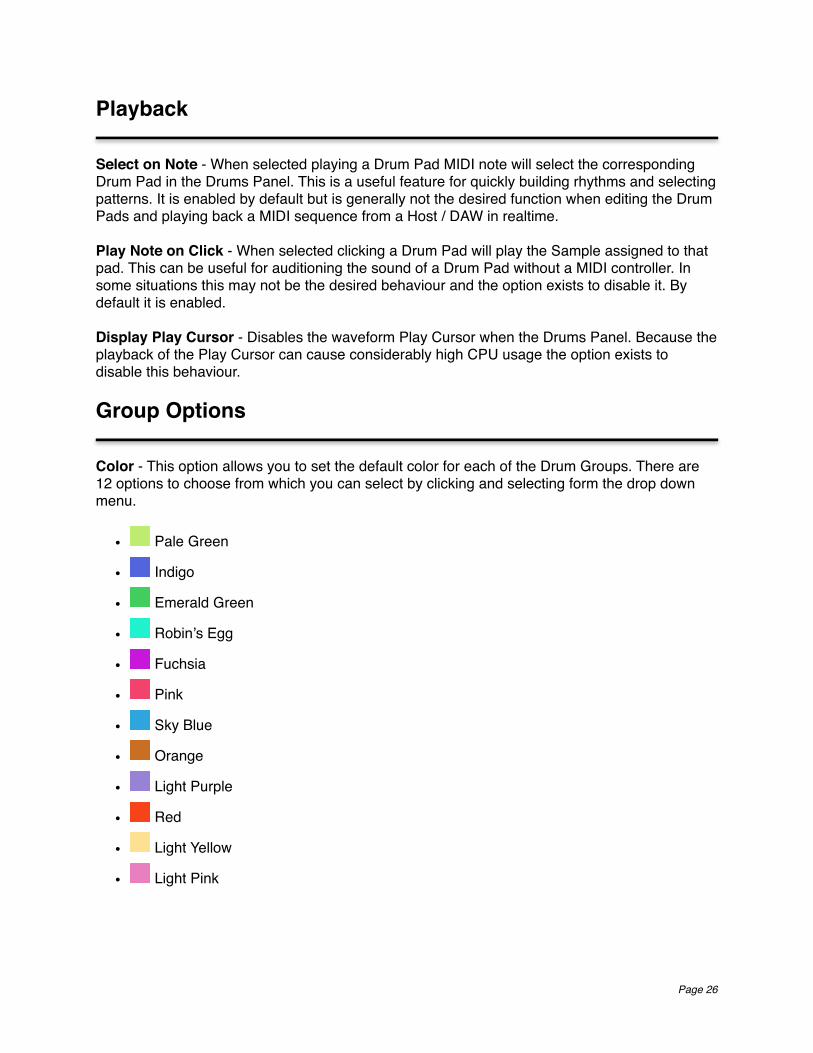
Color - This option allows you to set the default color for each of the Drum Groups. There are 12 options to choose from which you can select by clicking and selecting form the drop down menu.
• � Pale Green
• � Indigo
• � Emerald Green
• � Robin’s Egg
• � Fuchsia
• � Pink
• � Sky Blue
• � Orange
• � Light Purple
• � Red
• � Light Yellow
• � Light Pink
Page �26

After changing a color you must restart the Kontakt engine in order for the changes to take place globally throughout Drum Direktor. There are two ways which this can be achieved.
1. Restart the Kontakt Engine within Kontakt Instrument. This can be done by selecting the following within Kontakt …
a. Browseb. Monitorc. Engined. Restart Engine
For information on this process please refer to page 125 in the KONTAKT 5 Application Reference Manual.
2. Save your session or .nki instrument and reload Kontakt by closing and restarting your host or standalone application.
Page �27
Choke - Sets the Fade / Choke Time for all Drum Pads within the specified group. The Choke Time is how long it takes for a Drum Pad to fade out when another Drum Pad within the same group is played. Because no two Drum Pads in the same group may play simultaneously the Choke time can be used to create the desired transition between loops / samples. This includes creating realistic fades, instantaneous transitions and dealing with unwanted phase issues which may occur from overlapping sounds. The Choke Time is displayed in milliseconds and can be set on a per Group basis between 0 and 300 milliseconds.
Output - The Output Menu displays the available physical outputs in Kontakt and allows you to assign each group to its own output channel. Users can create their own output channels as described in page 137 in the KONTAKT 5 Application Reference Manual or load the included .nkm files “Drum Direktor Multi-Output.nkm” which has 8 dedicated external outputs already created. These outputs are used with the multi-output version of Kontakt for users who would prefer to have each group on it’s own unique channel for further processing within their DAW.
Please note the following limitations when using external outputs1. The Master Bus Effects are not available when using external outputs. Because these
effects are applied to the Stereo Mix of the group tracks inside of Kontakt the stereo mixing must take place inside of Kontakt. With external outputs the individual tracks are placed outside of Kontakt for mixing in your chosen DAW.
2. Kontakt can only see the outputs which are available when Drum Direktor is first loaded. If outputs are created after Drum Direktor is loaded you must restart the Kontakt engine or reload your instance of Kontakt as described on Page 26 of the Drum Direktor User Guide.
Page �28
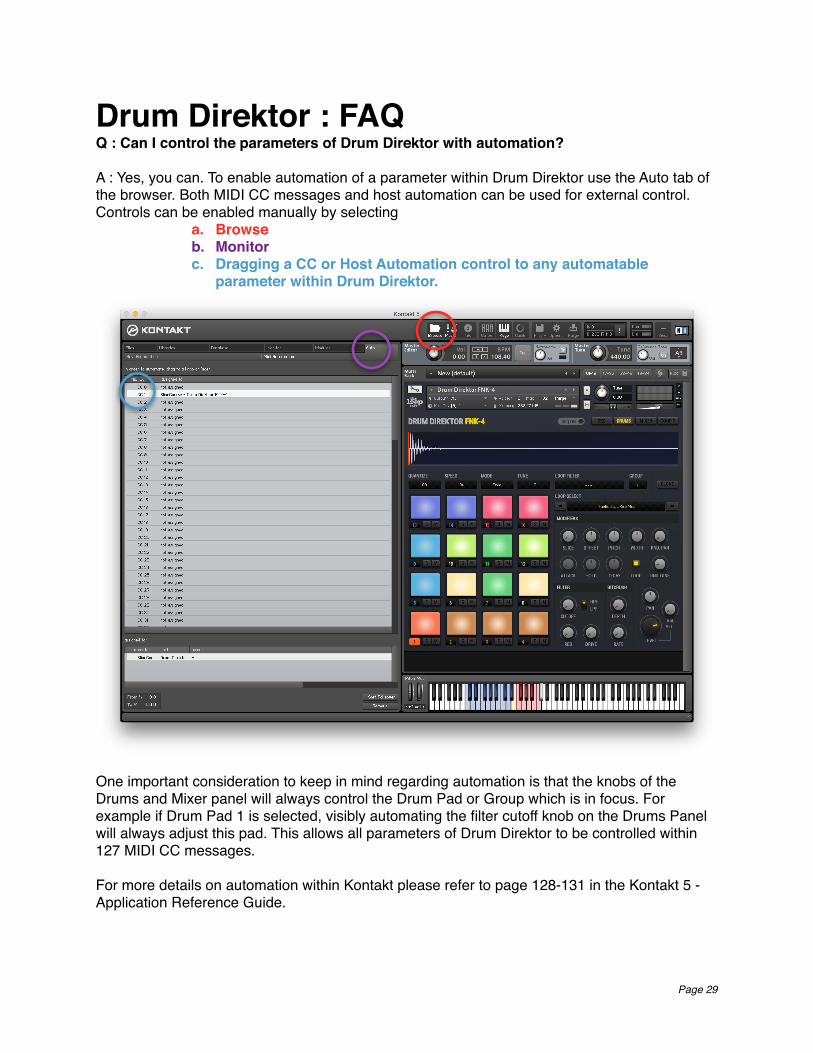
Drum Direktor : FAQQ : Can I control the parameters of Drum Direktor with automation?
A : Yes, you can. To enable automation of a parameter within Drum Direktor use the Auto tab of the browser. Both MIDI CC messages and host automation can be used for external control. Controls can be enabled manually by selecting
a. Browseb. Monitorc. Dragging a CC or Host Automation control to any automatable
parameter within Drum Direktor.
One important consideration to keep in mind regarding automation is that the knobs of the Drums and Mixer panel will always control the Drum Pad or Group which is in focus. For example if Drum Pad 1 is selected, visibly automating the filter cutoff knob on the Drums Panel will always adjust this pad. This allows all parameters of Drum Direktor to be controlled within 127 MIDI CC messages.
For more details on automation within Kontakt please refer to page 128-131 in the Kontakt 5 - Application Reference Guide.
Page �29
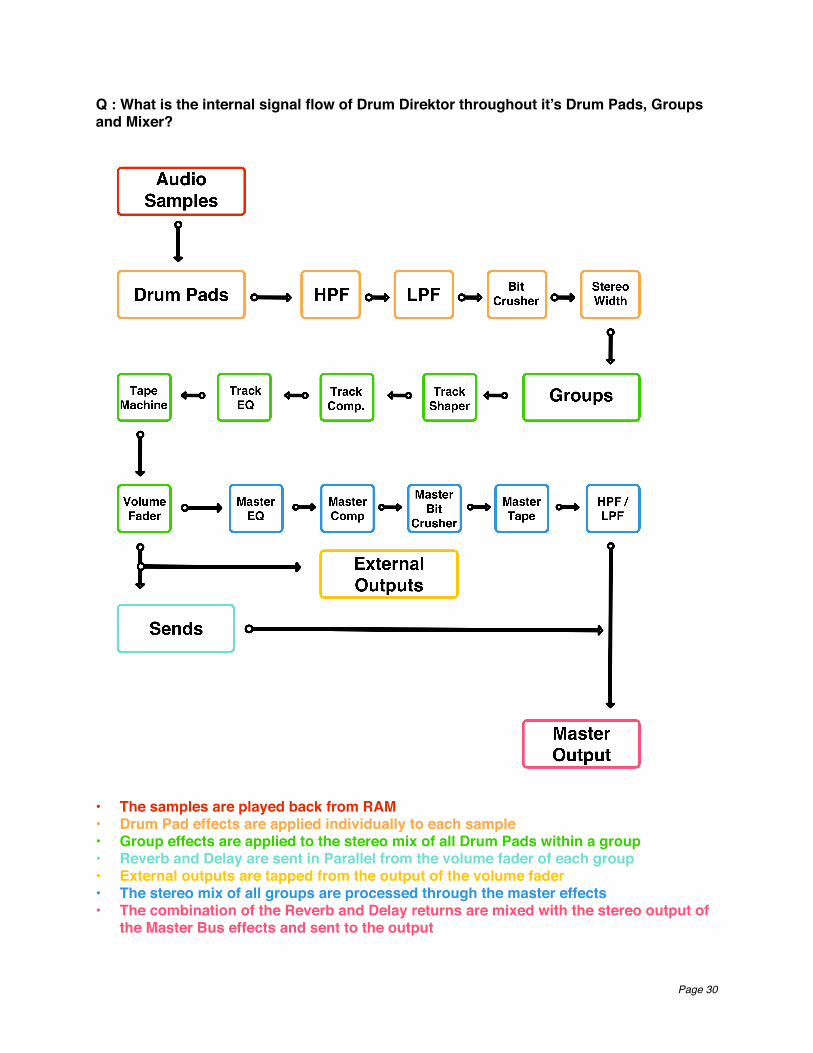
Q : What is the internal signal flow of Drum Direktor throughout it’s Drum Pads, Groups and Mixer?
• The samples are played back from RAM• Drum Pad effects are applied individually to each sample• Group effects are applied to the stereo mix of all Drum Pads within a group• Reverb and Delay are sent in Parallel from the volume fader of each group• External outputs are tapped from the output of the volume fader• The stereo mix of all groups are processed through the master effects• The combination of the Reverb and Delay returns are mixed with the stereo output of
the Master Bus effects and sent to the output
Page �30
Q : How do I use Drum Direktor with Multiple-Outputs in my DAW or Host?
A : Included in the ‘7 Templates’ folder is a file named “FNK-4 Drum Direktor Multi-Output.nkm”. This is a Kontakt multi which has multiple outputs pre-assigned. Once it is opened inside of Kontakt any Drum Direktor preset that is subsequently loaded will be able to see 9 individual outputs. Master and Groups 1-8. Please be aware that master group effects are not available in this scenario and for complete signal routing refer to the chart on page 30.
For more information on Multi-Output configuration please refer to page 137 - 141 in the Kontakt 5 - Application Reference.
Page �31
Drum Direktor System Requirements• 1GB Free Hard Drive Space• Intel Core i5 or Core i7 CPU recommended• 2GB RAM (8GB recommended) - Full instrument requires 250MB to load.• Kontakt 5.2.1 or greater
Drum Direktor Credits• Samples and Loops recorded by the Loop Loft• Concept and Scripting by Matthew Fudge• Graphic design by Brian Potstra• User manual and preset design by Matthew Fudge
Page �32