dvg-2001s quick install guide (english)
DESCRIPTION
Quick Setup Guide for D-Link DVG-2001S.TRANSCRIPT
©2005 D-Link Systems, Inc. All rights reserved. Trademarks or registered trademarks are the property of their respective holders. Software and specifications subject to change without notice. DVG-2001S VoIP Terminal Adapter
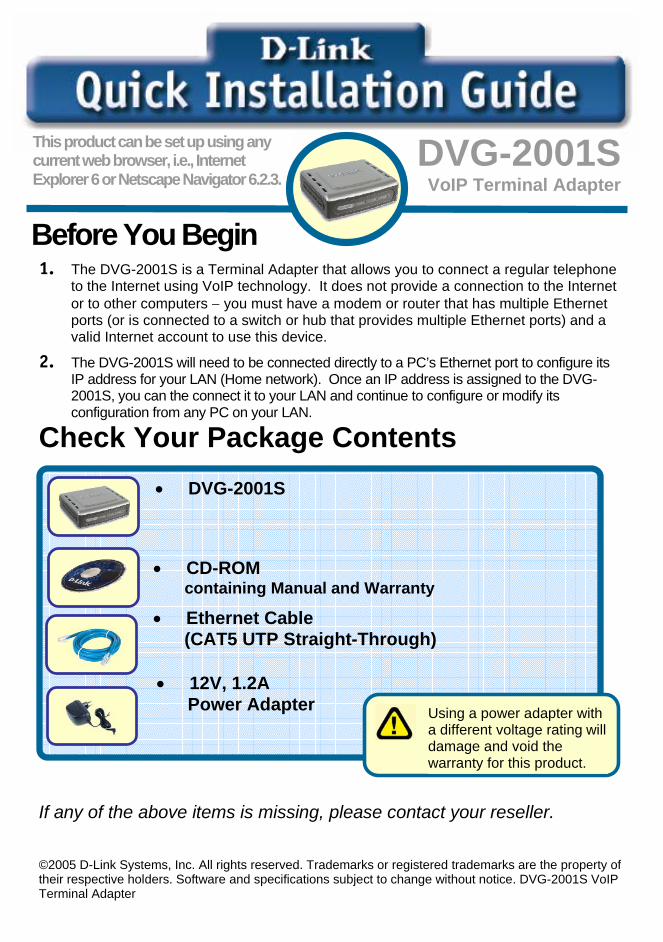
• DVG-2001S
• Ethernet Cable (CAT5 UTP Straight-Through)
• 12V, 1.2A Power Adapter
Before You Begin 1. The DVG-2001S is a Terminal Adapter that allows you to connect a regular telephone
to the Internet using VoIP technology. It does not provide a connection to the Internet or to other computers − you must have a modem or router that has multiple Ethernet ports (or is connected to a switch or hub that provides multiple Ethernet ports) and a valid Internet account to use this device.
2. The DVG-2001S will need to be connected directly to a PC’s Ethernet port to configure its IP address for your LAN (Home network). Once an IP address is assigned to the DVG-2001S, you can the connect it to your LAN and continue to configure or modify its configuration from any PC on your LAN.
Check Your Package Contents If any of the above items is missing, please contact your reseller.
This product can be set up using any current web browser, i.e., Internet Explorer 6 or Netscape Navigator 6.2.3.
DVG-2001SVoIP Terminal Adapter
Using a power adapter with a different voltage rating will damage and void the warranty for this product.
• CD-ROM containing Manual and Warranty

2
Connecting the VoIP Terminal Adapter to your Computer
A. First, connect the power adapter to the power input at the back panel of the DVG-2001S and then plug the other end of the power adapter to a wall outlet or power strip. On the front of the device, the Power LED will turn ON to indicate proper operation.
B. Initially Insert one end of the Ethernet cable into the Ethernet (LAN) port on the back panel of the DVG-2001S and the other end of the cable to an Ethernet Adapter or available Ethernet port on your computer. Later, you will connect this port to an available Ethernet port on your modem, router, switch, or hub so that it can become part of your LAN (Home network).
C. Insert a telephone cable into the Phone port, then connect the cable to your telephone.
D. Check the LED display on the front of the Terminal Adapter to confirm that the connections have been made.
ATTENTION : IF you are using a DHCP Server in your LAN, DVG-2001s can only be reached by using the IP Address assigned by DHCP Server
Power InputConnect to AC
Adapter
LAN Ports Connect to the LAN and other
computers
Phone Connections Connect to your phone using standard phone
cabling
Factory Reset button

3
Configure your PC’s IP Settings
For Microsoft Windows XP
To connect the DVG-2001S to your PC initially, make sure the network adapter in your computer is configured for a static IP address of 10.1.1.2 with a subnet mask of 255.0.0.0 and a default gateway of 10.1.1.1. Here’s how to assign a static IP address to your PC.
Go to Start > click Control Panel > click on the Network and Internet Connections icon
Click on Network and Internet Connections
Click on the Network Connections icon
Click on Network Connections

4
Right-click the Local Area Connection icon, and then select Properties.
Select Properties
The dialog box displays a list of currently installed network items.
Click Internet Protocol (TCP/IP)
Make the choice to get the IP settings assigned manually.
Select Use the following IP address
Click OK
Click Properties

5
There are two steps to connect the DVG-2001S to your LAN. First, you must connect the DVG-2001S directly to a single PC. This connection allows you to assign an IP address to the DVG-2001S that is compatible with your LAN. Second, you will then connect the DVG-2001S to an available Ethernet port on a broadband router or modem (or a switch or hub that is connected to the router or modem). A regular telephone is connected to the DVG-2001S using regular telephone cable. Using an Ethernet (CAT5 UTP) cable, connect the Ethernet port on the DVG-2001S to an available Ethernet port on your modem, router, switch, or hub.
Initially, your connection to the DVG-2001S should look like this:
Connecting the DVG-2001S VoIP Terminal Adapter to your LAN

6
DVG-2001S
Regular Telephone
Desktop or notebook PC
Cat 5 Ethernet Cable
Regular Telephone Cable
Initial Connections for Configuration
7
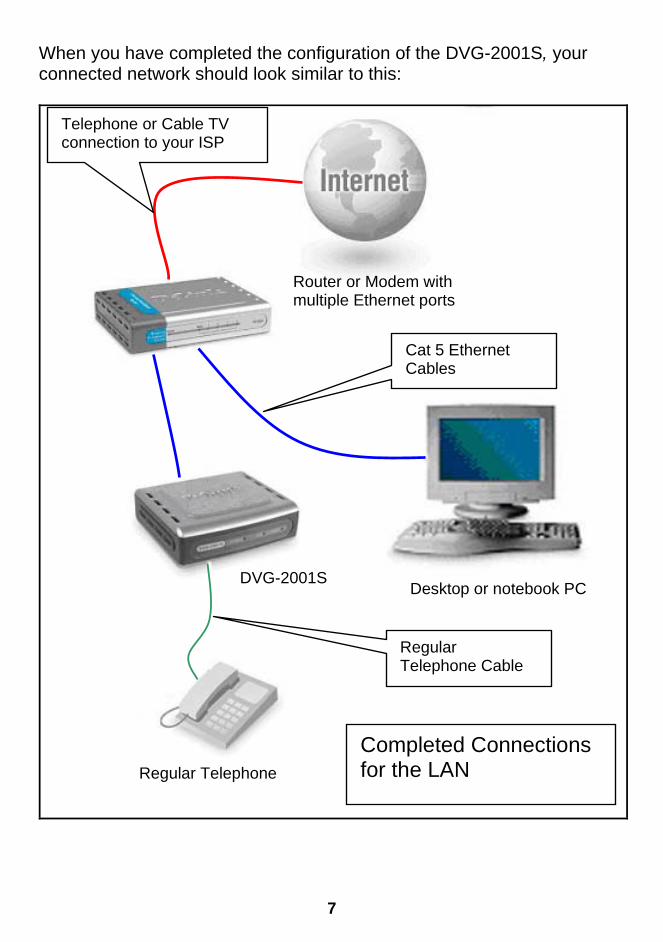
When you have completed the configuration of the DVG-2001S, your connected network should look similar to this:
Regular Telephone
Desktop or notebook PC
Router or Modem with multiple Ethernet ports
DVG-2001S
Regular Telephone Cable
Cat 5 Ethernet Cables
Telephone or Cable TV connection to your ISP
Completed Connections for the LAN

8
Initial Web Configuration
The Home window appears:
Open your Web browser and type http://10.1.1.1 into the URL address box. Press Enter or Return.
The login dialog box appears:
When you first log in, the User name is admin and the Password is also admin. These may be changed later.
Click OK.
Click Run Wizard.
Clicking a hyperlink on the menu on the upper left side of the window brings up a detailed configuration window.

9
Configuring the WAN (Internet) Connection
Click the Next button to continue. The window above allows you to select between the three most common ways to connect to your ISP’s WAN (Internet). Select Dynamic IP Address if your ISP automatically assigns you an IP address. This is the most common way of connecting the DVG-2001S to another modem or to a router, such as a Cable modem. Select Static IP Address if your ISP provided you with IP address information that will not change. Select PPPoE if your ISP provided you with a PPPoE Username and Password. This is useful if you connect to the Internet through a multi-
Click the Next button.
Click the Next button.
Click Run Wizard on the menu above to view the following Wizard window:
Confirm the new password by entering it again into the Verify Password field.Enter a new password for the DVG-2001S in the Password field.

10
port router to a single-port ADSL modem. Using the PPPoE option, you do not need to initiate the connection to your ISP from your PC.
Click the Next button to continue.
Dynamic IP Address Select Dynamic IP Address if your ISP automatically assigns you an IP address. This is the most common way of connecting the DVG-2001S to another modem, such as a Cable modem.
Click the Next button to continue.
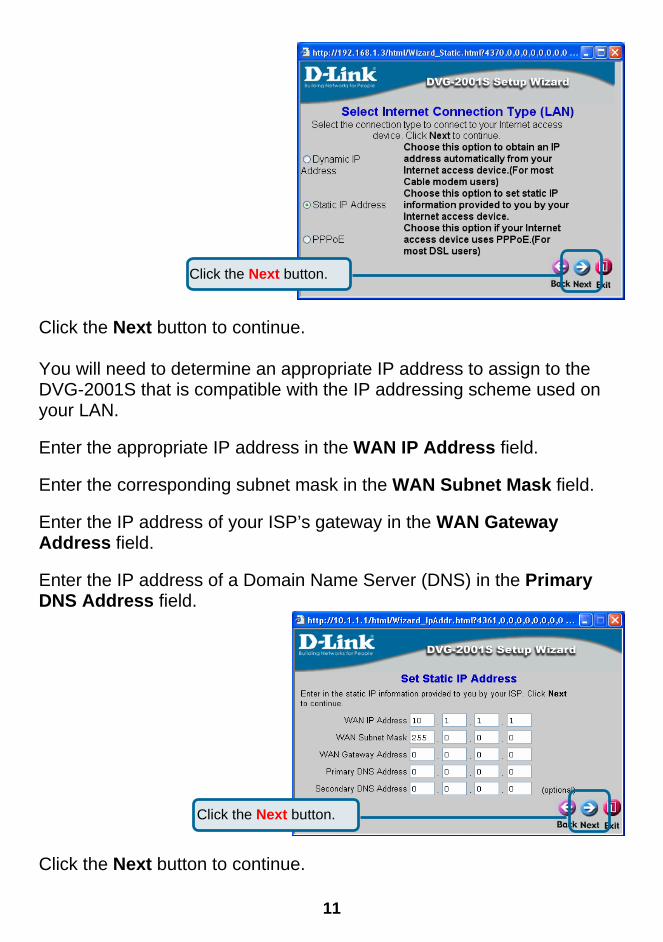
Static IP Address Select Static IP Address if your ISP provided you with IP address information that will not change.
Click the Next button.
Click the Next button.
Enter the host name, if required, in the Host Name field.
11
Click the Next button to continue. You will need to determine an appropriate IP address to assign to the DVG-2001S that is compatible with the IP addressing scheme used on your LAN. Enter the appropriate IP address in the WAN IP Address field. Enter the corresponding subnet mask in the WAN Subnet Mask field. Enter the IP address of your ISP’s gateway in the WAN Gateway Address field. Enter the IP address of a Domain Name Server (DNS) in the Primary DNS Address field.
Click the Next button to continue.
Click the Next button.
Click the Next button.
12
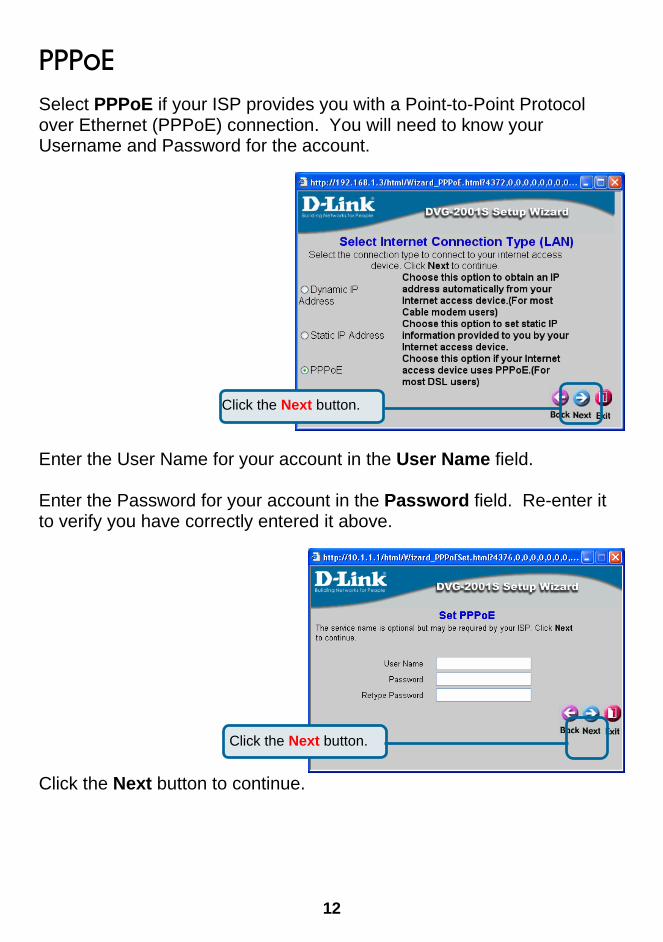
PPPoE Select PPPoE if your ISP provides you with a Point-to-Point Protocol over Ethernet (PPPoE) connection. You will need to know your Username and Password for the account.
Enter the User Name for your account in the User Name field. Enter the Password for your account in the Password field. Re-enter it to verify you have correctly entered it above.
Click the Next button to continue.
Click the Next button.
Click the Next button.
13
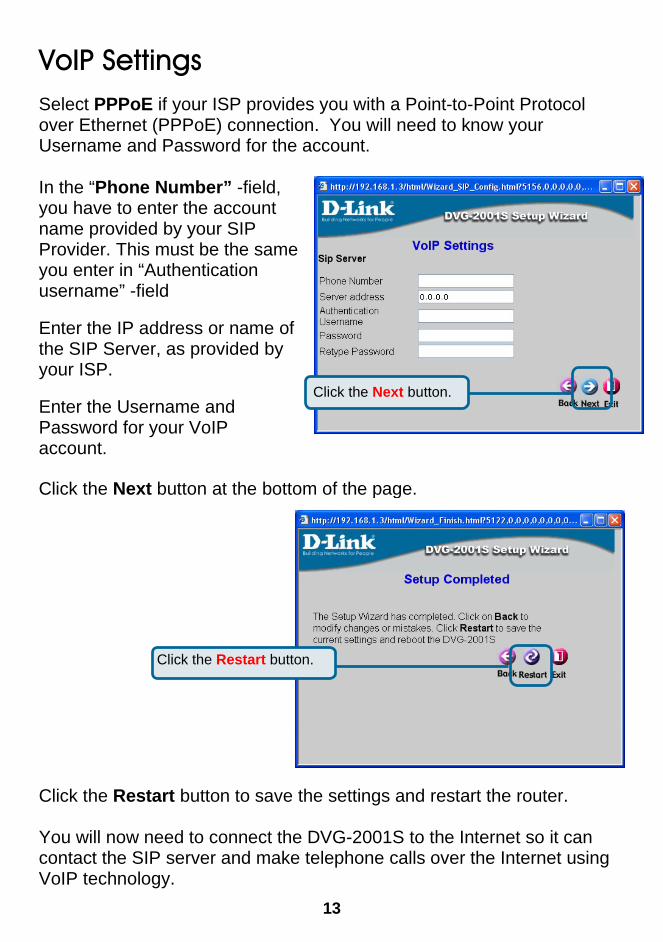
VoIP Settings Select PPPoE if your ISP provides you with a Point-to-Point Protocol over Ethernet (PPPoE) connection. You will need to know your Username and Password for the account.
Click the Restart button to save the settings and restart the router. You will now need to connect the DVG-2001S to the Internet so it can contact the SIP server and make telephone calls over the Internet using VoIP technology.
Click the Next button.
Click the Restart button.
In the “Phone Number” -field, you have to enter the account name provided by your SIP Provider. This must be the same you enter in “Authentication username” -field Enter the IP address or name of the SIP Server, as provided by your ISP. Enter the Username and Password for your VoIP account.
Click the Next button at the bottom of the page.

14
Now you can connect the DVG-2001S to an available Ethernet port on your broadband router or modem and use your VoIP telephone. You will hear a short tone on the telephone after you have dialed a number to indicate that the DVG-2001S has successfully connected to the SIP server (registered).
Peer-to-Peer Configuration If you want to be able to make telephone calls to a known peer, you can configure a Peer-to-Peer VoIP connection. Peer-to-Peer connections do not require a SIP server registration or a VoIP account with your ISP. All that is required is the IP address and telephone number used by your peer. Enter the IP address assigned to the DVG-2001S into the URL Address field in your Web browser (in the same way as you initially opened the Web configuration page). The Home window appears:
The SIP Configuration page will then appear: Next, click the Peer-to-Peer radio button at the top of the page shown above. The Peer-to-Peer page will appear: Click the Peer to Peer radio button at the top of the VoIP page. The Peer to Peer page will appear:
Click Advanced.

15
Click the Apply button at the bottom of the page. You can now contact your peer by dialing the telephone number you have entered above.
Enter the telephone number you want to use for your VoIP telephone in the Phone Number field, you can enter any telephone number you wish or you can enter a telephone number as provided by your ISP. Enter the Username and Password for your VoIP account.

16
Technical Support You can find software updates and user documentation on the
D-Link websites.
D-Link provides free technical support for customers within Canada,
the United Kingdom, and Ireland.
Customers can contact D-Link technical support through our websites,
or by phone.
For Customers within The United Kingdom & Ireland:
D-Link UK & Ireland Technical Support over the Telephone:
08456 12 0003 (United Kingdom) +44 8456 12 0003 (Ireland)
Lines Open 8.00am-10.00pm Mon-Fri
10.00am-7.00pm Sat & Sun
D-Link UK & Ireland Technical Support over the Internet:
http://www.dlink.co.uk/support/ ftp://ftp.dlink.co.uk
For Customers within Canada: D-Link Canada Technical Support over the
Telephone: