dvr wireless remote retro fit kit manual 17.08.2012 · maison du tournage phone: +33-467-232-852...
TRANSCRIPT
119-0812-006 1
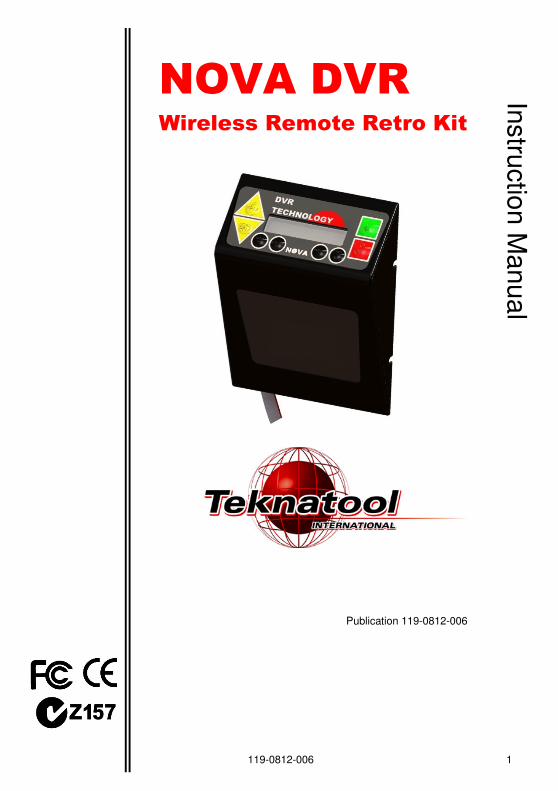
NOVA DVR
Wireless Remote Retro Kit
Publication 119-0812-006
Instru
ctio
n M
an
ua
l
119-0812-006 2
NOVA DVR Wireless Remote Retro
Kit Features: • Fits on any NOVA DVR Lathe*
Features of the NOVA DVR Wireless Remote:
• Wireless control convenience right at your turning position
• Start/Stop and speed adjustment
• Suitably sized buttons for rapid reference and response
• Use 'wristwatch' style or remove the strap to attach magnetically to your NOVA DVR Lathe
• Invaluable for long spindle work or large platters/bowls - when you can't be close to the headstock
• Range up to 7m ( 23Ft )line of sight
• 2.4 GHz Radio Frequency operation
• FCC Compliant
• 3 years stand by battery life
• 2 years approximate battery life with 20 commands per day
• 1-Year warranty
NOTE:
• All values are approximate and calculated under the specific test conditions. For end users, these values might be varied according to workshop conditions, other electronic equipment interference, battery types and operation distance, etc.
• Wireless Remote may not be available in all countries/markets or may require an additional optional accessory Retro Fit Kit for older DVR lathes. See our website or your NOVA Retailer for more information.
FCC STATEMENT This device complies with Part 15 of the FCC Rules. Operation is subject to the following two conditions: (1). This device may not cause harmful interference, and (2). This device must accept any interference received, including interference that may cause undesired operation. Note: Changes or modifications not expressly approved by the party responsible for compliance could void the user’s authority to operate the equipment
119-0812-006 3
Contact Teknatool New Zealand Teknatool International Ltd Phone: (+64) 9 477 5600 Fax: (+64) 9 477 5601 Email: [email protected] Website: www.teknatool.com Carbatec New Zealand Phone: 0800 444 329 Email: [email protected] Website: www.carbatec.co.nz
United States Teknatool Service Center Phone: 727-346-4775 Email: [email protected] Website: www.teknatool.com Woodcraft Supply Corp Technical Service: 1-800-535-4486 Orders: 1-800-225-1153 Website: www.woodcraft.com
Australia Carbatec Australia Phone: +61 7 3397 2577 Free Fax: +61 7 3390 5280 Email: [email protected] Website: www.carbatec.com.au
Canada KMS Tools and Equipment Ltd Phone: (+1) 604-522-5599 Free Phone: 1-800-567-8979 Fax: (+1) 604-522-0638 Email: [email protected] Website: www.kmstools.com
Netherlands Baptist voor Houtbewerkers Tel: 026 445 16 44 Website: http://www.baptist.nl
United Kingdom
Record Power Phone: (+44) 0870 770 1777 Fax: (+44) 0870 770 1888 Website: www.recordpower.co.uk
Austria Neureiter Phone:+43 6244 202 99 Fax: +43 6244 202 9910 Email: [email protected]
France OTELO Phone: 0.800 33 11 11 Fax: 01 39 72 16 60 Website: www.otelo.fr MAISON DU TOURNAGE Phone: +33-467-232-852 Fax +33-467-230-038 Email: [email protected]
Norway VERKTOY AS Phone: 0047-51-88-68-00 Fax: 0047-51-88-68-10 Email: [email protected] Website: www.verktoyas.no
Belgium Willy Vanhoutte BVBA Phone +32 (50) 78 17 94 Fax + 32 (50) 78 19 64 Email: [email protected] Website: http://www.willyvanhoutte.be
South Africa The Hardware Centre Phone: (27) 011 791 0844 Fax: (27) 011 791 0850 Website: www.hardwarecentre.co.za Email: [email protected]

119-0812-006 4
Table of Contents: GENERAL SAFETY RULES ............................................................ 5
ADDITIONAL SAFETY RULES: ....................................................... 7
Installation Instructions: .................................................................... 8
Remote Button Layout: ................................................................... 13
Operating instructions: ................................................................... 14
Troubleshooting: ............................................................................ 15
Battery Replacement: ................................................................. 15
DVR Remote Pairing Instructions ............................................... 15
© Copyright 2001-2012 by Teknatool International; All Rights Reserved. Nova DVR is a trademark of Teknatool International Ltd.
The information and specifications contained herein are subject to change. Teknatool is not responsible for errors or omissions herein or for incidental damages in connection with the furnishing or use of this information.
119-0812-006 5
GENERAL SAFETY RULES
! Warning! Failure to follow these rules may result in serious personal injury. IMPORTANT: THIS REMOTE IS NOT INTENDED FOR USE AS AN EMERGENCY DEVICE AND SHOULD NOT BE RELIED UPON AS SUCH
1. FOR YOUR OWN SAFETY, READ THE MANUAL BEFORE OPERATING THE TOOL. Learn the machine’s application, limitations and the specific hazards particular to it.
2. ALWAYS USE A FULL FACE SHIELD. Strongly recommended. (Must comply with ANSI STANDARD Z87.1 -USA) Everyday eye-glasses usually are only impact resistant and safety glasses only protect eyes. A full face shield will protect the eyes and face. Also use face or dust mask if cutting operation is dusty.
3. WEAR PROPER APPAREL. Do not wear loose clothing, gloves, neckties, rings, bracelets or other jewelry which may get caught in moving parts. Non-slip footwear is recommended. Wear protective hair covering to contain long hair.
4. USE EAR PROTECTORS. Use ear plugs or muffs for any period of operation. Use muffs rated to 103 DBA LEQ (8 hour).
5. DON’T USE IN DANGEROUS ENVIRONMENT. Don’t use power tools in damp or wet locations, or expose them to rain. Keep work area well lighted. The DVR Wood Lathe is intended for indoor use only. Failure to do so may void the warranty.
6. KEEP WORK AREA CLEAN. Cluttered areas and benches invite accidents. Build-up of sawdust is a fire hazard.
7. KEEP CHILDREN AND VISITORS AWAY. The Nova DVR is not recommended for children or the infirm. Such personnel and onlookers should be kept at a safe distance from the work area.
8. MAKE WORKSHOP CHILDPROOF. Utilize locks, master switches, or by removing starter/lockout keys.
9. GROUND ALL TOOLS. If the tool is equipped with a three-prong plug, it should be plugged into a three hole electrical receptacle. If an adapter is used to accommodate a two prong receptacle, the adapter plug must be attached to a known ground. NEVER remove the third or grounding prong.
10. DISCONNECT TOOLS. Ensure the plug is removed from the wall socket before servicing and when changing accessories such as blades, bits, cutters and fuses, etc.
11. AVOID ACCIDENTAL STARTING. Make sure switch is in the Off position before plugging in power cord into the wall socket.

119-0812-006 6
12. NEVER LEAVE MACHINE RUNNING UNATTENDED. Do not leave machine unless it is turned off and has come to a complete stop.
13. KEEP GUARDS IN PLACE. Ensure guards are in working order.
14. USE CORRECT TOOLS. Do not use a tool or attachment to do a job for which it was not designed.
15. DON’T FORCE THE TOOL. It will do the job better and be safer at the rate/force for which it was designed.
16. MAINTAIN TOOLS IN TOP CONDITION. Keep tools sharp and clean for the best and safest performance. Follow instructions for lubricating and changing accessories.
17. NEVER STAND ON THE TOOL. Serious injury could occur if the tool is tipped or if the cutting tool is accidentally contacted.
18. REMOVE ADJUSTING KEYS AND WRENCHES. Form a habit of checking to see that keys and adjusting wrenches are removed from tool before turning it on.
19. DON’T OVERREACH. Keep proper footing and balance at all times.
20. DIRECTION OF FEED. Feed work into the blade or cutter against the direction of rotation.
21. ATTENTION TO WORK. Concentrate on your work. If you become tired or frustrated, leave it for awhile and rest.
22. SECURE WORK. Use clamps or a vice to hold work when practical. It’s safer than using your hand and frees both hands to operate tool.
23. CHECK DAMAGED PARTS. Before further use of the tool, any part that is damaged should be carefully checked to ensure that it will operate properly and perform its intended function. Check for alignment of moving parts, binding of moving parts, mounting, and any other conditions that may affect its operation. Any damaged part should be properly repaired or replaced.
24. DRUGS, ALCOHOL OR MEDICATION. Do not operate machine while under the influence of drugs, alcohol, or any medication.
25. DUST WARNING. The dust generated by certain woods and wood products can be harmful to your health. Always use an approved dust mask and operate machinery in well-ventilated areas. In addition, provide a means for proper dust removal. Use wood dust collection systems whenever possible.
119-0812-006 7
ADDITIONAL SAFETY RULES:
! Warning! Failure to follow these rules may result in serious personal injury. IMPORTANT: THIS REMOTE IS NOT INTENDED FOR USE AS AN EMERGENCY DEVICE AND SHOULD NOT BE RELIED UPON
1. DO NOT RELY ON THIS DEVICE AS AN EMERGENCY STOP DEVICE.
2. DO NOT OPERATE THE WIRELESS. REMOTE UNTIL IT IS COMPLETELY ASSEMBLED AND INSTALLED. Follow instructions and recommendations.
3. REMOTE MUST BE SECURELY FASTENED. Fasten to either wrist or to the wood lathe with the magnetic back.
4. DO NOT GET WET. The remote may be destroyed or become inoperative if it gets wet.
5. AVOID EXCESS SAWDUST. Limit sawdust contact with the remote.
6. FOLLOW ELECTRICAL CODES. Make sure wiring codes and recommended electrical connections are followed and that the machine is properly grounded.
7. KEEP WORK AREA CLEAN. Do not turn the wood lathe on before clearing it of all objects (tools, scraps of wood, etc.). Keep the nearby area and floor clear of debris.
8. CHECK SET-UP WITH SPINDLE OFF. Examine the set-up carefully and rotate the work piece, by hand, to check clearance. In addition, check to see speed is correctly selected before turning on spindle.
9. ALWAYS CHECK CORRECT SPEED IS SELECTED BEFORE SWITCHING ON THE SPINDLE.
10. USE LOWEST SPEED when turning a new or unbalanced work piece.
11. TURN AT RECOMMENDED SPEED. Always operate the wood lathe at the recommended speeds. Consult your wood lathe manual for suggested speeds.
12. WHEN ROUGHING STOCK, do not jam the wood lathe tool or chisel into work piece or take too big/deep a cut.
13. DO NOT OPERATE LATHE IF DAMAGED OR FAULTY. If any part of your wood lathe is missing, damaged or broken, in any way, or if any electrical component fails, shut off the wood lathe and disconnect the wood lathe from the power supply. Replace missing, damaged, or failed parts before resuming the operation.
14. ADDITIONAL SAFETY INFORMATION. The instruction for the safe and proper operation of this product is available from the National Safety Council, 444 N. Michigan Avenue, Chicago, IL 60611 in the Accident Prevention Manual of Industrial Operations and also in the Safety Data Sheets provided by the NSC. Also refer to the American National Standards Institute ANSI 01.1 Safety Requirements for Woodworking Machines and the U.S Department of Labor OSHA 1910.213 Regulation.

119-0812-006 8
Installation Instructions:
1. Unpack the Retro Kit Control Panel from its packaging and the Remote and its Receiver Module form its packaging.
NOTE: This Retro kit requires the DVR Wireless Remote Kit in order to work.
Remote:
Receiver Module:
Control Panel:
119-0812-006 9
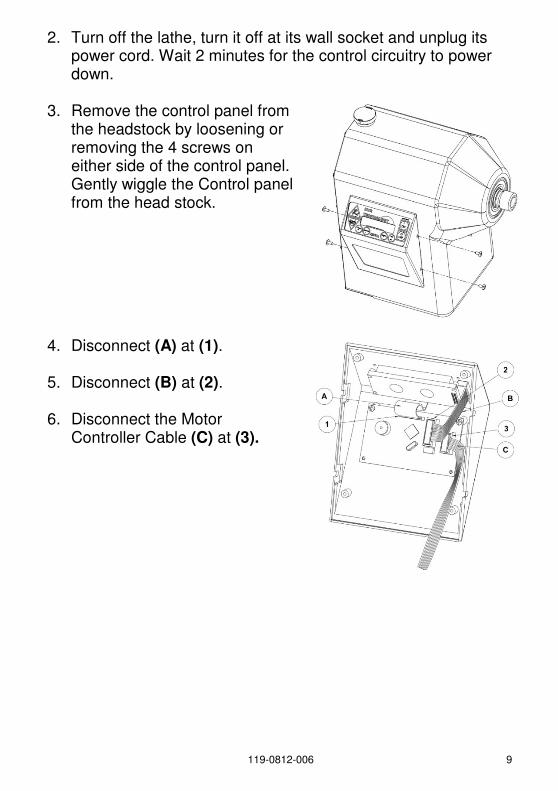
2. Turn off the lathe, turn it off at its wall socket and unplug its power cord. Wait 2 minutes for the control circuitry to power down.
3. Remove the control panel from
the headstock by loosening or removing the 4 screws on either side of the control panel. Gently wiggle the Control panel from the head stock.
4. Disconnect (A) at (1).
5. Disconnect (B) at (2).
6. Disconnect the Motor Controller Cable (C) at (3).
119-0812-006 10
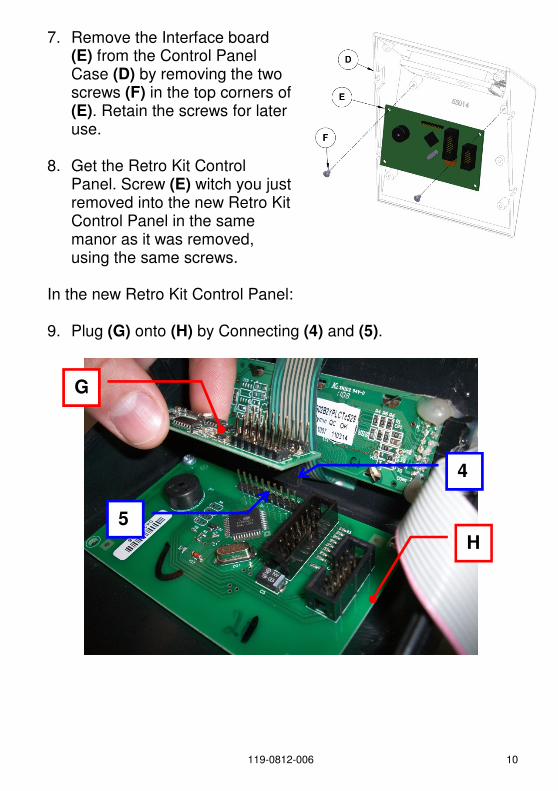
7. Remove the Interface board (E) from the Control Panel Case (D) by removing the two screws (F) in the top corners of (E). Retain the screws for later use.
8. Get the Retro Kit Control
Panel. Screw (E) witch you just removed into the new Retro Kit Control Panel in the same manor as it was removed, using the same screws.
In the new Retro Kit Control Panel: 9. Plug (G) onto (H) by Connecting (4) and (5).
G
H
4
5
119-0812-006 11
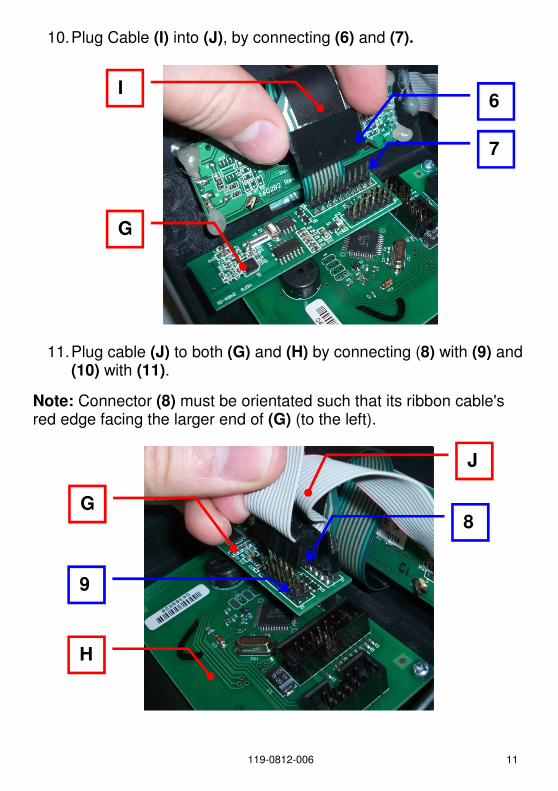
10. Plug Cable (I) into (J), by connecting (6) and (7).
11. Plug cable (J) to both (G) and (H) by connecting (8) with (9) and (10) with (11).
Note: Connector (8) must be orientated such that its ribbon cable's red edge facing the larger end of (G) (to the left).
G
I 6
7
G
J
8
9
H
119-0812-006 12
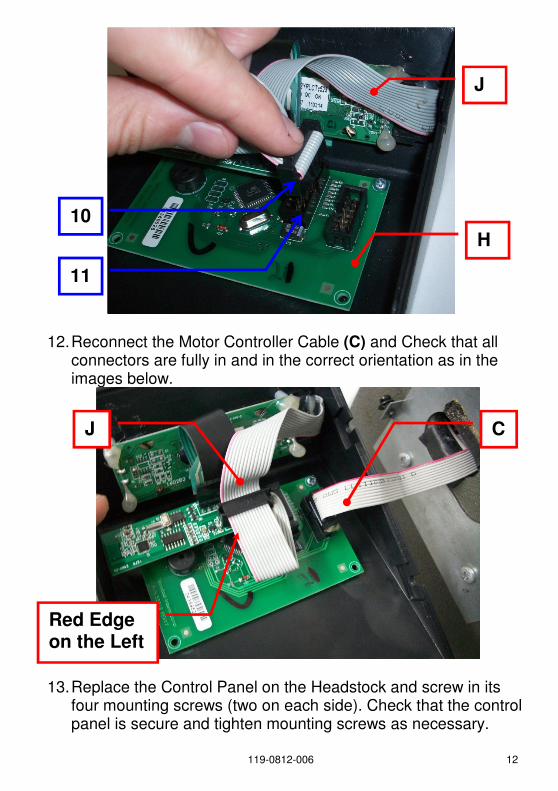
12. Reconnect the Motor Controller Cable (C) and Check that all connectors are fully in and in the correct orientation as in the images below.
13. Replace the Control Panel on the Headstock and screw in its four mounting screws (two on each side). Check that the control panel is secure and tighten mounting screws as necessary.
10
11
H
J
C
Red Edge on the Left
J
119-0812-006 13
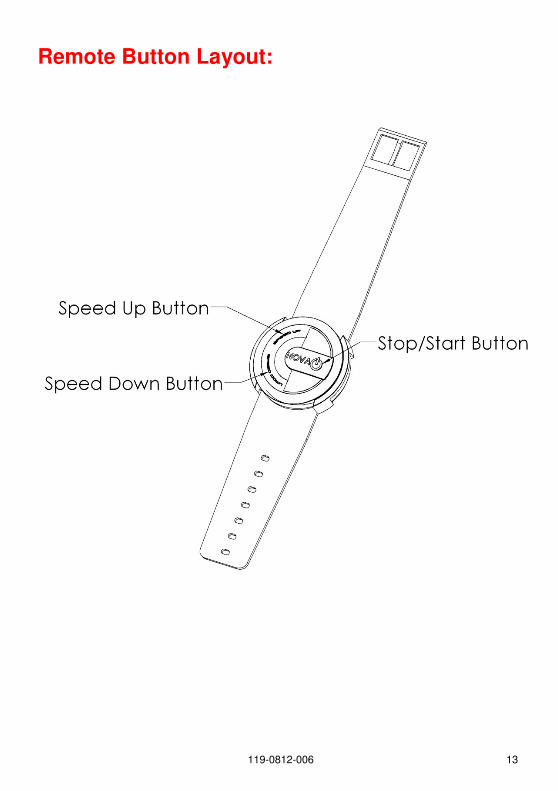
Remote Button Layout:
119-0812-006 14
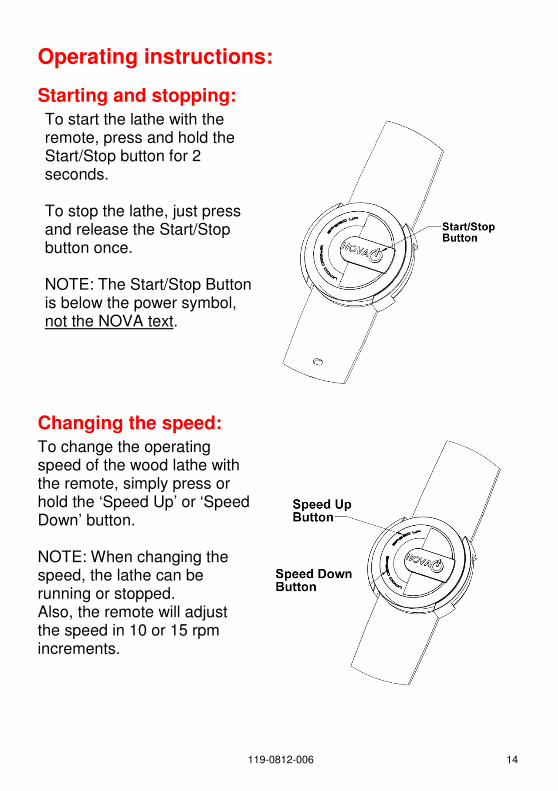
Operating instructions:
Starting and stopping:
To start the lathe with the remote, press and hold the Start/Stop button for 2 seconds. To stop the lathe, just press and release the Start/Stop button once. NOTE: The Start/Stop Button is below the power symbol, not the NOVA text.
Changing the speed:
To change the operating speed of the wood lathe with the remote, simply press or hold the ‘Speed Up’ or ‘Speed Down’ button. NOTE: When changing the speed, the lathe can be running or stopped. Also, the remote will adjust the speed in 10 or 15 rpm increments.
119-0812-006 15
Troubleshooting:
Battery Replacement:
If the battery fails, you can take the remote to a watch repair person to have the battery replaced. The remote will still be paired with or communicate with your NOVA DVR Lathe after battery replacement.
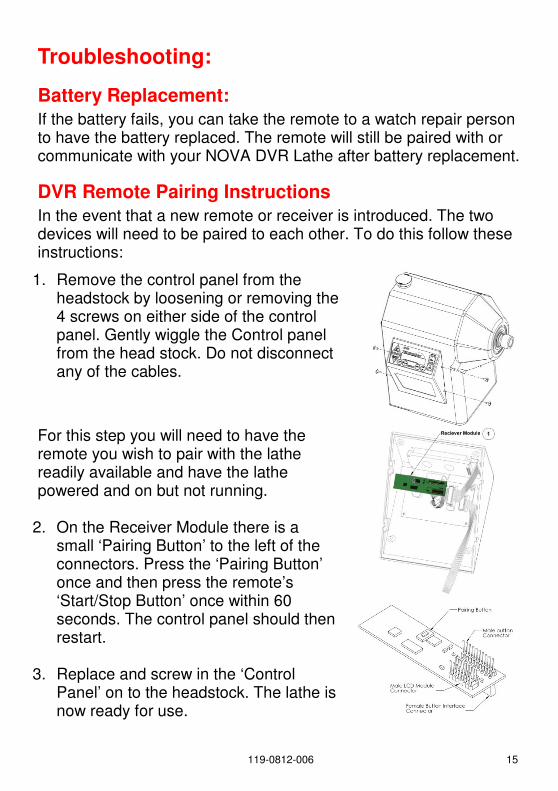
DVR Remote Pairing Instructions
In the event that a new remote or receiver is introduced. The two devices will need to be paired to each other. To do this follow these instructions:
1. Remove the control panel from the headstock by loosening or removing the 4 screws on either side of the control panel. Gently wiggle the Control panel from the head stock. Do not disconnect any of the cables.
For this step you will need to have the remote you wish to pair with the lathe readily available and have the lathe powered and on but not running.
2. On the Receiver Module there is a small ‘Pairing Button’ to the left of the connectors. Press the ‘Pairing Button’ once and then press the remote’s ‘Start/Stop Button’ once within 60 seconds. The control panel should then restart.
3. Replace and screw in the ‘Control
Panel’ on to the headstock. The lathe is now ready for use.
119-0812-006 16
© Teknatool® International 2012
All Rights Reserved. Teknatool USA, Inc.
Register your warranty online
www.teknatool.com