e6 earth in space student - department of education · prior beliefs ... recognising stars and...
TRANSCRIPT

Science / Mathematics Strand Science
Unit E: Environmental Science
Module E6 Earth in Space
Student Support Material
ii Module E6 Earth in Space
Student Support Material
Acknowledgements Materials written and compiled by Bro Gerry Buzolic (O.L.S.H. Teachers’ College – Kabaleo), John Broadfoot (Long Term Adviser, Science) and Ass Prof Keith Lucas (Queensland University of Technology).
The following Institutions and Government Departments were also represented at Strand meetings and workshops to review and contribute to the drafting of these materials:
O.L.S.H. Teachers’ College - Kabaleo
Holy Trinity Teachers’ College
Madang Teachers’ College
Balob Teachers’ College
St. Benedict’s Teachers’ College
Gaulim Teachers’ College
Dauli Teachers’ College
NDOE
Illustrations and photographs courtesy of John Broadfoot and NASA (National Aeronautical Space Agency) USA
Layout and diagrams supported by John Broadfoot.
Conversion from PageMaker by Nick Lauer
Date: 25 June 2002
PASTEP
Primary and Secondary Teacher Education Project Australian Agency for International Development (AusAID) GRM International
Papua New Guinea-Australia Development Cooperation Program

Module E6 Earth in Space iii
Student Support Material
Unit outline (Based on the National Curriculum Guidelines)
Unit
#
Modules
E1
Ecology
(Core)
E2
Flora and Fauna
(Core)
E5
Earth Science
(Core)
Unit E
Environmental
Science
E6
Earth in Space
(Core)
Icons
& Read or research
@ Write or summarise
F Activity or discussion

iv Module E6 Earth in Space
Student Support Material
Table of contents Unit overview.................................................................................................................1
Module Outline ..............................................................................................................2 Why study this module? ..............................................................................................2
Objectives .................................................................................................................2 Content ......................................................................................................................2 Main ideas developed ...............................................................................................3 Teaching and learning approaches...........................................................................3 Assessment strategies .............................................................................................3 References ................................................................................................................3
1. Prior beliefs..............................................................................................................4 What do you know already?......................................................................................4 Research prior beliefs ...............................................................................................4
2. The Changing Stars ................................................................................................5 Ancient Babylonian and Greek beliefs ......................................................................5 Finding north..............................................................................................................5 Locating and recording the position of objects..........................................................8 Azimuth and altitude..................................................................................................8
3. Recognising stars and constellations ................................................................ 10 Research The Greek alphabet................................................................................10 Star patterns ............................................................................................................10 Star movement........................................................................................................12 Finding South...........................................................................................................16 Observing the night sky ..........................................................................................17
4. The changing Moon.............................................................................................. 18 Drawing phases of the Moon...................................................................................19 Observing phases of the Moon...............................................................................20
5. Our star - the Sun! ................................................................................................ 25 Projecting the Sun's image .....................................................................................25 Movement of the Sun..............................................................................................26 Keeping time............................................................................................................27 Research: keeping time..........................................................................................29 Eclipses ...................................................................................................................29
6. Our planets............................................................................................................ 32 Finding planets in the night sky...............................................................................32

Module E6 Earth in Space 1
Student Support Material
Unit overview There are four core modules in the Environmental Science Unit. These modules provide coverage of the prominent topics in the Draft Primary Syllabuses.
Module E1 Ecology Distribution and adaptations of organisms
Community ecology (ecosystems, food chains and webs)
Ecosystem nutrient cycles
Sustainable biological development
Module E2 Flora and Fauna
Taxonomy of PNG fauna and flora
Endangered species
Field techniques and research skills
Project
Module E5 Earth Science
Plate tectonics
Earthquakes
Volcanoes
Natural disasters
Module E6 Earth in Space
Stars and constellations
Observing the Moon, stars and constellations
Observing the Sun and planets

2 Module E6 Earth in Space
Student Support Material
Module Outline
Why study this module? This module contributes to the study of Environmental Science. This is a core module for the Unit Environmental Science. Module E6 Earth in Space provides in-depth treatment of topics listed in the Primary Environmental Science Syllabuses for Lower and Upper Primary.
Much prehistory and cultural traditions are associated with observations of the motion of celestial bodies and the stars. Some coastal Papuan new Guinea cultures have strong associations with the constellations using these to navigate across oceans and seas. Through a study of astronomy teachers are better able to relate to these ancient traditional uses of astronomy.
Objectives After studying this module you should be able to:
• Identify your own prior knowledge about the changing sky • Find cardinal directions using the Sun or stars • Identify some major stars and constellations • Use star charts and models to observe changes in the night sky • Predict the movement of star patterns • Observe and record the changing shape and position of the Moon • Recognise the phases of the Moon • Predict changes to Moon phases and the changing position of the Moon • Observe and predict the movement and the position of the Sun and planets • Be persistent and systematic in collecting data • Sketch observations accurately • Interpret tables of data • Create pictorial representations • Report on observations in an informed manner
Content The Changing Stars: Using coordinates to find direction and record observations; North; altitude and azimuth
Recognising stars and constellations
Observing the night sky; star patterns and movement; finding South;
The Changing Moon: Observing and recording phases of the Moon; movement of Sun, Earth and Moon; Model of Sun-Earth-Moon system
Our star - the Sun: Projecting the Sun’s image; movement of the Sun and seasons; eclipses.
Our planets: Famous astronomers; observing planets; conjunctions

Module E6 Earth in Space 3
Student Support Material
Main ideas developed • Our Earth is part of a planetary system including the Moon and the Sun • Measurement of the positions of celestial objects may be made using references to
the Earth coordinates • Direction may be found using a knowledge of celestial navigation • Careful observation of the movement of stars, planets and the Sun provides evidence
for the relationships between the bodies within the solar system and space • The tilt of the Earth’s axis and the annual revolution of the Earth around the Sun
causes seasons • Alignment of the Moon and Sun may cause lunar and solar eclipses
Teaching and learning approaches This module will be delivered through the use of support materials, a lecture program, laboratory and field based activities and a workshop/tutorial program. The practical component is strongly based on the application of observation and recording skills. Field studies are an integral part of the teaching program. Activities provide a hands on approach to the teaching of this module. Teaching and learning in this module is based on the constructivist model of learning to ensure students have a thorough grounding and understanding of the concepts.
Throughout the teaching of this module there should be a strong emphasis on the constructivist approach to learning which can be readily applied to science teaching in the classroom. Students will be encouraged to apply their new knowledge and skills to the context of teaching at different levels in primary schools.
Assessment strategies This module will be assessed in a way which provides students with the opportunity to demonstrate their knowledge of the application of concepts and their ability to present an informed defensible opinion.
Practical activities occur throughout the learning process. Excursions form part of the College curriculum and field reports are part of the assessment program. Assignments or projects are based on individual and group research.
References Broadfoot, J. and Buzolic, G. (2000). Earth in Space. Support materials developed for
Program 2000. PASTEP: Port Moresby
Curriculum Development Unit (1998-1999). Science Curriculum for Primary Schools in PNG. National Department of Education: Port Moresby

4 Module E6 Earth in Space
Student Support Material
1. Prior beliefs
What do you know already? Many cultures throughout the world have many stories and beliefs relating to the origins and movement of the Sun, Moon, planets and stars. Melanesian and Polynesian groups are well known for using groups of stars to find their way across vast stretches of water. This is called navigation. Planting of staple crops and important festivals have also been associated with the Sun, Moon and appearance of stars at certain times of the year. You should know many of these stories and cultural beliefs?
F Activity E6.1 – What do you know already?
Write down your own ideas using the questions as a guide.
Discuss these ideas as a group and try to form a consensus (if possible).
Report the group's beliefs to the whole class.
• Why did people rely on the changing appearance/position of the Moon and Sun to plant crops?
• Which stars or constellation can be used for navigation?
• What do you know about the way the Sun and Moon moves and the way stars move?
• In which direction would you look to watch the sunrise?
• How do you locate north?
• Where does the Moon rise and set?
• How does the Moon's shape change?
• Is the Moon always visible at night? Is the Moon visible during the day?
• Are tides related to the changing Moon?
• Where do the stars appear to rise and set?
• What is the Southern Cross?
• How is astrology related to astronomy?
Research prior beliefs
Use references to find out more about some of the old beliefs or your own prior beliefs. You could interview friends or village elders to obtain a better insight into other beliefs.

Module E6 Earth in Space 5
Student Support Material
2. The Changing Stars The night sky had many meanings to our ancestors. Ancient Babylonian, Greeks and Romans believed that the day and night skies contained many "Gods" and mythical creatures. Lives were controlled by beliefs in these ideas. Celtic tribes used astronomical events to predict important dates for festivals and agriculture. Some groups also used this knowledge to worship their "gods" and for pagan rituals. Melanesian, Polynesian and Micronesian sailors found their way across large distances of water using the stars, Sun, Moon, planets and wave patterns. In fact we are now discovering that many ancients knew their way around the world's oceans.
Ancient Babylonian and Greek beliefs In olden times, in the Mediterranean area, the scholars of Babylon and Greece used 12 Zodiac signs for the path of the animals. These zodiac signs appear at different elevations at different times of the year. Only part of the zodiac band is visible at any one time because the other signs are below our horizon. In mid year the band of zodiacal constellations is at a higher elevation. During the night these signs move across the sky from east to west as shown in figure 2.1
Figure 2.1. The path of the zodiac signs on a mid year evening
Finding north The direction of true north (towards the geographic north pole) can be found by watching the changing length of a shadow during the middle of the day. When the Sun passes the highest elevation in the sky it is said to transit the meridian, that is, the Sun crosses the line joining the north celestial to south celestial poles (figure 2.2). The highest position of the Sun will give the shortest shadow which lies along the north-south line.
F Activity E6.2 – Finding North
Hypothesis: What happens to the length of a shadow throughout the day?
You will need:

6 Module E6 Earth in Space
Student Support Material
a piece of thick paper or cardboard (foolscap)
a 75 to 100 mm nail with a flat head or another suitable pointed object
a pair of compasses for drawing circles
a protractor for measuring angles
blue tack or gum
What to do:
1 Start your experiment soon after 11.00 a.m. and continue until about 1.00 p.m. Times may be different for different times of the year and daylight saving.
2 Find a flat place outside in the Sun. A concrete path is ideal or use a flat board. Make sure the paper or cardboard does not move or blow in the wind. Put heavy stones on it.
Figure 2.2. The path of the Sun as it transits the meridian.
3 Mark a point near the centre of your paper. Stand the nail or stick upright on the paper on this mark (figure 2.3).
4 Mark where the shadow of the nail ends.
5 Take awa y the nail and use your compass to quickly draw a circle with a radius less than the length of the shadow. Your circle should not reach the end of the shadow.
Figure 2.3. Stick is set up so that it is vertical.
Module E6 Earth in Space 7
Student Support Material
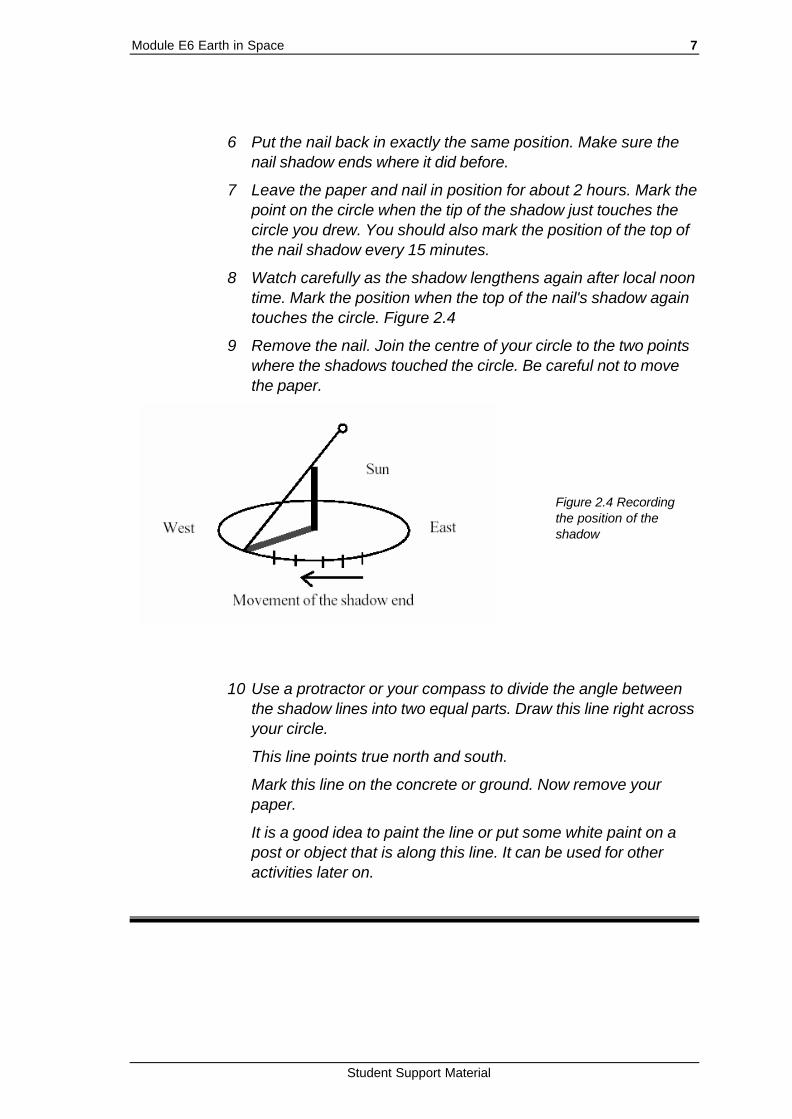
6 Put the nail back in exactly the same position. Make sure the nail shadow ends where it did before.
7 Leave the paper and nail in position for about 2 hours. Mark the point on the circle when the tip of the shadow just touches the circle you drew. You should also mark the position of the top of the nail shadow every 15 minutes.
8 Watch carefully as the shadow lengthens again after local noon time. Mark the position when the top of the nail's shadow again touches the circle. Figure 2.4
9 Remove the nail. Join the centre of your circle to the two points where the shadows touched the circle. Be careful not to move the paper.
Figure 2.4 Recording the position of the shadow
10 Use a protractor or your compass to divide the angle between the shadow lines into two equal parts. Draw this line right across your circle.
This line points true north and south.
Mark this line on the concrete or ground. Now remove your paper.
It is a good idea to paint the line or put some white paint on a post or object that is along this line. It can be used for other activities later on.

8 Module E6 Earth in Space
Student Support Material
Questions 1. Describe the changes to the shadow direction and length as midday approaches.
2. At what time is the shortest shadow seen?
3. Draw a diagram to show how the shadow would change during a whole day.
Locating and recording the position of objects To locate and record the changing positions of objects in the sky we need to be able to measure angles in a simple way. You carry with you one of the best and easy to use devices for this It is called your hand.
The activity that follows shows you how to estimate angles with your hand span.
Azimuth and altitude We need a way of measuring two things to find the position of an object. The first is the direction or azimuth from true North which you found in the last activity. The second is the angle above the ground. This is called the altitude .
Figure 2.5. This diagram shows the Sun at azimuth 270° (west) and altitude 30°
F Activity E6.3 – Altitude and azimuth
This activity is best done outside in the middle of a field or sports oval.
What to do:
To find the size of your hand span, stand up and stretch your arm out straight. Spread your fingers wide apart. Close one eye and line the outer edge of your thumb up with a distant tree or object. See what your little finger is lined up with. Move your thumb to this position. Keep doing this and keep count of the number of times to go around a complete circle

Module E6 Earth in Space 9
Student Support Material
(360°). Divide the number of hand spans into 360°. This will give you the size of your hand span.
Example: Number of hand spans in a circle = 20
Therefore one hand span = 360°/20
= 18° per hand span
The width across your knuckles (fist) will be approximately half of your hand span.
To make it simple for you, most adults with average hands have a hand span of 20° and a knuckle span of 10°.
You now have two useful ways to measure angles.
Questions 1. Using your hand span estimate the altitude of a tree or building in the grounds.
2. A student with a hand span of 18° measures the position of the Moon early one evening. The measurements are five hand spans from north and two hand spans up from the horizon. What is the azimuth and altitude of the Moon?
Extension: Measuring the height of a tree.
1. Using your handspan devise a way to estimate the height of a tree or height of a building without using any other measuring devices.
2. How could you find the width across a river without crossing it and without any equipment?

10 Module E6 Earth in Space
Student Support Material
3. Recognising stars and constellations This part will introduce you to some of the bright stars and constellations seen in the night sky. Many of the constellations seen in books have names given to them by ancient Babylonian and Greek scholars. You can see over 2500 stars on any clear night. The stars we see are only the brighter ones. There are many more, in fact some 4 to 5 billion in our own galaxy which is called the Milky Way. The stars that we see with our eyes are in our galaxy. There are millions of other galaxies that we know about. These are too far away for us to see the individual stars.
Some stars are brighter than others. Astronomers label stars with a letter of the Greek alphabet to indicate relative brightness. These letters are similar to our own a, b, c, and so on. Alpha - a, beta - b, gamma - g, and so on.
Research The Greek alphabet 1. Find a copy of the full Greek alphabet.
2. Some well known bright stars are Sirius, Regulus, Canopus, Achernar, Arcturus, Vega, and Antares. Locate these on star maps and list the formal names.
Star patterns Many stars have been grouped together into recognisable groups or patterns called constellations. Some of these patterns were made up by the ancients and you need a lot of imagination to see some of the mythical creatures. Most of the names of the constellations are based on the ancient names however many southern star groups were only seen during the explorations into the southern oceans. The Southern Cross (Crux) was named by these early seafarers. However we should also recognise that the southern constellations were also well known, by different names and different legends, by southern civilisations. For example, the polynesians such as the Tongans call the Southern Cross Toloa (wild duck).
Module E6 Earth in Space 11
Student Support Material
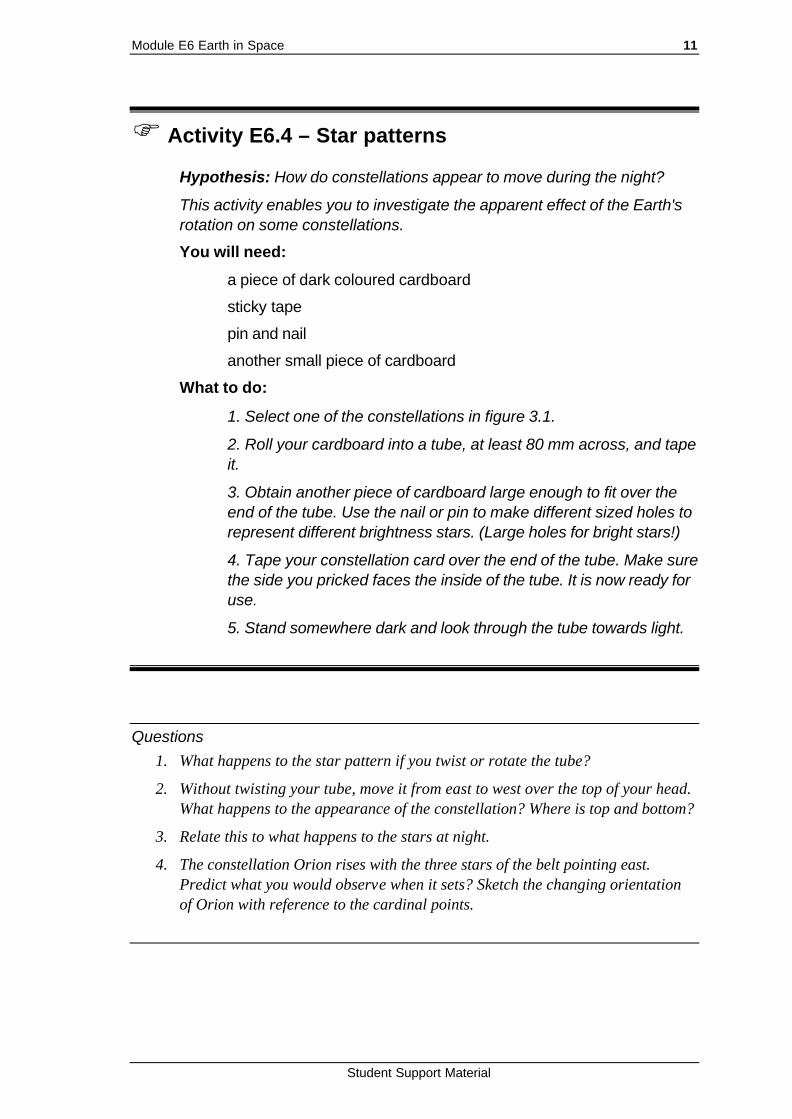
F Activity E6.4 – Star patterns
Hypothesis: How do constellations appear to move during the night?
This activity enables you to investigate the apparent effect of the Earth's rotation on some constellations.
You will need:
a piece of dark coloured cardboard
sticky tape
pin and nail
another small piece of cardboard
What to do:
1. Select one of the constellations in figure 3.1.
2. Roll your cardboard into a tube, at least 80 mm across, and tape it.
3. Obtain another piece of cardboard large enough to fit over the end of the tube. Use the nail or pin to make different sized holes to represent different brightness stars. (Large holes for bright stars!)
4. Tape your constellation card over the end of the tube. Make sure the side you pricked faces the inside of the tube. It is now ready for use.
5. Stand somewhere dark and look through the tube towards light.
Questions 1. What happens to the star pattern if you twist or rotate the tube?
2. Without twisting your tube, move it from east to west over the top of your head. What happens to the appearance of the constellation? Where is top and bottom?
3. Relate this to what happens to the stars at night.
4. The constellation Orion rises with the three stars of the belt pointing east. Predict what you would observe when it sets? Sketch the changing orientation of Orion with reference to the cardinal points.

12 Module E6 Earth in Space
Student Support Material
Figure 3.1.The viewer and star patterns for making the star movement model
Figure 3.2. The constellation Orion as it appears when rising in the East at night. Compare this appearance of Orion to that shown in the sketch above?
Star movement During the night the stars appear to move from east to west. If you look south, you will notice that some stars appear to move in circles. This happens slowly during the night.

Module E6 Earth in Space 13
Student Support Material
F Activity E6.5 – Star movement
In this activity you will make a model of some stars that may have been used by Polynesian and Melanesian sailors to find their way across vast expanses of ocean.
You will need:
One sheet of cardboard (A4)
Scissors
Circular star chart on page 10
Charcoal, black paint or texta pen
Paper fastener
What to do:
1. Place the circular star map (figure 3.3) over the piece of cardboard.
2. Mark the famous navigation stars by pushing through with your pencil.
3. Mark the outline of the circle and its centre.
4. Now take away the star map and mark the stars, circle and centre on your cardboard.
5. Cut out the circle and push a small hole through the centre.
6. Now use the remainder of your cardboard to mark and cut out the rectangular shape (figure 3.4) given on the bottom of the next page.
7. Cut the slot along the line AB. Do not cut to the edges.
8. Push a hole through the major centre point nearest you.
9. Put your circle in the slot so that the two holes line up.
10. Pin the two pieces of cardboard together.
11. Colour the portion below the horizon black.
You now have a model of the stars around the South Celestial Pole as seen from your latitude. The pin or paper fastener is directly above the Earth's South Pole. If you turn your disk clockwise you will see what the stars do at night.
The approximate latitudes for the major centres are Port Moresby (10° S), Lae (7° S), Mt Hagen (6° S), Madang (5° S), Kokopo (4° S) and Wewak (3° S).

14 Module E6 Earth in Space
Student Support Material
Figure 3.3. Chart of the southern sky (from Rukl, A. (1979). The Amateur Astronomer. Prague: Octopus.)
Figure 3.4. Approximate positions of the South Celestial Pole are shown for the major centres in PNG. These are the position to use for the pin.

Module E6 Earth in Space 15
Student Support Material
Horizon looking South
Figure 3.5. The appearance of the stars as they revolve around the South celestial pole.. The SCP is marked on the photograph. This point is about 4 degrees above the horizon. Can you pick out the Southern cross?
Questions
1. Turn the disk clockwise (î). Describe what happens to the Southern Cross if you give the disk one complete turn.
2. What do the other bright stars appear to do?
3. You could think of your model as a steering wheel like that in a car. Just imagine steering your boat across the ocean at night and using the stars as handles. By seeing the regular rotation of these stars, the ancient navigators could keep the boats pointed in the direction they were headed.
4. Draw a line through the long axis of Crux (Southern Cross) to the pin at the centre. Now draw another line from the pin to bisect the Pointers (a andb Centuarus). You have now discovered a way to find south. We are not sure if the olden time sailors used this method but it does work.
5. Rotate the disk and see if you can find other ways that the old world sailors, melanesians or polynesians may have navigated.
6. See if you can locate some of these important stars at night. Use the model to help you. There are some stars which go out of view for only a short time. Rotate your model to see which stars do this. How could these stars be useful in finding south?
7. See if there are any stars that do not set. These are circumpolar stars. What is maximum angle of such stars from the South Celestial Pole?
• SCP

16 Module E6 Earth in Space
Student Support Material
Finding South Stars may be used to construct imaginary shapes just as the ancients did. The diagram below shows the Southern Cross and the Pointers and Achernar. These stars rose and set in much the same position in ancient times as they do today.
F Activity E6.6 – Finding South
In this activity you will use the actual photograph (figure 3.6) that was taken of the southern part of the night sky. The Southern Cross and the Pointers are clearly visible above and between the trees. You will use this photograph to construct lines to locate the position of true South.
Pointers
Figure 3.6. A photograph showing the Southern Cross and the horizon
What to do
1. Draw a line along the long axis of the cross from a - crucis (left) to g - crucis (right). Extend this line to the right out of the photograph.
2. Now join the two pointers. Bisect them with a line at right angles. Extend this line out of the photograph until it crosses the line drawn before. The intersection of these two lines is the South Celestial Pole.
3. Now draw a vertical from the SCP to the horizon line. The point on the horizon is True South. Mark this point on the diagram.
4. Now Refer to figure 3.3 again. Locate the stars Canopus and Peacock. Why would these stars have importance for celestial navigation? Suggest a possible way of finding South with these stars.
5. Try to devise another way of finding South using the Southern Cross and the star Achernar.
Module E6 Earth in Space 17
Student Support Material
Observing the night sky Naked eye viewing of the stars and constellations requires reliable and accurate star charts. General charts as in many textbooks are hard to use because they don't give the view from a local area. They are usually equatorial and based on celestial coordinates which are hard to understand.
Star charts produced using azimuth and altitude positions for stars are easier to use from a local position on the Earth's surface. These can be produced by a number of computer programs. The charts need to be based on the longitude and latitude of area in which you live.
You will also need to remember how to use your hand and fist to estimate angles of azimuth and altitude.
F Activity E6.7 – Observing the night sky
1. Use your unaided (naked) eye to locate all major stars and constellations visible at this time of the year. Refer to altitude-azimuth star charts and use your hand and fist to estimate the positions.
2. Observe and sketch the position of one zodiacal and one circumpolar constellation (e.g. Scorpio and Crux) at times one hour apart. Describe the differences in apparent positions and motion.
3. Use the South Celestial Pole chart (figure 3.3) to locate the position of the South Celestial Pole (SCP). Why is the SCP positioned at an altitude equal to the latitude of your location?
4. Use the model you made in Activity 3.2 to orient yourself to the current position of the stars. Now try to identift the circumpolar stars. Observe these over a period of one hour and describe the changes seen.
5. Draw labeled sketches to indicate how at least two constellations, other than Crux, could be used to find your way (that is to locate azimuth directions).

18 Module E6 Earth in Space
Student Support Material
4. The changing Moon Does the Moon look the same every night? Is it in the same place at the same time every night? Does it always rise at the same point on the horizon? Does it always set at the same time?
This topic will introduce you to the movement of the Moon around the Earth. You will make first hand observations. These will be discussed in class. It is important that you make and record your own observations accurately. By observing the Moon often you will begin to understand its changing appearance and position in the sky.
Figure 4.1. The Full Moon as seen from Earth
In early history the Moon was very important to many cultures. For example the Polynesian year was based on 13 cycles of the Moon as it changed from new moon to full moon and back to a new moon (one cycle). Did any other past cultures use the Moon's changes as a calendar?
To fully appreciate the apparent motion of the Moon around the Earth and Sun you need to observe and record the changes in phases and positions over a full cycle. The following activities provide you with the opportunity to record the changes in a methodical way. After you complete activities 4.1 and 4.2 your results will be discussed in lectures and a model for the motion of the Moon will be developed.

Module E6 Earth in Space 19
Student Support Material
Drawing phases of the Moon It is very important to draw accurate representations of the Moon as it changes from day to day. You need to record the position in the sky, the time and the shape during your observations from the New Moon for two to three weeks. In this first activity you will learn to record the Moon's shape as accurately as possible. This activity will be done in conjunction with activity 4.2 in which you will record the time, position and shape of the Moon.
Figure 4.2. The Moon's surface is heavily cratered. This is because the Moon has no atmosphere to protect it from meteorites. The absence of an atmosphere is clearly seen in the top right of the photograph. There is an abrupt contrast between the surface and space
The Moon has no atmosphere. This results in a clear demarcation between the lit and unlit portions of its surface (figure 4.2). The line so formed is called the terminator. The area enclosed by the terminator (an arc of an ellipse) and the nearer edge of the Moon (an arc of a circle) is called a lune or simply a crescent.
During a synodic month, about 29½ days, the Moon passes through its complete cycle of phases. The orientations of the lune vary in a complex fashion due to the varying setting azimuths and path of the Moon with respect to the Sun and Earth. The following changes can be seen when the Moon is in
the west:

20 Module E6 Earth in Space
Student Support Material
Observing phases of the Moon
Which way does the Moon move?
Where does the Moon appear to rise and set?
The answers to these questions only become a reality through first hand observation. In this activity you make observations of the Moon for about three weeks beginning at a new moon. Your observations must be submitted as part of your field report.
Figure 4.4. Phases of the Moon are due to the direction of sunlight as seen from where we stand on the Earth’s surface. Even the Earth shows phases when viewed from outer space.
F Activity E6.8 – Drawing phases of the Moon
This exercise enables you to draw the terminator for any age Moon. The lune, once drawn, is shaded appropriately to represent the phase of the Moon. That is, for a crescent moon, the lune is left white while the remainder of the Moon is shaded black and for a gibbous moon the lune or crescent is shaded black. The line between the lit and unlit parts of the Moon should always begin and end on the diameter of the Moon as shown in figure 4.3.
1. Use your compass to draw a circle on a blank sheet of A4 paper. Use a radius of 10 cm.
2. Mark the diameter of the circle.
3. Now use the lune widths as given in the table 4.1 on to sketch and shade 3, 7, 13, 22, 25 and 28 day old moons. All of the circles should have a 10cm radius.
4. When you have completed your sketches, clearly label the phase on each.
5. Draw an Earth-Moon-Sun diagram to show the position of the Moon at each of these phases.

Module E6 Earth in Space 21
Student Support Material
Table 4.1. Lune widths related to the age of the Moon
Age of Moon Lune width
(days) (cm)
1 0.2 2 0.9 3 2.0 4 3.4 5 5.1 6 7.1 7 9.2 8 8.7 9 6.6 10 4.7 11 3.0 12 1.7 13 0.7 14 0.1 15 0.0
F Activity E6.9 – Observing phases of the Moon
Observe the Moon at about 7 p.m. each evening. Use your hand span to estimate the position, azimuth and altitude of the Moon from the horizon. You should have previously established the cardinal points (NESW) at your locality and the magnitude of your hand span.
Record your observations in an appropriate manner to clearly show your data and observations. For each observation include a sketch showing clearly the relative position of the Moon to the horizon and the cardinal points. Binoculars may be used to assist in recognising major features on the Moon’s surface. Use a detailed surface map of the Moon to identify major features.
Questions
1 How does the Moon change while you have observed it?
2 Identify the phases and write these in your table of observations.
3 On what date was the Moon full?
4 When the Moon was full, about what time did it rise? Where did it rise?
5 How does the Moon’s position change each day?
Figure 4.3 Terminology used to describe the moon's dimensions.

22 Module E6 Earth in Space
Student Support Material
F Activity E6.10 – Movement of Sun, Earth and Moon
This activity is a role play. Organise into groups representing SUN, MOON and EARTH. Arrange your groups outside the classroom as shown below. This activity is valuable in that you will quickly understand the nature of lunar phases.
What to do:
1. You only need yourselves and a large ball. Colour half of the ball white using water paint, whitewash or chalk.
2. "SUN" group Stand, in the middle, in a small circle with backs to each other. You are the SUN.
3. "EARTH" group A group of four students stands in a similar way about 10 metres away from the SUN.
4. MOON group One student holds the ball that is half white above his or her head and about 3 metres from the EARTH. The white side must always face the SUN. The student should face the SUN with the white side of the ball also facing the SUN.
5. The "MOON" now slowly walks around the "EARTH" making sure the white side of the ball always faces the "SUN".
6. Groups should interchange roles to enable everyone to gain a different perspective of the positions of the Moon, Sun and Earth.
Figure 4.5. How you should be arranged in your groups

Module E6 Earth in Space 23
Student Support Material
Questions
1. What does the SUN group notice about the appearance of the MOON?
2. What does each of the EARTH group notice about the appearance of the MOON? Each person (EARTH only) should make a sketch of the white part of the ball.
3. The four students in the EARTH group are to slowly turn and notice the different appearance of the white part of the ball.
4. Take turns at being the EARTH so that all students see the changes to the Moon.
After doing the above activity you should by now realise that the Moon does change its appearance as it moves around the Earth.
F Activity E6.11 – Sun-Earth-Moon model
In this activity you are to build a model to represent the Moon orbiting the Sun and the Earth orbiting the Sun. After observing and recording the apparent motion of the Sun and Moon you should now be able to use basic materials to explain some of lunar changes you observed.
You will need:
One tennis ball (Earth), one ping pong ball or similar sized object (Moon)
A large ball about the size of a volleyball or soccer ball (Sun), two sticks and a one metre length of string.
What to do:
1. Using your string and two sticks mark out a circle of 1 metre radius on the ground.
2. Place the large ball at the position of the centre to represent the Sun.
3. Place the smaller ball on the circle. This will represent the Earth.
4. Now place the ping pong ball about 30 cm from the Earth.
5. You now have a model for the Sun-Earth-Moon. The Earth and the Moon may be moved to represent different times of the year and different phases of the Moon.

24 Module E6 Earth in Space
Student Support Material
Investigate each of the following using the model
1 Place the Moon in positions to represent the phases:
· new
· first quarter
· full
· last quarter
2 Imagine that the Earth turns anticlockwise and the Moon orbits the Earth anticlockwise, use your model to explain why the Moon changes shape each lunar month.
3 What might happen when the Moon is between the Sun and Earth?
4 What might happen when the Earth is between the Sun and Moon?
5 Use your model to explain why the first quarter moon doesn't rise until about midnight.
6 Draw sketches of the model positions for the questions above.

Module E6 Earth in Space 25
Student Support Material
5. Our star - the Sun! In section two of these notes you were introduced to the Sun's apparent movement while finding true north. The following activities enable you to observe and record the Sun's motion in more detail and apply your findings to the construction of a sundial and to explain the occurrence of eclipses.
Projecting the Sun's image You must take great care not to look at the Sun because the intensity of the light can damage your eyes (retina). This is because the lens of your eye acts as a magnifying glass and concentrates the light energy onto a small spot which can become very hot and burn the tissues.
F Activity E6.12 – Projecting the Sun's image
1. Find a shady tree and observe the shapes of the sunlight on the ground.
2. What regular shape do you observe for some of the images? Explain, using a sketch, what is happening .
3. Now obtain a convex lens and a sheet of white cardboard. Place the cardboard on the ground and move the lens up and down until you get an image on the paper. Look carefully at the image. Describe and sketch the image. Do you see any features on the surface of the image? What might these be?
4. This experiment can be extended by placing a dark filter between the Sun and the lens. How might this change the experiment and the observations?
5. The Sun's image may also be projected using a pinhole in a card (figure 5.1). Obtain a piece of cardboard and pierce it with a pin. Now hold you pinhole between the Sun and another whit sheet of cardboard. Move it up and down until you see an image. Describe the image and sketch hoe you think it formed.
6. Finally you may make a pinhole camera to project the image of the Sun onto an opaque surface such as acetate or tracing paper. Design such an instrument and report on its success or otherwise. You will find excellent designs as shareware on the web.

26 Module E6 Earth in Space
Student Support Material
Figure 6.1. Projecting the image of the Sun using a pinhole and white cardboard for a screen. This is the safest way to look at the Sun.
Figure 6.2. A telescope photograph of the Sun. The surface shows dark spots. These are called sun spots. They are areas that are cooler than the surrounding area.
Movement of the Sun
In this activity you need to observe the Sun's rising or setting positions for approximately four weeks. Observations need only be made every 2 to 3 days as the Sun does appear to move slowly.
F Activity E6.13 – Movement of the Sun
Make a series of observations of the exact rising or setting of the Sun and record the cardinal positions and the times of observation. Present these observations as a series of accurate sketches with your portfolio for assessment.
Questions
1 Describe the changes in the cardinal rising or setting positions of the Sun.
2 Predict where the Sun would rise on June 22. Explain your answer.
3 Predict where the Sun would rise and set on about the 22 December.
Module E6 Earth in Space 27
Student Support Material
4 Prepare a model or a sketch to illustrate clearly how the Sun's motion changes throughout a year. Label the model or sketch clearly.
5 How do the changes throughout the year affect the shadows of vertical objects as seen in Brisbane.
6 Design a method to use a knowledge of the Sun's motion to find your longitude at any place on the Earth's surface.
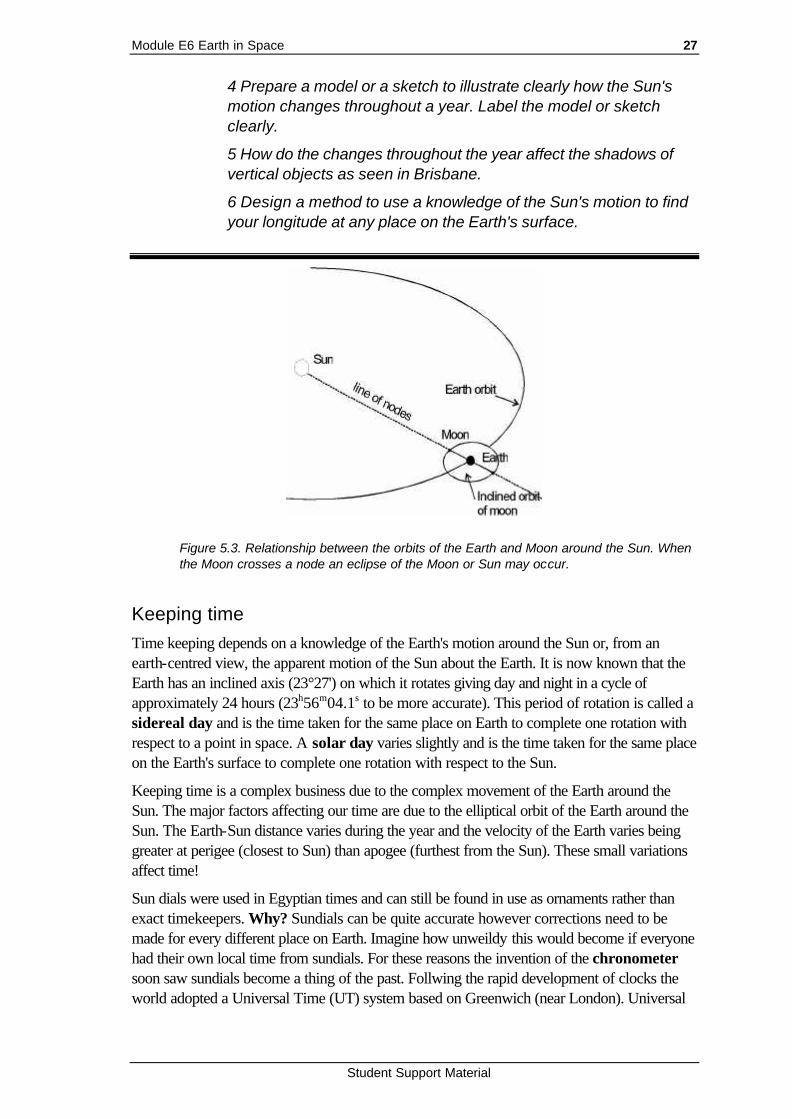
Figure 5.3. Relationship between the orbits of the Earth and Moon around the Sun. When the Moon crosses a node an eclipse of the Moon or Sun may occur.
Keeping time Time keeping depends on a knowledge of the Earth's motion around the Sun or, from an earth-centred view, the apparent motion of the Sun about the Earth. It is now known that the Earth has an inclined axis (23°27') on which it rotates giving day and night in a cycle of approximately 24 hours (23h56m04.1s to be more accurate). This period of rotation is called a sidereal day and is the time taken for the same place on Earth to complete one rotation with respect to a point in space. A solar day varies slightly and is the time taken for the same place on the Earth's surface to complete one rotation with respect to the Sun.
Keeping time is a complex business due to the complex movement of the Earth around the Sun. The major factors affecting our time are due to the elliptical orbit of the Earth around the Sun. The Earth-Sun distance varies during the year and the velocity of the Earth varies being greater at perigee (closest to Sun) than apogee (furthest from the Sun). These small variations affect time!
Sun dials were used in Egyptian times and can still be found in use as ornaments rather than exact timekeepers. Why? Sundials can be quite accurate however corrections need to be made for every different place on Earth. Imagine how unweildy this would become if everyone had their own local time from sundials. For these reasons the invention of the chronometer soon saw sundials become a thing of the past. Follwing the rapid development of clocks the world adopted a Universal Time (UT) system based on Greenwich (near London). Universal

28 Module E6 Earth in Space
Student Support Material
Time is also known as Greewich Mean Time. Therefore if you see time expressed as UT or GMT this is the time at 0° longitude.
How do you find the time in other places?
We know that the Earth rotates once on its axis every 24 hours therefore a full circle of 360° must pass in 24 hours. This means that the Earth rotates at 15° per hour or 1° degree every 4 minutes. This knowledge can be applied to find the Local Mean Time at any location if the GMT and the longitude is known.
For example, Brisbane is 153.02° east of Greenwich (0°). This means that Brisbane's time is 153.02 x 4 minutes ahead of Greenwich. That is 10h12m ahead!
Now it is not very useful to have every town or city calculate their own Local Mean Time therefore a system of time zones was created to unify the time for various longitudinal zones around the world. Papua New Guinea and the eastern States of Australia have adopted the Zone Time based on the 150° meridian or longitude. This time zone is known as the Australian Eastern Standard Time (AEST) which is 10 hours ahead of GMT. Eastern Summer Time is a variation of the AEST applied by some Australian States for daylight saving! The clocks are advanced one hour during summer. No daylight is saved at all!
In activity 2.1 you located True North by observing the shadow of a vertical stick. The time at which the shadow was shortest corresponded to the time (Local Noon) at which the Sun was highest in the sky. The Sun was seen to transit (pass) the local meridian (longitude).
F Activity E6.14 – Keeping time
Time Zones
1. Review Activity 2.1 "Finding North" and repeat this experiment by setting your watch or a clock to the GMT and using this time for your experiment.
2. Note the exact GMT and AEST at which the Sun transits the meridian.
Questions
1. What time (GMT) did the Sun actually transit your meridian?
2. Calculate the difference in longitude between Greenwich and your location using the GMT.
3. What is your calculated longitude East of Greenwich?
4. How does your answer compare to the actual value of 153.02° for Brisbane?
5. Now compare the recorded AEST to the time of transit. Was it before or after noon? Explain any differences in terms of your knowledge about keeping time.
Module E6 Earth in Space 29
Student Support Material
6. Draw a labelled illustration of the Earth globe which you could use to explain the international system of time keeping to a primary or secondary class.
Research: keeping time
What methods were used to keep time before the invention of modern clocks and watches?
Describe one of these in detail. If possible you may be able to make a model.
How did melanesians and polynesians keep track of time and seasons?
Eclipses
The occurrence of lunar and solar eclipses are generally well publiscised in advance. To understand how these events occur, and especially why they do not occur as frequently as the normal textbook diagrams suggest they should, construction of scale models is useful.
F Activity E6.15 – Modelling eclipses
1. Commence with any convenient world globe. As the Moon's diameter is approximately one quarter (1/4) that of Earth you need to select a sphere of appropriate size. If necessary, a white balloon inflated appropriately will serve well.
2. It is essential that the Earth-Moon distance in your model is also to scale. This distance is approximately 9-5 times the Earth's circumference. Take a length of cotton, and wrap it nine and one half times around the world globe used in your model. This length of cotton represents the scale distance between Farth and Moon in your model
3. Find a large enough space, and set up your Earth-Moon system model with Moon in the same plane as Earth's equator. A slide projection placed as far as possible off to the side and in the same plane as Farth and Moon will serve well as a model sun.
Solar eclipse With the Moon between Sun and Earth, observe how the Moon's shadow falls on the Earth.
30 Module E6 Earth in Space
Student Support Material
Questions
1. Does the Moon's shadow cover all of the Earth's hemisphere facing towards the Sun? Explain.
2. Spin the model Earth, and estimate how long a solar eclipse might last at any point on Earth's surface. Research this topic and explain any difference between your estimate and recorded values. Remember the angular size of the Sun and Moon and that the Earth rotates at 15° per hour.
3. Move the Moon slightly, about 5°) above or below the equatorial plane of Earth. Does your model suggest that a solar eclipse would still occur under these circumstances?
Remember that Earth's axis is inclined at 23.5° to the orbital plane of Earth. Move the projector slightly above or below (say up to20°) to simulate the orientation of Sun, Moon and Earth at various seasons. Does your model suggest that a solar eclipse will always occur when the Moon is new? Explain.
Lunar Eclipses
With Earth between Sun and Moon, observe how the Earth's shadow falls on the Moon
Questions
1 Does Earth's shadow cover all of the Moon hemisphere directed towards the Sun? Explain.
2 Move the Moon slightly above or below the equatorial plane of Earth (say 50) Does your model suggest that a lunar eclipse would still occur under these circumstances?
3 Research the occurrence of partial lunar eclipses. Arrange your model to show how such an event occurs.
4 The Moon's orbit is tilted approximately 5° to the plane of Earth's orbit around the Sun. Explain why lunar eclipses do not occur every time the Moon is full, but do occur sometimes when the Moon is full.

Module E6 Earth in Space 31
Student Support Material
Figure 5.4. A series of photographs showing a lunar eclipse from partial to total. The red colour is due to refraction of light around the edge of the Earth's atmosphere.
32 Module E6 Earth in Space
Student Support Material
6. Our planets
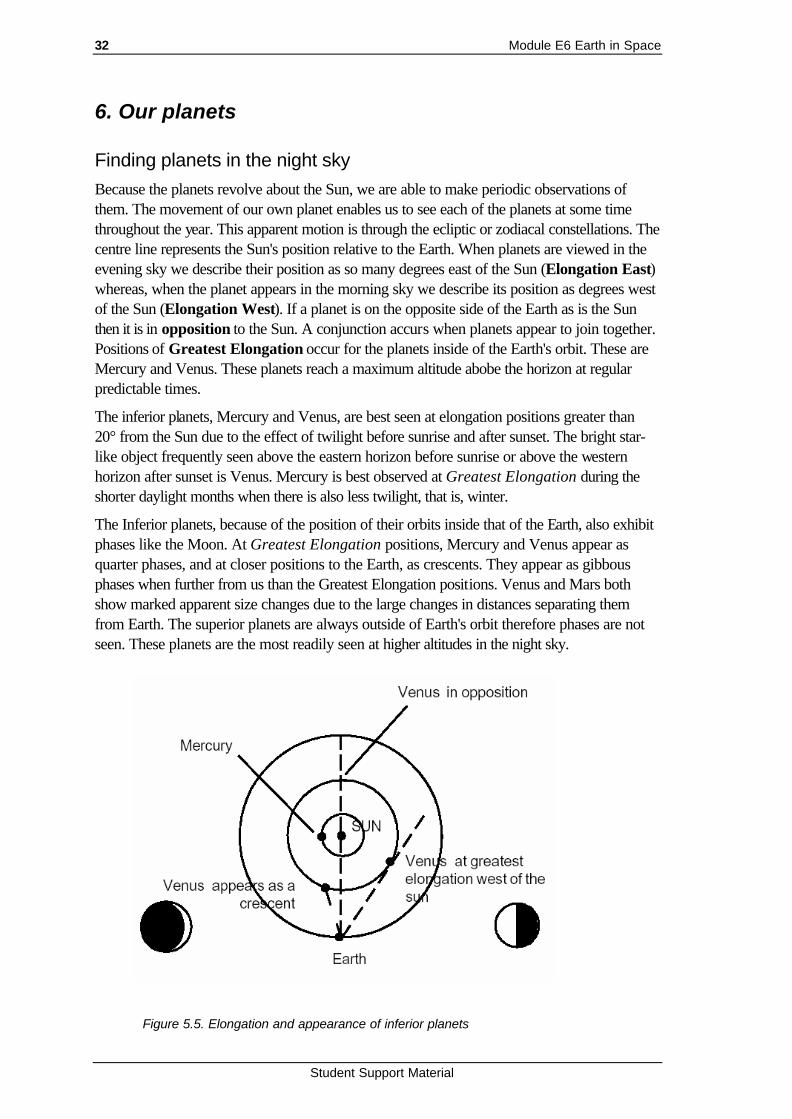
Finding planets in the night sky Because the planets revolve about the Sun, we are able to make periodic observations of them. The movement of our own planet enables us to see each of the planets at some time throughout the year. This apparent motion is through the ecliptic or zodiacal constellations. The centre line represents the Sun's position relative to the Earth. When planets are viewed in the evening sky we describe their position as so many degrees east of the Sun (Elongation East) whereas, when the planet appears in the morning sky we describe its position as degrees west of the Sun (Elongation West). If a planet is on the opposite side of the Earth as is the Sun then it is in opposition to the Sun. A conjunction accurs when planets appear to join together. Positions of Greatest Elongation occur for the planets inside of the Earth's orbit. These are Mercury and Venus. These planets reach a maximum altitude abobe the horizon at regular predictable times.
The inferior planets, Mercury and Venus, are best seen at elongation positions greater than 20° from the Sun due to the effect of twilight before sunrise and after sunset. The bright star-like object frequently seen above the eastern horizon before sunrise or above the western horizon after sunset is Venus. Mercury is best observed at Greatest Elongation during the shorter daylight months when there is also less twilight, that is, winter.
The Inferior planets, because of the position of their orbits inside that of the Earth, also exhibit phases like the Moon. At Greatest Elongation positions, Mercury and Venus appear as quarter phases, and at closer positions to the Earth, as crescents. They appear as gibbous phases when further from us than the Greatest Elongation positions. Venus and Mars both show marked apparent size changes due to the large changes in distances separating them from Earth. The superior planets are always outside of Earth's orbit therefore phases are not seen. These planets are the most readily seen at higher altitudes in the night sky.
Figure 5.5. Elongation and appearance of inferior planets

Module E6 Earth in Space 33
Student Support Material
F Activity E6.16 – Observing the planets
Observe the position of the planets Saturn, mars and Jupiter at 6.30 p.m. for one week. Use your hand span to estimate the position, azimuth and altitude, of the planets from the horizon. Mark the positions on a sheet of white paper on which the western horizon has been drawn. (You have previously established the cardinal points at your home and the magnitude of your hand span.) Record your observations in an appropriate manner to clearly show your data and observations. For each observation include a sketch showing clearly the relative position of the planets to your horizon and the cardinal points. Try to estimate the time each planet sets each day and record this data.
Questions
1. How do the planet positions change during one week?
2. Identify the planets by referring to the star chart for 11 April.
3. Which planet has moved the fastest relative to the others? Why?
4. Why do the planets appear to be in a straight line?
5. What time did each planet set each day?