ecdl v4 mod5 office-2000 manual
TRANSCRIPT

8/8/2019 Ecdl v4 Mod5 Office-2000 Manual
http://slidepdf.com/reader/full/ecdl-v4-mod5-office-2000-manual 1/77
ECDL Module 5Databases
Training ManualUsing Microsoft Office 2000 (Syllabus 4)
C C T G L O B
Cheltenham Computer Training
8/8/2019 Ecdl v4 Mod5 Office-2000 Manual
http://slidepdf.com/reader/full/ecdl-v4-mod5-office-2000-manual 2/77
© 1995-2003 Cheltenham Computer TrainingCrescent House24 Lansdown Crescent LaneCheltenhamGloucestershireGL50 2LD, UKTel: +44 (0)1242 227200Fax: +44 (0)1242 253200Email: [email protected]: http://www.cctglobal.com
All trademarks acknowledged. E&OE.
© Cheltenham Computer Training 1995-2003 No part of this document may be copied withoutwritten permission from Cheltenham Computer Training unless produced under the terms of acourseware site license agreement with Cheltenham Computer Training.
All reasonable precautions have been taken in the preparation of this document, including bothtechnical and non-technical proofing. Cheltenham Computer Training and all staff assume noresponsibility for any errors or omissions. No warranties are made, expressed or implied withregard to these notes. Cheltenham Computer Training shall not be responsible for any direct,incidental or consequential damages arising from the use of any material contained in thisdocument. If you find any errors in these training modules, please inform Cheltenham Computer Training. Whilst every effort is made to eradicate typing or technical mistakes, we apologize for any errors you may detect. All courses are updated on a regular basis, so your feedback is bothvalued by us and will help us to maintain the highest possible standards.
Sample versions of courseware from Cheltenham Computer Training(Normally supplied in Adobe Acrobat format)If the version of courseware that you are viewing is marked as NOT FOR TRAINING, SAMPLE,or similar, then it cannot be used as part of a training course, and is made available purely for content and style review. This is to give you the opportunity to preview our courseware, prior tomaking a purchasing decision. Sample versions may not be re-sold to a third party.
For current license informationCheltenham Computer Training reserves the right to alter the licensing conditions at any time,without prior notice. No terms or conditions will affect your rights as defined under UK law. Pleasesee the site license agreement available at:www.cctglobal.com/agreement

8/8/2019 Ecdl v4 Mod5 Office-2000 Manual
http://slidepdf.com/reader/full/ecdl-v4-mod5-office-2000-manual 3/77
ECDL Approved Courseware
IMPORTANT - PLEASE READ As a condition of providing official approval for this courseware, the ECDL
Foundation demand that the following statement appear within all approved ECDL courseware, produced by third party courseware providers: -
""European Computer Driving Licence" and ECDL and Stars device are registered trade marks of theEuropean Computer Driving Licence Foundation Limited in Ireland and other countries. CheltenhamComputer Training is an independent entity from the European Computer Driving Licence FoundationLimited, and not affiliated with the European Computer Driving Licence Foundation Limited in any manner.‘Cheltenham Computer Training ECDL Courseware’ may be used in assisting students to prepare for theEuropean Computer Driving Licence Examination. Neither the European Computer Driving LicenceFoundation Limited nor Cheltenham Computer Training warrants that the use of this ‘Cheltenham Computer Training ECDL Courseware’ will ensure passing the relevant Examination. Use of the ECDL-F approvedCourseware Logo on this product signifies that it has been independently reviewed and approved incomplying with the following standards:
Acceptable coverage of all courseware content related to the ECDL Syllabus Version 4.0. This coursewarematerial has not been reviewed for technical accuracy and does not guarantee that the end user will passthe associated ECDL Examinations. Any and all assessment tests and/or performance based exercisescontained in this ‘Cheltenham Computer Training ECDL Courseware’ relate solely to this ‘CheltenhamComputer Training ECDL Courseware’ and do not constitute, or imply, certification by the European DrivingLicence Foundation in respect of any ECDL Examinations. For details on sitting ECDL Examinations in your country please contact the local ECDL Licensee or visit the European Computer Driving Licence FoundationLimited web site at http://www.ecdl.com.
“Candidates using this courseware material should have a valid ECDL/ICDL Skills Card/Log book. Withoutsuch a skills card/Log book no ECDL/ICDL tests can be taken, no ECDL/ICDL certificate, nor any other formof recognition can be given to the candidate. ECDL/ICDL Skills Cards may be obtained from any accreditedECDL/ICDL Test Centre or from your country's National ECDL/ICDL designated Licensee".
References to the European Computer Driving Licence (ECDL) include the International Computer Driving
Licence (ICDL). ECDL Syllabus Version 4.0 is published as the official syllabus for use within the EuropeanComputer Driving Licence (ECDL) and International Computer Driving Licence (ICDL) certificationprogramme."
IMPORTANT: - Regarding ECDL courseware purchased from Cheltenham Computer Training. Cheltenham Computer Training accept no liability whatsoever arising from any changes that you make to this courseware, with, or without, ECDL Foundation approval.
8/8/2019 Ecdl v4 Mod5 Office-2000 Manual
http://slidepdf.com/reader/full/ecdl-v4-mod5-office-2000-manual 4/77
MODULE 5 – DATABASE (USING ACCESS 2000) .............. .............. .............. .............. ...... ..... ...... ...... .. 1
5.1 U SING THE APPLICATION .............................................................................................................................. 15.1.1 Database Concepts ......................................................................................................................... 1
5.1.1.1 Understand what a database is. ................................................................................................ 1
What is data? ..................................................................................................................................... 1What is a database? ........................................................................................................................... 1What is a relational database? ........................................................................................................... 1
5.1.1.2 Understand how a database is organized in terms of tables, records, fields, and with fielddata types, field properties. .................................................................................................................. 2
What is a table? ................................................................................................................................. 2What is a record? .............................................................................................................................. 2What is a field? ................................................................................................................................. 2What is meant by 'Field data types'? ................................................................................................. 2What is meant by 'Field properties'? ................................................................................................. 2
5.1.1.3 Understand what a primary key is. ........................................................................................... 3What is a primary key? ................................................................................................................. .... 3
5.1.1.4 Understand what an index is. ................................................................................................... 3What is an index? .............................................................................................................................. 3
5.1.1.5 Understand the purpose of relating tables in a database. ......................................................... 3Why relate tables? ............................................................................................................................. 3
5.1.1.6 Understand the importance of setting rules to ensure relationships between tables are valid. 3Design and document your database ................................................................................................ 3Questions to ask yourself .............................................................................................................. .... 3Define your needs ........................................................................................................................... .. 4Basic design rules ............................................................................................................................. 4
5.1.2 First Steps with Databases ........................................................................................................ ...... 45.1.2.1 Open (and close) a database application. ................................................................................. 4
To start Access .................................................................................................................................. 4To close Microsoft Access ................................................................................................................ 5
5.1.2.2 Open or log onto an existing database. ..................................................................................... 5To open a database when you start Access ....................................................................................... 5To open an Access database, once Access has already started ......................................................... 5
5.1.2.3 Create a new database ............................................................................................................. .. 5To create a new database .................................................................................................................. 5
5.1.2.4 Save a database to a location on a drive. ................................................................................. 6To save a database ............................................................................................................................ 6To save a database file to a diskette .................................................................................................. 6
5.1.2.5 Use available Help functions. .................................................................................................. 6Today's Tip ....................................................................................................................................... 6What is the Microsoft Office Assistant? ........................................................................................... 6To display the Microsoft Office Assistant ........................................................................................ 6To hide the Microsoft Office Assistant ...................................................................... ...... ...... ...... .... 7To use "What is this" Help ............................................................................................................... 7The Help drop down menu ............................................................................................................... 7
Microsoft Access Help dialog box ............................................................................................... .... 8Microsoft Access Help - Contents Tab ............................................................................................. 8Microsoft Access Help – Answer Wizard Tab ................................................................................. 9Microsoft Access Help – Index Tab ............................................................................................ ... 10Office on the Web ........................................................................................................................... 10Detect and Repair .................................................................................................... ...... ...... ...... ..... 10About Microsoft Access ...................................................................................................... ...... ..... 11
5.2.1.5 Close the database. ................................................................................................................. 11To close a database ......................................................................................................................... 11
5.1.3 Adjust Settings .............................................................................................................................. 11
FOR USE AT THE LICENSED SITE(S) ONLY© Cheltenham Computer Training 1995-2003 - www.cctglobal.com
8/8/2019 Ecdl v4 Mod5 Office-2000 Manual
http://slidepdf.com/reader/full/ecdl-v4-mod5-office-2000-manual 5/77
5.1.3.1 Change between view modes in a table, form, report. ........................................................... 11To switch between views when using tables, forms or reports ..................................... ...... ...... ..... 11To switch between Design and Datasheet View ............................................................................. 12
5.1.3.2 Display or hide built-in toolbars. ........................................................................................... 12To display or hide a toolbar (using the View menu) ...................................................................... 12To display or hide a toolbar by right-clicking ................................................................. ...... ...... ... 12
5.2 TABLES
.................................................................................................................................................... 135.2.1 Main Operations .......................................................................................................................... 135.2.1.1 Create and save a table and specify fields with their data types. ........................................... 13
To create a table and specify field data types. ................................................................................ 135.3.1.3 Add, delete records in a table. ............................................................................................... 15
To add records to a table. ................................................................................................................ 15To delete records within a table ...................................................................................................... 16
5.2.1.3 Add a field to an existing table. ............................................................................................. 16To add a field to an existing table. .................................................................................................. 16
5.2.1.4 Add, modify data in a record. ................................................................................................ 17To add data to a record ................................................................................................................... 17To modify data within a record ........................................................................................... ...... ..... 17
5.2.1.5 Delete data in a record. .......................................................................................................... 17To delete data within a record ............................................................................................. ...... ..... 17
5.2.1.6 Use the undo command. ........................................................................................................ 17To use the Undo command. ............................................................................................................ 17
5.2.1.7 Navigate within a table to the next record, the previous record, the first record, the lastrecord, a specific record. .................................................................................................................... 18
To navigate through a table to edit records .................................................................................... 18To move to a field using the mouse ............................................................................................. ... 18To move through the table using the keyboard ............................................................. ...... ...... ..... 18To move from record to record using the scroll bar and mouse ..................................................... 19To move to a specific record using the Edit menu ................................................................ ...... ... 19To move to a specific record using the keyboard ........................................................................... 19
5.2.1.8 Delete a table. ........................................................................................................................ 19To delete a table .............................................................................................................................. 19
5.2.1.9 Save and close a table. ........................................................................................................... 20To save a table ................................................................................................................................ 20To close a table ...................................................................................................................... ...... ... 20
5.2.2 Define Keys ............................................................................................................................ ...... . 205.2.2.1 Define a primary key .............................................................................................................. 20
To define a primary key (automatically when creating a table) ..................................................... 20To define a primary key (manually after a table has been created) ................................................ 21
5.2.2.2 Index a field without duplications allowed ............................................................................. 23Modifying the way a field is indexed .................................................................................... ...... ... 23
5.2.3 Table Design/Layout .................................................................................................................... 235.2.3.1 Change field format attributes such as: field size, number format, date format. ................... 23
To change field format attributes. ................................................................................................... 235.2.3.2 Understand consequences of changing field size attributes in a table .................................... 25
Make sure that your field size attributes are long enough ......................................................... ..... 25
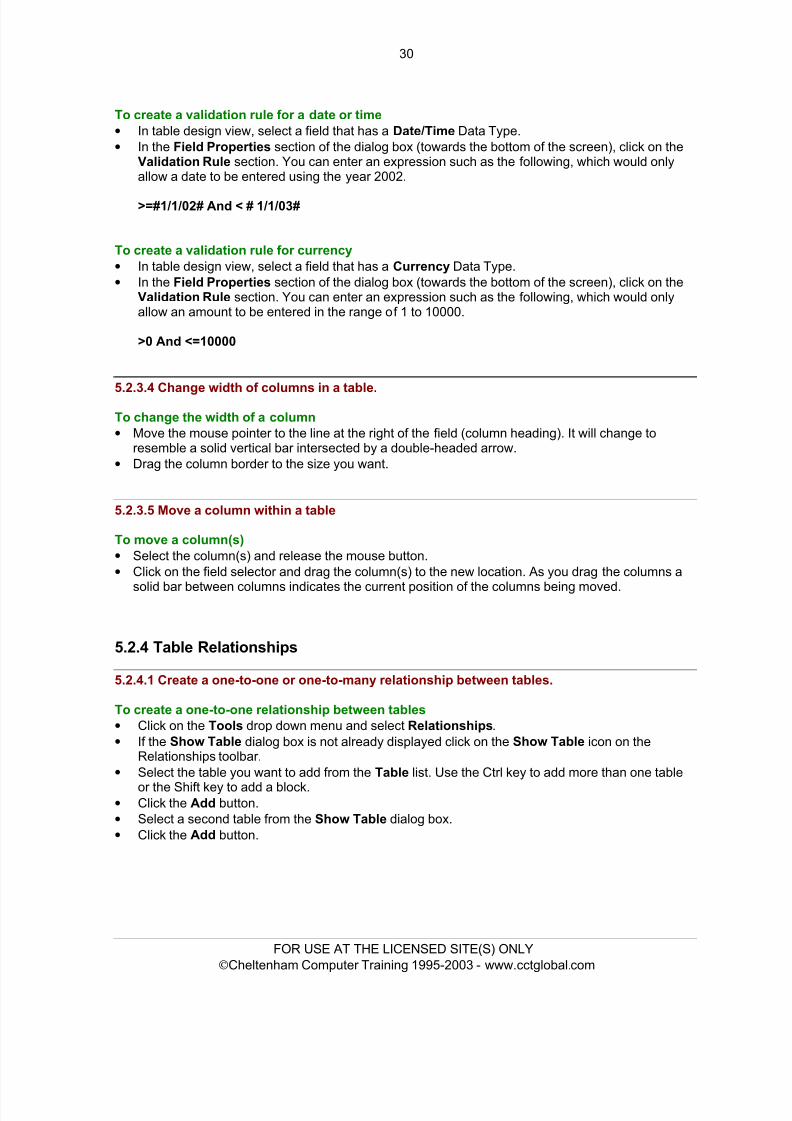
5.2.3.3 Create a simple validation rule for number, text, date/time, currency. ................................. 26To create a validation rule for a number ......................................................................................... 26To create a validation rule for text .................................................................................................. 28To create a validation rule for a date or time .................................................................................. 30To create a validation rule for currency .......................................................................................... 30
5.2.3.4 Change width of columns in a table. ..................................................................................... 30To change the width of a column ................................................................................................... 30
5.2.3.5 Move a column within a table ................................................................................................ 30To move a column(s) ...................................................................................................................... 30
5.2.4 Table Relationships ...................................................................................................................... 30
FOR USE AT THE LICENSED SITE(S) ONLY© Cheltenham Computer Training 1995-2003 - www.cctglobal.com

8/8/2019 Ecdl v4 Mod5 Office-2000 Manual
http://slidepdf.com/reader/full/ecdl-v4-mod5-office-2000-manual 6/77
5.2.4.1 Create a one-to-one or one-to-many relationship between tables. ........................................ 30To create a one-to-one relationship between tables ........................................................................ 30To create a one-to-many relationship between tables ..................................................................... 31
5.2.4.2 Delete relationships between tables. ...................................................................................... 33To delete a relationship between tables .......................................................................................... 33
5.2.4.3 Apply rule(s) to relationships such that fields that join tables are not deleted as long as links
to another table exist. ......................................................................................................................... 33To enforce referential integrity .................................................................................................... ... 335.3 F ORMS .................................................................................................................................................... 34
5.3.1 Working with Forms ............................................................................................................... ...... . 345.3.1.1 Open a form ......................................................................................................................... ... 34
To open a form ................................................................................................................................ 345.3.1.2 Create and save a form. .......................................................................................................... 35
To create a form using the AutoForm Wizard ............................................................................. ... 35To create a form using the Form Wizard ........................................................................................ 35To create a form using Form Wizard .............................................................................................. 35
5.3.1.3 Use a form to enter, modify, delete records. .......................................................................... 38To enter data into a form ................................................................................................................ 38To modify data using a form ......................................................................................... ...... ...... ..... 38To delete records using a form ....................................................................................................... 38
5.3.1.4 Go to next record, previous record, first record, last record, specific record using formdisplay. ............................................................................................................................................... 39
To navigate through a form ................................................................................................. ...... ..... 395.3.1.5 Add, modify text into Headers and Footers in a form. .......................................................... 39
To add text into headers or footers within a form ............................................................... ...... ..... 39To modify text in headers or footers within a form ........................................................................ 40
5.3.1.6 Delete a form. ........................................................................................................................ 40To delete a form .............................................................................................................................. 40
5.3.1.7 Save and close a form. ........................................................................................................... 41To save a form ................................................................................................................................ 41To close a form ...................................................................................................................... ...... ... 41
5.4 R ETRIEVE I NFORMATION ............................................................................................................................. 415.4.1 Main Operations .......................................................................................................................... 41
5.4.1.1 Use the search command for a specific word, number, date in a field. ................................. 41To begin a search ............................................................................................................................ 41To search using wildcard characters ............................................................................................ ... 42To find a specific value ................................................................................................................... 43To find another occurrence of the same value after you have closed the dialog box ..................... 43
5.4.1.2 Apply a filter to a table, form. ............................................................................................... 43What is a filter? ............................................................................................................................... 43To filter records in a table datasheet by selection ........................................................................... 43To filter records in a table datasheet by form ................................................................................. 44To apply the filter ................................................................................................................ ...... ..... 45
5.4.1.3 Remove a filter from a table, form. ....................................................................................... 45To remove the filter ............................................................................................................... ...... ... 45
5.4.2 Queries .......................................................................................................................................... 45
5.4 2.1 Create and save a single table query, two-table query using specific search criteria. ........... 45What are queries? .................................................................................................... ...... ...... ...... ..... 45To create a query using the Simple Query Wizard ......................................................................... 46To select fields that you wish to add to your simple query ............................................................ 46
5.4.2.2 Add criteria to a query using any of the following operators: < (Less than), <= (Less than or equals), > (Greater than), >= (Greater than or equals), = (Equals), <> (Not equal to), And, Or. .. .. . 49
To create a query without the wizard ...................................................................... ...... ...... ...... ..... 49To use the query grid ...................................................................................................................... 49To run a query .............................................................................................................................. ... 49Logical operators In criteria ............................................................................................................ 50
FOR USE AT THE LICENSED SITE(S) ONLY© Cheltenham Computer Training 1995-2003 - www.cctglobal.com
8/8/2019 Ecdl v4 Mod5 Office-2000 Manual
http://slidepdf.com/reader/full/ecdl-v4-mod5-office-2000-manual 7/77
To search using wildcard characters ............................................................................................ ... 50Specifying more complex criteria ................................................................................................ ... 51Combining criteria ............................................................................................................... ...... ..... 51
5.4.2.3 Edit a query by adding, removing criteria. ............................................................................ 52To add criteria to a query ................................................................................................................ 52To remove criteria from a query ..................................................................................................... 52
5.4.2.4 Edit a query: add, remove, move, hide, unhide fields. ........................................................... 53To add a field to a query ................................................................................................................. 53To remove a field from a query ...................................................................................................... 53To move a field in a query ......................................................................................................... ..... 53To hide a field in a query ........................................................................................................... ..... 53To show a field in a query ............................................................................................. ...... ...... ..... 53
5.4.2.5 Run a query. ........................................................................................................................... 54To run a query .............................................................................................................................. ... 54
5.4.2.6 Delete a query. ....................................................................................................................... 54To delete a query ............................................................................................................................ 54
5.4.2.7 Save and close a query. .......................................................................................................... 54To save a query ............................................................................................................................... 54To close a query .............................................................................................................................. 54
5.4.3 Sort Records ................................................................................................................................. 555.4.3.1 Sort data in a table, form, query, in ascending/descending and numeric/alphabetic order. . . 55
Sorting records ................................................................................................................................ 55To sort records in a table datasheet ................................................................................................. 55To sort records in a form or query .................................................................................................. 55
5.5 R EPORTS .................................................................................................................................................. 555.5.1 Working with Reports ................................................................................................................... 55
Introduction to reports .................................................................................................................... 555.5.1.1 Create and save a report based on a table, query. .................................................................. 56
To create a columnar report using AutoReport Wizard .................................................................. 56To create a tabular report using AutoReport Wizard ...................................................................... 56To create a report using Report Wizard .......................................................................................... 57To select which fields to add to a report ......................................................................................... 58To add grouping levels to a report .................................................................................................. 59To sort records within a report ........................................................................................................ 59To determine the layout of a report ................................................................................................ 60To determine the style of a report ................................................................................................... 60To name a report ........................................................................................................................ ..... 61
5.5.1.2 Change arrangement of data fields and headings within report layout. ................................ 61To alter the position of fields and headings in a report .................................................................. 61
5.5.1.3 Group data under a specific heading (field) in a report in ascending, descending order. ... .. 62To group information in a report .................................................................................................... 62
5.5.1.4 Present specific fields in a grouped report by sum, minimum, maximum, average, count, atappropriate break points .......................................................................................................... ...... ..... 63
To calculate statistics for groups in a report ................................................................................... 635.5.1.5 Add, modify text into Headers, Footers in a report. .............................................................. 65
To add text to a report header or footer .......................................................................................... 65
To modify text within a report header or footer .................................................................... ...... ... 655.5.1.6 Delete a report. ....................................................................................................................... 66
To delete a report ............................................................................................................................ 665.7.1.7 Save and close a report. ......................................................................................................... 66
To save a report .............................................................................................................................. 66To close a report ............................................................................................................ ...... ...... ..... 66
5.6 P REPARE OUTPUTS ................................................................................................................................... 665.6.1 Prepare to Print ........................................................................................................................... 66
5.6.1.1 Preview a table, form, report. ................................................................................................ 66To preview a table, form or report, prior to printing ...................................................................... 66
FOR USE AT THE LICENSED SITE(S) ONLY© Cheltenham Computer Training 1995-2003 - www.cctglobal.com

8/8/2019 Ecdl v4 Mod5 Office-2000 Manual
http://slidepdf.com/reader/full/ecdl-v4-mod5-office-2000-manual 8/77
5.6.1.2 Change report orientation: portrait, landscape. Change paper size. ...................................... 67To change a reports orientation ............................................................................................. ...... ... 67
5.6.2 Print options ................................................................................................................................. 67 5.6.2.1 Print a page, selected record(s), complete table. ................................................................... 67
To set what you want to print ........................................................................................................ 675.6.2.2 Print all records using form layout, specific pages using form layout. ................................. 68
5.6.2.3 Print result of a query. ........................................................................................................... 68To print a query .............................................................................................................................. 685.6.2.4 Print specific page(s) of a report, complete report. ............................................................... 69
To print a table, query or report to a file ......................................................................................... 69
FOR USE AT THE LICENSED SITE(S) ONLY© Cheltenham Computer Training 1995-2003 - www.cctglobal.com
8/8/2019 Ecdl v4 Mod5 Office-2000 Manual
http://slidepdf.com/reader/full/ecdl-v4-mod5-office-2000-manual 9/77
1
Module 5 – Database (using Access 2000)
5.1 Using the Application
5.1.1 Database Concepts
5.1.1.1 Understand what a database is.
What is data?• Data is made up of text, numbers, images, and in some cases, sounds that can be processed or
stored by a computer. By itself data might not mean very much. In order to understand it, it needsto be interpreted (or processed) to become information.
• Information is the meaning given to data by the way in which it is interpreted.
• To illustrate the difference, Murray , 15000 and 10 mean little as data. But if we were able tointerpret them as the name of a salesman, Murray, his annual basic salary of $15,000 and hiscommission rate of 10%, it would assume more meaning and could be called information. This isnot necessarily the end of the story as this information could be included in another set of dataand used to provide other information. Alternatively, the same data could be interpreted in another way.
• It is often helpful to think of data as the raw ingredients of a recipe that when processed and mixedin different amounts by differing techniques produce different results.
What is a database?• A simple definition of a database is:
A structured collection of related data about one or more subjects .
In normal daily life we make frequent use of databases, and probably don’t realize it. Here are anumber of simple examples:- The telephone directory- Bus or train timetable- Personal address book- Filing cabinet
What is a relational database?• A simple relational database, such as Microsoft Access, is a database that is based on tables.
Each column within a table defines the fields, while each row defines the records. Different relateddata can be held in separate tables. For instance information about suppliers can be held in onetable, while information about products can be held in a separate table.
FOR USE AT THE LICENSED SITE(S) ONLY© Cheltenham Computer Training 1995-2003 - www.cctglobal.com
8/8/2019 Ecdl v4 Mod5 Office-2000 Manual
http://slidepdf.com/reader/full/ecdl-v4-mod5-office-2000-manual 10/77
2
5.1.1.2 Understand how a database is organized in terms of tables, records, fields, and withfield data types, field properties.
What is a table?• A table holds data about a particular item, such as products or suppliers.
What is a record?• A record is a collection of information that relates to a particular item within your database table.
For instance a record in an address book may consist of the first and second name of a person,plus their phone number and address details. Each item within a record is called a field.
What is a field?• Fields are the individual items that make up a record within your database. In the example of an
address book database, first and second names of your contacts would both be field names, aswould the telephone number.
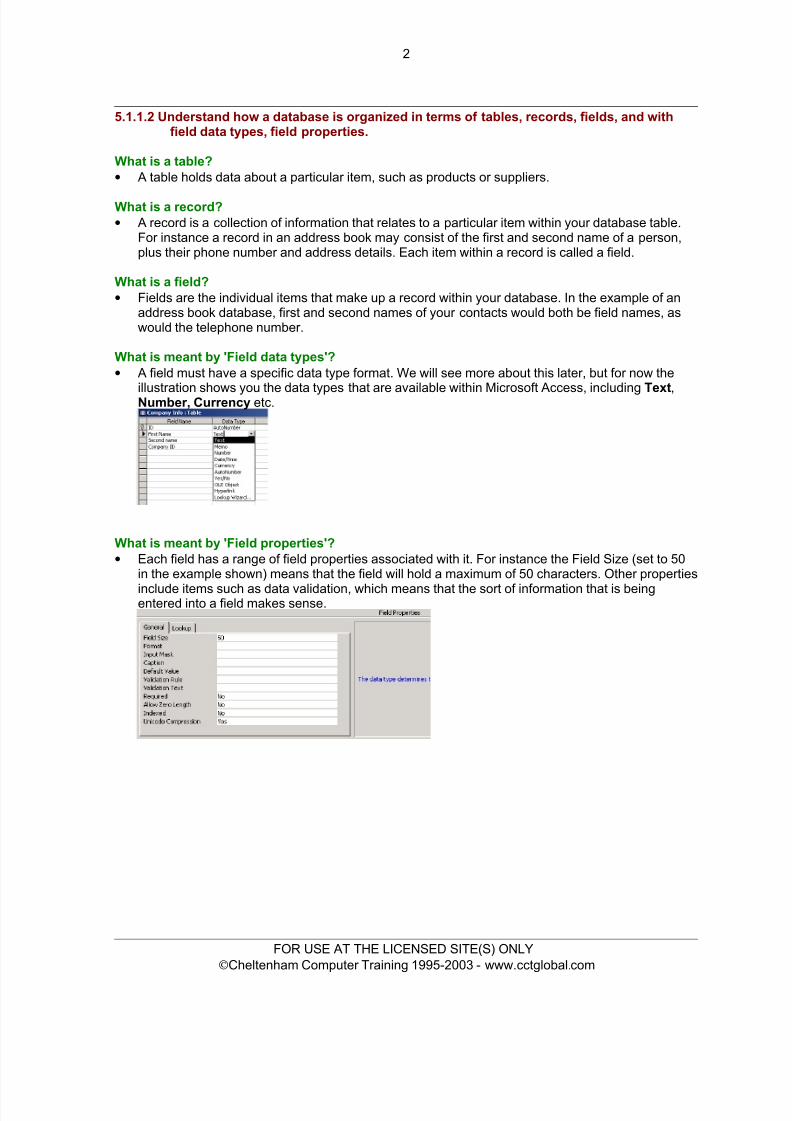
What is meant by 'Field data types'?• A field must have a specific data type format. We will see more about this later, but for now the
illustration shows you the data types that are available within Microsoft Access, including Text ,Number, Currency etc.
What is meant by 'Field properties'?• Each field has a range of field properties associated with it. For instance the Field Size (set to 50
in the example shown) means that the field will hold a maximum of 50 characters. Other properties
include items such as data validation, which means that the sort of information that is beingentered into a field makes sense.
FOR USE AT THE LICENSED SITE(S) ONLY© Cheltenham Computer Training 1995-2003 - www.cctglobal.com
8/8/2019 Ecdl v4 Mod5 Office-2000 Manual
http://slidepdf.com/reader/full/ecdl-v4-mod5-office-2000-manual 11/77
3
5.1.1.3 Understand what a primary key is.
What is a primary key?• Primary keys uniquely identify each record in your table and provide these advantages:
- An index is automatically created for the primary key. This speeds up data retrieval and sorting.
- The primary key is often used in establishing relationships.- Records in a form or Datasheet are displayed in primary key order.- Duplicate records are not allowed. Therefore all records are unique- A primary key can be made up of one or more fields.
5.1.1.4 Understand what an index is.
What is an index?• An index allows Access to work faster when finding and sorting records. They work in a similar
way to the way you would use an index in a traditional book, i.e. Access uses the index to find thelocation of the required data. Indexes can be created using a single field, or using multiple fields.
5.1.1.5 Understand the purpose of relating tables in a database.
Why relate tables?• When using Access you normally set up a number of tables, such as Customers, Products,
Orders, Employees etc. The next stage is to define relationships between these tables so that theinformation within each table can be linked with the information in the other tables. Once thesetable relationships are defined we can create queries, forms and reports to display information thatis actually spread across several tables.
5.1.1.6 Understand the importance of setting rules to ensure relationships between tables are
valid.
Design and document your database• It is extremely important to spend time designing your database as time spent here will often pay
dividends later on in the process, as you know where you are going and what you are trying to do.How do you know if you’ve got there if you don’t know where you are going?
Questions to ask yourself • When setting out on the difficult database design ask yourself:-
What do I want?: You must first establish why you require your database and what you expect toget from it. It is most important to define your output needs first. Mistakes are often made because
people try to decide what to put into their database before they know what they want from it.What have I got?: Knowing what you want then allows you to look critically at what data you haveand make decisions as to how it should be structured in terms of fields and tables.
What do I need to do?: This question asks you to look at any manipulation you need to carry outin order to achieve your information output: searches, sorts, and calculations.
FOR USE AT THE LICENSED SITE(S) ONLY© Cheltenham Computer Training 1995-2003 - www.cctglobal.com

8/8/2019 Ecdl v4 Mod5 Office-2000 Manual
http://slidepdf.com/reader/full/ecdl-v4-mod5-office-2000-manual 12/77
4
Define your needs• In order to clarify your needs it is often useful to draw a simple diagram and/or write a short
narrative. If the database is being designed for others, show them your sketch/narrative and use itto check your understanding of their requirements. Take the example shown below. C.C.Toys is aretailer of toys for children of all ages. It buys its toys from a number of suppliers. It employs four
staff. The store is laid out according to themes under a number of categories (e.g. Soft toys,Games Software etc.). Orders to suppliers can be for either single or multiple products. Theillustration below shows the tables needed for C.C. Toys.
PRODUCTS
C A T E G O R I E S
S U P P
L I E R
S
EMPLOYEESC.C.Toys
ORDERS
PRODUCTS
C A T E G O R I E S
S U P P
L I E R
S
EMPLOYEESC.C.Toys
ORDERS
Basic design rules• Make each record unique: Each table should be allocated a primary key. A primary key is a field
that makes a record unique. Give your table a primary key to ensure you have no duplicaterecords. Select the primary key yourself. If you let Access define the primary key, it will add acounter field at the beginning of each record. The counter will be incremented on every newrecord added to the table. Although this guarantees the uniqueness of the record, it does meanthat two records could contain identical data (apart from the key itself).
Make each field unique: Do not repeat the same kind of information in a table.
Make fields functionally dependent : Each field in the record should relate to the subject of therecord. If it doesn't, it's either redundant or it belongs in another table.
Ensure each field is independent : You should be able to alter any one field in a record withoutaffecting any of the others.
Ensure fields don’t contain calculated or derived data : As an example, you need only holdgross pay and deductions on a person's salary record. Net pay can be calculated when it isrequired, when printing the pay slip for instance.
Ensure data is in its smallest logical parts : It might be useful to keep customers' postcodesseparate from the rest of their addresses so that you can analyse sales based on postal regions.
5.1.2 First Steps with Databases
5.1.2.1 Open (and close) a database application.
To start Access• Click on the Windows Start icon. Click on Programs . Click on the Microsoft Access iconfrom within the sub-menu displayed.
FOR USE AT THE LICENSED SITE(S) ONLY© Cheltenham Computer Training 1995-2003 - www.cctglobal.com
8/8/2019 Ecdl v4 Mod5 Office-2000 Manual
http://slidepdf.com/reader/full/ecdl-v4-mod5-office-2000-manual 13/77
5
To close Microsoft Access• Click on the application's Close icon, at the top-right of the application window.
5.1.2.2 Open or log onto an existing database.
To open a database when you start Access• From the opening dialog box, select the Open an existing file option, select the file requiredand then click on the OK button.
To open an Access database, once Access has already started• Click on the Open icon on the Standard toolbar Recently used databases may be listed at thebottom of the File menu. If the database you require is included in the list, click once on the listentry. Select the File name from the list. You might need to change folders in order to find therequired database. Click on Open to complete the operation.
5.1.2.3 Create a new database
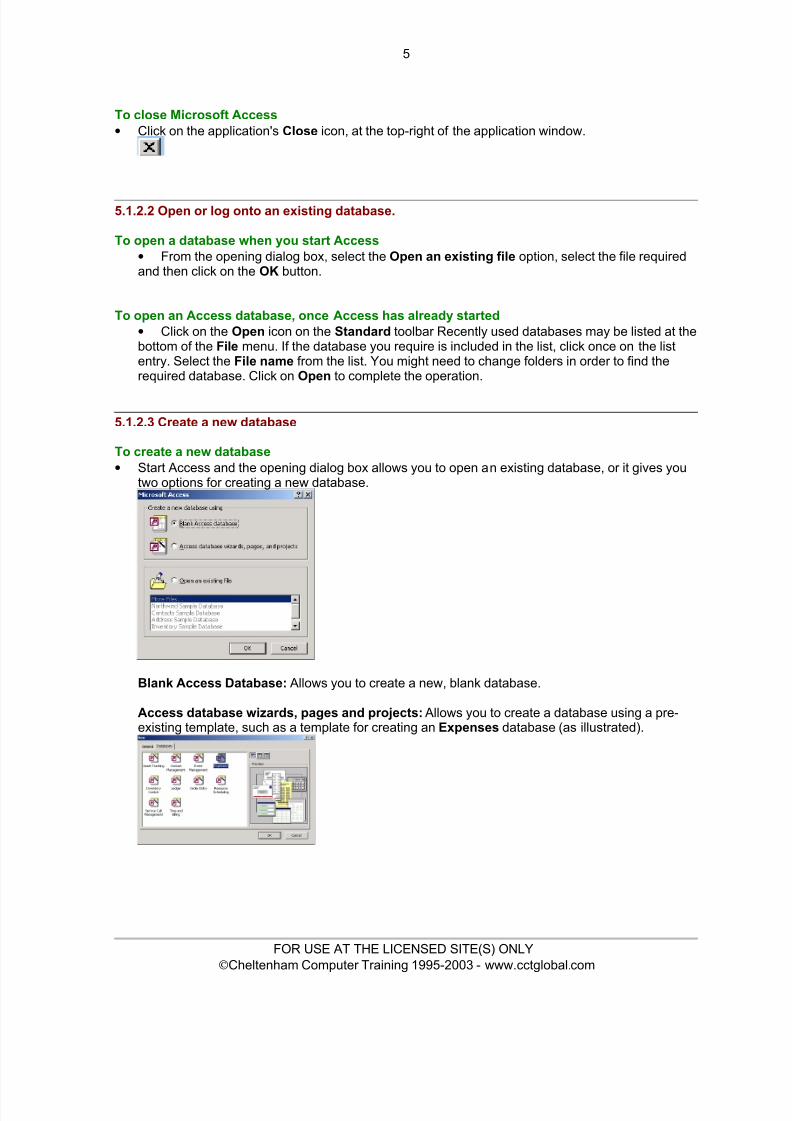
To create a new database• Start Access and the opening dialog box allows you to open an existing database, or it gives you
two options for creating a new database.
Blank Access Database: Allows you to create a new, blank database.
Access database wizards, pages and projects: Allows you to create a database using a pre-existing template, such as a template for creating an Expenses database (as illustrated).
FOR USE AT THE LICENSED SITE(S) ONLY© Cheltenham Computer Training 1995-2003 - www.cctglobal.com
8/8/2019 Ecdl v4 Mod5 Office-2000 Manual
http://slidepdf.com/reader/full/ecdl-v4-mod5-office-2000-manual 14/77
6
5.1.2.4 Save a database to a location on a drive.
To save a database• Choose Save from the File menu
OR click on the Save icon located on the toolbar.
To save a database file to a diskette• There is no easy way within the Access program to save a database opened from the hard disk to
a floppy disk. However you may use the Windows Explorer to copy a file to your floppy disk. Startthe Windows Explorer program. Select the database file on your hard disk that you wish to copyto a floppy disk. Right click on the file and select Send To 3 1/2" Floppy command.
5.1.2.5 Use available Help functions.
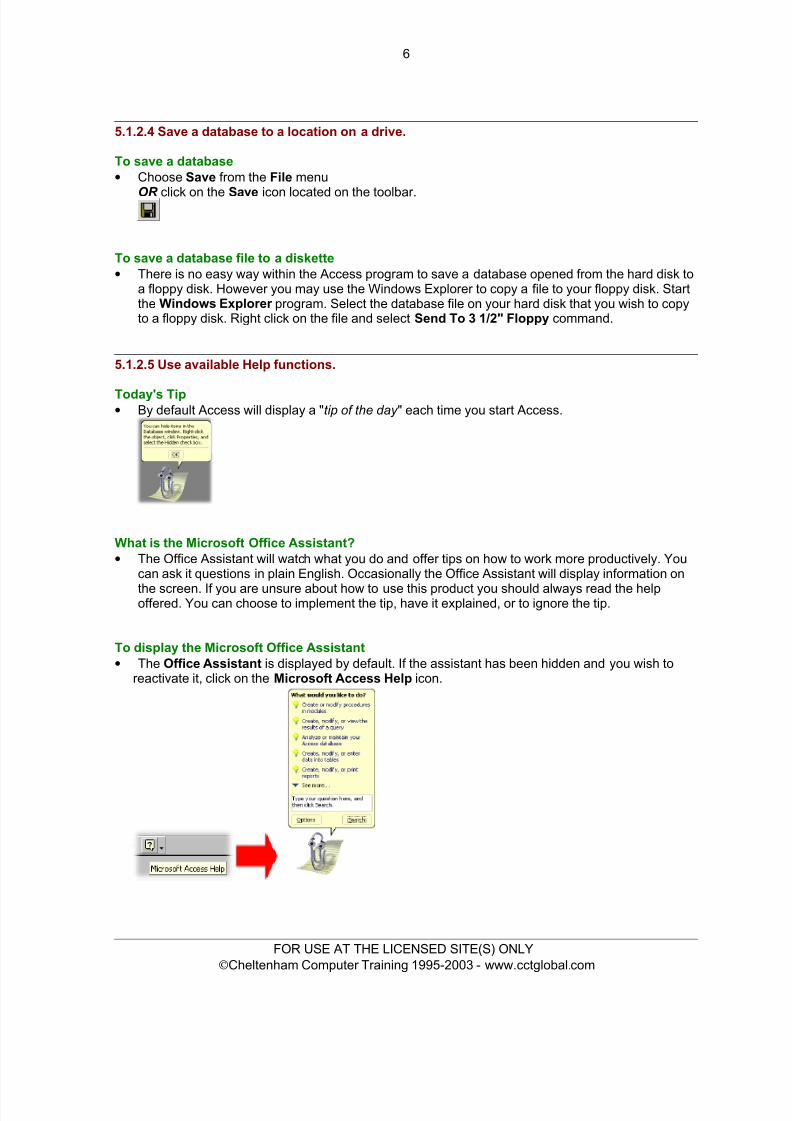
Today's Tip• By default Access will display a " tip of the day " each time you start Access.
What is the Microsoft Office Assistant?• The Office Assistant will watch what you do and offer tips on how to work more productively. You
can ask it questions in plain English. Occasionally the Office Assistant will display information on
the screen. If you are unsure about how to use this product you should always read the helpoffered. You can choose to implement the tip, have it explained, or to ignore the tip.
To display the Microsoft Office Assistant• The Office Assistant is displayed by default. If the assistant has been hidden and you wish to
reactivate it, click on the Microsoft Access Help icon.
FOR USE AT THE LICENSED SITE(S) ONLY© Cheltenham Computer Training 1995-2003 - www.cctglobal.com
8/8/2019 Ecdl v4 Mod5 Office-2000 Manual
http://slidepdf.com/reader/full/ecdl-v4-mod5-office-2000-manual 15/77
7
To hide the Microsoft Office Assistant• Right click on the Office Assistant and from the menu displayed, click on the Hide command.
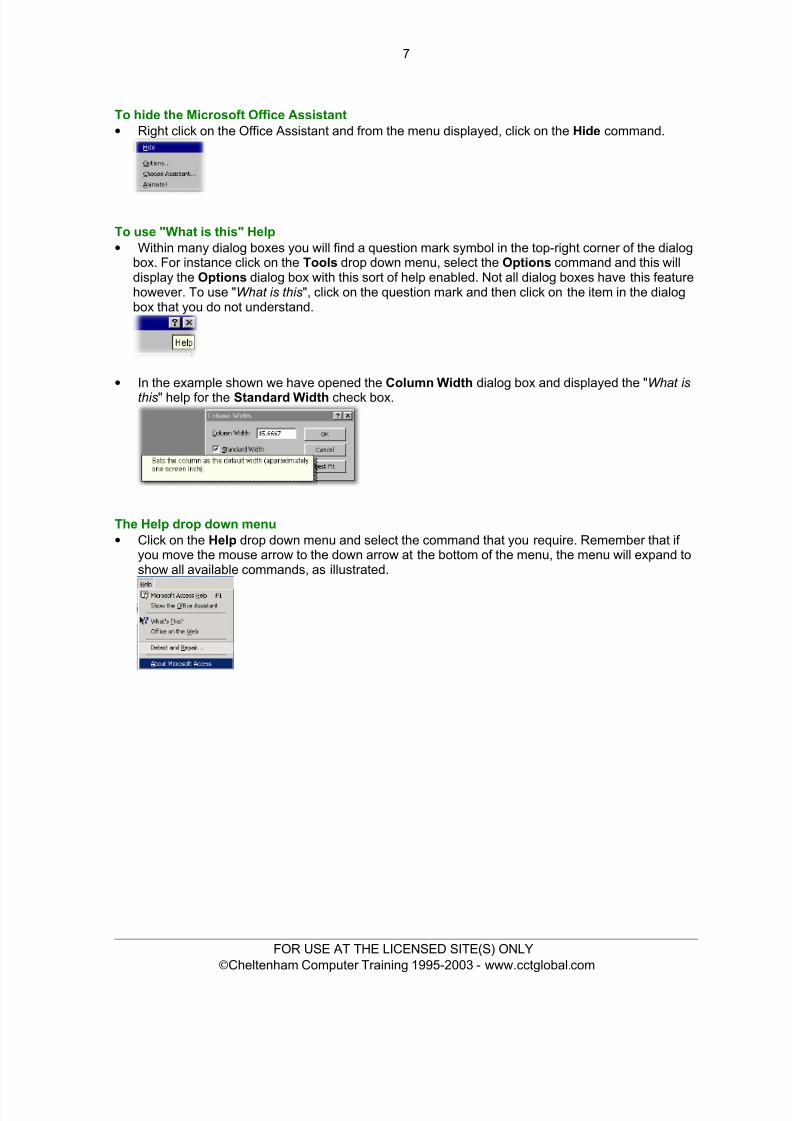
To use "What is this" Help• Within many dialog boxes you will find a question mark symbol in the top-right corner of the dialog
box. For instance click on the Tools drop down menu, select the Options command and this willdisplay the Options dialog box with this sort of help enabled. Not all dialog boxes have this featurehowever. To use " What is this ", click on the question mark and then click on the item in the dialogbox that you do not understand.
• In the example shown we have opened the Column Width dialog box and displayed the " What isthis " help for the Standard Width check box.
The Help drop down menu• Click on the Help drop down menu and select the command that you require. Remember that if
you move the mouse arrow to the down arrow at the bottom of the menu, the menu will expand toshow all available commands, as illustrated.
FOR USE AT THE LICENSED SITE(S) ONLY© Cheltenham Computer Training 1995-2003 - www.cctglobal.com

8/8/2019 Ecdl v4 Mod5 Office-2000 Manual
http://slidepdf.com/reader/full/ecdl-v4-mod5-office-2000-manual 16/77
8
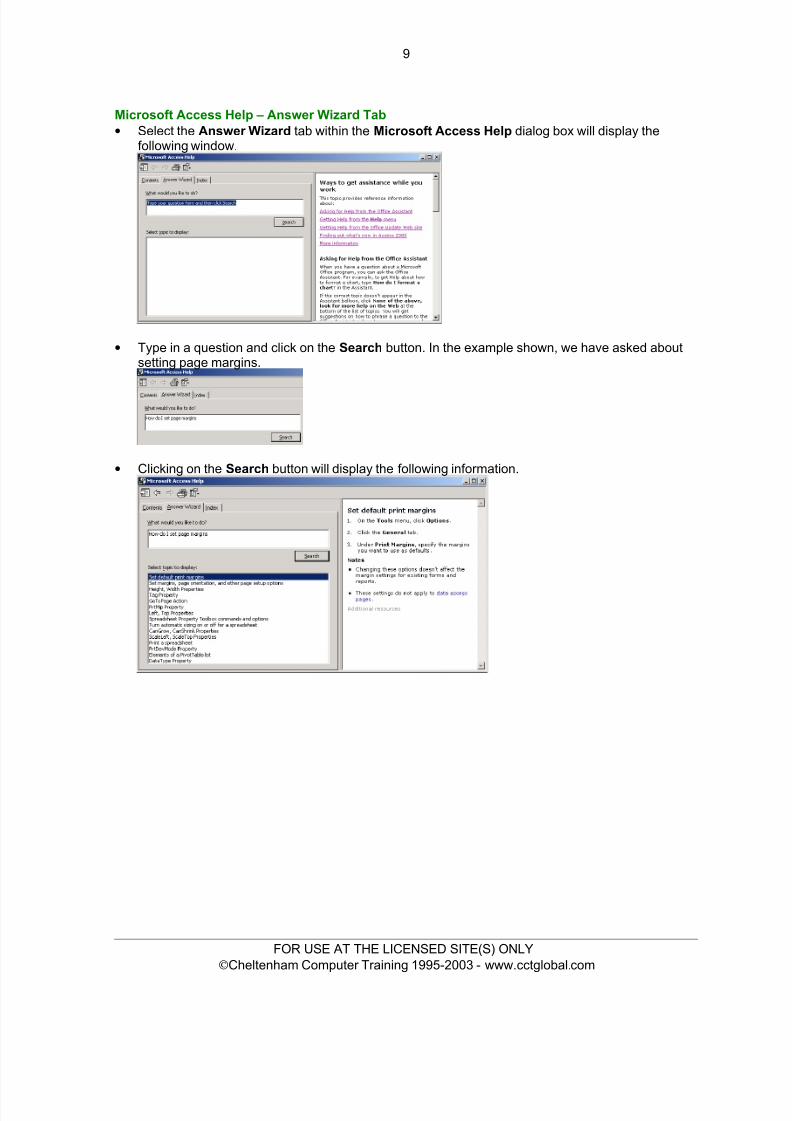
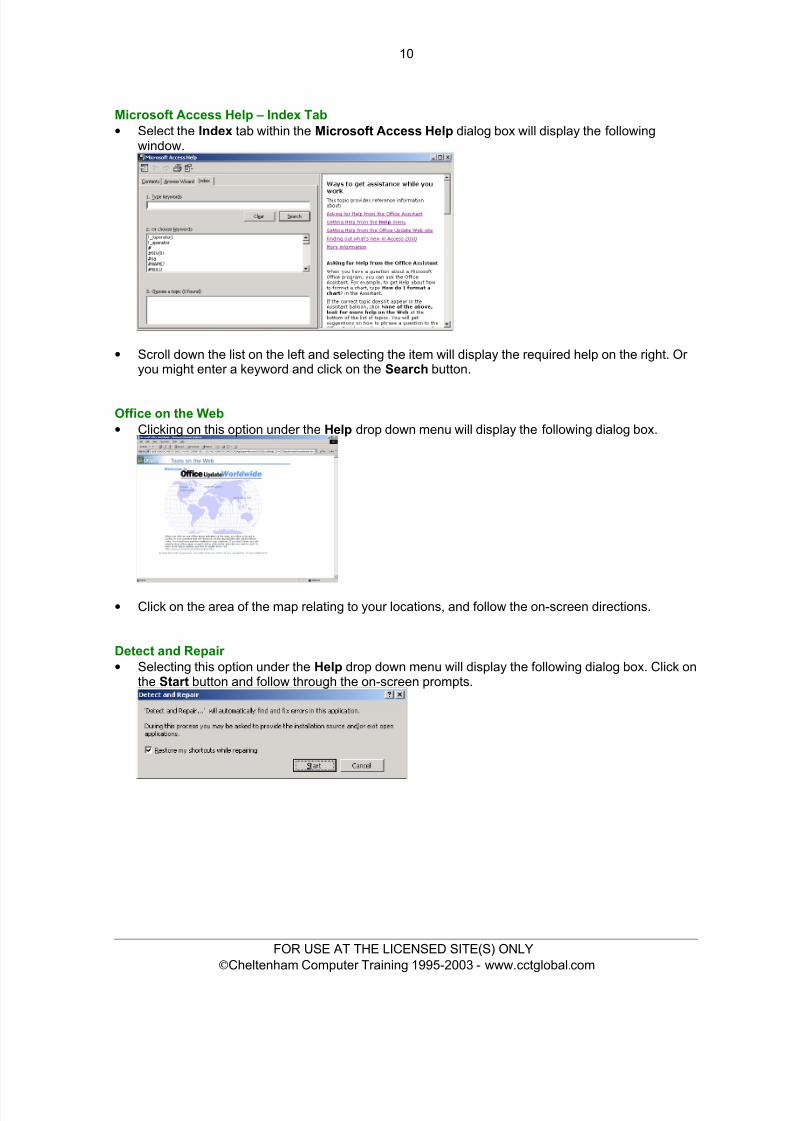
Microsoft Access Help dialog box• Selecting this option from the Help drop down menu will display the Help dialog box, as illustrated.
There are three tabs that you can select from, Contents , Answer Wizard and Index .
Microsoft Access Help - Contents Tab• Select the Contents tab within the Microsoft Access Help dialog box will display the following
window.
• In the left side of the window, topics are listed. Clicking on any of the plus symbols will expand theoptions available, as illustrated. Click on a topic in the left section will display information in theright section of the window.
FOR USE AT THE LICENSED SITE(S) ONLY© Cheltenham Computer Training 1995-2003 - www.cctglobal.com
8/8/2019 Ecdl v4 Mod5 Office-2000 Manual
http://slidepdf.com/reader/full/ecdl-v4-mod5-office-2000-manual 17/77
8/8/2019 Ecdl v4 Mod5 Office-2000 Manual
http://slidepdf.com/reader/full/ecdl-v4-mod5-office-2000-manual 18/77
10
Microsoft Access Help – Index Tab• Select the Index tab within the Microsoft Access Help dialog box will display the following
window.
• Scroll down the list on the left and selecting the item will display the required help on the right. Or you might enter a keyword and click on the Search button.
Office on the Web• Clicking on this option under the Help drop down menu will display the following dialog box.
• Click on the area of the map relating to your locations, and follow the on-screen directions.
Detect and Repair • Selecting this option under the Help drop down menu will display the following dialog box. Click on
the Start button and follow through the on-screen prompts.
FOR USE AT THE LICENSED SITE(S) ONLY© Cheltenham Computer Training 1995-2003 - www.cctglobal.com
8/8/2019 Ecdl v4 Mod5 Office-2000 Manual
http://slidepdf.com/reader/full/ecdl-v4-mod5-office-2000-manual 19/77
11
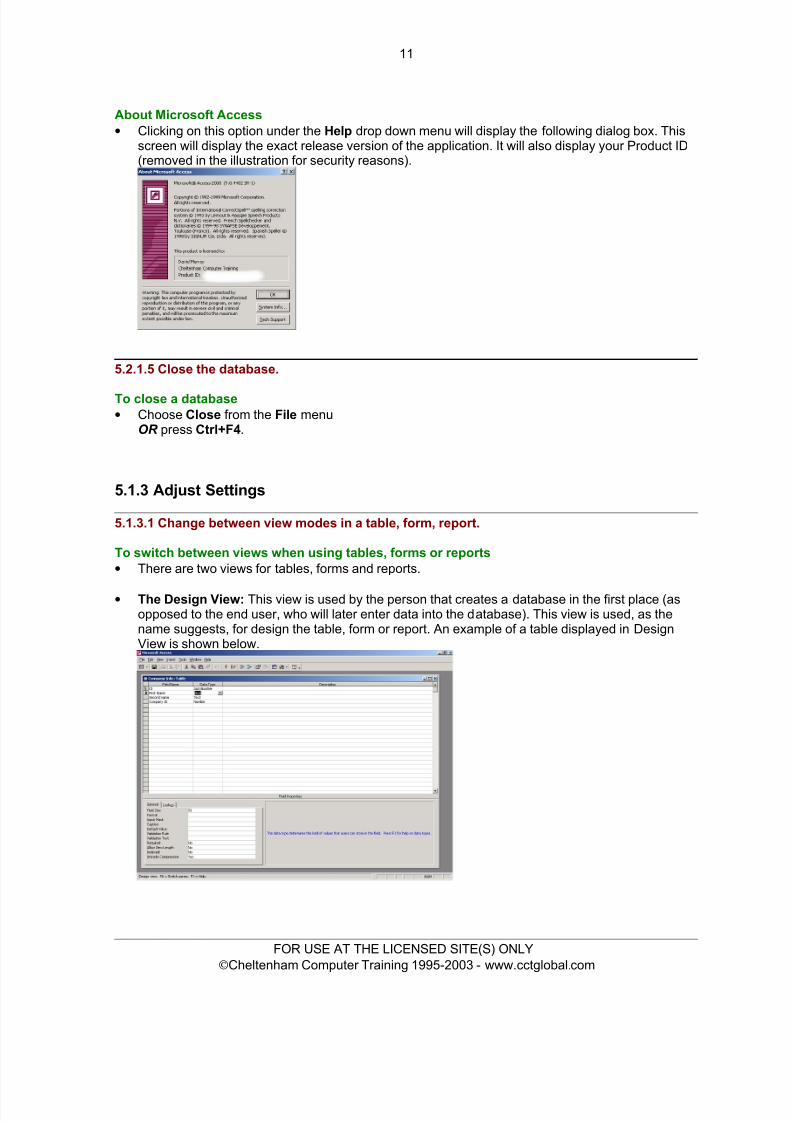
About Microsoft Access• Clicking on this option under the Help drop down menu will display the following dialog box. This
screen will display the exact release version of the application. It will also display your Product ID(removed in the illustration for security reasons).
5.2.1.5 Close the database.
To close a database• Choose Close from the File menu
OR press Ctrl+F4 .
5.1.3 Adjust Settings
5.1.3.1 Change between view modes in a table, form, report.
To switch between views when using tables, forms or reports• There are two views for tables, forms and reports.
• The Design View: This view is used by the person that creates a database in the first place (asopposed to the end user, who will later enter data into the database). This view is used, as thename suggests, for design the table, form or report. An example of a table displayed in DesignView is shown below.
FOR USE AT THE LICENSED SITE(S) ONLY© Cheltenham Computer Training 1995-2003 - www.cctglobal.com
8/8/2019 Ecdl v4 Mod5 Office-2000 Manual
http://slidepdf.com/reader/full/ecdl-v4-mod5-office-2000-manual 20/77
12
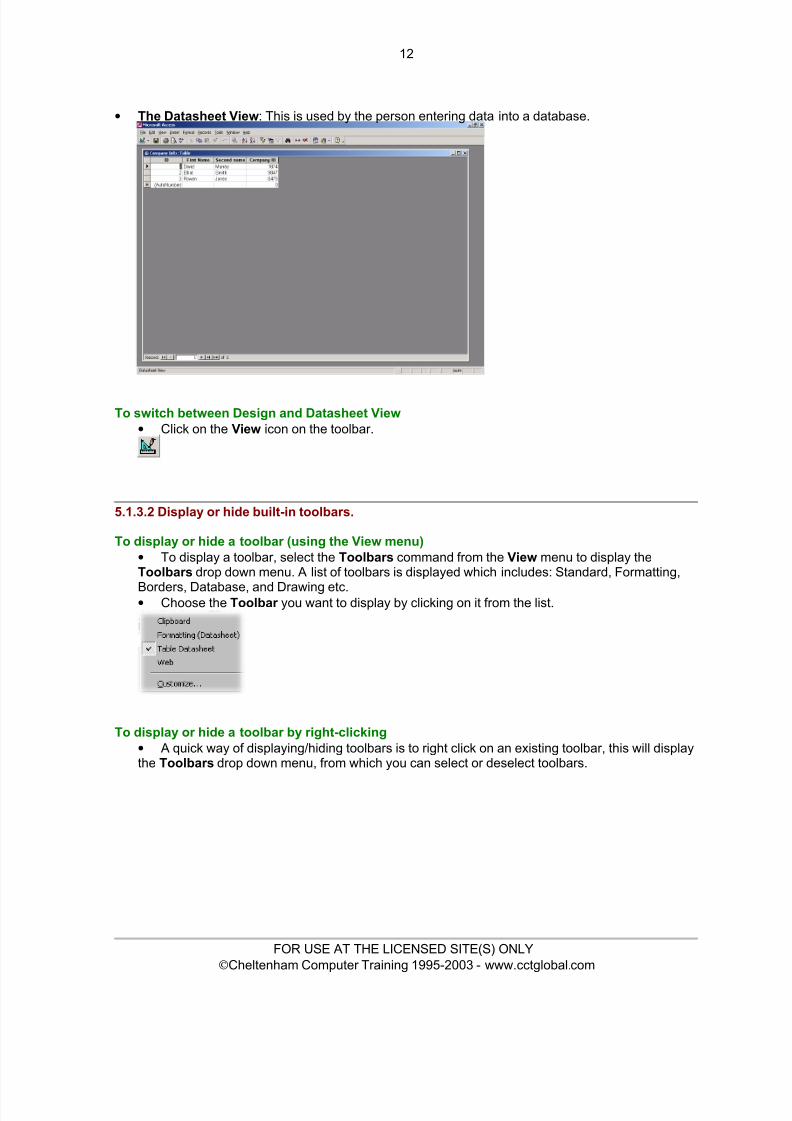
• The Datasheet View : This is used by the person entering data into a database.
To switch between Design and Datasheet View• Click on the View icon on the toolbar.
5.1.3.2 Display or hide built-in toolbars.
To display or hide a toolbar (using the View menu)• To display a toolbar, select the Toolbars command from the View menu to display theToolbars drop down menu. A list of toolbars is displayed which includes: Standard, Formatting,
Borders, Database, and Drawing etc.• Choose the Toolbar you want to display by clicking on it from the list.
To display or hide a toolbar by right-clicking• A quick way of displaying/hiding toolbars is to right click on an existing toolbar, this will displaythe Toolbars drop down menu, from which you can select or deselect toolbars.
FOR USE AT THE LICENSED SITE(S) ONLY© Cheltenham Computer Training 1995-2003 - www.cctglobal.com
8/8/2019 Ecdl v4 Mod5 Office-2000 Manual
http://slidepdf.com/reader/full/ecdl-v4-mod5-office-2000-manual 21/77
13
5.2 Tables
5.2.1 Main Operations
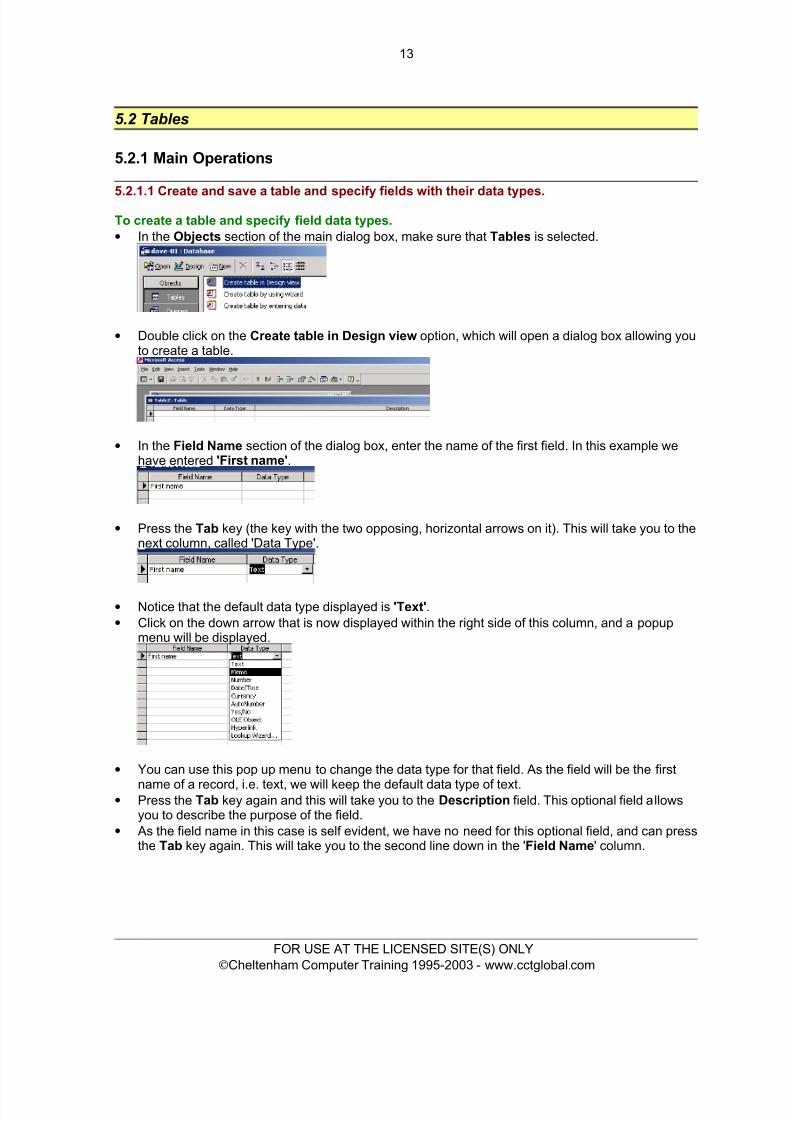
5.2.1.1 Create and save a table and specify fields with their data types.To create a table and specify field data types.• In the Objects section of the main dialog box, make sure that Tables is selected.
• Double click on the Create table in Design view option, which will open a dialog box allowing youto create a table.
• In the Field Name section of the dialog box, enter the name of the first field. In this example wehave entered 'First name' .
• Press the Tab key (the key with the two opposing, horizontal arrows on it). This will take you to thenext column, called 'Data Type'.
• Notice that the default data type displayed is 'Text' .• Click on the down arrow that is now displayed within the right side of this column, and a popup
menu will be displayed.
• You can use this pop up menu to change the data type for that field. As the field will be the first
name of a record, i.e. text, we will keep the default data type of text.• Press the Tab key again and this will take you to the Description field. This optional field allows
you to describe the purpose of the field.• As the field name in this case is self evident, we have no need for this optional field, and can press
the Tab key again. This will take you to the second line down in the ' Field Name ' column.
FOR USE AT THE LICENSED SITE(S) ONLY© Cheltenham Computer Training 1995-2003 - www.cctglobal.com
8/8/2019 Ecdl v4 Mod5 Office-2000 Manual
http://slidepdf.com/reader/full/ecdl-v4-mod5-office-2000-manual 22/77
14
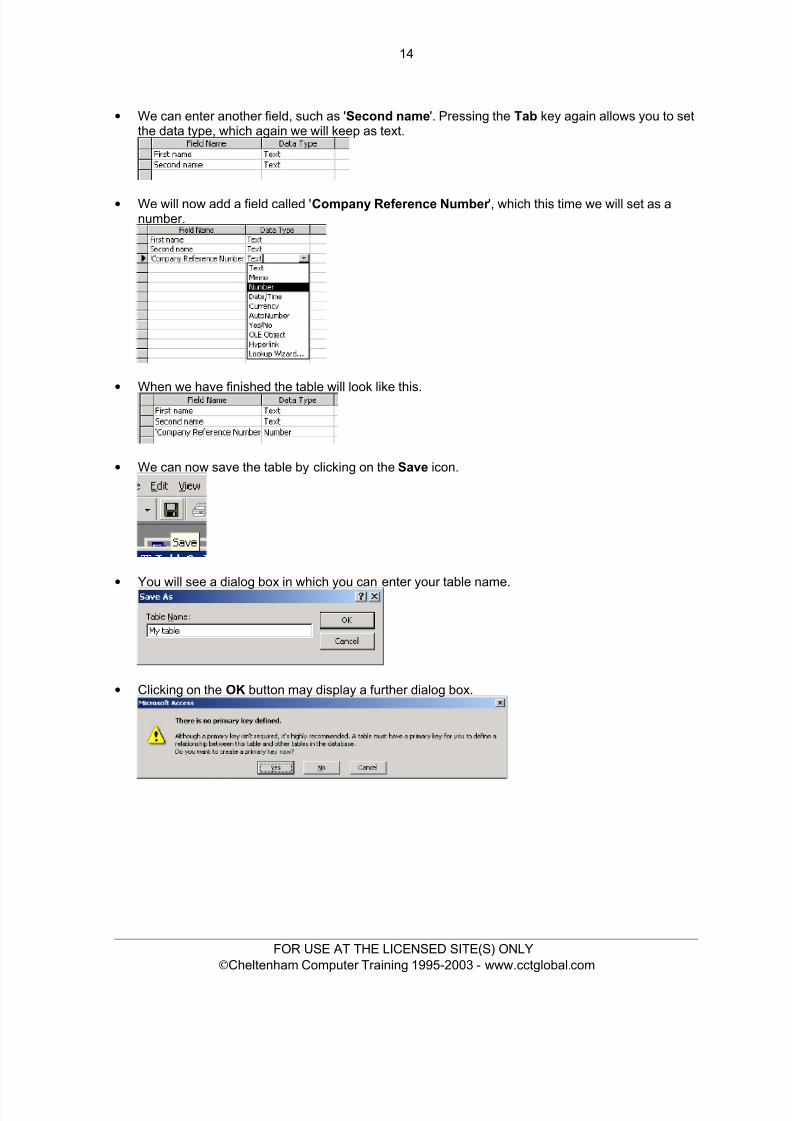
• We can enter another field, such as ' Second name '. Pressing the Tab key again allows you to setthe data type, which again we will keep as text.
• We will now add a field called ' Company Reference Number ', which this time we will set as anumber.
•When we have finished the table will look like this.
• We can now save the table by clicking on the Save icon.
• You will see a dialog box in which you can enter your table name.
• Clicking on the OK button may display a further dialog box.
FOR USE AT THE LICENSED SITE(S) ONLY© Cheltenham Computer Training 1995-2003 - www.cctglobal.com
8/8/2019 Ecdl v4 Mod5 Office-2000 Manual
http://slidepdf.com/reader/full/ecdl-v4-mod5-office-2000-manual 23/77
15
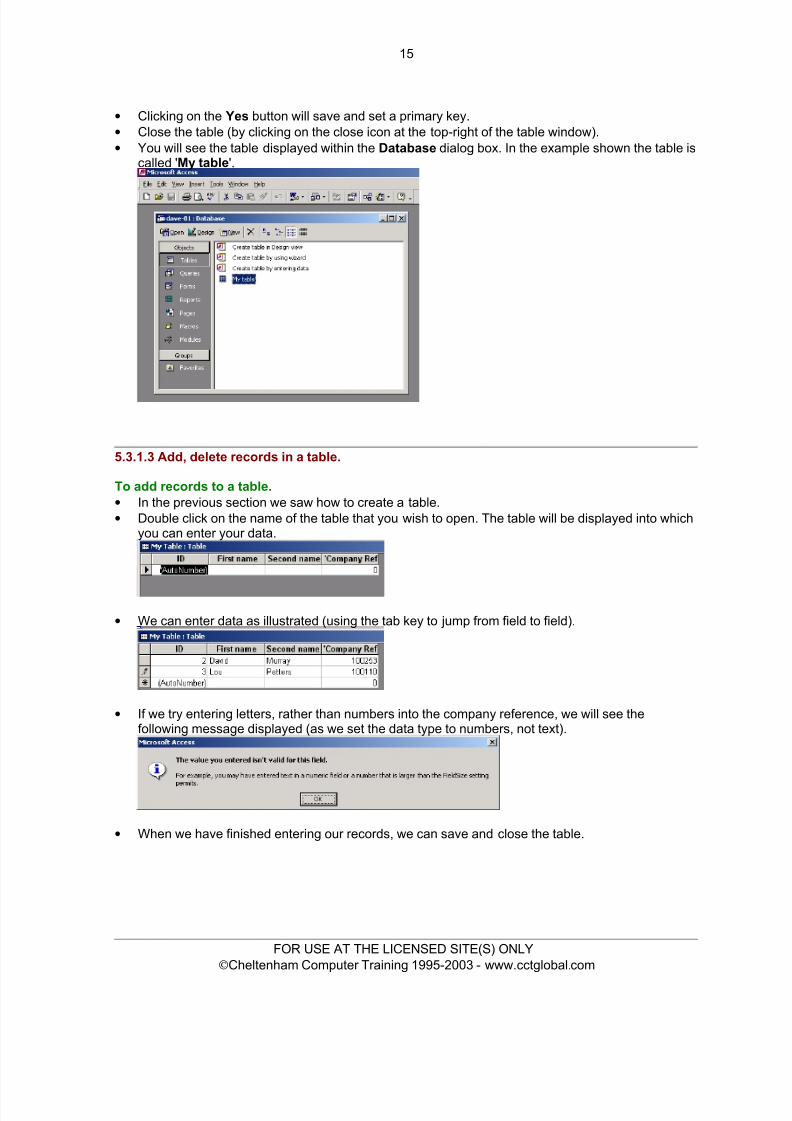
• Clicking on the Yes button will save and set a primary key.• Close the table (by clicking on the close icon at the top-right of the table window).• You will see the table displayed within the Database dialog box. In the example shown the table is
called ' My table '.
5.3.1.3 Add, delete records in a table.
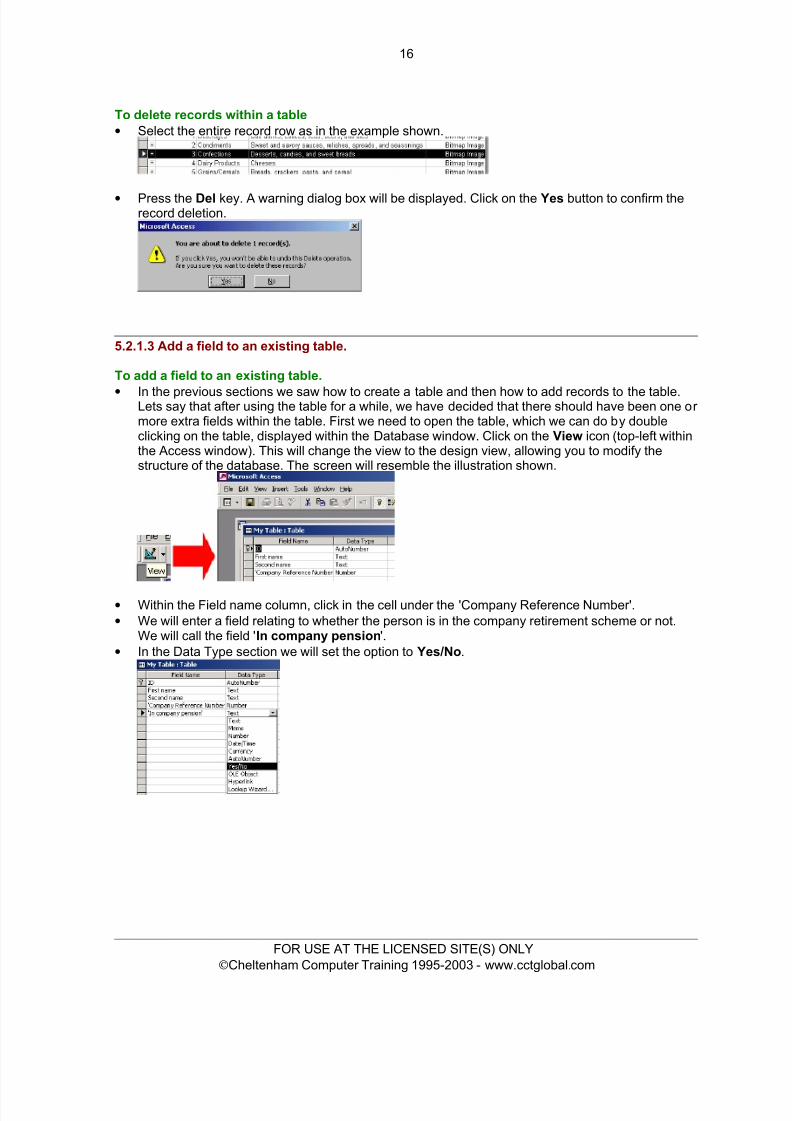
To add records to a table.• In the previous section we saw how to create a table.• Double click on the name of the table that you wish to open. The table will be displayed into which
you can enter your data.
• We can enter data as illustrated (using the tab key to jump from field to field).
• If we try entering letters, rather than numbers into the company reference, we will see thefollowing message displayed (as we set the data type to numbers, not text).
• When we have finished entering our records, we can save and close the table.
FOR USE AT THE LICENSED SITE(S) ONLY© Cheltenham Computer Training 1995-2003 - www.cctglobal.com
8/8/2019 Ecdl v4 Mod5 Office-2000 Manual
http://slidepdf.com/reader/full/ecdl-v4-mod5-office-2000-manual 24/77
16
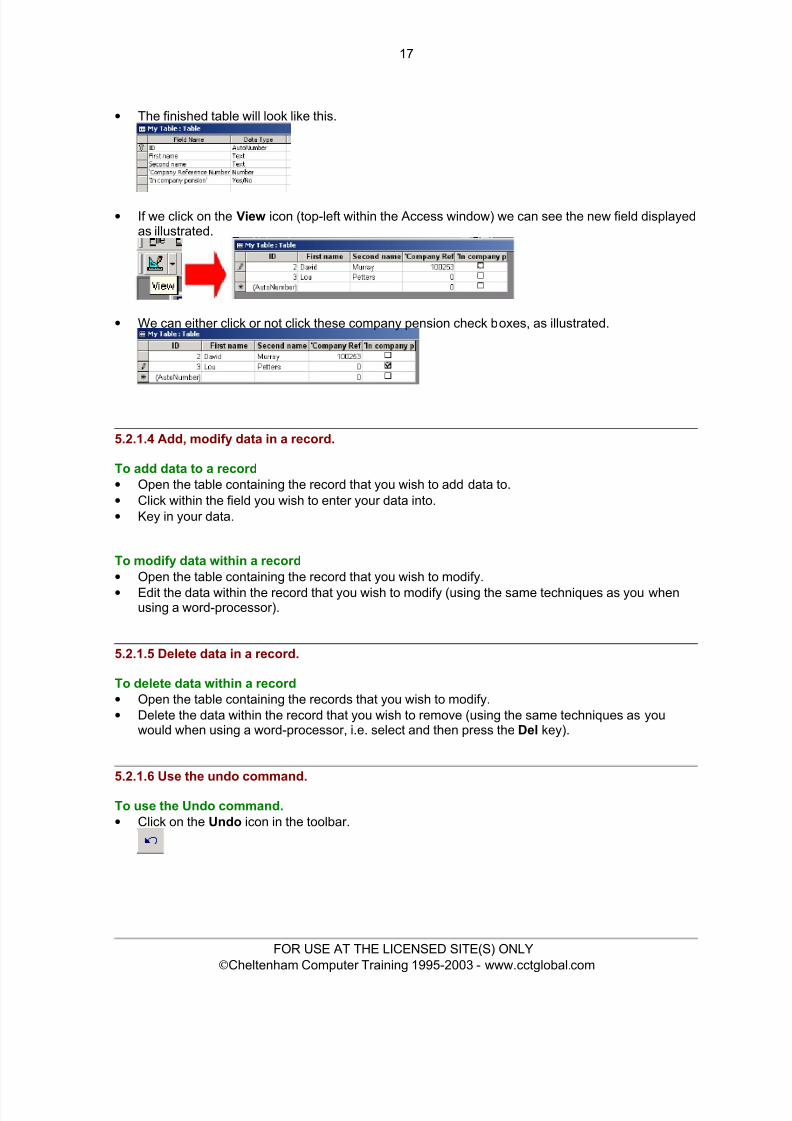
To delete records within a table• Select the entire record row as in the example shown.
• Press the Del key. A warning dialog box will be displayed. Click on the Yes button to confirm therecord deletion.
5.2.1.3 Add a field to an existing table.
To add a field to an existing table.
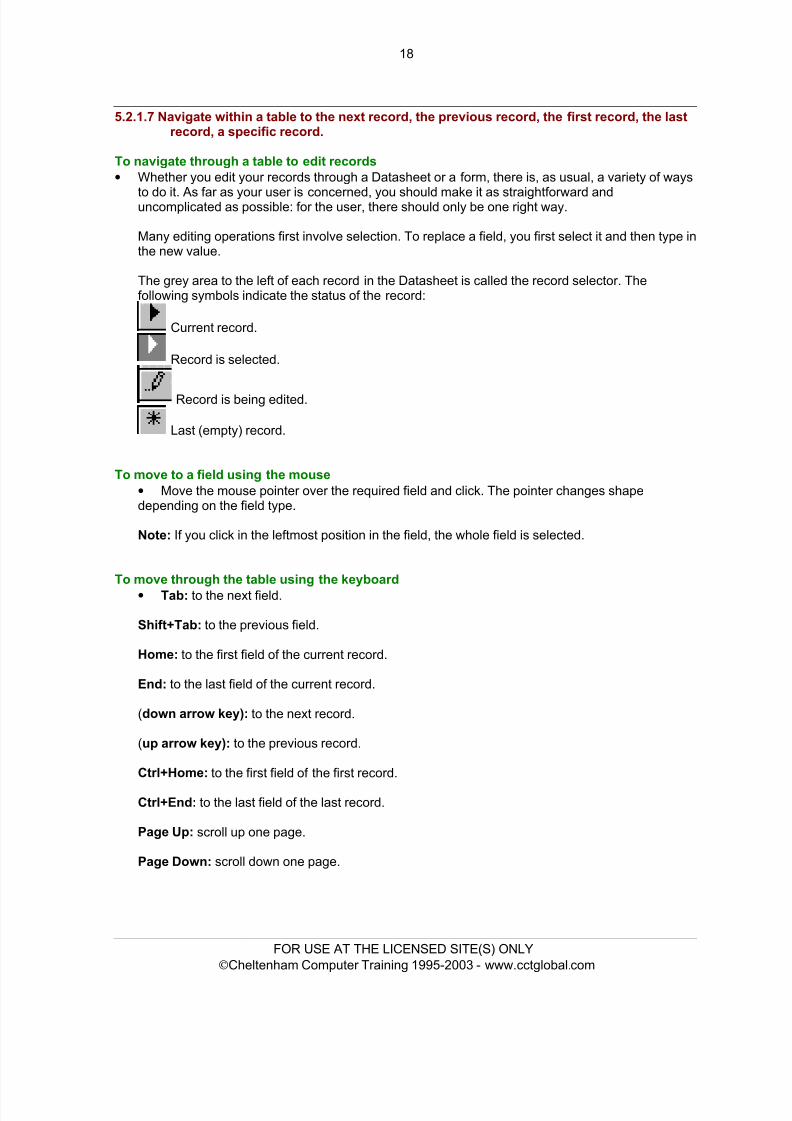
• In the previous sections we saw how to create a table and then how to add records to the table.Lets say that after using the table for a while, we have decided that there should have been one or more extra fields within the table. First we need to open the table, which we can do by doubleclicking on the table, displayed within the Database window. Click on the View icon (top-left withinthe Access window). This will change the view to the design view, allowing you to modify thestructure of the database. The screen will resemble the illustration shown.
• Within the Field name column, click in the cell under the 'Company Reference Number'.• We will enter a field relating to whether the person is in the company retirement scheme or not.
We will call the field ' In company pension '.• In the Data Type section we will set the option to Yes/No .
FOR USE AT THE LICENSED SITE(S) ONLY© Cheltenham Computer Training 1995-2003 - www.cctglobal.com
8/8/2019 Ecdl v4 Mod5 Office-2000 Manual
http://slidepdf.com/reader/full/ecdl-v4-mod5-office-2000-manual 25/77
17
• The finished table will look like this.
• If we click on the View icon (top-left within the Access window) we can see the new field displayedas illustrated.
• We can either click or not click these company pension check boxes, as illustrated.
5.2.1.4 Add, modify data in a record.
To add data to a record• Open the table containing the record that you wish to add data to.• Click within the field you wish to enter your data into.• Key in your data.
To modify data within a record• Open the table containing the record that you wish to modify.• Edit the data within the record that you wish to modify (using the same techniques as you when
using a word-processor).
5.2.1.5 Delete data in a record.
To delete data within a record• Open the table containing the records that you wish to modify.• Delete the data within the record that you wish to remove (using the same techniques as you
would when using a word-processor, i.e. select and then press the Del key).
5.2.1.6 Use the undo command.
To use the Undo command.• Click on the Undo icon in the toolbar.
FOR USE AT THE LICENSED SITE(S) ONLY© Cheltenham Computer Training 1995-2003 - www.cctglobal.com
8/8/2019 Ecdl v4 Mod5 Office-2000 Manual
http://slidepdf.com/reader/full/ecdl-v4-mod5-office-2000-manual 26/77
18
5.2.1.7 Navigate within a table to the next record, the previous record, the first record, the lastrecord, a specific record.
To navigate through a table to edit records• Whether you edit your records through a Datasheet or a form, there is, as usual, a variety of ways
to do it. As far as your user is concerned, you should make it as straightforward anduncomplicated as possible: for the user, there should only be one right way.
Many editing operations first involve selection. To replace a field, you first select it and then type inthe new value.
The grey area to the left of each record in the Datasheet is called the record selector. Thefollowing symbols indicate the status of the record:
Current record.
Record is selected.
Record is being edited.
Last (empty) record.
To move to a field using the mouse• Move the mouse pointer over the required field and click. The pointer changes shapedepending on the field type.
Note: If you click in the leftmost position in the field, the whole field is selected.
To move through the table using the keyboard• Tab: to the next field.
Shift+Tab: to the previous field.
Home: to the first field of the current record.
End: to the last field of the current record.
(down arrow key): to the next record.
(up arrow key): to the previous record.
Ctrl+Home: to the first field of the first record.
Ctrl+End: to the last field of the last record.
Page Up: scroll up one page.
Page Down: scroll down one page.
FOR USE AT THE LICENSED SITE(S) ONLY© Cheltenham Computer Training 1995-2003 - www.cctglobal.com

8/8/2019 Ecdl v4 Mod5 Office-2000 Manual
http://slidepdf.com/reader/full/ecdl-v4-mod5-office-2000-manual 27/77
19
To move from record to record using the scroll bar and mouse• To move from record to record:
to the next record
to the previous record
to the last record
to the first record
To move to a specific record using the Edit menu• Choose Go To from the Edit menu and select First , Last , Next , Previous or New Record .
To move to a specific record using the keyboard• Press F5 to highlight the record number on the scroll bar.• Type the number of the record you want and then press Enter .
5.2.1.8 Delete a table.
To delete a table• Select the table that you wish to delete, such as a table in the example below. Press the Del key
and you will see a warning dialog box. Clicking on the Yes button will delete the selected table.
FOR USE AT THE LICENSED SITE(S) ONLY© Cheltenham Computer Training 1995-2003 - www.cctglobal.com
8/8/2019 Ecdl v4 Mod5 Office-2000 Manual
http://slidepdf.com/reader/full/ecdl-v4-mod5-office-2000-manual 28/77
20
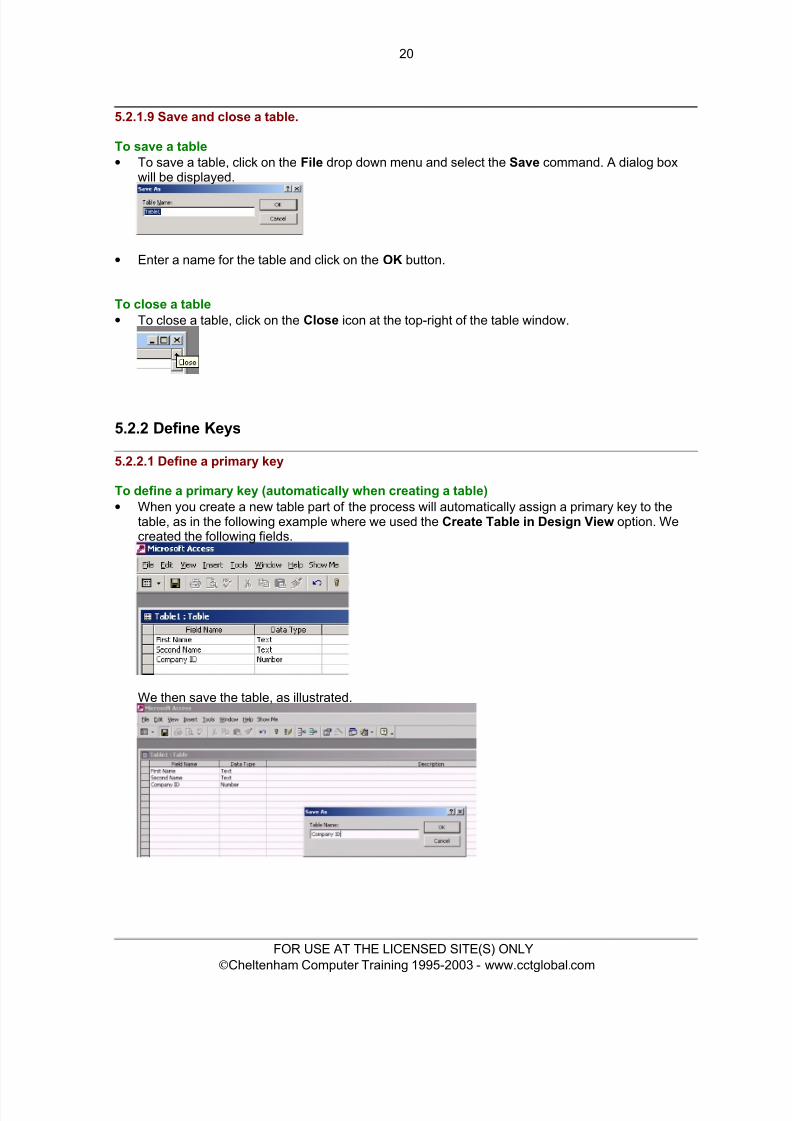
5.2.1.9 Save and close a table.
To save a table• To save a table, click on the File drop down menu and select the Save command. A dialog box
will be displayed.
• Enter a name for the table and click on the OK button.
To close a table• To close a table, click on the Close icon at the top-right of the table window.
5.2.2 Define Keys
5.2.2.1 Define a primary key
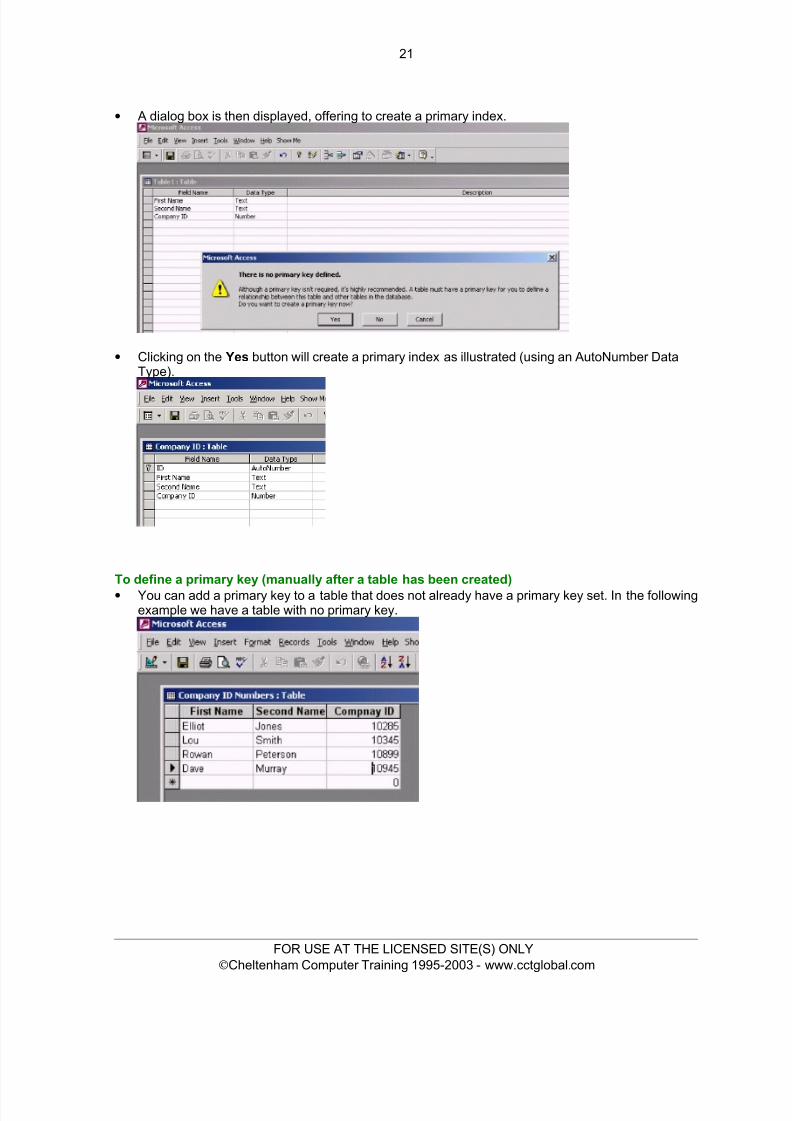
To define a primary key (automatically when creating a table)• When you create a new table part of the process will automatically assign a primary key to the
table, as in the following example where we used the Create Table in Design View option. Wecreated the following fields.
We then save the table, as illustrated.
FOR USE AT THE LICENSED SITE(S) ONLY© Cheltenham Computer Training 1995-2003 - www.cctglobal.com
8/8/2019 Ecdl v4 Mod5 Office-2000 Manual
http://slidepdf.com/reader/full/ecdl-v4-mod5-office-2000-manual 29/77
21
• A dialog box is then displayed, offering to create a primary index.
• Clicking on the Yes button will create a primary index as illustrated (using an AutoNumber DataType).
To define a primary key (manually after a table has been created)• You can add a primary key to a table that does not already have a primary key set. In the following
example we have a table with no primary key.
FOR USE AT THE LICENSED SITE(S) ONLY© Cheltenham Computer Training 1995-2003 - www.cctglobal.com
8/8/2019 Ecdl v4 Mod5 Office-2000 Manual
http://slidepdf.com/reader/full/ecdl-v4-mod5-office-2000-manual 30/77
22
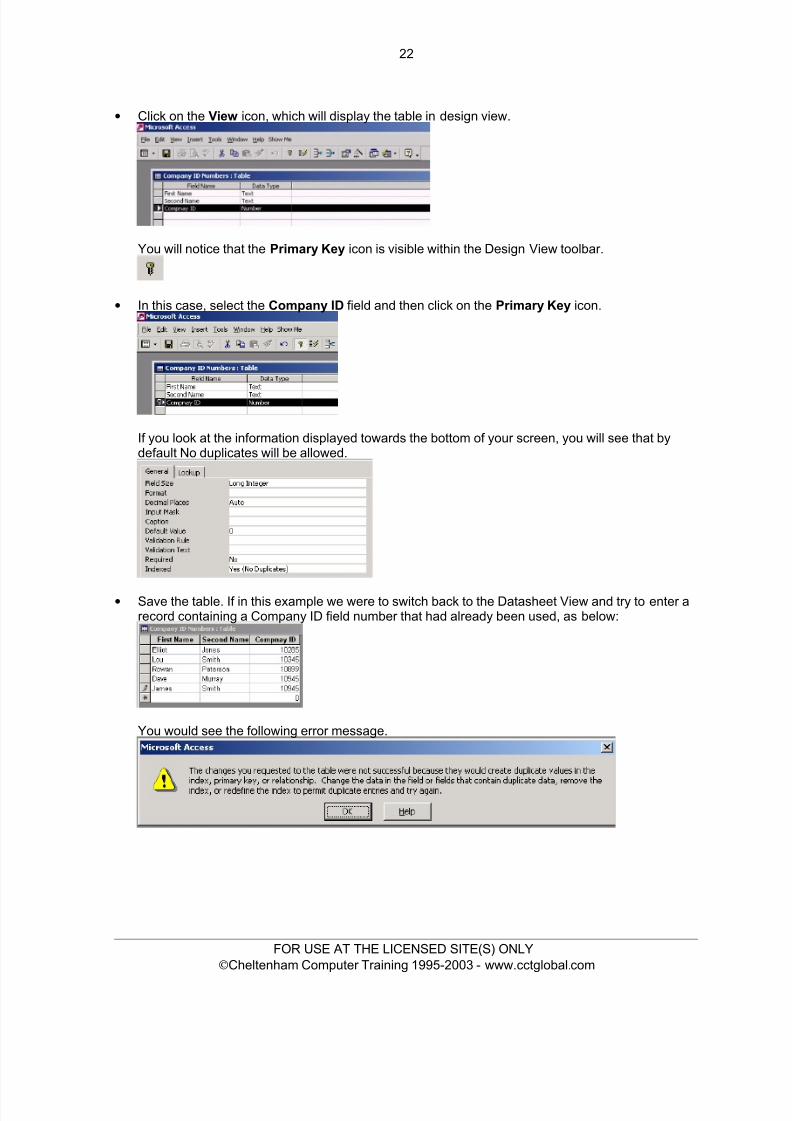
• Click on the View icon, which will display the table in design view.
You will notice that the Primary Key icon is visible within the Design View toolbar.
• In this case, select the Company ID field and then click on the Primary Key icon.
If you look at the information displayed towards the bottom of your screen, you will see that bydefault No duplicates will be allowed.
• Save the table. If in this example we were to switch back to the Datasheet View and try to enter arecord containing a Company ID field number that had already been used, as below:
You would see the following error message.
FOR USE AT THE LICENSED SITE(S) ONLY© Cheltenham Computer Training 1995-2003 - www.cctglobal.com
8/8/2019 Ecdl v4 Mod5 Office-2000 Manual
http://slidepdf.com/reader/full/ecdl-v4-mod5-office-2000-manual 31/77
23
5.2.2.2 Index a field without duplications allowed
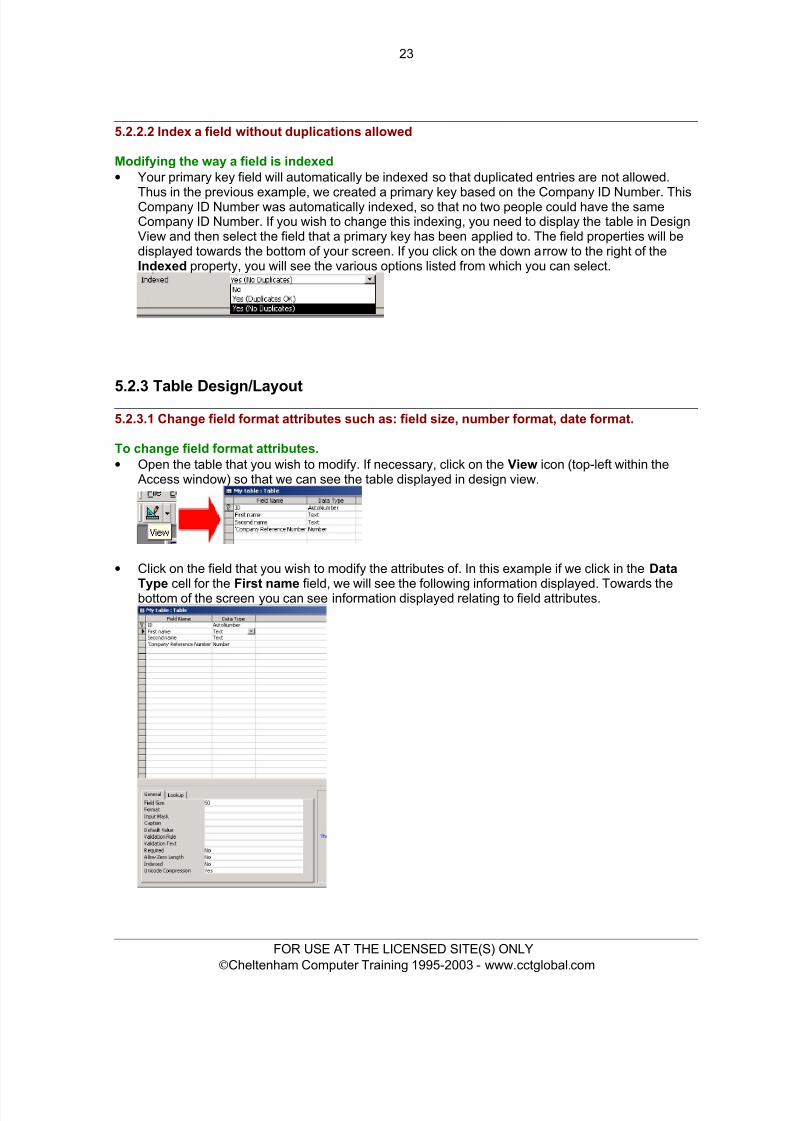
Modifying the way a field is indexed• Your primary key field will automatically be indexed so that duplicated entries are not allowed.
Thus in the previous example, we created a primary key based on the Company ID Number. ThisCompany ID Number was automatically indexed, so that no two people could have the sameCompany ID Number. If you wish to change this indexing, you need to display the table in DesignView and then select the field that a primary key has been applied to. The field properties will bedisplayed towards the bottom of your screen. If you click on the down arrow to the right of theIndexed property, you will see the various options listed from which you can select.
5.2.3 Table Design/Layout5.2.3.1 Change field format attributes such as: field size, number format, date format.
To change field format attributes.• Open the table that you wish to modify. If necessary, click on the View icon (top-left within the
Access window) so that we can see the table displayed in design view.
• Click on the field that you wish to modify the attributes of. In this example if we click in the Data
Type cell for the First name field, we will see the following information displayed. Towards thebottom of the screen you can see information displayed relating to field attributes.
FOR USE AT THE LICENSED SITE(S) ONLY© Cheltenham Computer Training 1995-2003 - www.cctglobal.com
8/8/2019 Ecdl v4 Mod5 Office-2000 Manual
http://slidepdf.com/reader/full/ecdl-v4-mod5-office-2000-manual 32/77
24
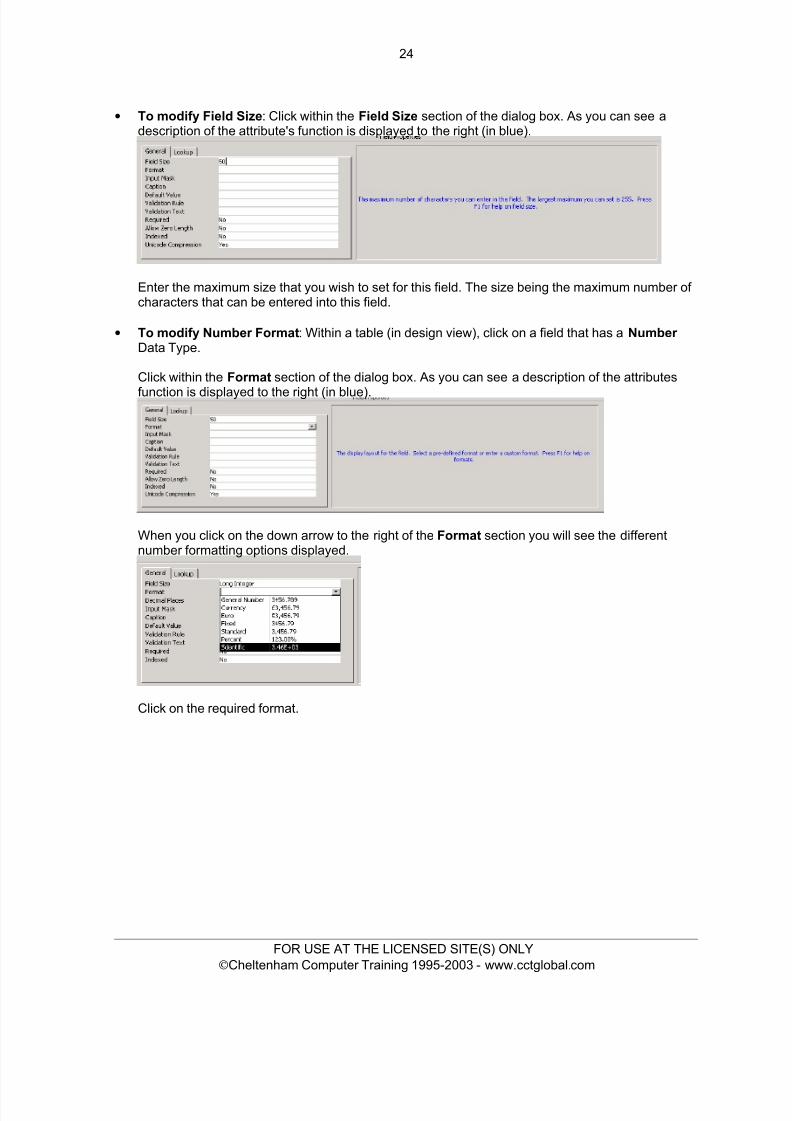
• To modify Field Size : Click within the Field Size section of the dialog box. As you can see adescription of the attribute's function is displayed to the right (in blue).
Enter the maximum size that you wish to set for this field. The size being the maximum number of characters that can be entered into this field.
• To modify Number Format : Within a table (in design view), click on a field that has a Number Data Type.
Click within the Format section of the dialog box. As you can see a description of the attributes
function is displayed to the right (in blue).
When you click on the down arrow to the right of the Format section you will see the differentnumber formatting options displayed.
Click on the required format.
FOR USE AT THE LICENSED SITE(S) ONLY© Cheltenham Computer Training 1995-2003 - www.cctglobal.com
8/8/2019 Ecdl v4 Mod5 Office-2000 Manual
http://slidepdf.com/reader/full/ecdl-v4-mod5-office-2000-manual 33/77
25
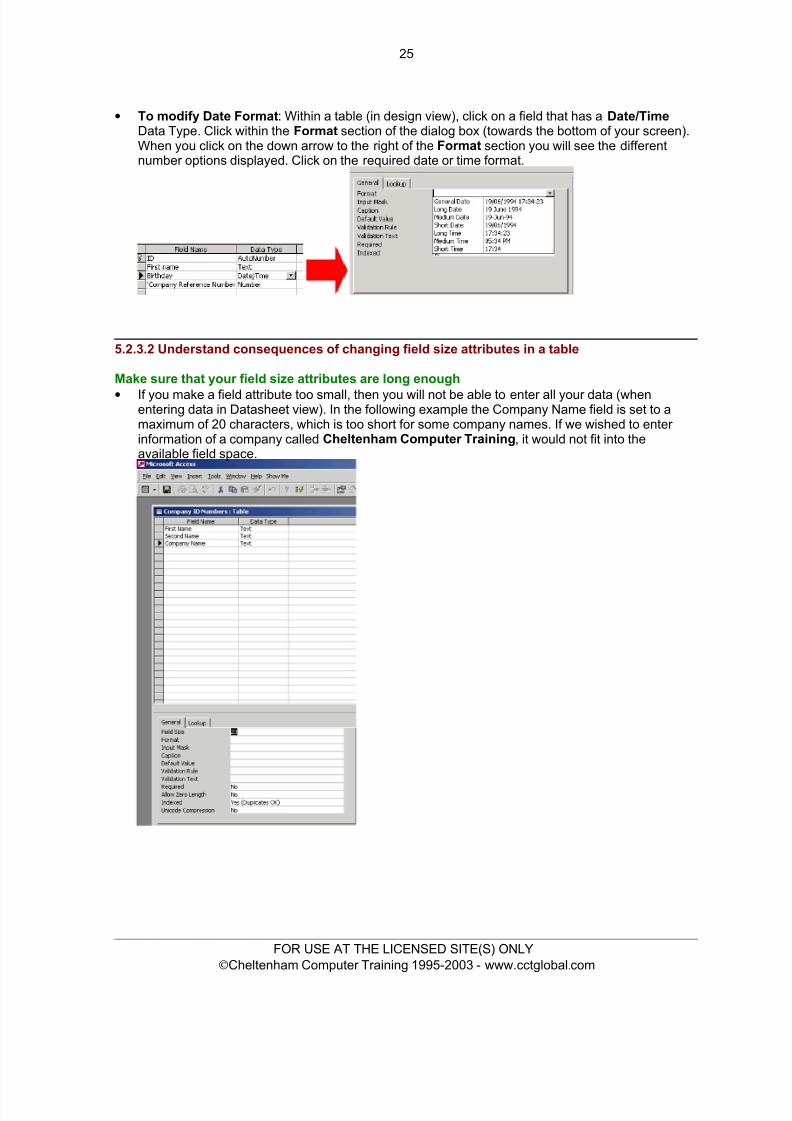
• To modify Date Format : Within a table (in design view), click on a field that has a Date/TimeData Type. Click within the Format section of the dialog box (towards the bottom of your screen).When you click on the down arrow to the right of the Format section you will see the differentnumber options displayed. Click on the required date or time format.
5.2.3.2 Understand consequences of changing field size attributes in a table
Make sure that your field size attributes are long enough• If you make a field attribute too small, then you will not be able to enter all your data (when
entering data in Datasheet view). In the following example the Company Name field is set to amaximum of 20 characters, which is too short for some company names. If we wished to enter information of a company called Cheltenham Computer Training , it would not fit into theavailable field space.
FOR USE AT THE LICENSED SITE(S) ONLY© Cheltenham Computer Training 1995-2003 - www.cctglobal.com
8/8/2019 Ecdl v4 Mod5 Office-2000 Manual
http://slidepdf.com/reader/full/ecdl-v4-mod5-office-2000-manual 34/77
26
5.2.3.3 Create a simple validation rule for number, text, date/time, currency.
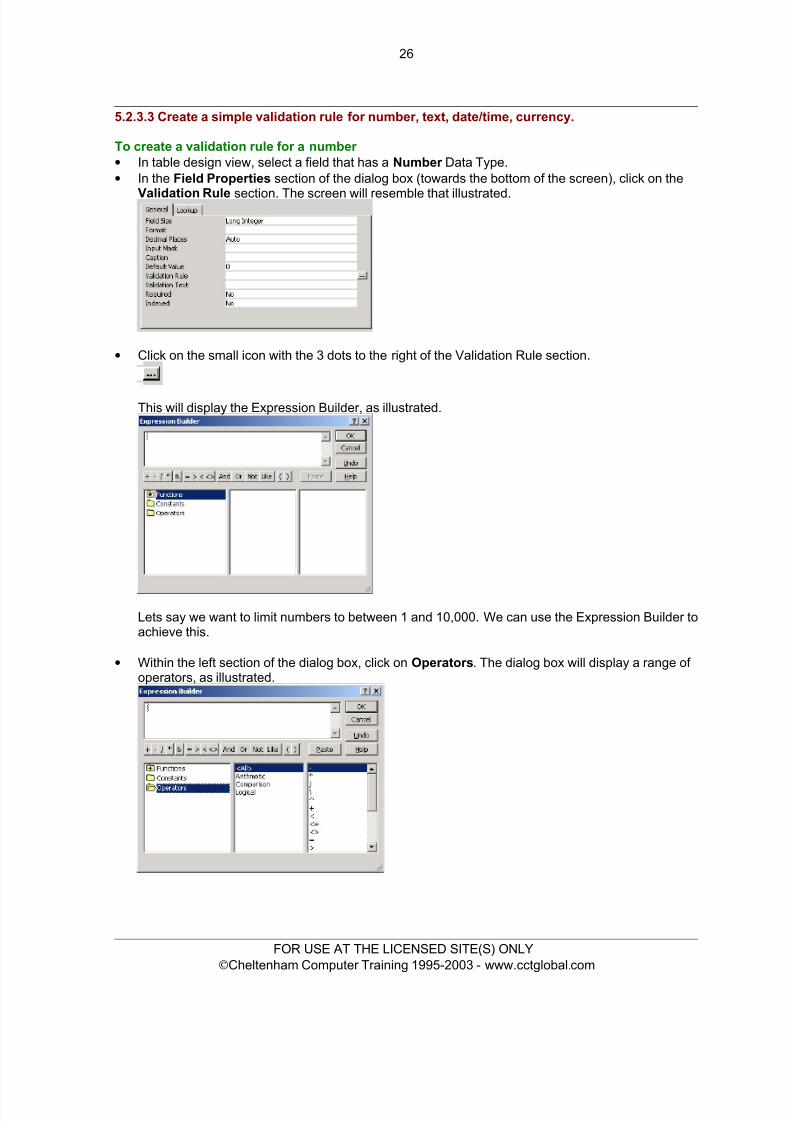
To create a validation rule for a number • In table design view, select a field that has a Number Data Type.• In the Field Properties section of the dialog box (towards the bottom of the screen), click on the
Validation Rule section. The screen will resemble that illustrated.
• Click on the small icon with the 3 dots to the right of the Validation Rule section.
This will display the Expression Builder, as illustrated.
Lets say we want to limit numbers to between 1 and 10,000. We can use the Expression Builder toachieve this.
• Within the left section of the dialog box, click on Operators . The dialog box will display a range of operators, as illustrated.
FOR USE AT THE LICENSED SITE(S) ONLY© Cheltenham Computer Training 1995-2003 - www.cctglobal.com

8/8/2019 Ecdl v4 Mod5 Office-2000 Manual
http://slidepdf.com/reader/full/ecdl-v4-mod5-office-2000-manual 35/77
27
• In this case we wish to limit valid entries to between 1-10,000, so we double click on theoperator. The screen will be as illustrated.
• We can then type in the value 10000. The screen will be as illustrated.
• Click on the OK button and the Field Properties section of the dialog box will be as illustrated.
• If we were to switch to Datasheet View and enter a number into the validated field that was over 10,000, we would see a rather confusing message such as the one below.
FOR USE AT THE LICENSED SITE(S) ONLY© Cheltenham Computer Training 1995-2003 - www.cctglobal.com
8/8/2019 Ecdl v4 Mod5 Office-2000 Manual
http://slidepdf.com/reader/full/ecdl-v4-mod5-office-2000-manual 36/77
28
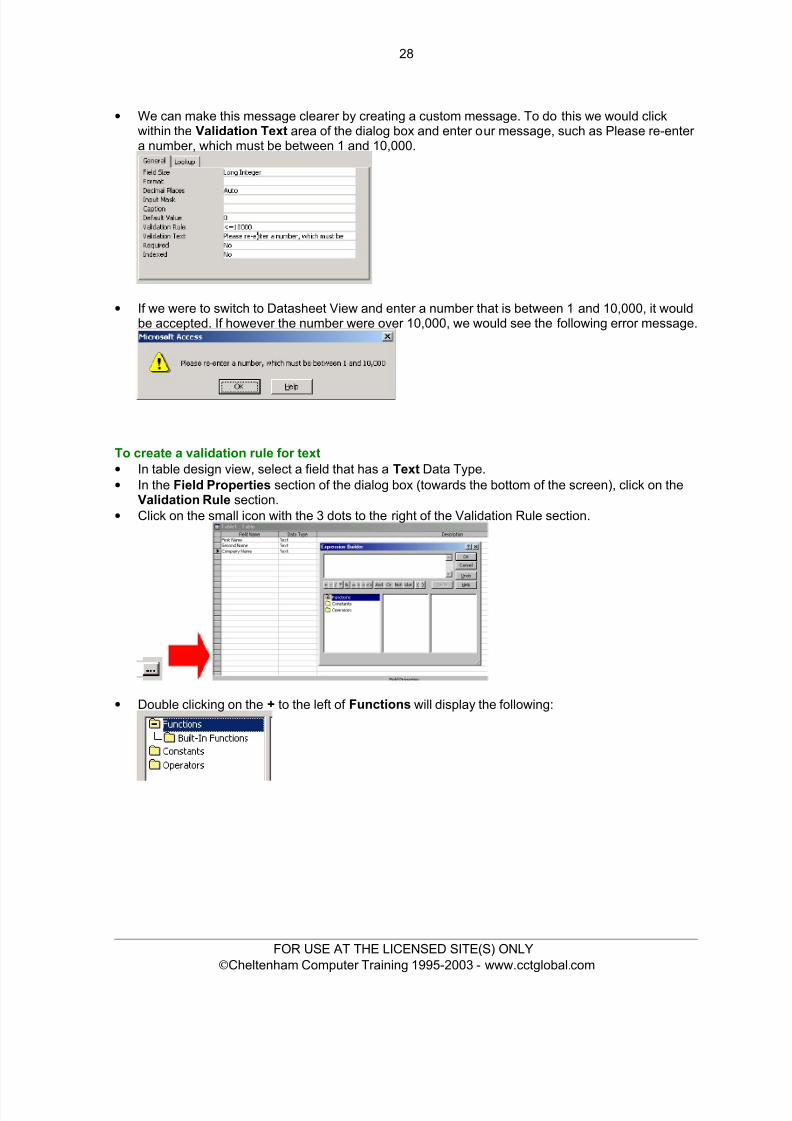
• We can make this message clearer by creating a custom message. To do this we would clickwithin the Validation Text area of the dialog box and enter our message, such as Please re-enter a number, which must be between 1 and 10,000.
• If we were to switch to Datasheet View and enter a number that is between 1 and 10,000, it wouldbe accepted. If however the number were over 10,000, we would see the following error message.
To create a validation rule for text• In table design view, select a field that has a Text Data Type.• In the Field Properties section of the dialog box (towards the bottom of the screen), click on the
Validation Rule section.• Click on the small icon with the 3 dots to the right of the Validation Rule section.
• Double clicking on the + to the left of Functions will display the following:
FOR USE AT THE LICENSED SITE(S) ONLY© Cheltenham Computer Training 1995-2003 - www.cctglobal.com
8/8/2019 Ecdl v4 Mod5 Office-2000 Manual
http://slidepdf.com/reader/full/ecdl-v4-mod5-office-2000-manual 37/77
29
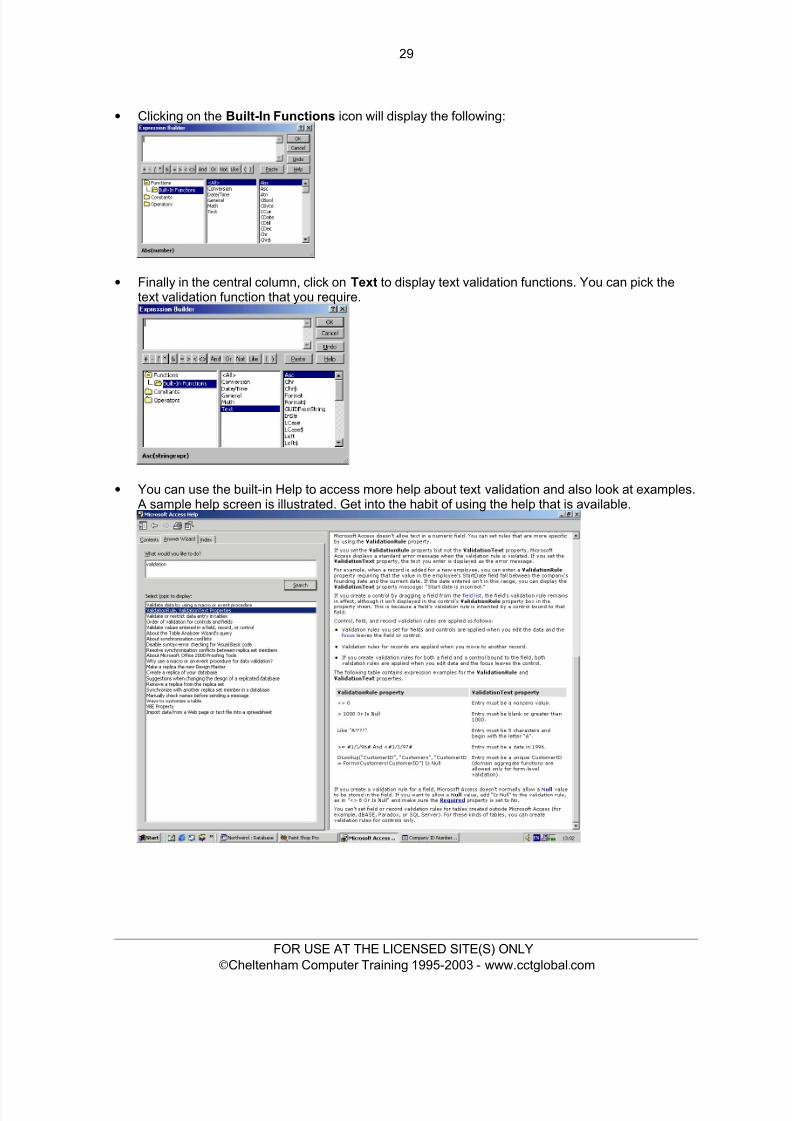
• Clicking on the Built-In Functions icon will display the following:
• Finally in the central column, click on Text to display text validation functions. You can pick thetext validation function that you require.
• You can use the built-in Help to access more help about text validation and also look at examples.A sample help screen is illustrated. Get into the habit of using the help that is available.
FOR USE AT THE LICENSED SITE(S) ONLY© Cheltenham Computer Training 1995-2003 - www.cctglobal.com
8/8/2019 Ecdl v4 Mod5 Office-2000 Manual
http://slidepdf.com/reader/full/ecdl-v4-mod5-office-2000-manual 38/77
30
To create a validation rule for a date or time• In table design view, select a field that has a Date/Time Data Type.• In the Field Properties section of the dialog box (towards the bottom of the screen), click on the
Validation Rule section. You can enter an expression such as the following, which would onlyallow a date to be entered using the year 2002.
>=#1/1/02# And < # 1/1/03#
To create a validation rule for currency• In table design view, select a field that has a Currency Data Type.• In the Field Properties section of the dialog box (towards the bottom of the screen), click on the
Validation Rule section. You can enter an expression such as the following, which would onlyallow an amount to be entered in the range of 1 to 10000.
>0 And <=10000
5.2.3.4 Change width of columns in a table.To change the width of a column• Move the mouse pointer to the line at the right of the field (column heading). It will change to
resemble a solid vertical bar intersected by a double-headed arrow.• Drag the column border to the size you want.
5.2.3.5 Move a column within a table
To move a column(s)• Select the column(s) and release the mouse button.• Click on the field selector and drag the column(s) to the new location. As you drag the columns a
solid bar between columns indicates the current position of the columns being moved.
5.2.4 Table Relationships
5.2.4.1 Create a one-to-one or one-to-many relationship between tables.
To create a one-to-one relationship between tables• Click on the Tools drop down menu and select Relationships .• If the Show Table dialog box is not already displayed click on the Show Table icon on the
Relationships toolbar.• Select the table you want to add from the Table list. Use the Ctrl key to add more than one table
or the Shift key to add a block.• Click the Add button.• Select a second table from the Show Table dialog box.• Click the Add button.
FOR USE AT THE LICENSED SITE(S) ONLY© Cheltenham Computer Training 1995-2003 - www.cctglobal.com
8/8/2019 Ecdl v4 Mod5 Office-2000 Manual
http://slidepdf.com/reader/full/ecdl-v4-mod5-office-2000-manual 39/77
31
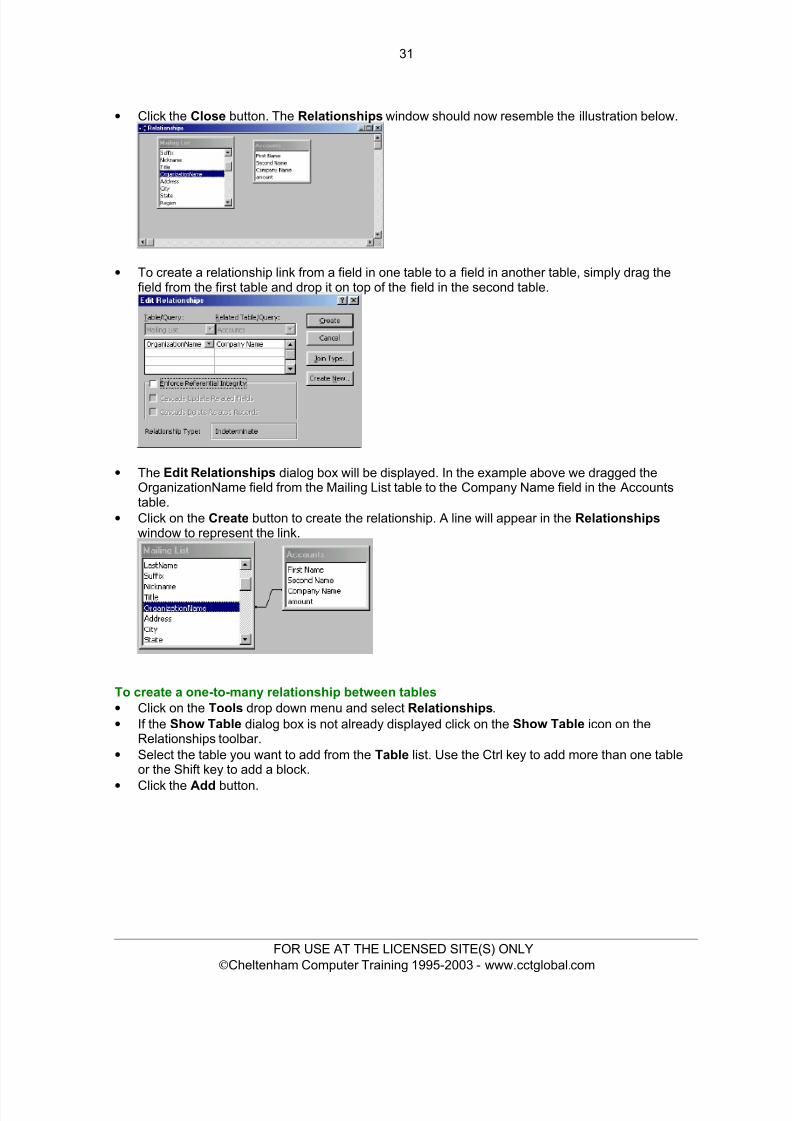
• Click the Close button. The Relationships window should now resemble the illustration below.
• To create a relationship link from a field in one table to a field in another table, simply drag thefield from the first table and drop it on top of the field in the second table.
• The Edit Relationships dialog box will be displayed. In the example above we dragged theOrganizationName field from the Mailing List table to the Company Name field in the Accountstable.
• Click on the Create button to create the relationship. A line will appear in the Relationshipswindow to represent the link.
To create a one-to-many relationship between tables• Click on the Tools drop down menu and select Relationships .• If the Show Table dialog box is not already displayed click on the Show Table icon on the
Relationships toolbar.• Select the table you want to add from the Table list. Use the Ctrl key to add more than one table
or the Shift key to add a block.• Click the Add button.
FOR USE AT THE LICENSED SITE(S) ONLY© Cheltenham Computer Training 1995-2003 - www.cctglobal.com
8/8/2019 Ecdl v4 Mod5 Office-2000 Manual
http://slidepdf.com/reader/full/ecdl-v4-mod5-office-2000-manual 40/77
32
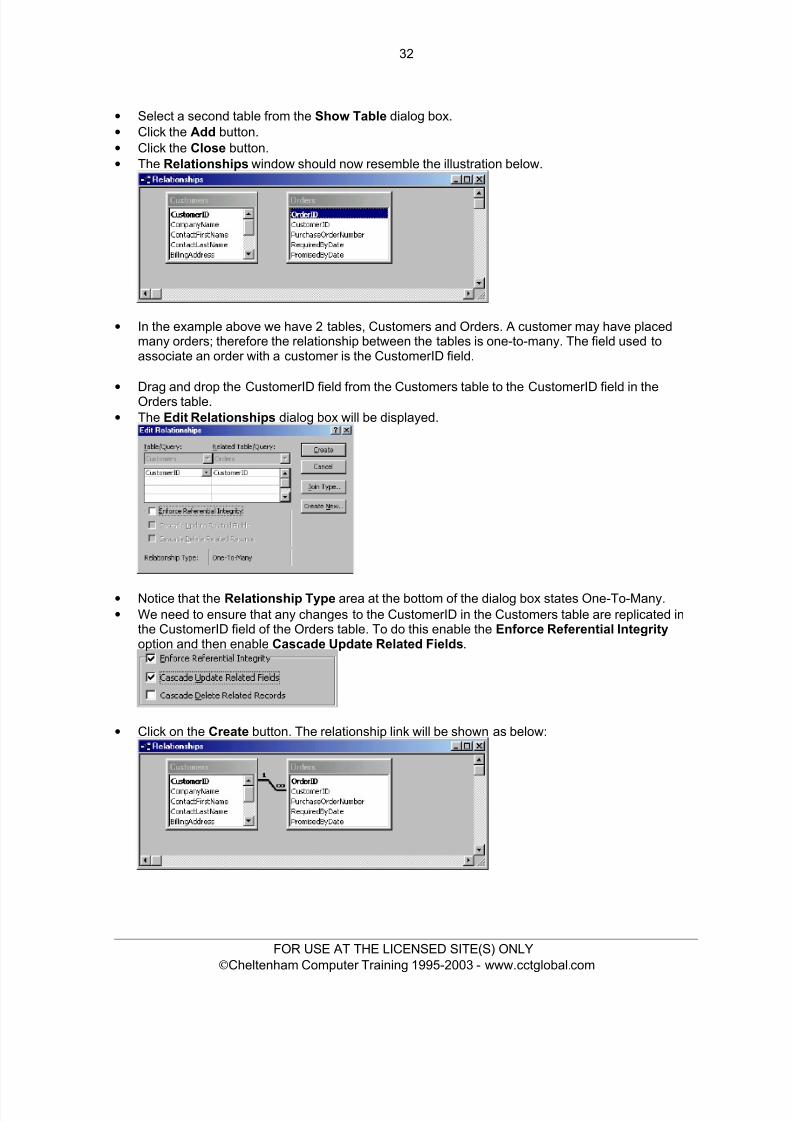
• Select a second table from the Show Table dialog box.• Click the Add button.• Click the Close button.• The Relationships window should now resemble the illustration below.
• In the example above we have 2 tables, Customers and Orders. A customer may have placedmany orders; therefore the relationship between the tables is one-to-many. The field used toassociate an order with a customer is the CustomerID field.
•Drag and drop the CustomerID field from the Customers table to the CustomerID field in theOrders table.
• The Edit Relationships dialog box will be displayed.
• Notice that the Relationship Type area at the bottom of the dialog box states One-To-Many.• We need to ensure that any changes to the CustomerID in the Customers table are replicated in
the CustomerID field of the Orders table. To do this enable the Enforce Referential Integrityoption and then enable Cascade Update Related Fields .
• Click on the Create button. The relationship link will be shown as below:
FOR USE AT THE LICENSED SITE(S) ONLY© Cheltenham Computer Training 1995-2003 - www.cctglobal.com

8/8/2019 Ecdl v4 Mod5 Office-2000 Manual
http://slidepdf.com/reader/full/ecdl-v4-mod5-office-2000-manual 41/77
33
• The infinity symbol at the Orders end of the link means that there may be more than one order from a particular customer in the Orders table.
5.2.4.2 Delete relationships between tables.
To delete a relationship between tables• Click on the Tools drop down menu and select Relationships .• Click on the relationship line that you wish to delete.• Press the Del key, and you will see a warning dialog box, asking if you wish to permanently
delete the relationship. Click on the Yes button to confirm the deletion.
5.2.4.3 Apply rule(s) to relationships such that fields that join tables are not deleted as long aslinks to another table exist.
To enforce referential integrity• When you create a relationship, or when you double click on an existing relationship line (within
the Relationships window), you will see the Edit Relationships dialog box. You can apply
relationship rules, by clicking on the Enforce Referential Integrity check box. This ensures thatrelationships between records in related tables are valid. It means that you will not be able toaccidentally modify related data.
Selecting Cascade Update Related Fields means that if you change the primary key in therecord of a primary table, Access updates the corresponding fields in related records with the newvalue. Example: If you change the number of an order, i.e. the primary key of the Orders record,Access will update the order number field on all of the associated Order Details records.
Selecting Cascade Delete Related Records means that if you delete a primary record, thecorresponding records in related tables will be deleted. Example: If you delete an Order record, allof the Order Detail records relating to that order will be deleted.
FOR USE AT THE LICENSED SITE(S) ONLY© Cheltenham Computer Training 1995-2003 - www.cctglobal.com

8/8/2019 Ecdl v4 Mod5 Office-2000 Manual
http://slidepdf.com/reader/full/ecdl-v4-mod5-office-2000-manual 42/77
34
5.3 Forms
5.3.1 Working with Forms
5.3.1.1 Open a formTo open a form• Within the main database window, select the form you wish to open, such as Categories (within
the Northwind database) in the example shown.
• Double click on the selected form to open, as illustrated.
FOR USE AT THE LICENSED SITE(S) ONLY© Cheltenham Computer Training 1995-2003 - www.cctglobal.com
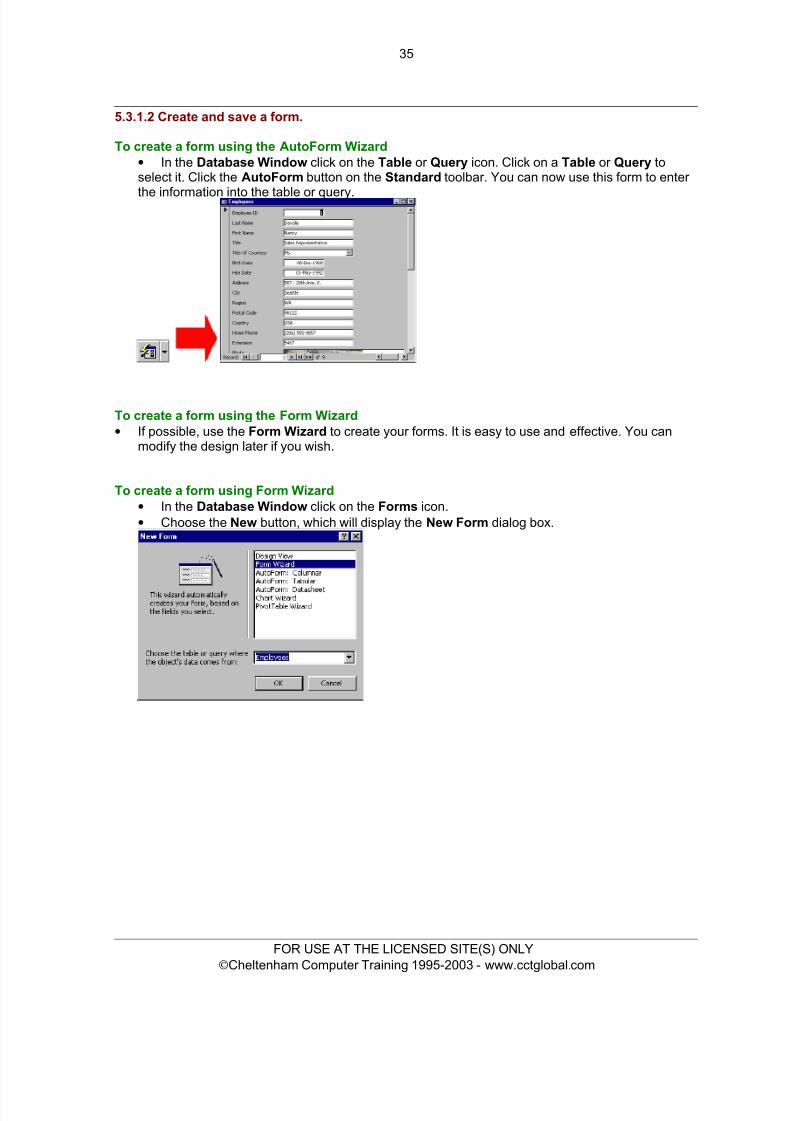
8/8/2019 Ecdl v4 Mod5 Office-2000 Manual
http://slidepdf.com/reader/full/ecdl-v4-mod5-office-2000-manual 43/77
35
5.3.1.2 Create and save a form.
To create a form using the AutoForm Wizard• In the Database Window click on the Table or Query icon. Click on a Table or Query toselect it. Click the AutoForm button on the Standard toolbar. You can now use this form to enter
the information into the table or query.
To create a form using the Form Wizard• If possible, use the Form Wizard to create your forms. It is easy to use and effective. You can
modify the design later if you wish.
To create a form using Form Wizard• In the Database Window click on the Forms icon.• Choose the New button, which will display the New Form dialog box.
FOR USE AT THE LICENSED SITE(S) ONLY© Cheltenham Computer Training 1995-2003 - www.cctglobal.com
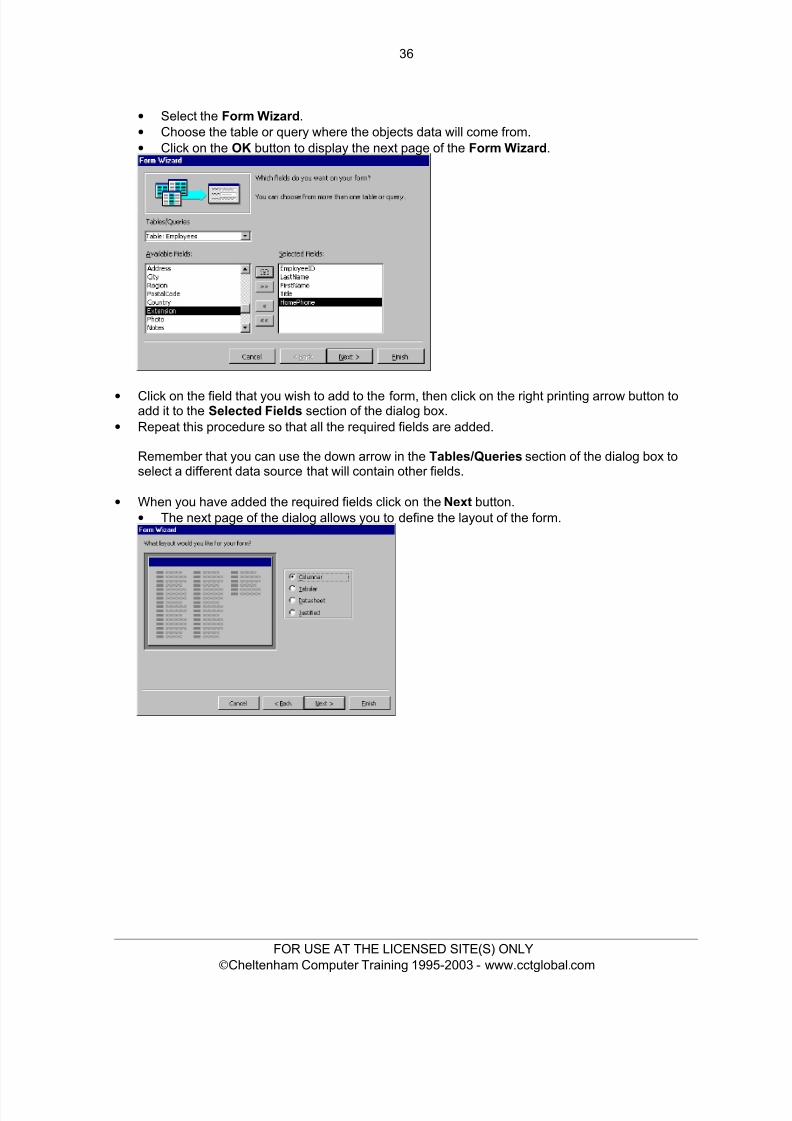
8/8/2019 Ecdl v4 Mod5 Office-2000 Manual
http://slidepdf.com/reader/full/ecdl-v4-mod5-office-2000-manual 44/77
36
• Select the Form Wizard .• Choose the table or query where the objects data will come from.• Click on the OK button to display the next page of the Form Wizard .
• Click on the field that you wish to add to the form, then click on the right printing arrow button toadd it to the Selected Fields section of the dialog box.
• Repeat this procedure so that all the required fields are added.
Remember that you can use the down arrow in the Tables/Queries section of the dialog box toselect a different data source that will contain other fields.
• When you have added the required fields click on the Next button.• The next page of the dialog allows you to define the layout of the form.
FOR USE AT THE LICENSED SITE(S) ONLY© Cheltenham Computer Training 1995-2003 - www.cctglobal.com
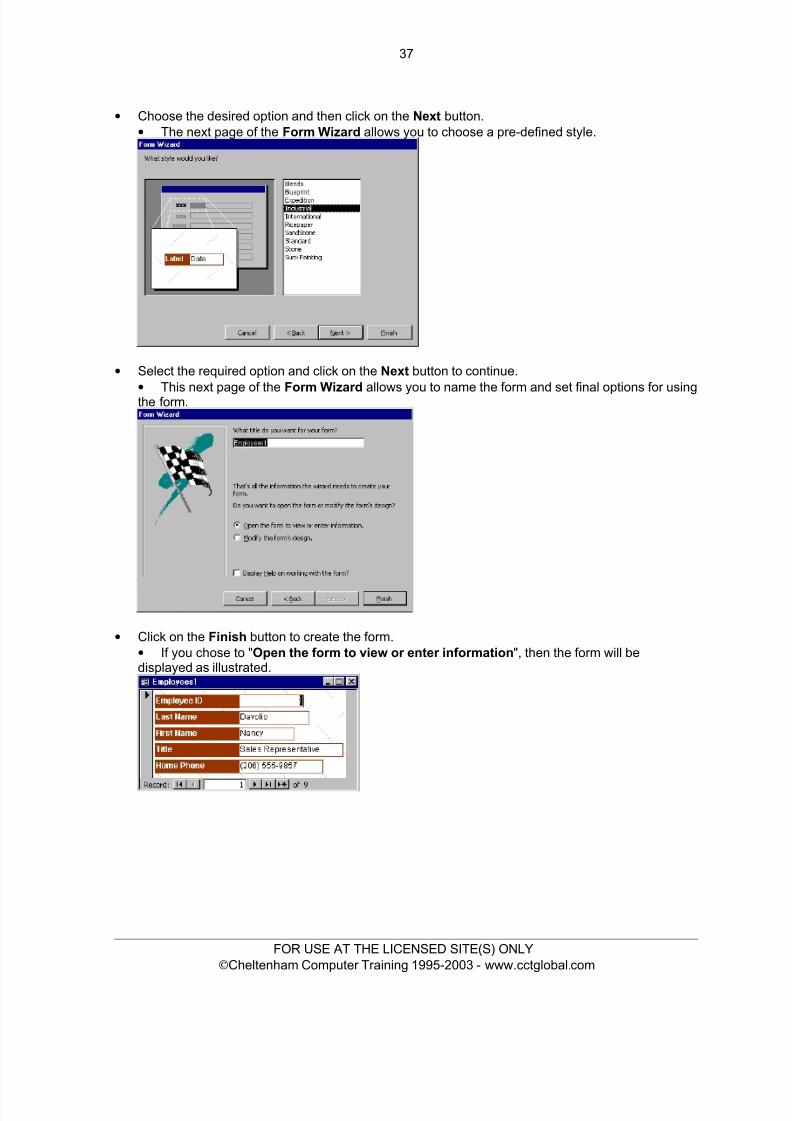
8/8/2019 Ecdl v4 Mod5 Office-2000 Manual
http://slidepdf.com/reader/full/ecdl-v4-mod5-office-2000-manual 45/77
37
• Choose the desired option and then click on the Next button.• The next page of the Form Wizard allows you to choose a pre-defined style.
• Select the required option and click on the Next button to continue.•
This next page of the Form Wizard allows you to name the form and set final options for usingthe form.
• Click on the Finish button to create the form.• If you chose to " Open the form to view or enter information ", then the form will bedisplayed as illustrated.
FOR USE AT THE LICENSED SITE(S) ONLY© Cheltenham Computer Training 1995-2003 - www.cctglobal.com
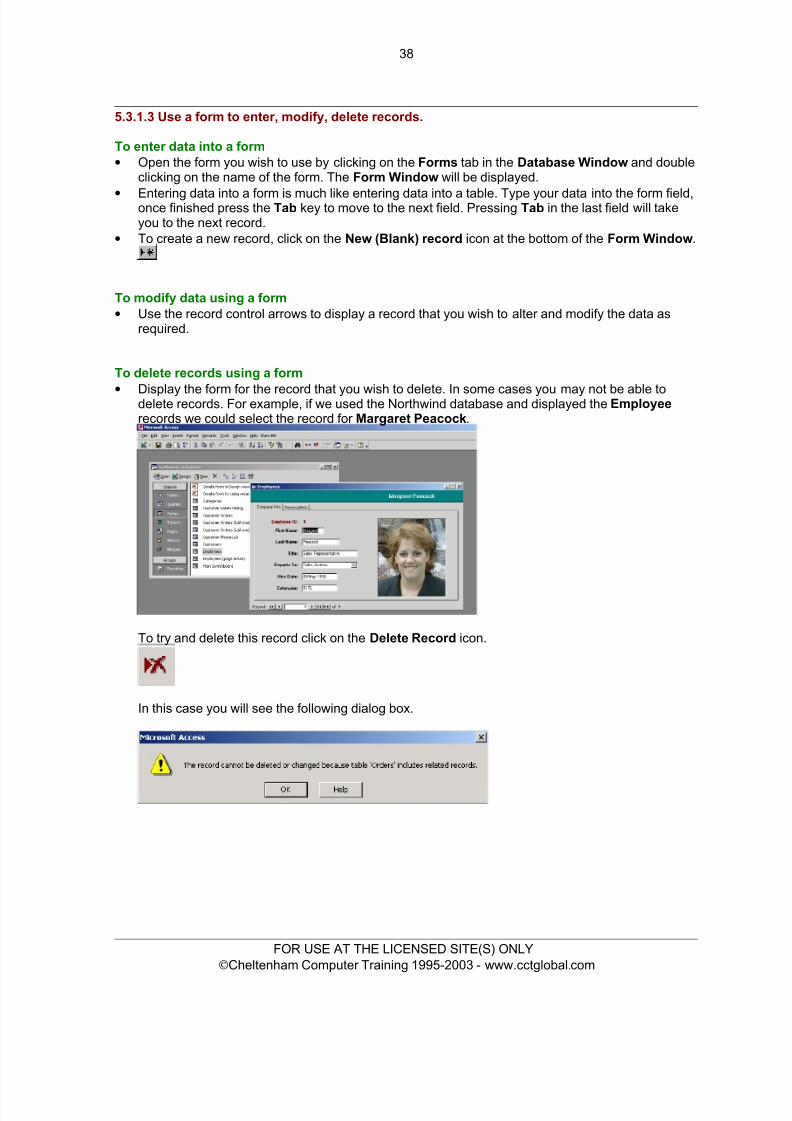
8/8/2019 Ecdl v4 Mod5 Office-2000 Manual
http://slidepdf.com/reader/full/ecdl-v4-mod5-office-2000-manual 46/77
38
5.3.1.3 Use a form to enter, modify, delete records.
To enter data into a form• Open the form you wish to use by clicking on the Forms tab in the Database Window and double
clicking on the name of the form. The Form Window will be displayed.
• Entering data into a form is much like entering data into a table. Type your data into the form field,once finished press the Tab key to move to the next field. Pressing Tab in the last field will takeyou to the next record.
• To create a new record, click on the New (Blank) record icon at the bottom of the Form Window .
To modify data using a form• Use the record control arrows to display a record that you wish to alter and modify the data as
required.
To delete records using a form
• Display the form for the record that you wish to delete. In some cases you may not be able todelete records. For example, if we used the Northwind database and displayed the Employeerecords we could select the record for Margaret Peacock .
To try and delete this record click on the Delete Record icon.
In this case you will see the following dialog box.
FOR USE AT THE LICENSED SITE(S) ONLY© Cheltenham Computer Training 1995-2003 - www.cctglobal.com
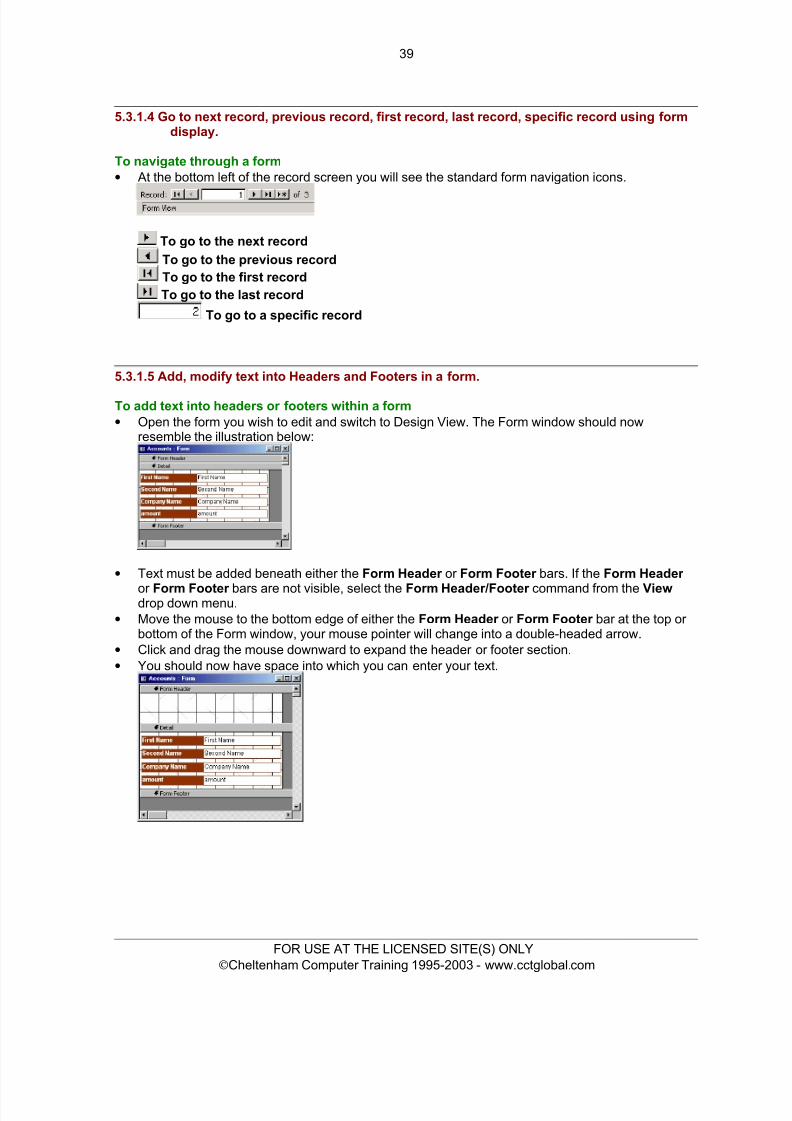
8/8/2019 Ecdl v4 Mod5 Office-2000 Manual
http://slidepdf.com/reader/full/ecdl-v4-mod5-office-2000-manual 47/77
39
5.3.1.4 Go to next record, previous record, first record, last record, specific record using formdisplay.
To navigate through a form• At the bottom left of the record screen you will see the standard form navigation icons.
To go to the next record To go to the previous recordTo go to the first record
To go to the last record
To go to a specific record
5.3.1.5 Add, modify text into Headers and Footers in a form.
To add text into headers or footers within a form• Open the form you wish to edit and switch to Design View. The Form window should now
resemble the illustration below:
• Text must be added beneath either the Form Header or Form Footer bars. If the Form Header
or Form Footer bars are not visible, select the Form Header/Footer command from the Viewdrop down menu.
• Move the mouse to the bottom edge of either the Form Header or Form Footer bar at the top or bottom of the Form window, your mouse pointer will change into a double-headed arrow.
• Click and drag the mouse downward to expand the header or footer section.• You should now have space into which you can enter your text.
FOR USE AT THE LICENSED SITE(S) ONLY© Cheltenham Computer Training 1995-2003 - www.cctglobal.com
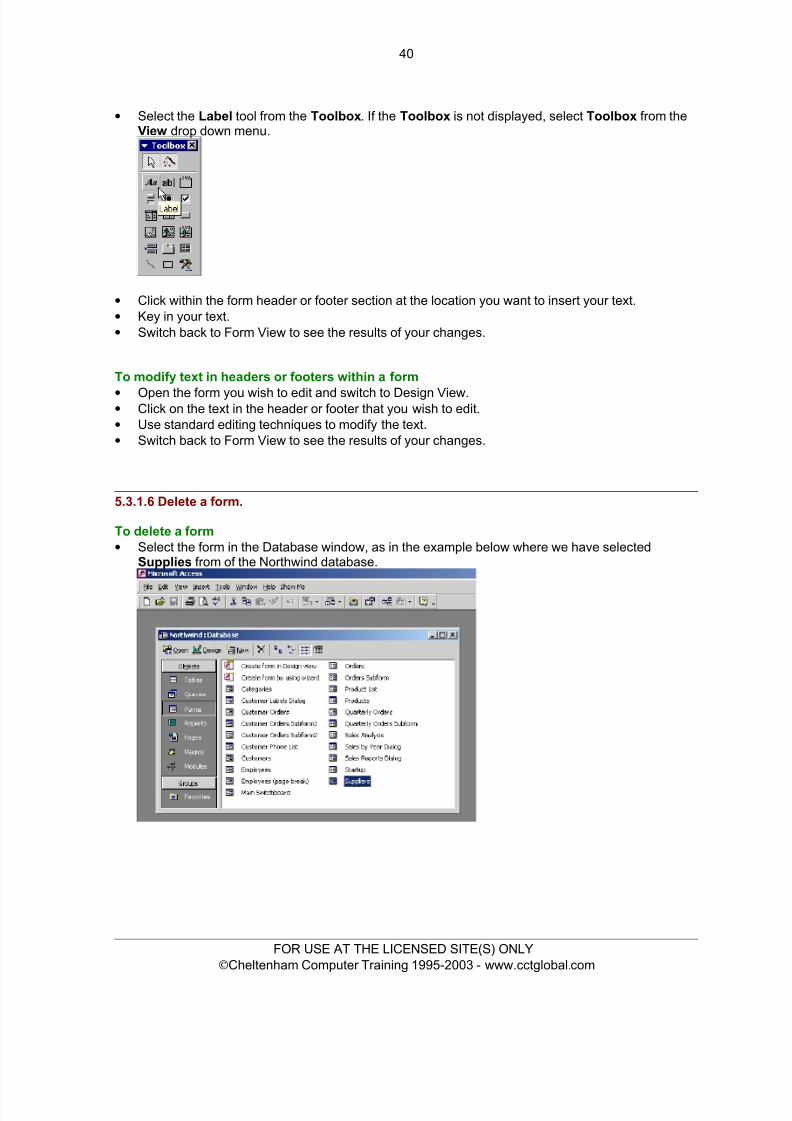
8/8/2019 Ecdl v4 Mod5 Office-2000 Manual
http://slidepdf.com/reader/full/ecdl-v4-mod5-office-2000-manual 48/77
40
• Select the Label tool from the Toolbox . If the Toolbox is not displayed, select Toolbox from theView drop down menu.
• Click within the form header or footer section at the location you want to insert your text.• Key in your text.• Switch back to Form View to see the results of your changes.
To modify text in headers or footers within a form• Open the form you wish to edit and switch to Design View.• Click on the text in the header or footer that you wish to edit.• Use standard editing techniques to modify the text.• Switch back to Form View to see the results of your changes.
5.3.1.6 Delete a form.
To delete a form• Select the form in the Database window, as in the example below where we have selected
Supplies from of the Northwind database.
FOR USE AT THE LICENSED SITE(S) ONLY© Cheltenham Computer Training 1995-2003 - www.cctglobal.com
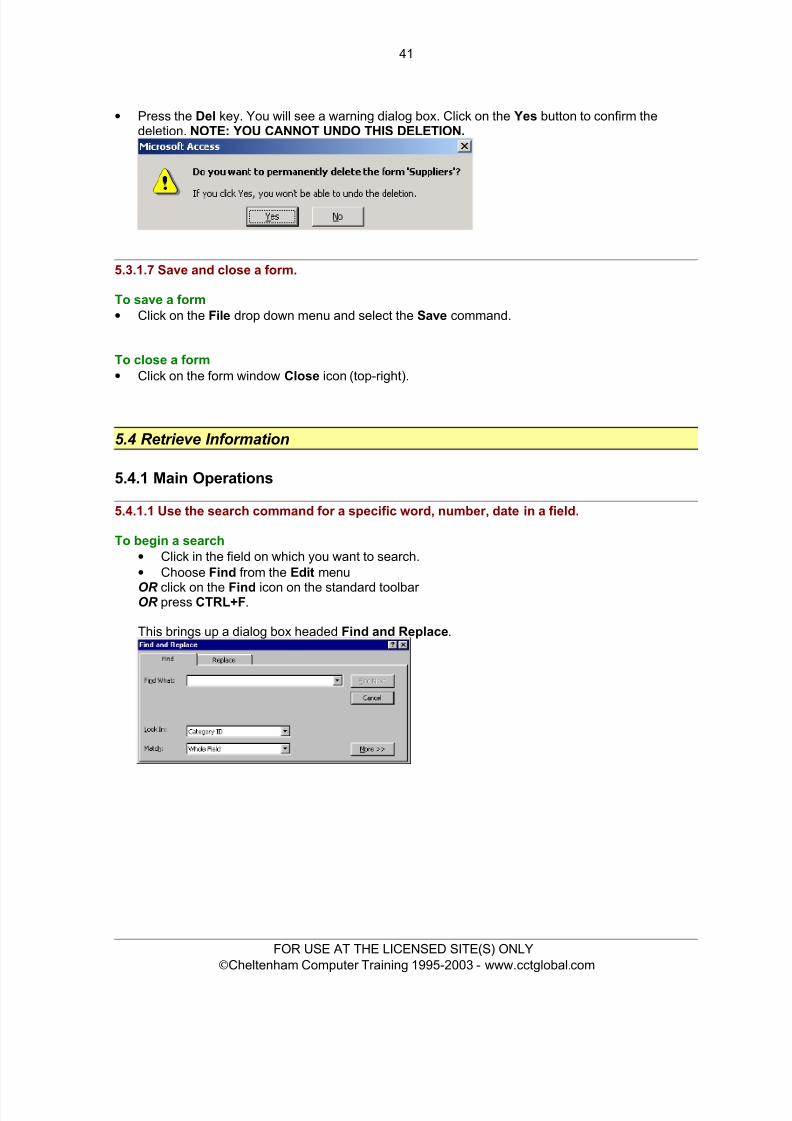
8/8/2019 Ecdl v4 Mod5 Office-2000 Manual
http://slidepdf.com/reader/full/ecdl-v4-mod5-office-2000-manual 49/77
41
• Press the Del key. You will see a warning dialog box. Click on the Yes button to confirm thedeletion. NOTE: YOU CANNOT UNDO THIS DELETION.
5.3.1.7 Save and close a form.
To save a form• Click on the File drop down menu and select the Save command.
To close a form• Click on the form window Close icon (top-right).
5.4 Retrieve Information
5.4.1 Main Operations
5.4.1.1 Use the search command for a specific word, number, date in a field.
To begin a search• Click in the field on which you want to search.• Choose Find from the Edit menu
OR click on the Find icon on the standard toolbar OR press CTRL+F .
This brings up a dialog box headed Find and Replace .
FOR USE AT THE LICENSED SITE(S) ONLY© Cheltenham Computer Training 1995-2003 - www.cctglobal.com
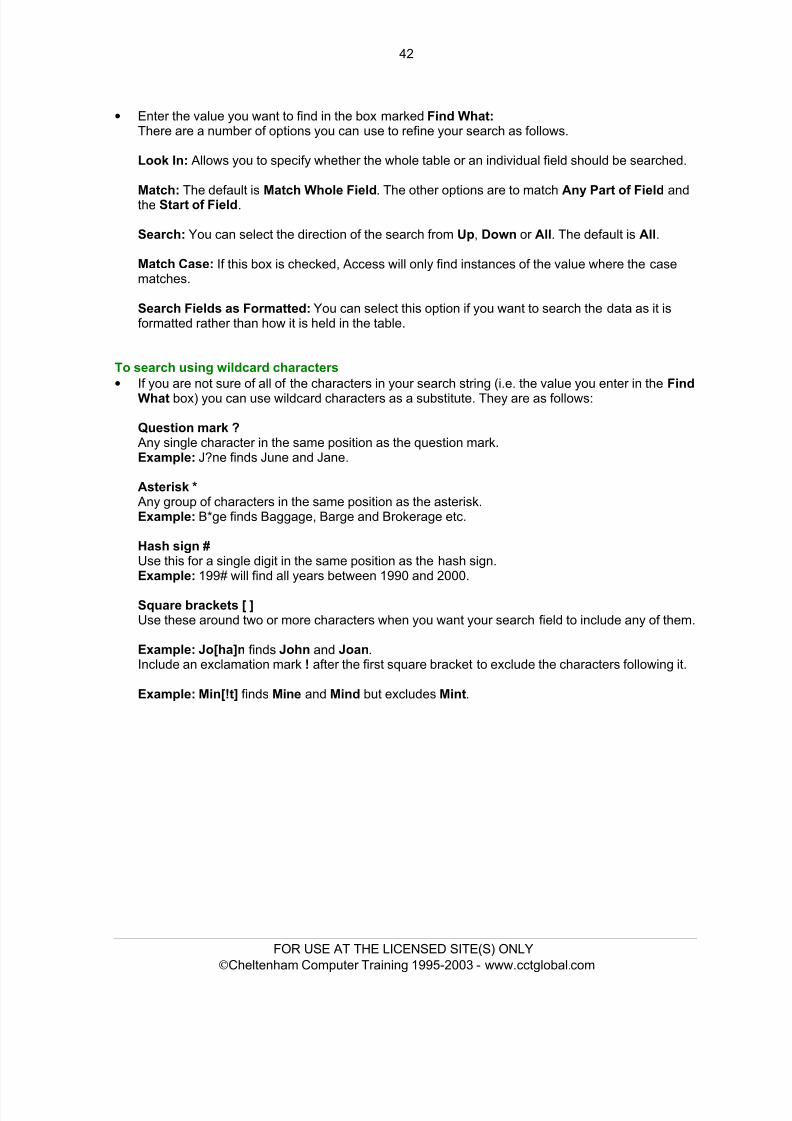
8/8/2019 Ecdl v4 Mod5 Office-2000 Manual
http://slidepdf.com/reader/full/ecdl-v4-mod5-office-2000-manual 50/77
42
• Enter the value you want to find in the box marked Find What:There are a number of options you can use to refine your search as follows.
Look In: Allows you to specify whether the whole table or an individual field should be searched.
Match: The default is Match Whole Field . The other options are to match Any Part of Field andthe Start of Field .
Search: You can select the direction of the search from Up , Down or All. The default is All .
Match Case: If this box is checked, Access will only find instances of the value where the casematches.
Search Fields as Formatted: You can select this option if you want to search the data as it isformatted rather than how it is held in the table.
To search using wildcard characters• If you are not sure of all of the characters in your search string (i.e. the value you enter in the Find
What box) you can use wildcard characters as a substitute. They are as follows:
Question mark ?Any single character in the same position as the question mark.Example: J?ne finds June and Jane.
Asterisk *Any group of characters in the same position as the asterisk.Example: B*ge finds Baggage, Barge and Brokerage etc.
Hash sign #Use this for a single digit in the same position as the hash sign.Example: 199# will find all years between 1990 and 2000.
Square brackets [ ]Use these around two or more characters when you want your search field to include any of them.
Example: Jo[ha]n finds John and Joan .Include an exclamation mark ! after the first square bracket to exclude the characters following it.
Example: Min[!t] finds Mine and Mind but excludes Mint .
FOR USE AT THE LICENSED SITE(S) ONLY© Cheltenham Computer Training 1995-2003 - www.cctglobal.com
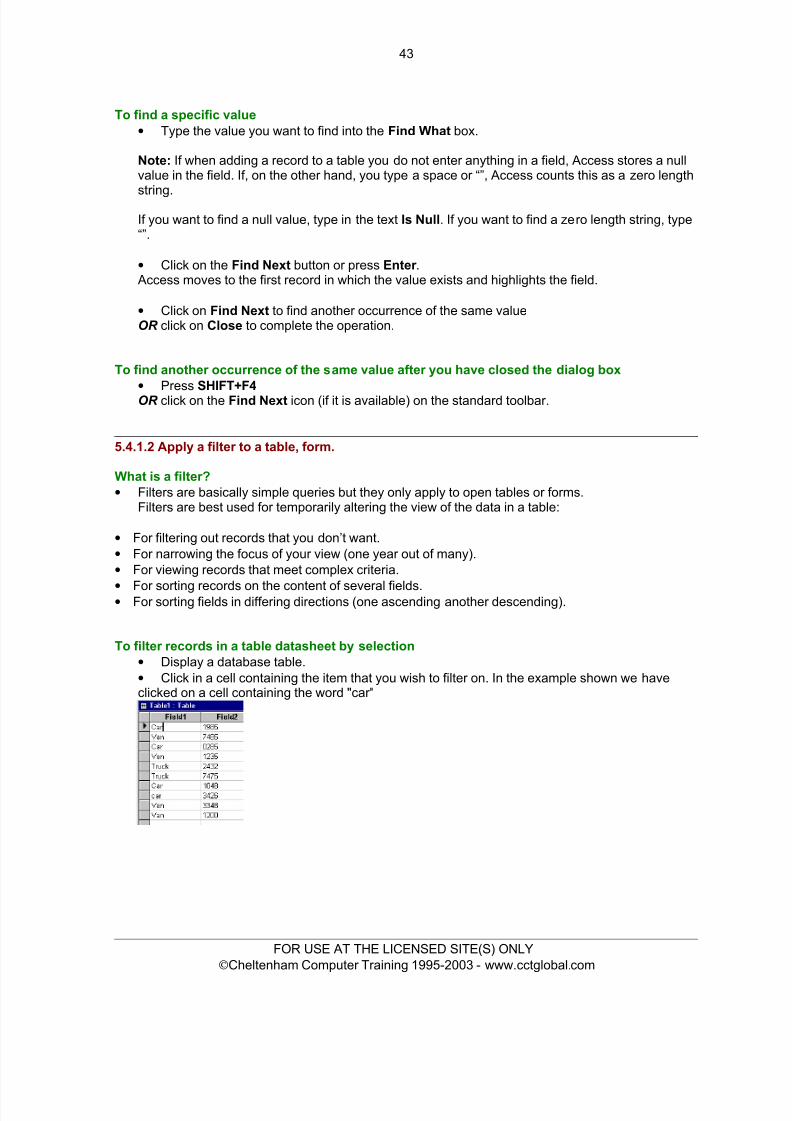
8/8/2019 Ecdl v4 Mod5 Office-2000 Manual
http://slidepdf.com/reader/full/ecdl-v4-mod5-office-2000-manual 51/77
43
To find a specific value• Type the value you want to find into the Find What box.
Note: If when adding a record to a table you do not enter anything in a field, Access stores a nullvalue in the field. If, on the other hand, you type a space or “”, Access counts this as a zero length
string.If you want to find a null value, type in the text Is Null . If you want to find a zero length string, type“”.
• Click on the Find Next button or press Enter .Access moves to the first record in which the value exists and highlights the field.
• Click on Find Next to find another occurrence of the same valueOR click on Close to complete the operation.
To find another occurrence of the same value after you have closed the dialog box• Press SHIFT+F4OR click on the Find Next icon (if it is available) on the standard toolbar.
5.4.1.2 Apply a filter to a table, form.
What is a filter?• Filters are basically simple queries but they only apply to open tables or forms.
Filters are best used for temporarily altering the view of the data in a table:
• For filtering out records that you don’t want.• For narrowing the focus of your view (one year out of many).• For viewing records that meet complex criteria.
• For sorting records on the content of several fields.• For sorting fields in differing directions (one ascending another descending).
To filter records in a table datasheet by selection• Display a database table.• Click in a cell containing the item that you wish to filter on. In the example shown we haveclicked on a cell containing the word "car"
FOR USE AT THE LICENSED SITE(S) ONLY© Cheltenham Computer Training 1995-2003 - www.cctglobal.com
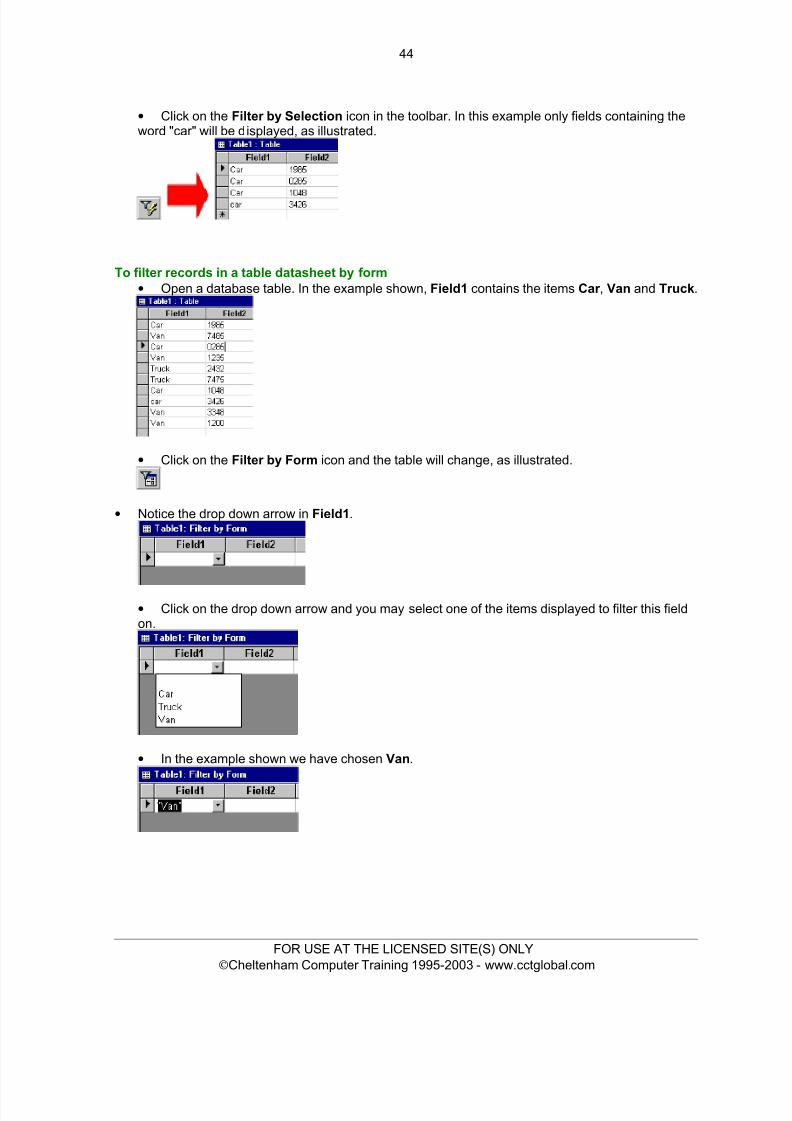
8/8/2019 Ecdl v4 Mod5 Office-2000 Manual
http://slidepdf.com/reader/full/ecdl-v4-mod5-office-2000-manual 52/77
44
• Click on the Filter by Selection icon in the toolbar. In this example only fields containing theword "car" will be displayed, as illustrated.
To filter records in a table datasheet by form• Open a database table. In the example shown, Field1 contains the items Car , Van and Truck .
• Click on the Filter by Form icon and the table will change, as illustrated.
• Notice the drop down arrow in Field1 .
• Click on the drop down arrow and you may select one of the items displayed to filter this fieldon.
• In the example shown we have chosen Van .
FOR USE AT THE LICENSED SITE(S) ONLY© Cheltenham Computer Training 1995-2003 - www.cctglobal.com
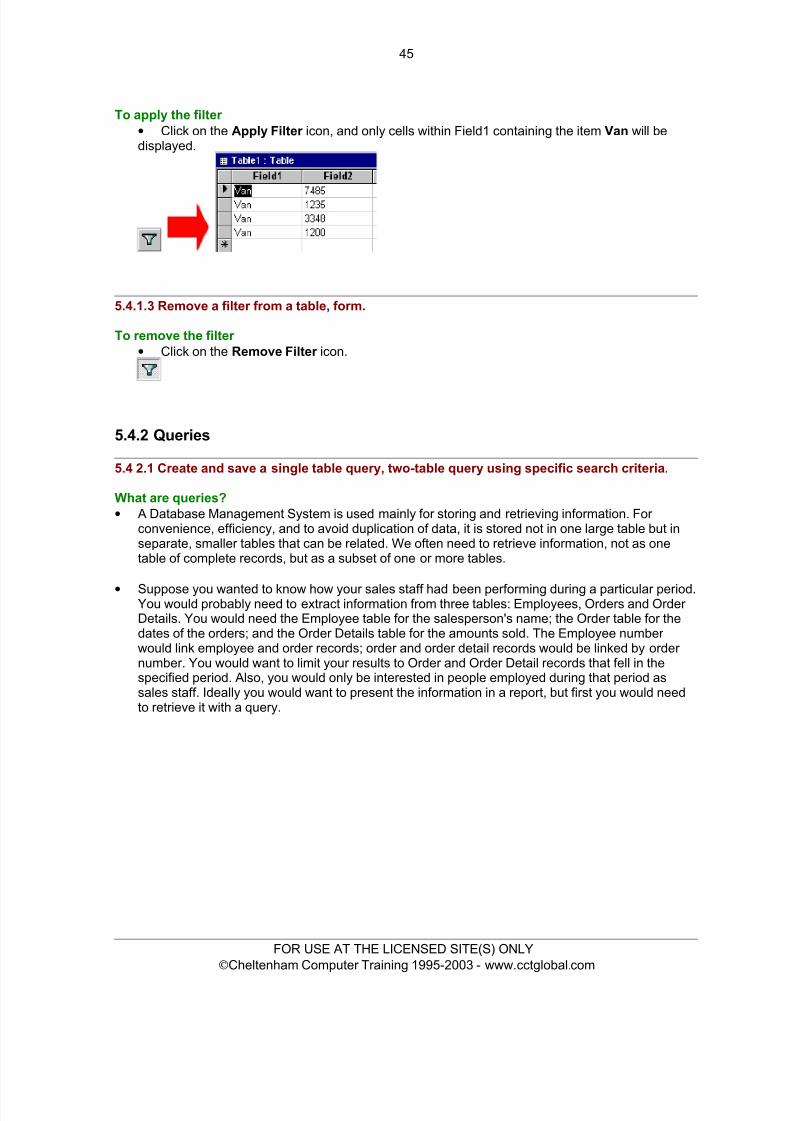
8/8/2019 Ecdl v4 Mod5 Office-2000 Manual
http://slidepdf.com/reader/full/ecdl-v4-mod5-office-2000-manual 53/77
45
To apply the filter • Click on the Apply Filter icon, and only cells within Field1 containing the item Van will bedisplayed.
5.4.1.3 Remove a filter from a table, form.
To remove the filter • Click on the Remove Filter icon.
5.4.2 Queries
5.4 2.1 Create and save a single table query, two-table query using specific search criteria.
What are queries?• A Database Management System is used mainly for storing and retrieving information. For
convenience, efficiency, and to avoid duplication of data, it is stored not in one large table but inseparate, smaller tables that can be related. We often need to retrieve information, not as onetable of complete records, but as a subset of one or more tables.
• Suppose you wanted to know how your sales staff had been performing during a particular period.You would probably need to extract information from three tables: Employees, Orders and Order Details. You would need the Employee table for the salesperson's name; the Order table for thedates of the orders; and the Order Details table for the amounts sold. The Employee number would link employee and order records; order and order detail records would be linked by order number. You would want to limit your results to Order and Order Detail records that fell in thespecified period. Also, you would only be interested in people employed during that period assales staff. Ideally you would want to present the information in a report, but first you would needto retrieve it with a query.
FOR USE AT THE LICENSED SITE(S) ONLY© Cheltenham Computer Training 1995-2003 - www.cctglobal.com

8/8/2019 Ecdl v4 Mod5 Office-2000 Manual
http://slidepdf.com/reader/full/ecdl-v4-mod5-office-2000-manual 54/77
46
To create a query using the Simple Query Wizard• In the database window, click the Query tab.• Click the New button to display a New Query dialog box.
• Select the Simply Query Wizard option, and then click on the OK button to move to the nextWizard page.
To select fields that you wish to add to your simple query• The dialog box should resemble that illustrated below.
• Click on the down arrow in the Tables/Queries text box to illustrate available queries and tablesfrom which you can select the fields of interest to you. In the example below, we have selectedNorthwind's Products table.
FOR USE AT THE LICENSED SITE(S) ONLY© Cheltenham Computer Training 1995-2003 - www.cctglobal.com
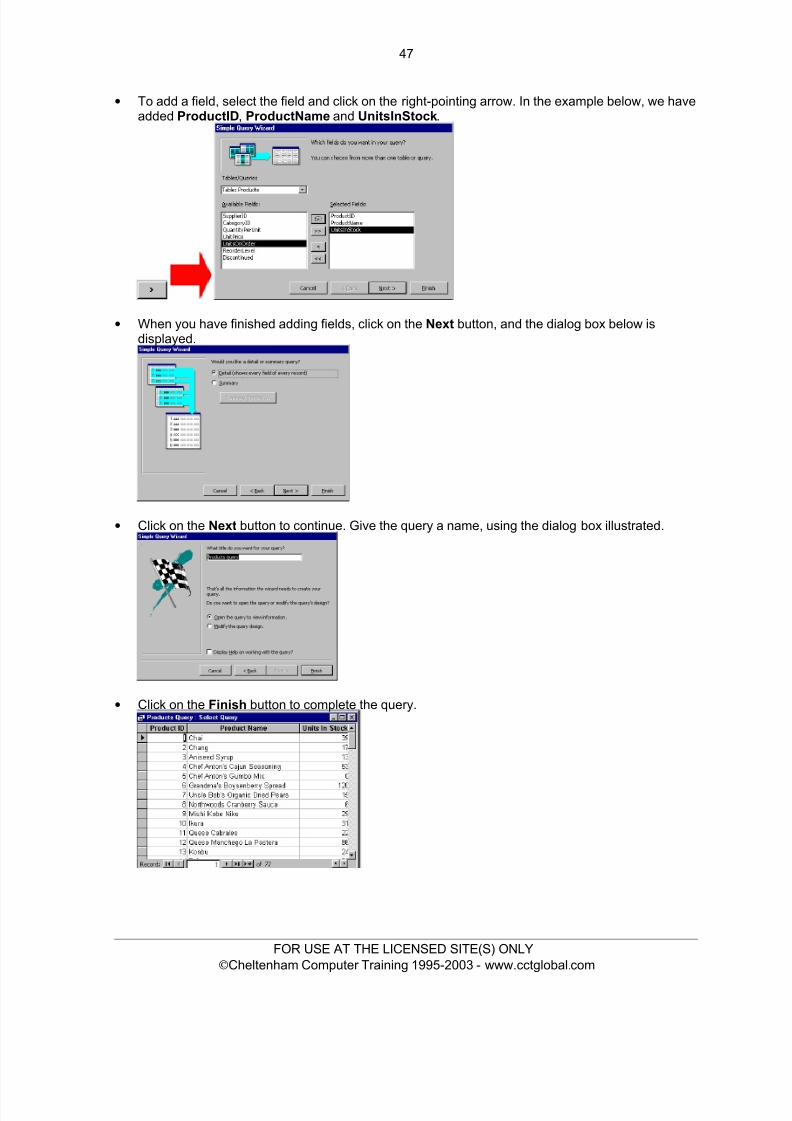
8/8/2019 Ecdl v4 Mod5 Office-2000 Manual
http://slidepdf.com/reader/full/ecdl-v4-mod5-office-2000-manual 55/77
47
• To add a field, select the field and click on the right-pointing arrow. In the example below, we haveadded ProductID , ProductName and UnitsInStock .
• When you have finished adding fields, click on the Next button, and the dialog box below isdisplayed.
• Click on the Next button to continue. Give the query a name, using the dialog box illustrated.
• Click on the Finish button to complete the query.
FOR USE AT THE LICENSED SITE(S) ONLY© Cheltenham Computer Training 1995-2003 - www.cctglobal.com
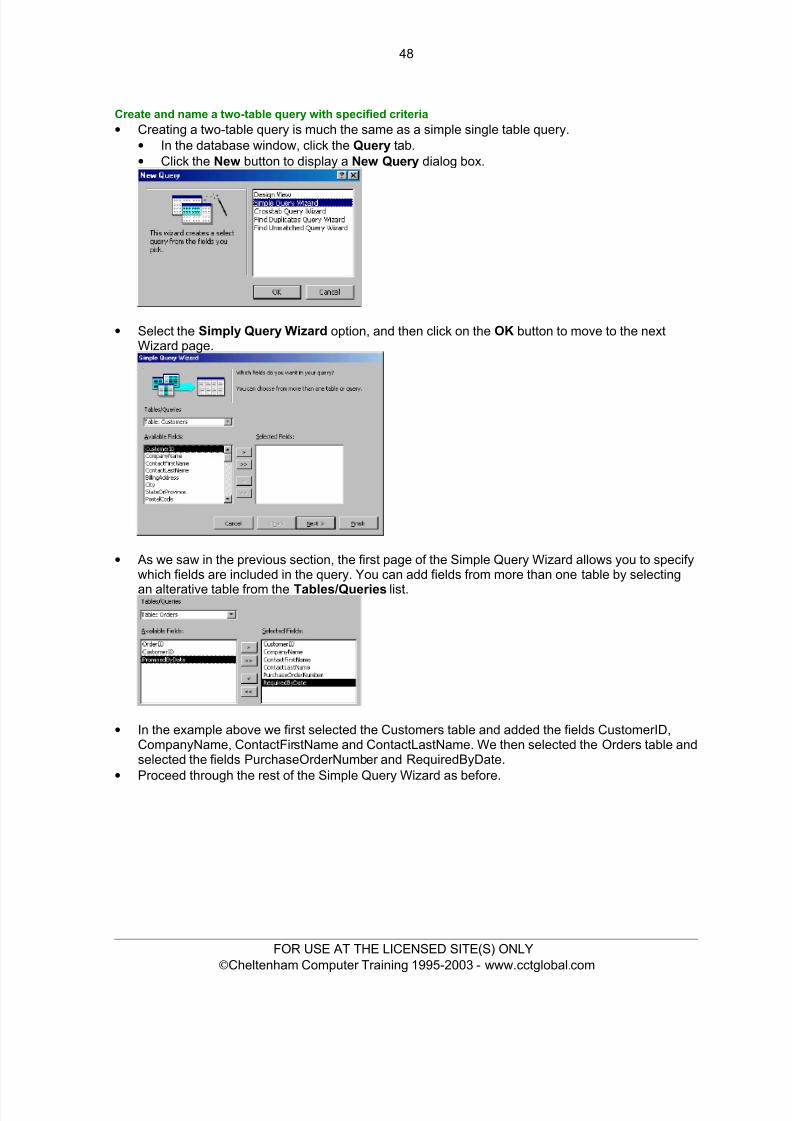
8/8/2019 Ecdl v4 Mod5 Office-2000 Manual
http://slidepdf.com/reader/full/ecdl-v4-mod5-office-2000-manual 56/77
48
Create and name a two-table query with specified criteria• Creating a two-table query is much the same as a simple single table query.
• In the database window, click the Query tab.• Click the New button to display a New Query dialog box.
• Select the Simply Query Wizard option, and then click on the OK button to move to the nextWizard page.
• As we saw in the previous section, the first page of the Simple Query Wizard allows you to specifywhich fields are included in the query. You can add fields from more than one table by selectingan alterative table from the Tables/Queries list.
• In the example above we first selected the Customers table and added the fields CustomerID,CompanyName, ContactFirstName and ContactLastName. We then selected the Orders table andselected the fields PurchaseOrderNumber and RequiredByDate.
• Proceed through the rest of the Simple Query Wizard as before.
FOR USE AT THE LICENSED SITE(S) ONLY© Cheltenham Computer Training 1995-2003 - www.cctglobal.com
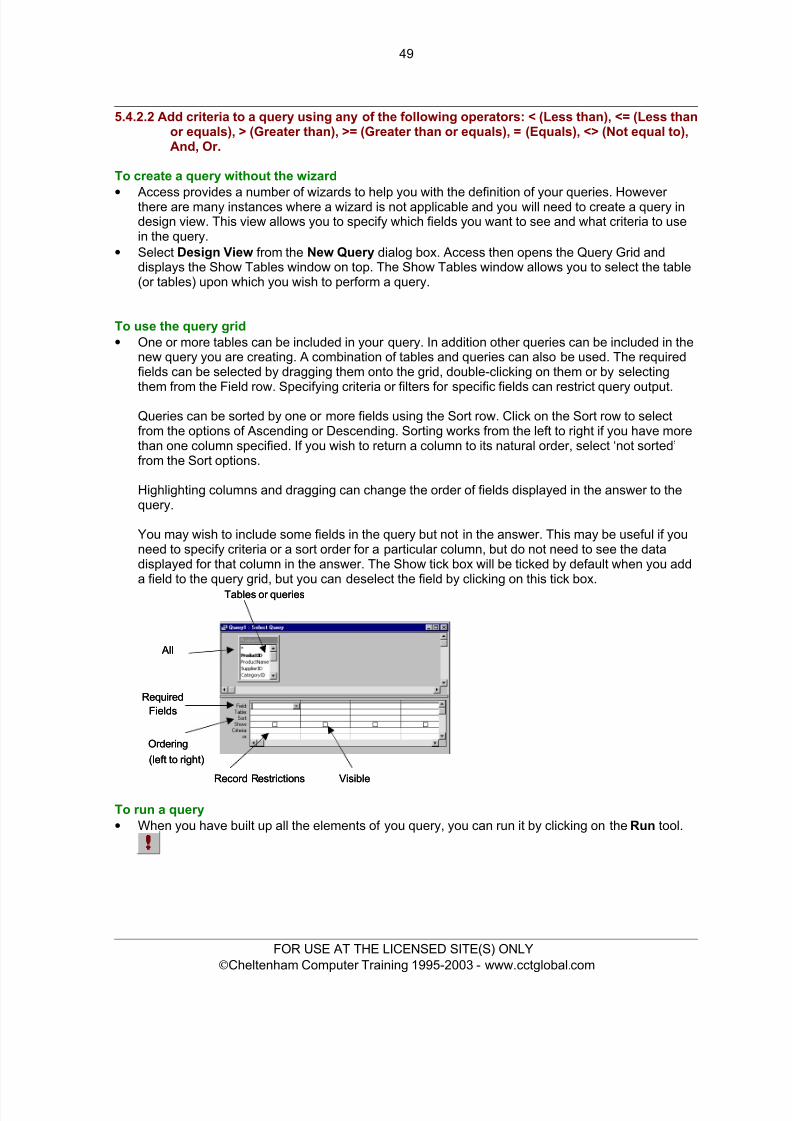
8/8/2019 Ecdl v4 Mod5 Office-2000 Manual
http://slidepdf.com/reader/full/ecdl-v4-mod5-office-2000-manual 57/77
49
5.4.2.2 Add criteria to a query using any of the following operators: < (Less than), <= (Less thanor equals), > (Greater than), >= (Greater than or equals), = (Equals), <> (Not equal to),And, Or.
To create a query without the wizard
• Access provides a number of wizards to help you with the definition of your queries. However there are many instances where a wizard is not applicable and you will need to create a query indesign view. This view allows you to specify which fields you want to see and what criteria to usein the query.
• Select Design View from the New Query dialog box. Access then opens the Query Grid anddisplays the Show Tables window on top. The Show Tables window allows you to select the table(or tables) upon which you wish to perform a query.
To use the query grid• One or more tables can be included in your query. In addition other queries can be included in the
new query you are creating. A combination of tables and queries can also be used. The requiredfields can be selected by dragging them onto the grid, double-clicking on them or by selecting
them from the Field row. Specifying criteria or filters for specific fields can restrict query output.Queries can be sorted by one or more fields using the Sort row. Click on the Sort row to selectfrom the options of Ascending or Descending. Sorting works from the left to right if you have morethan one column specified. If you wish to return a column to its natural order, select ‘not sorted’from the Sort options.
Highlighting columns and dragging can change the order of fields displayed in the answer to thequery.
You may wish to include some fields in the query but not in the answer. This may be useful if youneed to specify criteria or a sort order for a particular column, but do not need to see the datadisplayed for that column in the answer. The Show tick box will be ticked by default when you adda field to the query grid, but you can deselect the field by clicking on this tick box.
Record Restrictions Visible
Ordering
RequiredFields
All
Tables or queries
(left to right)
Record Restrictions Visible
Ordering
RequiredFields
All
Tables or queries
(left to right)
To run a query• When you have built up all the elements of you query, you can run it by clicking on the Run tool.
FOR USE AT THE LICENSED SITE(S) ONLY© Cheltenham Computer Training 1995-2003 - www.cctglobal.com
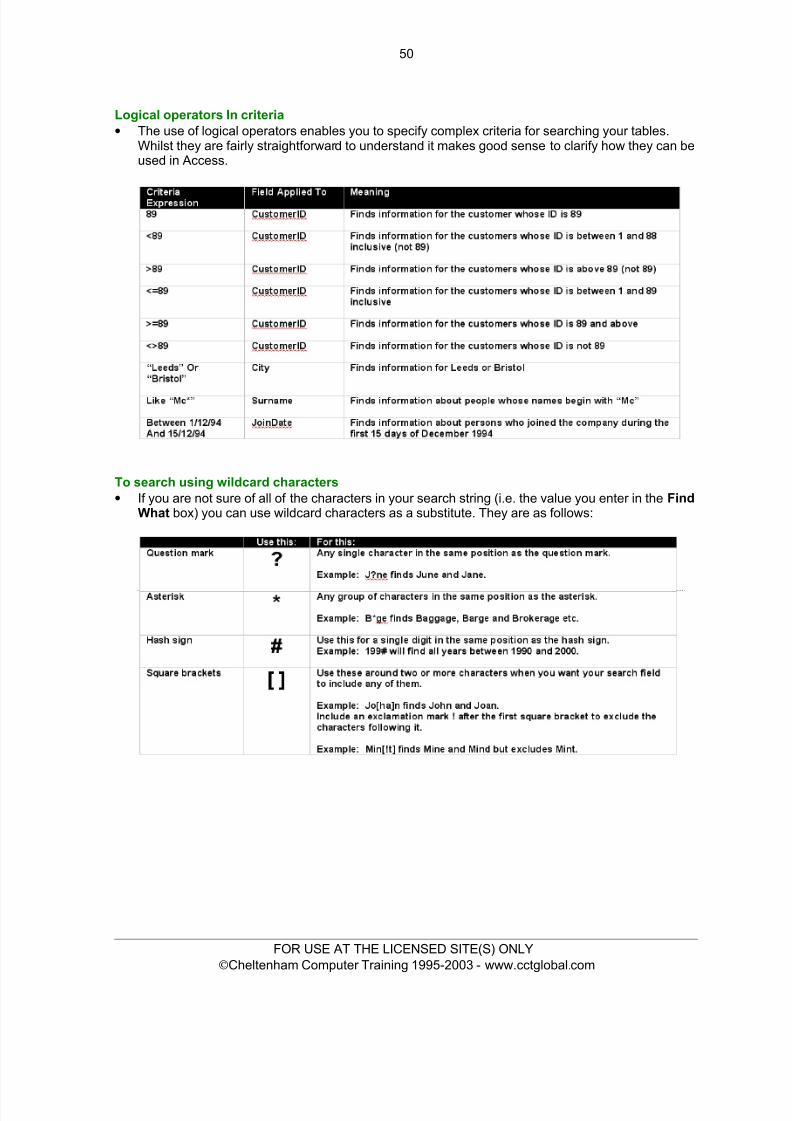
8/8/2019 Ecdl v4 Mod5 Office-2000 Manual
http://slidepdf.com/reader/full/ecdl-v4-mod5-office-2000-manual 58/77
50
Logical operators In criteria• The use of logical operators enables you to specify complex criteria for searching your tables.
Whilst they are fairly straightforward to understand it makes good sense to clarify how they can beused in Access.
To search using wildcard characters• If you are not sure of all of the characters in your search string (i.e. the value you enter in the Find
What box) you can use wildcard characters as a substitute. They are as follows:
FOR USE AT THE LICENSED SITE(S) ONLY© Cheltenham Computer Training 1995-2003 - www.cctglobal.com
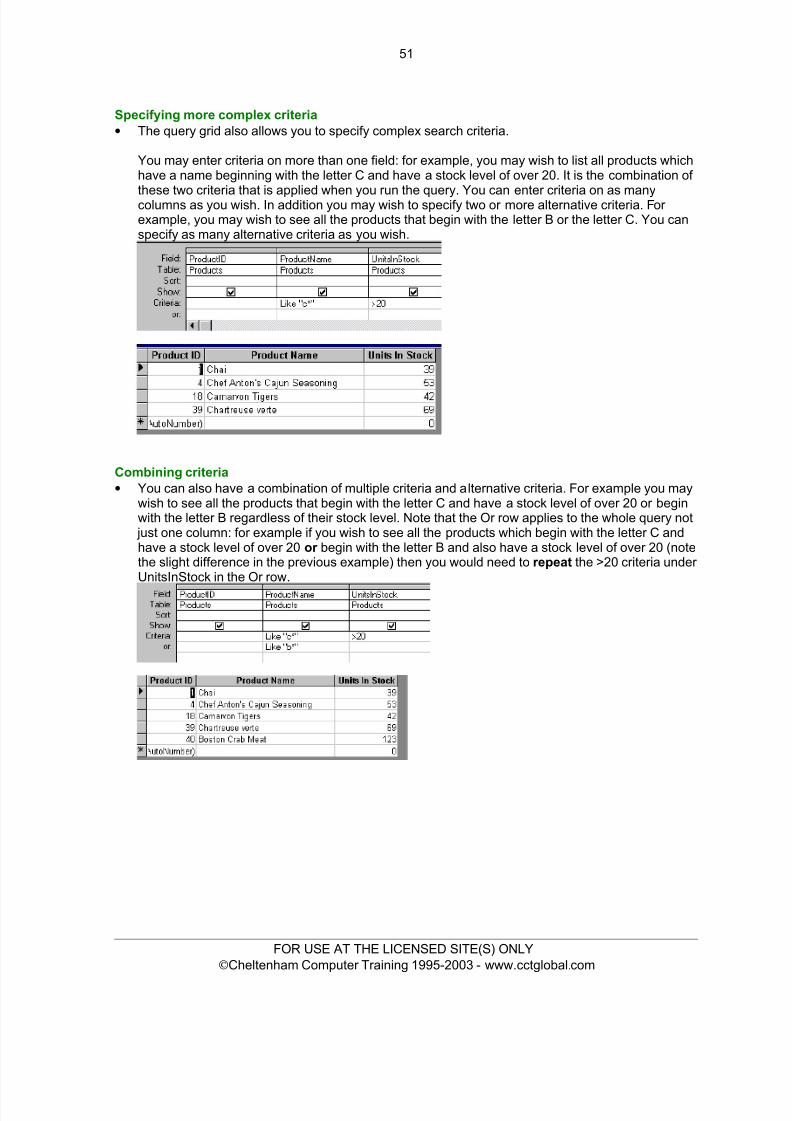
8/8/2019 Ecdl v4 Mod5 Office-2000 Manual
http://slidepdf.com/reader/full/ecdl-v4-mod5-office-2000-manual 59/77
51
Specifying more complex criteria• The query grid also allows you to specify complex search criteria.
You may enter criteria on more than one field: for example, you may wish to list all products whichhave a name beginning with the letter C and have a stock level of over 20. It is the combination of
these two criteria that is applied when you run the query. You can enter criteria on as manycolumns as you wish. In addition you may wish to specify two or more alternative criteria. For example, you may wish to see all the products that begin with the letter B or the letter C. You canspecify as many alternative criteria as you wish.
Combining criteria• You can also have a combination of multiple criteria and alternative criteria. For example you may
wish to see all the products that begin with the letter C and have a stock level of over 20 or beginwith the letter B regardless of their stock level. Note that the Or row applies to the whole query not
just one column: for example if you wish to see all the products which begin with the letter C andhave a stock level of over 20 or begin with the letter B and also have a stock level of over 20 (notethe slight difference in the previous example) then you would need to repeat the >20 criteria under UnitsInStock in the Or row.
FOR USE AT THE LICENSED SITE(S) ONLY© Cheltenham Computer Training 1995-2003 - www.cctglobal.com
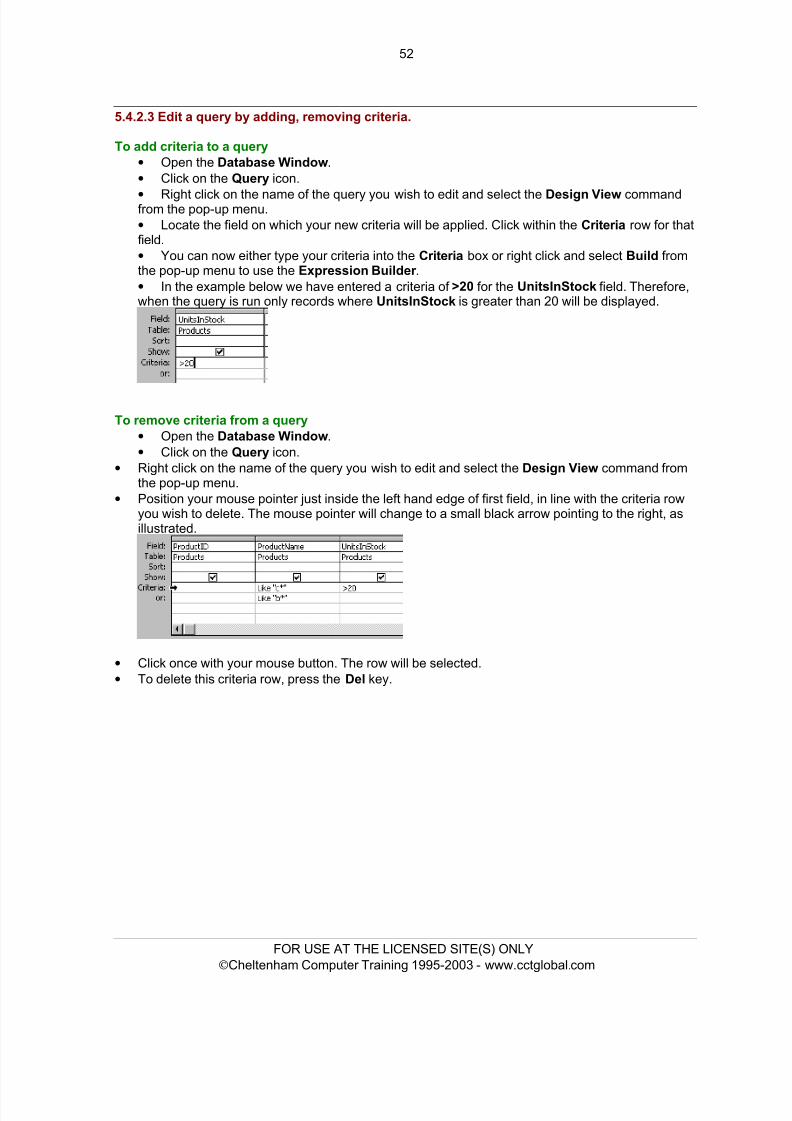
8/8/2019 Ecdl v4 Mod5 Office-2000 Manual
http://slidepdf.com/reader/full/ecdl-v4-mod5-office-2000-manual 60/77
52
5.4.2.3 Edit a query by adding, removing criteria.
To add criteria to a query• Open the Database Window .• Click on the Query icon.• Right click on the name of the query you wish to edit and select the Design View commandfrom the pop-up menu.• Locate the field on which your new criteria will be applied. Click within the Criteria row for thatfield.• You can now either type your criteria into the Criteria box or right click and select Build fromthe pop-up menu to use the Expression Builder .• In the example below we have entered a criteria of >20 for the UnitsInStock field. Therefore,when the query is run only records where UnitsInStock is greater than 20 will be displayed.
To remove criteria from a query• Open the Database Window .• Click on the Query icon.
• Right click on the name of the query you wish to edit and select the Design View command fromthe pop-up menu.
• Position your mouse pointer just inside the left hand edge of first field, in line with the criteria rowyou wish to delete. The mouse pointer will change to a small black arrow pointing to the right, asillustrated.
• Click once with your mouse button. The row will be selected.• To delete this criteria row, press the Del key.
FOR USE AT THE LICENSED SITE(S) ONLY© Cheltenham Computer Training 1995-2003 - www.cctglobal.com
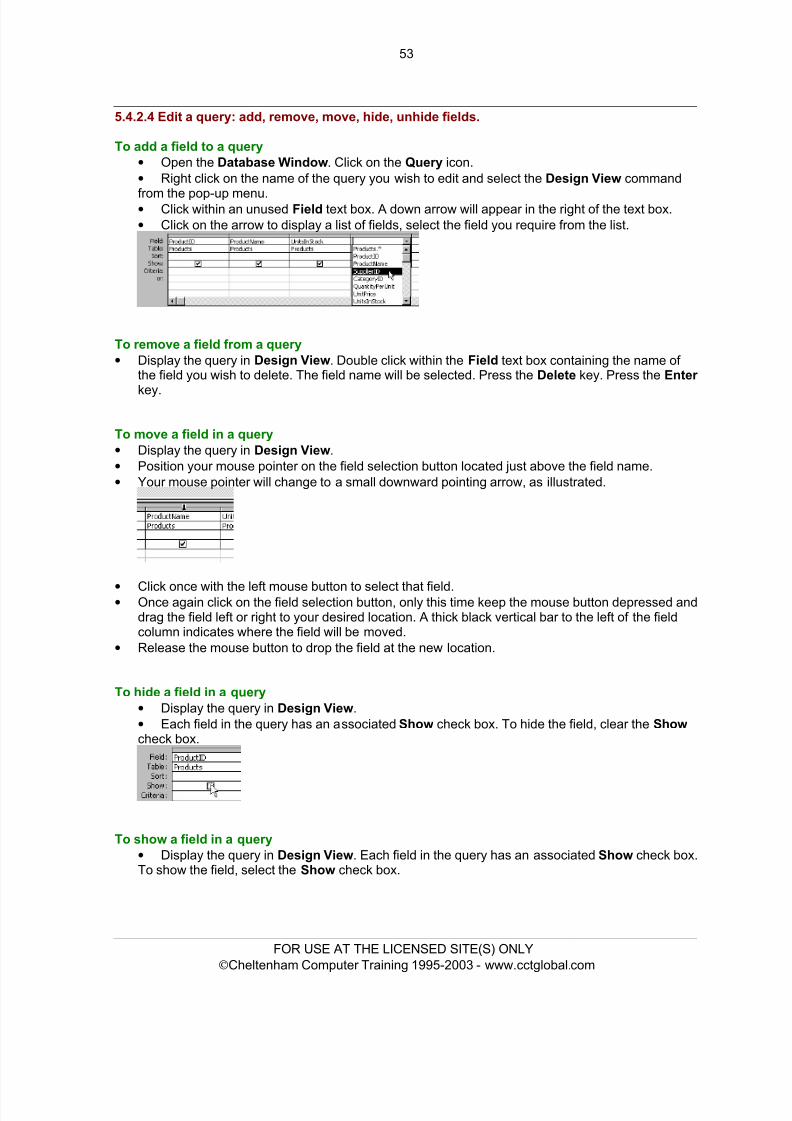
8/8/2019 Ecdl v4 Mod5 Office-2000 Manual
http://slidepdf.com/reader/full/ecdl-v4-mod5-office-2000-manual 61/77
53
5.4.2.4 Edit a query: add, remove, move, hide, unhide fields.
To add a field to a query• Open the Database Window . Click on the Query icon.• Right click on the name of the query you wish to edit and select the Design View command
from the pop-up menu.• Click within an unused Field text box. A down arrow will appear in the right of the text box.• Click on the arrow to display a list of fields, select the field you require from the list.
To remove a field from a query• Display the query in Design View . Double click within the Field text box containing the name of
the field you wish to delete. The field name will be selected. Press the Delete key. Press the Enter
key.
To move a field in a query• Display the query in Design View .• Position your mouse pointer on the field selection button located just above the field name.• Your mouse pointer will change to a small downward pointing arrow, as illustrated.
• Click once with the left mouse button to select that field.• Once again click on the field selection button, only this time keep the mouse button depressed anddrag the field left or right to your desired location. A thick black vertical bar to the left of the fieldcolumn indicates where the field will be moved.
• Release the mouse button to drop the field at the new location.
To hide a field in a query• Display the query in Design View .• Each field in the query has an associated Show check box. To hide the field, clear the Showcheck box.
To show a field in a query• Display the query in Design View . Each field in the query has an associated Show check box.To show the field, select the Show check box.
FOR USE AT THE LICENSED SITE(S) ONLY© Cheltenham Computer Training 1995-2003 - www.cctglobal.com

8/8/2019 Ecdl v4 Mod5 Office-2000 Manual
http://slidepdf.com/reader/full/ecdl-v4-mod5-office-2000-manual 62/77
54
5.4.2.5 Run a query.
To run a query• Select the query within the main Database window and double click on the query. In some cases
you may have to enter information, such as from and till dates.
5.4.2.6 Delete a query.
To delete a query• Select the query within the Database window, as in the example below where we have selected
the Sales by Year query.
• Once selected, press the Del key. A warning dialog will be displayed. If you click on Yes the querywill be deleted.
5.4.2.7 Save and close a query.
To save a query• Click on the File drop down menu and select the Save command.
To close a query• Click on the Close icon (top-right of the window).
FOR USE AT THE LICENSED SITE(S) ONLY© Cheltenham Computer Training 1995-2003 - www.cctglobal.com
8/8/2019 Ecdl v4 Mod5 Office-2000 Manual
http://slidepdf.com/reader/full/ecdl-v4-mod5-office-2000-manual 63/77
55
5.4.3 Sort Records
5.4.3.1 Sort data in a table, form, query, in ascending/descending and numeric/alphabeticorder.
Sorting records• If you want your records in a different order, you can use Quick Sort . You might, for instance, hold
your employee records by employee reference number but want to view them in alphabetical order of surname. In a table Datasheet, you can use more than one adjacent sort field but in a form youare limited to one sort field only. If you select more than one field in a Datasheet, the leftmost fieldis the primary sort field. Therefore you might need to rearrange the order of your columns beforesorting.
To sort records in a table datasheet• Select the column or columns on which you want to sort your records.• Choose Sort from the Records menu and select Sort Ascending or Sort Descending fromthe sub-menu OR click on the Sort Ascending or Sort Descending icon on the standard toolbar.
Note: An ascending sort arranges the Datasheet with the lowest value first, i.e. 0 to 9 and A to Z.A descending sort does the opposite.
To sort records in a form or query• Select the fields on which you want to base your sort.• Click on the Sort Ascending or Sort Descending icon on the standard toolbar.
5.5 Reports
5.5.1 Working with Reports
Introduction to reports• Your first step in creating a database should be to establish what you want from it, i.e. the output.
Output is normally information displayed either on-screen, or printed. A screen display is usually aDatasheet or a form and is the response to an interactive query or command. Forms can also beprinted, but for most purposes, printed reports are the best way to provide hard copy output. Thisis particularly so for information covering several records, especially when summary information isalso required. You can use reports for a variety of purposes: some common examples areperiodical sales summaries, stock lists, mailing lists and invoices. The easiest way to produce your own reports is by using the Microsoft Access wizards. There is a choice of different reports.Easiest of all is the AutoReport Wizard, which constructs the whole report according to your instructions. You can also choose single column, Groups/Totals, Mailing Labels, Summary andTabular reports. Grouping allows you to identify and organize data into logical groups and toprovide group and grand totals. Up to a maximum of ten groups are allowed. You can also includea sub-report as part of your report. Before attempting any report design of your own, it would be agood idea to explore some of the reports from the Northwind database supplied with MicrosoftAccess. You can look at them in print preview and design mode to get an idea of how they areconstructed.
FOR USE AT THE LICENSED SITE(S) ONLY© Cheltenham Computer Training 1995-2003 - www.cctglobal.com
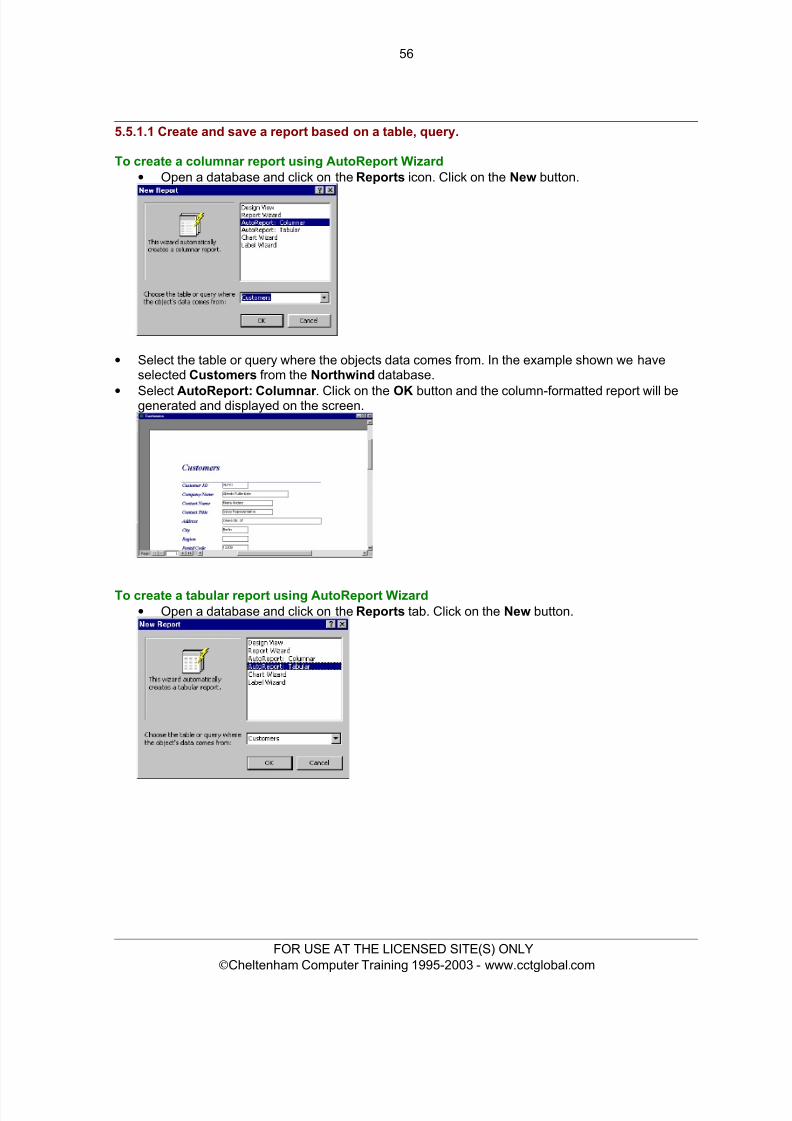
8/8/2019 Ecdl v4 Mod5 Office-2000 Manual
http://slidepdf.com/reader/full/ecdl-v4-mod5-office-2000-manual 64/77
56
5.5.1.1 Create and save a report based on a table, query.
To create a columnar report using AutoReport Wizard• Open a database and click on the Reports icon. Click on the New button.
• Select the table or query where the objects data comes from. In the example shown we haveselected Customers from the Northwind database.
• Select AutoReport: Columnar . Click on the OK button and the column-formatted report will begenerated and displayed on the screen.
To create a tabular report using AutoReport Wizard• Open a database and click on the Reports tab. Click on the New button.
FOR USE AT THE LICENSED SITE(S) ONLY© Cheltenham Computer Training 1995-2003 - www.cctglobal.com
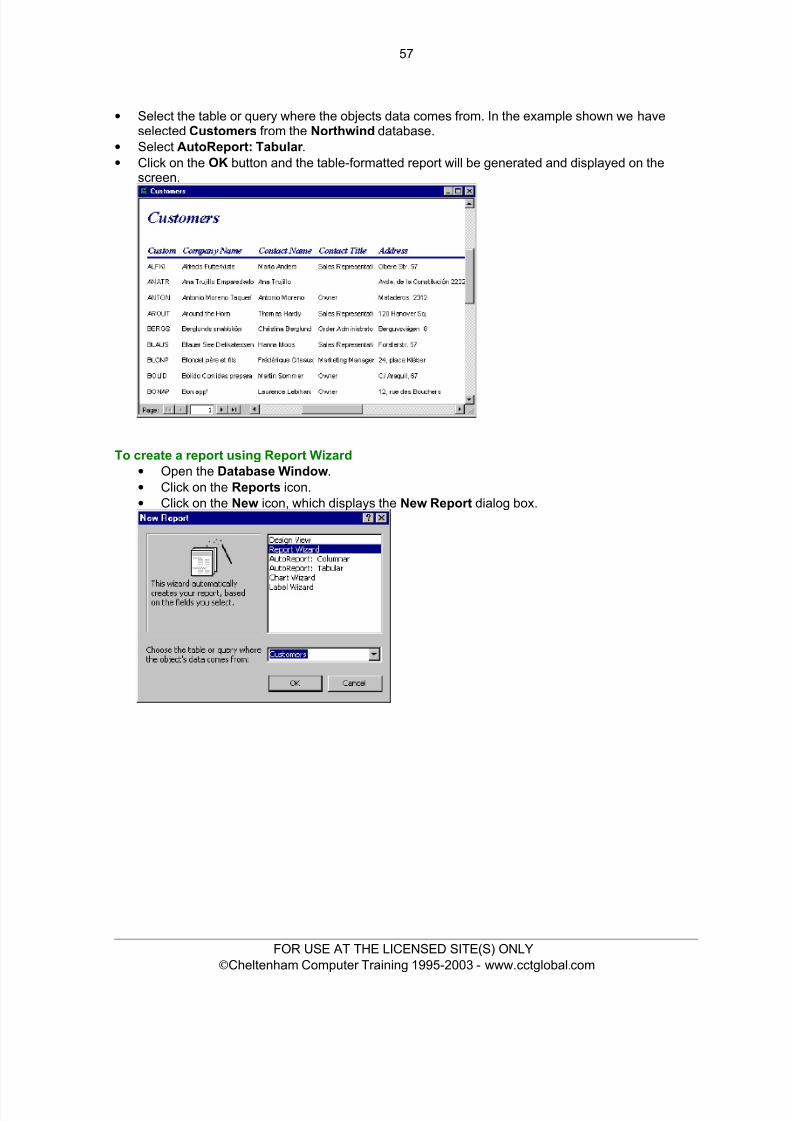
8/8/2019 Ecdl v4 Mod5 Office-2000 Manual
http://slidepdf.com/reader/full/ecdl-v4-mod5-office-2000-manual 65/77
57
• Select the table or query where the objects data comes from. In the example shown we haveselected Customers from the Northwind database.
• Select AutoReport: Tabular .• Click on the OK button and the table-formatted report will be generated and displayed on the
screen.
To create a report using Report Wizard• Open the Database Window .• Click on the Reports icon.• Click on the New icon, which displays the New Report dialog box.
FOR USE AT THE LICENSED SITE(S) ONLY© Cheltenham Computer Training 1995-2003 - www.cctglobal.com
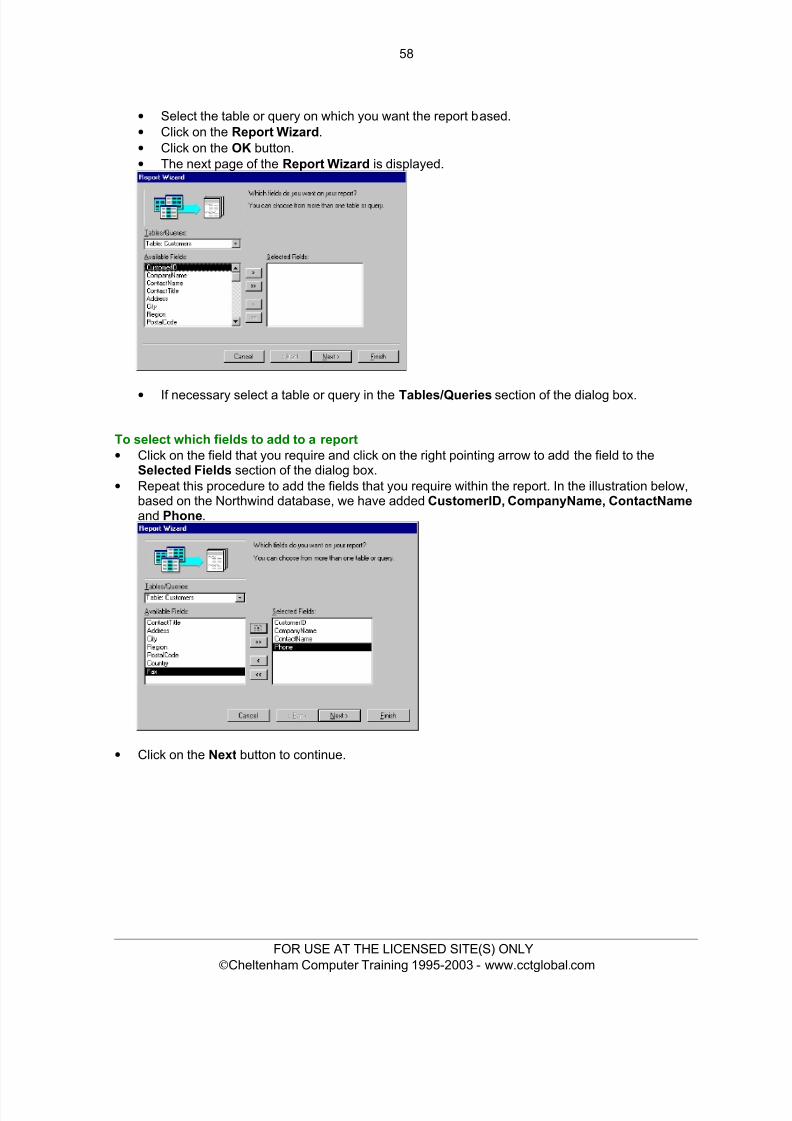
8/8/2019 Ecdl v4 Mod5 Office-2000 Manual
http://slidepdf.com/reader/full/ecdl-v4-mod5-office-2000-manual 66/77
58
• Select the table or query on which you want the report based.• Click on the Report Wizard .• Click on the OK button.• The next page of the Report Wizard is displayed.
• If necessary select a table or query in the Tables/Queries section of the dialog box.
To select which fields to add to a report• Click on the field that you require and click on the right pointing arrow to add the field to the
Selected Fields section of the dialog box.• Repeat this procedure to add the fields that you require within the report. In the illustration below,
based on the Northwind database, we have added CustomerID, CompanyName, ContactNameand Phone .
• Click on the Next button to continue.
FOR USE AT THE LICENSED SITE(S) ONLY© Cheltenham Computer Training 1995-2003 - www.cctglobal.com
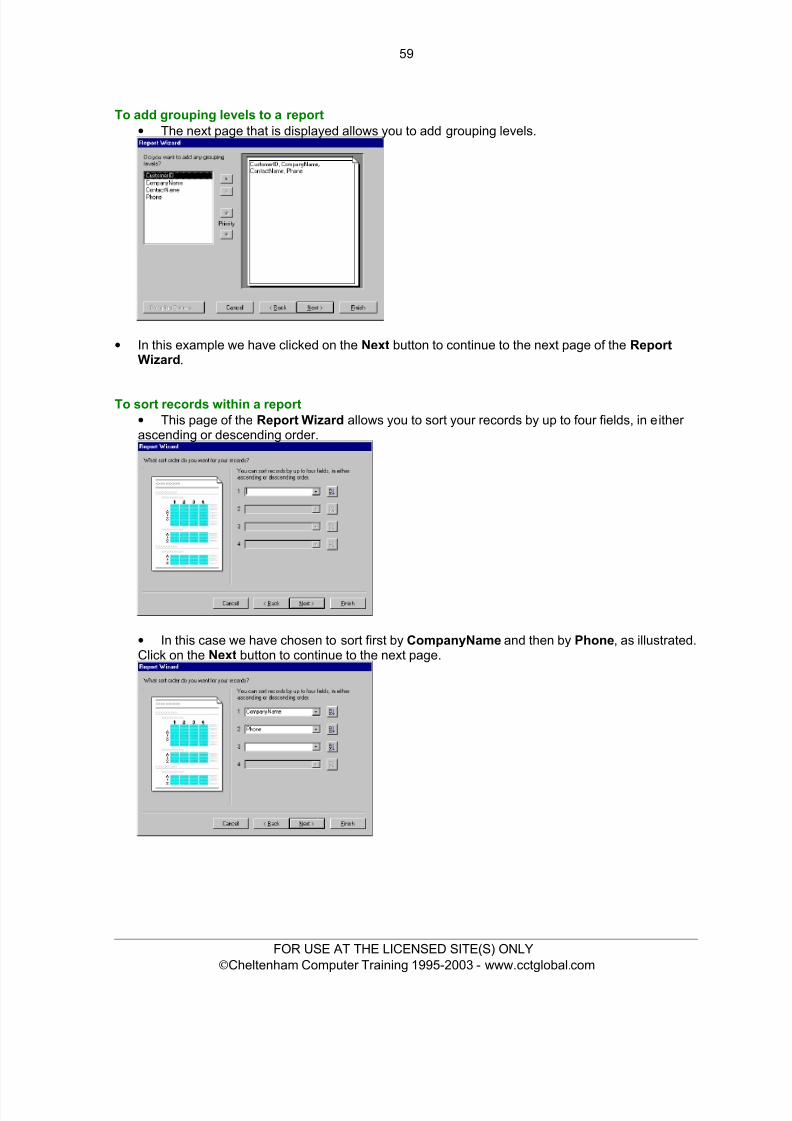
8/8/2019 Ecdl v4 Mod5 Office-2000 Manual
http://slidepdf.com/reader/full/ecdl-v4-mod5-office-2000-manual 67/77
59
To add grouping levels to a report• The next page that is displayed allows you to add grouping levels.
• In this example we have clicked on the Next button to continue to the next page of the ReportWizard .
To sort records within a report• This page of the Report Wizard allows you to sort your records by up to four fields, in either ascending or descending order.
• In this case we have chosen to sort first by CompanyName and then by Phone , as illustrated.Click on the Next button to continue to the next page.
FOR USE AT THE LICENSED SITE(S) ONLY© Cheltenham Computer Training 1995-2003 - www.cctglobal.com
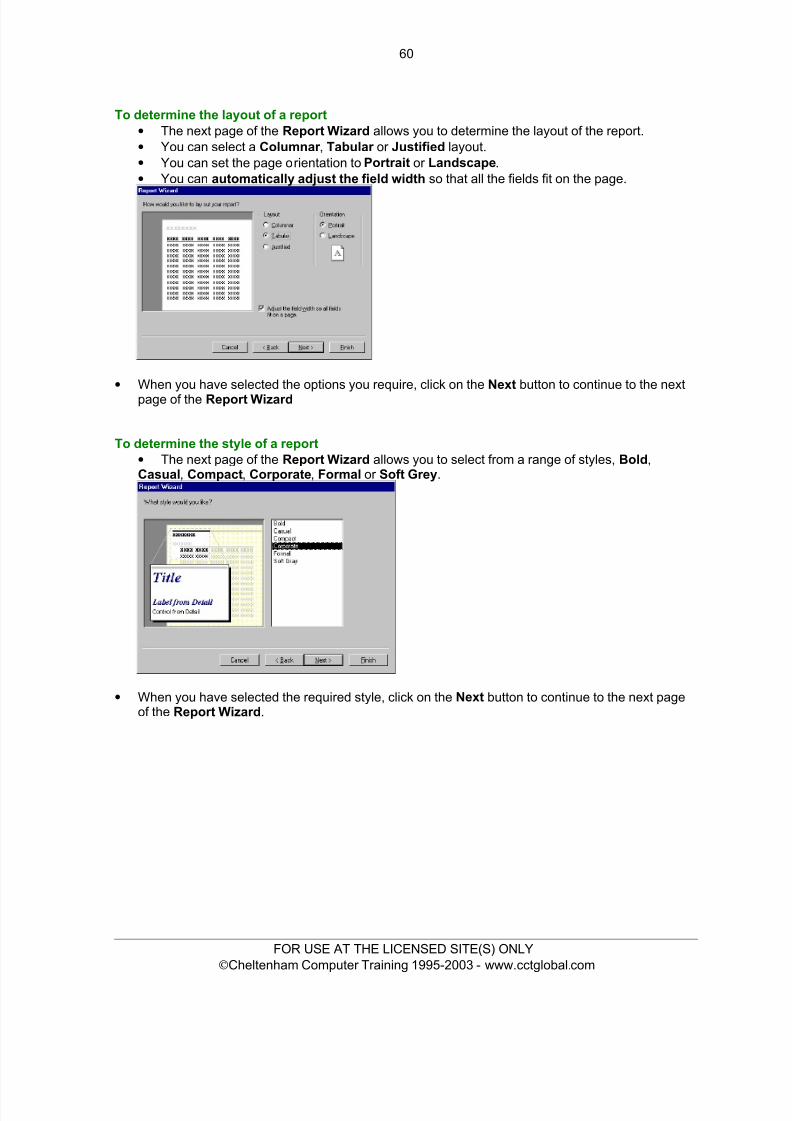
8/8/2019 Ecdl v4 Mod5 Office-2000 Manual
http://slidepdf.com/reader/full/ecdl-v4-mod5-office-2000-manual 68/77
60
To determine the layout of a report• The next page of the Report Wizard allows you to determine the layout of the report.• You can select a Columnar , Tabular or Justified layout.• You can set the page orientation to Portrait or Landscape .• You can automatically adjust the field width so that all the fields fit on the page.
• When you have selected the options you require, click on the Next button to continue to the nextpage of the Report Wizard
To determine the style of a report• The next page of the Report Wizard allows you to select from a range of styles, Bold ,Casual , Compact , Corporate , Formal or Soft Grey .
• When you have selected the required style, click on the Next button to continue to the next pageof the Report Wizard .
FOR USE AT THE LICENSED SITE(S) ONLY© Cheltenham Computer Training 1995-2003 - www.cctglobal.com

8/8/2019 Ecdl v4 Mod5 Office-2000 Manual
http://slidepdf.com/reader/full/ecdl-v4-mod5-office-2000-manual 69/77
61
To name a report• The next page of the Report Wizard is the final page, which allows you to give a name to thereport.
• Enter the report name in the top text box.• By default the Preview this report button is selected.• Click on the Finish button to generate and preview the report.
• The final report is displayed on the screen, as illustrated.
5.5.1.2 Change arrangement of data fields and headings within report layout.
To alter the position of fields and headings in a report• Open the report you wish to edit and switch to Design View. The Report window should now
resemble the illustration below:
FOR USE AT THE LICENSED SITE(S) ONLY© Cheltenham Computer Training 1995-2003 - www.cctglobal.com
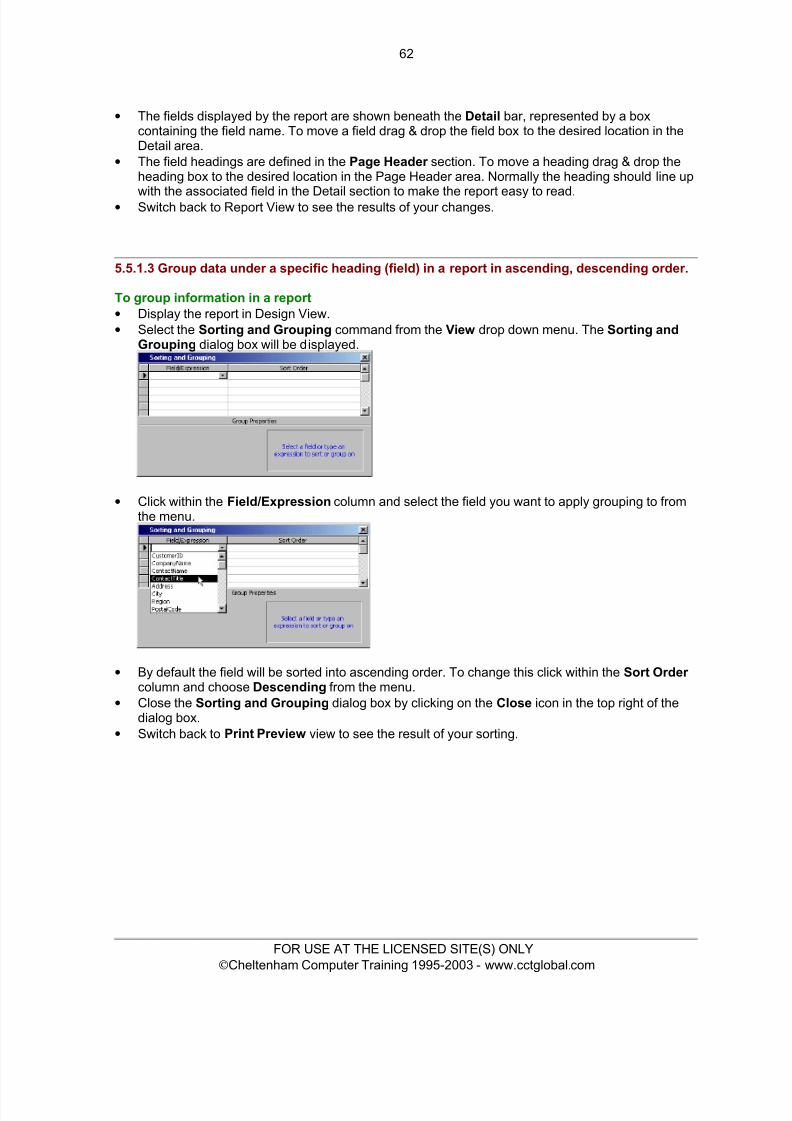
8/8/2019 Ecdl v4 Mod5 Office-2000 Manual
http://slidepdf.com/reader/full/ecdl-v4-mod5-office-2000-manual 70/77
62
• The fields displayed by the report are shown beneath the Detail bar, represented by a boxcontaining the field name. To move a field drag & drop the field box to the desired location in theDetail area.
• The field headings are defined in the Page Header section. To move a heading drag & drop theheading box to the desired location in the Page Header area. Normally the heading should line up
with the associated field in the Detail section to make the report easy to read.• Switch back to Report View to see the results of your changes.
5.5.1.3 Group data under a specific heading (field) in a report in ascending, descending order.
To group information in a report• Display the report in Design View.• Select the Sorting and Grouping command from the View drop down menu. The Sorting and
Grouping dialog box will be displayed.
• Click within the Field/Expression column and select the field you want to apply grouping to fromthe menu.
• By default the field will be sorted into ascending order. To change this click within the Sort Order column and choose Descending from the menu.
• Close the Sorting and Grouping dialog box by clicking on the Close icon in the top right of thedialog box.
• Switch back to Print Preview view to see the result of your sorting.
FOR USE AT THE LICENSED SITE(S) ONLY© Cheltenham Computer Training 1995-2003 - www.cctglobal.com
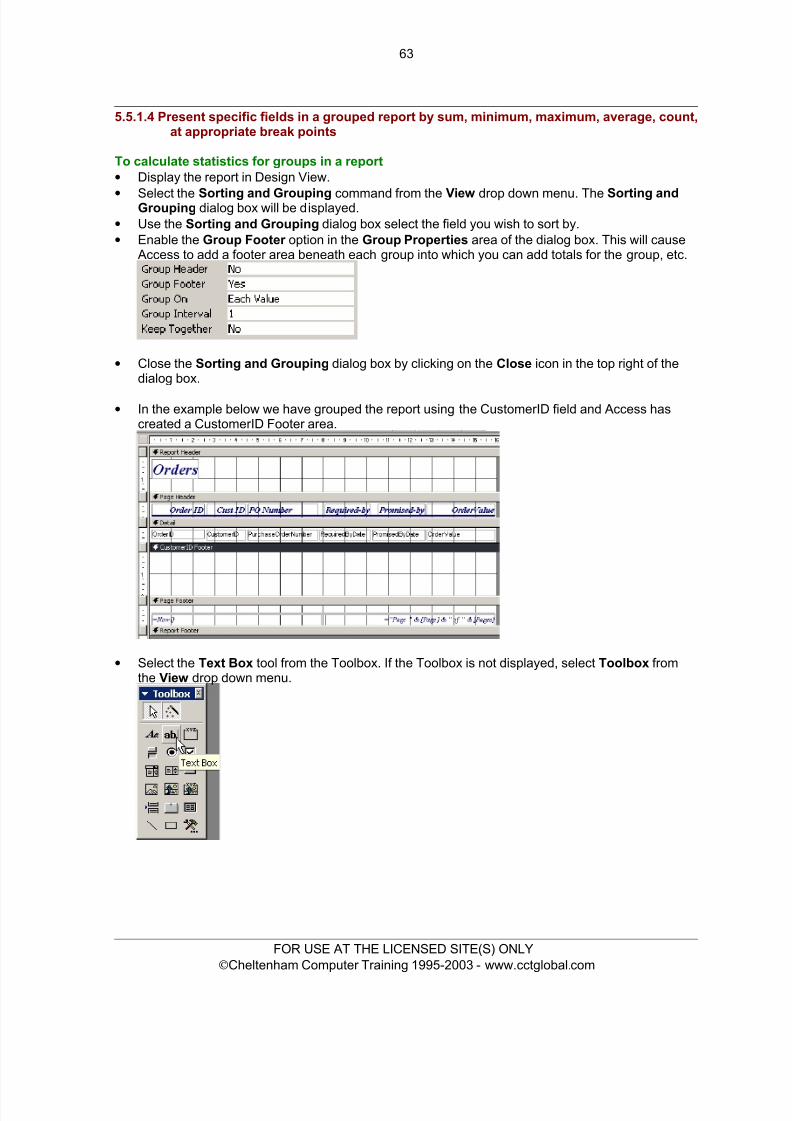
8/8/2019 Ecdl v4 Mod5 Office-2000 Manual
http://slidepdf.com/reader/full/ecdl-v4-mod5-office-2000-manual 71/77
63
5.5.1.4 Present specific fields in a grouped report by sum, minimum, maximum, average, count,at appropriate break points
To calculate statistics for groups in a report• Display the report in Design View.
• Select the Sorting and Grouping command from the View drop down menu. The Sorting andGrouping dialog box will be displayed.• Use the Sorting and Grouping dialog box select the field you wish to sort by.• Enable the Group Footer option in the Group Properties area of the dialog box. This will cause
Access to add a footer area beneath each group into which you can add totals for the group, etc.
• Close the Sorting and Grouping dialog box by clicking on the Close icon in the top right of thedialog box.
• In the example below we have grouped the report using the CustomerID field and Access hascreated a CustomerID Footer area.
• Select the Text Box tool from the Toolbox. If the Toolbox is not displayed, select Toolbox fromthe View drop down menu.
FOR USE AT THE LICENSED SITE(S) ONLY© Cheltenham Computer Training 1995-2003 - www.cctglobal.com
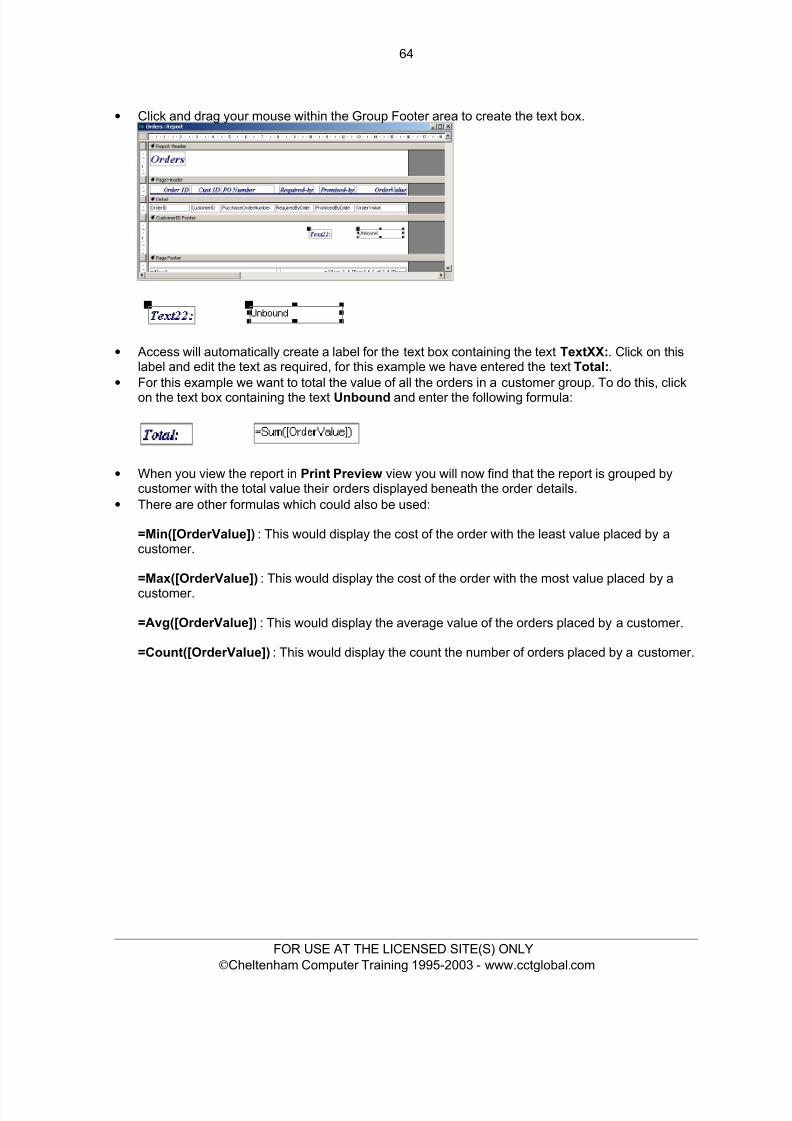
8/8/2019 Ecdl v4 Mod5 Office-2000 Manual
http://slidepdf.com/reader/full/ecdl-v4-mod5-office-2000-manual 72/77
64
• Click and drag your mouse within the Group Footer area to create the text box.
• Access will automatically create a label for the text box containing the text TextXX: . Click on thislabel and edit the text as required, for this example we have entered the text Total: .
• For this example we want to total the value of all the orders in a customer group. To do this, clickon the text box containing the text Unbound and enter the following formula:
• When you view the report in Print Preview view you will now find that the report is grouped bycustomer with the total value their orders displayed beneath the order details.
• There are other formulas which could also be used:
=Min([OrderValue]) : This would display the cost of the order with the least value placed by acustomer.
=Max([OrderValue]) : This would display the cost of the order with the most value placed by acustomer.
=Avg([OrderValue]) : This would display the average value of the orders placed by a customer.
=Count([OrderValue]) : This would display the count the number of orders placed by a customer.
FOR USE AT THE LICENSED SITE(S) ONLY© Cheltenham Computer Training 1995-2003 - www.cctglobal.com
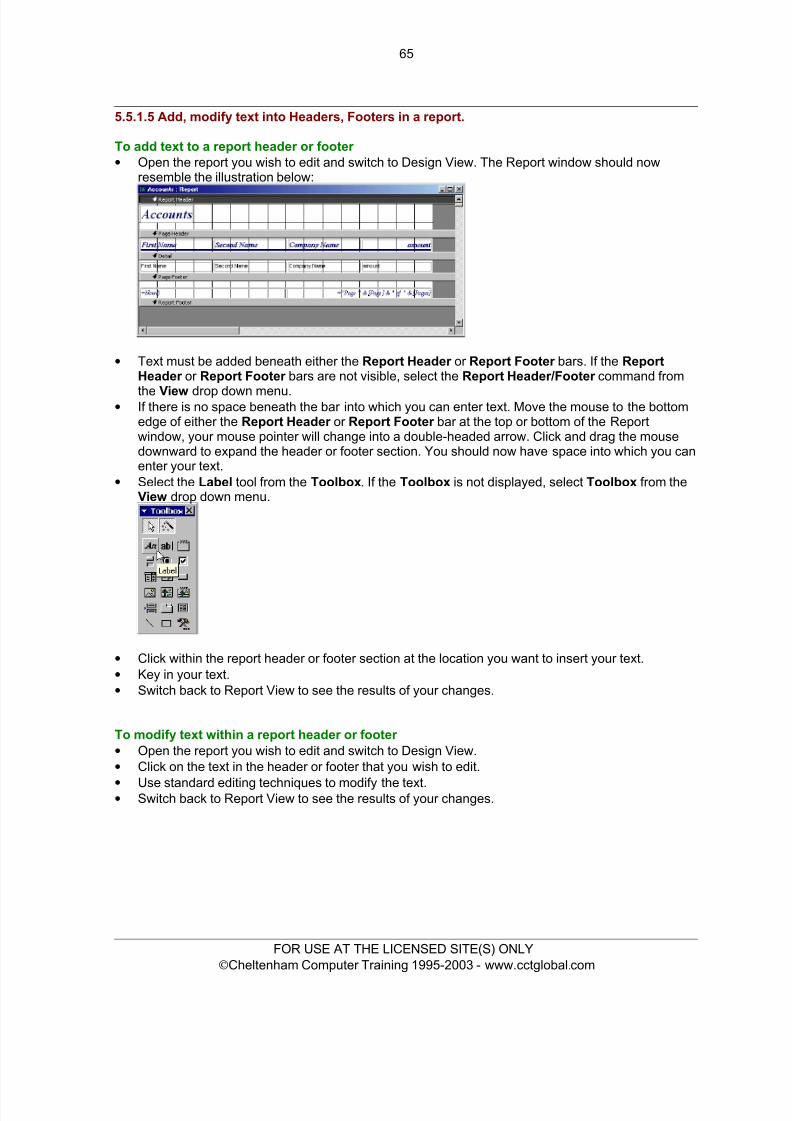
8/8/2019 Ecdl v4 Mod5 Office-2000 Manual
http://slidepdf.com/reader/full/ecdl-v4-mod5-office-2000-manual 73/77
65
5.5.1.5 Add, modify text into Headers, Footers in a report.
To add text to a report header or footer • Open the report you wish to edit and switch to Design View. The Report window should now
resemble the illustration below:
• Text must be added beneath either the Report Header or Report Footer bars. If the ReportHeader or Report Footer bars are not visible, select the Report Header/Footer command from
the View drop down menu.• If there is no space beneath the bar into which you can enter text. Move the mouse to the bottom
edge of either the Report Header or Report Footer bar at the top or bottom of the Reportwindow, your mouse pointer will change into a double-headed arrow. Click and drag the mousedownward to expand the header or footer section. You should now have space into which you canenter your text.
• Select the Label tool from the Toolbox . If the Toolbox is not displayed, select Toolbox from theView drop down menu.
• Click within the report header or footer section at the location you want to insert your text.• Key in your text.• Switch back to Report View to see the results of your changes.
To modify text within a report header or footer • Open the report you wish to edit and switch to Design View.• Click on the text in the header or footer that you wish to edit.
• Use standard editing techniques to modify the text.• Switch back to Report View to see the results of your changes.
FOR USE AT THE LICENSED SITE(S) ONLY© Cheltenham Computer Training 1995-2003 - www.cctglobal.com
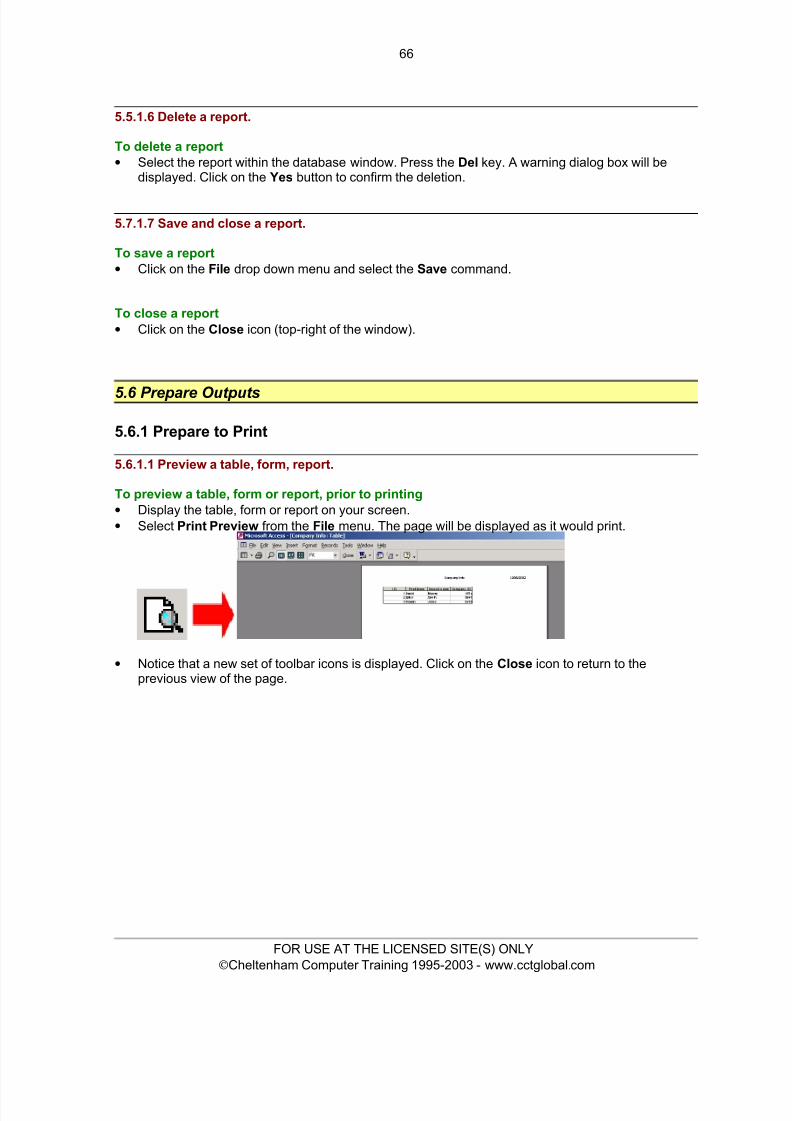
8/8/2019 Ecdl v4 Mod5 Office-2000 Manual
http://slidepdf.com/reader/full/ecdl-v4-mod5-office-2000-manual 74/77
66
5.5.1.6 Delete a report.
To delete a report• Select the report within the database window. Press the Del key. A warning dialog box will be
displayed. Click on the Yes button to confirm the deletion.
5.7.1.7 Save and close a report.
To save a report• Click on the File drop down menu and select the Save command.
To close a report• Click on the Close icon (top-right of the window).
5.6 Prepare Outputs
5.6.1 Prepare to Print
5.6.1.1 Preview a table, form, report.
To preview a table, form or report, prior to printing• Display the table, form or report on your screen.• Select Print Preview from the File menu. The page will be displayed as it would print.
• Notice that a new set of toolbar icons is displayed. Click on the Close icon to return to theprevious view of the page.
FOR USE AT THE LICENSED SITE(S) ONLY© Cheltenham Computer Training 1995-2003 - www.cctglobal.com
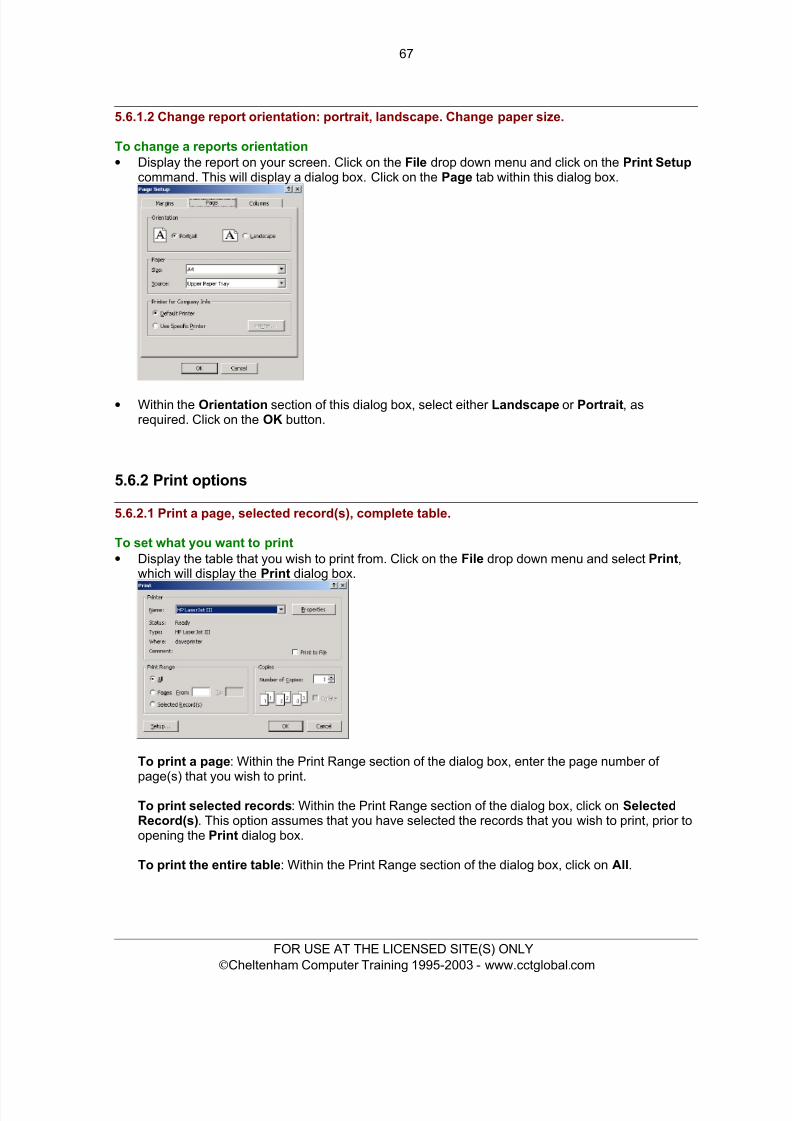
8/8/2019 Ecdl v4 Mod5 Office-2000 Manual
http://slidepdf.com/reader/full/ecdl-v4-mod5-office-2000-manual 75/77
67
5.6.1.2 Change report orientation: portrait, landscape. Change paper size.
To change a reports orientation• Display the report on your screen. Click on the File drop down menu and click on the Print Setup
command. This will display a dialog box. Click on the Page tab within this dialog box.
• Within the Orientation section of this dialog box, select either Landscape or Portrait , asrequired. Click on the OK button.
5.6.2 Print options
5.6.2.1 Print a page, selected record(s), complete table.
To set what you want to print• Display the table that you wish to print from. Click on the File drop down menu and select Print ,
which will display the Print dialog box.
To print a page : Within the Print Range section of the dialog box, enter the page number of page(s) that you wish to print.
To print selected records : Within the Print Range section of the dialog box, click on SelectedRecord(s) . This option assumes that you have selected the records that you wish to print, prior toopening the Print dialog box.
To print the entire table : Within the Print Range section of the dialog box, click on All.
FOR USE AT THE LICENSED SITE(S) ONLY© Cheltenham Computer Training 1995-2003 - www.cctglobal.com
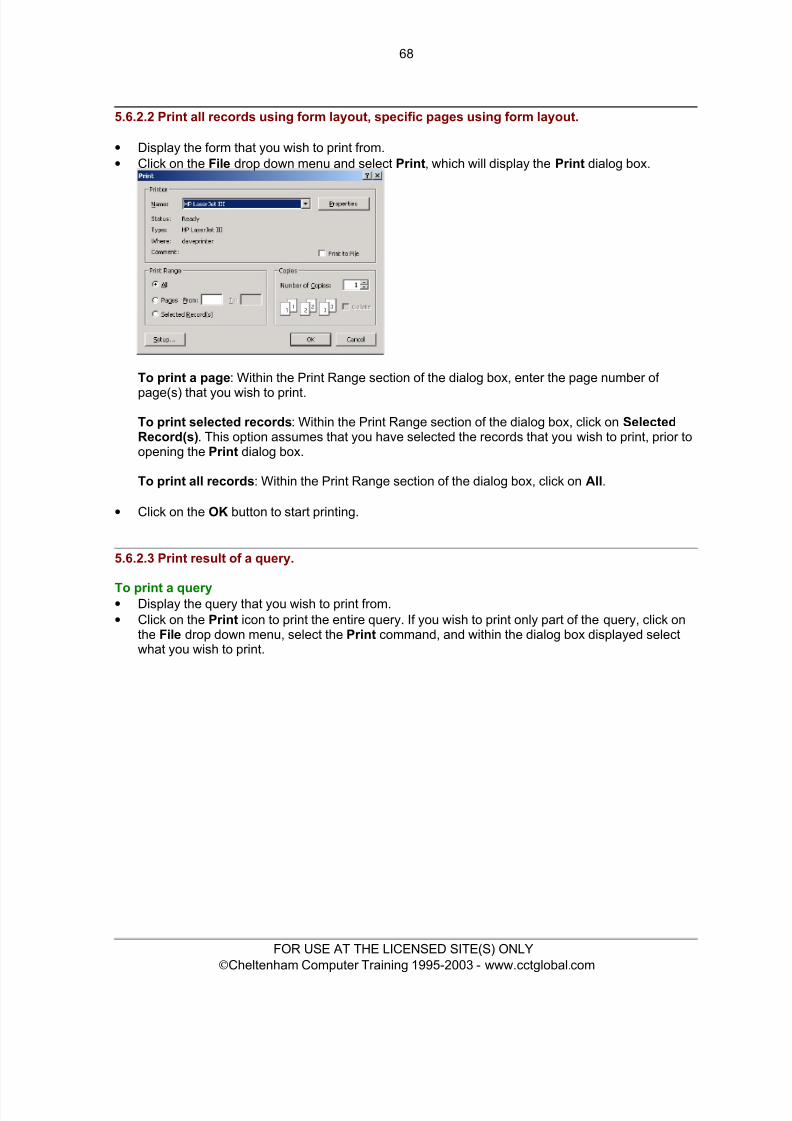
8/8/2019 Ecdl v4 Mod5 Office-2000 Manual
http://slidepdf.com/reader/full/ecdl-v4-mod5-office-2000-manual 76/77
68
5.6.2.2 Print all records using form layout, specific pages using form layout.
• Display the form that you wish to print from.• Click on the File drop down menu and select Print , which will display the Print dialog box.
To print a page : Within the Print Range section of the dialog box, enter the page number of
page(s) that you wish to print.
To print selected records : Within the Print Range section of the dialog box, click on SelectedRecord(s) . This option assumes that you have selected the records that you wish to print, prior toopening the Print dialog box.
To print all records : Within the Print Range section of the dialog box, click on All.
• Click on the OK button to start printing.
5.6.2.3 Print result of a query.
To print a query• Display the query that you wish to print from.• Click on the Print icon to print the entire query. If you wish to print only part of the query, click on
the File drop down menu, select the Print command, and within the dialog box displayed selectwhat you wish to print.
FOR USE AT THE LICENSED SITE(S) ONLY© Cheltenham Computer Training 1995-2003 - www.cctglobal.com
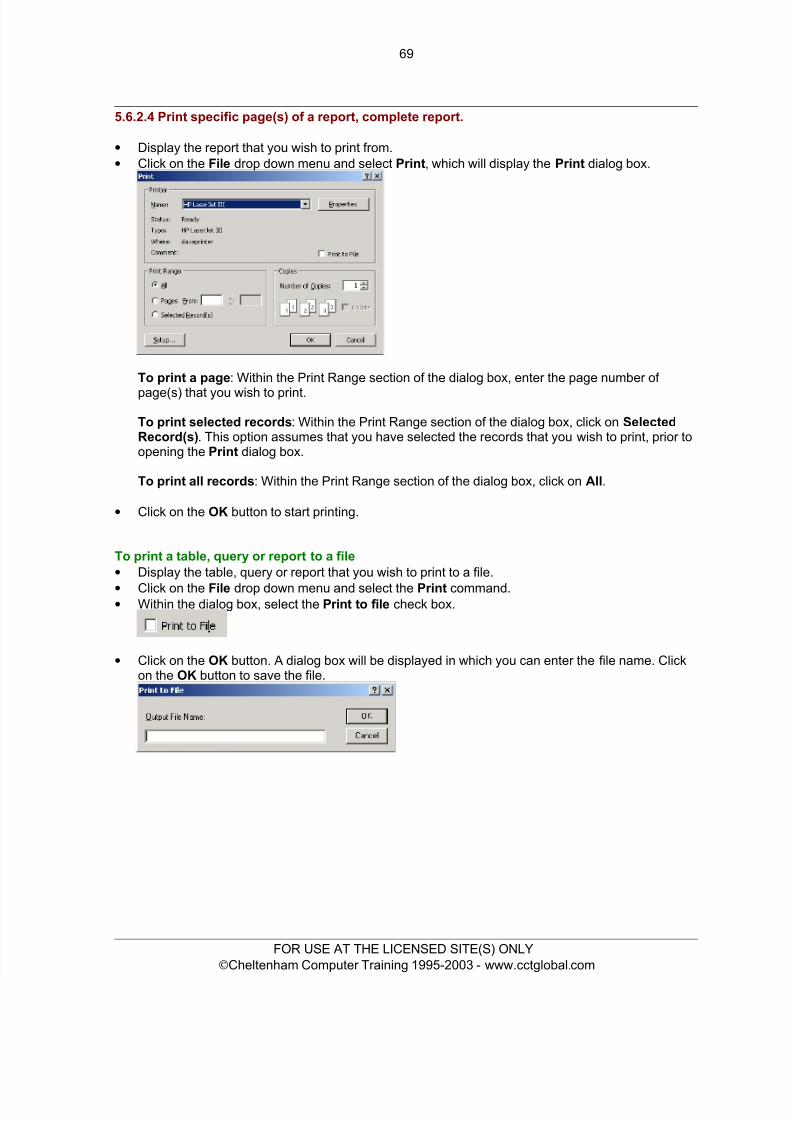
8/8/2019 Ecdl v4 Mod5 Office-2000 Manual
http://slidepdf.com/reader/full/ecdl-v4-mod5-office-2000-manual 77/77
69
5.6.2.4 Print specific page(s) of a report, complete report.
• Display the report that you wish to print from.• Click on the File drop down menu and select Print , which will display the Print dialog box.
To print a page : Within the Print Range section of the dialog box, enter the page number of
page(s) that you wish to print.
To print selected records : Within the Print Range section of the dialog box, click on SelectedRecord(s) . This option assumes that you have selected the records that you wish to print, prior toopening the Print dialog box.
To print all records : Within the Print Range section of the dialog box, click on All.
• Click on the OK button to start printing.
To print a table, query or report to a file• Display the table, query or report that you wish to print to a file.• Click on the File drop down menu and select the Print command.• Within the dialog box, select the Print to file check box.
• Click on the OK button. A dialog box will be displayed in which you can enter the file name. Clickon the OK button to save the file.