edition 2020 - db.kflex.com
TRANSCRIPT
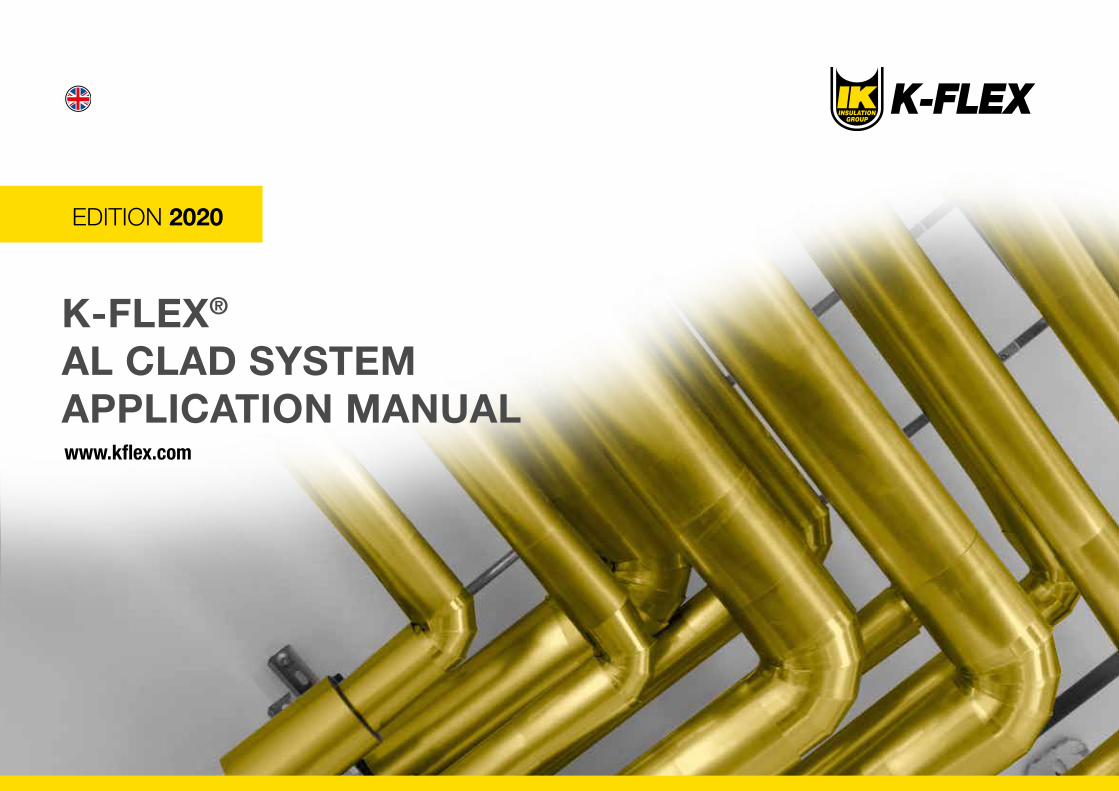
K-FLEX®
AL CLAD SYSTEMAPPLICATION MANUALwww.kflex.com
EDITION 2020

2
K-FLEX® } AL CLAD SYSTEM - APPLICATION MANUAL
INDEX
` K-FLEX® AL CLAD SYSTEM
General informations Pg 5
` TOOLS
The applications tools Pg 8
` TUBES
Pre-cut tube with AL CLAD finishing already applied Pg 9
Insulation with K-FLEX® sheet with AL CLAD finishing already applied Pg 10
Consecutive installation of AL CLAD SYSTEM pipes and sheet sections Pg 11
` ELBOWS
Installation of pre-shaped K-FLEX® AL CLAD elbows Pg 12
` DUCTS
Insulation of duct with K-FLEX® AL CLAD standard sheet Pg 14
Insulation of duct with K-FLEX® AL CLAD adhesive sheet Pg 15
3
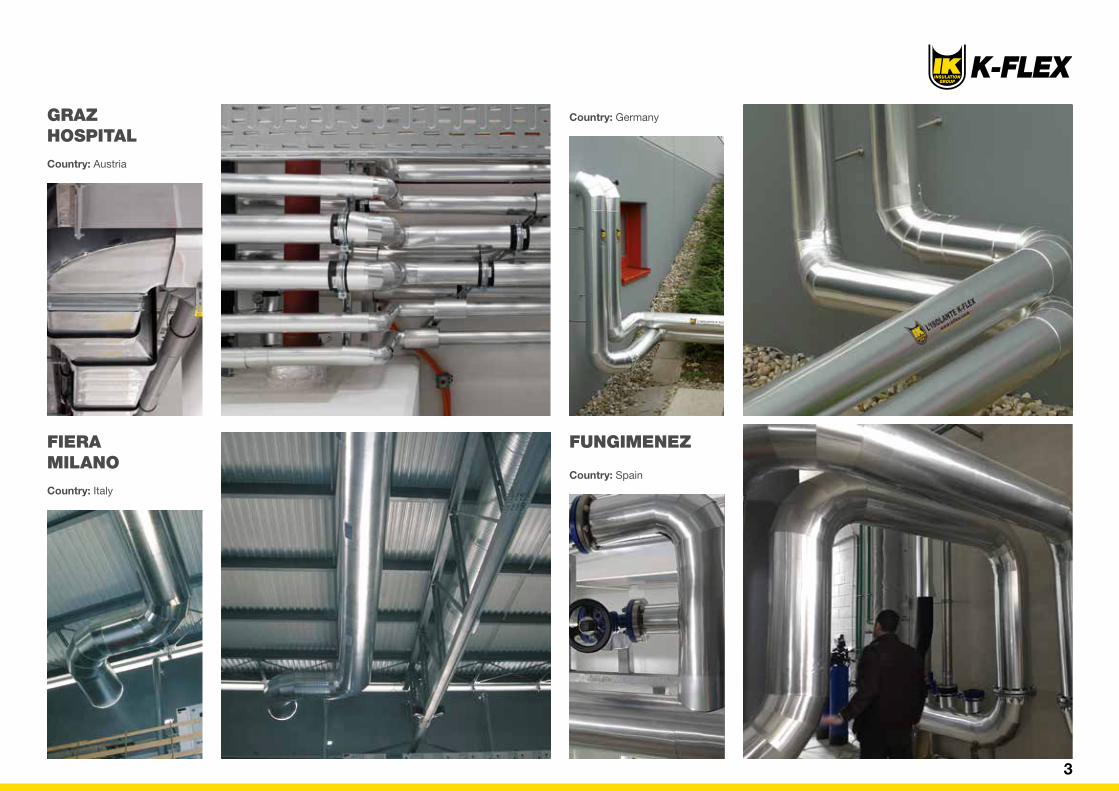
GRAZ HOSPITAL
Country: Austria
FIERA MILANO
Country: Italy
FUNGIMENEZ
Country: Spain
Country: Germany

4
K-FLEX® } AL CLAD SYSTEM - APPLICATION MANUAL
K-FLEX®
AL CLAD SYSTEM
App. ManualVideoSite
5
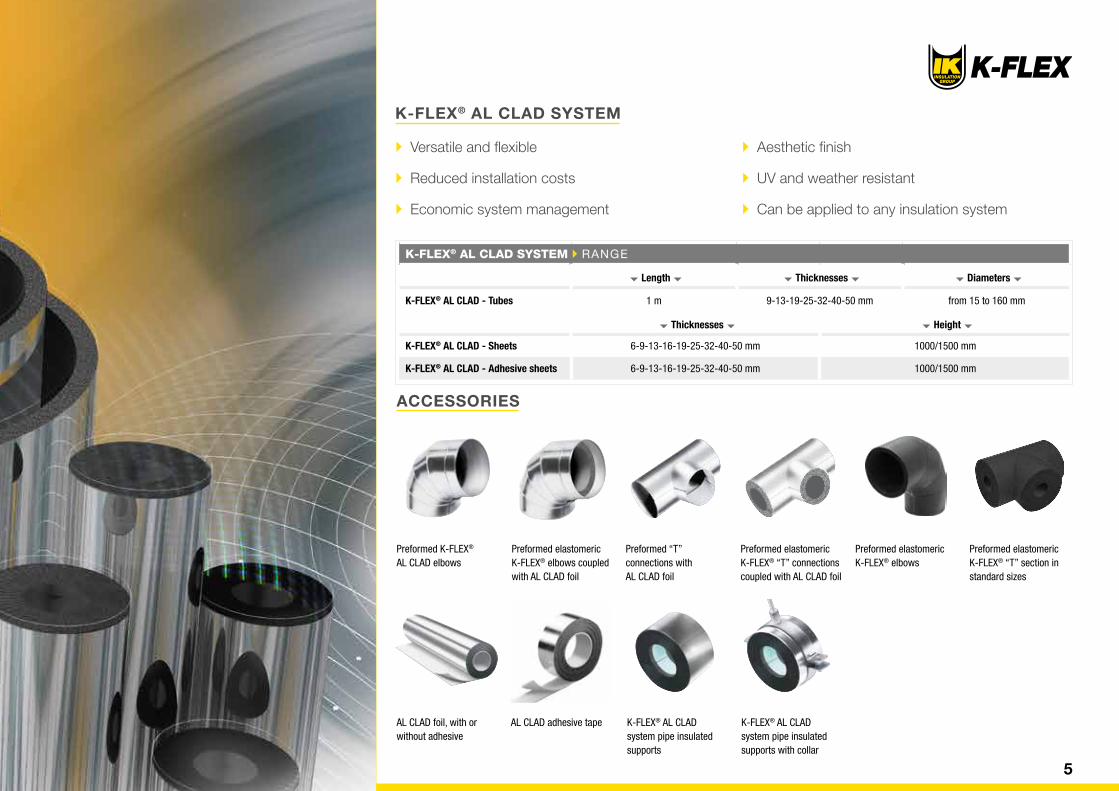
K-FLEX® AL CLAD SYSTEM
` Versatile and flexible
` Reduced installation costs
` Economic system management
` Aesthetic finish
` UV and weather resistant
` Can be applied to any insulation system
K-FLEX® AL CLAD SYSTEM ` RANGE
Length Thicknesses Diameters
K-FLEX® AL CLAD - Tubes 1 m 9-13-19-25-32-40-50 mm from 15 to 160 mm
Thicknesses Height
K-FLEX® AL CLAD - Sheets 6-9-13-16-19-25-32-40-50 mm 1000/1500 mm
K-FLEX® AL CLAD - Adhesive sheets 6-9-13-16-19-25-32-40-50 mm 1000/1500 mm
ACCESSORIES
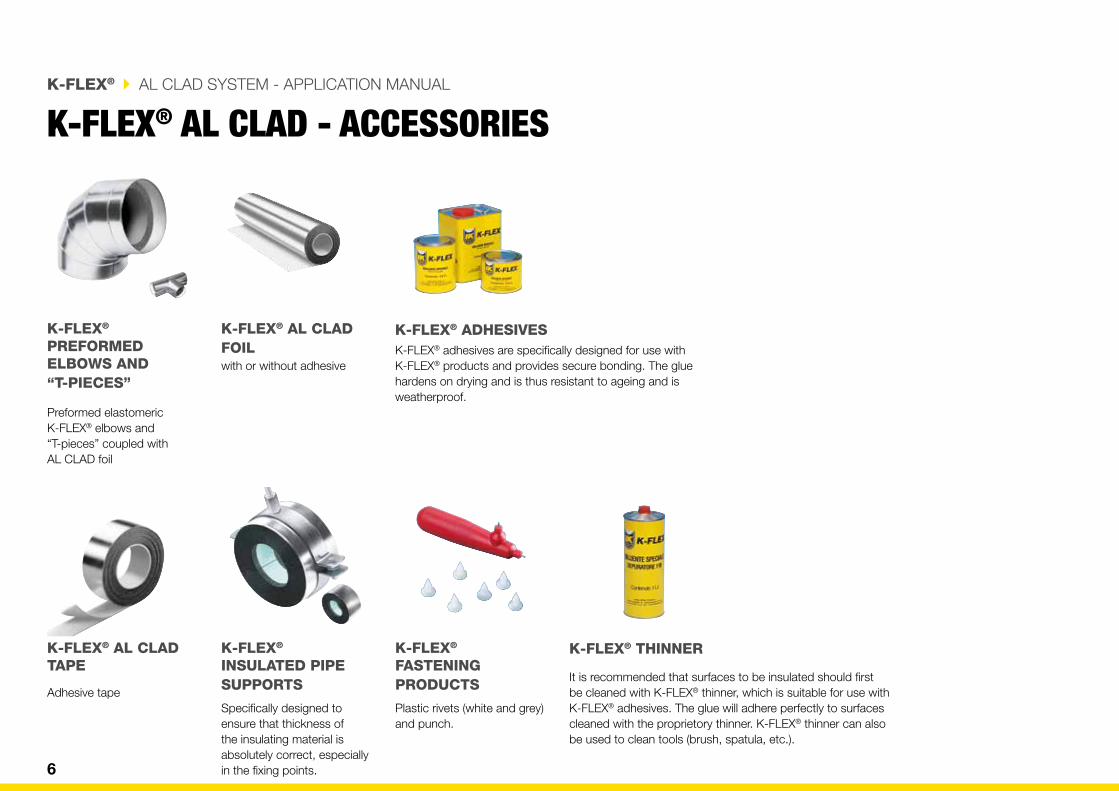
Preformed K-FLEX®
AL CLAD elbowsPreformed elastomeric K-FLEX® elbows coupled with AL CLAD foil
Preformed elastomeric K-FLEX® elbows
Preformed “T”connections withAL CLAD foil
Preformed elastomeric K-FLEX® “T” connections coupled with AL CLAD foil
Preformed elastomericK-FLEX® “T” section in standard sizes
AL CLAD foil, with or without adhesive
AL CLAD adhesive tape K-FLEX® AL CLADsystem pipe insulated supports with collar
K-FLEX® AL CLADsystem pipe insulated supports
6
K-FLEX® } AL CLAD SYSTEM - APPLICATION MANUAL
K-FLEX® AL CLAD - ACCESSORIES
K-FLEX® ADHESIVESK-FLEX® adhesives are specifically designed for use with K-FLEX® products and provides secure bonding. The glue hardens on drying and is thus resistant to ageing and is weatherproof.
K-FLEX® THINNER
It is recommended that surfaces to be insulated should first be cleaned with K-FLEX® thinner, which is suitable for use with K-FLEX® adhesives. The glue will adhere perfectly to surfaces cleaned with the proprietory thinner. K-FLEX® thinner can also be used to clean tools (brush, spatula, etc.).
K-FLEX® INSULATED PIPE SUPPORTS
Specifically designed to ensure that thickness of the insulating material is absolutely correct, especially in the fixing points.
K-FLEX® AL CLAD TAPE
Adhesive tape
K-FLEX® FASTENING PRODUCTS Plastic rivets (white and grey) and punch.
K-FLEX® AL CLAD FOILwith or without adhesive
K-FLEX® PREFORMED ELBOWS AND “T-PIECES”
Preformed elastomericK-FLEX® elbows and “T-pieces” coupled with AL CLAD foil

7
K-FLEX® - USING PRODUCTS AND ACCESSORIESCLEANING SURFACESThe surfaces to be glued must be perfectly clean and free of grease (use K-FLEX® thinner). Ensure that the surface of the K-FLEX® insulating material is also clean, otherwise it will not stick properly.
COATED SURFACESWhere surfaces have previously been painted, ensure that the glue is compatible and will adhere to the paint. Do not use the glue on surfaces that have been treated with products containing asphalt, bitumen or linseed oil. Use only chrome-zinc rust inhibitors and removers.
USING THE GLUEPreparation and storage. Before use, stir the K-FLEX® glue thoroughly. To store the glue, close the lid tightly to prevent the solvents evaporating.If the glue should become too hard (eg. when stored in contact with the air), dilute with K-FLEX® thinner. At low ambient temperature, don’t dilute but heat it up to approx 20°C.Method of application. When using a large quantity (eg. a tin of 2.6 litres), pour a small amount out into a separate container and top off when necessary.When applying K-FLEX® insulation to metallic or other surfaces, the glue must first be applied to the insulating material, then to the corresponding surface.Conditions for use. Do not apply to systems that are in use.Do not use in sunlight. Wheather protect where is possible.The insulation should be left to dry for 36 hours before turning the system back on.The ideal working temperature of the glue is +20° C.Do not use the glue at temperatures below +5° C as drying times are excessive.At temperatures above +30° C, the glue dries very rapidly.Dilute K-FLEX® glue using K-FLEX® Thinner only.In case of spray application, dilute K-FLEX® glue up to max 5%.
HARDENING TIME : 36 hoursSTORAGE : in cool conditions, away from cold and heatSHELF LIFE : one yearQUANTITIES USED : with insulation sheets, approx 7m2 per liter
CHOOSING K-FLEX® INSULATING MATERIALBefore starting, choose the right type of K-FLEX® insulation for the parts to be lagged. Use the thicknesses and sizes which are most suitable for the individual parts of the installation. Don’t forget - your K-FLEX® dealer can give expert advice.
USING K-FLEX® INSULATIONG MATERIAL Insulating tubing that is oval or flattened (eg. the larger cross-sections) should be cut along the flattened surface
USING REFRIGERATION PLANTS AND AIR -CONDITIONING SYSTEMS- Treat steel surfaces with rust inhibitor prior to applying insulation.The paint should be left for a minimum of 24 hours to dry.- Take special care over glueing critical areas such as curved sections, flanging and support brackets. Ensure that the ends of the insulating material are always firmly attached to the piping.- Do not apply insulation where parts are too close together, as this will result in the insulation becoming squashed and losing some of its properties.When carrying out particularly complicated installations on nickel steel, refer to our Technical Office.

8
K-FLEX® } AL CLAD SYSTEM - APPLICATION MANUAL
K-FLEX® AL CLAD - THE APPLICATION TOOLSTOOLS NEEDED FOR THE MANUAL INTERVENTIONS OF THE INSTALLER
THICKNESS GAUGEto measure diameters to be transferred on insulating sheets.
0
12
34
56
78
910
1112
1314
1516
1718
1920
2122
2324
2627
2829
3031
3233
3435
3637
3839
4041
42
WH
ITE
COMPASSto trace cutting circles.
SCISSORSfor cutting shapes.
BRUSHES ANDSPATULASfor spreading adhesives.
STAMPSfor accurateli perforating insulating material.
KNIFE AND CUTTERfor different types of cutting.
FLEXIBLE TAPEMEASURE ANDRIGID RULERfor measuring and as a guide for cutting and tracing. As a guide for straight cuts one can also use T or L shaped alluminium sections, which give useful hand protection.
PENCILS AND CHALKto map out cutting lines.
METAL TAPEto trim the ends of installed tubes and elbows.
9
K-FLEX® AL CLAD - TUBESPRE-CUT TUBE WITH AL CLAD FINISHING ALREADY APPLIED
KEY
K 420 adhesive
Sealant
Actions
MATERIALS
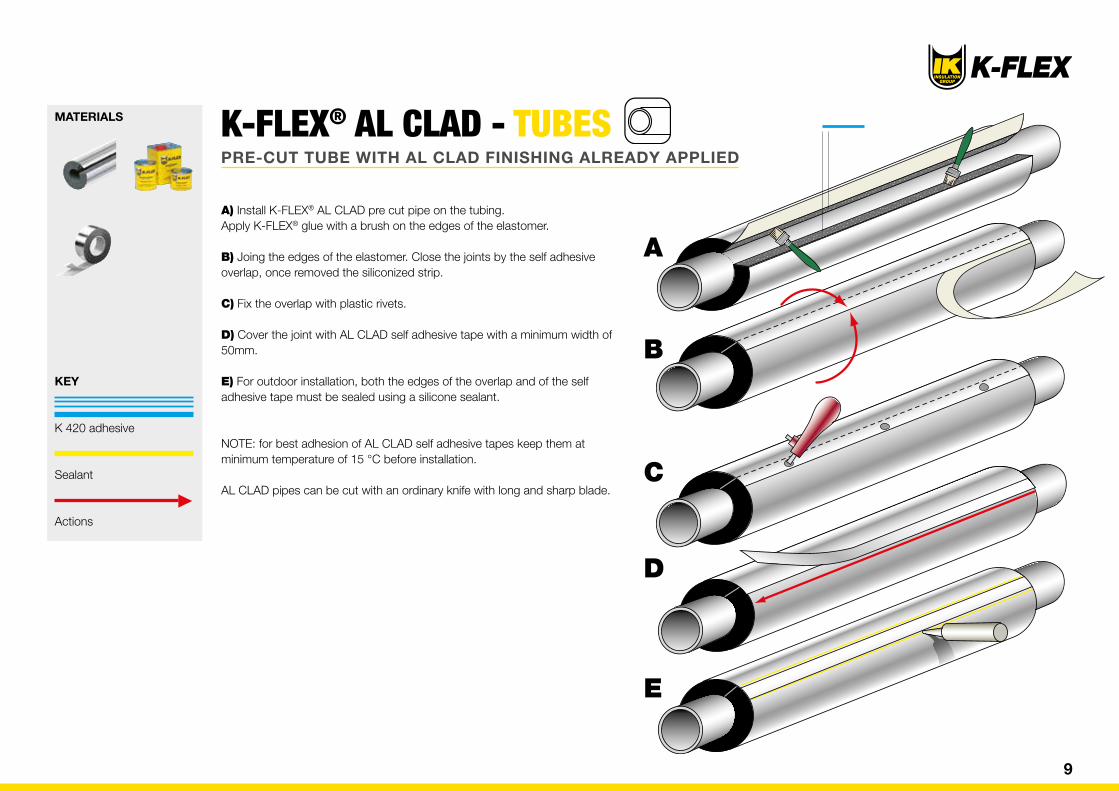
A) Install K-FLEX® AL CLAD pre cut pipe on the tubing. Apply K-FLEX® glue with a brush on the edges of the elastomer.
B) Joing the edges of the elastomer. Close the joints by the self adhesive overlap, once removed the siliconized strip.
C) Fix the overlap with plastic rivets.
D) Cover the joint with AL CLAD self adhesive tape with a minimum width of 50mm. E) For outdoor installation, both the edges of the overlap and of the self adhesive tape must be sealed using a silicone sealant.
NOTE: for best adhesion of AL CLAD self adhesive tapes keep them at minimum temperature of 15 °C before installation.
AL CLAD pipes can be cut with an ordinary knife with long and sharp blade.
A
B
C
D
E
10
K-FLEX® } AL CLAD SYSTEM - APPLICATION MANUAL
B
C
D
E
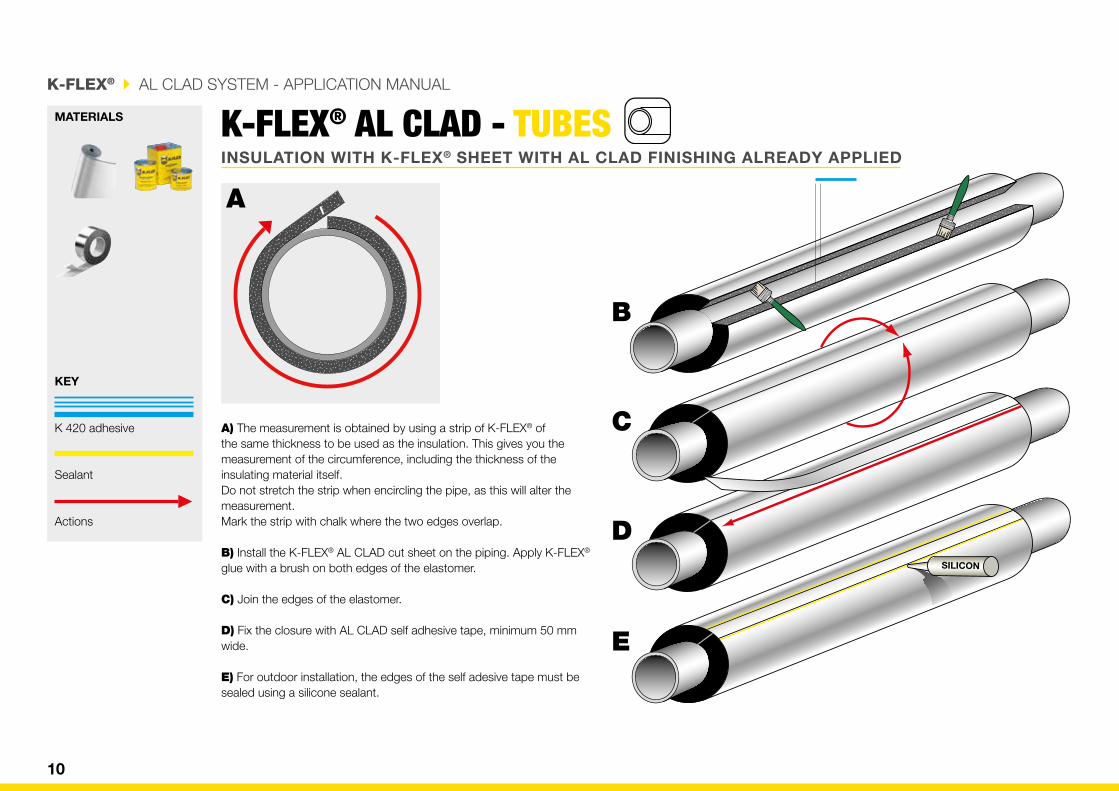
A) The measurement is obtained by using a strip of K-FLEX® of the same thickness to be used as the insulation. This gives you the measurement of the circumference, including the thickness of the insulating material itself.Do not stretch the strip when encircling the pipe, as this will alter the measurement. Mark the strip with chalk where the two edges overlap. B) Install the K-FLEX® AL CLAD cut sheet on the piping. Apply K-FLEX® glue with a brush on both edges of the elastomer.
C) Join the edges of the elastomer. D) Fix the closure with AL CLAD self adhesive tape, minimum 50 mm wide.
E) For outdoor installation, the edges of the self adesive tape must be sealed using a silicone sealant.
SILICON
K-FLEX® AL CLAD - TUBESINSULATION WITH K-FLEX® SHEET WITH AL CLAD FINISHING ALREADY APPLIED
KEY
K 420 adhesive
Sealant
Actions
MATERIALS
A
11
A
B
C
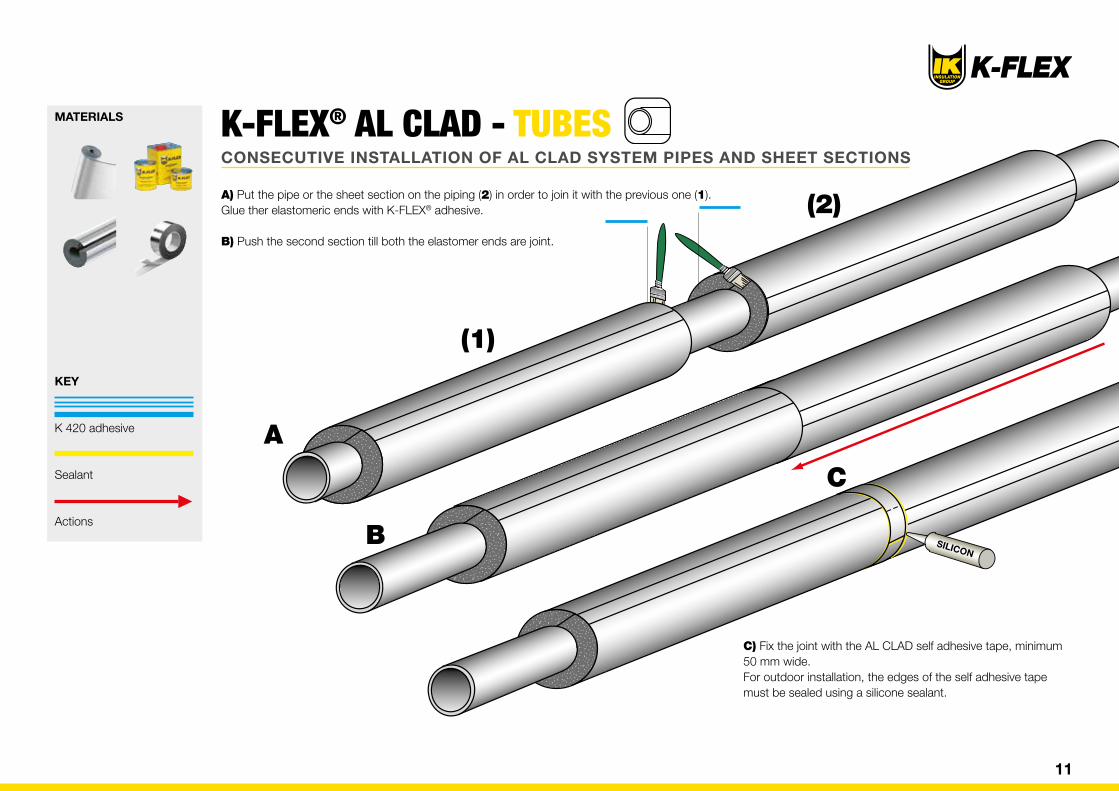
A) Put the pipe or the sheet section on the piping (2) in order to join it with the previous one (1). Glue ther elastomeric ends with K-FLEX® adhesive.
B) Push the second section till both the elastomer ends are joint.
C) Fix the joint with the AL CLAD self adhesive tape, minimum 50 mm wide. For outdoor installation, the edges of the self adhesive tape must be sealed using a silicone sealant.
SILICON
(1)
(2)
K-FLEX® AL CLAD - TUBESCONSECUTIVE INSTALLATION OF AL CLAD SYSTEM PIPES AND SHEET SECTIONS
KEY
K 420 adhesive
Sealant
Actions
MATERIALS
12
K-FLEX® } AL CLAD SYSTEM - APPLICATION MANUAL
f
bbb
c d
e
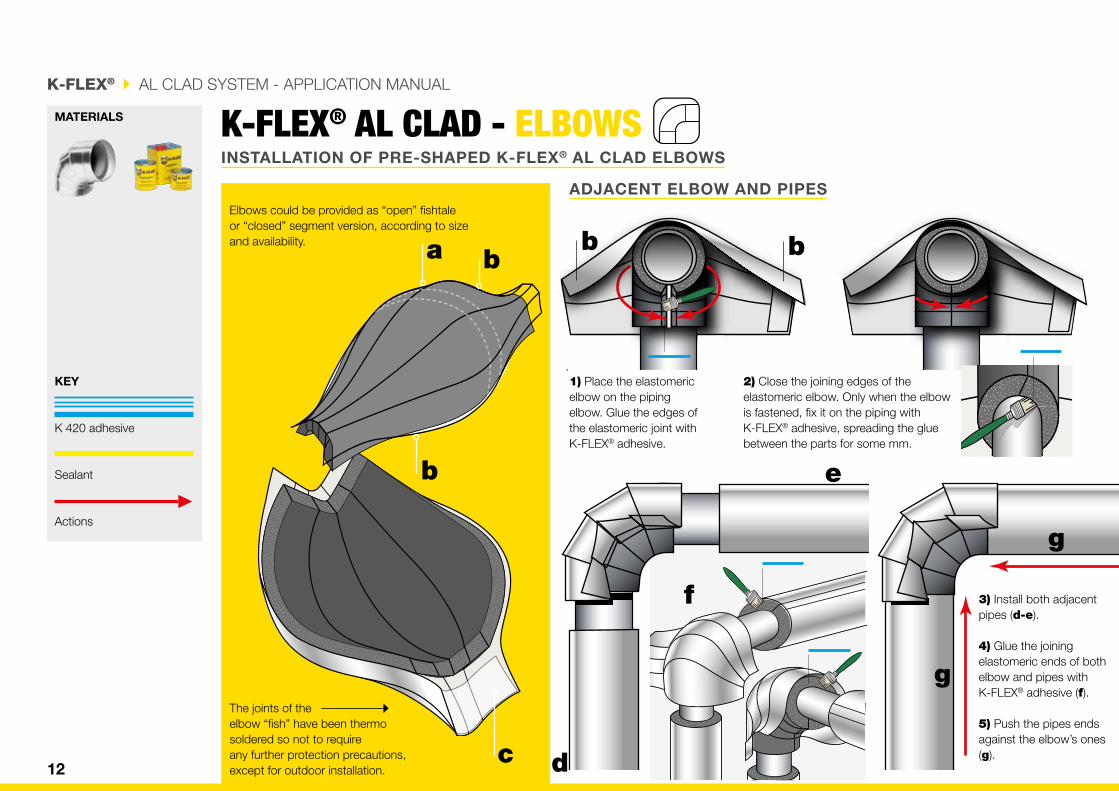
Elbows could be provided as “open” fishtale or “closed” segment version, according to size and availability.
The joints of theelbow “fish” have been thermosoldered so not to requireany further protection precautions, except for outdoor installation.
1) Place the elastomeric elbow on the piping elbow. Glue the edges of the elastomeric joint with K-FLEX® adhesive.
2) Close the joining edges of the elastomeric elbow. Only when the elbow is fastened, fix it on the piping with K-FLEX® adhesive, spreading the glue between the parts for some mm.
ADJACENT ELBOW AND PIPES
KEY
K 420 adhesive
Sealant
Actions
MATERIALS K-FLEX® AL CLAD - ELBOWSINSTALLATION OF PRE-SHAPED K-FLEX® AL CLAD ELBOWS
g
a
b
g
f 3) Install both adjacent pipes (d-e).
4) Glue the joining elastomeric ends of both elbow and pipes with K-FLEX® adhesive (f).
5) Push the pipes ends against the elbow’s ones (g).

13
6) Pull the finishing against the elastomeric elbow leaving the overlap overlapping (a).
7) Remove the siliconized strip from the overlap (b) and press the joining parts to grant adhesion.
8) Fix the joints with plastic nails or metallic clips (c) (see accessories catalogue). 9) Cover the joint with AL CLAD tape, 50 mm wide (d).
SILICON
SILICON
SILIC
ON
10) Fix the joints between elbow and pipes withAL CLAD tape, minimum 50 mm wide (e-f).
11) For outdoor installation, the edges of the self adhesive tape and thejointrs of the elbow’s “fish”must be sealed using a siliconesealant.
a b c d
e
fg
g gKEY
K 420 adhesive
Sealant
Actions
MATERIALS K-FLEX® AL CLAD - ELBOWSINSTALLATION OF PRE-SHAPED K-FLEX® AL CLAD ELBOWS
14
K-FLEX® } AL CLAD SYSTEM - APPLICATION MANUAL
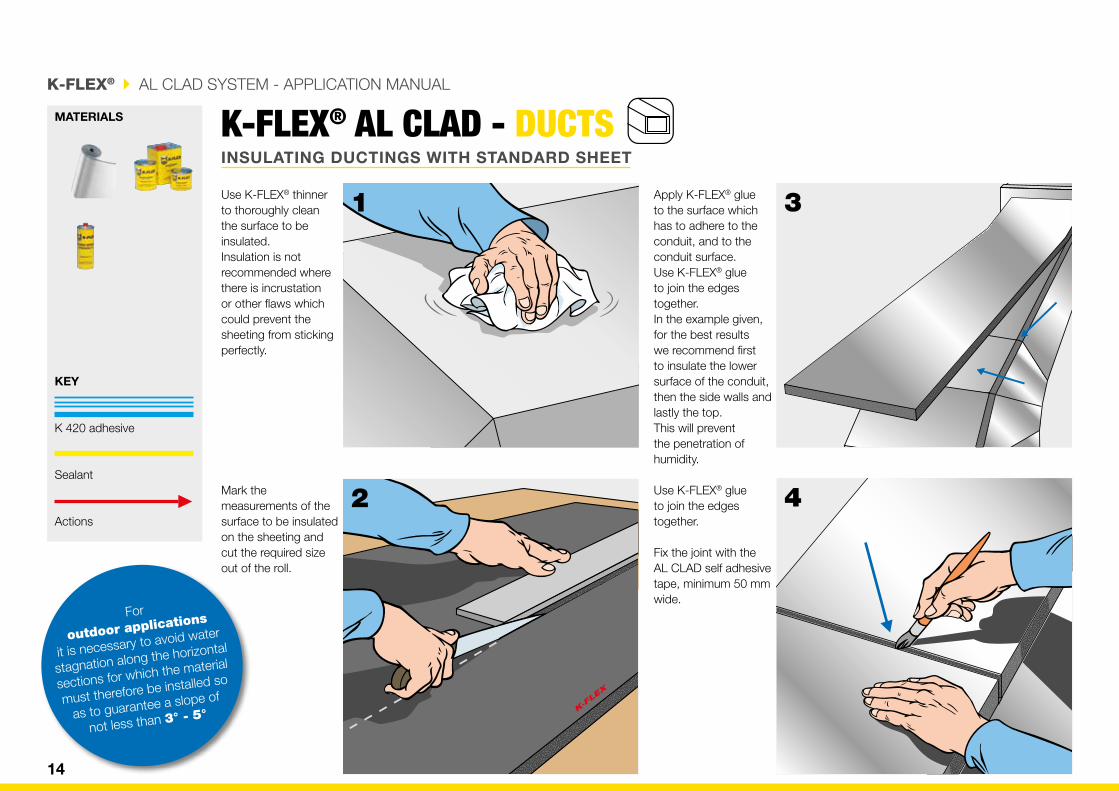
1Use K-FLEX® thinner to thoroughly clean the surface to be insulated. Insulation is not recommended where there is incrustation or other flaws which could prevent the sheeting from sticking perfectly.
3
42
Apply K-FLEX® glue to the surface which has to adhere to the conduit, and to the conduit surface. Use K-FLEX® glue to join the edges together.In the example given, for the best results we recommend first to insulate the lower surface of the conduit, then the side walls and lastly the top. This will prevent the penetration of humidity.
Mark the measurements of the surface to be insulated on the sheeting and cut the required size out of the roll.
Use K-FLEX® glue to join the edges together.
Fix the joint with the AL CLAD self adhesive tape, minimum 50 mm wide.
KEY
K 420 adhesive
Sealant
Actions
MATERIALS K-FLEX® AL CLAD - DUCTSINSULATING DUCTINGS WITH STANDARD SHEET
For
outdoor applications
it is necessary to avoid water
stagnation along the horizontal
sections for which the material
must therefore be installed so
as to guarantee a slope of
not less than 3° - 5°
15
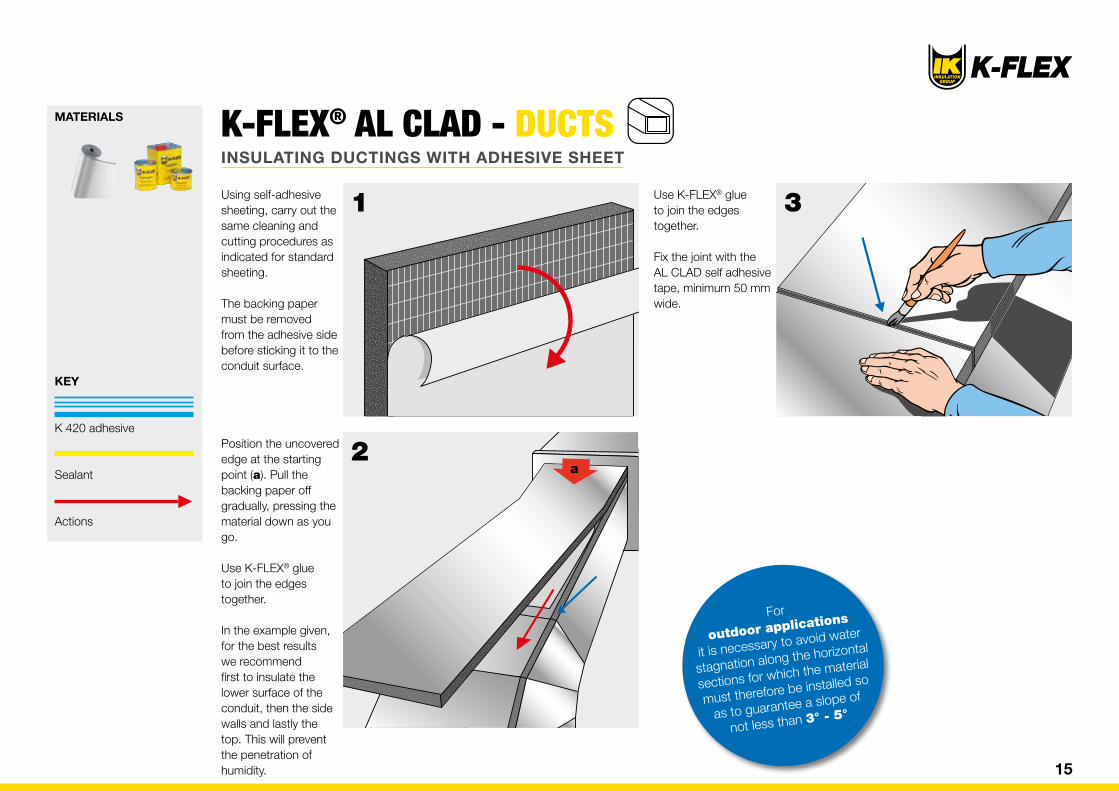
1Using self-adhesive sheeting, carry out the same cleaning and cutting procedures as indicated for standard sheeting.
The backing paper must be removed from the adhesive side before sticking it to the conduit surface.
3
2
Use K-FLEX® glue to join the edges together.
Fix the joint with the AL CLAD self adhesive tape, minimum 50 mm wide.
Position the uncovered edge at the starting point (a). Pull the backing paper off gradually, pressing the material down as you go.
Use K-FLEX® glue to join the edges together.
In the example given, for the best results we recommend first to insulate the lower surface of the conduit, then the side walls and lastly the top. This will prevent the penetration of humidity.
K-FLEX® AL CLAD - DUCTSINSULATING DUCTINGS WITH ADHESIVE SHEET
KEY
K 420 adhesive
Sealant
Actions
MATERIALS
a
For
outdoor applications
it is necessary to avoid water
stagnation along the horizontal
sections for which the material
must therefore be installed so
as to guarantee a slope of
not less than 3° - 5°

K-FLEX® } AL CLAD SYSTEM - APPLICATION MANUAL
CONTACT
L’ISOLANTE K-FLEX S.p.A. Via Don Locatelli, 35 - 20877 Roncello (MB) - Italy Sales Dept. E-mail: [email protected] Tel.: +39 039 6824.1 Technical Marketing Dept. E-mail: [email protected] www.kflex.com
© K
-FLE
X®. I
NT_M
AN_A
L CL
AD_V
1_11
20; K
-FLE
X® re
serv
es th
e rig
ht to
cha
nge
the
data
and
tech
nica
l fea
ture
s w
ithou
t prio
r not
ice.
2020