elluminate live! troubleshooting guide · elluminate live! troubleshooting guide for windows 2...
TRANSCRIPT

Elluminate Live!
Troubleshooting Guide
Windows 95/98/Me/NT/2000/XP
© 2001 - 2004 Elluminate, Inc. All Rights Reserved.

Elluminate Live!: Troubleshooting Guide for Windows i
Contents Section 1 Getting Started...............................................1
Prerequisites.............................................................................1 Minimum System Requirements...............................................1
Section 2 Audio Configuration ......................................2 Testing Your Speakers and Microphone...................................2 Testing Your Microphone in Windows.......................................2 Configuring Your Microphone ...................................................3 Sound Configuration.................................................................6 The Elluminate Live! Splash Screen Stops on Configuring Audio .....................................................................8
Section 3 Troubleshooting ............................................9 Converted PowerPoint Slides are Blurry...................................9 Direct Messaging Window is Greyed out ................................10 File Download Window Appears When Trying to Enter a Session...................................................................................10 Installing Java Web Start ........................................................10 Changing a MIME Type ..........................................................10 Maximum Login Attempts Exceeded ......................................11 Download Error.......................................................................11 Invalid Argument Error ............................................................12 Java Web Start begins but Nothing Happens .........................12

Elluminate Live!: Troubleshooting Guide for Windows 1
Section 1 Getting Started
Elluminate Live! is a world-class, real-time education, demonstration and collaboration environment that is customizable and easy to use. Elluminate Live! enables live, online learning, coaching, mentoring and meeting, and features full two-way audio, direct text messaging and a shared, interactive whiteboard—all in one intuitive, graphical interface.
Java Web Start is a platform-independent, secure, and robust deployment technology. It enables developers to deploy full-featured applications to end-users by making the applications available on a standard Web server. Using any Web browser, end-users can launch applications and be confident they have the most-recent version, without going through complicated installation procedures.
With Java Web Start, a user launches Elluminate Live! by clicking on a URL in an email or on a Web page. If Elluminate Live! is not present on the user’s computer, Java Web Start automatically downloads all necessary files. It then caches the files on the computer so the application is ready to launch at any time.
Java Web Start is available from Elluminate’s support page at www.elluminate.com/support, or from Sun Microsystems directly at www.java.com.
Prerequisites In order to install Elluminate Live! and Java Web Start, you must have permission to install software on your machine. You must either be an administrator on your machine, or be granted permission by an administrator to do installations. If you do not log on to your machine, and are its only user, you are probably the administrator. If you have previously installed software on your machine, you will be able to install Java Web Start.
Minimum System Requirements
▪ Processor Pentium II 266 MHz processor or faster ▪ Operating System Windows 95/98/NT/ME/2000/XP ▪ Memory 64 MB RAM for 95/98/ME; 128 MB RAM for NT/2000/XP ▪ Storage Space 20 MB of available disk space on your hard drive ▪ Audio Soundcard with speakers and microphone or headset ▪ Connection 28.8 kbps or higher Internet connection
Elluminate Live! Troubleshooting Guide for Windows 2
Section 2 Audio Configuration
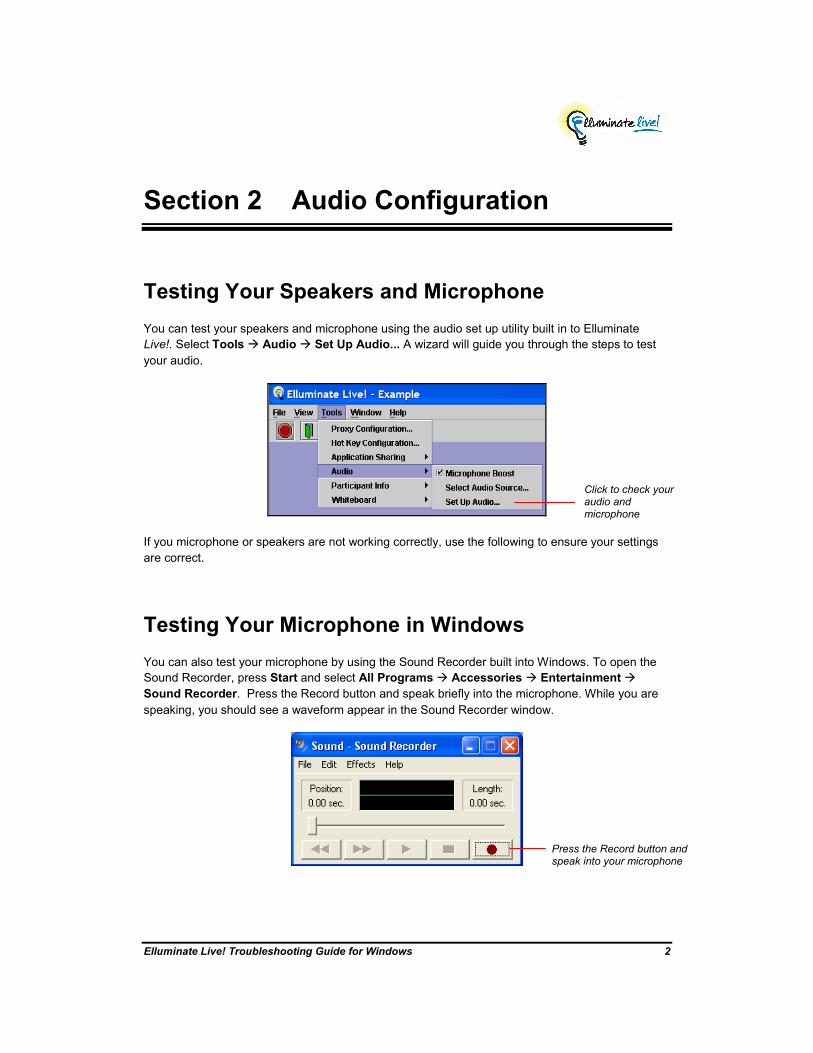
Testing Your Speakers and Microphone You can test your speakers and microphone using the audio set up utility built in to Elluminate Live!. Select Tools Audio Set Up Audio... A wizard will guide you through the steps to test your audio.
If you microphone or speakers are not working correctly, use the following to ensure your settings are correct.
Testing Your Microphone in Windows You can also test your microphone by using the Sound Recorder built into Windows. To open the Sound Recorder, press Start and select All Programs Accessories Entertainment Sound Recorder. Press the Record button and speak briefly into the microphone. While you are speaking, you should see a waveform appear in the Sound Recorder window.
Press the Record button and speak into your microphone
Click to check your audio and microphone

Elluminate Live! Troubleshooting Guide for Windows 3
Press Play to listen to the recording. If you hear your recording, your microphone is properly configured.
Configuring Your Microphone
If you cannot hear your voice in Sound Recorder, your microphone must be configured to work correctly.
Microphone Basics
Check the back of your computer to make sure the microphone is plugged in to the correct jack. The correct jack might be colour-coded, or identified by a symbol representing a microphone.
A waveform will appear while you are speaking
Press Stop to end the recording
Press Play to listen to the recording

Elluminate Live! Troubleshooting Guide for Windows 4
Microphone Settings
Check your Play Control settings. Click on the Start menu and select your Control Panel. Open your Sound and Audio Devices control. Ensure that Microphone Mute is checked.
If Microphone is not visible on the Play Control, select Options Properties and ensure that there is a checkmark beside Microphone. Press OK.
Check your Record Control settings. On the Play Control window, select Options Properties and select Recording. Ensure that there is a checkmark beside Microphone, and press OK.
Ensure that Mute is checked
Ensure Microphone Is checked

Elluminate Live! Troubleshooting Guide for Windows 5
When you press OK, the Record Control will open. Select the microphone by clicking in the check box. When you have selected it, you can close the Record Control.
Select Recording
Ensure Microphone Is checked
Ensure that Select is checked under Microphone

Elluminate Live! Troubleshooting Guide for Windows 6
Sound Configuration
Are your speakers plugged in?
Ensure that your speakers have power, and that they are plugged in to the correct port of your sound card.
Is the volume turned up on your computer?
Ensure that the speakers have not been muted by clicking on the volume icon in your taskbar (the lower right hand corner of your screen). The box should be unchecked (not muted). Ensure that the volume is not turned down all the way. Adjust it to desired level by dragging the volume slider up or down.
If you can’t see the volume icon on your taskbar, ensure that the volume settings are turned on in the Play Control. Click on the Start menu and select Programs Accessories Entertainment
Volume Control. Ensure that the Play Control is all the way to the top and that the check box beside the "Mute all" label is not checked.
Ensure “Mute all” is not checked

Elluminate Live! Troubleshooting Guide for Windows 7
Ensure that the Audio Properties are set correctly. To check the Audio Properties, right click the sound icon in the system tray and select Adjust Audio Properties, or open your control panel and select the Sound and Audio Devices control. Select the Audio tab and ensure that the Use only preferred (or default) devices checkbox is checked.
Ensure “Use only default devices” is checked

Elluminate Live! Troubleshooting Guide for Windows 8
The Elluminate Live! Splash Screen Stops on Configuring Audio When Configuring Audio is visible on the Elluminate splash screen, Elluminate Live! is loading the audio module. If it stops loading on the Configuring Audio message, your sound needs slight reconfiguration.
For Windows 95/98/Me/XP: ▪ Go to Start Control Panel Sound and Audio Devices ▪ On the Audio tab, select Use only default devices ▪ Click Apply and OK

Elluminate Live! Troubleshooting Guide for Windows 9
Section 3 Troubleshooting
Converted PowerPoint Slides are Blurry Converting a PowerPoint presentation in Elluminate Live! may result in blurry or fuzzy text. This is a result of screen font smoothing, and occurs most often on laptops. To prevent this from happening, open your Display Properties control panel by right-clicking on your desktop and selecting Properties. Select the Appearance tab and click on the Effects button.
Make sure the box beside Use the following method to smooth edges of screen fonts is unchecked. Click OK.
Select Apply on the Display Properties control panel. Convert your slides again. Text on the converted slides will not be blurry.

Elluminate Live! Troubleshooting Guide for Windows 10
Direct Messaging Window is Greyed out If you cannot see the Direct Messaging window, exit your session and:
▪ Open Java Web Start’s Application Manager by double-clicking on the Java Web Start icon on your desktop (or selecting Start/Programs/Java Web Start).
▪ Select Preferences from the File menu, and choose the Advanced tab.
▪ Click on Clear Folder and confirm.
▪ Close the Java Web Start Application Manager and follow the directions provided to enter your Elluminate Live! session again.
File Download Window Appears When Trying to Enter a Session If you get a File Download box when trying to enter a Elluminate Live! session, there is one of two problems:
▪ You do not have Java Web Start installed on your machine ▪ Your MIME type is set incorrectly.
In either case, press Cancel on the File Download window.
Installing Java Web Start
To find out if you have Java Web Start installed on your computer, and for directions to download and install it if you don’t, please visit www.elluminate.com/support or www.java.com.. If you have Java Web Start installed, and still experience the same difficulty, it may be that your MIME type is not set correctly.
Changing a MIME Type
To change your MIME type, open the Folder Options control panel (Start Control Panel or Start Settings Control Panel). Select the File Types tab.
Look for the extension JNLP and left-click on it so that it is selected. Under Details, the file type listed beside Opens With should read “javaws”. If it does not, click the Change button and find “javaws”. Select this and click the OK button. Click the Apply and then OK or Close button at the bottom of the Folder Options window to save these changes. Then try to enter the Elluminate Live! session again.

Elluminate Live! Troubleshooting Guide for Windows 11
Maximum Login Attempts Exceeded While attempting to login to “My Elluminate” at www.elluminate.com, you might encounter a message informing you “maximum login attempts exceeded.”
Elluminate limits the number of failed login attempts to four per browser session. If you open a new browser session, you will have four more login attempts. If you do not know your username or password information, contact your organization or institution.
Download Error When you receive a Download Error, click on the Details button for more information.

Elluminate Live! Troubleshooting Guide for Windows 12
This is likely to happen in a network environment which has a firewall between your computer and the Elluminate Live! server to which it is trying to connect. For information on firewall, visit www.elluminate.com/support.
Invalid Argument Error When you receive an Invalid Argument Error, click on the Details button for more information.
An Invalid Argument Error occurs when your Internet browser’s temporary Internet file folder is full and Java Web Start cannot store the necessary information to make the connection to an Elluminate Live! session. The solution is to clear your Internet browser cache. In Internet Explorer, select Internet Options from the Tools menu. Click on Delete Files and confirm. Try again to access your session.
Java Web Start begins but Nothing Happens Double-click the Java Web Start icon on the desktop to open the Java Web Start Application Manager, or click Start/Programs/Java Web Start.
In the Java Web Start Application Manager, select File Preferences.

Elluminate Live! Troubleshooting Guide for Windows 13
Select the Advanced tab, and click on Clear Folder.
When requested, select Yes to remove all downloaded resources. Your Java Web Start cache is now empty.