engine – dismantle and assemble (21 134 8) · 2,3 l dohc 16v engine 12/96 scorpio ’95 00-01-1...
TRANSCRIPT

2,3 l DOHC 16V Engine
12/96 Scorpio ’95 00-01-1
Engine – Dismantle and Assemble (21 134 8)Special Tools
15030A
15-030AUniversal flange-holdingwrench
16067
16-067Locator for clutch disc
1705502
17-055-02Depth gauge, adjusting shim
21031B
21-031 BEngine mounting bracket
21036A
21-036ARemover for pilot bearing
21044A
21-044AInstaller/centring pin, pilotbearing
21107
21-107Pliers, hydraulic tappets
21125
21-125Extractor, balancer shaft endfloat measurement
21141
21-141Installer, crankshaft rear oilseal
PZ21146C
21-146CEngine mounting plate
21147
21-147Vibration damper remover
21167
21-167Wrench for cylinder headbolts
21168
21-168Crankshaft locking tool
ES21202
21-202Socket, spark plugs
IA21214
21-214Installer, vibration damper
21540
21-540Bolt tightening angle gauge
Proprietary Tools
Piston ring compressor
Piston ring pliers
Dial indicator
Measuring fixture
External micrometer gauge
Internal gauge
E8 Torx wrench
E10 Torx wrench
T20 Torx wrench
T25 Torx wrench
T30 Torx wrench
T55 Torx wrench
Twist drill, 2,5 mm diameter
Steel straight edge
Oil filter strap wrench

2,3 l DOHC 16V Engine
12/96 Scorpio ’95 00-01-2
Workshop Equipment
Assembly stand withgeared drive
21-187
Materials
Engine oil
Spark plug threadlubricant (’NeverSeez’)
ESE-M1244-A
Lubricant, crankshaftposition sensor (CKPsensor)
WSD-M1C226-A
Sealer, coolanttemperature sensor,coolant pump angleconnector, oilpressure switch(Loctite 243)
WSK-M2G349-A7
Plastigage
Obtainable from:ReplacementServices Limited,30, Euston Street,Freemans IndustrialEstate, Leicester,LE2 7ST
Sealer for crankshaftrear oil seal carrier
WSE-M4G323-A6
Bolt M6 X 60
2,3 l DOHC 16V Engine
12/96 Scorpio ’95 00-01-3
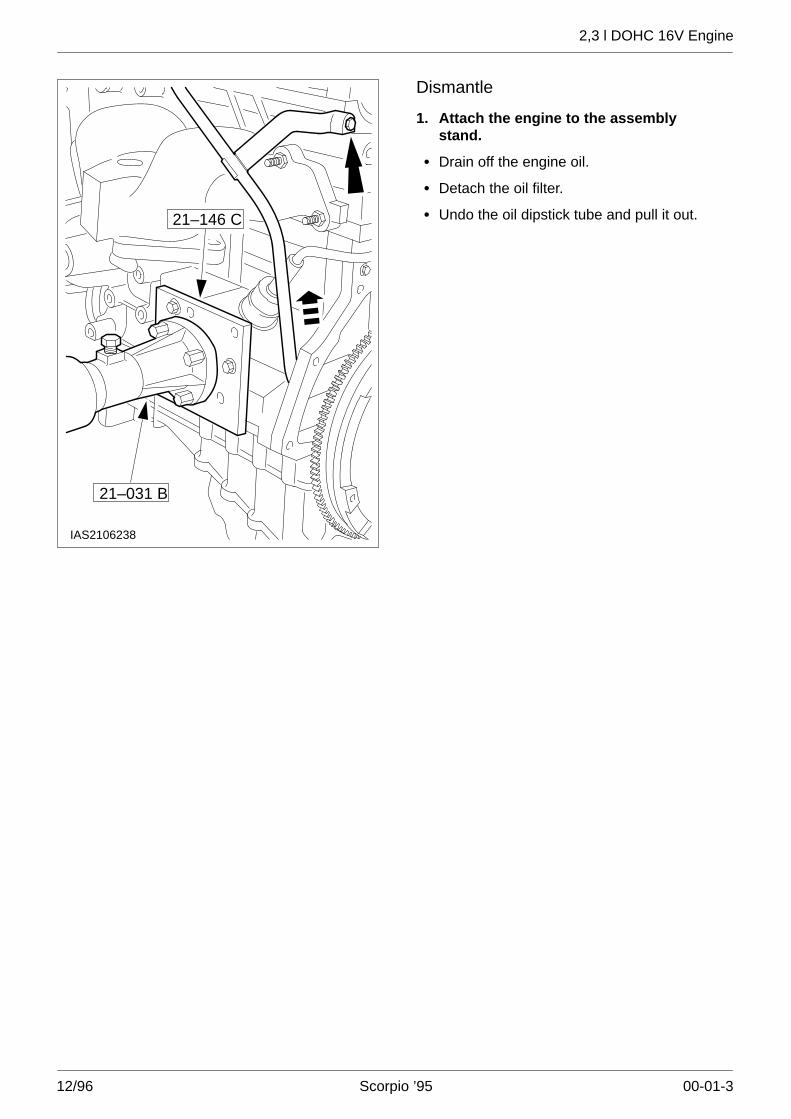
21–031 B
21–146 C
IAS2106238
Dismantle
1. Attach the engine to the assemblystand.
� Drain off the engine oil.
� Detach the oil filter.
� Undo the oil dipstick tube and pull it out.

2,3 l DOHC 16V Engine
12/96 Scorpio ’95 00-01-4
221–202
3
1
4
IAS2106239
2. Remove the cylinder head cover.
1 Remove the ignition coil cover (10 bolts).
2 Pull off the spark plug caps, remove thecoils and spark plugs.
3 Remove the camshaft position sensor(CMP sensor).
4 Remove the cylinder head cover (four nuts,11 bolts).
Remove the gaskets.
2,3 l DOHC 16V Engine
12/96 Scorpio ’95 00-01-5
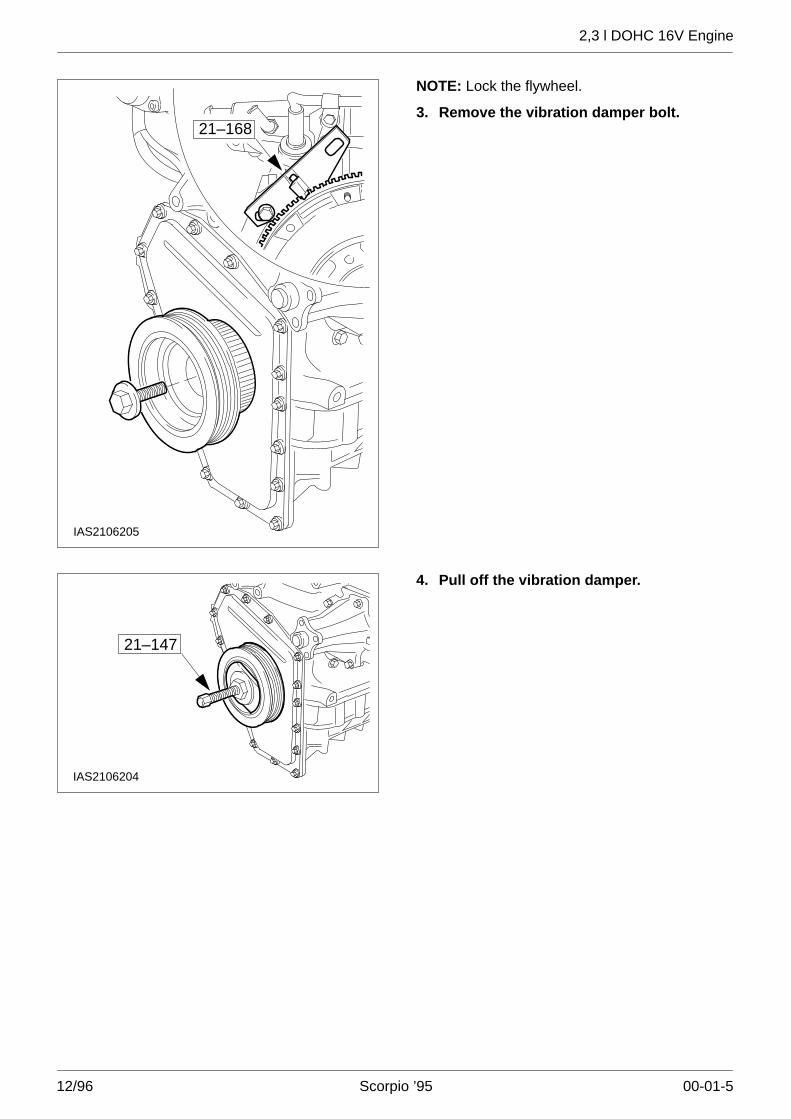
IAS2106205
21–168
NOTE: Lock the flywheel.
3. Remove the vibration damper bolt.
IAS2106204
21–147
4. Pull off the vibration damper.
2,3 l DOHC 16V Engine
12/96 Scorpio ’95 00-01-6
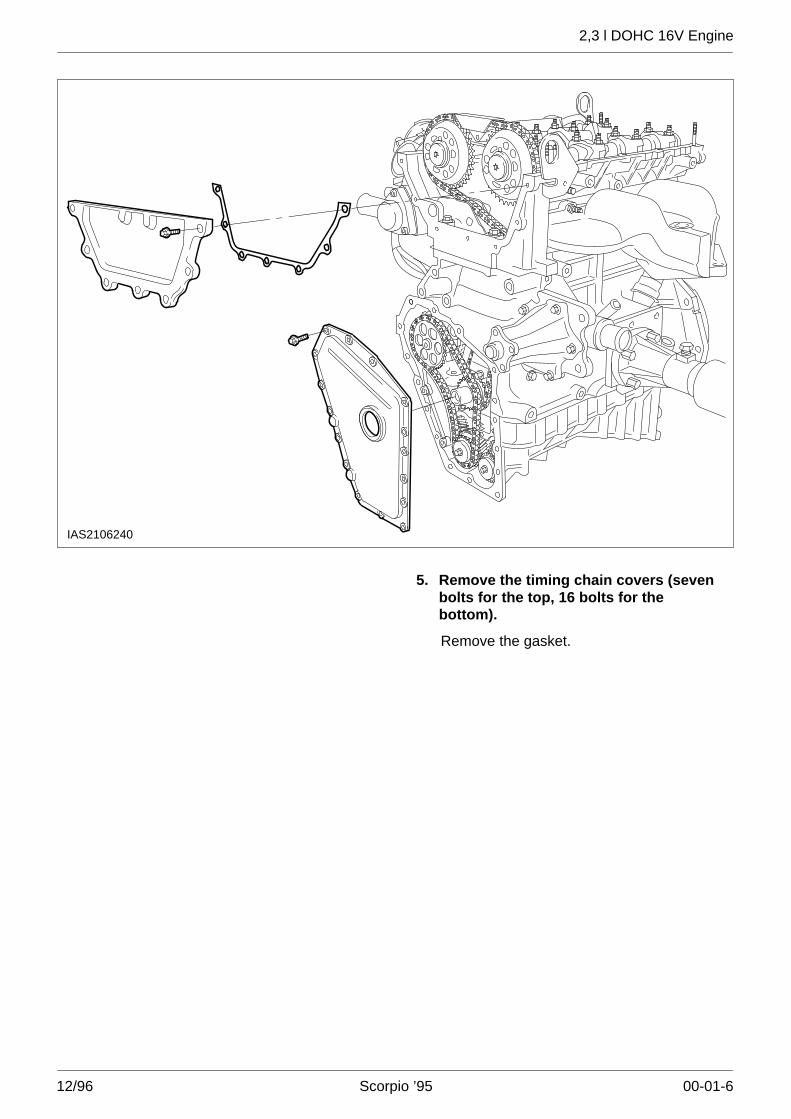
IAS2106240
5. Remove the timing chain covers (sevenbolts for the top, 16 bolts for thebottom).
Remove the gasket.

2,3 l DOHC 16V Engine
12/96 Scorpio ’95 00-01-7
IAS2106207
2
3
1
6. Dismantle the oil pump chain drive.
NOTE: Do not remove the bolt.
1 Loosen the oil pump sprocket bolt.
NOTE: Wrap adhesive tape around the twistdrill flutes.
2 Press the chain tensioner together, lock itwith a twist drill (2,5 mm diameter) andremove it.
3 Remove the chain guide.
Take off the chain.

2,3 l DOHC 16V Engine
12/96 Scorpio ’95 00-01-8
IAS2106209
15–030 A
3
1
2
4
2,3 l DOHC 16V Engine
12/96 Scorpio ’95 00-01-9
7. Remove the timing chain.
1 Remove the chain guide.
NOTE: Hold the flange with the special tool.Tie the chain up with wire to stop it from fallinginto the timing chain housing.
2 Undo the camshaft sprockets and removethem.
3 Remove the chain tensioner.
� Remove the lock washer.
� Extract the pivot bolt using an M6 bolt.
� Take out the chain tensioner and hydraulicplunger.
4 Remove the chain guide bolt and pull thechain guide up and out together with thechain.
2,3 l DOHC 16V Engine
12/96 Scorpio ’95 00-01-10
IAS2106210
21–107
1
32
2,3 l DOHC 16V Engine
12/96 Scorpio ’95 00-01-11
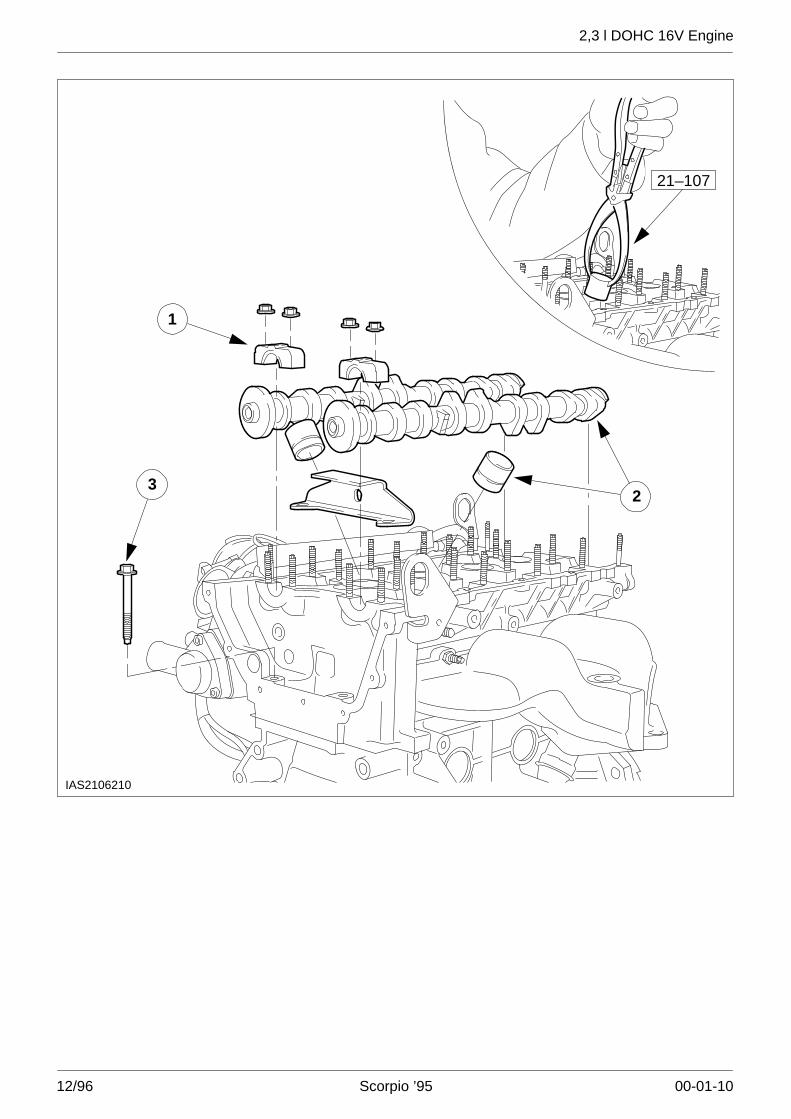
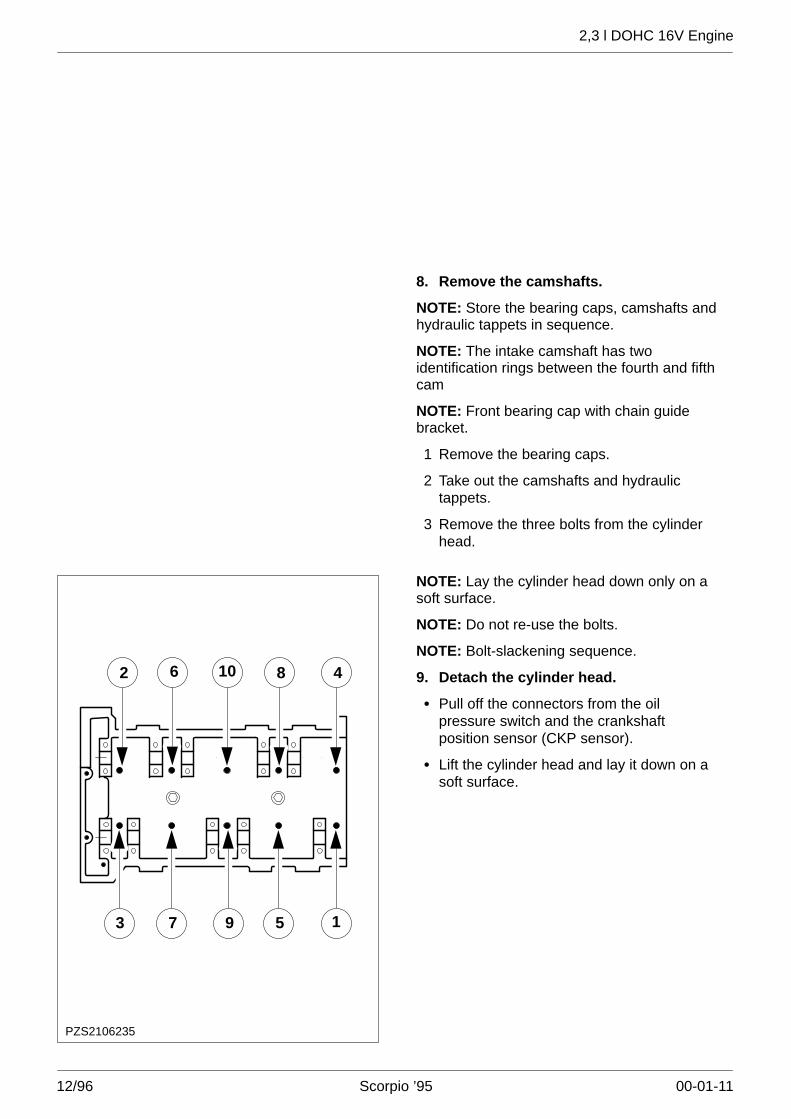
8. Remove the camshafts.
NOTE: Store the bearing caps, camshafts andhydraulic tappets in sequence.
NOTE: The intake camshaft has twoidentification rings between the fourth and fifthcam
NOTE: Front bearing cap with chain guidebracket.
1 Remove the bearing caps.
2 Take out the camshafts and hydraulictappets.
3 Remove the three bolts from the cylinderhead.
PZS2106235
3 7 9 5 1
2 6 10 8 4
NOTE: Lay the cylinder head down only on asoft surface.
NOTE: Do not re-use the bolts.
NOTE: Bolt-slackening sequence.
9. Detach the cylinder head.
� Pull off the connectors from the oilpressure switch and the crankshaftposition sensor (CKP sensor).
� Lift the cylinder head and lay it down on asoft surface.

2,3 l DOHC 16V Engine
12/96 Scorpio ’95 00-01-12
IAS2106241
6
4
1
5
3
2
10. Remove the components of the oil andcoolant circulation systems.
1 Take off the cylinder head gasket.
2 Oil pressure switch
3 Crankshaft position (CKP) sensor.
4 Oil pump sprocket.
5 Remove the oil pump.
Remove the gasket.
6 Detach the coolant pump.
Take out the seal.

2,3 l DOHC 16V Engine
12/96 Scorpio ’95 00-01-13
PZC2109109
11. Detach the clutch assembly.
J2101059
NOTE: Do not re-use the bolts.
12. Detach the flywheel.
Remove the special tool 21-168.

2,3 l DOHC 16V Engine
12/96 Scorpio ’95 00-01-14
1
3
IAS2106242
2
13. Remove the sump and balancer shafthousing.
NOTE: Only remove the sump and balancershaft housing from below, so that no oil sludgeor abraded particles can enter the engine.
1 Remove the sump.
2 Remove the oil intake tube.
3 Remove the balancer shaft housing andgasket.
2,3 l DOHC 16V Engine
12/96 Scorpio ’95 00-01-15
IAS2106213
14. Remove the crankshaft rear oil sealcarrier.
� Remove the gasket.
� Drive out the oil seal on a flat surface.
IAS2106215
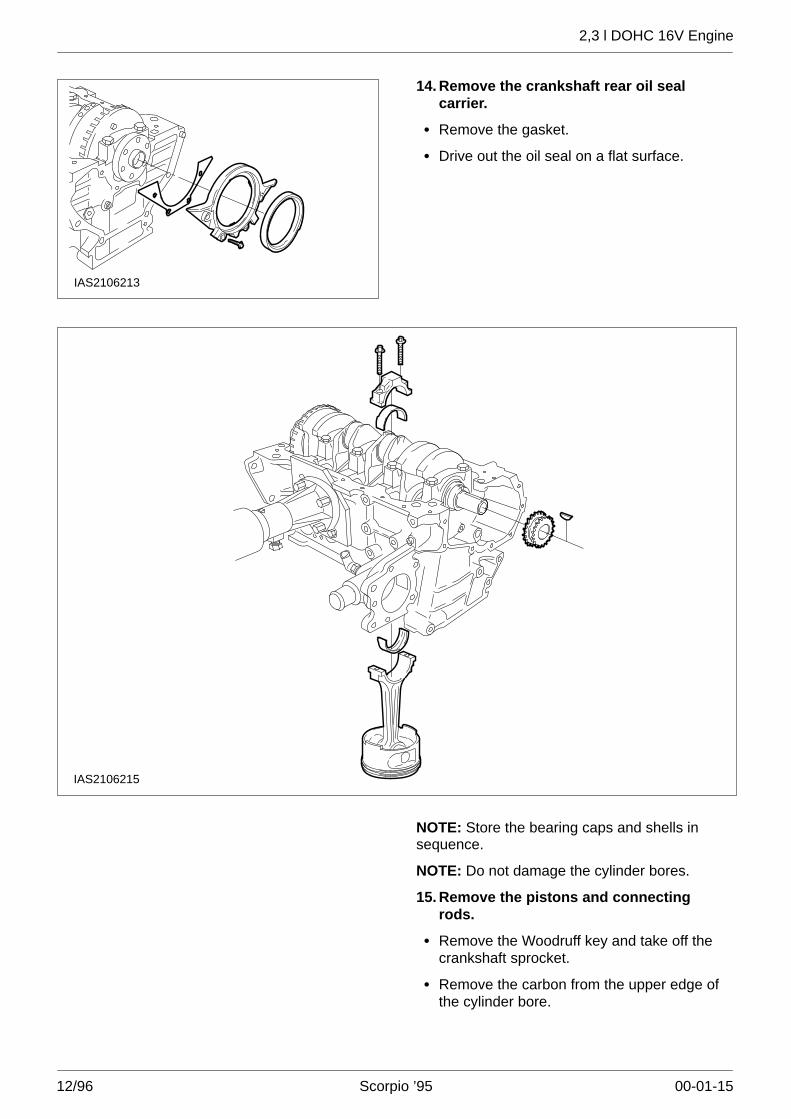
NOTE: Store the bearing caps and shells insequence.
NOTE: Do not damage the cylinder bores.
15. Remove the pistons and connectingrods.
� Remove the Woodruff key and take off thecrankshaft sprocket.
� Remove the carbon from the upper edge ofthe cylinder bore.
2,3 l DOHC 16V Engine
12/96 Scorpio ’95 00-01-16
IAS210621621–036 A
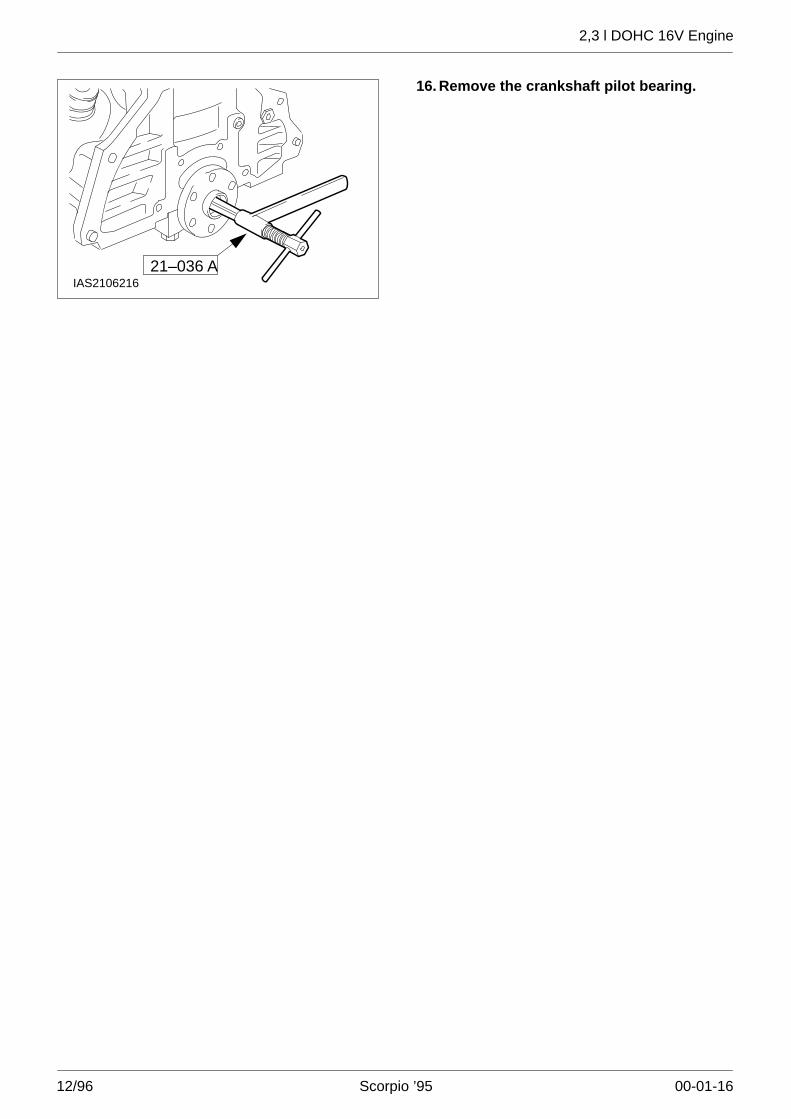
16. Remove the crankshaft pilot bearing.

2,3 l DOHC 16V Engine
12/96 Scorpio ’95 00-01-17
IAS2106217
NOTE: Store the bearing caps, shells andthrust half washers in sequence.
17. Remove the crankshaft.

2,3 l DOHC 16V Engine
12/96 Scorpio ’95 00-01-18
3
2
1IAS2106200
NOTE: Store the balancer shafts and bearingshells in sequence.
18. Dismantle the balancer shaft housing.
1 Remove the gear wheels.
2 Remove the balancer shafts.
2,3 l DOHC 16V Engine
12/96 Scorpio ’95 00-01-19
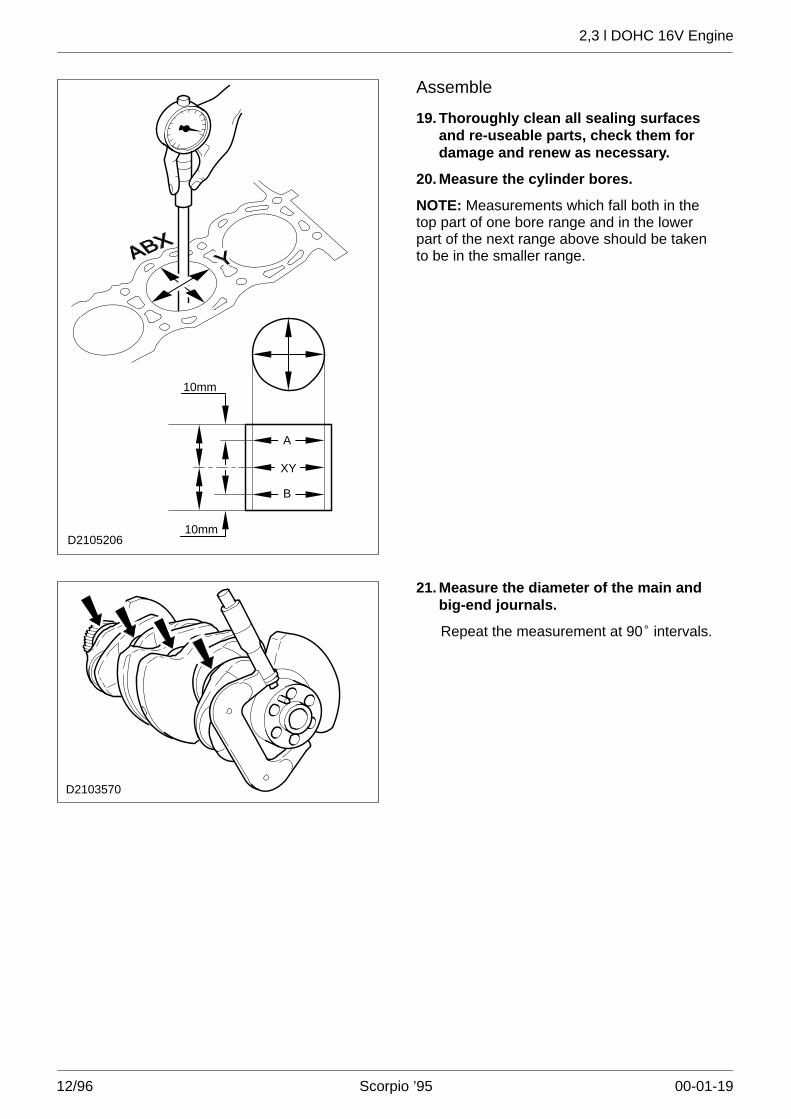
10mm
10mm
A
XY
B
D2105206
Assemble
19. Thoroughly clean all sealing surfacesand re-useable parts, check them fordamage and renew as necessary.
20. Measure the cylinder bores.
NOTE: Measurements which fall both in thetop part of one bore range and in the lowerpart of the next range above should be takento be in the smaller range.
D2103570
21. Measure the diameter of the main andbig-end journals.
Repeat the measurement at 90�� intervals.

2,3 l DOHC 16V Engine
12/96 Scorpio ’95 00-01-20
J2101111
22. Check the piston ring gaps.
The values given in the GeneralSpecifications apply to a gauge ring which isused in production. The figures measuredin the cylinder can exceed these by0,15 mm.
R2103661
23. Measure the piston diameter.
Measure the piston diameter at piston pinlevel.
M2103771
NOTE: Piston ring clearance must be measuredwith the piston ring proud of the piston surface.
24. Measure the piston ring clearance.

2,3 l DOHC 16V Engine
12/96 Scorpio ’95 00-01-21
IAC2109175
NOTE: The straight edge must be at least500 mm long and 5 mm wide.
25. Check the cylinder head for distortion.
� Maximum allowable distortion over thecombustion chamber steps: Across thecylinder head: 0,05 mm. Lengthways anddiagonally along the cylinder head: 0,10mm.
� Lay the straight edge across eachcombustion chamber and check each atthree points.
� Lay the straight edge lengthways along thecylinder head and check at each combustionchamber step.
� Lay the straight edge diagonally along thecylinder head and check at each combustionchamber step.
� If necessary re-work the cylinder head.
IAC2109260
ab
26. Notes on re-working the cylinder head.
NOTE: Keep the average peak-to-valley height(Rz) at 0,0135 mm on re-working.
� The cylinder head may be re-worked to amaximum of 0,20 mm (by milling or surfacegrinding). Measurement “a” must not be lessthan 13,80 mm (see step 27.) andmeasurement “b” must not be less than147,25 mm.
PZS2106733
17–055–02
NOTE: Remove any carbon deposit where themeasurement is to be made.
27. Measurement point in the combustionchamber for measurement “a”.
2,3 l DOHC 16V Engine
12/96 Scorpio ’95 00-01-22
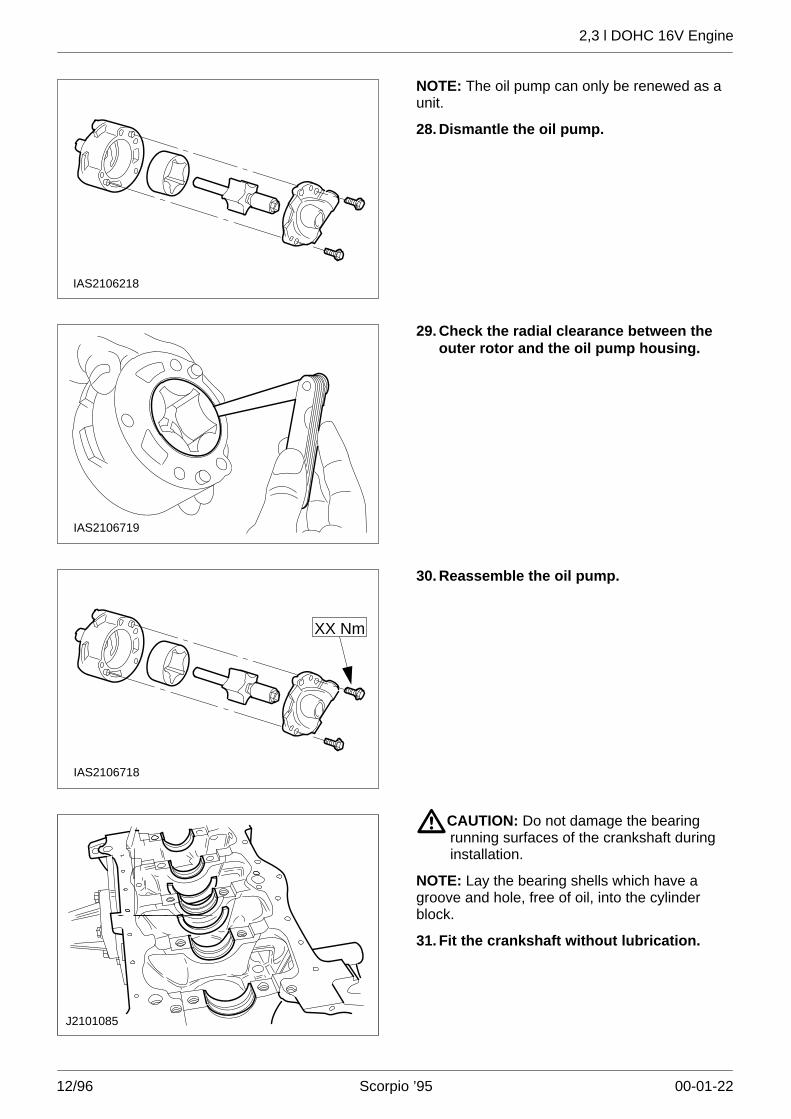
IAS2106218
NOTE: The oil pump can only be renewed as aunit.
28. Dismantle the oil pump.
IAS2106719
29. Check the radial clearance between theouter rotor and the oil pump housing.
IAS2106718
XX Nm
30. Reassemble the oil pump.
J2101085
�CAUTION: Do not damage the bearingrunning surfaces of the crankshaft duringinstallation.
NOTE: Lay the bearing shells which have agroove and hole, free of oil, into the cylinderblock.
31. Fit the crankshaft without lubrication.
2,3 l DOHC 16V Engine
12/96 Scorpio ’95 00-01-23
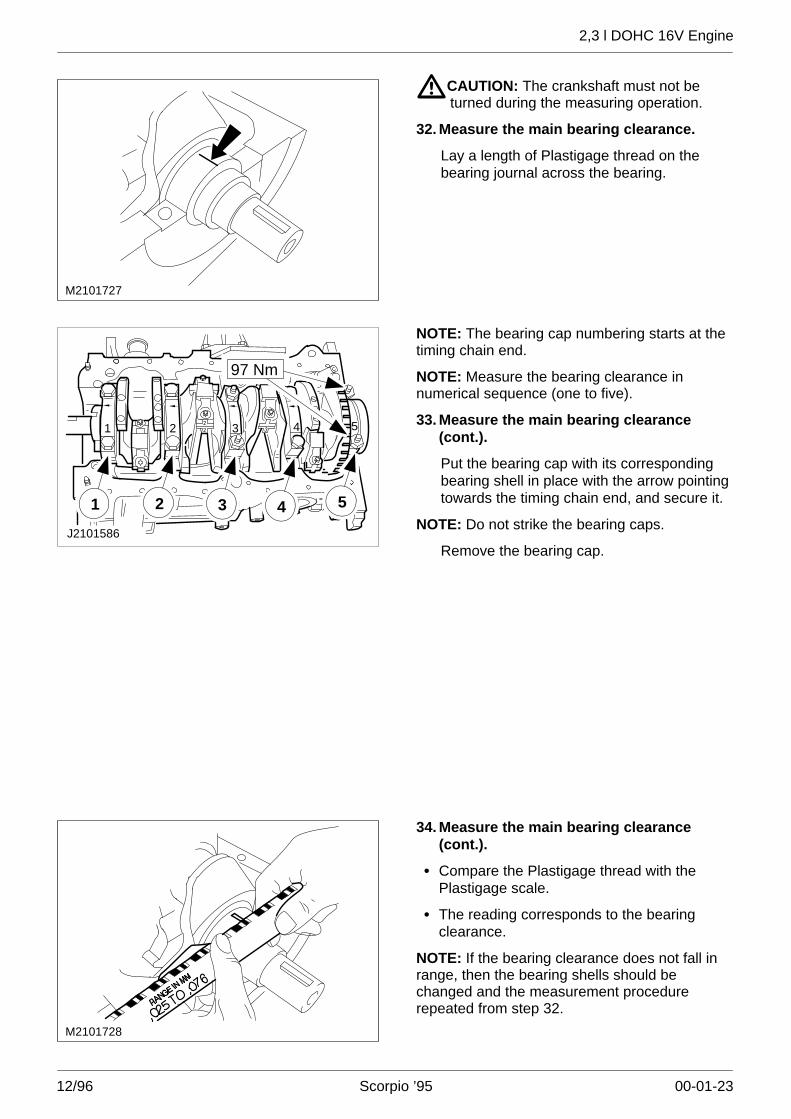
M2101727
�CAUTION: The crankshaft must not beturned during the measuring operation.
32. Measure the main bearing clearance.
Lay a length of Plastigage thread on thebearing journal across the bearing.
41 2 3
J2101586
5
2 3 541
97 Nm
NOTE: The bearing cap numbering starts at thetiming chain end.
NOTE: Measure the bearing clearance innumerical sequence (one to five).
33. Measure the main bearing clearance(cont.).
Put the bearing cap with its correspondingbearing shell in place with the arrow pointingtowards the timing chain end, and secure it.
NOTE: Do not strike the bearing caps.
Remove the bearing cap.
M2101728
34. Measure the main bearing clearance(cont.).
� Compare the Plastigage thread with thePlastigage scale.
� The reading corresponds to the bearingclearance.
NOTE: If the bearing clearance does not fall inrange, then the bearing shells should bechanged and the measurement procedurerepeated from step 32.

2,3 l DOHC 16V Engine
12/96 Scorpio ’95 00-01-24
IAS2106717
97 Nm
NOTE: Put the thrust half washers in placewith the grooves outwards.
NOTE: Lay the bearing shells which have thegroove and hole in place in the cylinder block.
35. Install the crankshaft.
Oil the crankshaft bearing shells and thrusthalf washers.
2,3 l DOHC 16V Engine
12/96 Scorpio ’95 00-01-25
M2101729
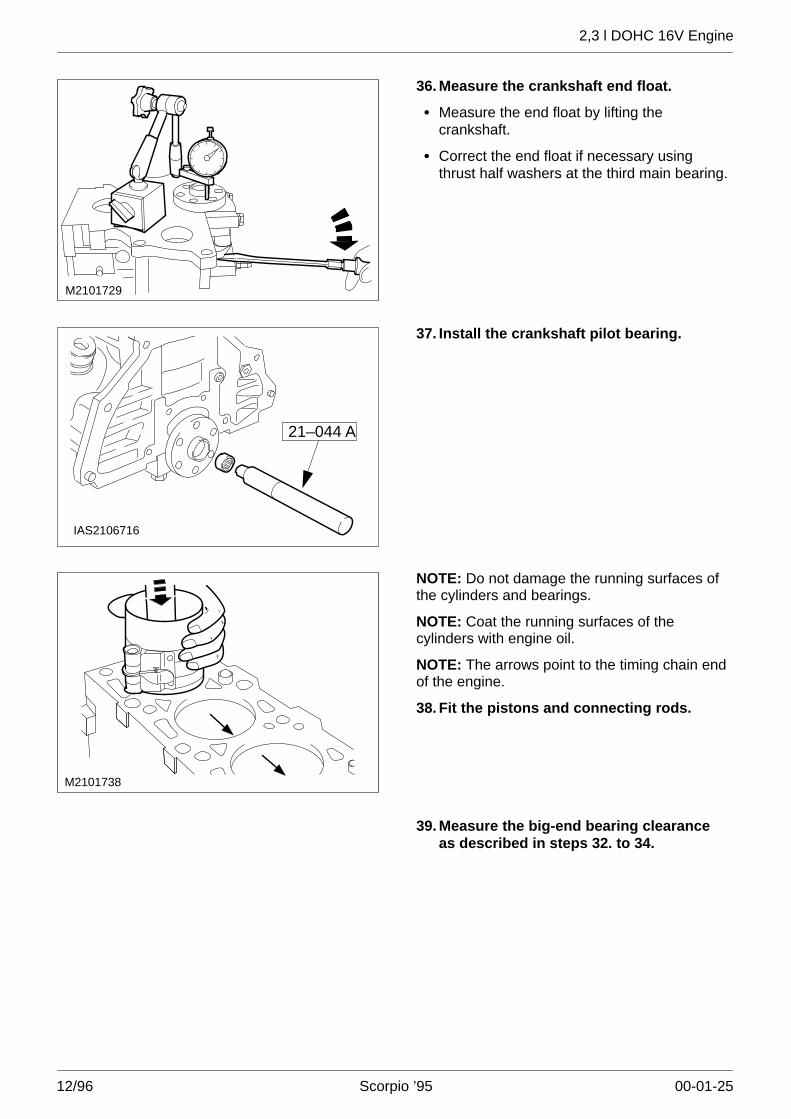
36. Measure the crankshaft end float.
� Measure the end float by lifting thecrankshaft.
� Correct the end float if necessary usingthrust half washers at the third main bearing.
IAS2106716
21–044 A
37. Install the crankshaft pilot bearing.
M2101738
NOTE: Do not damage the running surfaces ofthe cylinders and bearings.
NOTE: Coat the running surfaces of thecylinders with engine oil.
NOTE: The arrows point to the timing chain endof the engine.
38. Fit the pistons and connecting rods.
39. Measure the big-end bearing clearanceas described in steps 32. to 34.
2,3 l DOHC 16V Engine
12/96 Scorpio ’95 00-01-26
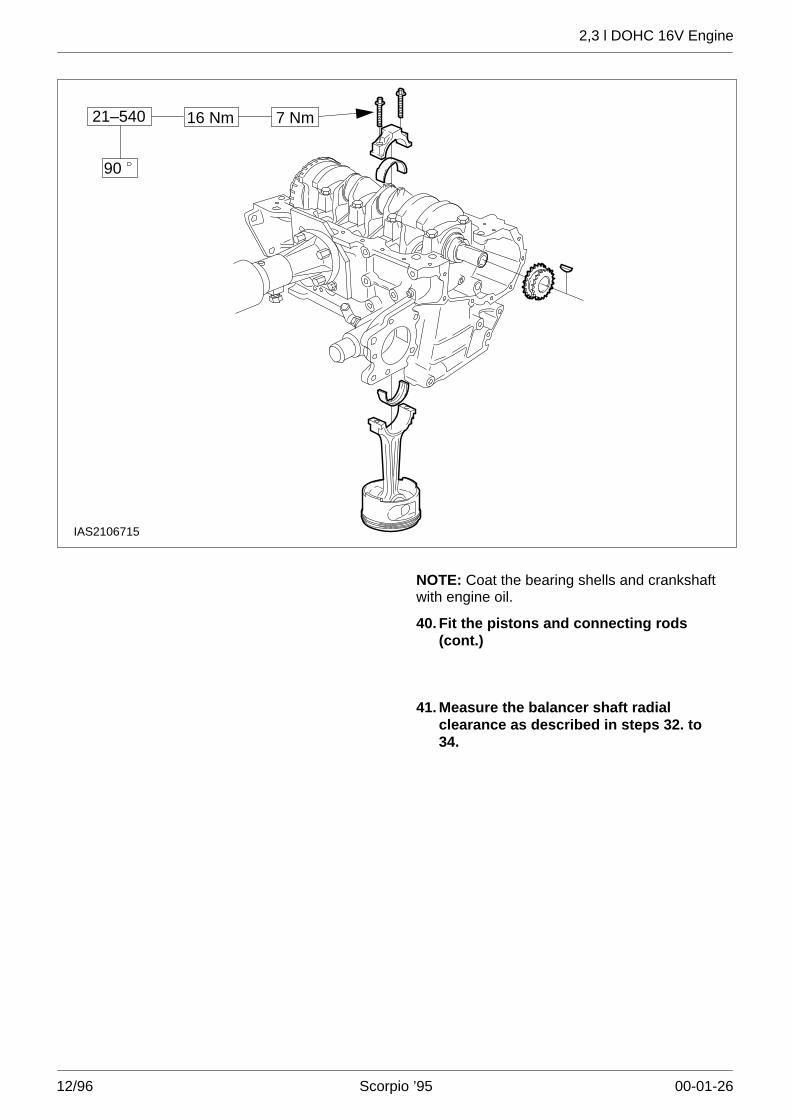
IAS2106715
7 Nm16 Nm21–540
90
NOTE: Coat the bearing shells and crankshaftwith engine oil.
40. Fit the pistons and connecting rods(cont.)
41. Measure the balancer shaft radialclearance as described in steps 32. to34.

2,3 l DOHC 16V Engine
12/96 Scorpio ’95 00-01-27
IAS2106700
12 Nm 1
19 Nm3
19 Nm
2
NOTE: Lubricate the bearing shells andbearing journals with engine oil.
�CAUTION: Put the bearing shells whichhave the holes into the balancer shafthousing and centralise them.
42. Assemble the balancer shaft housing.
NOTE: The markings on the gear wheels.
1 Install the balancer shafts.
2 Fit the gear wheels.
2,3 l DOHC 16V Engine
12/96 Scorpio ’95 00-01-28
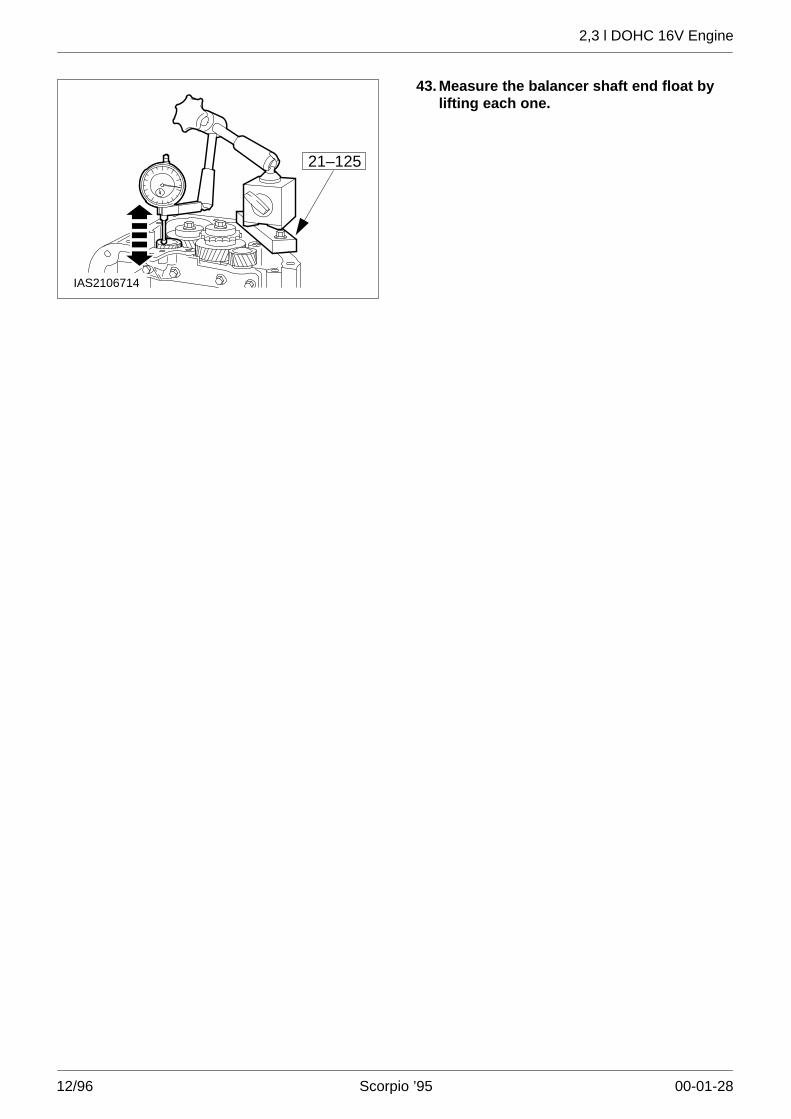
21–125
IAS2106714
43. Measure the balancer shaft end float bylifting each one.
2,3 l DOHC 16V Engine
12/96 Scorpio ’95 00-01-29
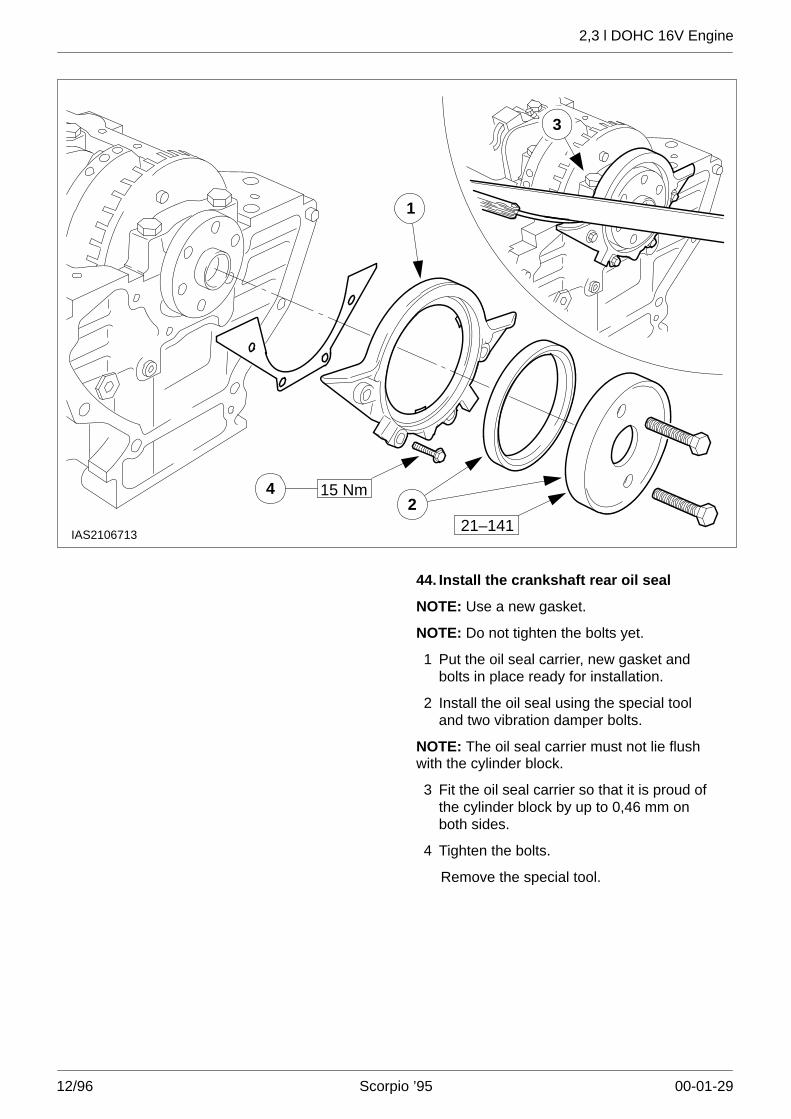
IAS2106713
1
221–141
4 15 Nm
3
44. Install the crankshaft rear oil seal
NOTE: Use a new gasket.
NOTE: Do not tighten the bolts yet.
1 Put the oil seal carrier, new gasket andbolts in place ready for installation.
2 Install the oil seal using the special tooland two vibration damper bolts.
NOTE: The oil seal carrier must not lie flushwith the cylinder block.
3 Fit the oil seal carrier so that it is proud ofthe cylinder block by up to 0,46 mm onboth sides.
4 Tighten the bolts.
Remove the special tool.

2,3 l DOHC 16V Engine
12/96 Scorpio ’95 00-01-30
IAS2106743
mm
10
10
3–4
45. Apply sealer (WSE-M4G323-A6) to thecontact faces of the cylinder block andthe oil seal carrier.
1
5 Nm
17 Nm
2
24 Nm 5
XX Nm 4
12 Nm
3
IAS2106742
2,3 l DOHC 16V Engine
12/96 Scorpio ’95 00-01-31
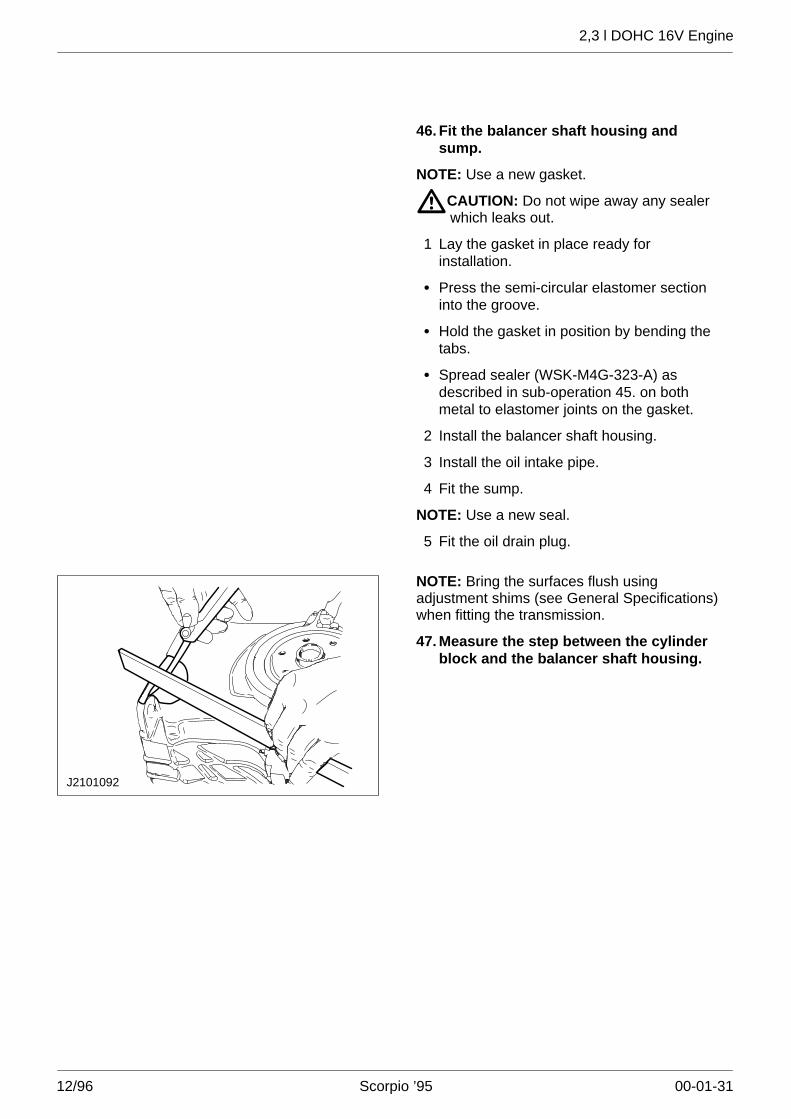
46. Fit the balancer shaft housing andsump.
NOTE: Use a new gasket.
�CAUTION: Do not wipe away any sealerwhich leaks out.
1 Lay the gasket in place ready forinstallation.
� Press the semi-circular elastomer sectioninto the groove.
� Hold the gasket in position by bending thetabs.
� Spread sealer (WSK-M4G-323-A) asdescribed in sub-operation 45. on bothmetal to elastomer joints on the gasket.
2 Install the balancer shaft housing.
3 Install the oil intake pipe.
4 Fit the sump.
NOTE: Use a new seal.
5 Fit the oil drain plug.
J2101092
NOTE: Bring the surfaces flush usingadjustment shims (see General Specifications)when fitting the transmission.
47. Measure the step between the cylinderblock and the balancer shaft housing.

2,3 l DOHC 16V Engine
12/96 Scorpio ’95 00-01-32
4
4 Nm
3
12 Nm
23 Nm1
6
27 Nm
5
2IAS2106741
48. Fit the components of the oil andcoolant circuits.
NOTE: Use a new seal.
1 Water pump
NOTE: Use a new gasket.
2 Oil pump
NOTE: Do not tighten the sprocket.
3 Oil pump sprocket.
NOTE: Apply lubricant (WSD-M1C226-A) tothe seal.
4 CKP sensor.
NOTE: Coat the first three turns of the threadwith sealer (WSK-M2G349-A7).
5 Oil pressure switch
6 Lay a new cylinder head gasket in place.
2,3 l DOHC 16V Engine
12/96 Scorpio ’95 00-01-33
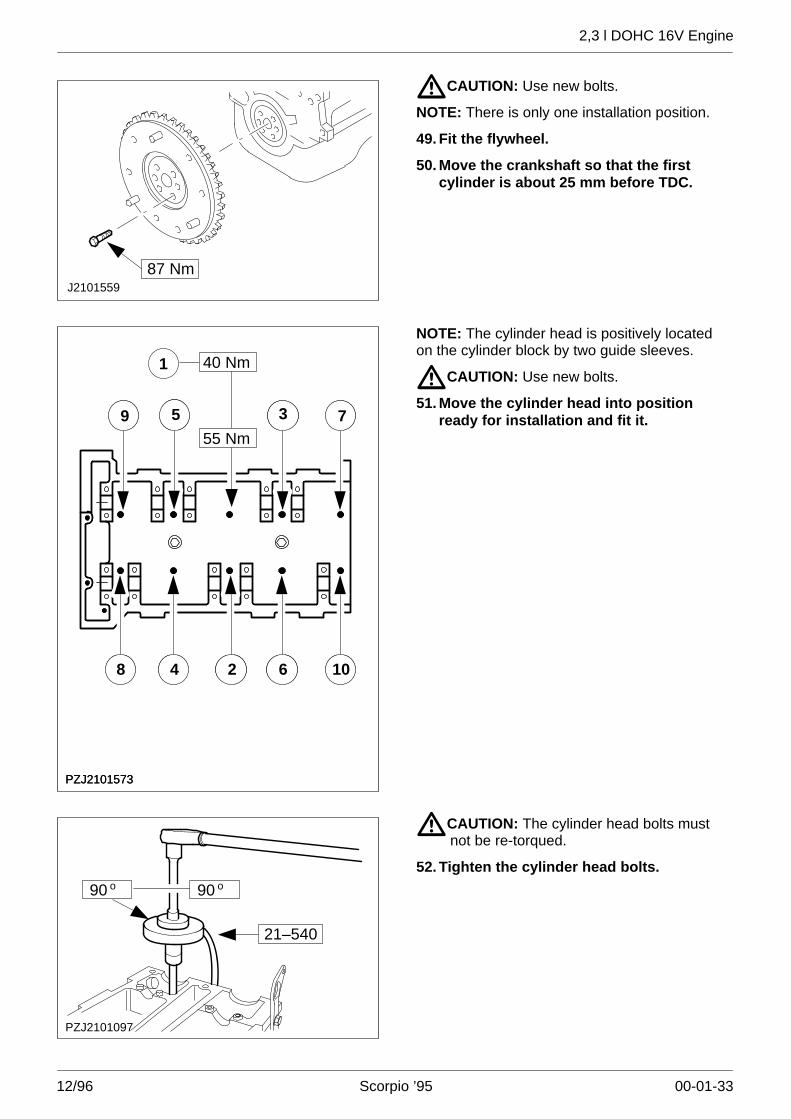
87 NmJ2101559
�CAUTION: Use new bolts.
NOTE: There is only one installation position.
49. Fit the flywheel.
50. Move the crankshaft so that the firstcylinder is about 25 mm before TDC.
PZJ2101573
8 4 2 6 10
9 5 7
1 40 Nm
3
55 Nm
PZJ2101573
8 4 2 6 10
9 5 7
1 40 Nm
3
55 Nm
NOTE: The cylinder head is positively locatedon the cylinder block by two guide sleeves.
�CAUTION: Use new bolts.
51. Move the cylinder head into positionready for installation and fit it.
PZJ2101097
90 o
21–540
90 o
�CAUTION: The cylinder head bolts mustnot be re-torqued.
52. Tighten the cylinder head bolts.
2,3 l DOHC 16V Engine
12/96 Scorpio ’95 00-01-34
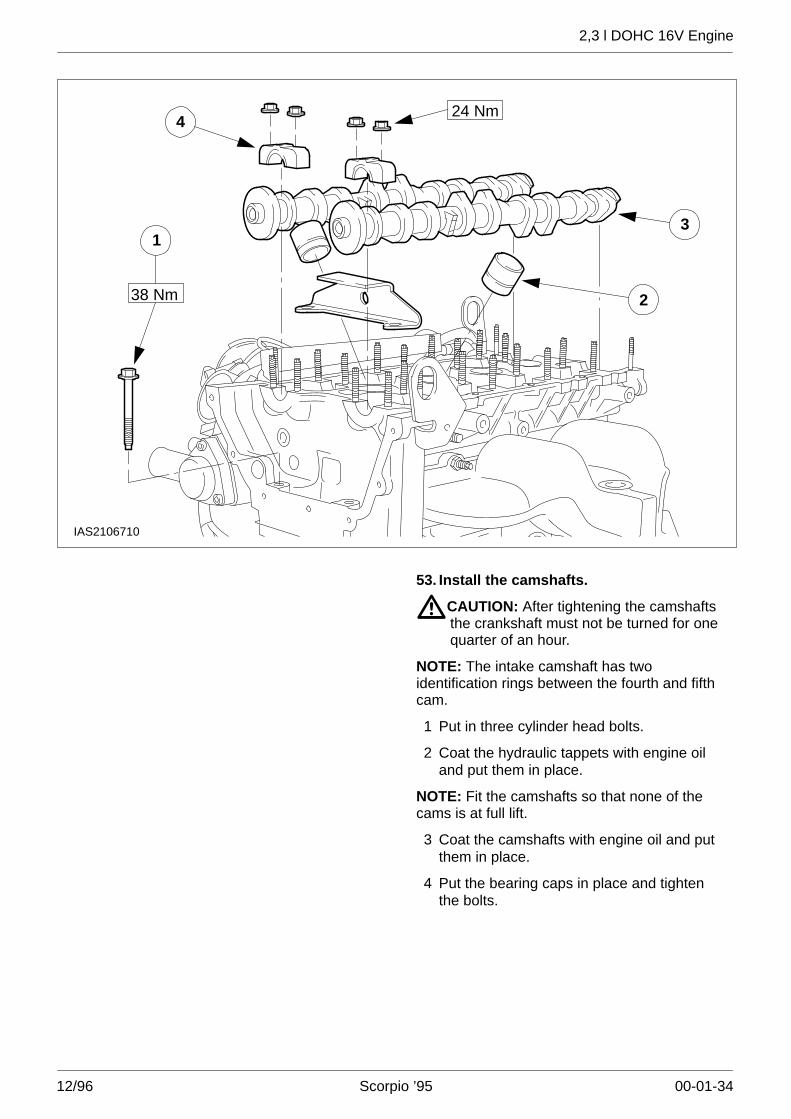
IAS2106710
2
3
24 Nm4
38 Nm
1
53. Install the camshafts.
�CAUTION: After tightening the camshaftsthe crankshaft must not be turned for onequarter of an hour.
NOTE: The intake camshaft has twoidentification rings between the fourth and fifthcam.
1 Put in three cylinder head bolts.
2 Coat the hydraulic tappets with engine oiland put them in place.
NOTE: Fit the camshafts so that none of thecams is at full lift.
3 Coat the camshafts with engine oil and putthem in place.
4 Put the bearing caps in place and tightenthe bolts.

2,3 l DOHC 16V Engine
12/96 Scorpio ’95 00-01-35
ELJ2101736
21 3�CAUTION: A fully or partially released
plunger (whether new or used) must not befitted.
54. Check the new chain tensioner plunger.
1 Plunger latched.
2 Plunger partly released.
3 Plunger fully released (the detent ring isvisible).
PZJ2101571
55. Install the chain tensioner plunger.
NOTE: The only copper coloured link must be atthe bottom of the chain guide.
56. Insert the timing chain with the chainguide.
PZS2106731
NOTE: The copper link must be across thesingle mark on the rear sprocket.
57. Fit the timing chain at the bottom.
� Slide on the sprocket.
� Lay the timing chain around the innersprocket.
� Fit the Woodruff key in the crankshaft.
� Tie the chain with wire to stop it from slippinginto the timing chest.

2,3 l DOHC 16V Engine
12/96 Scorpio ’95 00-01-36
12 Nm
26 Nm
J2101569
NOTE: Apply thread locking compound(WSK-M2349-A7) to the threads of the lowerbolt.
58. Tighten the chain guide bolts (2,0 DOHC16V shown).
J2101568
3 2 1
59. Install the chain tensioner.
1 Move the chain tensioner into position readyfor installation.
2 Insert the pin.
3 Fit the circlip.
PZJ2101104
60. Fit the timing chain at the top.
NOTE: The copper coloured chain link must liedirectly across the marking on the sprocket.
NOTE: The timing chain must be taut on thelong side.
If necessary, turn the camshaft slightly.

2,3 l DOHC 16V Engine
12/96 Scorpio ’95 00-01-37
PZJ2101105
61. Fit the timing chain at the top (continued).
NOTE: The copper coloured link must liedirectly across the marking on the sprocket.
NOTE: The timing chain may sag slightlybetween the camshaft sprockets.
Screw in the bolts of both camshaft timingsprockets.
J2101066
62. Fit a new timing chain upper guide.
J2101106
63. Release the chain tensioner plunger.
� Press the chain tensioner arm down by handand unlatch the oil-filled plunger.
� If the chain tensioner arm does not reachthe oil-filled plunger, the plunger must bereleased using an auxiliary tool.
J2101107
about 100 mm
about 15 mm
about 5 mm
2,5 mm
about 100 mm
5 mm
64. Fabricate an auxiliary tool.
Use 2,5 mm diameter welding rod cut to alength of about 220 mm.

2,3 l DOHC 16V Engine
12/96 Scorpio ’95 00-01-38
J2101567
15–030A
59 Nm
65. Tighten the camshaft sprocket bolts.
2,9�2,2�
PZJ2101600
66. Check the valve timing.
� Turn the engine in the normal direction ofrotation through two complete revolutionsand set it to the markings.
� If it is necessary to correct the valve timing,i.e. release the timing chain, a new oil-filledplunger must also be fitted for the chaintensioner.
J2101108
67. Check the valve timing (continued).
� Turn the crankshaft in the normal runningdirection until the second cylinder is at TDC.
� The markings on the camshaft sprocketsmust be opposite one another on the level ofthe top edge of the cylinder head.

2,3 l DOHC 16V Engine
12/96 Scorpio ’95 00-01-39
IAS2106707112 Nm
12 Nm
3
26 Nm
2
4
21 Nm
68. Fit the oil pump chain drive.
NOTE: The copper coloured links must beacross the markings on the crankshaftsprocket and the balancer shaft sprocket. Todo this turn the crankshaft so that the secondcylinder is at TDC.
1 Chain
2 Chain guide
3 Fit the chain guide and pull out the twistdrill.
4 Tighten the oil pump sprocket bolt.

2,3 l DOHC 16V Engine
12/96 Scorpio ’95 00-01-40
1
2
11 Nm
IAS2106740
11 Nm
NOTE: Use new gaskets.
69. Fit the timing chain cover.
NOTE: The top edge must lie flush with thecylinder head top edge.
1 Upper timing chain cover
NOTE: Take out the centring cap aftertightening the bolts.
2 Lower timing chain cover.
Tighten the cover bolts.
IAS2106704
21–214
70. Press on the vibration damper.

2,3 l DOHC 16V Engine
12/96 Scorpio ’95 00-01-41
IAS2106705
21–168
52 Nm
21–540
85
NOTE: Lock the crankshaft
71. Tighten the vibration damper bolt.
2,3 l DOHC 16V Engine
12/96 Scorpio ’95 00-01-42
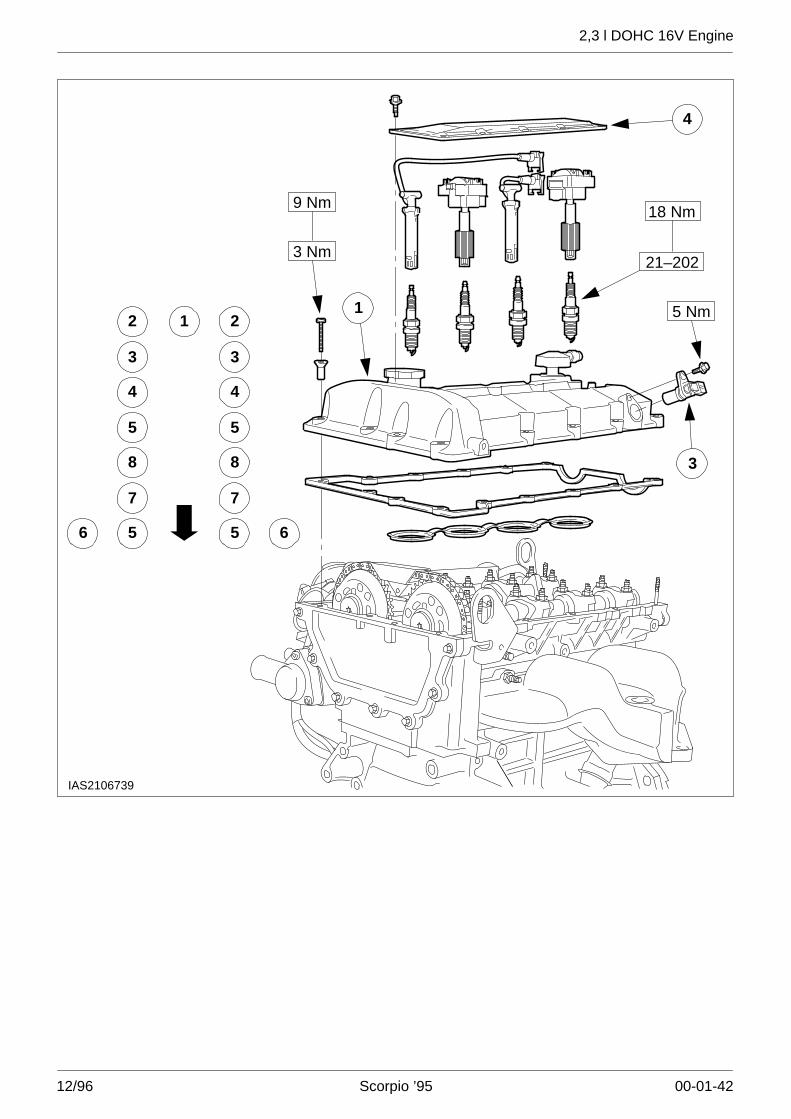
4
3 Nm
9 Nm18 Nm
21–202
5 Nm1
3
4 4
2 1 2
3 3
5 5
8 8
7 7
6 5 5 6
IAS2106739

2,3 l DOHC 16V Engine
12/96 Scorpio ’95 00-01-43
NOTE: Use new gaskets.
72. Fit the cylinder head cover.
NOTE: Bolt-tightening sequence.
1 Fit the cylinder head cover.
NOTE: Apply lubricant (ESE-M1244-A) to thespark plug threads.
2 Fit the spark plugs, ignition coils andignition cables.
3 Fit the CMP sensor and connector.
4 Fit the ignition coil cover.
M1601514
16–067
73. Centre the clutch disc.
PZC2109109
1
2
3
29 Nm
74. Secure the clutch.
1 Put the clutch pressure plate and thecentralised clutch disc in position ready forinstallation.
2 Tighten the bolts uniformly, workingdiagonally.
3 Remove the special tool.
2,3 l DOHC 16V Engine
12/96 Scorpio ’95 00-01-44
75. Finishing operations.
� Attach the oil filter.
� Fill up with engine oil.
� Detach the engine from the assemblystand.