esi video viewer user's guide - business ... video viewer user’s guide 6 click next to...
TRANSCRIPT

ESI Video Viewer
User’s Guide
0450-1214 Rev. C
For on-line help, visit www.esiusers.com.
About ESI ESI (Estech Systems, Inc.) is a privately held corporation based in Plano, Texas. Founded in 1987, ESI designs and builds innovative telecommunications products for businesses like yours. Because of their powerful combination of value and features, ESI products are consistently recognized by industry publications and leaders. Copyright © 2010 ESI (Estech Systems, Inc.). Windows, Outlook, XP, and Vista are registered trademarks of Microsoft Corporation. Intel and Pentium are registered trademarks of Intel Corporation. Information contained herein is subject to change without notice. ESI products are protected by various U.S. Patents, granted and pending. Visit ESI on the Web at www.esi-estech.com.
Contents Introduction.........................................................................................................................................................................................................2
ESI Video Viewer: An overview ....................................................................................................................................................................2 About the ESI Video Adapter........................................................................................................................................................................2 Minimum requirements.................................................................................................................................................................................2 Disclaimer ....................................................................................................................................................................................................3
Setting up ESI Video Viewer ..............................................................................................................................................................................4 Obtaining ESI Video Viewer installation software .........................................................................................................................................4 Installing ESI Video Viewer...........................................................................................................................................................................4
Using ESI Video Viewer......................................................................................................................................................................................9 Advanced Video Viewer: An introduction......................................................................................................................................................9 Camera layouts ..........................................................................................................................................................................................10 Video Adapter Key .....................................................................................................................................................................................14 Events ........................................................................................................................................................................................................15 Advanced toolbar: A quick overview...........................................................................................................................................................16 Menu bar selections ...................................................................................................................................................................................16 Basic Video Viewer ....................................................................................................................................................................................18
Troubleshooting ...............................................................................................................................................................................................20
Index

ESI Video Viewer User’s Guide
2
Introduction
ESI Video Management is a hardware and software solution offering live video monitoring, which enhances an organization’s ability to manage facilities, control access to sensitive areas within facilities, and provide security monitoring for both property and individuals These features are available when a compatible ESI business
communications system is equipped with one or more ESI Video Adapters and ESI Video Viewer software.
ESI Video Viewer: An overview
ESI Video Viewer is a Windows®-based application that displays live video images received from the ESI Video
Adapter. ESI Video Viewer comes in two versions — Basic and Advanced:
• Basic — Allows you to have access to a single camera that is associated with an ESI Presence Management RFID Reader. The Basic window can be set to appear automatically only upon the occurrence of two events (motion or ESI Presence Management calls). You also can launch it manually, using your ESI desktop phone or your PC.
• Advanced — Lets you view multiple cameras simultaneously. You can create several layouts, enlarge specific panels, and maximize entire layouts for better viewing. The Advanced Video Viewer also visually notifies you of events that include motion, ESI Presence Management calls, and specific ESI Presence Management “fob” events.
1
About the ESI Video Adapter
The ESI Video Adapter (Fig. 1) is a small, wall-mounted device which interfaces with surveillance cameras to provide video images to ESI Video Viewer. Specific events are sent to and from the ESI Video Adapter and ESI business communications system, allowing ESI Video Viewer to notify the user of these events.
Minimum requirements
ESI system requirements
• Call-processing software: Version xx.5.13.0 (or higher).
• System: ESI-1000, ESI-600, ESI-200, ESI-100, or ESI-50.2
Computer system requirements
• Operating system: Windows 7, Vista, or XP (including 64-bit versions of Windows 7 and Windows Vista).
• RAM: 2 GB or better.
• Processor: Intel® Pentium
® 4 (or equivalent), 2.0 GHz or better.
• Video: 256-color (eight-bit) video output. ESI recommends using a separate video card, as opposed to built-in CPU video support, especially for viewing multiple motion-detection-enabled cameras. This is
because a separate video card exerts less of a drain on the CPU, allowing the PC — and ESI Video Viewer — to run more smoothly than when depending upon built-in video support on the CPU.
Other requirements
• For viewing live video from IP cameras, ESI Video Viewer 2.0.1.2 (or higher) is required.
(Continued)
1 For more information concerning ESI Presence Management, please visit www.esi-estech.com/presence or consult your Certified ESI Reseller.
2 The entry-level ESI-50L system must be upgraded to an ESI-50 to support ESI Video Management. Consult your ESI Reseller for more details.
Figure 1
ESI Video Viewer User’s Guide
3
Supported IP cameras
The following Vivotek IP camera models are supported:
• IP7330
• IP7153
• IP7130
• IP8161
• FD7131
PC performance
Even on a PC that fulfills the computer system requirements (page 2), it’s possible for the PC to run slowly due not to only other running applications (such as anti-virus scanners) but also the number of cameras being
viewed simultaneously that are receiving a continuous flow of events, especially motion.
Network performance
In a local environment
ESI Video Management uses only multicast technology to stream video to multiple users. Multicasting decreases the amount of network bandwidth used for streaming video. Ten ESI Video Adapters running
on a 100Mbps network will consume about 3% of the available bandwidth.
Because each network is different, it is the responsibility of the Reseller and the System Administrator to evaluate available bandwidth and any impact upon users’ network performance.
Over a WAN
It’s not possible to multicast packets over a wide area network (WAN). Packets coming from the remote cameras use UDP (User Datagram Protocol), which consumes more bandwidth. Each ESI Video Viewer user at the local site viewing a remote camera is initiating a stream from the camera; thus, the more ESI Video Viewer users viewing that remote camera, the more bandwidth is consumed. A remote camera
sharing an Internet connection with ESI remote IP phones, Internet service, e-mail, etc., could cause the quality of these services to degrade. For better quality, ESI recommends separating this services.
Disclaimer
The ESI Video Viewer application and ESI Video Adapter — hereafter both referred to as “ESI Video Management” — constitute a surveillance product only. It is not expressly stated or implied that ESI Video Management shall protect or secure any property, possession or person, animal or public good. ESI relies solely on the ESI Reseller’s and end user’s investigation of ESI Video Management itself as to whether it shall be suitable for the purposes for which it is intended. ESI has used its best endeavors to ensure that ESI Video Management shall
be suitable for its general intended purpose, surveillance. In recognition of these best endeavors, anyone using ESI Video Management agrees that ESI shall not be responsible for any defects or occurrences that may arise from or during the use of ESI Video Management with any other products, goods, or services.
Camera surveillance can be prohibited by laws that vary from state to state, as well as by union guidelines. ESI advises that the ESI Reseller, end user, or third-party installer take any necessary precautions and training to understand and adhere to local, federal, and union guidelines for installing and using video in the home, workplace, or other environment. ESI is not responsible for educating the ESI Reseller or end user on either the law (local or federal) or union guidelines.

ESI Video Viewer User’s Guide
4
Setting up ESI Video Viewer
The Basic version of ESI Video Viewer requires no license and can be installed for any user on your ESI system, while the Advanced version requires licensing and can be installed for a limited number of users (dependent upon which ESI system you have). Your ESI Reseller or your System Administrator will enable your
ESI station for ESI Video Viewer and activate the necessary software licenses. If you’re not sure whether your system has been properly enabled, please contact your System Administrator.
Important: If your PC has a previous installation of ESI Video Viewer, uninstall it before installing this version.
The PC where you’re installing ESI Video Viewer must have Windows Administrator log-in privileges at the time of installation.
To install and configure ESI Video Viewer correctly, complete all of the following steps (explained in detail, beginning below). Failure to do so may cause ESI Video Viewer to function improperly.
Obtaining ESI Video Viewer installation software
1. Point your Web browser to www.esiusers.com/downloads. This will take you to the “Downloadables” page on ESI’s special Web site for users of its products.
2. Click the link for ESI Video Viewer software. This is a self-expanding archive file which may be called something like ESI_Video_Viewer_1_0_0.exe, depending on the current version of ESI Video Viewer. When your Web browser asks you whether you want to open or save the file, select save and pick a location on your PC where you can find the file again in subsequent steps.
3. Open Windows Explorer and navigate to the location where you saved the download in step 2.
(Depending on your “Folders” settings in Windows, the file name may not show the “.exe” extender.)
4. Double-click this file to expand the needed files, one of which — Setup.exe (or Setup) — is the installer file for ESI Video Viewer.
Installing ESI Video Viewer
1. Close any other currently running ESI applications (as well as Microsoft Outlook® if any VIP application
has been installed on the PC). Indeed, for optimal installation, ESI recommends closing all other currently running applications.
2. If you haven’t done so already, assign a voice mailbox password at your phone. To do so, press PROGRAM 5 1 and follow the prompt’s instructions.
3. Access the directory that contains the ESI Video Viewer installer file, Setup.exe (or Setup).
4. Double-click the ESI Video Viewer installer file. The ESI Video Viewer Setup Wizard will appear.
(Continued)
ESI Video Viewer User’s Guide
5
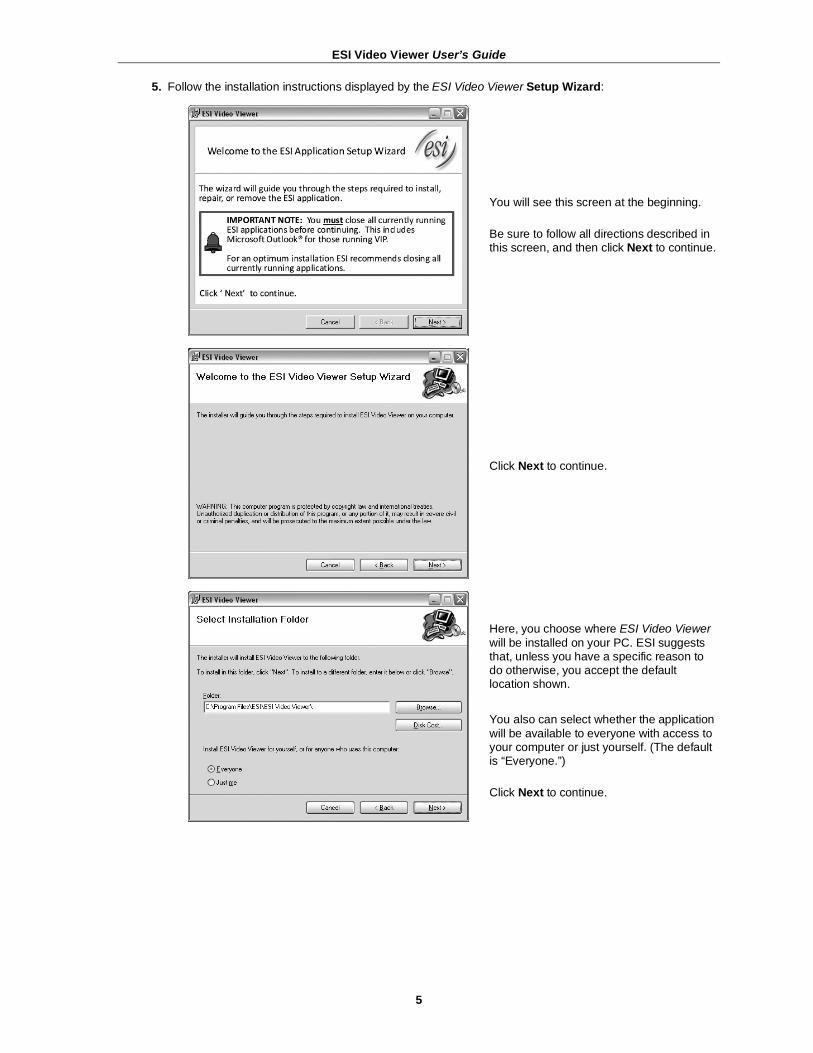
5. Follow the installation instructions displayed by the ESI Video Viewer Setup Wizard:
You will see this screen at the beginning.
Be sure to follow all directions described in this screen, and then click Next to continue.
Click Next to continue.
Here, you choose where ESI Video Viewer
will be installed on your PC. ESI suggests that, unless you have a specific reason to do otherwise, you accept the default location shown.
You also can select whether the application
will be available to everyone with access to your computer or just yourself. (The default is “Everyone.”)
Click Next to continue.

ESI Video Viewer User’s Guide
6
Click Next to continue.
You will see this progress bar display as the ESI Video Viewer Setup Wizard
proceeds to copy files to the appropriate locations on your PC. (If this process is interrupted, the installation will be unsuccessful, so don’t click Cancel unless it is absolutely necessary).
As the installation continues, the ESI Video Viewer Setup Wizard configures ports, makes necessary entries in the Windows Registry, and installs TSP
1 software.
(If this process is interrupted, the installation will be unsuccessful, so don’t click Cancel unless it is absolutely necessary).
1 Telephony service provider — defined by Microsoft as “a dynamic-link library (DLL) that supports communications device control through a set of
exported service functions.” For details, see http://msdn.microsoft.com/en-us/library/ms725167(VS.85).aspx.

ESI Video Viewer User’s Guide
7
The Setup Wizard will indicate it has
located your ESI system and displays its IP address.
(If multiple systems and IP addresses appear, click the appropriate one for your
extension. If you need assistance with this, consult your System Administrator.)
Click Next to continue.
The Setup Wizard then will communicate with the ESI system and show your phone
extension and voice mail password. Confirm that this information is correct as displayed (or change an entry if it is wrong), and click Next to submit this and continue.
The Setup Wizard next will report that the ESI system has validated the phone extension and password you submitted from the previous screen.
Click Next to continue.

ESI Video Viewer User’s Guide
8
Finally, the Setup Wizard will indicate that it
has completed configuring the system. Click Next to continue.
Congratulations! ESI Video Viewer is now
successfully installed on your PC, and a shortcut to ESI Video Viewer has been placed on your Windows Desktop.
Exit the setup by clicking Close. Then, use the instructions on the following pages to set up and use ESI Video Viewer’s layouts, panel options, and properties to suit your
particular requirements.

ESI Video Viewer User’s Guide
9
Using ESI Video Viewer
Advanced Video Viewer: An introduction
When first launched, ESI Video Viewer retrieves thumbnails of all cameras that you’re allowed to view. Each thumbnail is a still picture of the camera view. You will use these thumbnails when creating layouts.
After retrieving the thumbnails, the Advanced version of ESI Video Viewer launches. The image below is an example of Advanced Video Viewer using a 2 x 2 layout (see “Camera layouts,” page 10).
1. Menu bar
2. Toolbar
3. Panel title bar
4. Panel
5. Layout
1. Menu bar — The menu provides access to various tools and options. For a detailed explanation, see
“Menu bar selections,” page 16.
2. Toolbar — ESI Video Viewer’s toolbar lets you quickly access frequently used options and tools.
3. Panel title bar — Lists the panel name and provides an icon for enlarging the panel.
4. Panel — Displays video of a selected camera.
5. Layout — A collective group of panels.

ESI Video Viewer User’s Guide
10
Camera layouts
When initially launched, ESI Video Viewer will show each camera view one at a time. You can scroll through the toolbar’s pull-down list of available cameras by using the drop-down field in the toolbar.
You can combine these cameras into a layout, allowing you to view multiple cameras simultaneously. Follow these steps, beginning below, to create a layout.
Creating a layout view
1. Click the Create Layout icon on the ESI Video Viewer toolbar.
This will launch the Create Layout window:
2. In the Layouts field, click your layout preference — 1 x 1, 2 x 1, 1 x 2, 2 x 2, etc. Scroll to see more selections.
3. In the Layout Name field, enter a name for the layout. You can enter a unique name, use the default name (Layout 1, Layout 2, etc.), or leave the name field blank.
Tip: It’s easier to manage multiple layouts if each has a short, unique name that’s easily identifiable.
4. Click OK.
(Continued)

ESI Video Viewer User’s Guide
11
5. ESI Video Viewer now contains empty panels in the layout format you chose in step 2, and the Camera Selector’s left-hand navigation pane shows a list of available cameras:
To populate each empty panel, drag a thumbnail from the Camera Selector list to the desired panel:
6. After filling the empty panels, close the Camera Selector pane in one of the following ways:
a. Click the pushpin icon ( ) at the top of the Camera Selector.
b. Click the Camera Selector icon on the toolbar:
c. Choose a different layout (if you’ve created any others) from the toolbar’s drop-down field.
ESI Video Viewer User’s Guide
12
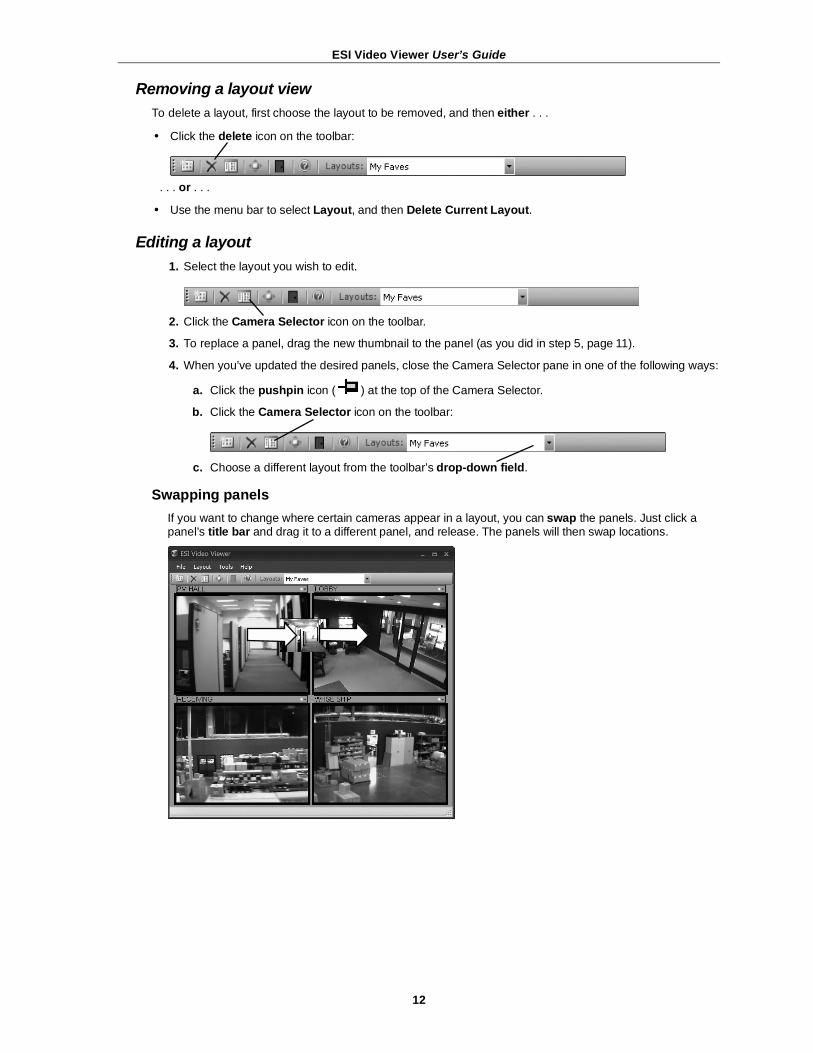
Removing a layout view
To delete a layout, first choose the layout to be removed, and then either . . .
• Click the delete icon on the toolbar:
. . . or . . .
• Use the menu bar to select Layout, and then Delete Current Layout.
Editing a layout
1. Select the layout you wish to edit.
2. Click the Camera Selector icon on the toolbar.
3. To replace a panel, drag the new thumbnail to the panel (as you did in step 5, page 11).
4. When you’ve updated the desired panels, close the Camera Selector pane in one of the following ways:
a. Click the pushpin icon ( ) at the top of the Camera Selector.
b. Click the Camera Selector icon on the toolbar:
c. Choose a different layout from the toolbar’s drop-down field.
Swapping panels
If you want to change where certain cameras appear in a layout, you can swap the panels. Just click a panel’s title bar and drag it to a different panel, and release. The panels will then swap locations.

ESI Video Viewer User’s Guide
13
Expanding a panel
You can expand a specific panel’s view by clicking the magnifying glass icon in the panel’s title bar (or by
double-clicking in the panel’s view area):
This panel then will take over the ESI Video Viewer viewing area. To return to the normal layout view, either click the magnifying glass icon again or right-click and choose Back to Layout from the pop-up menu.
Note: Expanding a panel doesn’t control the camera itself. Also, the object or location in the display will retain
its relative size. This operation simply expands the size of the panel.
Maximizing a layout
Click the toolbar’s Maximize layout icon to enlarge, or maximize, a layout:
This will hide the menu bar and toolbar, leaving more room for the layout.
You also can resize the application window (using normal Windows methods) to make better use of your monitor space.
To exit maximization, either: (a.) Press Esc on the PC keyboard (when the application’s title bar is selected (“in focus”) in Windows);
. . . or . . . (b.) Right-click in the layout area and choose Cancel Max Mode.

ESI Video Viewer User’s Guide
14
Using the multi-max layout style
A multi-max layout is one in which one panel is larger than the others. Each panel functions as it does in
other layouts, but with one added advantage: the small panels can auto-swap places with the large panel when an ESI Presence Management Call event occurs. To disable this functionality, de-select (un-check) the Swap Panels checkbox in Options (available from the Tools menu).
Note: Only ESI Presence Management key-press events will cause panels to swap positions automatically.
Video Adapter Key
Programming the Video Adapter Key
1. In ESI Video Viewer, choose the camera view to which you wish to assign a Video Adapter Key. Open the Camera Selector (if necessary, review “Camera layouts,” page 10) and note the one-to-three-digit number in parentheses next to the camera name. This number is the ID number of the ESI Video Adapter to which the camera is connected.
2. On your ESI desktop Feature Phone, hold down the desired programmable feature key until the phone enters station programming.
3. When prompted, enter key code 5 8 6 and press the programmable feature key again. The phone display will then prompt you for the ESI Video Adapter ID number.
4. Enter the desired Video Adapter’s one-to-three-digit ID number (as ascertained in step 1), and press the programmable feature key again.
Using the Video Adapter Key
When you press the Video Adapter key while the Video Viewer is minimized, the Video Viewer will pop up to show the selected camera. If the Video Viewer is already maximized, the panel in the layout will simply continue to stream video.
If the layout doesn’t contain the camera (the ESI Video Adapter) that’s assigned to the key, the layout will switch to show the selected camera.

ESI Video Viewer User’s Guide
15
Events
Whenever one of the following events occurs, the associated panel in ESI Video Viewer will be trimmed in a specific color:
Event Panel color trim
ESI Presence Management RFID Reader Call key-press Red
ESI Presence Management RFID Reader call-waiting key-press Green
ESI Presence Management RFID Reader fob event — Access denied or access allowed Orange
Motion detection Blue
ESI Presence Management RFID Reader Call key-press events
When a person presses the Call key on an ESI Presence Management RFID Reader that is associated with a camera and has an extension in the ESI Presence Management ring list, ESI Video Viewer changes that camera’s panel border
to red.
During this time, your ESI Feature Phone also will ring.
The panel border remains red until the call is answered and disconnected (or, if unanswered, stops ringing).
If you receive a call from a second RFID Reader while on a current RFID Reader call, the panel border for the new RFID Reader call will turn green, indicating a call-waiting call.
Example: A visitor enters the lobby and presses the Call key on an ESI Presence Management RFID Reader that’s associated with camera 100 (i.e., a camera connected to an ESI Video Adapter with an ID number of 100 as shown in the ESI Video Viewer Camera Selector).
At this time, the Video Viewer panel trim for camera 100 turns red. This call is answered by extension 145 (which is in the ring list for the RFID Reader), and the panel trim remains highlighted. While this call proceeds, a visitor arrives in Receiving and presses the Call key on an RFID Reader
that’s associated with camera 200; this beings ringing extension 145 as a call-waiting call. In ESI Video Viewer, the panel trim for camera 200 turns green.
Note: If authorized, you can view a camera associated with an RFID Reader. However, your phone won’t ring
and the panel border won’t turn red or green unless your extension is in the ring list for the RFID Reader. If unsure about this, consult your System Administrator.
ESI Presence Management fob events
ESI Video Viewer recognizes two types of ESI Presence Management fob events: access denied and access allowed (positive).
When a person swipes his/her fob at an RFID Reader associated with a camera, ESI Video Viewer turns that camera panel’s border orange.
Motion-detection event
Your Certified ESI Reseller may have programmed hot spots in certain camera views. When motion occurs within a hot spot, ESI Video Viewer turns its camera panel’s border blue. You can see people or objects move continuously in the view, but the panel won’t turn blue until/unless someone (or something) moves within the hot spot.

ESI Video Viewer User’s Guide
16
Advanced toolbar: A quick overview
Create new layout
Delete selected layout
Camera Selector pane — for editing layouts
Maximize layout
Door unlock — Unlocks the door when receiving an ESI Presence Management call
Help for ESI Video Viewer
List of created layouts
Menu bar selections
File
Click Exit to close ESI Video Viewer.
Layout
Layout allows you to create, rename, delete, and maximize a layout.
Most of these selections are available from the toolbar, as well.
Tools
Tools provides access to the following selections:
• Camera Selector — For editing layouts.
• Recreate Thumbnails — This recreates the thumbnails (snapshot views) for all cameras.
• Extension Settings — When chosen, this will show a window (right) in which you can change the extension, mailbox password, and NSP IP address information required for ESI Video Viewer to function properly.
Note: Use of the Extension Settings window may require the assistance of your Certified ESI Reseller or System Administrator.

ESI Video Viewer User’s Guide
17
Advanced Video Viewer options
• Alert me when the following events occur
— All five boxes are checked by default. This allows you to receive a visual alert upon the occurrence of a selected event (see “Events,” page 15). When an event is unchecked, ESI Video Viewer will provide no visual alert of the event’s occurrence at any camera. If it is minimized when a checked event occurs, ESI Video Viewer also will pop forward on your monitor.
• Duration of Motion and Fob Event Notifications (in seconds) — The number of seconds a panel’s border will change color to indicate motion and fob events (see “Events,”
page 15). Range: 0–90 seconds.
• Swap Panels for Events on Multi-Max Views — This box is checked by default. If it’s checked, panels in a multi-max layout (see “Using the multi-max layout style,” page 14) will automatically swap positions when an ESI Presence Management Call key event occurs.

ESI Video Viewer User’s Guide
18
Basic Video Viewer
The Basic version of Video Viewer shows only one camera view.
To use Basic Video Viewer, your extension:
• Must be authorized for a camera that is associated with an ESI Presence Manegement RFID Reader.
• Must not be assigned as an Advanced Video Viewer user in your ESI system’s Installer programming.
If necessary, consult your System Administrator to
confirm your Video Viewer status.
After Video Viewer is installed on your PC (using the same installation process as for the Advanced Video Viewer — see “Installing ESI Video Viewer,” page 4), a camera icon
will appear on your Windows Desktop and in your Windows System Tray.
There are three ways to initiate viewing of video in Basic Video Viewer:
• Automatic viewing
• Manual viewing via the PC
• Manual viewing via the phone
Automatic viewing
The Basic version of Video Viewer reacts to two types of events (see below). When these events occur while the Video Viewer is minimized, the Video Viewer will pop forward in the lower-right corner of your screen, above the System Tray. If the Viewer is maximized, it will always remain “on top of” documents and applications which may also be on your screen and, therefore, it won’t pop forward when an event occurs but will be the active window. No other visual alerts will be given for events.
• ESI Presence Management RFID Reader Call key-press events — When someone presses the Call key on an ESI Presence Management RFID Reader that’s associated with a camera, Basic Video Viewer
— if minimized — will pop forward. Also during this time, your ESI Feature Phone will ring. After you answer the call, Basic Video Viewer will highlight its toolbar’s door icon, which you can click to unlock the door associated with that RFID Reader.
• Motion-detection event — Your Certified ESI Reseller may have programmed hot spots in certain camera views. When motion occurs within a hot spot, Basic Video Viewer will pop forward.
Manual viewing via the PC
If Basic Video Viewer is minimized, you can see the camera view by double-clicking the camera icon in either (a.) the System Tray or (b.) the Windows Desktop.
Manual viewing via the phone
If Basic Video Viewer is minimized, you can see the camera view by pressing your ESI desktop phone’s Video Adapter Key (see “Video Adapter Key,” page 14).

ESI Video Viewer User’s Guide
19
Exiting Basic Video Viewer
To exit the Basic version of Video Viewer, right-click either of the following . . .
• The camera icon in the System Tray.
• The view area of the Video Viewer window itself.
. . . and select Exit. (Clicking the “X” on the toolbar only minimizes the application to the System Tray.)
Basic Video Viewer toolbar
Name of the camera you’re viewing
Door unlock — Unlocks the door when receiving an ESI Presence Management call
Help for ESI Video Viewer
Access to options for Basic Video Viewer
Basic Video VIewer options
• Duration of Event Notification (in seconds) —
The number of seconds a panel’s border will change color to indicate motion and fob events (see “Events,” page 15). Range: 0–90 seconds.
• Alert me when the following events occur —
Both boxes are checked by default. This allows you to receive a visual alert upon the occurrence of a selected event (motion detection or the pressing of the Call key on an associated ESI Presence Management RFID Reader). When an event is unchecked, ESI Video Viewer will provide no visual alert of the event’s occurrence. If it is minimized when a checked event occurs, ESI Video Viewer also will pop forward on your monitor.

ESI Video Viewer User’s Guide
20
Troubleshooting
Issue Solution
The NSP IP address couldn’t be found during
the installation process.
Consult the site administrator or ESI Reseller. The NSP may not be
programmed or may not be functioning correctly.
My extension and password couldn’t be validated during the installation process.
Verify that the extension and password you entered matches those of your phone. To program a password on your phone, press PROGRAM 5 1 and
follow the prompts.
I have no cameras from which to choose in
the ESI Video Viewer application.
Consult the site administrator or ESI Reseller. Your extension must be
assigned, in Installer programming, to the ESI Video Adapter(s).
I’ve created a layout, but can’t swap panels so
that the cameras appear in different locations within the layout.
You must drag the panel using its title bar (where the camera’s name is
displayed).
I’m not receiving motion alerts. Ensure that the motion checkbox in Options is checked.
Consult the site administrator or ESI Reseller to ensure that “hot spots” were created for your cameras.
I’m not receiving call or fob alerts. Ensure that the call and fob alert checkboxes in Options are checked.
Consult the site administrator or ESI Reseller to ensure each appropriate camera has an associated ESI Presence Management RFID Reader.
To receive red or green alerts, your extension must be in the RFID Reader’s ring list.
A panel shows the message “Video is currently unavailable.”
Consult the site administrator or ESI Reseller.
There are various reasons for this notice, including:
• The camera isn’t assigned to your extension.
• The ESI Video Adapter isn’t programmed correctly, or isn’t working.
• The ESI Video Adapter isn’t installed.
The door icon on the toolbar won’t enable so
that I can use it.
The door icon will enable only when you’re on a call with an ESI Presence
Management RFID Reader that is associated with a camera.
I’m in the maximize mode, where the tool and
menu bars disappear. I press my PC’s ESC key to exit this mode, but nothing happens.
For the ESC keypress to work, the ESI Video Viewer application must be “in
focus” (indicated by the title bar’s being highlighted) in Windows.
I see only a small ESI Video Viewer window and access to one camera. I thought I’d get a
larger window with color-coded alerts.
Consult the site administrator or ESI Reseller. A user of the Basic version of ESI Video Viewer receives only a one-camera view, while a user of the
Advanced version of ESI Video Viewer receives a multi-camera view with color-coded alerts.
In ESI Video Viewer, all the panels show the same video image.
This occurs when the Video Adapter or network isn’t multicasting. Consult your site administrator.
Index
Advanced version, 9 Disclaimer, 3
ESI Video Adapter, 2 Events, 15 Layout
Creating, 10 Editing, 12 Expanding, 13
Maximizing, 13 Multi-max style, 14 Removing, 12
Swapping panels, 12
Menu bar, 16 Network performance, 3
Options Basic version, 19
Requirements, 2
Software Installation, 4 Obtaining, 4
Setup, 4 Toolbar, 16, 19 Troubleshooting, 20
Video Adapter Key, 14
www.esi-estech.com