exploring interface builder -...
TRANSCRIPT
ptg
HOUR 5
Exploring Interface Builder
What You’ll Learn in This Hour:. What Interface Builder does, and what makes it special. How to create user interfaces using the Library. Common attributes that can be used to customize your interface. Ways to make your interface accessible to the visually impaired. How to connect interfaces to code with outlets and actions
Over the past few hours, you’ve become familiar with the core iOS technologies and the
Xcode and iPhone Simulator applications. Although these are certainly important skills
for becoming a successful developer, there’s nothing quite like building your first iPhone
application interface and seeing it come alive on the screen.
This hour introduces you to the third (and flashiest) component of the Apple Developer
Suite: Interface Builder. Interface Builder provides a visual approach to application inter-
face design but, behind the scenes, does much, much more.
Understanding Interface BuilderLet’s get it out of the way up front: Yes, Interface Builder (or IB for short) does help you
create interfaces for your applications, but it isn’t a just a drawing tool for GUIs; it helps
you symbolically build application functionality without writing code. This translates to
fewer bugs, less development time, and easier-to-maintain projects!
Although IB is a standalone application, it is dependent on Xcode and, to some extent,
the iPhone Simulator. In this hour, we focus on navigating through Interface Builder, but
will return in Hour 6, “Model-View-Controller Application Design,” to combine all three
pieces of the Apple Developer Suite for the first time.
Download at www.wowebook.com

ptg
106 HOUR 5: Exploring Interface Builder
At the time this book was being written, Apple began previewing a new version oftheir developer tools—Xcode 4. In Xcode 4, Interface Builder is part of the devel-opment suite, not a standalone application. We are providing an introduction toXcode 4’s tools in a downloadable document at http://teachyourselfiphone.com.
If you are a beginner, I recommend using the Xcode 3.2 toolset for the time being.It is time tested and, at least compared to the early previews of Xcode 4, includescoding features, such as bookmarks, that Xcode 4 does not.
The Interface Builder ApproachUsing Xcode and the Cocoa toolset, you can program iPhone interfaces by hand—
instantiating interface objects, defining where they appear on the screen, setting any
attributes for the object, and, finally, making them visible. For example, in Hour 2,
“Introduction to Xcode and the iPhone Simulator,” you entered this listing into
Xcode to make your iPhone display the text Hello Xcode in the middle of the
screen:
myMessage=[[UILabel alloc] initWithFrame:CGRectMake(25.0,225.0,300.0,50.0)];myMessage.text=@”Hello Xcode”;myMessage.font=[UIFont systemFontOfSize:48];[window addSubview:myMessage];[myMessage release];
Imagine how long it would take to build interfaces with text, buttons, images, and
dozens of other controls—and think of all the code you’d need to wade through just
to make small changes!
Over the years, there have been many different approaches to graphical interface
builders. One of the most common implementations is to enable the user to “draw”
an interface but, behind the scenes, create the code that generates that interface.
Any tweaks require the code to be edited by hand—hardly an acceptable situation.
Another tactic is to maintain the interface definition symbolically but attach the
code that implements functionality directly to interface elements. This, unfortunate-
ly, means that if you want to change your interface or swap functionality from one
UI element to another, you have to move the code as well.
Interface Builder works differently. Instead of autogenerating interface code or tying
source listings directly to interface elements, IB builds live objects that connect to your
application code through simple links called connections. Want to change how a fea-
ture of your app is triggered? Just change the connection. As you’ll learn a bit later,
changing how your application works with the objects you create in Interface Builder
is, quite literally, a matter of connecting or reconnecting the dots as you see fit.
By theWay
Download at www.wowebook.com

ptg
By theWay
Understanding Interface Builder 107
The Anatomy of an Interface Builder XIB FileYour work in Interface Builder results in an XML file called an XIB or (for legacy
reasons) NIB file, containing a hierarchy of objects. The objects could be interface ele-
ments—buttons, toggle switches, and so forth—but might also be other noninterface
objects that you need to use in your app. When the XIB file is loaded by your appli-
cation, the objects described in it are instantiated and can be accessed by your code.
Instantiation, just as a quick refresher, is the process of creating an instance of anobject that you can work with in your program. An instantiated object gains all thefunctionality described by its class. Buttons, for example, automatically highlightwhen clicked, content views scroll, and so on.
The Document WindowWhat do XIB files look like in IB? Open the Hour 5 Projects folder and double-click
the file EmptyView.xib to open Interface Builder and display a barebones XIB file.
The contents of the file are shown in the IB “Document” window (see Figure 5.1).
FIGURE 5.1An XIB file’sobjects are rep-resented byicons.
By theWayIf you do not see a window with icons when opening the XIB file, choose Window,
Document to ensure that the Document window is active and visible on yourscreen.
In this sample file, three icons are initially visible: File’s Owner, First Responder, and
View. The first two are special icons used to represent unique objects in our applica-
tion; these will be present in all XIB files that you work with:
File’s Owner: The File’s Owner icon denotes the object that loads the XIB file
in your running application. This is the object that effectively instantiates all
Download at www.wowebook.com

ptg
108 HOUR 5: Exploring Interface Builder
the other objects described in the XIB file. For example, you may have an
interface defined in myInterface.xib, which is loaded by an object you’ve writ-
ten called myInterfaceController. In this case, the File’s Owner would repre-
sent the myInterfaceController object. You’ll learn more about the relation-
ship between interfaces and code in Hour 6.
First Responder: The first responder icon stands for the object that the user is
currently interacting with. When a user works with an iPhone application,
multiple objects could potentially respond to the various gestures or keystrokes
that the user creates. The first responder is the object currently in control and
interacting with the user. A text field that the user is typing into, for example,
would be the first responder until the user moves to another field or control.
View: The view icon is an instance of the object UIView and represents the
visual layout that will be loaded and displayed on the iPhone’s screen. You
can double-click view icons to open and edit them with the IB tools, as shown
in Figure 5.2.
FIGURE 5.2Double-click theview icon toopen and editthe iPhoneapplication GUI.
Views are hierarchical in nature. This means that as you add controls to your inter-
face, they will be contained within the view. You can even add views within views to
cluster controls or create visual elements that can be shown or hidden as a group.
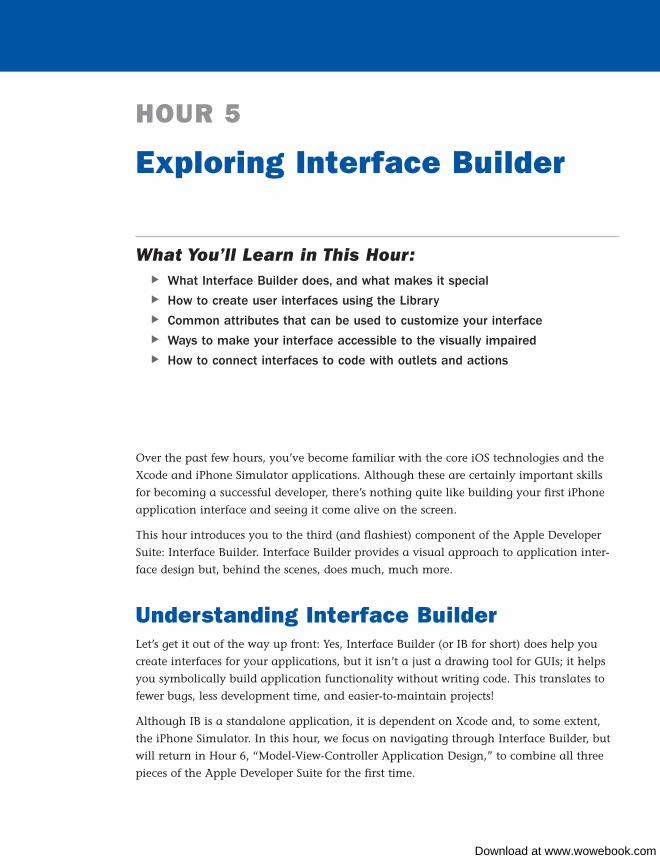
Because a view can contain many other objects, I recommend using the list or col-
umn view of the Document window to make sure that you can view the full hierar-
chy of objects you’ve created in an XIB file. To change the document view, click the
view mode icon on the Document window toolbar (see Figure 5.3).
Download at www.wowebook.com
ptgDid youKnow?
Understanding Interface Builder 109
At its most basic level, a view (UIView) is a rectangular region that can containcontent and respond to user events (touches and so forth). All the controls (but-tons, fields, and so on) that you’ll add to a view are, in fact, subclasses ofUIView. This isn’t necessarily something you need to be worried about, exceptthat you’ll be encountering documentation that refers to buttons and other inter-face elements referred to as subviews and the views that contain them assuperviews.
Just keep in the back of your mind that pretty much everything you see on theiPhone screen can be considered a “view” and the terminology will seem a littleless alien.
Working with the Document IconsThe Document window shows icons for objects in your application, but what good
are they? Aside from presenting a nice list, do the Document window icons provide
any functionality?
Absolutely! These icons give you a visual means of referring to the objects they rep-
resent. You will interact with the icons by dragging to and from them to create the
connections that drive your application’s features.
Consider an onscreen control, such as a button, that needs to be able to trigger an
action in your code. By dragging from the button to the File’s Owner icon, you can
create a connection from the GUI element you’ve drawn to a method you’ve written
in the object that loaded the XIB file.
FIGURE 5.3Using the listview modeensures thatyou can see allof the objects inyour XIB files.Here an XIBwith a full inter-face and viewhierarchy is dis-played.
Download at www.wowebook.com

ptg
110 HOUR 5: Exploring Interface Builder
We’ll go through a hands-on example later this hour so that you can get a feel for
how this works. Before we do that, however, let’s take a look at how you go about
turning a blank view into an interface masterpiece.
Creating User InterfacesIn Figures 5.2 and 5.3, you’ve seen an empty view and a fully fleshed-out iPhone
interface—but how do we get from one to the other? In this section, we explore how
interfaces are created with Interface Builder. In other words, it’s time for the fun stuff!
If you haven’t already, open the EmptyView.xib file included in this hour’s Projects
folder. Use the Document window to open the empty view and prepare for adding
content.
The Objects LibraryEverything that you add to a view comes from the IB Objects Library, shown in
Figure 5.4. You can open the Library from the menu bar by choosing Tools, Library
(Command+Shift+L). After the Library palette opens, click the Objects button at the
top of the window to focus on interface objects. When you click an element in the
Library, the bottom of the window refreshes to show a description of how it can be
used in the interface.
FIGURE 5.4The Library pro-vides a paletteof objects thatcan be added toyour views.
Download at www.wowebook.com

ptg
Did youKnow?
Creating User Interfaces 111
Using the action (gear) menu at the bottom of the Library, you can change theLibrary to show just the icons, icons and names, or icons and full descriptions foreach object. You can even group items based on their purposes. If you know thename of an object but can’t locate it in the list, use the Search field to quicklyfind it.
The button bar and drop-down menu at the top of the Library can be used to focuson specific parts of the Library or change how the information is organized. Whenstarting out, however, using the default settings should give you everything youneed for most application and interface design.
To add a object to the view, just click and drag from the Library to the view. For
example, find the label object (UILabel) in the Library and drag it into the center of
the view window. The label should appear in your view and read Label. Double-
click the label and type Hello. The text will update, as shown in Figure 5.5, just as
you would expect.
With that simple action, you’ve almost entirely replicated the functionality imple-
mented by the code fragment earlier in the lesson. Try dragging other objects from
the Library into the view (buttons, text fields, and so on). With few exceptions, the
objects should appear and behave just the way you’d expect.
FIGURE 5.5If an object con-tains text, inmany cases,just double-clickto edit it.
To remove an object from the view, click to select it, and then press the Delete key.
You may also use the options under the edit menu to copy and paste between views
or duplicate an element several times within a view.
Download at www.wowebook.com
ptg
112 HOUR 5: Exploring Interface Builder
Layout ToolsInstead of relying on your visual acuity to position objects in a view, Apple has
included some useful tools for fine-tuning your layout. If you’ve ever used a drawing
program like OmniGraffle or Adobe Illustrator, you’ll find many of these familiar.
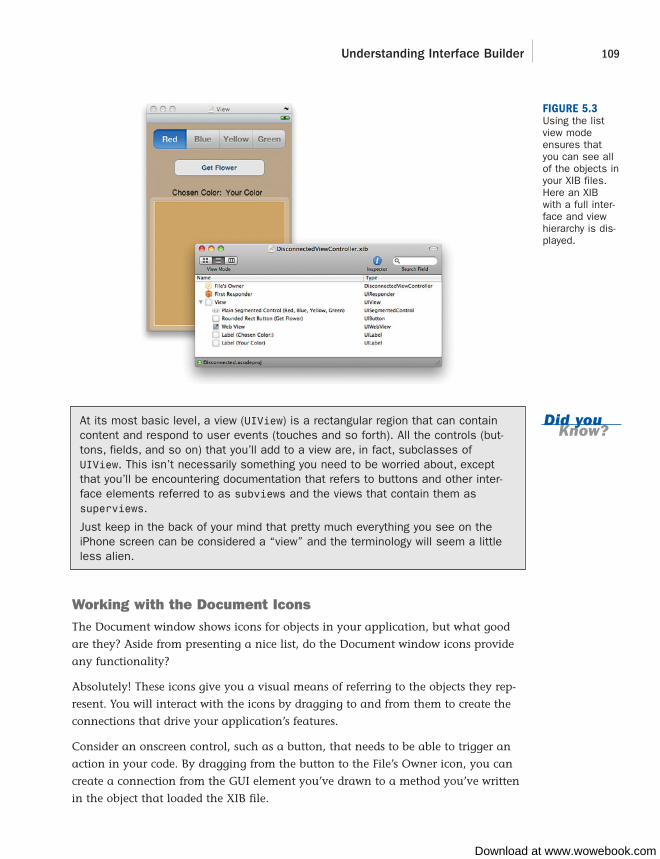
GuidesAs you drag objects in a view, you’ll notice guides (shown in Figure 5.6) appearing
to help with the layout. These blue dotted lines will be displayed to align objects
along the margins of the view, to the centers of other objects in the view, and to the
baseline of the fonts used in the labels and object titles.
FIGURE 5.6Guides helpposition yourobjects within aview.
As an added bonus, guides will automatically appear to indicate the approximate
spacing requirements of Apple’s interface guidelines. If you’re not sure why it’s
showing you a particular margin guide, it’s likely that your object is in a position
that Interface Builder considers “appropriate” for something of that type and size.
You can manually add your own guides by choosing Layout, Add Horizontal Guideor by choosing Layout, Add Vertical Guide.
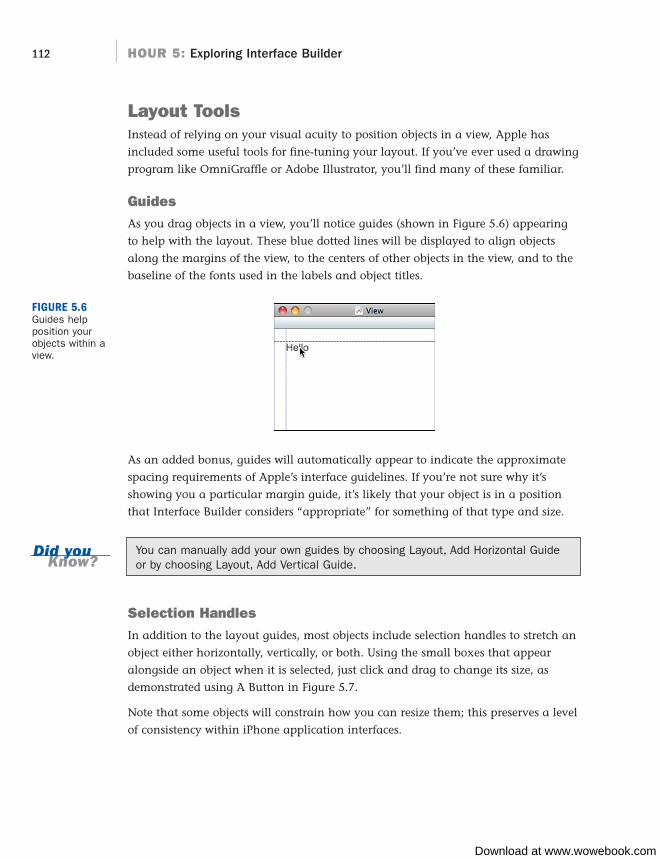
Selection HandlesIn addition to the layout guides, most objects include selection handles to stretch an
object either horizontally, vertically, or both. Using the small boxes that appear
alongside an object when it is selected, just click and drag to change its size, as
demonstrated using A Button in Figure 5.7.
Note that some objects will constrain how you can resize them; this preserves a level
of consistency within iPhone application interfaces.
Did youKnow?
Download at www.wowebook.com
ptg
Creating User Interfaces 113
AlignmentTo quickly align several objects within a view, select them by clicking and dragging
a selection rectangle around them or by holding down the Shift key, and then
choose Layout, Alignment and an appropriate alignment type from the menu.
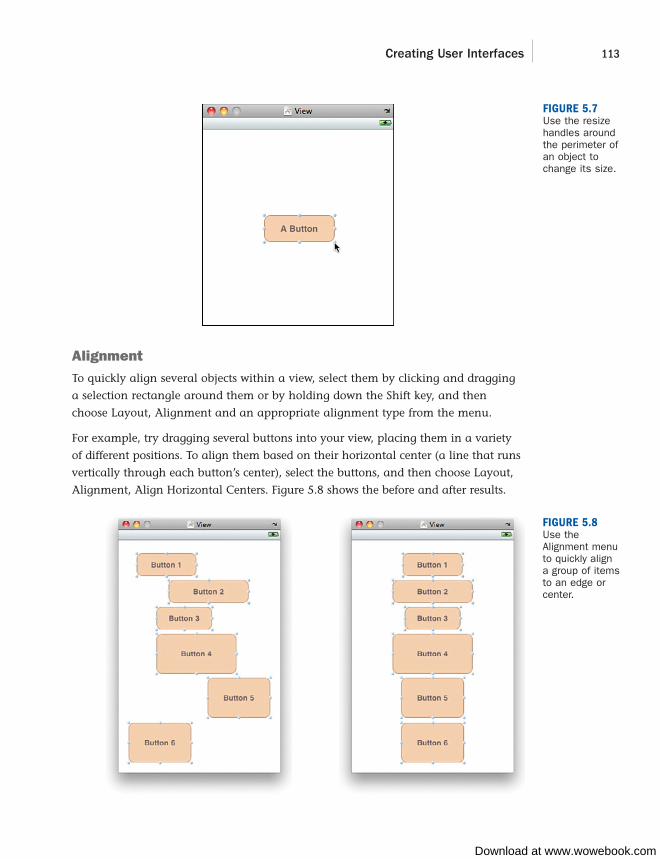
For example, try dragging several buttons into your view, placing them in a variety
of different positions. To align them based on their horizontal center (a line that runs
vertically through each button’s center), select the buttons, and then choose Layout,
Alignment, Align Horizontal Centers. Figure 5.8 shows the before and after results.
FIGURE 5.7Use the resizehandles aroundthe perimeter ofan object tochange its size.
FIGURE 5.8Use theAlignment menuto quickly aligna group of itemsto an edge orcenter.
Download at www.wowebook.com

ptg
114 HOUR 5: Exploring Interface Builder
Did youKnow?
FIGURE 5.9The SizeInspectorenables you toadjust the sizeand position ofone or moreobjects.
Using the fields at the top of the inspector, you can view or change the size and
position of the object by changing the coordinates in the H/W and X/Y fields. You
can also view the coordinates of a specific portion of an object by clicking one of the
black dots in the size and grid to indicate where the reading should come from.
Within the Size and Position settings, you’ll notice a drop-down menu where youcan choose between Frame and Layout. These two settings will usually be verysimilar, but there is a slight difference. The frame values represent the exact areaan object occupies onscreen, whereas the layout values take into account spacingaround the object.
To fine-tune an object’s position within a view, select it, and then use the arrowkeys to position it left, right, up, or down, 1 pixel at a time.
The Size InspectorAnother tool that you may want to use for controlling your layout is the Size
Inspector. Interface Builder has a number of “inspectors” for examining the attrib-
utes of an object. As the name implies, the Size Inspector provides information
about sizes, but also position and alignment. To open the Size Inspector, first select
the object (or objects) that you want to work with, and then press Command+3 or
choose Tools, Size Inspector (see Figure 5.9).
By theWay
Download at www.wowebook.com
ptg
Customizing Interface Appearance 115
The Autosizing settings of the Size Inspector determine how controls resize/reposition
themselves when the iPhone changes orientation. You’ll learn more about these in
Hour 15, “Building Rotatable and Resizable User Interfaces.”
Finally, the same controls found under Layout, Alignment can be accessed as click-
able icons at the bottom of the inspector. Choose your objects, and then click one of
the icons to align according to the red line.
Customizing Interface AppearanceHow your interface appears to the end user isn’t just a combination of control sizes
and positions. For many kinds of objects, literally dozens of different attributes can
be adjusted. Although you could certainly configure things such as colors and fonts
in your code, it’s easier to just use the tools included in Interface Builder.
Using the Attributes InspectorThe most common place you’ll tweak the way your interface objects appear is
through the Attributes Inspector, available by choosing Tools, Attributes Inspector or
by pressing Command+1. Let’s run through a quick example to see how this works.
Make sure the EmptyView.xib file is still open and that you’ve added a text label to
the view. Select the label, and then press Command+1 to open the Attributes
Inspector, shown in Figure 5.10.
The top portion of the Attributes Inspector will contain attributes for the specific
object. In the case of the text object, this includes settings such as font, size, color,
and alignment—everything you’d expect to find for editing text.
In the lower portion of the inspector are additional inherited attributes. Remember
that onscreen elements are a subclass of a view? This means that all the standard
view attributes are also available for the object and for your tinkering enjoyment. In
many cases, you’ll want to leave these alone, but settings such as background and
transparency can come in handy.
Don’t get hung up on trying to memorize every attribute for every control now—Icover interesting and important attributes when they are needed throughout thebook.
Feel free to explore the many different options available in the Attributes Inspector
to see what can be configured for different types of objects. There is a surprising
amount of flexibility to be found within the tool.
Did youKnow?
Download at www.wowebook.com

ptg
By theWay
116 HOUR 5: Exploring Interface Builder
The attributes you change in Interface Builder are simply properties of the objectsthemselves. To help identify what an attribute does, use the documentation tool inXcode to look up the object’s class and review the descriptions of its properties.
Setting Accessibility Attributes For many years, the “appearance” of an interface meant just how it looks visually.
Today, the technology is available for an interface to vocally describe itself to the
visually impaired. The iPhone includes Apple’s screen reader technology: Voiceover.
Voiceover combines speech synthesis with a customized interface to aid users in nav-
igating applications.
Using Voiceover, a user can touch interface elements and hear a short description of
what they do and how they can be used. Although you gain much of this function-
ality “for free” (the iPhone Voiceover software will read button labels, for example),
you can provide additional assistance by configuring the accessibility attributes in
Interface Builder.
To access the Accessibility settings, you need to open the Identity Inspector by choos-
ing Tools, Identity Inspector or by pressing Command+4. The Accessibility options
have their own section within the Identity Inspector, as shown in Figure 5.11.
FIGURE 5.10To change howan object looksand behaves,select it andthen open theAttributesInspector.
Download at www.wowebook.com
ptg
Did youKnow?
Customizing Interface Appearance 117
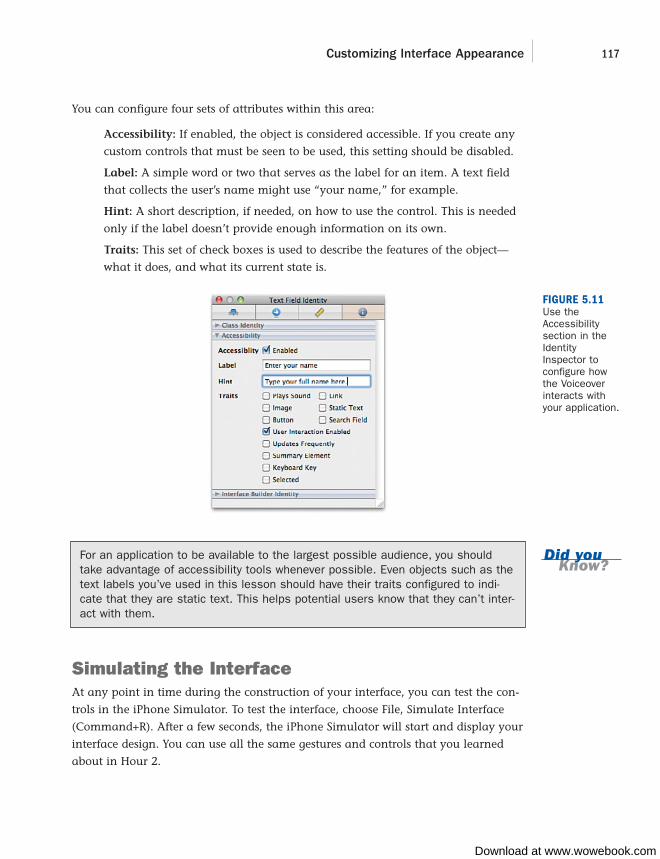
You can configure four sets of attributes within this area:
Accessibility: If enabled, the object is considered accessible. If you create any
custom controls that must be seen to be used, this setting should be disabled.
Label: A simple word or two that serves as the label for an item. A text field
that collects the user’s name might use “your name,” for example.
Hint: A short description, if needed, on how to use the control. This is needed
only if the label doesn’t provide enough information on its own.
Traits: This set of check boxes is used to describe the features of the object—
what it does, and what its current state is.
FIGURE 5.11Use theAccessibilitysection in theIdentityInspector toconfigure howthe Voiceoverinteracts withyour application.
For an application to be available to the largest possible audience, you shouldtake advantage of accessibility tools whenever possible. Even objects such as thetext labels you’ve used in this lesson should have their traits configured to indi-cate that they are static text. This helps potential users know that they can’t inter-act with them.
Simulating the InterfaceAt any point in time during the construction of your interface, you can test the con-
trols in the iPhone Simulator. To test the interface, choose File, Simulate Interface
(Command+R). After a few seconds, the iPhone Simulator will start and display your
interface design. You can use all the same gestures and controls that you learned
about in Hour 2.
Download at www.wowebook.com
ptg
118 HOUR 5: Exploring Interface Builder
When you use the Simulate Interface command, only the interface code is beingrun. Nothing that you may have written in Xcode is included. Therefore, you cansimulate interfaces even if you haven’t written a single line of supporting code orif your code has errors. However, it also means that if your code modifies the dis-play in any way, you won’t see those changes onscreen.
To compile and run your code along with the interface, switch to Xcode and clickBuild and Run, or, as a shortcut, choose File, Build and Go in Xcode from the IBmenu (Command+Shift+R).
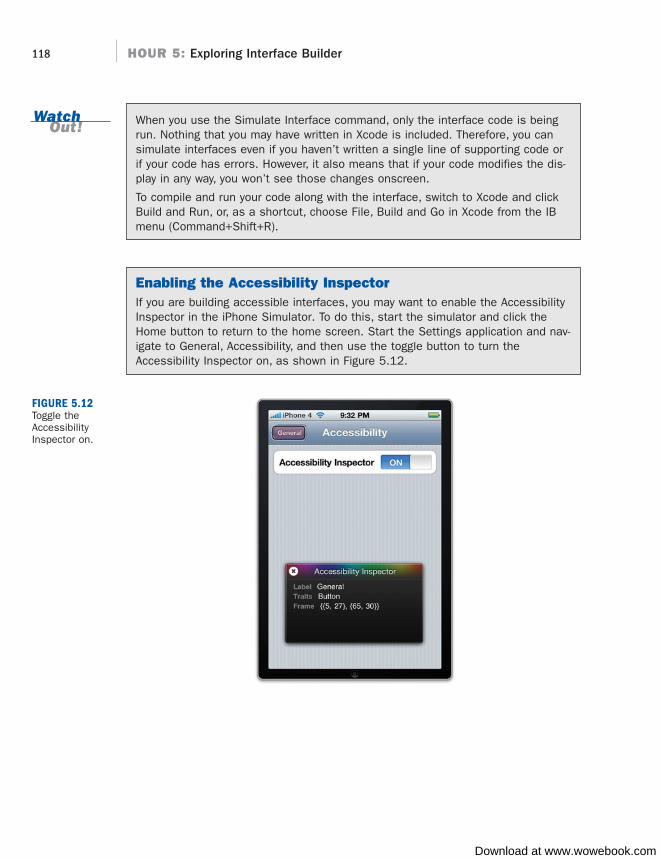
Enabling the Accessibility InspectorIf you are building accessible interfaces, you may want to enable the AccessibilityInspector in the iPhone Simulator. To do this, start the simulator and click theHome button to return to the home screen. Start the Settings application and nav-igate to General, Accessibility, and then use the toggle button to turn theAccessibility Inspector on, as shown in Figure 5.12.
WatchOut!
FIGURE 5.12Toggle theAccessibilityInspector on.
Download at www.wowebook.com

ptg
Connecting to Code 119
The Accessibility Inspector adds an overlay to the simulator workspace that dis-plays the label, hints, and traits that you’ve configured for your interface elements.Note that navigating the iPhone interface is very different when operating in acces-sibility mode.
Using the X button in the upper-left corner of the inspector, you can toggle it onand off. When off, the inspector collapses to a small bar, and the iPhone simula-tor will behave normally. Clicking the X button again turns it back on. To disablethe Accessibility Inspector altogether, just revisit the Accessibility setting in theSettings application.
Connecting to CodeYou know how to make an interface, but how do you make it do something?
Throughout this hour, I’ve been alluding to the idea that connecting an interface to
the code you write is just a matter of “connecting the dots.” In this last part of the
hour, we’ll do just that: take an interface and connect it to the code that makes it
into a functional application.
Launching Interface Builder from XcodeTo get started, we’ll use the project Disconnected contained within this hour’s
Projects folder. Open the folder and double-click the Disconnected.xcodeproj file.
This will open the project in Xcode, as shown in Figure 5.13. Almost all of your work
in Interface Builder will start from inside of Xcode, so we might as well get used to
using it as our launching point for IB.
By theWay
FIGURE 5.13Almost all ofyour work inInterface Builderwill start inXcode.
Download at www.wowebook.com

ptg
120 HOUR 5: Exploring Interface Builder
Once the project is loaded, expand the Resources file group and double-click the
DisconnectedViewController.xib file. This XIB file contains the view that this appli-
cation displays as its interface. After a few seconds, IB will launch and display the
interface Document window and the view, as shown in Figure 5.14.
FIGURE 5.14After launching,Interface Builderwill show theDocument win-dow and viewfrom the XIBfile.
Implementation OverviewThe interface contains four interactive elements: a button bar (called a segmented
control), a push button, an output label, and a web view (an integrated web browser
component). Together, these controls will interface with application code to enable a
user to pick a flower color, touch the Get Flower button, and then display the chosen
color in a text label along with a matching flower photo fetched from the website
http://www.floraphotographs.com. The final result is demonstrated in Figure 5.15.
Unfortunately, right now the application does nothing. The interface isn’t connected
to any application code, so it is hardly more than a pretty picture. To make it work,
we’ll be creating connections to outlets and actions that have been defined in Xcode.
Outlets and ActionsAn outlet is nothing more than a variable by which an object can be referenced. For
example, if you had created a field in Interface Builder intending that it would be
used to collect a user’s name, you might want to create an outlet for it in your code
called userName. Using this outlet, you could then access or change the contents of
the field.
Download at www.wowebook.com

ptg
Connecting to Code 121
An action, on the other hand, is a method within your code that is called when an
event takes place. Certain objects, such as buttons and switches, can trigger actions
when a user interacts with them through an event—such as touching the screen. By
defining actions in your code, Interface Builder can make them available to the
onscreen objects.
Joining an element in Interface Builder to an outlet or action creates what is generi-
cally termed a connection.
For the Disconnected app to function, we need to create connections to these outlets
and actions:
ColorChoice: An outlet created for the button bar to access the color the user
has selected
GetFlower: An action that retrieves a flower from the Web, displays it, and
updates the label with the chosen color
ChosenColor: An outlet for the label that will be updated by getFlower to
show the name of the chosen color
FlowerView: An outlet for the web view that will be updated by getFlower to
show the image
Let’s make the connections now.
FIGURE 5.15The finishedapplication willenable a user tochoose a colorand have aflower imagereturned thatmatches thatcolor.
Download at www.wowebook.com

ptg
122 HOUR 5: Exploring Interface Builder
Creating Connections to OutletsTo create a connection from an interface item to an outlet, Control-drag from the
File’s Owner icon either to the visual representation of the object in the view or to its
icon in the Document window of Interface Builder.
Try this with the button bar (segmented control). Pressing Control, click and drag
from the File’s Owner icon in the Document window to either the onscreen image of
the bar or its icon in the Document window. A line will appear as you drag,
enabling you to easily point to the object that you want to use for the connect.
When you release the mouse button, the available connections will be shown in a
pop-up menu (see Figure 5.16).
FIGURE 5.16Choose fromthe outletsavailable forthat object.
Download at www.wowebook.com

ptg
By theWay
Connecting to Code 123
Interface Builder knows what type of object is allowed to connect to a given outlet,so it will display only the outlets appropriate for the connection you’re trying tomake.
Repeat this process for the label with the text Your Color, connecting it to the
chosenColor outlet, and the web view, connecting to flowerView.
Connecting to ActionsConnecting to actions is a bit different. An object’s events trigger actions (methods)
in your code. So, the connection direction reverses; you connect from the object to
the File’s Owner icon. Although it is possible to Control-drag and create a connec-
tion in the same manner you did with outlets, this isn’t recommended because you
don’t get to specify which event triggers it. Do users have to touch the button?
Release their fingers from a button?
Actions can be triggered by many different events, so you need to make sure that
you’re picking exactly the right one, instead of leaving it up to Interface Builder. To do
this, select the object that will be connecting to the action and open the Connections
Inspector by choosing Tools, Connections Inspector (or by pressing Command+2).
The Connections Inspector, in Figure 5.17, shows a list of the events that the object
supports—in this case, a button. Beside each event is an open circle. To connect an
event to an action in your code, click and drag from one of these circles to the File’s
Owner icon.
FIGURE 5.17The ConnectionsInspector showsall the connec-tions you’vemade to andfrom an object.
Download at www.wowebook.com
ptg
124 HOUR 5: Exploring Interface Builder
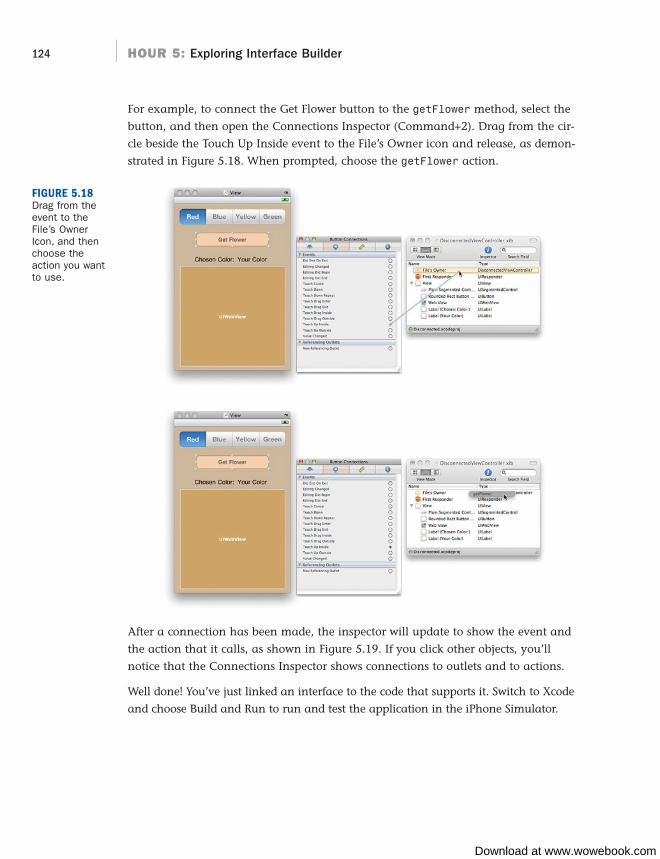
For example, to connect the Get Flower button to the getFlower method, select the
button, and then open the Connections Inspector (Command+2). Drag from the cir-
cle beside the Touch Up Inside event to the File’s Owner icon and release, as demon-
strated in Figure 5.18. When prompted, choose the getFlower action.
FIGURE 5.18Drag from theevent to theFile’s OwnerIcon, and thenchoose theaction you wantto use.
After a connection has been made, the inspector will update to show the event and
the action that it calls, as shown in Figure 5.19. If you click other objects, you’ll
notice that the Connections Inspector shows connections to outlets and to actions.
Well done! You’ve just linked an interface to the code that supports it. Switch to Xcode
and choose Build and Run to run and test the application in the iPhone Simulator.
Download at www.wowebook.com

ptg
Connecting to Code 125
Connections Without Code!Although most of your connections in Interface Builder will be between objects andoutlets and actions you’ve defined in your code, certain objects actually imple-ment some built-in actions without you writing a single line of code.
The web view, for example, implements actions, including goForward and goBack.Using these actions, you could add basic navigation functionality to a web view bydragging from a button’s Touch Up Inside event directly to the web view object(rather than the File’s Owner). As described previously, you’ll be prompted for theaction to connect to, but this time, it isn’t an action you had to code yourself!
Object IdentityAs we finish up our introduction to Interface Builder, I’d be remiss if I didn’t intro-
duce one more feature: the Identity Inspector. You’ve already accessed this tool to
view the accessibility attributes for interface objects, but there is another reason why
we’ll need to use the inspector in the future: setting class identities.
As you drag objects into the interface, you’re creating instances of classes that
already exist (buttons, labels, and so on). Throughout this book, however, we’re
going to be building custom subclasses that we’ll also need to be able to reference in
Interface Builder. In these cases, we’ll need to help Interface Builder out by identify-
ing the subclass it should use.
FIGURE 5.19The ConnectionsInspectorupdates to showthe actions andoutlets that anobject refer-ences.
Download at www.wowebook.com

ptg
126 HOUR 5: Exploring Interface Builder
For example, suppose we created a subclass of the standard button class (UIButton)
that we named ourFancyButtonClass. We might drag a button into Interface
Builder to represent our fancy button, but when the XIB file loads, it would just cre-
ate the same old UIButton.
To fix the problem, we select the button we’ve added to the view, open the Identity
Inspector by choosing Tools, Identity Inspector (Command+4), and then use the
drop-down menu/field to enter the class that we really want instantiated at runtime
(see Figure 5.20).
FIGURE 5.20If you’re using acustom class,you’ll need tomanually setthe identity ofyour objects inInterfaceBuilder.
This is something we’ll cover on an as-needed basis, so if it seems confusing, don’t
worry. We come back to it later in the book.
Further ExplorationInterface Builder gives you the opportunity to experiment with many of the different
GUI objects you’ve seen in iPhone applications and read about in the previous
hours. In the next hour, Xcode and Interface Builder will finally come together for
your first full project, from start to finish.
To learn even more about what you can do in Interface Builder, I suggest reading
through the following three Apple publications:
Interface Builder User Guide: Accessed by choosing Help, Interface Builder
Help from the IB menu, this is more than a simple help document. Apple’s user
Download at www.wowebook.com
ptg
127Q&A
guide walks you through all of the intricacies of IB and covers some advanced
topics that will be important as your development experience increases.
iPhone Human Interface Guidelines: Accessible through the Xcode docu-
mentation system, the Apple iPhone HIG document provides a clear set of
rules for building usable interfaces on the iPhone. This document describes
when you should use controls and how they should be displayed, helping you
to create more polished, professional-quality applications.
Accessibility Programming Guide for iPhone OS (accessible through the
Xcode documentation system): If you’re serious about creating accessible
apps, this is a mandatory read. The Accessibility Programming Guide
describes the accessibility features mentioned in this hour’s lesson as well as
ways to improve accessibility programmatically and methods of testing acces-
sibility beyond the tips given in this hour.
As a general note, from here on, you’ll be doing quite a bit of coding in each lesson,
so now would be a great time to review the previous hours if you have any questions.
SummaryIn this hour, you explored Interface Builder and the tools it provides for building rich
graphical interfaces for your iPhone applications. You learned how to navigate the IB
Document window and access the GUI elements from the Objects Library. Using the
various inspector tools within Interface Builder, you customized the look and feel of
the onscreen controls and how they can be made accessible to the visually impaired.
More than just a pretty picture, an IB-created interface uses simple outlets and
actions to connect to functionality in your code. You used Interface Builder’s connec-
tion tools to turn a nonfunctioning interface into a complete application. By main-
taining a separation between the code you write and what is displayed to the user,
you can revise your interface to look however you want, without breaking your
application. In Hour 6, you examine how to create outlets and actions from scratch
in Xcode (and thus gain a full toolset to get started developing).
Q&AQ. Why do I keep seeing things referred to as NIB files?
A. The origins of Interface Builder trace back to the NeXT Computer, which made
use of NIB files. These files, in fact, still bore the same name when Mac OS X
was released. In recent years, however, Apple has renamed the files to have
the .xib extension—unfortunately, documentation hasn’t quite caught up yet.
Download at www.wowebook.com

ptg
128 HOUR 5: Exploring Interface Builder
Q. Some of the objects in the Interface Builder Library can’t be added to myview. What gives?
A. Not all of the Library objects are interface objects. Some represent objects that
provide functionality to your application. In the next hour, we look at the first
object that does this (a view controller).
Q. I’ve seen controls in applications that aren’t available here. Where are they?
A. Keep in mind that the iPhone isn’t an iPad—not all user interface features work
or look the same. In addition, some developers choose to make their own UI
classes or subclasses that can vary tremendously from the stock UI appearance.
Workshop
Quiz1. Simulating an interface from IB also compiles the project’s code in Xcode. True
or false?
2. What tool can you use within the iPhone Simulator to help review accessibilityof objects in your apps?
3. How is Interface Builder typically launched?
Answers1. False. Simulating the interface does not use the project code at all. As a result,
the interface will not perform any actions that may be assigned.
2. The Accessibility Inspector makes it possible to view the accessibility attributesconfigured within Interface Builder.
3. Although Interface Builder is a standalone application, it is typically launchedby opening an XIB file from within Xcode.
Activities1. Practice using the interface layout tools on the EmptyView.xib file. Add each
available interface object to your view, and then review the Attributes Inspectorfor that object. If an attribute doesn’t make sense, remember that you canreview documentation for the class to identify the role of each of its properties.
2. Revise the Disconnected project with an accessible interface. Review the fin-ished design using the Accessibility Inspector in the iPhone Simulator.
Download at www.wowebook.com