financial edge webinvoicing user guide
TRANSCRIPT

WebInvoicing User Guide

042213
©2013 Blackbaud, Inc. This publication, or any part thereof, may not be reproduced or transmitted in any form or by any means, electronic, or mechanical, including photocopying, recording, storage in an information retrieval system, or otherwise, without the prior written permission of Blackbaud, Inc.
The information in this manual has been carefully checked and is believed to be accurate. Blackbaud, Inc., assumes no responsibility for any inaccuracies, errors, or omissions in this manual. In no event will Blackbaud, Inc., be liable for direct, indirect, special, incidental, or consequential damages resulting from any defect or omission in this manual, even if advised of the possibility of damages.
In the interest of continuing product development, Blackbaud, Inc., reserves the right to make improvements in this manual and the products it describes at any time, without notice or obligation.
All Blackbaud product names appearing herein are trademarks or registered trademarks of Blackbaud, Inc.
All other products and company names mentioned herein are trademarks of their respective holder.
WebInvoicingUserGuide-2013

WebInvoicing User Guide
WEBINVOICING SETUP. . . . . . . . . . . . . . . . . . . . . . . . . . . . .1
WebInvoicing Considerations . . . . . . . . . . . . . . . . . . . . . . . . . . . . . . . . . . . . . . 1WebInvoicing Setup Checklist . . . . . . . . . . . . . . . . . . . . . . . . . . . . . . . . . . . . . 2Security Group Setup . . . . . . . . . . . . . . . . . . . . . . . . . . . . . . . . . . . . . . . . . . . . . 2User Security Setup . . . . . . . . . . . . . . . . . . . . . . . . . . . . . . . . . . . . . . . . . . . . . . 5Create Vendors . . . . . . . . . . . . . . . . . . . . . . . . . . . . . . . . . . . . . . . . . . . . . . . . . . 9Create Expense Categories . . . . . . . . . . . . . . . . . . . . . . . . . . . . . . . . . . . . . . . 10Define Rejection Reasons . . . . . . . . . . . . . . . . . . . . . . . . . . . . . . . . . . . . . . . . 13Define Approval Rules . . . . . . . . . . . . . . . . . . . . . . . . . . . . . . . . . . . . . . . . . . . 14Configure Business Rules . . . . . . . . . . . . . . . . . . . . . . . . . . . . . . . . . . . . . . . . 16
USE WEBINVOICING ONLINE . . . . . . . . . . . . . . . . . . . . . . .19
Access WebInvoicing . . . . . . . . . . . . . . . . . . . . . . . . . . . . . . . . . . . . . . . . . . . . 20Home Page . . . . . . . . . . . . . . . . . . . . . . . . . . . . . . . . . . . . . . . . . . . . . . . . . . 20My Account Page . . . . . . . . . . . . . . . . . . . . . . . . . . . . . . . . . . . . . . . . . . . . . 21
Create Invoice Requests . . . . . . . . . . . . . . . . . . . . . . . . . . . . . . . . . . . . . . . . . 23View Invoice Requests . . . . . . . . . . . . . . . . . . . . . . . . . . . . . . . . . . . . . . . . . . . 27Approve and Reject Invoice Requests . . . . . . . . . . . . . . . . . . . . . . . . . . . . . . 29View Invoice Records in Accounts Payable . . . . . . . . . . . . . . . . . . . . . . . . . . 32
ADMINISTRATIVE TASKS. . . . . . . . . . . . . . . . . . . . . . . . . . .37
Manage Active Users . . . . . . . . . . . . . . . . . . . . . . . . . . . . . . . . . . . . . . . . . . . . 37Manage the Email Queue . . . . . . . . . . . . . . . . . . . . . . . . . . . . . . . . . . . . . . . . . 38
INDEX . . . . . . . . . . . . . . . . . . . . . . . . . . . . . . . . . . . . . . . .41


1CHAPTER
WebInvoicing Setup
In this chapter
“WebInvoicing Considerations” on page 1
“WebInvoicing Setup Checklist” on page 2
“Security Group Setup” on page 2
“User Security Setup” on page 5
“Create Vendors” on page 9
“Create Expense Categories” on page 10
“Define Rejection Reasons” on page 13
“Define Approval Rules” on page 14
“Configure Business Rules” on page 16
With WebInvoicing, you can submit reimbursement requests and get them approved online. When you submit reimbursement requests you can select pre-defined expense categories and attach supporting documentation such as receipts. Once the request is approved, an invoice is created in Accounts Payable.
To use WebInvoicing, you must have WebPortal licenses and a Web server. This chapter details the tasks you should follow to set up WebInvoicing.
WebInvoicing ConsiderationsBefore using WebInvoicing, we recommend you consider the following:
• Make sure your organization has defined its routing process so that you can configure your approval rules. For more information about approval rules, see “Define Approval Rules” on page 14.
• Define your spending limits. Before expenses are made, make sure your organization has a spending policy in place that is communicated to your employees.

CH A P T E R 12 .
• Carefully consider your expense categories and determine how they should be categorized, for example, meals, travel, gas, office supplies, etc.
• Determine if users have the right to edit the GL distribution and if you will use account masking.
• Determine how users will enter GL distribution information. Do you want them to be able to edit the distribution? What GL distribution information should be the default? The default distribution for expense categories can be a single account or you can combine the account code with segments defined on the user’s My Account profile. If you want to use account masking, make sure to define the segments in My Account for all users.
• Determine the default project distribution information. You can default the project distribution from the expense category or from the user’s My Account profile. If you want to default from My Account, make sure to define the project distribution in the My Account profile for all users. For more information about defining the user’s My Account profile, see “My Account Page” on page 21.
• Determine if your users will have rights both to The Financial Edge and WebInvoicing or just WebInvoicing.
• To send email notifications, make sure the email service settings were configured during installation and then define the user’s email notification settings on the My Account page. For more information about how to configure email service settings, see The Installation Guide for WebPortal. For more information about how to define email notifications for a user’s account, see “My Account Page” on page 21.
WebInvoicing Setup ChecklistThere are several tasks involved with setting up your WebInvoicing system. These tasks should be completed in the order below.
Create Security Groups – Use the Set up system security page in Administration in Accounts Payable to create group profiles for WebInvoicing users.
Create Users – Use the Set up system security page in Administration in Accounts Payable to create the user record and define the user’s security privileges, Windows authentication, and the type of access to WebInvoicing.
Create Vendors – For those users who submit their own invoice requests, you should create a vendor record for those users in Accounts Payable. By creating a vendor record, the user can select his name from the vendor list. For more information about how to create a vendor record, see the Vendors chapter in the Records Guide for Accounts Payable.
Create Expense Categories – On the Expense Categories page in Configuration in Accounts Payable, group expenses into specific categories, for example, mileage, travel, and meals.
Define Rejection Reasons – On the Tables page in Configuration in Accounts Payable, define specific reasons an invoice request would be rejected.
Define Approval Rules – On the Approval Rules page in Configuration in Accounts Payable, define the approval rules that route an invoice request to the reviewers identified by your organization.
Configure Business Rules – On the Business Rules page in Configuration in Accounts Payable, specify the requirements and settings for WebInvoicing functionality.
Security Group SetupBy creating a security group and assigning users, you determine the type of access a user has to WebInvoicing. Properly setting up security ensures that users can access only the areas that you specify. New security groups are defined in Administration in Accounts Payable.

WE BIN V O I C I N G SE T U P 3.
Add a security group
1. From the navigation bar in The Financial Edge, click Administration. The Administration page appears.
2. Click Set up system security. The Set up system security page appears.

CH A P T E R 14 .
3. Click New Group on the action bar. The New Group screen appears.
4. In the Group name field, enter a name for the user group. This name must be unique and no longer than 30 characters. We recommend you use a descriptive name that you can easily remember for each group. If you make a user with Supervisor rights a member of a security group, his Supervisor rights are not affected.
Note: When you create approval rules, you can specify what security groups have rights to use that approval. If your approvals are based on department, set up a security group for each department. For more information about approval rules, see “Define Approval Rules” on page 14.
5. In the Description field, enter a description of the user group that indicates the type of access the group has to WebInvoicing.
6. In the Group type field, select the type of group you want to create. Your selection changes the options that appear on the Group Privileges tab. Select “Standard” for users that access The Financial Edge. Select “WebPortal” for users that access WebInvoicing and/or WebPurchasing.
Note: If a user is a member of the “Standard” group, but their user record indicates that they have access to online modules, they will be able to access the WebPortal. If the user is a member of a “Web Portal” group only, they will not have access to The Financial Edge.
7. In the System Components box, select a program or component. To restrict users from accessing the program, unmark the checkbox. With a box marked, a list of security privileges for that component appears in the box on the right.
8. In the privileges box, unmark a checkbox to prevent the group from accessing that area of the program. Leave the checkbox marked to allow the group access.
9. To define additional levels of security, select a privilege and click Options. The Security Options screen appears.

WE BIN V O I C I N G SE T U P 5.
Note: If no additional security rights are available for the selected privilege, the Options button is disabled.
10. In the box on the left, select a security option. If the option has additional security privileges, they appear on the right.
11. Mark the checkbox in the View, Add, Edit, and Delete columns for the program areas the group can access.
12. Some privileges have miscellaneous options. Mark a checkbox to give the group access or unmark to deny access to a function.
13. When you finish, click OK to return to the New Group screen.
14. Although you can assign users to a security group by selecting the Group Members tab, we recommend you skip this section and add a user to a group from the Users screen. For more information on creating a user, see “User Security Setup” on page 5.
15. To return to the Set up system security page, click Save and Close.
User Security SetupAn individual user’s security privileges are determined by the group the user is assigned to. You add users to security and then define their levels of access by assigning them to security groups. Using groups ensures data consistency, integrity, and confidentiality by limiting access to records and functions to the users who need it. A user can be a member of multiple groups. User access to WebInvoicing is defined on the User screen in The Financial Edge.
CH A P T E R 16 .
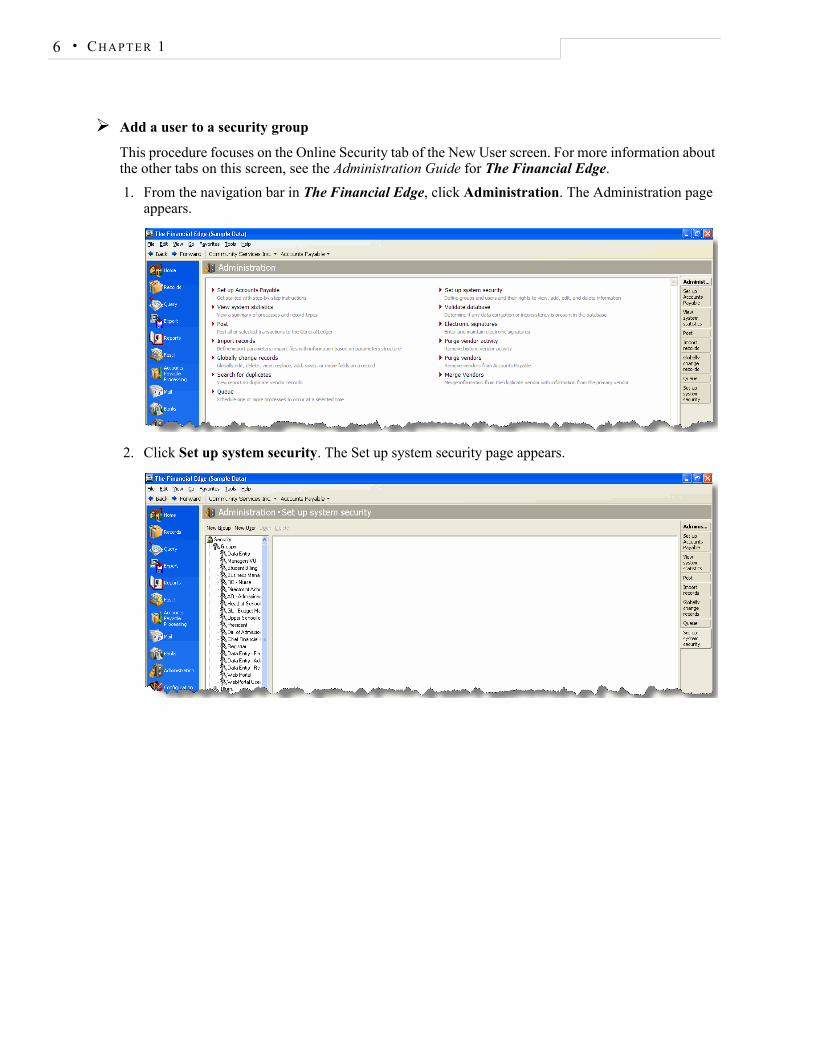
Add a user to a security group
This procedure focuses on the Online Security tab of the New User screen. For more information about the other tabs on this screen, see the Administration Guide for The Financial Edge.
1. From the navigation bar in The Financial Edge, click Administration. The Administration page appears.
2. Click Set up system security. The Set up system security page appears.

WE BIN V O I C I N G SE T U P 7.
3. Click New User on the action bar. The New User screen appears.
4. In the User name field, enter the name the user will use to log into the program.
5. In the Description field, enter a full name or other information to identify the user.
6. In the Connection Options frame, mark Use FE7 Authentication if you want a user’s log in information for The Financial Edge and WebInvoicing to be separate from his workstation log in information.
a. If you mark Use FE7 Authentication, enter the user’s password in the Password field. Create a password that consists of at least eight characters that are a combination of letters and numbers.
b. Enter the password again in the Confirm field.
Note: The actual password does not display in the Password and Confirm fields. For privacy, only asterisks appear.
7. Mark Use Windows Authentication if you want a user’s login information for The Financial Edge and WebInvoicing to be based on his Windows login information. When users logged into a workstation through their Windows authentication to access The Financial Edge or WebInvoicing, the Windows information is used to automatically log the user into the program.
Note: If you mark both the Use FE7 Authentication and Use Windows Authentication checkboxes, this affects only whether or not a password is stored for the user. The Financial Edge always tries Windows authentication first, but if for some reason that fails, The Financial Edge User name/Password screen appears.
To associate a user’s Windows authentication information with The Financial Edge, use the Login field to locate that user’s account on your network.
a. Click the binoculars in the Login field. The Select User Account screen appears.

CH A P T E R 18 .
b. In the List Names From field, select the system to which the user you want to select belongs.
c. All members of the selected system appear in the Names box. Select the user you want to specify and click Add. The name appears in the Add Name field.
d. Click OK. You return to the Security User screen where the user now appears in the Login field.
8. In the User Type field, to enable WebInvoicing for the user, you must select either “User can only access online modules” or “User can access The Financial Edge and online modules”.
9. In the Groups for <Your Organization> frame, to assign the user full access to the programs, mark Supervisor rights. To restrict access to certain security groups, mark Selected group rights.
10. If you mark Selected group rights, select the user’s group from the Not a member of box and click the single right arrow to move the group to the Member of box.
11. To grant the user the right to change his password, mark User can change password.
12. To grant the user the right to change his options, mark User can change User Options. To set options, click Set this user’s options after saving the user to open the user’s options screen. At the bottom of the Options screen, you can click Copy From to copy another user’s options. Using this feature helps keep data consistent.
13. If you selected “User can only access online modules” or “User can access The Financial Edge and online modules” in the User Type field on the User Information tab, the Online Security tab is added to the user record. You can grant users access to WebInvoicing from this tab.
14. In the Online Systems box, mark WebInvoicing to give the user access to WebInvoicing.
15. Mark the Can approve Invoice Requests checkbox to allow the user to approve invoice requests. Marking this option allows the user to be added to WebInvoicing approval rules.
16. Allowing the user to approve invoice requests activates Can approve over-budget Requests. To allow the user to approve invoice requests that exceed budget limits, mark this checkbox.
Note: To approve over-budget requests, you must also set the business rule for budget checking to include approved or unapproved.
17. To allow the user to approve his own invoice requests, mark Can self-approve Invoice Requests.

WE BIN V O I C I N G SE T U P 9.
18. To restrict the amount a user can self-approve, enter the maximum amount in the Invoice Request self approval limit field. Invoice requests under self-approve limits are automatically approved up to the self-approval limit.
Note: If the approval limit is left blank, the user’s approval amount will be unlimited.
19. To allow the user to view invoice requests created by all WebInvoicing users, mark Can view all Invoice Requests.
20. To allow the user to change their GL distribution on the My Account page in WebInvoicing, mark Can change GL distribution in My Account.
21. To allow the user to edit other users’ information on the My Account page in WebInvoicing, mark Can edit My Account information for other users.
22. To save the user security settings and return to the Set up system security page, click Save and Close.
Create VendorsFor those users who submit their own invoice requests, you should create a vendor record for those users in Accounts Payable. By creating a vendor record, the user can select his name from the vendor list.
Create a vendor
This procedure only discusses how to enter basic information about a requestor on the Vendor tab of the New Vendor screen. For more information about how to create a vendor record, see the Vendors chapter in the Records Guide for Accounts Payable.
1. On the Records page, click Vendors. The Vendors page appears.

CH A P T E R 110 .
2. Click Add a New Vendor. The New Vendor screen appears.
3. In the Vendor name field, enter the name of the requestor, for example, “Margaret Andrews”. This field is required when adding a new vendor record.
4. The vendor ID automatically appears in the Vendor ID field of saved vendor records if you mark the Automatically generate vendor IDs starting with option on the Vendor page of Business Rules in Configuration. If you do not want the ID to generate automatically, enter the ID.
5. In the Status field, select “Active”. This field is required when adding a new vendor record.
6. In the Payment method field, select “Check,” “Electronic Funds Transfer”, or “Bank Draft”. This field is required when adding a new vendor record.
7. In the Payment options field, select “One payment per invoice” or “One payment for all invoices”. This field is required when adding a new vendor record.
8. You can enter address information manually or click Address to access the Address screen.
9. To save the vendor record and return to the Vendors page, click Save and Close. The requestor’s vendor record is now searchable on the Find a Vendor screen in WebInvoicing.
Create Expense CategoriesTypically, when your employees request reimbursement or advances for expenses incurred on behalf of your organization, the expenses fall into certain categories such as travel, phone and internet usage, or mileage. Using expense categories creates data entry consistency by simplifying the process of selecting these categories and the corresponding default GL distribution.
WE BIN V O I C I N G SE T U P 11.
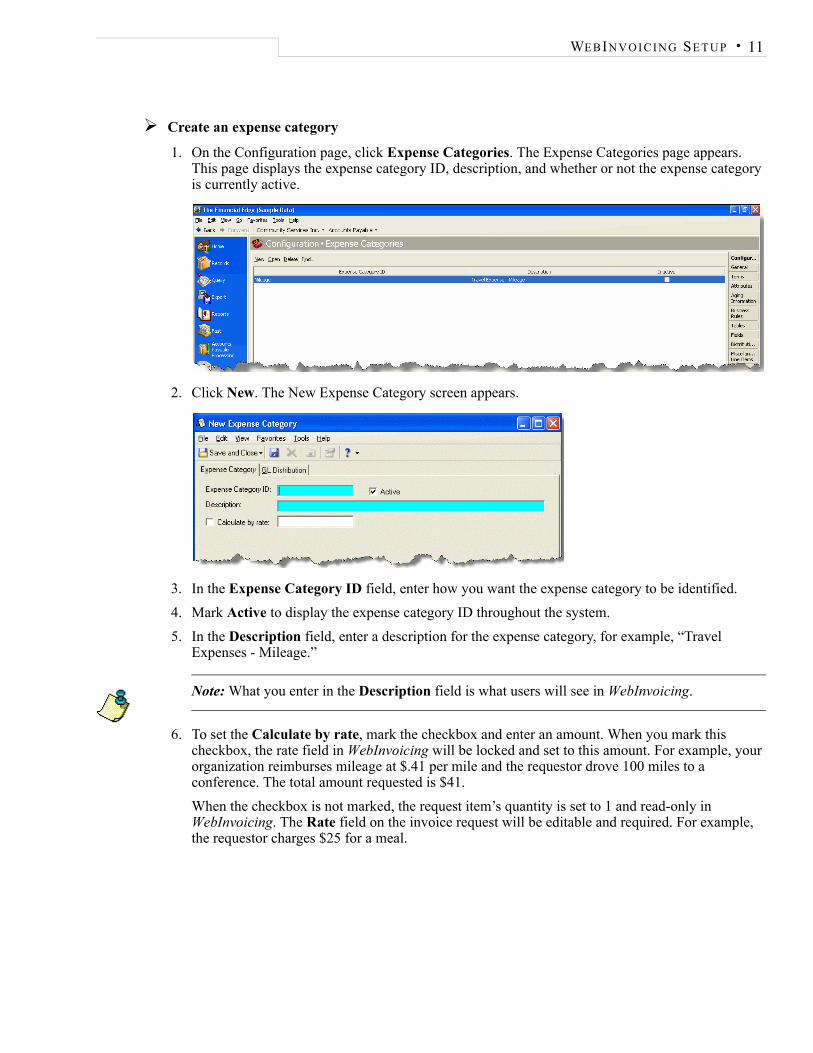
Create an expense category
1. On the Configuration page, click Expense Categories. The Expense Categories page appears. This page displays the expense category ID, description, and whether or not the expense category is currently active.
2. Click New. The New Expense Category screen appears.
3. In the Expense Category ID field, enter how you want the expense category to be identified.
4. Mark Active to display the expense category ID throughout the system.
5. In the Description field, enter a description for the expense category, for example, “Travel Expenses - Mileage.”
Note: What you enter in the Description field is what users will see in WebInvoicing.
6. To set the Calculate by rate, mark the checkbox and enter an amount. When you mark this checkbox, the rate field in WebInvoicing will be locked and set to this amount. For example, your organization reimburses mileage at $.41 per mile and the requestor drove 100 miles to a conference. The total amount requested is $41.
When the checkbox is not marked, the request item’s quantity is set to 1 and read-only in WebInvoicing. The Rate field on the invoice request will be editable and required. For example, the requestor charges $25 for a meal.

CH A P T E R 112 .
7. Select the GL Distribution tab.
8. The Distribution field displays “Debit (DR) distribution”.
9. The Interfund field lists all interfund sets available for use. An interfund entry is a balancing entry made to transfer activity between funds and ensure each fund is kept in balance. Interfund entries are used only when the debit account you enter is from a different fund than the credit account from the user’s AP Summary account.
Note: If the user has an account restriction in Security, he cannot save invoice requests for a category that contains that restricted number. Be sure to review the user’s account security restrictions after establishing the account numbers in their Expense Categories.
10. You have two options for defining the account number:
• Select Combine user distribution with this account code to enter the account code. The account code you enter is combined with the user’s masked account number on the WebInvoicing My Account page to create the distribution.
• Select Always debit this account to enter a debit account number.
11. You can mark Always use this transaction distribution to enter the projects, classes, and transaction codes to use for the default transaction distribution. This option overwrites any project distribution defined on the user’s My Account profile.

WE BIN V O I C I N G SE T U P 13.
• When defining the project distribution for an expense category, you should also define a project distribution on the user’s My Account profile. However, if you only define a project distribution for the expense category and not the user’s My Account profile and you require projects on the funds to be used with WebInvoicing, you should mark the business rule that allows users to edit GL distributions on invoice requests. For more information about business rules, see “Configure Business Rules” on page 16. For more information about defining the user’s My Account profile, see “My Account Page” on page 21.
• If you select Combine user distribution with this account code and mark Always use this transaction distribution, but do not define all of the characteristics for journal entries that will use this distribution, you may encounter errors.
12. Click Save and Close to return to the Expense Category page.
Define Rejection ReasonsWhen an invoice request is rejected, WebInvoicing requires you to give a rejection reason. Rejection reasons are defined on the Tables page in Configuration. Rejection reasons also are used in WebPurchasing.
Define a rejection reason
1. On the navigation bar, click Configuration. The Configuration page appears.
2. Click Tables. The Tables page appears.
3. In the box on the left, select “Rejection Reason”. Rejection reasons appear in a grid on the right.
4. Select New Table Entry. The New Table Entry screen appears.
5. In the Description field, enter a description of the new rejection reason, for example, “Support documentation is missing”.

CH A P T E R 114 .
Note: If you want to make the new rejection reason inactive, mark Inactive. When you make a table inactive it will not appear in WebInvoicing.
6. To save the new rejection reason and return to the Tables page, click OK.
Note: Table entries can be edited at any time or deleted if they are not used on any records.
Define Approval RulesApproval rules route invoice requests to selected reviewers. For example, an organization may require one set of reviewers for travel reimbursement requests, and a different set of reviewers reimbursement requests over a specific dollar amount.
You can attach an approval rule to any invoice request and have the request forwarded to the right reviewers in the correct order. Approval histories on all invoice requests are maintained and available to users.
If you have both WebInvoicing and WebPurchasing installed, you can designate which system should use a specific approval rule. In addition you can set up distinct user groups for each systems approval rule. For more information about user groups, see “Security Group Setup” on page 2.
Create an approval rule
1. On the Configuration page, click Approval Rules. The Approval Rules page appears.

WE BIN V O I C I N G SE T U P 15.
2. Click New. The New Approval Rule screen appears.
3. In the Approval Rule Name field, enter the name of the approval rule, for example “IT Purchases”.
4. Mark Active, to display the category throughout the system.
5. In the Description field, enter the a description of the approval rule, for example, “All IT requests needing approval”.
6. In the Approval Rule Type field, select the module(s) with which you want this approval rule associated, for example “WebInvoicing”.
Note: This field appears only if you have both WebInvoicing and WebPurchasing.
7. In the Approve above column, enter the requisition amount selected users can approve, for example a selected approver can approve purchases over $100.00. The default amount in the first row is $0.00. Enter other amount thresholds in each following row. For example, if you enter $500 in the second row, reviewers on the first row can approve purchases up to $499.
8. To select individual users for each row, in the Approvers column, click the binoculars. The Select Approvers screen appears.
The approvers listed on this screen are users defined in Accounts Payable Security. For more information, about user accounts, see the Administration Guide for The Financial Edge.
CH A P T E R 116 .
9. In the Available approvers box, select the approvers for each row and move them to the Selected approvers box.
10. To return to the New Approval Rule screen, click OK.
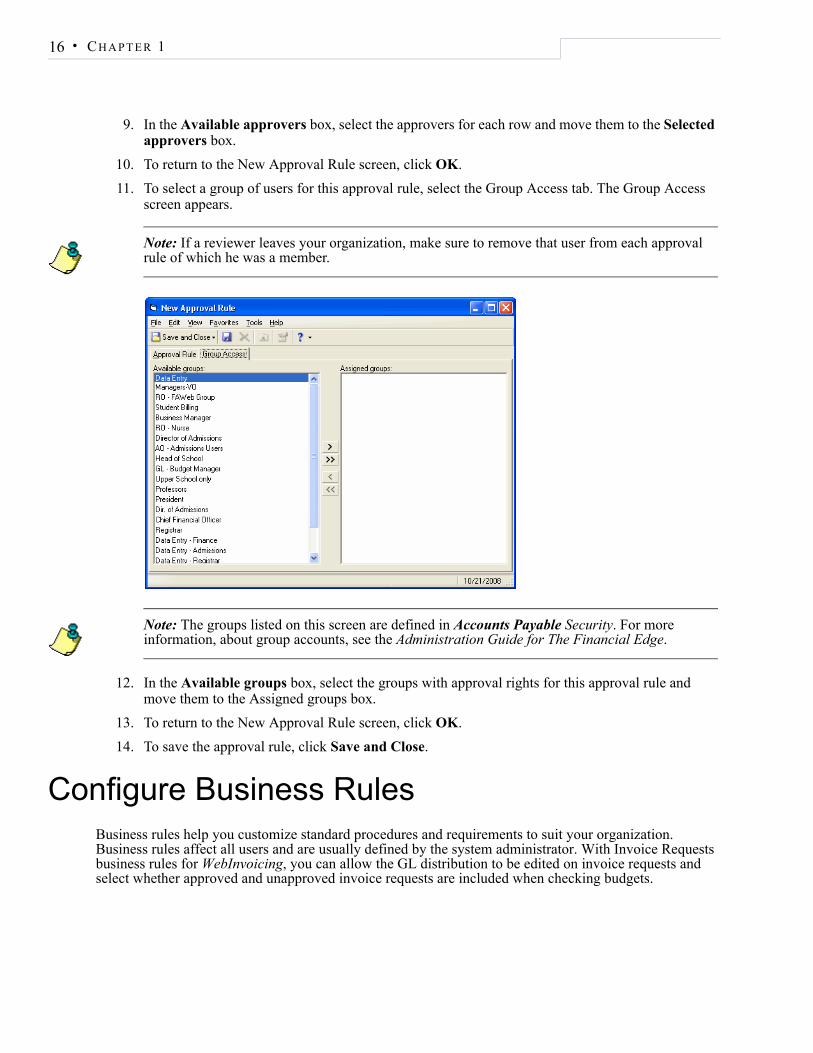
11. To select a group of users for this approval rule, select the Group Access tab. The Group Access screen appears.
Note: If a reviewer leaves your organization, make sure to remove that user from each approval rule of which he was a member.
Note: The groups listed on this screen are defined in Accounts Payable Security. For more information, about group accounts, see the Administration Guide for The Financial Edge.
12. In the Available groups box, select the groups with approval rights for this approval rule and move them to the Assigned groups box.
13. To return to the New Approval Rule screen, click OK.
14. To save the approval rule, click Save and Close.
Configure Business RulesBusiness rules help you customize standard procedures and requirements to suit your organization. Business rules affect all users and are usually defined by the system administrator. With Invoice Requests business rules for WebInvoicing, you can allow the GL distribution to be edited on invoice requests and select whether approved and unapproved invoice requests are included when checking budgets.

WE BIN V O I C I N G SE T U P 17.
To change business rules, from the Configuration page in Accounts Payable, click Business Rules. The Business Rules page appears. For more information about business rules, see the Business Rule Configuration chapter of the Configuration Guide for Accounts Payable.
The following is a list of business rules specific to WebInvoicing.
Business Rule DescriptionAllow General Ledger distribution to be edited on Invoice Requests
With this business rule marked, users can edit the GL distribution options on the invoice request. If you do not mark this checkbox, the GL Distribution column on the invoice request will not be editable.
Include unapproved invoice requests when checking budgets
With this business rule marked, all invoice requests, regardless of status, are included in budget totals when budget checking is performed.

CH A P T E R 118 .

2CHAPTER
Use WebInvoicing Online
In this chapter
“Access WebInvoicing” on page 20
“Create Invoice Requests” on page 23
“View Invoice Requests” on page 27
“Approve and Reject Invoice Requests” on page 29
“View Invoice Records in Accounts Payable” on page 32
Creating invoice requests through WebInvoicing involves selecting the appropriate expense category, adding spending details, such as attaching receipts, and then adding GL distribution information. When an invoice request is submitted for approval an email notification is sent to reviewers for approval. Based on the settings defined on your My Account page, you may receive email notifications when your invoice request is approved or rejected. Once the invoice request is approved, an invoice is generated in Accounts Payable. This chapter details the invoice request process, from creating and submitting requests, to approving or rejecting requests, to viewing those requests on the invoice record in Accounts Payable.

CH A P T E R 220 .
Access WebInvoicingDuring the install process, your system administrator defined the URL for The Financial Edge WebPortal website. Once you access the WebPortal website via this URL, you can log in to WebInvoicing using your user name and password. If you forgot your password, you can reset it.
WebInvoicing supports Internet Explorer 7 or higher on the PC and Firefox 3 or higher on the PC and Macintosh. Other browsers are not supported and may not operate or display information correctly in WebInvoicing.
Home Page
When you log in to the WebPortal, your WebInvoicing Home page appears. To use WebInvoicing, you must have specific security rights. Your security settings determine which tasks appear on the Home page. Therefore, the Home page will look different based on each user’s security settings. Your system administrator establishes security settings in The Financial Edge in Administration.
Note: If you have rights to both WebInvoicing and WebPurchasing, the Home page displays tasks related to both applications.
• All Invoice Requests – Click this link to view all submitted invoice requests.

US E WE BIN V O I C I N G ON L I N E 21.
• My Invoice Requests – Click this link to view only those invoice requests you submitted.
• Invoice Requests For Review – Click this link to view all invoice requests waiting for your approval.
Note: To close WebInvoicing, always click Log Out. Do not close the browser because the program considers the license you are using active until the session expires 40 minutes later. If you have multiple users accessing WebInvoicing, this may prevent someone from logging on.
My Account Page
If you have access to WebInvoicing or WebPurchasing, you can specify personal settings for your account. For example, you can choose to be notified when your approval is required for an invoice request, when your invoice request is rejected, or you can change your email address.
Manage your WebInvoicing account settings
1. From WebInvoicing, click My Account. Your account page appears.
2. The Department field is automatically populated based on the settings defined in user security. For more information about user security settings, see “User Security Setup” on page 5.
3. In the Email field, enter the email address you want to receive notifications.
4. Under WebInvoicing – Notifications, mark one or more checkboxes to specify when to receive notifications.
• Mark My request is approved by any reviewer if you want email notification when an invoice request you submitted has been approved by any reviewer.
• Mark My request is approved by final reviewer if you want email notification when an invoice request you submitted has been approved by the final reviewer.

CH A P T E R 222 .
• Mark My request is rejected if you want email notification when an invoice request you submitted has been rejected.
• Mark My approval is required for a request if you want email notification when an invoice request submitted by another user requires your approval.
5. If you will be out of the office for a period of time and want requests or requisitions submitted for your approval forwarded to someone else, mark Turn on Out of Office processing and select the person who will receive the requests or requisitions submitted while you are out.
6. Under Web Invoicing – General Ledger Distribution, you can select the account or project distribution to be used as defaults on invoice requests.
Only define these settings for account masking. When using account masking, you can distribute to a single account or to an account code on the expense category. In the My Account profile, you enter the rest of the segments to be combined with the account code from the expense category. For example, the expense category has 5050. The My Account profile has 01-****-01. When the user creates an invoice request for this expense category, the GL distribution will be 01-5050-01.
Note: This section only appears if you have rights to change your general ledger distribution information. To configure your general distribution settings, contact your system administrator.
7. From the drop-down list, select “Summary View” or “Detail View” and click Add.
If you select “Summary View”:
a. In the Percent field, enter the percentage to distribute to the account. You can manually enter percentages for each account or you can click Distribute Evenly to distribute percentages equally among the selected accounts.
b. In the GL Account field, enter the debit accounts for the distribution in the second field. You can use binoculars to search for an account number. When you enter a valid debit account number, the description appears automatically to the left of the account number field.
c. To add additional debit accounts, click Add.
If you select “Detail View”:
a. In the Percent field, enter the percentage to distribute to the account. You can manually enter percentages for each account or you can click Distribute Evenly to distribute percentages equally among the selected accounts.
b. In the GL Account field, enter the debit accounts for the distribution in the second field. You can use the binoculars to search for an account number. When you enter a valid debit account number, the description appears automatically to the left of the account number field.
c. In the Percent field, enter the percentage to distribute to the project. You can manually enter percentages for each account or you can click Distribute Evenly to distribute percentages equally among the selected accounts.
d. Enter a project ID number in the Project field or use the binoculars to search for a project ID.
e. Select a class for the distribution in the Class field.
f. To add additional debit accounts, click Add.

US E WE BIN V O I C I N G ON L I N E 23.
Note: If you have the optional module Projects and Grants and have defined transaction codes, additional fields appear based on the number of transaction codes you have defined. Select a value for each transaction code. For more information on transaction codes, see “Transaction Codes” in the Configuration Guide for General Ledger.
8. To use default account distributions, click Load Distribution. The Default Distributions screen appears. Select a distribution from the list and the distribution information appears in the Distribution frame of the Edit Line Item page.
9. Under Web Invoicing – Default Settings, you can select the approval rule and requestor to be used as defaults on your invoice requests. The requestor must be an existing vendor in Accounts Payable. For more information about vendors, see “Create Vendors” on page 9.
• In the Default Approval Rule field, select the default approval rule to use on your invoice requests. This field only lists approval rules that you have specific rights to. If you have self approval rights, this field defaults to “Self Approve”. For more information about approval rules, see “Define Approval Rules” on page 14.
• If there is particular vendor that you use frequently, enter that vendor name in the Default Requestor field or click the binoculars to search for the vendor.
10. To save your information, click Update My Account. You can update or change this information at any time.
Create Invoice RequestsCreating an invoice requests involves selecting the appropriate expense category and adding spending details, for example, attaching receipts and adding GL distribution information. When an invoice request is submitted for approval an email notification is sent to your reviewers for approval. Based on the settings defined on your My Account page, you may receive email notifications when your invoice request is approved or rejected. Once the invoice request is approved, an invoice is generated in Accounts Payable.

CH A P T E R 224 .
Create an invoice request
1. From the WebInvoicing home page, under Activities, click Create New Invoice Request. The Create New Invoice Request page appears.
2. In the Requestor field, enter the name of the vendor or person requesting payment. You also can use the binoculars to locate the person or vendor.
Note: To have a user’s name appear in the requestor list, you must create a vendor record in Accounts Payable. For more information about how to create a vendor record, see the Vendors chapter in the Records Guide for Accounts Payable.
3. In the Approval Rule field, select the approval rule you have rights to use. If you have self approval rights, this field defaults to “Self Approve”, however, you can change the rule. If your expenses exceed your self approval limit, this field becomes blank and you must select a new approval rule. Click Show Details to view more information about the selected approval rule.
4. In the Document Date field, enter the date the invoice request is created.
Note: When you want to check spending on a specific line item against the budget of a GL distribution account, the date entered in this field is used.
5. In the Description field, enter any additional information about the invoice request.

US E WE BIN V O I C I N G ON L I N E 25.
6. To attach receipts, invoices or other documentation to the invoice request, click View Attachments. The Attachments screen appears.
a. To locate the document you want to attach to the invoice request, click Browse.
b. To attach the document to the invoice request, click Upload. You can attach only one document at a time. Any attachments added to the request are added to the Invoice Request tab of the invoice record in Accounts Payable. For more information about the invoice record, see the Records Guide for Accounts Payable.
Tip: Images attached to an invoice request are stored in your database. You can attach any type of image file to your invoice request. However, we recommend you save your documents as .png or .jpeg files for uploading to the invoice request because they are smaller in size.
c. To view the documents attached to the invoice request, click View.
d. To close the Attachments screen, click Close.
7. In the line item area, enter detailed information about each expense:
• In the Expense Category field, enter the name of the expense category or use the binoculars to locate the expense category. Based on your expense category selection, the Description field is populated.
• In the Description field, enter a line item description. This description appears on the GL distribution line item descriptions. If there are multiple GL entries for each line item, the same description appears for each GL entry.
• In the Quantity field, you can enter the quantity of an item if Calculate by Rate was marked on the expense category record in Accounts Payable. For example, you drove 50 miles to a conference and your organization reimburses its employees for mileage at $0.42 per mile. You would enter “50” in this field. The $0.42 value appears in the Rate field.
If Calculate by Rate was not marked on the expense category record, the Quantity field defaults to “1” and is not editable. For more information about defining an expense category, see “Create Expense Categories” on page 10.

CH A P T E R 226 .
• In the Rate field, you can enter the cost for a particular expense, for example, $25 for a meal. However, if an expense category has a set rate, that value automatically appears in that field. For example, your organization reimburses its employees for mileage at $0.42 per mile, that amount appears in the Rate field. The number of miles traveled would be entered in the Quantity field. For more information about defining an expense category, see “Create Expense Categories” on page 10.
You can also enter negative distributions in WebInvoicing. By entering a negative line item amount, you can easily record refunds and\or credits on an invoice, resulting in a net amount.
• In the Date field, enter the date the expense occurred. If the expense occurred over a date range, follow your organization’s policy, for example, entering the date your credit card was charged.
• The Line Item Total field displays the total amount of the expense.
8. To add more line items to the invoice request, click Add Line Item.
9. To save the invoice request, click Save. We recommend saving frequently as you add line items to the invoice request. This prevents you from losing information if the browser is closed prior to saving.
Note: If necessary, you can delete an invoice request or a line item within the invoice request. To delete the invoice request, click Delete. Only the requestor can delete his own invoice request. To delete a line item within a request, click the trash can next to the specific line item. You cannot delete an invoice request once it has been submitted.
10. In the Expense Detail\Purpose frame, enter additional information about the expenses in the invoice request.
11. To submit the invoice request for approval, click Submit Invoice Request. A confirmation message appears.

US E WE BIN V O I C I N G ON L I N E 27.
Note: Based on the settings defined on the My Account page, you may receive email notifications when your invoice request is approved or rejected. For more information about defining email notifications for your account, see “My Account Page” on page 21.
12. Click the Home tab to return to the Home page.
View Invoice RequestsOnce invoice requests are submitted for approval, you can view the invoice requests you created or the invoice requests created by other users if you have the appropriate security rights. You can view who created the invoice request, when it was created, the request amount, and the approval status.
View invoice requests
1. From the WebInvoicing Home page, click All Invoice Requests or My Invoice Requests.
• When you click All Invoice Requests, the All Invoice Requests page appears. From this page you can view all the invoice requests submitted by every user in your organization.

CH A P T E R 228 .
Note: To view all invoice requests, you must have the appropriate security rights that are defined in Accounts Payable. For more information about user security see, “User Security Setup” on page 5.
• When you click My Invoice Requests, the My Invoice Requests page appears. From this page you can view the invoice requests you created.
2. To view a specific invoice request, click View. The View Invoice Request page appears.

US E WE BIN V O I C I N G ON L I N E 29.
3. To view the GL distribution information for a specific line item, click Distributed. The Edit Distribution screen appears.
Approve and Reject Invoice RequestsTo approve and reject invoice requests, you must have security rights. The Supervisor can establish security settings for groups of users in Administration. For more information about setting up WebInvoicing security, see “User Security Setup” on page 5.
Approve an invoice request
1. From the WebInvoicing Home page, click Review Invoice Requests. The Invoice Requests for Review page appears. This page lists the invoice requests available for approval.
2. Locate the invoice request(s) you want to approve. To speed your search, you can use Search Requests for Review on the Activities tab.

CH A P T E R 230 .
3. Click the Review link next to the invoice request you want to approve. The Review Invoice Request page appears.
4. To view or edit the GL distribution information for a specific line item, click Distributed. The Edit Distribution page appears.

US E WE BIN V O I C I N G ON L I N E 31.
5. To check account spending against the budget, click Check Budget. The Budget View screen appears. You can view the budget forecast for the selected account and what was actually budgeted. This screen allows you to see when you are over budget and plan accordingly.
6. To approve the invoice request, click Approve at the top of the Review Invoice Request page. A message appears to confirm the approval.
7. Click Yes to approve the invoice request. The invoice request is sent to the next reviewer or to the business office if you are the final reviewer.
Once an invoice request is approved by the final reviewer, an invoice is created in Accounts Payable. Your business office issues payment to the requestor.
To reject an invoice request
1. From the WebInvoicing Home page, click Review Invoice Requests. The Invoice Requests for Review page appears. This page lists the invoice requests available for approval.
2. Locate the invoice request(s) you want to review. To speed your search, you can use Search Requests for Review on the Activities tab.
3. Click the Review link next to the invoice request you want to review. The Review Invoice Request page appears.
4. To view or edit the GL distribution information for a specific line item, click Distributed. The Edit Distribution page appears.
5. To reject the invoice request, click Reject at the top of the Review Invoice Request page. The Rejection Reason screen appears.
Note: Rejection reasons are defined on the Tables page in Configuration in Accounts Payable. For more information about defining rejection reasons, see “Define Rejection Reasons” on page 13.
6. In the Reason field, select the reason why the invoice request was rejected. This is a required field.

CH A P T E R 232 .
7. In the Notes field, enter any additional information about why the invoice request was rejected or any further instructions for the requestor.
8. Click OK to reject the invoice request. An email is sent to the requestor stating the reason their invoice request was rejected.
Note: Based on the settings defined on the My Account page, you may receive email notifications when your requisition is approved or rejected. For more information about defining email notifications for your account, see “My Account Page” on page 21.
When an invoice request is rejected, it is returned to the requestor. The requestor can open up the rejected request and make the changes necessary for approval, for example, provide receipts for specific expenses. Once the changes are made the requestor can resubmit the invoice request for approval.
View Invoice Records in Accounts PayableOnce an invoice request is approved in WebInvoicing, an invoice is generated in Accounts Payable and an Invoice Request tab appears on the invoice record. The Invoice Request tab displays line item detail, such as the line item description, rate, line item total, and any notes about the invoice request the requestor entered online. If the requestor attached any documents to the invoice, such as scanned receipts, an Attachments link appears and you can download these documents to review.
Information on the Invoice Request tab is for informational purposes only, and cannot be edited. This tab appears only on invoice records that were created online using WebInvoicing.

US E WE BIN V O I C I N G ON L I N E 33.
View Invoice Records in Accounts Payable
1. From Accounts Payable, click Records on the navigation bar and then click the Invoices link. The Invoices page appears.
2. From the Invoices page, click Open an Invoice. The Open screen for invoices appears.
3. In the Find Invoices that meet these criteria frame, enter the criteria you are using to search for the requisition. The criteria you can use includes Vendor name, Vendor ID, Invoice amount, PO number, Post status, Last modified by, and Last modified on.
Tip: To search for invoices created by WebInvoicing, create a query of invoices that begin with “WI”. For more information about queries, see the Query Guide for The Financial Edge.
4. After you enter your search criteria, click Find Now. The program searches your database and displays all invoices that meet your search criteria. Again, depending on how limited or detailed your criteria are, the program may find one record or many records.
5. In the grid, select the invoice you want to open.

CH A P T E R 234 .
6. Click Open. The invoice appears.
7. From the open invoice, select the Invoice Request tab. By default, invoices created from WebInvoicing start with “WI”.
8. The Invoice Request grid displays line item detail, such as the line item description, rate and line item total.

US E WE BIN V O I C I N G ON L I N E 35.
9. To view any items attached to the invoice request, click the Attachments link.
You can select a file from the list download it to your local drive.
10. The Expense Detail\Purpose grid displays any notes the requestor entered online regarding the invoice request.

CH A P T E R 236 .

3CHAPTER
Administrative Tasks
In this chapter
“Manage Active Users” on page 37
“Manage the Email Queue” on page 38
If you have supervisor rights and access The Financial Edge WebPortal, you can perform several administrative tasks through the Administration page. On the Administration page, you can view active users, log users out of WebInvoicing and WebPurchasing, and manage your email queue.
Manage Active UsersOn the Active Users page, you can see who in your organization is using the WebPortal. In addition, you can log out users from the WebPortal on this page.
Manage active users
1. From the WebPortal Home page, under Administration, click View Active Users. The Active Users page appears. This page lists all the users in your organization currently using WebPortal.

CH A P T E R 338 .
Note: In the Activities tab, you can search for a specific user by name, or IP address. In addition, you can sort the list of users by “Last Activity”, “Last Activity (Descending)”, “User Name”, or “IP Address”.
2. To log a user out of WebPortal, click the Remove User button, next to the user name. A message appears to confirm the action. Click Yes and the user is logged out of WebPortal.
3. To log all users out of WebPortal, click Disconnect All Users under the Activities tab. A message appears to confirm the action. Click Yes and all users are logged out of WebPortal.
Manage the Email QueueThe Email Queue page lists all the email messages generated by users in your organization. Through the Email Queue you can see what email messages have been sent or waiting to be sent. You can resend email messages or delete them. Each message listed on the Email Queue is assigned a status:
• “Sent” – The email was sent.
• “Pending” – The email has not been sent.
• “Cancelled” – The WebPortal email service cancelled the email.
• “Errored” – There was a problem linking to the email server.

AD M I N I S T R A TI V E TA S K S 39.
Resend email messages
You can resend email messages with a “Cancelled” or “Errored” status.
1. From the WebPortal Home page, click View Email Queue. The Email Queue page appears.
Note: Sent email messages do not appear on this page. To show all sent email messages, click Show sent Emails under the Activities tab.
2. To resend a specific email, select it from the grid and click the Send button.
3. To resend all email messages, click Send All Emails under the Activities tab. A message appears asking you to confirm the action. Click Yes. This changes all “Cancelled” and “Errored” email messages to “Pending”. The “Pending” email messages are sent during time intervals defined on the Configuration Tool. For more information about the Configuration Tool, see The Installation Guide for WebPortal.
Delete email messages
If you have email messages listed in the queue that are no longer valid, you can delete them.
1. From the WebPortal Home page, click View Email Queue. The Email Queue page appears.
2. To delete a specific email, select it from the grid and click Delete.
3. To delete all email messages, click Delete All Emails. A message appears asking you to confirm the action. Click Yes. This deletes all “Sent”, “Pending”, “Cancelled”, and “Errored” email messages.

CH A P T E R 340 .

41IN D E X .
IndexAaccess
WebInvoicing 20WebPortal 20
Accounts Payable tasksadd security group 2add user 5create vendors 9define approval rules 14define business rules 16define expense categories 10define rejection reasons 13invoice records
view invoice requests 32administration tasks
active users 37email queue 38
approval rulesdefine 14
Bbusiness rules
define 16
Eemail notification 21email queue 38
delete email messages 39resend email messages 39
expense categoriescreate 10
GGL distribution
My Account 21
Iinvoice records
view invoice requests 32invoice requests
approve 29create 23reject 31
rejection reasons 13view 27
Llog in
home page 20
Mmanage active users 37my account page
email notification 21manage 21update 21
Rrejection reasons
define 13
Ssecurity group
add 2add user 5
Vvendors
create 9
WWebInvoicing
approval rules 14approve invoice requests 29business rules 16considerations 1create invoice requests 23expense categories 10home page 20reject invoice requests 31rejection reasons 13security group setup 2setup checklist 2user security setup 5vendors 9view invoice requests 27

IN D E X42 .