user manual - edge products
TRANSCRIPT

Color Touch Screen
Color Screen
User GuideUser Guide
**READ IMPORTANT SAFETY INFORMATION IN THIS MANUAL**
TABLE OF CONTENTS INTRODUCTION PARTS DESCRIPTION OPERATING INSTRUCTIONS INTERNET UPDATES APPENDIX TABLE OF CONTENTS INTRODUCTION PARTS DESCRIPTION OPERATING INSTRUCTIONS INTERNET UPDATES APPENDIX
T A B L E O F C O N T E N T SU S E R G U I D E
2
Table Of ContentsINTRODUCTION ..............................................4
SAFETY WARNING & CAUTION ......................................... 4
SAFETY GUIDELINES ........................................................ 5
LIMITED 1 YEAR WARRANTY ............................................ 6
WARRANTY INFORMATION ............................................... 7
CARB/EPA COMPLIANCE .................................................. 9
PRODUCT REGISTRATION ...............................................10
PRODUCT INFORMATION ................................................10
USING THE MANUAL ........................................................12
PARTS INCLUDED ............................................................13
PARTS DESCRIPTION .................................. 13
OPERATING INSTRUCTIONS ....................... 16CS GAUGE SCREEN LAYOUT ..........................................16
CTS GAUGE SCREEN LAYOUT .........................................17
GAUGE DISPLAY INFORMATION .....................................18GAUGE LAYOUT OPTIONS ............................................. 18
SELECT NEW PID ...................................................... 18
ALERT SETTINGS...................................................... 18
GAUGE COLOR......................................................... 18
PID INFORMATION .................................................... 18
EXIT MENU .............................................................. 18
NAVIGATING THE MAIN MENU ........................................19MENU BUTTONS .......................................................... 19
VIEW CAMERA (CTS) ..................................................... 19
SHOW ALERTS ............................................................ 20
SHOW MAINTENANCE DUE............................................ 21
DIAGNOSTICS ............................................................. 21
TROUBLE CODES ..................................................... 21
MANUAL DPF REGENERATION .................................... 22
TRANSMISSION RELEARN ......................................... 24
PERFORMANCE TESTS .............................................. 24
RECORDS ............................................................... 25
INJECTOR BALANCE RATES ....................................... 25
MILEAGE COACH ...................................................... 26
DATA LOGGING ........................................................ 28
MAINTENANCE MANAGER ............................................. 29
OPTIONS MENU .......................................................... 31
ALERT OPTIONS (SETTINGS) ...................................... 31
SOUND DURATION ................................................... 32
SCREEN LAYOUT ...................................................... 32
BACKLIGHT AUTODIM ............................................... 32

T A B L E O F C O N T E N T S
3
U S E R G U I D E TABLE OF CONTENTS INTRODUCTION PARTS DESCRIPTION OPERATING INSTRUCTIONS INTERNET UPDATES APPENDIX
TABLE OF CONTENTS INTRODUCTION PARTS DESCRIPTION OPERATING INSTRUCTIONS INTERNET UPDATES APPENDIX
MENU TIMEOUT ........................................................ 32
TIRE SIZE ................................................................ 33
ACCESSORY OPTIONS .............................................. 34
UNITS ..................................................................... 35
FACTORY RESET ...................................................... 35
HELP MENU ................................................................ 35
PRODUCT INFO -CS/CTS ............................................ 36
PRODUCT INFO - EAS................................................ 36
VEHICLE INFO ......................................................... 36
CONTACT INFO ........................................................ 36
TECH SUPPORT TOOLS ............................................. 36
EVOLUTION ..................................................................... 37PROGRAMMING ........................................................... 37
USING LEVELS ........................................................ 37
CUSTOM OPTIONS ................................................... 37
POWER LEVELS ........................................................... 39
ATTITUDE ......................................................................... 40POWER LEVELS ........................................................... 40
JUICE CONTROL ......................................................... 40
HOT UNLOCKER .......................................................... 42
PROGRAMMING ........................................................... 42
INSIGHT ........................................................................... 43EFI LIVE™ ................................................................... 43
SMARTY-POD™ ............................................................ 43
USING ACCESSORIES .................................................... 44EAS ........................................................................... 44
JAB (EAS) ............................................................... 44
EGT PROBE (EAS) ..................................................... 44
EGT PROBE [STANDARD] ........................................... 44
EDGE BACKUP CAMERA ............................................... 44
EDGE MOUNTING SOLUTIONS ....................................... 45
CUSTOMIZATION ............................................................. 46BACK GROUND IMAGE ................................................. 46
USING MYSTYLE ...................................................... 47
FUSION UPDATE SOFTWARE ......................................... 48USING THE SOFTWARE ................................................. 48
PROGRAMMING ERRORS .............................................. 50
UPDATE REQUIRED .................................................. 50
NON-STOCK CONDITION ........................................... 50
OEM EGT LOCATIONS ......................................................51
TIPS/TROUBLE SHOOTING ............................................. 54
COMMONLY USED ACRONYMS ...................................... 56
INDEX .............................................................................. 57

U S E R G U I D E
4
U S E R G U I D E
TABLE OF CONTENTS INTRODUCTION PARTS DESCRIPTION OPERATING INSTRUCTIONS INTERNET UPDATES APPENDIX TABLE OF CONTENTS INTRODUCTION PARTS DESCRIPTION OPERATING INSTRUCTIONS INTERNET UPDATES APPENDIX
I N T R O D U C T I O N
S A F E T Y W A R N I N G & C A U T I O NS A F E T Y W A R N I N G & C A U T I O N
SAFETY TERMS
Throughout this User Guide (hereafter noted as User Manual or Manual) you will see important messages regarding your safety or the protection of your vehicle. These messages are designated by the words WARNING or CAUTION.
WARNING indicates a condition that may cause serious injury or death to you, your passengers or others nearby. Pay careful attention to these Warning messages, and always comply with them. They could save a life.
CAUTION indicates a condition that could cause damage to your vehicle. It is important to install and operate your EDGE prod-uct in conformance with instructions in this Manual. Caution alerts you to particularly important things that will keep your vehicle operating properly.
The Edge Product you have bought is a high-performance product. As such, it does present some risks of which you should be fully aware. Do not use this product until you have carefully read the following safety information and the Owner Agreement.
NOTE: After the device has been installed, the screen and logo will appear followed by a warning and compliance directive. To indicate you accept and acknowledge the warning and compli-ance, press the [ENTER] or [YES] button.

U S E R G U I D E TABLE OF CONTENTS INTRODUCTION PARTS DESCRIPTION OPERATING INSTRUCTIONS INTERNET UPDATES APPENDIX
TABLE OF CONTENTS INTRODUCTION PARTS DESCRIPTION OPERATING INSTRUCTIONS INTERNET UPDATES APPENDIX I N T R O D U C T I O N
5
U S E R G U I D E TABLE OF CONTENTS INTRODUCTION PARTS DESCRIPTION OPERATING INSTRUCTIONS INTERNET UPDATES APPENDIX
TABLE OF CONTENTS INTRODUCTION PARTS DESCRIPTION OPERATING INSTRUCTIONS INTERNET UPDATES APPENDIX
S A F E T Y G U I D E L I N E SS A F E T Y G U I D E L I N E S
SAFETY GUIDELINES
1. Do not exceed legal speed limits on public roadways. Use any enhanced speed capabilities of this product only in closed circuit, legally sanctioned racing environments expressly for this purpose. Loss of control from speeding on a public road could seriously injure you, your passengers, or others on the roadway.
2. Do not operate the device while driving. Perform all adjust-ments or changes while stopped. Changing a setting while under way can interfere with your attention to roadway conditions.
3. “ Stacking” performance-enhancing devices or other improper installation can cause power train failure on the road. Other products may have features incompatible with your Edge device. Follow all installation and operating instructions, and do not stack products.
4. Some modifi cations may affect other parts of your vehicle. For example, if you remove/adjust the speed limiter in your vehicle, be sure your tires and other components are rated for the increased speeds they will have to withstand. Not doing so can lead to loss of vehicle control. Modify the speed limiter only for use in closed circuit, legally sanctioned racing environments, not for use on public roadways.
NOTE: Dispose of this product consistent with local codes. Re-turn to your electronics supplier for proper handling.
WARNING Misapplication or misuse of this product could lead to a seri-ous or fatal accident. Comply with all safety information in this manual, and your vehicle owner’s manual. Follow safety, instal-lation and operating instructions in this User Manual to assure proper use.

U S E R G U I D E I N T R O D U C T I O N
6
U S E R G U I D E
TABLE OF CONTENTS INTRODUCTION PARTS DESCRIPTION OPERATING INSTRUCTIONS INTERNET UPDATES APPENDIX TABLE OF CONTENTS INTRODUCTION PARTS DESCRIPTION OPERATING INSTRUCTIONS INTERNET UPDATES APPENDIX
L I M I T E D 1 Y E A R W A R R A N T Y L I M I T E D 1 Y E A R W A R R A N T Y
LIMITED 1 YEAR WARRANTY
Edge Products, LLC, (hereafter “SELLER”) gives Limited Warranty as to description, quality, merchantability, fi tness for any product’s purpose, produc-tiveness, or any other matter of SELLER’s product sold herewith. The SELLER shall be in no way responsible for the product’s open use and service and the BUYER hereby waives all rights other than those expressly written herein. This Warranty shall not be extended or varied except by a written instrument signed by SELLER and BUYER.
The Warranty is Limited to one (1) year from the date of sale and limited solely to the parts contained within the product’s kit. All products that are in question of Warranty must be returned shipping prepaid to the SELLER and must be ac-companied by a dated proof of purchase receipt. All Warranty claims are subject to approval by Edge Products Inc.
Under no circumstances shall the SELLER be liable for any labor charged or travel time incurred in diagnosis for defects, removal, or reinstallation of this product, or any other contingent expenses.
If the BUYER sends back a failed unit that is out of warranty and chooses to buy a refurbished unit, the refurbished unit will only carry a 90 day warranty. If the BUYER purchases a new unit at a predetermined discounted rate, it will have the standard 1 year warranty.
Under no circumstances will the SELLER be liable for any damage or expenses insured by reason of the use or sale of any such equipment.
THE INSTALLATION OF THIS PRODUCT INDICATES THAT THE BUYER HAS READ AND UNDERSTANDS THIS AGREEMENT AND ACCEPTS ITS TERMS AND CONDITIONS.
IN THE EVENT THAT THE BUYER DOES NOT AGREE WITH THIS AGREEMENT, THE BUYER MAY PROMPTLY RETURN THIS PROD-UCT, IN A NEW AND UNUSED CONDITION, WITH A DATED PROOF OF PURCHASE, TO THE PLACE OF PURCHASE WITHIN THIRTY (30) DAYS FROM DATE OF PURCHASE FOR A FULL REFUND.
NOTE: This warranty is void for any new products purchased through auction web sites. Warranty is valid only for new products purchased through Autho-rized Dealers (proof of purchase required for all warranty claims).

U S E R G U I D E TABLE OF CONTENTS INTRODUCTION PARTS DESCRIPTION OPERATING INSTRUCTIONS INTERNET UPDATES APPENDIX
TABLE OF CONTENTS INTRODUCTION PARTS DESCRIPTION OPERATING INSTRUCTIONS INTERNET UPDATES APPENDIX I N T R O D U C T I O N
7
U S E R G U I D E TABLE OF CONTENTS INTRODUCTION PARTS DESCRIPTION OPERATING INSTRUCTIONS INTERNET UPDATES APPENDIX
TABLE OF CONTENTS INTRODUCTION PARTS DESCRIPTION OPERATING INSTRUCTIONS INTERNET UPDATES APPENDIX
W A R R A N T Y I N F O R M A T I O NW A R R A N T Y I N F O R M A T I O N
IMPORTANT INFORMATION ABOUT YOUR VEHICLE’S WARRANTY
Many of our customers ask, “Will your product void my vehicle’s manufac-turer’s warranty?” While the answer is straightforward from a legal standpoint, it’s important to educate our customers (and all aftermarket consumers) on some industry realities and offer some common sense precautions to minimize your risk. Edge is committed to providing quality products that are safe to use. Our products do not cause damage to a vehicle when used as intended.
CAUTION: Operate your vehicle within manufactures recommended load and weight limits as shown in the Manufactures Operator Manual. Please keep in mind that towing in anything higher than the towing level and hard driving in race or extreme performance levels using Edge products is not recommended. Consumers of aftermarket products are protected by the Federal Magnusson-Moss Warranty Act. The Act states that if something breaks on your vehicle and you take it in for warranty repair, the dealer must honor your warranty unless whatever modifi cations you have added to your vehicle actually caused the prob-lem in question.
However, the reality is that many dealerships have been known to void warran-ties on vehicles that use aftermarket products as a matter of policy. This applies in particular to those aftermarket products that produce horsepower, such as performance enhancement “chips,” modifi ed intake manifolds, or aftermarket exhaust systems, regardless of product brand.
You have strong legal protection as a consumer in regard to your vehicle’s war-ranty. However, Edge strongly recommends you always disconnect and remove your module/programmer and monitor when you take your vehicle to a dealer for warranty work. In addition, leaving the product connected may affect dealer diagnostic analysis and scan tool functions. Edge makes every effort to produce product that can be easily removed.
NOTE: Even if you disconnect your unit, your dealer can detect the use of any programmer—even if the unit has been removed.
Thank you for purchasing the Edge CS/CTS products. The CS and CTS products have been developed and produced from the highest quality materials available to ensure the best performance for years to come. If you have any concerns or questions, please contact us.

U S E R G U I D E I N T R O D U C T I O N
8
U S E R G U I D E
TABLE OF CONTENTS INTRODUCTION PARTS DESCRIPTION OPERATING INSTRUCTIONS INTERNET UPDATES APPENDIX TABLE OF CONTENTS INTRODUCTION PARTS DESCRIPTION OPERATING INSTRUCTIONS INTERNET UPDATES APPENDIX
SERVICE CENTER AND COMPATIBILITY CAUTIONS
CAUTION: RETURN YOUR VEHICLE TO STOCK BEFORE TAKING IT TO A SERVICE CENTER. All Edge modules and programmers are built to operate with OEM calibrations. If you take your vehicle to a service center they may, by your request or otherwise, update your vehicle’s calibrations. If this happens and your vehicle has not been returned to stock your device will no longer be capable of programming your vehicle. Therefore it is important that you return your vehicle to stock before taking it in for service. Edge updates its active products (i.e. those currently being manufactured) to work effectively with updated OEM calibrations. However, this process can take some time as Edge is not always made aware of calibration changes made by the OEM. In the case of discontinued products, Edge cannot ensure that your unit will work effectively if you take your vehicle to a dealership and you are given, by your request or otherwise, a new calibration.
CAUTION: If you have used another tuner/programmer on your vehicle, you will need to program the vehicle back to stock and remove the device before using the Edge Product. Failure to return to stock may result in PCM failure or engine damage. Programming your vehicle may expose existing defects in the vehicle’s PCM that could disable your vehicle. It is advised that you do not program your vehicle in remote locations in case of vehicle failure.
CAUTION: The Evolution programmer was developed on a stock vehicle with no aftermarket bolt-on parts; as such, the performance changes implemented by the Evolution may not be compatible with certain aftermarket power add-ons. See below for a brief explanation of how the Evolution tuning may be affected by certain aftermarket devices.
COLD AIR INTAKE (CAI) KITSMost modern-day vehicles use a Mass Air Flow (MAF) sensor. The MAF sensor is generally located in the intake tube close to the factory air box. MAF sensors play a key role in determining the amount of fuel an engine needs at any given throttle position. MAF sensors are precisely calibrated for the factory intake systems; changes in intake tube diameter, sensor placement, or fi lter fl ow characteristics can adversely affect the reading from the MAF sensor. Most of the CAI kits on the market change intake tube diameter, sensor placement, or fi lter restriction. These changes may cause the sensor to command leaner fuel conditions. Most of the CAI kits on the market are developed on stock vehicles, where a leaner fuel curve may be acceptable. Due to the fact that the evolu-tion already alters the vehicle’s fueling strategies, CAI kits that create a leaner condition used in conjunction with the Evolution may cause the vehicle to run excessively lean. Excessively lean conditions can cause pre-ignition which can lead to detonation, a condition that could potentially damage an engine.

U S E R G U I D E TABLE OF CONTENTS INTRODUCTION PARTS DESCRIPTION OPERATING INSTRUCTIONS INTERNET UPDATES APPENDIX
TABLE OF CONTENTS INTRODUCTION PARTS DESCRIPTION OPERATING INSTRUCTIONS INTERNET UPDATES APPENDIX I N T R O D U C T I O N
9
U S E R G U I D E TABLE OF CONTENTS INTRODUCTION PARTS DESCRIPTION OPERATING INSTRUCTIONS INTERNET UPDATES APPENDIX
TABLE OF CONTENTS INTRODUCTION PARTS DESCRIPTION OPERATING INSTRUCTIONS INTERNET UPDATES APPENDIX
There are currently a large number of CAI kits on the market. These kits are de-signed to improve air fl ow and temperature. Some of these kits may be compat-ible with the Evolution programmer; however others may cause a lean condition when used in conjunction with the Evolution tuning.
MECHANICAL MODIFICATIONSMechanical modifi cations such as headers, upgraded camshafts, displacement changes, cylinder head improvements etc. will change the airfl ow characteristics of an internal combustion engine. The Evolution is not tailored to take advan-tage of these modifi cations, for the best results we recommend vehicle specifi c custom tuning.
FORCED INDUCTION (TURBOCHARGERS OR SUPER-CHARGERS)Turbochargers and Superchargers drastically change the dynamics/performance of the engine, and its fueling/timing needs. Additional hard parts and custom tuning are required to run a forced induction system on an engine that was origi-nally designed as a Naturally Aspirated (NA) engine. The Evolution does not support the addition of an aftermarket forced induction kit.
C A R B /C A R B / E P A C O M P L I A N C EE P A C O M P L I A N C E
This product meets the emissions compliance require-ments of the California Air Resources Board and Fed-eral Environmental Protection Agency and is legal for sale and use on pollution-controlled vehicles operated on public streets and highways. It must be installed and operated according to the instructions provided in this user’s manual. Included with this product is a sticker like the one pictured for you to keep in your vehicle. You can either apply it somewhere on the vehicle (e.g., the inside end of driver’s door) or simply store it in your glove box. The purpose of these stickers is to inform anyone who may have questions regarding the use of your Edge product and how it affects emissions. For example, it would be something to show an emissions technician if questioned when taking your vehicle in for an emissions check to let him/her know the product is CARB emissions compliant.
NOTE: The stickers included in some products apply to products that have received CARB certifi cation for emissions compliance.
U S E R G U I D E I N T R O D U C T I O N
10
U S E R G U I D E
TABLE OF CONTENTS INTRODUCTION PARTS DESCRIPTION OPERATING INSTRUCTIONS INTERNET UPDATES APPENDIX TABLE OF CONTENTS INTRODUCTION PARTS DESCRIPTION OPERATING INSTRUCTIONS INTERNET UPDATES APPENDIX
INTRODUCING THE CS AND CTS MODELSFrom the pioneers in display-based technology and engine performance manage-ment, comes the CS (Color Screen) and CTS (Color Touch Screen) for popu-lar late model vehicles. Edge has reinvented 3 of its most popular lines – the Evolution, Juice/Attitude, and Insight– with an all-new look and exclusive new features.
THE BREAKDOWNThree product lines, two screen options. It’s just that simple. Edge has taken its best-known products – the Evolution, Juice/Attitude, and Insight, – and given them a fresh look, improved features and benefi ts, and pricing that will make the competition obsolete. Consumers can pick the product that suits their needs and then choose the screen option that best fi ts them.
P R O D U C T I N F O R M A T I O NP R O D U C T I N F O R M A T I O N
PLEASE take the time to register your product on line at: www.edgeproducts.com. Follow the instructions at link: http://www.edgeproducts.com/product_registration.php
BENEFITS OF PRODUCT REGISTRATION
-Your Safety - Registering your product allows us to know exactly which product you have and provide important product updates to you that improve the quality and/or safety of the product.
-Enhanced Features - Almost all Edge products are easily updated via the in-ternet. We are constantly adding new features and improvements to our product that we know you will want to enjoy.
-Confi rmation of Ownership - Provides a record in case of product loss, theft, or required warranty work. When you call us for support our team will already have much of the information they need to help you.
-Improved Product Development - Helps us better understand you (our cus-tomers) and design products that meet your needs.
-Special Offers - Allows us to inform you about special offers on accessories and/or new products that fi t your vehicle and enhance your driving experience.
P R O D U C T R E G I S T R A T I O NP R O D U C T R E G I S T R A T I O N
U S E R G U I D E TABLE OF CONTENTS INTRODUCTION PARTS DESCRIPTION OPERATING INSTRUCTIONS INTERNET UPDATES APPENDIX
TABLE OF CONTENTS INTRODUCTION PARTS DESCRIPTION OPERATING INSTRUCTIONS INTERNET UPDATES APPENDIX I N T R O D U C T I O N
11
U S E R G U I D E TABLE OF CONTENTS INTRODUCTION PARTS DESCRIPTION OPERATING INSTRUCTIONS INTERNET UPDATES APPENDIX
TABLE OF CONTENTS INTRODUCTION PARTS DESCRIPTION OPERATING INSTRUCTIONS INTERNET UPDATES APPENDIX
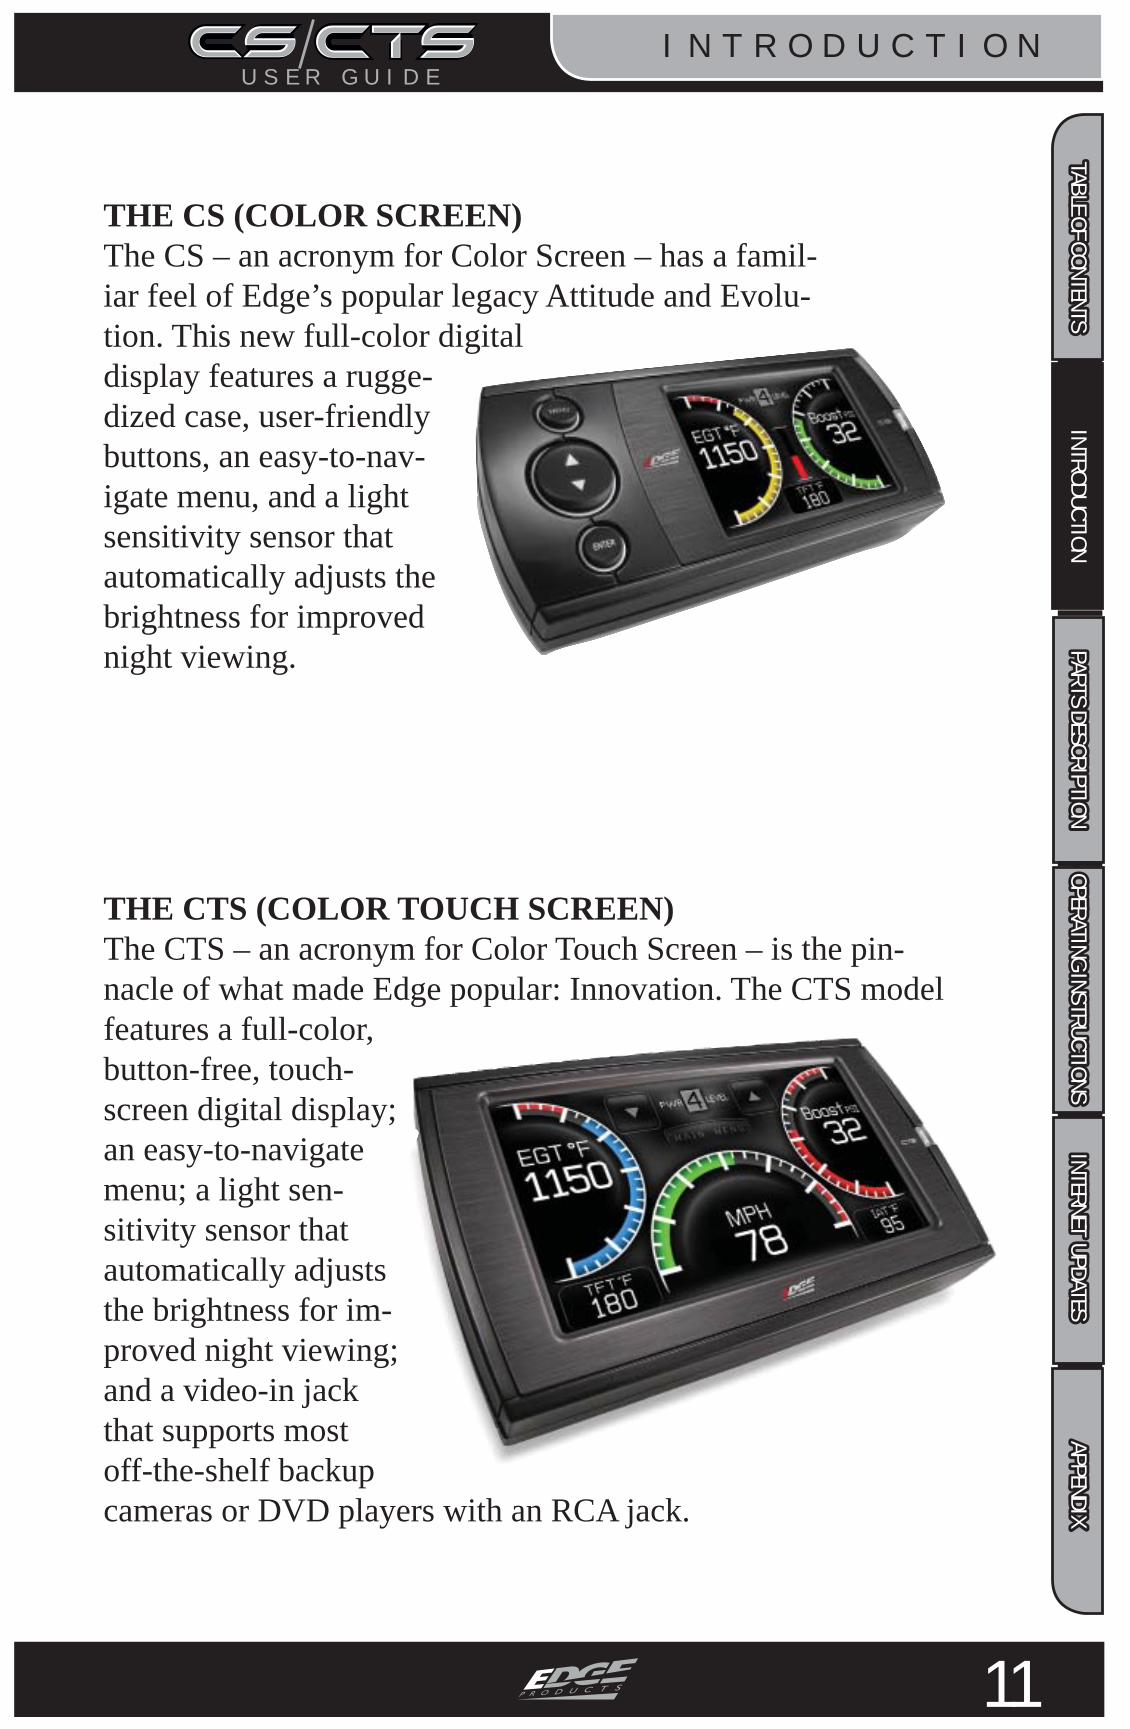
THE CS (COLOR SCREEN)The CS – an acronym for Color Screen – has a famil-iar feel of Edge’s popular legacy Attitude and Evolu-tion. This new full-color digital display features a rugge-dized case, user-friendly buttons, an easy-to-nav-igate menu, and a light sensitivity sensor that automatically adjusts the brightness for improved night viewing.
THE CTS (COLOR TOUCH SCREEN)The CTS – an acronym for Color Touch Screen – is the pin-nacle of what made Edge popular: Innovation. The CTS model features a full-color, button-free, touch-screen digital display; an easy-to-navigate menu; a light sen-sitivity sensor that automatically adjusts the brightness for im-proved night viewing; and a video-in jack that supports most off-the-shelf backup cameras or DVD players with an RCA jack.
U S E R G U I D E I N T R O D U C T I O N
12
U S E R G U I D E
TABLE OF CONTENTS INTRODUCTION PARTS DESCRIPTION OPERATING INSTRUCTIONS INTERNET UPDATES APPENDIX TABLE OF CONTENTS INTRODUCTION PARTS DESCRIPTION OPERATING INSTRUCTIONS INTERNET UPDATES APPENDIX
For specifi c information regarding horsepower, torque, and other features available for this product: 1. Go to www.edgeproducts.com2. Type the part number of your product in the “KEYWORD/PART# SEARCH” and press enter.3. Click the link under “Description”4. Scroll down to the “DOWNLOAD VEHICLE SPECIFIC HORSEPOWER, TORQUE, AND FEATURES CHART” link and click on it.5. Find the information that is specifi c to your make and model.
This manual includes coverage of the best known Legacy Edge Products – the Evolution, Juice/Attitude, and Insight. You may be familiar with the products and this manual will help you navigate through their operation on the CS/CTS device platform. Most of the menus, features and operation are similar and common to each other for the various products. When features or operation are different, the various sections or paragraphs will be identifi ed to the product. (e.g., Evolution, At-titude, Insight...). Look for those pages or sections related to your product and then choose the screen, features or option that best fi t your needs.NOTE: The display screens, menu items and operating instruc-tions contained in the following pages are meant to cover a wide variety of CS/CTS devices (Evolution, Attitude, Insight, ect.) as well as multiple vehicles (Ford, Chevy, Dodge). Every menu and feature is not shown in detail for each device, but selection and changes are made in a similar manner using the different devices. Also, some of the options/features covered in the operat-ing instructions may not apply to your device or vehicle. Your CS/CTS device will display only the menus, options and features that are unique to your device and those features and options your vehicle’s computer system is capable of executing. As such, not every menu and screen is explained in this manual. Most are user intuitive and similar in functionality.
U S I N G T H E M A N U A LU S I N G T H E M A N U A L

P A R T S D E S C R I P T I O N
13
U S E R G U I D E TABLE OF CONTENTS INTRODUCTION PARTS DESCRIPTION OPERATING INSTRUCTIONS INTERNET UPDATES APPENDIX
TABLE OF CONTENTS INTRODUCTION PARTS DESCRIPTION OPERATING INSTRUCTIONS INTERNET UPDATES APPENDIX
P A R T S I N C L U D E DP A R T S I N C L U D E D
Supplied Items Suggested Tools1. CS or CTS Device2. Arkon Windshield Mount3. OBDII Cable4. Mini USB Cable5. Alcohol Wipe6. Zip Tie Packet
• Flat head screwdriver• Cutting Pliers
1
2 3
4 5
6

P A R T S D E S C R I P T I O N
14
U S E R G U I D E
TABLE OF CONTENTS INTRODUCTION PARTS DESCRIPTION OPERATING INSTRUCTIONS INTERNET UPDATES APPENDIX TABLE OF CONTENTS INTRODUCTION PARTS DESCRIPTION OPERATING INSTRUCTIONS INTERNET UPDATES APPENDIX
NOTE: The Parts Description section of this manual describes each of the main parts included in your CS/CTS kit both physi-cally as well as functionally. Refer to the “CS/CTS Quick install Guide” for proper installation and windshield mounting.
CTS DEVICEThe CTS device provides you with an in-terface to change the performance program-ming on your vehicle as well as gives you a multi-color touch screen display which allows you to monitor multiple vehicle parameters in real time. It is equipped with a large touch screen, a USB port (for PC communication and electronic updates), a 16-pin connector (for main vehicle communication), a video-in jack, and a six-pin accessories connector which allows you to fur-ther extend the capabilities of the device (see the accessories page in the back of the manual).
CS DEVICEThe CS device provides you with an interface to change the performance programming on your vehicle as well as gives you a multi-color screen display which allows you to monitor multiple vehicle parameters in real time. It is equipped with a full color screen, a Menu button, Up and Down Arrow button, an Enter button, USB port (for PC communication and electronic up-dates), a 16-pin connector (for main vehicle communication), and a six-pin connector.

P A R T S D E S C R I P T I O N
15
U S E R G U I D E TABLE OF CONTENTS INTRODUCTION PARTS DESCRIPTION OPERATING INSTRUCTIONS INTERNET UPDATES APPENDIX
TABLE OF CONTENTS INTRODUCTION PARTS DESCRIPTION OPERATING INSTRUCTIONS INTERNET UPDATES APPENDIX
MINI USB CABLEThe USB cable is used to connect your device to your PC in order to perform fi rmware and calibration updates using Edge Products Fusion software.
ALCOHOL PADThe alcohol pad is supplied for cleaning the windshield prior to mounting the suction cup equipped Arkon mount.
ZIP TIESThe zip tie packet contains zip ties to help you secure the OBDII cable out of the way under the dash.
CS/CTS OBDII ConnectorThe OBDII connector/cable has two plugs, a smaller male 16-pin plug that connects to the back of your device, and a larger rectangle style 16-pin male connec-tor which connects to the OBDII port located under the driver’s side dashboard. The purpose of this connector is to provide a com-munication link between your vehicle and your device as well as provide a power and ground source. (NOTE: This cable must be plugged into both the OBDII port as well as the CS/CTS in order for the Display to function.
CS/CTS WINDSHIELD MOUNTThe windshield mount supplied with your CS/CTS kit is designed to give you fl exibility in mounting your device anywhere you’d like on your windshield. It is equipped with a locking suction cup, a vertically adjustable arm, and a 180 pivot head which allows you to fi ne tune the viewing angle to your preference.

O P E R A T I N G I N S T R U C T I O N S
16
U S E R G U I D E
TABLE OF CONTENTS INTRODUCTION PARTS DESCRIPTION OPERATING INSTRUCTIONS INTERNET UPDATES APPENDIX TABLE OF CONTENTS INTRODUCTION PARTS DESCRIPTION OPERATING INSTRUCTIONS INTERNET UPDATES APPENDIX
1. Up/Down Arrow Button - On the ATTITUDE gauge screen these buttons are used to toggle the power level up/down. The EVOLUTION gauge screen may use these buttons in future feature enhancements. The INSIGHT uses these to adjust power levels when using EFILive™ and Smarty POD™. In the menus these buttons are used to select the menu items and increase or decrease values.
2. Menu Button - The menu button gives you access to the main menu or can be used to exit out of a menu screen.
3. Left Gauge - The left analog gauge. The displayed parameter for all gauges can be changed by pressing the enter button, choosing the desired gauge, and selecting a diff erent parameter from the list.
4. Alert Indicator - The alert indicator light will illuminate (red) when an alert limit is exceeded. When this light contains an “R,” it indicates that your Diesel Particulate Filter ( DPF) equipped vehicle is performing a regeneration cycle. If the light is blue and contains a wrench your Maintenance Manager is letting you know a maintenance item is ready to be serviced.
5. Power Level Indicator - The power level indicator represents the current power level. 0 represents stock. I stands for Insight which produces no ad-ditional horsepower.
6. Back-down Indicator - (ATTITUDE with JUICE) The back-down indicator light will illuminate (yellow) when the Juice module is decreasing power added by the device, when approaching or exceeding the back-down set point limit.
7. Right Gauge - The right analog gauge.8. Enter Button - The enter button when pressed from the main screen will
allow you to change the gauge parameters (PID, Alert Settings, and Gauge Color). In the menus it allows you to select the highlighted option.
9. Center Gauge - The center gauge.
654
9
2
8
1 73
Figure 1
C S G A U G E C S G A U G E S C R E E N L A Y O U TS C R E E N L A Y O U T

O P E R A T I N G I N S T R U C T I O N S
17
U S E R G U I D E TABLE OF CONTENTS INTRODUCTION PARTS DESCRIPTION OPERATING INSTRUCTIONS INTERNET UPDATES APPENDIX
TABLE OF CONTENTS INTRODUCTION PARTS DESCRIPTION OPERATING INSTRUCTIONS INTERNET UPDATES APPENDIX
5 3
10
32
8
1
9
764
1. Main Menu button - The main menu button gives you access to the main menu.
2. Left Gauge - The left analog gauge. The displayed parameter for all gauges can be changed by simply touching the gauge and choosing a diff er-ent parameter from the list. Use this menu to choose a new PID, change alert settings, and choose a new gauge color.
3. Up/Down Arrow Buttons - On the ATTITUDE gauge screen these buttons are used to toggle the power level up/down. The EVOLUTION gauge screen may use these buttons in future feature enhancements. The INSIGHT uses these to adjust power levels when using EFILive™ and Smarty POD™. In the menus these buttons are used to select the menu items and increase or decrease values.
4. Alert Indicator - The alert indicator light will illuminate (red) when an alert limit is exceeded. When this light contains an “R,” it indicates that your Diesel Particulate Filter ( DPF) equipped vehicle is performing a regeneration cycle. If the light is blue and contains a wrench your Maintenance Manager is letting you know a maintenance item is ready to be serviced.
5. Power Level Indicator - The power level indicator represents the current power level. 0 represents stock. I stands for Insight which produces no ad-ditional horsepower.
6. Back-down Indicator - (ATTITUDE with JUICE) The back-down indicator light will illuminate (yellow) when the Juice module is decreasing power added by the device, when approaching or exceeding the back-down set point limit.
7. Right Gauge - The right analog gauge.8. Lower Left Gauge - The lower left digital gauge. 9. Center Gauge - The Center analog gauge.10. Lower Right Gauge - The lower right digital gauge.
Figure 2
C T S G A U G E C T S G A U G E S C R E E N L A Y O U TS C R E E N L A Y O U T

O P E R A T I N G I N S T R U C T I O N S
18
U S E R G U I D E
TABLE OF CONTENTS INTRODUCTION PARTS DESCRIPTION OPERATING INSTRUCTIONS INTERNET UPDATES APPENDIX TABLE OF CONTENTS INTRODUCTION PARTS DESCRIPTION OPERATING INSTRUCTIONS INTERNET UPDATES APPENDIX
This feature allows you to adjust gauge display informa-tion directly from the main gauge screen. To adjust what the gauge displays, follow these instructions:
1. CTS - While viewing the main gauge screen, touch the gauge you would like to modify. 2. CS - While viewing the main gauge screen, press the enter button and select the gauge location you would like to modify.
The following screen will appear.
Engine Coolant Temp
Gauge ColorPID InformationExit Menu
Alert SettingsSelect New PID
Engine Coolant Temp
Gauge ColorPID InformationExit Menu
Alert SettingsSelect New PID
MENU
ENTER
(Figure 2.1)
S E L E C T N E W P I DSelect the PID that you would like to monitor from the pro-vided list.
GAUGE LAYOUT OPTIONS A L E R T S ET T I N G SFor more information, refer to the “ALERT OPTIONS (SETTINGS)” section under the “OPTIONS MENU” sec-tion of this manual.
G A U G E C O LO RChoose a color from the list. This will modify the gauge in-dicator. NOTE: Only Analog gauges can be modifi ed.
P I D I N F O R M AT I O NThis briefl y explains what the selected PID is and/or what it monitors.
E X I T M E N UBrings you back to the main gauge screen.
G A U G E D I S P L A Y I N F O R M A T I O NG A U G E D I S P L A Y I N F O R M A T I O N

O P E R A T I N G I N S T R U C T I O N S
19
U S E R G U I D E TABLE OF CONTENTS INTRODUCTION PARTS DESCRIPTION OPERATING INSTRUCTIONS INTERNET UPDATES APPENDIX
TABLE OF CONTENTS INTRODUCTION PARTS DESCRIPTION OPERATING INSTRUCTIONS INTERNET UPDATES APPENDIX
N A V I G A T I N G T H E M A I N M E N UN A V I G A T I N G T H E M A I N M E N U
ATTITUDE
Figure 3
EVOLUTION
Figure 4
INSIGHT
Figure 5
NOTE: The following will only show under certain circumstances:1. “View Camera” will only show if a camera is plugged into the video jack located on the back side of the CTS. Does not apply to CS.2. “Show Alerts” will only show if an alert is active. 3. “Show Maintenance Due” will only show if your Maintenance Manager is turned on and a maintenance item is due.
MENU BUTTONSBoth the CS and CTS devices provide you with the following three buttons for navigating the menu system:
Menu: The Menu button allows you to enter the main menu. Once you are in the main menu you’ll use the Menu button to return to the previous screen. UP/Down Arrow: The Up/Down Arrow button will allow you to toggle up or down through the menu options, you’ll notice it highlights each option as you toggle. Enter: Pressing the enter Button will select the currently high-lighted option.
NOTE: With the CTS device you can simply touch the option you’d like to select on the menu screen. As a touch screen device it will automati-cally select the option you’ve touched and advance you to the selected option screen.
VIEW CAMERA (CTS)NOTE: If you have a back-up camera or other RCA device connected to the CTS, the view camera menu item will be
O P E R A T I N G I N S T R U C T I O N S
20
U S E R G U I D E
TABLE OF CONTENTS INTRODUCTION PARTS DESCRIPTION OPERATING INSTRUCTIONS INTERNET UPDATES APPENDIX TABLE OF CONTENTS INTRODUCTION PARTS DESCRIPTION OPERATING INSTRUCTIONS INTERNET UPDATES APPENDIX
active within the main menu. 1. Selecting “View Camera” in the “Main Menu” list, will allow you to view the camera image. If you would like to stop viewing the camera image, touch the screen and the main gauge screen will re-appear.
WARNING: Do not rely solely on the camera image for backing up. It is possible for the camera image to freeze. Always use your mirrors, and look behind you before backing up. Objects in the view may be closer than they appear. If you are using a camera not manufac-tured by Edge Products, the image may be reversed.
SHOW ALERTSThe CS/CTS device is equipped with an alert system that notifi es the user when vehicle param-eters are outside a user-defi ned value. There are a few ways the CS/CTS alerts are indicated and accessed:
MAIN SCREEN METHODIf one of your gauges on the main screen (Refer to Figures 1 & 2) contains the alert parameters, 2 things will occur: 1. The alert notifi cation will sound only if it is turned on. (Sound will turn off after a few seconds
depending on the sound duration you have set)2. The gauge back-light will fl ash. (Will continue fl ashing as long as the parameter is outside the user-defi ned value)NOTE: The alert sound and fl ashing will discontinue once parameter is no longer out of the user-defi ned value.
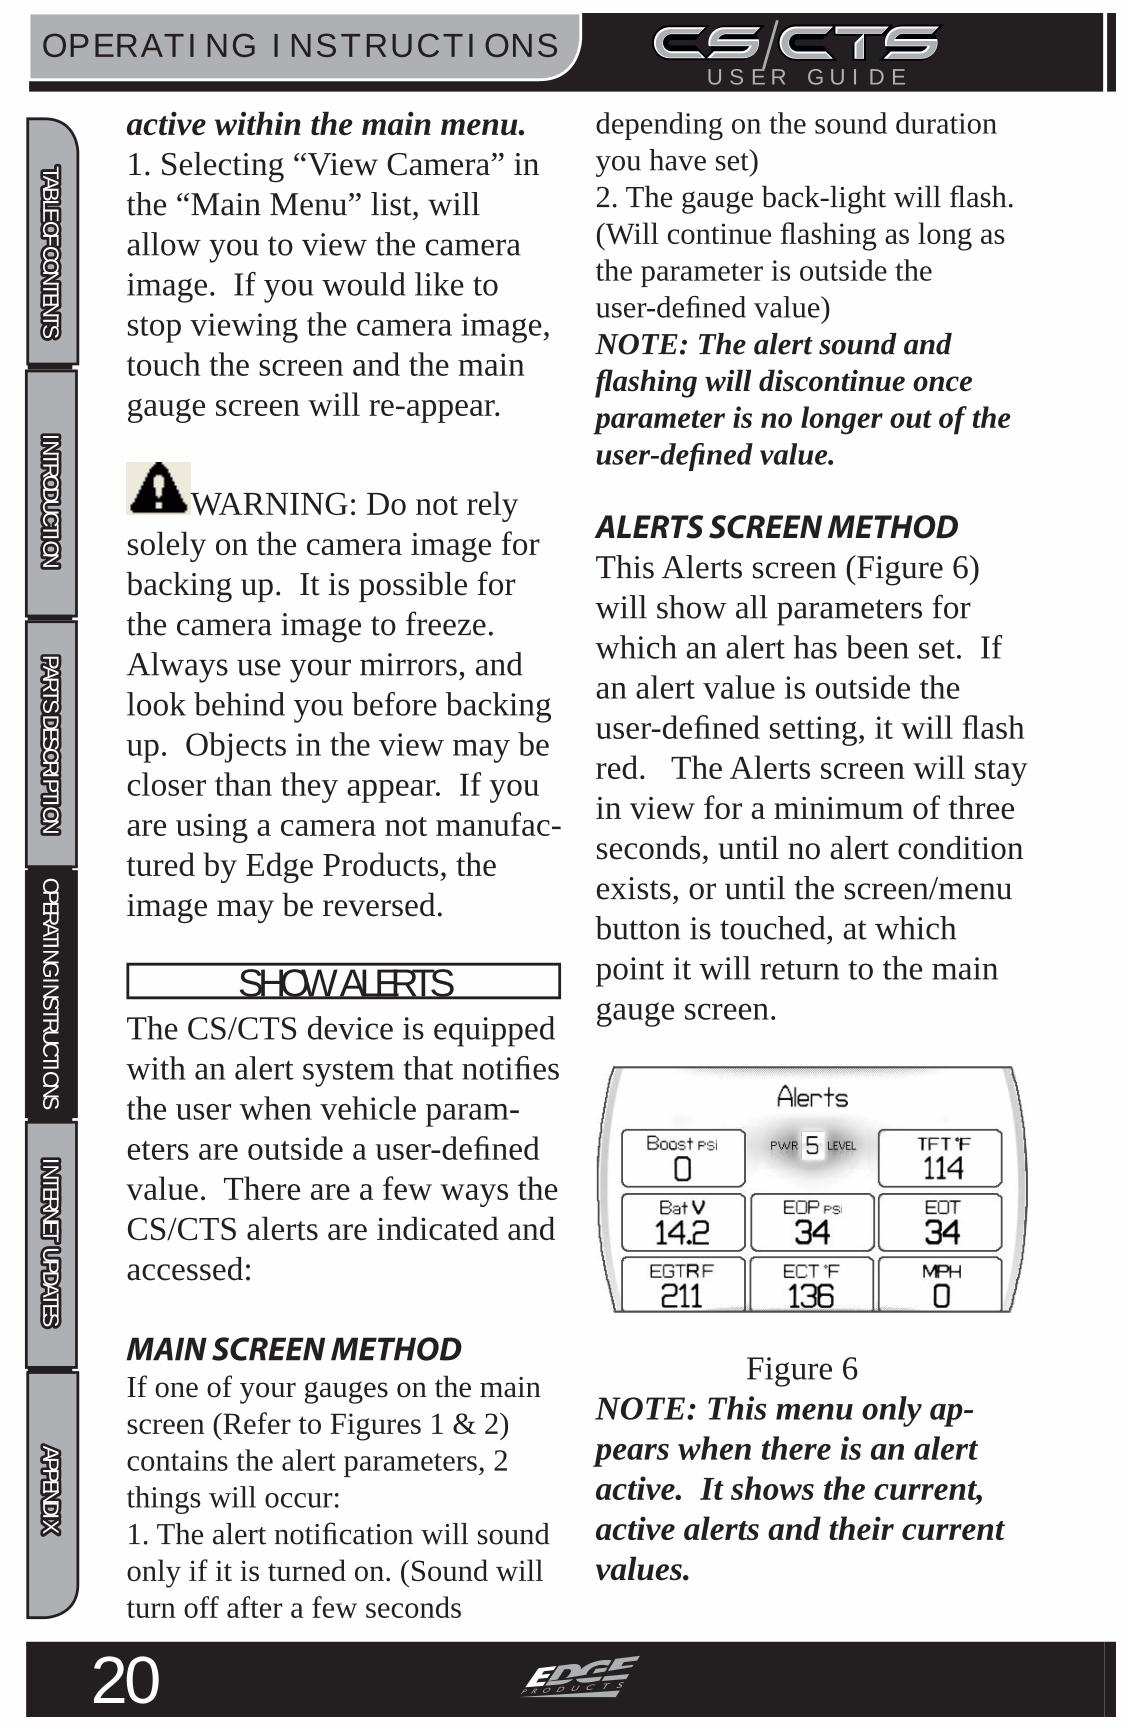
ALERTS SCREEN METHODThis Alerts screen (Figure 6) will show all parameters for which an alert has been set. If an alert value is outside the user-defi ned setting, it will fl ash red. The Alerts screen will stay in view for a minimum of three seconds, until no alert condition exists, or until the screen/menu button is touched, at which point it will return to the main gauge screen.
Figure 6NOTE: This menu only ap-pears when there is an alert active. It shows the current, active alerts and their current values.

O P E R A T I N G I N S T R U C T I O N S
21
U S E R G U I D E TABLE OF CONTENTS INTRODUCTION PARTS DESCRIPTION OPERATING INSTRUCTIONS INTERNET UPDATES APPENDIX
TABLE OF CONTENTS INTRODUCTION PARTS DESCRIPTION OPERATING INSTRUCTIONS INTERNET UPDATES APPENDIX
If you have exited the Alerts screen (Figure 6) you can return to the screen by entering the “Main Menu” and selecting the “Show Alerts”.
NOTE: For more information on how to set the Alerts, Refer to the: “ALERT SETTINGS (OR OPTIONS)” section of this manual.
SHOW MAINTENANCE DUEThis feature allows you to quickly view which Mainte-nance Item is up for service. Refer to the MAINTENANCE MANAGER section of this manual for more information.
DIAGNOSTICS
Figure 7
NOTE: Not all options in Figure 7 will be available. The availability of these options will vary due to the product you purchased and your vehicle.
T R O U B L E C O D E SWhen your PCM detects a problem with your vehicle it sets a trouble code. Use this menu item to retrieve the code, and to clear it after retrieval. See Figure 8.
Figure 8
The diagnostics scanner includ-ed with the CS and CTS devices is a powerful tool that allows you to view and clear Diagnos-tic Trouble Codes (DTCs) on your vehicle. DTCs are the messages your vehicle’s com-puter stores when it detects a problem with your vehicle. The “Check Engine” light on your dash is activated by the pres-ence of most DTCs (some DTCs may not set a check engine light).
READ DTCsIf you want to read the DTCs on your vehicle follow these instructions:1. Make sure the Key is in the ON position.
O P E R A T I N G I N S T R U C T I O N S
22
U S E R G U I D E
TABLE OF CONTENTS INTRODUCTION PARTS DESCRIPTION OPERATING INSTRUCTIONS INTERNET UPDATES APPENDIX TABLE OF CONTENTS INTRODUCTION PARTS DESCRIPTION OPERATING INSTRUCTIONS INTERNET UPDATES APPENDIX
2. Select the Trouble Codes from the Diagnostics menu. 3. Select Read DTCs from the menu.
CLEAR DTCsAfter you have retrieved the trouble codes and written them down, you can clear the trouble codes by selecting Clear DTCs from the menu. This will erase any of the codes currently set. If the codes come back we recommend you see a qualifi ed mechanic who can accurately diagnose/repair the problem. CLEAR ON STARTThis feature is not available on all products. In some instances, trouble codes may need to be cleared every time the truck starts or the truck will go into limp mode. When using this feature, follow all on-screen instructions.
NOTE: Fords and Chevy’s are able to clear codes while the truck is running. Dodge trucks may require you to clear only when the key is on and the engine is not running.
CLEAR DTCs DELAYThis option is not available on all products. The delay sets the time the Juice waits to clear
DTC’s on start (after key on).
M A N U A L D P F R E G E N E R AT I O NManual regeneration allows you to manually clear out the DPF. This can be helpful prior to heavy towing, racing, or prior to going off road in dead or dry shrubs/grass.Completing a manual regenera-tion cycle will clear the soot mass in the fi lter, and lower ex-haust back pressure/free up ex-haust fl ow. It will be helpful to do this before any competition such as drag racing or tractor pulling. It’s also helpful to use if you’re going to be in a situa-tion where you don’t want the truck computer to initiate the Active Regeneration cycle on it’s own, (i.e. heavy towing, or driving where dry grass, shrubs, or other combustibles are pres-ent). You can do this by: 1. Selecting the Manual Regen option in the Diagnostics menu. (Figure 7) When manually initiating a re-generation cycle some vehicles will require a drive cycle (i.e. you have to drive the vehicle some distance) while others may allow you to initiate a Ser-vice Regeneration where you can leave the vehicle parked and engine running. If the latter is the case, be sure to use the

O P E R A T I N G I N S T R U C T I O N S
23
U S E R G U I D E TABLE OF CONTENTS INTRODUCTION PARTS DESCRIPTION OPERATING INSTRUCTIONS INTERNET UPDATES APPENDIX
TABLE OF CONTENTS INTRODUCTION PARTS DESCRIPTION OPERATING INSTRUCTIONS INTERNET UPDATES APPENDIX
following guidelines:1. Park the vehicle outdoors and keep people, other vehicles, and combustible material away from it.2. Do not leave the vehicle unattended. 3. Do not connect any shop exhaust hoses or vents to the tail pipe.CAUTION: Exhaust tempera-tures may be greater than 300 C (572 F)during service regeneration.CAUTION: Due to the elevated temperatures during this procedure, open the hood and keep the front of the vehicle away from anything impeding air fl ow to the radiator.
DPF REGENERATIONIf you own a newer diesel powered vehicle, your vehicle is equipped with a diesel particu-late fi lter ( DPF). This fi lter is used in conjunction with a die-sel oxidation catalyst. Together they work to reduce the amount of soot and emissions emitted from the tailpipe. As soot builds up in the DPF it will begin re-stricting the fi lter. The soot that gathers is automatically purged in one of two ways: Passive Regeneration & Active Regen-eration. Both methods occur automatically and require no ac-
tion on your part. During either of these regeneration methods, you may notice an increase or change in the exhaust noise & increased EGT. PASSIVE REGENERATION Passive regeneration occurs when the exhaust temperature ( EGT) reaches an appropri-ate level in order to oxidize or burn soot to clean the DPF. This method can happen as a result of normal engine operat-ing conditions, typically when the engine reaches an EGT high enough to burn off the soot (i.e. heavy towing, high load condi-tions etc.) If EGTs do not get hot enough to cause passive regeneration, then your truck’s engine-control system automati-cally initiates an active regen-eration.
ACTIVE REGENERATIONDuring active regeneration, the truck computer cleans the DPF by raising the exhaust temp to a point where the soot is burned away. This is accom-plished through various engine actions which raise the EGTs in the oxidation catalyst/ DPF system to a level where the soot is burned off. After the soot is burned off, the EGTs and back-pressure (restriction) fall

O P E R A T I N G I N S T R U C T I O N S
24
U S E R G U I D E
TABLE OF CONTENTS INTRODUCTION PARTS DESCRIPTION OPERATING INSTRUCTIONS INTERNET UPDATES APPENDIX TABLE OF CONTENTS INTRODUCTION PARTS DESCRIPTION OPERATING INSTRUCTIONS INTERNET UPDATES APPENDIX
back to normal levels. In order to help you know the status of DPF Regeneration, the device will display an “R” in the “Alert Indicator” section of the screen anytime active regeneration is happening.
T R A N S M I S S I O N R E L E A R NRead through the screen infor-mation on your device to under-stand how this feature works.
NOTE: This feature is avail-able for the following only:
Evolutions: All 2001-2013 GM Diesel trucks.Attitudes: 2001-2005 GM Diesel trucks.
P E R F O R M A N C E T E S T SPerformance tests can be help-ful for measuring performance gains after vehicle modifi cations have been installed (intake, exhaust, programers, etc). Use this menu to access 0-60 and Quarter mile tests. (Figure 9)
Figure 9
WARNING: Do not use the Performance Tests feature to break any traffi c laws.
The CS and CTS devices allow you to test the performance of your vehicle by timing 0-60 and quarter mile runs. (Instructions are provided in the Instructions menu).The results recorded by the Performance Test features, will likely differ from what you’ll see on a drag-strip or other racing venues. Incorrect speedometer calibration, data sample rate, and tire slippage can cause miscalculations in the displayed results.
0-60 TEST Select the 0-60 menu item and the following screen will ap-pear. (Figure 10)
Figure 10After bringing the vehicle to a stop, follow the directions noted on the screen.

O P E R A T I N G I N S T R U C T I O N S
25
U S E R G U I D E TABLE OF CONTENTS INTRODUCTION PARTS DESCRIPTION OPERATING INSTRUCTIONS INTERNET UPDATES APPENDIX
TABLE OF CONTENTS INTRODUCTION PARTS DESCRIPTION OPERATING INSTRUCTIONS INTERNET UPDATES APPENDIX
QUARTER MILE TEST Select the Quarter Mile menu item and Figure 10 will appear. After bringing the vehicle to a stop, follow the directions noted on the screen. The Quarter mile test will prompt you with a drag strip style light tree. If you watch the circles on the left they will light up yellow, then green. If you go before green appears then a red light will light up in the bottom showing that you started too early. If you don’t start early then you will see a green light remain in the bottom circle. When you’ve fi nished the quarter mile run the device will display the ending mph, the distance traveled in ft., and the elapsed time it took to reach 1/4 mile. In addition it will graph your MPH vs Speed so you can better analyze the run.
R E C O R D SRecords contain certain param-eters for later review. This is useful on the drag strip, at a sled pull, or when you are trying to trouble shoot a problem/bug.
I N J E C T O R B A L A N C E R AT E S Injector Balance Rates are used to determine if all the injectors are operating within the correct tolerances.
NOTE: Only available on cer-tain models.If you experience a misfi re, knock, excessive smoke, or rough running condition with no DTCs, the Injector Balance Rate option can help identify faulty injectors. The balance rates are the fuel adjustments for each individual cylinder based on the variations in engine crankshaft speed. The balance rates will change de-pending on if the transmission is in Neutral or Drive. Monitor and record all cylinder balance rates in drive and neutral. Injec-tors that read a higher numerical value than +/- 4.0 ( e.g. +/- 5,6,7 etc.) in park/neutral and +/-6.0 in drive may identify faulty injectors. If the balance rates show a pos-sible faulty injector, we recom-mend you consult a professional diesel mechanic who can verify this test and also perform a Cylinder Power Balance test to diagnose faulty injectors.
RUNNING THE TEST 1. Select Injector Bal-ance Rates from the Di-agnostics screen. You’ll be prompted by the fol-lowing screen. (Figure 11)

O P E R A T I N G I N S T R U C T I O N S
26
U S E R G U I D E
TABLE OF CONTENTS INTRODUCTION PARTS DESCRIPTION OPERATING INSTRUCTIONS INTERNET UPDATES APPENDIX TABLE OF CONTENTS INTRODUCTION PARTS DESCRIPTION OPERATING INSTRUCTIONS INTERNET UPDATES APPENDIX
Figure 11
2. Select Yes. Figure 12 will appear. Each box represents an Injector. This screen is where you’ll want to compare the in-jector balance rates in both Park and Drive.
Figure 12
NOTE: Figure 12 injector balance screen shot represents a truck with injector balance rates that are acceptable. The sample was taken in park. You can see that there are no num-bers higher than +4.0 or -4.0 on the screen, so it’s safe to assume the injectors are work-ing properly.
M I L E A G E C O A C HThe Mileage Coach feature pro-vides useful tips and tools that help you learn ways to improve your fuel mileage.
There are 3 PID options that directly relate to the Mileage Coach feature. They are:
1) Mileage Average: This PID displays the calculated average MPG or L/100km and is updat-ed continuously while driving. (NOTE: The average is cal-culated only when the PID is being displayed on the main Gauge Screen).This value will typically change more during start/stop driving, and less on the highway.
2) Mileage Instantaneous: This PID shows a conscientious driv-er how to vary the pressure on the gas pedal to save fuel every second. The value is displayed in either MPG or L/100km.
3) Mileage Coach: This PID takes the Average and Instanta-neous values mentioned above and creates a visual tool to help maximize your fuel economy. This PID is best viewed us-ing one of the Analog Gauge locations. Figure 12A shows an

O P E R A T I N G I N S T R U C T I O N S
27
U S E R G U I D E TABLE OF CONTENTS INTRODUCTION PARTS DESCRIPTION OPERATING INSTRUCTIONS INTERNET UPDATES APPENDIX
TABLE OF CONTENTS INTRODUCTION PARTS DESCRIPTION OPERATING INSTRUCTIONS INTERNET UPDATES APPENDIX
example of an Analog Gauge being used.
Figure 12A
Looking at Figure 12A, you will notice the level indica-tor has been separated into 3 colors. The Green color in the middle indicates that your driv-ing habits are producing good fuel economy. The Red indi-cates that your driving habits are not producing the best fuel economy and that there is room to improve. The upper “Gauge Color” (depends on the color you chose in the PID proper-ties) indicates that your driving habits have been maximized, and you are getting the most out of your fuel.
DISPLAYING MILEAGE COACH PIDS:1. From the MAIN GAUGE screen, choose which gauge location you would like to view your Mileage PID. 2. Choose the SELECT NEW
PID option and select one of the Mileage Coach PIDs.
MILEAGE COACH SETUP:1. Enter the MAIN MENU, select DIAGNOSTICS, then select MILEAGE COACH. The following screen will be displayed:
.Figure 12B
2. Become familiar with each option within the Mileage Coach feature set and adjust values accordingly. Refer to the follow explanations.
CLEAR FUEL AVERAGEUse this option to clear the cal-culated average displayed in the Mileage Average PID.
LAST FUEL ECONOMYThis option allows you to enter your actual Fuel Economy Value. This value is important and should be calculated and entered regularly. This can be manually calculated by dividing the distance travelled by how
O P E R A T I N G I N S T R U C T I O N S
28
U S E R G U I D E
TABLE OF CONTENTS INTRODUCTION PARTS DESCRIPTION OPERATING INSTRUCTIONS INTERNET UPDATES APPENDIX TABLE OF CONTENTS INTRODUCTION PARTS DESCRIPTION OPERATING INSTRUCTIONS INTERNET UPDATES APPENDIX
much fuel you have used (Dis-tance/Fuel = Fuel Economy). Some vehicles have their own Fuel Economy average that is displayed in cab and may be used instead of a manual calcu-lation. TRIP ODOMETERThis value is used to calculate the Trip Cost and Fuel Average.FUEL PRICEIn order to calculate your Mile-age and Trip Costs, the price of fuel purchased must fi rst be entered. For example: Fuel purchased at $3.58/Gal should be entered as 3.58.MILEAGE COSTThis value is a calculated aver-age based on how many miles you have traveled and the Fuel Price you entered.TRIP COSTThis value is calculated from the Fuel Price and the Trip Odometer values.MILEAGE COACH DISPLAYThere are two ways to display the Mileage Coach PID. 1. Show Difference: Differ-ence between Instantaneous and Average. 2. Show Values: Displays asInstantaneous | Average. MILEAGE DRIVING TIPSThese tips are intended to give you general information regard-
ing driving habits or anything that will help maximize your fuel economy and overall driv-ing experience.
This feature allows you to record all of the available PID data on your device.
(NOTE: The device also runs background tasks which are also recorded. This informa-tion can be ignored.)
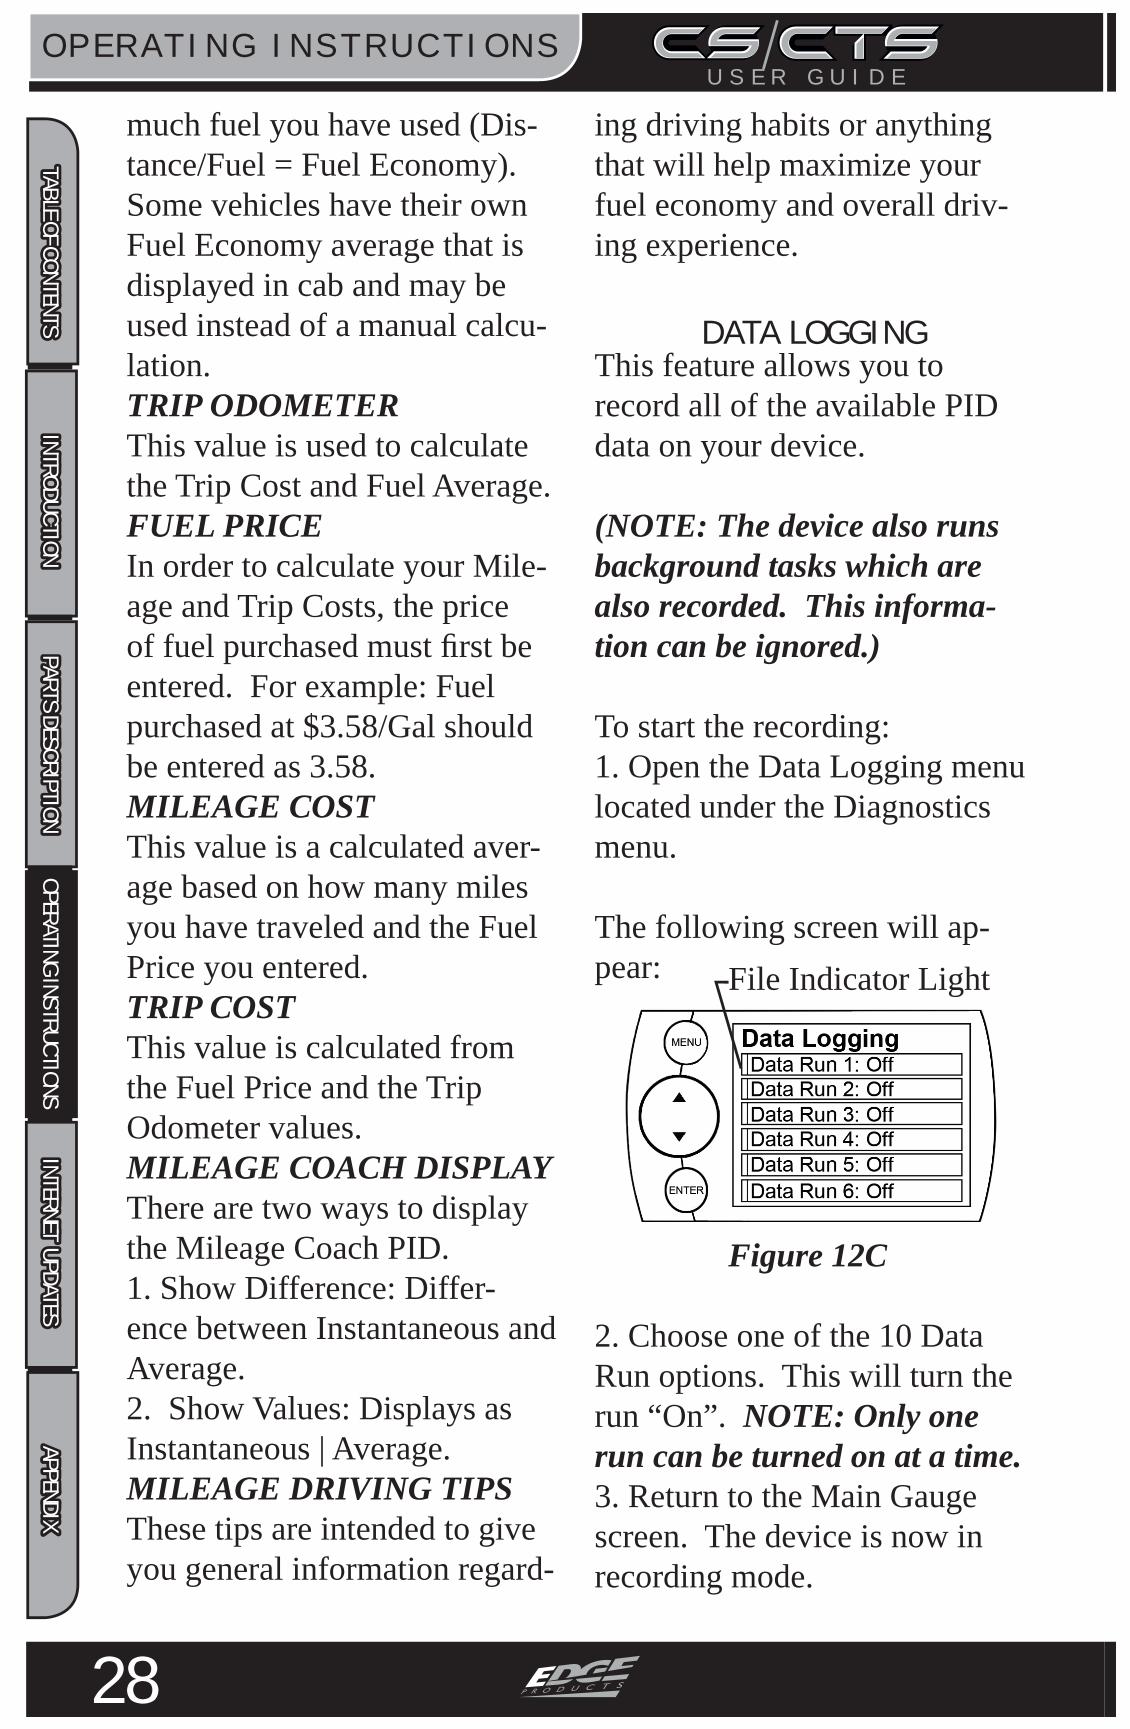
To start the recording: 1. Open the Data Logging menu located under the Diagnostics menu.
The following screen will ap-pear:
Figure 12C
2. Choose one of the 10 Data Run options. This will turn the run “On”. NOTE: Only one run can be turned on at a time.3. Return to the Main Gauge screen. The device is now in recording mode.
File Indicator Light
D ATA LO G G I N G

O P E R A T I N G I N S T R U C T I O N S
29
U S E R G U I D E TABLE OF CONTENTS INTRODUCTION PARTS DESCRIPTION OPERATING INSTRUCTIONS INTERNET UPDATES APPENDIX
TABLE OF CONTENTS INTRODUCTION PARTS DESCRIPTION OPERATING INSTRUCTIONS INTERNET UPDATES APPENDIX
4. Once you have recorded for a desired period of time, return to the Data Logging menu, and choose the same run as before. (This will turn the run “Off” and stop the device from record-ing. The recorded information will be stored for the My Style software to retrieve later on).
NOTE: If you turn the same Data Run back “On” the previ-ous data will be erased, and a new recording session will begin. If the indicator light is red, there is currently a record-ed fi le associated with that run.
MAINTENANCE MANAGERThe Maintenance Manager calculates the odometer value of your vehicle using the vehicle speed and time. NOTE: The Maintenance Manager odometer reading may become out of sync with the actual dash odometer read-ing. You may need to periodi-cally update the Maintenance Manager’s odometer value. It is important to note that the CS/CTS only tracks miles traveled when the main gauge screen is being displayed. If you are in the menus while driving, your miles are not calculated.
ODOMETER SETUP1. Locate the “ Maintenance Manager” by entering the “Main Menu”.2. Turn “ON” the Maintenance Manager. (If it is turned off, you will not be notifi ed when service is due.)
Figure 13
3. Choose “Odometer” to set your current Odometer reading. The screen shown in Figure 14 will appear.
Figure 14
4. Use the Arrow buttons to adjust the values up or down. 5. Press the Enter button to move to the next Digit.6. Once all digits have been en-tered, the Maintenance Manager screen will reappear showing your entered value. (See example in Figure 13. A value of 49,170 was entered).

O P E R A T I N G I N S T R U C T I O N S
30
U S E R G U I D E
TABLE OF CONTENTS INTRODUCTION PARTS DESCRIPTION OPERATING INSTRUCTIONS INTERNET UPDATES APPENDIX TABLE OF CONTENTS INTRODUCTION PARTS DESCRIPTION OPERATING INSTRUCTIONS INTERNET UPDATES APPENDIX
7. Once the Odometer is en-tered and displayed, chose the “Maintenance Items” option.
Alert Status Box
Figure 15
Other Maintenance Items not listed in Figure 15 may include:-Change Spark Plugs-Change Trans Fluid-Chk Trans Case Fld Lvl-Inspect Brake Pads-Lube Front Drive Shaft-Lube Tie Rod Ends-Rotate Tires
8. Chose the item you would like to maintain. (For demon-stration purposes we will chose “Change Engine Oil”. The following steps may also be ap-plied to all other items).
NOTE: Refer to Figure 15. Once a Maintenance Item is turned on, the Alert Status Box to the left of the item will light up. If it is green, the item is not yet due for service. If it is yellow, the item is about to be
due and within the specifi ed Alert Threshold. If it is red, the item is due for service. If it remains black, the item is not turned on. This all depends on the following settings.
MAINTENANCE SETUP1. First you need to setup the interval value. In fi gure 16 we entered 3,000.
Figure 16
This means that we want the oil changed every 3,000 miles. NOTE: Refer to your vehicle user manual to determine what value is recommended for each Maintenance Item.2. Select “Service Performed”. This will automatically set the “Next Service” value. NOTE: Each time your vehicle is serviced, the “Service Per-formed” button will need to be pushed to set the “Next Ser-vice” Value.3. The “Exit Menu” option will bring you back to the main gauge screen.

O P E R A T I N G I N S T R U C T I O N S
31
U S E R G U I D E TABLE OF CONTENTS INTRODUCTION PARTS DESCRIPTION OPERATING INSTRUCTIONS INTERNET UPDATES APPENDIX
TABLE OF CONTENTS INTRODUCTION PARTS DESCRIPTION OPERATING INSTRUCTIONS INTERNET UPDATES APPENDIX
ALERT THRESHOLDThe Alert Threshold value al-lows you to set how many miles ahead of time you want your Maintenance Manger to alert you that an item is due.
OPTIONS MENU
Figure 17
The Options menu contains menu items that will let you customize the device settings to your liking, as well as change the alert settings to best fi t your needs.
A L E R T O P T I O N S ( S ET T I N G S ) The Alert Options (Settings) screen (Figure 18) allows you to turn the alerts on/off both col-lectively and individually, and also lets you set the alert values for each of the available param-eters.To turn alerts on:1. Select Alert Options from the Options menu.2. Select Alerts are Off/On and
press enter. This will affect the entire alert system as a whole.
To individually disable/en-able an alert, or to change the alert:
1. Select a PID in the Alert Op-tions menu and Figure 18 will appear:
Figure 18
NOTE: In Figure 18 the En-gine Coolant Temperature PID is being modifi ed.
ALERT SYSTEM OFF/ON Turns the entire alert system off/on. This disables both the alerts and sound.
PID ALERT OFF/ON This turns off/on the specifi c PID alert you chose for Figure 14. That means that any other PID that is turned on, will re-main turned on.SOUNDDeals with individual PID alert sounds only.
O P E R A T I N G I N S T R U C T I O N S
32
U S E R G U I D E
TABLE OF CONTENTS INTRODUCTION PARTS DESCRIPTION OPERATING INSTRUCTIONS INTERNET UPDATES APPENDIX TABLE OF CONTENTS INTRODUCTION PARTS DESCRIPTION OPERATING INSTRUCTIONS INTERNET UPDATES APPENDIX
SET POINT This value is used to trigger the alert
S O U N D D U R AT I O N You can adjust the duration of the alert sound by using this menu option. Simply press the up/down arrow until you have the desired sound length in seconds.
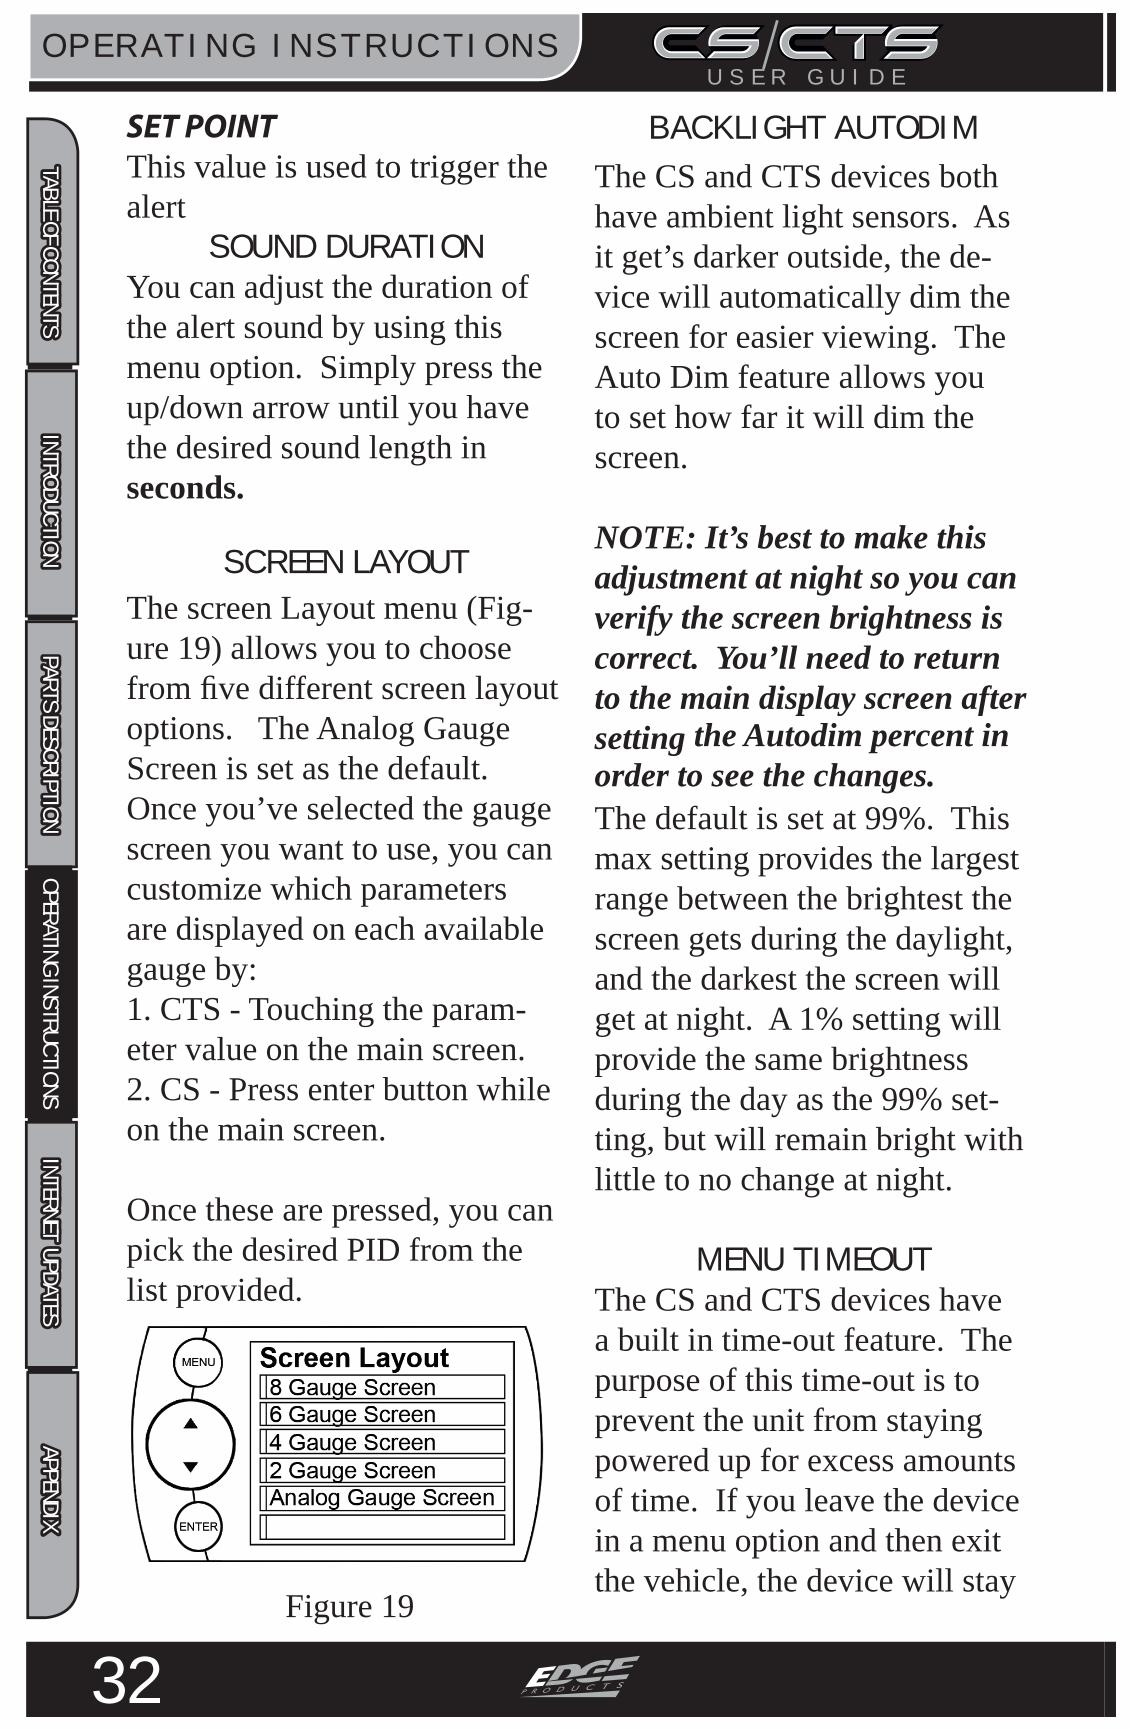
S C R E E N L AY O U TThe screen Layout menu (Fig-ure 19) allows you to choose from fi ve different screen layout options. The Analog Gauge Screen is set as the default. Once you’ve selected the gauge screen you want to use, you can customize which parameters are displayed on each available gauge by: 1. CTS - Touching the param-eter value on the main screen. 2. CS - Press enter button while on the main screen.
Once these are pressed, you can pick the desired PID from the list provided.
Figure 19
B A C K L I G H T A U T O D I M
The CS and CTS devices both have ambient light sensors. As it get’s darker outside, the de-vice will automatically dim the screen for easier viewing. The Auto Dim feature allows you to set how far it will dim the screen.
NOTE: It’s best to make this adjustment at night so you can verify the screen brightness is correct. You’ll need to return to the main display screen after setting the Autodim percent in order to see the changes. The default is set at 99%. This max setting provides the largest range between the brightest the screen gets during the daylight, and the darkest the screen will get at night. A 1% setting will provide the same brightness during the day as the 99% set-ting, but will remain bright with little to no change at night.
M E N U T I M E O U TThe CS and CTS devices have a built in time-out feature. The purpose of this time-out is to prevent the unit from staying powered up for excess amounts of time. If you leave the device in a menu option and then exit the vehicle, the device will stay

O P E R A T I N G I N S T R U C T I O N S
33
U S E R G U I D E TABLE OF CONTENTS INTRODUCTION PARTS DESCRIPTION OPERATING INSTRUCTIONS INTERNET UPDATES APPENDIX
TABLE OF CONTENTS INTRODUCTION PARTS DESCRIPTION OPERATING INSTRUCTIONS INTERNET UPDATES APPENDIX
in the menu for 300 seconds by default, after which it will re-turn to the main screen and then power off. If left in a menu while the truck is running or the key is on it will return to the main screen after 300 seconds.You can adjust the wait time to be longer or shorter by simply using the arrows to take the time up or down.
NOTE: This function only applies to menu screens. If you are viewing a parameter adjustment screen, the device will not time out. If you do not exit these screens, the device will not power-off and may dis-charge the vehicle’s battery.
T I R E S I Z EIf the CS/CTS is capable of re-calibrating your vehicle’s speedometer, you will enter your modifi ed tire size. If the CS/CTS can only display corrected vehicle speed, you will need to enter the values for stock tire size and modifi ed tire size.Choose the method for input-ting tire size that best fi ts your needs.English = 35/12.50/16 where 35 is the height, 12.50 the width, and 16 the wheel sizeP- Metric = 275/75/16 where 275 is width, 75 is aspect ratio, and 16 is diameter
Circumference = The outer circum-ference of the tire on your vehicleHeight = The Height of the tire on your vehicle Return to stock = Returns values to default.
NOTE: If your tire size is printed on the tire in P- Metric the easiest option will be choos-ing P- Metric (Figure 20).
Figure 20
Use the key pad on the right hand side of the screen to enter the tire size that is currently on your vehicle. You can navigate through the numbers with the UP/Down arrows, or by touch-ing the numbers (if you have a CTS). Once you’ve entered the value, hit enter and the tire size you’ve entered will be saved.
NOTE: (Evolutions Only)Changing the tire size on the screen will not automatically re-calibrate the vehicle com-puter for tire size. You must program the vehicle in order for the changes to take place. When you program a power level to the truck the tire size

O P E R A T I N G I N S T R U C T I O N S
34
U S E R G U I D E
TABLE OF CONTENTS INTRODUCTION PARTS DESCRIPTION OPERATING INSTRUCTIONS INTERNET UPDATES APPENDIX TABLE OF CONTENTS INTRODUCTION PARTS DESCRIPTION OPERATING INSTRUCTIONS INTERNET UPDATES APPENDIX
will be programmed into the PCM and re-calibrate the speedometer.
A C C E S S O R Y O P T I O N S Accessory options allow you to adjust add on features such as the Edge Expandable Accesso-ries System( EAS). As other ac-cessories are added, additional options will also be added.
NOTE: If you don’t have a camera or other RCA device connected to the CTS device, the camera menu options will be available but non func-tional.
Figure 21
CAMERA DELAY - CTS ONLYThe CTS is designed to auto-matically engage the back-up camera when the vehicle gear selector is in Reverse (the CTS must be able to detect gear position for this to function properly). The camera delay will allow you to customize the delay time for the device to switch from the main viewing
screen to camera view. If this is set too short then you’ll see the device blink as you move the gear selector past Reverse. If it’s set too long the screen may not appear before you start backing up. Some vehicles will communicate gear position faster than others, so this menu option allows you to customize the delay.
CAMERA AT STARTUPTurning this feature ON allows you to automatically see your camera during startup. Touch the screen to return to the main gauge screen.
TURBO COOL DOWN SETUP
Figure 22This menu allows the engine to continue running (after key-off) until one of three conditions are met. 1) If the EGT falls below the target set point or 2) The time set expires. 3.)Pressing ei-ther the brake pedal, gas pedal, button, or touch screen. Your display will tell you which one pertains to your vehicle.

O P E R A T I N G I N S T R U C T I O N S
35
U S E R G U I D E TABLE OF CONTENTS INTRODUCTION PARTS DESCRIPTION OPERATING INSTRUCTIONS INTERNET UPDATES APPENDIX
TABLE OF CONTENTS INTRODUCTION PARTS DESCRIPTION OPERATING INSTRUCTIONS INTERNET UPDATES APPENDIX
NOTE: Dodge 07-09 trucks can be turned off using the key’s panic button. Dodge 2010 trucks - lock and panic buttons at the same time.
WARNING: Do not use this feature in an enclosed area.NOTE: The turbo timer will not function while the vehicle is regenerating (Diesel).
U N I T SChanging the unit option al-lows you to view PIDs in either Metric or English on the main gauge screen. Vehicle Speed, for example, may be viewed as either MPH or KPH. Tempera-ture PIDs such as Engine Cool-ant Temperature may be viewed as either Fahrenheit or Celsius.
CAUTION: If you set up your units in either English or Met-ric, the alert value will be the same for both. If you change from one unit to another, you will need to setup the alert val-ues accordingly. For example, 100 MPH is not the same as 100 KPH.
FA C T O R Y R E S ETIf you would like to revert back to the factory default settings, simply select Factory Reset
and choose YES or press ENTER.
Many settings will be returned back to the default setting as they were when the unit was new. Any changes you’ve made to the alerts, the gauge screen displays, etc will be returned to the default settings provided by Edge Products.
NOTE: Factory Reset will not return the vehicle to stock from a programmed Power Level. See Programming Power Lev-els section for instructions to return to stock power level.
HELP MENUThe Help Menu contains useful information about your device, and the vehicle it is being used on. It also contains Edge Prod-ucts Contact Information, and Technical Support tools. (Figure 23)
Figure 23

O P E R A T I N G I N S T R U C T I O N S
36
U S E R G U I D E
TABLE OF CONTENTS INTRODUCTION PARTS DESCRIPTION OPERATING INSTRUCTIONS INTERNET UPDATES APPENDIX TABLE OF CONTENTS INTRODUCTION PARTS DESCRIPTION OPERATING INSTRUCTIONS INTERNET UPDATES APPENDIX
P R O D U C T I N F O - C S / C T SThe Product Info screen con-tains 7 important items:
1. Version 2. Application Version3. Calibration Version 4. Firmware (BC) Version5. FPGA Version6. MSP430 Version7. Serial Number The Serial Number is a num-ber assigned to your particular device. This number is used to identify your device in the software update process and to Edge Technical Support. Occasionally, Edge Prod-ucts will release updates with improved functionality for both Firmware and Calibra-tions. Each of these updates are labeled with a number, the number shown in this menu represents the version that is currently on your device.
P R O D U C T I N F O - E A SIf you have an EAS device installed on your vehicle and plugged into your CS/CTS device, another Product Info screen will pop up. It will list your EAS device’s Firmware Version as well as it’s Serial Number.
V E H I C L E I N F OVehicle Info contains important information about your vehicle. This information will help Edge Products Technical Support by letting them know all of the specifi cs of your vehicle.
C O N TA C T I N F OThe Contact Information menu contains the Edge Products web site URL, the company address, the Technical Support e-mail address, and the Technical Sup-port phone number.This information will be use-ful if you need to contact Edge Products for warranty claims, sales information, upgrade in-formation or any other technical questions/inquiries.
T E C H S U P P O R T T O O L SThe Technical Support Tools menu contains tools made spe-cifi cally to help Edge Products Technical Support representa-tives help customers when they are experiencing problems with their vehicle or device. This menu should only be used when requested by Edge Products Technical Support personnel.

O P E R A T I N G I N S T R U C T I O N S
37
U S E R G U I D E TABLE OF CONTENTS INTRODUCTION PARTS DESCRIPTION OPERATING INSTRUCTIONS INTERNET UPDATES APPENDIX
TABLE OF CONTENTS INTRODUCTION PARTS DESCRIPTION OPERATING INSTRUCTIONS INTERNET UPDATES APPENDIX
E V O L U T I O NE V O L U T I O N
PROGRAMMINGNOTE: It is important to unplug all power consum-ing devices (plugged into the cigarette lighter). If you are receiving errors or your display is stuck on the “Uploading bootloader” screen, refer to the trouble shooting guide at the back of this manual for more information.
U S I N G L E V E L SThe CS/CTS device comes ready with power levels to be programmed into your vehicle’s Power Control Module (PCM) (see the Power Levels section) of the manual for further detailed Power Level descriptions). You can choose these levels by en-tering the Programming menu (under the Main Menu), and choosing from one of the listed Power Levels. (Figure 24)
Figure 24
NOTE: Figure 21 depicts the programming level options for a GM product. If you have another make such as Ford or Dodge, you will notice that the levels available for your vehicle will vary from the GM options. For example, if you own a 97-09 F150, the economy level option is not available and can-not be added.Select the power level that best suits your needs. Follow the instructions on the screen. Evolution programming is done while the vehicle is parked and away from traffi c or where the vehicle may impede access, or exit. Programming will take several minutes and the vehicle can not be started.
WARNING: Do not com-bine, or “stack” chips (mod-ules) to gain more horsepower. The chips could be incompat-ible and result in power-train failure or create dangerous conditions leading to a serious or fatal accident.
C U S T O M O P T I O N SAfter choosing a power level to program your vehicle with the Evolution, you will be prompt-ed with the option to “Create

O P E R A T I N G I N S T R U C T I O N S
38
U S E R G U I D E
TABLE OF CONTENTS INTRODUCTION PARTS DESCRIPTION OPERATING INSTRUCTIONS INTERNET UPDATES APPENDIX TABLE OF CONTENTS INTRODUCTION PARTS DESCRIPTION OPERATING INSTRUCTIONS INTERNET UPDATES APPENDIX
a custom program.” Choosing YES will load the Custom Op-tions menu. (Figure 25)
Figure 25This will allow you to change certain parameters of the level you choose. Selecting NO will program a standard power level.USE CURRENT SETTINGSThis option will use the previ-ously selected options.RESET ALL VALUESThis option will restore all of the settings back to factory defaults.TIRE SIZEThis option will allow you to select a new tire size if you’ve changed the factory tires.GEAR RATIOThis option will allow you to select a new gear ratio if you’ve changed the factory gears.SPEED LIMITERThis option will allow you to adjust the factory speed limiter higher or lower than the factory set speed limiter MPH.Your Evolution programmer has the ability to remove/adjust
your vehicle’s factory speed limiter. Removal/adjustment of the factory speed limiter is intended for use at a closed circuit, legally sanctioned rac-ing environment. Even if racing in a legally sanctioned racing environment, it is your respon-sibility to ensure your tires and other vehicle components are rated to travel at increased speeds with the speed limiter removed/adjusted.
WARNING: If you drive on public roads after removal or adjustment of the speed limiter, you must still obey all driving laws, including ad-hering to posted speed limits. To drive at racing speeds on public roads seriously endan-gers you, your passengers, and others nearby. Driving at high speeds with inadequate tires or other components can lead to serious or fatal injury.
CAUTION: Removing/ad-justing the speed limiter for purposes inconsistent with the product’s intended function violates the product’s intended use and will invalidate the product’s warranty. Edge Products is not responsible for, or liable for the consequences
O P E R A T I N G I N S T R U C T I O N S
39
U S E R G U I D E TABLE OF CONTENTS INTRODUCTION PARTS DESCRIPTION OPERATING INSTRUCTIONS INTERNET UPDATES APPENDIX
TABLE OF CONTENTS INTRODUCTION PARTS DESCRIPTION OPERATING INSTRUCTIONS INTERNET UPDATES APPENDIX
of improper product use.During programming, the CS/CTS device will go through a series of screens telling you the action it is completing.Follow the on screen instruc-tions. After the CS/CTS device has successfully programmed your vehicle, the programmed level number will appear on the main screen in the level indicator box.
NOTE: Do not be alarmed if your lights fl ash, your dash chimes, or your doors auto-matically lock and unlock dur-ing the programming process. These operations are normal.
POWER LEVELS
WARNING: Performance and Extreme levels are not intended for, and should not be used for towing. Do not exceed your vehicle’s max GVWR as outlined in the vehicle’s owner’s manual. Doing so may result in loss of vehicle control and cause bodily injury.
The CS/CTS Evolution typical-ly has 4 power levels, and each is tuned specifi cally for differ-ent driving situations. The level names are refl ective of what the
driving level should be used for.
TRANS ONLY- The Trans Only level only makes changes to the transmission. It will provide fi rmer transmission shifts which help increase transmission life.
ECONOMY - The economy level is the lowest power set-ting. It has been specifi cally tuned for optimum fuel econo-my, we recommend using this level for daily driving.
TOWING - The towing level is designed for towing, Tuning strategies are optimized to pro-vide power where it is needed most in order to move a load.
PERFORMANCE - The Per-formance level is a high power level. The fuel injection and timing strategies are tuned semi aggressively to extract substantial power gains from the vehicle without sacrifi cing drive-ability or durability.
EXTREME - This is the highest setting for the Evolution. The fuel injection and timing strate-gies are aggressively tuned to extract high performance from your vehicle without sacrifi cing drive-ability or durability.

O P E R A T I N G I N S T R U C T I O N S
40
U S E R G U I D E
TABLE OF CONTENTS INTRODUCTION PARTS DESCRIPTION OPERATING INSTRUCTIONS INTERNET UPDATES APPENDIX TABLE OF CONTENTS INTRODUCTION PARTS DESCRIPTION OPERATING INSTRUCTIONS INTERNET UPDATES APPENDIX
A T T I T U D EA T T I T U D ENOTE: In order for the CS/CTS to function properly; the JAB, Juice Module, and OBDII cables must fi rst be installed and connected to the Attitude Monitor (CS/CTS). Refer to the EAS and JUICE Installation Guides as well as the Quick Install Guide for more information on how to install these devices.
POWER LEVELSThe CS/CTS Attitude has up to 5 power levels (6 with the optional Hot Unlock). The level names refl ect what the driving level should be used for. (Fig-ure 26) Incremental touch or press of the up/down arrow but-tons changes the level as shown. Level 1 has the lowest power output, and level 5 has the high-est power output. Level 1 or 2 are suitable for Towing, while levels 4 and higher are used when you desire a high power output from the vehicle and have modifi ed or upgraded your power and drive trains.
Figure 26
MILEAGESpecifi c tuning for optimum fuel economy under normal driving.TOWTuning strategies are optimized to provide power where it is needed most when moving a load.DRIVESpecifi c tuning for daily all-around driving and perfor-mance. RACERace Performance Tune. The fuel injection and timing strate-gies are aggressively tuned to extract substantial power gains from the vehicle without sacri-fi cing drive-ability or durability.EXTREMEThe fuel injection and timing strategies are aggressively tuned to extract high power and per-formance from your vehicle.
JUICE CONTROLThe Juice Control menu al-lows you to regulate engine power delivery and drive-train performance, by enhancing the ECM factory settings through the Juice Module. The follow-ing settings may or may not be available depending on your make of vehicle and/or your

O P E R A T I N G I N S T R U C T I O N S
41
U S E R G U I D E TABLE OF CONTENTS INTRODUCTION PARTS DESCRIPTION OPERATING INSTRUCTIONS INTERNET UPDATES APPENDIX
TABLE OF CONTENTS INTRODUCTION PARTS DESCRIPTION OPERATING INSTRUCTIONS INTERNET UPDATES APPENDIX
Edge product. (Figure 27)
Figure 27
BACK-DOWN SETTINGSEGT BACK-DOWNThe Attitude monitors the Ex-haust Gas Temperature (EGT)and will automatically de-fuel the vehicle at your specifi ed max EGT set point. As the exhaust gas temperature approaches the EGT set point, a percentage of de-fueling oc-curs. This percentage is shown as the back-down value you can view on the Attitude display if selected as an option. When this value reaches 100% the fueling delivered by the Juice module has been totally disabled. How-ever, stock fueling will allow the vehicle to reach EGT levels which may exceed the preset Max EGT Set Point.
CAUTION: Other high perfor-mance modifi cations in addi-tion to the Juice can allow the fueling to exceed the max set point and stock EGT levels,
even after 100% de-fueling by the Attitude. This may result in detrimental EGT levels and potential power-train damage.
CAUTION: On the 1999-2003 Ford 7.3L, EGT Back-down will remove even the stock power in order to limit EGT
COLD ENGINE PROTECTIONThis feature restricts the Juice module from adding more pow-er until the engine has reached a minimum temperature. As the engine warms up, more power is added until a specifi c engine temperature is reached at which point 100% Juice power is available.
(NOTE: The 1999-2003 Ford 7.3L uses Engine Oil Tempera-tures to determine when and how much additional power is to be added.)
LOW BOOST RESPONSEThis setting will allow you to change the performance re-sponse at low engine speed or boost levels. Select the power level for which you want to ad-just the Responsiveness. Select your level of responsiveness. 1 being the lowest and 5 being the highest.

O P E R A T I N G I N S T R U C T I O N S
42
U S E R G U I D E
TABLE OF CONTENTS INTRODUCTION PARTS DESCRIPTION OPERATING INSTRUCTIONS INTERNET UPDATES APPENDIX TABLE OF CONTENTS INTRODUCTION PARTS DESCRIPTION OPERATING INSTRUCTIONS INTERNET UPDATES APPENDIX
TRANSMISSION SETTINGSThese settings will allow you to de-fuel during shift and torque converter lock.
NOTE: We recommend choos-ing de-fueling (Yes) during torque converter or clutch slip for stock transmissions. Se-lecting (No) prevents the Juice module from de-fueling when the torque converter or clutch is slipping.
CAUTION: Selecting (No) will allow the Juice to fuel when the transmission slips. (Yes) eases the transmission strain because the Juice low-ers its power output when the torque converter or clutch is slipping.
TRANS SLIP PROTECTIONIn some cases, this option will be available under the “TRANSMISSION SET-TINGS” section. Refer to the previous section for more info.
TIMING OPTIONSThis option is only available on some Dodge diesel trucks. Choosing the Juice Timing al-lows the timing to be matched to the Juice Power options. Choosing stock timing will al-
low the engine to run according to stock settings.
AXLE RATIOThis option is only available on Dodge diesel trucks. Follow all on screen instructions
HOT UNLOCKERThis optional power level is a high performance level, that should only be used when the vehicle power and drive-train have been upgraded. To unlock the power level, you will need to:
1. Visit www.edgeproducts.com2. Click the “Hot Unlock Form” tab and save a copy to your computer.3. Print out the form and fi ll out accordingly.4. Follow instructions provided on the printout.
PROGRAMMINGDepending on your make and model, your Attitude may give you the option to program your PCM. If this is the case, refer to the Evolution section of this manual for more information on programming. Your CS/CTS will also guide you through the process.

O P E R A T I N G I N S T R U C T I O N S
43
U S E R G U I D E TABLE OF CONTENTS INTRODUCTION PARTS DESCRIPTION OPERATING INSTRUCTIONS INTERNET UPDATES APPENDIX
TABLE OF CONTENTS INTRODUCTION PARTS DESCRIPTION OPERATING INSTRUCTIONS INTERNET UPDATES APPENDIX
EFI LIVE™Adjust EFILive™ Tuned PCMS On-The-Fly!
On 2001-2005 LB7 and LLY Duramax engines you can now change the power levels on-the-fl y created by your EFILive™ custom tuning software with your Edge Insight CS or CTS! Simply use your EFILive™ software to change your DSP5 Switch Type from “hard wire” to “serial”. Once you are set up to support “serial” commu-nication, simply use the up and down arrow buttons on your Insight to adjust EFILive™ tunes on-the-fl y. Your current level will be displayed in the level indicator box. 5 custom levels (1-5) are usable with this feature.
SMARTY - POD™If you have a Smarty device with the Power On Demand op-tion enabled, you have the op-tion to adjust the Smarty levels with your Insight. Follow these instructions to turn this option on/off on your Insight device:
1. Program your vehicle using your Smarty device.
2. On your Insight, go to the OPTIONS menu under the MAIN MENU. A Smarty Live option will be made available.
3. Choose to turn ON the Smarty Live.
4. Return to the main gauge screen. Adjust the power levels using the up/down arrows (or button).
I N S I G H TI N S I G H T

O P E R A T I N G I N S T R U C T I O N S
44
U S E R G U I D E
TABLE OF CONTENTS INTRODUCTION PARTS DESCRIPTION OPERATING INSTRUCTIONS INTERNET UPDATES APPENDIX TABLE OF CONTENTS INTRODUCTION PARTS DESCRIPTION OPERATING INSTRUCTIONS INTERNET UPDATES APPENDIX
EASThe CS and CTS devices are equipped with an expandable accessories port which inter-faces with the Edge Expandable Accessory System ( EAS), as well as a video-in jack. (Figure 28)
Figure 28
The EAS is an accessory net-work cable that transmits data between the CS or CTS and Edge Accessories. With the EAS you can add mul-tiple accessories to the CS or CTS using a daisy-chain-style connection system.
Refer to your EAS Supplement Manual for instructions on how to properly install your EAS Devices.
J A B ( E A S )
The JAB (Juice to Attitude Bridge) allows you to connect your Edge Juice Module to your CS or CTS device. This allows your CS or CTS to communi-cate with and control your Juice Module.
E G T P R O B E ( E A S )
The EGT (Engine Exhaust Temperature) sensor gives you direct engine temperature read-ings via a temperature probe. The EGT is plugged into the accessory port shown in Figure 28.
E G T P R O B E [ S TA N D A R D ]
If you are not interested in an expandable system, use the Standard Edge EGT probe. The standard EGT probe is not expandable with future acces-sories.
EDGE BACKUP CAMERA Finish your CTS off with the Edge Products Backup Cam-era. (Figure 30) The Backup Camera provides a high-quality color image with “Night Vision” infrared LEDs allowing users to see objects in total darkness. The adjustable lens assembly al-
U S I N G U S I N G A C C E S S O R I E SA C C E S S O R I E S
VIDEO-IN JACK (CTS ONLY)
ACCESSORY PORT

O P E R A T I N G I N S T R U C T I O N S
45
U S E R G U I D E TABLE OF CONTENTS INTRODUCTION PARTS DESCRIPTION OPERATING INSTRUCTIONS INTERNET UPDATES APPENDIX
TABLE OF CONTENTS INTRODUCTION PARTS DESCRIPTION OPERATING INSTRUCTIONS INTERNET UPDATES APPENDIX
lows the user to adjust the view-ing angle up and down to reach the desired viewing angle. The CTS will work with most off-the-shelf back-up cameras that use an RCA style video connector. In addition to using the CTS as a back-up camera display device, you can also use it as a display for a DVD player, or other devices equipped with RCA video-out.
Figure 30
To view or purchase any of our EDGE Accessories visit: WWW.EDGEPRODUCTS.COM or contact your local EDGE PRODUCTS AUTHO-RIZED MVP DEALER.
EDGE MOUNTING SOLUTIONSD A S H P O D SEdge Products offers the best custom mounting options on the market. Edge Products dash mounts (Figure 31) offer a unique solution for CS or CTS owners that are looking to add a factory fi nish look to their truck.
Figure 31
The pods are durable, made from high-quality plastic, and manufactured for a perfect fi t and fi nish. They are angled for easy viewing, can be painted to match vehicle interior color (if needed), and are easy to install. The CS and CTS devices will fi t in all Edge Products pods.
NOTE: The CTS requires an adapter kit when used with Edge’s Custom Dash PODs. (Figure 32)
Figure 32

O P E R A T I N G I N S T R U C T I O N S
46
U S E R G U I D E
TABLE OF CONTENTS INTRODUCTION PARTS DESCRIPTION OPERATING INSTRUCTIONS INTERNET UPDATES APPENDIX TABLE OF CONTENTS INTRODUCTION PARTS DESCRIPTION OPERATING INSTRUCTIONS INTERNET UPDATES APPENDIX
BACK GROUND IMAGEWhen your display is in Analog Gauge Screen layout, you have a choice to change the back-ground image.
1. Select Options inside the Main Menu. 2. Select Screen Layout and choose the Analog Gauge Screen.3. When the Analog Gauge screen displays, you will have the option to choose from 10 different screen backgrounds. Scroll through options using the up/down arrows and then press enter or touch the screen to select.
Figures 34-36 are some example backgrounds:
Figure 34
Figure 35
Figure 36
S U C T I O N M O U N T SBoth CS and CTS devices come with a standard windshield mount (Figure 30) manufac-tured by Arkon Resources Inc., the leader in device-mounting solutions. The CS and CTS devices have a standard two-tab system built in so they can accept an array of different Arkon mounts.
Figure 33
C U S T O M I Z A T I O NC U S T O M I Z A T I O N

O P E R A T I N G I N S T R U C T I O N S
47
U S E R G U I D E TABLE OF CONTENTS INTRODUCTION PARTS DESCRIPTION OPERATING INSTRUCTIONS INTERNET UPDATES APPENDIX
TABLE OF CONTENTS INTRODUCTION PARTS DESCRIPTION OPERATING INSTRUCTIONS INTERNET UPDATES APPENDIX
U S I N G M Y S T Y L E
Create and add your own custom background using the unique Edge Products My-Style™ Software by download-ing it from the Edge Products website. Your background is lim-ited only by your imagination! Have a picture of your family, truck, pet or logo? ...easily add it by connecting your device to your computer and use the MyStyle™ Software.

I N T E R N E T U P D A T E S
48
U S E R G U I D E
TABLE OF CONTENTS INTRODUCTION PARTS DESCRIPTION OPERATING INSTRUCTIONS INTERNET UPDATES APPENDIX TABLE OF CONTENTS INTRODUCTION PARTS DESCRIPTION OPERATING INSTRUCTIONS INTERNET UPDATES APPENDIX
Fusion Software allows the user to update their device to the latest version of fi rmware and calibration fi les. It can be downloaded for free from Edge Products web site at: www.edgeproducts.com.
NOTE: Be sure to install both the SOFTWARE and the DRIVERS that come included in the download before you connect your device to your PC. During the installation you will be prompted to install the drivers, choose yes. For step by step installation in-structions please copy this link into your web browser:
http://www.edgeproducts.com/product_images/product_up-date-fi le-11.pdf
USING THE SOFTWARENOTE: The CS/CTS device should not be plugged into the vehicle’s OBDII port and your computer’s USB port at the same time. Only the USB is needed to update.1. Click the Fusion icon on your PC desktop once you’ve in-stalled Fusion.
2. If you have not yet created an account, click on “Create a New User”. You will then be directed to a web page to create your login information.
NOTE: After entering your information, a password will be sent to the e-mail address you provide. Be sure your e-mail account doesn’t block e-mails from www.fusionupdate.com. 3. Upon receiving the password, enter your e-mail address and password on the login screen of the Fusion Software.4. You’ll be prompted to con-nect the device to launch. After connecting the device, you’ll see a screen pop-up.(Figure 37) 5. Click yes to continue with the update.
NOTE: Be sure to return your vehicle to stock before connect-ing the device to Fusion.
NOTE: Plug USB connector into the computer before con-necting the device to ensure proper operation.
***REQUIRES INTERNET CONNECTION***
F U S I O N U P D A T E F U S I O N U P D A T E S O F T W A R ES O F T W A R E

I N T E R N E T U P D A T E S
49
U S E R G U I D E TABLE OF CONTENTS INTRODUCTION PARTS DESCRIPTION OPERATING INSTRUCTIONS INTERNET UPDATES APPENDIX
TABLE OF CONTENTS INTRODUCTION PARTS DESCRIPTION OPERATING INSTRUCTIONS INTERNET UPDATES APPENDIX
Figure 37
After you’ve selected yes on the previous screen (Figure 37 the Fusion software will go through the steps in order to update the device. Once it’s completed you’ll see the following screen.(Figure 38)
Figure 38
6. Click OK and the update will be completed. You’ll now have the latest Firmware, and Cali-bration on your device.When your device is connected to Fusion, the device model, Lvl, Bootloader, Firmware, Calibration and Serial Number are all displayed at the bottom
of the screen. These numbers will be useful to quickly view the state of your device, and whether or not it is currently programmed to a vehicle.
• MODEL : The model num-ber for your device.
• LVL : The currently pro-grammed level.
• BOOTLOADER : The boot loader version cur-rently on your device.
• FIRMWARE : The fi rm-ware version currently on your device.
• CALIBRATION: The cali-bration version currently on your device
• SERIAL NUMBER : The serial number assigned to your device

I N T E R N E T U P D A T E S
50
U S E R G U I D E
TABLE OF CONTENTS INTRODUCTION PARTS DESCRIPTION OPERATING INSTRUCTIONS INTERNET UPDATES APPENDIX TABLE OF CONTENTS INTRODUCTION PARTS DESCRIPTION OPERATING INSTRUCTIONS INTERNET UPDATES APPENDIX
PROGRAMMING ERRORS U P D AT E R E Q U I R E D
Fusion is designed to help the development team at Edge Products support new vehicle calibrations. When you connect your device to the vehicle, the fi rst step it takes is identifying your ve-hicle’s stock fi le. If the stock fi le isn’t currently supported:
1. The device will display a screen alerting you that the stock fi le is not yet supported.2. It will then prompt you to press a button/touch the screen in order to read and save the stock fi le.3. Once the device has saved the stock calibration, it will prompt you to connect the device to Fusion. 4. Fusion will ask you if you want to upload your vehicle’s stock fi les to our server. Choos-ing Yes will upload the fi les to the server, and alert the devel-opment team. This will help the development team at Edge Products provide support for your vehicle’s calibration as quickly as possible.
N O N - S T O C K C O N D I T I O N
During programming, the de-vice will read the stock fi le on your vehicle and compare it to a corresponding stock fi le that has been verifi ed by Edge Products. If there is a mismatch, the de-vice will alert you, and display this message: “ Non-stock condition detected. This is most likely because your vehicle has been pro-grammed with a competitive product. It is recommended that you return your vehicle to a stock condition with the product that changed it. Al-ternatively, you can plug your device into your computer and it will load the necessary fi les onto your device to return your vehicle to stock.”If you don’t have the competi-tive product that programmed your truck:
1. Connect the device to Fu-sion (via USB connector) where you’ll be prompted to download the correct stock fi les.2. Once downloaded, simply connect the device to your vehicle (via OBDII), and the device will program the verifi ed stock fi les to your vehicle.

A P P E N D I X
51
U S E R G U I D E TABLE OF CONTENTS INTRODUCTION PARTS DESCRIPTION OPERATING INSTRUCTIONS INTERNET UPDATES APPENDIX
TABLE OF CONTENTS INTRODUCTION PARTS DESCRIPTION OPERATING INSTRUCTIONS INTERNET UPDATES APPENDIX
The 2007.5 and newer light-du-ty diesel pickups are equipped with OEM Exhaust Gas Tem-perature ( EGT) sensors, all of which can be monitored with the CS and CTS Devices. Before a customer uses the vehicle’s OEM sensors for read-ing exhaust gas temperature, it’s extremely important that he/she become educated about EGT sensor placement, and under-stand what exactly to look for when using an EGT sensor on a diesel-powered vehicle. (NOTE: Additional detailed installation instructions are found in supple-mental manuals) Edge Products was the fi rst company to integrate gauge screens with their power mod-ules giving customers the ability to monitor EGTs and other vehicle parameters in real-time. Since the introduction of the Attitude monitor Edge Products has always recommended that the EGT probe be placed in the exhaust manifold, in a pre-turbo location simply because the manifold location gives the best representation of combustion chamber temperatures. Other locations downstream in the ex-
haust system do not accurately represent combustion chamber temperatures. The 2008 and newer Ford Powerstroke 6.4L is factory-equipped with an EGT sensor in the pipe prior to the high pressure turbo. This EGT sen-sor accurately represents EGT temperatures in the combustion chamber. The 2007.5+ GM Duramax and Dodge Ram 6.7 Cum-mins do not have EGT sen-sors placed pre-turbo where the optimum readings can be achieved. When items such as turbos, catalysts, NOX fi lters, and particulate traps are intro-duced, temperatures can vary in large margins due to the ther-mal energy stored/transferred by these devices. This creates an environment that doesn’t represent combustion-chamber temperatures as effectively as a manifold/ pre-turbo placed sen-sor does. Edge Products recommends using a pre-turbo EGT sensor if you use the CS/CTS for any kind of competition, or heavy hauling. If your vehicle is not equipped with a pre-turbo EGT
NOTE: This section refers to diesel vehicles
O E M E G T L O C A T I O N SO E M E G T L O C A T I O N S

A P P E N D I X
52
U S E R G U I D E
TABLE OF CONTENTS INTRODUCTION PARTS DESCRIPTION OPERATING INSTRUCTIONS INTERNET UPDATES APPENDIX TABLE OF CONTENTS INTRODUCTION PARTS DESCRIPTION OPERATING INSTRUCTIONS INTERNET UPDATES APPENDIX
sensor, Edge recommends you purchase an Edge Products sen-sor and install it in a pre-turbo location. As noted in the accessories section, you can purchase an Edge Products EGT sensor to be coupled with the Edge Ac-cessories System ( EAS) or you can purchase a standalone Edge EGT sensor. Either of these items can be purchased at www.edgeproducts.com or at your local Edge Products Authorized MVP Dealer.If you are unsure whether or not your vehicle is equipped with a pre-turbo EGT sensor please see the diagram on the following page. If you are unsure what tem-perature range is acceptable on your EGT’s we recommend you do the following:1 - Display EGTs on your main display screen2- Observe what EGTs are dis-played while at a stock power level and accelerating at a heavy load, i.e. pulling a heavy trailer up a long hill.3 - 1350 F is the highest recom-mended exhaust gas tempera-ture.The following Illustrations rep-resent the 2007.5 + light-duty diesel pickups.
(NOTE: Additional EGT instal-lation instructions can be found in the Juice Supplement Instal-lation Instructions manual as well as the EAS Installation Instruction manual.)The Dodge 6.7 Cummins is not equipped with a pre-turbo EGT sensor. It is however equipped with three EGT sensors down-stream from the turbo. All of these sensor’s readings are available for display on the CS and CTS. However they are not an accurate representation of combustion chamber tempera-tures. (Figure 39)The GM LMM Duramax is not equipped with a pre-turbo EGT sensor. It is however equipped with two EGT sensors down-stream from the turbo. Both of these sensor’s readings are available for display on the CS and CTS. However they are not an accurate representation of combustion chamber tempera-tures. (Figure 39)The Ford 6.4 Powerstroke has an EGT sensor placed in the passenger side up pipe prior to the turbo. This is an excellent location for an EGT sensor. The readings you’ll see here represent the temperatures in the combustion chamber than the temperatures you would see down stream. (Figure 39)

A P P E N D I X
53
U S E R G U I D E TABLE OF CONTENTS INTRODUCTION PARTS DESCRIPTION OPERATING INSTRUCTIONS INTERNET UPDATES APPENDIX
TABLE OF CONTENTS INTRODUCTION PARTS DESCRIPTION OPERATING INSTRUCTIONS INTERNET UPDATES APPENDIX
MufflerDiesel Oxidation
Catalyst
Exhaust Manifold
Pre-Turbo EGT
Pre-Cat EGTPre-DPF/Post-Cat
EGTPost-DPF
EGT
Diesel Particulate
filter
Diesel OxidationCatalyst
Exhaust Manifold
Muffler Diesel Particulate
filter
NOX Filter
Pre-Cat EGT
Pre-DPF/Post-Cat EGT
Post-DPF EGT
Diesel OxidationCatalyst
MufflerDiesel
Particulate filter
Pre-DPF/Post-Cat EGT
Post-DPF EGT
Ford 6.4 Powerstroke
GM LMM Duramax
Dodge 6.7Cummins
Modern Light-Duty Diesel Truck Exhaust Illustrations
Figure 39

A P P E N D I X
54
U S E R G U I D E
TABLE OF CONTENTS INTRODUCTION PARTS DESCRIPTION OPERATING INSTRUCTIONS INTERNET UPDATES APPENDIX TABLE OF CONTENTS INTRODUCTION PARTS DESCRIPTION OPERATING INSTRUCTIONS INTERNET UPDATES APPENDIX
Tip: Programming your vehicle may expose existing defects in your PCM that could disable your vehicle. It is advised that you do not program in remote locations in case of failure. Vehicle manu-facturers do not recommend programming in extreme temperature. Please see your vehicle service manual to ensure that programming is being done in accordance to the original equipment manufactur-ers specifi cations.
Tip: Keep in mind that the CS/CTS is a high performance product and that not all vehicles deliver the exact same power output when programmed with the CS/CTS. It is recommended that you select a program that will best fi t your needs. Whether towing, or traveling long distances at high speeds, choose your power level wisely and keep in mind the condition and tolerances of your vehicle when selecting a suitable power level.
Tip: If any problems persist, contact Edge Technical Support. Please have the product Serial Number and Vehicle Information prior to calling Technical Support. This will help ensure quick and accurate support.
Tip: When taking your vehicle to the dealership to get the oil changed or to get other work done, it is always a good idea to program the truck to stock before taking it in for service. In many cases, the dealership has new updates for the truck, and conse-quently will update the vehicles computer. If this is an Evolution product and is programmed to a power level, the dealership update will over write the programming and lock the device. Always program the truck to stock, and update the product on Fusion while it is out of the truck to ensure that the software on the Evolution is up to date with the software the dealer installs in the vehicle.
Tip: Plugging both USB Cables into your computer will improve the connection between your CS/CTS and Computer.
T I P S / T R O U B L E S H O O T I N GT I P S / T R O U B L E S H O O T I N G

A P P E N D I X
55
U S E R G U I D E TABLE OF CONTENTS INTRODUCTION PARTS DESCRIPTION OPERATING INSTRUCTIONS INTERNET UPDATES APPENDIX
TABLE OF CONTENTS INTRODUCTION PARTS DESCRIPTION OPERATING INSTRUCTIONS INTERNET UPDATES APPENDIX
TROUBLE SHOOTING GUIDESYMPTOM POSSIBLE CAUSE SOLUTION
Display beeps for two seconds (long beep)
The unit is too hot from being in the direct sunlight
Once the device cools down the screen will turn itself on
No display when the key is in “on” position
The unit will not wake up with the key in the “on” position until the screen is touched or any button is pressed
Touch the screen or start the vehicle, if this does not turn the screen on then you will need to call technical support
Vehicle does not start after programming
The calibration may have not written correctly
Select “Return to stock” from the programming menu. Then, Program back to stock. Now, try to start the vehicle again. If the problem contin-ues contact technical support
Fusion drivers will not install correctly
The drivers were not successfully installed by the automatic installer
Manually install the drivers, Edge technical support can provide you with instruction on how to do this
Camera picture is frozen Bad connections Cycle the key off and on. Double check your fuse and connectors.
Error 16 when programming There was a communication error Try to program the level againDisplay beeps quickly Possible device malfunction Update the device using the fusion
softwareEdge EGTs are not displaying Connector on the back of the device
is not fully seatedMake sure the cable connection is not upside down, and push the cable until it is fully seated
Unit will not power on after vehicle is started or after screen or buttons are pressed.
Typically this issue is caused by a blown OBDII/Cigarette Lighter Fuse.
Replace fuse and test unit again.
Evolution programming errors:1. Your device gets stuck on the “Uploading Boatloader” screen2. An error is displayed: “ERROR-We could no upload the bootloader to the vehicle...”3. If you are constantly asked to make sure your key is on.4. Error displayed after your device shows blank gauges and says that it is loading. The error will be displayed as “Cannot communicate with ve-hicle, ensure the key is in the on po-sition...”
Sometimes programming can be disrupted by installed aftermar-ket devices that are tapped into the trucks communication lines (J1850). These may include but are not limited to aftermarket radios, chime boxes, remote starters, ect.
Also, any power consuming devices should not be plugged into the ciga-rette adapter during the programming process. Fluctuations in power may disrupt the programming process.
The following solutions are good fi rst steps to getting around these program-ming errors. If these steps do not solve your problem, please contact Edge Tech Support:
Fuses: (CAUTION: Always turn the key off while unplugging fuses).1. Remove fuses connecting radio, radio amplifi er, satellite radio, re-mote starter, or any other aftermarket device you have installed on your vehicle.Power:1. Close all doors during program-ming.2. Do not operate electrical accesso-ries (radio, windows, wipers, ect.)3. Remove any devices plugged into the cigarette lighter or any other auxiliary power port.
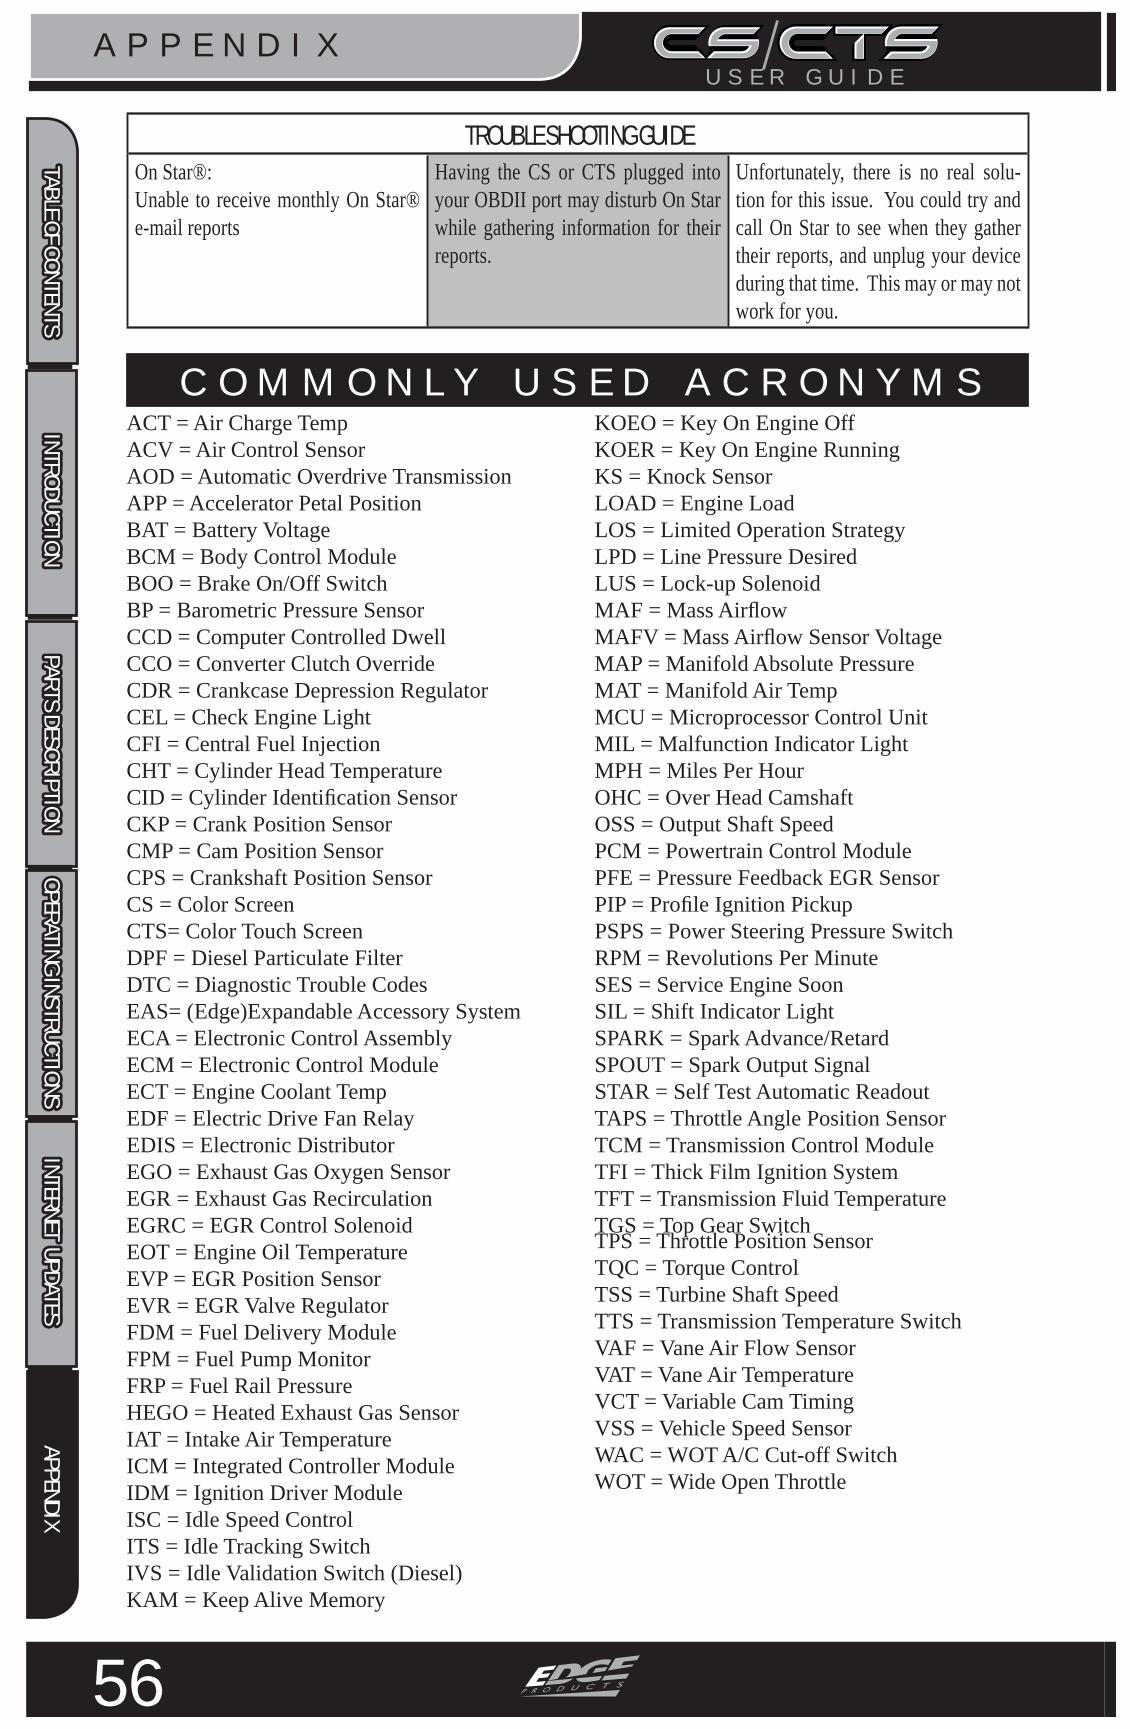
A P P E N D I X
56
U S E R G U I D E
TABLE OF CONTENTS INTRODUCTION PARTS DESCRIPTION OPERATING INSTRUCTIONS INTERNET UPDATES APPENDIX TABLE OF CONTENTS INTRODUCTION PARTS DESCRIPTION OPERATING INSTRUCTIONS INTERNET UPDATES APPENDIX
TROUBLE SHOOTING GUIDEOn Star®:Unable to receive monthly On Star® e-mail reports
Having the CS or CTS plugged into your OBDII port may disturb On Star while gathering information for their reports.
Unfortunately, there is no real solu-tion for this issue. You could try and call On Star to see when they gather their reports, and unplug your device during that time. This may or may not work for you.
ACT = Air Charge TempACV = Air Control SensorAOD = Automatic Overdrive TransmissionAPP = Accelerator Petal PositionBAT = Battery VoltageBCM = Body Control ModuleBOO = Brake On/Off SwitchBP = Barometric Pressure SensorCCD = Computer Controlled DwellCCO = Converter Clutch OverrideCDR = Crankcase Depression RegulatorCEL = Check Engine LightCFI = Central Fuel InjectionCHT = Cylinder Head TemperatureCID = Cylinder Identifi cation SensorCKP = Crank Position SensorCMP = Cam Position SensorCPS = Crankshaft Position SensorCS = Color ScreenCTS= Color Touch Screen DPF = Diesel Particulate Filter DTC = Diagnostic Trouble Codes EAS= (Edge)Expandable Accessory SystemECA = Electronic Control AssemblyECM = Electronic Control ModuleECT = Engine Coolant TempEDF = Electric Drive Fan RelayEDIS = Electronic DistributorEGO = Exhaust Gas Oxygen SensorEGR = Exhaust Gas RecirculationEGRC = EGR Control SolenoidEOT = Engine Oil TemperatureEVP = EGR Position SensorEVR = EGR Valve RegulatorFDM = Fuel Delivery ModuleFPM = Fuel Pump MonitorFRP = Fuel Rail PressureHEGO = Heated Exhaust Gas SensorIAT = Intake Air TemperatureICM = Integrated Controller ModuleIDM = Ignition Driver ModuleISC = Idle Speed ControlITS = Idle Tracking SwitchIVS = Idle Validation Switch (Diesel)KAM = Keep Alive Memory
KOEO = Key On Engine OffKOER = Key On Engine RunningKS = Knock SensorLOAD = Engine LoadLOS = Limited Operation StrategyLPD = Line Pressure DesiredLUS = Lock-up SolenoidMAF = Mass Airfl owMAFV = Mass Airfl ow Sensor VoltageMAP = Manifold Absolute PressureMAT = Manifold Air TempMCU = Microprocessor Control UnitMIL = Malfunction Indicator LightMPH = Miles Per HourOHC = Over Head CamshaftOSS = Output Shaft SpeedPCM = Powertrain Control ModulePFE = Pressure Feedback EGR SensorPIP = Profi le Ignition PickupPSPS = Power Steering Pressure SwitchRPM = Revolutions Per MinuteSES = Service Engine SoonSIL = Shift Indicator LightSPARK = Spark Advance/RetardSPOUT = Spark Output SignalSTAR = Self Test Automatic ReadoutTAPS = Throttle Angle Position SensorTCM = Transmission Control ModuleTFI = Thick Film Ignition SystemTFT = Transmission Fluid TemperatureTGS = Top Gear SwitchTPS = Throttle Position SensorTQC = Torque ControlTSS = Turbine Shaft SpeedTTS = Transmission Temperature SwitchVAF = Vane Air Flow SensorVAT = Vane Air TemperatureVCT = Variable Cam TimingVSS = Vehicle Speed SensorWAC = WOT A/C Cut-off SwitchWOT = Wide Open Throttle
C O M M O N L Y U S E D A C R O N Y M SC O M M O N L Y U S E D A C R O N Y M S

A P P E N D I X
57
U S E R G U I D E TABLE OF CONTENTS INTRODUCTION PARTS DESCRIPTION OPERATING INSTRUCTIONS INTERNET UPDATES APPENDIX
TABLE OF CONTENTS INTRODUCTION PARTS DESCRIPTION OPERATING INSTRUCTIONS INTERNET UPDATES APPENDIX
I N D E XI N D E XA
Accessory 44Accessory Options 33
Alert 4, 16, 17, 19, 20, 30, 31, 35, 50
Alert Options 30Show Alerts 20, 21Threshold 29, 30
Autodim 32
B
Back-down 16, 17Cold Engine Protection
41BackLight 32
C
Camera 19, 45CARB 9Clear DTC Delay 22Clear on start 22Clutch Slip 42Cold Air Intake 8Cold Engine Protection
41Custom Options 37
D
Diagnostics 21DPF 16, 17, 22, 23, 24,
56DTCs 22, 56
E
EAS 33, 35, 36, 44, 52, 56
EGTs 23, 34, 41, 44, 51, 52
EPA 9Errors 50
F
Factory Reset 34Fusion Software 48
G
Gauge 16, 17, 20, 31, 47
H
Hot Unlock 40
I
Injector Balance Rates 25
J
JAB 44Juice Control 40
L
Low Boost Response 41
M
Maintenance Manager 28, 29
Menu Timeout 32Mount 46Mystyle 47
N
Non-Stock Condition 50
O
OBDII 13, 15, 48, 50
P
Performance Tests 240-60 24Quarter Mile 25
Power Level 16, 17, 35, 37, 39, 40
Pre-Turbo 51, 52Probe 44Programming 37, 50
Q
Quarter Mile. See also Performance Tests
R
Race 40Records 25Regeneration 22
S
Safety 4, 5Screen Layout 16, 17, 31Serial Number 35, 36,
49, 54Software 48Sound Duration 31Speed Limiter 5, 38Stacking 5
T
Technical Support 35, 36, 54
Tire Size 32Torque Converter 42Transmission 56
Relearn 24Trouble Codes. See DTCsTurbo Cool Down 34
U
Units 34English 32, 34Metric 32, 33, 34
Update Required 50USB 13, 14, 15, 48, 50,
54
W
Warranty 6, 7


Copyright© 2010 Rev 07For additional questions not found in the user guide call:
Edge Products Technical Support: (888) 360-EDGE (3343) 8:00 am - 5:00 pm MSTTo expedite your support call, please have your Vehicle Information,
Part Number, and Serial Number ready prior to calling Technical Support. The Edge Products information is found on the label located
on the bottom of the device.