fit made easy© -
TRANSCRIPT

FIT MADE EASY™ "CATCH 22" DRESS FORMS & FITTING
SECRETS REVEALED©
The Fitting Sequence
The 11-Step Fitting Solution That Will Take You From Commercial Patterns to Fabulous Fitting Clothes
by
MASSIMO BARRA & JILL RALSTON

Prologue Fit Made Easy©, ("Catch 22" Dress Forms & Fitting Secrets Revealed©) is filled with fitting guidelines, gathered from our 20 years experience in fashion design, wardrobe for television, pattern making, and tailoring. By following the simple principles contained in this book, you will learn the secrets and tricks that the experts know, and your creativity will soar to new heights as you carefully follow and consciously break the rules.
Not only will you understand the cut, look, and feel of beautifully made clothes, but by comparing your new pattern to the initial commercial pattern, you will see what a "three-dimensional fit" looks like on paper, and you will be able to easily make the alterations to fit your needs at your own pace.
Some of the most celebrated universities in the United States and worldwide use the knowledge acquired from this workbook in their advanced classrooms, yet the steps are simple and easily understood even by the most novice designer. In today's fast-paced environment, technical departments often focus their efforts on patternmaking sometimes avoiding the most essential and basic part of fashion, "fitting".
Many pattern making companies have tried to resolve the issue of patterns that do not fit, but the truth is there is no way to adjust a commercial pattern to fit your exact measurements and shape, unless you make the alterations right on the person or on a dress form that duplicates your body.
Whether you are fitting for women, men, juniors, kids, seniors, physically asymmetrical, or wheel chair bound, the steps in this workbook will show you the way to Fit Made Easy©. Fit Made Easy©, ("Catch 22" Dress Forms & Fitting Secrets Revealed©) will turn your sewing experience into a walk in the park. We Wish You a Fabulous Fit!
About the Authors Massimo Barra and Jill Ralston have been major players in the fashion industry and founders of Fabulous Fit®, Visual Merchandising International, and the Fabulous Fit® Patented Fitting System, used by designers, worldwide. Their combined careers include a degree in one of Italian’s most celebrated fashion schools, and working on Dolce & Gabbana, and Versace collections, further expanding into branding, manufacturing, and designing clothes for prominent stores such as Bloomingdales, Neiman Marcus, Barney’s, Saks 5th Avenue, and more. The two fashion designers frustrated by the lack of quality in “fit”, focused their effort in building a new generation of fitting solutions. Since then, Massimo Barra, and Jill Ralston have always maintained a strong commitment in creating innovative ideas while expanding their vision.

"Crucial Guidelines And Simple Techniques That Will Change
The Way You Look!"
Lesson 1 - Understanding Cut ·Introduction ·Action & Reaction ·The Patented Fitting System
Lesson 2 - Visualize ·Analyzing Asymmetrical Bodies ·Planning is Your Secret
Lesson 3 - The First Sample ·Choosing and Organizing the Pattern ·Testing the Pattern ·Preparing the Fabric ·Positioning the Pattern & Cutting ·Making it Happen ·Seeing the "FIT" ·The Sleeve ·The Pattern ·Adjusting the Shoulder Line ·The Blouse Bodice
Lesson 4 - The Fitting Sequence ·The Fitting Sequence ·Adjusting the Size ·Altering the Shoulder Seam Adjusting the Shoulder Line ·Neckline ·Changing the Armseye ·Altering the Side Seam ·Underarm Ease ·Lengthwise Shoulder Alteration ·Summary of Alterations ·The Line of the Armseye ·Checking the Body vs. Form ·Testing the Sleeve ·Setting in the Sleeve ·Accuracy and Detail
Lesson 5 - The Second Fitting ·Checking Your Work ·Checking the Sleeve ·The Wrist Line

·The Neckline ·The Hemline ·Study
Lesson 6 - Creating the Pattern ·Planning the Pattern ·Marking the Pattern ·Using the Corrected Pattern ·Vintage, Cheap Chic…
Lesson 7 - Universal Design ·Fitting Pants on a Dress Form ·Basics ·Tips
Lesson 8 - The End ·Overview ·Conclusion

Lesson 1: Understanding Cut
Introduction A Fitting Workshop Have you ever, wondered: Why your sleeve pulls? Why your pants need tugging down in front, or tucking up in back? Why your skirt pulls across the stomach, or twists to one side? Why a side seam ripples or a collar slips back? Why necklines pinch, or a butt sags? Can such a minor annoyance, as well as dozens of other fitting problems ruin your day? Absolutely! We all have, or have had certain clothes in our closets that simply feel good every time we wear them, and it is not a matter of chance that we wear them over and over. Great clothes give you a lift, and a few thought out, well fitting pieces simplify your life. In fact, everything you sew should make you feel comfortable, happy and special or you have really missed the point. The technique of seeing how your clothes will feel involves a few simple principles in training your hands and your eyes to connect. With understanding and practice, you will develop a three-dimensional point of view as a new fitting guideline in working with the flat pattern. This is design. You will discover the key to this perspective of fit, by honestly analyzing each step of the fitting process at the neckline, shoulders, chest, armseye, sleeves, waist, and hipline, right on the dress form, and then comparing it to the pattern. Through working on a dress form, and creating samples, you will learn to see the changes that make a difference when fine-tuning the design. From “loving hands made at home” to clothes that look and feel like a million dollars. We wish you many hours of creativity!
Action and Reaction Planning
Great fitting clothes create illusions in proportion and posture. If your posture is sloping, you can make it look straighter; if your shoulders are narrow, you can make them look broader; if your bottom is flat, you can make it look rounder, and if your thighs are heavy, you can make them look thinner. Amazing figure irregularities vanish like magic with the right cut and fit. If fitting drives you close to madness, you are not alone. Many people have closets filled with beautiful clothes they never wear. Think about every detail before you begin. Take your time and plan! Everything matters!

Understanding fit, is probably one of the most creative, rewarding, and important accomplishments in sewing, and design. Forget about cutting, basting or fitting blindly again.
Follow these simple principles:
· How it works · How to "play" with fabric · How to avoid problems · How to see solutions Dress Forms Beyond a doubt, the easiest way to work with proportion, and create great looking clothes is on a dress form that matches the body. No matter how accurate your work is on the flat pattern, your clothes will not look or fit the same as when working on a real body duplicate on your dress form. You are free to pin, play, fit, and work on into the night, when the dress form mimics the curves of a real person. Have fun! In a custom sewing business, matching your client's bodies on the dress form makes fittings painless, efficient, and lucrative. In manufacturing, the key to "fit" is the dress form, since every commercial size encompasses many shapes, and variations. The ratio of pleats, darts or seams, based on the design, make any body shape within each size look great. Always choose a dress form that is smaller than the body you are fitting. When building out the dress form to match the vertical and horizontal measurements, you will be able to reproduce the exact silhouette. The difference between “home made” and “hand made” is detail in fit.
The Patented Fitting System® Before you begin the fitting process, we would like to show you the steps of creating your body on the form. Below is an example on how to use the Patented Fitting System, by Fabulous Fit®. You will be able to match any size and shape imaginable by repositioning the pads at the appropriate areas. Take your exact body measurements before you start padding your dress form. This will guarantee a perfect duplication of your figure. Step #1: Roll the side seam cover to just below the shoulder line. Slip the shoulder pads under the cover to match the shoulders of the person you are fitting. This is your start point. (You might prefer to pad the dress form on a table, rather than the base as shown in the photographs).

Step #2: Roll the side seam cover down to just below the bust line. Slip the bust pads under the cover matching the low and high bust, and side back.
This allows you to adjust the horizontal and vertical measurements as well as the shape of the form to match yours. You will be able to match shapes from low bust lines to up-lifts.

NOTE: For a wider back, add the side back pads right between the bust line and the waist. Adjust higher or lower to match your measurements. Step #3: Roll the side seam cover down to just below the waistline. Slip the stomach pad and the upper hip pads under the cover to increase each area, matching your vertical and horizontal measurements.
Step #4: Roll the side seam cover down to just below the hipline. Slip the hip pads under the cover matching your vertical measurement. At this point, you will be able to see your new shape coming together.

Step #5: Roll the side seam cover down to the bottom of the form. Slip the back hip pads under the cover to match your vertical and horizontal measurements. Stretch the back hip pads while positioning them under the cover to further smooth the line of your form. Use the filler pads under any of the contoured pads to further increase or enhance the shape.

Step #6: Stretch the princess seam cover over the form to achieve a definite and natural silhouette. This will also define the basic grainlines of your dress form to simplify your work.
Make sure that the princess lines on the cover match the bust points of your form and the front and back seams match the related positions. Your form is ready.

Lesson 2: Visualize
Analyzing Different Body Types Do you have average shoulders, round shoulders, or forward shoulders? Is your torso broad? Do you have a low bust? Is your waist rather high, and round? Are your thighs and hips rather wide? Well, this is normal. The last picture to the right shows a very full figure, with relatively small bones. The fitting details across the shoulders, armseye, bust, and hips are very important to the feeling in your clothes. Especially consider ease when concealing a full or an uneven silhouette. Seam line positions will divert the attention, and "ease" well placed will give you comfort in movement. Take care in choosing fabric and design. The design you choose will put an end to tons of fitting problems before you start. The best place to start is by taking an honest look at everything positive about your body. Do you have great legs, bust, and shoulders? Diverting attention is the magician's trick.
If your spine curves at the upper back, as in osteoporosis or if your body is asymmetrical, as in scoliosis, the same fitting principles apply. Duplicate the shape on the dress form, choose the pattern carefully, and follow the fitting sequence. Well-positioned grainlines and seam lines can hide a low bust line, uneven shoulders, too round thighs, one higher hip or the perfect shape of a pear. It all works the same way!
Planning is Your Secret
Prepare
Planning begins before cutting and basting. Understanding the pattern, the fabric, and the cut of the design are as important as understanding the lifestyle, the size, posture, and shape of the person you are working with. Since commercial

patterns are supposed to fit "average" figures, a standard paper pattern probably will not fit everybody. The commercial pattern is a wonderful two-dimensional guideline, and that is fine. We will show you how to work with the commercial pattern.
How does it all work together? Once you understand the principles of fit, you will own the concept of universal design. Create your Prêt-a-Porter! The rules of universal design apply to all types of materials you are working with, as well as the age or gender you are designing for, and whether you are designing clothes or furniture. The best way to see how your clothes will feel is through working on samples. This is what you do. Make your first cut in muslin. When you see the actual lines of your clothes in a well-made practice piece, you can easily adjust the line or design on the dress form before cutting the fabric. From there, you can retrace the "new” pattern or cut the fabric directly from the modified sample. This is the beginning. For samples, choose a material that falls most like the final fabric you will be using. For example, choose good quality batiste or mesh for working on voile, georgette, thin crepe de chine, or linen. Use muslin if you will be working on wool, heavier linen, or cotton. Use flannel for velvets, and other soft lightweight pile fabrics. The best way to understand the cut in fitting clothes is to try several samples. A simple, basic pattern, such as a straight blouse, with a front opening, set in sleeves, no darts, no tucks, no gathers, and a collar is a good start. We suggest beginning with muslin for your practice piece. Take your time because everything matters. Once you know the rules, you can break them! You are on your way.


Lesson 3: The First Sample
Choose and Organize the Pattern The First Sample To identify your chest measurement, place the tape measure under the arms, above your bust and around your body. The waist is right above the navel, and the upper hip is half way between the waist and the hipline. The hipline is also the widest point across your bottom. Usually, the widest part of your arm is ¼” to ½” below the deepest part of the curve on the sleeve.
Choose the pattern size that fits most closely at the upper chest, since this is the key to identifying your actual size. You will notice that each pattern piece has a vertical grainline marking. This line matches the vertical grainline on the fabric. Understanding the vertical and horizontal grain of the fabric, and how it relates to the body, saves hours and hours of trial. Extend the line on the pattern to both ends of each piece. Picture 4. Besides marking the vertical grainline (called warp) on the pattern, you also need to see the cross grain (called weft), which is a line on the pattern that is perpendicular to the vertical grainline. Once you have drawn the vertical grainline, identify the cross grainline by tracing a perpendicular line at the widest part of the chest, shoulder width, back, waist, high hip, low hip, and the fullest part of the arm (front and back), on the pattern. Vertical grainlines are parallel to the selvage.

Where you draw the line, makes a difference. Always follow the grainlines.
Measure and draw the cross grainlines at each horizontal measurement on the pattern. The folded pattern below, identifies the cross grainline.
Compare the measurement chart on the commercial pattern to your horizontal and vertical body measurements. The cross grainlines that you have drawn on the pattern must intersect the vertical grainline measurements. Match the vertical bust point, waist length (front and back), upper hip length (front and back), hip length (front and back), and adjust the sleeve length to the elbow and to the wrist using the patternmaker's guidelines "lengthen or shorten here".

Testing the Pattern Choose good cotton muslin, or possibly a light colored tattersol or gingham for an easier understanding of the fabric's grainlines. Avoid prints in the beginning; they are too confusing. Cut a piece of fabric that is larger than the pattern pieces, and find your vertical and horizontal grainlines by pulling the threads from the warp (lengthwise grain), and weft (crosswise grain). Place the pattern pieces on the muslin, and cut a notch matching the vertical grainline at the top of the fabric. If this seems tedious…hang on, the rewards are worth it!
Therefore, the vertical grainlines are parallel to the selvage (finished edge) of the fabric. Mark the vertical and horizontal grainlines on the muslin with a strong color marker matching the lines that you have drawn on the pattern pieces.

Preparing the Fabric Beware
Before you start "playing", make sure the fabric is in perfect condition. Sometimes fabric suppliers overlook the merchandise check. Two of the most common problems are, "flaws" in the weave, and the fabric pulling off grain. Check your fabric! Measure ten times and cut once. Couture is not about ripping. If the fabric is off grain, you can fix it! It can be stretched back to its natural state, depending on the nature of the problem, and fabric used. Usually you can accomplish this by pressing the fabric very carefully, while slightly stretching it diagonally. Warp and Weft of fabric
Positioning the Pattern & Cutting the Blouse Begin by laying the pattern piece onto the fabric, matching the vertical and horizontal grainlines. Follow the steps for each pattern piece: front, back, sleeves, collar, and cuffs. Transfer the horizontal lines to the muslin by drawing them with a marker. Start from the grainline. If the vertical grainline on the pattern piece is perfectly straight, the cross grainline will be exactly perpendicular. You will see that as you cut the actual pattern piece on the fabric. More about this later. Cut each pattern piece separately on the muslin. You can easily identify, and accurately match the vertical and horizontal grainlines between the muslin and the pattern piece. If instead, you decide to cut the final fabric double, fold it perfectly in half (on grain), matching the horizontal grainlines. You will also need to match the vertical and horizontal grainlines on the pattern to the fabric by carefully measuring, and pinning. Use the marking paper under the fabric while cutting. This little, yet very important detail, keeps the fabric from slipping away under your scissors, and will give you a very clean cut. Identify all the other markings on the fabric. (I.e. waist, hipline, elbow, etc.) Check all the markings as you pin the pattern to the fabric. Then, mark the notches from the pattern piece onto the fabric. Now carefully cut through the paper, and fabric around each piece. You must check that all the notches are in place, since they are the guidelines for matching all the pattern pieces together. Brava! You are ready.
Making it Happen Assembling the Pieces Begin by pinning the shoulder seams together, starting at the neck. Pin at right angles to the seam lines; follow the seam allowance on the pattern, and baste the seams together. You will see that the pattern piece is narrower in front, than it is in the back, at the shoulder line. The main reason for this is "ease", which is the room you will need to move effortlessly in your clothes. When you pin and sew the shoulder seams together, ease the back to match the front. These tiny gathers that you will not see when pressed flat, will provide that extra ease for movement. Well made clothes have the right amount of ease distributed in each area. DO NOT overlook this!
1. Pin and baste the side seams starting at the armseye. 2. Pin and baste the sleeve seams, but do not attach the sleeves to the body
yet.

3. From notch to notch, on each sleeve cap, sew one row of medium length stitches starting ¼” from the edge, and backstitch the thread on one side. If the bottom of the sleeve gathers into a cuff, repeat the same step as above then pin and baste the cuff onto the sleeves.
4. Pin and baste the collar, but do not attach it to the blouse. 5. Press all the seams open, and try the blouse on the form. Always fit
clothes right side out. If you need to insert shoulder pads, work with them under the muslin.
6. Pin the center fronts together evenly from top to bottom, matching all the markings for the upper chest, waist, and hipline.
Straighten the blouse on the form. Now stop! Look at the neckline (front and back), and write down some notes. Check the shoulder seam position of the blouse, and determine how it relates to the shoulder line of the dress form. NOTE: Consider the upper chest your most important area, since it determines your standard size. You can alter all the other areas of your body on the practice piece. We will show you how. Check the neckline; it should sit comfortably without gaping or pulling. The shoulder seam should line straight from the nape of the neck to the top of the shoulder bone, without creeping forward or sliding backward. You should not be able to see the shoulder seam from the front or back of the blouse. Starting with a nearly accurate fit at the top of the bodice will make fitting easier. Do not make any changes yet!
1. Pin and baste the collar to the neckline 2. Pin and baste the first sleeve to the blouse starting from the cap. 3. Match the notches on the sleeve to the notches on the armseye, and
adjust the ease. 4. Reposition your blouse on the form, and close the center front with pins. 5. Adjust the center back and center front vertical lines to match the center
front and center back lines of the form. 6. Position the seam lines, pin, and baste the sleeves to set as they would
on a real person. 7. Touch, play, and straighten the fabric.
Seeing the "FIT" of Your Blouse Stand a few feet away from the blouse while it is on the form, and check it from all angles. How does it look? Is it pulling or gaping? What is it happening to the vertical and horizontal lines that you have marked on each piece? What do you need to change in order for the blouse to fall straight? The vertical center back and center front lines on the blouse should follow the line of your form. If they are not straight, pin them into position. This is the only pinning we will do right now. Consider the next areas visually. Look at the cross grainlines at the chest, across the back, the waist, and the hipline. If they are not straight across the body, you will see a wrinkle.

Look at the vertical line of the sleeve. How does it fall to the elbow? Does the sleeve wrinkle, angle forward or pull back? Check the position of the cross grainline on the sleeve. The horizontal line should be perpendicular to the vertical sleeve marking.
The Ease
Check the fit of the blouse at the neck, shoulders, across the upper chest, bust, waist, and hips. Is the blouse too big or too small? Does the fabric pull, or gape? Is there too much or not enough fabric to allow for movement? Try on the blouse and see how it feels. You should be able to move comfortably. If a disturbing feeling catches your attention when you move in your blouse, that is ease, and you probably need to adjust for more.
The Sleeve Look at the sleeve seam lines. Are the lines straight? The armseye seam should follow the crease where the arm meets the body. If this is too narrow or too wide (front and back), the fabric will pull or bunch. Picture 9A, is showing our model with a very high shoulder line. The fabric lifts up at the highest point of the sleeve cap.
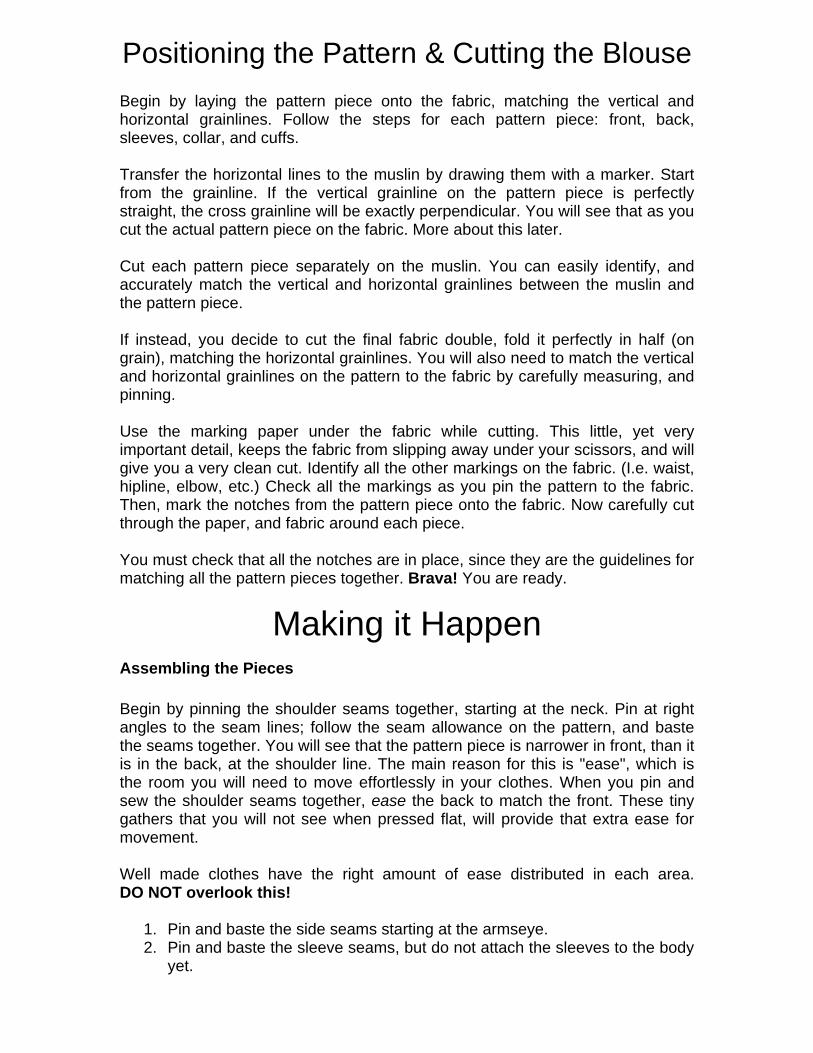
Notice how the vertical grainline pulls up at the shoulder seam. In picture 10A, our model's shoulder bones are leading backward; this causes the fabric to "lift" along the back, and the sleeve to swing backward for lack of fabric in the shoulder area. Pictures 11B & 11C show just the opposite. The shoulder bones are leading forward causing the fabric to "lift" on the front part of the sleeve.
Observe the vertical and horizontal lines on the sleeve and how they angle forward. In picture 11A, the fabric on the sleeve cap (back) is too short to cover the prominent shoulder bone, and it draws backward. On the other hand, the sleeve cap (front) is too long, and it wrinkles. Pictures 11B & 11C show the opposite. The fabric on the sleeve cap (front) is too short, and draws forward, while the fabric on the sleeve cap (back) is too long, and it wrinkles.

The Pattern Patterns are made for standard sizes. What this means is that, unless you are a perfect size 8-10-12 etc., and your measurements match the specifications of the patternmaker, the pattern will not fit your body shape. If this is the case, make sure you choose a pattern that matches your upper chest measurement, and then fine-tune the other areas.
After a careful fitting on the dress form, the adjusted pattern will reflect your exact measurements, allowing for comfort and movement. The pictures above are typical of very normal, yet different bodies that, with many variations, symbolize most women. The examples in the photographs represent most of the fitting problems that you will ever need to address. It is interesting to see how different body types can affect the final look.
The Blouse Bodice All the model pictures 9, 10 & 11, have a different curve degree, in posture and build, which affect the cross grainlines at each area.

This, in addition to the width of the body, will cause the fabric to poke out in front or create wrinkles in the bust area. We made all the corrections to the pattern pieces considering the posture, size, and body type of the models. Whatever the curve degree is, always choose the pattern size by the upper chest measurement. No matter what your body situation looks like (pregnant, round back, curved spine, asymmetrical body, etc.); the rules are still the same. NOTE: Practice on different size patterns, and explore a multitude of styles, and although the pattern corrections will be different for each model, the principles and rules will be the same for all. Just follow the fitting sequence and play.

Lesson 4: The Fitting Sequence
The Shoulder Line Make sure the shoulder slant on the pattern matches the shoulder slant of the body; otherwise, the lines that you have drawn on the muslin will not be straight. You will also see extra fabric, wrinkles, and stress or pulling along the shoulder line (front or back), if the shoulder slant between the pattern and the body are different. Observe the horizontal lines right on the dress form. Picture B has rather normal shoulders, and is close to the fit that was planned by the patternmaker. The cross grainlines are nearly straight (front and back), and the fit is relatively good on the upper body.
Easing the Shoulder Line In Picture 11B, you will notice slight wrinkles on the shoulder line, while in Picture 9C the direction of the vertical grainline on the left shoulder pulls down.

That is because the back pattern piece was not eased into the front. In picture 9B, the extra fabric is bunched at the neckline, rather than spreading evenly along the shoulder seam.
Picture 10B shows the cross grainlines pulling up at the center back. This is caused by the roundness through the shoulders.
To allow for the natural roundness of the back, the fabric can be cut right on the cross grainline at the top of the wrinkles, to release the necessary amount of fabric, making the back fall straight. We will show you how wrinkles disappear. It is amazing to see how the slightest alterations can change the way your clothes look and feel. Pictures 9A & I0A are a perfect example of a pattern that was not designed for square shoulders.

The lack of fabric at the back width causes the blouse to pull up at the shoulders, and drop at the neckline, creating deep diagonal wrinkles. Pictures 9C & 10C show examples of shoulders that are very sloping, and not accounted for in the pattern. Note how the cross grainline drops at the armseye, and pulls up at the neckline.

Fitting Guidelines
1. Understanding the grainlines of the fabric, for precision in fitting. 2. Understanding the "ease" of the fabric, for comfort, and movement. 3. Understanding the position of the seam lines, for detail accuracy. Remember! Wrinkles are the result, not the reason. Before you pick up the pins, scissors or even touch the fabric on your dress form, plan, plan, and plan! Consider all the alternatives. Would you straighten the grainline or change the position of the seam line? Would you add or subtract fabric to allow for movement in certain areas? Where would you start? Observe, think, and consider the easiest way to make the changes. Make as few changes as possible, starting from the top. Before you continue in sequence, complete all the changes at each step. In the end, you will save time, and achieve the best result.
Fitting Sequence Overview Check each area of the blouse on the form. 1. Center Front and Center Back. This is where you will make slight adjustments in size. Take it in or let it out. 2. Shoulder Seam. Here you can change the position of the shoulder seam or straighten the cross grain of the fabric for the upper chest, back, and bust line. 3. Armseye. You can use the armseye seam to make adjustments to the upper chest, back, and bust line. 4. Side Seam. Use it to straighten the cross grainline at the waist and hips, (front and back) or reposition the side seams. You can also address problems below the armseye or the bust line area. 5. Lengthwise on the Shoulder. Adjust the shoulder width, and armseye (front and back).

6. Armseye. Adjust the shape, and depth of the armseye under the arm, (front and back) to allow for movement. Remember, the armseye seam matches the crease where the arm meets the body. 7. Sleeve. Adjust the sleeve length, width, shape, and the vertical position of the elbow. 8. Armseye and Sleeve. Adjust the position of the sleeve to the armseye. Check the shape, depth, and ease at the sleeve cap, and the underarm. Also, make sure that all the notches match between the armseye and the sleeve, for a more accurate result. Check the grainlines. Do not forget! If your sleeve is off grain, it will not fall straight. 9. Sleeve hem and Sleeve Cuff. Adjust the line, and size width of the sleeve hem against the width, and line of the cuff. Next, adjust the gathers or pleats of the sleeve, to match the cuff at the wrist. 10. Neck. Adjust the neckline and the collar. 11. Blouse Hem. Adjust the blouse length and width at the hemline. If planning to make a belt, check its position now. When you make the changes from the top down, following the fitting sequence, you actually start unveiling the secrets of "fit". Everything falls into place! The grainlines fall straight (front and back). The ease along the back shoulder seam follows the line of the shoulder, without pulling. The armseye seam at the upper chest follows the exact shape of the arm, and the sleeves fall straight. The correct position, depth, and width of the armseye allow the body, and arms to move freely. The correct sleeve width and length, allow the elbow to bend easily. The grainline on the sleeve falls straight, without twisting. The sleeve length, at the wrist, sits just below the wrist bone, and does not draw nor hang. The neckline does not pinch, pull back nor creep forward. Last but not least, the hem falls in the most flattering proportion to the body. Well-fitting clothes, allow you to sit, stand, drive, reach, and most of all, hug!
Adjusting the Size Center Back and Center Front If the back of the blouse is too big, yet otherwise is the right size, you can alter it by cutting straight up the center vertical grainline, and pinning the fabric together to fit. NOTE: Remember to match the cross grainline of the fabric.
1. Pin in the same amount of fabric all the way down the center back, matching the grainlines of the fabric piece to the grainlines of the bodice.

2. Retrace the line down the center to identify the new center back. If the front of the blouse is too big, yet otherwise is the right size, adjust the front by repeating the same steps as for the back.
NOTE: In re-pinning and adjusting the front, it is easier to make a seam, as you did on the back, rather than crossing the center front pieces over as in Picture 9.
If the back or front of the blouse is too small, add some fabric at the area that needs to be altered. Pin the front center seam by following a vertical thread in the fabric to assure that the grainlines are straight. Pin the center back and center front to the form, to anchor the grainlines for the next step of the fitting.
Altering the Shoulder Seam Remove the collar and one sleeve before you make the alterations. If the shoulder seam slant does not follow the line of the shoulder, the cross grain will pull. Open the seam. There are two ways to straighten the cross grainline at the upper chest.
1. Alter the shoulder seam at the neck by pinching the fabric, and straighten the cross grainline. You can see this problem in picture 9A. The neckline is high and the armseye is small.

2. Straighten the cross grainline by dropping the top of the bodice at the shoulder, providing more room at the armseye. Picture 14
In the picture below, the armseye is large. You can straighten the cross grainline by adjusting the bodice at the neckline or by making the adjustment at the top of the armseye. Pin the fabric to the form to anchor the line (front and back).
Check the vertical grainline to make sure the fabric falls straight.
Neckline If the neckline is too high or tight, clip the edge with small ¼” cuts toward the body of the blouse. Do not trim the neckline at this point. If the neckline is too low or too large, add pieces of fabric, matching the grainlines, at the neckline. In picture 12 (front), and picture 13, (back), you will see the example of what happens by just correcting the position of the grainlines, and shoulder seams.

The cross grainlines, at the upper chest, upper back, and the shoulder seams, were the only corrections, yet the difference between the two sides is enormous. On the front bodice, the area above the cross grainline fits perfectly. Check the difference between the three shoulder lines in picture 14A, B, & C. You will see that the correct shoulder position for each body type is slightly different.

Changing the Armseye In pictures 12-14A, B, and C you can see how the fabric is pulled across the bust line. As a result the side seams draw forward at the bust, and the front “pokes” out creating deep diagonal wrinkles, and making the blouse look too full at the front hipline.
In Pictures 14B, & C, the armseye slightly waves at the underarm. The fabric pulling across the bust, the deep diagonal wrinkles, and the side seams running crooked are the consequence of a lack of fabric in the shoulder area. All three bodies in the pictures need more fabric in the bodice length, (front, and back) than the patternmaker intended.

NOTE: By releasing the fabric at the shoulder seam, you can easily address all the problems above. Although the upper chest armseye thread is straight, the bust is throwing the lower armseye position off by drawing the fabric too high in the front. Look at the cross grainline at the hipline. The wrinkle is also the result of the line pulling up at the bust. You need to straighten the cross grainline. You will see what to do when you rip the side seam, and let it fall. If your armseye line is right, do not touch it. Work only with the side seam. If the wrinkle is slight, try basting a few gathers in the side seam, in front, at the bust line. The tolerance of the ease should be slightly more than ½”.
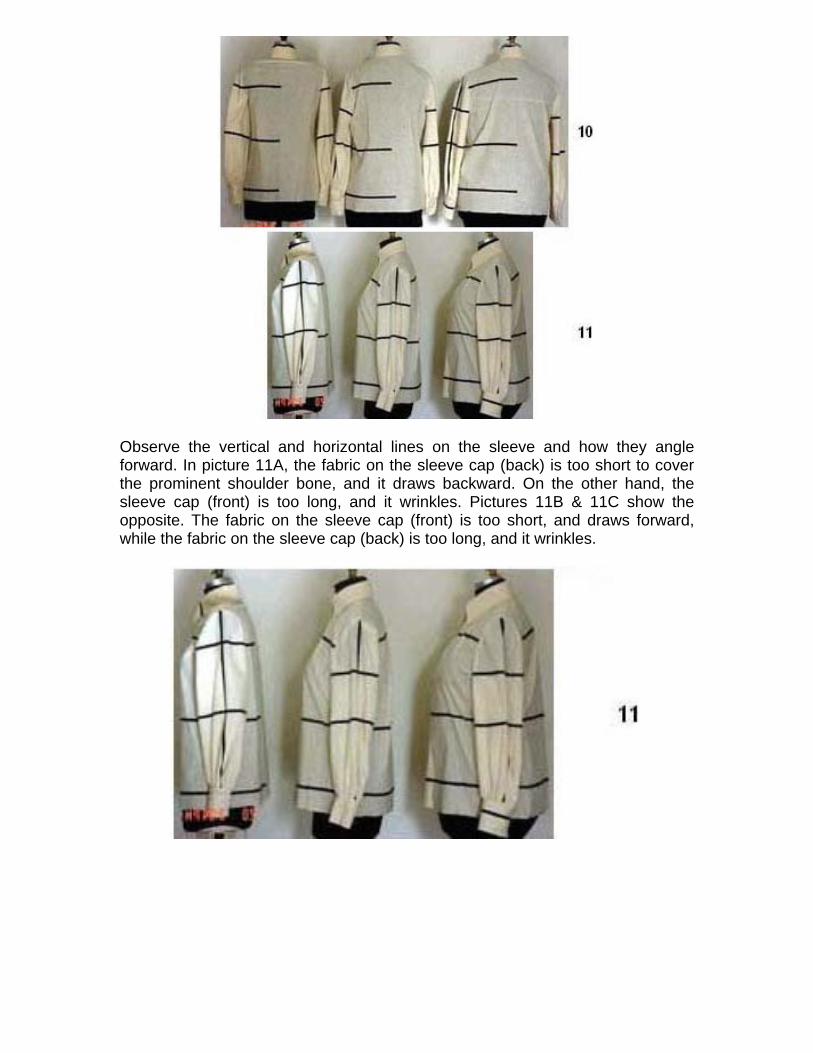
Another way to straighten the cross grainline is to pinch a small dart on the armseye line, (it disappears when you adjust the pattern), and pin it in place. Pictures 15, 16 & 17.
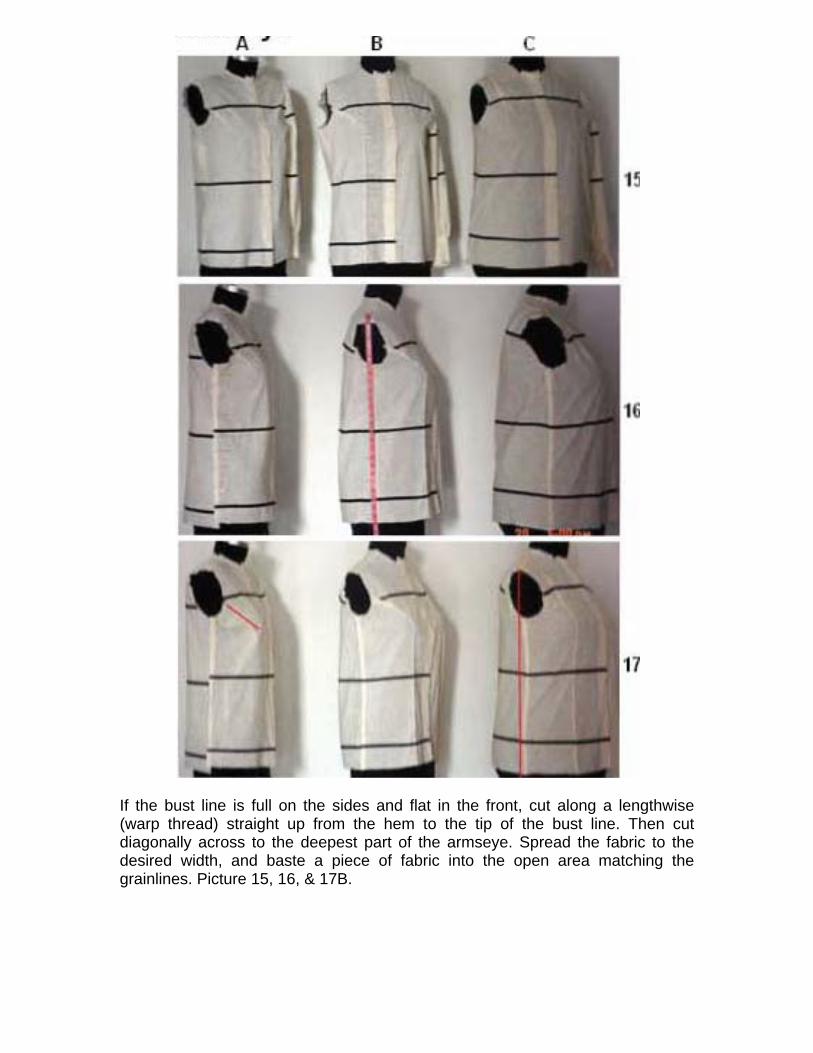
If the bust line is full on the sides and flat in the front, cut along a lengthwise (warp thread) straight up from the hem to the tip of the bust line. Then cut diagonally across to the deepest part of the armseye. Spread the fabric to the desired width, and baste a piece of fabric into the open area matching the grainlines. Picture 15, 16, & 17B.

If the bust of the body is very high or full compared to the blouse bodice, it can be dropped without changing the armseye. Cut diagonally across the thread to the fullest part of the bust line, and taper your line to nothing at the armseye. Spread the fabric to allow for the fullness in front, and set in a wedge-shaped piece to join the two sections. Do not forget to match the grainlines of the inset piece to the grainlines on the bodice. Picture 19B.

To correct a pull on the back of your bodice (as in Picture 18, 19), ending at the armseye area, cut the fabric from the center back to the armseye edge without cutting through it. Let the fabric drop at the center back until the pull disappears. Add an inset from the center back to the armseye edge to fill in. This will also correct the gaping at the armseye. Retrace the armseye shape if necessary.

Princess seams on a prominent bust line are by far the simplest method of allowing for extra fullness. Check the back wrinkles in the same way, and straighten the grainline to remove the wrinkles. Observe what happens to the fabric, and diagonal wrinkles on the blouse (front or back) when the pattern has been corrected to allow for the extra length needed. Pictures 15B, C, & 16.

In picture B, the blouse no longer sticks out in front, but the blouses in pictures A and C will need still another alteration in order to straighten the cross grainline. The adjustments will be made in the side seam.
Altering the Side Seam When the cross grainline is not straight through the hips, the blouse will stick out in the front, and the seams will be crooked or twist. If the cross grainline pulls up in the center front and or center back, the blouse will poke out in the front, and or in the back. If the cross grain pulls high at the hip, the side seams will stick out. The cross grainlines at all areas on your practice piece must be straight or you will end up with wrinkles. NOTE: For the average figure, you will mostly see the cross grainline dipping at the hip line. Try using one of the three methods for straightening the line:
1. The armseye dart. 2. The ease on your front bodice at the bust line. 3. The dart at the bust line.

Darts are everywhere on coats, jackets, dresses, skirts, starting at any area (waist, hips, hem, etc.). So, be creative! Do not limit yourself. There are absolutely no restrictions on how to use or where to place them.
1. Pin the cross grain markings on the practice piece onto the form at the hip and side seam line, and anchor them to the straight position.
2. Pin in the darts or baste in the ease on the side seam. Ideally, the armseye dart should be laid out so that it will start at the armhole, over the bust point, and down to the hem. Picture 15B NOTE: In order to allow for sitting in coats or straight dresses, the back hemline should be dropped a slight ¼”.
A dart beginning at the hem, the side seam or at the high hip area, on a basic bodice, should end at approximately ¾” from the bust point. Release the pins that are anchoring your hipline cross grain threads, and check the darts or ease at the bust line to make sure that your side seam falls straight. Check how much more fabric you will need on the side seam at the bust, waist, and hips. Try on your practice piece.

Underarm Ease A perfectly fitted straight cut bodice must look "relaxed" on the dress form. The basic allowance for a classic piece is about 2". The amount of ease around the body changes, depending on the size, style, and fabric of the blouse. The armseye should not pull, nor gape. If this happens, you can adjust it by building out or taking in the underarm seam. NOTE: The allowance at the armseye will obviously change if working on either fitted or over-sized bodices. Underarm Seam The underarm seam begins right underneath the tip of the shoulder at the armseye, and drops down to the end of the bodice passing over the waist, and hip areas. The correct position of the side seam will give the appearance of the best possible posture. If the seam draws backward, the bust and front body will look prominent. If the seam draws forward, it will emphasize round shoulders, or large hips. To identify this line, tie a scissor to a seam binding, and let it hang from the tip of the shoulder seam, on the dress form as shown in picture 16B. Mark this line, and pin the side seams together Picture 17.

NOTE: Observe the seam lines in picture 16, and compare them to picture 17. If your body is curved or asymmetrical, open the side seam, and consider what might be added, or redrawn to match your silhouette.
Lengthwise Shoulder Alteration If the bodice is too broad or narrow on the shoulders or at the armseye, cut the front or back along a lengthwise (warp) thread, straight up from the bottom of the blouse to the middle of the shoulder. If the shoulders of the body are narrow or broad compared to the bust line, make this alteration only above, and not below, the bust point. To alter the body at the shoulders, cut straight down to the bust point following the warp thread, and then across to the armseye. Take out, or set in, the necessary amount of fabric. Be sure to match the grainlines of the inset. Picture 17.
Summary of Alterations Picture 18 and 19 show the alterations that have been made up to this point. Pictures 18B and 19B show the "before" and “in process” alterations. The blouse in the pictures below has been corrected by changing the pattern at the chest width, back width, and open side seam areas. Pictures 19A, and B.

Picture 19B shows the alterations made (Picture 18A, 18B and 18C), to avoid the wrinkle at the front armseye, and the pull at the front bodice. The split taken on the back bodice, in order to straighten the grainline at the hips, allows the blouse to fall straight. Picture 19C shows the corrected pattern after the alteration. NOTE: Observe the excellent ease throughout the body, and how the shoulder seam, shoulder slant, and underarm seam are positioned and fall perfectly on the blouse. A very simple alteration as the one shown above completely changed the look and fit of the bodice. You can correct every wrinkle in the finished piece, with an easy step, following the sequence.
The Line of the Armseye The armseye line is probably the most defining line in the bodice. The perfect armseye seam position will actually improve or disguise many irregularities in posture and proportion when fitting a real person.
If the armseye is too deep, add a piece of fabric (matching the grainlines) at the side seam of the underarm. Retrace the new line of the armseye, and rejoin the side seams.
If the armseye is too high, cut, spread, and remove the necessary amount of fabric from the specific area, and retrace the new line of the armseye.

NOTE: Avoid making the armseye alteration by taking up or letting down the shoulder seam since this will change the ease and fit across the body. Now that the size of the armseye has been addressed, consider its shape. A natural armseye line follows the shape of the arm in conjunction with the body, extending from the highest point of the shoulder down toward the chest width, and back width areas. Your basic armseye is egg shaped, with the larger curve down at the underarm, and tipping slightly forward. Find its position at the top of the arm by following either step:
1. Baste a colored thread along the armseye edge starting at the shoulder going
down around the underarm, and then back up to the shoulder seam.
Check the bodice from every angle to determine the right position considering the depth of the armseye, and where the crease would be at arms down.
2. Cut a notch at the highest point of the sleeve, and use it as a guide.

Pull one side of the thread to gather the row of stitches previously sewn on the sleeve cap.
Compare the sleeve to the armseye, and pin it to the blouse matching the notch (highest point of the sleeve) to the shoulder seam, so that the vertical grainline to the elbow falls straight. Picture 2OC.

Step a few feet away from the dress form to make sure the position of the
sleeve is correct. When satisfied, mark the seam line for the armseye with a row of pins, and then remove the sleeve.
Trim the armseye ¼”' to ½” outside the line of marking. Picture 2OB. Unless the body you are working with is asymmetrical; make the corrections on one side only.
NOTE: Pay particular attention when working on the sleeve, since it is the most difficult area to fit.
Checking Your Work, Body vs. Form Position the blouse on the dress form, and check the ease on the front, back, and sleeves. Also, check the grainlines, and the position of the seam lines. Make sure that both sides of the blouse (front, and back) fit the same way on the dress form. If further alterations are needed, make the changes now following the fitting sequence. When the blouse fits perfectly on the form, and you are satisfied with the way it looks, complete the sequence for the second fitting by trying the blouse on the model. Note every alteration that you have made on the commercial pattern up to this point.
Testing the Sleeve Why sleeves have problems
Sleeves, without a doubt, give more problems in fitting than any other area. Usually, this is because we start working on sleeves before the bodice is ready for them. Many, problems are blamed on the sleeves, when in reality it is the bodice that is not correct. Only a small percentage of sleeve problems are related to the size and shape of the arms. NOTE: The bodice must be ready and fit perfectly at each area before attempting to set in the sleeve. Plan ahead... it is easier. Try the sleeve on the arm to test it for size, length, and for the position of the elbow. Generally, the sleeve will fit best if you allow for sufficient ease throughout its length. Usually 1 ½” to 3” at the top, and 1 ½” to 2 ½” around the arm at the wrist area. Of course, the body you are working with, the type of sleeve, fabric, and style will determine the exact amount of ease. 1. Plan to add more ease in soft materials than in heavier ones. You will be able
to verify the exact size, length, and shape of the sleeve after basting it into the blouse.
2. If the sleeve is too large or too small around the arm, alter it by cutting the sleeve in the middle on a lengthwise thread, and either spread or lap the amount of fabric needed.
3. If the sleeve length is too short at the wrist, alter it by adding a piece of fabric at the wrist and retrace the sleeve seam lines to accommodate the wrist width.
4. If the sleeve length is too long, alter it by cutting at the desired length and retrace the sleeve seam lines to accommodate the wrist width.
5. If the elbow of the sleeve does not match the elbow position of the body, adjust it by pinching or adding fabric at the elbow. Check the vertical measurement of the elbow on the sleeve, and retrace the sleeve length.
Setting in the Sleeve The easiest way to set in the sleeve is by placing the bodice on the dress form. Begin by gathering the row of stitches previously sewn on the sleeve cap, so that it is about the same size of the armseye.
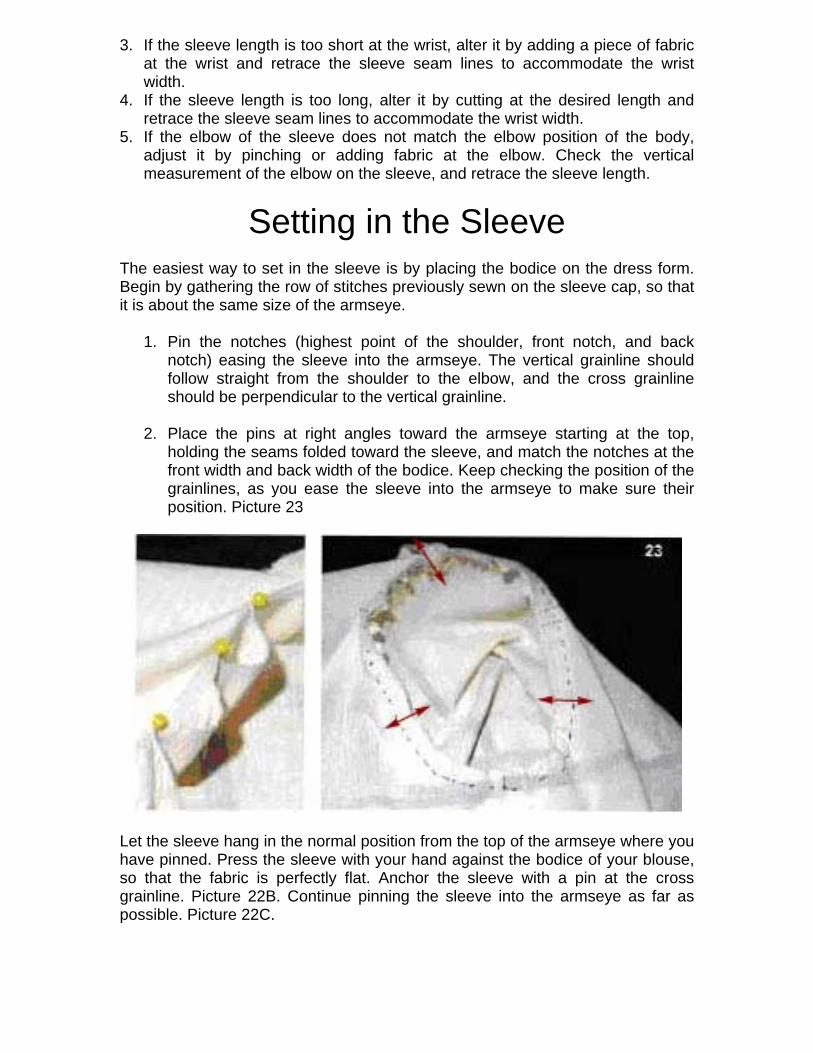
1. Pin the notches (highest point of the shoulder, front notch, and back notch) easing the sleeve into the armseye. The vertical grainline should follow straight from the shoulder to the elbow, and the cross grainline should be perpendicular to the vertical grainline.
2. Place the pins at right angles toward the armseye starting at the top,
holding the seams folded toward the sleeve, and match the notches at the front width and back width of the bodice. Keep checking the position of the grainlines, as you ease the sleeve into the armseye to make sure their position. Picture 23
Let the sleeve hang in the normal position from the top of the armseye where you have pinned. Press the sleeve with your hand against the bodice of your blouse, so that the fabric is perfectly flat. Anchor the sleeve with a pin at the cross grainline. Picture 22B. Continue pinning the sleeve into the armseye as far as possible. Picture 22C.

NOTE: After using this method several times, your skills will improve, and your sleeve will fit the body as perfectly as it fits the dress form. You have just completed the first fitting!
Accuracy & Detail With the pins in place, which are holding the sleeve flat against the bodice, take the blouse off the dress form. Pin the sleeve, into the armseye under the arm, and then baste a line on the sleeve at the edge of the armseye.
Check all the notches on the bodice (front width, back width) against the sleeve to make sure they match.

1. Mark the front and back with notches on the bodice, directly onto the sleeve using a tailor’s tack.
2. Mark the top notch of the sleeve to match the highest point on the bodice (shoulder). If the notches on your pattern are different from the new markings, make sure to change them to the new position.
3. Remove the sleeve from your blouse, and rip the sleeve seam. 4. Pin the two sleeves together, matching the vertical and cross grainlines. 5. Trace the corrected line for the sleeve top, and pin or baste the corrected
lines for the shoulder, underarm, and the armseye seam. 6. Unpin or rip all the seams on the bodice. 7. Carefully pin the fronts together by starting at the center front area. 8. Fold the back in half, and carefully pin the pieces together, matching the
vertical and cross grainlines. 9. Trace the new seam lines on the front and back pieces (Picture 24)
leaving a generous seam allowance to the new lines. Picture 25. 10. Using the new seam lines, pin and baste the back and front of the bodice
together. 11. Baste the sleeve into the armseye matching the notches, then sew and
stitch around the neckline, 3/16” (between the edge and the seam), to prevent it from stretching while fitting.

Lesson 5: The Second Fitting
Checking Your Work Study the corrected side of the blouse from all angles to make sure it fits perfectly on the form. It is important to keep the neckline high, so trim it above the bone at the base of the neck in back, close to the neck on the sides, and above the hollow at the base of the neck in front. Pictures 20A and B.
When you are happy with the fit on the form, test the blouse on the person you are fitting. It should fit exactly the same way. If not, either the form did not match your model or the blouse was not fitted to the form correctly. In either case, do not give up! Make the adjustments needed, by starting at the beginning fitting sequence, and keep going.

Soon your eyes will feel connected to your hands and your fittings will become easier. Check the vertical grainlines, the cross grainlines, the slant of the shoulder seam, and the armseye. See how comfortably the bodice fits across the shoulders, upper chest, back, bust, waist, hips. How does it feel? If you see wrinkles at any area on the model, that were not visible on the dress form, alter the dress form to match the model, so that the wrinkles reflect on the form the same way. Even minor adjustments are essential for every piece. Take your time and make the changes, once! When the fit of a pattern is excellent throughout the body, it will be used as a standard block in creating new designs, time after time. In custom clothes, the key to "fit" is the dress form, since it can be padded to exactly duplicate your client's body shape. You will be able to create as many clothes as you like, without going through the fittings with your clients. Each piece will become easier and more fun to create than ever before. In manufacturing, the key to "fit" is the dress form. Every size encompasses many shapes, and variations from “standard”. When all the singularities of a real person are addressed on the form, and the ratio of pleats, darts or seams has been considered to fit as many shapes as possible within each size, the "cut" will truly be your success.
Checking the Sleeve Try on your blouse. Be sure that your sleeve is comfortable, and correct in size and length. Bend, raise, and reach your arms to test it. If the armseye feels right, but still the sleeve feels tight throughout the arm, your sleeve seam may need letting out, your underarm may be too short, or the elbow position may be misplaced. The stress along the upper sleeve may be caused by a too low armseye position. In this case, the sleeve cap will be too long, and therefore cause stress on the arm. In order to take care of this problem, raise the armseye by adding a piece of fabric under the arm, and retracing the line (A-B1-C1).Then, shorten the sleeve cap by taking in the fabric at the top notch, and retracing the line (A-B1-C1).

In the picture above, you can easily see the same alterations made on a jacket pattern. Now cut the sleeve following the new shape. This allows you to move freely without adding fullness to the armseye. If the sleeve twists, pulls, or gapes, but feels more comfortable, repeat the fitting sequence steps, making the changes at ¼’ increments. Retrace any alterations on the original sleeve pattern in order to avoid further problems. For every action, there is a reaction. If you fix something that has already been altered several times, you will probably end up with a mess. If instead the sleeve does not fit at the armseye or throughout the arm, and if it is too big or too small, go back to "Testing Your Sleeve" and make the adjustments. Check how the sleeves fall, and the position of the grainlines. The vertical grainline to the elbow should be perpendicular to the cross grainline.

The sleeve should not twist, lead forward nor fall backward. The sleeve seam line should fall straight along the arm. Bend your arm to check the elbow position, and the position of the seam. If the seam line twists, it could be caused by one of the three following reasons:
1. The pattern was not placed correctly on the fabric when it was cut, causing the sleeve to twist, and the vertical and horizontal grainlines to be off.
2. The seam was stretched on one side when it was sewn. 3. The sleeve ease was not properly distributed around the armseye.
If the sleeve draws backward, from the armseye to the elbow, it is because the ease is not distributed correctly throughout the armseye. This is what you do.
1. Carefully rip the sleeve cap from front notch to back notch along the bodice, and re-distribute the ease of the sleeve cap from the back notch towards the front notch. The rotation of the sleeve will rebalance the ease.
2. If the cross grainline pulls or is too short, add or pinch the fabric at the
sleeve cap as you did on the bodice of the practice piece. Make all the necessary changes before proceeding to the next step. When the sleeve fits perfectly, try it on the model to check the look and fit, and then determine the line at the wrist area.
The Wrist Line The correct line at the wrist on the sleeve will be different depending on the style and type of sleeve.
1. Establish the height of the cuff (the standard cuff is 2 ½” to 3”). 2. Establish the style of the sleeve (lots of gathers, barely eased, a pleat,
etc.). 3. Bend your arm 45 degrees and measure the length of your sleeve. 4. Begin measuring at the shoulder point (where the sleeve cap meets the
shoulder seam) following the back of the arm, over the elbow, and down to the wrist.
5. Subtract the height of the cuff leaving the extra fabric you will need for the seam allowance and overlay.
6. For more gathers, add fabric at the bottom of the sleeve, at the side seams.
NOTE: On a tailored sleeve with the placket in back, make sure the cuff opening is in line with the elbow and the little finger. Picture 26

1. Check the length by bending the elbow, allowing the cuff to fall when your arm is relaxed at the side.
2. Arrange the gathers to follow the vertical grainline running straight from the elbow to the little finger.
3. Pin the cuff to the sleeve with the pins at right angles, and move the arm freely to test the ease, the grainline, and the position of the seam line. The sleeve will be longer in the back to allow for movement.
4. If the sleeve is finished without a cuff, you can use a seam tape, pinned around the wrist.
5. Tuck the sleeve fabric under the tape, and test the ease of the sleeve in length by bending the elbow.
When the sleeve and cuff are right, remove the bodice, and mark the cuff line, which is connected to the sleeve, with a row of pins or basting stitch. If you are working with a tailored cuff, mark on the sleeve, the position of the placket and the cuff opening, which also must be in line with the elbow, and the little finger. Arrange the gathers starting from the first finger and out toward the little finger. Check the position of the vertical grainline.
1. Remove the cuff, and check the line of pins or the basting. 2. Slide one sleeve inside the other, face to face. Pin the sleeves together,
matching the grainlines, the sleeve seams, and the cut edges at the bottom of the sleeve.
3. Trace along the line at the top of the cuff, marking the bottom of the sleeve.
4. Allow for a ¼” seam, and then trim the extra fabric. 5. Gather the sleeve at the bottom with one row of stitching, then pin the cuff
to the sleeve. 6. Adjust the gathers, and check the grainlines. Place the blouse on your
dress form.
The Neckline The starting point for every neckline is the natural line that follows the base of the neck where it meets the body. From there, you can develop variations or decide the height, and shape of the collar depending on the design.

NOTE: Collars always fit best if the neckline is high in the back. This is the natural position at the base of the neck. For practice, cut the pattern on a lengthwise thread or crosswise thread of the fabric, which will give you the proper fit at the center back on the collar.
1. Cut one or more collars in different styles using the vertical grainline. 2. Cut one or more collars in different styles using the cross grainline.
NOTE: The size and shape of a collar is very important to the face, neck, posture and size of the person wearing your design. In most designs, the center back of the collar is placed on the vertical grainline of the fabric. Pin and baste the collar you have chosen onto the blouse, and try it on the model to study the styles and shapes that best fit the type of person you are fitting.
The Hemline The magician's ruse is your mind's eye.
NOTE: Proportion is everything! The easiest way to see the hemline is to test it at different positions along the curves of your body. Mark the most flattering length with a row of pins or basting stitches. Pin the hem and check the curve. The same rule applies to blouses, jackets, coats, etc. As a final step, check the hem to see how the blouse looks in relation to the model's figure. You have just completed the second fitting, and your blouse is ready!
Study Study the blouse from every angle while on the model. Consider the three fitting guidelines.
1. The grainline of the fabric. Check the center front, and center back vertical grainlines. Check the horizontal grainlines at the front width, back width, waist, and hips. Check the vertical and horizontal grainlines of the sleeve.
2. The ease allows for movement and comfort. Check the ease at the neckline, shoulders, back, chest, bust, waist, hips, sleeves, collar, and cuffs by trying on your practice piece.
3. The position and slant of the seam lines. Check the shoulder, underarm, armseye, sleeve, cuff, neck or collar, and hem. If there is still fine-tuning to be done, do it now. Compare pictures 28, 29 & 30 showing the finished blouse to the original pictures 9, 10, & 11.

By using the fitting sequence in removing the wrinkles, pulling, etc. (just straightening the grainlines), there will be no guessing throughout the fitting process.
1. In the fitting process, problems above the chest width and back width were addressed at the shoulder seam.
2. Problems between the chest width and the bust line or between the back width and the bust line were addressed at the armseye.
3. Problems below the bust line were addressed in the side seam. The fitting began at the top of the blouse, and continued down to the hem, step by step, following the fitting sequence.
There was no random pinching, pulling nor “trial and error” at any stage. NOTE: You will be able to master the "fitting sequence", once you “see” the concept of action and reaction. Fitting represents self-expression and identity. You can sew to create "just clothes", or you can sew to express yourself!

Lesson 6: Creating the Pattern Planning the Pattern
Use this pattern guideline chart in your future projects. Lay the pattern pieces on the table, and check the following markings.
Front Pattern Markings Center Front Chest Width Hip Width Shoulder Line Armseye Position of the Underarm Seam of the Sleeve Neckline Darts
Back Pattern Markings Center Back Back Width Hip Width Neckline Shoulder Line Armseye Sleeve Pattern Markings Vertical and Horizontal Grainlines Front Width Notch Back Width Notch Position of Gathers or Pleats at the Wrist area Position of Cuff Opening or Seam Cuff Pattern Markings Position of Vertical Grain Line Position of the Gathers or Pleats Collar Pattern Markings Notch for Center Back on Bodice Notch for Center Back on Collar Notch for Shoulder on Collar

Marking the Pattern
Carefully rip the blouse apart. Press each piece flat without stretching the fabric. Pin the two halves of each pattern together (fronts, backs, and sleeves) to make sure they match at each area. If the difference between the two pieces is obvious, it is a good idea to prepare both sides separately. Trim the seam allowances from the marked seam lines 3/8" at the shoulder, around the armseye, and the sleeve, and ¼” at the neckline. Just be sure that all of the seam allowances are the same, except for the neck and wrist allowances, which will be 1/4'. If your design has a self-belt, trim the seam allowances at 3/8”. Place and pin the cloth pattern pieces onto the marking paper. Position the center front of the bodice along the edge of the paper, and the center back along the fold of the paper. NOTE: This will ensure the corrected position of the vertical grainline on each piece. Carefully trace a line around each cloth pattern piece and copy all the markings and notches onto the paper. If the side seam notches for the hip line on the front and back cloth pattern pieces do not match, due to the previously made changes, mark a new notch on the front pattern piece at the side seam to match the back pattern piece. Draw a line through the seam line, horizontally, and cut the notch (Plan your notches at chest, waist, and hips for reference). Indicate all of the seam allowances with a notch, so that anyone who uses the pattern will know exactly how to read it. You have successfully completed the sample piece! Check, every aspect of the paper pattern to ensure its accuracy, and that all the markings were properly copied. Remember that the ease on the back shoulder seam will change depending on the design and fabric used (approximately ½” longer than the front). NOTE: When working on an asymmetrical body, make sure to label each pattern piece. It is always a good idea to make a copy of the original pattern to keep it in order. Notch the hemline for the finished length, and mark the placement of buttonholes and buttons, if any.
Using the Corrected Pattern The patternmaker, who follows a standard block or guideline, for all sizes respectively, creates commercial patterns. Therefore, you will find that the basic styles you choose from any of the pattern companies will repeatedly need the same kind of alterations that you have made on your practice piece. NOTE: Only a few people will fit in a standard size.

Almost any pattern will require similar shoulder alterations, armseye changes, and allowances for the bust and hip lines that you have perfected on your practice piece. Each design will become easier to work with, as you will "see" what three-dimensional looks like on a two-dimensional medium, which is the paper pattern. Consider the whole picture before making any changes. Consider the practice piece as your reference guide to making changes on any commercial pattern. You have seen and made several alterations on a basic blouse pattern. Most likely, if your pattern is the right size, not every change will be necessary. Keep it simple! Contemplate before it gets “complicated”. Styles and shapes in fashion change from straight to boxy, from fitted to shaped, season after season, with multitudes of fabrics. However, whatever the innovations, the rules remain the same. You can make most of the alterations we have discussed directly on commercial patterns. The tissue pattern is pinned together, and tried on the dress form in order to see the changes you will be making. Always cut a practice piece from the commercial pattern to check the fit. In creating the blouse sample, you will be able to see three-dimensionally, the steps used in the fitting sequence, which will lead your eyes and hands to connect, and to realize your own perception of design. Our interpretation of "universal design" is creating clothes, using all fabrics, for all people, for all time.
Vintage, Cheap Chic, or Sewing Mistakes At this point, you might feel the urge to resurrect a piece that has been around for a while. Before even attempting this project, check the fit on your dress form. Follow the fitting sequence for any possible alterations, considering the fabric and wear of the piece. Check each area. 1. Center front and center back grainlines 2. The shoulder seams 3. The armseye 4. The side seams 5. Shoulders, front, and back width 6. Sleeve shape, length, and ease 7. The armseye depth and the position of the sleeve cap 8. Sleeve hem 9. Adjustments you will need at the neckline 10. The position and proportion of the hem Think about the changes and the possibilities that will make this project successful. Play with the design on your dress form to see if the proportions and style are right for you.

Lesson 7: Universal Design
Fitting Pants What will happen if your next project is a shaped dress with a low neckline, a back zipper, and no sleeves? What will you do if you want to make a summer skirt, a winter coat, or a pair of pants? The principles are universal. The rules are all the same! Try the original pattern on the form, following the fitting sequence from the top down, and remove the problems by making the changes on your practice piece. Pants Fitting Sequence 1. Waist 2. Upper hip 3. Hips 4. Thighs 5. Inseam on pants only 6. Position of the knee 7. Hem. Most of the wrinkles that you see on your pants can be altered on the dress form on the upper body by straightening the grainline. Use a ¾ or a full body form with a natural crotch for this project. 1. Before you attempt to position the pants on the form, baste in the legs, and try
on the pants. To position the center front, center back, and side seams, tie a piece of elastic around your waist. Pin the seams into the elastic, with the elastic at the waist position. Check the position and ease of the rise (front to back seam). Notice how the pant legs fall and where you will straighten the grainline. Play with the fabric at the waist, pulling it up, or letting it drop, just as you did on the shoulder seam of the bodice. The wrinkles will run from the high point to the low point of the cross grainline.
2. If the wrinkles appear above the top of the leg, they can be addressed on the dress form by straightening the grainlines from the top of the leg to the waist.
If the wrinkles appear at the upper inner thigh area on the seam line, or the inseam runs bubbly and crooked, it is because there is not enough length in the fabric on the back leg compared to the front. The wrinkles can be straightened at the cross grainline at the top of the inner thigh. This is done by adding fabric to the back leg to match the front, just as you would on a back shoulder. To do this, release the basting stitches on the inseam. 3. Start at the crotch line, and slice the back leg from the inseam across the
center of the leg, following the cross grainline. This is the same process as lengthening the armseye in the front upper chest or upper back of the bodice. Add a ½” wedge of fabric to the back leg, making the back leg longer than the

front leg. Match the grainlines of the wedge insert to the grainlines on the back leg piece. Sew in the wedge.
4. Mark the length of the ease by making one notch 2 ½” down from the crotch point, and another notch 6 ½” down from the crotch point on the front leg, (inner thigh). On the back, the notches will be 2 ½” down from the crotch point and 7" down, (inner thigh). When you sew the inseam pieces together, stretch the front leg to match the back, following the notches.
NOTE: The ease you have created on the back leg will allow for the extra body length under the back hips. Follow the fitting sequence for pants and skirts outlined above. Play with the design of the pants on the dress form. This is where you can disguise, or enhance with darts, pleats or gathers, pockets and waistband height. You will be amazed at how the proportions of the body can change, just by inverting pleats, creating three pleats from two, changing the pleats to small gathers, or removing all of the fullness for a straight front pant. 5. When you finish the design of the torso on the pant, sew in the legs. Begin by
pinning the front and back legs together, matching the notches that you have made at the inner thigh. Remember to ease in the back to match the front leg.
6. Sew the rise or the front body seam to the back body seam. 7. The zipper and waistband will be last. NOTE: Never sew a continuous seam from leg to leg. Sew each leg separately and connect the legs at the rise of the pant by sewing the center seam from back to front.
Basic Principles
1. Choose the design, the color and the fabric. 2. Test the paper pattern on the dress form. 3. Make a muslin sample. 4. Fit the sample on the dress form, following the fitting sequence. 5. Correct the pattern. 6. Prepare the fabric (Pre-wash or steam). 7. Straighten the fabric grainlines with a diagonal pull, if necessary. 8. Pin the corrected pattern to your fabric, matching the grainlines. 9. Cut the fabric, and create the markings with the tailors tack.
Tips Until you have reached perfection in fitting clothes, it is a good idea to baste the basic pieces together before you finish the design. When your finished piece needs no alterations, finish each section as you sew.

1. Pin, baste, stitch, and press the shoulder seams, the collar, the buttonholes and buttons before joining the front to the back at the side seams.
2. Pin, baste, stitch and press the side seams before setting the sleeve. 3. Pin, baste, stitch, and press the sleeves and the cuffs at the wrist, before
setting them into the armseye. The hem is last. Following the Fitting Sequence as you sew, allows you to save time and work faster in handling the design, and the fabric will remain in the best possible condition. Spend as much time as you need when creating the practice piece, since you will save yourself hours and hours of frustration in your final design. In addition, you will be able to understand the cutting process in full, and plan how much fabric you will need to buy, and use before cutting. Measure ten times, and cut only once!

Lesson 8: The End
Fitting for Special Needs Try this. You will need a full-length mirror, and a few yards of thin elastic. Wear a non-constricting leotard, and invite a good friend. Have your friend measure the first piece of elastic to softly stretch around your body at your lowest shoulder point. Cut the elastic to size, stitch it together, and stretch it around your body, keeping your arms down. Make the line of the elastic straight in the mirror. Then, let the elastic follow your shoulder line. How much higher is one shoulder? Note that. Does one shoulder twist forward? What happens to the neckline? The variation from side to side is visual… you will see it! Note the vertical measurement, between the high and low shoulder. Stretch a piece of elastic around your chest, just under your arms and above your bust line. What happens? First, make it straight, and then let it follow the curve. Measure, and note the vertical difference.
Stretch another piece of elastic around your bust line, waist, upper hip, thighs, and back hips. The vertical measurements between the pieces of elastic will be different from side to side. These are the changes you will make on your pattern, and on your dress form. Addressing every singularity on your dress form is essential. By analyzing the dress form and following the fitting sequence, you will see what to do. Knowing that your clothes look wonderful, fall straight, and feel fabulous, will make a world of difference in your day! You will no longer wonder if someone might notice the slanted hem, the too short pant leg or pulling at the shoulder, and certainly no need to go through the pain of trying on clothes.

Overview Remember seven points for creating extraordinary clothes.
1. Plan 2. Choose your pattern and fabric carefully 3. Duplicate the body you are fitting on your dress form 4. Check the grainlines of the fabric and the seam lines 5. Check the ease, for comfort and movement 6. Check the proportions, to show or hide curves on the body 7. Carefully make the changes, and check your final pattern
Own the secrets of "fit" and see how it feels. We hope that through the workshop you have realized the incredible reward in creating beautifully made clothes. Through experience in using these techniques, you will discover and radiate your innermost talent. Furthermore, your self-expression in creating, designing, and sewing beautiful clothes will be true to its purpose and inspiration, bringing above all, a feeling of beauty and joy to the person who is wearing them. We wish you a Fabulous Fit!
Conclusion "Reach Your Goal! Customize Your Working Environment." Dress Forms are essential in creating clothes! By customizing your working environment to meet your needs, and by choosing the right tools, you will be able to improve your productivity, work quality, and increase sales, saving time and money along the way. Statistics confirm that the number of home sewers, custom clothiers, dressmakers, and any of the sewing and fashion businesses that are using dress forms, increased their working productivity, work quality, and sales by 57% to 89% in a very short time. This simple improvement can be targeted to any kind of situation where time, money, and product quality, are the main issues. Its success is achieved by creating your unique working environment, focusing on what is essential to you and/or your business, and translating your creations into your own image and identity. Thank you, again, for choosing Fabulous Fit®!

Copyright
The copyright and all material provided in this book (Fit Made Easy©, "Catch 22” Dress Forms and Fitting Secrets Revealed©) is held by Fabulous Fit® or by the original creator of the material.
None of the material may be copied, reproduced, distributed, republished, downloaded, displayed, posted or transmitted in any form or by any means, including, but not limited to, electronic, mechanical, photocopying, recording, or otherwise, without the prior written permission of Fabulous Fit® or the copyright owner.
Any unauthorized use of any material contained in this book (Fit Made Easy©, "Catch 22” Dress Forms and Fitting Secrets Revealed©) may violate copyright laws, trademark laws, the laws of privacy and publicity, and communications regulations and statutes.
Fit Made Easy©, “Catch 22” Dress Forms and Fitting Secrets Revealed©, and Fabulous Fit® are all proprietary patents, trademarks, and copyrights of Fabulous Fit®. All Rights Reserved.