flassflblad - squarespacexpan+manual.pdf · hasselblad productswhilexpan hositsown specificsite-...
TRANSCRIPT

flASSfLBLAD
PAN
\\
lnstruction MonuaL Gebrauchsonweisung, Erugsonvisning, Manuol de lnstrucciones, Monuol d'lnstructions,Manuale d'lstruzioni, Gebruiksoonwijzing, Manuol de lnstrugdeg Bruksonvisning, Kiiyttiiohjekirjl.
flASSfLBLAD M1098
311
www.orphancameras.com
15
24
25
26
27
28
29
30
31
32
33

rso
E'
www.orphancameras.com
ffin l)^
S fln n6 a2-
4 '5 .6 I 11
4 5 6 7 8
?i-s 'o-\D
rI
L-
'l
I
-J
rI
L-
1
I
-J
4 5 . 6 8 1 1 1 6 2 2
B B B B B B B B B O O D O D O
oa\gl '
I
b ,
(
L-:la/ t \
L_ r _J
L- o -J
L- + -J
L- ;+3-J

L-:laf f i / t \
-J
L_ r _Jffi
ff i
L- o -Jru
L- o + - J%
L- + -Jffi
L- ;+3- Jffi
/ .:ilf- r -
/ \
^ /'),
<D
0.7 m 0.8 m 1.0 m 1.2 m 1.5 m 2.0 m 3.0 m 5.0 m 1 0 m oo
Hasselblad
4 l 4 5 m m
f 4 0.67-0.73 0.77-0.840.95-1.061.12-1.29 1.38-1.65 1.78-2.282.53-3.70 3.79-7.356.09-28.315.3- -
f 5.6 0.66-0.74 0.75-0.850.92-1.091.09-1.331.33-1.721.70-2.42 2,37-4.103.45-9.14 5.24- * 10.9- o"
f 8 0.65-0.76 0.73-0.880.90-1.131.05-1.40 1.27-1.831.61-2.66 2.18-4.83 3.06-13.94.39- "" 7.71- *
t 11 0.63-0.790.71-0.920.86-1.201.00-1.51 1.20-2.02 1.49-3.09 1.96-6.50 2.64-56.0 3.57- "" 5.47- *
t 1 6 0.61-0.830.68-0.98 0.81-1 .310.94-1.69 1.11-2.371.35-4.001.72-12.7 2.22- * 2.82- "" 3.89- ""
t22 0.58-0.900.64-1.08 0.76-1.500.86-2.031.00-3.141.19-6.92 1.47- * 1.81- "" 2.19- "" 2,76- *
Hasselblad
4 / 9 0 m m
t 4 0.99-1.011.18-1.221.47-1.531.94-2.06 2.87-3.1s4.63-5.438.61-11 .9 59.8- ""
t 5.6 0.98-1.021.17-1.23 1.45-1.551.92-2.092.81-3.214,49-5.64 8.14-12.942.5- ""
f 8 0.97-1.031,16-1.241.44-1.57 1.89-2.13 2.74-3.31 4.31-5.957.56-14.8 30.2- ""
f 1 1 0.96-1.04 1.14-1.26 1.41-1.50 1.84-2.19 2.65-3.46 4.08-6.47 6.87-18.5 21.5- ""
f 1 6 0.95-1.061.12-1.29 1.38-1.6s1,78-2.282.53-3.70 3.80-7.376.09-28.8 15.3- o"
f22 0.93-1.091.09-1.331.33-r.721.71-2.42 2.38-4.103.46-9.20 5.25-136 10.8- ""
HfiSS. f IBIAD
l. [ , [ ' .g, i l , U ,[E[. I IOUnIt
[ '. i l , ,,f l [,, i l i l ,;] [ [ [: ,[ [ ' 0]' i l [
Instruction manuol
r%N - a new way of seeing
,i,1,;r;,1.,',;,;,;','i::i;i.'i:,i,rywi:+ti,ttiilt:liUi
l llnjii i'li.l'..illii.l..'.r,,.,',.'.' 1'.'.,,,'.r :'::,, ',li
ir ,,;rli .ll..''', ,., t"''.r..t,.';i
t;,r,liri .'.,,,.,. .;,.,, ,;,:':;..'..,':r,;,:
ii' ,,,,"...''.'. i- '''.....,....1'.,. ....,...'1.':.'f:.
t 11i
ilill: i;l ; ,'. .',.':,,,; ,i,'. , ,,;': i :;,::i
yttlilii,ti;r.tlllitiliitilii
fhank you for choosing a Hasselblad XPon.This comera incorporates on
I innovative dual formot focility providing a 24x65 mm format - futt pan-, oromo - as well as a conventionol 24x36 mm formot on the same film.
This means you can hove all the convenience and advontages of the 35 mmformat but con produce an image with one side wider than the 6x6 cm format.Put simply - medium-format panoroma quality from a 35 mm camera whilestill providing the option of the conventional format!The xpan was voted as"Europeon ProfessionalCamero of theYear 1999 - 2000".
It follows on in the well-established Hasselblad tradition of superb crafts-manship founded on intensive development which has helped create the worldfomous nome.The quolity and reliability of Hosselblad equipment was clearlywitnessed when it was chosen by NASA for the lunar missions.
The Hasselblad xPan is a feature-packed and highly professional tool. rt in-cludes both outomoticfacilities and total monual overridefor comDlete controlto suit allsituotions ond working methods.Auto exposure,autobracketing,cou-pled rangefinder and pre-wind ore just some of the advontogeous features.
The comera body is robustly built from oluminium ond titanium forthe long working-life expected from such o cemero. The interchongeableHosselblod lenses are mode to the most exacting standards producing excel-lent coveroge ond'rozor'shorpness fortop quolity imoges.Digitoltechnologycontrols a host of functions making comera use simplicity itself so you con con-centrote more on composition ond imoge making.
This instruction manual describes in detail how to operate your XPon, soplease reod it carefully,lf you have o query please do not hesitate to contactyour deoler - we want you to be 100o/o satisfied!Your dealer can also provideyou with the latest in news and technicol developments from Hosselblod. Aquarterly magazine - FORUM - is published with the emphasis on photo-grophic imagery featuring photogrophers from oll over the world to provideyou with inspiration! XPan imoges now regulorly appear Our internet site -
vvvvw.hasselblad.com - is a source of general and technical information concemingHasselblad productswhileXPan hositsown specificsite-www.xpon.com.You conolso e-mail us - [email protected] - for further inquiries,
We are sure you hove made o wise choice with this exciting comero.Hasselblad hove providedthe possibility,its now uptoyouto createthe images.
Wewish you good luckond lookforwardto seeingthe results!
: :i':::ii:ii:iii:ii:lil.l::ii::i:i
4 601119116' t'::i1,,:r,;:lilt;i;i
5 |fitroductiott:'";,.
Parts & components ,
Parts descriPtion ' ,.1,
GETTING STA,trTED
: ! 1 : : :
11 Foffi in$ . ' ' ' : , :: : .::: :.
1l Rangefindeifffiiiilg
i? De'th-of field.,'1..r,,.,1 .i..,.
| 2 FI LM,.,..'..i.r....,,,,.i..,.i'... .':
12 Film speed (150) setting13 Film loading
14 [xposure counter ; . ,. ' '
I4VIEWFINDER
15 ftanging the viewfinder eyepiece
15 FORMAf ...i;:r'..i;if....i',..';il;..'lrill'..i'..l..l.lll:ii:,
16 Automatic ,, ,,,, ,',', ,,,,,,', ,,, ,18 ManUal ",.,,18 [xposure compensation19 Auto-bracketing
LCD illuminatioll , :,,,:, ,:
Close-range photography
Film planeinda, , , , . . , . . . . .Self-timer : ::,: ....i',.l:.i..;i:.1,li.,ll.ll:lijlnfrared photography, l:,..,,t laSh,,, ' , , , , l , ,1,: l l , .1,, i l l : , : , . l . ; ; , ' : . l : l : : : , : : ' : . : ; ' l .1
ft ble releaig .:. : :: :r.r,:r ::!i:i::r: :i :i' :ri:ri
21212122222323
67
8
8I8I
I
Attaching the strap , ;,,:r,:iLoading the batteries ll,l;'1.Ba ttery ch eck,, :,,,;,;;,,,.,,,,' ;',,:,,.,r,,power
.. ,.,.,r,,,i.,,. '. .ill... ;'li.illll:.lf.
[ENSES':;:'Ltii:',';:'ltil:::'i.i'11"':;;'it,i;i
23 Mid-roll rewind .1'.......,.23 Exposure history .....N1......
.24 Film Pr,"sing...' ' l i l1.;:
24 ACCESSOR'ES9 Lens case t ,9 Attaching lenses,9 Removing lenses10 Lens cap10 Lenscomponents10 Filters ,,,,,,, '10 Lensshade, ,.,,.,..,....,
15 Standard and panorama
16 EXPOSURE CONTROL 26TIPS & REMINDERS
it',,t.2 8 V i e wfi n du e y e p i e ce s e I e ct i on, , . . ... .' ..., .:'t 29 Troubleshooting , ,, , , ,ir';,,:,30 **rn^ SpeCifrCmiiinitt: i:.:.llili ;i;l l11ii1. :'; iiili'l;i..
"' 33 Equipmenture,service ondEtnrilftee
Become fomilior with the vorious components on
the camera by checking them ogainst figs l - 3 andthe component list.Avoid touching the lens surfac-
es and take care regarding the focal plane shutterand format blind when opening the camero back.
Begin by looding the batteries so thot you can go
through all the camera's functions. The XPan is avery simple camera to operate following well-estab-lished routines and most photographers should beable to successfully operate it straight away with-out any problems.
The mode selector switch is the moin ON/OFF con'trol which activates the camera.lnformation is pro-
vided by two LCD panels ond an LED display in theviewfinder. Read quickly through the main itemsin this manualfor a general overview of the infor-motion system and the mechonics of the camero.Then read again more corefully the relevant sec-
tions to gain a firmer understanding of individuol
procedures.Fluency in operation of the camera willallow you to concentrate more on picture taking.
ln the text,the main LCD on the back of the comereis referred to as'M/d'and the small exposure coun'ter LCD as'EC/ di
Positions of components and orientation are de-scribed in relation to the cemera as seen when tak'ing a photograph, i.e. with the lens at the front, un'less otherwise stoted.
The relevant illustrations are indicated by the fig-ures beside the small headings in the text.
Please read'Film processing' before sending your
exposed film to a film laboratory.
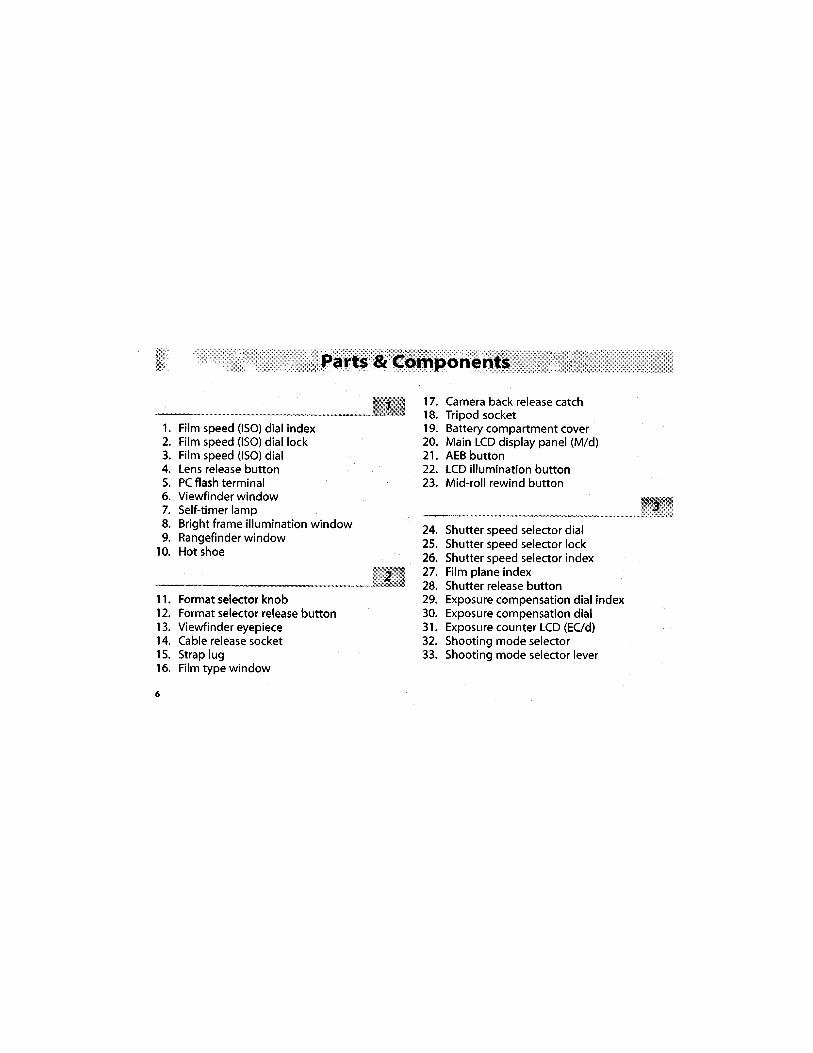
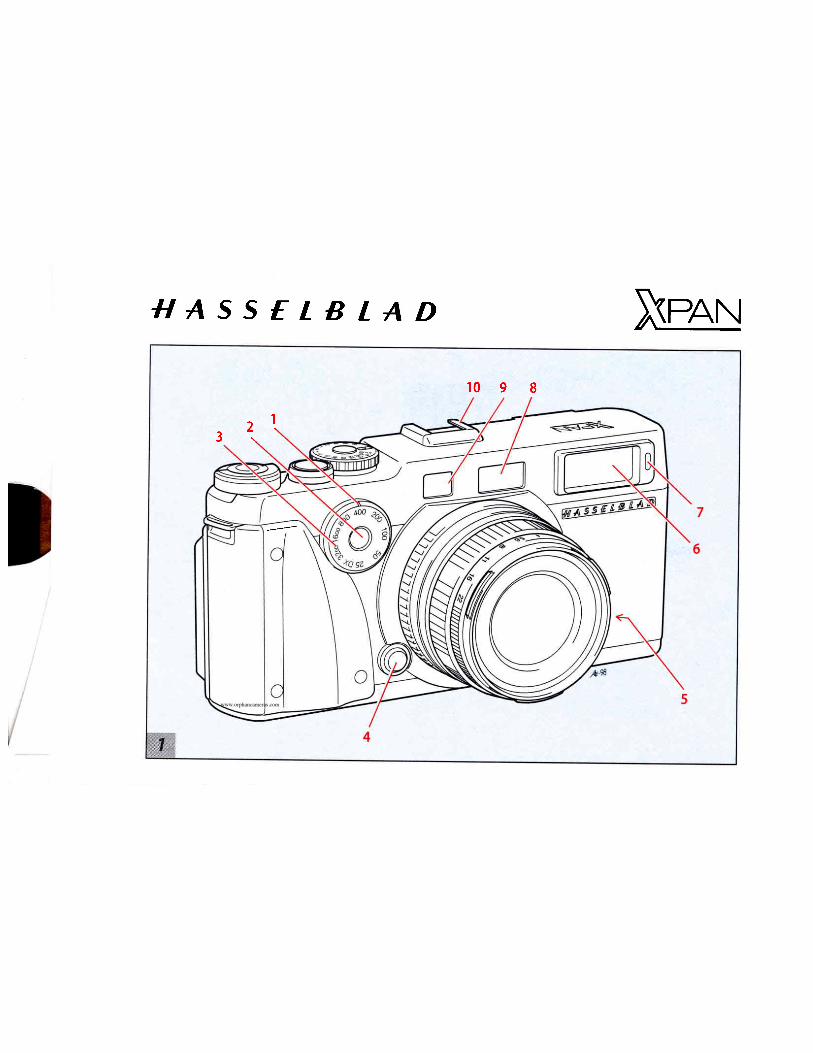
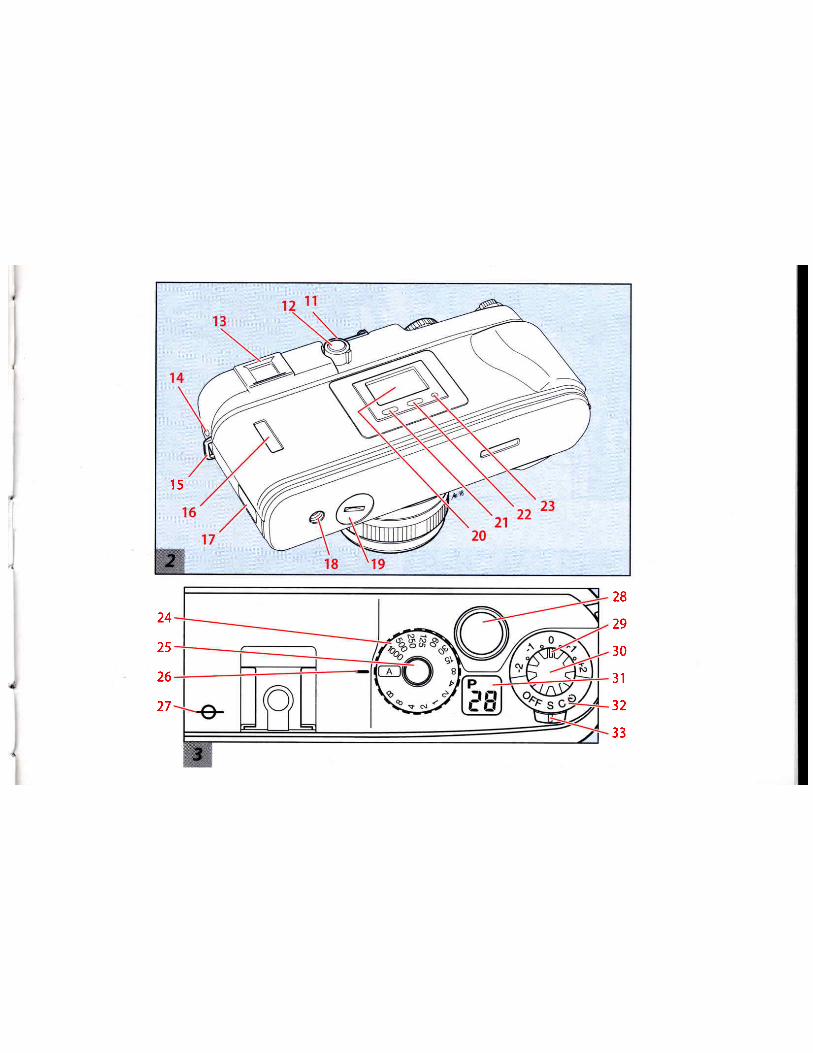
Parts & Components
1. Film speed (lSO)dial index2. Film speed (lSO)dial lock3. Film speed (lSO)dial4. Lens release button5. PC flash terminal6. Viewfinder window7. Self-timer lamp8. Bright frame il lumination window9. Rangefinder window
10. Hot shoe
11. Format selector knob12. Format selector release button13. Viewfinder eyepiece14. Cable release socket15. Strap lug16. Film type window
6
Camera back release catchTripod socketBattery compartment coverMain LCD display panel (M/d)AEB buttonLCD illumination buttonMid-roll rewind button
17.1 8 .'19.
20.2'.1,22.23.
.
24. Shutter speed selector dial25. Shutter speed selector lock26. Shutter speed selector index27. Film plane index28. Shutter release button29. Exposure compensation dial index30. Exposure compensation dial31. Exposure counter LCD (ECld)32. Shooting mode selector33. Shooting mode selector lever
Thefollowing is a concise introductory description of themajor ports of the camero (the figures refer to the illus-trotions 1-3).Details of functions ond procedures can befound under the appropriote sections and headings fur-ther on in this manuol.See the main index for detoils.
2. Film speed (150) dial index lock - releases selector
from automatic (DX) film speed setting.
3. Filmspeed (lS0)dial - for automatic (DX) and man-ualflm speed setting.
5. PCflashterminal - forflash connectionvia cord.
7. Self-timerlamp - countdown timerfor shutterre-Iease when set at self-timer mode.
10. Hot shoe - accessorf shoe with direct contact forflashunits.
11. Formatselectorknob - for standard and panorama
format.14. Cable release so*et - for vibration-free or remote
shutter-release.
16. Film type window - for confrmation of whethercamera isloaded andfilm type.
17. Main ICD display panel - main information panel.(Referred to in the text as'M/d')
21. AEBbutton - auto-bracketingmode.
22. tCD iffumination button - information and expo-
sure LCD illumination.
23. Mid-rof f rewind button - for rewindingflm before
completion.
24. Shutter speed selecto r dial - for manual or automatic
shutter modes.
25. Shutterspeed selector lock - releases selector fromautomatic setting.
27. Film plane index - for critical focusing distance
measurement,
28. Shutter release button - for camera activation
when pressed half way and shutter release when
pressed completely.
30. Exposure compensation dial - for rapid exposure
variations from normal exposure settings.
31. Exposure counter LCD - indicates number of unex-
posed frames left on flm and format indication.(Referred to in the text as'EC/d')
32. Shootingmodeselector - for choicebetweenS,C and
self-timer modes.
Attaching the strap
The camera is wholly battery dependent and so it willnot function in any way if the batteries have beenomitted, are exhausted or have been fitted incorrectly.Always use freshbatteries and do notmixoldwith new.8
Please discard used batteries in an environmentallycorrect wav.
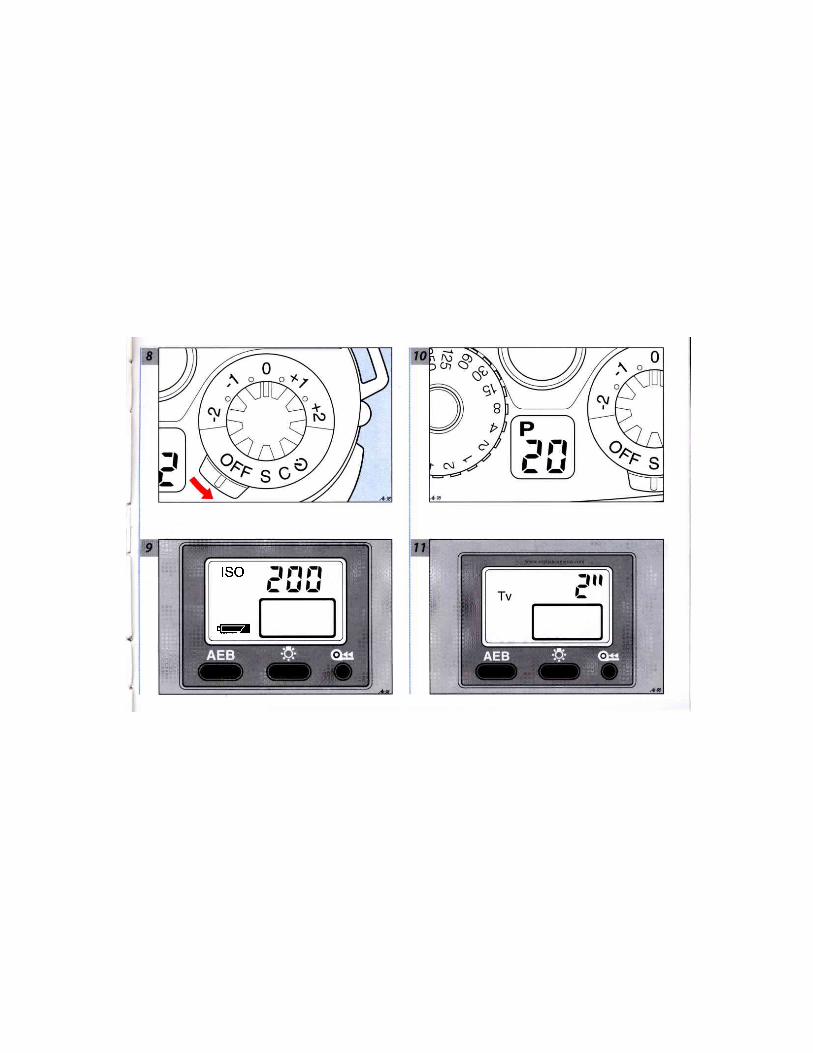
Set the shooting mode selector to S, C or S, The M/dwill indicate the battery status by the following icons:
a.The battery capacity is adequate,
b.The batteries are low. The camera will function butreplace batteries soon.
c.Flashing battery icon. The batteries are exhaustedand the camerawill notfunction.
The battery check icon is always visible when the cam-era is in active mode. Checkbattery status regularly.
Power -$B;:,,ei,,:tb;:,irilON
Set the shooting mode selector to S, C or S.
S - single exposure mode
C - continuous exposuremode
O - self-timermode
Without film in the camera, the M/d will display anIS0 symbol, the manually set IS0 rating (or'100'in thecase of an automatic DX setting) and abatteryicon, seefig. 9 for example. When loaded with film, however, the
With the buckle and retainer alreadv attached to thestrap, pass the strap end first throtigh the strap lugon the camera, then thro.ugh the retainer and finallyback through the buckle again. Allow at least 2-3 cmofloose strap beyond the buckle. See the illustrationfor details.
Set the shooting mode selector to '0FF'.
Unscrew thebattery compartment cap - situated on the baseplate- counter-clockwise several turns by inserting a smallcoin or similar in the groove. Insert two fresh batteries(Lithium CR2- 3V) with the terminals positioned as inthe illustration. Replace the cap and screw clockwiseseveral turns until secure.
EC/d will also display a figure that shows the numberof unexposed frames left on the film (fig. l0).
When the shutter release button is pressed halfwaydown, the'IS0' symbol disappears and a'Tv'symbolappears (time value) together with the selected shut-ter speed (fig.11). After ten seconds ofno response, the'IS0' symbol appears again, replacing the'Tv' symbol.
OFF
l. Set the shooting mode selector to 'OFF'
2. All indications on both LCD's disappear.
POWERSAVE
After three minutes of no response from the cameracontrols,all indications on the LCD'swill disappear andthe camera switches over to stand-by status automati-cally.
The camera will reactivate when :r the shooting mode selector is moved from'0FF'to S,
Co rE .r the shutter release button is pressed halfway downo the cable release is operated (see'Cable release')o the LCD back light illumination button is pressedr the camera back is opened or closed. theAEB (auto bracketing) buttonis pressed
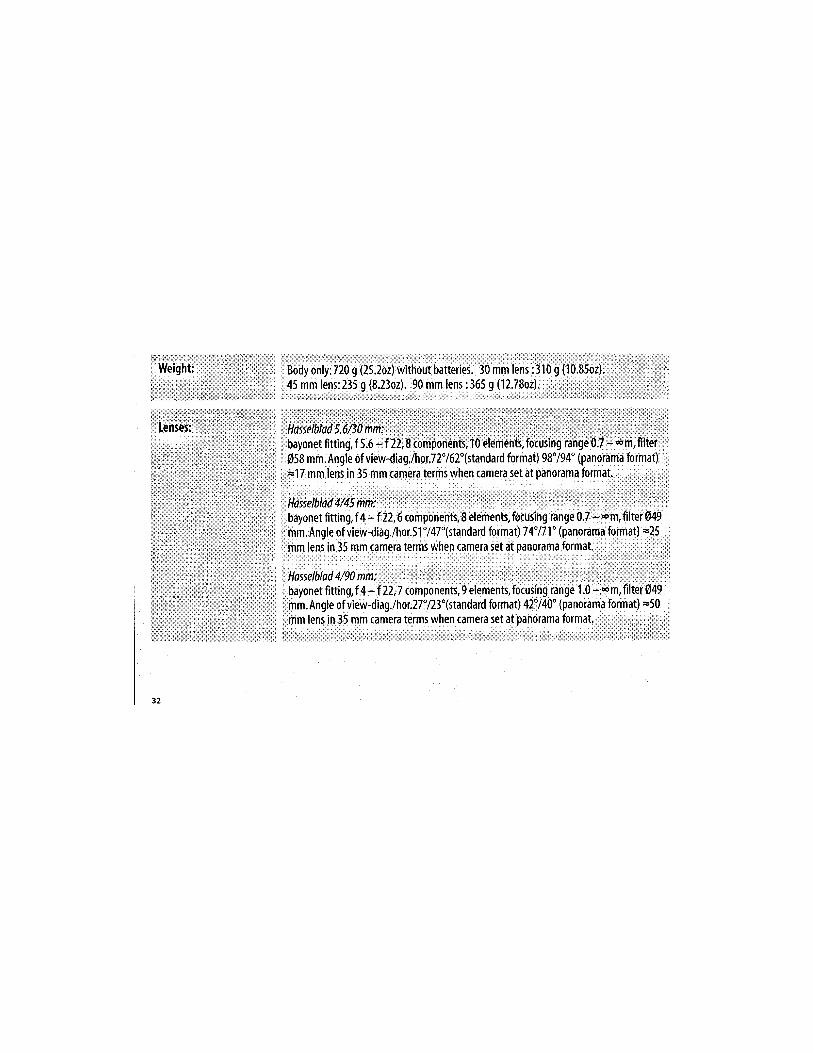
Th e XPo n uses i nte rch o n geabl e bayonet-fitti n g H asse I bl a dIenses specifically designed forthe XPon.Three lenses are
ovailable: a 30mm Aspherical, o 45mm ond a 91mm.Thefollowing is general user information for both the 45mm
ond the 90mm lenses.The 30mm lens requires more spe-
cific informotion and is therefore supplied with its own
user monuoL See the'Technicol Specifications'table to-
wardsthe end of this manualforfurther detailsof allthree
lenses os well as depth of field tobles for the 45 mm ond
90 mm lenses. Further information on filters con olso be
found under'Accessories'towords the end of this monual.
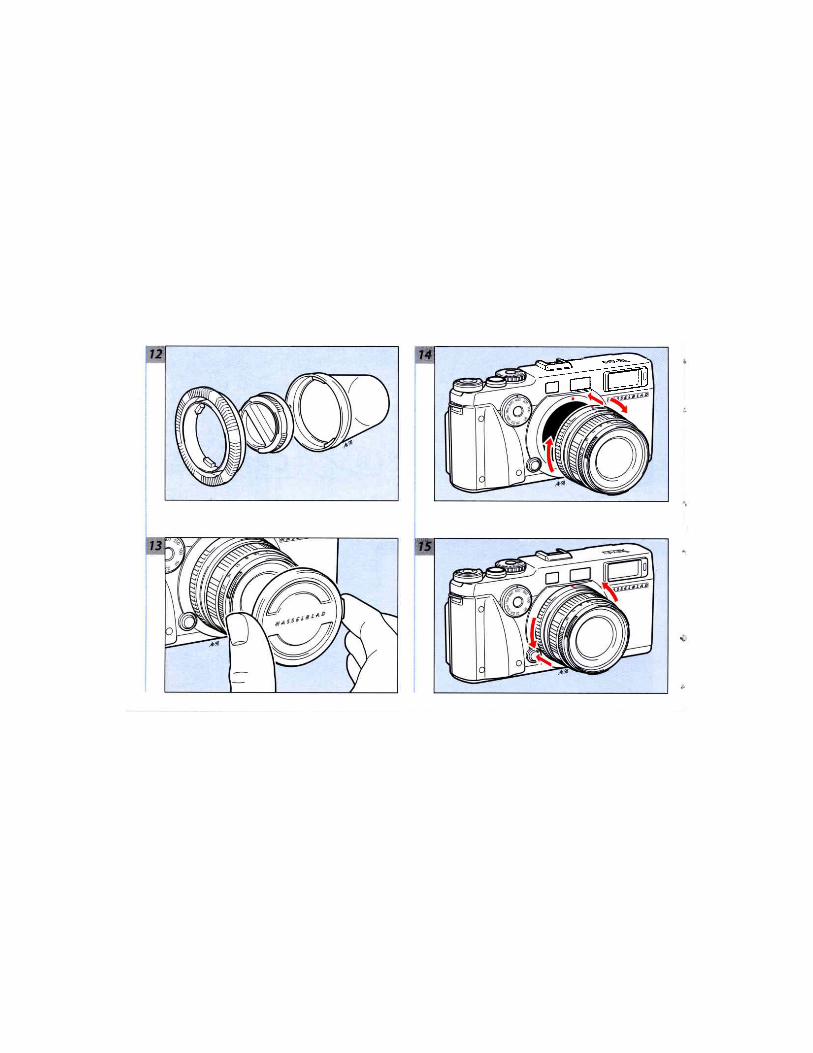
Lens case $$ffiThe lens case consists ofa cover, cover base and an integralrear lens cap. The lens cover is unscrewed approximatelyl/8 turn counter-cloclsMise to remove. The lens can thenbe unscrewed approximately 1/8 turn counter-clockwiseto remove from the base. If, however, you continue to turnthe lens counter-clockwise, the rear lens cap will also bereleased from thebase. As thecap is thenalso freefrom thelens, take care not to drop it.
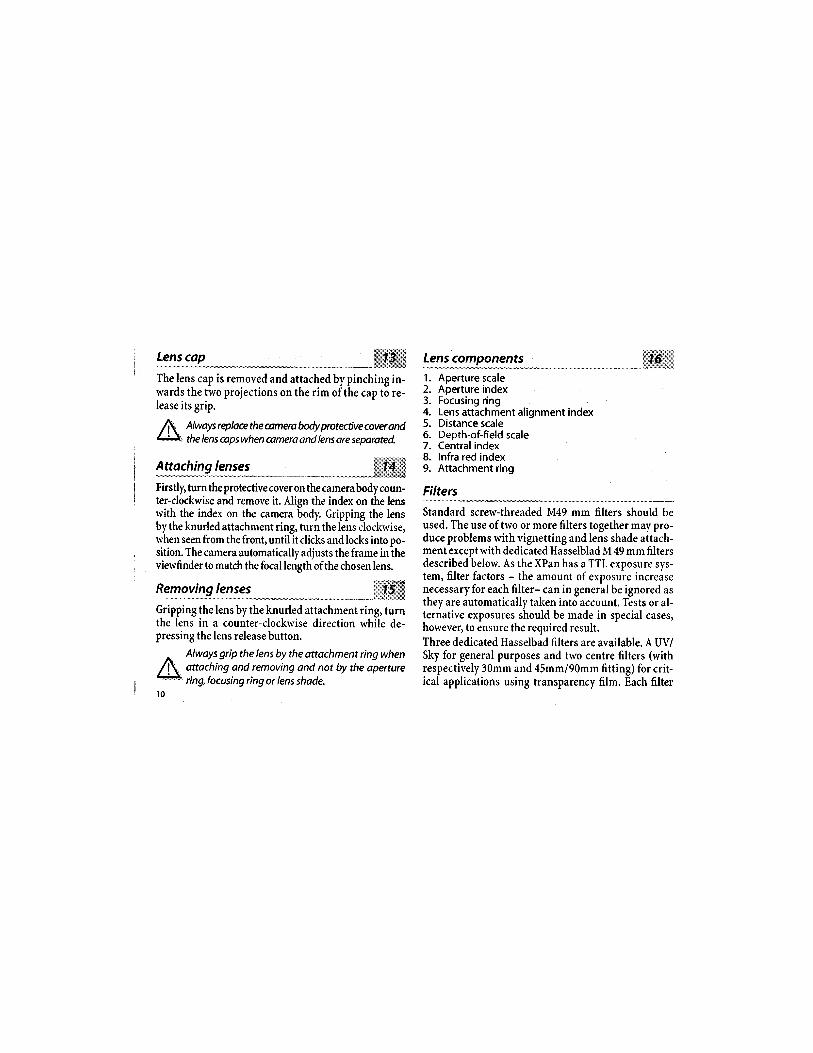
Always replace the camera body protective cover andthe lens copswhen comera and lens are separated.
Firstly, turn the protective cover on the camera body coun-ter-clockwise and remove it. Align the index on the lenswith the index on the camera body. Gripping the lensbythe knurled attachment ring, turn the lens clockwise,when seen from the front, until it clicks and locks into po-sition. The camera automatically adjusts the frame in theviewfinder to match the focal length of the chosen lens.
R:ygfi9{"":-": - - -*-** * j*ii,ffiGripping the lens by the knurled attachment ring, turnthe lens in a counter-clockwise direction while de-pressing the lens release button.
Always grip the lens by the attachment ring whenattaching and removing and not by the aperturering,focusing ring or lens shade,
Lens components
1. Aperture scale2. Aperture index3. Focusing ring4. Lens attachment alignment index5. Distance scale6. Depth-of-field scale7. Central index8. Infra red index9. Attachment ring
Filters
Standard screw-threaded M49 mm filters should beused. The use of two or more filters together may pro-duce problems with vignetting and lens shade attach-mentexceptwith dedicated Hasselblad M 49 mm filtersdescribed below. As the XPan has a TTL exposure sys-tem, filter factors - the amount of exposure increasenecessary for each filter- can in general be ignored asthey are automatically taken into account. Tests or al-ternative exposures should be made in special cases,however, to ensure the required result.
Three dedicated Hasselbad filters are available. A UV/Sky for general purposes and two centre filters (withrespectively 3Omm and 45mm/90mm fitting) for crit-ical applications using transparency film. Each filter
$Irffiiii$The lens cap is removed and attached by pinching in-wards the two projections on the rim of the cap to re-lease its grip.
can also be combined with one additional dedicatedHasselblad filter or a filter with a narrow, low-profilering.
See under'Accessories' for further information aboutdedicated UV/Sky and Centre filters for HasselbladXPanlenses.
When using filters and a hand-held meter, besure to include ony filter factors in the exposurecalculotions.
Lens shade ffitMatch the red index on the rear of the XPan lens shade(see illustration) withthered index onthelens. Turn thelens shade (bayonet fitting) counter-clockwise (when
seen from behind the camera) until it clicks into place.XPan lens shades have been specifically designed forXPan lenses; other types of lens shade are not recom-mended. The XPan lens shade is designed so that itshould be removed first before a filter or lens cap isatached, changed or removed.
When an XPan lens shade is fitted,there is a partial
blocking of view in the bottom right of the view-finder image. However, this in no way affects theresults.
P.sr:ing"The lens is focused by turning the rubber covered fo-cusing ring that surrounds the lens barrel. Focusingcan be either visual, via the viewfinder/rangefindersystem, or manual. For the former see'Rangefinder fo-cusing'. For manual focusing align the chosen distanceon the distance scale against the lens central index.
IStg_SljN:y fo,9u1jns ,_ $ili$$$itf;The rangefinder is a coupled-type in the form of a small,bright rectangle in the centre of the field-of-view framein the viewfinder that provides a superimposed'ghost-ed' image of a central part of the subject (fig 19). Thelens is turned until the'ghosted'image coincides withthe subject image (fig 20)producing a sharp focus set-ting for that particular distance from the camera. Youmay find that subjects containing few or no lines orsharp contrasts in the image aremore difficult to focus.Try pointing the camera to other areas of the subjectcontaining vertical lines or contrast changes that areapproximately the same distance away from the cam-era, focus at those points and then return to your orig-inal composition. You may also find it easier to turnthe camera on its side if there are only horizontal lineswithin the image, for example, when'photographing a
near horizon. Alternatively, the distance can be esti-mated and the distance scale on the lens aligned ac-cordingly against the central index.
Look dhectly into the viewfinder and not from anangle otherwise it can result in inaccurate focusing. rl/"n":ff _e-{_ff-_gJ:_ettf ?-e_
Depth-of-freld
Depth-of-field - the amount ofacceptable sharpness pro-duced at a given aperture and focus setting - can be cal-culated as in the following example:
The aperture has been set at f/ll and the focus at 3 me-tres. By reading across from the relevant aperture mark-ings on the depth-of-field scale on either side ofthe cen-tral index to the focusing distance scale, you can see theextent of the sharp zone. In this example the depth-of-field ranges from approx .2 mto 7 m.
There are two tables at the end of the illustration sectionof this manual that describe the depth-of-field producedby the various combinations of aperture settings and fo-cus settings regarding 45mm and 90mm lenses. For ex-
1mple, when focusedat2mand set at f/8, the depth-of-field extends from l.6lto 2.66 m with the 45 mm lens andfrom 1.89 to2.l3 with the 90 mm lens. See separate usermanual for 30mm depth-of-field table.
If you want to expose the film at the recommendedspeed (IS0/ASA/DIN) and the film has a DX code stripon it (a large pattern consisting of exposed metal sur-faces) then set'DX'on the film speed dial against theindex on the camera body with the shootingmode se-lector set at'OFF'. The 'IS0'
symbol appears on theM/d and the corresponding IS0 rating is indicated af-ter loading the film.
If, however,the'IS0' symbol appears together with'100'flashing, this is caused by oni if the foilowing:o There is nofilm in the camera.. A rtlm without a DX code has been loaded.. A flm with an abnormal DX code has been loaded.If there is no DX code strip on the cassette or you wantto alter the recommended IS0 rating of the film, manu-ally set the'IS0'dial. Do this by pressing the film speeddiil lock while turning the diif to the lequired vilue.The dial remains locked only at the'DX'sitting and soit can be freely adjusted from any other setting without
having to depress the lockbutton again. The dial can be
set at l/3 intervals from IS025 through 3200 and the
selection will be visible on the M/d. Proceed to load the
camera as described below.
Make o manuol ISO setting before using an uncod-
ed cassette, otherwise the camera will not load the
film.
lf you make a manual ISO setting do not forget to
make the appropriate changes afterwords for the
nextfilm,
Film loading $,,,ii:ffi itb.'Hi'l$S,ffiIn subdued lighting,lift the camera back release catch
as in the illustration and push upwards. The camera
backwill now be released.
out just enough -but no more - film leader to align the
tongue of the film against the green'film tip' index line
so that it rests on the take-up spool. Ensure the film
is laying down flat against the shutter housing and the
cassette opening is pulled down accordingly. If the film
bows upwards it may pull the film tip back and away
from the index position. Carefully close the camera back.
Press the left part of the back towards the main camera
bodv untilvou hear a clickto ensure it is locked. The film
is automatically withdrawn completely from the cas-
sette, set at the first frame and the camera power turned
off.
lf a non-DX film has been loaded while the ISO selec-
tor was set at DX then it will not be wound forward
and the camera will not operate,Turn the shooting
mode selector to'OFF' and manually set the ISO dial.
- Be careful not touch the shutter or format blinds
ftwith your fingers or iet a film cassette drop onto
/N toadthecamerowiththemodesettingot,oFF,* them! 4#.
With the shooting mode selector set at'0FF', insert a 35
mm film cassette into the film compartment as in the il-
lustration. Note which way round the cassette is insert-
ed. Tilt the 'top' of the cassette a little at first so that
the cassette is seated securely in the compartment. Pull
While the film is being withdrawn, the M/d will show
the film speed while the EC/d will count down the ex-
posures. When the film has been completelywithdrawn
from the cassette, both LCD's will go off. 0n reactivat-
ing the camera, the EC/d will indicate the number ofexposures remaining.
The number of exposures remaining will dependon the format setting.Therefore with a new 36 ex-posure cassette,for instance,the counter will show36 exposures at standard formot but only 2l atpanoramaformat.
tf the exposure counter does not show how manyexposures are remqining, it is an indicotion of afault. Open the comera back and re-align the tip ofthe film with the take-up spool.
lf the exposure counter flashes,it isan indication ofa fault. Rewind the film ond reload the camera.
The camera will appear to operote normally even ifit is empty. However, no figures will be visible in theEQd and of course no information con be seen inthe film type window!
Exposure counter
The EC/d indicates the number of unexposed framesremaining, automatically changing after every expo-sure.It also takes into account the chosen format set-ting automatically. This means that by switching the
format selector knob back and forth, you can see howmany frames are remaining in either format at anytime. The figure'l'indicates the last frame and whenthat has been exposed the camera automatically re-winds the remainder ofthe film into thecassette. Whenthe motor stops, the exposure counter will indicate'E'(empty).
The viewfinder is o coupled rangefinder type withthe additional feature of automatic field-of-viewframe change according to the focal length of thelens and chosen format.The field-of-view frame alsomoves automatically to compensate for parollax
error when photographing close subjects. The 90mm lens produces a larger rangefinder double-image compared to the 45 mm lens.
The viewfinder eyepiece is interchangeoble to suitindividual eyesight.
A,
A
A

Changing the viewfinder eyepiece
The standard dioptre of the viewfinder eyepiece is -1.0.
Five other strengths are available:+2D,+0.5D, -2D,-3D
and -4D. The eyepieces simply slides in and out of theviewfinder frame, clicking into position. It can be re-
leased by inserting a thin object in the notch at the bot-
tom of the frame.
Please refer to the'Viewfinder eyepiece selection'table
towards the end of this manual for a detailed descrip-
tion ofchoice.
Standard
For the standard 35 mm format (24mmx 36 mm) turn
the format selector knob to align the indexes (counter-
clockwise if already set at the panorama format) while
keeping the centre button depressed. The viewfinder
will automatically display the correct format framing
and the exposure counter will indicate the number of
frames remaining at that chosen format.
Panoroma
From the standard format, turn the format selector
knob clockwise while keeping the centre button de-
pressed and align the indexes to the panorama format.
The letter'P'will be visible on the top of the dial. Again
the viewfinder will automatically display the correct
format framing and the exposure counter will indicate
the number of frames remaining though now for the
panorama format. The EC/d also displays a'P' in the
top left of the window.
Ensure you turn the knob as for as it will go to
the stop position when selecting the panorama
formot.
A flashing'P' in the EQd together with a lockedshutter release indicates that either the format se-lector knob is not positioned correctly or thot youhave switched from standardto panorama formatwhen only one standard sized unexposed frameremained onthefilm.
$q iffi
Exposure controlcan be automatic (aperture prio-rity) or manual. Aperture priority meons that thecamero automatically chooses o shutter speed tomatch the operture that you have set.The TTL ex-posure meter provides a centre-weighted, overagereading and measures the light at the shutter plane,A red LED disploy in the form of symbols inside theviewfinder indicate the exposure reading status.Awarning 'r symbol olso indicates thot the lens copmoy stillbe in place.The pattern of the sensitive orea remainsthe sameforboth the normol ond panoramo formots. lt occupiesa central area of approximately 20 x 30 mm and issuitable for readings with the camera in both theh o rizo n tal a n d ve rti ca I po s it i on s. N o r m a I ph otog rap h i cprecautions and practices apply when taking onexposu re read i n g i n e ith er m a n u o I or automotic modewith regard to the tonolvalue of the chosen meteredarea, the effect of bright skies in landscapeg thecontrost range of the scene, bock light situation, etc
Automatic
l.If set within the manual speed range, turn the shut-ter speed selector dial to align'A against the indexon the camera body. It will click into position.
2. Press the shutter release button halfway to activate themeter.
3. Adjust the aperture setting according to the signalsin the viewfinder to ensure the exposurewill be with-in the metering range as in the table.
Ensure you check this information when using au-tomatic mode in case the lighting conditions arebeyond the range of the meter/camera settings forthe sensitivity of the film in use.This might happenwhen using a fast film in very bright conditions or aslow film in poor lighting conditions,for example,
ln automatic mode,the longest exposure possibleis 4 seconds.
Holding the shutter release button half way down willlock the exposure reading. When the shutter releasebutton returns to its normal position, the camera con-tinues to measure light for approximately 10 seconds.
The M/d will also show the Tv value (shutter speed) forthat particular exposure setting in t/z EV steps.
lLi ji $f
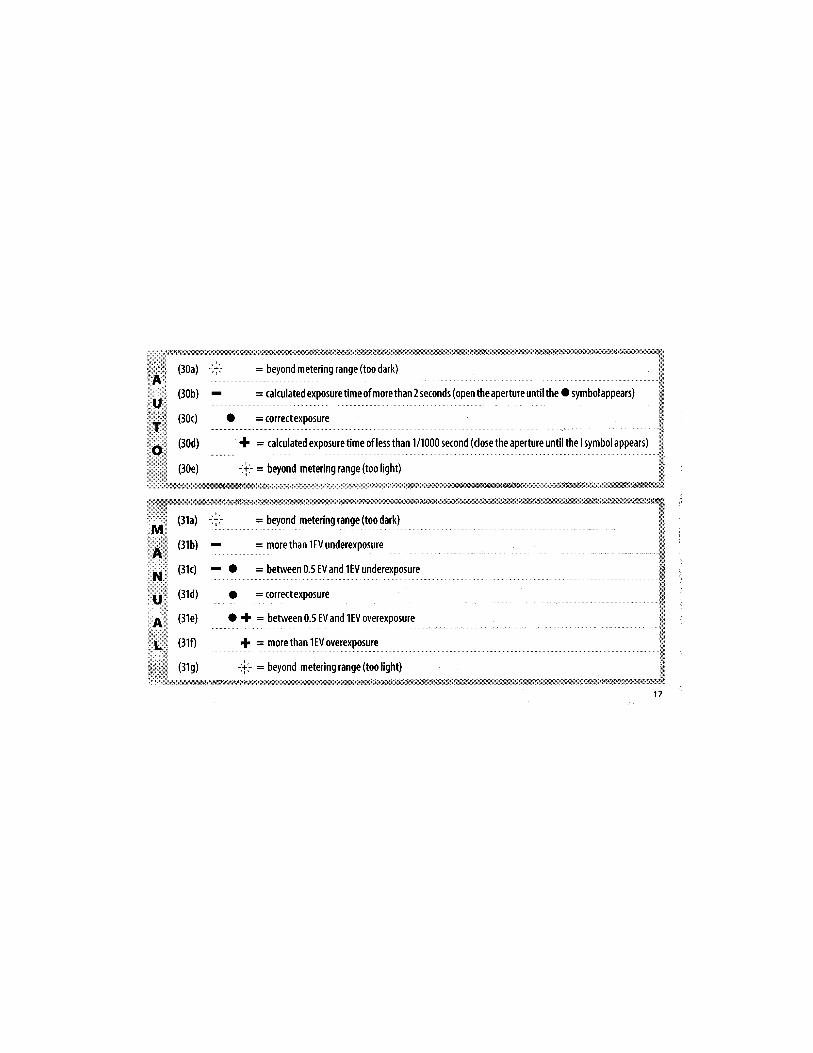
t*******ti!B.,ir$i#f Hli'i4i,i#$Tairi$i!i!-i.$
,, - - , (30b) r = calculated exposure time of more than 2 seconds (open theaperture untilthe O symbolappears) i.i: lf ,, iil::: :: = forpftpxnosrrrp fi.r,f..i: (304 O = corlectexposure *iii
* = calculated exposure time of less than 1/1000 second (close the aperture until the I symbolappear$ l$
H= beyond metering range (too dark)
_= more than 1 EV underexposure
O = between0.5tVandlEVunderexposure
il;l:,.(ji{-+.i{tii[T.i$[rss.i:'f.:siljl*-*$ff ll
| = cofre:texposure
O * = between0.5 EVand ltVoverexposure
* = morethan lEVoveJexpo:ltl:
-.*. = beyond metering range (too light)-*"*--*- -;'
t 7
Manual -o$uiffil.If set at'A', depress the shutter speed control lock
button. At the same time, turn the shutter speed con-trol to any desired shutter speed except '.{ or 'B'
byaligning it against the index. You can then turn theshutter speed control without having to press thelock button again. It remains locked only at the '.{
setting. Be sure to set the dial at a specific speed andnot in between two speeds as this will cause expo-sure errors.
2. Press the shutter release button half way to activate themeter.
3.Adjust the aperture and/or shutter speed controlsuntil the O symbol appears in the viewfinder for cor-rect exposure, or as in the table.
The M/d will also indicate the Tv (shutter speed) set-ting. A flashing Tv signal, fi,g32,indicates exposure be-yond the range of the film.
:ji,- in the M/d = outside exposure range' t "
5-Ip--?*'-rl*1s9rffi :glj-o.n--"*----"-""$pi,,iIn certain situations a preferable exposure may be ob-tained - technically or creatively - by overridingthe sug-gested exposure. There are two alternative ways io do thisin automatic mode, the choice ofmethod depending on thetype of scene. Where there are large, bright areas- aland-scape withlarge white clouds for example - pointthe cam-era down towards foreground tones and press the releasebutton half way to lock the exposure. While maintainingthe pressure on the button, return to the desired composi-tionand press the button all thewaydown for exposure.
In situations where this method is not possible - there areno suitable areas to make a reading from or where you aretaking several pictures in quick succession, for example- use the exposure compensation dial instead. Markedinhalf EV steps, it will provide you with the desired amountof correction automatically.
For example, if you want to photograph a dark figureagainst a dominant light background, the exposure sug-gested (averaged TTL meter reading) will produce an un-derexposed image. By setting an exposure compensationof + 1.5, for example, the result will be more natural. Acommon situation is a
'back lit' subiect- an interior where
a figure is standing in front of a window, for instance, oragainst snow, a sandybeach, silhoueted against a sky, etc,
AA
I
Auto-bracketing
The auto-bracketing function allows you to make a seriesof increased and decreased exposures in rapid succes-
where the background is very light while a much smallerbut important part of the image is comparatively muchdarker.
The opposite situation can also be corrected where, forexample, a light coloured object is positioned in front ofa very dark background. In this case an averaged TTLmeter reading will suggest a reading that would pro-duce an overexposed image. A decrease compensationof -1.5, for example, can be applied producing a back-ground tone that was closer to the original and dark-ening the object to a more'natural'tone. Similar situ-ations might be an object placed in sunlight against abackground in shadow, for example.
The amount of compensation required will differ fromcase to case dependant on the situation and the desiredeffect.
Do not forget to re-set the exrysure compensationdial bock to zero after use.
Check regularly thatthe exposure compenntion dialhas not been unintentionally changed.
sion to ensure an optimal exposure without having to al-ter the settings after each exposure. This is particularlyuseful when using reversal film that inherently has littletolerance for exposure error. It under- and overexposes(by altering the shutter speed) using the chosen exposuresetting as standard providing three separate exposures.Half or full EV step variations can be made. Proceed asfollows:
l. Set the film transport mode to'S'or'C'.
2.Depress the 'AEB'
button located below the M/ dpanel. The'AEB' symbol will appear in the squarein the M/d (fig.35).'t 0.5'will also appear, replacedby
'* f if depressed one more time and finally a
return to neutral if pressed for a third time.Thesefigures show the amount of exposure variation youcan choose from for the three frame sequence.
3. Determine the exposure as normal in manual or'au-tomatic'mode.
4. Press the shutter release button (or remote release)and keep it pressed until the three frames have beenexposed.
The exposures will consecutivelybe : standard, under, over.They are also indicated in the M/d as follows (assuming
0.5 EV is your choice ofvariation for this example) :
Exposure #l displays 't 0.5' (standard)
Exposure #2 displays '-0.5' (under)
Exposure #3 displays '+0.5' (over)
The bracketing function will automatically be deactivat-ed when the camera is turned off and will have to be reac-
tivated when switched on again. The function can also be
turned offby pressing the AEB button again.
lf you release the pressure on the shutter release 75button (or remote release) too soon,the operation A,will not complete.When depressed again, the se-quence will carry on from where it stopped.Thatis to say, if you release the pressure after the first nexposure for exomple,the two final exposures re- 4'"iJ,main programmed in the camera.Therefore,when
ft you depress the release again (assuming you haver# nsl turned off the AEB mode or the camera), the 1.,
first exposure wilt be underexposed by 0.5EV and Athe exposure after that,overexposed by O.SEV.T6einformation concerning the remaining frames re- ,4tr.mains in the camera even if it has gone into the 4j-}'standby mode but the AEB symbol and the figureswill be visible again in the M/d when the camera is
reactivated,
20
Pay attention to the information in the M/d whenworking in the AEB mode and try to remember tocancel this mode after use either by pressing theAEB button again or by turning off the camera.Failure to do so can cause frames to be incorrectly
exposed as you may have inadvertently continuedon interrupted sequence or started a new one.
The standard exposure will include any exposure
compensotion you hove set either by using the ex-posure compensation dial or via the ISO dial.
Th e sh utter w i I I lock a n d the M/d wi I I i nd i cate a f lash -
ingAEB"I'and a numberwhen the bracketing func-
tion is aaivated if only one or two unexposed frames
remain onthefilm.
The shutter will lock and a flashing'P'will appearin the EC/d if the format is changed while the cam-
era is set at AEB'.
Do not forget to remove the lens cap when makingan exposure !
The film is odvanced outomatically to the next fra-
me with consistent spocing between frames regord-
less of format.This resetting of the frame position
can be heard when the format selector is moved.When the mode dial is set at'S', one exposure is made.When the mode dial is set at'C', consecutive exposuresare made as long as the release button remains de-pressed. In the C mode the exposure rate is 3 frames/sin the standard format and 2 frames/s in the panoramaformat.
lf only one unexposed frame is left on the film to coverthe standard format and the format selector is switchdto'pan oram a: the sh utter wi I I lock a nd a'P wi I I fl osh asawarning.
When the ambient lighting conditions are too dark tooread the LCD information panels, pr!ss the LCD backlight illumination button located below the M/d panel,
as in the illustration. The panels will be illuminated andremain so until the camera remains inactive for a period
of five seconds. The lighting will then go out automati-cally. The button also has a toggle function so you can
turn the lighting off simply by pressing button again.
c !2 19 - r _q 1 s e .p lJ ol! g s r d p h y _
The viewfinderhas an integral parallaxcompensation fa-cility. This automatically moves the position of the brightframe in the viewfinder in accordance with the focusingdistance to ensure correct framing of the subject.
Fi I m plan errg"r ..""...""*The film plane index is situated on the top plate ofthe cam-era to the left of the flash hot shoe. This provides the most
accurate mark for distance measurement from the subject.
LCD illumination
Self timer
l. Set the main selector dial to the self timer icon as inthe illustration.
2.A self timer icon appears in the M/d panel.
3. Press the shutter release button.
4. The self timer lamp, located on the front of the cam-era to the right of the viewfinder window, lights upfor seven seconds and flashes for three seconds as acountdown indication.
5. The shutter will then fire, the film will advance andthe self-timer will be reset.
Even if the self-timer operation has started, you canstop it simply by turning the mode switch back to
'S' 'C'
or'OFF'.
When set in the automatic mode, do not standin front of the camera when pressing the release
button as this could adversely affect the exposurereading.
The exposure reading is fixed at the time of pressing
the shutter release button ,even in AE mode.Check,
therefore, to see that there has been no change in
the lighting conditionsduring theten second delay
before exposure.
lnfrared photogrophy
Infrared (IR) rays (wavelengths longer than 800 nm)form an image on a plane further away from the lensthan the image plane for visible light. To compensatefor this difference you have to align the chosen distanceagainst the red IR index and not the normal central in-dex. Proceed as follows:
1. Focus as usual.
2.Note the distance on the focusing scale that is oppo-site the central index line on the lens.
3. Now rotate the focusing ring to set this distance op-posite the red IR index spot instead ofthe central in-dex line.
The illustration shows a lens focused at approx. 4 me-tres for infrared film. See specific film instruction leaf-let for details of filters, film storage, handling and de-velopment.
Pleose moke tests with your choice of infrared filmbefore use. High speed black and white infroredfilm, for example, can be slightly fogged on theedge of the film frame by the film transport emitter/sensor system.
,t HashThere is flash sync at all speeds from B to 11125 via thePC flash socket or hot shoe connector. Please see your
flash unit's user manual for further information. '
When the panorama format is selected, the flashshould be adiusted to cover the field of view. With the45mm lens you should choose an angle that wouldnormally be suitable for a 25 mm lens in the 35 mmformat. With the 90mm lens you should choose an an-gle that would normally be suitable for a 50 mm lensin the 35 mm format.
*.W
When the shutter speed is set at'Bi the drain onthe batteries is substantial. The maximum expo-sure time ot this setting is 270 seconds,
gi*rqJtr-e"Yi"{ . -*Normally the film is automatically rewound into thecassette after the last frame has been exposed. To re-move the film beforehand, however, you must press themid-roll rewind button located below the M/d panel.The button is recessed to prevent unintentional use, souse the tip of a ball-point pen or similar to access it.
5:p--g-t-r'-::?-t!"9-I-----"r-The total number of exposures taken with the cameracan be checked on the M/d. With the camera turnedoff, depress the AEB button and keep it depressed whileyou switch the shooting mode selector to'S'.
Each unit signifies ten exposures. You may find thateven a brand new camera indicates around 200 expo-sures taken. This is a result of testing during manufac-ture and is not a sign of used equipment.
This facility is a handy check to see whether the camerashould be serviced.
Cable release
Avarietv of remote releases can be attached to the XPanwhich his a standard cable release port. Any type of re-lease is suitable on condition that the final connector ismechanical and standard, as in the illustration.
The use of a cable release activates the camera (includ-
ing the exposure meter) and fires the shutter imme-diately. In Auto mode you can see what shutter speedwas chosen by the camera on the M/d; in Manual modepress the shutter release button halfway to activate theexposure meter and adjust the settings before makingan exposure with a cable release.
IFilm processing ff..HH..If you have panorama format exposures or a mixture of
standard and panorama format exposures on the same
roll of film, be sure to use a film processing laboratory
I that is aware of the situation and is qualified to handle'
such cases. Normal consumer film processing facilities
are not suitable as their systems cannot allow for the
mix of formats and will cut the film incorrectly. Films
containing only standard format images, however, re-
main unaffected and you may use a normal consumer
lab.
The lab stickers are provided as a convenient way of
informing or reminding the film lab of the situation.
Ensure that the sticker covers the film type bar code
and the DX code strip on the cassette. Additional stick-
ers are available from your Hasselblad dealer. You may
of course mark the cassettes very clearly in some other
way to ensure that the film is cut manually.
ft nlwafs check with the laboratory first to avoidtA problems.
Further information about panorama format printing
and the location of suitable processing labs can be ob-
tained from your local Hasselblad dealer.24
The XPan is supplied with a front protective cap, a
Quick-coupling plate (together with a hex wrench(Allen key) and fixing bolt),a spirit-level ond a strap.
At the end of this manual you will find a list con-
taining the optional accessories available for the
XPon, some of which are described below.Various
flash guns can be attoched to the hot shoe and flash
brackets can be ottoched via the tripod screw on
the baseplate. Remote releases - cable, pneumotic
or electric - con be attoched via the cable release
socket.
-9-g-ig-f":-."o..-r.ptine""pto]t*9*The Quick-coupling plate allows you to use theHasselblad Tripod quick-coupling S (45144) - anoptional accessory available from the conventionalHasselblad range - for rapid and secure attachment toa tripod and is only necessary for use in this case.
The plate is supplied together with a fixing bolt anda hexagonal Allen key'wrench. Align the plate alongthe length of the camera's baseplate and screw the bolt
clockwise into the tripod socket a few turns. Ensurethe alignment pin on the plate matches its respectivesocket in the camera baseplate and continue to screwthebolt until it is securely attached.
Spirit-level rffi,ffi,lli.*}$*-HThe dual-directional spirit-level simply fits into theflash hot-shoe and provides a check for both horizon-tal and vertical photography. This can be particularlyuseful when photographing buildings, for example. Inthese cases the use of a tripod or stable camera supportis particularly recommended.
Ensure, however, that it is fitted correctly; see illustra-tions. Note the difference depending on whether thecamera is in the horizontal or the vertical position.Checkthat the spirit-level has been pushed all the wayinto the shoe as far as it will go. Remember that the spir-itlevel is intended to be an aid in levelling and cannotguarantee complete accuracy. Check the image careful-lyin the viewfinder.
lu-sky fi!!The UV-Sky filter XPan (54460) is designed for use withthe Hasselblad 4/45mm and the Hasselblad 4l90mmlenses. The filter absorbs some of the ultra-violet ravs
present in light which cause the appearance of. haze,particularly noticeable in photography at high alti-tudes, for example. The use of a UV-Sky filter canreduce this effect somewhat and also cause a slightwarming of tone on colour film.
The filter can safely be left on the lens for most photo-graphic applications as it provides some protection forthe lens'front element not only against dust and rainetc but also against scratches and accidental damage.
The filter is multi-coated to ensure high anti-reflectionquality. No degradation in MTF is seen and there is noshift in focus.
Centre filter XPan for 45mm
TheCentre filterXPanfor45 mm (54453) is designedforuse mainlywith the Hasselblad 4145-mmlens (24015).
The 45 mm lens is free from vignetting with panoramaformat images at lens aperture settings smaller thanfl8. However, natural light fall-off (a basic law of phys-ics) reduces the exposure at the corners of the image byroughly 1f-stop.
This light fall-off at the corners causes visible effectsin critical photography when using transparency film.When using negative film, however, natural light fall-off present in traditional optical printing set-ups (most
film labs and mini-labs) automatically compensatesfor this to a greater extent in the print. Therefore, whenusing negative film and with the lens stopped down,there maybe no need to use a centre filter.
The onlyway to eliminate light fall-off at the corners isto reduce the amount of exposure at the centre of theimage. The Centre filter XPan works by a concentrationofneutral density at the centre and a progressive reduc-tion of density towards the outer edge. The effect at thecentre ofthe filter corresponds to a 1 f-stop reductionin exposure.
The filter is multi-coated to ensure high anti-reflectionquality. No degradation in MTF is seen and there is noshift in focus.
J Photographers normally used to working with SLR cam-eras should particularly check that the lens cap hasbeen removed when making exposures.Aflashing redwarning appears in the viewfinder.
f Toke care if usi ng other types of lens shade or fi lter hold-ers. As the XPan does not have a TTL viewing system itwill be difficult to judge effects and possible vignetting.They moy also obscure the rangefinder optics ond causevis ua I fo cusi n g d iffi cu lti es th ro ug h t h e viewfi nd e r.
I Regularly check that the controls are set correctly be-fore you take a photograph.For example,you may haveset the camera at ASNISO override for a previous filmand have forgotten to reset the Auto DX code setting.Or perhapsyou have inadvertently moved the exposurecompensator dial or forgotten to reset it.
I When using the panoramo format, ensure that youcompose occurately, or at least allow a margin for er-ror. lf you decide to crop an image later,to level a hori-zon for instance,you moy be forced to mask off slightlymore than normal compared to a similar correction inthe standard formot, owing to the panorama format'sgreoter length.
I lf you open the camera back by mistake before youhave finished the film, you will only have lost the lastexposed frame and the unexposed frames.The exposedfromes have already been wound back into the cossetteas the XPan starts by withdrawing all of the film firstand progressively rewinding it frame by frame.
I Make a habit of turning off the comera when not in use,The power save function will put the camera in stand-bymode automatically after three minutes of inactivity butit may reactivate if something presses against it; in acomera bag for example.
t Check battery status regularly and always keep somespare botteries in your camera bag.
I At very low temperatures,the batteries may not providesufficient power for the camera.Keep some spare bat-teries in your pocket,for example,to keepthem warm.These can then be exchanged and be used alternatelywhile the cold batteries are being warmed.
I The dependoble working range for the camera is -l 0" C -+40"c.
a The LCD's may look dark at temperatures around 60" Cand react slowly atvery low temperatures.This is quitenormal and does not signify a fault.
I When using using a combination of the 45mm lens,ponorama format and transparency film, the natural
light decrease appears as slight light fall-off for criticalapplicotions.This is quite natural and is not due to lensvignetting for a stopped-down lens.To minimize this ef-fect use an aperture of f/8 or smaller and avoid under-exposure.The effect can be completely eliminated byusing the Centre filter XPan for 45mm (54453).
I Remember that it is roughly the centrol 20 x30 mm areathat is used in light metering.This is particularly impor-tantwhen usingthe panoramoformatif the scene con-tains a wide range of lighting or tonal, controsts.
I When objects ore very close to the lens, remember thattheir position in relation to the background will alsobe subject to parallax and therefore, dependent on dis-tance,will not be exactly as seen in the viewfinderThiseffect is mainly of concern with the 30mm lens.
f Landscapes can often include a great deal of sky inwide-angle photography.lf pale in tone or with largewhite clouds for exomple, such skies can affect the ex-posure meter sufficiently to cause under-exposure ofthe image.Dependant on the desired effect,take an ex-posure reading from a more appropriate part of thesubject,excluding most of the sky,or use an externalex-posure meter.
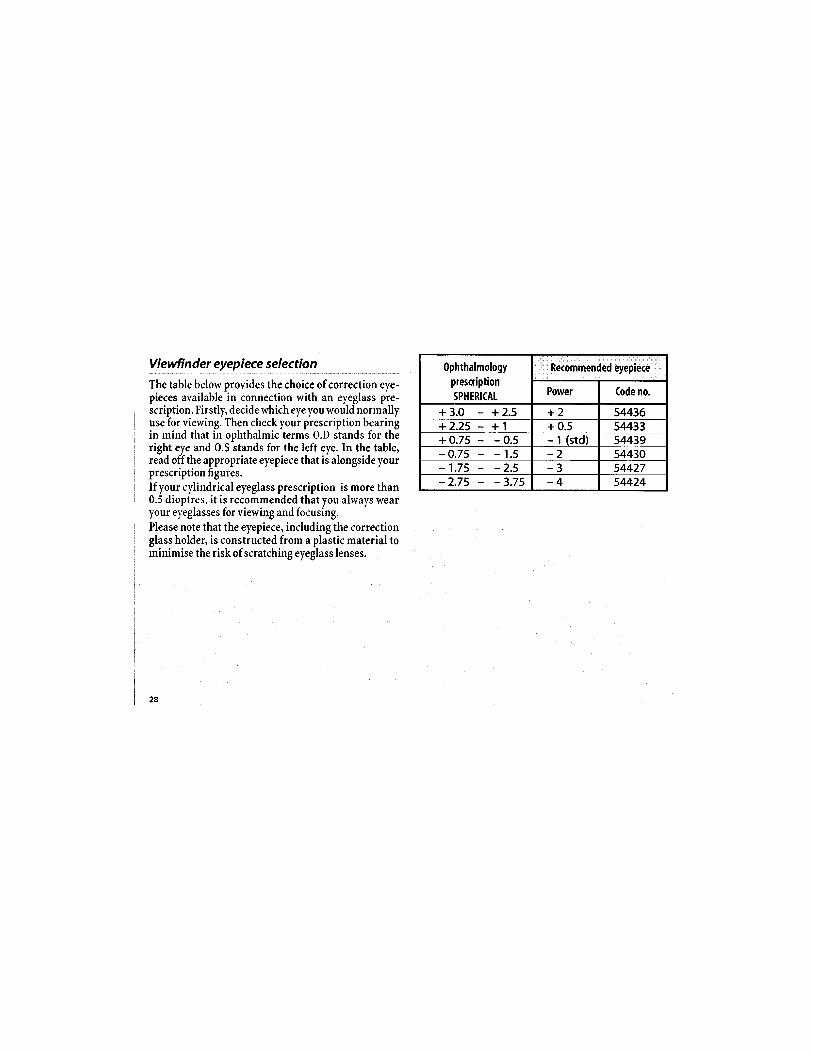
Vi ev,tfi n d er eyepi ece sel e cti o n
The table below provides the choice ofcorrection eye-pieces available in connection with an eyeglass pre-scription, Firstly, decide which eye you would normallyuse for viewing. Then check your prescription bearingin mind that in ophthalmic terms O.D stands for theright eye and 0.S stands for the left eye. In the table,read offthe appropriate eyepiece that is alongsideyourprescription figures.
If your cylindrical eyeglass prescription is more than0.5 dioptres, it is recommended that you always wearyour eyeglasses for viewing and focusing.
Please note that the eyepiece, including the correctionglass holder, is constiucted from a pla-stic material tominimise the risk of scratching eyeglass lenses.
0phthalmologyprescription
SPHERICAt
Recommended eyepiece
Power (ode no.
+ 3 . 0 - + 2 . 5 + 2 54436+2.25 - + I + 0.5 54/.33+0.75 - -0 .5 - 1 (std) 54439- 0.75 - 1.5 - 2 54430- 1 .75 -2 .5 - 3 54427-2.75 -3.75 - 4 54424
I\our{Pan is afully professional camera and should provide manl lears of service particularly if the advice isfol-Iowed under 'Equipineit
Care, Service and Guarantee'. If a problem arisei, howevir, check bicli in this manuil tothe relevant sectionfrst takingparticular note of the specifii warnings. Then check the table below to see if you cansolve it. Refer to a Hasselblad Authorised Service Centre is the problem persists,
ffi#
CamEia dbe5 hot react'when:the release button is pressed.
You cannot attach the lens. ':
You cannot remove the lens.: , : , . , , : .
- . . i i : , , : . : : . . . : , : j : : . . . , . , : . . : , . , . : , . . :
New film has not wbund onto first frame.
, . ittit,tjt i::iii::,it, !]: !i::,;i!::,,;,:iti:ii:,,i::it:::l:iii:i:i:iiii:
' : : : : 1 i : : : : l : i . : : : : i : : l : : l i : i : i :
r : l : i : r j : : : : : r ' : l : : : r : : l
Whole film under/ ,' , ,: , , ,,, ,overexPos , . . ' . . . . . , , , . , ' . , '
' : " " : " : : ' : ' : ' . . : : : : : : '
Some frames un!xposed. i ,
, , , . B a t t e r i e s o m i t t e d o r e x h a u s t e d . , , , ' , , , , . , , , ' , . . , .
;l i t :al i l t t l i : : l ! , l t : : i : : : ' , : : : : , '
: , , : , , : , , : ! : : : : : : : , :r : : !
, . ' ' ' . , , : ' ' ' ' : . . . . . , , : , . , , , , : . i , ,
,,. ,, . Film tip inconectly positioned before closing camara back. '
, , :,:' r 150 setting at DX position with a non-Dx coded film cassette.
i'i.i. l.t.;.i!, t : ' i ! l l r , : i : ! a
:rrii:i i:ri:i:,rri
Manualfilm ipeed 050) dialset incoiieitli:,Exposure compensation dial not set at zero.
Lens cap not removed. : : :,:... . : . . . . . . . . : : . : . : :- - . : , . , , , . , . , . . . ' , . : , ' . i . i
29

,,,Cou pled ran$efi nder with interchangea ble lensej.
: l : : , : . : : . : t . - : . . ' , , , . . : : : , . : , . . . ; . ; ; ; ; ; ; , ; , ' . ' r r
: : : : . : : . i : . i : : : . : : : : : . : . . : . : , i : . : , :
i'lAluminium and titanium ceileii body..lii:.i:j:ii1i;li;,.;riil1;i;i;;i;r,iii1
Bright fraffit viewflnder tambient light), aUtofiatit parallax t0mpnsatioil;autoffiaticstandard/ panoramic switch over via format selector dial, automatic bright frameswitch-over according to lens fitted, integral LED exposure metering indications. Fieldof view 8570 or mor!.
: . , , . . . . . . .Lens helicoid interlocked to coupled rangefinder. . : , ' : ., '. ;: ;: , ; ::;,; ;; :, ', ,,
. . , , , . , . , . , . . : . : : . : : : . : : : : : : : : : : ' . :
' ' , t : . . , . . : . . . . , . : . ' :
Pre-wind gpe, automatic positioning according to format, automatic wind-on, dutorm a t i c r e w i n d . s i n g l e { r a m e a n d c o n t i n u o u s .
: : , , , , , , , , , . . . , , , , , , , ,
',:,,3i,6ii2iAand i2 fiamts inritindaro tCIffiat..ui 2l'i3 flnd'6 frafies in [nbihfiE ftifiatiili:ii:.ii
fiom 36 exp,24 exp and 12 exp cassettes respectively. : .
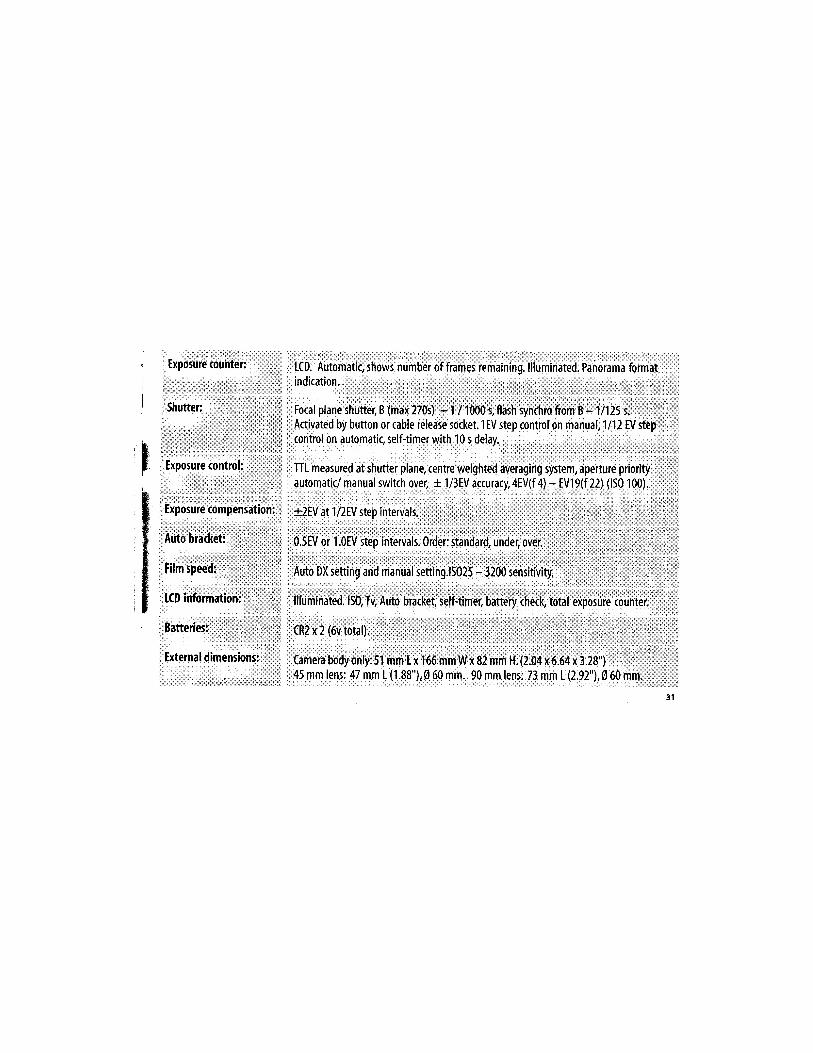
Expoiiiie counter:
; j l : : l : , : , , . : , , , , 1 ' . : : : l : . : : :
l r : : : : : : : : ) : : : l l : : : : l : . : : l : : : :
Shufter: " : "" : . '
LCD. Automatic, shows number of frames iemaining. llluminated. Panorama formatifl di(dtioll.,,,r:r,r, :,,:::, :,,.,'
iFI Activated by button or cable release socket. 1 EV step control on manual, 1l12EU step ,
,'.:TTL measured atshutter plane,centre weigtrteo averaging ryrt*rn,ip.rtuiC tri;riii.l.iiili.llii
0.5EV or l.0EV step intervals. 0rder: standard, under, over. , :: : : .:: :: : : : ,:: .:
: . , . . . , ' . . . ' , . . , , ' , r , , , , , . , , , , , , ,
, llluminated.lS0,Tv, Autb brickCt, self-timer, battery check, totalCxposuie counier. ",',i,
camera bodyonty:5t r*t-* roimmw;C2 m:*.tr.oolte.o+x 3.291 ".: ' : .45 mm lens: 47 mm L (1.88"1,A60 mm. 90 mm lens: 73 mm L(2.92"),A60 mm.
; r : , , : . . . ; . ; . : . . , , . : , ' . . , , : . : ' . '
' . : : : : : : : : :

ili$* iHiffi$ffi lCHtC;'$Er,ultH
EQU'PMENTCAREThe Hasselblad XPan is designed to withstand the rig-ours of professional use in most environments.To avoidthe possibility of damage however, it should be protectedfrom the following:
Extremes of tempcrature, High temperatures conhave on adverse effect on both film and equipment.Tryto avoid frequent and severe temperature chonges. Beporticularly careful in humid environments.Corrosion ofelectrical contacts may occur in these situations if suffi-cient care is not taken.Allow the equipmentto acclima-tize before disassembly.Try to ensure the storage condi-tions in such environments are os dry as possible.
Dust and grit.You should take care to prevent dust andgrit from getting into your equipment.ln coastal areastake measuresto protectyour equipmentfrom sand andsalt woter spray. Dust on the lens gloss con be removedwith a blower brush or very soft lens brush if necessary.Smears on the lens glass should be treated with great cou-tion.ln somecasesthey maybe removedwith a high qual-ity lens cleaning solution on a tissue but be careful nottoscratch the lens or touch any of the glass surfaces withyour fingers.lf in any doubt, do not ottempt to cleon lens
glass surfaces yourself but allow a "Hasselblad AuthorizedServ i ce Center " to treat th em.
lmpact.Your equipment can be damaged by severe phys-ical shocks so practical protective precautions should betaken.When not in use, try to make a habit of storing yourcamera equipment in some form of protective case or bagto avoid occidental da mage.
Loss. Hasselblad equipment is much sought after and youshould take obvious steps to prevent theft. Never leave itvisible in an unottended car,for example.Separate and spe-cific camera insurance cover should be considered by pro-
fessional users.
SERVICE
You should return your equipment to a service centre foroccasional checking and preventive mointenance to en-sure optimal reliability.lf your comera is used constantlyand intensively, periodic check-ups every six months arerecommended at one of the"Hasselblad Authorized ServiceCenters".They have the expert staff and specialised equip-ment necessary to ensurethatyour equipment remains inperfectworking order,
33
GUARANTEE
Provided thot you bught your quipment from an au'thorised Hasselblad outlet,it is covered by an internation-al guarantee for one year.The guarantee document anda registration card are supplied with the camera.Keep theguarantee document carefully, but fill in the registrationcard and return it to your Hasselblad distributor,
supplied with the following equipmeif:
Front protective cap, XPan :: : : ,; , ,
Quick-coupling plate, XPan (with hex wrenft)Strap, XPanS p i r i t - l e v e l , X P a n , . . , . : : : : : . ' . . .
Batteries (2 x CR2) ' ,,1,i i: : ,, ' :
.E[.n ssrr,.sr, AD XPAN c A M E R A
.Hassrr,rrADXpAN Ktr
14010
,,ll:,.,,:l l l l l i
544rs444085440354418
1i;;il;lriirll .
14450
Complete camera with supplied equip'"" ', ,,;, ,,ment asMA.10, plus.Hasselblad4/45 mm , :,, ::,Iens (complete'with supptied equipmeni:',.:r.liii i'.l.',i.r,r....i.r..'iiiiiiiias24015) plus Lens shade, XPan 54406, ....;L:,:.:rll,l:1.l:lll:...l..lilrr:i:i:i
ASPHERICAT TENS
Htssnrnr.no 5.6/jo mm #$#ffi fi I'$:# :fi fi $E,tisupplied with the following equipment:Front lens cap,XPanRear lens cap, XPan (integnl).: ::.l:,l.,,...'.,....ir;,1:1..;,1.:1';:;.Protectivg lens covgr, XPan , : ::::::i:i:i:::i:i'::::ii::ii,:iirriiiiriri;,i:.i!:i;1
i,::i:,j].1i]lrill
24013
: ' : : :5,44725;44825M075,4451584085M6J54410'544"12
'rt,,,,,:,;,, ,$,4476i;,i't,t',, 54479:.,4,.:,,, 5i,4482i'..,:....' 5*t
'il'..,..5ffis
,;,.1,,., 24015
24019: : : :'smg
5M1254At
tir,i::i,,,Li,i:ii;
544055445354460544745442754430544395443354436
sup pli e d w ith th e foll ouii{ e qiil ms htl:,.t' |:'::
Viewfinder XPan 30 mmfitted with a'neutral'correction lenr . ..t,.,1.ilii.lii.L e n s s h a d e X P a n 3 0 m m , ; : ; : : : : : :(gntrgfilter XPan for 30 ltlffi , , ,,,,, ',, ,,,i:rii::ir:::r::r.i;ri:it:irr:1.::r:1lens pouch ..';.;.ilit.i.,i..r'i'ii:l,i iii.ri.ri:'.ii.iViewfinder pouch XPan 30 mm, .,,i...t..r..i'.i..iiiiii:,i..t.f,i.r.'.irFront lens cap for XPan '' .,,,, ; ,' ', '
Rea r l enscapXPan , , , , , . , . , . . . ' . ' ' ' ,. ' ' '
Orrro Cccrssonrrs; 3o,,.,,.'.1.
A p r t oN,e. t.A ccrssoR rrs
tens shadg XPan (for 45 and 90 mm)Centre filter XPan for 45 mmUv{kyf i l terXPan : : ; : : :COnection lens, XPan;: ;.4,.,..l..i.i..l..l1rt.iit.,.,.i..:ii
Correction lens,XPan, -3 : :,'Conection lens, XPan, - 2.. :li:,i.::..i::r;i:.i:l.::l:,r:i.lCorrection lens, XPan, - |(ngutr6l) : : .,
Correction lens, XPan, +0.5 ,, :
Conection lens, XPan, *2 : , ,;;.'
(onection lens,XPan 34, - 4 , , ,,, ,,, ,,,,'.:Conection lens, XPan 30, - 1.5 '.' ''
Conection lens, XPan 30, - 'l (neutal)
Conection lens, XPan 30, + 0.5(onectionlens,XPan30,+2 : : , ;
H.nsstrsrAn 4/45 tutw t tNs
suppl, iedwith,thefol lowingequipment:, , , - ; .-^frri]it lgns cap, XPan" ,,, iiri:r..i!;i:ii;r,;;ri;r::rj::::::::i:,:rlr,,11,;;,;,,r,i;,i1rl,.i:j;,... i :Iffi?
Rear lens cap,XPan (integraiil..,.ltll.;.i.lll i.ii.iri,li.o.f.nii..'.iii.'.;.iii.. :11]?ProteCtive lens cover, XPan ,,,.,,,,,,,,,,,..t..t..:,i,.,t'i,1i,ii ;;1.t;:.1;,;,.;i;;;;,'i';;;;1;;,;. 1 54421'