forward facing child restraint owner’s...
TRANSCRIPT
Forward Facing Child RestraintOwner’s Manual
Read this manualKEEP INSTRUCTIONS FOR FUTURE USE.
Even if using this child restraint seems easy tofigure out on your own, it is very important to READ,
UNDERSTAND AND FOLLOW THE OWNER’S MANUAL.Failure to properly use this child restraint increasesthe risk of serious injury or death in a sudden stop
or crash.
© 2007 Graco ISPC092BD 5/07 US
TODDLERTODDLER
BAR CODE

2
1.0 Warnings to Parents and Other Users . . . . . . .32.0 Registration Information . . . . . . . . . . . . . . . . . .4
2.1 Register Your Child Restraint . . . . . . . . . . . .42.2 Recall Information . . . . . . . . . . . . . . . . . . . . .42.3 If You Need Help . . . . . . . . . . . . . . . . . . . . .4
3.0 Important Information . . . . . . . . . . . . . . . . . . .5-83.1 Warnings . . . . . . . . . . . . . . . . . . . . . . . . . . . .53.2 Height and Weight Limits . . . . . . . . . . . . . . .8
4.0 Features . . . . . . . . . . . . . . . . . . . . . . . . . . . . .9-105.0 Using Child Restraint Harness . . . . . . . . .11-16
5.1 Positioning the Harness Straps . . . . . . . . .115.2 Securing Your Child in the
Child Restraint . . . . . . . . . . . . . . . . . . . . . .156.0 Child Restraint Location . . . . . . . . . . . . . .17-21
6.1 Vehicle Seat Requirements . . . . . . . . . . . .176.2 Vehicle Seat Belt Requirements . . . . . . . . .18
6.2.1 UNSAFE Vehicle Belt Systems . . . . .186.2.2 SAFE Vehicle Belt Systems . . . . . . .20
7.0 Securing the Child Restraint inYour Vehicle . . . . . . . . . . . . . . . . . . . . .22-31
7.1 With a Vehicle Lap Only Belt . . . . . . . . . . . .227.2 With a Vehicle Lap/Shoulder Belt . . . . . . . .247.3 With LATCH . . . . . . . . . . . . . . . . . . . . . . . . .277.4 Using the Tether . . . . . . . . . . . . . . . . . . . . .307.5 Using Recline . . . . . . . . . . . . . . . . . . . . . . .31
8.0 Additional Information . . . . . . . . . . . . . . . .32-348.1 Storing LATCH and Tether . . . . . . . . . . . . .328.2 Airplane Use . . . . . . . . . . . . . . . . . . . . . . . .328.3 Accessories (on certain models) . . . . . . . .33
9.0 Care and Maintenance . . . . . . . . . . . . . . . .35-3610.0 Replacement Parts . . . . . . . . . . . . . . . . . . . . .38
Table of Contents

3
Failure to properly use this child restraint increases the riskof serious injury or death in a sharp turn, sudden stop orcrash. Your child’s safety depends on you installing andusing this child restraint correctly. Use ONLY forward facing.Even if using this child restraint seems easy to figure out onyour own, it is very important to READ, UNDERSTAND ANDFOLLOW THE OWNER’S MANUAL.The manual should be stored in the slot below the reclinelever.You must also read your vehicle owner’s manual.Your child’s safety depends on:1. Inserting the harness straps in the proper slots for
your child.2. Properly securing your child in the child restraint.3. Selecting a suitable location for the child restraint in
your vehicle.4. Properly routing and securing the vehicle seat belt or
properly using LATCH.
1.0 Warnings to Parentsand Other Users
4
Model Number:
Manufactured in:
Purchase Date:
2.0 Registration Information
2.1 Register Your Child Restraint
2.3 If You Need Help
Please fill in the above information. The model numberand manufactured in (date) can be found on a labelunderneath your child restraint. Fill out the prepaidregistration postcard attached to the seat cover andmail it today.Child restraints could be recalled for safety reasons.You must register this restraint to be reached in a recall. Sendyour name, address, model number and manufacturing date to:
Graco Children’s Products Inc.150 Oaklands Blvd.Exton, PA 19341or call 1-800-345-4109or register online at www.gracobaby.com
Please contact our Customer Service Department withany questions you may have concerning parts, use, ormaintenance. When you contact us, please have yourproduct’s model number and manufactured in (date)ready so that we may help you efficiently. The numberscan be found on a sticker on the underside of your childrestraint.
1-800-345-4109 or www.gracobaby.com
• Call the U.S. Government’s Vehicle Safety Hotlineat 1-888-327-4236 (TTY: 1–800–424–9153) or go tohttp://www.NHTSA.gov
• Graco: 1-800-345-4109 or www.gracobaby.com
2.2 Recall Information
5
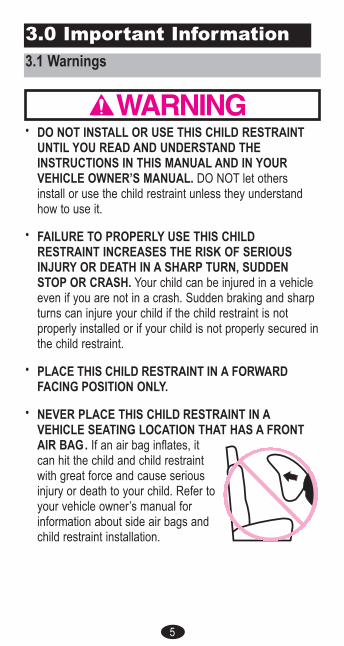
• DO NOT INSTALL OR USE THIS CHILD RESTRAINTUNTIL YOU READ AND UNDERSTAND THEINSTRUCTIONS IN THIS MANUAL AND IN YOURVEHICLE OWNER’S MANUAL. DO NOT let othersinstall or use the child restraint unless they understandhow to use it.
• FAILURE TO PROPERLY USE THIS CHILDRESTRAINT INCREASES THE RISK OF SERIOUSINJURY OR DEATH IN A SHARP TURN, SUDDENSTOP OR CRASH. Your child can be injured in a vehicleeven if you are not in a crash. Sudden braking and sharpturns can injure your child if the child restraint is notproperly installed or if your child is not properly secured inthe child restraint.
• PLACE THIS CHILD RESTRAINT IN A FORWARDFACING POSITION ONLY.
• NEVER PLACE THIS CHILD RESTRAINT IN AVEHICLE SEATING LOCATION THAT HAS A FRONTAIR BAG. If an air bag inflates, itcan hit the child and child restraintwith great force and cause seriousinjury or death to your child. Refer toyour vehicle owner’s manual forinformation about side air bags andchild restraint installation.
3.0 Important Information3.1 Warnings

6
• According to accident statistics, CHILDREN ARE SAFERWHEN PROPERLY RESTRAINED IN REAR VEHICLESEATING POSITIONS RATHER THAN FRONTSEATING POSITIONS. For a vehicle with a frontpassenger air bag, refer to your vehicle owner’s manualas well as these instructions for child restraint installation.
• NEVER LEAVE YOUR CHILD UNATTENDED.
• NEVER LEAVE A CHILD RESTRAINT UNSECURED INYOUR VEHICLE. An unsecured child restraint can bethrown around and may injure occupants in a sharp turn,sudden stop or crash. Remove it or make sure that it issecurely belted in the vehicle. If not using LATCH, makesure LATCH connectors are properly stored on back ofseat. See page 32 for LATCH storage.
• REPLACE THE CHILD RESTRAINT AFTER ANACCIDENT OF ANY KIND. An accident can causedamage to the child restraint that you cannot see.
• STOP USING CHILD RESTRAINT AND THROW ITAWAY after the date molded into the bottom of the childrestraint. “DO NOT use this car seat after December(Year)”
• DO NOT MODIFY YOUR CHILD RESTRAINT or use anyaccessories or parts supplied by other manufacturers.
• NEVER USE CHILD RESTRAINT IF IT HAS DAMAGEDOR MISSING PARTS. DO NOT use a cut, frayed ordamaged child restraint harness, LATCH belt or vehicleseat belt.

7
• THE CHILD RESTRAINT CAN BECOME VERY HOT IFLEFT IN THE SUN. Contact with these parts can burnyour child’s skin. Always touch the surface of any metal orplastic parts before putting your child in the child restraint.
• THIS CHILD RESTRAINT CONFORMS to allapplicable Federal Motor Vehicle Safety Standardsand is certified for use in motor vehicles and Aircraft.
8
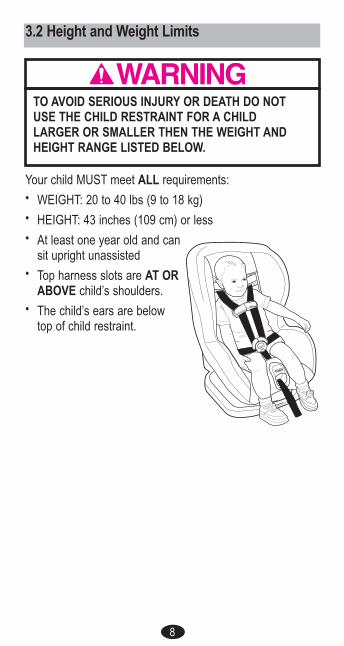
TO AVOID SERIOUS INJURY OR DEATH DO NOTUSE THE CHILD RESTRAINT FOR A CHILDLARGER OR SMALLER THEN THE WEIGHT ANDHEIGHT RANGE LISTED BELOW.
3.2 Height and Weight Limits
Your child MUST meet ALL requirements:• WEIGHT: 20 to 40 lbs (9 to 18 kg)• HEIGHT: 43 inches (109 cm) or less• At least one year old and can
sit upright unassisted• Top harness slots are AT OR
ABOVE child’s shoulders.• The child’s ears are below
top of child restraint.
9
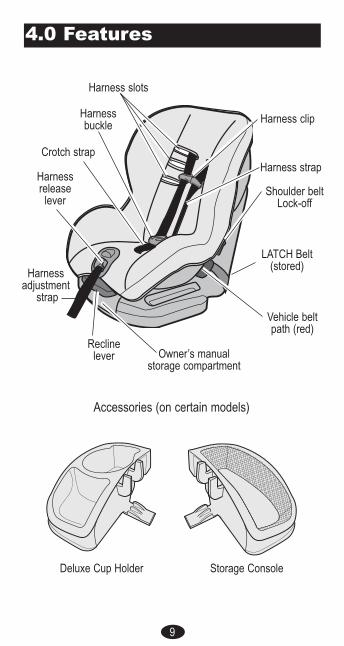
Harness slots
Harness clip
Crotch strap
Harnessbuckle
4.0 Features
Accessories (on certain models)
Harnessadjustment
strap
Harnessreleaselever
Owner’s manualstorage compartment
Reclinelever
Harness strap
Vehicle beltpath (red)
Shoulder beltLock-off
LATCH Belt(stored)
Deluxe Cup Holder Storage Console

10
**Vehicles are now (or can be) equipped with tether anchorpoints behind some seats. A tether anchors the top of thechild restraint to the body of the vehicle. When usedproperly with the vehicle seat belt or LATCH, a tetherhelps reduce injury in a sudden stop or crash.
***United States Federal Motor Vehicle Safety Standardshave defined a new system for installing child restraints invehicles. The system is called LATCH. LATCH may ONLYbe used IN PLACE of vehicle belt if vehicle isequipped with LATCH anchor points. Please referto vehicle owner’s manual for LATCH locationsin vehicles.
Tether strap**
Tether clipLATCH***
Belt
Adjustmentbelt
LATCHStorage bar
LATCHConnector
TetherStorage bar
Harnessslots

11
5.0 Using Child RestraintHarness
5.1 Positioning the Harness Straps
FAILURE TO PROPERLY ADJUST THE HARNESSSTRAPS FOR YOUR CHILD INCREASES THE RISKOF SERIOUS INJURY OR DEATH IN THE EVENT OFA SHARP TURN, SUDDEN STOP OR CRASH. Snuglyadjust the belts provided with this child restraint aroundyour child. A snug strap should not allow any slack. It liesin a relatively straight line without sagging. It does notpress on the child’s flesh or push the child’s body intoan unnatural position.
1. Loosen the harness straps bylifting the adjustment lever onthe front of the seat andpulling the straps out as faras they will come at theshoulders �.
2. Open harness clip �.
3. Unbuckle harness straps �.Lay the harness straps overthe sides of the seat to avoidthe harness twisting.
�
�
�

12
4. Place child in the seat.The harness strapsmust go in the slots evenwith or just above theshoulders �.If straps are already in theproper slots, go to step 1on page 15.
5. To adjust harness straps:Loosen the harnessstraps by lifting theharness release lever onthe front of the seat whilepulling the straps outat the shoulders.a) Recline the seat bysqueezing the reclinelever up and pulling theseat forward, so you willhave access to the backof the seat �.
b) From the side of the seat,pull the harness and metaljunction plate out andremove straps from metaljunction plate �.
�
�
�

13
c) Pull strap ends throughslots � and reinsert them inthe correct slots � asdetermined in step 4,page 12.Check that the strapsare not twisted.
d) Reassemble straps ontometal junction plate exactlyas shown �. Check thatstraps are completely withinthe slots and that they arenot twisted.
e) Check that the strapsare inserted at the samelevel and that they are nottwisted. A twisted belt maykeep the harness fromworking properly. Pull onharness to make sure itis secure.
�
�
�

14
6. Harness AdjustmentLoosen the harnessstraps by lifting theharness release lever onthe front of the seat whilepulling the straps outat the shoulders asshown �.
Tighten the harness strapsby pulling the adjustmentstrap on the front of theseat �.(See also Section 5.2,Securing Your Child in theChild Restraint, page 15.)
REMEMBER to checkthe shoulder straps asyour child grows and movethem to the next positionwhen necessary. Theharness straps must go inthe slots even with or justabove the shoulders.
�
�

1. Place child in child restraintwith child’s back flat againstback of child restraint.
2. Place harness strapsover child’s shoulders, insertthe two buckle tongues intothe harness buckle on thecrotch strap. Make sure thatyou hear each tongue clickinto the buckle.DO NOT use the child restraintif the buckle tongues do not latch in place.Call Graco at 1-800-345-4109�.CHECK that straps are not twisted.CHECK that harness is securely latched by pullingup on straps.DO NOT use child restraint if harness does notlatch.
15
5.2 Securing Your Child in the Child Restraint
FAILURE TO PROPERLY SECURE YOUR CHILD INTHE CHILD RESTRAINT INCREASES THE RISK OFSERIOUS INJURY OR DEATH IN THE EVENT OF ASHARP TURN, SUDDEN STOP OR CRASH.In a crash, the child restraint provides NO protectionfor your child unless the harness straps are properlysecured. Follow these instructions carefully to properlysecure your child.
• ADJUST THE HARNESS SYSTEM SNUGLY EVERYTIME you place your child in the child restraint.
• Avoid bulky clothing.
�

16
3. Pull the adjustment strapto securely tighten theharness �.
4. Fasten harness clip �.Position harness clipat middle of child’s chest,level with armpits.
5. Make sure straps areflat and tight againstchild’s shoulders. Youshould not be able topinch the harness straps.A snug strap should notallow any slack. It lies in arelatively straight linewithout sagging. It doesnot press on the child’sflesh or push the child’sbody into an unnaturalposition �.
�
�
�

17
• Children are safer when properly restrainedin rear vehicle seating positions. Whenever possiblesecure the child restraint inthe center position of theseat directly behind thefront seats.
• The vehicle seat must face forward.
6.0 Child Restraint Location
6.1 Vehicle Seat Requirements
IMPROPER PLACEMENT OF THE CHILD RESTRAINTINCREASES THE RISK OF SERIOUS INJURY ORDEATH. Some seating positions in your vehicle may notbe safe for this child restraint. Some vehicles do nothave any seating positions that can be used safely withthe child restraint. If you are not sure where to place thechild restraint in your vehicle, consult your vehicleowner’s manual or call Graco Children's Products Inc.,1-800-345-4109.
18
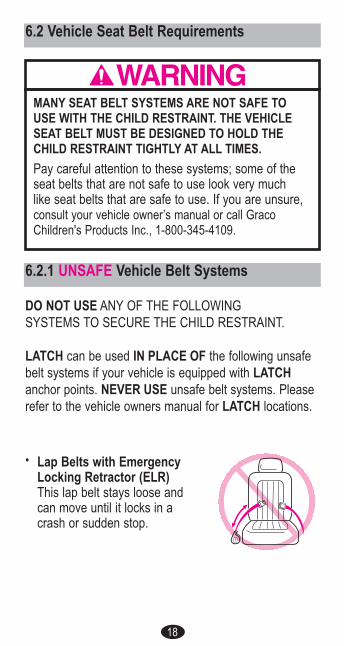
DO NOT USE ANY OF THE FOLLOWINGSYSTEMS TO SECURE THE CHILD RESTRAINT.
LATCH can be used IN PLACE OF the following unsafebelt systems if your vehicle is equipped with LATCHanchor points. NEVER USE unsafe belt systems. Pleaserefer to the vehicle owners manual for LATCH locations.
• Lap Belts with EmergencyLocking Retractor (ELR)This lap belt stays loose andcan move until it locks in acrash or sudden stop.
6.2 Vehicle Seat Belt Requirements
MANY SEAT BELT SYSTEMS ARE NOT SAFE TOUSE WITH THE CHILD RESTRAINT. THE VEHICLESEAT BELT MUST BE DESIGNED TO HOLD THECHILD RESTRAINT TIGHTLY AT ALL TIMES.Pay careful attention to these systems; some of theseat belts that are not safe to use look very muchlike seat belts that are safe to use. If you are unsure,consult your vehicle owner’s manual or call GracoChildren's Products Inc., 1-800-345-4109.
6.2.1 UNSAFE Vehicle Belt Systems

19
• Combination Lap/ShoulderBelt with RetractorEach strap has a retractor atone end and is attached tothe latch plate at the otherend.
• Passive Restraint -Lap or Shoulder BeltMounted on Door
• Passive Restraint -Lap Belt with MotorizedShoulder BeltDO NOT use vehicle beltsthat are attached to the doorin any way or that movealong a track to automaticallysurround the passenger whenthe door is closed.
• Lap Belts Forward of SeatCrease
20
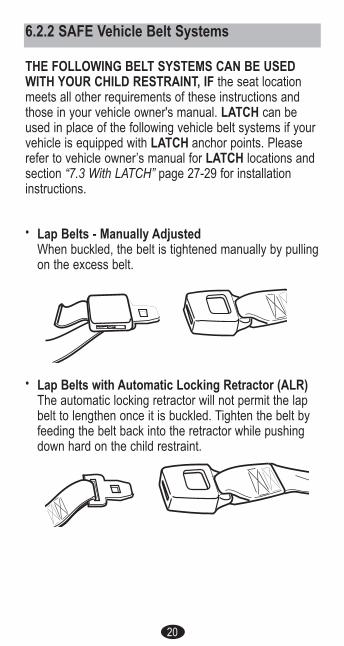
6.2.2 SAFE Vehicle Belt Systems
• Lap Belts - Manually AdjustedWhen buckled, the belt is tightened manually by pullingon the excess belt.
• Lap Belts with Automatic Locking Retractor (ALR)The automatic locking retractor will not permit the lapbelt to lengthen once it is buckled. Tighten the belt byfeeding the belt back into the retractor while pushingdown hard on the child restraint.
THE FOLLOWING BELT SYSTEMS CAN BE USEDWITH YOUR CHILD RESTRAINT, IF the seat locationmeets all other requirements of these instructions andthose in your vehicle owner's manual. LATCH can beused in place of the following vehicle belt systems if yourvehicle is equipped with LATCH anchor points. Pleaserefer to vehicle owner’s manual for LATCH locations andsection “7.3 With LATCH” page 27-29 for installationinstructions.

21
• Combination Lap/Shoulder Belt with LockingLatch PlateOnce it is buckled, this type of belt has a latch platethat will not allow the lap portion of the belt to loosen.Belt is tightened by pulling hard on the shoulderportion of the vehicle belt while pushing down onthe child restraint.
• Combination Lap/Shoulder Belt with SlidingLatch PlateThis belt has a latchplate that slides freely along thebelt. Belt is tightened by pulling hard on the shoulderportion of the vehicle belt while pushing down on thechild restraint.

22
FAILURE TO PROPERLY SECURE THE CHILDRESTRAINT IN THE VEHICLE INCREASES THECHILD’S RISK OF SERIOUS INJURY OR DEATH INTHE EVENT OF A SHARP TURN, SUDDEN STOP ORCRASH.Carefully follow these instructions and those in your vehicleowner’s manual to be sure your child restraint is properlylocated, positioned, and held tightly at all times.
7.1 With a Vehicle Lap Only Belt
Before beginning, make sure that LATCH is stored. SeeSection 8.1, Storing LATCH and Tether, page 32. Ifyour vehicle is equipped with tether anchor points,remove the tether clip from the storage bar, otherwisemake sure that the tether is stored.
1. Place the child restraintfirmly against the back of aforward-facing vehicleseat.
2. NEVER place the vehiclebelt over the armrest ofthe child restraint.Recline the child restraintand thread the vehicle beltthrough the belt path.
3. Buckle the vehicle belt �.The vehicle belt should notbe twisted or turned.
7.0 Securing the ChildRestraint in Your Vehicle
�
23
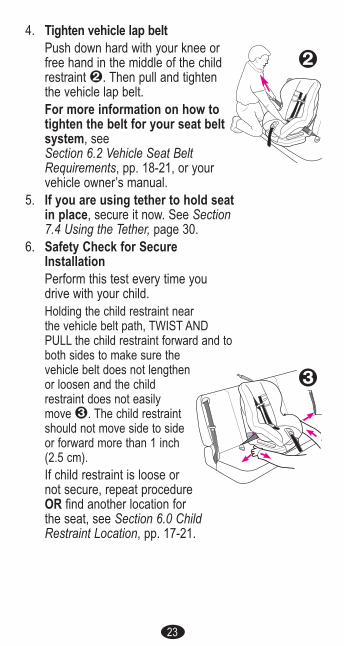
4. Tighten vehicle lap beltPush down hard with your knee orfree hand in the middle of the childrestraint �. Then pull and tightenthe vehicle lap belt.For more information on how totighten the belt for your seat beltsystem, seeSection 6.2 Vehicle Seat BeltRequirements, pp. 18-21, or yourvehicle owner’s manual.
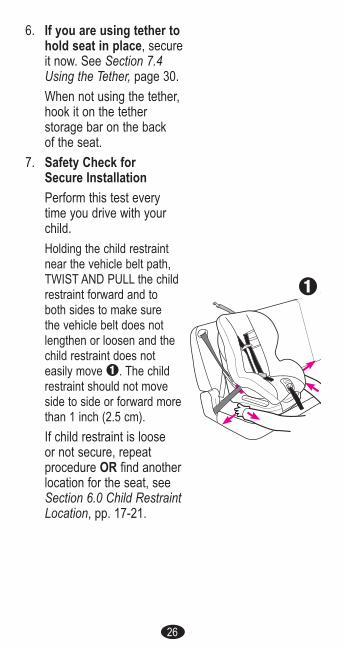
5. If you are using tether to hold seatin place, secure it now. See Section7.4 Using the Tether, page 30.
6. Safety Check for SecureInstallationPerform this test every time youdrive with your child.Holding the child restraint nearthe vehicle belt path, TWIST ANDPULL the child restraint forward and toboth sides to make sure thevehicle belt does not lengthenor loosen and the childrestraint does not easilymove �. The child restraintshould not move side to sideor forward more than 1 inch(2.5 cm).If child restraint is loose ornot secure, repeat procedureOR find another location forthe seat, see Section 6.0 ChildRestraint Location, pp. 17-21.
�
�

24
1. Place the child restraintfirmly against the back ofa forward-facing vehicleseat.
2. NEVER place the vehiclebelt over the top of thechild restraint.Recline the child restraintand thread the vehicle beltthrough the belt path.
3. Buckle the vehicle belt �.The vehicle belt should notbe twisted or turned.
�
7.2 With a Vehicle Lap/Shoulder Belt
Before beginning, make sure that LATCH is stored. SeeSection 8.1, Storing LATCH and Tether, page 32. Ifyour vehicle is equipped with tether anchor points,remove the tether clip from the storage bar, otherwisemake sure that the tether is stored.
When using an approved combination lap/shoulder belt,this child restraint is equipped with a lock-off that isused to secure the shoulder portion of the belt so it willnot loosen or shift during use. You must use thelock-off provided on the child restraint whenever youare using a combination lap/shoulder belt to secureyour child restraint.

25
4. Tighten vehicle seat beltPush down with your freehand or knee in the middleof the child restraint �.Then pull and tighten theshoulder portion of thelap/shoulder belt.For more information onhow to tighten the beltfor your seat beltsystem, see Section6.2 Vehicle Seat BeltRequirements, pp. 18-21,or your vehicle owner’smanual.
5. While pulling the shoulderportion of the lap/shoulderbelt, lay the shoulder beltinside the opened lock-off� and snap the lock-offover the shoulder belt �.Two lock-offs are providedto allow for the seat to beinstalled on the right or leftside of the vehicle seat.Only use one lock-off ata time. NEVER try to useboth lock-offs wheninstalling the childrestraint.DO NOT try to close thelock-off over anything butthe shoulder portion of thevehicle lap/shoulder belt. Ifany other part of the belt isin the way then try anotherseat location.
�
�
26
6. If you are using tether tohold seat in place, secureit now. See Section 7.4Using the Tether, page 30.When not using the tether,hook it on the tetherstorage bar on the backof the seat.
7. Safety Check forSecure InstallationPerform this test everytime you drive with yourchild.Holding the child restraintnear the vehicle belt path,TWIST AND PULL the childrestraint forward and toboth sides to make surethe vehicle belt does notlengthen or loosen and thechild restraint does noteasily move �. The childrestraint should not moveside to side or forward morethan 1 inch (2.5 cm).If child restraint is looseor not secure, repeatprocedure OR find anotherlocation for the seat, seeSection 6.0 Child RestraintLocation, pp. 17-21.
�

27
7.3 With LATCH
Newer vehicles have one or more seating positions withLATCH anchorage systems. If vehicle is equipped withLATCH, the vehicle lower anchor points may be visible atthe vehicle seat crease. If not visible, they may bemarked with the symbol below �.
See your vehicle owner’s manual for exact locations,anchor identification, and requirements for use witha child restraint.
LATCH is defined as anchorages 280mm (11 inches)between anchor points. Graco does not recommendusing the LATCH system in the center position if thespacing is greater than 280 mm (11 inches) unlessrecommended in your vehicle owner’s manual.
Typical seat in a passenger vehicle. Other vehicletypes may have different LATCH locations.
Check vehicle owner’s manual for vehicle top tetheranchor locations. They may be identified using one of theanchor symbols as shown above � or �. ONLY useLATCH on a child restraint in a seating positionrecommended by vehicle manufacturer.
VehicleTop Tether Anchor
Points
Vehicle LowerAnchor Points
VehicleSeat Crease
� � �
28
1. Remove both LATCHconnectors and the tetherconnector from the storagebars and extend LATCH toits maximum length forease of installation.
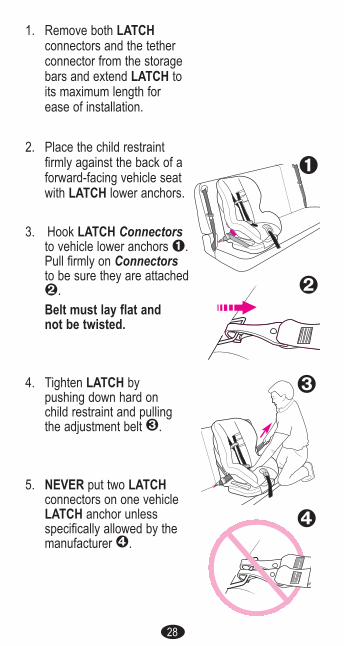
2. Place the child restraintfirmly against the back of aforward-facing vehicle seatwith LATCH lower anchors.
3. Hook LATCH Connectorsto vehicle lower anchors �.Pull firmly on Connectorsto be sure they are attached�.Belt must lay flat andnot be twisted.
4. Tighten LATCH bypushing down hard onchild restraint and pullingthe adjustment belt �.
5. NEVER put two LATCHconnectors on one vehicleLATCH anchor unlessspecifically allowed by themanufacturer �.
�
�
�
�
29
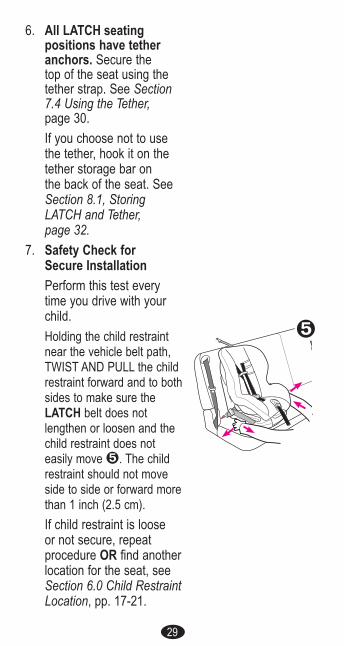
6. All LATCH seatingpositions have tetheranchors. Secure thetop of the seat using thetether strap. See Section7.4 Using the Tether,page 30.If you choose not to usethe tether, hook it on thetether storage bar onthe back of the seat. SeeSection 8.1, StoringLATCH and Tether,page 32.
7. Safety Check forSecure InstallationPerform this test everytime you drive with yourchild.Holding the child restraintnear the vehicle belt path,TWIST AND PULL the childrestraint forward and to bothsides to make sure theLATCH belt does notlengthen or loosen and thechild restraint does noteasily move �. The childrestraint should not moveside to side or forward morethan 1 inch (2.5 cm).If child restraint is looseor not secure, repeatprocedure OR find anotherlocation for the seat, seeSection 6.0 Child RestraintLocation, pp. 17-21.
�
30
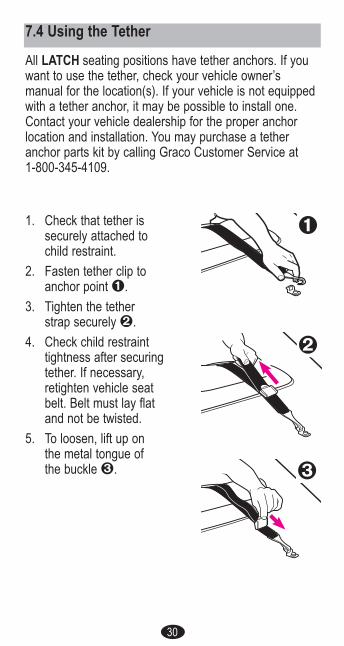
7.4 Using the Tether
1. Check that tether issecurely attached tochild restraint.
2. Fasten tether clip toanchor point �.
3. Tighten the tetherstrap securely �.
4. Check child restrainttightness after securingtether. If necessary,retighten vehicle seatbelt. Belt must lay flatand not be twisted.
5. To loosen, lift up onthe metal tongue ofthe buckle �.
All LATCH seating positions have tether anchors. If youwant to use the tether, check your vehicle owner’smanual for the location(s). If your vehicle is not equippedwith a tether anchor, it may be possible to install one.Contact your vehicle dealership for the proper anchorlocation and installation. You may purchase a tetheranchor parts kit by calling Graco Customer Service at1-800-345-4109.
�
�
�

31
7.5 Using Recline
1. To use recline: squeeze onrecline lever at front of theseat and pull the seatforward into one of therecline positions. �.When the seat is in thedesired position, releasethe handle and push onthe seat until you hear theseat lock into position.
2. To put seat back into oneof the upright positions,squeeze the recline handleand push the seat back�. When the seat is in thedesired position, releasethe handle and push onthe seat until you hear theseat lock into position.
Seat may be adjusted whilechild is seated. NEVER adjustthe recline while driving.
�

32
8.2 Airplane Use
8.1 Storing LATCH and Tether8.0 Additional Information
1. For ease of storing, extendLATCH to its maximumlength.
2. Locate the storage bar onback of child restraint �.
3. Fasten LATCH connectorsto storage bar as shown.
4. After fastening to storagebar, pull on adjustment beltto make sure LATCH issecurely fastened.
5. Fasten tether clip to storagebar and tighten strap.
6. LATCH and tether storageshould look like this whencomplete �.
�
LATCHStorage bar
TetherStorage bar
This restraint is certified for use in Motor Vehicles andAircraftImportant points to remember1. Airlines have some restrictions about the use of
child restraints.2. Install your child restraint on an airplane in the
same way it is installed in an automobile with a lapbelt using recline position 2. (see Section 7.1, With aVehicle Lap Only Belt, pp. 22-23).
3. Check that the airplane seat belt holds the childrestraint securely in place at all times.
33
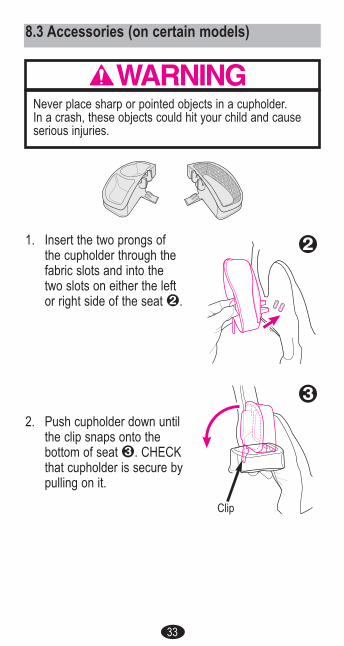
8.3 Accessories (on certain models)
1. Insert the two prongs ofthe cupholder through thefabric slots and into thetwo slots on either the leftor right side of the seat �.
2. Push cupholder down untilthe clip snaps onto thebottom of seat �. CHECKthat cupholder is secure bypulling on it.
Clip
�
�
Never place sharp or pointed objects in a cupholder.In a crash, these objects could hit your child and causeserious injuries.

34
DetachableHead Pillow
HarnessCovers
Crotch StrapCover
Body Support(styles vary)
Your model may include one or more of the followingaccessory items.
To prevent ejection in sudden stop or crash:• Always make sure shoulder straps are threaded
through slots and properly positioned on shoulders.• Never allow body support to bunch or fold behind child.• Use body support with bottom harness slots only.• Make sure that harness covers do not interfere with
placement of the chest clip at armpit level.
35
9.0 Care and Maintenance• CONTINUOUS USE OF CHILD RESTRAINT
MAY CAUSE DAMAGE TO VEHICLE SEAT. Usea child restraint mat, towel or thin blanket to protectupholstery.
• METAL AND PLASTIC PARTS: clean with mild soapand cool water. NO BLEACH OR DETERGENTS.
• HARNESS STRAPS AND LATCH STRAPS may bespot cleaned or replaced. DO NOT IMMERSE THESTRAPS IN WATER. Doing so may weaken thestraps. NEVER iron the harness straps.
• IF HARNESS STRAPS have cuts, fraying or becomebadly twisted, you must replace the straps.
• BUCKLE AND HARNESS ADJUSTER may becleaned with a damp cloth.
• NEVER LUBRICATE THE BUCKLE. If buckle orharness adjuster sticks or will not remain tight, checkfor foreign objects such as food, dirt, etc. Removeobjects with tweezers and/or clean with a cotton swab.If you cannot get the harness to remain tight with thebuckle securely locked, do not use this child restraint.Call Graco at 1-800-345-4109 to purchase areplacement harness or buckle.
• NEVER USE A SECOND-HAND CHILD RESTRAINTor a child restraint whose history you do not know.
• SEAT COVER may be cleaned with a damp spongeusing mild soap and cool water. If necessary, covermay be removed for cleaning. DO NOT use childrestraint without seat pad.

36
To Wash Seat Pad
1. It is not necessary to remove the harness to removethe seat pad. Simply unbuckle the harness clip andbuckle, open the seams near the harness slots on theseat pad and gently lift the pad over the adjustmentbutton cover. Push the crotch strap through the slot.Some models may have elastic straps that will need tobe removed before the seat pad can be lifted off theseat.DO NOT USE child restraint without the seat cover.
2. Machine wash cover in cold water on delicate cycleand drip-dry. DO NOT USE BLEACH.
Reverse the process to reinstall the seat pad. MAKESURE that the harness is going through the seat padslots that line up with the slots in the seat back.

37
Notes

38
To purchase parts or accessories or for warrantyinformation in the United States,please contact us at the following:
www.gracobaby.comor
1-800-345-4109
10.0 Replacement Parts
Keep this manual in the storageslot on the front of the child
restraint just below the recline handle.

Sistema de seguridad paraniños orientado hacia adelanteManual del propietario
Lea este manualGUARDE ESTAS INSTRUCCIONES PARA USO FUTURO.
A pesar de que el uso de este sistema deseguridad para niños parezca fácil de descifrar,es muy importante LEER, ENTENDER Y SEGUIR
EL MANUAL DEL PROPIETARIO.No usar debidamente este sistema de seguridadpara niños aumenta el riesgo de lesiones seriaso muerte en una parada repentina o accidente.
© 2007 Graco ISPC092BD 5/07 US
TODDLERTODDLER

2
1.0 Advertencias a padres y otros usuarios . . . . . . .32.0 Información sobre el registro . . . . . . . . . . . . . .4-5
2.1 Registro de su sistema de seguridadpara niños . . . . . . . . . . . . . . . . . . . . . . . . . . . . .4
2.2 Información sobre el retiro de productosdel mercado . . . . . . . . . . . . . . . . . . . . . . . . . . .4
2.3 Si necesita ayuda . . . . . . . . . . . . . . . . . . . . . . .53.0 Información importante . . . . . . . . . . . . . . . . . . .5-8
3.1 Advertencias . . . . . . . . . . . . . . . . . . . . . . . . . . .53.2 Limitaciones de peso y altura . . . . . . . . . . . . .8
4.0 Características . . . . . . . . . . . . . . . . . . . . . . . . .9-105.0 Uso del arnés del sistema de seguridad
para niños . . . . . . . . . . . . . . . . . . . . . . . . . . . .11-165.1 Colocación de las correas del arnés . . . . . . .115.2 Asegurar a su niño en el sistema de
seguridad para niños . . . . . . . . . . . . . . . . . . .156.0 Ubicación del sistema de seguridad
para niños . . . . . . . . . . . . . . . . . . . . . . . . . . . .17-216.1 Requisitos del asiento del vehículo . . . . . . . .176.2 Requisitos del cinturón de seguridad del vehículo 18
6.2.1 Sistemas PELIGROSOS de cinturonesde vehículos . . . . . . . . . . . . . . . . . . . . . .18
6.2.2 Sistemas SEGUROS de cinturonesde vehículos . . . . . . . . . . . . . . . . . . . . .20
7.0 Asegurar el sistema de seguridad para niñosa su vehículo . . . . . . . . . . . . . . . . . . . . . . . . . .22-317.1 Con un cinturón del vehículo para la falda
solamente . . . . . . . . . . . . . . . . . . . . . . . . . . . .227.2 Con un cinturón del vehículo para la
falda/hombro . . . . . . . . . . . . . . . . . . . . . . . . .247.3 Con LATCH . . . . . . . . . . . . . . . . . . . . . . . . . .277.4 Uso del anclaje . . . . . . . . . . . . . . . . . . . . . . . .307.5 Uso de la reclinación . . . . . . . . . . . . . . . . . . .31
8.0 Información adicional . . . . . . . . . . . . . . . . . . .32-348.1 Cómo guardar el LATCH y anclaje . . . . . . . .328.2 Uso en aeronaves . . . . . . . . . . . . . . . . . . . . .328.3 Accesorios (en ciertos modelos) . . . . . . . . . .33
9.0 Atención y mantenimiento . . . . . . . . . . . . . . .35-3610.0 Piezas de repuesto . . . . . . . . . . . . . . . . . . . . . . .38
Índice de materias

3
No usar debidamente este sistema de seguridad para niñosaumenta el riesgo de lesiones serias o la muerte en unacurva cerrada, parada repentina o accidente. La seguridadde su niño depende de que usted instale y use estesistema de seguridad para niños correctamente. ÚseloSOLAMENTE orientado hacia adelante.A pesar de que el uso de este sistema de seguridad paraniños parezca fácil de descifrar, es muy importante LEER,ENTENDER Y SEGUIR EL MANUAL DEL PROPIETARIO.El manual deberá guardarse en la ranura debajo de lapalanca de reclinación.También debe leer el manual del propietario de su vehículo.La seguridad de su niño depende de que:1. Introduzca las correas de arnés en las ranuras
adecuadas para su niño.2. Asegure debidamente a su niño en el sistema de
seguridad para niños.3. Seleccione un lugar adecuado para el sistema de
seguridad para niños en su vehículo.4. Rutear y asegurar correctamente el cinturón de
seguridad del vehículo o usando correctamente elLATCH.
1.0 Advertencias a padresy otros usuarios
4
Número de modelo:
Fabricado en:
Fecha de compra:
2.0 Información sobreel registro
2.1 Registro de su sistema de seguridadpara niños
• Llame a la línea gratuita de información de seguridadautomotriz del Gobierno de EE.UU. al 1-888-327-4236(TTY: 1–800–424–9153), o http://www.NHTSA.gov
• Graco: 1-800-345-4109 o www.gracobaby.com
2.2 Información sobre el retiro de productosdel mercado
Por favor, complete la información que se solicita másarriba. El número de modelo y la fecha de fabricaciónpueden encontrarse en una etiqueta ubicada debajo delsistema de seguridad para niños. Llene la tarjeta postalde registro prepagada que se encuentra en la funda delasiento y envíela hoy mismo.Los sistemas de seguridad para niños podrán ser retirados delmercado por problemas de seguridad. Debe registrar estesistema para que lo podamos contactar en dicho caso. Envíe sunombre, dirección y número de modelo a:
Graco Children’s Products Inc.150 Oaklands Blvd.Exton, PA 19341o llame al 1-800-345-4109o regístrelo en línea en www.gracobaby.com
5
2.3 Si necesita ayudaPor favor, comuníquese con el Departamento de Servicio alCliente con cualquier pregunta que pudiera tener sobrepiezas, uso o mantenimiento. Cuando se ponga en contactocon nosotros, por favor tenga listo el número de modelo yla fecha de fabricación para que lo podamos ayudar máseficientemente. Estos números pueden encontrarse en unaetiqueta ubicada en la parte inferior de su sistema deseguridad para niños.
1-800-345-4109 o www.gracobaby.com
• NO INSTALE NI USE ESTE SISTEMA DE SEGURIDADPARA NIÑOS HASTA QUE HAYA LEÍDO Y ENTIENDALAS INSTRUCCIONES EN ESTE MANUAL Y EN ELMANUAL DEL PROPIETARIO DE SU VEHÍCULO. NOdeje que otros instalen o usen el sistema de seguridadpara niños a menos que entiendan cómo usarlo.
• NO USAR DEBIDAMENTE ESTE SISTEMA DESEGURIDAD PARA NIÑOS AUMENTA EL RIESGO DELESIONES SERIAS O LA MUERTE EN UNA CURVACERRADA, PARADA REPENTINA O ACCIDENTE. Suniño puede sufrir una lesión en un vehículo aunque nosufra un accidente. Una frenada repentina o una curvacerrada puede lesionar a su niño si el sistema deseguridad para niños no está debidamente instaladoo si el niño no está debidamente sujetado en el sistemade seguridad para niños.
3.0 Información importante3.1 Advertencias
6
• PONGA ESTE SISTEMA DE SEGURIDAD PARA NIÑOSEN LA POSICIÓN ORIENTADO HACIA ADELANTESOLAMENTE.
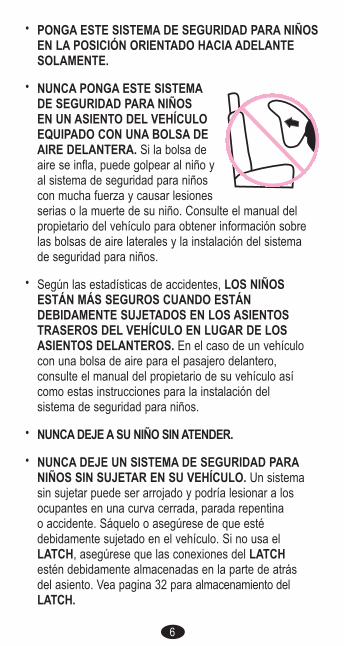
• NUNCA PONGA ESTE SISTEMADE SEGURIDAD PARA NIÑOSEN UN ASIENTO DEL VEHÍCULOEQUIPADO CON UNA BOLSA DEAIRE DELANTERA. Si la bolsa deaire se infla, puede golpear al niño yal sistema de seguridad para niñoscon mucha fuerza y causar lesionesserias o la muerte de su niño. Consulte el manual delpropietario del vehículo para obtener información sobrelas bolsas de aire laterales y la instalación del sistemade seguridad para niños.
• Según las estadísticas de accidentes, LOS NIÑOSESTÁN MÁS SEGUROS CUANDO ESTÁNDEBIDAMENTE SUJETADOS EN LOS ASIENTOSTRASEROS DEL VEHÍCULO EN LUGAR DE LOSASIENTOS DELANTEROS. En el caso de un vehículocon una bolsa de aire para el pasajero delantero,consulte el manual del propietario de su vehículo asícomo estas instrucciones para la instalación delsistema de seguridad para niños.
• NUNCA DEJE A SU NIÑO SIN ATENDER.
• NUNCA DEJE UN SISTEMA DE SEGURIDAD PARANIÑOS SIN SUJETAR EN SU VEHÍCULO. Un sistemasin sujetar puede ser arrojado y podría lesionar a losocupantes en una curva cerrada, parada repentinao accidente. Sáquelo o asegúrese de que estédebidamente sujetado en el vehículo. Si no usa elLATCH, asegúrese que las conexiones del LATCHestén debidamente almacenadas en la parte de atrásdel asiento. Vea pagina 32 para almacenamiento delLATCH.

7
• CAMBIE EL SISTEMA DE SEGURIDAD PARA NIÑOSDESPUÉS DE UN ACCIDENTE DE CUALQUIER TIPO.Un accidente puede causar daño invisible al sistema deseguridad para niños.
• DEJE DE USAR EL SISTEMA DE SEGURIDAD PARANIÑOS Y TÍRELO luego de la fecha indicada en la partede abajo del sistema de seguridad. “NO use este asientode seguridad para automóvil después de diciembre del(año)”
• NO MODIFIQUE EL SISTEMA DE SEGURIDAD PARANIÑOS ni use accesorios o piezas suministradas porotros fabricantes.
• NUNCA USE EL SISTEMA DE SEGURIDAD PARANIÑOS SI ESTÁ DAÑADO O TIENE PIEZAS QUEFALTAN. NO use un arnés de sistema de seguridadpara niños o cinturón del asiento del vehículo ocinturón del LATCH roto, deshilachado o dañado.
• EL SISTEMA DE SEGURIDAD PARA NIÑOS PUEDEALCANZAR ALTAS TEMPERATURAS SI QUEDA ENEL SOL. El contacto con estas partes puede quemar lapiel de su niño. Toque siempre la superficie de cualquierpieza de metal o de plástico antes de poner a su niñoen el sistema de seguridad para niños.
• ESTE SISTEMA DE SEGURIDAD PARA NIÑOSCUMPLE con todas las Normas Federales de Seguridadpara Vehículos Automotor y ha sido certificado para eluso en vehículos automotor y aeronaves.
8
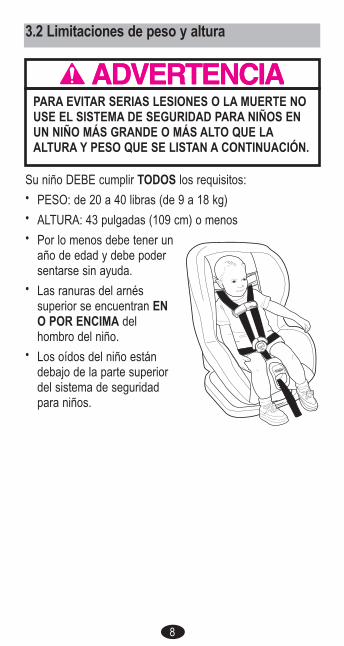
PARA EVITAR SERIAS LESIONES O LA MUERTE NOUSE EL SISTEMA DE SEGURIDAD PARA NIÑOS ENUN NIÑO MÁS GRANDE O MÁS ALTO QUE LAALTURA Y PESO QUE SE LISTAN A CONTINUACIÓN.
3.2 Limitaciones de peso y altura
Su niño DEBE cumplir TODOS los requisitos:• PESO: de 20 a 40 libras (de 9 a 18 kg)• ALTURA: 43 pulgadas (109 cm) o menos• Por lo menos debe tener un
año de edad y debe podersentarse sin ayuda.
• Las ranuras del arnéssuperior se encuentran ENO POR ENCIMA delhombro del niño.
• Los oídos del niño estándebajo de la parte superiordel sistema de seguridadpara niños.

9
Ranuras para el arnés
Traba delarnés
Correa delentrepiernas
Hebilla delarnés
4.0 Características
Accesorios (en ciertos modelos)
Correa deajuste del
arnés
Palancapara liberar
el arnés
Compartimiento dealmacenamiento del
manual del propietarioPalanca dereclinación
Correadel arnés
Vía delcinturón del
vehículo (rojo)
Traba delcinturón del
hombroCinturón del
LATCH(guardado)
Apoyavasos de lujo Consola dealmacenamiento
10
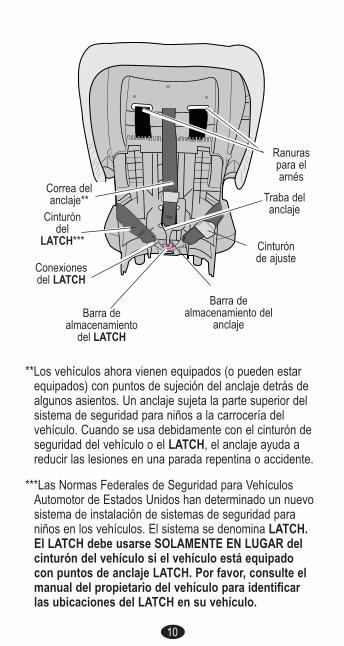
**Los vehículos ahora vienen equipados (o pueden estarequipados) con puntos de sujeción del anclaje detrás dealgunos asientos. Un anclaje sujeta la parte superior delsistema de seguridad para niños a la carrocería delvehículo. Cuando se usa debidamente con el cinturón deseguridad del vehículo o el LATCH, el anclaje ayuda areducir las lesiones en una parada repentina o accidente.
***Las Normas Federales de Seguridad para VehículosAutomotor de Estados Unidos han determinado un nuevosistema de instalación de sistemas de seguridad paraniños en los vehículos. El sistema se denomina LATCH.El LATCH debe usarse SOLAMENTE EN LUGAR delcinturón del vehículo si el vehículo está equipadocon puntos de anclaje LATCH. Por favor, consulte elmanual del propietario del vehículo para identificarlas ubicaciones del LATCH en su vehículo.
Correa delanclaje** Traba del
anclajeCinturóndel
LATCH*** Cinturónde ajuste
Barra dealmacenamiento
del LATCH
Conexionesdel LATCH
Barra dealmacenamiento del
anclaje
Ranuraspara elarnés

11
5.0 Uso del arnés del sistemade seguridad para niños
5.1 Colocación de las correas del arnés
NO AJUSTAR DEBIDAMENTE LAS CORREAS DELARNÉS DEL NIÑO AUMENTA EL RIESGO DESUFRIR LESIONES SERIAS O LA MUERTE ENCASO DE UNA CURVA CERRADA, PARADAREPENTINA O ACCIDENTE. Ajuste apretadamentelos cinturones provistos con este sistema de seguridadalrededor de su niño. Una correa tensa no deberáestar floja. Se mantiene en una línea recta sin doblarse.No aprieta la carne del niño ni empuja el cuerpo delniño en una posición que no sea natural.
1. Afloje las correas del arnéslevantando la palanca deajuste de adelante del asientoy tirando las correas haciaafuera todo lo posible en loshombros �.
2. Abra la traba del arnés �.
3. Destrabe las correas delarnés �. Ponga las correasdel arnés sobre los costadosdel asiento para evitar queel arnés se doble.
�
�
�
12
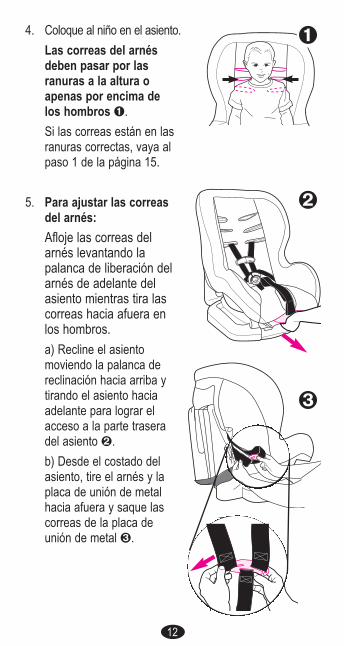
4. Coloque al niño en el asiento.Las correas del arnésdeben pasar por lasranuras a la altura oapenas por encima delos hombros �.Si las correas están en lasranuras correctas, vaya alpaso 1 de la página 15.
5. Para ajustar las correasdel arnés:Afloje las correas delarnés levantando lapalanca de liberación delarnés de adelante delasiento mientras tira lascorreas hacia afuera enlos hombros.a) Recline el asientomoviendo la palanca dereclinación hacia arriba ytirando el asiento haciaadelante para lograr elacceso a la parte traseradel asiento �.b) Desde el costado delasiento, tire el arnés y laplaca de unión de metalhacia afuera y saque lascorreas de la placa deunión de metal �.
�
�
�

13
c) Tire los extremos de lascorreas a través de lasranuras � y vuelva ainsertarlos en las ranurascorrectas � como sedetermina en el paso 4,página 12.Verifique que las correas noestén dobladas.
d) Vuelva a armar lascorreas sobre la placa deunión de metal exactamentecomo se indica �. Verifiqueque las correas esténcompletamente dentro delas ranuras y que loscinturones no esténdoblados.
e) Verifique que las correasse inserten al mismo nively que no estén dobladas.Un cinturón doblado podríaimpedir que el arnésfuncione correctamente.Tire del arnés paraasegurarse que estéasegurado.
�
�
�
14
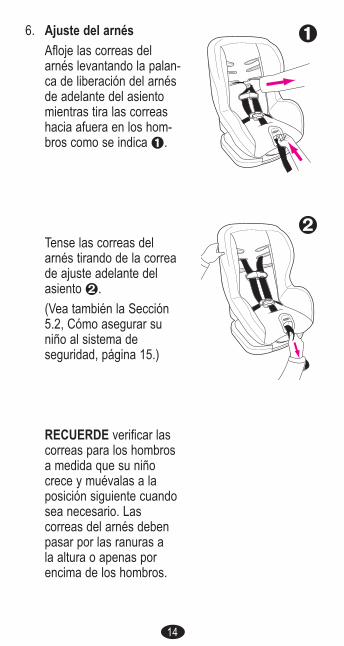
6. Ajuste del arnésAfloje las correas delarnés levantando la palan-ca de liberación del arnésde adelante del asientomientras tira las correashacia afuera en los hom-bros como se indica �.
Tense las correas delarnés tirando de la correade ajuste adelante delasiento �.(Vea también la Sección5.2, Cómo asegurar suniño al sistema deseguridad, página 15.)
RECUERDE verificar lascorreas para los hombrosa medida que su niñocrece y muévalas a laposición siguiente cuandosea necesario. Lascorreas del arnés debenpasar por las ranuras ala altura o apenas porencima de los hombros.
�
�
15
5.2 Asegurar a su niño en el sistema deseguridad para niños
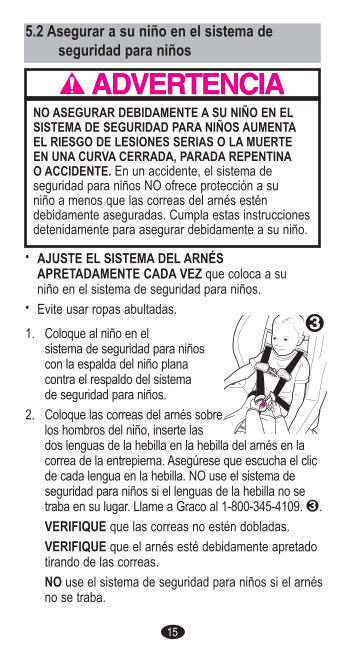
NO ASEGURAR DEBIDAMENTE A SU NIÑO EN ELSISTEMA DE SEGURIDAD PARA NIÑOS AUMENTAEL RIESGO DE LESIONES SERIAS O LA MUERTEEN UNA CURVA CERRADA, PARADA REPENTINAO ACCIDENTE. En un accidente, el sistema deseguridad para niños NO ofrece protección a suniño a menos que las correas del arnés esténdebidamente aseguradas. Cumpla estas instruccionesdetenidamente para asegurar debidamente a su niño.
• AJUSTE EL SISTEMA DEL ARNÉSAPRETADAMENTE CADA VEZ que coloca a suniño en el sistema de seguridad para niños.
• Evite usar ropas abultadas.1. Coloque al niño en el
sistema de seguridad para niñoscon la espalda del niño planacontra el respaldo del sistemade seguridad para niños.
2. Coloque las correas del arnés sobrelos hombros del niño, inserte lasdos lenguas de la hebilla en la hebilla del arnés en lacorrea de la entrepierna. Asegúrese que escucha el clicde cada lengua en la hebilla. NO use el sistema deseguridad para niños si el lenguas de la hebilla no setraba en su lugar. Llame a Graco al 1-800-345-4109.�.VERIFIQUE que las correas no estén dobladas.VERIFIQUE que el arnés esté debidamente apretadotirando de las correas.NO use el sistema de seguridad para niños si el arnésno se traba.
�

16
3. Tire la correa de ajustepara tensionar el arnéscon seguridad �.
4. Trabe la traba del arnés�. Ponga la traba delarnés en el medio delpecho del niño, a la alturade las axilas.
5. Asegúrese que lascorreas estén planas yajustadas contra loshombros del niño. Nodebería poder apretar lascorreas del arnés. Unacorrea tensa no deberáestar floja. Se mantieneen una línea recta sindoblarse. No aprieta lacarne del niño ni empujael cuerpo del niño enuna posición que no seanatural �.
�
�
�
17
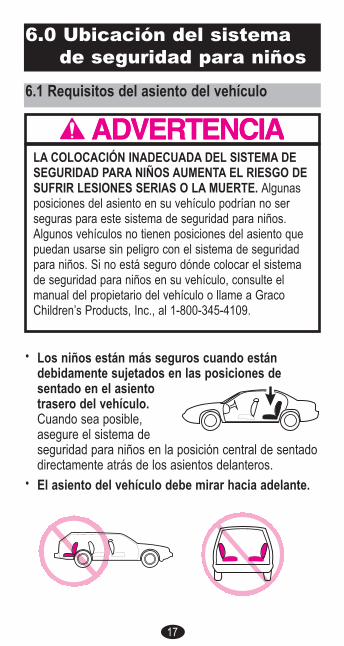
• Los niños están más seguros cuando estándebidamente sujetados en las posiciones desentado en el asientotrasero del vehículo.Cuando sea posible,asegure el sistema deseguridad para niños en la posición central de sentadodirectamente atrás de los asientos delanteros.
• El asiento del vehículo debe mirar hacia adelante.
6.0 Ubicación del sistemade seguridad para niños
6.1 Requisitos del asiento del vehículo
LA COLOCACIÓN INADECUADA DEL SISTEMA DESEGURIDAD PARA NIÑOS AUMENTA EL RIESGO DESUFRIR LESIONES SERIAS O LA MUERTE. Algunasposiciones del asiento en su vehículo podrían no serseguras para este sistema de seguridad para niños.Algunos vehículos no tienen posiciones del asiento quepuedan usarse sin peligro con el sistema de seguridadpara niños. Si no está seguro dónde colocar el sistemade seguridad para niños en su vehículo, consulte elmanual del propietario del vehículo o llame a GracoChildren’s Products, Inc., al 1-800-345-4109.
18
NO USE NINGUNO DE LOS SIGUIENTES SISTEMASPARA SUJETAR EL SISTEMA DE SEGURIDAD PARANIÑOS.
El LATCH puede usarse EN LUGAR de los siguientessistemas de cinturón peligrosos si su vehículo estáequipado con puntos de anclaje LATCH. NUNCA USEsistemas de cinturones peligrosos. Por favor, consulte elmanual del propietario del vehículo para identificar lasubicaciones donde debe instalarse el LATCH.
6.2 Requisitos del cinturón de seguridaddel vehículo
MUCHOS SISTEMAS DE CINTURONES DESEGURIDAD NO SE PUEDEN USAR CONCONFIANZA CON ESTE SISTEMA DE SEGURIDADPARA NIÑOS. EL CINTURÓN DE SEGURIDAD DELVEHÍCULO DEBE HABER SIDO DISEÑADO PARARETENER AL SISTEMA DE SEGURIDAD PARANIÑOS DE MODO AJUSTADO EN TODO MOMENTO.Preste mucha atención a estos sistemas ya quemuchos de los sistemas de cinturones de seguridadque no son seguros se parecen mucho a los que nopresentan peligro. Si no está seguro, consulte sumanual del dueño del vehículo o llame a Graco al1-800-345-4109.
6.2.1 Sistemas PELIGROSOS de cinturonesde vehículos

19
• Cinturón de seguridad de lafalda con retractor de trabade emergencia (EmergencyLocking Retractor, ELR)Este cinturón de seguridadpara la falda se mantieneflojo y puede moverse hastaque se trabe en un accidenteo parada repentina.
• Combinación de cinturónpara la falda y el hombrocon retractorCada correa tiene unretractor en una punta yestá conectada a la placa deseguridad en la otra punta.
• Cinturón pasivo – Cinturónpara la falda o el hombromontado en la puerta
• Cinturón pasivo – Cinturónpara la falda con cinturónpara el hombro motorizadoNO use los cinturonesdel vehículo que esténconectados a la puerta demanera alguna o que semuevan a través de uncarril para rodearautomáticamente al pasajerocuando se cierra la puerta.
• Cinturones para la faldaque están más adelantedel pliegue del asiento
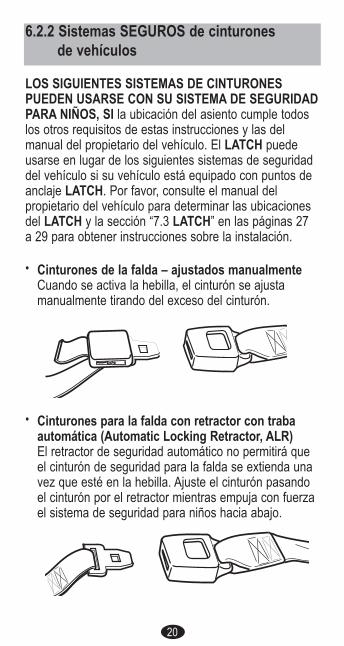
20
• Cinturones de la falda – ajustados manualmenteCuando se activa la hebilla, el cinturón se ajustamanualmente tirando del exceso del cinturón.
• Cinturones para la falda con retractor con trabaautomática (Automatic Locking Retractor, ALR)El retractor de seguridad automático no permitirá queel cinturón de seguridad para la falda se extienda unavez que esté en la hebilla. Ajuste el cinturón pasandoel cinturón por el retractor mientras empuja con fuerzael sistema de seguridad para niños hacia abajo.
LOS SIGUIENTES SISTEMAS DE CINTURONESPUEDEN USARSE CON SU SISTEMA DE SEGURIDADPARA NIÑOS, SI la ubicación del asiento cumple todoslos otros requisitos de estas instrucciones y las delmanual del propietario del vehículo. El LATCH puedeusarse en lugar de los siguientes sistemas de seguridaddel vehículo si su vehículo está equipado con puntos deanclaje LATCH. Por favor, consulte el manual delpropietario del vehículo para determinar las ubicacionesdel LATCH y la sección “7.3 LATCH” en las páginas 27a 29 para obtener instrucciones sobre la instalación.
6.2.2 Sistemas SEGUROS de cinturonesde vehículos
21
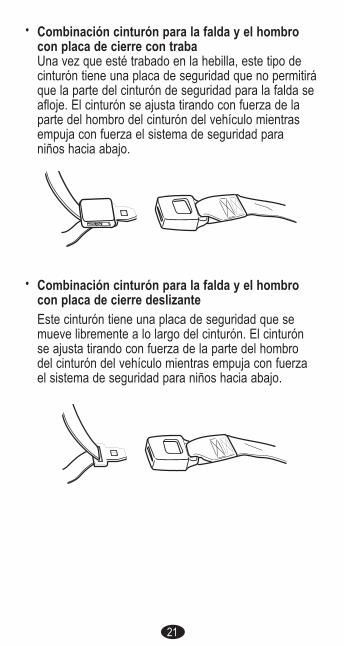
• Combinación cinturón para la falda y el hombrocon placa de cierre con trabaUna vez que esté trabado en la hebilla, este tipo decinturón tiene una placa de seguridad que no permitiráque la parte del cinturón de seguridad para la falda seafloje. El cinturón se ajusta tirando con fuerza de laparte del hombro del cinturón del vehículo mientrasempuja con fuerza el sistema de seguridad paraniños hacia abajo.
• Combinación cinturón para la falda y el hombrocon placa de cierre deslizanteEste cinturón tiene una placa de seguridad que semueve libremente a lo largo del cinturón. El cinturónse ajusta tirando con fuerza de la parte del hombrodel cinturón del vehículo mientras empuja con fuerzael sistema de seguridad para niños hacia abajo.

gracobabycom
22
NO AJUSTAR DEBIDAMENTE LAS CORREAS DELARNÉS DEL NIÑO AUMENTA EL RIESGO DE SUFRIRLESIONES SERIAS O LA MUERTE EN CASO DEUNA CURVA CERRADA, PARADA REPENTINA OACCIDENTE. Cumpla detenidamente estas instruc-ciones y las del manual del propietario de su vehículopara asegurarse que el sistema de seguridad para niñosesté debidamente ubicado, colocado y aseguradoapretadamente en todo momento.
7.0 Asegurar el sistema deseguridad para niños ensu vehículo
Antes de comenzar, asegúrese de que el LATCH estéguardado. Vea la Sección 8.1, Guardar el LATCH y elanclaje, página 32. Si su vehículo está equipado conpuntos de sujeción del anclaje, saque la traba delanclaje de la barra de almacenamiento, caso contrario,asegúrese de que el anclaje esté guardado.
7.1 Con un cinturón del vehículo para lafalda solamente
1. Coloque el sistema de seguridad para niños firme-mente contra el respaldo de un asiento del vehículoque mire hacia adelante.
2. NUNCA ponga el cinturón del vehículo sobre elapoyabrazos del sistema de seguridad para niños.Recline el sistema de seguridadpara niños y pase el cinturóndel vehículo a través de lavía del cinturón.
3. Trabe el cinturón de vehículo�. El cinturón del vehículo nodeberá estar doblado ni dado vuelta.
�
23
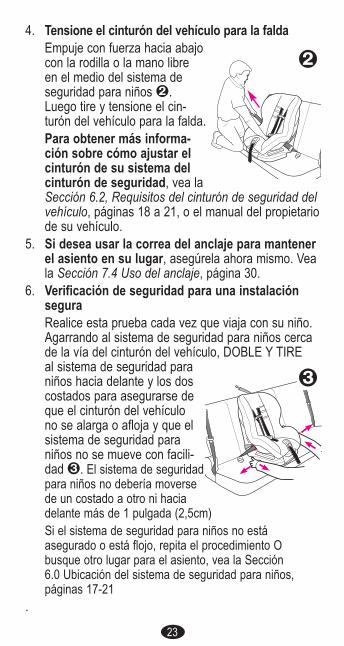
4. Tensione el cinturón del vehículo para la faldaEmpuje con fuerza hacia abajocon la rodilla o la mano libreen el medio del sistema deseguridad para niños �.Luego tire y tensione el cin-turón del vehículo para la falda.Para obtener más informa-ción sobre cómo ajustar elcinturón de su sistema delcinturón de seguridad, vea laSección 6.2, Requisitos del cinturón de seguridad delvehículo, páginas 18 a 21, o el manual del propietariode su vehículo.
5. Si desea usar la correa del anclaje para mantenerel asiento en su lugar, asegúrela ahora mismo. Veala Sección 7.4 Uso del anclaje, página 30.
6. Verificación de seguridad para una instalaciónseguraRealice esta prueba cada vez que viaja con su niño.Agarrando al sistema de seguridad para niños cercade la vía del cinturón del vehículo, DOBLE Y TIREal sistema de seguridad paraniños hacia delante y los doscostados para asegurarse deque el cinturón del vehículono se alarga o afloja y que elsistema de seguridad paraniños no se mueve con facili-dad �. El sistema de seguridadpara niños no debería moversede un costado a otro ni haciadelante más de 1 pulgada (2,5cm)Si el sistema de seguridad para niños no estáasegurado o está flojo, repita el procedimiento Obusque otro lugar para el asiento, vea la Sección6.0 Ubicación del sistema de seguridad para niños,páginas 17-21
.
�
gracobabycom
�

24
1. Coloque el sistema deseguridad para niñosfirmemente contra el respaldodel asiento del vehículo quemire hacia adelante.
2. NUNCA ponga el cinturóndel vehículo arriba delsistema de seguridadpara niños.Recline el sistema deseguridad para niños y paseel cinturón del vehículo através de la vía del cinturón.
3. Trabe el cinturón devehículo �. El cinturóndel vehículo no deberáestar doblado ni dadovuelta.
�
7.2 Con un cinturón del vehículo para lafalda/hombro
Antes de comenzar, asegúrese de que el LATCH estéguardado. Vea la Sección 8.1, Guardar el LATCH yel anclaje, página 32. Si su vehículo está equipadocon puntos de sujeción del anclaje, saque la trabadel anclaje de la barra de almacenamiento, casocontrario, asegúrese de que el anclaje esté guardado.
Cuando usa un cinturón combinado aprobado parafalda/hombro, este sistema de seguridad para niñosestá equipado con una traba que se usa para asegurarla parte del hombro del cinturón para que no se aflojeni mueva durante el uso. Usted debe usar la trabaprovista en el sistema de seguridad para niños cuandousa un cinturón combinado para falda/hombro paraasegurar el sistema de seguridad para niños.

25
4. Tensione el cinturón del asiento del vehículoEmpuje hacia abajo con la mano libre o rodillaen el medio del sistema deseguridad para niños �.Luego, tire y tensione laparte del hombro del cin-turón para falda/hombro.Para obtener másinformación sobre cómoajustar el cinturón de susistema del cinturón deseguridad, vea la Sección6.2, Requisitos del cinturónde seguridad del vehículo,páginas 18 a 21, o elmanual del propietario desu vehículo.
5. Mientras tira la parte delhombro del cinturón para elhombro y la falda, ponga elcinturón del hombro en el interiorde la traba abierta � y trabe latraba sobre el cinturón �.Se incluyen dos trabas parapermitir que el asiento se instaleen el lado derecho o izquierdodel asiento del vehículo. Usesolamente una traba por vez.NUNCA trate de usar ambastrabas cuando instala el sistemade seguridad para niños.NO trate de cerrar la traba sobre nada que no sea laparte del hombro del cinturón del vehículo para lafalda/hombro. Si alguna otra parte del cinturón seencuentra en el medio pruebe otro lugar del asiento.
�
�
�

26
6. Si desea usar la correa del anclajepara mantener el asiento en sulugar, asegúrela ahora mismo.Vea la Sección 7.4 Uso del anclaje,página 30.Cuando no se usa el anclaje,engánchelo en la barra dealmacenamiento del anclajeubicada atrás del asiento.
7. Verificación de seguridad parauna instalación seguraRealice esta prueba cada vez queviaja con su niño.Agarrando al sistema de seguridadpara niños cerca de la vía delcinturón del vehículo, DOBLE Y TIREal sistema de seguridad para niñoshacia delante y los dos costados paraasegurarse de que el cinturón delvehículo no se alarga oafloja y que el sistema deseguridad para niños no semueve con facilidad �. Elsistema de seguridad paraniños no debería moversede un costado a otro ni haciadelante más de 1 pulgada(2,5cm).Si el sistema de seguridadpara niños no estáasegurado o está flojo, repitael procedimiento O busque otrolugar para el asiento, vea laSección 6.0 Ubicación delistema de seguridad para niños,
páginas 17-21.
�

27
7.3 Con LATCH
Los vehículos nuevos tienen uno o varios asientosequipados con sistemas de anclaje LATCH. Si elvehículo viene equipado con el sistema LATCH, sepueden ver los puntos de anclaje inferiores en el plieguedel asiento del vehículo. Si no están visibles, puedenestar marcados con el símbolo que sigue �.
Vea el manual del propietario de su vehículo parainformarse sobre las ubicaciones exactas, laidentificación de los anclajes y los requisitos parasu uso con el sistema de seguridad para niños.
El LATCH se define como anclajes de 280 mm (11pulgadas) entre los puntos de anclaje. Graco norecomienda usar el sistema LATCH en la posición centralsi el espacio es más de 280 mm (11 pulgadas) a menosque se lo recomiende en su manual del dueño del vehículo.
Un asiento típico de un vehículo de pasajeros. Otros tipos devehículos disponen de otras ubicaciones del sistema LATCH.
Compruebe la ubicación de los puntos de anclajesuperiores del vehículo en el manual del propietario delvehículo. Se podrían haber identificado usando uno delos símbolos de anclaje como se indicó anteriormente� o �. Utilice SOLAMENTE el LATCH en un sistemade seguridad para niños en el asiento recomendadopor el fabricante del vehículo.
Puntos de anclaje superioresdel vehículo
Puntos de anclajeinferiores del vehículo
Pliegue delasiento del
vehículo
� � �

28
1. Saque ambas conexionesdel LATCH y la conexióndel anclaje de las barras dealmacenamiento y extiendael LATCH hasta alcanzar lalongitud máxima para facili-tar la instalación.
2. Coloque el sistema deseguridad para niñosfirmemente contra elrespaldo del asiento delvehículo que mire haciaadelante con los anclajesinferiores del LATCH.
3. Enganche las Conexionesdel LATCH a los anclajesinferiores del vehículo �.Tire firmemente de lasconexiones paraasegurarse que esténenganchadas �.El cinturón debemantenerse en posiciónplana sin doblarse.
4. Tensione el LATCHempujando con fuerzahacia abajo sobre elsistema de seguridad paraniños y tirando el cinturónde ajuste �.
5. NUNCA ponga dosconexiones del LATCHen un anclaje LATCH delvehículo a menos que elfabricante lo haya permitidoespecíficamente �.
�
gracobabycom
�
�
�

29
6. Todas las posiciones del asientoLATCH tienen puntos de anclaje.Asegure la parte de arriba del asientousando la correa de anclaje. Vea laSección 7.4 Uso del anclaje en lapágina 30.
Si decide no usar el anclaje, engánchelo enla barra de almacenamiento del anclajeubicado en la parte de atrás del asiento.Ver la Sección 8.1, Cómo guardar elLATCH y el anclaje, página 32.
7. Verificación de seguridad para unainstalación seguraRealice esta prueba cada vez queviaja con su niño.Agarrando al sistema de seguridad paraniños cerca de la vía del cinturón delvehículo, DOBLE Y TIRE al sistema deseguridad para niños haciadelante y los dos costadospara asegurarse de que elcinturón del vehículo no sealarga o afloja y que elsistema de seguridad paraniños no se mueve confacilidad �. El sistema deseguridad para niños nodebería moverse de uncostado a otro ni hacia delantemás de 1 pulgada (2,5cm).Si el sistema de seguridad para niñosno está asegurado o está flojo, repita elprocedimiento O busque otro lugar parael asiento, vea la Sección 6.0 Ubicacióndel sistema de seguridad para niños,páginas 17-21.
�

30
7.4 Uso del anclaje
1. Verifique que el anclajeesté apretadamentesujetado al sistema deseguridad para niños.
2. Sujete la presilla delanclaje al punto deagarre �.
3. Ajuste la correa delanclaje apretadamente �.
4. Verifique que el sistemade seguridad para niñosesté seguro después deinstalar el anclaje. Deser necesario, vuelva atensionar el cinturón deseguridad del vehículo.El cinturón debemantenerse en posiciónplana sin doblarse.
5. Para aflojarlo, levantela lengua de metal dela hebilla �.
Todas las posiciones del asiento LATCH tienen puntosde anclaje. Si desea usar el anclaje, consulte el manualdel propietario de su vehículo para determinar loslugares. Si su vehículo no está equipado con unsujetador del anclaje, podría ser posible instalar uno.Contacte al concesionario de su vehículo paradeterminar el lugar correcto del sujetador y suinstalación. Puede comprar un juego de piezas parasujetar el anclaje llamando a Servicio al Cliente deGraco al 1-800-345-4109.
�
�
�

31
7.5 Uso de la reclinación
1. Para usar el asientoreclinado: apriete la manijade reclinación al frente delasiento y tire el asientohacia adelante hacia unade las posiciones dereclinación. �. Cuando elasiento esté en la posicióndeseada, libere la manijay empuje el asiento hastaque escuche que elasiento se traba enposición.
2. Para volver a poner elasiento en una de lasposiciones verticales,apriete la manija dereclinación y empuje elrespaldo del asiento �.Cuando el asiento estéen la posición deseada,libere la manija y empujeel asiento hasta queescuche que el asientose traba en posición.
El asiento puede ajustarsemientras el niño está sentado.NUNCA ajuste la reclinaciónmientras maneja.
�
32
8.2 Uso en aeronaves
8.1 Cómo guardar el LATCH y anclaje8.0 Información adicional
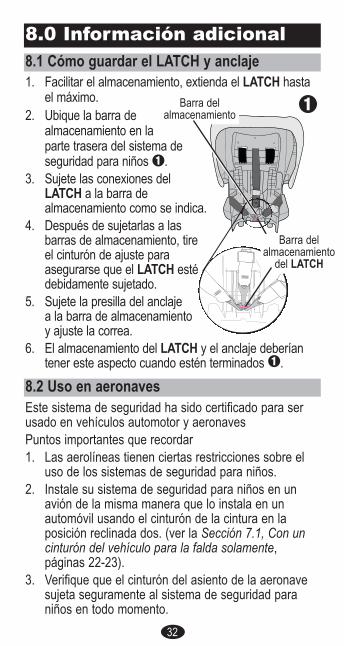
1. Facilitar el almacenamiento, extienda el LATCH hastael máximo.
2. Ubique la barra dealmacenamiento en laparte trasera del sistema deseguridad para niños�.
3. Sujete las conexiones delLATCH a la barra dealmacenamiento como se indica.
4. Después de sujetarlas a lasbarras de almacenamiento, tireel cinturón de ajuste paraasegurarse que el LATCH estédebidamente sujetado.
5. Sujete la presilla del anclajea la barra de almacenamientoy ajuste la correa.
6. El almacenamiento del LATCH y el anclaje deberíantener este aspecto cuando estén terminados�.
Barra delalmacenamiento �
Barra delalmacenamiento
del LATCH
Este sistema de seguridad ha sido certificado para serusado en vehículos automotor y aeronavesPuntos importantes que recordar1. Las aerolíneas tienen ciertas restricciones sobre el
uso de los sistemas de seguridad para niños.2. Instale su sistema de seguridad para niños en un
avión de la misma manera que lo instala en unautomóvil usando el cinturón de la cintura en laposición reclinada dos. (ver la Sección 7.1, Con uncinturón del vehículo para la falda solamente,páginas 22-23).
3. Verifique que el cinturón del asiento de la aeronavesujeta seguramente al sistema de seguridad paraniños en todo momento.
33
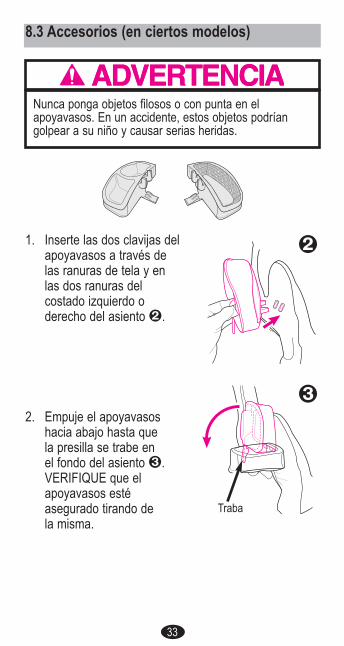
8.3 Accesorios (en ciertos modelos)
1. Inserte las dos clavijas delapoyavasos a través delas ranuras de tela y enlas dos ranuras delcostado izquierdo oderecho del asiento �.
2. Empuje el apoyavasoshacia abajo hasta quela presilla se trabe enel fondo del asiento �.VERIFIQUE que elapoyavasos estéasegurado tirando dela misma.
Traba
�
�
Nunca ponga objetos filosos o con punta en elapoyavasos. En un accidente, estos objetos podríangolpear a su niño y causar serias heridas.
34
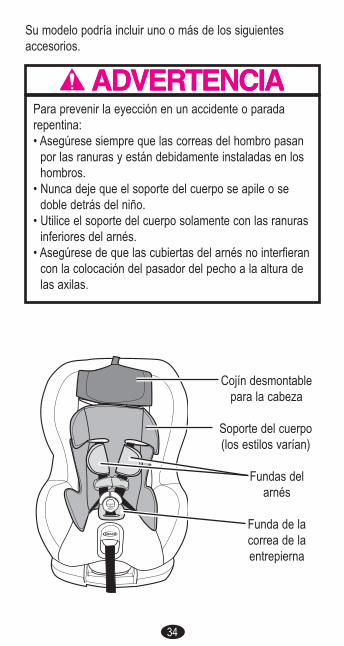
Cojín desmontablepara la cabeza
Fundas delarnés
Funda de lacorrea de laentrepierna
Soporte del cuerpo(los estilos varían)
Su modelo podría incluir uno o más de los siguientesaccesorios.
Para prevenir la eyección en un accidente o paradarepentina:• Asegúrese siempre que las correas del hombro pasan
por las ranuras y están debidamente instaladas en loshombros.
• Nunca deje que el soporte del cuerpo se apile o sedoble detrás del niño.
• Utilice el soporte del cuerpo solamente con las ranurasinferiores del arnés.
• Asegúrese de que las cubiertas del arnés no interfierancon la colocación del pasador del pecho a la altura delas axilas.
35
9.0 Atención y mantenimiento• EL USO CONTINUO DEL SISTEMA DE SEGURIDAD
PARA NIÑOS PODRÍA CAUSAR DAÑOS ALASIENTO DEL VEHÍCULO. Use una estera, toallao frazada fina con el sistema de seguridad paraniños para proteger el tapizado.
• PIEZAS DE METAL Y DE PLÁSTICO: limpiar con unjabón suave y agua fresca. NO USE BLANQUEADORNI DETERGENTES.
• LAS CORREAS DEL ARNÉS Y LAS CORREASDEL LATCH se pueden limpiar a mano o cambiarse.NO SUMERJA LAS CORREAS EN AGUA. Hacerlopodría debilitar las correas. NUNCA planche lascorreas del arnés.
• SI LAS CORREAS DEL ARNÉS tienen cortes, estánmuy dobladas o deshilachadas, debe cambiarlas.
• EL AJUSTADOR DE LA HEBILLA Y EL ARNÉSpueden limpiarse con un trapo húmedo.
• NUNCA LUBRIQUE LA HEBILLA. Si la hebilla oel ajustador del arnés se pega o no se mantieneapretado, verifique que no haya ningún objeto extrañotal como comida, suciedad, etc. Saque los objetos conpinzas y/o límpielas con una escobilla de algodón. Sino puede lograr que el arnés se mantenga apretadocon la hebilla trabada con seguridad, no use estesistema de seguridad para niños. Llame a Graco al1-800-345-4109 para comprar un arnés o hebillade repuesto.
• NUNCA USE UN SISTEMA DE SEGURIDAD PARANIÑOS USADO o un sistema de seguridad cuyahistoria no conoce.
• LA FUNDA DEL ASIENTO se puede limpiar conuna esponja húmeda usando un jabón suave y aguafresca. De ser necesario, se puede sacar la fundapara limpiarla. NO use el sistema de seguridad paraniños sin la almohadilla del asiento.
36
Para lavar la almohadilla del asiento
1. No es necesario sacar el arnés para sacar laalmohadilla del asiento. Simplemente destrabe latraba y hebilla del arnés, abra las costuras cerca delas ranuras del arnés en la almohadilla del asientoy levante suavemente la almohadilla sobre la tapadel botón de ajuste. Pase la correa de la entrepiernaa través de la ranura. Algunos modelos podrían tenercorreas elásticas que deben sacarse antes de que sepueda levantar la almohadilla del asiento.NO use el sistema de seguridad para niños sin lafunda del asiento.
2. Lave la funda a máquina en agua fría en el ciclodelicado y séquela al aire. NO USE BLANQUEADOR.
Invierta el proceso para volver a instalar la almohadilladel asiento. ASEGÚRESE de que el arnés pase a travésde las ranuras de la almohadilla del asiento que están enlínea con las ranuras en el respaldo del asiento.

37
Notas

38
Para comprar piezas o accesorios o para obtenerinformación sobre la garantía en los Estados Unidos,
por favor comuníquese con nosotros en:
www.gracobaby.como
1-800-345-4109
10.0 Piezas de repuesto
Guarde este manual en el compartimiento dealmacenamiento en el frente del sistema de
seguridad para niños apenas debajo de la palancade reclinación.