fpr-bio installation & operation guidetkb.amano.com/phpkb/assets/fpt-80-user-guide.pdf ·...
TRANSCRIPT

AMX-502700 ● Copyright © 2012 Amano Cincinnati, Inc. ● Printed in U.S.A. ● 10/25/12
FPT-80 Fingerprint Data Collection Terminal
Installation and Operation Guide

AMX-502700 ● Copyright © 2012 Amano Cincinnati, Inc. ● Printed in U.S.A. ● 10/25/12
Thank You…. For purchasing another fine product from
Amano Cincinnati, Inc.
Proprietary Notice
This document contains proprietary information and such information may not be reproduced in whole or part without the written permission from Amano Cincinnati, Inc. 140 Harrison Ave., Roseland, New Jersey 07068.
Amano Cincinnati, Inc. reserves the right to make equipment changes and improvements, which may not be reflected in this document. Portions of this document may have been updated to include the latest hardware or firmware version, if applicable.
To ensure safe use of this terminal, be sure to thoroughly read this manual in its entirety before any attempt is made to operate the equipment. After you have finished reading this manual, be sure to store it and in a safe place for further reference.
For more information about Amano’s complete line of products, visit our web site at:
www.amano.com/time
For on line help please visit our Knowledge base link at:
http://tkb.amano.com/phpkb/search.php
About This Operation Guide
This Operation Guide covers the following FPT-80 Fingerprint terminal with Amano Part Numbers for use with Amano Time & Attendance software:
FPT-80/A958 - Fingerprint terminal only.
FPT-80/A959 - package with USB 50 ft. CommStik™ cable, 6ft Cat 5 network cable, and Time Guardian software.
AUS-10065X - CommStik 50 ft. cable only.
EOE-108540 - Ethernet 6 ft. Cat 5 cable only.
This Operation Guide covers the FPT-80 Terminals for use with Amano Time & Attendance software for the following versions; Time Guardian v5.5, and Time Guardian Pro v4.5. CommStik™ is a trademark of Amano Cincinnati, Inc. Other brand names mentioned herein are for identification purposes only and may be trademarks of their respective holder(s).

FPT-80 Installation & Operation Guide Page i
Table of Contents
Table of Contents…………………………………………………………………………………………………………i Basic Installation for Time Guardian FPT-80/A943………………...……………………………………………....ii
Chapter 1: FPT-80 Installation……………………………………………………………………………………….…5 Introduction……………………………………………………………………………………………………………….5 Unpacking Your FPT-80 Terminal……………………………………………………………………………………..5 Understanding the FPT-80 Terminal Front Panel…………………………………………………………………….5 Before Installing FPT-80 Fingerprint Terminal………………………………………………………………………..6 Wall Mounting………………………………………………………………………………………………………….7 Communication Connections…………………………………………………………………………………………..8 Serial Connection (Direct Connect)……………………………………………………………………………………8 Ethernet Connection (Network)………………………………………………………………………………………..9 FPT-80 Startup Welcome Screen (Power On)……………………………………………………………………10 Normal Punch IN/OUT Display………………………………………………………………………………………..10
Chapter 2: FPT-80 Operation………………………………………………………………………………………….13 Daily FPT-80 Use………………………………………………………………………………………………………13 Punching with a Fingerprint (FP)……………………………………………………………………………………..13 Punching with a Password (Pwd)……………………………………………………………………………………13 Punching with a Fingerprint (FP) or Password (Pwd)……………………………………………………………..14 Punching with a Fingerprint (FP) and Password (Pwd)……………………………………………………………14 View Hours at the Clock F-1………………………………………………………………………………………….15 Department Transfer at the Terminal F-2……………………………………………………………………………15 View Previous Punch at the Terminal F-3…………………………………………………………………………..15
Enrolling Users at the FPT-80 Terminal………………………………………………………………………..15
Introduction to Fingerprint Recognition Technology……………………………………………………………….15
Priviledge (Status) Levels…………………………………………………………………………………………16
Proper Finger Placement……………………………………………………………………………………………...16 User Option Menu (FPT-80)……………………………………………………………………………………….....17 How to Enroll a User with a Fingerprint……………………………………………………………………………...17 How to Enroll a User with a Password............................................................................................................19 How to Change, Edit or Delete User………………………………………………………………………………..19 How to Restore Users From Time & Attendance Software………………………………………………………20
Comunication Option Menu (FPT – 80)……………………………………………….………………….………...21 System Option Menu (FPT – 80)21 Date and Time Menu (FPT – 80)………………………….……………………………………………….…….….23 Auto Test Menu (FPT – 80)………………………………………….……………………………………………….24 Query Record Menu (FPT – 80)…………………………………………………………………………………….25 System Information Menu (FPT – 80)……………………………………………………………………………….25 System Parameter……………………………………………………………………………………………………..26
Chapter 3: FPT-80 Setup with Time & Attendance Software…………………………………………………29 FPT-80 TerminalCommunications……………………………………………………………………………………29 FPT-80 Setup with Amano Time & Attendance Software…………………………………………………………29 Time & Attendance Software Communications Module…………………………………………………………...35 Using the Fingerprint Commands…………………………………………………………………………………….36 Frequently Asked Questions (FAQs)………………………………………………………………………………..38 FPT-80 Specifications…………………………………………………………………………………………………39

FPT-80 Installation & Operation Guide Page ii
Basic Installation for Time Guardian FPT-80/A943
Note: Other installations, i.e. with FPT80 terminal, with Time Guardian Pro may be slightly different. This procedure of
connecting the FPT-80 terminal utilizes examples with Time Guardian software.
Step 1 – Wall Mount the FPT-80. Connect the FPT-80 terminal using direct
connection with included USB cable to host PC, or Ethernet cable for network
connection. Plug the in the AC adapter to the FPT-80 and AC outlet and the FPT-80
terminal will power up.
Step 2 – Install the Time Guardian Software on the host PC. The installation should
start automatically, but if it stalls, browse on CD to Disk1\InstData\Windows\VM\install.exe
Step 3 – Perform software activation by entering the Serial Number when requested after
the initial software installation and complete on-line registration for Time Guardian.
Note: QuickBooks® integration is available, but it needs to be setup in Time Guardian.
Also, it’s recommended that QuickBooks be installed on the same host computer and running for full synchronization.
Step 4 – Perform Wizard Setup by completing the Steps 1 - 9 and end Time Guardian
installation by pressing Wizard Complete
button.
All employees must be enrolled at the FPT-80 terminal with fingerprint and/or PIN password for identification and validation. This employee information will be synchronized with Time Guardian by performing polling and downloading commands from the Time Guardian software. This action is necessary to save the biometric fingerprint templates for newly enrolled employees in the Time & Attendance database while sending time, Daylight Saving Time settings, hours worked for the current payperiod, and employee assignments to the FPT-80 terminal.
integration and synchronization will occur with employee transfer from Time Guardian when the FPT-80 terminal is polled. The hours worked will be retained at the FPT-80 terminal from the date of the last download for up to 14 days. When the FPT-80 is downloaded to from Time Guardian, the terminal display will show Downloading…., followed by Working…, and finish with Restarting…. The terminal will power off then back on to refresh with the options just downloaded to it.
FPT-80 Installation & Operation Guide Page 5 of 40
Chapter 1: FPT-80 Installation
Introduction
The FPT-80 Fingerprint terminal provides a sophisticated fingerprint recognition and data collection terminal for use directly with the Amano Time & Attendance software to provide a complete PC-based time and attendance solution for small business. Fingerprint recognition is considered to be one of the good forms of biometric security because of its accuracy, affordability, and ease-of-use.
The FPT-80 Fingerprint terminal with Amano Time & Attendance software provides a system that automatically calculates and accumulates hours worked based on a company's payroll policies. This system separates the hours worked into regular and overtime pay categories and displays them at the terminal (see Normal Punch IN/OUT Display on page 1-10).
The Amano Time & Attendance software also offers many sophisticated features to simplify payroll preparation, such as: Revision, Red Print with Grace Zones, Flexible Rounding Rules, Unpaid and Paid Breaks, and Time Card Reports, to name a few. In addition, easy-to-read management reports are available in hours or dollars to provide accurate and timely labor information.
See Chapter 3 for details on setting up the Amano Time & Attendance software on the host PC to communicate with the Fingerprint terminal.
In order to use fingerprint recognition, a user must enroll their fingerprint in the fingerprint template database. The FPT-80 Fingerprint terminal will record the user’s fingerprint template, encrypt it, and store the data. When a user presents their finger for verification, a new template is captured and compared to the pre-enrolled fingerprint in the database. If there is a match, the user will be accepted by the FPT-80 Fingerprint terminal.
One of the main benefits of this system is that it eliminates fraudulent punches (“Buddy Punching”), while providing a comprehensive and secure method when coupled with the Time & Attendance software to accurately account for employee labor costs.
The FPT-80 Fingerprint terminal also provides re-punch protection at the terminal when the "Recheck Min” feature is set. Multiple punches within the setting time frame will be verified but not recorded at the terminal in flash memory .
Unpacking Your FPT-80 Terminal
In addition to this guide, your FPT-80 terminal package should include the following:
Fingerprint Data Collection Terminal
AC Adapter
USB-to-serial connector (RJ-11) with 50ft cable
6 foot Ethernet cable
Terminal mounting plate and hardware
Time Guardian/FPT-80 Quick-Start Guide (A943 package only)
Time Guardian CD (A959 package only)
Understanding the FPT-80 Terminal Front Panel
The front panel of the FPT-80 Fingerprint terminal (see Figure 0-1) contains the following controls:
LEDs: During normal standby operation (power on), the Green LED will flash once per second, and stay on momentarily when a user successfully verifies. If a user fails to verify, the Red LED will momentarily stay on.
Note: If the fingerprint reader does not follow the standard LED operational parameters, please consult support.
Speaker: Provides audible voice verification of operations, i.e., "Thank you", "Incorrect Password", "Access Denied", "Invalid Id", "Please try again", etc. See Advanced Options on page 24 for voice control.
TFT Display: Displays time, date, day, and operational information.
Fingerprint Sensor: Enrolls (creates) template and verifies fingerprint.

FPT-80 Installation & Operation Guide Page 6 of 40
Keypad: Used to input User ID, password, and perform menu operation with the following keys:
ESC – to perform exit, cancel, ignore when using the Menus.
M/OK – Menu, OK
– Power ON/OFF & space back.
- Modify current item value.
or - to scroll down or up for menu operations.
F1 – View Hours
F2 – Department Transfer
F3 – View Previous Punch
Note: Press the Power ON/OFF button to turn off the terminal. Dept. Transfer and View Hours requires
configuration and dowload from Time Guardian Software.
Figure 0-1 FPT-80 Fingerprint Terminal Front View
Before Installing FPT-80 Fingerprint Terminal
Before installation, please make sure the unit is not connected to power. Connect the power to the unit as the last step.
The recommended proper height to mount the device is 55 – 60 " (1.4 – 1.5 meters).
Use only the AC adapter provided. Use of another AC adapter may damage the unit and void the warranty.
Before connecting the device, please read and follow the installation instructions. Failure to do so could cause equipment failure; Amano is not responsible for any damages.
Please use the enclosed cable [either 6ft Ethernet, or 50 ft USB-to-Serial cable to connect the FPT-80 Fingerprint terminal. If longer serial cables for direct connect are required please consult Amano.
FPT-80 Installation & Operation Guide Page 7 of 40
Wall Mounting
Warning! Before selecting a mounting location for your FPT-80 Fingerprint terminal, you must consider the following:
The mounting surface and hardware must be able to support the unit’s weight, 1.35 lbs. (0.61 kg).
The area must be within the specified operating temperature & humidity range (see Specifications on page 4-11)).
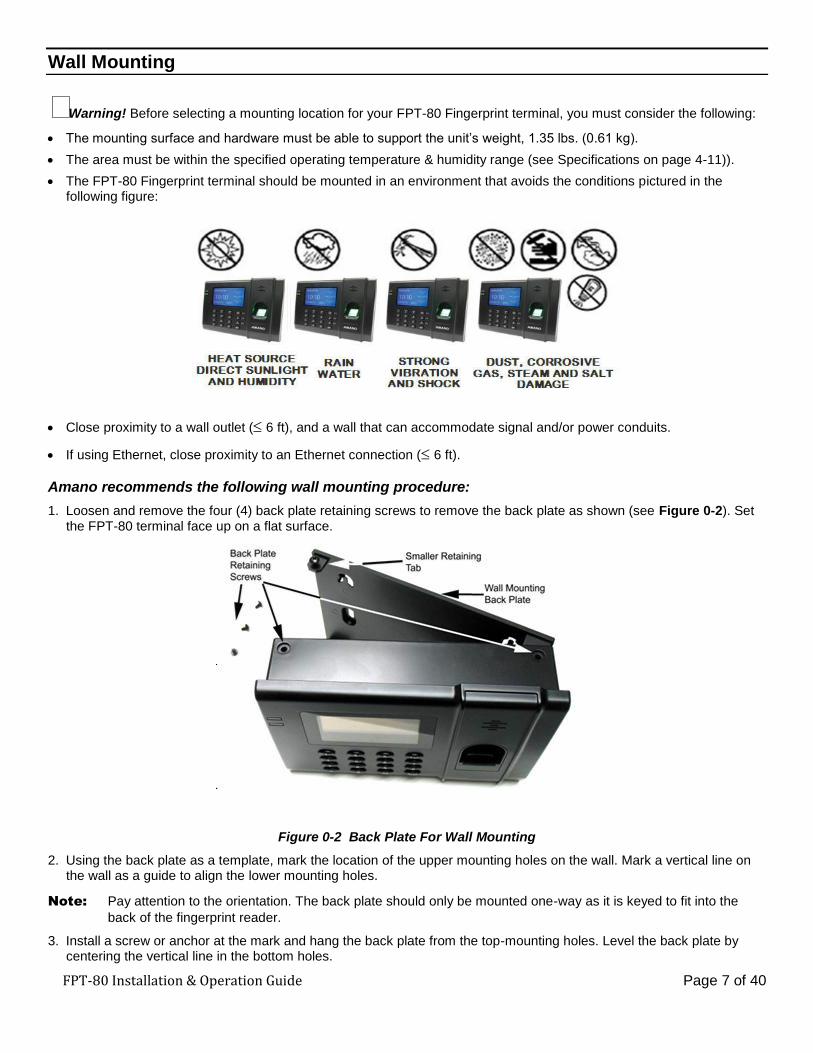
The FPT-80 Fingerprint terminal should be mounted in an environment that avoids the conditions pictured in the following figure:
Close proximity to a wall outlet ( 6 ft), and a wall that can accommodate signal and/or power conduits.
If using Ethernet, close proximity to an Ethernet connection ( 6 ft).
Amano recommends the following wall mounting procedure:
1. Loosen and remove the four (4) back plate retaining screws to remove the back plate as shown (see Figure 0-2). Set the FPT-80 terminal face up on a flat surface.
Figure 0-2 Back Plate For Wall Mounting
2. Using the back plate as a template, mark the location of the upper mounting holes on the wall. Mark a vertical line on the wall as a guide to align the lower mounting holes.
Note: Pay attention to the orientation. The back plate should only be mounted one-way as it is keyed to fit into the
back of the fingerprint reader.
3. Install a screw or anchor at the mark and hang the back plate from the top-mounting holes. Level the back plate by centering the vertical line in the bottom holes.

FPT-80 Installation & Operation Guide Page 8 of 40
4. Mark the location of the bottom holes.
5. Install the screws or anchors for the bottom-mounting holes and secure the back plate to the wall.
6. Insert the back of the fingerprint reader onto the four (4) retaining tabs. The tabs are keyed to accept the fingerprint reader only one way! Secure the reader to the tabs by inserting and tightening the 4 retaining screws.
7. Your fingerprint reader is now mounted to the wall and ready to connect the data and power lines. After wall mounting, remove the dustproof film on the sensor window. Proceed to the next section, Communication Connections.
Communication Connections
A connection between your Host PC with the Time & Attendance software and the FPT-80 terminal(s) is/are based upon your setup.
Serial Connection (Direct Connect)
You should use the Amano CommStik™ [part number AUS-10035x] (50 foot RJ-11 to USB) Communications Cable (included) to interface with the host PC and Time & Attendance software.
RS-485 communications can be used for systems requiring up to 31 terminals. You will require the following accessories for each additional RS-485 terminal:
AMX-206950: Communications Cable – 10’, 6 conductor RJ-11
AMX-206700: Junction Box
Figure 0-3 Serial Direct Connection with CommStik
Note: If the distance between the terminal and the host PC is more than 50 feet, two junction boxes will be required.
Time & Attendance Software PC Host

FPT-80 Installation & Operation Guide Page 9 of 40
The connections between the host PC and multiple serial terminals for this application are as follows:
Figure 0-4 Multiple Direct Connect Serial Terminals
* The maximum number of terminals is dependent upon the distance and the quality of cabling used. It is recommended that Belden Low Voltage Computer Cable, P/N 9841 or equivalent, be used to connect the junction boxes for this application.
Warning! Please note that terminal #3 (used for the RS-485 cable Shield) is disconnected from the internal RJ-11
receptacle of the junction box. This is deliberate; the shield connection is NOT fed through to the Terminal.
Ethernet Connection (Network)
Networked terminals can be connected to a standard 10Base-T or 100BaseTX computer network. In addition, each networked terminal can have a group of up to 29 serial terminals connected via RS-485.
Figure 0-5 Networked Terminal(s)
Time & Attendance Software PC Host

FPT-80 Installation & Operation Guide Page 10 of 40
Note: The serial connections for the RS-485 branch network are the same as for the RS-485 wiring described
previously.
FPT-80 Startup Welcome Screen (Power On)
Once the terminal is wall mounted and the communication connections have been made, connect the terminal to AC power (see Figure 1-6) and power on to setup and enroll users.
Figure 0-6 FPT-80 Fingerprint Terminal Bottom View
To start-up perform the following:
Ensure the AC Power Adapter is connected to the FPT-80 terminal and plugged into an outlet. Press the power
button. The FPT-80 terminal will display the splash screen, perform a diagnostic check, and then display the Welcome screen (see figure).
Figure 0-6 Welcome Screen
Note: The time and date can be set with the terminal keypad, or downloaded to the terminal from the host PC utilizing
the Time & Attendance software. The information such as date, time, daylight saving time (DST), finger templates, and hours worked sent from the Time & Attendance software will have precedence over existing similar information. That is to say the Time & Attendance software will act as the master.
Upon power up, the Green LED indicator will blink once every second to signify the terminal is operating properly.
All normal time and attendance functions (validation for punch in/out) must be performed from the "Welcome" screen.
Press the power On/Off button to shutdown the FPT-80 Fingerprint terminal and display "halting system….Shutdown 2 secs, 1sec". The FPT-80 terminal will retain all templates and transactions while the power is off.
Normal Punch IN/OUT Display
The system is ready to use after the FPT-80 terminal and the host PC with the Time & Attendance software are connected and setup. Upon recognition at the terminal, the terminal will first briefly display his/hers name [first 8 characters of the first and last name combined], followed by the User ID and validation status (see figure).
Figure 0-7 Validation Screen
DC/6V
Ethernet Serial (DB9 to
USB CommStik)
AC PowerBack Plate
Retaining Screws

FPT-80 Installation & Operation Guide Page 11 of 40
Next, the terminal will display the "As of" date followed by the current pay period hours worked for the user that just punched in (see figure for example).
Figure 0-8 Hours Worked for Pay Period
Note: The current pay period information is transferred from the Time & Attendance software to the terminal during a
download and can be retained at the terminal for up to 14 days between downloads.


FPT-80 Installation & Operation Guide Page 13 of 40
Chapter 2: FPT-80 Operation
Daily FPT-80 Use
The following "Daily Use" sections assume the FPT-80 Fingerprint terminal has been setup with enrolled users and system options have been defined. Please see Enrolling Users on page 15 and the other sections for enrollment details, etc.
Punching with a Fingerprint (FP)
1. From the Welcome screen place your enrolled finger in the sensor window (see figure).
2. Upon verification, the Green LED will momentarily stay on; the screen will briefly display your User ID, Name and
the confirmation "Verified." (see figure) with the voice prompt "Thank you", followed by the momentary display of your hours worked for the active pay period.
Validation Screen
Note: The name, assignments, and current pay period information are downloaded from Time & Attendance software
to the FPT-80.
Note: An invalid finger entry will flash the error message,
"FP Verify fail “. The Red LED will momentarily stay on.
Punching with a Password (Pwd)
1. From the Welcome screen enter your User ID using the keypad and press OK to confirm ID (see figure).
Enter User ID

FPT-80 Installation & Operation Guide Page 14 of 40
2. Input your password and ok (see figure).
Punch Accepted
Note: An invalid password entry will flash the error message,
"Error Pwd.", and the voice prompt, "Incorrect password". The Red LED will stay on until the correct password
is entered or the password entry times out and the terminal returns to the Welcome screen.
Note: The user will be prompted to "Place Finger" if they do not have a password.
3. Upon verification, the screen will display your Name, User ID, and the confirmation "Verified." with the voice prompt "Thank you". Next, the display will momentarily show the "As of" date followed by the current pay period hours worked for the user that just punched in (see figure for example).
Hours Worked for Pay Period
Note: When Recheck Min is set, if an employee punches more than once within the time setting [usually 1 – 2 mins.],
the voice prompt will be "Punch accepted…thank you" and no pay period hours will be displayed
Punching with a Fingerprint (FP) or Password (Pwd)
1. From the Welcome screen either place your finger on the sensor or enter your assigned User ID using the keypad.
2. Follow the on screen prompt to remove finger or input your password.
3. Upon verification, the screen will display your Name, User ID, and the confirmation "Verified." with the voice prompt "Thank you" followed by the momentary display of your hours worked for the active pay period.
Note: The advantage of being enrolled as a user with a fingerprint template and password is that you can use either
method to punch. This provides an automatic backup should you encounter any problems with fingerprint validation. Therefore, the first method used and accepted is the only method you need to validate a punch.
Punching with a Fingerprint (FP) and Password (Pwd)
1. From the Welcome screen either place your finger on the sensor or enter your assigned User ID using the
keypad.
2. Follow the on screen prompt to Please Input Password and OK then Please Press Finger (if User ID and Password was used).
3. Upon verification, the screen will display your Name, User ID, and the confirmation "Verified." with the voice prompt "Thank you" followed by the momentary display of your hours worked for the active pay period.

FPT-80 Installation & Operation Guide Page 15 of 40
View Hours at the Clock F-1
1. Press the F1 key (ESC = F1) and the terminal will ask for Badge No. or Finger Print 2. Enter Badge No or place finger on the fingerprint reader and hours will show on display.
Note: Hours showed in the display are from the last download to the terminal.
Department Transfer at the Terminal F-2 1. Press the F2 key (▲) and select department by using the up and down keys (▲▼) 2. Press ok after selecting the department 3. Enter Badge No or place finger on the fingerprint reader. Employee name and hours worked will show after
punch. Note: Department Transfer needs to be configured and downloaded to the clock from Time Guardian.
View Previous Punch at the Terminal F-3 1. Press the F3 key (▼) View Previous Punch and the terminal will ask for Badge No. or Finger Print 2. Select Date and press Ok to display previous punches.
Note: Previous punches are reset (cleared) every time the clock is polled.
Enrolling Users at the FPT-80 Terminal
After installing the FPT-80 Fingerprint terminal and powering on, you may begin enrolling users. If this is the first enrollment in a new or empty system, everyone will be able to enroll. However, if there are any users with privileges already setup in the system, you will have to be enrolled by a user with privileges. The FPT-80 fingerprint reader provides the following four methods for enrollment; fingerprint, password, fingerprint and password and fingerprint or password [in this instance the 1
st method submitted and accepted is used].
Caution! Use care when enrolling users at the terminal as the ESC button can alter the entry fuctions during some operations.
Introduction to Fingerprint Recognition Technology
User Identification/Verification
This is the process of comparing a user's finger against the stored map, and/or verifying a user from a stored password number (5 digit max). After performing the verification process the system will indicate success or failure while also storing all verified punches for transfer to the Time & Attendnace software.
Threshold
The threshold is a predefined number, often controlled by the administrator, which establishes the degree of correlation necessary for a successful match. If the score from the template comparison exceeds the threshold, the templates are considered a match. The threshold establishes a balance between False Acceptance Rate (FAR) and False Rejection Rate (FRR). FAR indicates the probability that a biometric system will incorrectly identify an individual or will fail to reject an imposter.
You can set the threshold for all users. For a user who has a difficult fingerprint verification, it is recommended to use ID & fingerprint verification (match one-to-one). Raising the threshold increases security, while lowering it increases the passing ratio. The correct balance can be vital. For example, a user whose finger is worn or injured should have a reduced threshold.
The FAR and FRR values affect each other. As FAR is increased, FRR should be decreased. The default one-to-many threshold is 35, while the 1:1 matching default threshold is 15 (see the following table).
Table 0-1 Recommended Threshold Level Settings
FRR FAR One-to-Many One-to-One
High Low 45 25
Middle Middle 35 15
Low High 25 10

FPT-80 Installation & Operation Guide Page 16 of 40
Priviledge (Status) Levels
The status levels define the ability of a user to perform specified administrator and other tasks including the ability to view, edit, add, and renew specified information categories. Four status levels can be assigned at the FPT-80 terminal or from the Time & Attendance software, and modified as required. These four (4) levels on page are:
User – person whose identity must be verified to punch and have their attendance recorded in the Time & Attendance software. Cannot perform any administrator functions.
Administrator – person who has access to all functions, including system setup..
Proper Finger Placement
Make sure the fingerprint image captured contains the core part of desired finger, because a fingerprint is the impression of the friction ridges of all or any part of the finger. Also when enrolling a finger, use a slightly adjusted angle for each finger press, i.e, one to the center, one inclined slightly to the left, and a third inclined slightly to the right. If these techniques are followed; the success rate should increase dramatically. The correct way to place a finger on the sensor is:
The user’s finger should completely cover the sensor. The finger should be placed flat and in the center of the sensor.
The finger should cover at least 80% of the sensor as shown below:
Place the finger flat on the center of the sensor surface
The wrong ways to place a finger on the sensor are:
FPT-80 Installation & Operation Guide Page 17 of 40
The following hints are provided as suggestions to help obtain a good fingerprint enrollment.
Table 0-2 Fingerprint Enrollment Hints
Problem Suggested Solution
Fingerprint is too dry or dirty. Wipe finger, and/or moisten.
Not enough pressure. Place finger firmly and flat on the sensor.
How to select finger? Use the finger alongside your thumb. Select fingers that are not worn or injured. If the fingers are small, use the thumb.
Finger placement? Place at least 2/3 of the finger firmly on the sensor. Do not touch the finger too fast and do not move the finger on the sensor until prompted.
Finger pattern change? Re-enroll your finger if your fingerprint changes as a result of an injury, etc.
Other reasons Use password registration as an alternative for people with poor quality fingerprints. Also, the threshold setting can be reduced.
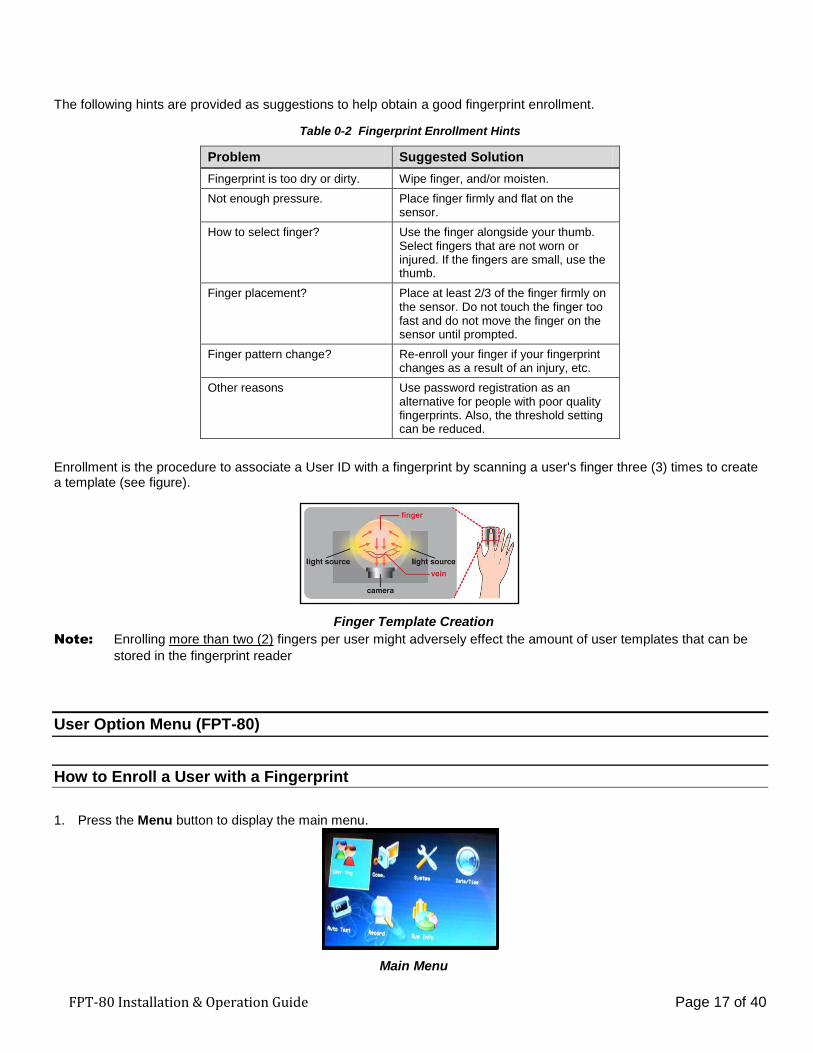
Enrollment is the procedure to associate a User ID with a fingerprint by scanning a user's finger three (3) times to create a template (see figure).
Finger Template Creation
Note: Enrolling more than two (2) fingers per user might adversely effect the amount of user templates that can be
stored in the fingerprint reader
User Option Menu (FPT-80)
How to Enroll a User with a Fingerprint
1. Press the Menu button to display the main menu.
Main Menu

FPT-80 Installation & Operation Guide Page 18 of 40
2. Select User Mange to display the User Manage menu (see figure)
User Manage Menu 3. Select New User to display the New User menu and select VerType = FP. The possible enrollment choices using
the ◄ or ► buttons are; FP = fingerprint, Pwd = password only, FP OR Pwd = fingerprint or password and FP & Pwd = fingerprint & password.
New User Menu
4. Press OK and Enroll FP menu will appear.
New Enroll FP Screen
Note: The system may prompt you with voice and on screen warnings if errors in the FP enrollment process occur.
For example, if that ID already has the same finger enrolled, the voice prompt will say "Duplicate Finger" while the screen will display "FP Enrolled Alrd" [for fingerprint enrolled already].
Note: The system will not allow duplicate enrollment of the same finger for the same or different User IDs. You must
enroll a different finger.
5. After the 3rd
successful finger press, the display will show the User ID followed by “ – 0” (see figure) to indicate that one (1) finger template exists for this ID.
Save User ID with FP Template
6. Press OK to save the finger template, and enroll a backup finger or ESC to enroll a new user.
FPT-80 Installation & Operation Guide Page 19 of 40
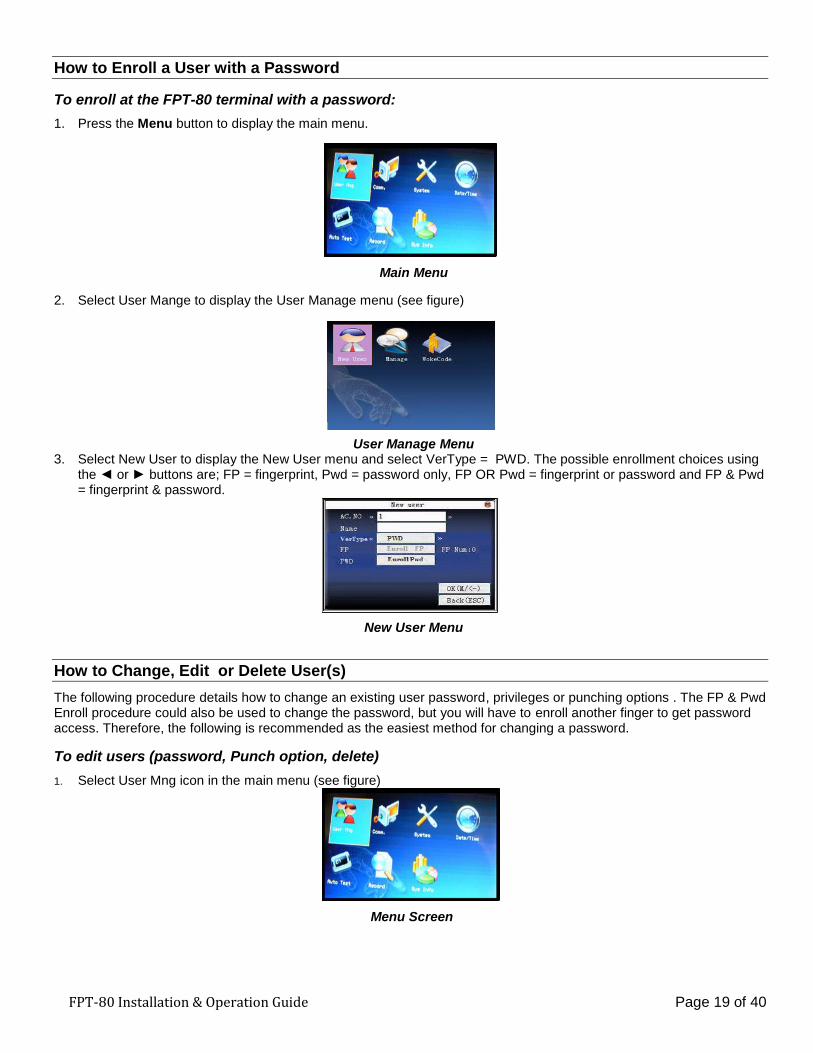
How to Enroll a User with a Password
To enroll at the FPT-80 terminal with a password:
1. Press the Menu button to display the main menu.
Main Menu
2. Select User Mange to display the User Manage menu (see figure)
User Manage Menu 3. Select New User to display the New User menu and select VerType = PWD. The possible enrollment choices using
the ◄ or ► buttons are; FP = fingerprint, Pwd = password only, FP OR Pwd = fingerprint or password and FP & Pwd = fingerprint & password.
New User Menu
How to Change, Edit or Delete User(s)
The following procedure details how to change an existing user password, privileges or punching options . The FP & Pwd Enroll procedure could also be used to change the password, but you will have to enroll another finger to get password access. Therefore, the following is recommended as the easiest method for changing a password.
To edit users (password, Punch option, delete)
1. Select User Mng icon in the main menu (see figure)
Menu Screen

FPT-80 Installation & Operation Guide Page 20 of 40
2. Select Manage icon (see figure).
User Manage Menu
3. Select Employee
Enroll User Menu 4. Select one of the available options.
Enroll Pwd New Enroll Screen
How to Restore Users From Time Guardian Software
You can retrieve the Users you just deleted at the terminal [location] from the Time & Attendance software. Also, it is recommended to utilize the Time & Attendance software backup feature to protect the database which contains the maps, etc.
The sequence to restore users from the Time & Attendance software is:
1. First press the button from the Time & Attendance Communications screen (see Using the Fingerprint Commands ) to load employee ID's, etc. into the FPT-80 terminal.
2. Next press from the Time & Attendance Fingerprint Communications screen to transfer all template maps to the terminal.

FPT-80 Installation & Operation Guide Page 21 of 40
Comunication Option Menu (FPT – 80)
Network – Enter Network Settings:
RS232/485 – Enable RS485 when using the AMANO USB Commstick. (Default is off)
System Option Menu (FPT – 80)

FPT-80 Installation & Operation Guide Page 22 of 40
DATA MANAGEMENT
Delete Att Log:Delete all attendance records. Delete All:Delete all enrolled employees’ information, fingerprint and attendance record. Delete Admin Role:Change all administrators into common users. Clean Dept: Delete all Departments
DISPLAY
Display Setup – allows to configure the match retry times and password retry times.
RESET

FPT-80 Installation & Operation Guide Page 23 of 40
Reset all default data. Miscellaneous Settings
Settings for Sleep Time, Lock Power (on or off) and Language (English or Spanish)
Date and Time Menu (FPT – 80)
Date/Time
Time settings and day light savings can be entered at the clock or setup in Time Guardian and downloaded to the clock.
Time & Attendance Software DLS Settings

FPT-80 Installation & Operation Guide Page 24 of 40
Auto Test Menu (FPT – 80)
The device can test various modules automatically to help operator to judge the module with fault quickly. Auto test includs TFT display Test, Audio Test, Keyboard Test, Sensor Test and RTC Test.
Press”▲/▼” to select the item to be selected. Press OK to start it.
7.1 TFT display test
The device can automatically test TFT color display effect through color display, white display and black display) to see whether the screen works nomally. Press OK to continue and press ESC to exit.
7.2 Audio test
The device can automatically test voice prompt effect through playing voice files in the device to see whether the files are complete and the voice effect are good or not. Press OK to continue and press ESC to exit.
7.3 Keyboard test
The device can automatically test various keyboards to see whether the keys work nomally or not. Press any keyboard on the test interface (except for OK and ESC) to check whether the pressed keyboard is in accordance with that displayed on the screen.
will appear whether it is the right key, and will appear whether is is not the right key. Press ESC to exit.
7.4 Sensor test
The device will automatically test the sensor to see whether it works normally. Press fingerprint to see whether the image is clear and useable. Press fingerprint on the sensor window and the fingerprint image will appear on the screen. Press ESC to exit.
7.5 Real-time clock
The device can automatically test the clock to see whether it works nomally. Press OK to start time and then press OK to stop time. Press ESC to exit.

FPT-80 Installation & Operation Guide Page 25 of 40
Query Record Menu (FPT – 80)
Employee’s attendance records will be saved in the device. For convenience, query record function is provided. According to user’s input query condition, the record will be displayed on the screen for user to check. Enter query attendance, input corresponding information in the query condition input box.
1) When the User ID is blank, all employedds are quried.
2) When input an User ID, only this employee’s attendance record can be queried. After query, the records in accordance with the conditions will be displayed on the screen:
System Information Menu (FPT – 80)
Use system information to check the current device’s saving status, its version information and so on.
Record capacity
Display the count of enrolled users, administrator , password enrollment, the current enrolled fingerprint and the current saved attendance record. Also display the capacity of the fingerprint and attendance record, as show below:

FPT-80 Installation & Operation Guide Page 26 of 40
Device information Display device name, serial number, version information and manufacture date in device information for check.
System Parameter
1:1 matching threshold value: The similarity of ID+fingerprint verification and the enrolled template
1:N matching threshold value: The similarity of verification and the enrolled template
Recommended matching threshold value:
FRR FAR
Matching threshold value
1:N 1:1
high low 45 25
middle middle 35 15
low high 25 10
Time format: Time format displayed on the initializing interface of fingerprint sensor
Press / to select format. The fingerprint sensor supports ten date format: YY-MM-DD, YY/MM/DD, YY.MM.DD, MM-
DD-YY, MM/DD/YY, MM.DD.YY, DD-MM-YY, DD/MM/YY, DD.MM.YY and YYYYMMDD. Select your desired date
format.
keyboard voice: Press / to set whether the key has voice or not. “Yes” means having voice, and “No” means no voice.
Voice prompt: Press / to select whether to give voice prompt or not. The device will give corresponding voice prompt during operation.
volume: Press / to set it.
attendance record alarm: when the free space reaches the set value, the device will give alarm automatically (effective
value is 0~99,0 means the space is all used and there is no alarm. )
repeat verification time: it is in the set time range(unit :minute). If somebody’s attendance record has been there, then the record of
second attendance won’t be saved. (effective value is 0~60 minutes. 0 means all the records after verification are saved.)

FPT-80 Installation & Operation Guide Page 27 of 40
Press ▲/▼ to move cursor to the input box. Press numeric key on small keyboard to input the value. If it is the input box, press numeric keys on small keyboard to input the value. If it is the roll box, press / to switch the values. After setting, press OK or menu directly to save the setting and return to the last interface. Press “ESC” to cancel setting and return to the last interface.


FPT-80 Installation & Operation Guide Page 29 of 40
FPT-80 Setup with Time & Attendance Software
See the Time & Attendance User's Guide [AMX-502700] for more detailed operation and setup information for the Time & Attendance software.
FPT-80 Terminal Communications
The Communications module in the Time & Attendance software can be used to communicate with FPT-80 terminals when setup. Locations and terminals can be configured utilizing the Time & Attendance software Clock tab in the Setup Wizard. Operations from this module include polling, downloading, setting the time, and viewing specific terminal settings in a location. Polling, or polled operation, refers to actively sampling the status of the external terminals by the client Time & Attendance program. Downloading is utilized to send data to the remote terminals from the Time & Attendance software.
Note: All operations at the clock including time and employee ID’s are controlled by downloading information from the
Time & Attendance software.
The following sections describe how to setup the Amano Time & Attendance Software to communicate with the FPT-80 terminal for normal time and attendance functions.
FPT-80 Setup with Amano Time & Attendance Software
Note: Prior to commencing with the Time & Attendance software Setup Wizard, Amano recommends that you install
the FPT-80 terminal(s), using this FPT-80 Terminal Installation and Operation Guide. The FPT-80 terminal is installed to communicate with your PC.
If you are setting up a networked Ethernet FPT-80 terminal, you may need to obtain the correct IP address from your network administrator for each Ethernet FPT-80 terminal(s) connected to the system and enter the IP address in the Location screen of the Time & Attendance software. Also, see the section on “Communications Options Menu” for how to enter a specific IP into your FPT-80 terminal.
During the installation and setup of the Time & Attendance software the Setup Wizard for Step 8: Clock Setup should be used to setup your FPT-80 terminal;
Clock Setup from Time & Attendance Software Use Step 8 if:
FPT-80 Installation & Operation Guide Page 30 of 40
Do you have Terminals other than Access Control Terminals?
If Yes, the Time & Attendance software will automatically poll and upload punches from connected FPT-80 terminals each time the software is opened.
If No, the connected FPT-80 terminals will have to be polled manually using the Communications module in the Time & Attendance software.
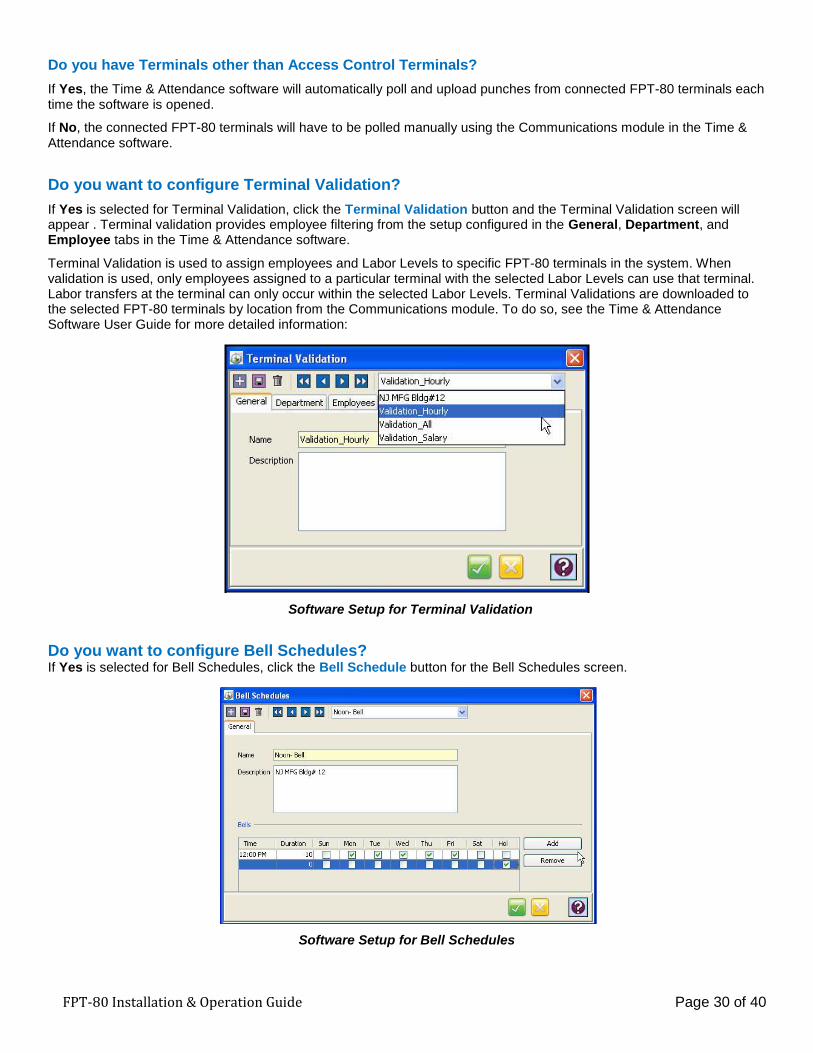
Do you want to configure Terminal Validation?
If Yes is selected for Terminal Validation, click the Terminal Validation button and the Terminal Validation screen will appear . Terminal validation provides employee filtering from the setup configured in the General, Department, and Employee tabs in the Time & Attendance software.
Terminal Validation is used to assign employees and Labor Levels to specific FPT-80 terminals in the system. When validation is used, only employees assigned to a particular terminal with the selected Labor Levels can use that terminal. Labor transfers at the terminal can only occur within the selected Labor Levels. Terminal Validations are downloaded to the selected FPT-80 terminals by location from the Communications module. To do so, see the Time & Attendance Software User Guide for more detailed information:
Software Setup for Terminal Validation
Do you want to configure Bell Schedules? If Yes is selected for Bell Schedules, click the Bell Schedule button for the Bell Schedules screen.
Software Setup for Bell Schedules
FPT-80 Installation & Operation Guide Page 31 of 40
Special Note: Selecting Holidays will only work with HandPunches (all HandPunch models).
The FPT-80 terminal does not contain the capability to ring bells, but you may have a configuration which includes other terminals such as the MTX-15 or HandPunch that does have relays for bell ringing.
A Bell schedule requires you to enter the Duration for the bell to ring, the time of day for the bell to ring and the days of the week. Multiple entries can be made for Bell Schedules with different duration and day assignments. Bell Schedules are downloaded to the selected terminals by location by using the Communications module in the Time & Attendance Software. To do so, see the next section and/or Time & Attendance Software User Guide for more details.
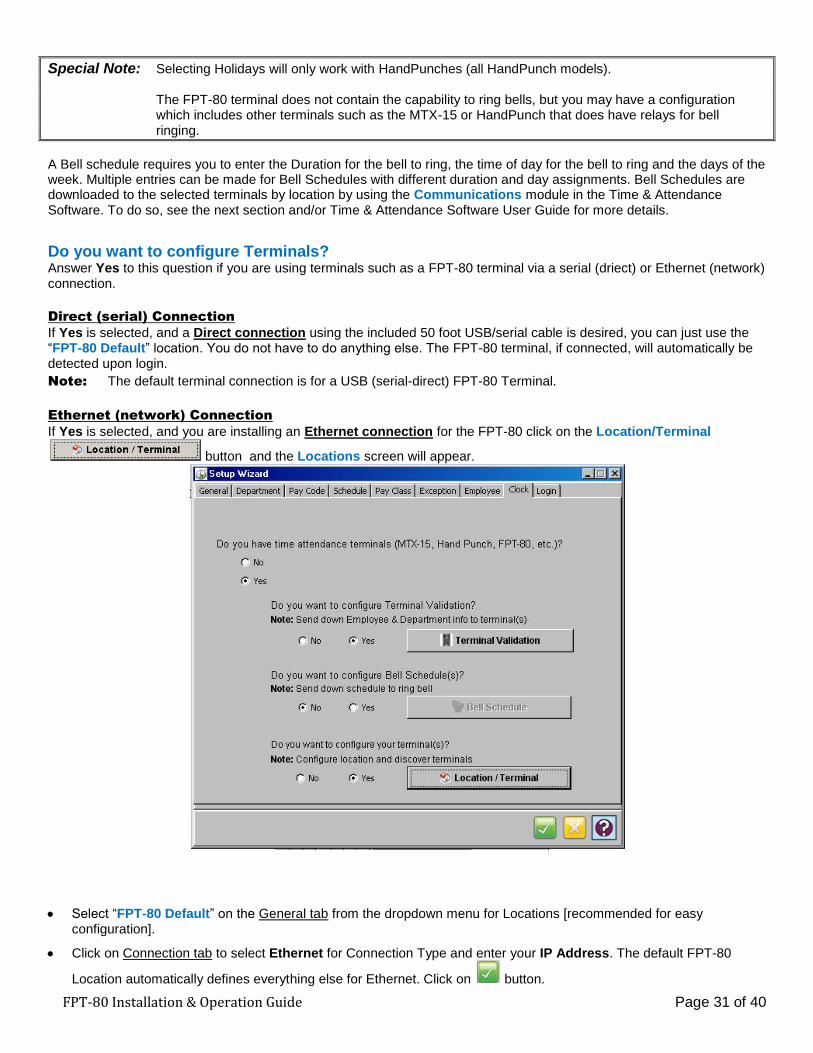
Do you want to configure Terminals? Answer Yes to this question if you are using terminals such as a FPT-80 terminal via a serial (driect) or Ethernet (network) connection.
Direct (serial) Connection
If Yes is selected, and a Direct connection using the included 50 foot USB/serial cable is desired, you can just use the “FPT-80 Default” location. You do not have to do anything else. The FPT-80 terminal, if connected, will automatically be detected upon login.
Note: The default terminal connection is for a USB (serial-direct) FPT-80 Terminal.
Ethernet (network) Connection
If Yes is selected, and you are installing an Ethernet connection for the FPT-80 click on the Location/Terminal
button and the Locations screen will appear.
Select “FPT-80 Default” on the General tab from the dropdown menu for Locations [recommended for easy configuration].
Click on Connection tab to select Ethernet for Connection Type and enter your IP Address. The default FPT-80
Location automatically defines everything else for Ethernet. Click on button.

FPT-80 Installation & Operation Guide Page 32 of 40
Before a Location can be created, a Bell Schedule (optional) and Terminal Validation list should be setup.
You may have to create a Location to communicate with your FPT-80 terminals. A Location enables the Time & Attendance software to distinguish and interact with the desired terminal(s). Only one terminal type can be used per Location. If you have more than one terminal type [i.e, FPT-80 and MTX-15], you must have multiple Locations.
If you are configuring a direct connect serial FPT-80 terminal, you may have to determine the PC Comm port that the USB CommStik is connected to and select it in Connection tab from the Locations screen.
The window will open on the General tab with a default Location Name. It is recommended to use the “FPT-80 Default” name.
To create a new Location in Time & Attendance software for FPT-80 terminal:
Step 1. Click the Add button to create a new Location. You will be required to enter a unique Name [yellow required field] that will be used to describe the area or site where a terminal or group of terminals is located.
Step 2. In the Description field, enter a brief description of the Location. This field is optional.
Step 3. In the Term Type field; select FPT-80.
Step 4. In the TZ (Time Zone) Offset field, select the time zone difference (if applicable) between the physical location of your PC and the FPT-80 terminals.
Step 5. In the Output Path field, enter the path of the output XML file. If necessary, press the Browse button to navigate to the location of the XML output file.
Step 6. If necessary, check the “Secondary Output File” box, and In the Output Path field, enter the path of the secondary output file. Press the Browse button to navigate to the location of the secondary output file.
Step 7. Click on the Override DLS for DLS (Daylight Savings Time ) Settings override and enter the following:
Start Date: The date that the DLS period will begin.
Start Time: The time of the day of the Start Date that the DLS period will begin.
End Date: The date that the DLS period will end.
End Time: The time of the day of the End Date that the DLS period will end.

FPT-80 Installation & Operation Guide Page 33 of 40
Press the Reset button to Reset the DLS at the Terminal.
Step 8. From the Locations screen click on the Connection tab.
Software Setup for Connection Type
Step 9. In the Connection field, select the type of connection you are using to communicate with the FPT-80 terminal(s). The required information in the Connection Info depends on your connection.
Ethernet: The FPT-80 terminals communicate to the Host PC via Ethernet connection. If selected, you must enter the IP Address and Port 4370. [Obtain the correct IP address from your network administrator, or alternatively, please consult Chapter 3: Network Configuration of this Guide for additional information about hardware configuration].
Note: The Port number for Ethernet terminals must be set to;
MTX-15 = 2101, MTX-10 & 20 = 401, FPT-80 = 4370, and HandPunch’s = 3001.
Direct: The FPT-80 terminal(s) are directly connected to the Host PC via Com Port. If selected, you must select the Com Port and Baud Rate.
Step 10. Click on the Terminals tab to add, edit, delete, or communicate with FPT-80 terminals.
Setup for Locations with Terminals Tab
Step 11. The Ethernet and direct connection FPT-80 terminals in this location should appear in the Terminals list (see figure).

FPT-80 Installation & Operation Guide Page 34 of 40
Step 12. Double-click on the found terminal or highlight the terminal and click on the Add button to add a new Terminal to the Location and the Terminal window General tab will appear for setup.
Software General Terminal Setup
Step 13. In the Name field, enter in a unique name [required field] that will be used to describe the terminal. This field will be automatically populated with the MAC address when the eyeglass button is used.
Step 14. In the Number field, enter in a unique number for the terminal if allowed.
Step 15. In the Serial No. field, a unique number will appear for a found FPT-80 terminal.
Step 16. The Bells option is not available on the FPT-80 so the selection is grayed out.
Step 17. If you wish to assign a Terminal Validation setting to the terminal, select one from the dropdown list in the Validation field.
Step 18. Click on the Options tab to activate the Department Labor at the FPT-80 terminal with a check.
Step 19. In the Time Format box, select the time format (12-hour or 24-hour) for the terminal.
Software Terminal Options Setup
Step 20. In the Misc box, select whether to enable the view hours and View Punch at the terminal.
Step 21. To update the terminal settings, click on the Apply button. This will download the current settings in this window to the terminal.

FPT-80 Installation & Operation Guide Page 35 of 40
Time & Attendance Software Communications Module
With the Time & Attendance Software open on the host PC, from the tree view, click on the Communications module within the Daily Activities group and the following type of screen should appear for the Time Guardian Plus. Note – the tree view can look a little different depending upon which modules are activated and/or whether it is Time Guardian Pro (all modules will be active). The figure below shows the tree view for Time Guradian with all modules activated.
Time & Attendance Software Tree View
Locations are selected by clicking on the desired row . You can select multiple locations by holding down the Ctrl Key and clicking on other locations. Also, you can sort the displayed Locations list by clicking on the dropdown list in the upper left-hand corner and selecting on; Name, Description, Term Type, TZ Offset, Connection, IP, Port, COM Port, Baud Rate, Modem, and Phone. Once the location is selected use the following commands found at the bottom of the screen to communicate with the connected FPT-80 terminal(s) at that location:

FPT-80 Installation & Operation Guide Page 36 of 40
To select specific terminals within a location, double-click on the desired location row, and the following Communications dialog will appear:
Software Communications Screen Select terminals in the Terminals list by placing a check in the Select box of each terminal. When you have finished making your selections, use one the commands to communicate with the FPT-80 terminals.
Using the Fingerprint Commands
From the Time & Attendance software Communication Settings screen, this tab allows you to perform the following functions with the FPT-80 Fingerprint terminal:
Poll: Press the button to collect the most recent data from the terminal(s) (i.e., fingerprint templates and punches). When checked, Time Sync. performs time synchronization between the Host PC and the terminal(s) including Daylight Saving settings.
Download: Press the button to send time, Daylight Saving Time settings, hours worked for the current pay period, and employee assignments. The hours worked will be retained at the terminal from the date of the last download for up to 14 days. If no new download occurs within 14 days, the hours worked will not appear after 14 days.
Note: When this button is pressed, the terminal display will show Downloading…., followed by Working…., and finish with Restarting…..The terminal will power off then back on to refresh with the options just downloaded to it. Simultaneously the lower portion of the Time Guardian Fingerprint Commands screen will display the location, terminal # downloaded date/time, hours worked sent for users X to Y, time format changes, restarting device, and download operation done (see figure). Click on Clear Display to clear the displayed information.
Biometric Maps: The terminal must be polled before performing the following operations. Polling the terminals will save biometric fingerprint templates for newly enrolled employees, automatically update the database with templates for employees who have punched at the terminal, and create terminal assignments for employees that have not yet been enrolled in the database.
Note: If a newly enrolled employee does not exist in the employee database, then the template in the terminal will not be saved. If the template data is inadvertently lost, it must be reassigned to the terminal through the Assignments tab.

FPT-80 Installation & Operation Guide Page 37 of 40
Each time an employee punches at the FPT-80 Fingerprint terminal, their finger template (map) will automatically be updated in the employee database with the most recent template from the terminal. This feature is for maintaining accurate fingerprint templates. However, if the employee does not exist in the employee database, then a message will be displayed in the message window at the bottom of the tab.
Once an employee is added to the Employee database, their template will not automatically be uploaded unless the employee is removed and re-enrolled at the terminal, or a punch is received from the terminal. Once this is done, however, the employee’s template will be saved and an assignment will automatically be created.
Send Maps: Press the button to send user(s) biometric map(s) from the employee database in Time Guardian to the selected terminals. Only employees assigned to terminals will be sent. Employees are assigned to terminals from the Assignments tab, or by polling. Because the “Send Maps” operation consists of first clearing all templates from the terminal and then loading assigned employee templates.
Receive Maps: Press the button to receive employee templates from the selected terminal(s) to the Time Guardian database. Only templates assigned to the selected terminals will be uploaded to TG. Employees are manually assigned to the terminals in the Assignments tab.
Clear Maps: Press the button to clear (delete) all assigned employee templates from the terminal. Because the Clear Maps operation consists of clearing all templates from the terminal, a confirmation dialog box will appear before this command executes.
Caution! This command can be used to clear [reset] the terminal if an Administrator has been setup and the
password is lost, etc. Access at the terminal to the menu options, etc. maybe denied unless it is an Administrator.
Note: All the above command options can be performed at either Selected Terminals, All Terminals, or All Locations.
Whereas, the "Polling" and "Downloading" commands from the Communication menu can only be performed on All Terminals at All Locations.

FPT-80 Installation & Operation Guide Page 38 of 40
Frequently Asked Questions (FAQs)
1. Q: Some user's fingerprints occasionally cannot be verified?
A: The following reasons could lead to a poor fingerprint template:
Smooth fingerprint
The fingerprint contains too many drapes [ridges] and/or they change too often
The fingerprint in question has serious skin shed
Resolution: Select a different fingerprint (less crinkle, no sloughed off skin, clear image), and make your fingerprint touch a larger area of the sensor. Also, enroll more than 1 fingerprint, and use 1:1 match method with password verification method.
2. Q: FPT-80 Fingerprint terminal(s) fail to communicate?
A: The following reasons could lead to faulty communications:
COM port configuration is not correct. COM port currently selected is not the actual COM port being used.
The Baud rate settings between the fingerprint reader and the PC COM port are different
The fingerprint reader has failed to connect with the computer.
The fingerprint reader has connected but it is not starting up.
The serial number of linked fingerprint reader is not correct.
The Data line or converter (CommStik) fails to communicate.
The PC COM port breaks down.
3. Q: Upon power up, the FPT-80 Fingerprint terminal TFT displays incompletely; only half, sometimes jumbled, etc?
A: The possible reasons are:
Bad motherboard in fingerprint terminal.
Bad TFT display, seek service/repair/replacement. 4. Q: How to clear administrator from the FPT-80 terminal?
A: The following method could be used:
privileges utilizing the "Clr Admin Pri" [clear administrator privileges] command from the Adv Option menu. However, if you cannot gain access to do this, you must use the "Clear Maps" command from the Time & Attendance software. See Using the Fingerprint Commands.
From the Fingerprint terminal follow this procedure:
Step 1. Press the MENU button.
Step 2. Enter administrator User ID.
Step 3. Press OK, and enter password or press enrolled finger.
Step 4. Select User Mng menu and press OK.
Step 5. Select Manage and press OK.
Step 6. Select Badge No., press OK
Step 7. Select Edit and press OK.
Step 8. Change User Role from Admin to User
Step 9. Select “(OK M/C+)” and press OK.
Step 10. Press ESC to go back to main menu.
Note: Until an actual “Administrator” is enrolled in the FPT-80, ALL “users” enrolled have “temporarily” administrative access. Therefore it is important to enroll an “administrator” on the FPT-80 soon after initial installation.

FPT-80 Installation & Operation Guide Page 39 of 40
5. Q: When the fingerprint terminal connects serially, and the sound "ding, ding" occurs?
A: The possible reasons are:
With RS-232 communications, the computer Baud rate may not match the terminal setting.
With RS-485 communication, two lines of the converter may be joined.
FPT-80 Specifications
Capacity: Fingerprints: 3,000 templates
Transactions: 100,000 transactions
Display: 3” LCD TFT screen
Communication: RS485
TCP/IP
Power: Power Supply: 5V DC, 2A
Environment: Operating Temp: 32-105° F (0-45° C)
Operating Humidity: 20% to 80%
Dimensions: Height: 9.5” (145 mm)
Width:12.5” (200 mm)
Depth: 3.6” (58 mm)
Packaging: Dimension: 9” x 10 1/2” x 3 1/2” • Weight: 3 lbs. ( 48 ozs.)
Memory Backup: Provides up to 3 years of continuous memory backup without AC power.
Display: 2.8” diagonal, 128 x 64 dots resolution LCD reflective (backlight).
Keypad: 4x4 keypad (0~9, OK, ESC) + 4 function keys.
Clock: Quartz oscillator, accuracy within 3 seconds per week at normal temperature. * Specifications and/or operational characteristics are subject to change without notice. The AC adapter is UL listed E21589
Note: This equipment has been tested and found to comply with the limits for a Class B digital device, pursuant to Part 15 of the FCC Rules. These limits are designed to provide reasonable protection against harmful interference in a residential installation. This equipment generates uses and can radiate radio frequency energy and, if not installed and used in accordance with the instructions, may cause harmful interference to radio communications. However, there is no guarantee that interference will not occur in a particular installation. If this equipment does cause harmful interference to radio or television reception, which can be determined by turning the equipment off and on, the user is encouraged to try to correct the interference by one or more of the following measures: Reorient or relocate the receiving antenna; Increase the separation between the equipment and receiver; Connect the equipment into an outlet on a circuit different from that to which the receiver is connected; Consult the dealer or an experienced radio/TV technician for help.

AMX-502700 ● Copyright © 2012 Amano Cincinnati, Inc. ● Printed in U.S.A. ● 10/25/12
www.amano.com/time