frequently asked questions - digital2you · 1 epson stylus pro 7900 ctp faq frequently asked...
TRANSCRIPT

1
Epson Stylus Pro 7900 CTP FAQ Frequently Asked Questions
Table of Contents System Questions
1. What is required for installation of the Epson Stylus Pro 7900 CTP System? 2. How long does it take to setup? 3. What tools do I need for setup? 4. What is the large plate accessory kit for and when would I need it? 5. What power is required for Printer? 6. What power is required for PCU? 7. Why does the PCU require 208/220 VAC power? 8. Does the 7900CTP punch a plate? 9. What are ongoing supplies needed for the Epson Stylus Pro 7900 System? 10. What maintenance is required? 11. What Ink is used to image the Epson DirectPlate- Aluminum? 12. Why Cyan ink? 13. What settings should I have the PCU (plate curing unit) set for? 14. How often do I need to register the plate guide? 15. Is this a chemical press process? Do I need to keep my old plate processor? 16. Does this system do 2 and 4 color work? 17. When I first start using this system, how much time should I expect to get up to speed on press? 18. Who do I call for support on this system? 19. Why are there 2 different sized PCU platens? 20. Why is there a reversing switch on the PCU? 21. What is the smell on initial start up of the PCU? 22. Why does the power light turn on and off during operation.?
RIP Questions
1. What type of computer do I need to install the RIP on? 2. What If I don’t like the EFI RIP? Are there other RIPs available? 3. Who do I call for support on the EFI RIP? 4. Where can I get training on the rip? 5. How do I print a alignment sheet? 6. How do I adjust for dot gain on press? 7. How do I put in my plate size, bend and gripper edge? 8. How do I print just one color or just one plate? 9. Can I adjust the printer for feed length and do I need to do this? 10. How does Licensing and the Hardware Dongle work? 11. Can I also make proofs? 12. How do I change between proofing and plates? 13. Do I need to use a RIP or can I use the standard printer driver to make plates? 14. Does the RIP Support trapping?
Version 3.0 2011 RH

2
Epson DirectPlate Aluminum Questions
1. How do these plates work? 2. What is the highest resolution these Plates will support? 3. Do I need to gum the plates? 4. Are the plates anodized? 5. Are these plates light sensitive? 6. Do these Plates have Grain? 7. Can I cut/ convert these plates? 8. What is the shelf life of the Epson DirectPlate Aluminum? 9. Can I reuse plates after they have been used on press? 10. Can I use a Deletion pen? 11. Are these plates made by Epson? 12. How many impressions can I get out of a plate? 13. What if I have a plate with a bent corner, Can I use that? 14. Are these plates dry when they come out of the Epson Printer? 15. What happens if a plate looks darker after if comes out of the PCU? 16. How do I load a plate into the printer? 17. Do I mount these plates like any normal plate on my press? 18. What happens if I see small dots on the press sheet? 19. What happens if I see alignment issues? 20. What if I see lines on the press sheet in the direction of the plate travel through the PCU? 21. What happens if I don’t get the number of impressions I’m expecting?
Press Integration Questions
1. What fountain solution should I use? 2. What is the recommended PH level of the fountain solution? 3. What plate cleaner do I need? 4. What is different about how I would use an Epson DirectPlate? 5. What about a press wash? 6. What type of Ink should I use? 7. What presses and plate sizes are supported by Epson DirectPlate?
3
System Questions
1. What is required for installation of the Epson Stylus Pro 7900 CTP System? You must have the following to install the Epson Stylus Pro 7900 CTP System: 1. A computer with the following minimum requirements:
• IBM®-compatible PC with a Pentium® 1 GHz CPU or equivalent • 1GB of RAM • 80GB hard drive (20GB available space recommended) • Microsoft® Windows Vista® or Windows® XP- 32 bit or 64 bit • DVD drive Higher specifications are RECOMMENDED. Note that a Windows Based PC is required to run the EFI RIP, however, you can print from Macintosh workstations to the EFI RIP.
2. A standard 110v power (for the printer) and 220v power (plug type L6-20) for the Plate Curing Unit. 3. A Plate Punch specific to your press. (Note that the 7900CTP system does not punch the plates during processing nor is a punch plate included with the 7900CTP system)
2. How long does it take to setup? It takes approximately 1 hour to unpack the Printer, approximately 1 hour to install the software and align the Plate Guide, and about 1 hour to install and calibrate the Plate Curing Unit. While much of this can happen concurrently, we would recommend about 4 total hours from start to finish before you should expect to have a plate on press.
3. What tools do I need for setup? All of the required tools needed for setup are included with the Epson Stylus Pro 7900 CTP system. The Printer Stand includes an Allen key that will also be used to install the Plate Guide. Note that if the plate guide requires more alignment a crescent wrench may be required.
4. What is the Large Plate Accessory Kit for and when would I need it?
The Large Plate Accessory Kit allows you to image large plates. The kit contains a large plate guide to be used on the printer and an extension base for the Plate Curing Unit (PCU) trays to accommodate large plates. The Large Plate Accessory Kit is recommended for Epson DirectPlate Aluminum plates over 16 inches (406 mm) wide.
5. What power is required for the printer? The Epson Stylus Pro 7900 is a standard Epson Stylus Printer that requires 110 V power
6. What power is required for PCU? The Plate Curing Unit requires 208/220 VAC power (with an acceptable range of 208 – 240 V). The plug type is L6-20P plug (male) and requires a L6-20 electrical outlet.
7. Why does the PCU require 208/220 VAC power? The 208/220 V power allows the PCU to reach operating temperature within a few minutes and draws less current than lower voltage devices. The faster response time also provides more precise temperature control and better overall energy efficiency.
8. Does the 7900CTP punch a plate? No. An offline Plate Punch is required to use the Epson Stylus Pro 7900 CTP system. If your press did not include a punch, they are available for each press from an Epson Authorized CTP Reseller or from most dealers who sell press equipment.

4
9. What are ongoing supplies needed for the Epson Stylus Pro 7900CTP System? There are no unique chemicals or special items required to use this system on an ongoing basis. All that is required is Epson UltraChromeHDR Ink cartridges (depending on usage), Epson DirectPlate- Aluminum plates, and occasionally, the printer will require a maintenance tank. All of these items should be available from your Epson Computer to Plate Authorized Reseller.
10. What maintenance is required? No ongoing maintenance is required for this system other than providing ink, maintenance cartridges and Epson DirectPlate media. The printer will automatically do routine maintenance to maintain the print head and print quality. The Plate Curing Unit requires no maintenance other than being kept free of dust.
11. What ink is used to image the Epson DirectPlate- Aluminum? Standard Epson UltraChrome HDR ink is used to image plates.
12. Why cyan ink? We have found that the durability on press is superior due to the pigment content of the cyan ink. In addition, the cyan ink makes the image on the plate easier to check prior to loading the plate on press.
13. What settings should I have the PCU (plate curing unit) set for? The PCU is calibrated and set when it comes out of the box. The initial settings should be 190 degrees with a speed of about 1.5. During the setup process you use Thermax strips to confirm that the temperature after going through the PCU is between 150 and 160 degrees. You may need to increase or decrease the temperature control. Different conditions may affect this calibration (such as altitude, ambient temperature and humidity, etc).
14. How often do I need to register the plate guide? Once initially installed and calibrated, the Plate Guide should not need to be reregistered unless it is removed and reinstalled, or you notice something unusual while printing on press that indicates the registration from plate to plate is incorrect. The Plate guide should initially be aligned to within 0.5 mm. More precise alignment ensures higher accuracy.
15. Is this a chemical press process? Do I need to keep my old plate processor? This system is chemical free and requires no chemical cleanup, maintenance or consumable. The only item that you need to keep this system running is Plates and Printer ink. Once you install this system, you no longer need to maintain or keep your current plate processor.
16. Does this system do 2 and 4 color work? Yes. This system will work for both 2 and 4 color work. While we think the majority of the work you will be doing with this system is 2 color, the print quality on 4 color will exceed your expectations. For a Sample of this, please order a sample kit at www.proimaging.epson.com.
17. When I first start using this system, how much time should I expect to get up to speed on press?
You should allow a half-to day to setup and install the system and another half-full day to become comfortable using these plates in your existing workflow.
18. Who do I call for support on this system? For any and all support questions related to this system, the PCU, and the EFI RIP software, contact Epson at 888-377-6611. When calling this number please have your UNIT ID from you Preferred Service Card, if you do not have this information, contact 562-276-1305

5
19. Why are there two different sized PCU trays?
Two different sized trays for the PCU are provided so they can be interchanged to accomodate different sized plates, and the customer’s environment.
20. Why is there a reversing switch on the PCU? A reverse switch is provided for in-line applications and to clear any jams that may occur.
21. What is the smell on initial start up of the PCU?
The PCU unit may emit a slight odor on initial start up. This is normal and due to the PCU’s thermal panel expelling any moisture absorbed from the ambient air during shipping.
22. Why does the power light turn on and off during operation?
This is normal. The light indicates that the heater panel is turned on. It remains fully on until the oven has reached the set temperature and then turn on and off as necessary to maintain and regulate that temperature.
6
RIP Questions
1. What type of computer do I need to install the RIP on? A computer with the following MINIMUM requirements:
• IBM®-compatible PC with a Pentium® 1 GHz CPU or equivalent • 1GB of RAM • 80GB hard drive (20GB available space recommended) • Microsoft® Windows Vista® or Windows® XP • DVD drive • One free USB port
A computer with the following is RECOMMENDED: • Pentium 4, 3 GHz or comparable multi-core
• 2GB of RAM • 300GB hard drive • Windows 7 (recommended), Windows Vista, or Windows XP- 32 bit • DVD drive • One free USB port
2. What if I don’t like the EFI RIP? Are there other RIPs available?
Yes. There are a few other RIPs available from third parties that are approved for the Epson Computer To Plate System. See www.proimaging.epson.com for a complete list.
3. Who do I call for support on the EFI RIP? For issues related to the EFI software for making plates or proofs, contact Epson Technical Support at: 1- 888-377-6611
4. Where can I get training on the RIP? As part of your installation, training on the EFI RIP should have been included. Video training on installation and use of the EFI RIP is available at www.proimaging.epson.com.
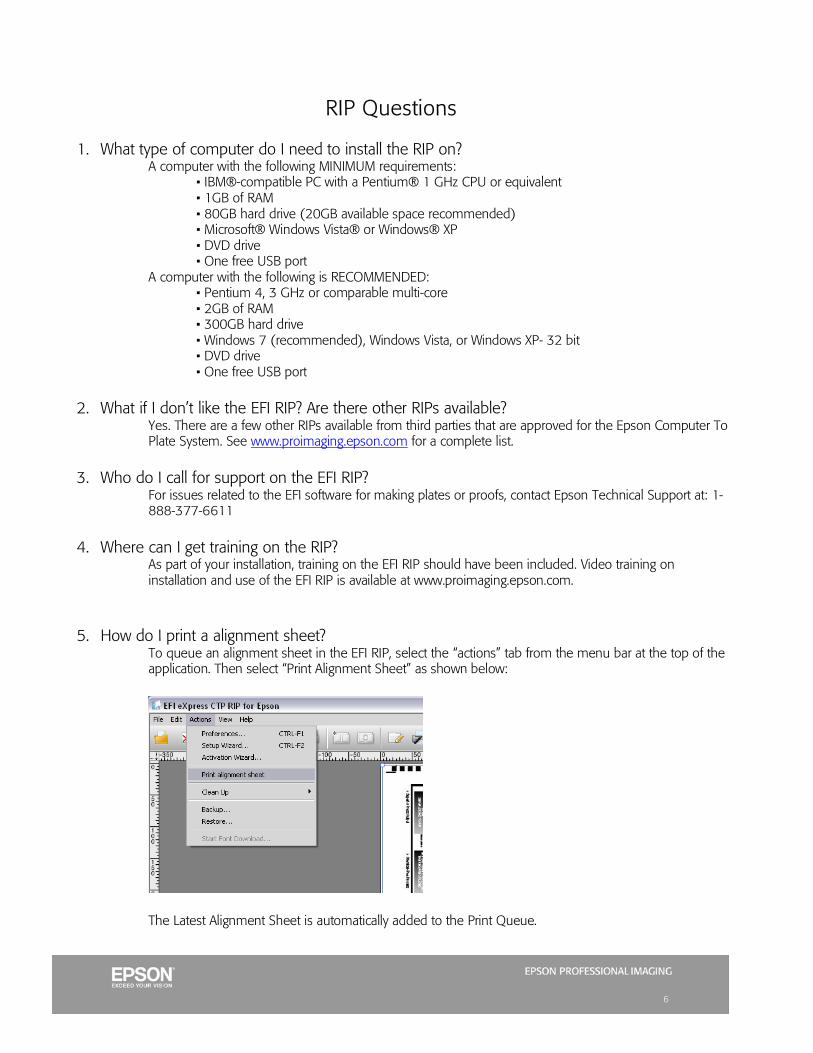
5. How do I print a alignment sheet? To queue an alignment sheet in the EFI RIP, select the “actions” tab from the menu bar at the top of the application. Then select “Print Alignment Sheet” as shown below:
The Latest Alignment Sheet is automatically added to the Print Queue.
7
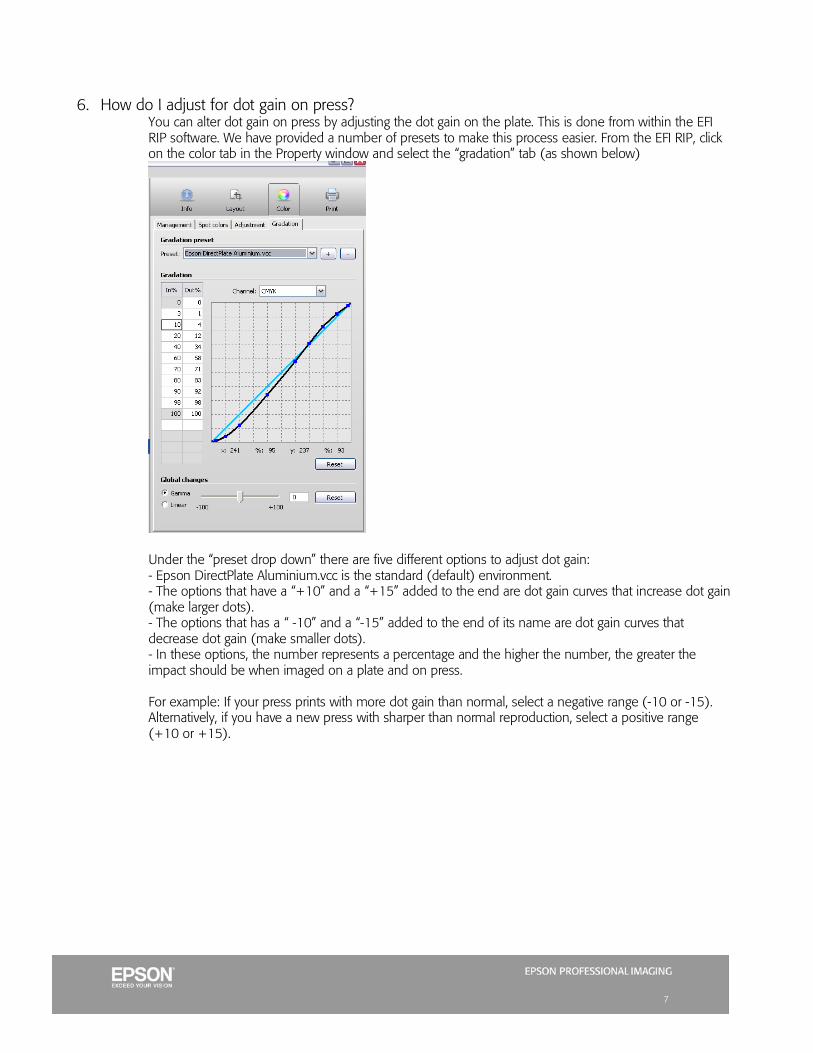
6. How do I adjust for dot gain on press? You can alter dot gain on press by adjusting the dot gain on the plate. This is done from within the EFI RIP software. We have provided a number of presets to make this process easier. From the EFI RIP, click on the color tab in the Property window and select the “gradation” tab (as shown below)
Under the “preset drop down” there are five different options to adjust dot gain: - Epson DirectPlate Aluminium.vcc is the standard (default) environment. - The options that have a “+10” and a “+15” added to the end are dot gain curves that increase dot gain (make larger dots). - The options that has a “ -10” and a “-15” added to the end of its name are dot gain curves that decrease dot gain (make smaller dots). - In these options, the number represents a percentage and the higher the number, the greater the impact should be when imaged on a plate and on press. For example: If your press prints with more dot gain than normal, select a negative range (-10 or -15). Alternatively, if you have a new press with sharper than normal reproduction, select a positive range (+10 or +15).
8
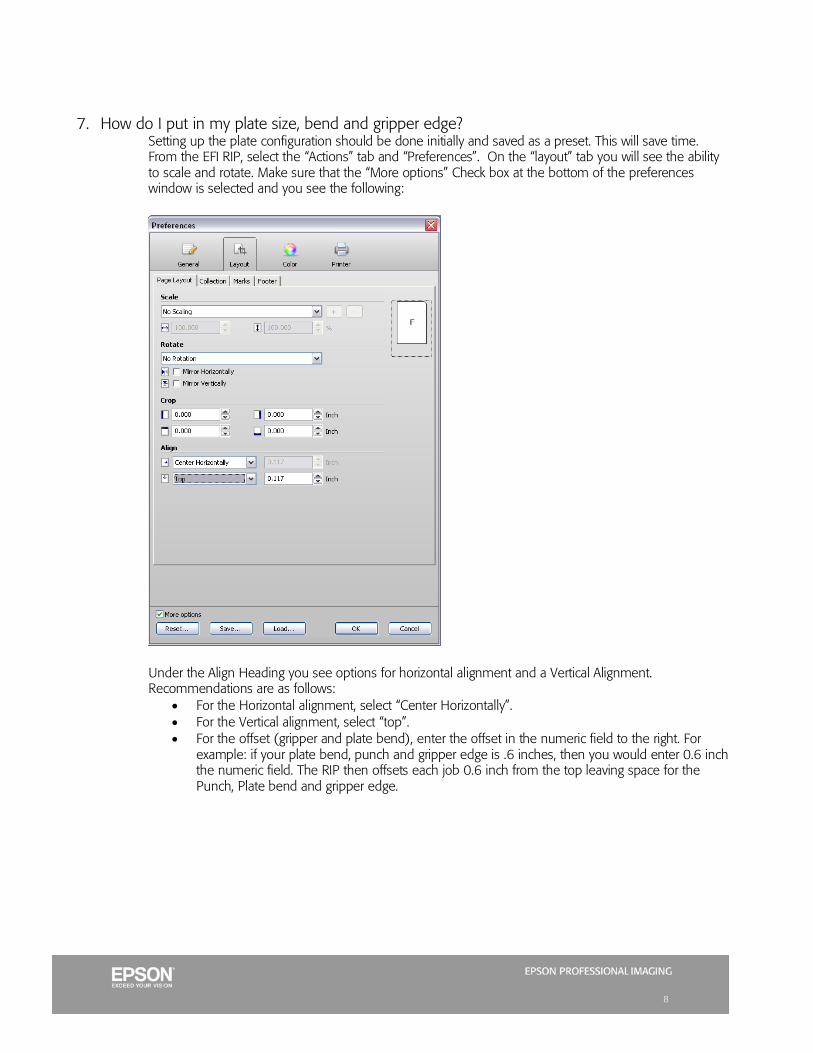
7. How do I put in my plate size, bend and gripper edge?
Setting up the plate configuration should be done initially and saved as a preset. This will save time. From the EFI RIP, select the “Actions” tab and “Preferences”. On the “layout” tab you will see the ability to scale and rotate. Make sure that the “More options” Check box at the bottom of the preferences window is selected and you see the following:
Under the Align Heading you see options for horizontal alignment and a Vertical Alignment. Recommendations are as follows:
• For the Horizontal alignment, select “Center Horizontally”. • For the Vertical alignment, select “top”. • For the offset (gripper and plate bend), enter the offset in the numeric field to the right. For
example: if your plate bend, punch and gripper edge is .6 inches, then you would enter 0.6 inch the numeric field. The RIP then offsets each job 0.6 inch from the top leaving space for the Punch, Plate bend and gripper edge.

9
8. How do I print just one color or just one plate? When used to create plates, the EFI RIP, considers each detected color (spot color or process color) a separate page. Use the preview window to view the job to see the associated spot color to that page, as shown below.
In the example above, Pantone 363c is Page 1. If you only wanted to print a single plate which is Pantone 363c, you would direct the RIP to print only Page 1. To do this, select the Print Tab from the property window (on the right) with the job you want to print selected. Under the “device” sub tab select “Page/Sheet” and indicate what pages you want to print. In the case of the above example, you would select “1” and then print the job.

10
9. Can I adjust the printer for feed length and do I need to do this? Yes, The EFI RIP has an adjustment to compensate for feed length of the Printer because each printer may feed slightly differently. It is HIGHLY recommended that you adjust for this when you first install the printer and the RIP and it should not need to be adjusted again. The adjustment is specfied in the “Preferences” window under the “printer” tab and “media Size” sub-tab as shown below:
The correct process is to enter the target value (430 mm above) and the actual length (430 mm to start). Then, print an alignment sheet that has the included 430 mm line. Measure the line after the printing is complete and then enter the ACTUAL number you measure to the 0.xx mm. Here is the 430 mm line on the alignment sheet (outlined in red):

11
10. How does Licensing and the Hardware Dongle work? Each Epson Stylus Pro 7900 CTP includes a License for the EFI Rip software. Required for this license is a hardware dongle and an EAC Code. Both are included in the package. Once you install the software and insert the Hardware dongle, you will be asked to enter the EAC code. Once this is done, that EAC code is attached to that dongle and cannot be changed. It is NOT recommended that you run this software on a computer that also is running other versions of EFI software as there could be licensing conflicts between the multiple software packages.
11. Can I also make proofs? Yes, The EFI RIP and the Epson Stylus Pro 7900 CTP system are fully capable of making Proofs of jobs on paper. All of the Epson proofing papers are supported. It is recommended that you create a preset inside the RIP that allows Proofs. To do this, select an Epson Proofing paper” on the “Print” Tab and “media Set” sub tab in the Property window:
For Example, when you select Epson Standard Proofing Paper, the RIP is then set to print a proof. Then, drag you job into the RIP and the RIP will not separate the print job, but instead prepare it to be produced on paper.
12. How do I change between proofing and plates? The EFI CTP RIP allows you to create and save presets settings that control everything from the color settings, media settings, and layout preferences. The simplest way to switch easily between plates, proofs and different plate sizes is to create presets for each “workflow”. To create a preset, select the Actions mneu and then select the “preferences” menu. Here, you can go through each tab and sub tab to create the settings you wanted to store as a preset.
12
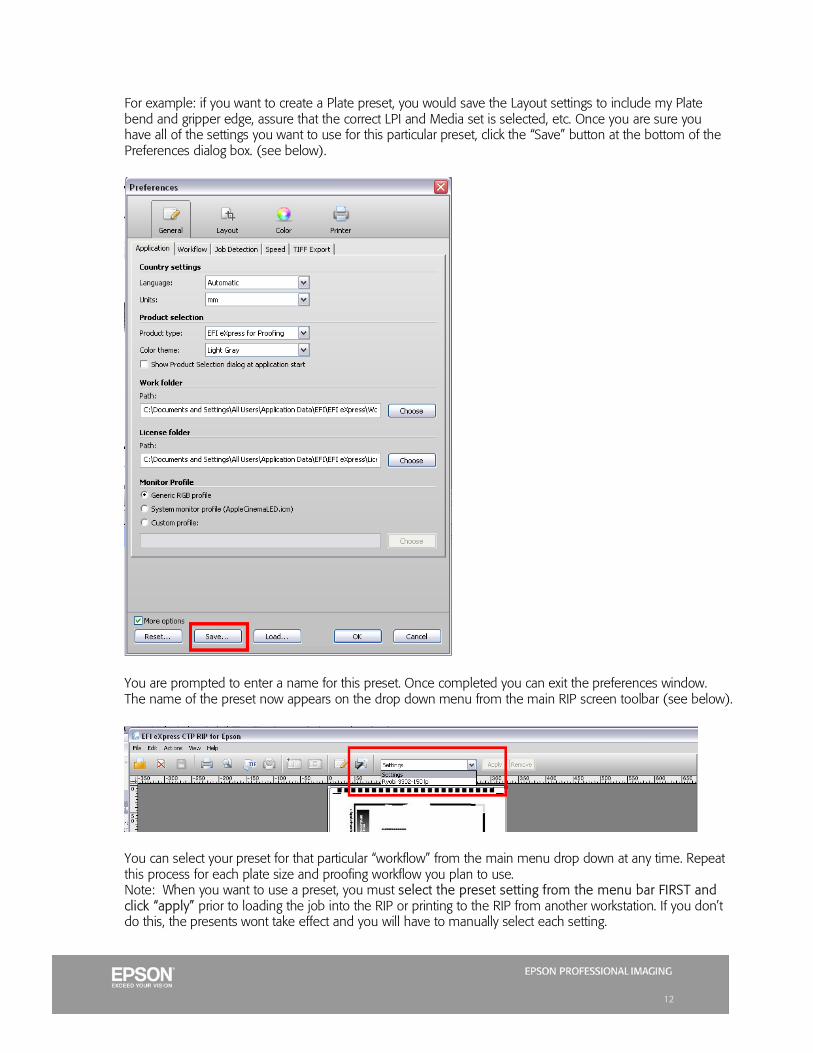
For example: if you want to create a Plate preset, you would save the Layout settings to include my Plate bend and gripper edge, assure that the correct LPI and Media set is selected, etc. Once you are sure you have all of the settings you want to use for this particular preset, click the “Save” button at the bottom of the Preferences dialog box. (see below).
You are prompted to enter a name for this preset. Once completed you can exit the preferences window. The name of the preset now appears on the drop down menu from the main RIP screen toolbar (see below).
You can select your preset for that particular “workflow” from the main menu drop down at any time. Repeat this process for each plate size and proofing workflow you plan to use. Note: When you want to use a preset, you must select the preset setting from the menu bar FIRST and click “apply” prior to loading the job into the RIP or printing to the RIP from another workstation. If you don’t do this, the presents wont take effect and you will have to manually select each setting.

13
13. Do I need to use a RIP or can I use the standard printer driver to make plates? The RIP is required to produce plates because it controls the separations, screening, and ink density on the plates to ensure optimal quality. You can however, use the standard Epson Printer driver to print photographs, banners, or other print jobs.
14. Does the RIP support trapping?
The EFI CTP RIP supports trapping that was set and applied in an application (such as Adobe Creative Suite) and passes that information through to the printed plates. However it does not support initiating or editing trap settings from within the EFI RIP itself.

14
Epson DirectPlate Aluminum Questions
1. How do these plates work? In conventional aluminum plates, the aluminum surface is the water-attracting layer. The water sits on top the aluminum, and therefore conventional aluminum plates require a relatively small amount of water to reach proper wetting for the printing process.
Epson DirectPlate Aluminum plates have a unique structure. The top hydrophilic layer serves as the water accepting layer. This layer is relatively thick and water penetrable. Therefore, when the wetting process starts, the water first saturates the hydrophilic layer, and then covers the surface. As a result it requires longer time and more water to obtain a properly wetted surface, than that required of a conventional aluminum plate.
Like polyester plates, Epson DirectPlate-aluminum plates require more water and longer wetting process before ink is applied to the plate.
2. What is the highest resolution these plates will support?
The Epson Stylus Pro 7900 CTP system supports up to 175 lpi
15
3. Do I need to gum the plates? These plates do not require gumming. The DirectPlate coating seals and preserves the print surface
4. Are the plates anodized? Epson DirectPlate Aluminum is an anodized and specially coated press plate.
5. Are these plates light sensitive? No, these plates are NOT light sensitive
6. Do these plates have grain? No, they are considered smooth plates. Note that spite of this, they may require more water for usage (see press operation recommendations) and a longer warm up cycle.
7. Can I cut/ convert these plates? Yes, you can cut and convert these plates yourself, but, it is not recommended. A plate that is cut could cause damage to the printer due to a sharp or jagged edge.
8. What is the shelf life of the Epson DirectPlate Aluminum plates? Because these plates are not light sensitive, there is not a strict shelf life for these plates. However, Epson recommends no longer that 2 years as a shelf life for these plates.
9. Can I reuse plates after they have been used on press? Yes. Simply take the plate off and clean it using a recommended cleaner and fountain solution.
10. Can I use a deletion pen? Yes. You can delete images with IWATSU Elotax Corrector OX-1. You can also use AGFA Lithostar Copyrapid Correction Pen. A standard pencil eraser works well to delete a small section from an image.
11. Are these plates made by Epson? Yes, these are unique plates that are specific to the Epson Stylus Pro 7900 CTP system
12. How many impressions can I get out of a plate? The number of impressions is largely dependent on the condition of your press, the press pressures, the plate, the usage of the plate, and the image you are printing. During normal usage with correctly set press pressures we estimate that you will get between 15,000 and 20,000 impressions. However, excessive plate pressures, excessive plate cleaning with non-recommended plate cleaners, or unsuitable fountain solutions can contribute to lower than expected run lengths.
13. What if I have a plate with a bent corner, Can I use that? No. It is highly likely that a plate with bent corners will damage the print head on the Epson Stylus Pro 7900CTP Printer. You should inspect all plates prior to loading them to assure that they don’t have any bent corners. Epson’s packaging prevents bent corners. If you receive a package that is damaged, contact your Authorized Reseller.
14. Are these plates dry when they come out of the Epson printer? Yes. They are dry to the touch. However, you must cure them in the PCU prior to mounting on press. This is necessary because of a chemical reaction that occurs between the plate coating and the Epson UltraChrome HDR ink which hardens the ink allowing it to last the duration of the print run.

16
15. What happens if a plate looks darker after if comes out of the PCU?
If the PCU causes discoloration on the plate surface, it should not be visible on press and should not cause any artifacts on the final print. The cause of this could be that the PCU is set to run too slowly or the set temperature is too high. If this discoloration occurs, use the Thermax strips to test the calibration of the PCU.
16. How do I load a plate into the printer?
Epson DirectPlate aluminum Plates are loaded differently than paper or other media. When loading a plate you should first release the platen to assure that the plate is FIRMLY pressed against both points on the plate guide. Second, always remove the plates from the package and load them into the printer with the same orientation. This will assure accurate registration.
17. Do I mount these plates like any normal plate on my press? Yes. However, if you currently use polyester today, your press may have a clamping system that is specific to polyester. You can easily remove that grip and Epson DirectPlate Aluminum plates will mount the same way as any standard metal plate would on your press.
18. What happens if I see small dots on the press sheet?
If small dots are visible on the final print, you should do the following: 1. Check your fountain solution. Epson DirectPlate Aluminum requires a slightly acid fountain solution
(like most polyester plates) Use one of the recommended fountains with pH 4.1 – 4.5 2. Assure that your environment is clean. Be sure the plates are enclosed until you use them. It may be
necessary to lightly dust the plates before you print them and again before you cure them. 3. Unwanted background dots/blemishes can be removed by one of the recommended deletion pens.
19. What happens if I see alignment issues? It is important that you consistently load the plates into the printer the same way each time assuring that they are pressed to the RIGHT against the Plate Guide.
20. What if I see lines on the press sheet in the direction of the plate as it travels through the PCU?
Lines spaced approximately 2 inches apart on the plate may appear if the plate is fed into the PCU before the Epson ink is dry. The lines are caused by the input drive rollers on the PCU. The most common cause of this is over-inking – a RIP setting, that reduces the amount of ink being applied to the plate surface. The lines are most noticeable near solid areas. The remedy is to adjust the RIP ink reduction settings, to allow more drying time before inserting the plate in the PCU, or to reduce the ambient relative humidity. This over-inking situation will also reduce the run length on the plates.
21. What happens if I don’t get the number of impressions I’m expecting? If you are not getting the number of impressions you are expecting try the following troubleshooting tips:
• Check the settings on the Plate curing unit and confirm that it is functioning correctly. • Check the ink reduction setting on the RIP. If too much ink is being applied to the plate the
curing process is • Check and confirm the concentration of the fountain solution. Are you using a
recommended fountain solution? • Confirm you are using a recommended plate cleaner and that you are not cleaning the
plate with excessive pressure or an excessive number of times during the printing process. • Check and repack your blanket • Check the pressures on your press

17
Press Integration Questions
1. What fountain solution should I use? If you are using Polyester plates today, then it is likely that the fountain solution that you are using will be compatible with Epson DirectPlate-Aluminum technology. Here is a list of recommended Fountain Solutions:
• RBP UniTrol 192 • Prisco Fount Concentrate 142-126 • Agfa G671c • Varn Universal Pink Note: If you choose to use another fountain solution, make sure it is alcohol-free.
2. What is the recommended PH level of the fountain solution? The Epson DirectPlate Aluminum fountain solution PH level should be between 4.1 and 4.5.
3. What plate cleaner do I need? Here is a list of recommended Plate Cleaners
• HYDRO CLEAN™ RBP Chemical Technology, Inc. • Varn CtP cleaner • POSCO Hit-’n-Run emulsion plate cleaner • Ultrachem POWA PLATE CLEANER • Ultrachem Speedclean EXP plate cleaner • Fujifilm PS Plate Multi Cleaner MC-E • Prisco® Velocity Plate Cleaner
4. What is different about how I would use an Epson DirectPlate Aluminum Plate? Epson DirectPlate-Aluminum technology is a unique solution that allows a water based (aqueous) ink to adhere to it but also will repel water during the printing process (after being cured). Because the unique coating on the surface of the Epson DirectPlate Aluminum uses a Hydrophilic coating (water loving) some customers have noted that a longer warm up cycle is required and more water should be applied to the plate before applying ink. Therefore, here are a few recommendations where your process might be different than your standard process: If the dampening system has a transition roller connecting the dampening system and the inking system together (For example: ALCOLOR and other similar continuous-feed dampening Systems), the transition roller should be deactivated. When the press starts up, the plates will require more water than conventional metal plates. Therefore, sufficient dampening should be set in advance. You should provide about 30 seconds of pre-dampening before turning on the ink rollers. If the printing press has a pre-dampening function, (for example Heidelberg Printmaster QM 46) set a higher pre-dampening level. If there are short breaks during the set-up phase, or when the paper stack is being replaced, leave the dampening rollers engaged on the plate. If this is not possible, restart printing in same manner as in the initial start-up procedure.

18
5. What about a press wash? Here is a list of recommended Press Washes:
• Varn EC Wash • Ultrachem Prima Wash • Varn News 75 Wash • printcom® wash 202B • Sun Chemicals SUN WASH U H8830A
Note: The press wash process requires some harsh chemicals and if you plan to reuse a plate, you will need to REMOVE the plate prior to washing down a press
6. What type of Ink should I use?
Standard Press inks are compatible with Epson DirectPlate Aluminum plates. Highly pigmented inks keep the amount of transferred ink at a low level and decrease the scumming effect. For optimum printing quality, ink should not be mixed with printing oil, or any other printing agents that tend to decrease the tackiness.
7. What presses and plate sizes are supported by Epson DirectPlate?
Note: If you do not see your plate size or Press listed above, contact your Authorized Epson Computer to Plate Reseller.