geomax zenith 25 gps gsm profile and bluetooth...
TRANSCRIPT
Creating a GeoMax Zenith 25 GNSS
GSM Network Rover Profile and
Connecting to a GNSS Network Data
Correction Service Using
MicroSurvey FieldGenius
March 21, 2013
© 2013 MicroSurvey Software Inc. Page 2 of 25
Creating a GeoMax Zenith 25 GNSS GSM Network Rover
Profile
Introduction This guide describes how to create a GNSS GSM network rover
profile for your GeoMax Zenith 25 GNSS receiver.
After creating this profile, you will be able to connect to your
Internet GNSS data correction service, achieve a solution, and start
measuring.
Important Note: You only need to create a particular profile once.
After that FieldGenius will preserve and use this already-created
profile. You are also welcome to create more profiles such as for a
UHF radio GNSS profile, but in this guide we explain how to create
a GSM Network GNSS profile.
Current
Version This guide was written using FieldGenius Version 6.0.5.6 installed
on a Getac PS236 with Windows Mobile 6.1 installed. If you are
using a different version, your screens may look differently than
what is displayed in this guide.
Before you begin Have your GeoMax Zenith 25 Receiver, data collector with
FieldGenius installed, and a SIM card close by. You will need them
to complete this guide.
Continued on the following page
© 2013 MicroSurvey Software Inc. Page 3 of 25
Creating a GeoMax Zenith 25 GNSS GSM Network Rover
Profile, continued
Step Action Display
1
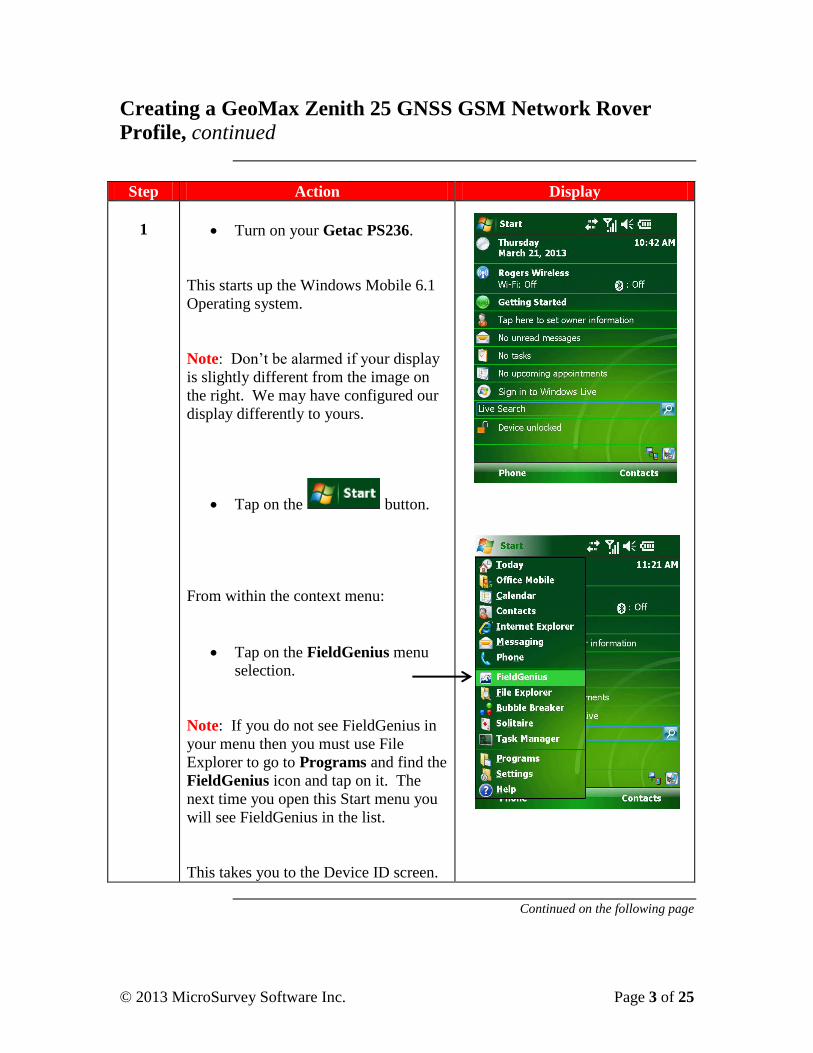
Turn on your Getac PS236.
This starts up the Windows Mobile 6.1
Operating system.
Note: Don’t be alarmed if your display
is slightly different from the image on
the right. We may have configured our
display differently to yours.
Tap on the button.
From within the context menu:
Tap on the FieldGenius menu
selection.
Note: If you do not see FieldGenius in
your menu then you must use File
Explorer to go to Programs and find the
FieldGenius icon and tap on it. The
next time you open this Start menu you
will see FieldGenius in the list.
This takes you to the Device ID screen.
Continued on the following page
© 2013 MicroSurvey Software Inc. Page 4 of 25
Creating a GeoMax Zenith 25 GNSS GSM Network Rover
Profile, continued
Step Action Display
2
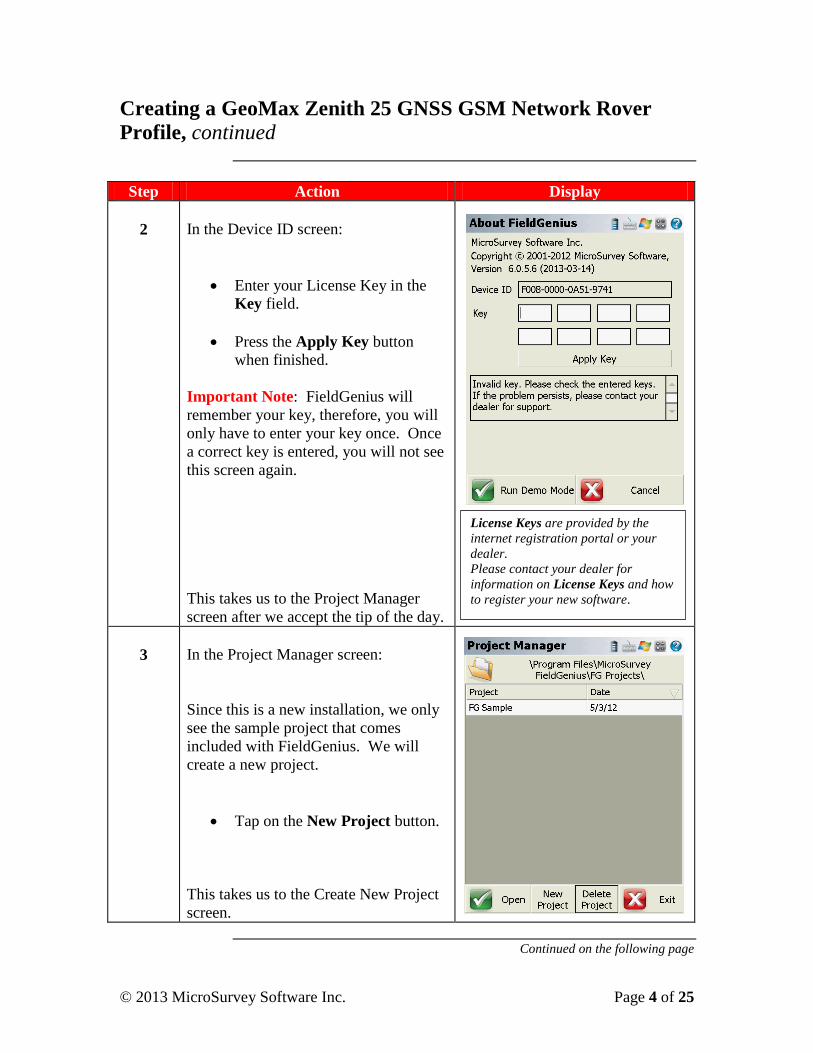
In the Device ID screen:
Enter your License Key in the
Key field.
Press the Apply Key button
when finished.
Important Note: FieldGenius will
remember your key, therefore, you will
only have to enter your key once. Once
a correct key is entered, you will not see
this screen again.
This takes us to the Project Manager
screen after we accept the tip of the day.
3
In the Project Manager screen:
Since this is a new installation, we only
see the sample project that comes
included with FieldGenius. We will
create a new project.
Tap on the New Project button.
This takes us to the Create New Project
screen.
Continued on the following page
License Keys are provided by the
internet registration portal or your
dealer.
Please contact your dealer for
information on License Keys and how
to register your new software.
© 2013 MicroSurvey Software Inc. Page 5 of 25
Creating a GeoMax Zenith 25 GNSS GSM Network Rover
Profile, continued
Step Action Display
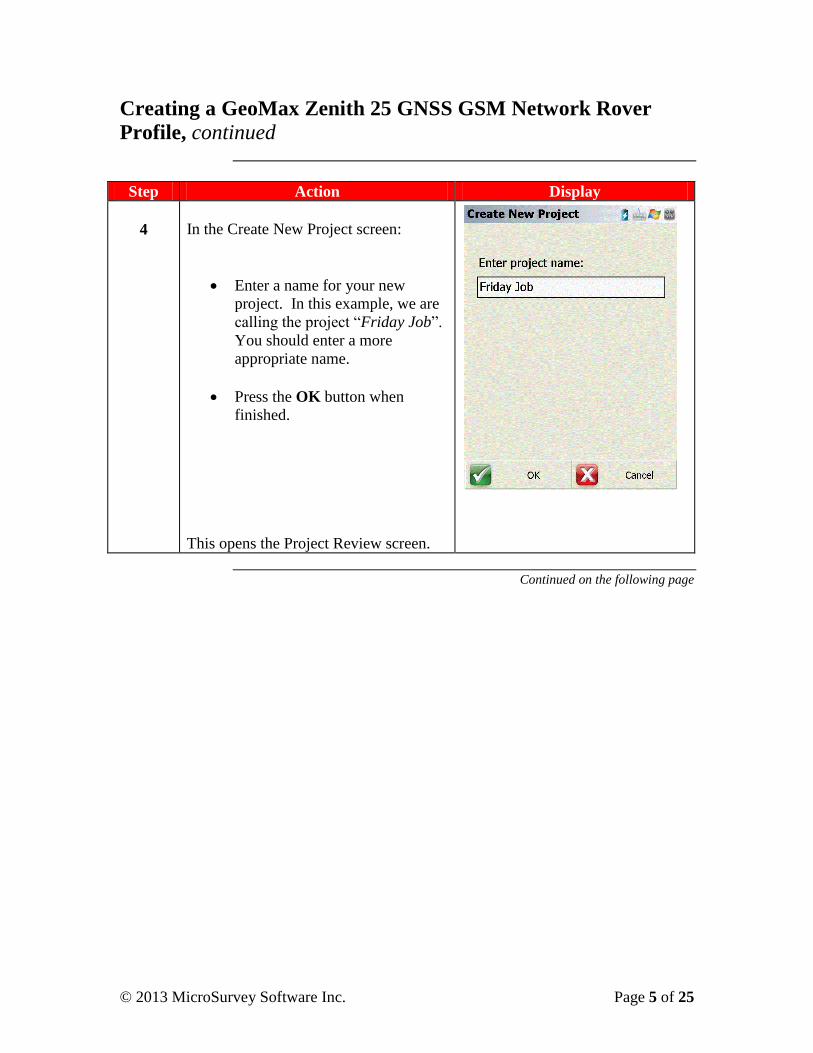
4
In the Create New Project screen:
Enter a name for your new
project. In this example, we are
calling the project “Friday Job”.
You should enter a more
appropriate name.
Press the OK button when
finished.
This opens the Project Review screen.
Continued on the following page
© 2013 MicroSurvey Software Inc. Page 6 of 25
Creating a GeoMax Zenith 25 GNSS GSM Network Rover
Profile, continued
Step Action Display
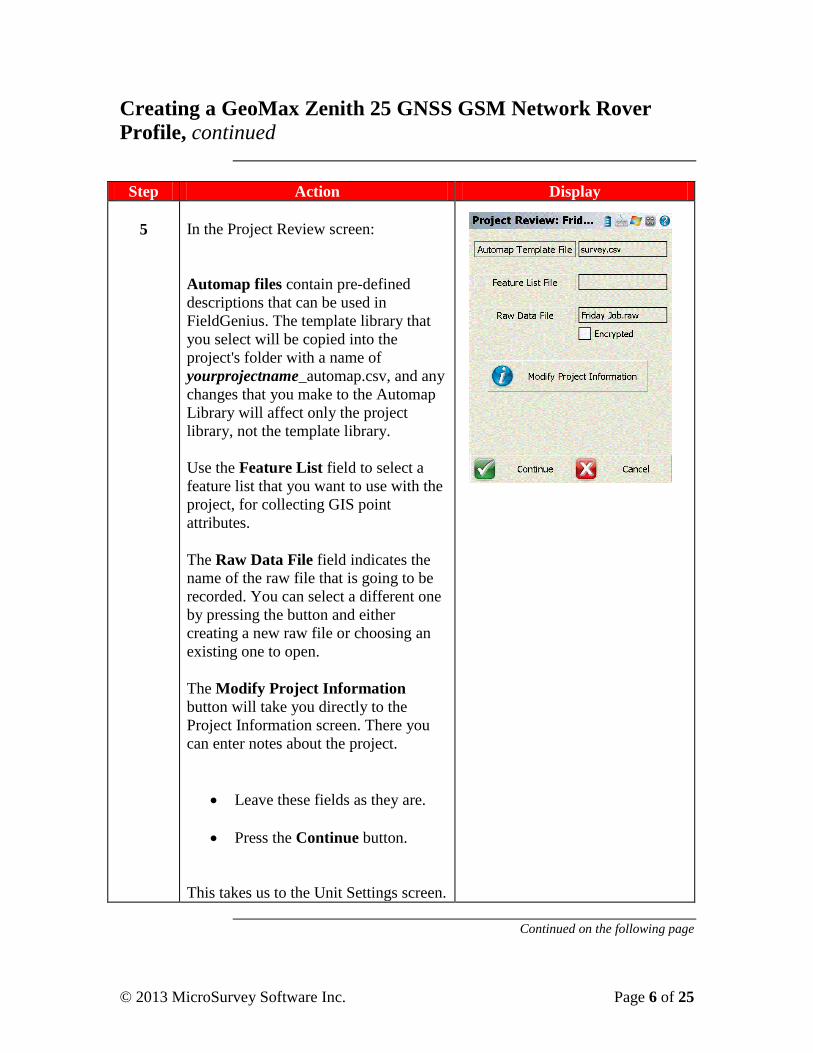
5
In the Project Review screen:
Automap files contain pre-defined
descriptions that can be used in
FieldGenius. The template library that
you select will be copied into the
project's folder with a name of
yourprojectname_automap.csv, and any
changes that you make to the Automap
Library will affect only the project
library, not the template library.
Use the Feature List field to select a
feature list that you want to use with the
project, for collecting GIS point
attributes.
The Raw Data File field indicates the
name of the raw file that is going to be
recorded. You can select a different one
by pressing the button and either
creating a new raw file or choosing an
existing one to open.
The Modify Project Information
button will take you directly to the
Project Information screen. There you
can enter notes about the project.
Leave these fields as they are.
Press the Continue button.
This takes us to the Unit Settings screen.
Continued on the following page
© 2013 MicroSurvey Software Inc. Page 7 of 25
Creating a GeoMax Zenith 25 GNSS GSM Network Rover
Profile, continued
Step Action Display
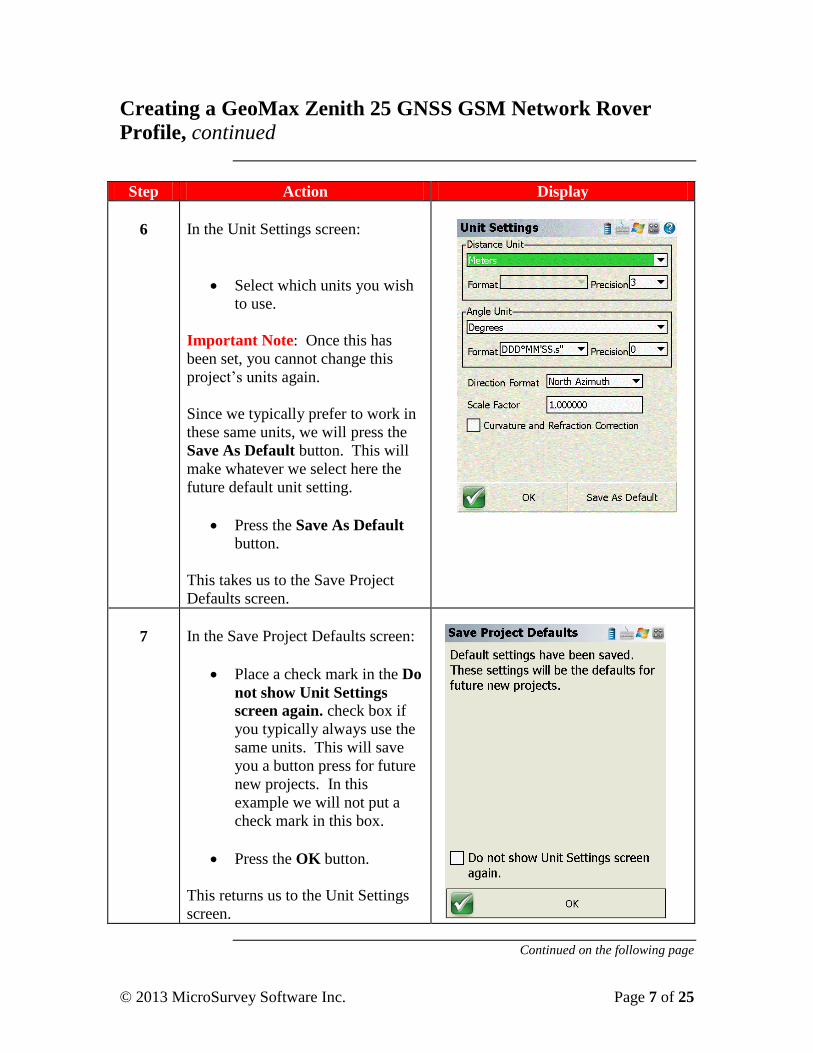
6
In the Unit Settings screen:
Select which units you wish
to use.
Important Note: Once this has
been set, you cannot change this
project’s units again.
Since we typically prefer to work in
these same units, we will press the
Save As Default button. This will
make whatever we select here the
future default unit setting.
Press the Save As Default
button.
This takes us to the Save Project
Defaults screen.
7
In the Save Project Defaults screen:
Place a check mark in the Do
not show Unit Settings
screen again. check box if
you typically always use the
same units. This will save
you a button press for future
new projects. In this
example we will not put a
check mark in this box.
Press the OK button.
This returns us to the Unit Settings
screen.
Continued on the following page
© 2013 MicroSurvey Software Inc. Page 8 of 25
Creating a GeoMax Zenith 25 GNSS GSM Network Rover
Profile, continued
Step Action Display
8
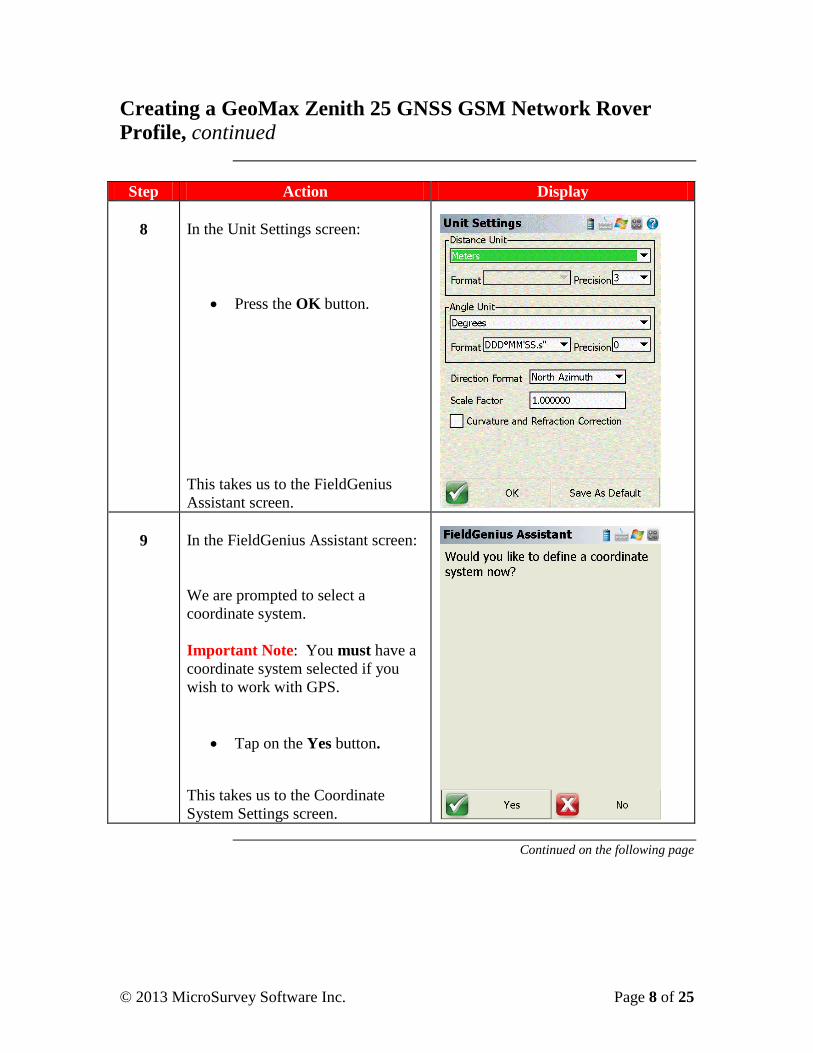
In the Unit Settings screen:
Press the OK button.
This takes us to the FieldGenius
Assistant screen.
9
In the FieldGenius Assistant screen:
We are prompted to select a
coordinate system.
Important Note: You must have a
coordinate system selected if you
wish to work with GPS.
Tap on the Yes button.
This takes us to the Coordinate
System Settings screen.
Continued on the following page
© 2013 MicroSurvey Software Inc. Page 9 of 25
Creating a GeoMax Zenith 25 GNSS GSM Network Rover
Profile, continued
Step Action Display
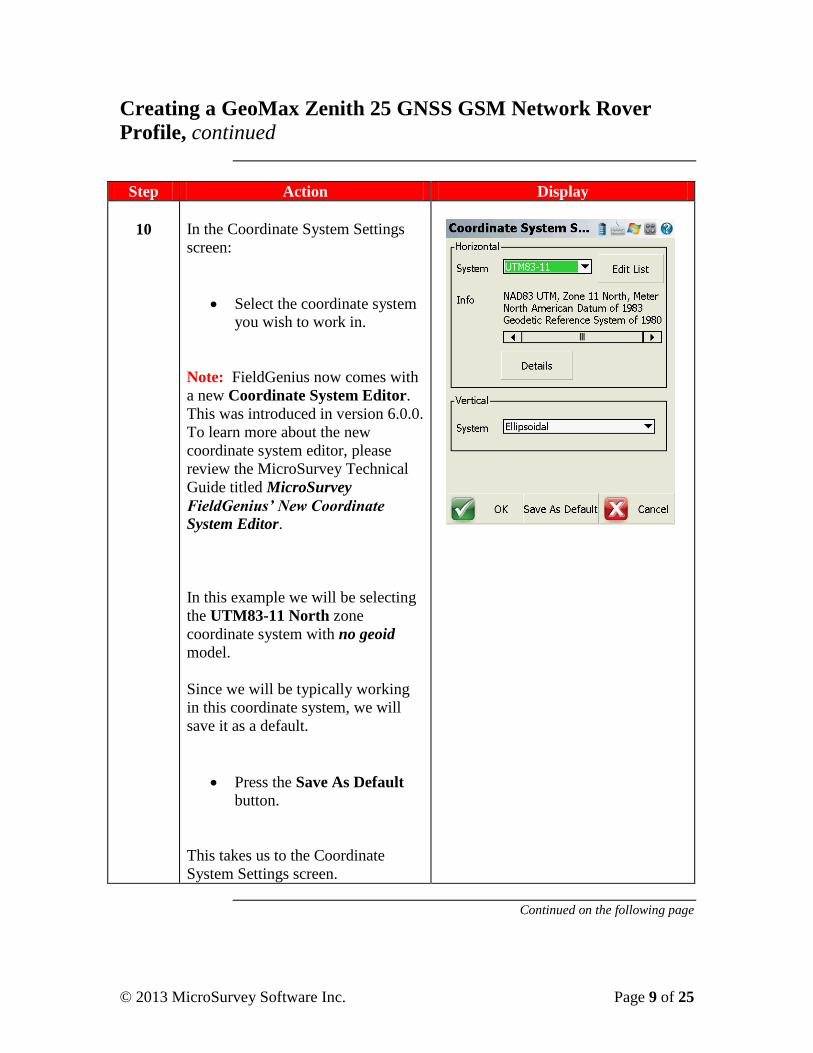
10
In the Coordinate System Settings
screen:
Select the coordinate system
you wish to work in.
Note: FieldGenius now comes with
a new Coordinate System Editor.
This was introduced in version 6.0.0.
To learn more about the new
coordinate system editor, please
review the MicroSurvey Technical
Guide titled MicroSurvey
FieldGenius’ New Coordinate
System Editor.
In this example we will be selecting
the UTM83-11 North zone
coordinate system with no geoid
model.
Since we will be typically working
in this coordinate system, we will
save it as a default.
Press the Save As Default
button.
This takes us to the Coordinate
System Settings screen.
Continued on the following page
© 2013 MicroSurvey Software Inc. Page 10 of 25
Creating a GeoMax Zenith 25 GNSS GSM Network Rover
Profile, continued
Step Action Display
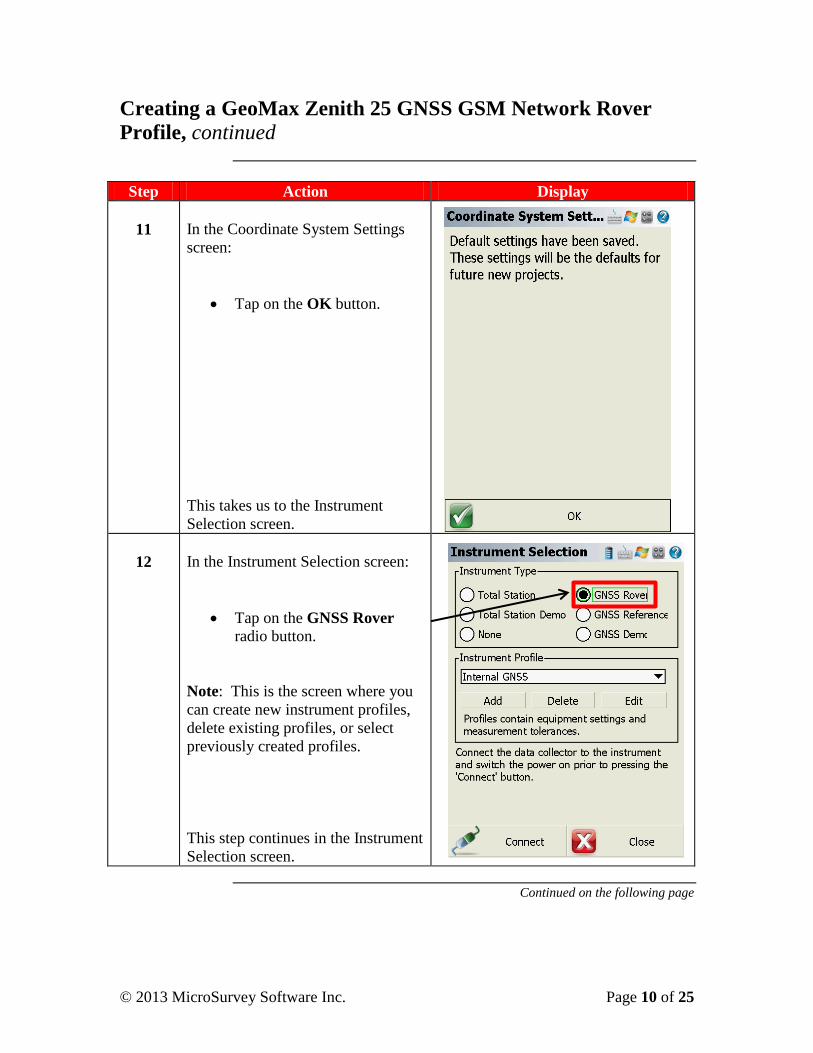
11
In the Coordinate System Settings
screen:
Tap on the OK button.
This takes us to the Instrument
Selection screen.
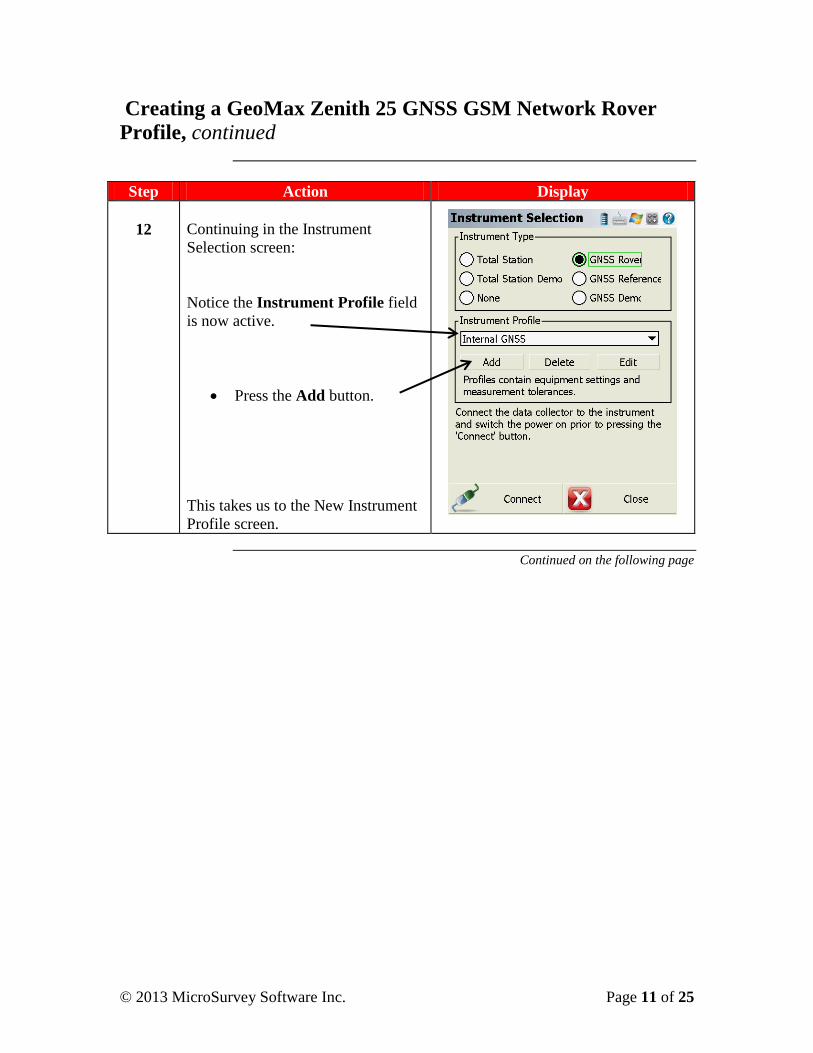
12
In the Instrument Selection screen:
Tap on the GNSS Rover
radio button.
Note: This is the screen where you
can create new instrument profiles,
delete existing profiles, or select
previously created profiles.
This step continues in the Instrument
Selection screen.
Continued on the following page
© 2013 MicroSurvey Software Inc. Page 11 of 25
Creating a GeoMax Zenith 25 GNSS GSM Network Rover
Profile, continued
Step Action Display
12
Continuing in the Instrument
Selection screen:
Notice the Instrument Profile field
is now active.
Press the Add button.
This takes us to the New Instrument
Profile screen.
Continued on the following page
© 2013 MicroSurvey Software Inc. Page 12 of 25
Creating a GeoMax Zenith 25 GNSS GSM Network Rover
Profile, continued
Step Action Display
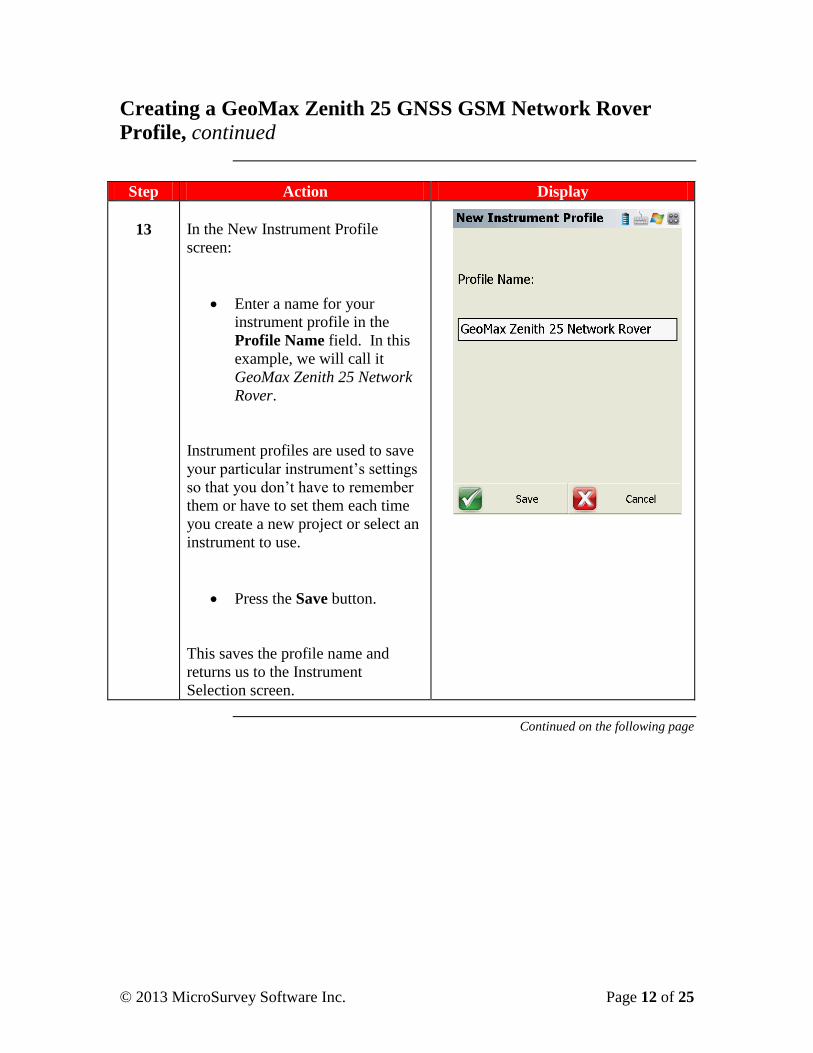
13
In the New Instrument Profile
screen:
Enter a name for your
instrument profile in the
Profile Name field. In this
example, we will call it
GeoMax Zenith 25 Network
Rover.
Instrument profiles are used to save
your particular instrument’s settings
so that you don’t have to remember
them or have to set them each time
you create a new project or select an
instrument to use.
Press the Save button.
This saves the profile name and
returns us to the Instrument
Selection screen.
Continued on the following page
© 2013 MicroSurvey Software Inc. Page 13 of 25
Creating a GeoMax Zenith 25 GNSS GSM Network Rover
Profile, continued
Step Action Display
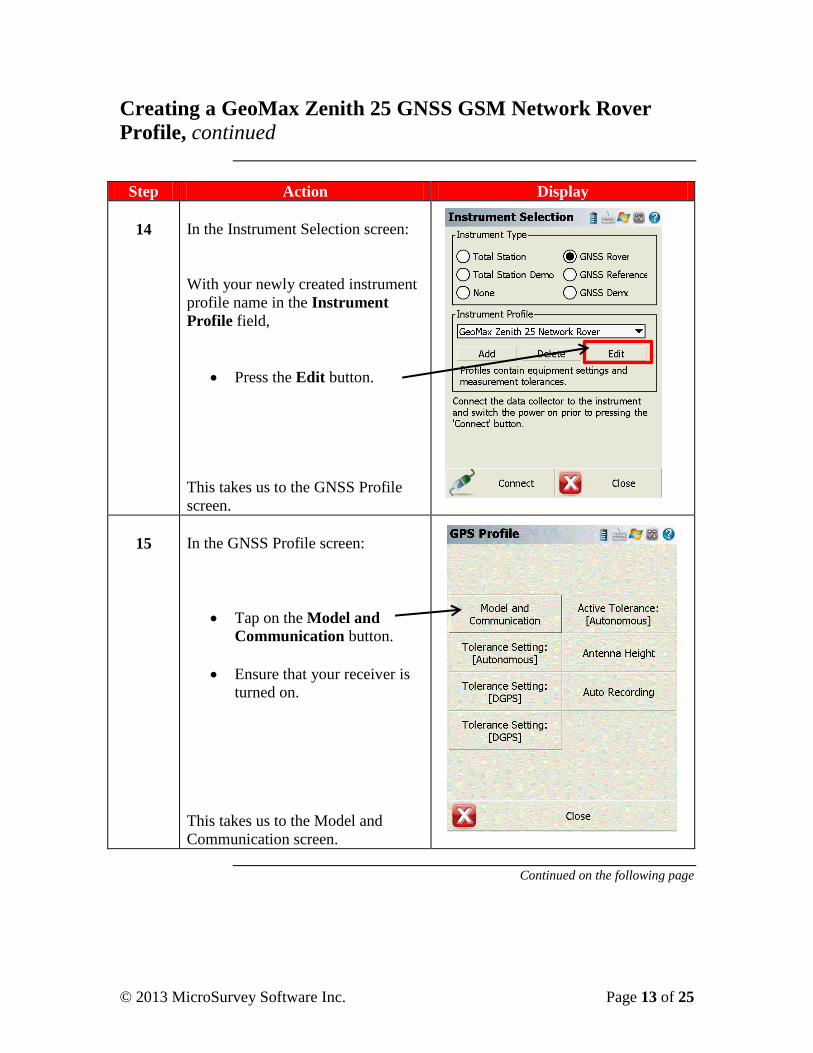
14
In the Instrument Selection screen:
With your newly created instrument
profile name in the Instrument
Profile field,
Press the Edit button.
This takes us to the GNSS Profile
screen.
15
In the GNSS Profile screen:
Tap on the Model and
Communication button.
Ensure that your receiver is
turned on.
This takes us to the Model and
Communication screen.
Continued on the following page
© 2013 MicroSurvey Software Inc. Page 14 of 25
Creating a GeoMax Zenith 25 GNSS GSM Network Rover
Profile, continued
Step Action Display
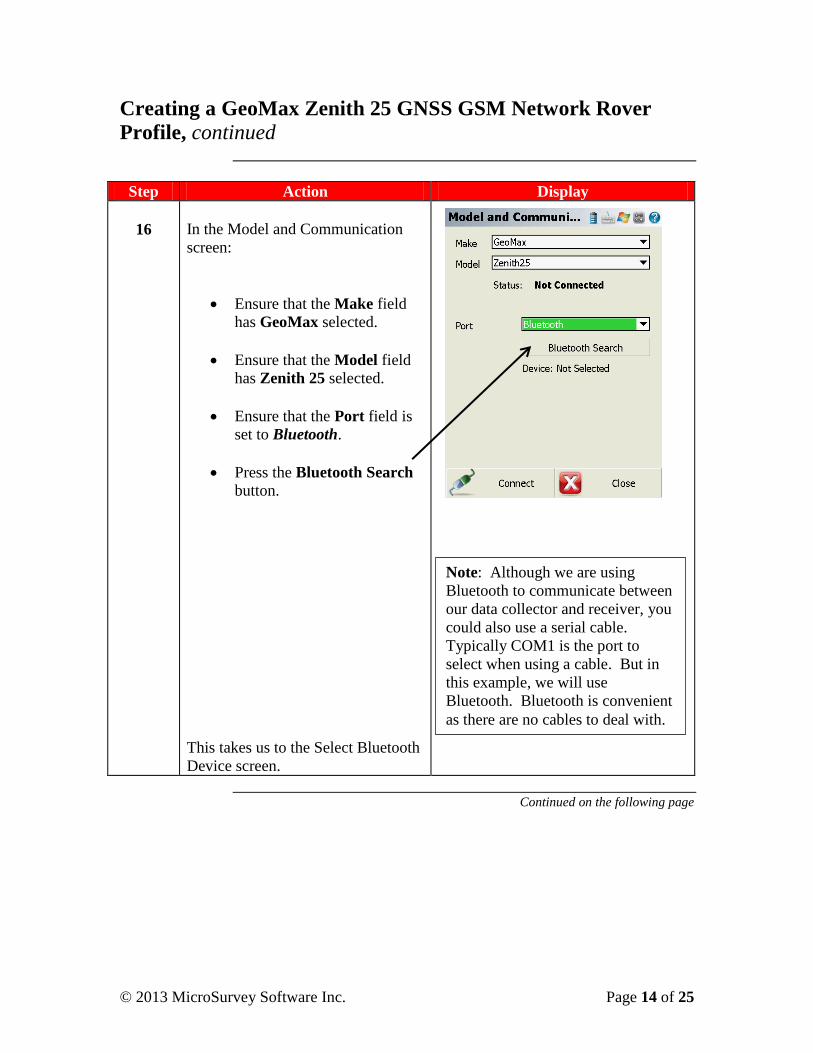
16
In the Model and Communication
screen:
Ensure that the Make field
has GeoMax selected.
Ensure that the Model field
has Zenith 25 selected.
Ensure that the Port field is
set to Bluetooth.
Press the Bluetooth Search
button.
This takes us to the Select Bluetooth
Device screen.
Continued on the following page
Note: Although we are using
Bluetooth to communicate between
our data collector and receiver, you
could also use a serial cable.
Typically COM1 is the port to
select when using a cable. But in
this example, we will use
Bluetooth. Bluetooth is convenient
as there are no cables to deal with.

© 2013 MicroSurvey Software Inc. Page 15 of 25
Creating a GeoMax Zenith 25 GNSS GSM Network Rover
Profile, continued
Step Action Display
17
In the Select Bluetooth Device
screen:
We see in this screen all of the
Bluetooth devices that your data
collector has found. If you do not
see your GNSS receiver, press the
Refresh List button and another
search will be performed.
Tap on your GNSS
receiver’s button. In this
example, our receiver is
named GMZ2830009 (the
receiver’s serial nuber).
This takes us to the Bluetooth
screen.
Continued on the following page
Note: Don’t be alarmed if your
screen does not have the same
devices listed as in the image above.
© 2013 MicroSurvey Software Inc. Page 16 of 25
Creating a GeoMax Zenith 25 GNSS GSM Network Rover
Profile, continued
Step Action Display
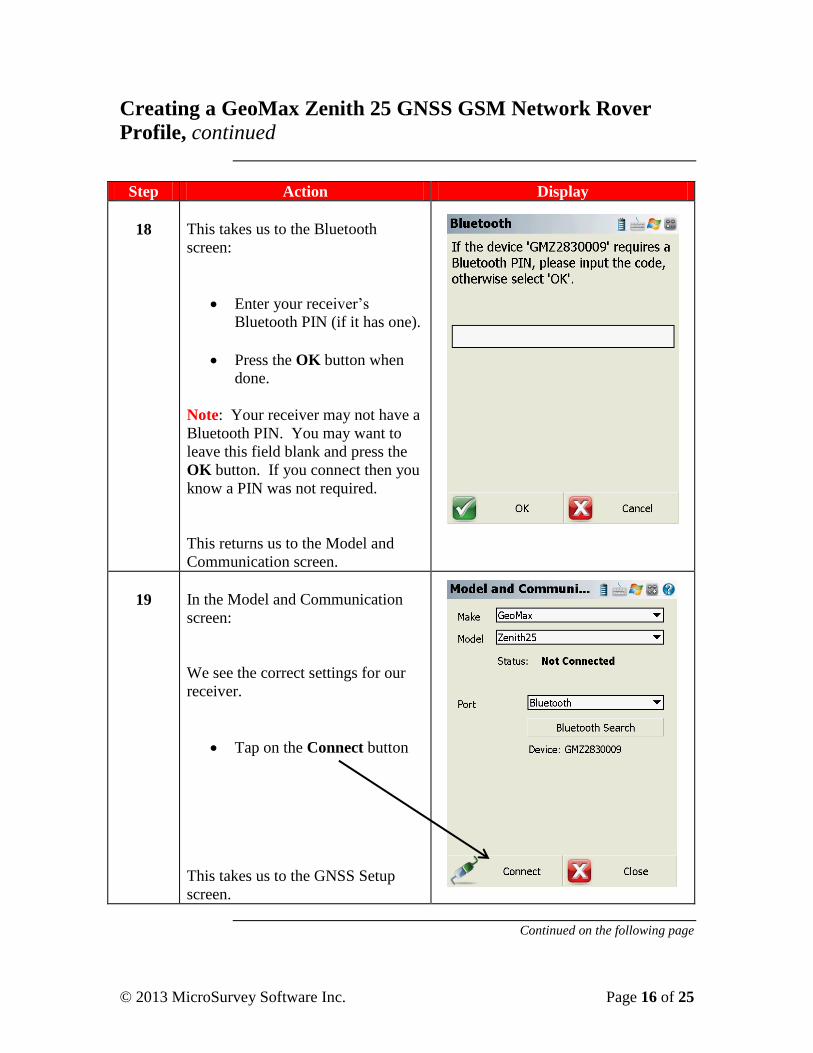
18
This takes us to the Bluetooth
screen:
Enter your receiver’s
Bluetooth PIN (if it has one).
Press the OK button when
done.
Note: Your receiver may not have a
Bluetooth PIN. You may want to
leave this field blank and press the
OK button. If you connect then you
know a PIN was not required.
This returns us to the Model and
Communication screen.
19
In the Model and Communication
screen:
We see the correct settings for our
receiver.
Tap on the Connect button
This takes us to the GNSS Setup
screen.
Continued on the following page
© 2013 MicroSurvey Software Inc. Page 17 of 25
Creating a GeoMax Zenith 25 GNSS GSM Network Rover
Profile, continued
Step Action Display
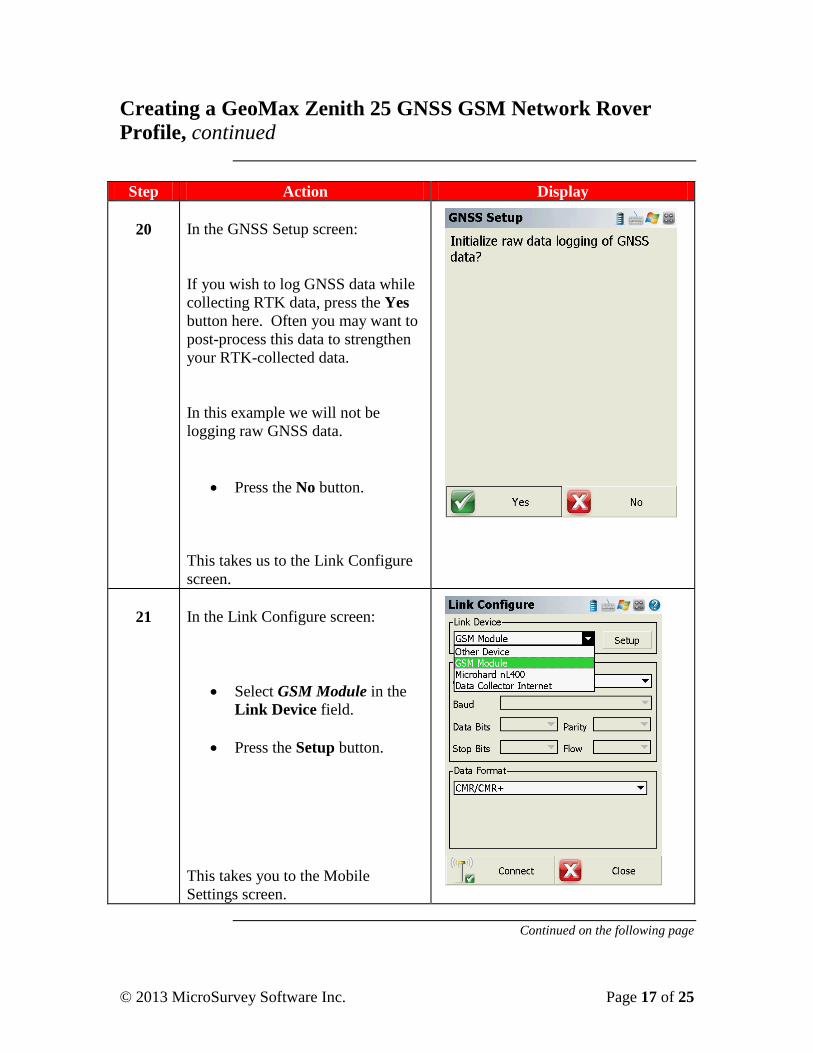
20
In the GNSS Setup screen:
If you wish to log GNSS data while
collecting RTK data, press the Yes
button here. Often you may want to
post-process this data to strengthen
your RTK-collected data.
In this example we will not be
logging raw GNSS data.
Press the No button.
This takes us to the Link Configure
screen.
21
In the Link Configure screen:
Select GSM Module in the
Link Device field.
Press the Setup button.
This takes you to the Mobile
Settings screen.
Continued on the following page
© 2013 MicroSurvey Software Inc. Page 18 of 25
Creating a GeoMax Zenith 25 GNSS GSM Network Rover
Profile, continued
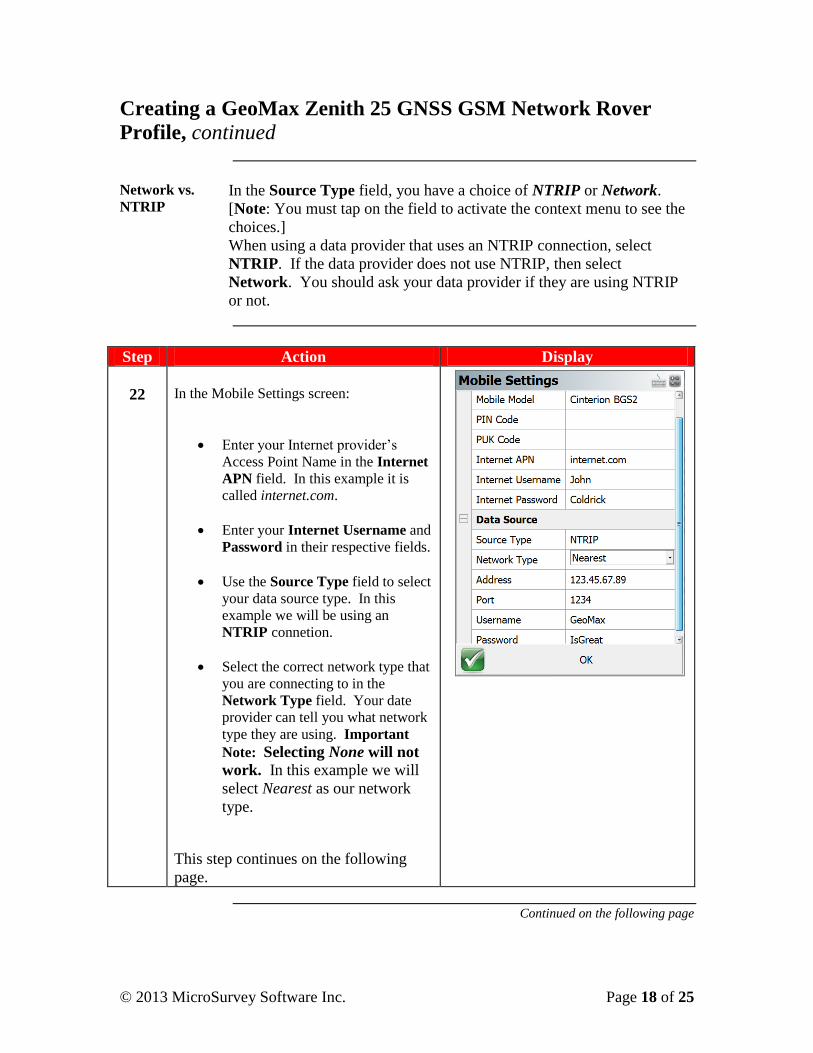
Network vs.
NTRIP In the Source Type field, you have a choice of NTRIP or Network.
[Note: You must tap on the field to activate the context menu to see the
choices.]
When using a data provider that uses an NTRIP connection, select
NTRIP. If the data provider does not use NTRIP, then select
Network. You should ask your data provider if they are using NTRIP
or not.
Step Action Display
22
In the Mobile Settings screen:
Enter your Internet provider’s
Access Point Name in the Internet
APN field. In this example it is
called internet.com.
Enter your Internet Username and
Password in their respective fields.
Use the Source Type field to select
your data source type. In this
example we will be using an
NTRIP connetion.
Select the correct network type that
you are connecting to in the
Network Type field. Your date
provider can tell you what network
type they are using. Important
Note: Selecting None will not
work. In this example we will
select Nearest as our network
type.
This step continues on the following
page.
Continued on the following page

© 2013 MicroSurvey Software Inc. Page 19 of 25
Creating a GeoMax Zenith 25 GNSS GSM Network Rover
Profile, continued
Step Action Display
22
This step continues from the
previous page:
Enter the IP address of your
GNSS data correction source,
TCP/IP port, user name, and
password in the appropriate
fields.
Press the OK button when
finished.
This returns us to the Link Configure
screen.
Continued on the following page
Important Note: The above
settings are space fillers and
will not work with any Internet
provider.
PIN and PUK codes are used to
protect your cell phone from
unauthorized use. In this example
we are leaving them blank.
© 2013 MicroSurvey Software Inc. Page 20 of 25
Creating a GeoMax Zenith 25 GNSS GSM Network Rover
Profile, continued
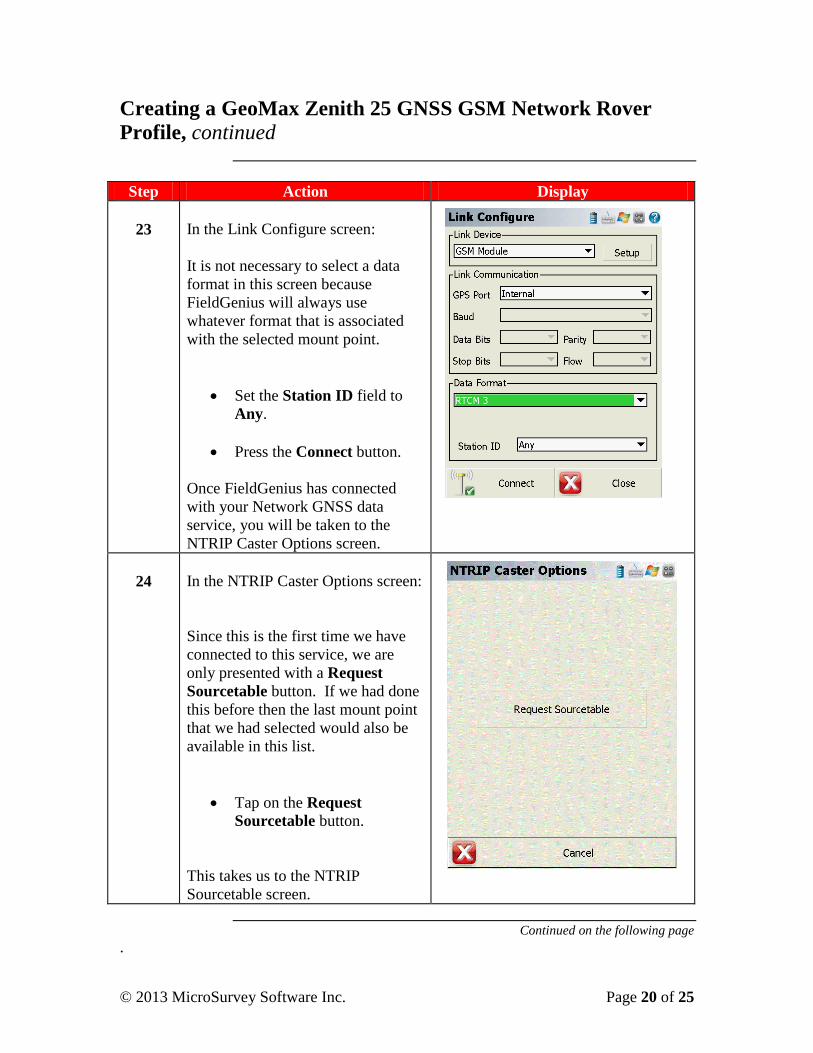
Step Action Display
23
In the Link Configure screen:
It is not necessary to select a data
format in this screen because
FieldGenius will always use
whatever format that is associated
with the selected mount point.
Set the Station ID field to
Any.
Press the Connect button.
Once FieldGenius has connected
with your Network GNSS data
service, you will be taken to the
NTRIP Caster Options screen.
24
In the NTRIP Caster Options screen:
Since this is the first time we have
connected to this service, we are
only presented with a Request
Sourcetable button. If we had done
this before then the last mount point
that we had selected would also be
available in this list.
Tap on the Request
Sourcetable button.
This takes us to the NTRIP
Sourcetable screen.
Continued on the following page
.
© 2013 MicroSurvey Software Inc. Page 21 of 25
Creating a GeoMax Zenith 25 GNSS GSM Network Rover
Profile, continued
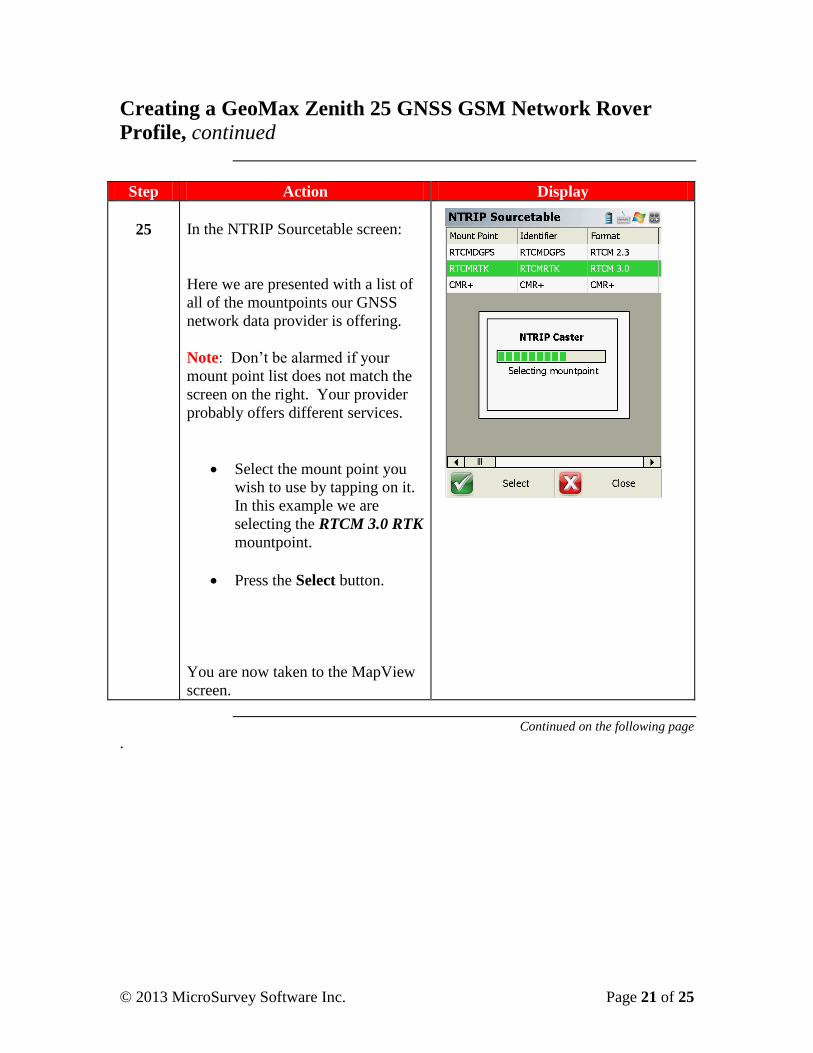
Step Action Display
25
In the NTRIP Sourcetable screen:
Here we are presented with a list of
all of the mountpoints our GNSS
network data provider is offering.
Note: Don’t be alarmed if your
mount point list does not match the
screen on the right. Your provider
probably offers different services.
Select the mount point you
wish to use by tapping on it.
In this example we are
selecting the RTCM 3.0 RTK
mountpoint.
Press the Select button.
You are now taken to the MapView
screen.
Continued on the following page
.
© 2013 MicroSurvey Software Inc. Page 22 of 25
Creating a GeoMax Zenith 25 GNSS GSM Network Rover
Profile, continued
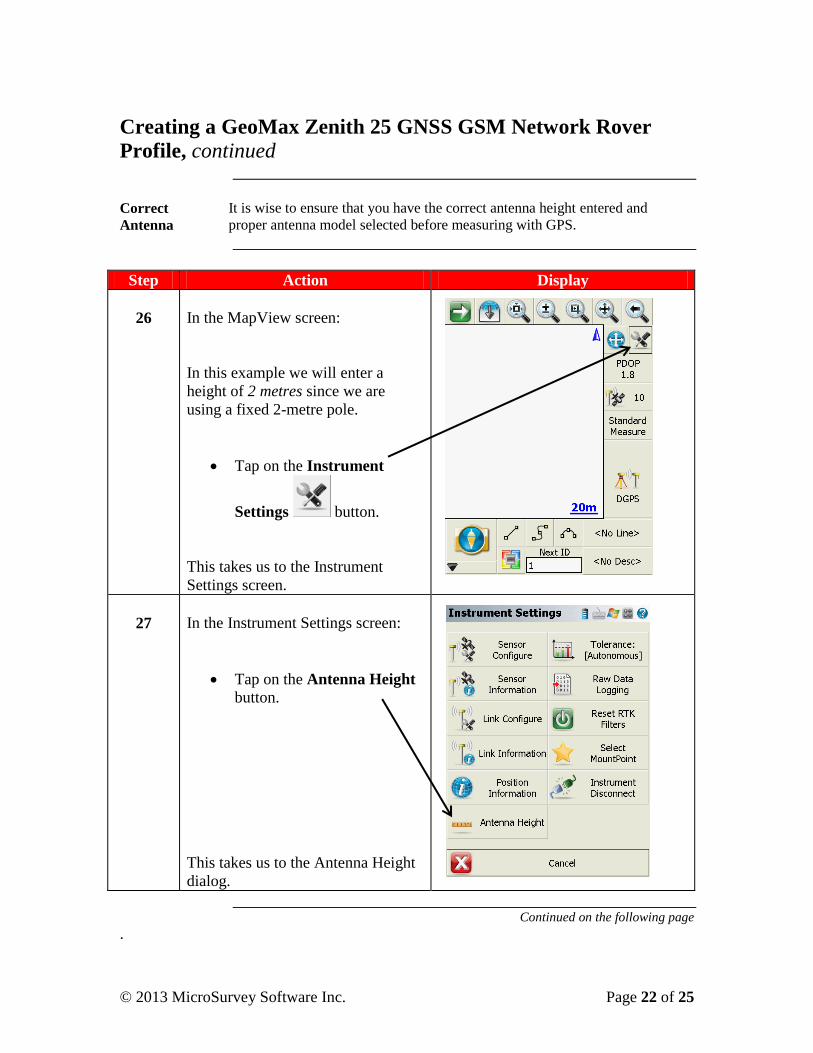
Correct
Antenna
It is wise to ensure that you have the correct antenna height entered and
proper antenna model selected before measuring with GPS.
Step Action Display
26
In the MapView screen:
In this example we will enter a
height of 2 metres since we are
using a fixed 2-metre pole.
Tap on the Instrument
Settings button.
This takes us to the Instrument
Settings screen.
27
In the Instrument Settings screen:
Tap on the Antenna Height
button.
This takes us to the Antenna Height
dialog.
Continued on the following page
.
© 2013 MicroSurvey Software Inc. Page 23 of 25
Creating a GeoMax Zenith 25 GNSS GSM Network Rover
Profile, continued
Step Action Display
28
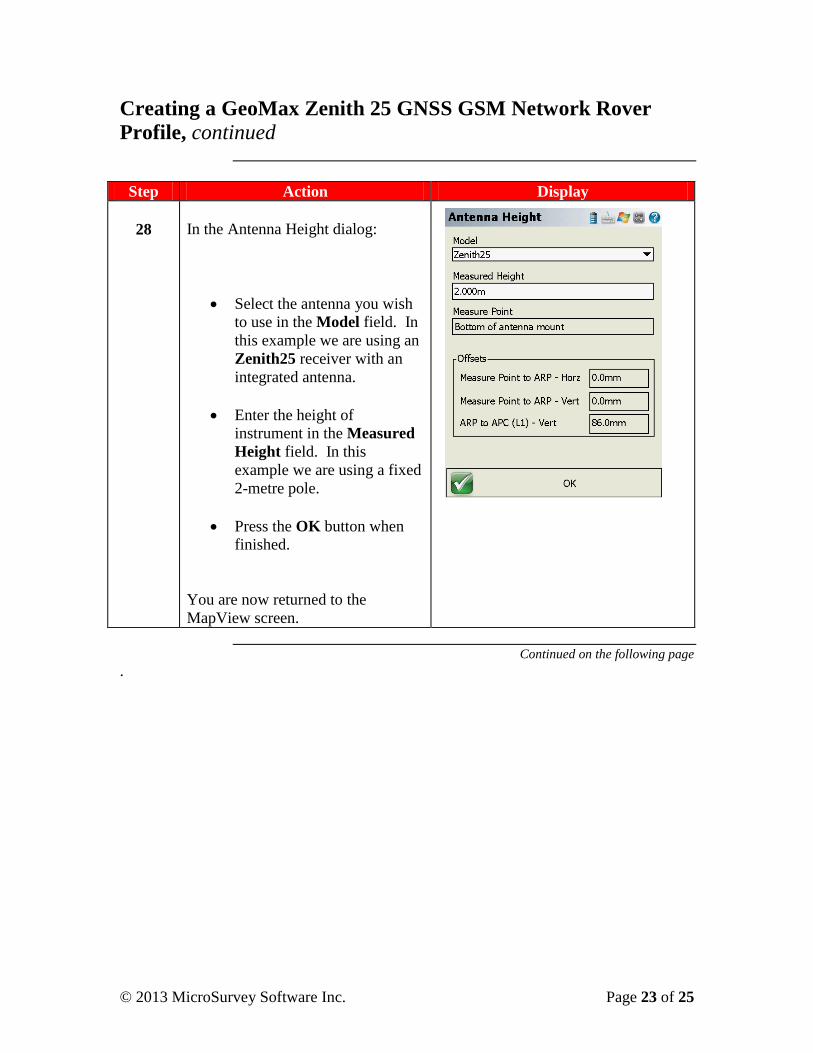
In the Antenna Height dialog:
Select the antenna you wish
to use in the Model field. In
this example we are using an
Zenith25 receiver with an
integrated antenna.
Enter the height of
instrument in the Measured
Height field. In this
example we are using a fixed
2-metre pole.
Press the OK button when
finished.
You are now returned to the
MapView screen.
Continued on the following page
.
© 2013 MicroSurvey Software Inc. Page 24 of 25
Creating a GeoMax Zenith 25 GNSS GSM Network Rover
Profile, continued
Step Action Display
29
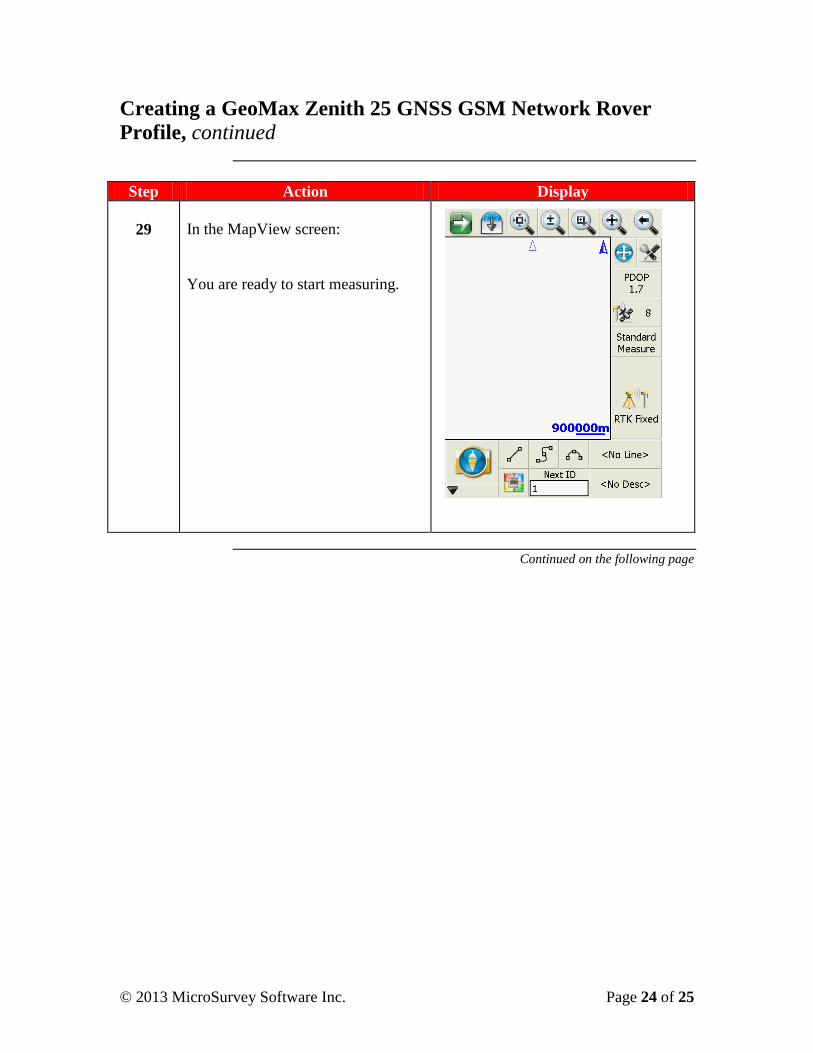
In the MapView screen:
You are ready to start measuring.
Continued on the following page
© 2013 MicroSurvey Software Inc. Page 25 of 25
Creating a GeoMax Zenith 25 GNSS GSM Network Rover
Profile, continued
Congratulations You have successfully created a GNSS network rover profile.
You then made a connection to your GNSS receiver via Bluetooth.
From there you connected to your GNSS network correction
provider and started receiving network data.
You then entered the correct antenna height and selected the correct
antenna model and are ready to start measuring.
Remember, FieldGenius will preserve these settings in your
instrument profile. You only have to create this profile once. In
other words, you don’t have to follow these steps each and every
time you want to survey using the GNSS receiver and the Internet.
Glossary GNSS – Global Positioning System
ISP – Internet Service Provider
PIN – Personal Identification Number
PUK – PIN Unlocked Key
GSM – Global System for Mobile Communications
CDMA – Code Division Multiple Access
ISP - Internet Service Provider
NTRIP – Networked Transport of RTCM via Internet Protocol
NTRIP Caster – an HTTP server that accepts request-messages on a
single port and then decides where there is streaming data to receive
or to send. The caster offers a list of mountpoints that is called a
source list or source table.
HTTP: Hypertext Transfer Protocol
SIM - Subscriber Identity Module
RTCM - Radio Technical Commision for Martitime
RTK – Real Time Kinematic