gep live cd user guide - gep community...
TRANSCRIPT

Last Update: 12/30/2015
1
GEP Live CD User Guide
Wilson Leung
Table of Contents
Introduction ............................................................................................................................ 2
Acknowledgements .................................................................................................................. 2
Software Versions .................................................................................................................... 2
Questions about the GEP Live CD ........................................................................................... 2
Availability .............................................................................................................................. 2
Document History ................................................................................................................... 3
Download VirtualBox .............................................................................................................. 3
Install VirtualBox .................................................................................................................... 4 Install the VirtualBox Extension Pack ............................................................................................... 5
Using the GEP Live CD in VirtualBox ..................................................................................... 6 Download the GEP Live CD .............................................................................................................. 6 Create a new virtual machine ............................................................................................................. 6 Attach the GEP Live CD ISO image to the virtual machine .............................................................. 10 Add USB support to the virtual machine ......................................................................................... 11 Launch the GEP Live CD ................................................................................................................ 12 Shutdown the virtual machine ......................................................................................................... 14
Data persistence ..................................................................................................................... 15 Saving data to a USB Drive .............................................................................................................. 15 Saving data to a VirtualBox virtual hard drive .................................................................................. 16
Format the virtual hard drive .................................................................................................................. 16 Use the virtual hard drive as a persistent home directory ...................................................................... 19
Using the GEP Live CD Virtual Appliance in VirtualBox ...................................................... 21 Download the GEP VirtualBox Disk Image ..................................................................................... 21 Importing the Virtual Appliance ..................................................................................................... 21 Setup a shared drive between the host and guest systems .................................................................. 23
Create a mount point for the shared drive ............................................................................................. 25
Account Credentials for the GEP Live CD ............................................................................. 27
Additional Resources ............................................................................................................. 27

Last Update: 12/30/2015
2
Introduction The Phred/Phrap/Consed package is a powerful suite of tools designed for creating, editing and viewing genomic assemblies. However, despite recent improvements, installing the Consed package remains non-trivial and it requires the user to have some familiarity with UNIX systems. In addition, because Consed cannot run on Microsoft Windows, GEP faculty members might not be able to install the Consed package and incorporate sequence improvement into their curriculum. The Genomics Education Partnership (GEP) seeks to address these issues by providing a Live CD image with Consed already installed and configured for GEP projects. The Live CD can be used in many different configurations and settings: as a standalone bootable Live CD, a bootable Live CD inside a virtual machine, or an actual virtual machine in VirtualBox. In this user guide, we will focus on using the GEP Live CD and the GEP Live CD VDI virtual machine in VirtualBox on Windows 7. We decided to use Oracle VM VirtualBox because it runs on all three major platforms (Windows, Mac OS X, and Linux) and it is freely available. However, because all the major virtual machine programs (VMWare, Parallels, Virtual PC) support mounting ISO disk images, the Live CD should work on other virtualization platforms with only minor changes. In addition, the GEP virtual machine is also distributed as an Open Virtualization Appliance (OVA package), which is supported by most virtualization platforms.
Acknowledgements • The GEP Live CD is based on the SliTaz GNU/Linux Live CD. For more information on
SliTaz, please visit http://www.slitaz.org/en/. • Oracle’s VirtualBox software is available for download at http://www.virtualbox.org.
Software Versions • GEP Live CD: version 4 • Operating System: Windows 7 SP1 • VirtualBox: Version 5.0.12
Questions about the GEP Live CD Please contact Wilson at [email protected] if you have any questions or encounter any problems with the GEP Live CD.
Availability The GEP Live CD and the VirtualBox VDI is available for download at the GEP web site (http://gep.wustl.edu è Projects è Tools Under Development).

Last Update: 12/30/2015
3
Document History First Revision: 01/31/2011 Second Revision: 12/05/2012 Third Version: 08/07/2013 Current Version: 12/30/2015
Download VirtualBox In this user guide, we will setup VirtualBox to run a virtual machine on Microsoft Windows 7 SP1. Among the virtual machine software available, VirtualBox is the only one that can run on all three major platforms (Windows, Mac, and Linux) and is free for academic and personal use. To download a copy of VirtualBox, open a web browser and navigate to the VirtualBox home page at http://www.virtualbox.org and click on the “Downloads” link on the left navigation bar (Figure 1).
Figure 1 Download VirtualBox from http://www.virtualbox.org
Click on the link under VirtualBox platform packages to download the installer for your platform (e.g., VirtualBox 5.0.12 for Windows hosts). Click on the “All supported platforms” link under VirtualBox 5.0.12 Oracle VM VirtualBox Extension Pack to download the Extension Pack (Figure 2). For this tutorial, we will save these packages in the “MyPrograms” folder of your user account (e.g., C:\Users\Wilson\MyPrograms).
Figure 2 Download installation package for your platform and the extension pack from the VirtualBox website.

Last Update: 12/30/2015
4
Install VirtualBox The steps required to install VirtualBox will differ depending on your platform. If you are on Windows, you will need to launch the installer using an account with administrative rights. Double-click on the VirtualBox installation package to launch the installer (Figure 3). Follow the instructions provided by the VirtualBox setup wizard to install VirtualBox (Figure 4). (Note that you might need to accept the installation of additional drivers from Oracle during the installation process.)
Figure 3 Double click on the VirtualBox-5.0.12-104815-Win.exe file to launch the VirtualBox installer.
Figure 4 Follow the instructions provided by the setup wizard to install VirtualBox.
If all goes well, a message should appear indicating that installation was successful (Figure 5). Uncheck the box “Start Oracle VirtualBox 5.0.12 after installation” and then click “Finish”.

Last Update: 12/30/2015
5
Figure 5 Uncheck the “Start Oracle VM VirtualBox after installation” checkbox after installation is complete.
Please refer to the Installation details section (https://www.virtualbox.org/manual/ch02.html) of the VirtualBox end-user documentation for details on specific installation issues for your platform.
Install the VirtualBox Extension Pack While not required, we recommend installing the VirtualBox Extension Pack in order to enable support for external USB 2.0 and 3.0 devices. Go back to the File Explorer and navigate to the directory where you have downloaded the Extension Pack (e.g., C:\Users\Wilson\MyPrograms, Figure 6).
Figure 6 Double click on the Extension Pack installer to add USB support to VirtualBox.
Double click on the Extension Pack installation package. This will launch VirtualBox and a dialog will appear which asks us if we would like to install the Extension Pack. Click “Install” (Figure 7).
Figure 7 Click on the "Install" button to install the Oracle VM VirtualBox Extension Pack.

Last Update: 12/30/2015
6
Using the GEP Live CD in VirtualBox
Download the GEP Live CD After installing VirtualBox, we will setup a virtual machine to launch the GEP Live CD. The GEP Live CD is available for download on the GEP web site (http://gep.wustl.edu è Projects è Tools Under Development, Figure 8). Because of licensing restrictions for the Consed package, only members of the GEP can download the GEP Live CD. Please contact Wilson ([email protected]) to obtain the credentials required to download the GEP Live CD image.
Figure 8 Download the GEP Live CD ISO image from the GEP web site.
In this tutorial, we will save the GEP Live CD ISO image to a directory called GEP_LiveCD (C:\Users\Wilson\My Documents\GEP_LiveCD).
Create a new virtual machine Go back to the Oracle VM VirtualBox Manager window and click on the “New” icon on the main toolbar (Figure 9). A wizard will appear which will help us configure our new virtual machine.
Figure 9 Click on the "New" button to create a new virtual machine.

Last Update: 12/30/2015
7
We will call our new virtual machine “GEP Live CD”. Verify that the “Type” field is set to “Linux” and the “Version” field is set to “Linux 2.6 / 3.x / 4.x (32-bit)” (Figure 10). Click “Next”.
Figure 10 Create a new Linux virtual machine called "GEP Live CD"
The next screen asks us to select the amount of memory for the virtual machine. Depending on the amount of memory available on your system, you might want to allocate more memory to the virtual machine in order to improve the performance of the virtual machine. We will change the memory size from 256 MB to 1024 MB (Figure 11). Click “Next”.
Figure 11 Setup a new virtual machine with 1GB of memory.
The next page of the wizard asks us if we would like to add a virtual hard drive to the machine. One of the key characteristics of a Live CD is that it can run in memory. This means we can freely experiment with the system and with Consed without making permanent changes to the system (i.e. you can restore to the original settings by restarting the virtual machine). However, eventually we will want some of these changes to persist (e.g., when we work on a Consed project). Consequently, we will setup a virtual hard drive and attach it to the new virtual machine.

Last Update: 12/30/2015
8
Select the “Create a virtual hard drive now” option and click on “Create”. Then select “VDI (VirtualBox Disk Image)” in the “Hard drive file type” dialog and click “Next” (Figure 12).
Figure 12 Create a new VDI virtual hard drive.
The next screen asks us to decide how the virtual hard disk should be stored on the physical hard drive on the host machine. We will pick the “Dynamically allocated” option so that the virtual hard drive will only take up the amount of space it needs to store all the files on the virtual hard drive (Figure 13). The size of the drive will grow dynamically as needed.
Figure 13 Create a “Dynamically allocated” drive that will occupy a small amount of space initially and grow in size as needed.

Last Update: 12/30/2015
9
In the next “File location and size” screen, we will call the virtual hard drive “GEP Live CD” and set the maximum size of the dynamically allocated hard drive to 8.00 GB (Figure 14). Click “Create”. A new virtual machine called “GEP Live CD” will appear in the Oracle VM VirtualBox Manager window (Figure 15).
Figure 14 Change the name of the new virtual drive to "GEP Live CD" and set the maximum size of the drive to 8.00 GB.
Figure 15 Oracle VM VirtualBox Manager shows the new virtual machine called "GEP Live CD".

Last Update: 12/30/2015
10
Attach the GEP Live CD ISO image to the virtual machine In order to boot the GEP Live CD inside the virtual machine, we need to attach the ISO image to the virtual machine. Select “GEP Live CD” in the left panel of the VirtualBox Manager window and then click on the “Storage” header (Figure 16).
Figure 16 Click on the "Storage" header to change the virtual machine storage settings.
In the Storage settings dialog, select the “Empty” entry under “Controller: IDE”. Click on the CD-ROM icon and select “Choose a virtual CD/DVD disk file”. Navigate to the location where the GEP Live CD ISO image is stored (e.g., C:\Users\Wilson\My Documents\GEP_LiveCD). Select the ISO image file and then click “Open” (Figure 17).
Figure 17 Select the GEP Live CD image (gep_livecd_2014) using the Storage settings dialog.
The gep_livecd_2014.iso image will appear under the “Controller: IDE” section (Figure 18).
Figure 18 The GEP Live CD (gep_livecd_2014.iso) is now attached to the virtual machine.

Last Update: 12/30/2015
11
Add USB support to the virtual machine In order to access USB devices inside the virtual machine, we need to add a generic USB filter to the virtual machine. On the left panel of the “GEP Live CD – Settings” window, click on “USB”. Verify that both the “Enable USB Controller” and “Enable USB 2.0 (EHCI) Controller” options have been selected and then click on the first icon in the “USB Device Filters” section to add a new USB filter (Figure 19). A new item called “New Filter 1” will appear under the “USB Device Filters” section.
Figure 19 Click on the first icon in the "USB Device Filters" section to define a new USB filter.
Double click on “New Filter 1” and change the name to “USB Devices” (Figure 20). This filter will allow the virtual machine to capture all the USB devices that is connected to the computer. You can use the additional fields in this dialog to restrict the types of USB devices that the virtual machine can access. Please refer to the “USB support” section of the VirtualBox documentation (http://www.virtualbox.org/manual/ch03.html#idp6405104) for details.
Figure 20 Define a new filter for USB devices.

Last Update: 12/30/2015
12
Click “OK” to accept the changes. Then click “OK” again to dismiss the “GEP Live CD – Settings” window. The VirtualBox Manager window should show that we have attached the GEP Live CD image (gep_livecd_2014.iso) to the virtual machine and there is 1 active USB device filter (Figure 21).
Figure 21 The GEP Live CD virtual machine after we have modified the storage and USB settings.
Launch the GEP Live CD Click on the “Start” button on the top toolbar of the Oracle VM VirtualBox Manager window to launch the virtual machine (Figure 22). A startup screen will appear which shows the boot options and the help pages available (Figure 23). You can press Enter (or wait 3 seconds) to boot the GEP Live CD.
Figure 22 Click on the "Start" button to start the GEP Live CD virtual machine.

Last Update: 12/30/2015
13
Figure 23 Select “GEP Consed 2014” and press Enter in the boot screen to launch the GEP Live CD.
After the boot sequence is complete, you should see a new window with an xterm. The virtual machine is now up and running (Figure 24). You can toggle between the host machine (e.g., MS Windows) and the guest machine (i.e. GEP Live CD) using the host key (by default, the Right-Ctrl key on MS Windows).
Figure 24 The GEP Live CD running inside the virtual machine.

Last Update: 12/30/2015
14
We have included the Consed tutorial Using Consed Graphically on the GEP Live CD image. You can access the tutorial PDF by double-clicking on the “Using_Consed_Graphically.pdf” icon on the Desktop. Type the following into the xterm to open the project in Consed (Figure 25):
cd Standard3/edit_dir consed &
Figure 25 Use the xterm to launch the Consed project (Standard3) for the “Using Consed Graphically” tutorial.
You can download additional sequence improvement walkthroughs and projects through the GEP web site using the Midori web browser (green compass icon on the main toolbar).
Shutdown the virtual machine To shutdown the virtual machine, click on the “Power” icon at the top right corner. Then select “Shutdown system: halt” in the Logout dialog (Figure 26).
Figure 26 Click on the “Power” icon at the top right corner and select “Shutdown system” to shutdown the virtual machine.

Last Update: 12/30/2015
15
Data persistence Because the GEP Live CD runs entirely in memory, it will not make any permanent changes to your machine. This allows you to freely experiment with the system. However, as you use the GEP Live CD to work on Consed tutorials and projects, you will want to be able to save your work.
Saving data to a USB Drive Because of the USB filter we have setup previously, you can simply plug in an USB drive and the virtual machine will automatically recognize the device. On Microsoft Windows, VirtualBox will install a device driver when you plug in an USB device for the first time. Follow the instructions in the “Found New Hardware Wizard” and accept the default settings to install the driver (Figure 27).
Figure 27 Installing the VirtualBox USB device driver on Microsoft Windows the first time you connect a USB device to the virtual machine.
Once the driver has been successfully installed, use the following steps to mount the USB device inside the virtual machine:
1. Shutdown the virtual machine 2. Eject and unplug the USB drive from the host system 3. Start the virtual machine 4. Plug in the USB drive, the virtual machine should capture the USB device automatically
Note: you only need to follow the steps above the first time you plug in a USB device
inside a virtual machine. Once the VirtualBox device driver has been installed, you can simply start the virtual machine and then plug in the USB device.

Last Update: 12/30/2015
16
To access the USB drive inside the virtual machine, double click on the “My Documents” icon on the Desktop to open a file explorer window (Figure 28).
Figure 28 Double click on "My Documents" on the Desktop to open a file explorer window. Click on the name of the USB device (e.g., Memorex TRAVELDRIVE) to mount the drive.
Click on the name of your drive on the left sidebar (e.g., Memorex TRAVELDRIVE) and the USB drive should mount automatically (Figure 28). Once the drive is mounted, the drive name on the left sidebar will change to the name of the volume (e.g., TRAVELDRIVE, Figure 29).
Figure 29 The contents of the USB drive is available at /media/TRAVELDRIVE
In addition to accessing the USB drive using the graphical interface, you can also access the drive using the command line (e.g., when saving Consed projects) at /media/TRAVELDRIVE.
Saving data to a VirtualBox virtual hard drive Besides saving data onto a USB drive, you can also save data onto the virtual hard drive we have created previously. The main benefit of using the virtual hard drive is that we can configure the Live CD to automatically save the changes we have made to the system (e.g., project files, bookmarks, downloads, desktop customizations, etc.).
Format the virtual hard drive Before we can mount the virtual hard drive inside the Live CD, we need to format the drive first. Launch the GEP Live CD virtual machine and then open the GParted Partition Editor (available under the Start menu è System Tools è GParted Partition Editor, Figure 30).

Last Update: 12/30/2015
17
Figure 30 Launch the GParted Partition Editor to format the virtual hard disk.
A dialog box will appear asking for the root password. Type “root” and click “OK” (Figure 31).
Figure 31 Enter the root password (root) to run the GParted Partition Editor.
Select the unformatted hard drive (/dev/sda, 8.00 GiB) and then select Device è Create Partition Table on the top menu bar (Figure 32).
Figure 32 Create a new partition table on the new virtual hard drive.
A dialog will appear which warns us that all the data on the disk will be erased. Click “Apply” (Figure 33).
Figure 33 Create a new partition table will erase all the data on the disk.
Last Update: 12/30/2015
18
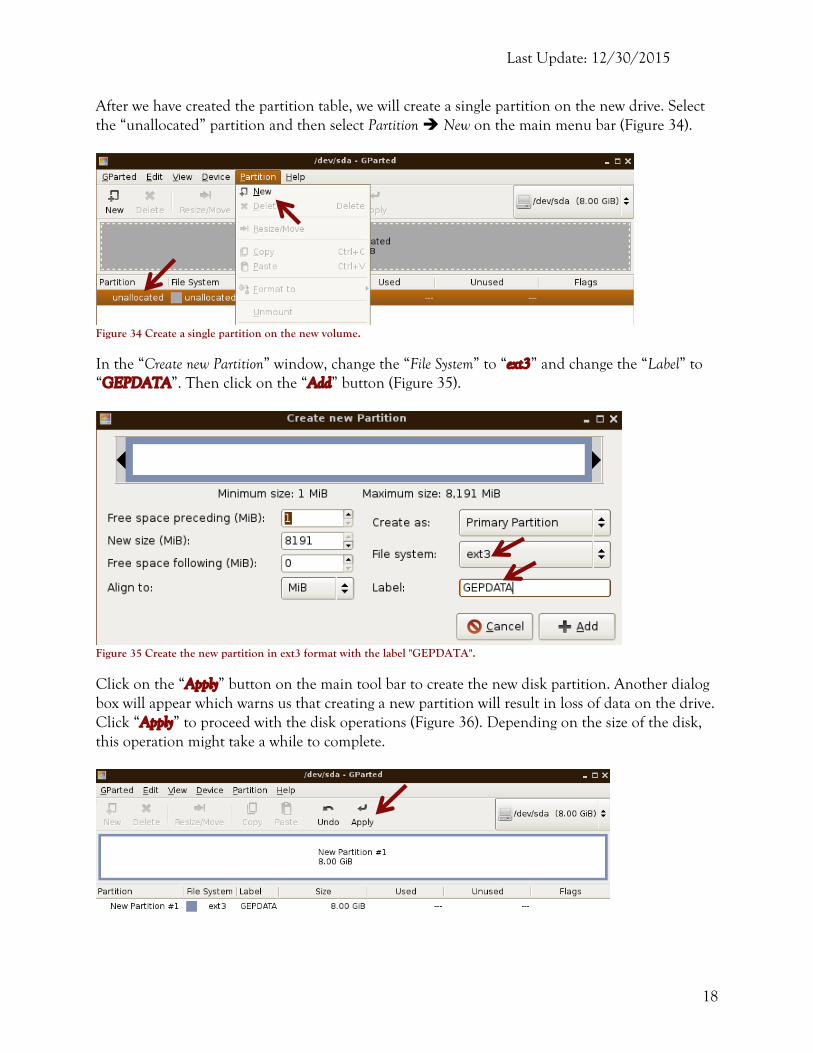
After we have created the partition table, we will create a single partition on the new drive. Select the “unallocated” partition and then select Partition è New on the main menu bar (Figure 34).
Figure 34 Create a single partition on the new volume.
In the “Create new Partition” window, change the “File System” to “ext3” and change the “Label” to “GEPDATA”. Then click on the “Add” button (Figure 35).
Figure 35 Create the new partition in ext3 format with the label "GEPDATA".
Click on the “Apply” button on the main tool bar to create the new disk partition. Another dialog box will appear which warns us that creating a new partition will result in loss of data on the drive. Click “Apply” to proceed with the disk operations (Figure 36). Depending on the size of the disk, this operation might take a while to complete.

Last Update: 12/30/2015
19
Figure 36 Formatting the new virtual hard disk.
After the disk operations are complete, click on the “Close” button and the newly formatted disk will appear in the GParted window (Figure 37). The new drive GEPDATA is on the partition /dev/sda1.
Figure 37 GParted successfully formatted and created the new drive GEPDATA.
Use the virtual hard drive as a persistent home directory Now that we have formatted the virtual hard drive, we can replace the temporary home directory created by the GEP Live CD with a persistent home directory on the new virtual hard drive. To use our new hard drive as the home directory, we need to add a boot option during startup. Quit GParted and click on the power icon at the top right corner. In the Logout dialog box, select the “Reboot system: reboot” option and then click “OK” (Figure 38).

Last Update: 12/30/2015
20
Figure 38 Restart the system after formatting the virtual hard drive.
When the GEP Live CD startup screen appears, press the [Tab] key to edit the boot command. Add “home=sda1” to the list of boot options and then press [Enter] (Figure 39). This option tells the GEP Live CD to use the drive sda1 (which we have just created) as the home directory.
Figure 39 Add the "home=sda1" option to use the virtual hard drive as a persistent home directory.
The steps above will create a “tux” directory on the GEPDATA drive where all the changes you have made to the Live CD will be saved. To load these changes, simply add the “home=sda1” flag to the list of boot options (as shown above) when you start the virtual machine.
Last Update: 12/30/2015
21
Using the GEP Live CD Virtual Appliance in VirtualBox In addition to the GEP Live CD, we have also created a virtual appliance (OVA) for the GEP Live CD. This OVA version has better overall performance compared to the Live CD. It also allows you to treat the virtual machine as if it were a normal machine and save data directly onto the virtual hard drive. The OVA version also includes VirtualBox Guest Additions (version 5.0.12). Guest Additions add many features that improve the integration between the host and the guest operating systems. These features include mouse pointer integration, shared folders and improved video support.
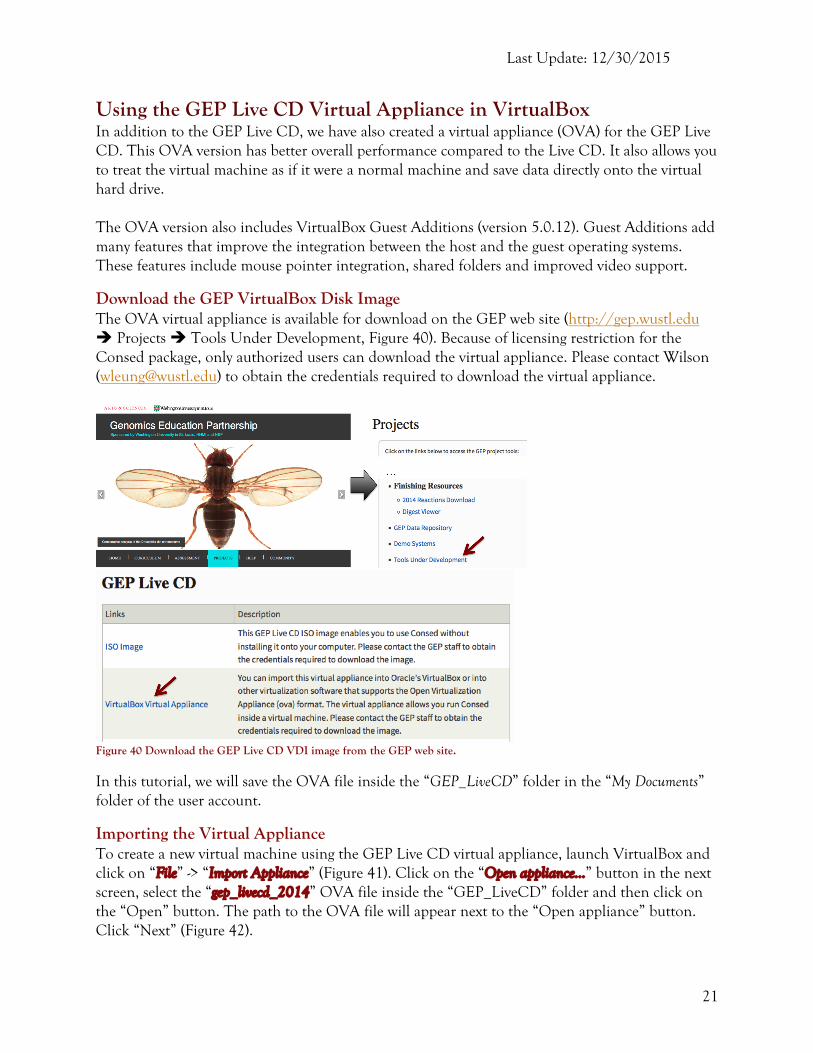
Download the GEP VirtualBox Disk Image The OVA virtual appliance is available for download on the GEP web site (http://gep.wustl.edu è Projects è Tools Under Development, Figure 40). Because of licensing restriction for the Consed package, only authorized users can download the virtual appliance. Please contact Wilson ([email protected]) to obtain the credentials required to download the virtual appliance.
Figure 40 Download the GEP Live CD VDI image from the GEP web site.
In this tutorial, we will save the OVA file inside the “GEP_LiveCD” folder in the “My Documents” folder of the user account.
Importing the Virtual Appliance To create a new virtual machine using the GEP Live CD virtual appliance, launch VirtualBox and click on “File” -> “Import Appliance” (Figure 41). Click on the “Open appliance…” button in the next screen, select the “gep_livecd_2014” OVA file inside the “GEP_LiveCD” folder and then click on the “Open” button. The path to the OVA file will appear next to the “Open appliance” button. Click “Next” (Figure 42).

Last Update: 12/30/2015
22
Figure 41 Select “File” è “Import Appliance...” to import the GEP Live CD virtual appliance into VirtualBox.
Figure 42 Importing the GEP Live CD virtual appliance into VirtualBox.
The next screen shows the default settings for our new virtual machine (Figure 43). We will use the default settings in this tutorial (you can double click on each item to modify the virtual machine settings). Click on the “Import” button to create the new virtual machine.
Figure 43 The Import Virtual Appliance dialog shows the settings for our new virtual machine. Double click on the items to modify the virtual machine settings.
Once the importing appliance process is complete, you will see a new virtual machine called “GEP Live CD VM” on the left panel (Figure 44). The new virtual machine (by default) uses 1024MB of RAM with a 20GB dynamically resized hard drive and a generic USB device filter already setup.

Last Update: 12/30/2015
23
Figure 44 The imported GEP Live CD virtual appliance has a 20GB hard drive and a USB device filter already setup.
Setup a shared drive between the host and guest systems One of the key features of the VirtualBox Guest Additions is the ability to create folders that can share files directly between the host (e.g., Windows 7) and the guest (e.g., GEP Live CD VM) systems. To create a shared drive, select the GEP Live CD VM in the VirtualBox Manager window, scroll down and select the “Shared folders” tab on the settings panel (Figure 45).
Figure 45 Click on the "Shared Folders" tab in the VirtualBox Manager settings panel.
Last Update: 12/30/2015
24
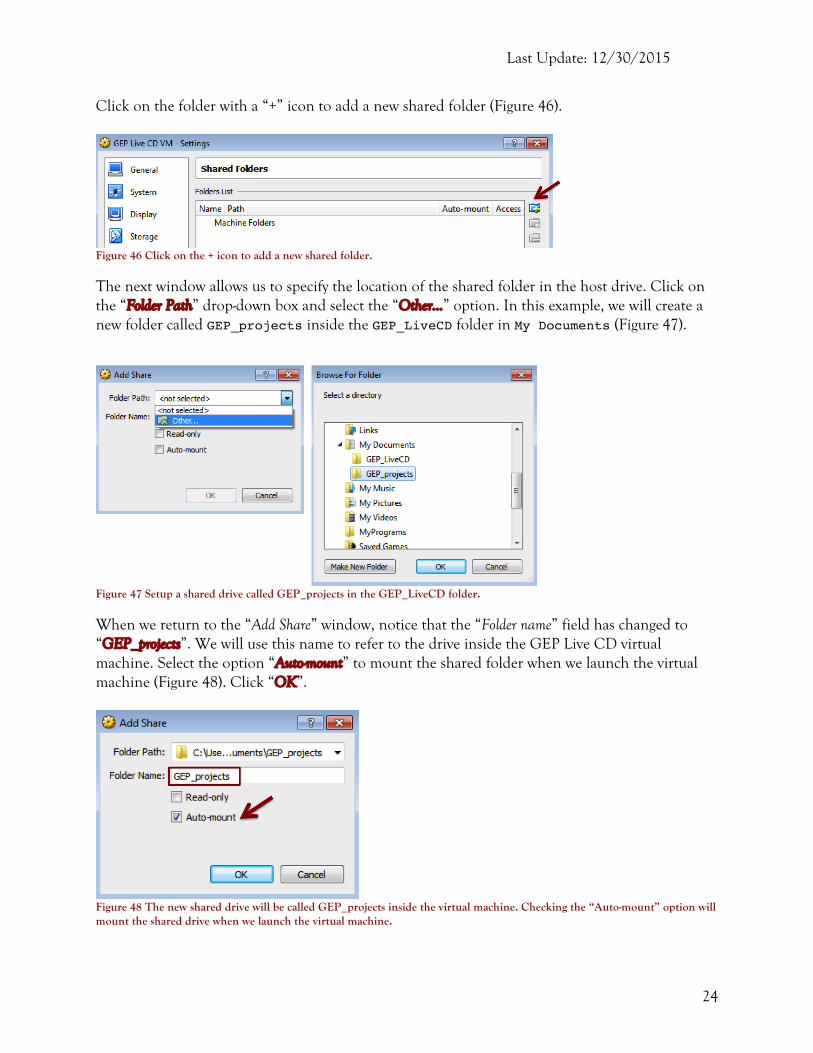
Click on the folder with a “+” icon to add a new shared folder (Figure 46).
Figure 46 Click on the + icon to add a new shared folder.
The next window allows us to specify the location of the shared folder in the host drive. Click on the “Folder Path” drop-down box and select the “Other…” option. In this example, we will create a new folder called GEP_projects inside the GEP_LiveCD folder in My Documents (Figure 47).
Figure 47 Setup a shared drive called GEP_projects in the GEP_LiveCD folder.
When we return to the “Add Share” window, notice that the “Folder name” field has changed to “GEP_projects”. We will use this name to refer to the drive inside the GEP Live CD virtual machine. Select the option “Auto-mount” to mount the shared folder when we launch the virtual machine (Figure 48). Click “OK”.
Figure 48 The new shared drive will be called GEP_projects inside the virtual machine. Checking the “Auto-mount” option will mount the shared drive when we launch the virtual machine.

Last Update: 12/30/2015
25
A new “GEP_projects” entry should appear in the “Folder List” (Figure 49). Click “OK” to dismiss the settings window.
Figure 49 The GEP_projects folder is now setup on the host side of the virtual machine.
Create a mount point for the shared drive Select the “GEP Live CD VM” virtual machine on the left panel of the VirtualBox Manager window. Click on the “Start” button on the main toolbar to launch the virtual machine. The machine will boot up like the GEP Live CD but it has mouse pointer integration and the screen size will change automatically to fit the size of the virtual machine window (Figure 50).
Figure 50 GEP Live CD virtual appliance running inside VirtualBox.
However, the guest operating system did not automatically mount the shared drive we have defined previously. To fix this problem, we need to add a new entry to the file systems table (/etc/fstab). Because only users with administrative rights can edit this file, we will need to switch to the root account before we can edit the file. Type the following in the xterm. Note that, for security reasons, the password will not appear on the xterm when you type in the password (Figure 51).
su geplivecd leafpad /etc/fstab

Last Update: 12/30/2015
26
Figure 51 Launch the leafpad editor to modify the fstab file.
A text editor (called leafpad) will appear with the contents of the fstab file. Add the following line to the end of the file:
GEP_projects /mnt/GEP_projects vboxsf rw,uid=1000,gid=100 0 0
The fields are separated by one or more spaces. Note that the first field should match the value of the “Folder Name” field (Figure 48) when we setup the shared drive. The second field specifies where the drive will be mounted (/mnt/GEP_projects) on the guest file system (Figure 52).
Figure 52 Define a mount point in the /etc/fstab file for our GEP_projects shared drive.
Press Ctrl-S (or File è Save) to save the file and then close the Leafpad text editor (click on the X icon on the top right corner). Finally, we will create the directory where the GEP_projects folder will be mounted by issuing the following command on the xterm (Figure 53):
mkdir /mnt/GEP_projects
Figure 53 Create the mount point directory as defined in /etc/fstab.
Reboot the machine (click on the power icon at the top right corner and select the “Reboot system: reboot” option). You should now be able to create and access all the files in the GEP_projects directory in both the host and guest systems (Figure 54).

Last Update: 12/30/2015
27
Figure 54 Access the shared folder at C:\Users\Wilson\My Documents\GEP_LiveCD\GEP_projects in the host system and /mnt/GEP_projects in the guest system.
Account Credentials for the GEP Live CD GEP Live CD:
• Administrator account o Username: root o Password: root
• User account o Username: tux o Password: <empty> (no password)
GEP Live CD virtual appliance:
• Administrator account o Username: root o Password: geplivecd
• User account o Username: tux o Password: geplivecd
Additional Resources VirtualBox is a sophisticated piece of software and it has many advanced configurations and functionalities that are not discussed in this user guide. Please refer to the VirtualBox user manual for a more detail introduction to VirtualBox (https://www.virtualbox.org/manual/). The GEP Live CD is based on the Live CD image provided by the SliTaz GNU/Linux project (http://www.slitaz.org/en/). Please refer to the SliTaz Handbook for more information on how to configure and use SliTaz (http://doc.slitaz.org/en:handbook:start).