guide for email marketing - at&t · 1 introduction ... email marketing is an email marketing...
TRANSCRIPT
Welcome to AT&T Website SolutionsSM
We are focused on providing you the very best web hosting service including all the tools necessary to establish and maintain a successful website. This document contains information
that will help you to create and send graphically-rich and compelling HTML emails through the Create Email Wizard.
© 2012 AT&T Intellectual Property. All rights reserved. AT&T products and services are provided or offered by
subsidiaries and affiliates of AT&T Inc. under the AT&T brand and not by AT&T Inc. AT&T, AT&T logo and all other
AT&T marks contained herein are trademarks of AT&T Intellectual Property and/or AT&T affiliated companies. All
other trademarks are the property of their owners. This document is not an offer, commitment, representation or
warranty by AT&T and is subject to change. Your Web Hosting service is subject to the Terms and Conditions
(T&Cs), which may be found at http://webhosting.att.com/Terms-Conditions.aspx. Service terms and Fees are
subject to change without notice. Please read the T&Cs for additional information.
Email Marketing
User Guide
July 2012
Table of Contents 1 INTRODUCTION ............................................................................................................................................. 4
1.1 GETTING STARTED .............................................................................................................................................. 4 1.2 NAVIGATION ..................................................................................................................................................... 5
1.2.1 Main Menu ........................................................................................................................................................................................... 5 1.2.2 Sub Menu .............................................................................................................................................................................................. 5
2 CREATE AN EMAIL .......................................................................................................................................... 6
2.1 EMAIL DETAILS .................................................................................................................................................. 6 2.1.1 Company information ........................................................................................................................................................................... 7 2.1.2 Time Zone ............................................................................................................................................................................................. 8 2.1.3 Sender Email Address ........................................................................................................................................................................... 8 2.1.4 Email Information ................................................................................................................................................................................. 8 2.1.5 Webpage Version ................................................................................................................................................................................. 8 2.1.6 Social Networking and Google Analytics .............................................................................................................................................. 9
2.2 CHOOSE CONTACTS ............................................................................................................................................ 9 2.2.1 Segmenting a Contact List .................................................................................................................................................................. 13
2.3 CHOOSE A TEMPLATE ........................................................................................................................................ 14 2.4 EDIT EMAIL ..................................................................................................................................................... 15
2.4.1 Preview Email ..................................................................................................................................................................................... 18 2.5 SCHEDULE EMAIL ............................................................................................................................................. 19 2.6 EMAIL COMPLETED ........................................................................................................................................... 20 2.7 MANAGING COMPANY INFORMATION .................................................................................................................. 21 2.8 MANAGE EMAIL SETTINGS ................................................................................................................................. 22
3 MANAGE CONTACTS .................................................................................................................................... 23
3.1 ADD CONTACTS ............................................................................................................................................... 23 3.2 FIND/EDIT CONTACTS ....................................................................................................................................... 24 3.3 CREATE/EDIT LISTS ........................................................................................................................................... 27 3.4 IMPORT EMAIL ADDRESSES ................................................................................................................................ 28
3.4.1 Field Mapping ..................................................................................................................................................................................... 29 3.5 CREATE SUBSCRIBER FORMS ............................................................................................................................... 34
3.5.1 Editing a Form .................................................................................................................................................................................... 34 3.6 EXPORT LISTS .................................................................................................................................................. 38 3.7 MERGE LISTS ................................................................................................................................................... 39
4 MANAGE EMAILS ......................................................................................................................................... 40
4.1 EMAIL STATUS INDICATORS ................................................................................................................................ 40 4.2 EMAIL DETAILS ................................................................................................................................................ 42
4.2.1 Company information ......................................................................................................................................................................... 42 4.2.2 Time Zone ........................................................................................................................................................................................... 43 4.2.3 Sender Email Address ......................................................................................................................................................................... 43 4.2.4 Email Information ............................................................................................................................................................................... 44
4.2.5 Webpage Version ............................................................................................................................................................................... 44 4.2.6 Social Networking and Google Analytics ............................................................................................................................................ 44
4.3 CHOOSE CONTACTS .......................................................................................................................................... 45 4.3.1 Segmenting a Contact List .................................................................................................................................................................. 47
4.4 EDIT EMAIL ..................................................................................................................................................... 48 4.4.1 Email Editor Buttons ........................................................................................................................................................................... 48
4.5 SCHEDULE EMAIL ............................................................................................................................................. 51 4.6 MANAGE AUTORESPONDERS .............................................................................................................................. 52
5 VIEW RESULTS ............................................................................................................................................. 53
5.1 SENT EMAILS ................................................................................................................................................... 54 5.2 EMAIL SUMMARY ............................................................................................................................................. 54 5.3 OVERVIEW ...................................................................................................................................................... 55 5.4 TOP SUBSCRIBERS ............................................................................................................................................ 56 5.5 GENERATING REPORTS ...................................................................................................................................... 57
6 SOCIAL NETWORKING .................................................................................................................................. 60
6.1 SHARE EMAIL .................................................................................................................................................. 60 6.2 GOOGLE ANALYTICS .......................................................................................................................................... 60
WHERE TO FIND HELP/INSTRUCTIONS ................................................................................................................. 61
HOW TO CONTACT SUPPORT .......................................................................................................................................... 61 SUBMIT A TICKET BY EMAIL: [email protected] ...................................................................................... 61 CONTACT US BY PHONE: ................................................................................................................................................ 61
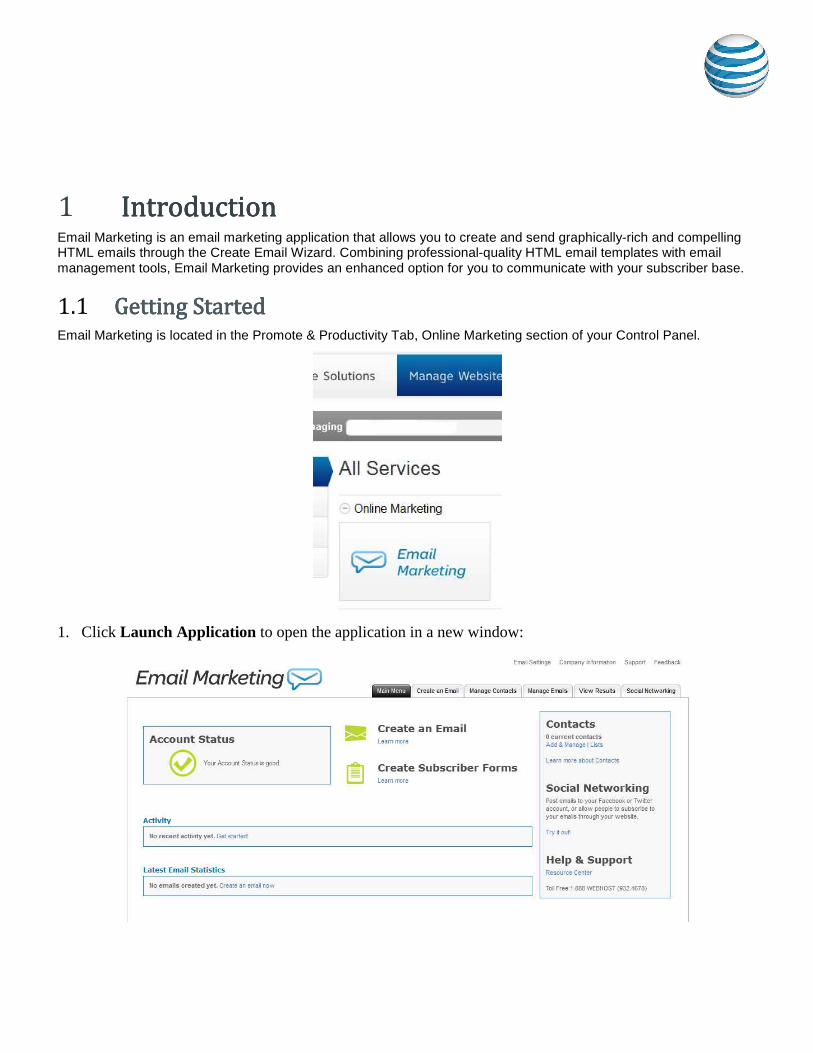
1 IntroductionIntroductionIntroductionIntroduction Email Marketing is an email marketing application that allows you to create and send graphically-rich and compelling HTML emails through the Create Email Wizard. Combining professional-quality HTML email templates with email management tools, Email Marketing provides an enhanced option for you to communicate with your subscriber base.
1.1 Getting Getting Getting Getting StartedStartedStartedStarted Email Marketing is located in the Promote & Productivity Tab, Online Marketing section of your Control Panel.
1. Click Launch Application to open the application in a new window:
1.2 NavigationNavigationNavigationNavigation
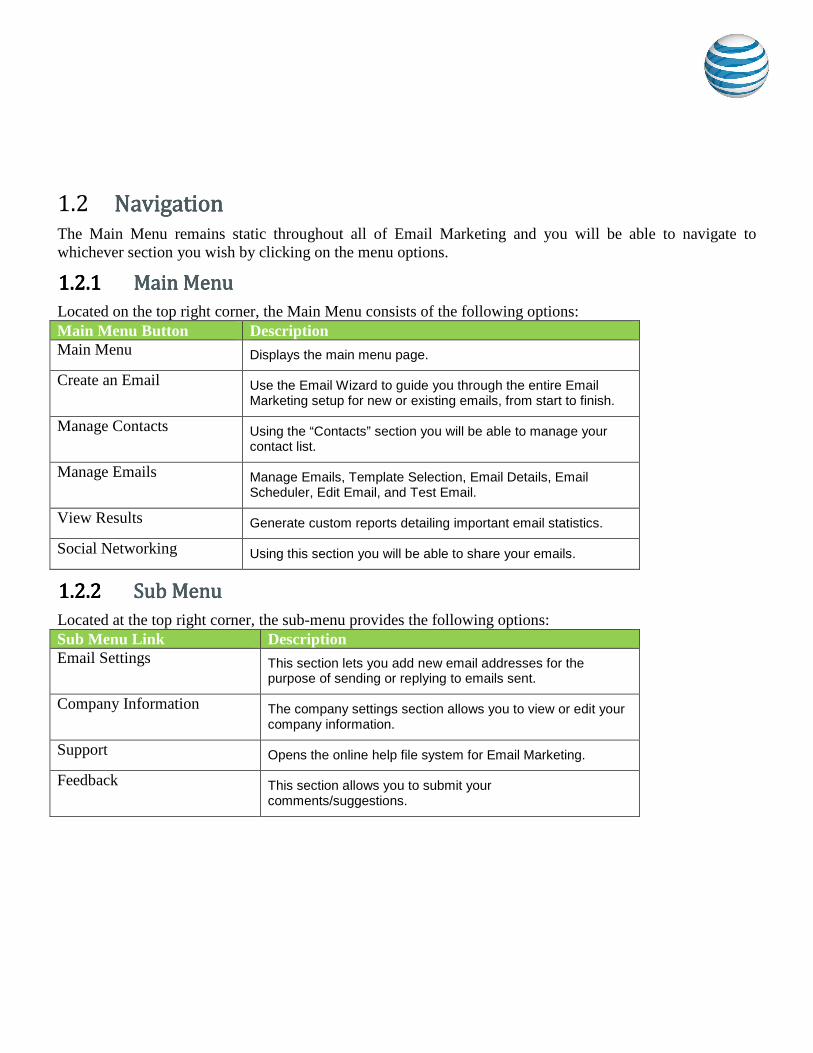
The Main Menu remains static throughout all of Email Marketing and you will be able to navigate to whichever section you wish by clicking on the menu options.
1.2.11.2.11.2.11.2.1 MainMainMainMain MenuMenuMenuMenu
Located on the top right corner, the Main Menu consists of the following options: Main Menu Button Description Main Menu Displays the main menu page.
Create an Email Use the Email Wizard to guide you through the entire Email Marketing setup for new or existing emails, from start to finish.
Manage Contacts Using the “Contacts” section you will be able to manage your contact list.
Manage Emails Manage Emails, Template Selection, Email Details, Email Scheduler, Edit Email, and Test Email.
View Results Generate custom reports detailing important email statistics.
Social Networking Using this section you will be able to share your emails.
1.2.21.2.21.2.21.2.2 Sub MenuSub MenuSub MenuSub Menu
Located at the top right corner, the sub-menu provides the following options: Sub Menu Link Description Email Settings This section lets you add new email addresses for the
purpose of sending or replying to emails sent.
Company Information The company settings section allows you to view or edit your company information.
Support Opens the online help file system for Email Marketing.
Feedback This section allows you to submit your comments/suggestions.
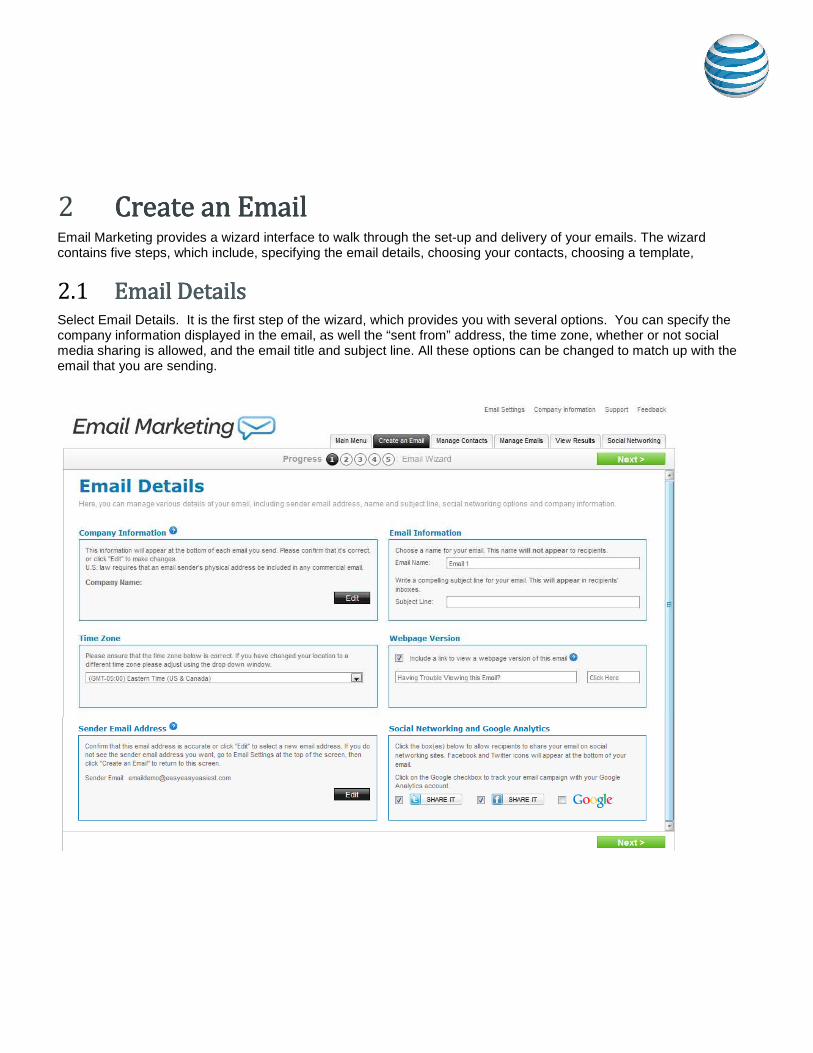
2 Create an EmailCreate an EmailCreate an EmailCreate an Email Email Marketing provides a wizard interface to walk through the set-up and delivery of your emails. The wizard contains five steps, which include, specifying the email details, choosing your contacts, choosing a template,
2.1 Email DetailsEmail DetailsEmail DetailsEmail Details Select Email Details. It is the first step of the wizard, which provides you with several options. You can specify the company information displayed in the email, as well the “sent from” address, the time zone, whether or not social media sharing is allowed, and the email title and subject line. All these options can be changed to match up with the email that you are sending.
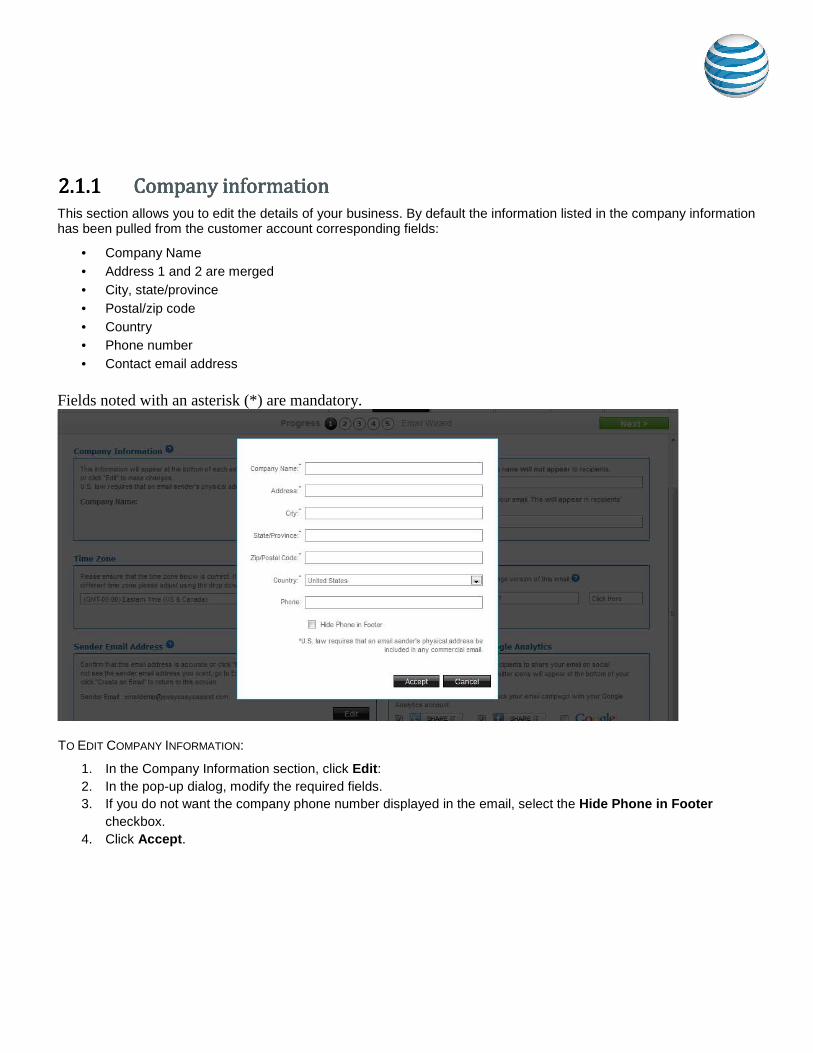
2.1.12.1.12.1.12.1.1 CompanyCompanyCompanyCompany informationinformationinformationinformation
This section allows you to edit the details of your business. By default the information listed in the company information has been pulled from the customer account corresponding fields:
• Company Name • Address 1 and 2 are merged • City, state/province • Postal/zip code • Country • Phone number • Contact email address
Fields noted with an asterisk (*) are mandatory.
TO EDIT COMPANY INFORMATION:
1. In the Company Information section, click Edit: 2. In the pop-up dialog, modify the required fields. 3. If you do not want the company phone number displayed in the email, select the Hide Phone in Footer
checkbox. 4. Click Accept.

2.1.22.1.22.1.22.1.2 TimeTimeTimeTime ZoneZoneZoneZone
This section allows you to set and change the time zone of your email.
TO EDIT THE TIME ZONE:
• Select the appropriate time zone from the drop-down list.
2.1.32.1.32.1.32.1.3 SenderSenderSenderSender Email AddressEmail AddressEmail AddressEmail Address
The sender email address will appear as the "Sent From" address when your email is delivered. Sender email addresses need to be confirmed to verify your identity as the sender.
Emails will not be sent from unconfirmed email addresses. After completing the wizard, you must, check your email inbox for the identity confirmation email.
Note: If you do not see your identity confirmation email in your inbox, please check your Junk mail box as your email program may have labeled it as SPAM.
To Edit the Sender email Address: 1. In the Sender Email Address section, click Edit. 2. In the Sender Email Address drop-down list, select the email address that you want to appear in the
“Sent From” field. 3. Click Accept.
Note: If the Email address is not listed in the drop-down list, you can add a new address on the Email Settings page. For more information about adding an email address, see Email Details.
2.1.42.1.42.1.42.1.4 EmailEmailEmailEmail InformationInformationInformationInformation
This section allows you to name your email (for internal references) and provide a subject line (displayed to customers).
TO ADD EMAIL INFORMATION
1. In the Email Information section, enter the name for your email. 2. Enter the Subject Line for your email.
2.1.52.1.52.1.52.1.5 Webpage VersionWebpage VersionWebpage VersionWebpage Version
This section allows you to include a link to a Webpage version of the content. You can edit the default description as well as the link text. TO ADD WEBPAGE VERSION:
1. In the Webpage Version section, select the Include a link to view a webpage version of this email checkbox. 2. Change the default description for the link, if required. 3. Change the default link text, if required.

2.1.62.1.62.1.62.1.6 SocSocSocSociiiiaaaallll Networking and Google AnalyticsNetworking and Google AnalyticsNetworking and Google AnalyticsNetworking and Google Analytics
This section allows you to specify whether your email recipients can share this email on their social media sites. You can also use your Google Analytics account to track the visits to your Website.
TO ENABLE SOCIAL NETWORKING:
1. To enable sharing through Twitter, select the Twitter SHARE IT checkbox. 2. To enable sharing through Facebook, select the Facebook SHARE IT checkbox. 3. To enable Google Analytics, select the Google checkbox.
2.2 ChooseChooseChooseChoose ContactsContactsContactsContacts The Choose Contacts page allows you to select one or more contact lists as the recipients of this email. You can also create a new contact list by importing email addresses from an external source.
The available import options include:
• Windows Live • Yahoo • Gmail • Outlook • CSV file • Excel
You can update, delete or add contacts to any of your lists using the Manage Contacts page.
By entering your account and password details, Email Marketing will import all of the contacts from those accounts. Note that Email Marketing will not store passwords.

You are limited to 1500 contacts to be imported; if you have more than 1500 contacts in your contact list we suggest that you create multiple .csv files (1500 contacts or less) and import them one at a time, or cut and paste the email addresses (1500 emails addresses or less) using the Cut and Paste Email List button.
You can also create your own spread sheet of contacts (i.e. Microsoft Excel) and save it as .CSV file. Next find the file on your computer and using the “Import” feature import the contacts.
TO ADD A NEW CONTACT LIST:
1. Click Add New Contact List.
2. Select your import option from the How would you like to add your contacts drop-down.
3. For contacts from Windows Live, Yahoo, or Gmail accounts, do the following:

• Select the appropriate email account and do the following:
•
• Enter your email address and password.
• Click Save List. 4. For Outlook contacts, select Import from Outlook and do the following:
• Click Browse. • Upload your .csv file. • Click Save List.
Note: Before you can import your Outlook contacts, you must save your contacts as a .csv file. 5. For .csv files, select Import from .CSV and do the following:
• Click Browse. • Upload your .csv file. • Click Save List.
The Match columns from imported list dialog opens. • Adjust any required fields and click Save.
6. For Excel contacts, select Import from Excel and do the following: • Click Browse. • Upload your .Excel file. • Click Save List.
The Match columns from imported list dialog opens.

• Adjust any required fields and click Save. 7. To add contacts manually, do the following:
• Select Copy and Paste Email Addresses or Add Emails individually. • Click Save File.
Note: Enter one email address per line. You can input a maximum of 1500 email addresses using this method. Any further contact information (name, address, etc.) will need to be updated manually in the contact section.
TO SAVE YOUR OUTLOOK CONTACTS AS A .CSV FILE:
1. In MS Outlook, click File. 2. Click Import and Export. 3. Choose Export to File. 4. Select Comma Separated Values (Windows). 5. Choose the location where you’d like the file saved to. 6. Click Do Import Duplicate Items. 7. Select Contacts from the drop down that will appear showing your tree structure of folders 8. Click Next. 9. In Email Marketing, click Browse and search for your file that you have saved in the previous steps. 10. Once you have found the file, click Import. 11. Click Next.
If you checked send an opt in message to subscriber, then

The subscriber will receive an email message to opt in
Then if the subscriber agrees to opt in, they will receive the following message:
2.2.12.2.12.2.12.2.1 Segmenting a Contact ListSegmenting a Contact ListSegmenting a Contact ListSegmenting a Contact List
Contact segmenting allows you to filter targeted audiences out of a list by setting up one or more rules. Each list should allow for one or more segments to be created underneath it. These segments are a series of rules that filter lists into smaller audiences. More than one rule is connected with either an AND or OR logical operator. The resulting set of rules can be defined either:
TO SEGMENT CONTACTS:
1. Select the I want to segment my contacts checkbox.
2. In the Matches drop-down, select one of the following:
• All
• One
3. Select the field that this segment should filter.
4. Select one of the following filter parameters:
• Is
• Is not

• Contains
• Does not contain
• Starts with
• Ends with
5. Enter the filter value in the corresponding text field.
6. To add another rule, click Add another rule.
2.3 ChooseChooseChooseChoose aaaa TemplateTemplateTemplateTemplate
Templates allow you to select the overall layout and theme of your email:
TO SELECT AN EMAIL TEMPLATE:
1. Use the drop-down menu to select a category of Templates that best suit your needs. 2. Select a Template.
A confirmation dialog opens. 3. To choose a different template, click Select different template. 4. To accept the selected template, click Select this template. 5. Click Next.
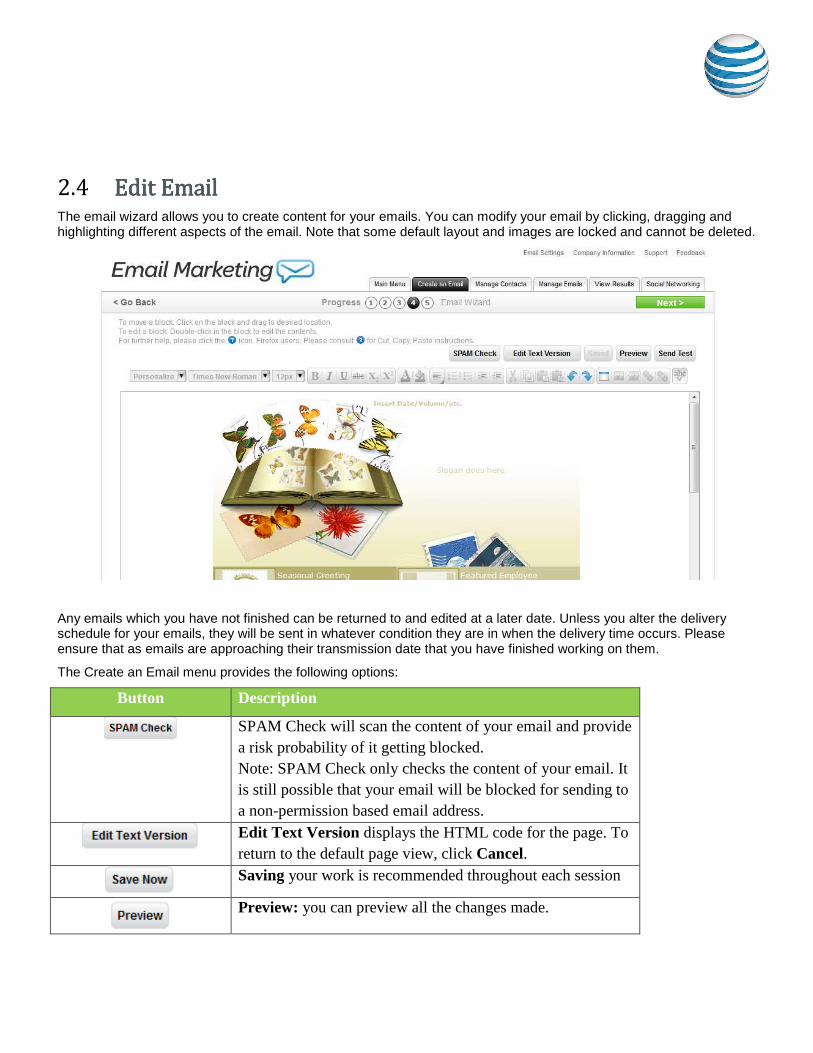
2.4 Edit Edit Edit Edit EmailEmailEmailEmail The email wizard allows you to create content for your emails. You can modify your email by clicking, dragging and highlighting different aspects of the email. Note that some default layout and images are locked and cannot be deleted.
Any emails which you have not finished can be returned to and edited at a later date. Unless you alter the delivery schedule for your emails, they will be sent in whatever condition they are in when the delivery time occurs. Please ensure that as emails are approaching their transmission date that you have finished working on them.
The Create an Email menu provides the following options:
Button Description
SPAM Check will scan the content of your email and provide a risk probability of it getting blocked. Note: SPAM Check only checks the content of your email. It is still possible that your email will be blocked for sending to a non-permission based email address.
Edit Text Version displays the HTML code for the page. To return to the default page view, click Cancel.
Saving your work is recommended throughout each session
Preview: you can preview all the changes made.
Button Description
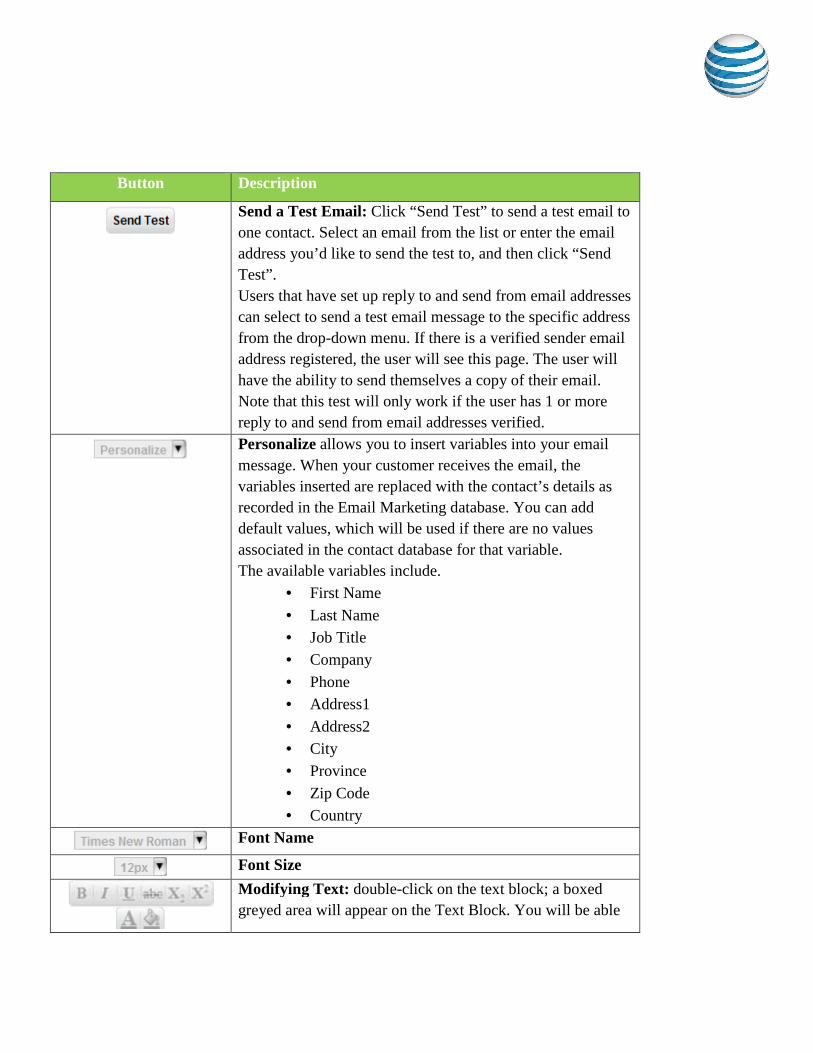
Send a Test Email: Click “Send Test” to send a test email to one contact. Select an email from the list or enter the email address you’d like to send the test to, and then click “Send Test”. Users that have set up reply to and send from email addresses can select to send a test email message to the specific address from the drop-down menu. If there is a verified sender email address registered, the user will see this page. The user will have the ability to send themselves a copy of their email. Note that this test will only work if the user has 1 or more reply to and send from email addresses verified.
Personalize allows you to insert variables into your email message. When your customer receives the email, the variables inserted are replaced with the contact’s details as recorded in the Email Marketing database. You can add default values, which will be used if there are no values associated in the contact database for that variable. The available variables include.
• First Name
• Last Name • Job Title • Company
• Phone • Address1
• Address2 • City • Province
• Zip Code • Country
Font Name
Font Size
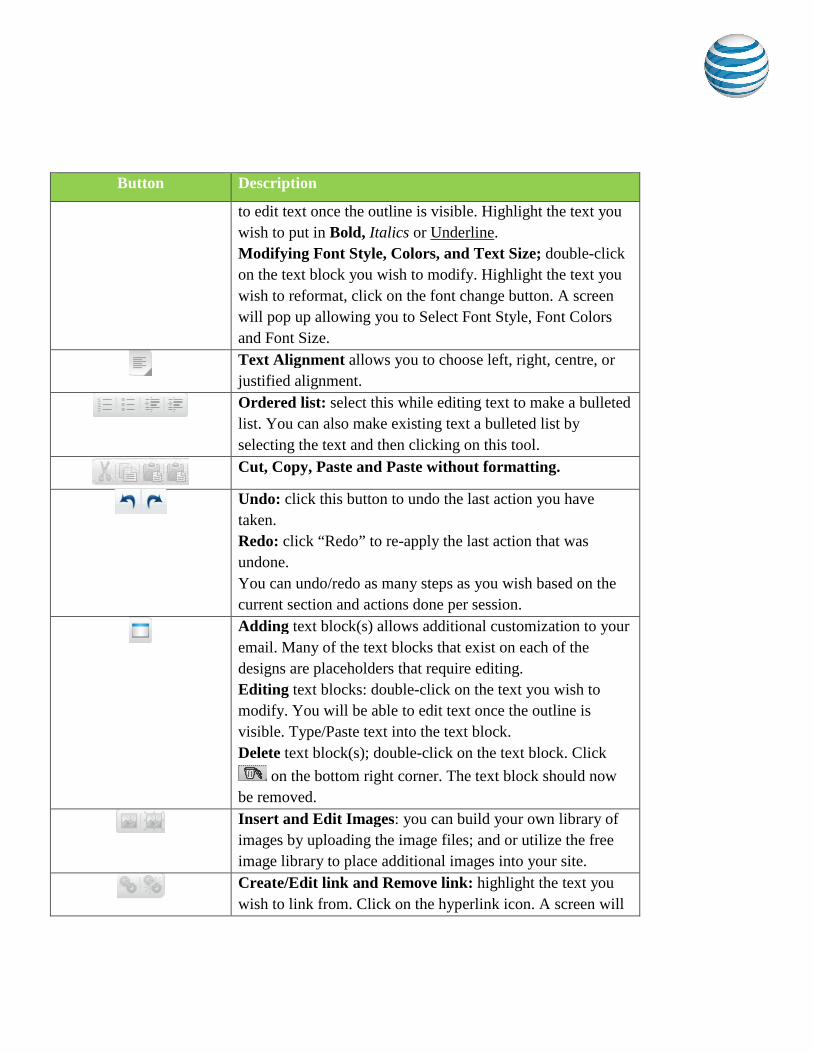
Modifying Text: double-click on the text block; a boxed greyed area will appear on the Text Block. You will be able

Button Description
to edit text once the outline is visible. Highlight the text you wish to put in Bold, Italics or Underline. Modifying Font Style, Colors, and Text Size; double-click on the text block you wish to modify. Highlight the text you wish to reformat, click on the font change button. A screen will pop up allowing you to Select Font Style, Font Colors and Font Size.
Text Alignment allows you to choose left, right, centre, or justified alignment.
Ordered list: select this while editing text to make a bulleted list. You can also make existing text a bulleted list by selecting the text and then clicking on this tool.
Cut, Copy, Paste and Paste without formatting.
Undo: click this button to undo the last action you have taken. Redo: click “Redo” to re-apply the last action that was undone. You can undo/redo as many steps as you wish based on the current section and actions done per session.
Adding text block(s) allows additional customization to your email. Many of the text blocks that exist on each of the designs are placeholders that require editing. Editing text blocks: double-click on the text you wish to modify. You will be able to edit text once the outline is visible. Type/Paste text into the text block. Delete text block(s); double-click on the text block. Click
on the bottom right corner. The text block should now be removed.
Insert and Edit Images: you can build your own library of images by uploading the image files; and or utilize the free image library to place additional images into your site.
Create/Edit link and Remove link: highlight the text you wish to link from. Click on the hyperlink icon. A screen will

Button Description
pop up. Type in the desired URL, such ashttp://domain.com.
Checking Spelling: within a text block, double left click on the text block you wish to check spelling for. Click on the “Check spelling” tool in the Editor toolbar. Words which appear to be spelled incorrectly are outlined in red. Click on the red outline and select from the option list for the correct word. It will automatically be corrected.
2.4.12.4.12.4.12.4.1 PreviewPreviewPreviewPreview EmailEmailEmailEmail
The purpose of this page is to let the user know that they are nearly done developing their email. The page provides a preview of the customized template.
Users will see the contacts as well as the sender email address that was set up in previous steps. Here they can change the title of the Email as well as the contacts list.
TO PREVIEW YOUR EMAIL:
1. Click Preview.
2. On the Preview page, click Apply Changes.

2.5 ScheduleScheduleScheduleSchedule EmailEmailEmailEmail In this step you will need to indicate the date and time when the email should be sent.
TO SCHEDULE YOUR EMAIL
1. On the Schedule Email page, do one of the following:
• Select Send Now. The Email will be added to the distribution queue and will be sent out.
Note: If the sender email has not been verified the user will be displayed with the following message and the email will not be sent out until the sender email has been verified.
• Select Save Draft. You can save it as a draft and edited later within the Manage Emails section
• Select Schedule Email. Select a date and time when the Email should be sent out. You can:
o Select a date from the calendar. o Select the time and time zone.
• Select Save as an Autoresponder: o To send the email when the contact is added to the list, select the Sends at addition of new
contact to selected list radio button. o To specify the amount of time before sending the email, select the Sends radio button and
specify the time in days or weeks. 2. Click Next.
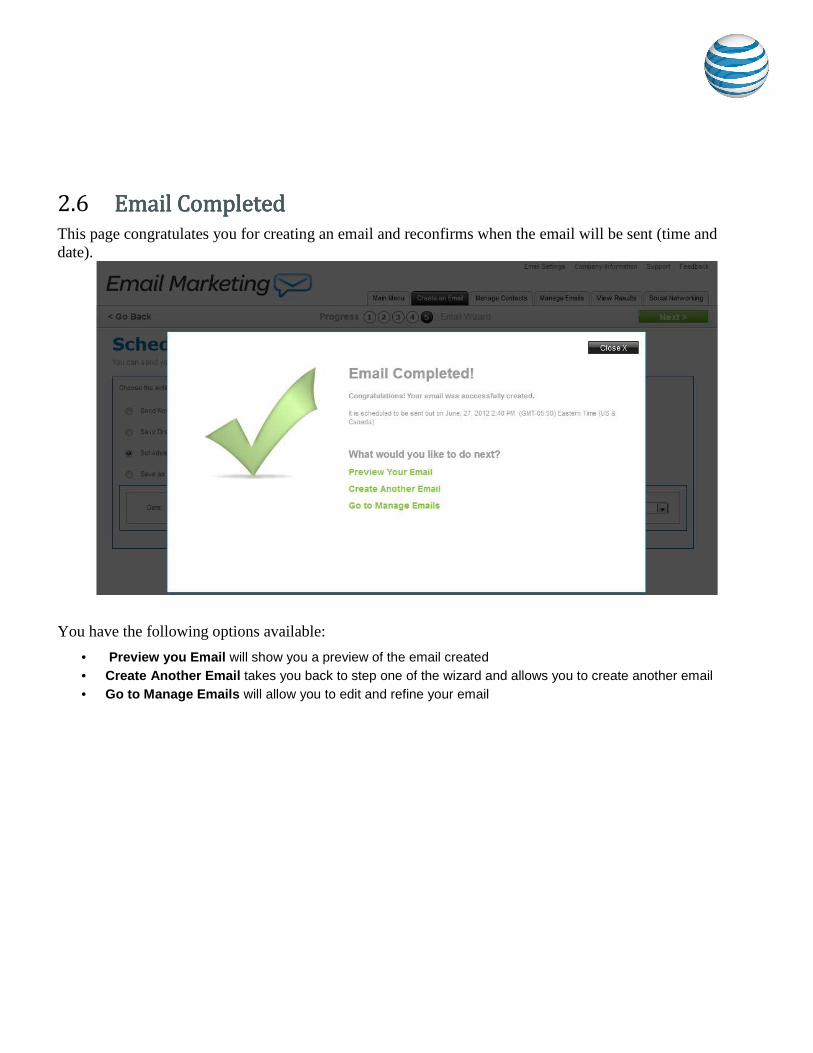
2.6 EmailEmailEmailEmail CompletedCompletedCompletedCompleted
This page congratulates you for creating an email and reconfirms when the email will be sent (time and date).
You have the following options available:
• Preview you Email will show you a preview of the email created • Create Another Email takes you back to step one of the wizard and allows you to create another email • Go to Manage Emails will allow you to edit and refine your email

2.7 Managing Managing Managing Managing CompanyCompanyCompanyCompany InformationInformationInformationInformation This section allows you to enter the details of your business. By default, company information is hidden from public view.
TO MODIFY COMPANY DETAILS:
1. Click Company Information.
2. On the Company Information page, make the required changes.
3. Click Apply to commit changes or Cancel if you do not want to commit the changes.
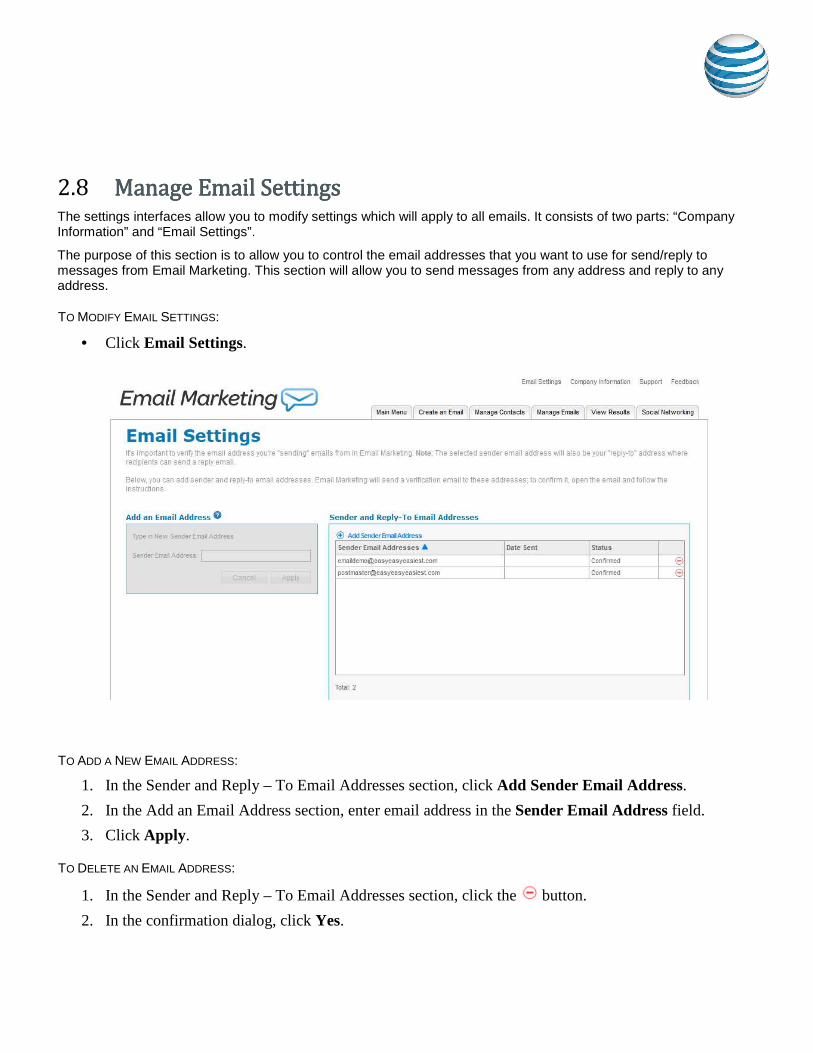
2.8 Manage Manage Manage Manage EmailEmailEmailEmail SettingsSettingsSettingsSettings The settings interfaces allow you to modify settings which will apply to all emails. It consists of two parts: “Company Information” and “Email Settings”.
The purpose of this section is to allow you to control the email addresses that you want to use for send/reply to messages from Email Marketing. This section will allow you to send messages from any address and reply to any address.
TO MODIFY EMAIL SETTINGS:
• Click Email Settings.
TO ADD A NEW EMAIL ADDRESS:
1. In the Sender and Reply – To Email Addresses section, click Add Sender Email Address.
2. In the Add an Email Address section, enter email address in the Sender Email Address field.
3. Click Apply.
TO DELETE AN EMAIL ADDRESS:
1. In the Sender and Reply – To Email Addresses section, click the button.
2. In the confirmation dialog, click Yes.

3 Manage Manage Manage Manage ContactsContactsContactsContacts This page allows you to add contacts to any of your available lists, create new lists, import email addresses from an external source, or export an entire list.
3.1 Add ContactsAdd ContactsAdd ContactsAdd Contacts This step allows you to add contacts to the list(s) that you have created. To add a contact, enter all available information into the fields provided. The only required field is the email address.
Next, select which list(s) you would like to add this contact to. You can do this by clicking on the checkbox beside each list you want to add it to.
TO ADD A CONTACT:
1. On the Add Contacts page, enter the email address of a new contact. 2. Select the list for which this contact should be added. 3. To send an opt-in message to your subscribers, select Check this box to send an opt-in message to
subscribers. When this is selected, your contacts must first respond to the “opt-in” request before they can receive emails.
4. Click Add.
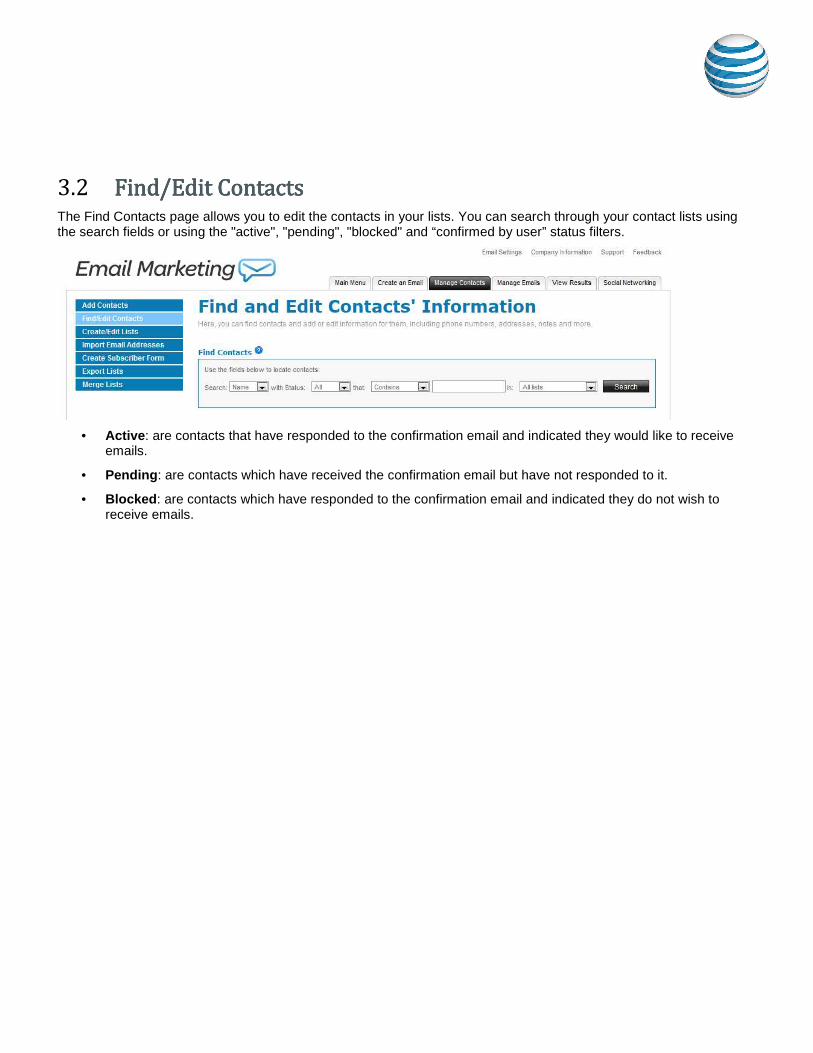
3.2 FindFindFindFind/Edit Conta/Edit Conta/Edit Conta/Edit Contactsctsctscts The Find Contacts page allows you to edit the contacts in your lists. You can search through your contact lists using the search fields or using the "active", "pending", "blocked" and “confirmed by user” status filters.
• Active: are contacts that have responded to the confirmation email and indicated they would like to receive
emails.
• Pending: are contacts which have received the confirmation email but have not responded to it.
• Blocked: are contacts which have responded to the confirmation email and indicated they do not wish to receive emails.
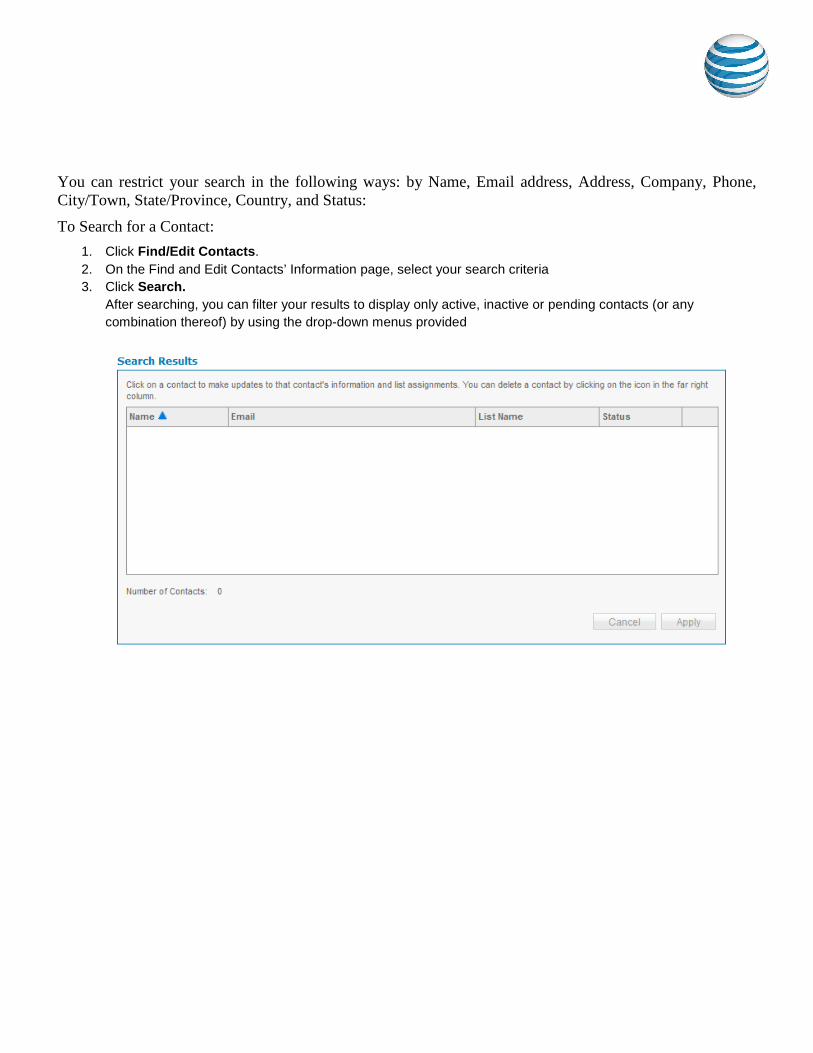
You can restrict your search in the following ways: by Name, Email address, Address, Company, Phone, City/Town, State/Province, Country, and Status:
To Search for a Contact:
1. Click Find/Edit Contacts. 2. On the Find and Edit Contacts’ Information page, select your search criteria 3. Click Search.
After searching, you can filter your results to display only active, inactive or pending contacts (or any combination thereof) by using the drop-down menus provided
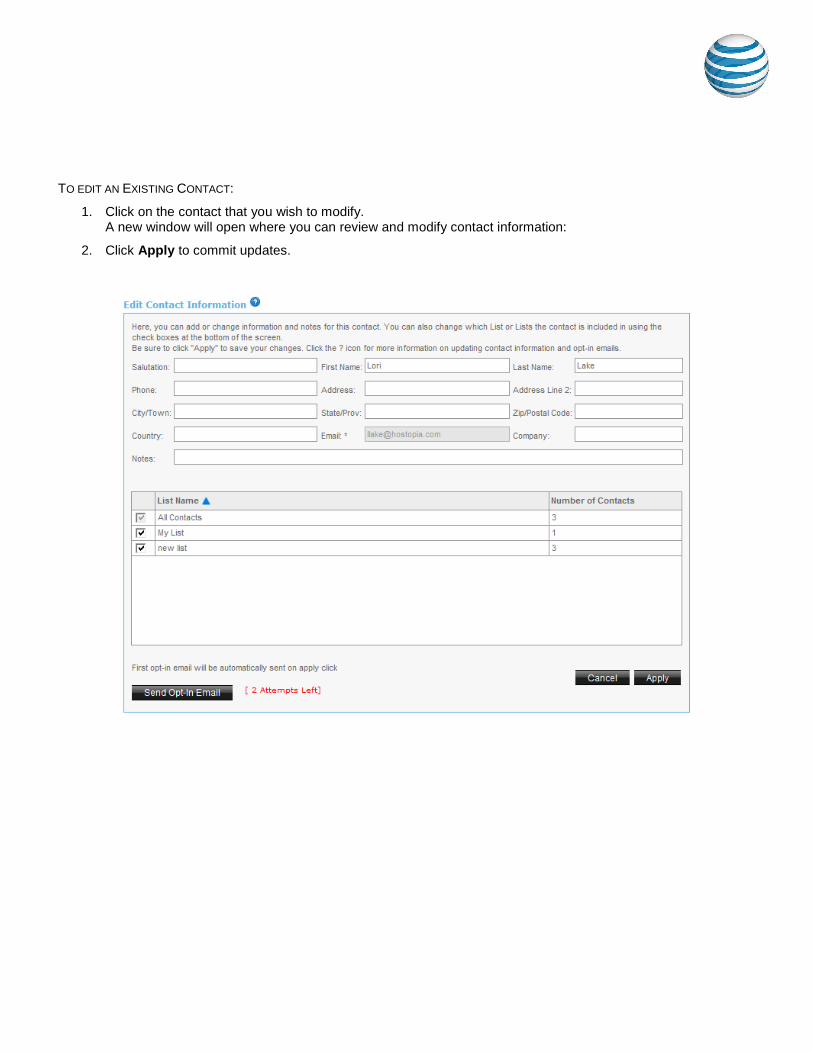
TO EDIT AN EXISTING CONTACT:
1. Click on the contact that you wish to modify. A new window will open where you can review and modify contact information:
2. Click Apply to commit updates.
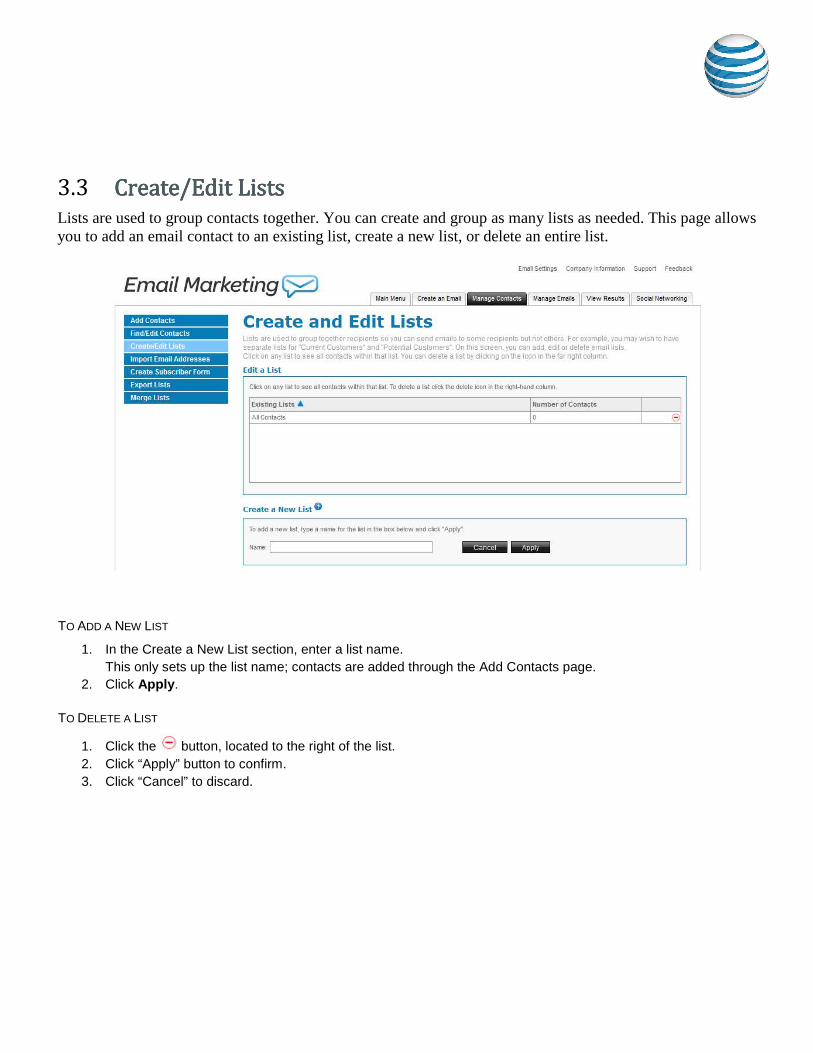
3.3 CreateCreateCreateCreate/Edit /Edit /Edit /Edit ListsListsListsLists
Lists are used to group contacts together. You can create and group as many lists as needed. This page allows you to add an email contact to an existing list, create a new list, or delete an entire list.
TO ADD A NEW LIST
1. In the Create a New List section, enter a list name. This only sets up the list name; contacts are added through the Add Contacts page.
2. Click Apply.
TO DELETE A LIST
1. Click the button, located to the right of the list. 2. Click “Apply” button to confirm. 3. Click “Cancel” to discard.

TO EDIT AN EXISTING LIST
1. Click on the name of the list you want to edit. A Search Results dialog displays a list of all contact contained in the selected list:
2. In order to edit a certain contact within that list click on a contact; the “Edit contact” page will open shown on
previous page
3.4 ImportImportImportImport EmailEmailEmailEmail AddressesAddressesAddressesAddresses
The Import Email Addresses page allows you to import contacts from an external email address or a file on your computer. You can import your contacts to an existing list or create a new list with the imported contacts.
Note: Email Marketing does not import or store passwords.
By entering your live.com, hotmail.com, Yahoo! Mail, Gmail account and password details, Email Marketing will import all of the contacts from those accounts. You import up to1500 contacts – if you have more than 1500 contacts in your external contact list, you can create multiple .csv files (1500 contacts or less) and import them one at a time.
Alternatively, you can “cut and paste” the email addresses (1500 emails addresses or less). Please separate each email address with a space, or one email address on each line. Any further contact information (name, address, etc.) will need to be updated manually in the contact section.
You can also create your own spread sheet of contacts (i.e. Microsoft Excel) and save it as .csv file, which can be imported.
Note that if you wish to create your own spread sheet of contacts, the spread sheet must contain column headings and the minimum info required is the contacts email address.
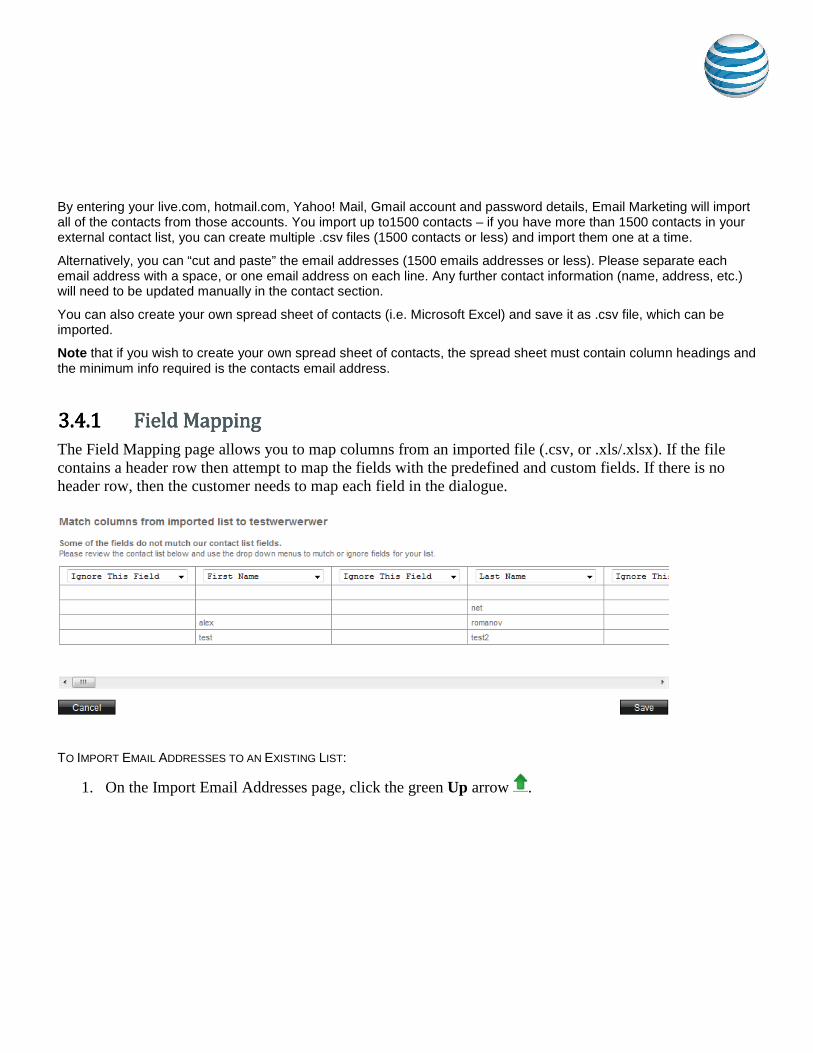
3.4.13.4.13.4.13.4.1 Field MappingField MappingField MappingField Mapping
The Field Mapping page allows you to map columns from an imported file (.csv, or .xls/.xlsx). If the file contains a header row then attempt to map the fields with the predefined and custom fields. If there is no header row, then the customer needs to map each field in the dialogue.
TO IMPORT EMAIL ADDRESSES TO AN EXISTING LIST:
1. On the Import Email Addresses page, click the green Up arrow .

2. On the Add New Contacts page, select the import option from the How would you like to add your contacts drop-down.
8. For contacts from Windows Live, Yahoo, or Gmail accounts, do the following:
• Select the appropriate email account and do the following:
• Enter your email address and password.
• Click Save List.
9. For Outlook contacts, select Import from Outlook and do the following: • Click Browse. • Upload your .csv file. • Click Save List.
Note: Before you can import your Outlook contacts, you must save your contacts as a .csv file.
10. For Excel contacts, select Import from Excel and do the following: • Click Browse. • Upload your .Excel file. • Click Save List.
The Match columns from imported list dialog opens. • Adjust any required fields and click Save. • ]
11. For .csv files, select Import from .CSV and do the following: • Click Browse. • Upload your .csv file. • Click Save List.
The Match columns from imported list dialog opens. • Adjust any required fields and click Save.
12. To add contacts manually, do the following: • Select Copy and Paste Email Addresses or Add Emails individually. • Click Save File.
Note: Enter one email address per line. You can input a maximum of 1500 email addresses using this method. Any further contact information (name, address, etc.) will need to be updated manually in the contact section.

TO ADD A NEW CONTACT LIST:
1. Click Add New Contact List.
2. Select your import option from the How would you like to add your contacts drop-down.
3. For contacts from Windows Live, Yahoo, or Gmail accounts, do the following:
• Select the appropriate email account and do the following:
• Enter your email address and password.
• Click Save List. 4. For Outlook contacts, select Import from Outlook and do the following:
• Click Browse. • Upload your .csv file. • Click Save List.
Note: Before you can import your Outlook contacts, you must save your contacts as a .csv file. 5. For Excel contacts, select Import from Excel and do the following:
• Click Browse. • Upload your .Excel file. • Click Save List.
6. To add contacts manually, do the following: • Select Copy and Paste Email Addresses or Add Emails individually. • Click Save File.
Note: Enter one email address per line. You can input a maximum of 1500 email addresses using this method. Any further contact information (name, address, etc.) will need to be updated manually in the contact section.
TO SAVE YOUR OUTLOOK CONTACTS AS A .CSV FILE:
1. In MS Outlook, click File.
2. Click Import and Export.
3. Choose Export to File.
4. Select Comma Separated Values (Windows).
5. Choose the location where you’d like the file saved to.
6. Click Do Import Duplicate Items.
7. Select Contacts from the drop down that will appear showing your tree structure of folders
8. Click Next.
9. In Email Marketing, click Browse and search for your file that you have saved in the previous steps.
10. Once you have found the file, click Import.
11. Click Next.

3.5 Create Subscriber FormsCreate Subscriber FormsCreate Subscriber FormsCreate Subscriber Forms
The Create Subscriber Forms page allows you to customize the look and feel of your subscriber form to match the colors of your Website. The user should also have the ability to choose which list the subscribers are placed into as well as control over the fields displayed on the subscriber form. The current subscriber form page should include options for font and background colors, which fields should be included, which are required, and which list a subscriber should be placed into. The purpose of this function is to allow a user to create one or more subscriber forms. Each subscriber form is associated with exactly one (1) contact list. For each subscriber form, a user can specify the fields, order of the fields, required fields, and color preferences
3.5.13.5.13.5.13.5.1 Editing a FormEditing a FormEditing a FormEditing a Form
The edit Form page allows you to modify an existing Subscriber form. You can add or delete fields using the Add Field and Field Settings tabs. When you add a new field through the Add Field tab, the Field Settings opens so that you change the default label. Each time a new filed is added, the changes are displayed in a dynamic preview.
Example: My current form only contains an email address and I want to add fields for the customer to enter their name. To add these fields I would do the following:
• Click the Add Field tab.
• Select the Full Name checkbox.
Once selected, the Field Settings tab opens with a default label for that field.
• To change the default label name, enter the text in the Field Name text box.
• Click Add. The preview is updated with your changes and you are returned to the Add Field tab.

This page also provides a Form Settings tab, which allows you to edit the Form title and description. You can also change the label for the Submit button, modify the background, border and text colors, or change the form name or contact list. Any changes made are dynamically displayed in the form preview. Example: I want to change the background colour for my form. To do this:
• Click the Form Settings tab.
• Select the color pallet.
• Select the color
• Then preview updates with your changes.
TO EDIT A SUBSCRIBER FORM:
1. In the Subscriber Form Details list, click the Edit icon. A pop-up dialog opens.
2. Click Edit Form.
3. On the Edit Form page, click the Add Field tab and select the field you want to add to the form. The Field Settings opens with the default value for the filed that you selected:
4. On the field Settings tab, complete the following:
• To change the default field setting, enter a new value.
• To make this field mandatory, select the This field is required checkbox.
• Click Add.
5. Repeat step 4 for each new field.
6. Click Save.
TO CREATE A NEW SUBSCRIBER FORM:
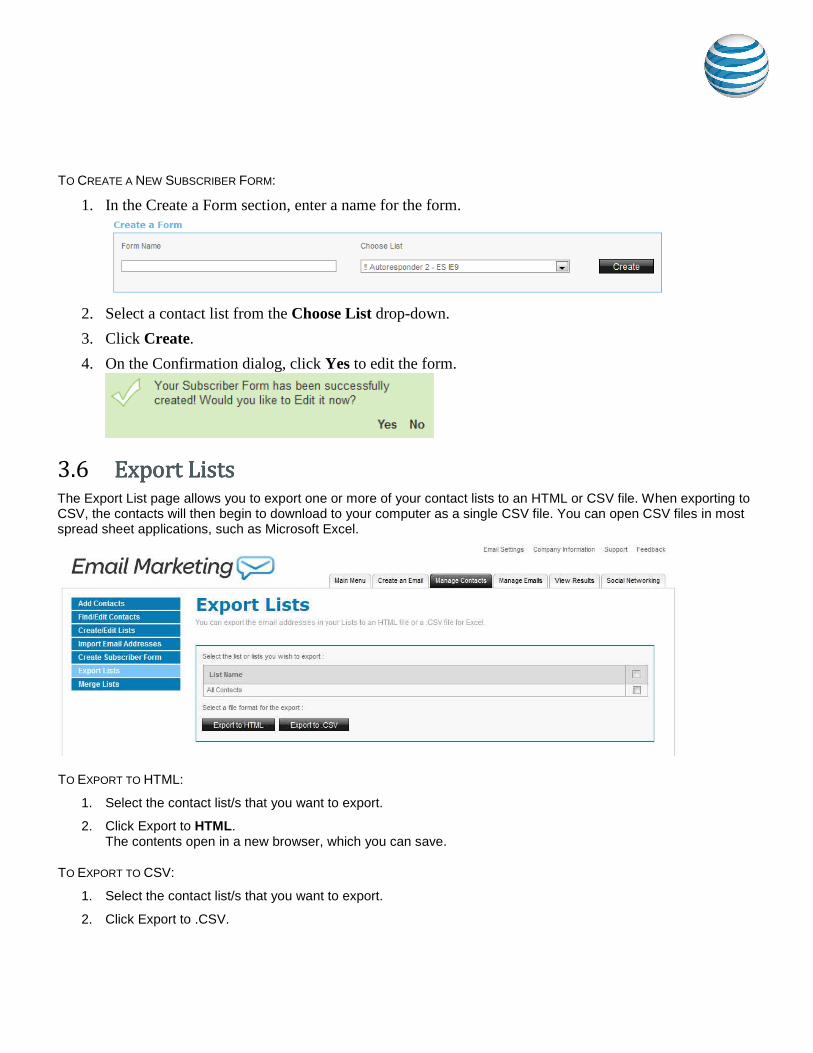
1. In the Create a Form section, enter a name for the form.
2. Select a contact list from the Choose List drop-down.
3. Click Create.
4. On the Confirmation dialog, click Yes to edit the form.
3.6 Export Export Export Export ListsListsListsLists The Export List page allows you to export one or more of your contact lists to an HTML or CSV file. When exporting to CSV, the contacts will then begin to download to your computer as a single CSV file. You can open CSV files in most spread sheet applications, such as Microsoft Excel.
TO EXPORT TO HTML:
1. Select the contact list/s that you want to export.
2. Click Export to HTML. The contents open in a new browser, which you can save.
TO EXPORT TO CSV:
1. Select the contact list/s that you want to export.
2. Click Export to .CSV.

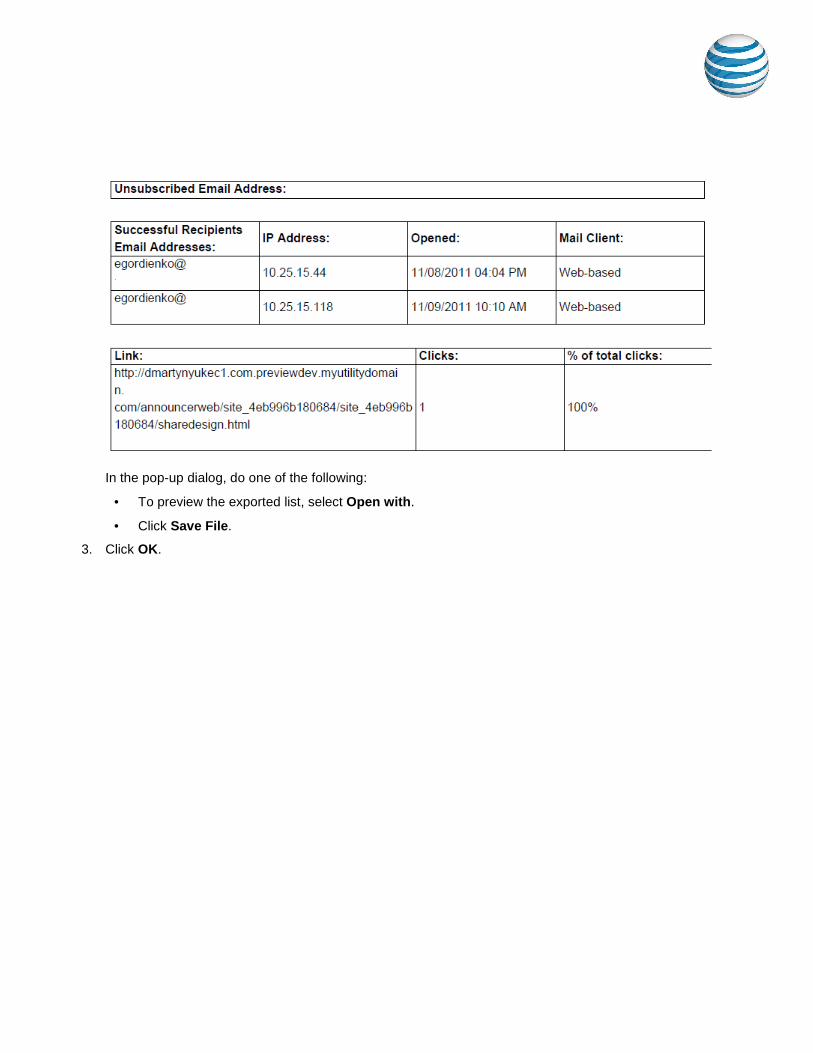
3. In the pop-up dialog, do one of the following:
• To preview the exported list, select Open with.
• Click Save File.
4. Click OK.
3.7 MergeMergeMergeMerge ListsListsListsLists This page allows you to merge one or more lists into another list:
TO MERGE LISTS:
1. Select the list(s) to merge by checking the respective checkbox beside the list in the left tab
2. Select the list to merge into or enter the name of a new list in the right tab
3. Click Apply.
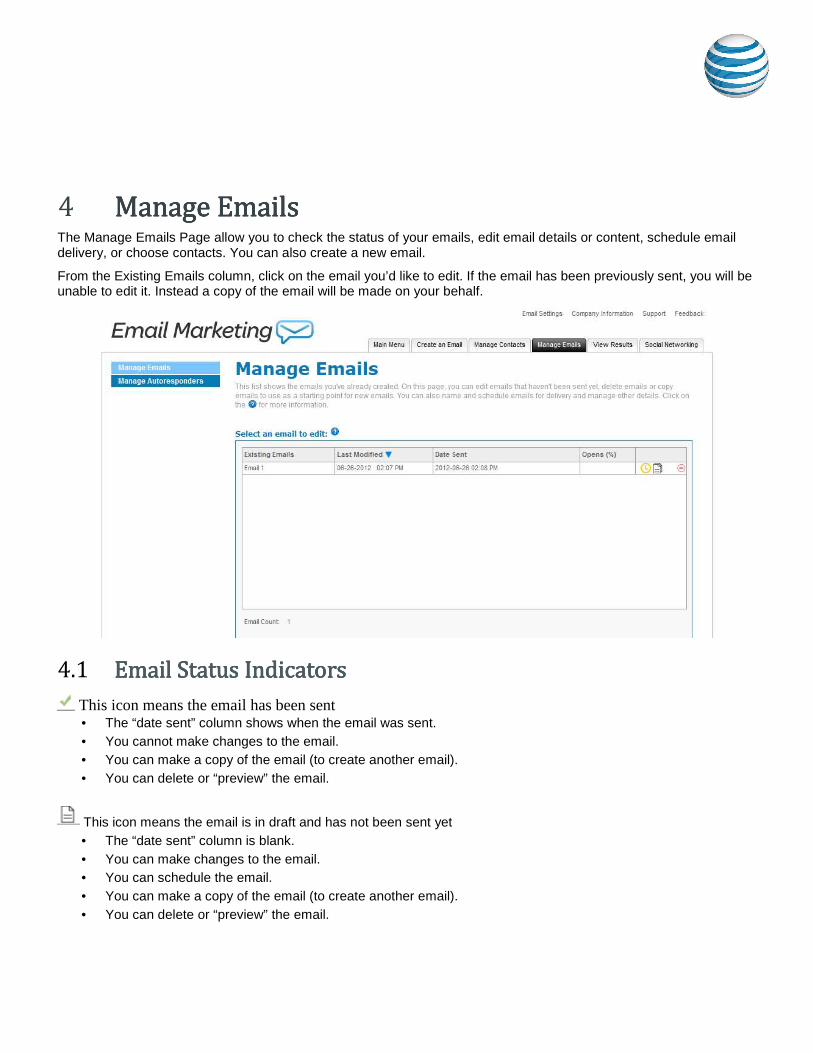
4 ManageManageManageManage EmailsEmailsEmailsEmails The Manage Emails Page allow you to check the status of your emails, edit email details or content, schedule email delivery, or choose contacts. You can also create a new email.
From the Existing Emails column, click on the email you’d like to edit. If the email has been previously sent, you will be unable to edit it. Instead a copy of the email will be made on your behalf.
4.1 Email Status IndicatorsEmail Status IndicatorsEmail Status IndicatorsEmail Status Indicators
This icon means the email has been sent • The “date sent” column shows when the email was sent. • You cannot make changes to the email. • You can make a copy of the email (to create another email). • You can delete or “preview” the email.
This icon means the email is in draft and has not been sent yet • The “date sent” column is blank. • You can make changes to the email. • You can schedule the email. • You can make a copy of the email (to create another email). • You can delete or “preview” the email.

This icon means the email is scheduled to be sent
This icon means the email has not been sent and has expired. • The sender email address has not been verified. Complete one of the following:
o Copy the email and re-schedule, but select a sender email address that has been verified o Copy the email and re-schedule, but first verify the sender email address. o (To verify, find the verification email in your inbox and click on the link in the email)
TO EDIT AN EMAIL:
The following options are available: • Click on to delete an email from the list of existing emails
• Click on to preview your email
• Click on to make a copy of the email
TO DELETE AN EMAIL:
1. Select the email you wish to delete from the existing list of emails
2. Click on the button alongside the email you would like to delete. A pop up window will prompt you to confirm deletion.
3. Click Yes.
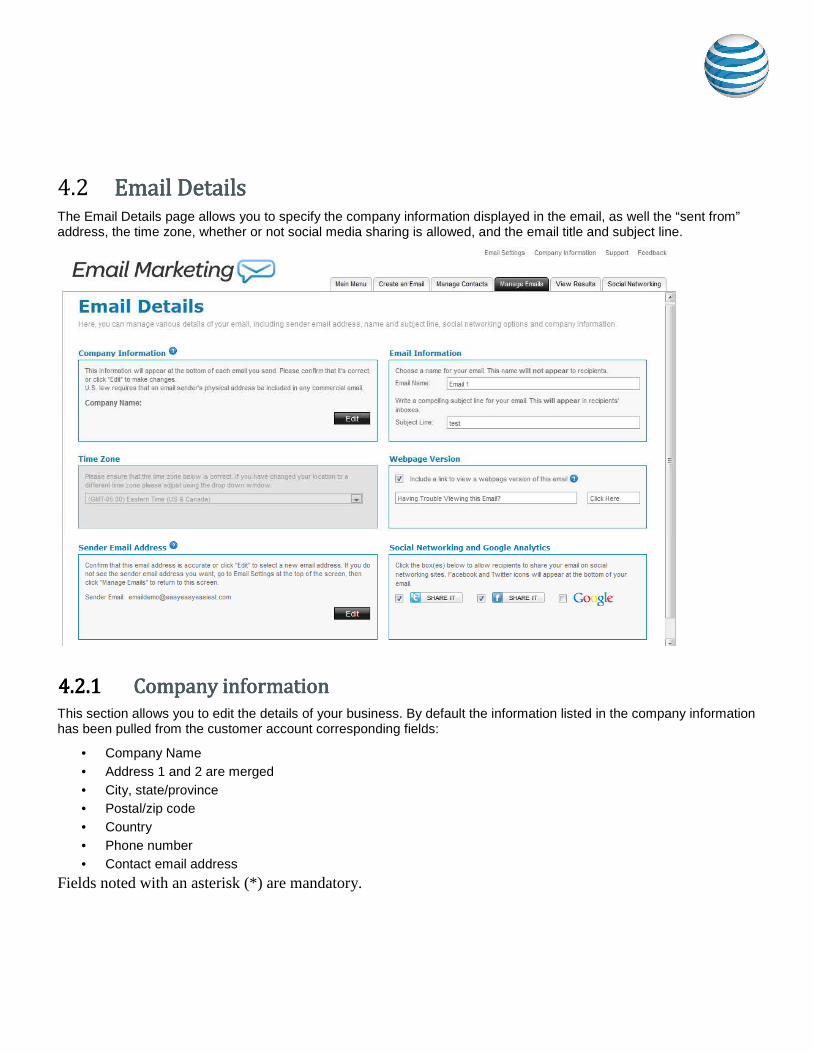
4.2 Email DetailsEmail DetailsEmail DetailsEmail Details The Email Details page allows you to specify the company information displayed in the email, as well the “sent from” address, the time zone, whether or not social media sharing is allowed, and the email title and subject line.
4.2.14.2.14.2.14.2.1 CompanyCompanyCompanyCompany informationinformationinformationinformation
This section allows you to edit the details of your business. By default the information listed in the company information has been pulled from the customer account corresponding fields:
• Company Name • Address 1 and 2 are merged • City, state/province • Postal/zip code • Country • Phone number • Contact email address
Fields noted with an asterisk (*) are mandatory.

TO EDIT COMPANY INFORMATION:
1. In the Company Information section, click Edit:
2. In the pop-up dialog, modify the required fields. 3. If you do not want the company phone number displayed in the email, select the Hide Phone in Footer
checkbox. 4. Click Accept.
4.2.24.2.24.2.24.2.2 TimeTimeTimeTime ZoneZoneZoneZone
This section allows you to change the time zone of your email.
TO EDIT THE TIME ZONE:
• Select the appropriate time zone from the drop-down list.
4.2.34.2.34.2.34.2.3 SenderSenderSenderSender Email AddressEmail AddressEmail AddressEmail Address
The sender email address will appear as the "Sent From" address when your email is delivered. Sender email addresses need to be confirmed to verify your identity as the sender.
Emails will not be sent from unconfirmed email addresses. After completing the wizard, you must, check your email inbox for the identity confirmation email.
Note: If you do not see your identity confirmation email in your inbox, please check your Junk mail box as your email program may have labeled it as SPAM.
To Edit the Sender email Address: 4. In the Sender Email Address section, click Edit. 5. In the Sender Email Address drop-down list, select the email address that you want to appear in the
“Sent From” field. 6. Click Accept.
Note: If the Email address is not listed in the drop-down list, you can add a new address on the Email Settings page. For more information about adding an email address, see Email Details.
4.2.44.2.44.2.44.2.4 EmailEmailEmailEmail InfoInfoInfoInformationrmationrmationrmation
This section allows you to name your email (for internal references) and provide a subject line (displayed to customers).
TO ADD EMAIL INFORMATION
3. In the Email Information section, enter the name for your email. 4. Enter the Subject Line for your email.
4.2.54.2.54.2.54.2.5 Webpage VersionWebpage VersionWebpage VersionWebpage Version
This section allows you to include a link to a Webpage version of the content. You can edit the default description as well as the link text. TO ADD WEBPAGE VERSION:
4. In the Webpage Version section, select the Include a link to view a webpage version of this email checkbox. 5. Change the default description for the link, if required. 6. Change the default link text, if required.
4.2.64.2.64.2.64.2.6 SocSocSocSociiiiaaaallll Networking and Google AnalyticsNetworking and Google AnalyticsNetworking and Google AnalyticsNetworking and Google Analytics
This section allows you to specify whether your email recipients can share this email on their social media sites. You can also use your Google Analytics account to track the visits to your Website.
TO ENABLE SOCIAL NETWORKING:
4. To enable sharing through Twitter, select the Twitter SHARE IT checkbox. 5. To enable sharing through Facebook, select the Facebook SHARE IT checkbox. 6. To enable Google Analytics, select the Google checkbox.

4.3 ChooseChooseChooseChoose ContactsContactsContactsContacts
From the Manage Email page, you can modify the contact list for a particular email.
TO CHOOSE CONTACTS FOR AN EMAIL:
1. On the Manage Emails page, click Choose Contacts.
2. Select the contact list, for which you would like to have the email sent.
3. Click Apply.

TO ADD A NEW CONTACT:
1. On the Manage Emails page, click Choose Contacts.
2. Click Create New List.
3. Select the Send an opt-in message to subscribers checkbox, if required.
4. To import contacts from an external list, select the source form the How would you like add your contacts drop-down.
5. Click Save List.

4.3.14.3.14.3.14.3.1 Segmenting a Contact ListSegmenting a Contact ListSegmenting a Contact ListSegmenting a Contact List
Contact segmenting allows you to filter targeted audiences out of a list by setting up one or more rules. Each list should allow for one or more segments to be created underneath it. These segments are a series of rules that filter lists into smaller audiences. More than one rule is connected with either an AND or OR logical operator. The resulting set of rules can be defined either:
TO SEGMENT CONTACTS:
1. Select the I want to segment my contacts checkbox.
2. In the Matches drop-down, select one of the following:
• All
• One
3. Select the field that this segment should filter.
4. Select one of the following filter parameters:
• Is
• Is not
• Contains
• Does not contain
• Starts with
• Ends with
5. Enter the filter value in the corresponding text field.
6. To add another rule, click Add another rule.
6.
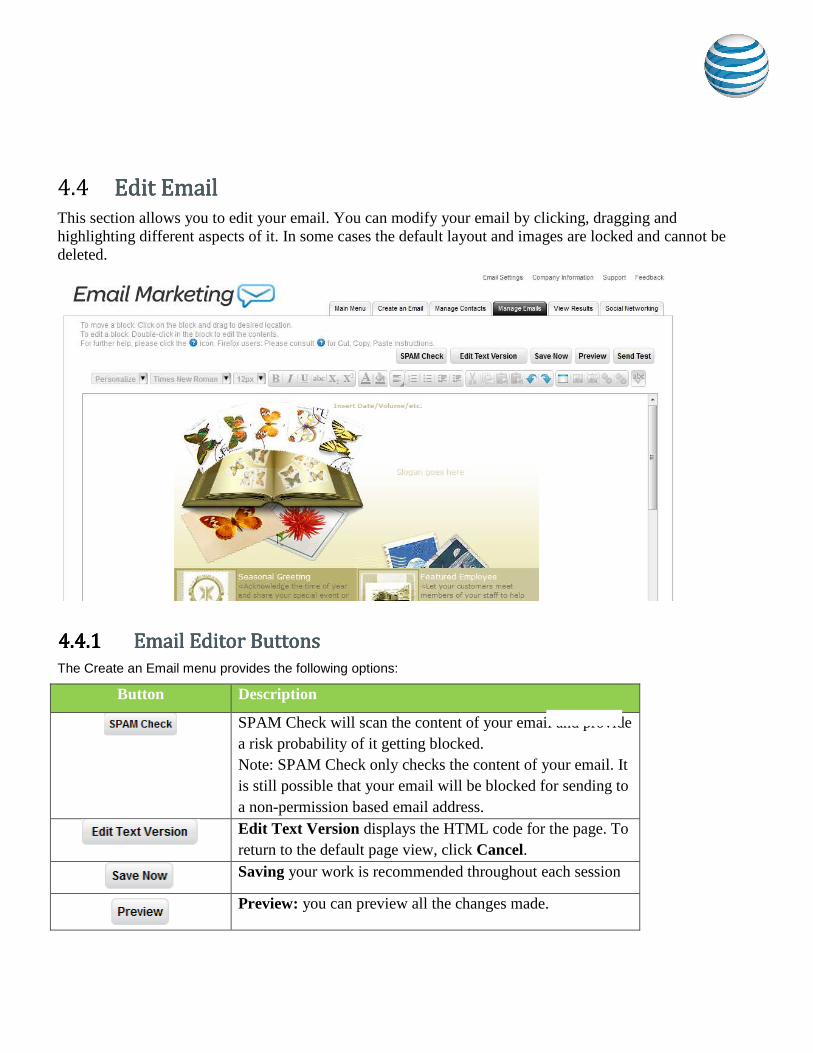
4.4 EditEditEditEdit EmailEmailEmailEmail
This section allows you to edit your email. You can modify your email by clicking, dragging and highlighting different aspects of it. In some cases the default layout and images are locked and cannot be deleted.
4.4.14.4.14.4.14.4.1 EmailEmailEmailEmail Editor ButtonsEditor ButtonsEditor ButtonsEditor Buttons
The Create an Email menu provides the following options:
Button Description
SPAM Check will scan the content of your email and provide a risk probability of it getting blocked. Note: SPAM Check only checks the content of your email. It is still possible that your email will be blocked for sending to a non-permission based email address.
Edit Text Version displays the HTML code for the page. To return to the default page view, click Cancel.
Saving your work is recommended throughout each session
Preview: you can preview all the changes made.

Button Description
Send a Test Email: Click “Send Test” to send a test email to one contact. Select an email from the list or enter the email address you’d like to send the test to, and then click “Send Test”. Users that have set up reply to and send from email addresses can select to send a test email message to the specific address from the drop-down menu. If there is a verified sender email address registered, the user will see this page. The user will have the ability to send themselves a copy of their email. Note that this test will only work if the user has 1 or more reply to and send from email addresses verified.
Personalize allows you to insert variables into your email message. When your customer receives the email, the variables inserted are replaced with the contact’s details as recorded in the Email Marketing database. You can add default values, which will be used if there are no values associated in the contact database for that variable. The available variables include.
• First Name
• Last Name • Job Title • Company
• Phone • Address1
• Address2 • City • Province
• Zip Code • Country
Font Name
Font Size
Modifying Text: double-click on the text block; a boxed greyed area will appear on the Text Block. You will be able
Button Description
to edit text once the outline is visible. Highlight the text you wish to put in Bold, Italics or Underline. Modifying Font Style, Colors, and Text Size; double-click on the text block you wish to modify. Highlight the text you wish to reformat, click on the font change button. A screen will pop up allowing you to Select Font Style, Font Colors and Font Size.
Text Alignment allows you to choose left, right, centre, or justified alignment.
Ordered list: select this while editing text to make a bulleted list. You can also make existing text a bulleted list by selecting the text and then clicking on this tool.
Cut, Copy, Paste and Paste without formatting.
Undo: click this button to undo the last action you have taken. Redo: click “Redo” to re-apply the last action that was undone. You can undo/redo as many steps as you wish based on the current section and actions done per session.
Adding text block(s) allows additional customization to your email. Many of the text blocks that exist on each of the designs are placeholders that require editing. Editing text blocks: double-click on the text you wish to modify. You will be able to edit text once the outline is visible. Type/Paste text into the text block. Delete text block(s); double-click on the text block. Click
on the bottom right corner. The text block should now be removed.
Insert and Edit Images: you can build your own library of images by uploading the image files; and or utilize the free image library to place additional images into your site.
Create/Edit link and Remove link: highlight the text you wish to link from. Click on the hyperlink icon. A screen will

Button Description
pop up. Type in the desired URL, such ashttp://domain.com.
Checking Spelling: within a text block, double left click on the text block you wish to check spelling for. Click on the “Check spelling” tool in the Editor toolbar. Words which appear to be spelled incorrectly are outlined in red. Click on the red outline and select from the option list for the correct word. It will automatically be corrected.
4.5 Schedule EmailSchedule EmailSchedule EmailSchedule Email
TO SCHEDULE YOUR EMAIL
3. On the Schedule Email page, do one of the following:
• Select Send Now. The Email will be added to the distribution queue and will be sent out.
Note: If the sender email has not been verified the user will be displayed with the following message and the email will not be sent out until the sender email has been verified.
• Select Save Draft. You can save it as a draft and edited later within the Manage Emails section
• Select Schedule Email. Select a date and time when the Email should be sent out. You can:
o Select a date from the calendar.

o Select the time and time zone. • Select Save as an Autoresponder:
o To send the email when the contact is added to the list, select the Sends at addition of new contact to selected list radio button.
o To specify the amount of time before sending the email, select the Sends radio button and specify the time in days or weeks.
4. Click Next.
4.6 Manage AutorespondersManage AutorespondersManage AutorespondersManage Autoresponders
The Manage Autoresponders page displays a list of previously created emails that were saved as autoresponders. This page allows you to edit the autoresponder details, contacts, or content. You can also delete, copy, or create a new autoresponder.

5 View View View View ResultsResultsResultsResults The View Results page displays data and statistics related to your sent emails. The information on this page indicates the effectiveness of each email. Having this information, you can adjust the content and messaging to improve the amount of times emails are opened or clicked. This page also allows you to generate reports and download them as HTML, PDF or CSV files.
’

5.1 Sent Sent Sent Sent EmailsEmailsEmailsEmails
The Sent Emails section displays a list of emails, the date it was sent and includes the following details:
• Number of contacts that received the email
• The amount of times the email was opened, bounced, clicked, added to Facebook or Twitter, and the how many customers clicked Unsubscribe.
This section also allows you to compare statistics between two emails. The information is presented in a table graph.
TO COMPARE DATA FROM TWO EMAILS:
1. In the Sent Emails section, select two emails, for which you want to compare.
2. Click Compare. The data for both emails is presented side-by-side.
3. To stop the comparison, click Single View.
5.2 Email SumEmail SumEmail SumEmail Summarymarymarymary
The following table describes the static information available for each email Email Details Description Email Name Identifies the name of the selected email.
Subject Displays the text that was entered into the Subject line for the email.
Reply-to-Email Displays the email address used for email replies. Date Sent Date when the email was sent out.
The following table displays the email statistics. Email Details Description

Intended recipients The total number of unique recipients that have been emailed across all mailing lists used (excludes unique recipients which are blocked).
Delivered The amount of emails, in percentage, of recipients that received the email.
Unsubscribed The number of recipients who clicked the "unsubscribe" link when receiving the email.
Opened Emails The amount of emails, in percentage, of recipients that opened the email.
Contacts This is the number of intended recipients, minus the number of bounces.
Clicks The number of unique clicks which occurred in the email. A unique click is a single user clicking on a specific URL for the first time. If this user clicks on the same URL a second time or more, the additional clicks are not counted.
Facebook The amount of people, in percentage, that added this email to their Facebook account.
Twitter The amount of people, in percentage, that added this email to their Twitter account.
Bounced The number of emails which have been undeliverable. Download report as This option allows you to download the email summary
information, and a copy of every report type available (each report is generated as a separate file and then zipped together for download).
Output format This is the format in which the reports will be generated. You can select PDF, HTML or CSV format. CSV-formatted reports are downloaded as a file; PDF and HTML formats are displayed in your web browser in a new window. Note that PDF display requires the browser plug-in from Adobe to be installed.
5.3 OverviewOverviewOverviewOverview
The Overview section is a graphical representation of the percentage of emails that were opened, unopened, and bounced. This section also displays the percentage of click rates, unsubscribed emails, and emails that were flagged as spam. You can also view how often your email is shared through Facebook and Twitter. The information is displayed as a percentage of the total amount of clicks.

5.4 TopTopTopTop SubscribersSubscribersSubscribersSubscribers
The Top Subscribers section displays a list of contacts, which have the highest number of clicks for that email. The list includes the contact name, the contact email address and the number of times that contact has clicked on their received email.
TO DISPLAY A LIST OF ALL SUBSCRIBERS:
1. In the Top Subscribers section, click View All Results.
2. To close this list, click Close.
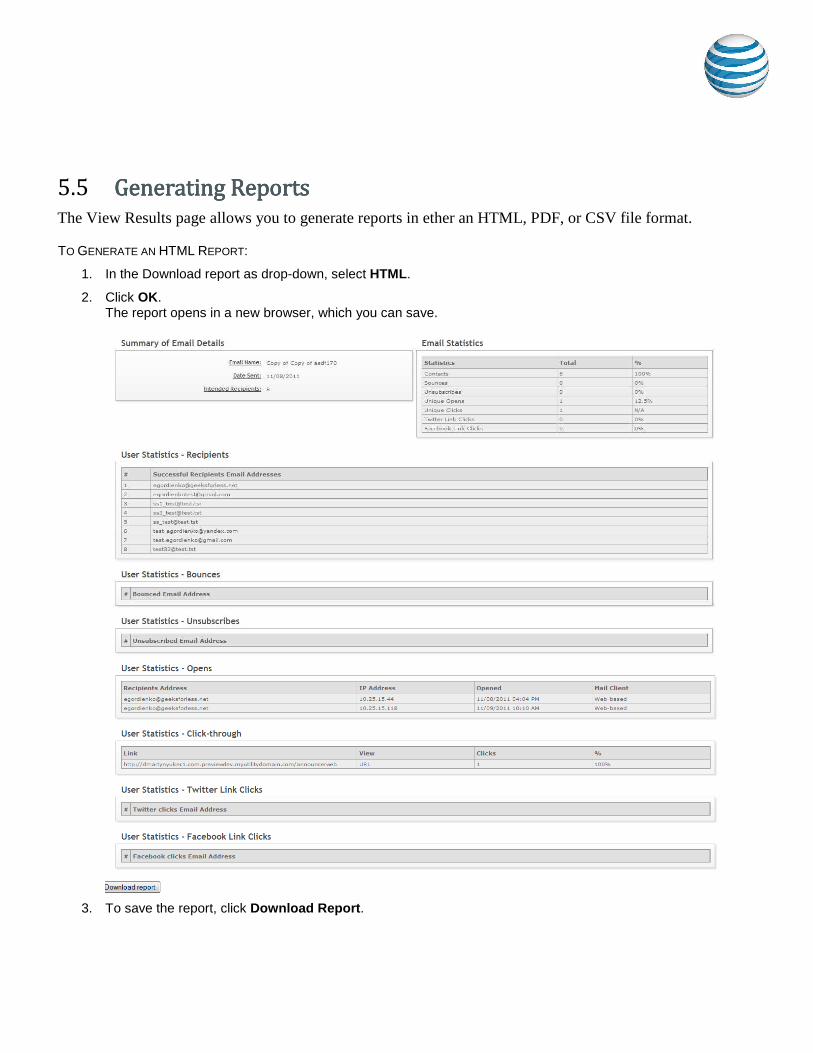
5.5 GeneratingGeneratingGeneratingGenerating RRRReportseportseportseports
The View Results page allows you to generate reports in ether an HTML, PDF, or CSV file format.
TO GENERATE AN HTML REPORT:
1. In the Download report as drop-down, select HTML.
2. Click OK. The report opens in a new browser, which you can save.
3. To save the report, click Download Report.
4. Save the file.
TO GENERATE A CSV REPORT:
1. In the Download report as drop-down, select CSV.
2. Click OK. In the pop-up dialog, do one of the following:
• To preview the exported list, select Open with.
• Click Save File.
3. Click OK.
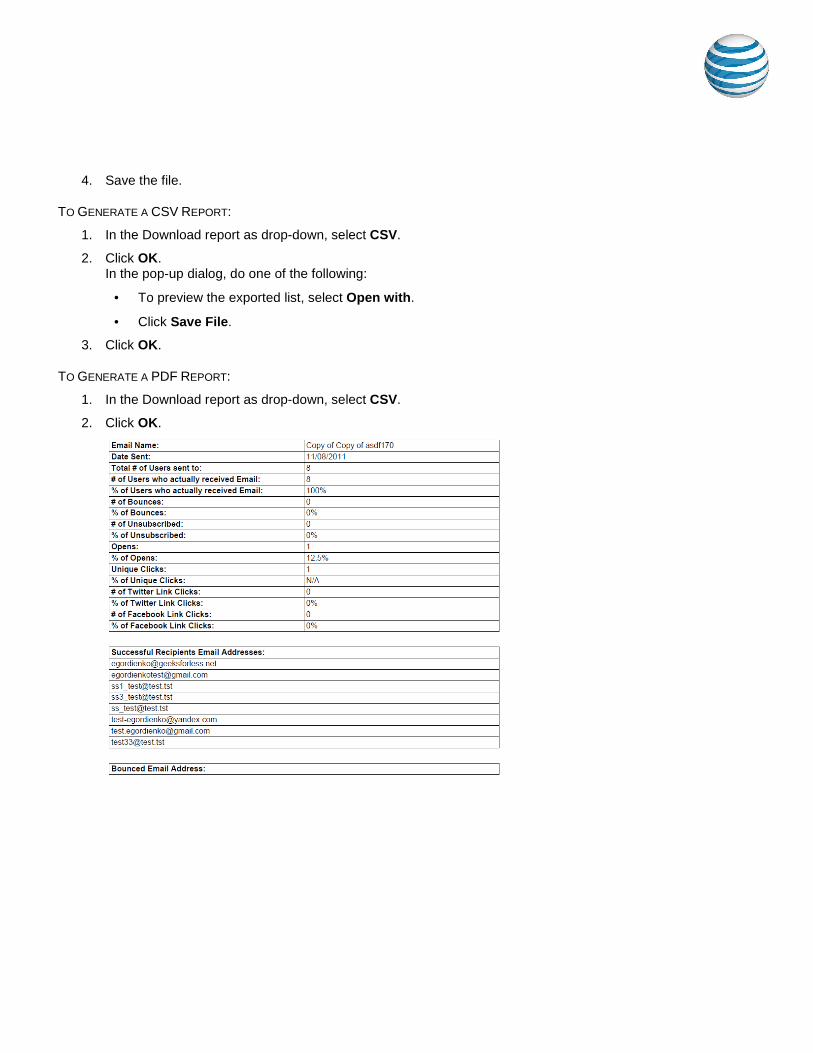
TO GENERATE A PDF REPORT:
1. In the Download report as drop-down, select CSV.
2. Click OK.
In the pop-up dialog, do one of the following:
• To preview the exported list, select Open with.
• Click Save File.
3. Click OK.

6 Social Social Social Social NetworkingNetworkingNetworkingNetworking This page lets you share your email.
6.1 ShareShareShareShare EmailEmailEmailEmail
If you would like to share a link to your email on your Facebook or Twitter accounts, select the email and click the appropriate button. You will be forwarded to the appropriate site.
6.2 Google AnalyticsGoogle AnalyticsGoogle AnalyticsGoogle Analytics
The Google Analytics page allows you to use your Google Analytics account to track the visits to your Websites from Email Marketing emails. Tags will be automatically added to all domains and sub-directories of domains.

Where to find Help/InstructionsWhere to find Help/InstructionsWhere to find Help/InstructionsWhere to find Help/Instructions AT&T Website Solutions includes a number of applications and tools that you can use on your website.
Help/Instructions on how to use each of these features are located in the top right of your control
panel. For specific help for each application together with instructions, select the
application you want in the control panel and click the help button in the top right corner.
How to Contact SuppoHow to Contact SuppoHow to Contact SuppoHow to Contact Supportrtrtrt
Submit a ticket by email: : : : [email protected] For support issues, please also include a step-by-step on how to replicate your problem including your operating system, browser type and version, and any links and login information that may be needed to duplicate and correct the reported issue.
Contact us by phone:::: You may also reach us by dialing 1.888.WEB.HOST (1.888.932.4678). Our Technical Support staff is available 24 hours a day, 7 days a week; choose the tech support option. Our billing group is available Monday - Friday 8 a.m. – 8 p.m. (Eastern); select the billing option. All questions concerning billing, renewal or cancellation should be directed here. Our sales staff is available Monday – Friday 8 a.m. – 8 p.m. (Eastern); select the sales option. International customers may reach us by calling 972-234-4847