harmony & unity - weebly
TRANSCRIPT
z
Harmony & Unity
Art 2
Lesson 1
Mrs. Senick

z
The Elements of Art: Review
▪ Can you name all 7?

z z
The Elements of Art: Review
▪ Line
▪ Shape
▪ Color
▪ Space
▪ Value
▪ Form
▪ Texture

z
Principles of Art
▪ These are the “rules” that tell artists HOW to use the
Elements of Art effectively
▪ These rules help artists to create “successful”
artworks

z
Principles of Art
▪ Harmony
▪ Unity
▪ Repetition
▪ Balance
▪ Emphasis
▪ Dominance
▪ Gradation
▪ Variety
▪ Movement
▪ Proportion

zz
Unity and Harmony
▪ These terms are interchangeable and work
together
▪ They refer to the composition of an artwork
▪ There is no simple solution or correct recipe
for success
▪ The simplest way is to bring similar objects,
shapes, and forms together
zz
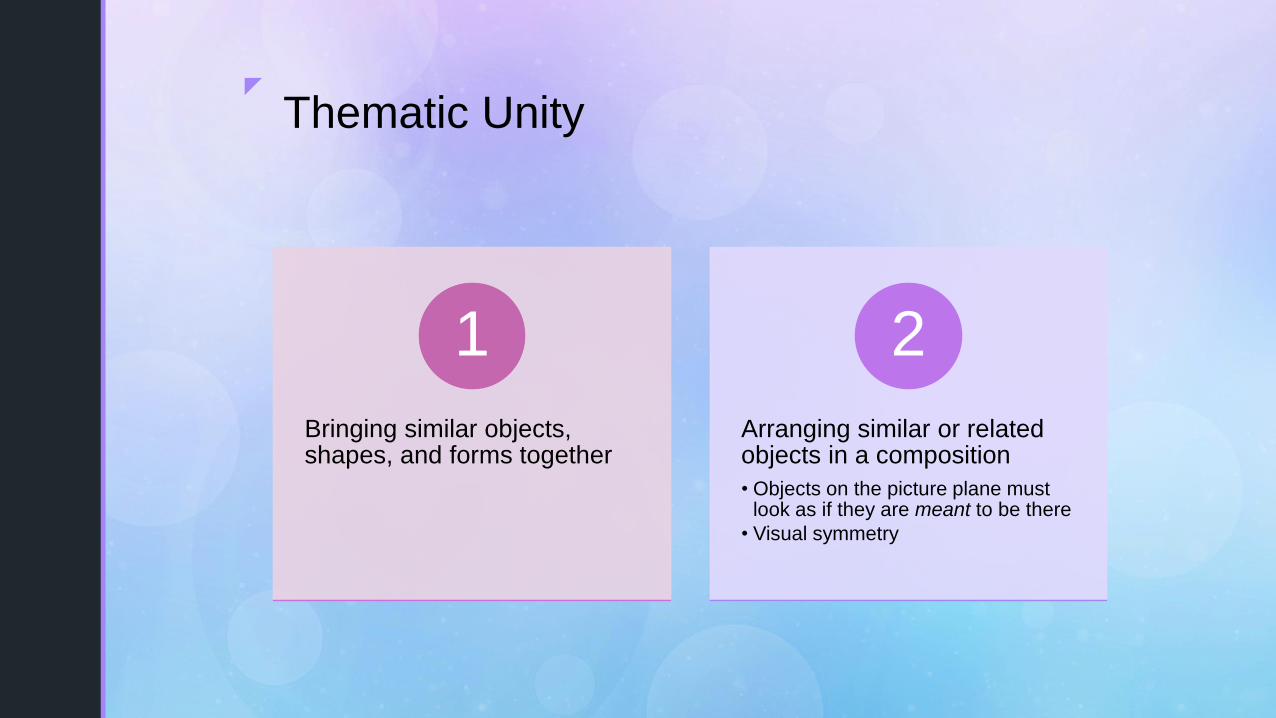
Thematic Unity
Bringing similar objects, shapes, and forms together
1
Arranging similar or related objects in a composition
• Objects on the picture plane must look as if they are meant to be there
• Visual symmetry
2

zz
Marc & Anna“The Connectors”
▪ Notice how each of the
items here represent
something that would
connect one thing to
another.
▪ This “common theme”
creates unity with the
symbols being
represented.

z
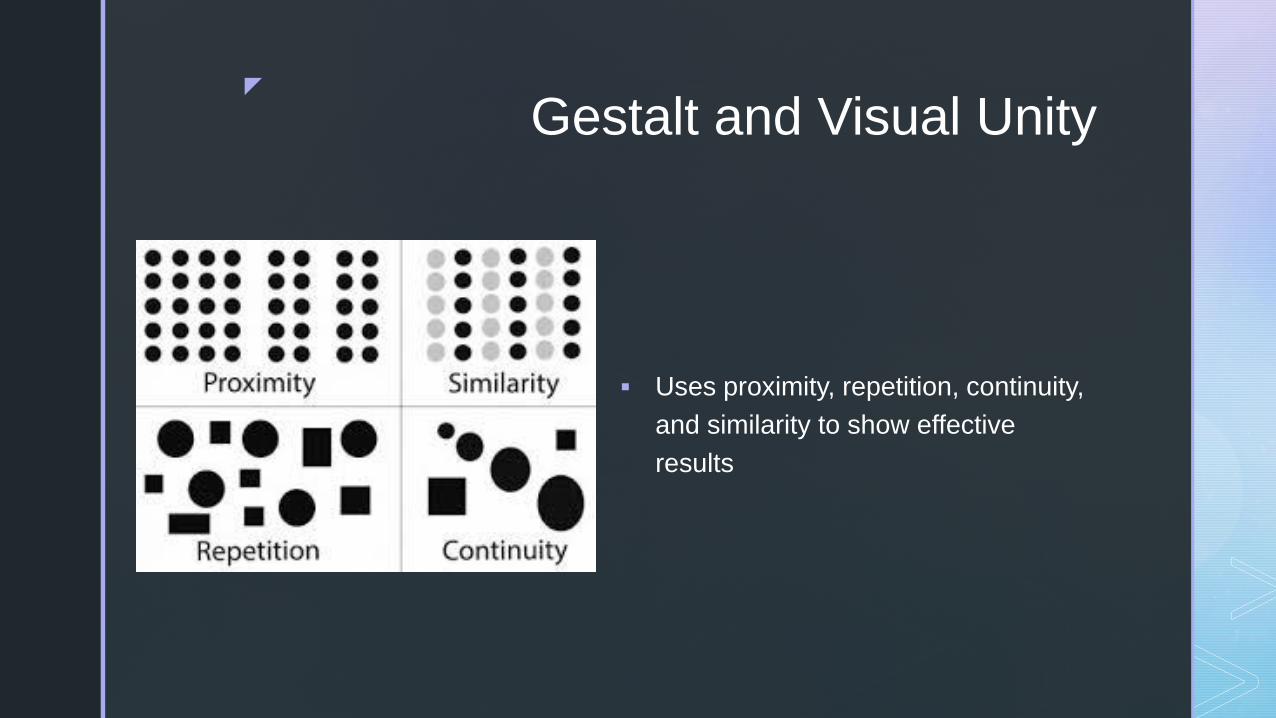
Gestalt and Visual Unity
▪ Organized whole
▪ The appearance of parts (ex. Individual colors) is determined by the
whole (context of subject matter)
▪ Must view the artwork as a whole before noticing the smaller parts
▪ Not like a scrapbook, where the parts are viewed separately
▪ Artists to know: Klee, Kandinsky, Albers
z
Gestalt and Visual Unity
▪ Uses proximity, repetition, continuity,
and similarity to show effective
results

z z
Gestalt and Visual Unity
▪ Proximity – Closeness
▪ How close or far one part is to
another can give an entirely
different meaning, definition, or
feeling in a composition
▪ Nearness – Typography
▪ Touching – Flow
▪ Overlapping – Strongest
▪ Combining – Group or isolate
items

zz
Proximity
▪ Touching
▪ Overlapping
▪ Combining

zz
Gestalt and Visual Unity
▪ Repetition – Repeating an
element or design aspect to
create unity
▪ A color
▪ A shape
▪ A texture
▪ An angle

z z
Gestalt and Visual Unity
▪ Similarity – The use of similar
shapes, colors, or textures
create a unified composition

z
zz
Similarity
(Color)

zz
Gestalt and Visual Unity
▪ Continuity – leads your eye around the
page.
▪ Subtle – following real or implied lines
▪ A unified series of paintings using a
grid method
▪ Horizontal and vertical lines
▪ Too much? Rigid and boring
▪ Inventive grids are more
effective and flexible
▪ Deliberate - intentional

z z
Grid Method
▪ Rectilinear arrangement of
horizontal and vertical lines
▪ Grid paper
▪ Checkerboard

z z
Grid Method
z
Achieving Unity
▪ Generally, people prefer structure and simplicity to chaos
▪ Abstract art – The edges line up
▪ Realistic art – Directs the eye around the page in an even flow

z
Achieving Unity▪ Unity with Variety
▪ Variety – Appears to be superficially uncontrolled and free of any formal
design restraints
▪ Shapes, sizes, color, and pattern

z
Achieving Unity
▪ The Guggenheim Museum
▪ Italy

z z
Achieving Unity
▪ Color
▪ Color families
▪ Primary
▪ Secondary
▪ Tertiary
▪ Complementary
▪ Analogous
▪ Warm Colors
▪ Cool Colors
▪ Neutral Colors

z
The Project…▪ Choose some color families to work with
▪ I prefer analogous colors
▪ Choose an animal or person
▪ Get AND email that image TO ME
▪ As soon as we are finished!!
▪ I will make the adjustments FOR YOU
▪ So if you don’t email me one, you’ll have to do it
yourself
▪ (Yes, I’m that petty.)
▪ Create a portrait of that person/animal using
your color family

zExamples

z
How to Convert Images
▪ www.freeonlinephotoeditor.com
▪ Upload your photo
▪ Click “browse” from photo library and select your image.
▪ Click “ok”
▪ Click “Color” > “Black and White”
▪ Click “Basic” > “Brighten/Contrast”
▪ Adjust these until you are happy with the image
▪ Right click and save the image on your computer/ipad
▪ Print the picture – Make sure you do this as an 8” X 10”
z
The Process
▪ Choose your image
▪ Email your image to ME
▪ I will do the editing TODAY
▪ Tomorrow, you will get a printout
▪ We will go through the next steps together

z
The Next Steps…
▪ You should have chosen some color schemes by now
▪ Get your sketchbooks out of the bin
▪ Get your image from me
▪ Begin sketching your image 4 times into your sketchbook
▪ Use the grid method if you need to!
▪ Ms. Yetter taught you this last year ;)
▪ Begin practicing with adding color
▪ Draw 4 full color sketches, practicing 4 different color families
▪ When you are finished with 4 full color sketches, show me and begin your
final (FORMATIVE GRADE)

zGrid Drawing
▪ Draw a grid over your image that is ½” squares
▪ Begin by holding your ruler at the top of your image.
▪ Measure and make a small dash (vertical) above the half inch mark, then the whole inch mark,
etc.
▪ Continue until you’ve reached the other end of you image.
▪ Do the same thing at the bottom of the image
▪ Line up your two measurements and connect them with a solid, dark line.
▪ Measure the same way (marking with horizontal lines) on the left and right side of your image.
Connect your lines to create horizontal lines.
▪ Now you have a grid.
▪ Create a box on your sketchbook page that is the same height and width of your image.
Create your ½” grid in your sketchbook the same way you did over your image. LIGHTLY
DRAW YOUR LINES SO THAT YOU CAN ERASE THEM!!!!!
▪ Transfer your image to you sketchbook, one square at a time.