heinrich, melanie - studio lighting workbook
TRANSCRIPT

7302019 Heinrich Melanie - Studio Lighting Workbook
httpslidepdfcomreaderfullheinrich-melanie-studio-lighting-workbook 189
STUDIO
LIGHTING
WORKBOOK
by
Melanie Heinrich
7302019 Heinrich Melanie - Studio Lighting Workbook
httpslidepdfcomreaderfullheinrich-melanie-studio-lighting-workbook 289
Table of Contents
Introduction
Learning to see Light
Light Types
Camera Positions
Subjects
Backgrounds
Props
Building A StudioScrim Soft Box and White Tent
Backdrop and Table
Studio Flat-Reflector
People PhotographyEmotional Power Portrait
Creating a Sullen Emotion
Staging People
Product PhotographyLighting Multiple Glass
Using Props with Products
Multiple Exposures
Making Reflections work for you
Using a Product for a Background
Floating a Product
Boring Product Interesting Design
Still LifeMixing Texture Shape and Color Arranging a Set
Photograhing Beautiful Glass
Messages in Still Life
Creating a Mood
Selling a Product
7302019 Heinrich Melanie - Studio Lighting Workbook
httpslidepdfcomreaderfullheinrich-melanie-studio-lighting-workbook 389
Introduction
to
Studio Lighting
Photography is all about light When you are outside shooting you
are at the mercy of the ambient or existing light typically sunlight
and whatever source that reflects sunlight Studio lighting on the
other hand will let the photographer control the light its source
and the objects that reflect light on a set This book covers the ins
and outs of strobe lights how to use them and how to control them
on a set It also covers how and why advertising images are created
stylized and designed as well as set construction
What you will learn
1 The power of strobe lights
2 Control with strobe lights
3 Advertising affects using strobe lights
4 Concept designs created for use in advertising
5 Lighting glass objects
6 Manipulation of reflective surfaces to enhance the image style
like in a professional studio
Using many different types of strobe lights you will recreatelighting effects that other photographers have used
There are many factors that affect the final images you will create
The type of light you use the direction the distance of light to
subject fill lights and reflectors lens depth-of-field and product
position all play an important role in creating an image style These
are only a few factors that will affect your final image Experience
will teach you how to see light and how the subject responds In the
studio there are so many choices for lighting objects Mastering
how the strobes light objects will be the first objective The power
of the lights their height and the angle of the lights are only a fewthings to consider in the studio
7302019 Heinrich Melanie - Studio Lighting Workbook
httpslidepdfcomreaderfullheinrich-melanie-studio-lighting-workbook 489
subject on the set that you have created This all happens before
you touch any lights Studio Lighting is far more complex than
shooting outside because you have many more opportunities Using
the studio lights you will emphasize some areas of the subject while
downplaying other areas For example in a portrait shot ask
yourself which is the best side of the face Is shallow depth-of-field
required for this product shot What will my background do if it is
in or out of focus in this photograph You should be aware of how
light can set a mood and portray a unique emotion Using colored
gels over the lights or different color balanced lights such as
tungsten lights using daylight film you can manipulate the mood of
the image by making it warmer or cooler By paying attention to
your subjects positioning personal interpretation of your subject
whether it is human or inanimate will help you create your own
unique vision
After each setup you should tear down the set and pack away the
lights This should force you to think fresh when you go back into
the studio
After your idea is developed and sketched you will position your
7302019 Heinrich Melanie - Studio Lighting Workbook
httpslidepdfcomreaderfullheinrich-melanie-studio-lighting-workbook 589
Learn about Light
Recognizing how light affects subjects on a set is how photographers train
their eye to create light and its different effects
The best way to train your eye is to look at other photographers work
Look at magazines photo books and any other source that include
photographs You will be keeping a record of images that you glean from
magazines
After finding an image you like and one that suits the assignment ask
yourself why a particular lighting style was used and why a position and
vantage point was chosen Take notes that indicate what you like about the
photographs and draw diagrams that indicate the lighting direction
including the type of light used (ie direct diffused backlight direct
diffused) This will not only help you learn to see light and its effects but
also help you as a reference for any future assignments
(See examples below and in later pages of this book)
You will be keeping the same notes and diagrams when creating your own
work One sketch will be topographical and the other a side view (Seebelow) In fact we will be working on these diagrams during class These
will all be included and displayed for critique when you hand in an
assignment Keep records of what your meter readings are as well as your
used fstops and speeds The distances of the lights filters diffusion
materials the film used lens used position and height of the lights and
any other tools that you used are also to be recorded
When you are shooting use the record-keeping sheet in the ldquoPhoto Tips
and Tricksrdquo book to record the above
Below are examples of diagrams topographical side views and camera
position views that you will be creating from gleaned magazine images
You will follow the same style of drawing when creating your own
7302019 Heinrich Melanie - Studio Lighting Workbook
httpslidepdfcomreaderfullheinrich-melanie-studio-lighting-workbook 689
images
Topographical from a
topographical shotSide View
Final Image from the above diagrams
7302019 Heinrich Melanie - Studio Lighting Workbook
httpslidepdfcomreaderfullheinrich-melanie-studio-lighting-workbook 789
reflectors
7302019 Heinrich Melanie - Studio Lighting Workbook
httpslidepdfcomreaderfullheinrich-melanie-studio-lighting-workbook 889
Types of Lights
There are many different types of lights that can be used in thestudio
The type of fixture that the light source emanates from willeffect the style of lighting it creates There are materials used to
soften light reflect the light and cones used to direct light
Color balances are typically daylight or tungstun
Below you will find images that show and describe the kind of
light produced
Image 1Notice the soft light under the chins and on the right side The
main light is high and frontal with a small fill on the right for theshadow areas The background is out of focus
1 Frontal Direct Diffused lLight
Image 2
This image has been light on all side to remove any chance of ashadow It was used for a company brochure The props in this
shot give the viewer a peak into the companys building process
2 Diffused Light
7302019 Heinrich Melanie - Studio Lighting Workbook
httpslidepdfcomreaderfullheinrich-melanie-studio-lighting-workbook 989
Image 4
A direct light in a softbox was positioned on the right and close to
the model A soft fill on the left dramatizes the mood in this image
and emphasizes the models positioning The dark backgroundhelps emphasize the models dramatic mood
3 Direct Light with Spot
4 Side DirectDiffused Light
Image 3
A strong light on the left side of the frame set the mood for this
shot A small spotlight brought out his back shoulder revealing
his shape against the black background The lighting is verytheatrical
7302019 Heinrich Melanie - Studio Lighting Workbook
httpslidepdfcomreaderfullheinrich-melanie-studio-lighting-workbook 1089
5 Frontal Overhead Softbox
6 Multiple Cone Lights
Image 6
Three small strobe heads with cones were positioned to push lightthrough the multicolored glasses The blue background helps
separate the subjects color from the background
In addition to these lighting types and styles white colored
reflectors may be added to reflect a touch of light Black papermay be added to a light to cut back hot spots that reflect into
highly reflective objects
Image 5
A soft box is positioned about 4 feet from the products and was
used to evenly light the glass One light was used with several fill
cards A grey background was chosen to minimizm anydistraction
7302019 Heinrich Melanie - Studio Lighting Workbook
httpslidepdfcomreaderfullheinrich-melanie-studio-lighting-workbook 1189
Camera Position Styles
Camera positioning can change the entire feel of the image you are
creating Study the image below and start to think about how you can
change your camera positions to help your photograph Think about
the message you are conveying Make associations using camera
positioning
Image 1
The bike was a high-end racing bike It had a specialized back wheel
Therefore it needed to be the main subject in the image The entire
bike was included in the shot yet the back wheel is the main focus A
wide-angle lens provided the perfect solution by accenting the back
wheel A small aperture was used to maintain depth-of-field
Image 2
This add was shot on a table top The camera was positioned
approximately 2 feet higher than the table level The angle and
position were chosen to include the product reflections Products are
separated from the background that was used
Image 3
This image was shot at a low angle and close-up It invites the viewer
into the scene of this intimate event Observe the close cropping done
in the camera eyepiece
Image 4
Shot straight down on top of the set (topographical) this image boxes
in the products by framing definitive edges A black background
separates the products and pronounces their colors The set has a
geometric flair that is contradicted by soft flowing ribbons and acircular hat
7302019 Heinrich Melanie - Studio Lighting Workbook
httpslidepdfcomreaderfullheinrich-melanie-studio-lighting-workbook 1289
1 Low angle right
4 Topographical
2 Frontal medium height
3 Low angle Close-up
7302019 Heinrich Melanie - Studio Lighting Workbook
httpslidepdfcomreaderfullheinrich-melanie-studio-lighting-workbook 1389
Your Subject
When choosing your subject (perhaps a client has
supplied a product) look at its characteristics The list
below is a jumping-off-place Start by looking for those
things in your products
1 Shape Oddly shaped subjects may need a dark or
subdued background to distract the viewer from the
subjects shape
2 Texture Is the surface smooth or coarse What type
of lighting will accent or tone-down the texture Think
about using a low scraping light to accent texture A
broad soft light will minimize unwanted texture
3 Color Are the colors demanding subtle or strong
backgrounds and props to minimize the color Consider
using complimentary colors to help accent your subjects
color Be careful not to use complimentary colors that
overpower your subject taking away its attention
4 Tone Study your subject for is tonal values Lighter
subjects may work well against darker backdrops where
darker subjects work well against lighter backdrops
Contrast may not be needed in your set Try making a
high key photograph or low key photograph if your
subject calls for it
How will this subject fall against the background you
have chosen If you are shooting more than one subject
together on a set consider how these work together using
the same observations listed above Swinging your main
light from foreground to the right side or left side and to
the back of your subject will reveal an entirely different
texture color and shape as you pan around the subject
Try doing this before you make your final lighting
decision
7302019 Heinrich Melanie - Studio Lighting Workbook
httpslidepdfcomreaderfullheinrich-melanie-studio-lighting-workbook 1489
and accentuate their unique characteristics
Image 1
The soft large shapes of the bowling balls have been
broken up by a strong perspective of the straight piece of
oak wood that stretches to the horizon line The oak
wood piece emulates the distance and texture of a bowling
lane The background has a magenta color that fades
into blue which helps pull out the colors of the bowling
balls and pins
Image 2
The bottles needed to be shot with the packaging whichcontradict both the texture and shape of each other In
this image the background creates the mood We see the
bottles on the floor with ribbons and bows The viewer is
meant to think they have entered the scene of a birthday
party The products shapes are fanning outward in an
open expression of fun and excitement
The subjects in the images below were shot to contradict
7302019 Heinrich Melanie - Studio Lighting Workbook
httpslidepdfcomreaderfullheinrich-melanie-studio-lighting-workbook 1589
piece of formica to contradict the edible factor of the
vegetables It is a slick image meant to stop the viewerrsquos
eye Water sprayed on the formica connects the
background with the product Not suitable for a food
magazine this image displays an artistc view
Image 3Shallow depth-of-field was used in this image to help
pronounce the texture of both the onion and the
broccoli They were placed on a flat high gloss black
7302019 Heinrich Melanie - Studio Lighting Workbook
httpslidepdfcomreaderfullheinrich-melanie-studio-lighting-workbook 1689
Your Background
When choosing a
background think about how
it will help your subject You
may want a distinct
separation between the
background and foreground
The lightness and or
darkness of your
background will change the
feel of your subject A darkly
lit background will force theviewers eye to look at a well-
lit subject Conversely a well
lit background and under-lit
subject will create a
silhouette and show the
shape of the subject
Imagine your background
choice as an aid in conveyingyour message For example
an ad that is shot on sand
will help sell sunglasses orbeach towels in an
advertisement
Consider creating a shadow
by pushing a light through a
solid object onto a
background This will help
identify the kind of product
you are shooting For
example imagine a shadow
of a company logo on the
background and a selective
part of the subject in the
foreground of the image
Brand identity is used here
to convey the message
Black drops out to float
Colors for environmental placement
7302019 Heinrich Melanie - Studio Lighting Workbook
httpslidepdfcomreaderfullheinrich-melanie-studio-lighting-workbook 1789
Although not considered
part of the background the
foreground material you use
to place your product or
subject on is also to be
thought of with the same
purpose as backgrounds See
the computer chip below as
an example of this
Textured formica
White makes black products
Products can be used as
backgrounds
Highly-reflective lined
material
pop
7302019 Heinrich Melanie - Studio Lighting Workbook
httpslidepdfcomreaderfullheinrich-melanie-studio-lighting-workbook 1889
Props
Props are accent items that help convey the message you are
portraying in your image They are meant to help the subject
speak For example if you are producing an ad for
silverware a plate would be a perfect accent for the product
Be careful not to lose the focus of your product Showing a
small part of a prop is sometimes all that is necessary to
convey the message You must not allow a prop to distract the
viewer from what you are selling in the advertisement
Image 1
Below the old-fashioned photos give the viewer an idea of the
type of image that is produced from this camera
1 Old-fashioned Photos
7302019 Heinrich Melanie - Studio Lighting Workbook
httpslidepdfcomreaderfullheinrich-melanie-studio-lighting-workbook 1989
Cowboy Boots
Image 3
The boots are the prop in this ad and help sell the intimate
aparel to a specific target market
Image 2
The roses placed diagonally and at different levels add a
touch of sensitivity to this image The wood adds contrast
from that of the Bible and roses The wood and roses also add
a warmth to the image becasue of their color
2 Roses with Bible
7302019 Heinrich Melanie - Studio Lighting Workbook
httpslidepdfcomreaderfullheinrich-melanie-studio-lighting-workbook 2089
Lace
Image 4
The lace in this shot gives the glass products in baskets a
homemade look
7302019 Heinrich Melanie - Studio Lighting Workbook
httpslidepdfcomreaderfullheinrich-melanie-studio-lighting-workbook 2189
The photographs on the right portray
an advertising studio Thephotographer is in the middle of a
shoot working with a model on a
skiing shot
In the images you will see five
different lights The two with
umbrellas are lighting the
background washing it out to a
bright white
Two more lights are working in
conjunction with props that are on a
stand in front of the lights The propsthrow a shadow onto the set to
emulate the skier passing trees The
main light is a broad soft box
overhead and in front of the
photographer Finally you will see
the photographers assistant on the
ladder with a bag of styrofoam
peanuts to drop at command
The photographer is using a large
format 4 x 5 view camera on a studiotripod Two power pack batteries are
serving as a light source each
supplying different wattage levels to
the strobes The background is
created with seamless paper It hangs
from a set of poles and produces a
flawless smooth background to shoot
Lessons in this sectionBuilding a Scrim Soft Box and White Tent
Building a Backdrop and Table
Building a Studio Flat-Reflector
7302019 Heinrich Melanie - Studio Lighting Workbook
httpslidepdfcomreaderfullheinrich-melanie-studio-lighting-workbook 2289
against Building this backdrop is
described in the lesson Building a
Backdrop and Table
Whether you are using a small or
large format camera setting up a
photo studio will be the same
procedure You can either buy these
items listed below or you can followthe lessons in this section and make
your own
Most photographers end up making
some things in their studio so this will
be a good place to start
The building projects that follow are
easy to do and require very few tools
A drill of some sort may be the only
expensive tool you will need for
building Making these projects will
save you a lot of money and get you
started right away
Depending on the kind of room you
have you may need to be more
creative with your studio design
The following is a list of things you
will want in your studio
1 Table Top or Drafting Table
2 Workhorses
3 Backdrops ~ Seamless paper cloth
materials painted backdrops
4 Stands and Tripods5 Light Table loop croppers
hot glue puddy reflectors
6 Lights ~ strobes or tungsten
7302019 Heinrich Melanie - Studio Lighting Workbook
httpslidepdfcomreaderfullheinrich-melanie-studio-lighting-workbook 2389
on the list at the top of the page but
be assured they include the basic
requirements for a studio
In this section Building a Studio youwill receive information to help you
build your own studio You may not
understand what all of the things are
7302019 Heinrich Melanie - Studio Lighting Workbook
httpslidepdfcomreaderfullheinrich-melanie-studio-lighting-workbook 2489
Building a Scrim Soft Box and White Tent
Materials Needed
(A) Frame 16 x 20
(B) White Acetate can bepurchased at any glass
company
(C) Black Photographers Tape
(D) Two Matte Boards 18 x
20 each
(black on one side white on the
other)
(E) Matte Boards 18 x 16
(black on one side white on the
other) Fig 1
A Scrim Soft Box and White
Tent are used to scatter
diffused light onto your subject
The professional version of this
is costly and not as versatile as
the design described in this
lesson
This lesson will show you how
to construct a scrim ordiffusion system a soft box and
Fig 1
a white tent
7302019 Heinrich Melanie - Studio Lighting Workbook
httpslidepdfcomreaderfullheinrich-melanie-studio-lighting-workbook 2589
Making the Scrim
A scrim is used to soften thelight source It can also be used
to add shadows on any subject
after light is pushed through it
Fig 3
Build or buy a simple 16 x 20
frame (A) (an artist canvas
frame made of wood will work
fine) Get one that is big enough
so light cant spill around the
edges creating shadows fromthe frame itself A 16 x 20
frame (A) will be a good place
to start
The frame size used here is 16 x
20 It is only used to give you an
idea of how to make a scrim
You can make your scrim any
size you like and then cut the
acetate to fit the frame and
adjust all the other materials to
fit the size of the scrim you are
making
Measure the acetate (B) by
placing the frame down on top
of it and then draw a line to
mark out your exact
dimensions Now attach the
white acetate (B) to the frame
using photographers black tape (C) not staples Staples
may tear the acetate
Make sure to conceal the edges
of the frame with the acetate
Fig 2
7302019 Heinrich Melanie - Studio Lighting Workbook
httpslidepdfcomreaderfullheinrich-melanie-studio-lighting-workbook 2689
This will prevent dark shadow
lines from reflecting onto your
subjects highly reflective
surfaces Fig 2
TIP ~ In place of acetate try using a
white sheet
TRICK ~
To have a window shape
appear in your subjects
reflective surface place two
pieces of black tape (C) across
both center axis This will
reflect into your subject and
look like a window Fig 3
Making the Soft Box
A soft box will emulate the
same kind of lighting used in a
big studio and it softens the
light from a strobe supplying a
diffused light source Image
colors will be saturated and
rich in appearance
A soft box is made up of one
scrim and the black matte
board box To make the box
cut the matte board at an angle
so when taped together it
forms the shape of a cone Fig
4 White sides should face in
Tape the four pieces of matte
board to the edges of the scrim
with photographers black
tape two pieces (D) 20 x 18
are taped to the 20 lengths
and the other two pieces (E)
18 x 16 are taped to the 16
Fig 3
length of the scrim
7302019 Heinrich Melanie - Studio Lighting Workbook
httpslidepdfcomreaderfullheinrich-melanie-studio-lighting-workbook 2789
Face the white side of the matte
board in toward the centerMake the shape of the box cone
inward Fig 5 These flaps will
scatter light all around the
inside softening the light as it
comes through the scrim
Both the light and the soft box
should be attached to a light
stand to hold them up in place
Making a White Tent ~
A white tent is used to
photograph highly reflective
objects by revealing only white
in its reflected areas To make a
white tent for shooting
reflective objects make five
scrims not the soft box as
described above Tape them
together in a box shape hiding
any and all edges of the framesThis is because they will reflect
in the object you are
photographing All reflections
must be white
You will end up with a box with
no bottom It will be placed on
top of your subject on a table
top in effect covering it You
will be lighting the subject by
pushing light through all fivescrims Position your lights so
they do not cast any shadows
onto your subject by placing
them at a distance from the
white tent You will need to cut
Fig 4
Fig 5
7302019 Heinrich Melanie - Studio Lighting Workbook
httpslidepdfcomreaderfullheinrich-melanie-studio-lighting-workbook 2889
a small hole into one of the
scrims to put your lens
through Make sure your
product is placed properly or
you will be moving the tent
several times to get it right Fig 6
TIP ~
Another way to approach this
is to make one of the scrimsfreely swing open so you can
easily access the subject for
rearranging Hinge one of the
connecting joints
TIP ~
You may need to make color
tests because the acetate can
fade over time giving a yellow
cast
TRICK ~
The scrim can be covered with
a colored sheet of acetate Try
using different colors on
opposite sides of the tent
Fig 6
7302019 Heinrich Melanie - Studio Lighting Workbook
httpslidepdfcomreaderfullheinrich-melanie-studio-lighting-workbook 2989
Building a Backdrop and Table
A backdrop is essential for most
photographs taken in a studio This
lesson will show you how to make one
The ceiling must be solid not a drop
ceiling
Materials Needed
(A) Two- curtain rods (height of your
ceiling)
(B) One- 7 pole 2 diameter
(C) two sets of workhorses
The curtain rods you buy must be high
enough to reach between your floor
and ceiling They must have enough
spring tension to stay in place from
floor to ceiling
Set the curtain rods up between floor
and ceiling and about 6 feet apart and
3 feet from the wall Fig1
Stretch the 7 foot pole between the two
curtain rods and attach with clamps or
duct tape in place Fig 2
Fig 1
Fig 2
7302019 Heinrich Melanie - Studio Lighting Workbook
httpslidepdfcomreaderfullheinrich-melanie-studio-lighting-workbook 3089
material on the pole by draping it over
the top and attaching it with clamps If
you want to use seamless paper (large
rolls of paper on long cylinders) you
will need to leave one end of the poleaccessible to load the seamless
TIP ~
Seamless paper comes in 4 foot and 9
foot rolls You can use this paper over
and over again depending on how well
you take care of it avoiding creases
and soiling
TIP ~
Light stands can be used in place of the
curtain rods if you have a drop ceiling
This backdrop can be used in many
different situations as seen in Figs 3-8
All three setups are top lit
TRICK ~
Fig3 has a backdrop hanging to the
floor and a light on the floor that
flashes upwards onto the white
background paper The table is pulled
away from the backdrop Hint Place
an interesting material on the table
top this can achieve the look of a
sunset
The shot of the phone in Fig 4 was
done using this kind of set-up The
difference between the table top
material and the backdrop has left a
hard line at the horizon The spotlight
with a red acetate on it is set on the
floor below and facing up at the
seamless paper leaving the magenta
color behind the phone
Fig 5 leaves a hard horizon line where
Fig 3
Fig 4
Fig 5
At this point you can hang any kind of
your table top meets the backdrop
7302019 Heinrich Melanie - Studio Lighting Workbook
httpslidepdfcomreaderfullheinrich-melanie-studio-lighting-workbook 3189
TIP ~ Put an interesting material on the table
top this will increase the contrast
between the foreground and
background
Fig 6 is an example of a hard line
horizon line The table top in this shot
is a marble table top The background
is a piece of black velvet
Fig 7 is a traditional set for product
photography When the backdrop
swoops down onto the tabletop in this
fashion it leaves a beautiful gradation
on the backdrop
Fig 8 is a shot of a live set using this
style of backdrop The final image was
cropped to exclude all traces of the set
Fig 6
Fig 7
Fig 8
7302019 Heinrich Melanie - Studio Lighting Workbook
httpslidepdfcomreaderfullheinrich-melanie-studio-lighting-workbook 3289
Building a Studio Flat- Reflector
Materials Needed
One- 4 x 6 piece of foam core (14 thick)
(Plumbing department)
(A) Two (6 x 15 lengths of PVC tubing
(B) Four (1 x 15 lengths of PVC
tubing
(C) Three (44 x 15 lengths of PVC
tubing
(D) Six right-angle PVC tubing pieces
(red in Fig 2) to fit into lengths of tubing
above
(E) Two Ts (blue in Fig 2) to fit intolengths of tubing above
Double sided foam tape
Plumbers cement and purple pvc
preparation fluid
Saw (ask the hardware store to make
the cuts required)
This lesson will show you how to build a
studio flat that can be used as a reflector
as well as some other things that are
shown below
Fig 1
7302019 Heinrich Melanie - Studio Lighting Workbook
httpslidepdfcomreaderfullheinrich-melanie-studio-lighting-workbook 3389
You can make this flat any size you like
Ours is designed as a 4 x 6 Just follow
the simple construction plan below
Once you get all the things that are listed
in the materials listed above read all of
the directions before continuing
TIP ~
PLUMBERS CEMENT DOES NOT
SEPARATE ONCE IT ISCONNECTED TO TUBING
FRAME
1 Using the plumbers cement attach
two of the right-angled tubes to the ends
of the 6 foot tubing Once these are
secure attach the 44 tube at the top of
the frame See Fig 1 Be sure the two 6
tubing sections are parallel to each
other front to back and side to side
BASE
2 Using the plumbers cement attach
the Ts to the one foot sections of tubing
Fig 2
3 Using the plumbers cement attach
the four right angles to the opposite ends
of the 4 foot sections Before you do this
make sure that the two Ts are pointing
up and at right angles to the cornersFig 2
Fig 3
Fig 2
7302019 Heinrich Melanie - Studio Lighting Workbook
httpslidepdfcomreaderfullheinrich-melanie-studio-lighting-workbook 3489
frame using the double sided foam tape
Position the foam core so it fits against
the frame tightly
TIP ~
You can use this flat for many things
besides a reflector It will be sturdy
enough to hang things from it and can
even be useful as a backdrop Fig4
TRICK ~ Drape material over it for close-up
photography or simply use it to block
light from an area on your set Fig 5
Fig 5
Fig 4
Finally attach the foam core to the
4 Using the plumbers cement attach
the final 44 pieces of the base to the
right angles Fig 2
5 Using the plumbers cement attach
the frame to the base at the Ts Fig 3
7302019 Heinrich Melanie - Studio Lighting Workbook
httpslidepdfcomreaderfullheinrich-melanie-studio-lighting-workbook 3589
Some photographers have a real gift for
photographing people They are able toembrace humanity and capture on film the
very essence of life They reveal the
persons emotions without saying a word
They seem to understand the unspoken
word of the heart and are able to record it
without the distraction of camera and
technique
If you have clicked on to this page chances
are you are one of those people Perhapsyou just need a bit more help or
information to push your images to a new
level of success These lessons are aimed at
doing just that
In these lessons you will learn how to make
your subject comfortable and to reveal
the subjects true feelings It is true not all
people are comfortable enough with themselves
to trust and let go and you will discover who
is easy to shoot and who is not easy to
shoot There are ways to help people
become comfortable in front of a camera
Lessons in this section
Emotional Power Portrait
Creating a Sullen Emotion
Staging People
7302019 Heinrich Melanie - Studio Lighting Workbook
httpslidepdfcomreaderfullheinrich-melanie-studio-lighting-workbook 3689
The best way to shoot people is from a
distance Give them personal space andshoot with a long lens Pretend you are
shooting a couple of rolls to get them
familiar with being photographed Try not
to give much direction or you will find
yourself with very staged and stiff
subjects Follow them around if they will
permit it At some time they will be relaxed
this is when you will get the best shot
Let the people be themselves until they are
comfortable then direct them with very
simple suggestions Many factors come into
play when photographing people like the
texture of their skin what areas the light
hits their face their posture and the gait of
their walk Remember your basic visual
design elements when positioning a person
in the frame Colors will also play a large
role in the emotion you portray about the
person See visual design
Below are some successful photographs of
people Some of the people the photographer
knew and some of the people were just
shot on the street
7302019 Heinrich Melanie - Studio Lighting Workbook
httpslidepdfcomreaderfullheinrich-melanie-studio-lighting-workbook 3789
Emotional Power Portrait
Film
Ektachrome 100 Daylight
Film
Camera Format35mm - Nikon
Small Format
Lens
28mm Wide
Light Source
Strobe with softbox
Meter
Handheld Incident
Tripod
No
Filters
None
Polaroids
No
7302019 Heinrich Melanie - Studio Lighting Workbook
httpslidepdfcomreaderfullheinrich-melanie-studio-lighting-workbook 3889
The photograph was shot for a portfolio Our
photographer included this image in his portfolio in
an attempt to get jobs of this nature This image
reveals the ability to direct the subject
Understanding body posture is very important
when taking these kinds of photographs Knowing
the right moment to record the image as the model
stares into the photographers lens may take some
time to learn Study people and record in your
mind their posture and movements notice their
emotions and how they display them in their
bodies By studying people you will learn to
communicate and capture peoples emotion in your
images
Use props to direct your viewers eyes in your
images In the above image the model holds a
barbell that breaks into the lower part of the image
frame which leads the viewers eyes to the models
eyes The barbell was counterbalanced with her
face in the background Cropping is the key here
Dont be afraid to get in close It will help convey
the message of intimacy When the above image
was shot our photographer had to invade the
models personal space However our
photographer was able to capture something
unique in his image As a photographer you mustunderstand what effect and subtle nuances you
want to provoke and get in your images and then
know how to achieve them using your camera
through our lessons
Now ask yourself how was the light created in the
above image Where were the lights positioned
What type of light was used
The light was created by a strobe in a softbox (See
Building a Studio to learn how to build this kind of lighting system) The lighting was directdiffused A
small fill on the left side added a soft diffused fill
light This diffused light was created by bouncing
light from the main light and was placed close to
7302019 Heinrich Melanie - Studio Lighting Workbook
httpslidepdfcomreaderfullheinrich-melanie-studio-lighting-workbook 3989
the models face It was positioned approximately 3
feet from her and powered by a large power pack
of about 2000 watts
The background was intentionally dropped off intoblack leaving no more detail than necessary or
desired It was placed about 5 feet behind the
model
The model applied baby oil to her face for the shot
A spray bottle filled with water was used to add the
illusion of sweat She shook her head about to
provide the work-out like appearance After all
that the photographer was able to achieve the
image he wanted after paying close attention to the
small details and knowing how to use his camera
A wide-angle lens was used to take this shot It
helped to accentuate the barbell and hand of the
model The exposure was taken with a handheld
incident meter facing the camera Several frames
were shot bracketing the image and the final image
was chosen in editing Study your brackets
carefully on a good light table to pick a final
photograph
7302019 Heinrich Melanie - Studio Lighting Workbook
httpslidepdfcomreaderfullheinrich-melanie-studio-lighting-workbook 4089
Creating a Sullen Emotion
Film
Tmax 100 Black and White Film
Camera Format
2 14square - HasselbladMedium Format
Lens
80mm Normal
Light Source
Strobe with softbox and spot
stobe
Meter
Handheld Incident
Tripod
Yes
Filters
None
Polaroids
Yes
7302019 Heinrich Melanie - Studio Lighting Workbook
httpslidepdfcomreaderfullheinrich-melanie-studio-lighting-workbook 4189
Capturing a mood or creating a mood can be done using
dramatic light You should also direct your subject into
positions that convey the emotion you are after Be carefulnot to over direct your subject This can make the image
look contrived and fake Professional models are great
actors and will understand your direction very well If you
are not photographing a professional model you should do
a couple of things to help your model Use a long lens
Keeping a distance between you and the model will give
them room to relax Secondly pretend to shoot a couple of
rolls of film This should give them enough time to get
comfortable with the flashing lights and shutter clicks
Next shoot a lot of film Be clear with your directions
Design your set so you can move around freely and shootfrom different vantage points During the shoot your
model will become more relaxed and the images will turn
from stiff to candid
In the image above a softbox was positioned close to the
subject and was the main light The light was intentionally
overexposed This was done by taking a meter reading
from the subjects left side where the fill light fell off This
technique slightly overexposed the light on his right side
and forehead Now you can see how a slight change in
metering placement can change the entire feeling of an
image A white reflector card was used to bounce a
diffused fill light into the subjects right side This style is
meant to emulate the lighting found in a theatre ~ high
contrast and a dramatic mood A spotlight lights the back
part of his neck It is raised high above and pointed down
at the subject
7302019 Heinrich Melanie - Studio Lighting Workbook
httpslidepdfcomreaderfullheinrich-melanie-studio-lighting-workbook 4289
With a little direction we found the emotion we were
looking for The subject was told to rest his elbows on his
knees as he clutched his drumsticks The position of his
head relative to his body turns his face toward the viewer
This position is natural and comfortable for him His eyes
are looking downward as though in reflection of another
time It is a moody image because of the lighting and his
expression Practice photographing your friends by
directing them with posture poses and physical
appearance changes
7302019 Heinrich Melanie - Studio Lighting Workbook
httpslidepdfcomreaderfullheinrich-melanie-studio-lighting-workbook 4389
Staging People
Film
Ektachrome 100
Daylight
Camera Format
2 14 square - Hasselblad
Medium Format
Lens80mm Normal
Light ource
Two Umbrellas with
Strobes
Meter
Handheld Incident
Tripod
Yes
Filters
None
Polaroids
Yes
7302019 Heinrich Melanie - Studio Lighting Workbook
httpslidepdfcomreaderfullheinrich-melanie-studio-lighting-workbook 4489
When staging people you need to create a natural appearance
The same principle holds true when photographing people If you
hire professional models it will make your job much easier
Professional models will know exactly what to do with very little
direction More importantly they are completely comfortable in
front of the lens
The image above was shot for an architectural firm catalog The
company wanted to save money by using their own employees as
models We wanted to use professional models but made the
concession in order to secure the job We used familiar icons to
help the employees feel comfortable in front of the camera Oncewe had them working on the architectural model they had
forgotten about the camera and lights in the room We were able
to get the tools of their trade in the scene the employees
comfortable and then able to capture several successful images
for our client
We used two lights with umbrellas to light the scene One strobe
was placed to the right of the camera and pointed at the set and
the other strobe was positioned behind the left side of the camera
and was high in the air and pointed downward towards the set
See the diagram below
The two strobes were balanced and their meter readings were the
same When photographing people use a shutter speed that stops
any possible movement Do not shoot at a shutter speed below the
millimeter of the lens you are using For example if the lens you
are using is a 90mm lens your shutter speed will be 1125th or
faster Use 160th of a second if you have a focal plane shutter
Cameras with a leaf shutter do not hold to the same constraints as
a focal shutter Leaf shutter lens also sync at any speed Review
your camera manual to see if there are any limitations with your
lens and camera
7302019 Heinrich Melanie - Studio Lighting Workbook
httpslidepdfcomreaderfullheinrich-melanie-studio-lighting-workbook 4589
Film
Ektachrome 100
Daylight Film
Camera Format
2 14 square -
Hasselblad
Medium Format
Lens
80mm Normal
Light Source
Strobes with Two
umbrellas
Meter
Handheld Incident
Tripod
Yes
Filters
None
PolaroidsYes
7302019 Heinrich Melanie - Studio Lighting Workbook
httpslidepdfcomreaderfullheinrich-melanie-studio-lighting-workbook 4689
The second image was shot in a compressor room It portrays
the inspection division of the same company These men are not
models and have a very realistic appearance One man poses as
manager and the other as an inspector Again we used props to
set the stage and asked the men to talk with each other
Cleaning the compressors was an important part of making the
statement the client desired The client portrays a clean and safe
environment Cleaning a set before shooting is sometimes the
most important thing you can do Paying attention to the small
details will get you repeat business This cant be stressedenough If you need to paint something in the scene before you
shoot it to make sure it looks right do it It may make all the
difference in the world Your client will take notice of your
attention to detail This is why previewing a location before you
shoot it is very important It gives you a chance to hire someone
or ask the client to clean these areas for the shot
The image above was shot with two strobes both using
umbrellas Both strobes were placed to the right of the camera
One of the strobes was positioned somewhat behind the men and
set high in the air This pushed light onto the compressorsbehind the men The second strobe lights the men and the
foreground parts of the compressors
7302019 Heinrich Melanie - Studio Lighting Workbook
httpslidepdfcomreaderfullheinrich-melanie-studio-lighting-workbook 4789
The advertising field is very competitive
yet the potential for increased income isgreat Photographers who are doing
advertising work tend to specialize
depending on the area they live in For
example someone living in a small city
may need to have several specialties On
the other hand someone in New York
could specialize in one thing ie
childrens fashions or motorcycles An
advertising photographer will most of
the time be working with an art
director from a design or advertising
firm Clients rarely hire photographersdirectly unless they have established a
rapport with them It is generally the
AD (art director) working on the job
that will hire for the client
Ask yourself this question What is the
one thing that I like and feel
comfortable with Your answer is the
area you should be specializing in In
reality most people go through life and
their likes and dislikes change Aphotographer sometimes follows a
specialty For instance someone who
assisted a commercial photographer
shooting childrens clothes and liked it
decided to pursue that field The ideal
situation is to make a living doing whatyou really like
Lessons in this section
Lighting Multiple Glass ProductsUsing Props with Products
Multiple Exposures
Making Reflections Work for You
Using a Product for a Background
Floating a Product
Boring Product - Interesting Design
7302019 Heinrich Melanie - Studio Lighting Workbook
httpslidepdfcomreaderfullheinrich-melanie-studio-lighting-workbook 4889
The lessons in this section assume you
have a good working knowledge of
camera tools visual basics and lightingIf not go back to these sections and
learn these things first Also some of the
studio setups can be built Those
designs are described in Building a
Studio
The lessons in this section go into
extensive details showing you where to
position your lights and reflectors etc
in order to achieve a certain look and
feel in an image They includedescriptive diagrams for you to
duplicate
7302019 Heinrich Melanie - Studio Lighting Workbook
httpslidepdfcomreaderfullheinrich-melanie-studio-lighting-workbook 4989
Lighting Multiple Glass Products
FilmEktachrome 100
Daylight Film
Camera Format
4 x 5 - Horseman
Large Format
Lens
150mm Normal
Light SourceStrobe with Softbox and
Reflectors
Meter
Handheld Incident
Tripod
Yes
Filters
None
7302019 Heinrich Melanie - Studio Lighting Workbook
httpslidepdfcomreaderfullheinrich-melanie-studio-lighting-workbook 5089
The image above was an inset photograph for a
brochure cover The company sold gift baskets and
products The brochure was used to help their growing
marketing requirements The brochure had three
different images similar to this one along with
accompanying text The client was in the studiowhen this was taken and was the acting art director
So all proofs were finalized at the time of shooting
This eliminates any questionable fees for reshooting
Polaroids are used for the same reason An instant
image of lesser quality than film will serve as great
representations of the final photograph Polaroids
are sometimes faxed or scanned and emailed to the
client for approval Asking your client to sign off on
a photograph will give you the assurance that all is
okay and you can record the image on film
Shooting glass and high gloss labels can be a
frustrating exercise because of the multiple
reflections that occur Remember as you shoot to
look through the lens to see if you have any
reflections on your products in the set All
reflections are caused due to the angle between
lens and light source Review your polaroids
carefully for any reflections before you expose the
film
TIP ~ Moving the product a small amount may be the best
way to remove the reflections Before you do that
adjust your light to eliminate any glare and
reflection Each time you change the light position
you must check for glare
Place all the products on the table top according to
the layout supplied by your client or art director
The image above was tiered giving it height and
depth
The light is positioned directly over the set It is
tilted slightly toward the backdrop and away from
the camera The backdrop is set up as a sweep It is
a piece of gray formica See Building a Studio to
7302019 Heinrich Melanie - Studio Lighting Workbook
httpslidepdfcomreaderfullheinrich-melanie-studio-lighting-workbook 5189
learn how to make this if you are inexperienced in
studio construction
Three white or silver cards are used in the front andon both sides to pump additional light into the
scene These are carefully and strategically placed
to avoid seeing the reflector cards in the glass
When you are shooting glass objects the main light
should reflect in the glass It indicates the direction
of the light source The main light source reflection
is acceptable as long as it is not too bright The fill
light from the reflector cards should not dominate
your main light source
TIP ~ Reflector cards can be made from any material that
reflects light such as a white card Large pieces of
foam core are used and cut into smaller pieces
depending on the size of the set Silver cards are also
used They are positioned to reflect the light coming
from your main light source and bounce the light
softly back into the set These cards will add more
light and sometimes add unacceptable hot spots on
the products These hot spots are very distracting
and unsightly
Now that you have all your lighting sources in place
look through the camera to see if you have any
reflections If you have a lot of glare in your image
readjust the overhead light by tilting it more
towards the back or front Be careful to avoid lens
flare Lens flare is when your light or lights reflect a
glare back into the lens For example when
someone shoots into the sun the lens picks up a
glare Block the lens flare with a black card by
placing the card between the light and lens Make
sure not to put the card into your scenes final crop
or in a position where you block your image You
may need to move your lights or use a scrim to get
rid of the lens flare It will be easier to add a scrim if
you have previously adjusted all the glass for no
reflections Instead of a scrim you could use a lens
hood The lens hood attaches to the front of the lens
7302019 Heinrich Melanie - Studio Lighting Workbook
httpslidepdfcomreaderfullheinrich-melanie-studio-lighting-workbook 5289
It protrudes from the lens and blocks any glare
falling on the front lens element Each lens may use
a different hood These come in many different
shapes and sizes I use a scrim because it is far more
versatile
Assuming your light source is in a good position you
may still have some glare on the glass You can
eliminate many reflections by slightly tipping the
product forward Use a small object under the back
side of the product while not disturbing the
products position These are very slight movements
and will not change the appearance to any great
degree Also tip the reflectors back and forth and
side to side to remove any added glare from your
objects Be attentive to all the objects You may
eliminate glare in one object and produce it in
another You must check for any reflections in your
polaroids Some reflections are very difficult to
detect when viewing the set from behind the camera
using the modeling lights
Use an incident meter and read the light falling on
the set Always bracket your exposure Bracketing is
the process of taking many shots of the same set but
using different fstops For example if your meter
reads f32 at 160th of a second your bracket would
be one stop on either side f22 and f45 at the same
speed The image was shot at f32 or greater depth-
of-field Some photographers bracket with 12 stops
and 13 stop differences They shoot 5 sheets of film
using these small incremental changes
7302019 Heinrich Melanie - Studio Lighting Workbook
httpslidepdfcomreaderfullheinrich-melanie-studio-lighting-workbook 5389
Final cropping of image
The final image displayed on the left was
successfully shot with no glare on any of the
products All the products were in glass or were
wrapped in cellophane The image has been
cropped to match the final inset space for the
brochure This shot took about a half day toshoot
7302019 Heinrich Melanie - Studio Lighting Workbook
httpslidepdfcomreaderfullheinrich-melanie-studio-lighting-workbook 5489
Using Props with Products
FilmEktachrome 100
Daylight Film
Camera Format
4 x 5 - Horseman
Large Format
Lens
90mm Wide
Light SourceStrobe with Softbox
Meter
Handheld Incident
Tripod
Yes
Filters
None
7302019 Heinrich Melanie - Studio Lighting Workbook
httpslidepdfcomreaderfullheinrich-melanie-studio-lighting-workbook 5589
When using props to help convey your message
remember the visual basics about colorperspective framing contrast backgrounds
and balance
This image of a racing bike was shot from an
angle that enlarged the back wheel The wide
angle lens helps pronounce the wheel size as well
as increasing the elongated perspective of the
bike
The bike was shot against a black background
Isolating your subjects by eliminatingdistracting backgrounds will help make the
objects in the set stand out The three arrow-
shaped plexiglass pieces all point to the distance
This visually portrays the speed and forward
motion of a racing bike Primary colors of the
plexiglass are used to simplify the information
in the image The gears of the bike are
pronounced displaying the bikes power and
versatility The camera position is very low and
tilted upward to further increase the illusion of
size
A softbox was used to keep the glare on the
chrome to a minimum It was positioned
parallel to the bike seat on its right side and
tipped down slightly toward the pedals If you
look carefully you can see the reflection of the
softbox in the blue plexiglass This is acceptable
The light has bounced color from the plexiglass
back onto the chrome of the bike This adds
interesting color highlights to the image that
balance well with the other colors
Parts of the wheels reflect the colors of the
plexiglass adding an interesting bit of color
7302019 Heinrich Melanie - Studio Lighting Workbook
httpslidepdfcomreaderfullheinrich-melanie-studio-lighting-workbook 5689
backdrop will work also The velvet material
absorbs any light that falls on it
When you are taking your exposure readings
make sure that you take readings of the
background walls in the scene Do not face your
light toward the back wall The meter readingsof the walls should be at least 4 stops darker
than your final exposure This will maintain a
black background
The wide angle lens was used to achieve
maximum depth-of-field This image was
exposed at f45
The room was totally darkened for this shot
Some photographers will even paint their walls
black for a shot like this A black velvet
7302019 Heinrich Melanie - Studio Lighting Workbook
httpslidepdfcomreaderfullheinrich-melanie-studio-lighting-workbook 5789
Multiple Exposures
Film
Ektachrome 100
Daylight Film
Camera Format
4 x 5 - Horseman
Large Format
Lens
150mm Normal
and 90mm Wide
Light Source
Strobe with Softbox
Meter
Handheld Incident
Tripod
Yes
Filters
None
7302019 Heinrich Melanie - Studio Lighting Workbook
httpslidepdfcomreaderfullheinrich-melanie-studio-lighting-workbook 5889
This image was designed as a poster for a national bowling
tournament The objects were intentionally placed leavingblack areas for the white text or copy and logos to be placed
on the final poster
The image above was done by repositioning the camera
three different times and exposing the film each time with
the change (Three shots on one piece of film) In addition the
lens was changed for one of the shots
You will need a large piece of black velvet to absorb all
scattered light All exposures were shot on the black velvet
The velvet does not see light This leaves that area of the filmunexposed This allows you to expose something else in the
black area which occurs when you take your next exposure
You will also need a piece of acetate to place on the film
back for tracing the objects in each exposure This will help
you line everything up and avoid overlapping your
products By tracing the objects that appear on your film
back onto a piece of acetate you will be able to align
everything perfectly
The first exposure was made of the bowling ball in thebottom right with a wide angle lens The second exposure
was made of the bowling pin on the left bottom The third
exposure was made of the top right 2 bowling pins One of
these pins was raised up on a block for added dimension
With each exposure the camera was progressively pulled
away from the scene The camera lens to subject distance
was increased to help this illusion of depth Diagrams below
may help you understand this better
Make sure when taking photos like this that any part of the
image you wish to remain unexposed is filled with the black velvet You can add any lighter value to a black area with
film because it is unexposed
7302019 Heinrich Melanie - Studio Lighting Workbook
httpslidepdfcomreaderfullheinrich-melanie-studio-lighting-workbook 5989
When you are ready to make the first exposure trace the
film back onto the acetate by placing the acetate over your
film back Do this with each exposure
A softbox was used and placed close to all of the subjects
producing direct lighting Your exposure times and fstops
can be different for each exposure just as if you were taking
separate photographs In fact think of this type of image as
a composite
Wide Angel Lens Normal Lens Normal Lens
7302019 Heinrich Melanie - Studio Lighting Workbook
httpslidepdfcomreaderfullheinrich-melanie-studio-lighting-workbook 6089
Making ReflectionsWork for You
Film
Ektachrome 100
Daylight Film
Camera Format
4 x 5 - Horseman
Large Format
Lens
150mm Normal
Light Source
Strobe withSoftbox
Meter
Handheld
Incident
Tripod
Yes
Filters
None
7302019 Heinrich Melanie - Studio Lighting Workbook
httpslidepdfcomreaderfullheinrich-melanie-studio-lighting-workbook 6189
The image above was shot on a highly reflective
background It came in a long roll about 4 feet
wide The light was positioned toward the front
parts of the products to avoid a hard horizon lineThe light falls off into black making it useful for
the reversed type of white (see below) Be careful
to avoid lens flare when positioning the lights near
the camera lens Make sure to block any light that
may fall on the lens Use a scrim to block the light
A scrim is any black piece of material that will
function as a light block Black masking tape was
secured to the edge of the lens to block the light
Be careful not to show the tape in your
photograph
Glare can be a major problem with highly
reflective sets like this one Always remember to
look through your lens to avoid this Tip your
light toward the front or back of the scene to
adjust the glare on the set This shot was taken
using a strobe head inside a softbox This type of
light is often used in product photography
especially when shooting highly reflective objects
The light rays are scattered and softened by this
kind of light source
Each of the objects in this scene are veryreflective The reflective gold surface used to shoot
on adds interest to the products by adding a gold
reflection of the product onto the gold surface
This gives depth to the image
Adding different colored line art around the edge
of the image in the white border adds an extra
dimension to the final composite below This was
done by the designer after the image was taken
Some of the line art is in front of the image and
some is dropped behind the image Reverse text isused on the black part of the image and black text
is used on the white border
7302019 Heinrich Melanie - Studio Lighting Workbook
httpslidepdfcomreaderfullheinrich-melanie-studio-lighting-workbook 6289
Using a Product for a Background
Film
Ektachrome 100
Daylight Film
Camera Format
4 x 5 - Horseman
Large Format
Lens
150mm Normal
Light Source
Strobe with Softbox and
Reflector
Meter
Handheld Incident
Tripod
Yes
Filters
None
7302019 Heinrich Melanie - Studio Lighting Workbook
httpslidepdfcomreaderfullheinrich-melanie-studio-lighting-workbook 6389
This close-up of a computer chip was designed for the
front cover of a computer companys brochure (see
below) It was nesseccary to get the best detail for
enlargement reasons so a large format camera was used
The end image was 9 x 12 our negative was 4 x 5
A strobe with a softbox was used to light this subject
from the left side An accompanying white reflector card
was placed close to the subject to fill in the right side
with light (see diagram below)
The bellows on the 4 x 5 camera were extended to
enlarge this chip to fill the frame When extending the
bellows you increase the need for light to reach the film
In this case we did not need to have a small f-stop
number for sharpness so we left the lens open at f56and made our exposure appropriately Even if you need
to pop your flash a couple of times extending the
bellows should not be something to hold you back from
making the close-up you want to shoot The detail in this
shot is achieved by using a 4 x 5 camera with a good lens
TIP ~
Popping or firing the strobe multiple times is done with
the lens open in a darkened room so the only light in the
room is coming from your controlled multiple burst of
the flash Since you have no need for speed whenshooting inanimate objects keep pumping in the light to
get the exposure you need In a dark room you could
leave your lens open and just continually pop the strobe
Or you can cock the shutter and repeat the same
exposure until it adds up to the correct amount of light
required Make sure you are on a very steady tripod
The slightest amount of movement will blur your image
TIP ~
The best set up for any overhead shot with a 4 x 5 is to
put your set on the floor This is of course dependent on
the size of your set A short-legged set of horses works
very well also The legs used in this set were about 12
high
The hue of bluegreen works well with the yellow text
7302019 Heinrich Melanie - Studio Lighting Workbook
httpslidepdfcomreaderfullheinrich-melanie-studio-lighting-workbook 6489
The text pops off the image This color prevents the text
from falling into the background The background of the
computer chip remains a simple reminder of what the
company does It is the text that the viewer is expected to
read
This image would also make a great backdrop for a
collage or montage image
7302019 Heinrich Melanie - Studio Lighting Workbook
httpslidepdfcomreaderfullheinrich-melanie-studio-lighting-workbook 6589
Floating Product
Film
Ektachrome 100
Daylight Film
Camera Format4 x 5 - Horseman
Large Format
Lens
150mm Normal
and 90mm Wide
Light Source
Strobe with
Softbox
Meter
Handheld
Incident
Tripod
Yes
Filters
None
PolaroidsYes
7302019 Heinrich Melanie - Studio Lighting Workbook
httpslidepdfcomreaderfullheinrich-melanie-studio-lighting-workbook 6689
Both images in this lesson give the illusion of
floating The top image is propped up underneath by
a block A softbox directly above the computer
circuit board was used to achieve a soft even light In
todays high-tech industry these kinds of images are
being used in composites and as single images
TIP ~
Using black velvet as a backdrop can achieve a
similar effect where the subject appears to float The
light will be absorbed into the black velvet material
to create the illusion
The computer chip is not grounded to anything so it
appears to float (see Fig 1) The angle of the light on
the computer circuit board picked up some very
interesting highlights in Fig 1 which adds to the
high-tech feel of the image
A 4 x 5 camera was used to get greater detail with
the larger negative for enlargement purposes Depth-
of-field was achieved at f32
When shooting any subject like this you can portray
many kinds of interesting illusions The black velvet
material may be a little more expensive but nothing
else works as well This kind of material will help
you take the shots like the pros
Fig 1
7302019 Heinrich Melanie - Studio Lighting Workbook
httpslidepdfcomreaderfullheinrich-melanie-studio-lighting-workbook 6789
Boring Product -Interesting Design
Film
Ektachrome 100
Daylight Film
Camera Format
4 x 5 - Horseman
Large Format
Lens
150mm Normal
Light Source
Strobe with Softbox
Meter
Hanheld Incident
Tripod
Yes
Filters
None
7302019 Heinrich Melanie - Studio Lighting Workbook
httpslidepdfcomreaderfullheinrich-melanie-studio-lighting-workbook 6889
Some products you will be photographing will be justplain boring such as the rods in the shot above Its
your job as the photographer to bring life and interest
to boring products like these In the image above the
client needed his products shot for his company
catalog
Making something interesting from something boring
can be done by using an interesting background or
unusual lighting In this image the layout and diagonal
positioning of the rods directs the viewers eye to the
top right area of the image of the frame Text was
placed at the top and right side of this image (see final
image below)
The softbox was positioned above and to the left of the
product as indicated by the soft shadows Fig1 This
image could have easily been cut out from its
background and placed on any other background
Minimal depth-of-field is needed for this shot because
the maximum height of the product was only two
inches An aperture of f8 was used The exposure is
made with an incident meter reading to achieve an
overall well-balanced tone
Deep shadows could have been used to add interest to
these products by using a direct light at a very low
level to the table angle Fig 2 No softbox would be
used for this kind of shot
The set is placed on the floor so your camera position
is directly over the top of the set If shot on a table top
you would need to stand on top of a ladder to take the
shot The easier choice is to shoot on the floor
7302019 Heinrich Melanie - Studio Lighting Workbook
httpslidepdfcomreaderfullheinrich-melanie-studio-lighting-workbook 6989
Fig 1
Fig 2
7302019 Heinrich Melanie - Studio Lighting Workbook
httpslidepdfcomreaderfullheinrich-melanie-studio-lighting-workbook 7089
Lessons in this section
Mixing Texture Shapes and Color
Arranging a Set
Photographing Beautiful Glass
Messages in a Still Life
Creating a Mood
Still Lifes Selling Products
Setting the stage works to help convince the
viewer of a place and time or mood Small
details make a shot believable These
lessons will teach you how to think and tell
a story of a certain place in time Picking
the right props for your shoot will ensure
believability The lessons in this section
work in conjunction with the ProductPhotography section
A still life photographer can be found
working in a studio or on location This
type of photography demands the
recreation of a set or going to the set to
capture a moment in time This can be done
on location in the studio or digitally
created on the computer The truth is it fits
into many categories It is more than
product photography You are creating a
scene that conveys a sense of being
somewhere
7302019 Heinrich Melanie - Studio Lighting Workbook
httpslidepdfcomreaderfullheinrich-melanie-studio-lighting-workbook 7189
you pull your entire learning experience
together I include details and diagrams
that will reinforce your understanding
Still life scenes are often used in a designers
set or in a showroom like in a furniture
store They can also be used to convey a
story quickly and help transfer the concept
and idea throughout the entire image These
lessons include tips on how to light objects
in small and detailed areas They will help
7302019 Heinrich Melanie - Studio Lighting Workbook
httpslidepdfcomreaderfullheinrich-melanie-studio-lighting-workbook 7289
Mixing Texture Shapes and Color
Film
Ektachrome 100
Camera Format
4 x 5 - Horsemen
Large Format View
Camera
Lens
150mm Normal
Light Source
Strobe with Softbox
MeterHandheld Incident
Tripod
Yes
Filters
None
7302019 Heinrich Melanie - Studio Lighting Workbook
httpslidepdfcomreaderfullheinrich-melanie-studio-lighting-workbook 7389
The image above was shot as a portfolio piece
Mixing textures shapes and colors the
photograph displays the photographers eye for
design It is photographed on black velvet which
adds saturation of the overall appearance by
absorbing all the light that falls on it The black
velvet can be purchased at any fabric store
Two scarves are positioned at opposing angles
adding strong graphic interest and competition
between them Against the soft colored scarves
the dark blue hat pops out The colored markers
are color complements to the blue hat and add
additional depth to the image
Resting on top of the scarves are brightly
colored objects which add spots of color andinterest The curvy lines of the ribbons break up
the edges of the two scarves and add a bit of fun
to the image The final crop of the image forces
the viewer to see the positive and negative
spaces of color within the frame Cropping plays
an important role in the success of your image
How the image was photographed ~
One main strobe light was used It was shot
through a softbox or mylar scrim Several white
and silver reflector cards surrounding the setbounced in a soft fill light Using the reflectors
as fill light evens out the overall appearance
without eliminating the direction of the main
light The shadows in the image are soft and
reveal more texture in the scarf
Minimal if any depth-of-field was needed in
this image so it was exposed at f56 The meter
reading is taken with an incident meter and
pointed directly at the camera Several readings
were taken of the entire image For example a
meter reading was taken of the light falling onthe hat the tip of the triangular scarf and the
black corners of the velvet before an exposure
was chosen A range of only 1 stop was allowed
between these exposure readings Reposition
your reflecting cards either closer or further
7302019 Heinrich Melanie - Studio Lighting Workbook
httpslidepdfcomreaderfullheinrich-melanie-studio-lighting-workbook 7489
from your subject to adjust the exposure
variations Your final exposure choice will be of
the area in the scene that is the brightest or
where the most light is falling If your exposure
variations are between f16 and f11 f16
indicates the brightest area in the scene You
should know this at this point in your educationIf you dont go back to the Camera Basics
section and read over the lessons Choosing f16
will prevent overexposure to the lighter areas in
your scene The camera was positioned directly
over the top of the set using a tripod Make sure
your tripod is capable of supporting your
camera in these unusual positions
Pick three or four objects that work well
together Lay them out on a solid colored
background in an interesting design pattern
Position your camera lights and reflectors
Using a color transparency film bracket your
frames as you shoot
Final crop of image
reflector
reflector
7302019 Heinrich Melanie - Studio Lighting Workbook
httpslidepdfcomreaderfullheinrich-melanie-studio-lighting-workbook 7589
Arranging a Set
Film
VPS 100 - Color Negative
Camera Format
2 14 square - Hasselblad
Medium Format
Lens
80mm Normal
Light Source
Strobe with Softbox
Meter
Handheld Incident
Tripod
Yes
Filters
None
7302019 Heinrich Melanie - Studio Lighting Workbook
httpslidepdfcomreaderfullheinrich-melanie-studio-lighting-workbook 7689
Within each image there can exist sets that pull the
entire image together The image above is an example
of one of these small sets The set is staged for a period
in time
Some professionals hire stylists to set something like
this up Background information helps convey a
message in the overall scene For example suppose you
are shooting the interior spaces of a Victorian home
and your client wants to place the product in the late
1800s Objects in the photo above will help transport
your viewer into that time in history Props are a very
important part in convincing your viewer of a place in
time You can find props at antique stores for this kind
of scene Time period images must be authentic down
to the smallest details Hire a historian for accuracy if
needed
Magazines use small inset photos that display intricate
details of settings They may not be set against a black
background as in the photograph above The
background should be dimly lit or out of focus to
help accent the subject Shallow depth of field and
object placement will work together to make your
image successful
One main strobe light was used in the photograph
above with no fill lights or reflectors This drops the
background of black velvet into black making it a
perfect place for white text Remember an
editor or designer usually needs to add type and will
need this space
7302019 Heinrich Melanie - Studio Lighting Workbook
httpslidepdfcomreaderfullheinrich-melanie-studio-lighting-workbook 7789
Still lifes have been used in fine art for many years The
image above happens to be found in nature but could
have just as easily have been set up in a studio The
arrangement of the plates and glass objects can be
emulated in the studio or in a set I have included this
image to show you that what you find most naturally in
life is how you should set up a scene whether in the
studio or on location Take your camera into the world
around you and shoot small stories such as the one
above These still lifes will help you to stylize your own
setups This lesson will help you learn how to crop and
balance your images Pay close attention to the light
falling on the objects in your scenes Follow the previous
example to determine the proper exposure of your film
Be deliberate when you consider the photographs you
will take Take your time
Remember to see within the boundaries of your frame
balancing objects from front to back side to side and
corner to corner See Visual Basics for more
information on setting an objects position within the
frame
7302019 Heinrich Melanie - Studio Lighting Workbook
httpslidepdfcomreaderfullheinrich-melanie-studio-lighting-workbook 7889
Photographing Beautiful Glass
Film
VPS 100 - Color Negative
Camera Format
2 14 square - Hassalblad
Medium Format
Lens
80mm Normal
Light Source
Strobe with Softbox
Meter
Handheld Incident
Tripod
Yes
Filters
None
7302019 Heinrich Melanie - Studio Lighting Workbook
httpslidepdfcomreaderfullheinrich-melanie-studio-lighting-workbook 7989
The image above will give you an idea of how to light
small objects in a room or on a set You can make
objects pop out that are a very small part of the sceneFor example the color in this image is something you
really want to show but each of the objects must be
placed and lit properly to portray the beauty of their
colors Small strobes with funnel snoots will spotlight
only the objects you are interested in The blue
background color was chosen as a color complement to
the colors in the glass
TIP A snoot can be made from a rolled piece of
poster board into the shape of a cone You can also
buy these cones to fit on the strobe Be careful if using
poster board as the lights can get very hot
Take a large piece of poster board and roll it into a
cylinder shape Fig 1 Tape the center of the cylinder
then expand one end and decrease the opposite end of
the cylinder Fig 2 Make the expanded end large
enough to fit over the strobe head The other end of
the cylinder should be small enough to direct the light
at whatever object you want to be lighting The size of
the smaller hole will dictate the angle of the light
pointed at the object
Fig 1 Fig 2
7302019 Heinrich Melanie - Studio Lighting Workbook
httpslidepdfcomreaderfullheinrich-melanie-studio-lighting-workbook 8089
WARNING
DO NOT USE POSTER BOARD CONES WITH
TUNGSTEN LIGHTS The chance of fire is far too
great NEVER leave powered lights unattended
The glass objects in the photograph above have had the
light pushed directly through them When the light
passes through the colors are revealed
Shooting glass with liquid in it is described in the
diagram below The softbox is placed directly above the
set and slightly tilted away from the camera With the
liquid in the glass place a reflector card behind the
liquid only Looking through the camera lens make sure
the card does not extend past the liquid above or to the
sides Tip the card backwards so it picks up some of the
light falling down from the softbox This will illuminate
the liquid giving it a glowing appearance
7302019 Heinrich Melanie - Studio Lighting Workbook
httpslidepdfcomreaderfullheinrich-melanie-studio-lighting-workbook 8189
Your background can be any color detail or density when
using this reflector card
7302019 Heinrich Melanie - Studio Lighting Workbook
httpslidepdfcomreaderfullheinrich-melanie-studio-lighting-workbook 8289
Messages in a Still Life
Film
Ektachrome 100
Camera Format
35mm - Nikon
Small Format
Lens
50mm Normal
Light Source
Strobe with Softbox
Meter
Handheld Incident
Tripod
Yes
Filters
5 Red CC Filter
7302019 Heinrich Melanie - Studio Lighting Workbook
httpslidepdfcomreaderfullheinrich-melanie-studio-lighting-workbook 8389
The above image sends a message of peace and
comfort to its viewer in a couple of different
methods
One method is achieved by the type of lighting
used (In this case a strobe within a softbox) A warm
glow of very soft light is scraping horizontally
across the image and highlights fall on the outer
pages of the book It has a golden quality Another
method is achieved by using a number 5 CC filter
over the camera lens This accents the rich red color
in the roses with their saturated hue and balances
perfectly with the gold color in the pages as well as
the reddish-brown boards that they sit on
TIP ~
A red or orange transparent gel in an acetate sheet
form could be placed over the softbox to warm the
color pushed into the set
The background falls off into black holding the
viewers eye on the bible and the perfectly balanced
roses
This was shot with a softbox to the right of the scene
with no fill cards or fill lights The main light source
is close to the subject so the light falls off very little
When the light is positioned close to the subject its effect
on the oppiste side is minimal
7302019 Heinrich Melanie - Studio Lighting Workbook
httpslidepdfcomreaderfullheinrich-melanie-studio-lighting-workbook 8489
Using light color balance and the right props this
image conveys both warmth and love The main
subject is the bible The roses are used to convey a
feeling of love If instead of roses guns were used as
props the message would be entirley different
perhaps of violence Props can make or break
your image
7302019 Heinrich Melanie - Studio Lighting Workbook
httpslidepdfcomreaderfullheinrich-melanie-studio-lighting-workbook 8589
Creating a Mood
Film
Ektachrome 100
Camera Format
35mm - Nikon
Small Format
Lens
50mm Normal
Light Source
Strobes and reflectors
Meter
Handheld Incident
Tripod
No
Filters
None
7302019 Heinrich Melanie - Studio Lighting Workbook
httpslidepdfcomreaderfullheinrich-melanie-studio-lighting-workbook 8689
Making a statement with your photography should
be foremost in your mind The image above tells us ~
bedroom lovers intimacy passion etc It is up to
our imagination to fill in the blanks You have only a
few moments to convey your message so be careful
not to be too subtle yet not so blatant that your
message is visually insulting
The location in this shot was specifically chosen
Shot on a wooden floor a rustic authenticity is
portrayed A cowboy feel was achieved with these
surrounding elements The lingerie casually draped
over the boots looks accidental and unplanned The
boot that is tipped over leads the viewer to believe an
impetuous moment of hurried passion is taking
place The background is evident but intentionally
made out of focus by shooting at f4 for shallow
depth of field
This image is far from haphazard It was planned
from layout to location to scouting to objectplacement The idea came first then the execution of
the image Although minor alterations of layouts are
common the concept will remain the same This
eliminates confusion by isolating one idea and
working it through from all directions
Scouting out locations can be a full-time job and you
may need special permission to shoot in a particular
place See property release in the Legal Forms
section to cover your legal requirements and release
forms
7302019 Heinrich Melanie - Studio Lighting Workbook
httpslidepdfcomreaderfullheinrich-melanie-studio-lighting-workbook 8789
This kind of image will work very well for an adselling lingerie A strobe light with a softbox was
used to light the boots and the lingerie from the
right A reflector card was placed close to the boots
to fill in the left side of the scene The light is
positioned low near the floor which scrapes the light
on a low plan This was placed to simulate a specific
time during the day sunset or early evening The
light at this time is warm in color value which adds
to the subject matters message The camera vantage
point is low also bringing the viewer into intimate
contact with the boots and lingerie
7302019 Heinrich Melanie - Studio Lighting Workbook
httpslidepdfcomreaderfullheinrich-melanie-studio-lighting-workbook 8889
Still Lifes Selling Products
Film
Ektachrome 100
Camera Format
2 14 square - Hassalblad
Medium Format
Lens
80mm Normal
Light Source
Strobe with Softbox
Meter
Handheld Incident
Tripod
Yes
FiltersNone
7302019 Heinrich Melanie - Studio Lighting Workbook
httpslidepdfcomreaderfullheinrich-melanie-studio-lighting-workbook 8989
Placement and staging of objects requires a thought-out layout and planned
execution when using multiple products Layering has been used in this image
where non-information has been overlapped for example where the licence
plates and shirts touch Your viewer does not need to see the entire object in
this case to know what it is Strong diagonal lines have been made by object
placement This helps pull the viewer through the image and leads the eye to
a specific area of an image This image was created to find funding for
Vietnam vets by selling these products
If you have been asked to shoot several products and put them all into one
image think of it in terms of a still life setting Larger items will be placed inthe background sometimes even being used as the background For example
picture a group of images all representing something American The
background for this scene could be a flag which is also one of the subjects
There is no need to see the entire flag because it is an easily recognizable icon
In the image above the wooden floor was used to add a sense of the rustic and
gritty realism of the Vietnam war It was lit with a softbox directly above the
subjects The aperture was a concern for foreground to background
sharpness so the camera was pulled back far enough from the scene to allow
for a large aperture of around f 56
Below is the final image This was dropped into a 3 fold 812 x 4 brochure
along with other images of the same sort

7302019 Heinrich Melanie - Studio Lighting Workbook
httpslidepdfcomreaderfullheinrich-melanie-studio-lighting-workbook 289
Table of Contents
Introduction
Learning to see Light
Light Types
Camera Positions
Subjects
Backgrounds
Props
Building A StudioScrim Soft Box and White Tent
Backdrop and Table
Studio Flat-Reflector
People PhotographyEmotional Power Portrait
Creating a Sullen Emotion
Staging People
Product PhotographyLighting Multiple Glass
Using Props with Products
Multiple Exposures
Making Reflections work for you
Using a Product for a Background
Floating a Product
Boring Product Interesting Design
Still LifeMixing Texture Shape and Color Arranging a Set
Photograhing Beautiful Glass
Messages in Still Life
Creating a Mood
Selling a Product
7302019 Heinrich Melanie - Studio Lighting Workbook
httpslidepdfcomreaderfullheinrich-melanie-studio-lighting-workbook 389
Introduction
to
Studio Lighting
Photography is all about light When you are outside shooting you
are at the mercy of the ambient or existing light typically sunlight
and whatever source that reflects sunlight Studio lighting on the
other hand will let the photographer control the light its source
and the objects that reflect light on a set This book covers the ins
and outs of strobe lights how to use them and how to control them
on a set It also covers how and why advertising images are created
stylized and designed as well as set construction
What you will learn
1 The power of strobe lights
2 Control with strobe lights
3 Advertising affects using strobe lights
4 Concept designs created for use in advertising
5 Lighting glass objects
6 Manipulation of reflective surfaces to enhance the image style
like in a professional studio
Using many different types of strobe lights you will recreatelighting effects that other photographers have used
There are many factors that affect the final images you will create
The type of light you use the direction the distance of light to
subject fill lights and reflectors lens depth-of-field and product
position all play an important role in creating an image style These
are only a few factors that will affect your final image Experience
will teach you how to see light and how the subject responds In the
studio there are so many choices for lighting objects Mastering
how the strobes light objects will be the first objective The power
of the lights their height and the angle of the lights are only a fewthings to consider in the studio
7302019 Heinrich Melanie - Studio Lighting Workbook
httpslidepdfcomreaderfullheinrich-melanie-studio-lighting-workbook 489
subject on the set that you have created This all happens before
you touch any lights Studio Lighting is far more complex than
shooting outside because you have many more opportunities Using
the studio lights you will emphasize some areas of the subject while
downplaying other areas For example in a portrait shot ask
yourself which is the best side of the face Is shallow depth-of-field
required for this product shot What will my background do if it is
in or out of focus in this photograph You should be aware of how
light can set a mood and portray a unique emotion Using colored
gels over the lights or different color balanced lights such as
tungsten lights using daylight film you can manipulate the mood of
the image by making it warmer or cooler By paying attention to
your subjects positioning personal interpretation of your subject
whether it is human or inanimate will help you create your own
unique vision
After each setup you should tear down the set and pack away the
lights This should force you to think fresh when you go back into
the studio
After your idea is developed and sketched you will position your
7302019 Heinrich Melanie - Studio Lighting Workbook
httpslidepdfcomreaderfullheinrich-melanie-studio-lighting-workbook 589
Learn about Light
Recognizing how light affects subjects on a set is how photographers train
their eye to create light and its different effects
The best way to train your eye is to look at other photographers work
Look at magazines photo books and any other source that include
photographs You will be keeping a record of images that you glean from
magazines
After finding an image you like and one that suits the assignment ask
yourself why a particular lighting style was used and why a position and
vantage point was chosen Take notes that indicate what you like about the
photographs and draw diagrams that indicate the lighting direction
including the type of light used (ie direct diffused backlight direct
diffused) This will not only help you learn to see light and its effects but
also help you as a reference for any future assignments
(See examples below and in later pages of this book)
You will be keeping the same notes and diagrams when creating your own
work One sketch will be topographical and the other a side view (Seebelow) In fact we will be working on these diagrams during class These
will all be included and displayed for critique when you hand in an
assignment Keep records of what your meter readings are as well as your
used fstops and speeds The distances of the lights filters diffusion
materials the film used lens used position and height of the lights and
any other tools that you used are also to be recorded
When you are shooting use the record-keeping sheet in the ldquoPhoto Tips
and Tricksrdquo book to record the above
Below are examples of diagrams topographical side views and camera
position views that you will be creating from gleaned magazine images
You will follow the same style of drawing when creating your own
7302019 Heinrich Melanie - Studio Lighting Workbook
httpslidepdfcomreaderfullheinrich-melanie-studio-lighting-workbook 689
images
Topographical from a
topographical shotSide View
Final Image from the above diagrams
7302019 Heinrich Melanie - Studio Lighting Workbook
httpslidepdfcomreaderfullheinrich-melanie-studio-lighting-workbook 789
reflectors
7302019 Heinrich Melanie - Studio Lighting Workbook
httpslidepdfcomreaderfullheinrich-melanie-studio-lighting-workbook 889
Types of Lights
There are many different types of lights that can be used in thestudio
The type of fixture that the light source emanates from willeffect the style of lighting it creates There are materials used to
soften light reflect the light and cones used to direct light
Color balances are typically daylight or tungstun
Below you will find images that show and describe the kind of
light produced
Image 1Notice the soft light under the chins and on the right side The
main light is high and frontal with a small fill on the right for theshadow areas The background is out of focus
1 Frontal Direct Diffused lLight
Image 2
This image has been light on all side to remove any chance of ashadow It was used for a company brochure The props in this
shot give the viewer a peak into the companys building process
2 Diffused Light
7302019 Heinrich Melanie - Studio Lighting Workbook
httpslidepdfcomreaderfullheinrich-melanie-studio-lighting-workbook 989
Image 4
A direct light in a softbox was positioned on the right and close to
the model A soft fill on the left dramatizes the mood in this image
and emphasizes the models positioning The dark backgroundhelps emphasize the models dramatic mood
3 Direct Light with Spot
4 Side DirectDiffused Light
Image 3
A strong light on the left side of the frame set the mood for this
shot A small spotlight brought out his back shoulder revealing
his shape against the black background The lighting is verytheatrical
7302019 Heinrich Melanie - Studio Lighting Workbook
httpslidepdfcomreaderfullheinrich-melanie-studio-lighting-workbook 1089
5 Frontal Overhead Softbox
6 Multiple Cone Lights
Image 6
Three small strobe heads with cones were positioned to push lightthrough the multicolored glasses The blue background helps
separate the subjects color from the background
In addition to these lighting types and styles white colored
reflectors may be added to reflect a touch of light Black papermay be added to a light to cut back hot spots that reflect into
highly reflective objects
Image 5
A soft box is positioned about 4 feet from the products and was
used to evenly light the glass One light was used with several fill
cards A grey background was chosen to minimizm anydistraction
7302019 Heinrich Melanie - Studio Lighting Workbook
httpslidepdfcomreaderfullheinrich-melanie-studio-lighting-workbook 1189
Camera Position Styles
Camera positioning can change the entire feel of the image you are
creating Study the image below and start to think about how you can
change your camera positions to help your photograph Think about
the message you are conveying Make associations using camera
positioning
Image 1
The bike was a high-end racing bike It had a specialized back wheel
Therefore it needed to be the main subject in the image The entire
bike was included in the shot yet the back wheel is the main focus A
wide-angle lens provided the perfect solution by accenting the back
wheel A small aperture was used to maintain depth-of-field
Image 2
This add was shot on a table top The camera was positioned
approximately 2 feet higher than the table level The angle and
position were chosen to include the product reflections Products are
separated from the background that was used
Image 3
This image was shot at a low angle and close-up It invites the viewer
into the scene of this intimate event Observe the close cropping done
in the camera eyepiece
Image 4
Shot straight down on top of the set (topographical) this image boxes
in the products by framing definitive edges A black background
separates the products and pronounces their colors The set has a
geometric flair that is contradicted by soft flowing ribbons and acircular hat
7302019 Heinrich Melanie - Studio Lighting Workbook
httpslidepdfcomreaderfullheinrich-melanie-studio-lighting-workbook 1289
1 Low angle right
4 Topographical
2 Frontal medium height
3 Low angle Close-up
7302019 Heinrich Melanie - Studio Lighting Workbook
httpslidepdfcomreaderfullheinrich-melanie-studio-lighting-workbook 1389
Your Subject
When choosing your subject (perhaps a client has
supplied a product) look at its characteristics The list
below is a jumping-off-place Start by looking for those
things in your products
1 Shape Oddly shaped subjects may need a dark or
subdued background to distract the viewer from the
subjects shape
2 Texture Is the surface smooth or coarse What type
of lighting will accent or tone-down the texture Think
about using a low scraping light to accent texture A
broad soft light will minimize unwanted texture
3 Color Are the colors demanding subtle or strong
backgrounds and props to minimize the color Consider
using complimentary colors to help accent your subjects
color Be careful not to use complimentary colors that
overpower your subject taking away its attention
4 Tone Study your subject for is tonal values Lighter
subjects may work well against darker backdrops where
darker subjects work well against lighter backdrops
Contrast may not be needed in your set Try making a
high key photograph or low key photograph if your
subject calls for it
How will this subject fall against the background you
have chosen If you are shooting more than one subject
together on a set consider how these work together using
the same observations listed above Swinging your main
light from foreground to the right side or left side and to
the back of your subject will reveal an entirely different
texture color and shape as you pan around the subject
Try doing this before you make your final lighting
decision
7302019 Heinrich Melanie - Studio Lighting Workbook
httpslidepdfcomreaderfullheinrich-melanie-studio-lighting-workbook 1489
and accentuate their unique characteristics
Image 1
The soft large shapes of the bowling balls have been
broken up by a strong perspective of the straight piece of
oak wood that stretches to the horizon line The oak
wood piece emulates the distance and texture of a bowling
lane The background has a magenta color that fades
into blue which helps pull out the colors of the bowling
balls and pins
Image 2
The bottles needed to be shot with the packaging whichcontradict both the texture and shape of each other In
this image the background creates the mood We see the
bottles on the floor with ribbons and bows The viewer is
meant to think they have entered the scene of a birthday
party The products shapes are fanning outward in an
open expression of fun and excitement
The subjects in the images below were shot to contradict
7302019 Heinrich Melanie - Studio Lighting Workbook
httpslidepdfcomreaderfullheinrich-melanie-studio-lighting-workbook 1589
piece of formica to contradict the edible factor of the
vegetables It is a slick image meant to stop the viewerrsquos
eye Water sprayed on the formica connects the
background with the product Not suitable for a food
magazine this image displays an artistc view
Image 3Shallow depth-of-field was used in this image to help
pronounce the texture of both the onion and the
broccoli They were placed on a flat high gloss black
7302019 Heinrich Melanie - Studio Lighting Workbook
httpslidepdfcomreaderfullheinrich-melanie-studio-lighting-workbook 1689
Your Background
When choosing a
background think about how
it will help your subject You
may want a distinct
separation between the
background and foreground
The lightness and or
darkness of your
background will change the
feel of your subject A darkly
lit background will force theviewers eye to look at a well-
lit subject Conversely a well
lit background and under-lit
subject will create a
silhouette and show the
shape of the subject
Imagine your background
choice as an aid in conveyingyour message For example
an ad that is shot on sand
will help sell sunglasses orbeach towels in an
advertisement
Consider creating a shadow
by pushing a light through a
solid object onto a
background This will help
identify the kind of product
you are shooting For
example imagine a shadow
of a company logo on the
background and a selective
part of the subject in the
foreground of the image
Brand identity is used here
to convey the message
Black drops out to float
Colors for environmental placement
7302019 Heinrich Melanie - Studio Lighting Workbook
httpslidepdfcomreaderfullheinrich-melanie-studio-lighting-workbook 1789
Although not considered
part of the background the
foreground material you use
to place your product or
subject on is also to be
thought of with the same
purpose as backgrounds See
the computer chip below as
an example of this
Textured formica
White makes black products
Products can be used as
backgrounds
Highly-reflective lined
material
pop
7302019 Heinrich Melanie - Studio Lighting Workbook
httpslidepdfcomreaderfullheinrich-melanie-studio-lighting-workbook 1889
Props
Props are accent items that help convey the message you are
portraying in your image They are meant to help the subject
speak For example if you are producing an ad for
silverware a plate would be a perfect accent for the product
Be careful not to lose the focus of your product Showing a
small part of a prop is sometimes all that is necessary to
convey the message You must not allow a prop to distract the
viewer from what you are selling in the advertisement
Image 1
Below the old-fashioned photos give the viewer an idea of the
type of image that is produced from this camera
1 Old-fashioned Photos
7302019 Heinrich Melanie - Studio Lighting Workbook
httpslidepdfcomreaderfullheinrich-melanie-studio-lighting-workbook 1989
Cowboy Boots
Image 3
The boots are the prop in this ad and help sell the intimate
aparel to a specific target market
Image 2
The roses placed diagonally and at different levels add a
touch of sensitivity to this image The wood adds contrast
from that of the Bible and roses The wood and roses also add
a warmth to the image becasue of their color
2 Roses with Bible
7302019 Heinrich Melanie - Studio Lighting Workbook
httpslidepdfcomreaderfullheinrich-melanie-studio-lighting-workbook 2089
Lace
Image 4
The lace in this shot gives the glass products in baskets a
homemade look
7302019 Heinrich Melanie - Studio Lighting Workbook
httpslidepdfcomreaderfullheinrich-melanie-studio-lighting-workbook 2189
The photographs on the right portray
an advertising studio Thephotographer is in the middle of a
shoot working with a model on a
skiing shot
In the images you will see five
different lights The two with
umbrellas are lighting the
background washing it out to a
bright white
Two more lights are working in
conjunction with props that are on a
stand in front of the lights The propsthrow a shadow onto the set to
emulate the skier passing trees The
main light is a broad soft box
overhead and in front of the
photographer Finally you will see
the photographers assistant on the
ladder with a bag of styrofoam
peanuts to drop at command
The photographer is using a large
format 4 x 5 view camera on a studiotripod Two power pack batteries are
serving as a light source each
supplying different wattage levels to
the strobes The background is
created with seamless paper It hangs
from a set of poles and produces a
flawless smooth background to shoot
Lessons in this sectionBuilding a Scrim Soft Box and White Tent
Building a Backdrop and Table
Building a Studio Flat-Reflector
7302019 Heinrich Melanie - Studio Lighting Workbook
httpslidepdfcomreaderfullheinrich-melanie-studio-lighting-workbook 2289
against Building this backdrop is
described in the lesson Building a
Backdrop and Table
Whether you are using a small or
large format camera setting up a
photo studio will be the same
procedure You can either buy these
items listed below or you can followthe lessons in this section and make
your own
Most photographers end up making
some things in their studio so this will
be a good place to start
The building projects that follow are
easy to do and require very few tools
A drill of some sort may be the only
expensive tool you will need for
building Making these projects will
save you a lot of money and get you
started right away
Depending on the kind of room you
have you may need to be more
creative with your studio design
The following is a list of things you
will want in your studio
1 Table Top or Drafting Table
2 Workhorses
3 Backdrops ~ Seamless paper cloth
materials painted backdrops
4 Stands and Tripods5 Light Table loop croppers
hot glue puddy reflectors
6 Lights ~ strobes or tungsten
7302019 Heinrich Melanie - Studio Lighting Workbook
httpslidepdfcomreaderfullheinrich-melanie-studio-lighting-workbook 2389
on the list at the top of the page but
be assured they include the basic
requirements for a studio
In this section Building a Studio youwill receive information to help you
build your own studio You may not
understand what all of the things are
7302019 Heinrich Melanie - Studio Lighting Workbook
httpslidepdfcomreaderfullheinrich-melanie-studio-lighting-workbook 2489
Building a Scrim Soft Box and White Tent
Materials Needed
(A) Frame 16 x 20
(B) White Acetate can bepurchased at any glass
company
(C) Black Photographers Tape
(D) Two Matte Boards 18 x
20 each
(black on one side white on the
other)
(E) Matte Boards 18 x 16
(black on one side white on the
other) Fig 1
A Scrim Soft Box and White
Tent are used to scatter
diffused light onto your subject
The professional version of this
is costly and not as versatile as
the design described in this
lesson
This lesson will show you how
to construct a scrim ordiffusion system a soft box and
Fig 1
a white tent
7302019 Heinrich Melanie - Studio Lighting Workbook
httpslidepdfcomreaderfullheinrich-melanie-studio-lighting-workbook 2589
Making the Scrim
A scrim is used to soften thelight source It can also be used
to add shadows on any subject
after light is pushed through it
Fig 3
Build or buy a simple 16 x 20
frame (A) (an artist canvas
frame made of wood will work
fine) Get one that is big enough
so light cant spill around the
edges creating shadows fromthe frame itself A 16 x 20
frame (A) will be a good place
to start
The frame size used here is 16 x
20 It is only used to give you an
idea of how to make a scrim
You can make your scrim any
size you like and then cut the
acetate to fit the frame and
adjust all the other materials to
fit the size of the scrim you are
making
Measure the acetate (B) by
placing the frame down on top
of it and then draw a line to
mark out your exact
dimensions Now attach the
white acetate (B) to the frame
using photographers black tape (C) not staples Staples
may tear the acetate
Make sure to conceal the edges
of the frame with the acetate
Fig 2
7302019 Heinrich Melanie - Studio Lighting Workbook
httpslidepdfcomreaderfullheinrich-melanie-studio-lighting-workbook 2689
This will prevent dark shadow
lines from reflecting onto your
subjects highly reflective
surfaces Fig 2
TIP ~ In place of acetate try using a
white sheet
TRICK ~
To have a window shape
appear in your subjects
reflective surface place two
pieces of black tape (C) across
both center axis This will
reflect into your subject and
look like a window Fig 3
Making the Soft Box
A soft box will emulate the
same kind of lighting used in a
big studio and it softens the
light from a strobe supplying a
diffused light source Image
colors will be saturated and
rich in appearance
A soft box is made up of one
scrim and the black matte
board box To make the box
cut the matte board at an angle
so when taped together it
forms the shape of a cone Fig
4 White sides should face in
Tape the four pieces of matte
board to the edges of the scrim
with photographers black
tape two pieces (D) 20 x 18
are taped to the 20 lengths
and the other two pieces (E)
18 x 16 are taped to the 16
Fig 3
length of the scrim
7302019 Heinrich Melanie - Studio Lighting Workbook
httpslidepdfcomreaderfullheinrich-melanie-studio-lighting-workbook 2789
Face the white side of the matte
board in toward the centerMake the shape of the box cone
inward Fig 5 These flaps will
scatter light all around the
inside softening the light as it
comes through the scrim
Both the light and the soft box
should be attached to a light
stand to hold them up in place
Making a White Tent ~
A white tent is used to
photograph highly reflective
objects by revealing only white
in its reflected areas To make a
white tent for shooting
reflective objects make five
scrims not the soft box as
described above Tape them
together in a box shape hiding
any and all edges of the framesThis is because they will reflect
in the object you are
photographing All reflections
must be white
You will end up with a box with
no bottom It will be placed on
top of your subject on a table
top in effect covering it You
will be lighting the subject by
pushing light through all fivescrims Position your lights so
they do not cast any shadows
onto your subject by placing
them at a distance from the
white tent You will need to cut
Fig 4
Fig 5
7302019 Heinrich Melanie - Studio Lighting Workbook
httpslidepdfcomreaderfullheinrich-melanie-studio-lighting-workbook 2889
a small hole into one of the
scrims to put your lens
through Make sure your
product is placed properly or
you will be moving the tent
several times to get it right Fig 6
TIP ~
Another way to approach this
is to make one of the scrimsfreely swing open so you can
easily access the subject for
rearranging Hinge one of the
connecting joints
TIP ~
You may need to make color
tests because the acetate can
fade over time giving a yellow
cast
TRICK ~
The scrim can be covered with
a colored sheet of acetate Try
using different colors on
opposite sides of the tent
Fig 6
7302019 Heinrich Melanie - Studio Lighting Workbook
httpslidepdfcomreaderfullheinrich-melanie-studio-lighting-workbook 2989
Building a Backdrop and Table
A backdrop is essential for most
photographs taken in a studio This
lesson will show you how to make one
The ceiling must be solid not a drop
ceiling
Materials Needed
(A) Two- curtain rods (height of your
ceiling)
(B) One- 7 pole 2 diameter
(C) two sets of workhorses
The curtain rods you buy must be high
enough to reach between your floor
and ceiling They must have enough
spring tension to stay in place from
floor to ceiling
Set the curtain rods up between floor
and ceiling and about 6 feet apart and
3 feet from the wall Fig1
Stretch the 7 foot pole between the two
curtain rods and attach with clamps or
duct tape in place Fig 2
Fig 1
Fig 2
7302019 Heinrich Melanie - Studio Lighting Workbook
httpslidepdfcomreaderfullheinrich-melanie-studio-lighting-workbook 3089
material on the pole by draping it over
the top and attaching it with clamps If
you want to use seamless paper (large
rolls of paper on long cylinders) you
will need to leave one end of the poleaccessible to load the seamless
TIP ~
Seamless paper comes in 4 foot and 9
foot rolls You can use this paper over
and over again depending on how well
you take care of it avoiding creases
and soiling
TIP ~
Light stands can be used in place of the
curtain rods if you have a drop ceiling
This backdrop can be used in many
different situations as seen in Figs 3-8
All three setups are top lit
TRICK ~
Fig3 has a backdrop hanging to the
floor and a light on the floor that
flashes upwards onto the white
background paper The table is pulled
away from the backdrop Hint Place
an interesting material on the table
top this can achieve the look of a
sunset
The shot of the phone in Fig 4 was
done using this kind of set-up The
difference between the table top
material and the backdrop has left a
hard line at the horizon The spotlight
with a red acetate on it is set on the
floor below and facing up at the
seamless paper leaving the magenta
color behind the phone
Fig 5 leaves a hard horizon line where
Fig 3
Fig 4
Fig 5
At this point you can hang any kind of
your table top meets the backdrop
7302019 Heinrich Melanie - Studio Lighting Workbook
httpslidepdfcomreaderfullheinrich-melanie-studio-lighting-workbook 3189
TIP ~ Put an interesting material on the table
top this will increase the contrast
between the foreground and
background
Fig 6 is an example of a hard line
horizon line The table top in this shot
is a marble table top The background
is a piece of black velvet
Fig 7 is a traditional set for product
photography When the backdrop
swoops down onto the tabletop in this
fashion it leaves a beautiful gradation
on the backdrop
Fig 8 is a shot of a live set using this
style of backdrop The final image was
cropped to exclude all traces of the set
Fig 6
Fig 7
Fig 8
7302019 Heinrich Melanie - Studio Lighting Workbook
httpslidepdfcomreaderfullheinrich-melanie-studio-lighting-workbook 3289
Building a Studio Flat- Reflector
Materials Needed
One- 4 x 6 piece of foam core (14 thick)
(Plumbing department)
(A) Two (6 x 15 lengths of PVC tubing
(B) Four (1 x 15 lengths of PVC
tubing
(C) Three (44 x 15 lengths of PVC
tubing
(D) Six right-angle PVC tubing pieces
(red in Fig 2) to fit into lengths of tubing
above
(E) Two Ts (blue in Fig 2) to fit intolengths of tubing above
Double sided foam tape
Plumbers cement and purple pvc
preparation fluid
Saw (ask the hardware store to make
the cuts required)
This lesson will show you how to build a
studio flat that can be used as a reflector
as well as some other things that are
shown below
Fig 1
7302019 Heinrich Melanie - Studio Lighting Workbook
httpslidepdfcomreaderfullheinrich-melanie-studio-lighting-workbook 3389
You can make this flat any size you like
Ours is designed as a 4 x 6 Just follow
the simple construction plan below
Once you get all the things that are listed
in the materials listed above read all of
the directions before continuing
TIP ~
PLUMBERS CEMENT DOES NOT
SEPARATE ONCE IT ISCONNECTED TO TUBING
FRAME
1 Using the plumbers cement attach
two of the right-angled tubes to the ends
of the 6 foot tubing Once these are
secure attach the 44 tube at the top of
the frame See Fig 1 Be sure the two 6
tubing sections are parallel to each
other front to back and side to side
BASE
2 Using the plumbers cement attach
the Ts to the one foot sections of tubing
Fig 2
3 Using the plumbers cement attach
the four right angles to the opposite ends
of the 4 foot sections Before you do this
make sure that the two Ts are pointing
up and at right angles to the cornersFig 2
Fig 3
Fig 2
7302019 Heinrich Melanie - Studio Lighting Workbook
httpslidepdfcomreaderfullheinrich-melanie-studio-lighting-workbook 3489
frame using the double sided foam tape
Position the foam core so it fits against
the frame tightly
TIP ~
You can use this flat for many things
besides a reflector It will be sturdy
enough to hang things from it and can
even be useful as a backdrop Fig4
TRICK ~ Drape material over it for close-up
photography or simply use it to block
light from an area on your set Fig 5
Fig 5
Fig 4
Finally attach the foam core to the
4 Using the plumbers cement attach
the final 44 pieces of the base to the
right angles Fig 2
5 Using the plumbers cement attach
the frame to the base at the Ts Fig 3
7302019 Heinrich Melanie - Studio Lighting Workbook
httpslidepdfcomreaderfullheinrich-melanie-studio-lighting-workbook 3589
Some photographers have a real gift for
photographing people They are able toembrace humanity and capture on film the
very essence of life They reveal the
persons emotions without saying a word
They seem to understand the unspoken
word of the heart and are able to record it
without the distraction of camera and
technique
If you have clicked on to this page chances
are you are one of those people Perhapsyou just need a bit more help or
information to push your images to a new
level of success These lessons are aimed at
doing just that
In these lessons you will learn how to make
your subject comfortable and to reveal
the subjects true feelings It is true not all
people are comfortable enough with themselves
to trust and let go and you will discover who
is easy to shoot and who is not easy to
shoot There are ways to help people
become comfortable in front of a camera
Lessons in this section
Emotional Power Portrait
Creating a Sullen Emotion
Staging People
7302019 Heinrich Melanie - Studio Lighting Workbook
httpslidepdfcomreaderfullheinrich-melanie-studio-lighting-workbook 3689
The best way to shoot people is from a
distance Give them personal space andshoot with a long lens Pretend you are
shooting a couple of rolls to get them
familiar with being photographed Try not
to give much direction or you will find
yourself with very staged and stiff
subjects Follow them around if they will
permit it At some time they will be relaxed
this is when you will get the best shot
Let the people be themselves until they are
comfortable then direct them with very
simple suggestions Many factors come into
play when photographing people like the
texture of their skin what areas the light
hits their face their posture and the gait of
their walk Remember your basic visual
design elements when positioning a person
in the frame Colors will also play a large
role in the emotion you portray about the
person See visual design
Below are some successful photographs of
people Some of the people the photographer
knew and some of the people were just
shot on the street
7302019 Heinrich Melanie - Studio Lighting Workbook
httpslidepdfcomreaderfullheinrich-melanie-studio-lighting-workbook 3789
Emotional Power Portrait
Film
Ektachrome 100 Daylight
Film
Camera Format35mm - Nikon
Small Format
Lens
28mm Wide
Light Source
Strobe with softbox
Meter
Handheld Incident
Tripod
No
Filters
None
Polaroids
No
7302019 Heinrich Melanie - Studio Lighting Workbook
httpslidepdfcomreaderfullheinrich-melanie-studio-lighting-workbook 3889
The photograph was shot for a portfolio Our
photographer included this image in his portfolio in
an attempt to get jobs of this nature This image
reveals the ability to direct the subject
Understanding body posture is very important
when taking these kinds of photographs Knowing
the right moment to record the image as the model
stares into the photographers lens may take some
time to learn Study people and record in your
mind their posture and movements notice their
emotions and how they display them in their
bodies By studying people you will learn to
communicate and capture peoples emotion in your
images
Use props to direct your viewers eyes in your
images In the above image the model holds a
barbell that breaks into the lower part of the image
frame which leads the viewers eyes to the models
eyes The barbell was counterbalanced with her
face in the background Cropping is the key here
Dont be afraid to get in close It will help convey
the message of intimacy When the above image
was shot our photographer had to invade the
models personal space However our
photographer was able to capture something
unique in his image As a photographer you mustunderstand what effect and subtle nuances you
want to provoke and get in your images and then
know how to achieve them using your camera
through our lessons
Now ask yourself how was the light created in the
above image Where were the lights positioned
What type of light was used
The light was created by a strobe in a softbox (See
Building a Studio to learn how to build this kind of lighting system) The lighting was directdiffused A
small fill on the left side added a soft diffused fill
light This diffused light was created by bouncing
light from the main light and was placed close to
7302019 Heinrich Melanie - Studio Lighting Workbook
httpslidepdfcomreaderfullheinrich-melanie-studio-lighting-workbook 3989
the models face It was positioned approximately 3
feet from her and powered by a large power pack
of about 2000 watts
The background was intentionally dropped off intoblack leaving no more detail than necessary or
desired It was placed about 5 feet behind the
model
The model applied baby oil to her face for the shot
A spray bottle filled with water was used to add the
illusion of sweat She shook her head about to
provide the work-out like appearance After all
that the photographer was able to achieve the
image he wanted after paying close attention to the
small details and knowing how to use his camera
A wide-angle lens was used to take this shot It
helped to accentuate the barbell and hand of the
model The exposure was taken with a handheld
incident meter facing the camera Several frames
were shot bracketing the image and the final image
was chosen in editing Study your brackets
carefully on a good light table to pick a final
photograph
7302019 Heinrich Melanie - Studio Lighting Workbook
httpslidepdfcomreaderfullheinrich-melanie-studio-lighting-workbook 4089
Creating a Sullen Emotion
Film
Tmax 100 Black and White Film
Camera Format
2 14square - HasselbladMedium Format
Lens
80mm Normal
Light Source
Strobe with softbox and spot
stobe
Meter
Handheld Incident
Tripod
Yes
Filters
None
Polaroids
Yes
7302019 Heinrich Melanie - Studio Lighting Workbook
httpslidepdfcomreaderfullheinrich-melanie-studio-lighting-workbook 4189
Capturing a mood or creating a mood can be done using
dramatic light You should also direct your subject into
positions that convey the emotion you are after Be carefulnot to over direct your subject This can make the image
look contrived and fake Professional models are great
actors and will understand your direction very well If you
are not photographing a professional model you should do
a couple of things to help your model Use a long lens
Keeping a distance between you and the model will give
them room to relax Secondly pretend to shoot a couple of
rolls of film This should give them enough time to get
comfortable with the flashing lights and shutter clicks
Next shoot a lot of film Be clear with your directions
Design your set so you can move around freely and shootfrom different vantage points During the shoot your
model will become more relaxed and the images will turn
from stiff to candid
In the image above a softbox was positioned close to the
subject and was the main light The light was intentionally
overexposed This was done by taking a meter reading
from the subjects left side where the fill light fell off This
technique slightly overexposed the light on his right side
and forehead Now you can see how a slight change in
metering placement can change the entire feeling of an
image A white reflector card was used to bounce a
diffused fill light into the subjects right side This style is
meant to emulate the lighting found in a theatre ~ high
contrast and a dramatic mood A spotlight lights the back
part of his neck It is raised high above and pointed down
at the subject
7302019 Heinrich Melanie - Studio Lighting Workbook
httpslidepdfcomreaderfullheinrich-melanie-studio-lighting-workbook 4289
With a little direction we found the emotion we were
looking for The subject was told to rest his elbows on his
knees as he clutched his drumsticks The position of his
head relative to his body turns his face toward the viewer
This position is natural and comfortable for him His eyes
are looking downward as though in reflection of another
time It is a moody image because of the lighting and his
expression Practice photographing your friends by
directing them with posture poses and physical
appearance changes
7302019 Heinrich Melanie - Studio Lighting Workbook
httpslidepdfcomreaderfullheinrich-melanie-studio-lighting-workbook 4389
Staging People
Film
Ektachrome 100
Daylight
Camera Format
2 14 square - Hasselblad
Medium Format
Lens80mm Normal
Light ource
Two Umbrellas with
Strobes
Meter
Handheld Incident
Tripod
Yes
Filters
None
Polaroids
Yes
7302019 Heinrich Melanie - Studio Lighting Workbook
httpslidepdfcomreaderfullheinrich-melanie-studio-lighting-workbook 4489
When staging people you need to create a natural appearance
The same principle holds true when photographing people If you
hire professional models it will make your job much easier
Professional models will know exactly what to do with very little
direction More importantly they are completely comfortable in
front of the lens
The image above was shot for an architectural firm catalog The
company wanted to save money by using their own employees as
models We wanted to use professional models but made the
concession in order to secure the job We used familiar icons to
help the employees feel comfortable in front of the camera Oncewe had them working on the architectural model they had
forgotten about the camera and lights in the room We were able
to get the tools of their trade in the scene the employees
comfortable and then able to capture several successful images
for our client
We used two lights with umbrellas to light the scene One strobe
was placed to the right of the camera and pointed at the set and
the other strobe was positioned behind the left side of the camera
and was high in the air and pointed downward towards the set
See the diagram below
The two strobes were balanced and their meter readings were the
same When photographing people use a shutter speed that stops
any possible movement Do not shoot at a shutter speed below the
millimeter of the lens you are using For example if the lens you
are using is a 90mm lens your shutter speed will be 1125th or
faster Use 160th of a second if you have a focal plane shutter
Cameras with a leaf shutter do not hold to the same constraints as
a focal shutter Leaf shutter lens also sync at any speed Review
your camera manual to see if there are any limitations with your
lens and camera
7302019 Heinrich Melanie - Studio Lighting Workbook
httpslidepdfcomreaderfullheinrich-melanie-studio-lighting-workbook 4589
Film
Ektachrome 100
Daylight Film
Camera Format
2 14 square -
Hasselblad
Medium Format
Lens
80mm Normal
Light Source
Strobes with Two
umbrellas
Meter
Handheld Incident
Tripod
Yes
Filters
None
PolaroidsYes
7302019 Heinrich Melanie - Studio Lighting Workbook
httpslidepdfcomreaderfullheinrich-melanie-studio-lighting-workbook 4689
The second image was shot in a compressor room It portrays
the inspection division of the same company These men are not
models and have a very realistic appearance One man poses as
manager and the other as an inspector Again we used props to
set the stage and asked the men to talk with each other
Cleaning the compressors was an important part of making the
statement the client desired The client portrays a clean and safe
environment Cleaning a set before shooting is sometimes the
most important thing you can do Paying attention to the small
details will get you repeat business This cant be stressedenough If you need to paint something in the scene before you
shoot it to make sure it looks right do it It may make all the
difference in the world Your client will take notice of your
attention to detail This is why previewing a location before you
shoot it is very important It gives you a chance to hire someone
or ask the client to clean these areas for the shot
The image above was shot with two strobes both using
umbrellas Both strobes were placed to the right of the camera
One of the strobes was positioned somewhat behind the men and
set high in the air This pushed light onto the compressorsbehind the men The second strobe lights the men and the
foreground parts of the compressors
7302019 Heinrich Melanie - Studio Lighting Workbook
httpslidepdfcomreaderfullheinrich-melanie-studio-lighting-workbook 4789
The advertising field is very competitive
yet the potential for increased income isgreat Photographers who are doing
advertising work tend to specialize
depending on the area they live in For
example someone living in a small city
may need to have several specialties On
the other hand someone in New York
could specialize in one thing ie
childrens fashions or motorcycles An
advertising photographer will most of
the time be working with an art
director from a design or advertising
firm Clients rarely hire photographersdirectly unless they have established a
rapport with them It is generally the
AD (art director) working on the job
that will hire for the client
Ask yourself this question What is the
one thing that I like and feel
comfortable with Your answer is the
area you should be specializing in In
reality most people go through life and
their likes and dislikes change Aphotographer sometimes follows a
specialty For instance someone who
assisted a commercial photographer
shooting childrens clothes and liked it
decided to pursue that field The ideal
situation is to make a living doing whatyou really like
Lessons in this section
Lighting Multiple Glass ProductsUsing Props with Products
Multiple Exposures
Making Reflections Work for You
Using a Product for a Background
Floating a Product
Boring Product - Interesting Design
7302019 Heinrich Melanie - Studio Lighting Workbook
httpslidepdfcomreaderfullheinrich-melanie-studio-lighting-workbook 4889
The lessons in this section assume you
have a good working knowledge of
camera tools visual basics and lightingIf not go back to these sections and
learn these things first Also some of the
studio setups can be built Those
designs are described in Building a
Studio
The lessons in this section go into
extensive details showing you where to
position your lights and reflectors etc
in order to achieve a certain look and
feel in an image They includedescriptive diagrams for you to
duplicate
7302019 Heinrich Melanie - Studio Lighting Workbook
httpslidepdfcomreaderfullheinrich-melanie-studio-lighting-workbook 4989
Lighting Multiple Glass Products
FilmEktachrome 100
Daylight Film
Camera Format
4 x 5 - Horseman
Large Format
Lens
150mm Normal
Light SourceStrobe with Softbox and
Reflectors
Meter
Handheld Incident
Tripod
Yes
Filters
None
7302019 Heinrich Melanie - Studio Lighting Workbook
httpslidepdfcomreaderfullheinrich-melanie-studio-lighting-workbook 5089
The image above was an inset photograph for a
brochure cover The company sold gift baskets and
products The brochure was used to help their growing
marketing requirements The brochure had three
different images similar to this one along with
accompanying text The client was in the studiowhen this was taken and was the acting art director
So all proofs were finalized at the time of shooting
This eliminates any questionable fees for reshooting
Polaroids are used for the same reason An instant
image of lesser quality than film will serve as great
representations of the final photograph Polaroids
are sometimes faxed or scanned and emailed to the
client for approval Asking your client to sign off on
a photograph will give you the assurance that all is
okay and you can record the image on film
Shooting glass and high gloss labels can be a
frustrating exercise because of the multiple
reflections that occur Remember as you shoot to
look through the lens to see if you have any
reflections on your products in the set All
reflections are caused due to the angle between
lens and light source Review your polaroids
carefully for any reflections before you expose the
film
TIP ~ Moving the product a small amount may be the best
way to remove the reflections Before you do that
adjust your light to eliminate any glare and
reflection Each time you change the light position
you must check for glare
Place all the products on the table top according to
the layout supplied by your client or art director
The image above was tiered giving it height and
depth
The light is positioned directly over the set It is
tilted slightly toward the backdrop and away from
the camera The backdrop is set up as a sweep It is
a piece of gray formica See Building a Studio to
7302019 Heinrich Melanie - Studio Lighting Workbook
httpslidepdfcomreaderfullheinrich-melanie-studio-lighting-workbook 5189
learn how to make this if you are inexperienced in
studio construction
Three white or silver cards are used in the front andon both sides to pump additional light into the
scene These are carefully and strategically placed
to avoid seeing the reflector cards in the glass
When you are shooting glass objects the main light
should reflect in the glass It indicates the direction
of the light source The main light source reflection
is acceptable as long as it is not too bright The fill
light from the reflector cards should not dominate
your main light source
TIP ~ Reflector cards can be made from any material that
reflects light such as a white card Large pieces of
foam core are used and cut into smaller pieces
depending on the size of the set Silver cards are also
used They are positioned to reflect the light coming
from your main light source and bounce the light
softly back into the set These cards will add more
light and sometimes add unacceptable hot spots on
the products These hot spots are very distracting
and unsightly
Now that you have all your lighting sources in place
look through the camera to see if you have any
reflections If you have a lot of glare in your image
readjust the overhead light by tilting it more
towards the back or front Be careful to avoid lens
flare Lens flare is when your light or lights reflect a
glare back into the lens For example when
someone shoots into the sun the lens picks up a
glare Block the lens flare with a black card by
placing the card between the light and lens Make
sure not to put the card into your scenes final crop
or in a position where you block your image You
may need to move your lights or use a scrim to get
rid of the lens flare It will be easier to add a scrim if
you have previously adjusted all the glass for no
reflections Instead of a scrim you could use a lens
hood The lens hood attaches to the front of the lens
7302019 Heinrich Melanie - Studio Lighting Workbook
httpslidepdfcomreaderfullheinrich-melanie-studio-lighting-workbook 5289
It protrudes from the lens and blocks any glare
falling on the front lens element Each lens may use
a different hood These come in many different
shapes and sizes I use a scrim because it is far more
versatile
Assuming your light source is in a good position you
may still have some glare on the glass You can
eliminate many reflections by slightly tipping the
product forward Use a small object under the back
side of the product while not disturbing the
products position These are very slight movements
and will not change the appearance to any great
degree Also tip the reflectors back and forth and
side to side to remove any added glare from your
objects Be attentive to all the objects You may
eliminate glare in one object and produce it in
another You must check for any reflections in your
polaroids Some reflections are very difficult to
detect when viewing the set from behind the camera
using the modeling lights
Use an incident meter and read the light falling on
the set Always bracket your exposure Bracketing is
the process of taking many shots of the same set but
using different fstops For example if your meter
reads f32 at 160th of a second your bracket would
be one stop on either side f22 and f45 at the same
speed The image was shot at f32 or greater depth-
of-field Some photographers bracket with 12 stops
and 13 stop differences They shoot 5 sheets of film
using these small incremental changes
7302019 Heinrich Melanie - Studio Lighting Workbook
httpslidepdfcomreaderfullheinrich-melanie-studio-lighting-workbook 5389
Final cropping of image
The final image displayed on the left was
successfully shot with no glare on any of the
products All the products were in glass or were
wrapped in cellophane The image has been
cropped to match the final inset space for the
brochure This shot took about a half day toshoot
7302019 Heinrich Melanie - Studio Lighting Workbook
httpslidepdfcomreaderfullheinrich-melanie-studio-lighting-workbook 5489
Using Props with Products
FilmEktachrome 100
Daylight Film
Camera Format
4 x 5 - Horseman
Large Format
Lens
90mm Wide
Light SourceStrobe with Softbox
Meter
Handheld Incident
Tripod
Yes
Filters
None
7302019 Heinrich Melanie - Studio Lighting Workbook
httpslidepdfcomreaderfullheinrich-melanie-studio-lighting-workbook 5589
When using props to help convey your message
remember the visual basics about colorperspective framing contrast backgrounds
and balance
This image of a racing bike was shot from an
angle that enlarged the back wheel The wide
angle lens helps pronounce the wheel size as well
as increasing the elongated perspective of the
bike
The bike was shot against a black background
Isolating your subjects by eliminatingdistracting backgrounds will help make the
objects in the set stand out The three arrow-
shaped plexiglass pieces all point to the distance
This visually portrays the speed and forward
motion of a racing bike Primary colors of the
plexiglass are used to simplify the information
in the image The gears of the bike are
pronounced displaying the bikes power and
versatility The camera position is very low and
tilted upward to further increase the illusion of
size
A softbox was used to keep the glare on the
chrome to a minimum It was positioned
parallel to the bike seat on its right side and
tipped down slightly toward the pedals If you
look carefully you can see the reflection of the
softbox in the blue plexiglass This is acceptable
The light has bounced color from the plexiglass
back onto the chrome of the bike This adds
interesting color highlights to the image that
balance well with the other colors
Parts of the wheels reflect the colors of the
plexiglass adding an interesting bit of color
7302019 Heinrich Melanie - Studio Lighting Workbook
httpslidepdfcomreaderfullheinrich-melanie-studio-lighting-workbook 5689
backdrop will work also The velvet material
absorbs any light that falls on it
When you are taking your exposure readings
make sure that you take readings of the
background walls in the scene Do not face your
light toward the back wall The meter readingsof the walls should be at least 4 stops darker
than your final exposure This will maintain a
black background
The wide angle lens was used to achieve
maximum depth-of-field This image was
exposed at f45
The room was totally darkened for this shot
Some photographers will even paint their walls
black for a shot like this A black velvet
7302019 Heinrich Melanie - Studio Lighting Workbook
httpslidepdfcomreaderfullheinrich-melanie-studio-lighting-workbook 5789
Multiple Exposures
Film
Ektachrome 100
Daylight Film
Camera Format
4 x 5 - Horseman
Large Format
Lens
150mm Normal
and 90mm Wide
Light Source
Strobe with Softbox
Meter
Handheld Incident
Tripod
Yes
Filters
None
7302019 Heinrich Melanie - Studio Lighting Workbook
httpslidepdfcomreaderfullheinrich-melanie-studio-lighting-workbook 5889
This image was designed as a poster for a national bowling
tournament The objects were intentionally placed leavingblack areas for the white text or copy and logos to be placed
on the final poster
The image above was done by repositioning the camera
three different times and exposing the film each time with
the change (Three shots on one piece of film) In addition the
lens was changed for one of the shots
You will need a large piece of black velvet to absorb all
scattered light All exposures were shot on the black velvet
The velvet does not see light This leaves that area of the filmunexposed This allows you to expose something else in the
black area which occurs when you take your next exposure
You will also need a piece of acetate to place on the film
back for tracing the objects in each exposure This will help
you line everything up and avoid overlapping your
products By tracing the objects that appear on your film
back onto a piece of acetate you will be able to align
everything perfectly
The first exposure was made of the bowling ball in thebottom right with a wide angle lens The second exposure
was made of the bowling pin on the left bottom The third
exposure was made of the top right 2 bowling pins One of
these pins was raised up on a block for added dimension
With each exposure the camera was progressively pulled
away from the scene The camera lens to subject distance
was increased to help this illusion of depth Diagrams below
may help you understand this better
Make sure when taking photos like this that any part of the
image you wish to remain unexposed is filled with the black velvet You can add any lighter value to a black area with
film because it is unexposed
7302019 Heinrich Melanie - Studio Lighting Workbook
httpslidepdfcomreaderfullheinrich-melanie-studio-lighting-workbook 5989
When you are ready to make the first exposure trace the
film back onto the acetate by placing the acetate over your
film back Do this with each exposure
A softbox was used and placed close to all of the subjects
producing direct lighting Your exposure times and fstops
can be different for each exposure just as if you were taking
separate photographs In fact think of this type of image as
a composite
Wide Angel Lens Normal Lens Normal Lens
7302019 Heinrich Melanie - Studio Lighting Workbook
httpslidepdfcomreaderfullheinrich-melanie-studio-lighting-workbook 6089
Making ReflectionsWork for You
Film
Ektachrome 100
Daylight Film
Camera Format
4 x 5 - Horseman
Large Format
Lens
150mm Normal
Light Source
Strobe withSoftbox
Meter
Handheld
Incident
Tripod
Yes
Filters
None
7302019 Heinrich Melanie - Studio Lighting Workbook
httpslidepdfcomreaderfullheinrich-melanie-studio-lighting-workbook 6189
The image above was shot on a highly reflective
background It came in a long roll about 4 feet
wide The light was positioned toward the front
parts of the products to avoid a hard horizon lineThe light falls off into black making it useful for
the reversed type of white (see below) Be careful
to avoid lens flare when positioning the lights near
the camera lens Make sure to block any light that
may fall on the lens Use a scrim to block the light
A scrim is any black piece of material that will
function as a light block Black masking tape was
secured to the edge of the lens to block the light
Be careful not to show the tape in your
photograph
Glare can be a major problem with highly
reflective sets like this one Always remember to
look through your lens to avoid this Tip your
light toward the front or back of the scene to
adjust the glare on the set This shot was taken
using a strobe head inside a softbox This type of
light is often used in product photography
especially when shooting highly reflective objects
The light rays are scattered and softened by this
kind of light source
Each of the objects in this scene are veryreflective The reflective gold surface used to shoot
on adds interest to the products by adding a gold
reflection of the product onto the gold surface
This gives depth to the image
Adding different colored line art around the edge
of the image in the white border adds an extra
dimension to the final composite below This was
done by the designer after the image was taken
Some of the line art is in front of the image and
some is dropped behind the image Reverse text isused on the black part of the image and black text
is used on the white border
7302019 Heinrich Melanie - Studio Lighting Workbook
httpslidepdfcomreaderfullheinrich-melanie-studio-lighting-workbook 6289
Using a Product for a Background
Film
Ektachrome 100
Daylight Film
Camera Format
4 x 5 - Horseman
Large Format
Lens
150mm Normal
Light Source
Strobe with Softbox and
Reflector
Meter
Handheld Incident
Tripod
Yes
Filters
None
7302019 Heinrich Melanie - Studio Lighting Workbook
httpslidepdfcomreaderfullheinrich-melanie-studio-lighting-workbook 6389
This close-up of a computer chip was designed for the
front cover of a computer companys brochure (see
below) It was nesseccary to get the best detail for
enlargement reasons so a large format camera was used
The end image was 9 x 12 our negative was 4 x 5
A strobe with a softbox was used to light this subject
from the left side An accompanying white reflector card
was placed close to the subject to fill in the right side
with light (see diagram below)
The bellows on the 4 x 5 camera were extended to
enlarge this chip to fill the frame When extending the
bellows you increase the need for light to reach the film
In this case we did not need to have a small f-stop
number for sharpness so we left the lens open at f56and made our exposure appropriately Even if you need
to pop your flash a couple of times extending the
bellows should not be something to hold you back from
making the close-up you want to shoot The detail in this
shot is achieved by using a 4 x 5 camera with a good lens
TIP ~
Popping or firing the strobe multiple times is done with
the lens open in a darkened room so the only light in the
room is coming from your controlled multiple burst of
the flash Since you have no need for speed whenshooting inanimate objects keep pumping in the light to
get the exposure you need In a dark room you could
leave your lens open and just continually pop the strobe
Or you can cock the shutter and repeat the same
exposure until it adds up to the correct amount of light
required Make sure you are on a very steady tripod
The slightest amount of movement will blur your image
TIP ~
The best set up for any overhead shot with a 4 x 5 is to
put your set on the floor This is of course dependent on
the size of your set A short-legged set of horses works
very well also The legs used in this set were about 12
high
The hue of bluegreen works well with the yellow text
7302019 Heinrich Melanie - Studio Lighting Workbook
httpslidepdfcomreaderfullheinrich-melanie-studio-lighting-workbook 6489
The text pops off the image This color prevents the text
from falling into the background The background of the
computer chip remains a simple reminder of what the
company does It is the text that the viewer is expected to
read
This image would also make a great backdrop for a
collage or montage image
7302019 Heinrich Melanie - Studio Lighting Workbook
httpslidepdfcomreaderfullheinrich-melanie-studio-lighting-workbook 6589
Floating Product
Film
Ektachrome 100
Daylight Film
Camera Format4 x 5 - Horseman
Large Format
Lens
150mm Normal
and 90mm Wide
Light Source
Strobe with
Softbox
Meter
Handheld
Incident
Tripod
Yes
Filters
None
PolaroidsYes
7302019 Heinrich Melanie - Studio Lighting Workbook
httpslidepdfcomreaderfullheinrich-melanie-studio-lighting-workbook 6689
Both images in this lesson give the illusion of
floating The top image is propped up underneath by
a block A softbox directly above the computer
circuit board was used to achieve a soft even light In
todays high-tech industry these kinds of images are
being used in composites and as single images
TIP ~
Using black velvet as a backdrop can achieve a
similar effect where the subject appears to float The
light will be absorbed into the black velvet material
to create the illusion
The computer chip is not grounded to anything so it
appears to float (see Fig 1) The angle of the light on
the computer circuit board picked up some very
interesting highlights in Fig 1 which adds to the
high-tech feel of the image
A 4 x 5 camera was used to get greater detail with
the larger negative for enlargement purposes Depth-
of-field was achieved at f32
When shooting any subject like this you can portray
many kinds of interesting illusions The black velvet
material may be a little more expensive but nothing
else works as well This kind of material will help
you take the shots like the pros
Fig 1
7302019 Heinrich Melanie - Studio Lighting Workbook
httpslidepdfcomreaderfullheinrich-melanie-studio-lighting-workbook 6789
Boring Product -Interesting Design
Film
Ektachrome 100
Daylight Film
Camera Format
4 x 5 - Horseman
Large Format
Lens
150mm Normal
Light Source
Strobe with Softbox
Meter
Hanheld Incident
Tripod
Yes
Filters
None
7302019 Heinrich Melanie - Studio Lighting Workbook
httpslidepdfcomreaderfullheinrich-melanie-studio-lighting-workbook 6889
Some products you will be photographing will be justplain boring such as the rods in the shot above Its
your job as the photographer to bring life and interest
to boring products like these In the image above the
client needed his products shot for his company
catalog
Making something interesting from something boring
can be done by using an interesting background or
unusual lighting In this image the layout and diagonal
positioning of the rods directs the viewers eye to the
top right area of the image of the frame Text was
placed at the top and right side of this image (see final
image below)
The softbox was positioned above and to the left of the
product as indicated by the soft shadows Fig1 This
image could have easily been cut out from its
background and placed on any other background
Minimal depth-of-field is needed for this shot because
the maximum height of the product was only two
inches An aperture of f8 was used The exposure is
made with an incident meter reading to achieve an
overall well-balanced tone
Deep shadows could have been used to add interest to
these products by using a direct light at a very low
level to the table angle Fig 2 No softbox would be
used for this kind of shot
The set is placed on the floor so your camera position
is directly over the top of the set If shot on a table top
you would need to stand on top of a ladder to take the
shot The easier choice is to shoot on the floor
7302019 Heinrich Melanie - Studio Lighting Workbook
httpslidepdfcomreaderfullheinrich-melanie-studio-lighting-workbook 6989
Fig 1
Fig 2
7302019 Heinrich Melanie - Studio Lighting Workbook
httpslidepdfcomreaderfullheinrich-melanie-studio-lighting-workbook 7089
Lessons in this section
Mixing Texture Shapes and Color
Arranging a Set
Photographing Beautiful Glass
Messages in a Still Life
Creating a Mood
Still Lifes Selling Products
Setting the stage works to help convince the
viewer of a place and time or mood Small
details make a shot believable These
lessons will teach you how to think and tell
a story of a certain place in time Picking
the right props for your shoot will ensure
believability The lessons in this section
work in conjunction with the ProductPhotography section
A still life photographer can be found
working in a studio or on location This
type of photography demands the
recreation of a set or going to the set to
capture a moment in time This can be done
on location in the studio or digitally
created on the computer The truth is it fits
into many categories It is more than
product photography You are creating a
scene that conveys a sense of being
somewhere
7302019 Heinrich Melanie - Studio Lighting Workbook
httpslidepdfcomreaderfullheinrich-melanie-studio-lighting-workbook 7189
you pull your entire learning experience
together I include details and diagrams
that will reinforce your understanding
Still life scenes are often used in a designers
set or in a showroom like in a furniture
store They can also be used to convey a
story quickly and help transfer the concept
and idea throughout the entire image These
lessons include tips on how to light objects
in small and detailed areas They will help
7302019 Heinrich Melanie - Studio Lighting Workbook
httpslidepdfcomreaderfullheinrich-melanie-studio-lighting-workbook 7289
Mixing Texture Shapes and Color
Film
Ektachrome 100
Camera Format
4 x 5 - Horsemen
Large Format View
Camera
Lens
150mm Normal
Light Source
Strobe with Softbox
MeterHandheld Incident
Tripod
Yes
Filters
None
7302019 Heinrich Melanie - Studio Lighting Workbook
httpslidepdfcomreaderfullheinrich-melanie-studio-lighting-workbook 7389
The image above was shot as a portfolio piece
Mixing textures shapes and colors the
photograph displays the photographers eye for
design It is photographed on black velvet which
adds saturation of the overall appearance by
absorbing all the light that falls on it The black
velvet can be purchased at any fabric store
Two scarves are positioned at opposing angles
adding strong graphic interest and competition
between them Against the soft colored scarves
the dark blue hat pops out The colored markers
are color complements to the blue hat and add
additional depth to the image
Resting on top of the scarves are brightly
colored objects which add spots of color andinterest The curvy lines of the ribbons break up
the edges of the two scarves and add a bit of fun
to the image The final crop of the image forces
the viewer to see the positive and negative
spaces of color within the frame Cropping plays
an important role in the success of your image
How the image was photographed ~
One main strobe light was used It was shot
through a softbox or mylar scrim Several white
and silver reflector cards surrounding the setbounced in a soft fill light Using the reflectors
as fill light evens out the overall appearance
without eliminating the direction of the main
light The shadows in the image are soft and
reveal more texture in the scarf
Minimal if any depth-of-field was needed in
this image so it was exposed at f56 The meter
reading is taken with an incident meter and
pointed directly at the camera Several readings
were taken of the entire image For example a
meter reading was taken of the light falling onthe hat the tip of the triangular scarf and the
black corners of the velvet before an exposure
was chosen A range of only 1 stop was allowed
between these exposure readings Reposition
your reflecting cards either closer or further
7302019 Heinrich Melanie - Studio Lighting Workbook
httpslidepdfcomreaderfullheinrich-melanie-studio-lighting-workbook 7489
from your subject to adjust the exposure
variations Your final exposure choice will be of
the area in the scene that is the brightest or
where the most light is falling If your exposure
variations are between f16 and f11 f16
indicates the brightest area in the scene You
should know this at this point in your educationIf you dont go back to the Camera Basics
section and read over the lessons Choosing f16
will prevent overexposure to the lighter areas in
your scene The camera was positioned directly
over the top of the set using a tripod Make sure
your tripod is capable of supporting your
camera in these unusual positions
Pick three or four objects that work well
together Lay them out on a solid colored
background in an interesting design pattern
Position your camera lights and reflectors
Using a color transparency film bracket your
frames as you shoot
Final crop of image
reflector
reflector
7302019 Heinrich Melanie - Studio Lighting Workbook
httpslidepdfcomreaderfullheinrich-melanie-studio-lighting-workbook 7589
Arranging a Set
Film
VPS 100 - Color Negative
Camera Format
2 14 square - Hasselblad
Medium Format
Lens
80mm Normal
Light Source
Strobe with Softbox
Meter
Handheld Incident
Tripod
Yes
Filters
None
7302019 Heinrich Melanie - Studio Lighting Workbook
httpslidepdfcomreaderfullheinrich-melanie-studio-lighting-workbook 7689
Within each image there can exist sets that pull the
entire image together The image above is an example
of one of these small sets The set is staged for a period
in time
Some professionals hire stylists to set something like
this up Background information helps convey a
message in the overall scene For example suppose you
are shooting the interior spaces of a Victorian home
and your client wants to place the product in the late
1800s Objects in the photo above will help transport
your viewer into that time in history Props are a very
important part in convincing your viewer of a place in
time You can find props at antique stores for this kind
of scene Time period images must be authentic down
to the smallest details Hire a historian for accuracy if
needed
Magazines use small inset photos that display intricate
details of settings They may not be set against a black
background as in the photograph above The
background should be dimly lit or out of focus to
help accent the subject Shallow depth of field and
object placement will work together to make your
image successful
One main strobe light was used in the photograph
above with no fill lights or reflectors This drops the
background of black velvet into black making it a
perfect place for white text Remember an
editor or designer usually needs to add type and will
need this space
7302019 Heinrich Melanie - Studio Lighting Workbook
httpslidepdfcomreaderfullheinrich-melanie-studio-lighting-workbook 7789
Still lifes have been used in fine art for many years The
image above happens to be found in nature but could
have just as easily have been set up in a studio The
arrangement of the plates and glass objects can be
emulated in the studio or in a set I have included this
image to show you that what you find most naturally in
life is how you should set up a scene whether in the
studio or on location Take your camera into the world
around you and shoot small stories such as the one
above These still lifes will help you to stylize your own
setups This lesson will help you learn how to crop and
balance your images Pay close attention to the light
falling on the objects in your scenes Follow the previous
example to determine the proper exposure of your film
Be deliberate when you consider the photographs you
will take Take your time
Remember to see within the boundaries of your frame
balancing objects from front to back side to side and
corner to corner See Visual Basics for more
information on setting an objects position within the
frame
7302019 Heinrich Melanie - Studio Lighting Workbook
httpslidepdfcomreaderfullheinrich-melanie-studio-lighting-workbook 7889
Photographing Beautiful Glass
Film
VPS 100 - Color Negative
Camera Format
2 14 square - Hassalblad
Medium Format
Lens
80mm Normal
Light Source
Strobe with Softbox
Meter
Handheld Incident
Tripod
Yes
Filters
None
7302019 Heinrich Melanie - Studio Lighting Workbook
httpslidepdfcomreaderfullheinrich-melanie-studio-lighting-workbook 7989
The image above will give you an idea of how to light
small objects in a room or on a set You can make
objects pop out that are a very small part of the sceneFor example the color in this image is something you
really want to show but each of the objects must be
placed and lit properly to portray the beauty of their
colors Small strobes with funnel snoots will spotlight
only the objects you are interested in The blue
background color was chosen as a color complement to
the colors in the glass
TIP A snoot can be made from a rolled piece of
poster board into the shape of a cone You can also
buy these cones to fit on the strobe Be careful if using
poster board as the lights can get very hot
Take a large piece of poster board and roll it into a
cylinder shape Fig 1 Tape the center of the cylinder
then expand one end and decrease the opposite end of
the cylinder Fig 2 Make the expanded end large
enough to fit over the strobe head The other end of
the cylinder should be small enough to direct the light
at whatever object you want to be lighting The size of
the smaller hole will dictate the angle of the light
pointed at the object
Fig 1 Fig 2
7302019 Heinrich Melanie - Studio Lighting Workbook
httpslidepdfcomreaderfullheinrich-melanie-studio-lighting-workbook 8089
WARNING
DO NOT USE POSTER BOARD CONES WITH
TUNGSTEN LIGHTS The chance of fire is far too
great NEVER leave powered lights unattended
The glass objects in the photograph above have had the
light pushed directly through them When the light
passes through the colors are revealed
Shooting glass with liquid in it is described in the
diagram below The softbox is placed directly above the
set and slightly tilted away from the camera With the
liquid in the glass place a reflector card behind the
liquid only Looking through the camera lens make sure
the card does not extend past the liquid above or to the
sides Tip the card backwards so it picks up some of the
light falling down from the softbox This will illuminate
the liquid giving it a glowing appearance
7302019 Heinrich Melanie - Studio Lighting Workbook
httpslidepdfcomreaderfullheinrich-melanie-studio-lighting-workbook 8189
Your background can be any color detail or density when
using this reflector card
7302019 Heinrich Melanie - Studio Lighting Workbook
httpslidepdfcomreaderfullheinrich-melanie-studio-lighting-workbook 8289
Messages in a Still Life
Film
Ektachrome 100
Camera Format
35mm - Nikon
Small Format
Lens
50mm Normal
Light Source
Strobe with Softbox
Meter
Handheld Incident
Tripod
Yes
Filters
5 Red CC Filter
7302019 Heinrich Melanie - Studio Lighting Workbook
httpslidepdfcomreaderfullheinrich-melanie-studio-lighting-workbook 8389
The above image sends a message of peace and
comfort to its viewer in a couple of different
methods
One method is achieved by the type of lighting
used (In this case a strobe within a softbox) A warm
glow of very soft light is scraping horizontally
across the image and highlights fall on the outer
pages of the book It has a golden quality Another
method is achieved by using a number 5 CC filter
over the camera lens This accents the rich red color
in the roses with their saturated hue and balances
perfectly with the gold color in the pages as well as
the reddish-brown boards that they sit on
TIP ~
A red or orange transparent gel in an acetate sheet
form could be placed over the softbox to warm the
color pushed into the set
The background falls off into black holding the
viewers eye on the bible and the perfectly balanced
roses
This was shot with a softbox to the right of the scene
with no fill cards or fill lights The main light source
is close to the subject so the light falls off very little
When the light is positioned close to the subject its effect
on the oppiste side is minimal
7302019 Heinrich Melanie - Studio Lighting Workbook
httpslidepdfcomreaderfullheinrich-melanie-studio-lighting-workbook 8489
Using light color balance and the right props this
image conveys both warmth and love The main
subject is the bible The roses are used to convey a
feeling of love If instead of roses guns were used as
props the message would be entirley different
perhaps of violence Props can make or break
your image
7302019 Heinrich Melanie - Studio Lighting Workbook
httpslidepdfcomreaderfullheinrich-melanie-studio-lighting-workbook 8589
Creating a Mood
Film
Ektachrome 100
Camera Format
35mm - Nikon
Small Format
Lens
50mm Normal
Light Source
Strobes and reflectors
Meter
Handheld Incident
Tripod
No
Filters
None
7302019 Heinrich Melanie - Studio Lighting Workbook
httpslidepdfcomreaderfullheinrich-melanie-studio-lighting-workbook 8689
Making a statement with your photography should
be foremost in your mind The image above tells us ~
bedroom lovers intimacy passion etc It is up to
our imagination to fill in the blanks You have only a
few moments to convey your message so be careful
not to be too subtle yet not so blatant that your
message is visually insulting
The location in this shot was specifically chosen
Shot on a wooden floor a rustic authenticity is
portrayed A cowboy feel was achieved with these
surrounding elements The lingerie casually draped
over the boots looks accidental and unplanned The
boot that is tipped over leads the viewer to believe an
impetuous moment of hurried passion is taking
place The background is evident but intentionally
made out of focus by shooting at f4 for shallow
depth of field
This image is far from haphazard It was planned
from layout to location to scouting to objectplacement The idea came first then the execution of
the image Although minor alterations of layouts are
common the concept will remain the same This
eliminates confusion by isolating one idea and
working it through from all directions
Scouting out locations can be a full-time job and you
may need special permission to shoot in a particular
place See property release in the Legal Forms
section to cover your legal requirements and release
forms
7302019 Heinrich Melanie - Studio Lighting Workbook
httpslidepdfcomreaderfullheinrich-melanie-studio-lighting-workbook 8789
This kind of image will work very well for an adselling lingerie A strobe light with a softbox was
used to light the boots and the lingerie from the
right A reflector card was placed close to the boots
to fill in the left side of the scene The light is
positioned low near the floor which scrapes the light
on a low plan This was placed to simulate a specific
time during the day sunset or early evening The
light at this time is warm in color value which adds
to the subject matters message The camera vantage
point is low also bringing the viewer into intimate
contact with the boots and lingerie
7302019 Heinrich Melanie - Studio Lighting Workbook
httpslidepdfcomreaderfullheinrich-melanie-studio-lighting-workbook 8889
Still Lifes Selling Products
Film
Ektachrome 100
Camera Format
2 14 square - Hassalblad
Medium Format
Lens
80mm Normal
Light Source
Strobe with Softbox
Meter
Handheld Incident
Tripod
Yes
FiltersNone
7302019 Heinrich Melanie - Studio Lighting Workbook
httpslidepdfcomreaderfullheinrich-melanie-studio-lighting-workbook 8989
Placement and staging of objects requires a thought-out layout and planned
execution when using multiple products Layering has been used in this image
where non-information has been overlapped for example where the licence
plates and shirts touch Your viewer does not need to see the entire object in
this case to know what it is Strong diagonal lines have been made by object
placement This helps pull the viewer through the image and leads the eye to
a specific area of an image This image was created to find funding for
Vietnam vets by selling these products
If you have been asked to shoot several products and put them all into one
image think of it in terms of a still life setting Larger items will be placed inthe background sometimes even being used as the background For example
picture a group of images all representing something American The
background for this scene could be a flag which is also one of the subjects
There is no need to see the entire flag because it is an easily recognizable icon
In the image above the wooden floor was used to add a sense of the rustic and
gritty realism of the Vietnam war It was lit with a softbox directly above the
subjects The aperture was a concern for foreground to background
sharpness so the camera was pulled back far enough from the scene to allow
for a large aperture of around f 56
Below is the final image This was dropped into a 3 fold 812 x 4 brochure
along with other images of the same sort
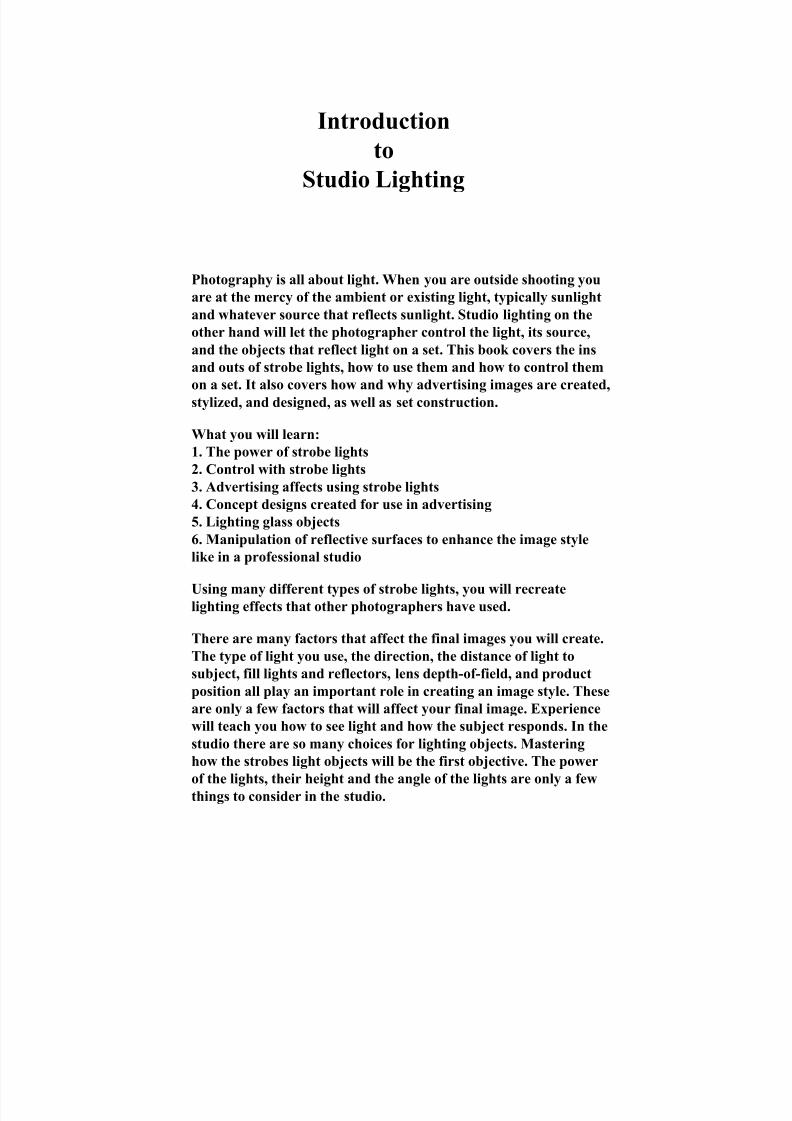
7302019 Heinrich Melanie - Studio Lighting Workbook
httpslidepdfcomreaderfullheinrich-melanie-studio-lighting-workbook 589
Learn about Light
Recognizing how light affects subjects on a set is how photographers train
their eye to create light and its different effects
The best way to train your eye is to look at other photographers work
Look at magazines photo books and any other source that include
photographs You will be keeping a record of images that you glean from
magazines
After finding an image you like and one that suits the assignment ask
yourself why a particular lighting style was used and why a position and
vantage point was chosen Take notes that indicate what you like about the
photographs and draw diagrams that indicate the lighting direction
including the type of light used (ie direct diffused backlight direct
diffused) This will not only help you learn to see light and its effects but
also help you as a reference for any future assignments
(See examples below and in later pages of this book)
You will be keeping the same notes and diagrams when creating your own
work One sketch will be topographical and the other a side view (Seebelow) In fact we will be working on these diagrams during class These
will all be included and displayed for critique when you hand in an
assignment Keep records of what your meter readings are as well as your
used fstops and speeds The distances of the lights filters diffusion
materials the film used lens used position and height of the lights and
any other tools that you used are also to be recorded
When you are shooting use the record-keeping sheet in the ldquoPhoto Tips
and Tricksrdquo book to record the above
Below are examples of diagrams topographical side views and camera
position views that you will be creating from gleaned magazine images
You will follow the same style of drawing when creating your own
7302019 Heinrich Melanie - Studio Lighting Workbook
httpslidepdfcomreaderfullheinrich-melanie-studio-lighting-workbook 689
images
Topographical from a
topographical shotSide View
Final Image from the above diagrams
7302019 Heinrich Melanie - Studio Lighting Workbook
httpslidepdfcomreaderfullheinrich-melanie-studio-lighting-workbook 789
reflectors
7302019 Heinrich Melanie - Studio Lighting Workbook
httpslidepdfcomreaderfullheinrich-melanie-studio-lighting-workbook 889
Types of Lights
There are many different types of lights that can be used in thestudio
The type of fixture that the light source emanates from willeffect the style of lighting it creates There are materials used to
soften light reflect the light and cones used to direct light
Color balances are typically daylight or tungstun
Below you will find images that show and describe the kind of
light produced
Image 1Notice the soft light under the chins and on the right side The
main light is high and frontal with a small fill on the right for theshadow areas The background is out of focus
1 Frontal Direct Diffused lLight
Image 2
This image has been light on all side to remove any chance of ashadow It was used for a company brochure The props in this
shot give the viewer a peak into the companys building process
2 Diffused Light
7302019 Heinrich Melanie - Studio Lighting Workbook
httpslidepdfcomreaderfullheinrich-melanie-studio-lighting-workbook 989
Image 4
A direct light in a softbox was positioned on the right and close to
the model A soft fill on the left dramatizes the mood in this image
and emphasizes the models positioning The dark backgroundhelps emphasize the models dramatic mood
3 Direct Light with Spot
4 Side DirectDiffused Light
Image 3
A strong light on the left side of the frame set the mood for this
shot A small spotlight brought out his back shoulder revealing
his shape against the black background The lighting is verytheatrical
7302019 Heinrich Melanie - Studio Lighting Workbook
httpslidepdfcomreaderfullheinrich-melanie-studio-lighting-workbook 1089
5 Frontal Overhead Softbox
6 Multiple Cone Lights
Image 6
Three small strobe heads with cones were positioned to push lightthrough the multicolored glasses The blue background helps
separate the subjects color from the background
In addition to these lighting types and styles white colored
reflectors may be added to reflect a touch of light Black papermay be added to a light to cut back hot spots that reflect into
highly reflective objects
Image 5
A soft box is positioned about 4 feet from the products and was
used to evenly light the glass One light was used with several fill
cards A grey background was chosen to minimizm anydistraction
7302019 Heinrich Melanie - Studio Lighting Workbook
httpslidepdfcomreaderfullheinrich-melanie-studio-lighting-workbook 1189
Camera Position Styles
Camera positioning can change the entire feel of the image you are
creating Study the image below and start to think about how you can
change your camera positions to help your photograph Think about
the message you are conveying Make associations using camera
positioning
Image 1
The bike was a high-end racing bike It had a specialized back wheel
Therefore it needed to be the main subject in the image The entire
bike was included in the shot yet the back wheel is the main focus A
wide-angle lens provided the perfect solution by accenting the back
wheel A small aperture was used to maintain depth-of-field
Image 2
This add was shot on a table top The camera was positioned
approximately 2 feet higher than the table level The angle and
position were chosen to include the product reflections Products are
separated from the background that was used
Image 3
This image was shot at a low angle and close-up It invites the viewer
into the scene of this intimate event Observe the close cropping done
in the camera eyepiece
Image 4
Shot straight down on top of the set (topographical) this image boxes
in the products by framing definitive edges A black background
separates the products and pronounces their colors The set has a
geometric flair that is contradicted by soft flowing ribbons and acircular hat
7302019 Heinrich Melanie - Studio Lighting Workbook
httpslidepdfcomreaderfullheinrich-melanie-studio-lighting-workbook 1289
1 Low angle right
4 Topographical
2 Frontal medium height
3 Low angle Close-up
7302019 Heinrich Melanie - Studio Lighting Workbook
httpslidepdfcomreaderfullheinrich-melanie-studio-lighting-workbook 1389
Your Subject
When choosing your subject (perhaps a client has
supplied a product) look at its characteristics The list
below is a jumping-off-place Start by looking for those
things in your products
1 Shape Oddly shaped subjects may need a dark or
subdued background to distract the viewer from the
subjects shape
2 Texture Is the surface smooth or coarse What type
of lighting will accent or tone-down the texture Think
about using a low scraping light to accent texture A
broad soft light will minimize unwanted texture
3 Color Are the colors demanding subtle or strong
backgrounds and props to minimize the color Consider
using complimentary colors to help accent your subjects
color Be careful not to use complimentary colors that
overpower your subject taking away its attention
4 Tone Study your subject for is tonal values Lighter
subjects may work well against darker backdrops where
darker subjects work well against lighter backdrops
Contrast may not be needed in your set Try making a
high key photograph or low key photograph if your
subject calls for it
How will this subject fall against the background you
have chosen If you are shooting more than one subject
together on a set consider how these work together using
the same observations listed above Swinging your main
light from foreground to the right side or left side and to
the back of your subject will reveal an entirely different
texture color and shape as you pan around the subject
Try doing this before you make your final lighting
decision
7302019 Heinrich Melanie - Studio Lighting Workbook
httpslidepdfcomreaderfullheinrich-melanie-studio-lighting-workbook 1489
and accentuate their unique characteristics
Image 1
The soft large shapes of the bowling balls have been
broken up by a strong perspective of the straight piece of
oak wood that stretches to the horizon line The oak
wood piece emulates the distance and texture of a bowling
lane The background has a magenta color that fades
into blue which helps pull out the colors of the bowling
balls and pins
Image 2
The bottles needed to be shot with the packaging whichcontradict both the texture and shape of each other In
this image the background creates the mood We see the
bottles on the floor with ribbons and bows The viewer is
meant to think they have entered the scene of a birthday
party The products shapes are fanning outward in an
open expression of fun and excitement
The subjects in the images below were shot to contradict
7302019 Heinrich Melanie - Studio Lighting Workbook
httpslidepdfcomreaderfullheinrich-melanie-studio-lighting-workbook 1589
piece of formica to contradict the edible factor of the
vegetables It is a slick image meant to stop the viewerrsquos
eye Water sprayed on the formica connects the
background with the product Not suitable for a food
magazine this image displays an artistc view
Image 3Shallow depth-of-field was used in this image to help
pronounce the texture of both the onion and the
broccoli They were placed on a flat high gloss black
7302019 Heinrich Melanie - Studio Lighting Workbook
httpslidepdfcomreaderfullheinrich-melanie-studio-lighting-workbook 1689
Your Background
When choosing a
background think about how
it will help your subject You
may want a distinct
separation between the
background and foreground
The lightness and or
darkness of your
background will change the
feel of your subject A darkly
lit background will force theviewers eye to look at a well-
lit subject Conversely a well
lit background and under-lit
subject will create a
silhouette and show the
shape of the subject
Imagine your background
choice as an aid in conveyingyour message For example
an ad that is shot on sand
will help sell sunglasses orbeach towels in an
advertisement
Consider creating a shadow
by pushing a light through a
solid object onto a
background This will help
identify the kind of product
you are shooting For
example imagine a shadow
of a company logo on the
background and a selective
part of the subject in the
foreground of the image
Brand identity is used here
to convey the message
Black drops out to float
Colors for environmental placement
7302019 Heinrich Melanie - Studio Lighting Workbook
httpslidepdfcomreaderfullheinrich-melanie-studio-lighting-workbook 1789
Although not considered
part of the background the
foreground material you use
to place your product or
subject on is also to be
thought of with the same
purpose as backgrounds See
the computer chip below as
an example of this
Textured formica
White makes black products
Products can be used as
backgrounds
Highly-reflective lined
material
pop
7302019 Heinrich Melanie - Studio Lighting Workbook
httpslidepdfcomreaderfullheinrich-melanie-studio-lighting-workbook 1889
Props
Props are accent items that help convey the message you are
portraying in your image They are meant to help the subject
speak For example if you are producing an ad for
silverware a plate would be a perfect accent for the product
Be careful not to lose the focus of your product Showing a
small part of a prop is sometimes all that is necessary to
convey the message You must not allow a prop to distract the
viewer from what you are selling in the advertisement
Image 1
Below the old-fashioned photos give the viewer an idea of the
type of image that is produced from this camera
1 Old-fashioned Photos
7302019 Heinrich Melanie - Studio Lighting Workbook
httpslidepdfcomreaderfullheinrich-melanie-studio-lighting-workbook 1989
Cowboy Boots
Image 3
The boots are the prop in this ad and help sell the intimate
aparel to a specific target market
Image 2
The roses placed diagonally and at different levels add a
touch of sensitivity to this image The wood adds contrast
from that of the Bible and roses The wood and roses also add
a warmth to the image becasue of their color
2 Roses with Bible
7302019 Heinrich Melanie - Studio Lighting Workbook
httpslidepdfcomreaderfullheinrich-melanie-studio-lighting-workbook 2089
Lace
Image 4
The lace in this shot gives the glass products in baskets a
homemade look
7302019 Heinrich Melanie - Studio Lighting Workbook
httpslidepdfcomreaderfullheinrich-melanie-studio-lighting-workbook 2189
The photographs on the right portray
an advertising studio Thephotographer is in the middle of a
shoot working with a model on a
skiing shot
In the images you will see five
different lights The two with
umbrellas are lighting the
background washing it out to a
bright white
Two more lights are working in
conjunction with props that are on a
stand in front of the lights The propsthrow a shadow onto the set to
emulate the skier passing trees The
main light is a broad soft box
overhead and in front of the
photographer Finally you will see
the photographers assistant on the
ladder with a bag of styrofoam
peanuts to drop at command
The photographer is using a large
format 4 x 5 view camera on a studiotripod Two power pack batteries are
serving as a light source each
supplying different wattage levels to
the strobes The background is
created with seamless paper It hangs
from a set of poles and produces a
flawless smooth background to shoot
Lessons in this sectionBuilding a Scrim Soft Box and White Tent
Building a Backdrop and Table
Building a Studio Flat-Reflector
7302019 Heinrich Melanie - Studio Lighting Workbook
httpslidepdfcomreaderfullheinrich-melanie-studio-lighting-workbook 2289
against Building this backdrop is
described in the lesson Building a
Backdrop and Table
Whether you are using a small or
large format camera setting up a
photo studio will be the same
procedure You can either buy these
items listed below or you can followthe lessons in this section and make
your own
Most photographers end up making
some things in their studio so this will
be a good place to start
The building projects that follow are
easy to do and require very few tools
A drill of some sort may be the only
expensive tool you will need for
building Making these projects will
save you a lot of money and get you
started right away
Depending on the kind of room you
have you may need to be more
creative with your studio design
The following is a list of things you
will want in your studio
1 Table Top or Drafting Table
2 Workhorses
3 Backdrops ~ Seamless paper cloth
materials painted backdrops
4 Stands and Tripods5 Light Table loop croppers
hot glue puddy reflectors
6 Lights ~ strobes or tungsten
7302019 Heinrich Melanie - Studio Lighting Workbook
httpslidepdfcomreaderfullheinrich-melanie-studio-lighting-workbook 2389
on the list at the top of the page but
be assured they include the basic
requirements for a studio
In this section Building a Studio youwill receive information to help you
build your own studio You may not
understand what all of the things are
7302019 Heinrich Melanie - Studio Lighting Workbook
httpslidepdfcomreaderfullheinrich-melanie-studio-lighting-workbook 2489
Building a Scrim Soft Box and White Tent
Materials Needed
(A) Frame 16 x 20
(B) White Acetate can bepurchased at any glass
company
(C) Black Photographers Tape
(D) Two Matte Boards 18 x
20 each
(black on one side white on the
other)
(E) Matte Boards 18 x 16
(black on one side white on the
other) Fig 1
A Scrim Soft Box and White
Tent are used to scatter
diffused light onto your subject
The professional version of this
is costly and not as versatile as
the design described in this
lesson
This lesson will show you how
to construct a scrim ordiffusion system a soft box and
Fig 1
a white tent
7302019 Heinrich Melanie - Studio Lighting Workbook
httpslidepdfcomreaderfullheinrich-melanie-studio-lighting-workbook 2589
Making the Scrim
A scrim is used to soften thelight source It can also be used
to add shadows on any subject
after light is pushed through it
Fig 3
Build or buy a simple 16 x 20
frame (A) (an artist canvas
frame made of wood will work
fine) Get one that is big enough
so light cant spill around the
edges creating shadows fromthe frame itself A 16 x 20
frame (A) will be a good place
to start
The frame size used here is 16 x
20 It is only used to give you an
idea of how to make a scrim
You can make your scrim any
size you like and then cut the
acetate to fit the frame and
adjust all the other materials to
fit the size of the scrim you are
making
Measure the acetate (B) by
placing the frame down on top
of it and then draw a line to
mark out your exact
dimensions Now attach the
white acetate (B) to the frame
using photographers black tape (C) not staples Staples
may tear the acetate
Make sure to conceal the edges
of the frame with the acetate
Fig 2
7302019 Heinrich Melanie - Studio Lighting Workbook
httpslidepdfcomreaderfullheinrich-melanie-studio-lighting-workbook 2689
This will prevent dark shadow
lines from reflecting onto your
subjects highly reflective
surfaces Fig 2
TIP ~ In place of acetate try using a
white sheet
TRICK ~
To have a window shape
appear in your subjects
reflective surface place two
pieces of black tape (C) across
both center axis This will
reflect into your subject and
look like a window Fig 3
Making the Soft Box
A soft box will emulate the
same kind of lighting used in a
big studio and it softens the
light from a strobe supplying a
diffused light source Image
colors will be saturated and
rich in appearance
A soft box is made up of one
scrim and the black matte
board box To make the box
cut the matte board at an angle
so when taped together it
forms the shape of a cone Fig
4 White sides should face in
Tape the four pieces of matte
board to the edges of the scrim
with photographers black
tape two pieces (D) 20 x 18
are taped to the 20 lengths
and the other two pieces (E)
18 x 16 are taped to the 16
Fig 3
length of the scrim
7302019 Heinrich Melanie - Studio Lighting Workbook
httpslidepdfcomreaderfullheinrich-melanie-studio-lighting-workbook 2789
Face the white side of the matte
board in toward the centerMake the shape of the box cone
inward Fig 5 These flaps will
scatter light all around the
inside softening the light as it
comes through the scrim
Both the light and the soft box
should be attached to a light
stand to hold them up in place
Making a White Tent ~
A white tent is used to
photograph highly reflective
objects by revealing only white
in its reflected areas To make a
white tent for shooting
reflective objects make five
scrims not the soft box as
described above Tape them
together in a box shape hiding
any and all edges of the framesThis is because they will reflect
in the object you are
photographing All reflections
must be white
You will end up with a box with
no bottom It will be placed on
top of your subject on a table
top in effect covering it You
will be lighting the subject by
pushing light through all fivescrims Position your lights so
they do not cast any shadows
onto your subject by placing
them at a distance from the
white tent You will need to cut
Fig 4
Fig 5
7302019 Heinrich Melanie - Studio Lighting Workbook
httpslidepdfcomreaderfullheinrich-melanie-studio-lighting-workbook 2889
a small hole into one of the
scrims to put your lens
through Make sure your
product is placed properly or
you will be moving the tent
several times to get it right Fig 6
TIP ~
Another way to approach this
is to make one of the scrimsfreely swing open so you can
easily access the subject for
rearranging Hinge one of the
connecting joints
TIP ~
You may need to make color
tests because the acetate can
fade over time giving a yellow
cast
TRICK ~
The scrim can be covered with
a colored sheet of acetate Try
using different colors on
opposite sides of the tent
Fig 6
7302019 Heinrich Melanie - Studio Lighting Workbook
httpslidepdfcomreaderfullheinrich-melanie-studio-lighting-workbook 2989
Building a Backdrop and Table
A backdrop is essential for most
photographs taken in a studio This
lesson will show you how to make one
The ceiling must be solid not a drop
ceiling
Materials Needed
(A) Two- curtain rods (height of your
ceiling)
(B) One- 7 pole 2 diameter
(C) two sets of workhorses
The curtain rods you buy must be high
enough to reach between your floor
and ceiling They must have enough
spring tension to stay in place from
floor to ceiling
Set the curtain rods up between floor
and ceiling and about 6 feet apart and
3 feet from the wall Fig1
Stretch the 7 foot pole between the two
curtain rods and attach with clamps or
duct tape in place Fig 2
Fig 1
Fig 2
7302019 Heinrich Melanie - Studio Lighting Workbook
httpslidepdfcomreaderfullheinrich-melanie-studio-lighting-workbook 3089
material on the pole by draping it over
the top and attaching it with clamps If
you want to use seamless paper (large
rolls of paper on long cylinders) you
will need to leave one end of the poleaccessible to load the seamless
TIP ~
Seamless paper comes in 4 foot and 9
foot rolls You can use this paper over
and over again depending on how well
you take care of it avoiding creases
and soiling
TIP ~
Light stands can be used in place of the
curtain rods if you have a drop ceiling
This backdrop can be used in many
different situations as seen in Figs 3-8
All three setups are top lit
TRICK ~
Fig3 has a backdrop hanging to the
floor and a light on the floor that
flashes upwards onto the white
background paper The table is pulled
away from the backdrop Hint Place
an interesting material on the table
top this can achieve the look of a
sunset
The shot of the phone in Fig 4 was
done using this kind of set-up The
difference between the table top
material and the backdrop has left a
hard line at the horizon The spotlight
with a red acetate on it is set on the
floor below and facing up at the
seamless paper leaving the magenta
color behind the phone
Fig 5 leaves a hard horizon line where
Fig 3
Fig 4
Fig 5
At this point you can hang any kind of
your table top meets the backdrop
7302019 Heinrich Melanie - Studio Lighting Workbook
httpslidepdfcomreaderfullheinrich-melanie-studio-lighting-workbook 3189
TIP ~ Put an interesting material on the table
top this will increase the contrast
between the foreground and
background
Fig 6 is an example of a hard line
horizon line The table top in this shot
is a marble table top The background
is a piece of black velvet
Fig 7 is a traditional set for product
photography When the backdrop
swoops down onto the tabletop in this
fashion it leaves a beautiful gradation
on the backdrop
Fig 8 is a shot of a live set using this
style of backdrop The final image was
cropped to exclude all traces of the set
Fig 6
Fig 7
Fig 8
7302019 Heinrich Melanie - Studio Lighting Workbook
httpslidepdfcomreaderfullheinrich-melanie-studio-lighting-workbook 3289
Building a Studio Flat- Reflector
Materials Needed
One- 4 x 6 piece of foam core (14 thick)
(Plumbing department)
(A) Two (6 x 15 lengths of PVC tubing
(B) Four (1 x 15 lengths of PVC
tubing
(C) Three (44 x 15 lengths of PVC
tubing
(D) Six right-angle PVC tubing pieces
(red in Fig 2) to fit into lengths of tubing
above
(E) Two Ts (blue in Fig 2) to fit intolengths of tubing above
Double sided foam tape
Plumbers cement and purple pvc
preparation fluid
Saw (ask the hardware store to make
the cuts required)
This lesson will show you how to build a
studio flat that can be used as a reflector
as well as some other things that are
shown below
Fig 1
7302019 Heinrich Melanie - Studio Lighting Workbook
httpslidepdfcomreaderfullheinrich-melanie-studio-lighting-workbook 3389
You can make this flat any size you like
Ours is designed as a 4 x 6 Just follow
the simple construction plan below
Once you get all the things that are listed
in the materials listed above read all of
the directions before continuing
TIP ~
PLUMBERS CEMENT DOES NOT
SEPARATE ONCE IT ISCONNECTED TO TUBING
FRAME
1 Using the plumbers cement attach
two of the right-angled tubes to the ends
of the 6 foot tubing Once these are
secure attach the 44 tube at the top of
the frame See Fig 1 Be sure the two 6
tubing sections are parallel to each
other front to back and side to side
BASE
2 Using the plumbers cement attach
the Ts to the one foot sections of tubing
Fig 2
3 Using the plumbers cement attach
the four right angles to the opposite ends
of the 4 foot sections Before you do this
make sure that the two Ts are pointing
up and at right angles to the cornersFig 2
Fig 3
Fig 2
7302019 Heinrich Melanie - Studio Lighting Workbook
httpslidepdfcomreaderfullheinrich-melanie-studio-lighting-workbook 3489
frame using the double sided foam tape
Position the foam core so it fits against
the frame tightly
TIP ~
You can use this flat for many things
besides a reflector It will be sturdy
enough to hang things from it and can
even be useful as a backdrop Fig4
TRICK ~ Drape material over it for close-up
photography or simply use it to block
light from an area on your set Fig 5
Fig 5
Fig 4
Finally attach the foam core to the
4 Using the plumbers cement attach
the final 44 pieces of the base to the
right angles Fig 2
5 Using the plumbers cement attach
the frame to the base at the Ts Fig 3
7302019 Heinrich Melanie - Studio Lighting Workbook
httpslidepdfcomreaderfullheinrich-melanie-studio-lighting-workbook 3589
Some photographers have a real gift for
photographing people They are able toembrace humanity and capture on film the
very essence of life They reveal the
persons emotions without saying a word
They seem to understand the unspoken
word of the heart and are able to record it
without the distraction of camera and
technique
If you have clicked on to this page chances
are you are one of those people Perhapsyou just need a bit more help or
information to push your images to a new
level of success These lessons are aimed at
doing just that
In these lessons you will learn how to make
your subject comfortable and to reveal
the subjects true feelings It is true not all
people are comfortable enough with themselves
to trust and let go and you will discover who
is easy to shoot and who is not easy to
shoot There are ways to help people
become comfortable in front of a camera
Lessons in this section
Emotional Power Portrait
Creating a Sullen Emotion
Staging People
7302019 Heinrich Melanie - Studio Lighting Workbook
httpslidepdfcomreaderfullheinrich-melanie-studio-lighting-workbook 3689
The best way to shoot people is from a
distance Give them personal space andshoot with a long lens Pretend you are
shooting a couple of rolls to get them
familiar with being photographed Try not
to give much direction or you will find
yourself with very staged and stiff
subjects Follow them around if they will
permit it At some time they will be relaxed
this is when you will get the best shot
Let the people be themselves until they are
comfortable then direct them with very
simple suggestions Many factors come into
play when photographing people like the
texture of their skin what areas the light
hits their face their posture and the gait of
their walk Remember your basic visual
design elements when positioning a person
in the frame Colors will also play a large
role in the emotion you portray about the
person See visual design
Below are some successful photographs of
people Some of the people the photographer
knew and some of the people were just
shot on the street
7302019 Heinrich Melanie - Studio Lighting Workbook
httpslidepdfcomreaderfullheinrich-melanie-studio-lighting-workbook 3789
Emotional Power Portrait
Film
Ektachrome 100 Daylight
Film
Camera Format35mm - Nikon
Small Format
Lens
28mm Wide
Light Source
Strobe with softbox
Meter
Handheld Incident
Tripod
No
Filters
None
Polaroids
No
7302019 Heinrich Melanie - Studio Lighting Workbook
httpslidepdfcomreaderfullheinrich-melanie-studio-lighting-workbook 3889
The photograph was shot for a portfolio Our
photographer included this image in his portfolio in
an attempt to get jobs of this nature This image
reveals the ability to direct the subject
Understanding body posture is very important
when taking these kinds of photographs Knowing
the right moment to record the image as the model
stares into the photographers lens may take some
time to learn Study people and record in your
mind their posture and movements notice their
emotions and how they display them in their
bodies By studying people you will learn to
communicate and capture peoples emotion in your
images
Use props to direct your viewers eyes in your
images In the above image the model holds a
barbell that breaks into the lower part of the image
frame which leads the viewers eyes to the models
eyes The barbell was counterbalanced with her
face in the background Cropping is the key here
Dont be afraid to get in close It will help convey
the message of intimacy When the above image
was shot our photographer had to invade the
models personal space However our
photographer was able to capture something
unique in his image As a photographer you mustunderstand what effect and subtle nuances you
want to provoke and get in your images and then
know how to achieve them using your camera
through our lessons
Now ask yourself how was the light created in the
above image Where were the lights positioned
What type of light was used
The light was created by a strobe in a softbox (See
Building a Studio to learn how to build this kind of lighting system) The lighting was directdiffused A
small fill on the left side added a soft diffused fill
light This diffused light was created by bouncing
light from the main light and was placed close to
7302019 Heinrich Melanie - Studio Lighting Workbook
httpslidepdfcomreaderfullheinrich-melanie-studio-lighting-workbook 3989
the models face It was positioned approximately 3
feet from her and powered by a large power pack
of about 2000 watts
The background was intentionally dropped off intoblack leaving no more detail than necessary or
desired It was placed about 5 feet behind the
model
The model applied baby oil to her face for the shot
A spray bottle filled with water was used to add the
illusion of sweat She shook her head about to
provide the work-out like appearance After all
that the photographer was able to achieve the
image he wanted after paying close attention to the
small details and knowing how to use his camera
A wide-angle lens was used to take this shot It
helped to accentuate the barbell and hand of the
model The exposure was taken with a handheld
incident meter facing the camera Several frames
were shot bracketing the image and the final image
was chosen in editing Study your brackets
carefully on a good light table to pick a final
photograph
7302019 Heinrich Melanie - Studio Lighting Workbook
httpslidepdfcomreaderfullheinrich-melanie-studio-lighting-workbook 4089
Creating a Sullen Emotion
Film
Tmax 100 Black and White Film
Camera Format
2 14square - HasselbladMedium Format
Lens
80mm Normal
Light Source
Strobe with softbox and spot
stobe
Meter
Handheld Incident
Tripod
Yes
Filters
None
Polaroids
Yes
7302019 Heinrich Melanie - Studio Lighting Workbook
httpslidepdfcomreaderfullheinrich-melanie-studio-lighting-workbook 4189
Capturing a mood or creating a mood can be done using
dramatic light You should also direct your subject into
positions that convey the emotion you are after Be carefulnot to over direct your subject This can make the image
look contrived and fake Professional models are great
actors and will understand your direction very well If you
are not photographing a professional model you should do
a couple of things to help your model Use a long lens
Keeping a distance between you and the model will give
them room to relax Secondly pretend to shoot a couple of
rolls of film This should give them enough time to get
comfortable with the flashing lights and shutter clicks
Next shoot a lot of film Be clear with your directions
Design your set so you can move around freely and shootfrom different vantage points During the shoot your
model will become more relaxed and the images will turn
from stiff to candid
In the image above a softbox was positioned close to the
subject and was the main light The light was intentionally
overexposed This was done by taking a meter reading
from the subjects left side where the fill light fell off This
technique slightly overexposed the light on his right side
and forehead Now you can see how a slight change in
metering placement can change the entire feeling of an
image A white reflector card was used to bounce a
diffused fill light into the subjects right side This style is
meant to emulate the lighting found in a theatre ~ high
contrast and a dramatic mood A spotlight lights the back
part of his neck It is raised high above and pointed down
at the subject
7302019 Heinrich Melanie - Studio Lighting Workbook
httpslidepdfcomreaderfullheinrich-melanie-studio-lighting-workbook 4289
With a little direction we found the emotion we were
looking for The subject was told to rest his elbows on his
knees as he clutched his drumsticks The position of his
head relative to his body turns his face toward the viewer
This position is natural and comfortable for him His eyes
are looking downward as though in reflection of another
time It is a moody image because of the lighting and his
expression Practice photographing your friends by
directing them with posture poses and physical
appearance changes
7302019 Heinrich Melanie - Studio Lighting Workbook
httpslidepdfcomreaderfullheinrich-melanie-studio-lighting-workbook 4389
Staging People
Film
Ektachrome 100
Daylight
Camera Format
2 14 square - Hasselblad
Medium Format
Lens80mm Normal
Light ource
Two Umbrellas with
Strobes
Meter
Handheld Incident
Tripod
Yes
Filters
None
Polaroids
Yes
7302019 Heinrich Melanie - Studio Lighting Workbook
httpslidepdfcomreaderfullheinrich-melanie-studio-lighting-workbook 4489
When staging people you need to create a natural appearance
The same principle holds true when photographing people If you
hire professional models it will make your job much easier
Professional models will know exactly what to do with very little
direction More importantly they are completely comfortable in
front of the lens
The image above was shot for an architectural firm catalog The
company wanted to save money by using their own employees as
models We wanted to use professional models but made the
concession in order to secure the job We used familiar icons to
help the employees feel comfortable in front of the camera Oncewe had them working on the architectural model they had
forgotten about the camera and lights in the room We were able
to get the tools of their trade in the scene the employees
comfortable and then able to capture several successful images
for our client
We used two lights with umbrellas to light the scene One strobe
was placed to the right of the camera and pointed at the set and
the other strobe was positioned behind the left side of the camera
and was high in the air and pointed downward towards the set
See the diagram below
The two strobes were balanced and their meter readings were the
same When photographing people use a shutter speed that stops
any possible movement Do not shoot at a shutter speed below the
millimeter of the lens you are using For example if the lens you
are using is a 90mm lens your shutter speed will be 1125th or
faster Use 160th of a second if you have a focal plane shutter
Cameras with a leaf shutter do not hold to the same constraints as
a focal shutter Leaf shutter lens also sync at any speed Review
your camera manual to see if there are any limitations with your
lens and camera
7302019 Heinrich Melanie - Studio Lighting Workbook
httpslidepdfcomreaderfullheinrich-melanie-studio-lighting-workbook 4589
Film
Ektachrome 100
Daylight Film
Camera Format
2 14 square -
Hasselblad
Medium Format
Lens
80mm Normal
Light Source
Strobes with Two
umbrellas
Meter
Handheld Incident
Tripod
Yes
Filters
None
PolaroidsYes
7302019 Heinrich Melanie - Studio Lighting Workbook
httpslidepdfcomreaderfullheinrich-melanie-studio-lighting-workbook 4689
The second image was shot in a compressor room It portrays
the inspection division of the same company These men are not
models and have a very realistic appearance One man poses as
manager and the other as an inspector Again we used props to
set the stage and asked the men to talk with each other
Cleaning the compressors was an important part of making the
statement the client desired The client portrays a clean and safe
environment Cleaning a set before shooting is sometimes the
most important thing you can do Paying attention to the small
details will get you repeat business This cant be stressedenough If you need to paint something in the scene before you
shoot it to make sure it looks right do it It may make all the
difference in the world Your client will take notice of your
attention to detail This is why previewing a location before you
shoot it is very important It gives you a chance to hire someone
or ask the client to clean these areas for the shot
The image above was shot with two strobes both using
umbrellas Both strobes were placed to the right of the camera
One of the strobes was positioned somewhat behind the men and
set high in the air This pushed light onto the compressorsbehind the men The second strobe lights the men and the
foreground parts of the compressors
7302019 Heinrich Melanie - Studio Lighting Workbook
httpslidepdfcomreaderfullheinrich-melanie-studio-lighting-workbook 4789
The advertising field is very competitive
yet the potential for increased income isgreat Photographers who are doing
advertising work tend to specialize
depending on the area they live in For
example someone living in a small city
may need to have several specialties On
the other hand someone in New York
could specialize in one thing ie
childrens fashions or motorcycles An
advertising photographer will most of
the time be working with an art
director from a design or advertising
firm Clients rarely hire photographersdirectly unless they have established a
rapport with them It is generally the
AD (art director) working on the job
that will hire for the client
Ask yourself this question What is the
one thing that I like and feel
comfortable with Your answer is the
area you should be specializing in In
reality most people go through life and
their likes and dislikes change Aphotographer sometimes follows a
specialty For instance someone who
assisted a commercial photographer
shooting childrens clothes and liked it
decided to pursue that field The ideal
situation is to make a living doing whatyou really like
Lessons in this section
Lighting Multiple Glass ProductsUsing Props with Products
Multiple Exposures
Making Reflections Work for You
Using a Product for a Background
Floating a Product
Boring Product - Interesting Design
7302019 Heinrich Melanie - Studio Lighting Workbook
httpslidepdfcomreaderfullheinrich-melanie-studio-lighting-workbook 4889
The lessons in this section assume you
have a good working knowledge of
camera tools visual basics and lightingIf not go back to these sections and
learn these things first Also some of the
studio setups can be built Those
designs are described in Building a
Studio
The lessons in this section go into
extensive details showing you where to
position your lights and reflectors etc
in order to achieve a certain look and
feel in an image They includedescriptive diagrams for you to
duplicate
7302019 Heinrich Melanie - Studio Lighting Workbook
httpslidepdfcomreaderfullheinrich-melanie-studio-lighting-workbook 4989
Lighting Multiple Glass Products
FilmEktachrome 100
Daylight Film
Camera Format
4 x 5 - Horseman
Large Format
Lens
150mm Normal
Light SourceStrobe with Softbox and
Reflectors
Meter
Handheld Incident
Tripod
Yes
Filters
None
7302019 Heinrich Melanie - Studio Lighting Workbook
httpslidepdfcomreaderfullheinrich-melanie-studio-lighting-workbook 5089
The image above was an inset photograph for a
brochure cover The company sold gift baskets and
products The brochure was used to help their growing
marketing requirements The brochure had three
different images similar to this one along with
accompanying text The client was in the studiowhen this was taken and was the acting art director
So all proofs were finalized at the time of shooting
This eliminates any questionable fees for reshooting
Polaroids are used for the same reason An instant
image of lesser quality than film will serve as great
representations of the final photograph Polaroids
are sometimes faxed or scanned and emailed to the
client for approval Asking your client to sign off on
a photograph will give you the assurance that all is
okay and you can record the image on film
Shooting glass and high gloss labels can be a
frustrating exercise because of the multiple
reflections that occur Remember as you shoot to
look through the lens to see if you have any
reflections on your products in the set All
reflections are caused due to the angle between
lens and light source Review your polaroids
carefully for any reflections before you expose the
film
TIP ~ Moving the product a small amount may be the best
way to remove the reflections Before you do that
adjust your light to eliminate any glare and
reflection Each time you change the light position
you must check for glare
Place all the products on the table top according to
the layout supplied by your client or art director
The image above was tiered giving it height and
depth
The light is positioned directly over the set It is
tilted slightly toward the backdrop and away from
the camera The backdrop is set up as a sweep It is
a piece of gray formica See Building a Studio to
7302019 Heinrich Melanie - Studio Lighting Workbook
httpslidepdfcomreaderfullheinrich-melanie-studio-lighting-workbook 5189
learn how to make this if you are inexperienced in
studio construction
Three white or silver cards are used in the front andon both sides to pump additional light into the
scene These are carefully and strategically placed
to avoid seeing the reflector cards in the glass
When you are shooting glass objects the main light
should reflect in the glass It indicates the direction
of the light source The main light source reflection
is acceptable as long as it is not too bright The fill
light from the reflector cards should not dominate
your main light source
TIP ~ Reflector cards can be made from any material that
reflects light such as a white card Large pieces of
foam core are used and cut into smaller pieces
depending on the size of the set Silver cards are also
used They are positioned to reflect the light coming
from your main light source and bounce the light
softly back into the set These cards will add more
light and sometimes add unacceptable hot spots on
the products These hot spots are very distracting
and unsightly
Now that you have all your lighting sources in place
look through the camera to see if you have any
reflections If you have a lot of glare in your image
readjust the overhead light by tilting it more
towards the back or front Be careful to avoid lens
flare Lens flare is when your light or lights reflect a
glare back into the lens For example when
someone shoots into the sun the lens picks up a
glare Block the lens flare with a black card by
placing the card between the light and lens Make
sure not to put the card into your scenes final crop
or in a position where you block your image You
may need to move your lights or use a scrim to get
rid of the lens flare It will be easier to add a scrim if
you have previously adjusted all the glass for no
reflections Instead of a scrim you could use a lens
hood The lens hood attaches to the front of the lens
7302019 Heinrich Melanie - Studio Lighting Workbook
httpslidepdfcomreaderfullheinrich-melanie-studio-lighting-workbook 5289
It protrudes from the lens and blocks any glare
falling on the front lens element Each lens may use
a different hood These come in many different
shapes and sizes I use a scrim because it is far more
versatile
Assuming your light source is in a good position you
may still have some glare on the glass You can
eliminate many reflections by slightly tipping the
product forward Use a small object under the back
side of the product while not disturbing the
products position These are very slight movements
and will not change the appearance to any great
degree Also tip the reflectors back and forth and
side to side to remove any added glare from your
objects Be attentive to all the objects You may
eliminate glare in one object and produce it in
another You must check for any reflections in your
polaroids Some reflections are very difficult to
detect when viewing the set from behind the camera
using the modeling lights
Use an incident meter and read the light falling on
the set Always bracket your exposure Bracketing is
the process of taking many shots of the same set but
using different fstops For example if your meter
reads f32 at 160th of a second your bracket would
be one stop on either side f22 and f45 at the same
speed The image was shot at f32 or greater depth-
of-field Some photographers bracket with 12 stops
and 13 stop differences They shoot 5 sheets of film
using these small incremental changes
7302019 Heinrich Melanie - Studio Lighting Workbook
httpslidepdfcomreaderfullheinrich-melanie-studio-lighting-workbook 5389
Final cropping of image
The final image displayed on the left was
successfully shot with no glare on any of the
products All the products were in glass or were
wrapped in cellophane The image has been
cropped to match the final inset space for the
brochure This shot took about a half day toshoot
7302019 Heinrich Melanie - Studio Lighting Workbook
httpslidepdfcomreaderfullheinrich-melanie-studio-lighting-workbook 5489
Using Props with Products
FilmEktachrome 100
Daylight Film
Camera Format
4 x 5 - Horseman
Large Format
Lens
90mm Wide
Light SourceStrobe with Softbox
Meter
Handheld Incident
Tripod
Yes
Filters
None
7302019 Heinrich Melanie - Studio Lighting Workbook
httpslidepdfcomreaderfullheinrich-melanie-studio-lighting-workbook 5589
When using props to help convey your message
remember the visual basics about colorperspective framing contrast backgrounds
and balance
This image of a racing bike was shot from an
angle that enlarged the back wheel The wide
angle lens helps pronounce the wheel size as well
as increasing the elongated perspective of the
bike
The bike was shot against a black background
Isolating your subjects by eliminatingdistracting backgrounds will help make the
objects in the set stand out The three arrow-
shaped plexiglass pieces all point to the distance
This visually portrays the speed and forward
motion of a racing bike Primary colors of the
plexiglass are used to simplify the information
in the image The gears of the bike are
pronounced displaying the bikes power and
versatility The camera position is very low and
tilted upward to further increase the illusion of
size
A softbox was used to keep the glare on the
chrome to a minimum It was positioned
parallel to the bike seat on its right side and
tipped down slightly toward the pedals If you
look carefully you can see the reflection of the
softbox in the blue plexiglass This is acceptable
The light has bounced color from the plexiglass
back onto the chrome of the bike This adds
interesting color highlights to the image that
balance well with the other colors
Parts of the wheels reflect the colors of the
plexiglass adding an interesting bit of color
7302019 Heinrich Melanie - Studio Lighting Workbook
httpslidepdfcomreaderfullheinrich-melanie-studio-lighting-workbook 5689
backdrop will work also The velvet material
absorbs any light that falls on it
When you are taking your exposure readings
make sure that you take readings of the
background walls in the scene Do not face your
light toward the back wall The meter readingsof the walls should be at least 4 stops darker
than your final exposure This will maintain a
black background
The wide angle lens was used to achieve
maximum depth-of-field This image was
exposed at f45
The room was totally darkened for this shot
Some photographers will even paint their walls
black for a shot like this A black velvet
7302019 Heinrich Melanie - Studio Lighting Workbook
httpslidepdfcomreaderfullheinrich-melanie-studio-lighting-workbook 5789
Multiple Exposures
Film
Ektachrome 100
Daylight Film
Camera Format
4 x 5 - Horseman
Large Format
Lens
150mm Normal
and 90mm Wide
Light Source
Strobe with Softbox
Meter
Handheld Incident
Tripod
Yes
Filters
None
7302019 Heinrich Melanie - Studio Lighting Workbook
httpslidepdfcomreaderfullheinrich-melanie-studio-lighting-workbook 5889
This image was designed as a poster for a national bowling
tournament The objects were intentionally placed leavingblack areas for the white text or copy and logos to be placed
on the final poster
The image above was done by repositioning the camera
three different times and exposing the film each time with
the change (Three shots on one piece of film) In addition the
lens was changed for one of the shots
You will need a large piece of black velvet to absorb all
scattered light All exposures were shot on the black velvet
The velvet does not see light This leaves that area of the filmunexposed This allows you to expose something else in the
black area which occurs when you take your next exposure
You will also need a piece of acetate to place on the film
back for tracing the objects in each exposure This will help
you line everything up and avoid overlapping your
products By tracing the objects that appear on your film
back onto a piece of acetate you will be able to align
everything perfectly
The first exposure was made of the bowling ball in thebottom right with a wide angle lens The second exposure
was made of the bowling pin on the left bottom The third
exposure was made of the top right 2 bowling pins One of
these pins was raised up on a block for added dimension
With each exposure the camera was progressively pulled
away from the scene The camera lens to subject distance
was increased to help this illusion of depth Diagrams below
may help you understand this better
Make sure when taking photos like this that any part of the
image you wish to remain unexposed is filled with the black velvet You can add any lighter value to a black area with
film because it is unexposed
7302019 Heinrich Melanie - Studio Lighting Workbook
httpslidepdfcomreaderfullheinrich-melanie-studio-lighting-workbook 5989
When you are ready to make the first exposure trace the
film back onto the acetate by placing the acetate over your
film back Do this with each exposure
A softbox was used and placed close to all of the subjects
producing direct lighting Your exposure times and fstops
can be different for each exposure just as if you were taking
separate photographs In fact think of this type of image as
a composite
Wide Angel Lens Normal Lens Normal Lens
7302019 Heinrich Melanie - Studio Lighting Workbook
httpslidepdfcomreaderfullheinrich-melanie-studio-lighting-workbook 6089
Making ReflectionsWork for You
Film
Ektachrome 100
Daylight Film
Camera Format
4 x 5 - Horseman
Large Format
Lens
150mm Normal
Light Source
Strobe withSoftbox
Meter
Handheld
Incident
Tripod
Yes
Filters
None
7302019 Heinrich Melanie - Studio Lighting Workbook
httpslidepdfcomreaderfullheinrich-melanie-studio-lighting-workbook 6189
The image above was shot on a highly reflective
background It came in a long roll about 4 feet
wide The light was positioned toward the front
parts of the products to avoid a hard horizon lineThe light falls off into black making it useful for
the reversed type of white (see below) Be careful
to avoid lens flare when positioning the lights near
the camera lens Make sure to block any light that
may fall on the lens Use a scrim to block the light
A scrim is any black piece of material that will
function as a light block Black masking tape was
secured to the edge of the lens to block the light
Be careful not to show the tape in your
photograph
Glare can be a major problem with highly
reflective sets like this one Always remember to
look through your lens to avoid this Tip your
light toward the front or back of the scene to
adjust the glare on the set This shot was taken
using a strobe head inside a softbox This type of
light is often used in product photography
especially when shooting highly reflective objects
The light rays are scattered and softened by this
kind of light source
Each of the objects in this scene are veryreflective The reflective gold surface used to shoot
on adds interest to the products by adding a gold
reflection of the product onto the gold surface
This gives depth to the image
Adding different colored line art around the edge
of the image in the white border adds an extra
dimension to the final composite below This was
done by the designer after the image was taken
Some of the line art is in front of the image and
some is dropped behind the image Reverse text isused on the black part of the image and black text
is used on the white border
7302019 Heinrich Melanie - Studio Lighting Workbook
httpslidepdfcomreaderfullheinrich-melanie-studio-lighting-workbook 6289
Using a Product for a Background
Film
Ektachrome 100
Daylight Film
Camera Format
4 x 5 - Horseman
Large Format
Lens
150mm Normal
Light Source
Strobe with Softbox and
Reflector
Meter
Handheld Incident
Tripod
Yes
Filters
None
7302019 Heinrich Melanie - Studio Lighting Workbook
httpslidepdfcomreaderfullheinrich-melanie-studio-lighting-workbook 6389
This close-up of a computer chip was designed for the
front cover of a computer companys brochure (see
below) It was nesseccary to get the best detail for
enlargement reasons so a large format camera was used
The end image was 9 x 12 our negative was 4 x 5
A strobe with a softbox was used to light this subject
from the left side An accompanying white reflector card
was placed close to the subject to fill in the right side
with light (see diagram below)
The bellows on the 4 x 5 camera were extended to
enlarge this chip to fill the frame When extending the
bellows you increase the need for light to reach the film
In this case we did not need to have a small f-stop
number for sharpness so we left the lens open at f56and made our exposure appropriately Even if you need
to pop your flash a couple of times extending the
bellows should not be something to hold you back from
making the close-up you want to shoot The detail in this
shot is achieved by using a 4 x 5 camera with a good lens
TIP ~
Popping or firing the strobe multiple times is done with
the lens open in a darkened room so the only light in the
room is coming from your controlled multiple burst of
the flash Since you have no need for speed whenshooting inanimate objects keep pumping in the light to
get the exposure you need In a dark room you could
leave your lens open and just continually pop the strobe
Or you can cock the shutter and repeat the same
exposure until it adds up to the correct amount of light
required Make sure you are on a very steady tripod
The slightest amount of movement will blur your image
TIP ~
The best set up for any overhead shot with a 4 x 5 is to
put your set on the floor This is of course dependent on
the size of your set A short-legged set of horses works
very well also The legs used in this set were about 12
high
The hue of bluegreen works well with the yellow text
7302019 Heinrich Melanie - Studio Lighting Workbook
httpslidepdfcomreaderfullheinrich-melanie-studio-lighting-workbook 6489
The text pops off the image This color prevents the text
from falling into the background The background of the
computer chip remains a simple reminder of what the
company does It is the text that the viewer is expected to
read
This image would also make a great backdrop for a
collage or montage image
7302019 Heinrich Melanie - Studio Lighting Workbook
httpslidepdfcomreaderfullheinrich-melanie-studio-lighting-workbook 6589
Floating Product
Film
Ektachrome 100
Daylight Film
Camera Format4 x 5 - Horseman
Large Format
Lens
150mm Normal
and 90mm Wide
Light Source
Strobe with
Softbox
Meter
Handheld
Incident
Tripod
Yes
Filters
None
PolaroidsYes
7302019 Heinrich Melanie - Studio Lighting Workbook
httpslidepdfcomreaderfullheinrich-melanie-studio-lighting-workbook 6689
Both images in this lesson give the illusion of
floating The top image is propped up underneath by
a block A softbox directly above the computer
circuit board was used to achieve a soft even light In
todays high-tech industry these kinds of images are
being used in composites and as single images
TIP ~
Using black velvet as a backdrop can achieve a
similar effect where the subject appears to float The
light will be absorbed into the black velvet material
to create the illusion
The computer chip is not grounded to anything so it
appears to float (see Fig 1) The angle of the light on
the computer circuit board picked up some very
interesting highlights in Fig 1 which adds to the
high-tech feel of the image
A 4 x 5 camera was used to get greater detail with
the larger negative for enlargement purposes Depth-
of-field was achieved at f32
When shooting any subject like this you can portray
many kinds of interesting illusions The black velvet
material may be a little more expensive but nothing
else works as well This kind of material will help
you take the shots like the pros
Fig 1
7302019 Heinrich Melanie - Studio Lighting Workbook
httpslidepdfcomreaderfullheinrich-melanie-studio-lighting-workbook 6789
Boring Product -Interesting Design
Film
Ektachrome 100
Daylight Film
Camera Format
4 x 5 - Horseman
Large Format
Lens
150mm Normal
Light Source
Strobe with Softbox
Meter
Hanheld Incident
Tripod
Yes
Filters
None
7302019 Heinrich Melanie - Studio Lighting Workbook
httpslidepdfcomreaderfullheinrich-melanie-studio-lighting-workbook 6889
Some products you will be photographing will be justplain boring such as the rods in the shot above Its
your job as the photographer to bring life and interest
to boring products like these In the image above the
client needed his products shot for his company
catalog
Making something interesting from something boring
can be done by using an interesting background or
unusual lighting In this image the layout and diagonal
positioning of the rods directs the viewers eye to the
top right area of the image of the frame Text was
placed at the top and right side of this image (see final
image below)
The softbox was positioned above and to the left of the
product as indicated by the soft shadows Fig1 This
image could have easily been cut out from its
background and placed on any other background
Minimal depth-of-field is needed for this shot because
the maximum height of the product was only two
inches An aperture of f8 was used The exposure is
made with an incident meter reading to achieve an
overall well-balanced tone
Deep shadows could have been used to add interest to
these products by using a direct light at a very low
level to the table angle Fig 2 No softbox would be
used for this kind of shot
The set is placed on the floor so your camera position
is directly over the top of the set If shot on a table top
you would need to stand on top of a ladder to take the
shot The easier choice is to shoot on the floor
7302019 Heinrich Melanie - Studio Lighting Workbook
httpslidepdfcomreaderfullheinrich-melanie-studio-lighting-workbook 6989
Fig 1
Fig 2
7302019 Heinrich Melanie - Studio Lighting Workbook
httpslidepdfcomreaderfullheinrich-melanie-studio-lighting-workbook 7089
Lessons in this section
Mixing Texture Shapes and Color
Arranging a Set
Photographing Beautiful Glass
Messages in a Still Life
Creating a Mood
Still Lifes Selling Products
Setting the stage works to help convince the
viewer of a place and time or mood Small
details make a shot believable These
lessons will teach you how to think and tell
a story of a certain place in time Picking
the right props for your shoot will ensure
believability The lessons in this section
work in conjunction with the ProductPhotography section
A still life photographer can be found
working in a studio or on location This
type of photography demands the
recreation of a set or going to the set to
capture a moment in time This can be done
on location in the studio or digitally
created on the computer The truth is it fits
into many categories It is more than
product photography You are creating a
scene that conveys a sense of being
somewhere
7302019 Heinrich Melanie - Studio Lighting Workbook
httpslidepdfcomreaderfullheinrich-melanie-studio-lighting-workbook 7189
you pull your entire learning experience
together I include details and diagrams
that will reinforce your understanding
Still life scenes are often used in a designers
set or in a showroom like in a furniture
store They can also be used to convey a
story quickly and help transfer the concept
and idea throughout the entire image These
lessons include tips on how to light objects
in small and detailed areas They will help
7302019 Heinrich Melanie - Studio Lighting Workbook
httpslidepdfcomreaderfullheinrich-melanie-studio-lighting-workbook 7289
Mixing Texture Shapes and Color
Film
Ektachrome 100
Camera Format
4 x 5 - Horsemen
Large Format View
Camera
Lens
150mm Normal
Light Source
Strobe with Softbox
MeterHandheld Incident
Tripod
Yes
Filters
None
7302019 Heinrich Melanie - Studio Lighting Workbook
httpslidepdfcomreaderfullheinrich-melanie-studio-lighting-workbook 7389
The image above was shot as a portfolio piece
Mixing textures shapes and colors the
photograph displays the photographers eye for
design It is photographed on black velvet which
adds saturation of the overall appearance by
absorbing all the light that falls on it The black
velvet can be purchased at any fabric store
Two scarves are positioned at opposing angles
adding strong graphic interest and competition
between them Against the soft colored scarves
the dark blue hat pops out The colored markers
are color complements to the blue hat and add
additional depth to the image
Resting on top of the scarves are brightly
colored objects which add spots of color andinterest The curvy lines of the ribbons break up
the edges of the two scarves and add a bit of fun
to the image The final crop of the image forces
the viewer to see the positive and negative
spaces of color within the frame Cropping plays
an important role in the success of your image
How the image was photographed ~
One main strobe light was used It was shot
through a softbox or mylar scrim Several white
and silver reflector cards surrounding the setbounced in a soft fill light Using the reflectors
as fill light evens out the overall appearance
without eliminating the direction of the main
light The shadows in the image are soft and
reveal more texture in the scarf
Minimal if any depth-of-field was needed in
this image so it was exposed at f56 The meter
reading is taken with an incident meter and
pointed directly at the camera Several readings
were taken of the entire image For example a
meter reading was taken of the light falling onthe hat the tip of the triangular scarf and the
black corners of the velvet before an exposure
was chosen A range of only 1 stop was allowed
between these exposure readings Reposition
your reflecting cards either closer or further
7302019 Heinrich Melanie - Studio Lighting Workbook
httpslidepdfcomreaderfullheinrich-melanie-studio-lighting-workbook 7489
from your subject to adjust the exposure
variations Your final exposure choice will be of
the area in the scene that is the brightest or
where the most light is falling If your exposure
variations are between f16 and f11 f16
indicates the brightest area in the scene You
should know this at this point in your educationIf you dont go back to the Camera Basics
section and read over the lessons Choosing f16
will prevent overexposure to the lighter areas in
your scene The camera was positioned directly
over the top of the set using a tripod Make sure
your tripod is capable of supporting your
camera in these unusual positions
Pick three or four objects that work well
together Lay them out on a solid colored
background in an interesting design pattern
Position your camera lights and reflectors
Using a color transparency film bracket your
frames as you shoot
Final crop of image
reflector
reflector
7302019 Heinrich Melanie - Studio Lighting Workbook
httpslidepdfcomreaderfullheinrich-melanie-studio-lighting-workbook 7589
Arranging a Set
Film
VPS 100 - Color Negative
Camera Format
2 14 square - Hasselblad
Medium Format
Lens
80mm Normal
Light Source
Strobe with Softbox
Meter
Handheld Incident
Tripod
Yes
Filters
None
7302019 Heinrich Melanie - Studio Lighting Workbook
httpslidepdfcomreaderfullheinrich-melanie-studio-lighting-workbook 7689
Within each image there can exist sets that pull the
entire image together The image above is an example
of one of these small sets The set is staged for a period
in time
Some professionals hire stylists to set something like
this up Background information helps convey a
message in the overall scene For example suppose you
are shooting the interior spaces of a Victorian home
and your client wants to place the product in the late
1800s Objects in the photo above will help transport
your viewer into that time in history Props are a very
important part in convincing your viewer of a place in
time You can find props at antique stores for this kind
of scene Time period images must be authentic down
to the smallest details Hire a historian for accuracy if
needed
Magazines use small inset photos that display intricate
details of settings They may not be set against a black
background as in the photograph above The
background should be dimly lit or out of focus to
help accent the subject Shallow depth of field and
object placement will work together to make your
image successful
One main strobe light was used in the photograph
above with no fill lights or reflectors This drops the
background of black velvet into black making it a
perfect place for white text Remember an
editor or designer usually needs to add type and will
need this space
7302019 Heinrich Melanie - Studio Lighting Workbook
httpslidepdfcomreaderfullheinrich-melanie-studio-lighting-workbook 7789
Still lifes have been used in fine art for many years The
image above happens to be found in nature but could
have just as easily have been set up in a studio The
arrangement of the plates and glass objects can be
emulated in the studio or in a set I have included this
image to show you that what you find most naturally in
life is how you should set up a scene whether in the
studio or on location Take your camera into the world
around you and shoot small stories such as the one
above These still lifes will help you to stylize your own
setups This lesson will help you learn how to crop and
balance your images Pay close attention to the light
falling on the objects in your scenes Follow the previous
example to determine the proper exposure of your film
Be deliberate when you consider the photographs you
will take Take your time
Remember to see within the boundaries of your frame
balancing objects from front to back side to side and
corner to corner See Visual Basics for more
information on setting an objects position within the
frame
7302019 Heinrich Melanie - Studio Lighting Workbook
httpslidepdfcomreaderfullheinrich-melanie-studio-lighting-workbook 7889
Photographing Beautiful Glass
Film
VPS 100 - Color Negative
Camera Format
2 14 square - Hassalblad
Medium Format
Lens
80mm Normal
Light Source
Strobe with Softbox
Meter
Handheld Incident
Tripod
Yes
Filters
None
7302019 Heinrich Melanie - Studio Lighting Workbook
httpslidepdfcomreaderfullheinrich-melanie-studio-lighting-workbook 7989
The image above will give you an idea of how to light
small objects in a room or on a set You can make
objects pop out that are a very small part of the sceneFor example the color in this image is something you
really want to show but each of the objects must be
placed and lit properly to portray the beauty of their
colors Small strobes with funnel snoots will spotlight
only the objects you are interested in The blue
background color was chosen as a color complement to
the colors in the glass
TIP A snoot can be made from a rolled piece of
poster board into the shape of a cone You can also
buy these cones to fit on the strobe Be careful if using
poster board as the lights can get very hot
Take a large piece of poster board and roll it into a
cylinder shape Fig 1 Tape the center of the cylinder
then expand one end and decrease the opposite end of
the cylinder Fig 2 Make the expanded end large
enough to fit over the strobe head The other end of
the cylinder should be small enough to direct the light
at whatever object you want to be lighting The size of
the smaller hole will dictate the angle of the light
pointed at the object
Fig 1 Fig 2
7302019 Heinrich Melanie - Studio Lighting Workbook
httpslidepdfcomreaderfullheinrich-melanie-studio-lighting-workbook 8089
WARNING
DO NOT USE POSTER BOARD CONES WITH
TUNGSTEN LIGHTS The chance of fire is far too
great NEVER leave powered lights unattended
The glass objects in the photograph above have had the
light pushed directly through them When the light
passes through the colors are revealed
Shooting glass with liquid in it is described in the
diagram below The softbox is placed directly above the
set and slightly tilted away from the camera With the
liquid in the glass place a reflector card behind the
liquid only Looking through the camera lens make sure
the card does not extend past the liquid above or to the
sides Tip the card backwards so it picks up some of the
light falling down from the softbox This will illuminate
the liquid giving it a glowing appearance
7302019 Heinrich Melanie - Studio Lighting Workbook
httpslidepdfcomreaderfullheinrich-melanie-studio-lighting-workbook 8189
Your background can be any color detail or density when
using this reflector card
7302019 Heinrich Melanie - Studio Lighting Workbook
httpslidepdfcomreaderfullheinrich-melanie-studio-lighting-workbook 8289
Messages in a Still Life
Film
Ektachrome 100
Camera Format
35mm - Nikon
Small Format
Lens
50mm Normal
Light Source
Strobe with Softbox
Meter
Handheld Incident
Tripod
Yes
Filters
5 Red CC Filter
7302019 Heinrich Melanie - Studio Lighting Workbook
httpslidepdfcomreaderfullheinrich-melanie-studio-lighting-workbook 8389
The above image sends a message of peace and
comfort to its viewer in a couple of different
methods
One method is achieved by the type of lighting
used (In this case a strobe within a softbox) A warm
glow of very soft light is scraping horizontally
across the image and highlights fall on the outer
pages of the book It has a golden quality Another
method is achieved by using a number 5 CC filter
over the camera lens This accents the rich red color
in the roses with their saturated hue and balances
perfectly with the gold color in the pages as well as
the reddish-brown boards that they sit on
TIP ~
A red or orange transparent gel in an acetate sheet
form could be placed over the softbox to warm the
color pushed into the set
The background falls off into black holding the
viewers eye on the bible and the perfectly balanced
roses
This was shot with a softbox to the right of the scene
with no fill cards or fill lights The main light source
is close to the subject so the light falls off very little
When the light is positioned close to the subject its effect
on the oppiste side is minimal
7302019 Heinrich Melanie - Studio Lighting Workbook
httpslidepdfcomreaderfullheinrich-melanie-studio-lighting-workbook 8489
Using light color balance and the right props this
image conveys both warmth and love The main
subject is the bible The roses are used to convey a
feeling of love If instead of roses guns were used as
props the message would be entirley different
perhaps of violence Props can make or break
your image
7302019 Heinrich Melanie - Studio Lighting Workbook
httpslidepdfcomreaderfullheinrich-melanie-studio-lighting-workbook 8589
Creating a Mood
Film
Ektachrome 100
Camera Format
35mm - Nikon
Small Format
Lens
50mm Normal
Light Source
Strobes and reflectors
Meter
Handheld Incident
Tripod
No
Filters
None
7302019 Heinrich Melanie - Studio Lighting Workbook
httpslidepdfcomreaderfullheinrich-melanie-studio-lighting-workbook 8689
Making a statement with your photography should
be foremost in your mind The image above tells us ~
bedroom lovers intimacy passion etc It is up to
our imagination to fill in the blanks You have only a
few moments to convey your message so be careful
not to be too subtle yet not so blatant that your
message is visually insulting
The location in this shot was specifically chosen
Shot on a wooden floor a rustic authenticity is
portrayed A cowboy feel was achieved with these
surrounding elements The lingerie casually draped
over the boots looks accidental and unplanned The
boot that is tipped over leads the viewer to believe an
impetuous moment of hurried passion is taking
place The background is evident but intentionally
made out of focus by shooting at f4 for shallow
depth of field
This image is far from haphazard It was planned
from layout to location to scouting to objectplacement The idea came first then the execution of
the image Although minor alterations of layouts are
common the concept will remain the same This
eliminates confusion by isolating one idea and
working it through from all directions
Scouting out locations can be a full-time job and you
may need special permission to shoot in a particular
place See property release in the Legal Forms
section to cover your legal requirements and release
forms
7302019 Heinrich Melanie - Studio Lighting Workbook
httpslidepdfcomreaderfullheinrich-melanie-studio-lighting-workbook 8789
This kind of image will work very well for an adselling lingerie A strobe light with a softbox was
used to light the boots and the lingerie from the
right A reflector card was placed close to the boots
to fill in the left side of the scene The light is
positioned low near the floor which scrapes the light
on a low plan This was placed to simulate a specific
time during the day sunset or early evening The
light at this time is warm in color value which adds
to the subject matters message The camera vantage
point is low also bringing the viewer into intimate
contact with the boots and lingerie
7302019 Heinrich Melanie - Studio Lighting Workbook
httpslidepdfcomreaderfullheinrich-melanie-studio-lighting-workbook 8889
Still Lifes Selling Products
Film
Ektachrome 100
Camera Format
2 14 square - Hassalblad
Medium Format
Lens
80mm Normal
Light Source
Strobe with Softbox
Meter
Handheld Incident
Tripod
Yes
FiltersNone
7302019 Heinrich Melanie - Studio Lighting Workbook
httpslidepdfcomreaderfullheinrich-melanie-studio-lighting-workbook 8989
Placement and staging of objects requires a thought-out layout and planned
execution when using multiple products Layering has been used in this image
where non-information has been overlapped for example where the licence
plates and shirts touch Your viewer does not need to see the entire object in
this case to know what it is Strong diagonal lines have been made by object
placement This helps pull the viewer through the image and leads the eye to
a specific area of an image This image was created to find funding for
Vietnam vets by selling these products
If you have been asked to shoot several products and put them all into one
image think of it in terms of a still life setting Larger items will be placed inthe background sometimes even being used as the background For example
picture a group of images all representing something American The
background for this scene could be a flag which is also one of the subjects
There is no need to see the entire flag because it is an easily recognizable icon
In the image above the wooden floor was used to add a sense of the rustic and
gritty realism of the Vietnam war It was lit with a softbox directly above the
subjects The aperture was a concern for foreground to background
sharpness so the camera was pulled back far enough from the scene to allow
for a large aperture of around f 56
Below is the final image This was dropped into a 3 fold 812 x 4 brochure
along with other images of the same sort
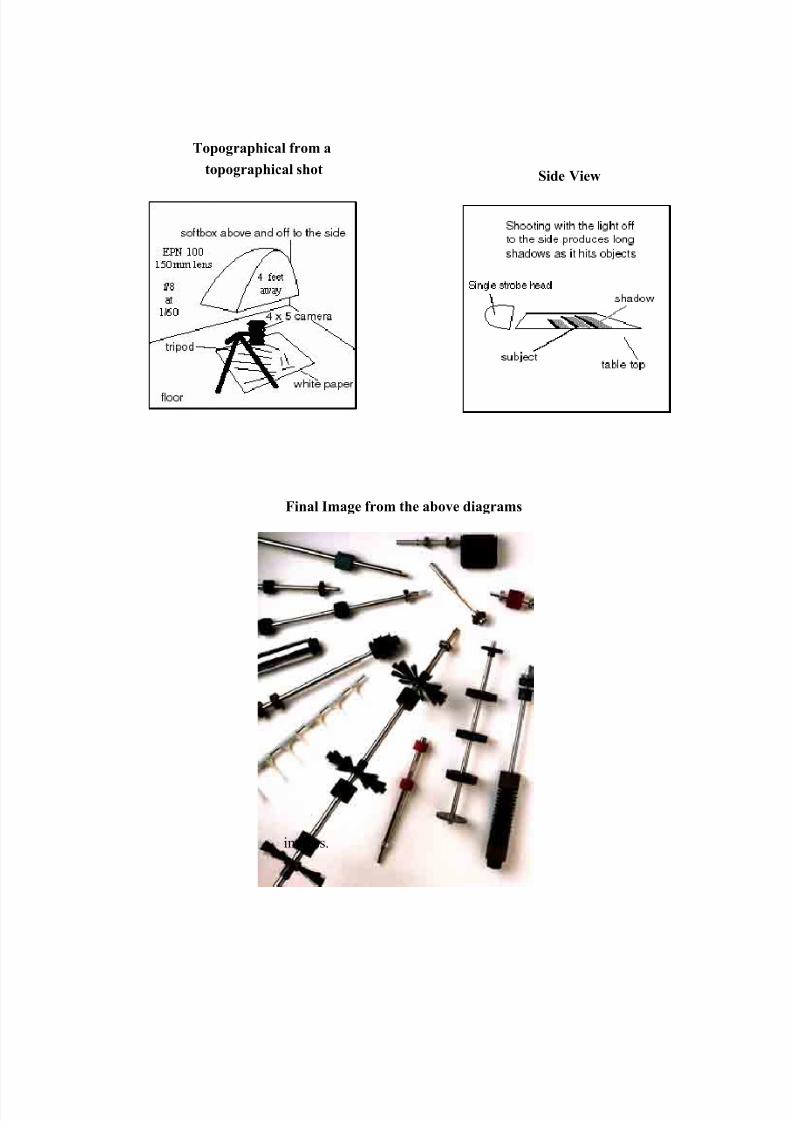
7302019 Heinrich Melanie - Studio Lighting Workbook
httpslidepdfcomreaderfullheinrich-melanie-studio-lighting-workbook 2289
against Building this backdrop is
described in the lesson Building a
Backdrop and Table
Whether you are using a small or
large format camera setting up a
photo studio will be the same
procedure You can either buy these
items listed below or you can followthe lessons in this section and make
your own
Most photographers end up making
some things in their studio so this will
be a good place to start
The building projects that follow are
easy to do and require very few tools
A drill of some sort may be the only
expensive tool you will need for
building Making these projects will
save you a lot of money and get you
started right away
Depending on the kind of room you
have you may need to be more
creative with your studio design
The following is a list of things you
will want in your studio
1 Table Top or Drafting Table
2 Workhorses
3 Backdrops ~ Seamless paper cloth
materials painted backdrops
4 Stands and Tripods5 Light Table loop croppers
hot glue puddy reflectors
6 Lights ~ strobes or tungsten
7302019 Heinrich Melanie - Studio Lighting Workbook
httpslidepdfcomreaderfullheinrich-melanie-studio-lighting-workbook 2389
on the list at the top of the page but
be assured they include the basic
requirements for a studio
In this section Building a Studio youwill receive information to help you
build your own studio You may not
understand what all of the things are
7302019 Heinrich Melanie - Studio Lighting Workbook
httpslidepdfcomreaderfullheinrich-melanie-studio-lighting-workbook 2489
Building a Scrim Soft Box and White Tent
Materials Needed
(A) Frame 16 x 20
(B) White Acetate can bepurchased at any glass
company
(C) Black Photographers Tape
(D) Two Matte Boards 18 x
20 each
(black on one side white on the
other)
(E) Matte Boards 18 x 16
(black on one side white on the
other) Fig 1
A Scrim Soft Box and White
Tent are used to scatter
diffused light onto your subject
The professional version of this
is costly and not as versatile as
the design described in this
lesson
This lesson will show you how
to construct a scrim ordiffusion system a soft box and
Fig 1
a white tent
7302019 Heinrich Melanie - Studio Lighting Workbook
httpslidepdfcomreaderfullheinrich-melanie-studio-lighting-workbook 2589
Making the Scrim
A scrim is used to soften thelight source It can also be used
to add shadows on any subject
after light is pushed through it
Fig 3
Build or buy a simple 16 x 20
frame (A) (an artist canvas
frame made of wood will work
fine) Get one that is big enough
so light cant spill around the
edges creating shadows fromthe frame itself A 16 x 20
frame (A) will be a good place
to start
The frame size used here is 16 x
20 It is only used to give you an
idea of how to make a scrim
You can make your scrim any
size you like and then cut the
acetate to fit the frame and
adjust all the other materials to
fit the size of the scrim you are
making
Measure the acetate (B) by
placing the frame down on top
of it and then draw a line to
mark out your exact
dimensions Now attach the
white acetate (B) to the frame
using photographers black tape (C) not staples Staples
may tear the acetate
Make sure to conceal the edges
of the frame with the acetate
Fig 2
7302019 Heinrich Melanie - Studio Lighting Workbook
httpslidepdfcomreaderfullheinrich-melanie-studio-lighting-workbook 2689
This will prevent dark shadow
lines from reflecting onto your
subjects highly reflective
surfaces Fig 2
TIP ~ In place of acetate try using a
white sheet
TRICK ~
To have a window shape
appear in your subjects
reflective surface place two
pieces of black tape (C) across
both center axis This will
reflect into your subject and
look like a window Fig 3
Making the Soft Box
A soft box will emulate the
same kind of lighting used in a
big studio and it softens the
light from a strobe supplying a
diffused light source Image
colors will be saturated and
rich in appearance
A soft box is made up of one
scrim and the black matte
board box To make the box
cut the matte board at an angle
so when taped together it
forms the shape of a cone Fig
4 White sides should face in
Tape the four pieces of matte
board to the edges of the scrim
with photographers black
tape two pieces (D) 20 x 18
are taped to the 20 lengths
and the other two pieces (E)
18 x 16 are taped to the 16
Fig 3
length of the scrim
7302019 Heinrich Melanie - Studio Lighting Workbook
httpslidepdfcomreaderfullheinrich-melanie-studio-lighting-workbook 2789
Face the white side of the matte
board in toward the centerMake the shape of the box cone
inward Fig 5 These flaps will
scatter light all around the
inside softening the light as it
comes through the scrim
Both the light and the soft box
should be attached to a light
stand to hold them up in place
Making a White Tent ~
A white tent is used to
photograph highly reflective
objects by revealing only white
in its reflected areas To make a
white tent for shooting
reflective objects make five
scrims not the soft box as
described above Tape them
together in a box shape hiding
any and all edges of the framesThis is because they will reflect
in the object you are
photographing All reflections
must be white
You will end up with a box with
no bottom It will be placed on
top of your subject on a table
top in effect covering it You
will be lighting the subject by
pushing light through all fivescrims Position your lights so
they do not cast any shadows
onto your subject by placing
them at a distance from the
white tent You will need to cut
Fig 4
Fig 5
7302019 Heinrich Melanie - Studio Lighting Workbook
httpslidepdfcomreaderfullheinrich-melanie-studio-lighting-workbook 2889
a small hole into one of the
scrims to put your lens
through Make sure your
product is placed properly or
you will be moving the tent
several times to get it right Fig 6
TIP ~
Another way to approach this
is to make one of the scrimsfreely swing open so you can
easily access the subject for
rearranging Hinge one of the
connecting joints
TIP ~
You may need to make color
tests because the acetate can
fade over time giving a yellow
cast
TRICK ~
The scrim can be covered with
a colored sheet of acetate Try
using different colors on
opposite sides of the tent
Fig 6
7302019 Heinrich Melanie - Studio Lighting Workbook
httpslidepdfcomreaderfullheinrich-melanie-studio-lighting-workbook 2989
Building a Backdrop and Table
A backdrop is essential for most
photographs taken in a studio This
lesson will show you how to make one
The ceiling must be solid not a drop
ceiling
Materials Needed
(A) Two- curtain rods (height of your
ceiling)
(B) One- 7 pole 2 diameter
(C) two sets of workhorses
The curtain rods you buy must be high
enough to reach between your floor
and ceiling They must have enough
spring tension to stay in place from
floor to ceiling
Set the curtain rods up between floor
and ceiling and about 6 feet apart and
3 feet from the wall Fig1
Stretch the 7 foot pole between the two
curtain rods and attach with clamps or
duct tape in place Fig 2
Fig 1
Fig 2
7302019 Heinrich Melanie - Studio Lighting Workbook
httpslidepdfcomreaderfullheinrich-melanie-studio-lighting-workbook 3089
material on the pole by draping it over
the top and attaching it with clamps If
you want to use seamless paper (large
rolls of paper on long cylinders) you
will need to leave one end of the poleaccessible to load the seamless
TIP ~
Seamless paper comes in 4 foot and 9
foot rolls You can use this paper over
and over again depending on how well
you take care of it avoiding creases
and soiling
TIP ~
Light stands can be used in place of the
curtain rods if you have a drop ceiling
This backdrop can be used in many
different situations as seen in Figs 3-8
All three setups are top lit
TRICK ~
Fig3 has a backdrop hanging to the
floor and a light on the floor that
flashes upwards onto the white
background paper The table is pulled
away from the backdrop Hint Place
an interesting material on the table
top this can achieve the look of a
sunset
The shot of the phone in Fig 4 was
done using this kind of set-up The
difference between the table top
material and the backdrop has left a
hard line at the horizon The spotlight
with a red acetate on it is set on the
floor below and facing up at the
seamless paper leaving the magenta
color behind the phone
Fig 5 leaves a hard horizon line where
Fig 3
Fig 4
Fig 5
At this point you can hang any kind of
your table top meets the backdrop
7302019 Heinrich Melanie - Studio Lighting Workbook
httpslidepdfcomreaderfullheinrich-melanie-studio-lighting-workbook 3189
TIP ~ Put an interesting material on the table
top this will increase the contrast
between the foreground and
background
Fig 6 is an example of a hard line
horizon line The table top in this shot
is a marble table top The background
is a piece of black velvet
Fig 7 is a traditional set for product
photography When the backdrop
swoops down onto the tabletop in this
fashion it leaves a beautiful gradation
on the backdrop
Fig 8 is a shot of a live set using this
style of backdrop The final image was
cropped to exclude all traces of the set
Fig 6
Fig 7
Fig 8
7302019 Heinrich Melanie - Studio Lighting Workbook
httpslidepdfcomreaderfullheinrich-melanie-studio-lighting-workbook 3289
Building a Studio Flat- Reflector
Materials Needed
One- 4 x 6 piece of foam core (14 thick)
(Plumbing department)
(A) Two (6 x 15 lengths of PVC tubing
(B) Four (1 x 15 lengths of PVC
tubing
(C) Three (44 x 15 lengths of PVC
tubing
(D) Six right-angle PVC tubing pieces
(red in Fig 2) to fit into lengths of tubing
above
(E) Two Ts (blue in Fig 2) to fit intolengths of tubing above
Double sided foam tape
Plumbers cement and purple pvc
preparation fluid
Saw (ask the hardware store to make
the cuts required)
This lesson will show you how to build a
studio flat that can be used as a reflector
as well as some other things that are
shown below
Fig 1
7302019 Heinrich Melanie - Studio Lighting Workbook
httpslidepdfcomreaderfullheinrich-melanie-studio-lighting-workbook 3389
You can make this flat any size you like
Ours is designed as a 4 x 6 Just follow
the simple construction plan below
Once you get all the things that are listed
in the materials listed above read all of
the directions before continuing
TIP ~
PLUMBERS CEMENT DOES NOT
SEPARATE ONCE IT ISCONNECTED TO TUBING
FRAME
1 Using the plumbers cement attach
two of the right-angled tubes to the ends
of the 6 foot tubing Once these are
secure attach the 44 tube at the top of
the frame See Fig 1 Be sure the two 6
tubing sections are parallel to each
other front to back and side to side
BASE
2 Using the plumbers cement attach
the Ts to the one foot sections of tubing
Fig 2
3 Using the plumbers cement attach
the four right angles to the opposite ends
of the 4 foot sections Before you do this
make sure that the two Ts are pointing
up and at right angles to the cornersFig 2
Fig 3
Fig 2
7302019 Heinrich Melanie - Studio Lighting Workbook
httpslidepdfcomreaderfullheinrich-melanie-studio-lighting-workbook 3489
frame using the double sided foam tape
Position the foam core so it fits against
the frame tightly
TIP ~
You can use this flat for many things
besides a reflector It will be sturdy
enough to hang things from it and can
even be useful as a backdrop Fig4
TRICK ~ Drape material over it for close-up
photography or simply use it to block
light from an area on your set Fig 5
Fig 5
Fig 4
Finally attach the foam core to the
4 Using the plumbers cement attach
the final 44 pieces of the base to the
right angles Fig 2
5 Using the plumbers cement attach
the frame to the base at the Ts Fig 3
7302019 Heinrich Melanie - Studio Lighting Workbook
httpslidepdfcomreaderfullheinrich-melanie-studio-lighting-workbook 3589
Some photographers have a real gift for
photographing people They are able toembrace humanity and capture on film the
very essence of life They reveal the
persons emotions without saying a word
They seem to understand the unspoken
word of the heart and are able to record it
without the distraction of camera and
technique
If you have clicked on to this page chances
are you are one of those people Perhapsyou just need a bit more help or
information to push your images to a new
level of success These lessons are aimed at
doing just that
In these lessons you will learn how to make
your subject comfortable and to reveal
the subjects true feelings It is true not all
people are comfortable enough with themselves
to trust and let go and you will discover who
is easy to shoot and who is not easy to
shoot There are ways to help people
become comfortable in front of a camera
Lessons in this section
Emotional Power Portrait
Creating a Sullen Emotion
Staging People
7302019 Heinrich Melanie - Studio Lighting Workbook
httpslidepdfcomreaderfullheinrich-melanie-studio-lighting-workbook 3689
The best way to shoot people is from a
distance Give them personal space andshoot with a long lens Pretend you are
shooting a couple of rolls to get them
familiar with being photographed Try not
to give much direction or you will find
yourself with very staged and stiff
subjects Follow them around if they will
permit it At some time they will be relaxed
this is when you will get the best shot
Let the people be themselves until they are
comfortable then direct them with very
simple suggestions Many factors come into
play when photographing people like the
texture of their skin what areas the light
hits their face their posture and the gait of
their walk Remember your basic visual
design elements when positioning a person
in the frame Colors will also play a large
role in the emotion you portray about the
person See visual design
Below are some successful photographs of
people Some of the people the photographer
knew and some of the people were just
shot on the street
7302019 Heinrich Melanie - Studio Lighting Workbook
httpslidepdfcomreaderfullheinrich-melanie-studio-lighting-workbook 3789
Emotional Power Portrait
Film
Ektachrome 100 Daylight
Film
Camera Format35mm - Nikon
Small Format
Lens
28mm Wide
Light Source
Strobe with softbox
Meter
Handheld Incident
Tripod
No
Filters
None
Polaroids
No
7302019 Heinrich Melanie - Studio Lighting Workbook
httpslidepdfcomreaderfullheinrich-melanie-studio-lighting-workbook 3889
The photograph was shot for a portfolio Our
photographer included this image in his portfolio in
an attempt to get jobs of this nature This image
reveals the ability to direct the subject
Understanding body posture is very important
when taking these kinds of photographs Knowing
the right moment to record the image as the model
stares into the photographers lens may take some
time to learn Study people and record in your
mind their posture and movements notice their
emotions and how they display them in their
bodies By studying people you will learn to
communicate and capture peoples emotion in your
images
Use props to direct your viewers eyes in your
images In the above image the model holds a
barbell that breaks into the lower part of the image
frame which leads the viewers eyes to the models
eyes The barbell was counterbalanced with her
face in the background Cropping is the key here
Dont be afraid to get in close It will help convey
the message of intimacy When the above image
was shot our photographer had to invade the
models personal space However our
photographer was able to capture something
unique in his image As a photographer you mustunderstand what effect and subtle nuances you
want to provoke and get in your images and then
know how to achieve them using your camera
through our lessons
Now ask yourself how was the light created in the
above image Where were the lights positioned
What type of light was used
The light was created by a strobe in a softbox (See
Building a Studio to learn how to build this kind of lighting system) The lighting was directdiffused A
small fill on the left side added a soft diffused fill
light This diffused light was created by bouncing
light from the main light and was placed close to
7302019 Heinrich Melanie - Studio Lighting Workbook
httpslidepdfcomreaderfullheinrich-melanie-studio-lighting-workbook 3989
the models face It was positioned approximately 3
feet from her and powered by a large power pack
of about 2000 watts
The background was intentionally dropped off intoblack leaving no more detail than necessary or
desired It was placed about 5 feet behind the
model
The model applied baby oil to her face for the shot
A spray bottle filled with water was used to add the
illusion of sweat She shook her head about to
provide the work-out like appearance After all
that the photographer was able to achieve the
image he wanted after paying close attention to the
small details and knowing how to use his camera
A wide-angle lens was used to take this shot It
helped to accentuate the barbell and hand of the
model The exposure was taken with a handheld
incident meter facing the camera Several frames
were shot bracketing the image and the final image
was chosen in editing Study your brackets
carefully on a good light table to pick a final
photograph
7302019 Heinrich Melanie - Studio Lighting Workbook
httpslidepdfcomreaderfullheinrich-melanie-studio-lighting-workbook 4089
Creating a Sullen Emotion
Film
Tmax 100 Black and White Film
Camera Format
2 14square - HasselbladMedium Format
Lens
80mm Normal
Light Source
Strobe with softbox and spot
stobe
Meter
Handheld Incident
Tripod
Yes
Filters
None
Polaroids
Yes
7302019 Heinrich Melanie - Studio Lighting Workbook
httpslidepdfcomreaderfullheinrich-melanie-studio-lighting-workbook 4189
Capturing a mood or creating a mood can be done using
dramatic light You should also direct your subject into
positions that convey the emotion you are after Be carefulnot to over direct your subject This can make the image
look contrived and fake Professional models are great
actors and will understand your direction very well If you
are not photographing a professional model you should do
a couple of things to help your model Use a long lens
Keeping a distance between you and the model will give
them room to relax Secondly pretend to shoot a couple of
rolls of film This should give them enough time to get
comfortable with the flashing lights and shutter clicks
Next shoot a lot of film Be clear with your directions
Design your set so you can move around freely and shootfrom different vantage points During the shoot your
model will become more relaxed and the images will turn
from stiff to candid
In the image above a softbox was positioned close to the
subject and was the main light The light was intentionally
overexposed This was done by taking a meter reading
from the subjects left side where the fill light fell off This
technique slightly overexposed the light on his right side
and forehead Now you can see how a slight change in
metering placement can change the entire feeling of an
image A white reflector card was used to bounce a
diffused fill light into the subjects right side This style is
meant to emulate the lighting found in a theatre ~ high
contrast and a dramatic mood A spotlight lights the back
part of his neck It is raised high above and pointed down
at the subject
7302019 Heinrich Melanie - Studio Lighting Workbook
httpslidepdfcomreaderfullheinrich-melanie-studio-lighting-workbook 4289
With a little direction we found the emotion we were
looking for The subject was told to rest his elbows on his
knees as he clutched his drumsticks The position of his
head relative to his body turns his face toward the viewer
This position is natural and comfortable for him His eyes
are looking downward as though in reflection of another
time It is a moody image because of the lighting and his
expression Practice photographing your friends by
directing them with posture poses and physical
appearance changes
7302019 Heinrich Melanie - Studio Lighting Workbook
httpslidepdfcomreaderfullheinrich-melanie-studio-lighting-workbook 4389
Staging People
Film
Ektachrome 100
Daylight
Camera Format
2 14 square - Hasselblad
Medium Format
Lens80mm Normal
Light ource
Two Umbrellas with
Strobes
Meter
Handheld Incident
Tripod
Yes
Filters
None
Polaroids
Yes
7302019 Heinrich Melanie - Studio Lighting Workbook
httpslidepdfcomreaderfullheinrich-melanie-studio-lighting-workbook 4489
When staging people you need to create a natural appearance
The same principle holds true when photographing people If you
hire professional models it will make your job much easier
Professional models will know exactly what to do with very little
direction More importantly they are completely comfortable in
front of the lens
The image above was shot for an architectural firm catalog The
company wanted to save money by using their own employees as
models We wanted to use professional models but made the
concession in order to secure the job We used familiar icons to
help the employees feel comfortable in front of the camera Oncewe had them working on the architectural model they had
forgotten about the camera and lights in the room We were able
to get the tools of their trade in the scene the employees
comfortable and then able to capture several successful images
for our client
We used two lights with umbrellas to light the scene One strobe
was placed to the right of the camera and pointed at the set and
the other strobe was positioned behind the left side of the camera
and was high in the air and pointed downward towards the set
See the diagram below
The two strobes were balanced and their meter readings were the
same When photographing people use a shutter speed that stops
any possible movement Do not shoot at a shutter speed below the
millimeter of the lens you are using For example if the lens you
are using is a 90mm lens your shutter speed will be 1125th or
faster Use 160th of a second if you have a focal plane shutter
Cameras with a leaf shutter do not hold to the same constraints as
a focal shutter Leaf shutter lens also sync at any speed Review
your camera manual to see if there are any limitations with your
lens and camera
7302019 Heinrich Melanie - Studio Lighting Workbook
httpslidepdfcomreaderfullheinrich-melanie-studio-lighting-workbook 4589
Film
Ektachrome 100
Daylight Film
Camera Format
2 14 square -
Hasselblad
Medium Format
Lens
80mm Normal
Light Source
Strobes with Two
umbrellas
Meter
Handheld Incident
Tripod
Yes
Filters
None
PolaroidsYes
7302019 Heinrich Melanie - Studio Lighting Workbook
httpslidepdfcomreaderfullheinrich-melanie-studio-lighting-workbook 4689
The second image was shot in a compressor room It portrays
the inspection division of the same company These men are not
models and have a very realistic appearance One man poses as
manager and the other as an inspector Again we used props to
set the stage and asked the men to talk with each other
Cleaning the compressors was an important part of making the
statement the client desired The client portrays a clean and safe
environment Cleaning a set before shooting is sometimes the
most important thing you can do Paying attention to the small
details will get you repeat business This cant be stressedenough If you need to paint something in the scene before you
shoot it to make sure it looks right do it It may make all the
difference in the world Your client will take notice of your
attention to detail This is why previewing a location before you
shoot it is very important It gives you a chance to hire someone
or ask the client to clean these areas for the shot
The image above was shot with two strobes both using
umbrellas Both strobes were placed to the right of the camera
One of the strobes was positioned somewhat behind the men and
set high in the air This pushed light onto the compressorsbehind the men The second strobe lights the men and the
foreground parts of the compressors
7302019 Heinrich Melanie - Studio Lighting Workbook
httpslidepdfcomreaderfullheinrich-melanie-studio-lighting-workbook 4789
The advertising field is very competitive
yet the potential for increased income isgreat Photographers who are doing
advertising work tend to specialize
depending on the area they live in For
example someone living in a small city
may need to have several specialties On
the other hand someone in New York
could specialize in one thing ie
childrens fashions or motorcycles An
advertising photographer will most of
the time be working with an art
director from a design or advertising
firm Clients rarely hire photographersdirectly unless they have established a
rapport with them It is generally the
AD (art director) working on the job
that will hire for the client
Ask yourself this question What is the
one thing that I like and feel
comfortable with Your answer is the
area you should be specializing in In
reality most people go through life and
their likes and dislikes change Aphotographer sometimes follows a
specialty For instance someone who
assisted a commercial photographer
shooting childrens clothes and liked it
decided to pursue that field The ideal
situation is to make a living doing whatyou really like
Lessons in this section
Lighting Multiple Glass ProductsUsing Props with Products
Multiple Exposures
Making Reflections Work for You
Using a Product for a Background
Floating a Product
Boring Product - Interesting Design
7302019 Heinrich Melanie - Studio Lighting Workbook
httpslidepdfcomreaderfullheinrich-melanie-studio-lighting-workbook 4889
The lessons in this section assume you
have a good working knowledge of
camera tools visual basics and lightingIf not go back to these sections and
learn these things first Also some of the
studio setups can be built Those
designs are described in Building a
Studio
The lessons in this section go into
extensive details showing you where to
position your lights and reflectors etc
in order to achieve a certain look and
feel in an image They includedescriptive diagrams for you to
duplicate
7302019 Heinrich Melanie - Studio Lighting Workbook
httpslidepdfcomreaderfullheinrich-melanie-studio-lighting-workbook 4989
Lighting Multiple Glass Products
FilmEktachrome 100
Daylight Film
Camera Format
4 x 5 - Horseman
Large Format
Lens
150mm Normal
Light SourceStrobe with Softbox and
Reflectors
Meter
Handheld Incident
Tripod
Yes
Filters
None
7302019 Heinrich Melanie - Studio Lighting Workbook
httpslidepdfcomreaderfullheinrich-melanie-studio-lighting-workbook 5089
The image above was an inset photograph for a
brochure cover The company sold gift baskets and
products The brochure was used to help their growing
marketing requirements The brochure had three
different images similar to this one along with
accompanying text The client was in the studiowhen this was taken and was the acting art director
So all proofs were finalized at the time of shooting
This eliminates any questionable fees for reshooting
Polaroids are used for the same reason An instant
image of lesser quality than film will serve as great
representations of the final photograph Polaroids
are sometimes faxed or scanned and emailed to the
client for approval Asking your client to sign off on
a photograph will give you the assurance that all is
okay and you can record the image on film
Shooting glass and high gloss labels can be a
frustrating exercise because of the multiple
reflections that occur Remember as you shoot to
look through the lens to see if you have any
reflections on your products in the set All
reflections are caused due to the angle between
lens and light source Review your polaroids
carefully for any reflections before you expose the
film
TIP ~ Moving the product a small amount may be the best
way to remove the reflections Before you do that
adjust your light to eliminate any glare and
reflection Each time you change the light position
you must check for glare
Place all the products on the table top according to
the layout supplied by your client or art director
The image above was tiered giving it height and
depth
The light is positioned directly over the set It is
tilted slightly toward the backdrop and away from
the camera The backdrop is set up as a sweep It is
a piece of gray formica See Building a Studio to
7302019 Heinrich Melanie - Studio Lighting Workbook
httpslidepdfcomreaderfullheinrich-melanie-studio-lighting-workbook 5189
learn how to make this if you are inexperienced in
studio construction
Three white or silver cards are used in the front andon both sides to pump additional light into the
scene These are carefully and strategically placed
to avoid seeing the reflector cards in the glass
When you are shooting glass objects the main light
should reflect in the glass It indicates the direction
of the light source The main light source reflection
is acceptable as long as it is not too bright The fill
light from the reflector cards should not dominate
your main light source
TIP ~ Reflector cards can be made from any material that
reflects light such as a white card Large pieces of
foam core are used and cut into smaller pieces
depending on the size of the set Silver cards are also
used They are positioned to reflect the light coming
from your main light source and bounce the light
softly back into the set These cards will add more
light and sometimes add unacceptable hot spots on
the products These hot spots are very distracting
and unsightly
Now that you have all your lighting sources in place
look through the camera to see if you have any
reflections If you have a lot of glare in your image
readjust the overhead light by tilting it more
towards the back or front Be careful to avoid lens
flare Lens flare is when your light or lights reflect a
glare back into the lens For example when
someone shoots into the sun the lens picks up a
glare Block the lens flare with a black card by
placing the card between the light and lens Make
sure not to put the card into your scenes final crop
or in a position where you block your image You
may need to move your lights or use a scrim to get
rid of the lens flare It will be easier to add a scrim if
you have previously adjusted all the glass for no
reflections Instead of a scrim you could use a lens
hood The lens hood attaches to the front of the lens
7302019 Heinrich Melanie - Studio Lighting Workbook
httpslidepdfcomreaderfullheinrich-melanie-studio-lighting-workbook 5289
It protrudes from the lens and blocks any glare
falling on the front lens element Each lens may use
a different hood These come in many different
shapes and sizes I use a scrim because it is far more
versatile
Assuming your light source is in a good position you
may still have some glare on the glass You can
eliminate many reflections by slightly tipping the
product forward Use a small object under the back
side of the product while not disturbing the
products position These are very slight movements
and will not change the appearance to any great
degree Also tip the reflectors back and forth and
side to side to remove any added glare from your
objects Be attentive to all the objects You may
eliminate glare in one object and produce it in
another You must check for any reflections in your
polaroids Some reflections are very difficult to
detect when viewing the set from behind the camera
using the modeling lights
Use an incident meter and read the light falling on
the set Always bracket your exposure Bracketing is
the process of taking many shots of the same set but
using different fstops For example if your meter
reads f32 at 160th of a second your bracket would
be one stop on either side f22 and f45 at the same
speed The image was shot at f32 or greater depth-
of-field Some photographers bracket with 12 stops
and 13 stop differences They shoot 5 sheets of film
using these small incremental changes
7302019 Heinrich Melanie - Studio Lighting Workbook
httpslidepdfcomreaderfullheinrich-melanie-studio-lighting-workbook 5389
Final cropping of image
The final image displayed on the left was
successfully shot with no glare on any of the
products All the products were in glass or were
wrapped in cellophane The image has been
cropped to match the final inset space for the
brochure This shot took about a half day toshoot
7302019 Heinrich Melanie - Studio Lighting Workbook
httpslidepdfcomreaderfullheinrich-melanie-studio-lighting-workbook 5489
Using Props with Products
FilmEktachrome 100
Daylight Film
Camera Format
4 x 5 - Horseman
Large Format
Lens
90mm Wide
Light SourceStrobe with Softbox
Meter
Handheld Incident
Tripod
Yes
Filters
None
7302019 Heinrich Melanie - Studio Lighting Workbook
httpslidepdfcomreaderfullheinrich-melanie-studio-lighting-workbook 5589
When using props to help convey your message
remember the visual basics about colorperspective framing contrast backgrounds
and balance
This image of a racing bike was shot from an
angle that enlarged the back wheel The wide
angle lens helps pronounce the wheel size as well
as increasing the elongated perspective of the
bike
The bike was shot against a black background
Isolating your subjects by eliminatingdistracting backgrounds will help make the
objects in the set stand out The three arrow-
shaped plexiglass pieces all point to the distance
This visually portrays the speed and forward
motion of a racing bike Primary colors of the
plexiglass are used to simplify the information
in the image The gears of the bike are
pronounced displaying the bikes power and
versatility The camera position is very low and
tilted upward to further increase the illusion of
size
A softbox was used to keep the glare on the
chrome to a minimum It was positioned
parallel to the bike seat on its right side and
tipped down slightly toward the pedals If you
look carefully you can see the reflection of the
softbox in the blue plexiglass This is acceptable
The light has bounced color from the plexiglass
back onto the chrome of the bike This adds
interesting color highlights to the image that
balance well with the other colors
Parts of the wheels reflect the colors of the
plexiglass adding an interesting bit of color
7302019 Heinrich Melanie - Studio Lighting Workbook
httpslidepdfcomreaderfullheinrich-melanie-studio-lighting-workbook 5689
backdrop will work also The velvet material
absorbs any light that falls on it
When you are taking your exposure readings
make sure that you take readings of the
background walls in the scene Do not face your
light toward the back wall The meter readingsof the walls should be at least 4 stops darker
than your final exposure This will maintain a
black background
The wide angle lens was used to achieve
maximum depth-of-field This image was
exposed at f45
The room was totally darkened for this shot
Some photographers will even paint their walls
black for a shot like this A black velvet
7302019 Heinrich Melanie - Studio Lighting Workbook
httpslidepdfcomreaderfullheinrich-melanie-studio-lighting-workbook 5789
Multiple Exposures
Film
Ektachrome 100
Daylight Film
Camera Format
4 x 5 - Horseman
Large Format
Lens
150mm Normal
and 90mm Wide
Light Source
Strobe with Softbox
Meter
Handheld Incident
Tripod
Yes
Filters
None
7302019 Heinrich Melanie - Studio Lighting Workbook
httpslidepdfcomreaderfullheinrich-melanie-studio-lighting-workbook 5889
This image was designed as a poster for a national bowling
tournament The objects were intentionally placed leavingblack areas for the white text or copy and logos to be placed
on the final poster
The image above was done by repositioning the camera
three different times and exposing the film each time with
the change (Three shots on one piece of film) In addition the
lens was changed for one of the shots
You will need a large piece of black velvet to absorb all
scattered light All exposures were shot on the black velvet
The velvet does not see light This leaves that area of the filmunexposed This allows you to expose something else in the
black area which occurs when you take your next exposure
You will also need a piece of acetate to place on the film
back for tracing the objects in each exposure This will help
you line everything up and avoid overlapping your
products By tracing the objects that appear on your film
back onto a piece of acetate you will be able to align
everything perfectly
The first exposure was made of the bowling ball in thebottom right with a wide angle lens The second exposure
was made of the bowling pin on the left bottom The third
exposure was made of the top right 2 bowling pins One of
these pins was raised up on a block for added dimension
With each exposure the camera was progressively pulled
away from the scene The camera lens to subject distance
was increased to help this illusion of depth Diagrams below
may help you understand this better
Make sure when taking photos like this that any part of the
image you wish to remain unexposed is filled with the black velvet You can add any lighter value to a black area with
film because it is unexposed
7302019 Heinrich Melanie - Studio Lighting Workbook
httpslidepdfcomreaderfullheinrich-melanie-studio-lighting-workbook 5989
When you are ready to make the first exposure trace the
film back onto the acetate by placing the acetate over your
film back Do this with each exposure
A softbox was used and placed close to all of the subjects
producing direct lighting Your exposure times and fstops
can be different for each exposure just as if you were taking
separate photographs In fact think of this type of image as
a composite
Wide Angel Lens Normal Lens Normal Lens
7302019 Heinrich Melanie - Studio Lighting Workbook
httpslidepdfcomreaderfullheinrich-melanie-studio-lighting-workbook 6089
Making ReflectionsWork for You
Film
Ektachrome 100
Daylight Film
Camera Format
4 x 5 - Horseman
Large Format
Lens
150mm Normal
Light Source
Strobe withSoftbox
Meter
Handheld
Incident
Tripod
Yes
Filters
None
7302019 Heinrich Melanie - Studio Lighting Workbook
httpslidepdfcomreaderfullheinrich-melanie-studio-lighting-workbook 6189
The image above was shot on a highly reflective
background It came in a long roll about 4 feet
wide The light was positioned toward the front
parts of the products to avoid a hard horizon lineThe light falls off into black making it useful for
the reversed type of white (see below) Be careful
to avoid lens flare when positioning the lights near
the camera lens Make sure to block any light that
may fall on the lens Use a scrim to block the light
A scrim is any black piece of material that will
function as a light block Black masking tape was
secured to the edge of the lens to block the light
Be careful not to show the tape in your
photograph
Glare can be a major problem with highly
reflective sets like this one Always remember to
look through your lens to avoid this Tip your
light toward the front or back of the scene to
adjust the glare on the set This shot was taken
using a strobe head inside a softbox This type of
light is often used in product photography
especially when shooting highly reflective objects
The light rays are scattered and softened by this
kind of light source
Each of the objects in this scene are veryreflective The reflective gold surface used to shoot
on adds interest to the products by adding a gold
reflection of the product onto the gold surface
This gives depth to the image
Adding different colored line art around the edge
of the image in the white border adds an extra
dimension to the final composite below This was
done by the designer after the image was taken
Some of the line art is in front of the image and
some is dropped behind the image Reverse text isused on the black part of the image and black text
is used on the white border
7302019 Heinrich Melanie - Studio Lighting Workbook
httpslidepdfcomreaderfullheinrich-melanie-studio-lighting-workbook 6289
Using a Product for a Background
Film
Ektachrome 100
Daylight Film
Camera Format
4 x 5 - Horseman
Large Format
Lens
150mm Normal
Light Source
Strobe with Softbox and
Reflector
Meter
Handheld Incident
Tripod
Yes
Filters
None
7302019 Heinrich Melanie - Studio Lighting Workbook
httpslidepdfcomreaderfullheinrich-melanie-studio-lighting-workbook 6389
This close-up of a computer chip was designed for the
front cover of a computer companys brochure (see
below) It was nesseccary to get the best detail for
enlargement reasons so a large format camera was used
The end image was 9 x 12 our negative was 4 x 5
A strobe with a softbox was used to light this subject
from the left side An accompanying white reflector card
was placed close to the subject to fill in the right side
with light (see diagram below)
The bellows on the 4 x 5 camera were extended to
enlarge this chip to fill the frame When extending the
bellows you increase the need for light to reach the film
In this case we did not need to have a small f-stop
number for sharpness so we left the lens open at f56and made our exposure appropriately Even if you need
to pop your flash a couple of times extending the
bellows should not be something to hold you back from
making the close-up you want to shoot The detail in this
shot is achieved by using a 4 x 5 camera with a good lens
TIP ~
Popping or firing the strobe multiple times is done with
the lens open in a darkened room so the only light in the
room is coming from your controlled multiple burst of
the flash Since you have no need for speed whenshooting inanimate objects keep pumping in the light to
get the exposure you need In a dark room you could
leave your lens open and just continually pop the strobe
Or you can cock the shutter and repeat the same
exposure until it adds up to the correct amount of light
required Make sure you are on a very steady tripod
The slightest amount of movement will blur your image
TIP ~
The best set up for any overhead shot with a 4 x 5 is to
put your set on the floor This is of course dependent on
the size of your set A short-legged set of horses works
very well also The legs used in this set were about 12
high
The hue of bluegreen works well with the yellow text
7302019 Heinrich Melanie - Studio Lighting Workbook
httpslidepdfcomreaderfullheinrich-melanie-studio-lighting-workbook 6489
The text pops off the image This color prevents the text
from falling into the background The background of the
computer chip remains a simple reminder of what the
company does It is the text that the viewer is expected to
read
This image would also make a great backdrop for a
collage or montage image
7302019 Heinrich Melanie - Studio Lighting Workbook
httpslidepdfcomreaderfullheinrich-melanie-studio-lighting-workbook 6589
Floating Product
Film
Ektachrome 100
Daylight Film
Camera Format4 x 5 - Horseman
Large Format
Lens
150mm Normal
and 90mm Wide
Light Source
Strobe with
Softbox
Meter
Handheld
Incident
Tripod
Yes
Filters
None
PolaroidsYes
7302019 Heinrich Melanie - Studio Lighting Workbook
httpslidepdfcomreaderfullheinrich-melanie-studio-lighting-workbook 6689
Both images in this lesson give the illusion of
floating The top image is propped up underneath by
a block A softbox directly above the computer
circuit board was used to achieve a soft even light In
todays high-tech industry these kinds of images are
being used in composites and as single images
TIP ~
Using black velvet as a backdrop can achieve a
similar effect where the subject appears to float The
light will be absorbed into the black velvet material
to create the illusion
The computer chip is not grounded to anything so it
appears to float (see Fig 1) The angle of the light on
the computer circuit board picked up some very
interesting highlights in Fig 1 which adds to the
high-tech feel of the image
A 4 x 5 camera was used to get greater detail with
the larger negative for enlargement purposes Depth-
of-field was achieved at f32
When shooting any subject like this you can portray
many kinds of interesting illusions The black velvet
material may be a little more expensive but nothing
else works as well This kind of material will help
you take the shots like the pros
Fig 1
7302019 Heinrich Melanie - Studio Lighting Workbook
httpslidepdfcomreaderfullheinrich-melanie-studio-lighting-workbook 6789
Boring Product -Interesting Design
Film
Ektachrome 100
Daylight Film
Camera Format
4 x 5 - Horseman
Large Format
Lens
150mm Normal
Light Source
Strobe with Softbox
Meter
Hanheld Incident
Tripod
Yes
Filters
None
7302019 Heinrich Melanie - Studio Lighting Workbook
httpslidepdfcomreaderfullheinrich-melanie-studio-lighting-workbook 6889
Some products you will be photographing will be justplain boring such as the rods in the shot above Its
your job as the photographer to bring life and interest
to boring products like these In the image above the
client needed his products shot for his company
catalog
Making something interesting from something boring
can be done by using an interesting background or
unusual lighting In this image the layout and diagonal
positioning of the rods directs the viewers eye to the
top right area of the image of the frame Text was
placed at the top and right side of this image (see final
image below)
The softbox was positioned above and to the left of the
product as indicated by the soft shadows Fig1 This
image could have easily been cut out from its
background and placed on any other background
Minimal depth-of-field is needed for this shot because
the maximum height of the product was only two
inches An aperture of f8 was used The exposure is
made with an incident meter reading to achieve an
overall well-balanced tone
Deep shadows could have been used to add interest to
these products by using a direct light at a very low
level to the table angle Fig 2 No softbox would be
used for this kind of shot
The set is placed on the floor so your camera position
is directly over the top of the set If shot on a table top
you would need to stand on top of a ladder to take the
shot The easier choice is to shoot on the floor
7302019 Heinrich Melanie - Studio Lighting Workbook
httpslidepdfcomreaderfullheinrich-melanie-studio-lighting-workbook 6989
Fig 1
Fig 2
7302019 Heinrich Melanie - Studio Lighting Workbook
httpslidepdfcomreaderfullheinrich-melanie-studio-lighting-workbook 7089
Lessons in this section
Mixing Texture Shapes and Color
Arranging a Set
Photographing Beautiful Glass
Messages in a Still Life
Creating a Mood
Still Lifes Selling Products
Setting the stage works to help convince the
viewer of a place and time or mood Small
details make a shot believable These
lessons will teach you how to think and tell
a story of a certain place in time Picking
the right props for your shoot will ensure
believability The lessons in this section
work in conjunction with the ProductPhotography section
A still life photographer can be found
working in a studio or on location This
type of photography demands the
recreation of a set or going to the set to
capture a moment in time This can be done
on location in the studio or digitally
created on the computer The truth is it fits
into many categories It is more than
product photography You are creating a
scene that conveys a sense of being
somewhere
7302019 Heinrich Melanie - Studio Lighting Workbook
httpslidepdfcomreaderfullheinrich-melanie-studio-lighting-workbook 7189
you pull your entire learning experience
together I include details and diagrams
that will reinforce your understanding
Still life scenes are often used in a designers
set or in a showroom like in a furniture
store They can also be used to convey a
story quickly and help transfer the concept
and idea throughout the entire image These
lessons include tips on how to light objects
in small and detailed areas They will help
7302019 Heinrich Melanie - Studio Lighting Workbook
httpslidepdfcomreaderfullheinrich-melanie-studio-lighting-workbook 7289
Mixing Texture Shapes and Color
Film
Ektachrome 100
Camera Format
4 x 5 - Horsemen
Large Format View
Camera
Lens
150mm Normal
Light Source
Strobe with Softbox
MeterHandheld Incident
Tripod
Yes
Filters
None
7302019 Heinrich Melanie - Studio Lighting Workbook
httpslidepdfcomreaderfullheinrich-melanie-studio-lighting-workbook 7389
The image above was shot as a portfolio piece
Mixing textures shapes and colors the
photograph displays the photographers eye for
design It is photographed on black velvet which
adds saturation of the overall appearance by
absorbing all the light that falls on it The black
velvet can be purchased at any fabric store
Two scarves are positioned at opposing angles
adding strong graphic interest and competition
between them Against the soft colored scarves
the dark blue hat pops out The colored markers
are color complements to the blue hat and add
additional depth to the image
Resting on top of the scarves are brightly
colored objects which add spots of color andinterest The curvy lines of the ribbons break up
the edges of the two scarves and add a bit of fun
to the image The final crop of the image forces
the viewer to see the positive and negative
spaces of color within the frame Cropping plays
an important role in the success of your image
How the image was photographed ~
One main strobe light was used It was shot
through a softbox or mylar scrim Several white
and silver reflector cards surrounding the setbounced in a soft fill light Using the reflectors
as fill light evens out the overall appearance
without eliminating the direction of the main
light The shadows in the image are soft and
reveal more texture in the scarf
Minimal if any depth-of-field was needed in
this image so it was exposed at f56 The meter
reading is taken with an incident meter and
pointed directly at the camera Several readings
were taken of the entire image For example a
meter reading was taken of the light falling onthe hat the tip of the triangular scarf and the
black corners of the velvet before an exposure
was chosen A range of only 1 stop was allowed
between these exposure readings Reposition
your reflecting cards either closer or further
7302019 Heinrich Melanie - Studio Lighting Workbook
httpslidepdfcomreaderfullheinrich-melanie-studio-lighting-workbook 7489
from your subject to adjust the exposure
variations Your final exposure choice will be of
the area in the scene that is the brightest or
where the most light is falling If your exposure
variations are between f16 and f11 f16
indicates the brightest area in the scene You
should know this at this point in your educationIf you dont go back to the Camera Basics
section and read over the lessons Choosing f16
will prevent overexposure to the lighter areas in
your scene The camera was positioned directly
over the top of the set using a tripod Make sure
your tripod is capable of supporting your
camera in these unusual positions
Pick three or four objects that work well
together Lay them out on a solid colored
background in an interesting design pattern
Position your camera lights and reflectors
Using a color transparency film bracket your
frames as you shoot
Final crop of image
reflector
reflector
7302019 Heinrich Melanie - Studio Lighting Workbook
httpslidepdfcomreaderfullheinrich-melanie-studio-lighting-workbook 7589
Arranging a Set
Film
VPS 100 - Color Negative
Camera Format
2 14 square - Hasselblad
Medium Format
Lens
80mm Normal
Light Source
Strobe with Softbox
Meter
Handheld Incident
Tripod
Yes
Filters
None
7302019 Heinrich Melanie - Studio Lighting Workbook
httpslidepdfcomreaderfullheinrich-melanie-studio-lighting-workbook 7689
Within each image there can exist sets that pull the
entire image together The image above is an example
of one of these small sets The set is staged for a period
in time
Some professionals hire stylists to set something like
this up Background information helps convey a
message in the overall scene For example suppose you
are shooting the interior spaces of a Victorian home
and your client wants to place the product in the late
1800s Objects in the photo above will help transport
your viewer into that time in history Props are a very
important part in convincing your viewer of a place in
time You can find props at antique stores for this kind
of scene Time period images must be authentic down
to the smallest details Hire a historian for accuracy if
needed
Magazines use small inset photos that display intricate
details of settings They may not be set against a black
background as in the photograph above The
background should be dimly lit or out of focus to
help accent the subject Shallow depth of field and
object placement will work together to make your
image successful
One main strobe light was used in the photograph
above with no fill lights or reflectors This drops the
background of black velvet into black making it a
perfect place for white text Remember an
editor or designer usually needs to add type and will
need this space
7302019 Heinrich Melanie - Studio Lighting Workbook
httpslidepdfcomreaderfullheinrich-melanie-studio-lighting-workbook 7789
Still lifes have been used in fine art for many years The
image above happens to be found in nature but could
have just as easily have been set up in a studio The
arrangement of the plates and glass objects can be
emulated in the studio or in a set I have included this
image to show you that what you find most naturally in
life is how you should set up a scene whether in the
studio or on location Take your camera into the world
around you and shoot small stories such as the one
above These still lifes will help you to stylize your own
setups This lesson will help you learn how to crop and
balance your images Pay close attention to the light
falling on the objects in your scenes Follow the previous
example to determine the proper exposure of your film
Be deliberate when you consider the photographs you
will take Take your time
Remember to see within the boundaries of your frame
balancing objects from front to back side to side and
corner to corner See Visual Basics for more
information on setting an objects position within the
frame
7302019 Heinrich Melanie - Studio Lighting Workbook
httpslidepdfcomreaderfullheinrich-melanie-studio-lighting-workbook 7889
Photographing Beautiful Glass
Film
VPS 100 - Color Negative
Camera Format
2 14 square - Hassalblad
Medium Format
Lens
80mm Normal
Light Source
Strobe with Softbox
Meter
Handheld Incident
Tripod
Yes
Filters
None
7302019 Heinrich Melanie - Studio Lighting Workbook
httpslidepdfcomreaderfullheinrich-melanie-studio-lighting-workbook 7989
The image above will give you an idea of how to light
small objects in a room or on a set You can make
objects pop out that are a very small part of the sceneFor example the color in this image is something you
really want to show but each of the objects must be
placed and lit properly to portray the beauty of their
colors Small strobes with funnel snoots will spotlight
only the objects you are interested in The blue
background color was chosen as a color complement to
the colors in the glass
TIP A snoot can be made from a rolled piece of
poster board into the shape of a cone You can also
buy these cones to fit on the strobe Be careful if using
poster board as the lights can get very hot
Take a large piece of poster board and roll it into a
cylinder shape Fig 1 Tape the center of the cylinder
then expand one end and decrease the opposite end of
the cylinder Fig 2 Make the expanded end large
enough to fit over the strobe head The other end of
the cylinder should be small enough to direct the light
at whatever object you want to be lighting The size of
the smaller hole will dictate the angle of the light
pointed at the object
Fig 1 Fig 2
7302019 Heinrich Melanie - Studio Lighting Workbook
httpslidepdfcomreaderfullheinrich-melanie-studio-lighting-workbook 8089
WARNING
DO NOT USE POSTER BOARD CONES WITH
TUNGSTEN LIGHTS The chance of fire is far too
great NEVER leave powered lights unattended
The glass objects in the photograph above have had the
light pushed directly through them When the light
passes through the colors are revealed
Shooting glass with liquid in it is described in the
diagram below The softbox is placed directly above the
set and slightly tilted away from the camera With the
liquid in the glass place a reflector card behind the
liquid only Looking through the camera lens make sure
the card does not extend past the liquid above or to the
sides Tip the card backwards so it picks up some of the
light falling down from the softbox This will illuminate
the liquid giving it a glowing appearance
7302019 Heinrich Melanie - Studio Lighting Workbook
httpslidepdfcomreaderfullheinrich-melanie-studio-lighting-workbook 8189
Your background can be any color detail or density when
using this reflector card
7302019 Heinrich Melanie - Studio Lighting Workbook
httpslidepdfcomreaderfullheinrich-melanie-studio-lighting-workbook 8289
Messages in a Still Life
Film
Ektachrome 100
Camera Format
35mm - Nikon
Small Format
Lens
50mm Normal
Light Source
Strobe with Softbox
Meter
Handheld Incident
Tripod
Yes
Filters
5 Red CC Filter
7302019 Heinrich Melanie - Studio Lighting Workbook
httpslidepdfcomreaderfullheinrich-melanie-studio-lighting-workbook 8389
The above image sends a message of peace and
comfort to its viewer in a couple of different
methods
One method is achieved by the type of lighting
used (In this case a strobe within a softbox) A warm
glow of very soft light is scraping horizontally
across the image and highlights fall on the outer
pages of the book It has a golden quality Another
method is achieved by using a number 5 CC filter
over the camera lens This accents the rich red color
in the roses with their saturated hue and balances
perfectly with the gold color in the pages as well as
the reddish-brown boards that they sit on
TIP ~
A red or orange transparent gel in an acetate sheet
form could be placed over the softbox to warm the
color pushed into the set
The background falls off into black holding the
viewers eye on the bible and the perfectly balanced
roses
This was shot with a softbox to the right of the scene
with no fill cards or fill lights The main light source
is close to the subject so the light falls off very little
When the light is positioned close to the subject its effect
on the oppiste side is minimal
7302019 Heinrich Melanie - Studio Lighting Workbook
httpslidepdfcomreaderfullheinrich-melanie-studio-lighting-workbook 8489
Using light color balance and the right props this
image conveys both warmth and love The main
subject is the bible The roses are used to convey a
feeling of love If instead of roses guns were used as
props the message would be entirley different
perhaps of violence Props can make or break
your image
7302019 Heinrich Melanie - Studio Lighting Workbook
httpslidepdfcomreaderfullheinrich-melanie-studio-lighting-workbook 8589
Creating a Mood
Film
Ektachrome 100
Camera Format
35mm - Nikon
Small Format
Lens
50mm Normal
Light Source
Strobes and reflectors
Meter
Handheld Incident
Tripod
No
Filters
None
7302019 Heinrich Melanie - Studio Lighting Workbook
httpslidepdfcomreaderfullheinrich-melanie-studio-lighting-workbook 8689
Making a statement with your photography should
be foremost in your mind The image above tells us ~
bedroom lovers intimacy passion etc It is up to
our imagination to fill in the blanks You have only a
few moments to convey your message so be careful
not to be too subtle yet not so blatant that your
message is visually insulting
The location in this shot was specifically chosen
Shot on a wooden floor a rustic authenticity is
portrayed A cowboy feel was achieved with these
surrounding elements The lingerie casually draped
over the boots looks accidental and unplanned The
boot that is tipped over leads the viewer to believe an
impetuous moment of hurried passion is taking
place The background is evident but intentionally
made out of focus by shooting at f4 for shallow
depth of field
This image is far from haphazard It was planned
from layout to location to scouting to objectplacement The idea came first then the execution of
the image Although minor alterations of layouts are
common the concept will remain the same This
eliminates confusion by isolating one idea and
working it through from all directions
Scouting out locations can be a full-time job and you
may need special permission to shoot in a particular
place See property release in the Legal Forms
section to cover your legal requirements and release
forms
7302019 Heinrich Melanie - Studio Lighting Workbook
httpslidepdfcomreaderfullheinrich-melanie-studio-lighting-workbook 8789
This kind of image will work very well for an adselling lingerie A strobe light with a softbox was
used to light the boots and the lingerie from the
right A reflector card was placed close to the boots
to fill in the left side of the scene The light is
positioned low near the floor which scrapes the light
on a low plan This was placed to simulate a specific
time during the day sunset or early evening The
light at this time is warm in color value which adds
to the subject matters message The camera vantage
point is low also bringing the viewer into intimate
contact with the boots and lingerie
7302019 Heinrich Melanie - Studio Lighting Workbook
httpslidepdfcomreaderfullheinrich-melanie-studio-lighting-workbook 8889
Still Lifes Selling Products
Film
Ektachrome 100
Camera Format
2 14 square - Hassalblad
Medium Format
Lens
80mm Normal
Light Source
Strobe with Softbox
Meter
Handheld Incident
Tripod
Yes
FiltersNone
7302019 Heinrich Melanie - Studio Lighting Workbook
httpslidepdfcomreaderfullheinrich-melanie-studio-lighting-workbook 8989
Placement and staging of objects requires a thought-out layout and planned
execution when using multiple products Layering has been used in this image
where non-information has been overlapped for example where the licence
plates and shirts touch Your viewer does not need to see the entire object in
this case to know what it is Strong diagonal lines have been made by object
placement This helps pull the viewer through the image and leads the eye to
a specific area of an image This image was created to find funding for
Vietnam vets by selling these products
If you have been asked to shoot several products and put them all into one
image think of it in terms of a still life setting Larger items will be placed inthe background sometimes even being used as the background For example
picture a group of images all representing something American The
background for this scene could be a flag which is also one of the subjects
There is no need to see the entire flag because it is an easily recognizable icon
In the image above the wooden floor was used to add a sense of the rustic and
gritty realism of the Vietnam war It was lit with a softbox directly above the
subjects The aperture was a concern for foreground to background
sharpness so the camera was pulled back far enough from the scene to allow
for a large aperture of around f 56
Below is the final image This was dropped into a 3 fold 812 x 4 brochure
along with other images of the same sort
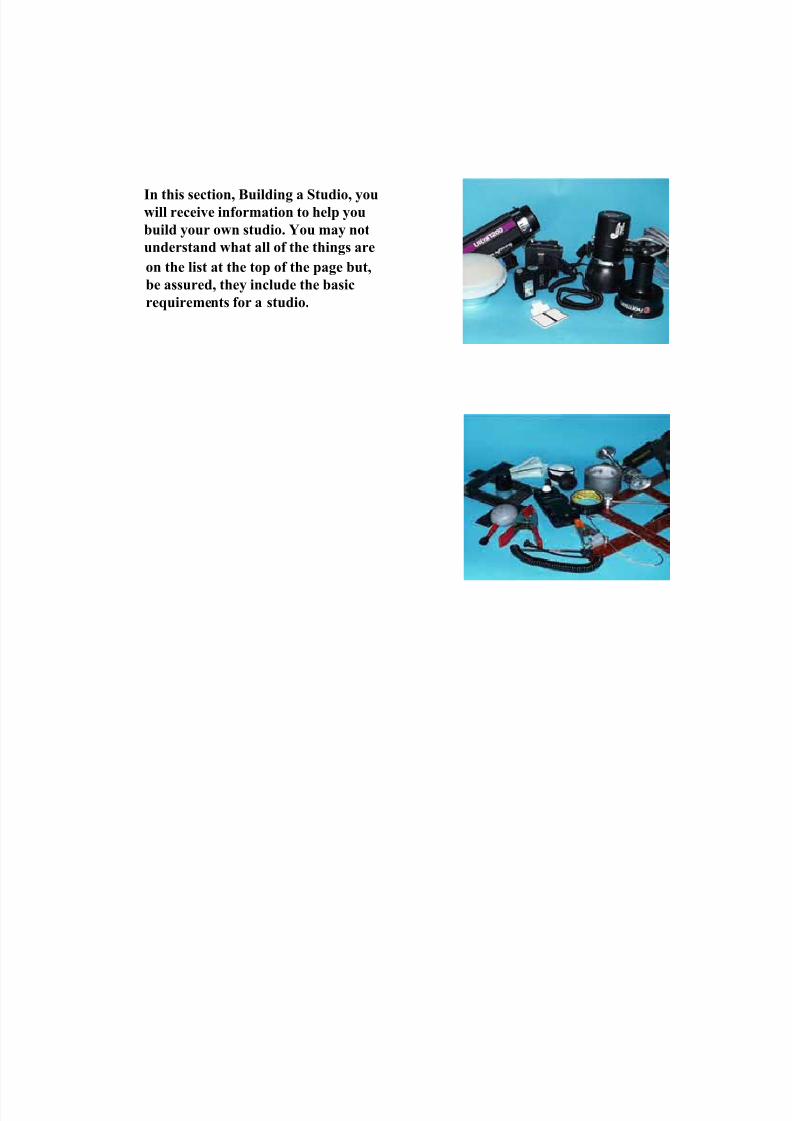
7302019 Heinrich Melanie - Studio Lighting Workbook
httpslidepdfcomreaderfullheinrich-melanie-studio-lighting-workbook 2489
Building a Scrim Soft Box and White Tent
Materials Needed
(A) Frame 16 x 20
(B) White Acetate can bepurchased at any glass
company
(C) Black Photographers Tape
(D) Two Matte Boards 18 x
20 each
(black on one side white on the
other)
(E) Matte Boards 18 x 16
(black on one side white on the
other) Fig 1
A Scrim Soft Box and White
Tent are used to scatter
diffused light onto your subject
The professional version of this
is costly and not as versatile as
the design described in this
lesson
This lesson will show you how
to construct a scrim ordiffusion system a soft box and
Fig 1
a white tent
7302019 Heinrich Melanie - Studio Lighting Workbook
httpslidepdfcomreaderfullheinrich-melanie-studio-lighting-workbook 2589
Making the Scrim
A scrim is used to soften thelight source It can also be used
to add shadows on any subject
after light is pushed through it
Fig 3
Build or buy a simple 16 x 20
frame (A) (an artist canvas
frame made of wood will work
fine) Get one that is big enough
so light cant spill around the
edges creating shadows fromthe frame itself A 16 x 20
frame (A) will be a good place
to start
The frame size used here is 16 x
20 It is only used to give you an
idea of how to make a scrim
You can make your scrim any
size you like and then cut the
acetate to fit the frame and
adjust all the other materials to
fit the size of the scrim you are
making
Measure the acetate (B) by
placing the frame down on top
of it and then draw a line to
mark out your exact
dimensions Now attach the
white acetate (B) to the frame
using photographers black tape (C) not staples Staples
may tear the acetate
Make sure to conceal the edges
of the frame with the acetate
Fig 2
7302019 Heinrich Melanie - Studio Lighting Workbook
httpslidepdfcomreaderfullheinrich-melanie-studio-lighting-workbook 2689
This will prevent dark shadow
lines from reflecting onto your
subjects highly reflective
surfaces Fig 2
TIP ~ In place of acetate try using a
white sheet
TRICK ~
To have a window shape
appear in your subjects
reflective surface place two
pieces of black tape (C) across
both center axis This will
reflect into your subject and
look like a window Fig 3
Making the Soft Box
A soft box will emulate the
same kind of lighting used in a
big studio and it softens the
light from a strobe supplying a
diffused light source Image
colors will be saturated and
rich in appearance
A soft box is made up of one
scrim and the black matte
board box To make the box
cut the matte board at an angle
so when taped together it
forms the shape of a cone Fig
4 White sides should face in
Tape the four pieces of matte
board to the edges of the scrim
with photographers black
tape two pieces (D) 20 x 18
are taped to the 20 lengths
and the other two pieces (E)
18 x 16 are taped to the 16
Fig 3
length of the scrim
7302019 Heinrich Melanie - Studio Lighting Workbook
httpslidepdfcomreaderfullheinrich-melanie-studio-lighting-workbook 2789
Face the white side of the matte
board in toward the centerMake the shape of the box cone
inward Fig 5 These flaps will
scatter light all around the
inside softening the light as it
comes through the scrim
Both the light and the soft box
should be attached to a light
stand to hold them up in place
Making a White Tent ~
A white tent is used to
photograph highly reflective
objects by revealing only white
in its reflected areas To make a
white tent for shooting
reflective objects make five
scrims not the soft box as
described above Tape them
together in a box shape hiding
any and all edges of the framesThis is because they will reflect
in the object you are
photographing All reflections
must be white
You will end up with a box with
no bottom It will be placed on
top of your subject on a table
top in effect covering it You
will be lighting the subject by
pushing light through all fivescrims Position your lights so
they do not cast any shadows
onto your subject by placing
them at a distance from the
white tent You will need to cut
Fig 4
Fig 5
7302019 Heinrich Melanie - Studio Lighting Workbook
httpslidepdfcomreaderfullheinrich-melanie-studio-lighting-workbook 2889
a small hole into one of the
scrims to put your lens
through Make sure your
product is placed properly or
you will be moving the tent
several times to get it right Fig 6
TIP ~
Another way to approach this
is to make one of the scrimsfreely swing open so you can
easily access the subject for
rearranging Hinge one of the
connecting joints
TIP ~
You may need to make color
tests because the acetate can
fade over time giving a yellow
cast
TRICK ~
The scrim can be covered with
a colored sheet of acetate Try
using different colors on
opposite sides of the tent
Fig 6
7302019 Heinrich Melanie - Studio Lighting Workbook
httpslidepdfcomreaderfullheinrich-melanie-studio-lighting-workbook 2989
Building a Backdrop and Table
A backdrop is essential for most
photographs taken in a studio This
lesson will show you how to make one
The ceiling must be solid not a drop
ceiling
Materials Needed
(A) Two- curtain rods (height of your
ceiling)
(B) One- 7 pole 2 diameter
(C) two sets of workhorses
The curtain rods you buy must be high
enough to reach between your floor
and ceiling They must have enough
spring tension to stay in place from
floor to ceiling
Set the curtain rods up between floor
and ceiling and about 6 feet apart and
3 feet from the wall Fig1
Stretch the 7 foot pole between the two
curtain rods and attach with clamps or
duct tape in place Fig 2
Fig 1
Fig 2
7302019 Heinrich Melanie - Studio Lighting Workbook
httpslidepdfcomreaderfullheinrich-melanie-studio-lighting-workbook 3089
material on the pole by draping it over
the top and attaching it with clamps If
you want to use seamless paper (large
rolls of paper on long cylinders) you
will need to leave one end of the poleaccessible to load the seamless
TIP ~
Seamless paper comes in 4 foot and 9
foot rolls You can use this paper over
and over again depending on how well
you take care of it avoiding creases
and soiling
TIP ~
Light stands can be used in place of the
curtain rods if you have a drop ceiling
This backdrop can be used in many
different situations as seen in Figs 3-8
All three setups are top lit
TRICK ~
Fig3 has a backdrop hanging to the
floor and a light on the floor that
flashes upwards onto the white
background paper The table is pulled
away from the backdrop Hint Place
an interesting material on the table
top this can achieve the look of a
sunset
The shot of the phone in Fig 4 was
done using this kind of set-up The
difference between the table top
material and the backdrop has left a
hard line at the horizon The spotlight
with a red acetate on it is set on the
floor below and facing up at the
seamless paper leaving the magenta
color behind the phone
Fig 5 leaves a hard horizon line where
Fig 3
Fig 4
Fig 5
At this point you can hang any kind of
your table top meets the backdrop
7302019 Heinrich Melanie - Studio Lighting Workbook
httpslidepdfcomreaderfullheinrich-melanie-studio-lighting-workbook 3189
TIP ~ Put an interesting material on the table
top this will increase the contrast
between the foreground and
background
Fig 6 is an example of a hard line
horizon line The table top in this shot
is a marble table top The background
is a piece of black velvet
Fig 7 is a traditional set for product
photography When the backdrop
swoops down onto the tabletop in this
fashion it leaves a beautiful gradation
on the backdrop
Fig 8 is a shot of a live set using this
style of backdrop The final image was
cropped to exclude all traces of the set
Fig 6
Fig 7
Fig 8
7302019 Heinrich Melanie - Studio Lighting Workbook
httpslidepdfcomreaderfullheinrich-melanie-studio-lighting-workbook 3289
Building a Studio Flat- Reflector
Materials Needed
One- 4 x 6 piece of foam core (14 thick)
(Plumbing department)
(A) Two (6 x 15 lengths of PVC tubing
(B) Four (1 x 15 lengths of PVC
tubing
(C) Three (44 x 15 lengths of PVC
tubing
(D) Six right-angle PVC tubing pieces
(red in Fig 2) to fit into lengths of tubing
above
(E) Two Ts (blue in Fig 2) to fit intolengths of tubing above
Double sided foam tape
Plumbers cement and purple pvc
preparation fluid
Saw (ask the hardware store to make
the cuts required)
This lesson will show you how to build a
studio flat that can be used as a reflector
as well as some other things that are
shown below
Fig 1
7302019 Heinrich Melanie - Studio Lighting Workbook
httpslidepdfcomreaderfullheinrich-melanie-studio-lighting-workbook 3389
You can make this flat any size you like
Ours is designed as a 4 x 6 Just follow
the simple construction plan below
Once you get all the things that are listed
in the materials listed above read all of
the directions before continuing
TIP ~
PLUMBERS CEMENT DOES NOT
SEPARATE ONCE IT ISCONNECTED TO TUBING
FRAME
1 Using the plumbers cement attach
two of the right-angled tubes to the ends
of the 6 foot tubing Once these are
secure attach the 44 tube at the top of
the frame See Fig 1 Be sure the two 6
tubing sections are parallel to each
other front to back and side to side
BASE
2 Using the plumbers cement attach
the Ts to the one foot sections of tubing
Fig 2
3 Using the plumbers cement attach
the four right angles to the opposite ends
of the 4 foot sections Before you do this
make sure that the two Ts are pointing
up and at right angles to the cornersFig 2
Fig 3
Fig 2
7302019 Heinrich Melanie - Studio Lighting Workbook
httpslidepdfcomreaderfullheinrich-melanie-studio-lighting-workbook 3489
frame using the double sided foam tape
Position the foam core so it fits against
the frame tightly
TIP ~
You can use this flat for many things
besides a reflector It will be sturdy
enough to hang things from it and can
even be useful as a backdrop Fig4
TRICK ~ Drape material over it for close-up
photography or simply use it to block
light from an area on your set Fig 5
Fig 5
Fig 4
Finally attach the foam core to the
4 Using the plumbers cement attach
the final 44 pieces of the base to the
right angles Fig 2
5 Using the plumbers cement attach
the frame to the base at the Ts Fig 3
7302019 Heinrich Melanie - Studio Lighting Workbook
httpslidepdfcomreaderfullheinrich-melanie-studio-lighting-workbook 3589
Some photographers have a real gift for
photographing people They are able toembrace humanity and capture on film the
very essence of life They reveal the
persons emotions without saying a word
They seem to understand the unspoken
word of the heart and are able to record it
without the distraction of camera and
technique
If you have clicked on to this page chances
are you are one of those people Perhapsyou just need a bit more help or
information to push your images to a new
level of success These lessons are aimed at
doing just that
In these lessons you will learn how to make
your subject comfortable and to reveal
the subjects true feelings It is true not all
people are comfortable enough with themselves
to trust and let go and you will discover who
is easy to shoot and who is not easy to
shoot There are ways to help people
become comfortable in front of a camera
Lessons in this section
Emotional Power Portrait
Creating a Sullen Emotion
Staging People
7302019 Heinrich Melanie - Studio Lighting Workbook
httpslidepdfcomreaderfullheinrich-melanie-studio-lighting-workbook 3689
The best way to shoot people is from a
distance Give them personal space andshoot with a long lens Pretend you are
shooting a couple of rolls to get them
familiar with being photographed Try not
to give much direction or you will find
yourself with very staged and stiff
subjects Follow them around if they will
permit it At some time they will be relaxed
this is when you will get the best shot
Let the people be themselves until they are
comfortable then direct them with very
simple suggestions Many factors come into
play when photographing people like the
texture of their skin what areas the light
hits their face their posture and the gait of
their walk Remember your basic visual
design elements when positioning a person
in the frame Colors will also play a large
role in the emotion you portray about the
person See visual design
Below are some successful photographs of
people Some of the people the photographer
knew and some of the people were just
shot on the street
7302019 Heinrich Melanie - Studio Lighting Workbook
httpslidepdfcomreaderfullheinrich-melanie-studio-lighting-workbook 3789
Emotional Power Portrait
Film
Ektachrome 100 Daylight
Film
Camera Format35mm - Nikon
Small Format
Lens
28mm Wide
Light Source
Strobe with softbox
Meter
Handheld Incident
Tripod
No
Filters
None
Polaroids
No
7302019 Heinrich Melanie - Studio Lighting Workbook
httpslidepdfcomreaderfullheinrich-melanie-studio-lighting-workbook 3889
The photograph was shot for a portfolio Our
photographer included this image in his portfolio in
an attempt to get jobs of this nature This image
reveals the ability to direct the subject
Understanding body posture is very important
when taking these kinds of photographs Knowing
the right moment to record the image as the model
stares into the photographers lens may take some
time to learn Study people and record in your
mind their posture and movements notice their
emotions and how they display them in their
bodies By studying people you will learn to
communicate and capture peoples emotion in your
images
Use props to direct your viewers eyes in your
images In the above image the model holds a
barbell that breaks into the lower part of the image
frame which leads the viewers eyes to the models
eyes The barbell was counterbalanced with her
face in the background Cropping is the key here
Dont be afraid to get in close It will help convey
the message of intimacy When the above image
was shot our photographer had to invade the
models personal space However our
photographer was able to capture something
unique in his image As a photographer you mustunderstand what effect and subtle nuances you
want to provoke and get in your images and then
know how to achieve them using your camera
through our lessons
Now ask yourself how was the light created in the
above image Where were the lights positioned
What type of light was used
The light was created by a strobe in a softbox (See
Building a Studio to learn how to build this kind of lighting system) The lighting was directdiffused A
small fill on the left side added a soft diffused fill
light This diffused light was created by bouncing
light from the main light and was placed close to
7302019 Heinrich Melanie - Studio Lighting Workbook
httpslidepdfcomreaderfullheinrich-melanie-studio-lighting-workbook 3989
the models face It was positioned approximately 3
feet from her and powered by a large power pack
of about 2000 watts
The background was intentionally dropped off intoblack leaving no more detail than necessary or
desired It was placed about 5 feet behind the
model
The model applied baby oil to her face for the shot
A spray bottle filled with water was used to add the
illusion of sweat She shook her head about to
provide the work-out like appearance After all
that the photographer was able to achieve the
image he wanted after paying close attention to the
small details and knowing how to use his camera
A wide-angle lens was used to take this shot It
helped to accentuate the barbell and hand of the
model The exposure was taken with a handheld
incident meter facing the camera Several frames
were shot bracketing the image and the final image
was chosen in editing Study your brackets
carefully on a good light table to pick a final
photograph
7302019 Heinrich Melanie - Studio Lighting Workbook
httpslidepdfcomreaderfullheinrich-melanie-studio-lighting-workbook 4089
Creating a Sullen Emotion
Film
Tmax 100 Black and White Film
Camera Format
2 14square - HasselbladMedium Format
Lens
80mm Normal
Light Source
Strobe with softbox and spot
stobe
Meter
Handheld Incident
Tripod
Yes
Filters
None
Polaroids
Yes
7302019 Heinrich Melanie - Studio Lighting Workbook
httpslidepdfcomreaderfullheinrich-melanie-studio-lighting-workbook 4189
Capturing a mood or creating a mood can be done using
dramatic light You should also direct your subject into
positions that convey the emotion you are after Be carefulnot to over direct your subject This can make the image
look contrived and fake Professional models are great
actors and will understand your direction very well If you
are not photographing a professional model you should do
a couple of things to help your model Use a long lens
Keeping a distance between you and the model will give
them room to relax Secondly pretend to shoot a couple of
rolls of film This should give them enough time to get
comfortable with the flashing lights and shutter clicks
Next shoot a lot of film Be clear with your directions
Design your set so you can move around freely and shootfrom different vantage points During the shoot your
model will become more relaxed and the images will turn
from stiff to candid
In the image above a softbox was positioned close to the
subject and was the main light The light was intentionally
overexposed This was done by taking a meter reading
from the subjects left side where the fill light fell off This
technique slightly overexposed the light on his right side
and forehead Now you can see how a slight change in
metering placement can change the entire feeling of an
image A white reflector card was used to bounce a
diffused fill light into the subjects right side This style is
meant to emulate the lighting found in a theatre ~ high
contrast and a dramatic mood A spotlight lights the back
part of his neck It is raised high above and pointed down
at the subject
7302019 Heinrich Melanie - Studio Lighting Workbook
httpslidepdfcomreaderfullheinrich-melanie-studio-lighting-workbook 4289
With a little direction we found the emotion we were
looking for The subject was told to rest his elbows on his
knees as he clutched his drumsticks The position of his
head relative to his body turns his face toward the viewer
This position is natural and comfortable for him His eyes
are looking downward as though in reflection of another
time It is a moody image because of the lighting and his
expression Practice photographing your friends by
directing them with posture poses and physical
appearance changes
7302019 Heinrich Melanie - Studio Lighting Workbook
httpslidepdfcomreaderfullheinrich-melanie-studio-lighting-workbook 4389
Staging People
Film
Ektachrome 100
Daylight
Camera Format
2 14 square - Hasselblad
Medium Format
Lens80mm Normal
Light ource
Two Umbrellas with
Strobes
Meter
Handheld Incident
Tripod
Yes
Filters
None
Polaroids
Yes
7302019 Heinrich Melanie - Studio Lighting Workbook
httpslidepdfcomreaderfullheinrich-melanie-studio-lighting-workbook 4489
When staging people you need to create a natural appearance
The same principle holds true when photographing people If you
hire professional models it will make your job much easier
Professional models will know exactly what to do with very little
direction More importantly they are completely comfortable in
front of the lens
The image above was shot for an architectural firm catalog The
company wanted to save money by using their own employees as
models We wanted to use professional models but made the
concession in order to secure the job We used familiar icons to
help the employees feel comfortable in front of the camera Oncewe had them working on the architectural model they had
forgotten about the camera and lights in the room We were able
to get the tools of their trade in the scene the employees
comfortable and then able to capture several successful images
for our client
We used two lights with umbrellas to light the scene One strobe
was placed to the right of the camera and pointed at the set and
the other strobe was positioned behind the left side of the camera
and was high in the air and pointed downward towards the set
See the diagram below
The two strobes were balanced and their meter readings were the
same When photographing people use a shutter speed that stops
any possible movement Do not shoot at a shutter speed below the
millimeter of the lens you are using For example if the lens you
are using is a 90mm lens your shutter speed will be 1125th or
faster Use 160th of a second if you have a focal plane shutter
Cameras with a leaf shutter do not hold to the same constraints as
a focal shutter Leaf shutter lens also sync at any speed Review
your camera manual to see if there are any limitations with your
lens and camera
7302019 Heinrich Melanie - Studio Lighting Workbook
httpslidepdfcomreaderfullheinrich-melanie-studio-lighting-workbook 4589
Film
Ektachrome 100
Daylight Film
Camera Format
2 14 square -
Hasselblad
Medium Format
Lens
80mm Normal
Light Source
Strobes with Two
umbrellas
Meter
Handheld Incident
Tripod
Yes
Filters
None
PolaroidsYes
7302019 Heinrich Melanie - Studio Lighting Workbook
httpslidepdfcomreaderfullheinrich-melanie-studio-lighting-workbook 4689
The second image was shot in a compressor room It portrays
the inspection division of the same company These men are not
models and have a very realistic appearance One man poses as
manager and the other as an inspector Again we used props to
set the stage and asked the men to talk with each other
Cleaning the compressors was an important part of making the
statement the client desired The client portrays a clean and safe
environment Cleaning a set before shooting is sometimes the
most important thing you can do Paying attention to the small
details will get you repeat business This cant be stressedenough If you need to paint something in the scene before you
shoot it to make sure it looks right do it It may make all the
difference in the world Your client will take notice of your
attention to detail This is why previewing a location before you
shoot it is very important It gives you a chance to hire someone
or ask the client to clean these areas for the shot
The image above was shot with two strobes both using
umbrellas Both strobes were placed to the right of the camera
One of the strobes was positioned somewhat behind the men and
set high in the air This pushed light onto the compressorsbehind the men The second strobe lights the men and the
foreground parts of the compressors
7302019 Heinrich Melanie - Studio Lighting Workbook
httpslidepdfcomreaderfullheinrich-melanie-studio-lighting-workbook 4789
The advertising field is very competitive
yet the potential for increased income isgreat Photographers who are doing
advertising work tend to specialize
depending on the area they live in For
example someone living in a small city
may need to have several specialties On
the other hand someone in New York
could specialize in one thing ie
childrens fashions or motorcycles An
advertising photographer will most of
the time be working with an art
director from a design or advertising
firm Clients rarely hire photographersdirectly unless they have established a
rapport with them It is generally the
AD (art director) working on the job
that will hire for the client
Ask yourself this question What is the
one thing that I like and feel
comfortable with Your answer is the
area you should be specializing in In
reality most people go through life and
their likes and dislikes change Aphotographer sometimes follows a
specialty For instance someone who
assisted a commercial photographer
shooting childrens clothes and liked it
decided to pursue that field The ideal
situation is to make a living doing whatyou really like
Lessons in this section
Lighting Multiple Glass ProductsUsing Props with Products
Multiple Exposures
Making Reflections Work for You
Using a Product for a Background
Floating a Product
Boring Product - Interesting Design
7302019 Heinrich Melanie - Studio Lighting Workbook
httpslidepdfcomreaderfullheinrich-melanie-studio-lighting-workbook 4889
The lessons in this section assume you
have a good working knowledge of
camera tools visual basics and lightingIf not go back to these sections and
learn these things first Also some of the
studio setups can be built Those
designs are described in Building a
Studio
The lessons in this section go into
extensive details showing you where to
position your lights and reflectors etc
in order to achieve a certain look and
feel in an image They includedescriptive diagrams for you to
duplicate
7302019 Heinrich Melanie - Studio Lighting Workbook
httpslidepdfcomreaderfullheinrich-melanie-studio-lighting-workbook 4989
Lighting Multiple Glass Products
FilmEktachrome 100
Daylight Film
Camera Format
4 x 5 - Horseman
Large Format
Lens
150mm Normal
Light SourceStrobe with Softbox and
Reflectors
Meter
Handheld Incident
Tripod
Yes
Filters
None
7302019 Heinrich Melanie - Studio Lighting Workbook
httpslidepdfcomreaderfullheinrich-melanie-studio-lighting-workbook 5089
The image above was an inset photograph for a
brochure cover The company sold gift baskets and
products The brochure was used to help their growing
marketing requirements The brochure had three
different images similar to this one along with
accompanying text The client was in the studiowhen this was taken and was the acting art director
So all proofs were finalized at the time of shooting
This eliminates any questionable fees for reshooting
Polaroids are used for the same reason An instant
image of lesser quality than film will serve as great
representations of the final photograph Polaroids
are sometimes faxed or scanned and emailed to the
client for approval Asking your client to sign off on
a photograph will give you the assurance that all is
okay and you can record the image on film
Shooting glass and high gloss labels can be a
frustrating exercise because of the multiple
reflections that occur Remember as you shoot to
look through the lens to see if you have any
reflections on your products in the set All
reflections are caused due to the angle between
lens and light source Review your polaroids
carefully for any reflections before you expose the
film
TIP ~ Moving the product a small amount may be the best
way to remove the reflections Before you do that
adjust your light to eliminate any glare and
reflection Each time you change the light position
you must check for glare
Place all the products on the table top according to
the layout supplied by your client or art director
The image above was tiered giving it height and
depth
The light is positioned directly over the set It is
tilted slightly toward the backdrop and away from
the camera The backdrop is set up as a sweep It is
a piece of gray formica See Building a Studio to
7302019 Heinrich Melanie - Studio Lighting Workbook
httpslidepdfcomreaderfullheinrich-melanie-studio-lighting-workbook 5189
learn how to make this if you are inexperienced in
studio construction
Three white or silver cards are used in the front andon both sides to pump additional light into the
scene These are carefully and strategically placed
to avoid seeing the reflector cards in the glass
When you are shooting glass objects the main light
should reflect in the glass It indicates the direction
of the light source The main light source reflection
is acceptable as long as it is not too bright The fill
light from the reflector cards should not dominate
your main light source
TIP ~ Reflector cards can be made from any material that
reflects light such as a white card Large pieces of
foam core are used and cut into smaller pieces
depending on the size of the set Silver cards are also
used They are positioned to reflect the light coming
from your main light source and bounce the light
softly back into the set These cards will add more
light and sometimes add unacceptable hot spots on
the products These hot spots are very distracting
and unsightly
Now that you have all your lighting sources in place
look through the camera to see if you have any
reflections If you have a lot of glare in your image
readjust the overhead light by tilting it more
towards the back or front Be careful to avoid lens
flare Lens flare is when your light or lights reflect a
glare back into the lens For example when
someone shoots into the sun the lens picks up a
glare Block the lens flare with a black card by
placing the card between the light and lens Make
sure not to put the card into your scenes final crop
or in a position where you block your image You
may need to move your lights or use a scrim to get
rid of the lens flare It will be easier to add a scrim if
you have previously adjusted all the glass for no
reflections Instead of a scrim you could use a lens
hood The lens hood attaches to the front of the lens
7302019 Heinrich Melanie - Studio Lighting Workbook
httpslidepdfcomreaderfullheinrich-melanie-studio-lighting-workbook 5289
It protrudes from the lens and blocks any glare
falling on the front lens element Each lens may use
a different hood These come in many different
shapes and sizes I use a scrim because it is far more
versatile
Assuming your light source is in a good position you
may still have some glare on the glass You can
eliminate many reflections by slightly tipping the
product forward Use a small object under the back
side of the product while not disturbing the
products position These are very slight movements
and will not change the appearance to any great
degree Also tip the reflectors back and forth and
side to side to remove any added glare from your
objects Be attentive to all the objects You may
eliminate glare in one object and produce it in
another You must check for any reflections in your
polaroids Some reflections are very difficult to
detect when viewing the set from behind the camera
using the modeling lights
Use an incident meter and read the light falling on
the set Always bracket your exposure Bracketing is
the process of taking many shots of the same set but
using different fstops For example if your meter
reads f32 at 160th of a second your bracket would
be one stop on either side f22 and f45 at the same
speed The image was shot at f32 or greater depth-
of-field Some photographers bracket with 12 stops
and 13 stop differences They shoot 5 sheets of film
using these small incremental changes
7302019 Heinrich Melanie - Studio Lighting Workbook
httpslidepdfcomreaderfullheinrich-melanie-studio-lighting-workbook 5389
Final cropping of image
The final image displayed on the left was
successfully shot with no glare on any of the
products All the products were in glass or were
wrapped in cellophane The image has been
cropped to match the final inset space for the
brochure This shot took about a half day toshoot
7302019 Heinrich Melanie - Studio Lighting Workbook
httpslidepdfcomreaderfullheinrich-melanie-studio-lighting-workbook 5489
Using Props with Products
FilmEktachrome 100
Daylight Film
Camera Format
4 x 5 - Horseman
Large Format
Lens
90mm Wide
Light SourceStrobe with Softbox
Meter
Handheld Incident
Tripod
Yes
Filters
None
7302019 Heinrich Melanie - Studio Lighting Workbook
httpslidepdfcomreaderfullheinrich-melanie-studio-lighting-workbook 5589
When using props to help convey your message
remember the visual basics about colorperspective framing contrast backgrounds
and balance
This image of a racing bike was shot from an
angle that enlarged the back wheel The wide
angle lens helps pronounce the wheel size as well
as increasing the elongated perspective of the
bike
The bike was shot against a black background
Isolating your subjects by eliminatingdistracting backgrounds will help make the
objects in the set stand out The three arrow-
shaped plexiglass pieces all point to the distance
This visually portrays the speed and forward
motion of a racing bike Primary colors of the
plexiglass are used to simplify the information
in the image The gears of the bike are
pronounced displaying the bikes power and
versatility The camera position is very low and
tilted upward to further increase the illusion of
size
A softbox was used to keep the glare on the
chrome to a minimum It was positioned
parallel to the bike seat on its right side and
tipped down slightly toward the pedals If you
look carefully you can see the reflection of the
softbox in the blue plexiglass This is acceptable
The light has bounced color from the plexiglass
back onto the chrome of the bike This adds
interesting color highlights to the image that
balance well with the other colors
Parts of the wheels reflect the colors of the
plexiglass adding an interesting bit of color
7302019 Heinrich Melanie - Studio Lighting Workbook
httpslidepdfcomreaderfullheinrich-melanie-studio-lighting-workbook 5689
backdrop will work also The velvet material
absorbs any light that falls on it
When you are taking your exposure readings
make sure that you take readings of the
background walls in the scene Do not face your
light toward the back wall The meter readingsof the walls should be at least 4 stops darker
than your final exposure This will maintain a
black background
The wide angle lens was used to achieve
maximum depth-of-field This image was
exposed at f45
The room was totally darkened for this shot
Some photographers will even paint their walls
black for a shot like this A black velvet
7302019 Heinrich Melanie - Studio Lighting Workbook
httpslidepdfcomreaderfullheinrich-melanie-studio-lighting-workbook 5789
Multiple Exposures
Film
Ektachrome 100
Daylight Film
Camera Format
4 x 5 - Horseman
Large Format
Lens
150mm Normal
and 90mm Wide
Light Source
Strobe with Softbox
Meter
Handheld Incident
Tripod
Yes
Filters
None
7302019 Heinrich Melanie - Studio Lighting Workbook
httpslidepdfcomreaderfullheinrich-melanie-studio-lighting-workbook 5889
This image was designed as a poster for a national bowling
tournament The objects were intentionally placed leavingblack areas for the white text or copy and logos to be placed
on the final poster
The image above was done by repositioning the camera
three different times and exposing the film each time with
the change (Three shots on one piece of film) In addition the
lens was changed for one of the shots
You will need a large piece of black velvet to absorb all
scattered light All exposures were shot on the black velvet
The velvet does not see light This leaves that area of the filmunexposed This allows you to expose something else in the
black area which occurs when you take your next exposure
You will also need a piece of acetate to place on the film
back for tracing the objects in each exposure This will help
you line everything up and avoid overlapping your
products By tracing the objects that appear on your film
back onto a piece of acetate you will be able to align
everything perfectly
The first exposure was made of the bowling ball in thebottom right with a wide angle lens The second exposure
was made of the bowling pin on the left bottom The third
exposure was made of the top right 2 bowling pins One of
these pins was raised up on a block for added dimension
With each exposure the camera was progressively pulled
away from the scene The camera lens to subject distance
was increased to help this illusion of depth Diagrams below
may help you understand this better
Make sure when taking photos like this that any part of the
image you wish to remain unexposed is filled with the black velvet You can add any lighter value to a black area with
film because it is unexposed
7302019 Heinrich Melanie - Studio Lighting Workbook
httpslidepdfcomreaderfullheinrich-melanie-studio-lighting-workbook 5989
When you are ready to make the first exposure trace the
film back onto the acetate by placing the acetate over your
film back Do this with each exposure
A softbox was used and placed close to all of the subjects
producing direct lighting Your exposure times and fstops
can be different for each exposure just as if you were taking
separate photographs In fact think of this type of image as
a composite
Wide Angel Lens Normal Lens Normal Lens
7302019 Heinrich Melanie - Studio Lighting Workbook
httpslidepdfcomreaderfullheinrich-melanie-studio-lighting-workbook 6089
Making ReflectionsWork for You
Film
Ektachrome 100
Daylight Film
Camera Format
4 x 5 - Horseman
Large Format
Lens
150mm Normal
Light Source
Strobe withSoftbox
Meter
Handheld
Incident
Tripod
Yes
Filters
None
7302019 Heinrich Melanie - Studio Lighting Workbook
httpslidepdfcomreaderfullheinrich-melanie-studio-lighting-workbook 6189
The image above was shot on a highly reflective
background It came in a long roll about 4 feet
wide The light was positioned toward the front
parts of the products to avoid a hard horizon lineThe light falls off into black making it useful for
the reversed type of white (see below) Be careful
to avoid lens flare when positioning the lights near
the camera lens Make sure to block any light that
may fall on the lens Use a scrim to block the light
A scrim is any black piece of material that will
function as a light block Black masking tape was
secured to the edge of the lens to block the light
Be careful not to show the tape in your
photograph
Glare can be a major problem with highly
reflective sets like this one Always remember to
look through your lens to avoid this Tip your
light toward the front or back of the scene to
adjust the glare on the set This shot was taken
using a strobe head inside a softbox This type of
light is often used in product photography
especially when shooting highly reflective objects
The light rays are scattered and softened by this
kind of light source
Each of the objects in this scene are veryreflective The reflective gold surface used to shoot
on adds interest to the products by adding a gold
reflection of the product onto the gold surface
This gives depth to the image
Adding different colored line art around the edge
of the image in the white border adds an extra
dimension to the final composite below This was
done by the designer after the image was taken
Some of the line art is in front of the image and
some is dropped behind the image Reverse text isused on the black part of the image and black text
is used on the white border
7302019 Heinrich Melanie - Studio Lighting Workbook
httpslidepdfcomreaderfullheinrich-melanie-studio-lighting-workbook 6289
Using a Product for a Background
Film
Ektachrome 100
Daylight Film
Camera Format
4 x 5 - Horseman
Large Format
Lens
150mm Normal
Light Source
Strobe with Softbox and
Reflector
Meter
Handheld Incident
Tripod
Yes
Filters
None
7302019 Heinrich Melanie - Studio Lighting Workbook
httpslidepdfcomreaderfullheinrich-melanie-studio-lighting-workbook 6389
This close-up of a computer chip was designed for the
front cover of a computer companys brochure (see
below) It was nesseccary to get the best detail for
enlargement reasons so a large format camera was used
The end image was 9 x 12 our negative was 4 x 5
A strobe with a softbox was used to light this subject
from the left side An accompanying white reflector card
was placed close to the subject to fill in the right side
with light (see diagram below)
The bellows on the 4 x 5 camera were extended to
enlarge this chip to fill the frame When extending the
bellows you increase the need for light to reach the film
In this case we did not need to have a small f-stop
number for sharpness so we left the lens open at f56and made our exposure appropriately Even if you need
to pop your flash a couple of times extending the
bellows should not be something to hold you back from
making the close-up you want to shoot The detail in this
shot is achieved by using a 4 x 5 camera with a good lens
TIP ~
Popping or firing the strobe multiple times is done with
the lens open in a darkened room so the only light in the
room is coming from your controlled multiple burst of
the flash Since you have no need for speed whenshooting inanimate objects keep pumping in the light to
get the exposure you need In a dark room you could
leave your lens open and just continually pop the strobe
Or you can cock the shutter and repeat the same
exposure until it adds up to the correct amount of light
required Make sure you are on a very steady tripod
The slightest amount of movement will blur your image
TIP ~
The best set up for any overhead shot with a 4 x 5 is to
put your set on the floor This is of course dependent on
the size of your set A short-legged set of horses works
very well also The legs used in this set were about 12
high
The hue of bluegreen works well with the yellow text
7302019 Heinrich Melanie - Studio Lighting Workbook
httpslidepdfcomreaderfullheinrich-melanie-studio-lighting-workbook 6489
The text pops off the image This color prevents the text
from falling into the background The background of the
computer chip remains a simple reminder of what the
company does It is the text that the viewer is expected to
read
This image would also make a great backdrop for a
collage or montage image
7302019 Heinrich Melanie - Studio Lighting Workbook
httpslidepdfcomreaderfullheinrich-melanie-studio-lighting-workbook 6589
Floating Product
Film
Ektachrome 100
Daylight Film
Camera Format4 x 5 - Horseman
Large Format
Lens
150mm Normal
and 90mm Wide
Light Source
Strobe with
Softbox
Meter
Handheld
Incident
Tripod
Yes
Filters
None
PolaroidsYes
7302019 Heinrich Melanie - Studio Lighting Workbook
httpslidepdfcomreaderfullheinrich-melanie-studio-lighting-workbook 6689
Both images in this lesson give the illusion of
floating The top image is propped up underneath by
a block A softbox directly above the computer
circuit board was used to achieve a soft even light In
todays high-tech industry these kinds of images are
being used in composites and as single images
TIP ~
Using black velvet as a backdrop can achieve a
similar effect where the subject appears to float The
light will be absorbed into the black velvet material
to create the illusion
The computer chip is not grounded to anything so it
appears to float (see Fig 1) The angle of the light on
the computer circuit board picked up some very
interesting highlights in Fig 1 which adds to the
high-tech feel of the image
A 4 x 5 camera was used to get greater detail with
the larger negative for enlargement purposes Depth-
of-field was achieved at f32
When shooting any subject like this you can portray
many kinds of interesting illusions The black velvet
material may be a little more expensive but nothing
else works as well This kind of material will help
you take the shots like the pros
Fig 1
7302019 Heinrich Melanie - Studio Lighting Workbook
httpslidepdfcomreaderfullheinrich-melanie-studio-lighting-workbook 6789
Boring Product -Interesting Design
Film
Ektachrome 100
Daylight Film
Camera Format
4 x 5 - Horseman
Large Format
Lens
150mm Normal
Light Source
Strobe with Softbox
Meter
Hanheld Incident
Tripod
Yes
Filters
None
7302019 Heinrich Melanie - Studio Lighting Workbook
httpslidepdfcomreaderfullheinrich-melanie-studio-lighting-workbook 6889
Some products you will be photographing will be justplain boring such as the rods in the shot above Its
your job as the photographer to bring life and interest
to boring products like these In the image above the
client needed his products shot for his company
catalog
Making something interesting from something boring
can be done by using an interesting background or
unusual lighting In this image the layout and diagonal
positioning of the rods directs the viewers eye to the
top right area of the image of the frame Text was
placed at the top and right side of this image (see final
image below)
The softbox was positioned above and to the left of the
product as indicated by the soft shadows Fig1 This
image could have easily been cut out from its
background and placed on any other background
Minimal depth-of-field is needed for this shot because
the maximum height of the product was only two
inches An aperture of f8 was used The exposure is
made with an incident meter reading to achieve an
overall well-balanced tone
Deep shadows could have been used to add interest to
these products by using a direct light at a very low
level to the table angle Fig 2 No softbox would be
used for this kind of shot
The set is placed on the floor so your camera position
is directly over the top of the set If shot on a table top
you would need to stand on top of a ladder to take the
shot The easier choice is to shoot on the floor
7302019 Heinrich Melanie - Studio Lighting Workbook
httpslidepdfcomreaderfullheinrich-melanie-studio-lighting-workbook 6989
Fig 1
Fig 2
7302019 Heinrich Melanie - Studio Lighting Workbook
httpslidepdfcomreaderfullheinrich-melanie-studio-lighting-workbook 7089
Lessons in this section
Mixing Texture Shapes and Color
Arranging a Set
Photographing Beautiful Glass
Messages in a Still Life
Creating a Mood
Still Lifes Selling Products
Setting the stage works to help convince the
viewer of a place and time or mood Small
details make a shot believable These
lessons will teach you how to think and tell
a story of a certain place in time Picking
the right props for your shoot will ensure
believability The lessons in this section
work in conjunction with the ProductPhotography section
A still life photographer can be found
working in a studio or on location This
type of photography demands the
recreation of a set or going to the set to
capture a moment in time This can be done
on location in the studio or digitally
created on the computer The truth is it fits
into many categories It is more than
product photography You are creating a
scene that conveys a sense of being
somewhere
7302019 Heinrich Melanie - Studio Lighting Workbook
httpslidepdfcomreaderfullheinrich-melanie-studio-lighting-workbook 7189
you pull your entire learning experience
together I include details and diagrams
that will reinforce your understanding
Still life scenes are often used in a designers
set or in a showroom like in a furniture
store They can also be used to convey a
story quickly and help transfer the concept
and idea throughout the entire image These
lessons include tips on how to light objects
in small and detailed areas They will help
7302019 Heinrich Melanie - Studio Lighting Workbook
httpslidepdfcomreaderfullheinrich-melanie-studio-lighting-workbook 7289
Mixing Texture Shapes and Color
Film
Ektachrome 100
Camera Format
4 x 5 - Horsemen
Large Format View
Camera
Lens
150mm Normal
Light Source
Strobe with Softbox
MeterHandheld Incident
Tripod
Yes
Filters
None
7302019 Heinrich Melanie - Studio Lighting Workbook
httpslidepdfcomreaderfullheinrich-melanie-studio-lighting-workbook 7389
The image above was shot as a portfolio piece
Mixing textures shapes and colors the
photograph displays the photographers eye for
design It is photographed on black velvet which
adds saturation of the overall appearance by
absorbing all the light that falls on it The black
velvet can be purchased at any fabric store
Two scarves are positioned at opposing angles
adding strong graphic interest and competition
between them Against the soft colored scarves
the dark blue hat pops out The colored markers
are color complements to the blue hat and add
additional depth to the image
Resting on top of the scarves are brightly
colored objects which add spots of color andinterest The curvy lines of the ribbons break up
the edges of the two scarves and add a bit of fun
to the image The final crop of the image forces
the viewer to see the positive and negative
spaces of color within the frame Cropping plays
an important role in the success of your image
How the image was photographed ~
One main strobe light was used It was shot
through a softbox or mylar scrim Several white
and silver reflector cards surrounding the setbounced in a soft fill light Using the reflectors
as fill light evens out the overall appearance
without eliminating the direction of the main
light The shadows in the image are soft and
reveal more texture in the scarf
Minimal if any depth-of-field was needed in
this image so it was exposed at f56 The meter
reading is taken with an incident meter and
pointed directly at the camera Several readings
were taken of the entire image For example a
meter reading was taken of the light falling onthe hat the tip of the triangular scarf and the
black corners of the velvet before an exposure
was chosen A range of only 1 stop was allowed
between these exposure readings Reposition
your reflecting cards either closer or further
7302019 Heinrich Melanie - Studio Lighting Workbook
httpslidepdfcomreaderfullheinrich-melanie-studio-lighting-workbook 7489
from your subject to adjust the exposure
variations Your final exposure choice will be of
the area in the scene that is the brightest or
where the most light is falling If your exposure
variations are between f16 and f11 f16
indicates the brightest area in the scene You
should know this at this point in your educationIf you dont go back to the Camera Basics
section and read over the lessons Choosing f16
will prevent overexposure to the lighter areas in
your scene The camera was positioned directly
over the top of the set using a tripod Make sure
your tripod is capable of supporting your
camera in these unusual positions
Pick three or four objects that work well
together Lay them out on a solid colored
background in an interesting design pattern
Position your camera lights and reflectors
Using a color transparency film bracket your
frames as you shoot
Final crop of image
reflector
reflector
7302019 Heinrich Melanie - Studio Lighting Workbook
httpslidepdfcomreaderfullheinrich-melanie-studio-lighting-workbook 7589
Arranging a Set
Film
VPS 100 - Color Negative
Camera Format
2 14 square - Hasselblad
Medium Format
Lens
80mm Normal
Light Source
Strobe with Softbox
Meter
Handheld Incident
Tripod
Yes
Filters
None
7302019 Heinrich Melanie - Studio Lighting Workbook
httpslidepdfcomreaderfullheinrich-melanie-studio-lighting-workbook 7689
Within each image there can exist sets that pull the
entire image together The image above is an example
of one of these small sets The set is staged for a period
in time
Some professionals hire stylists to set something like
this up Background information helps convey a
message in the overall scene For example suppose you
are shooting the interior spaces of a Victorian home
and your client wants to place the product in the late
1800s Objects in the photo above will help transport
your viewer into that time in history Props are a very
important part in convincing your viewer of a place in
time You can find props at antique stores for this kind
of scene Time period images must be authentic down
to the smallest details Hire a historian for accuracy if
needed
Magazines use small inset photos that display intricate
details of settings They may not be set against a black
background as in the photograph above The
background should be dimly lit or out of focus to
help accent the subject Shallow depth of field and
object placement will work together to make your
image successful
One main strobe light was used in the photograph
above with no fill lights or reflectors This drops the
background of black velvet into black making it a
perfect place for white text Remember an
editor or designer usually needs to add type and will
need this space
7302019 Heinrich Melanie - Studio Lighting Workbook
httpslidepdfcomreaderfullheinrich-melanie-studio-lighting-workbook 7789
Still lifes have been used in fine art for many years The
image above happens to be found in nature but could
have just as easily have been set up in a studio The
arrangement of the plates and glass objects can be
emulated in the studio or in a set I have included this
image to show you that what you find most naturally in
life is how you should set up a scene whether in the
studio or on location Take your camera into the world
around you and shoot small stories such as the one
above These still lifes will help you to stylize your own
setups This lesson will help you learn how to crop and
balance your images Pay close attention to the light
falling on the objects in your scenes Follow the previous
example to determine the proper exposure of your film
Be deliberate when you consider the photographs you
will take Take your time
Remember to see within the boundaries of your frame
balancing objects from front to back side to side and
corner to corner See Visual Basics for more
information on setting an objects position within the
frame
7302019 Heinrich Melanie - Studio Lighting Workbook
httpslidepdfcomreaderfullheinrich-melanie-studio-lighting-workbook 7889
Photographing Beautiful Glass
Film
VPS 100 - Color Negative
Camera Format
2 14 square - Hassalblad
Medium Format
Lens
80mm Normal
Light Source
Strobe with Softbox
Meter
Handheld Incident
Tripod
Yes
Filters
None
7302019 Heinrich Melanie - Studio Lighting Workbook
httpslidepdfcomreaderfullheinrich-melanie-studio-lighting-workbook 7989
The image above will give you an idea of how to light
small objects in a room or on a set You can make
objects pop out that are a very small part of the sceneFor example the color in this image is something you
really want to show but each of the objects must be
placed and lit properly to portray the beauty of their
colors Small strobes with funnel snoots will spotlight
only the objects you are interested in The blue
background color was chosen as a color complement to
the colors in the glass
TIP A snoot can be made from a rolled piece of
poster board into the shape of a cone You can also
buy these cones to fit on the strobe Be careful if using
poster board as the lights can get very hot
Take a large piece of poster board and roll it into a
cylinder shape Fig 1 Tape the center of the cylinder
then expand one end and decrease the opposite end of
the cylinder Fig 2 Make the expanded end large
enough to fit over the strobe head The other end of
the cylinder should be small enough to direct the light
at whatever object you want to be lighting The size of
the smaller hole will dictate the angle of the light
pointed at the object
Fig 1 Fig 2
7302019 Heinrich Melanie - Studio Lighting Workbook
httpslidepdfcomreaderfullheinrich-melanie-studio-lighting-workbook 8089
WARNING
DO NOT USE POSTER BOARD CONES WITH
TUNGSTEN LIGHTS The chance of fire is far too
great NEVER leave powered lights unattended
The glass objects in the photograph above have had the
light pushed directly through them When the light
passes through the colors are revealed
Shooting glass with liquid in it is described in the
diagram below The softbox is placed directly above the
set and slightly tilted away from the camera With the
liquid in the glass place a reflector card behind the
liquid only Looking through the camera lens make sure
the card does not extend past the liquid above or to the
sides Tip the card backwards so it picks up some of the
light falling down from the softbox This will illuminate
the liquid giving it a glowing appearance
7302019 Heinrich Melanie - Studio Lighting Workbook
httpslidepdfcomreaderfullheinrich-melanie-studio-lighting-workbook 8189
Your background can be any color detail or density when
using this reflector card
7302019 Heinrich Melanie - Studio Lighting Workbook
httpslidepdfcomreaderfullheinrich-melanie-studio-lighting-workbook 8289
Messages in a Still Life
Film
Ektachrome 100
Camera Format
35mm - Nikon
Small Format
Lens
50mm Normal
Light Source
Strobe with Softbox
Meter
Handheld Incident
Tripod
Yes
Filters
5 Red CC Filter
7302019 Heinrich Melanie - Studio Lighting Workbook
httpslidepdfcomreaderfullheinrich-melanie-studio-lighting-workbook 8389
The above image sends a message of peace and
comfort to its viewer in a couple of different
methods
One method is achieved by the type of lighting
used (In this case a strobe within a softbox) A warm
glow of very soft light is scraping horizontally
across the image and highlights fall on the outer
pages of the book It has a golden quality Another
method is achieved by using a number 5 CC filter
over the camera lens This accents the rich red color
in the roses with their saturated hue and balances
perfectly with the gold color in the pages as well as
the reddish-brown boards that they sit on
TIP ~
A red or orange transparent gel in an acetate sheet
form could be placed over the softbox to warm the
color pushed into the set
The background falls off into black holding the
viewers eye on the bible and the perfectly balanced
roses
This was shot with a softbox to the right of the scene
with no fill cards or fill lights The main light source
is close to the subject so the light falls off very little
When the light is positioned close to the subject its effect
on the oppiste side is minimal
7302019 Heinrich Melanie - Studio Lighting Workbook
httpslidepdfcomreaderfullheinrich-melanie-studio-lighting-workbook 8489
Using light color balance and the right props this
image conveys both warmth and love The main
subject is the bible The roses are used to convey a
feeling of love If instead of roses guns were used as
props the message would be entirley different
perhaps of violence Props can make or break
your image
7302019 Heinrich Melanie - Studio Lighting Workbook
httpslidepdfcomreaderfullheinrich-melanie-studio-lighting-workbook 8589
Creating a Mood
Film
Ektachrome 100
Camera Format
35mm - Nikon
Small Format
Lens
50mm Normal
Light Source
Strobes and reflectors
Meter
Handheld Incident
Tripod
No
Filters
None
7302019 Heinrich Melanie - Studio Lighting Workbook
httpslidepdfcomreaderfullheinrich-melanie-studio-lighting-workbook 8689
Making a statement with your photography should
be foremost in your mind The image above tells us ~
bedroom lovers intimacy passion etc It is up to
our imagination to fill in the blanks You have only a
few moments to convey your message so be careful
not to be too subtle yet not so blatant that your
message is visually insulting
The location in this shot was specifically chosen
Shot on a wooden floor a rustic authenticity is
portrayed A cowboy feel was achieved with these
surrounding elements The lingerie casually draped
over the boots looks accidental and unplanned The
boot that is tipped over leads the viewer to believe an
impetuous moment of hurried passion is taking
place The background is evident but intentionally
made out of focus by shooting at f4 for shallow
depth of field
This image is far from haphazard It was planned
from layout to location to scouting to objectplacement The idea came first then the execution of
the image Although minor alterations of layouts are
common the concept will remain the same This
eliminates confusion by isolating one idea and
working it through from all directions
Scouting out locations can be a full-time job and you
may need special permission to shoot in a particular
place See property release in the Legal Forms
section to cover your legal requirements and release
forms
7302019 Heinrich Melanie - Studio Lighting Workbook
httpslidepdfcomreaderfullheinrich-melanie-studio-lighting-workbook 8789
This kind of image will work very well for an adselling lingerie A strobe light with a softbox was
used to light the boots and the lingerie from the
right A reflector card was placed close to the boots
to fill in the left side of the scene The light is
positioned low near the floor which scrapes the light
on a low plan This was placed to simulate a specific
time during the day sunset or early evening The
light at this time is warm in color value which adds
to the subject matters message The camera vantage
point is low also bringing the viewer into intimate
contact with the boots and lingerie
7302019 Heinrich Melanie - Studio Lighting Workbook
httpslidepdfcomreaderfullheinrich-melanie-studio-lighting-workbook 8889
Still Lifes Selling Products
Film
Ektachrome 100
Camera Format
2 14 square - Hassalblad
Medium Format
Lens
80mm Normal
Light Source
Strobe with Softbox
Meter
Handheld Incident
Tripod
Yes
FiltersNone
7302019 Heinrich Melanie - Studio Lighting Workbook
httpslidepdfcomreaderfullheinrich-melanie-studio-lighting-workbook 8989
Placement and staging of objects requires a thought-out layout and planned
execution when using multiple products Layering has been used in this image
where non-information has been overlapped for example where the licence
plates and shirts touch Your viewer does not need to see the entire object in
this case to know what it is Strong diagonal lines have been made by object
placement This helps pull the viewer through the image and leads the eye to
a specific area of an image This image was created to find funding for
Vietnam vets by selling these products
If you have been asked to shoot several products and put them all into one
image think of it in terms of a still life setting Larger items will be placed inthe background sometimes even being used as the background For example
picture a group of images all representing something American The
background for this scene could be a flag which is also one of the subjects
There is no need to see the entire flag because it is an easily recognizable icon
In the image above the wooden floor was used to add a sense of the rustic and
gritty realism of the Vietnam war It was lit with a softbox directly above the
subjects The aperture was a concern for foreground to background
sharpness so the camera was pulled back far enough from the scene to allow
for a large aperture of around f 56
Below is the final image This was dropped into a 3 fold 812 x 4 brochure
along with other images of the same sort
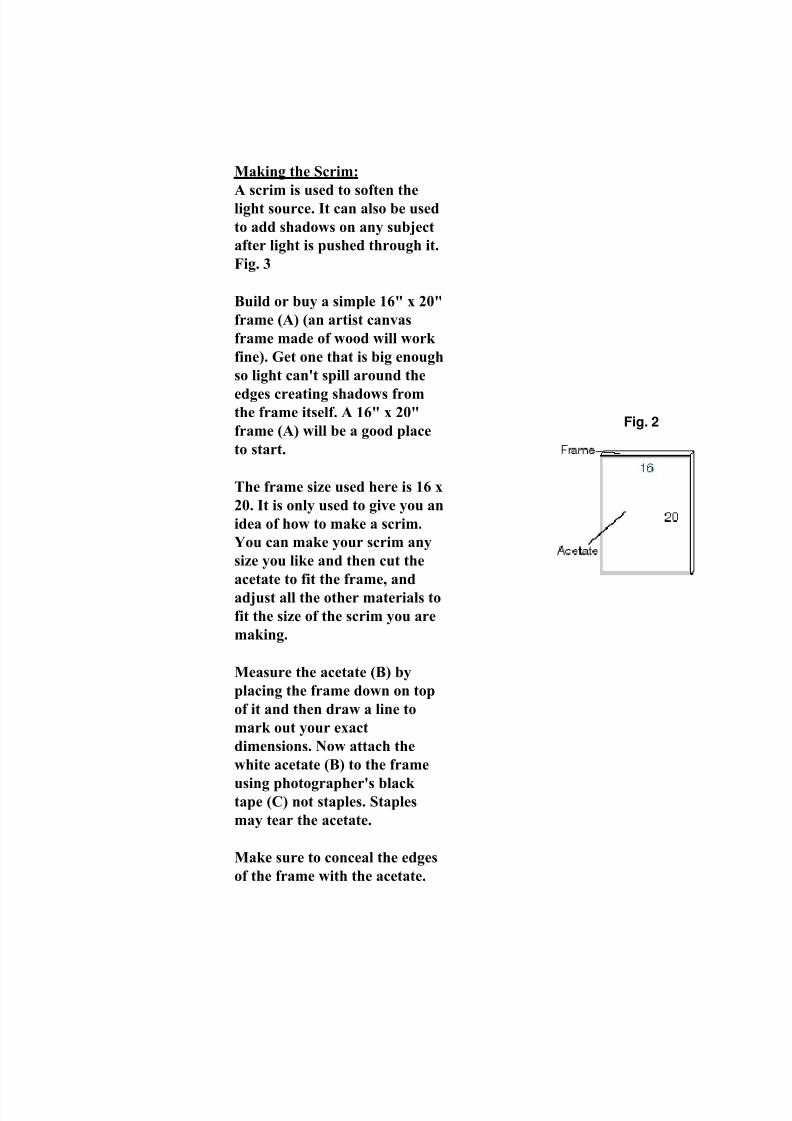
7302019 Heinrich Melanie - Studio Lighting Workbook
httpslidepdfcomreaderfullheinrich-melanie-studio-lighting-workbook 2889
a small hole into one of the
scrims to put your lens
through Make sure your
product is placed properly or
you will be moving the tent
several times to get it right Fig 6
TIP ~
Another way to approach this
is to make one of the scrimsfreely swing open so you can
easily access the subject for
rearranging Hinge one of the
connecting joints
TIP ~
You may need to make color
tests because the acetate can
fade over time giving a yellow
cast
TRICK ~
The scrim can be covered with
a colored sheet of acetate Try
using different colors on
opposite sides of the tent
Fig 6
7302019 Heinrich Melanie - Studio Lighting Workbook
httpslidepdfcomreaderfullheinrich-melanie-studio-lighting-workbook 2989
Building a Backdrop and Table
A backdrop is essential for most
photographs taken in a studio This
lesson will show you how to make one
The ceiling must be solid not a drop
ceiling
Materials Needed
(A) Two- curtain rods (height of your
ceiling)
(B) One- 7 pole 2 diameter
(C) two sets of workhorses
The curtain rods you buy must be high
enough to reach between your floor
and ceiling They must have enough
spring tension to stay in place from
floor to ceiling
Set the curtain rods up between floor
and ceiling and about 6 feet apart and
3 feet from the wall Fig1
Stretch the 7 foot pole between the two
curtain rods and attach with clamps or
duct tape in place Fig 2
Fig 1
Fig 2
7302019 Heinrich Melanie - Studio Lighting Workbook
httpslidepdfcomreaderfullheinrich-melanie-studio-lighting-workbook 3089
material on the pole by draping it over
the top and attaching it with clamps If
you want to use seamless paper (large
rolls of paper on long cylinders) you
will need to leave one end of the poleaccessible to load the seamless
TIP ~
Seamless paper comes in 4 foot and 9
foot rolls You can use this paper over
and over again depending on how well
you take care of it avoiding creases
and soiling
TIP ~
Light stands can be used in place of the
curtain rods if you have a drop ceiling
This backdrop can be used in many
different situations as seen in Figs 3-8
All three setups are top lit
TRICK ~
Fig3 has a backdrop hanging to the
floor and a light on the floor that
flashes upwards onto the white
background paper The table is pulled
away from the backdrop Hint Place
an interesting material on the table
top this can achieve the look of a
sunset
The shot of the phone in Fig 4 was
done using this kind of set-up The
difference between the table top
material and the backdrop has left a
hard line at the horizon The spotlight
with a red acetate on it is set on the
floor below and facing up at the
seamless paper leaving the magenta
color behind the phone
Fig 5 leaves a hard horizon line where
Fig 3
Fig 4
Fig 5
At this point you can hang any kind of
your table top meets the backdrop
7302019 Heinrich Melanie - Studio Lighting Workbook
httpslidepdfcomreaderfullheinrich-melanie-studio-lighting-workbook 3189
TIP ~ Put an interesting material on the table
top this will increase the contrast
between the foreground and
background
Fig 6 is an example of a hard line
horizon line The table top in this shot
is a marble table top The background
is a piece of black velvet
Fig 7 is a traditional set for product
photography When the backdrop
swoops down onto the tabletop in this
fashion it leaves a beautiful gradation
on the backdrop
Fig 8 is a shot of a live set using this
style of backdrop The final image was
cropped to exclude all traces of the set
Fig 6
Fig 7
Fig 8
7302019 Heinrich Melanie - Studio Lighting Workbook
httpslidepdfcomreaderfullheinrich-melanie-studio-lighting-workbook 3289
Building a Studio Flat- Reflector
Materials Needed
One- 4 x 6 piece of foam core (14 thick)
(Plumbing department)
(A) Two (6 x 15 lengths of PVC tubing
(B) Four (1 x 15 lengths of PVC
tubing
(C) Three (44 x 15 lengths of PVC
tubing
(D) Six right-angle PVC tubing pieces
(red in Fig 2) to fit into lengths of tubing
above
(E) Two Ts (blue in Fig 2) to fit intolengths of tubing above
Double sided foam tape
Plumbers cement and purple pvc
preparation fluid
Saw (ask the hardware store to make
the cuts required)
This lesson will show you how to build a
studio flat that can be used as a reflector
as well as some other things that are
shown below
Fig 1
7302019 Heinrich Melanie - Studio Lighting Workbook
httpslidepdfcomreaderfullheinrich-melanie-studio-lighting-workbook 3389
You can make this flat any size you like
Ours is designed as a 4 x 6 Just follow
the simple construction plan below
Once you get all the things that are listed
in the materials listed above read all of
the directions before continuing
TIP ~
PLUMBERS CEMENT DOES NOT
SEPARATE ONCE IT ISCONNECTED TO TUBING
FRAME
1 Using the plumbers cement attach
two of the right-angled tubes to the ends
of the 6 foot tubing Once these are
secure attach the 44 tube at the top of
the frame See Fig 1 Be sure the two 6
tubing sections are parallel to each
other front to back and side to side
BASE
2 Using the plumbers cement attach
the Ts to the one foot sections of tubing
Fig 2
3 Using the plumbers cement attach
the four right angles to the opposite ends
of the 4 foot sections Before you do this
make sure that the two Ts are pointing
up and at right angles to the cornersFig 2
Fig 3
Fig 2
7302019 Heinrich Melanie - Studio Lighting Workbook
httpslidepdfcomreaderfullheinrich-melanie-studio-lighting-workbook 3489
frame using the double sided foam tape
Position the foam core so it fits against
the frame tightly
TIP ~
You can use this flat for many things
besides a reflector It will be sturdy
enough to hang things from it and can
even be useful as a backdrop Fig4
TRICK ~ Drape material over it for close-up
photography or simply use it to block
light from an area on your set Fig 5
Fig 5
Fig 4
Finally attach the foam core to the
4 Using the plumbers cement attach
the final 44 pieces of the base to the
right angles Fig 2
5 Using the plumbers cement attach
the frame to the base at the Ts Fig 3
7302019 Heinrich Melanie - Studio Lighting Workbook
httpslidepdfcomreaderfullheinrich-melanie-studio-lighting-workbook 3589
Some photographers have a real gift for
photographing people They are able toembrace humanity and capture on film the
very essence of life They reveal the
persons emotions without saying a word
They seem to understand the unspoken
word of the heart and are able to record it
without the distraction of camera and
technique
If you have clicked on to this page chances
are you are one of those people Perhapsyou just need a bit more help or
information to push your images to a new
level of success These lessons are aimed at
doing just that
In these lessons you will learn how to make
your subject comfortable and to reveal
the subjects true feelings It is true not all
people are comfortable enough with themselves
to trust and let go and you will discover who
is easy to shoot and who is not easy to
shoot There are ways to help people
become comfortable in front of a camera
Lessons in this section
Emotional Power Portrait
Creating a Sullen Emotion
Staging People
7302019 Heinrich Melanie - Studio Lighting Workbook
httpslidepdfcomreaderfullheinrich-melanie-studio-lighting-workbook 3689
The best way to shoot people is from a
distance Give them personal space andshoot with a long lens Pretend you are
shooting a couple of rolls to get them
familiar with being photographed Try not
to give much direction or you will find
yourself with very staged and stiff
subjects Follow them around if they will
permit it At some time they will be relaxed
this is when you will get the best shot
Let the people be themselves until they are
comfortable then direct them with very
simple suggestions Many factors come into
play when photographing people like the
texture of their skin what areas the light
hits their face their posture and the gait of
their walk Remember your basic visual
design elements when positioning a person
in the frame Colors will also play a large
role in the emotion you portray about the
person See visual design
Below are some successful photographs of
people Some of the people the photographer
knew and some of the people were just
shot on the street
7302019 Heinrich Melanie - Studio Lighting Workbook
httpslidepdfcomreaderfullheinrich-melanie-studio-lighting-workbook 3789
Emotional Power Portrait
Film
Ektachrome 100 Daylight
Film
Camera Format35mm - Nikon
Small Format
Lens
28mm Wide
Light Source
Strobe with softbox
Meter
Handheld Incident
Tripod
No
Filters
None
Polaroids
No
7302019 Heinrich Melanie - Studio Lighting Workbook
httpslidepdfcomreaderfullheinrich-melanie-studio-lighting-workbook 3889
The photograph was shot for a portfolio Our
photographer included this image in his portfolio in
an attempt to get jobs of this nature This image
reveals the ability to direct the subject
Understanding body posture is very important
when taking these kinds of photographs Knowing
the right moment to record the image as the model
stares into the photographers lens may take some
time to learn Study people and record in your
mind their posture and movements notice their
emotions and how they display them in their
bodies By studying people you will learn to
communicate and capture peoples emotion in your
images
Use props to direct your viewers eyes in your
images In the above image the model holds a
barbell that breaks into the lower part of the image
frame which leads the viewers eyes to the models
eyes The barbell was counterbalanced with her
face in the background Cropping is the key here
Dont be afraid to get in close It will help convey
the message of intimacy When the above image
was shot our photographer had to invade the
models personal space However our
photographer was able to capture something
unique in his image As a photographer you mustunderstand what effect and subtle nuances you
want to provoke and get in your images and then
know how to achieve them using your camera
through our lessons
Now ask yourself how was the light created in the
above image Where were the lights positioned
What type of light was used
The light was created by a strobe in a softbox (See
Building a Studio to learn how to build this kind of lighting system) The lighting was directdiffused A
small fill on the left side added a soft diffused fill
light This diffused light was created by bouncing
light from the main light and was placed close to
7302019 Heinrich Melanie - Studio Lighting Workbook
httpslidepdfcomreaderfullheinrich-melanie-studio-lighting-workbook 3989
the models face It was positioned approximately 3
feet from her and powered by a large power pack
of about 2000 watts
The background was intentionally dropped off intoblack leaving no more detail than necessary or
desired It was placed about 5 feet behind the
model
The model applied baby oil to her face for the shot
A spray bottle filled with water was used to add the
illusion of sweat She shook her head about to
provide the work-out like appearance After all
that the photographer was able to achieve the
image he wanted after paying close attention to the
small details and knowing how to use his camera
A wide-angle lens was used to take this shot It
helped to accentuate the barbell and hand of the
model The exposure was taken with a handheld
incident meter facing the camera Several frames
were shot bracketing the image and the final image
was chosen in editing Study your brackets
carefully on a good light table to pick a final
photograph
7302019 Heinrich Melanie - Studio Lighting Workbook
httpslidepdfcomreaderfullheinrich-melanie-studio-lighting-workbook 4089
Creating a Sullen Emotion
Film
Tmax 100 Black and White Film
Camera Format
2 14square - HasselbladMedium Format
Lens
80mm Normal
Light Source
Strobe with softbox and spot
stobe
Meter
Handheld Incident
Tripod
Yes
Filters
None
Polaroids
Yes
7302019 Heinrich Melanie - Studio Lighting Workbook
httpslidepdfcomreaderfullheinrich-melanie-studio-lighting-workbook 4189
Capturing a mood or creating a mood can be done using
dramatic light You should also direct your subject into
positions that convey the emotion you are after Be carefulnot to over direct your subject This can make the image
look contrived and fake Professional models are great
actors and will understand your direction very well If you
are not photographing a professional model you should do
a couple of things to help your model Use a long lens
Keeping a distance between you and the model will give
them room to relax Secondly pretend to shoot a couple of
rolls of film This should give them enough time to get
comfortable with the flashing lights and shutter clicks
Next shoot a lot of film Be clear with your directions
Design your set so you can move around freely and shootfrom different vantage points During the shoot your
model will become more relaxed and the images will turn
from stiff to candid
In the image above a softbox was positioned close to the
subject and was the main light The light was intentionally
overexposed This was done by taking a meter reading
from the subjects left side where the fill light fell off This
technique slightly overexposed the light on his right side
and forehead Now you can see how a slight change in
metering placement can change the entire feeling of an
image A white reflector card was used to bounce a
diffused fill light into the subjects right side This style is
meant to emulate the lighting found in a theatre ~ high
contrast and a dramatic mood A spotlight lights the back
part of his neck It is raised high above and pointed down
at the subject
7302019 Heinrich Melanie - Studio Lighting Workbook
httpslidepdfcomreaderfullheinrich-melanie-studio-lighting-workbook 4289
With a little direction we found the emotion we were
looking for The subject was told to rest his elbows on his
knees as he clutched his drumsticks The position of his
head relative to his body turns his face toward the viewer
This position is natural and comfortable for him His eyes
are looking downward as though in reflection of another
time It is a moody image because of the lighting and his
expression Practice photographing your friends by
directing them with posture poses and physical
appearance changes
7302019 Heinrich Melanie - Studio Lighting Workbook
httpslidepdfcomreaderfullheinrich-melanie-studio-lighting-workbook 4389
Staging People
Film
Ektachrome 100
Daylight
Camera Format
2 14 square - Hasselblad
Medium Format
Lens80mm Normal
Light ource
Two Umbrellas with
Strobes
Meter
Handheld Incident
Tripod
Yes
Filters
None
Polaroids
Yes
7302019 Heinrich Melanie - Studio Lighting Workbook
httpslidepdfcomreaderfullheinrich-melanie-studio-lighting-workbook 4489
When staging people you need to create a natural appearance
The same principle holds true when photographing people If you
hire professional models it will make your job much easier
Professional models will know exactly what to do with very little
direction More importantly they are completely comfortable in
front of the lens
The image above was shot for an architectural firm catalog The
company wanted to save money by using their own employees as
models We wanted to use professional models but made the
concession in order to secure the job We used familiar icons to
help the employees feel comfortable in front of the camera Oncewe had them working on the architectural model they had
forgotten about the camera and lights in the room We were able
to get the tools of their trade in the scene the employees
comfortable and then able to capture several successful images
for our client
We used two lights with umbrellas to light the scene One strobe
was placed to the right of the camera and pointed at the set and
the other strobe was positioned behind the left side of the camera
and was high in the air and pointed downward towards the set
See the diagram below
The two strobes were balanced and their meter readings were the
same When photographing people use a shutter speed that stops
any possible movement Do not shoot at a shutter speed below the
millimeter of the lens you are using For example if the lens you
are using is a 90mm lens your shutter speed will be 1125th or
faster Use 160th of a second if you have a focal plane shutter
Cameras with a leaf shutter do not hold to the same constraints as
a focal shutter Leaf shutter lens also sync at any speed Review
your camera manual to see if there are any limitations with your
lens and camera
7302019 Heinrich Melanie - Studio Lighting Workbook
httpslidepdfcomreaderfullheinrich-melanie-studio-lighting-workbook 4589
Film
Ektachrome 100
Daylight Film
Camera Format
2 14 square -
Hasselblad
Medium Format
Lens
80mm Normal
Light Source
Strobes with Two
umbrellas
Meter
Handheld Incident
Tripod
Yes
Filters
None
PolaroidsYes
7302019 Heinrich Melanie - Studio Lighting Workbook
httpslidepdfcomreaderfullheinrich-melanie-studio-lighting-workbook 4689
The second image was shot in a compressor room It portrays
the inspection division of the same company These men are not
models and have a very realistic appearance One man poses as
manager and the other as an inspector Again we used props to
set the stage and asked the men to talk with each other
Cleaning the compressors was an important part of making the
statement the client desired The client portrays a clean and safe
environment Cleaning a set before shooting is sometimes the
most important thing you can do Paying attention to the small
details will get you repeat business This cant be stressedenough If you need to paint something in the scene before you
shoot it to make sure it looks right do it It may make all the
difference in the world Your client will take notice of your
attention to detail This is why previewing a location before you
shoot it is very important It gives you a chance to hire someone
or ask the client to clean these areas for the shot
The image above was shot with two strobes both using
umbrellas Both strobes were placed to the right of the camera
One of the strobes was positioned somewhat behind the men and
set high in the air This pushed light onto the compressorsbehind the men The second strobe lights the men and the
foreground parts of the compressors
7302019 Heinrich Melanie - Studio Lighting Workbook
httpslidepdfcomreaderfullheinrich-melanie-studio-lighting-workbook 4789
The advertising field is very competitive
yet the potential for increased income isgreat Photographers who are doing
advertising work tend to specialize
depending on the area they live in For
example someone living in a small city
may need to have several specialties On
the other hand someone in New York
could specialize in one thing ie
childrens fashions or motorcycles An
advertising photographer will most of
the time be working with an art
director from a design or advertising
firm Clients rarely hire photographersdirectly unless they have established a
rapport with them It is generally the
AD (art director) working on the job
that will hire for the client
Ask yourself this question What is the
one thing that I like and feel
comfortable with Your answer is the
area you should be specializing in In
reality most people go through life and
their likes and dislikes change Aphotographer sometimes follows a
specialty For instance someone who
assisted a commercial photographer
shooting childrens clothes and liked it
decided to pursue that field The ideal
situation is to make a living doing whatyou really like
Lessons in this section
Lighting Multiple Glass ProductsUsing Props with Products
Multiple Exposures
Making Reflections Work for You
Using a Product for a Background
Floating a Product
Boring Product - Interesting Design
7302019 Heinrich Melanie - Studio Lighting Workbook
httpslidepdfcomreaderfullheinrich-melanie-studio-lighting-workbook 4889
The lessons in this section assume you
have a good working knowledge of
camera tools visual basics and lightingIf not go back to these sections and
learn these things first Also some of the
studio setups can be built Those
designs are described in Building a
Studio
The lessons in this section go into
extensive details showing you where to
position your lights and reflectors etc
in order to achieve a certain look and
feel in an image They includedescriptive diagrams for you to
duplicate
7302019 Heinrich Melanie - Studio Lighting Workbook
httpslidepdfcomreaderfullheinrich-melanie-studio-lighting-workbook 4989
Lighting Multiple Glass Products
FilmEktachrome 100
Daylight Film
Camera Format
4 x 5 - Horseman
Large Format
Lens
150mm Normal
Light SourceStrobe with Softbox and
Reflectors
Meter
Handheld Incident
Tripod
Yes
Filters
None
7302019 Heinrich Melanie - Studio Lighting Workbook
httpslidepdfcomreaderfullheinrich-melanie-studio-lighting-workbook 5089
The image above was an inset photograph for a
brochure cover The company sold gift baskets and
products The brochure was used to help their growing
marketing requirements The brochure had three
different images similar to this one along with
accompanying text The client was in the studiowhen this was taken and was the acting art director
So all proofs were finalized at the time of shooting
This eliminates any questionable fees for reshooting
Polaroids are used for the same reason An instant
image of lesser quality than film will serve as great
representations of the final photograph Polaroids
are sometimes faxed or scanned and emailed to the
client for approval Asking your client to sign off on
a photograph will give you the assurance that all is
okay and you can record the image on film
Shooting glass and high gloss labels can be a
frustrating exercise because of the multiple
reflections that occur Remember as you shoot to
look through the lens to see if you have any
reflections on your products in the set All
reflections are caused due to the angle between
lens and light source Review your polaroids
carefully for any reflections before you expose the
film
TIP ~ Moving the product a small amount may be the best
way to remove the reflections Before you do that
adjust your light to eliminate any glare and
reflection Each time you change the light position
you must check for glare
Place all the products on the table top according to
the layout supplied by your client or art director
The image above was tiered giving it height and
depth
The light is positioned directly over the set It is
tilted slightly toward the backdrop and away from
the camera The backdrop is set up as a sweep It is
a piece of gray formica See Building a Studio to
7302019 Heinrich Melanie - Studio Lighting Workbook
httpslidepdfcomreaderfullheinrich-melanie-studio-lighting-workbook 5189
learn how to make this if you are inexperienced in
studio construction
Three white or silver cards are used in the front andon both sides to pump additional light into the
scene These are carefully and strategically placed
to avoid seeing the reflector cards in the glass
When you are shooting glass objects the main light
should reflect in the glass It indicates the direction
of the light source The main light source reflection
is acceptable as long as it is not too bright The fill
light from the reflector cards should not dominate
your main light source
TIP ~ Reflector cards can be made from any material that
reflects light such as a white card Large pieces of
foam core are used and cut into smaller pieces
depending on the size of the set Silver cards are also
used They are positioned to reflect the light coming
from your main light source and bounce the light
softly back into the set These cards will add more
light and sometimes add unacceptable hot spots on
the products These hot spots are very distracting
and unsightly
Now that you have all your lighting sources in place
look through the camera to see if you have any
reflections If you have a lot of glare in your image
readjust the overhead light by tilting it more
towards the back or front Be careful to avoid lens
flare Lens flare is when your light or lights reflect a
glare back into the lens For example when
someone shoots into the sun the lens picks up a
glare Block the lens flare with a black card by
placing the card between the light and lens Make
sure not to put the card into your scenes final crop
or in a position where you block your image You
may need to move your lights or use a scrim to get
rid of the lens flare It will be easier to add a scrim if
you have previously adjusted all the glass for no
reflections Instead of a scrim you could use a lens
hood The lens hood attaches to the front of the lens
7302019 Heinrich Melanie - Studio Lighting Workbook
httpslidepdfcomreaderfullheinrich-melanie-studio-lighting-workbook 5289
It protrudes from the lens and blocks any glare
falling on the front lens element Each lens may use
a different hood These come in many different
shapes and sizes I use a scrim because it is far more
versatile
Assuming your light source is in a good position you
may still have some glare on the glass You can
eliminate many reflections by slightly tipping the
product forward Use a small object under the back
side of the product while not disturbing the
products position These are very slight movements
and will not change the appearance to any great
degree Also tip the reflectors back and forth and
side to side to remove any added glare from your
objects Be attentive to all the objects You may
eliminate glare in one object and produce it in
another You must check for any reflections in your
polaroids Some reflections are very difficult to
detect when viewing the set from behind the camera
using the modeling lights
Use an incident meter and read the light falling on
the set Always bracket your exposure Bracketing is
the process of taking many shots of the same set but
using different fstops For example if your meter
reads f32 at 160th of a second your bracket would
be one stop on either side f22 and f45 at the same
speed The image was shot at f32 or greater depth-
of-field Some photographers bracket with 12 stops
and 13 stop differences They shoot 5 sheets of film
using these small incremental changes
7302019 Heinrich Melanie - Studio Lighting Workbook
httpslidepdfcomreaderfullheinrich-melanie-studio-lighting-workbook 5389
Final cropping of image
The final image displayed on the left was
successfully shot with no glare on any of the
products All the products were in glass or were
wrapped in cellophane The image has been
cropped to match the final inset space for the
brochure This shot took about a half day toshoot
7302019 Heinrich Melanie - Studio Lighting Workbook
httpslidepdfcomreaderfullheinrich-melanie-studio-lighting-workbook 5489
Using Props with Products
FilmEktachrome 100
Daylight Film
Camera Format
4 x 5 - Horseman
Large Format
Lens
90mm Wide
Light SourceStrobe with Softbox
Meter
Handheld Incident
Tripod
Yes
Filters
None
7302019 Heinrich Melanie - Studio Lighting Workbook
httpslidepdfcomreaderfullheinrich-melanie-studio-lighting-workbook 5589
When using props to help convey your message
remember the visual basics about colorperspective framing contrast backgrounds
and balance
This image of a racing bike was shot from an
angle that enlarged the back wheel The wide
angle lens helps pronounce the wheel size as well
as increasing the elongated perspective of the
bike
The bike was shot against a black background
Isolating your subjects by eliminatingdistracting backgrounds will help make the
objects in the set stand out The three arrow-
shaped plexiglass pieces all point to the distance
This visually portrays the speed and forward
motion of a racing bike Primary colors of the
plexiglass are used to simplify the information
in the image The gears of the bike are
pronounced displaying the bikes power and
versatility The camera position is very low and
tilted upward to further increase the illusion of
size
A softbox was used to keep the glare on the
chrome to a minimum It was positioned
parallel to the bike seat on its right side and
tipped down slightly toward the pedals If you
look carefully you can see the reflection of the
softbox in the blue plexiglass This is acceptable
The light has bounced color from the plexiglass
back onto the chrome of the bike This adds
interesting color highlights to the image that
balance well with the other colors
Parts of the wheels reflect the colors of the
plexiglass adding an interesting bit of color
7302019 Heinrich Melanie - Studio Lighting Workbook
httpslidepdfcomreaderfullheinrich-melanie-studio-lighting-workbook 5689
backdrop will work also The velvet material
absorbs any light that falls on it
When you are taking your exposure readings
make sure that you take readings of the
background walls in the scene Do not face your
light toward the back wall The meter readingsof the walls should be at least 4 stops darker
than your final exposure This will maintain a
black background
The wide angle lens was used to achieve
maximum depth-of-field This image was
exposed at f45
The room was totally darkened for this shot
Some photographers will even paint their walls
black for a shot like this A black velvet
7302019 Heinrich Melanie - Studio Lighting Workbook
httpslidepdfcomreaderfullheinrich-melanie-studio-lighting-workbook 5789
Multiple Exposures
Film
Ektachrome 100
Daylight Film
Camera Format
4 x 5 - Horseman
Large Format
Lens
150mm Normal
and 90mm Wide
Light Source
Strobe with Softbox
Meter
Handheld Incident
Tripod
Yes
Filters
None
7302019 Heinrich Melanie - Studio Lighting Workbook
httpslidepdfcomreaderfullheinrich-melanie-studio-lighting-workbook 5889
This image was designed as a poster for a national bowling
tournament The objects were intentionally placed leavingblack areas for the white text or copy and logos to be placed
on the final poster
The image above was done by repositioning the camera
three different times and exposing the film each time with
the change (Three shots on one piece of film) In addition the
lens was changed for one of the shots
You will need a large piece of black velvet to absorb all
scattered light All exposures were shot on the black velvet
The velvet does not see light This leaves that area of the filmunexposed This allows you to expose something else in the
black area which occurs when you take your next exposure
You will also need a piece of acetate to place on the film
back for tracing the objects in each exposure This will help
you line everything up and avoid overlapping your
products By tracing the objects that appear on your film
back onto a piece of acetate you will be able to align
everything perfectly
The first exposure was made of the bowling ball in thebottom right with a wide angle lens The second exposure
was made of the bowling pin on the left bottom The third
exposure was made of the top right 2 bowling pins One of
these pins was raised up on a block for added dimension
With each exposure the camera was progressively pulled
away from the scene The camera lens to subject distance
was increased to help this illusion of depth Diagrams below
may help you understand this better
Make sure when taking photos like this that any part of the
image you wish to remain unexposed is filled with the black velvet You can add any lighter value to a black area with
film because it is unexposed
7302019 Heinrich Melanie - Studio Lighting Workbook
httpslidepdfcomreaderfullheinrich-melanie-studio-lighting-workbook 5989
When you are ready to make the first exposure trace the
film back onto the acetate by placing the acetate over your
film back Do this with each exposure
A softbox was used and placed close to all of the subjects
producing direct lighting Your exposure times and fstops
can be different for each exposure just as if you were taking
separate photographs In fact think of this type of image as
a composite
Wide Angel Lens Normal Lens Normal Lens
7302019 Heinrich Melanie - Studio Lighting Workbook
httpslidepdfcomreaderfullheinrich-melanie-studio-lighting-workbook 6089
Making ReflectionsWork for You
Film
Ektachrome 100
Daylight Film
Camera Format
4 x 5 - Horseman
Large Format
Lens
150mm Normal
Light Source
Strobe withSoftbox
Meter
Handheld
Incident
Tripod
Yes
Filters
None
7302019 Heinrich Melanie - Studio Lighting Workbook
httpslidepdfcomreaderfullheinrich-melanie-studio-lighting-workbook 6189
The image above was shot on a highly reflective
background It came in a long roll about 4 feet
wide The light was positioned toward the front
parts of the products to avoid a hard horizon lineThe light falls off into black making it useful for
the reversed type of white (see below) Be careful
to avoid lens flare when positioning the lights near
the camera lens Make sure to block any light that
may fall on the lens Use a scrim to block the light
A scrim is any black piece of material that will
function as a light block Black masking tape was
secured to the edge of the lens to block the light
Be careful not to show the tape in your
photograph
Glare can be a major problem with highly
reflective sets like this one Always remember to
look through your lens to avoid this Tip your
light toward the front or back of the scene to
adjust the glare on the set This shot was taken
using a strobe head inside a softbox This type of
light is often used in product photography
especially when shooting highly reflective objects
The light rays are scattered and softened by this
kind of light source
Each of the objects in this scene are veryreflective The reflective gold surface used to shoot
on adds interest to the products by adding a gold
reflection of the product onto the gold surface
This gives depth to the image
Adding different colored line art around the edge
of the image in the white border adds an extra
dimension to the final composite below This was
done by the designer after the image was taken
Some of the line art is in front of the image and
some is dropped behind the image Reverse text isused on the black part of the image and black text
is used on the white border
7302019 Heinrich Melanie - Studio Lighting Workbook
httpslidepdfcomreaderfullheinrich-melanie-studio-lighting-workbook 6289
Using a Product for a Background
Film
Ektachrome 100
Daylight Film
Camera Format
4 x 5 - Horseman
Large Format
Lens
150mm Normal
Light Source
Strobe with Softbox and
Reflector
Meter
Handheld Incident
Tripod
Yes
Filters
None
7302019 Heinrich Melanie - Studio Lighting Workbook
httpslidepdfcomreaderfullheinrich-melanie-studio-lighting-workbook 6389
This close-up of a computer chip was designed for the
front cover of a computer companys brochure (see
below) It was nesseccary to get the best detail for
enlargement reasons so a large format camera was used
The end image was 9 x 12 our negative was 4 x 5
A strobe with a softbox was used to light this subject
from the left side An accompanying white reflector card
was placed close to the subject to fill in the right side
with light (see diagram below)
The bellows on the 4 x 5 camera were extended to
enlarge this chip to fill the frame When extending the
bellows you increase the need for light to reach the film
In this case we did not need to have a small f-stop
number for sharpness so we left the lens open at f56and made our exposure appropriately Even if you need
to pop your flash a couple of times extending the
bellows should not be something to hold you back from
making the close-up you want to shoot The detail in this
shot is achieved by using a 4 x 5 camera with a good lens
TIP ~
Popping or firing the strobe multiple times is done with
the lens open in a darkened room so the only light in the
room is coming from your controlled multiple burst of
the flash Since you have no need for speed whenshooting inanimate objects keep pumping in the light to
get the exposure you need In a dark room you could
leave your lens open and just continually pop the strobe
Or you can cock the shutter and repeat the same
exposure until it adds up to the correct amount of light
required Make sure you are on a very steady tripod
The slightest amount of movement will blur your image
TIP ~
The best set up for any overhead shot with a 4 x 5 is to
put your set on the floor This is of course dependent on
the size of your set A short-legged set of horses works
very well also The legs used in this set were about 12
high
The hue of bluegreen works well with the yellow text
7302019 Heinrich Melanie - Studio Lighting Workbook
httpslidepdfcomreaderfullheinrich-melanie-studio-lighting-workbook 6489
The text pops off the image This color prevents the text
from falling into the background The background of the
computer chip remains a simple reminder of what the
company does It is the text that the viewer is expected to
read
This image would also make a great backdrop for a
collage or montage image
7302019 Heinrich Melanie - Studio Lighting Workbook
httpslidepdfcomreaderfullheinrich-melanie-studio-lighting-workbook 6589
Floating Product
Film
Ektachrome 100
Daylight Film
Camera Format4 x 5 - Horseman
Large Format
Lens
150mm Normal
and 90mm Wide
Light Source
Strobe with
Softbox
Meter
Handheld
Incident
Tripod
Yes
Filters
None
PolaroidsYes
7302019 Heinrich Melanie - Studio Lighting Workbook
httpslidepdfcomreaderfullheinrich-melanie-studio-lighting-workbook 6689
Both images in this lesson give the illusion of
floating The top image is propped up underneath by
a block A softbox directly above the computer
circuit board was used to achieve a soft even light In
todays high-tech industry these kinds of images are
being used in composites and as single images
TIP ~
Using black velvet as a backdrop can achieve a
similar effect where the subject appears to float The
light will be absorbed into the black velvet material
to create the illusion
The computer chip is not grounded to anything so it
appears to float (see Fig 1) The angle of the light on
the computer circuit board picked up some very
interesting highlights in Fig 1 which adds to the
high-tech feel of the image
A 4 x 5 camera was used to get greater detail with
the larger negative for enlargement purposes Depth-
of-field was achieved at f32
When shooting any subject like this you can portray
many kinds of interesting illusions The black velvet
material may be a little more expensive but nothing
else works as well This kind of material will help
you take the shots like the pros
Fig 1
7302019 Heinrich Melanie - Studio Lighting Workbook
httpslidepdfcomreaderfullheinrich-melanie-studio-lighting-workbook 6789
Boring Product -Interesting Design
Film
Ektachrome 100
Daylight Film
Camera Format
4 x 5 - Horseman
Large Format
Lens
150mm Normal
Light Source
Strobe with Softbox
Meter
Hanheld Incident
Tripod
Yes
Filters
None
7302019 Heinrich Melanie - Studio Lighting Workbook
httpslidepdfcomreaderfullheinrich-melanie-studio-lighting-workbook 6889
Some products you will be photographing will be justplain boring such as the rods in the shot above Its
your job as the photographer to bring life and interest
to boring products like these In the image above the
client needed his products shot for his company
catalog
Making something interesting from something boring
can be done by using an interesting background or
unusual lighting In this image the layout and diagonal
positioning of the rods directs the viewers eye to the
top right area of the image of the frame Text was
placed at the top and right side of this image (see final
image below)
The softbox was positioned above and to the left of the
product as indicated by the soft shadows Fig1 This
image could have easily been cut out from its
background and placed on any other background
Minimal depth-of-field is needed for this shot because
the maximum height of the product was only two
inches An aperture of f8 was used The exposure is
made with an incident meter reading to achieve an
overall well-balanced tone
Deep shadows could have been used to add interest to
these products by using a direct light at a very low
level to the table angle Fig 2 No softbox would be
used for this kind of shot
The set is placed on the floor so your camera position
is directly over the top of the set If shot on a table top
you would need to stand on top of a ladder to take the
shot The easier choice is to shoot on the floor
7302019 Heinrich Melanie - Studio Lighting Workbook
httpslidepdfcomreaderfullheinrich-melanie-studio-lighting-workbook 6989
Fig 1
Fig 2
7302019 Heinrich Melanie - Studio Lighting Workbook
httpslidepdfcomreaderfullheinrich-melanie-studio-lighting-workbook 7089
Lessons in this section
Mixing Texture Shapes and Color
Arranging a Set
Photographing Beautiful Glass
Messages in a Still Life
Creating a Mood
Still Lifes Selling Products
Setting the stage works to help convince the
viewer of a place and time or mood Small
details make a shot believable These
lessons will teach you how to think and tell
a story of a certain place in time Picking
the right props for your shoot will ensure
believability The lessons in this section
work in conjunction with the ProductPhotography section
A still life photographer can be found
working in a studio or on location This
type of photography demands the
recreation of a set or going to the set to
capture a moment in time This can be done
on location in the studio or digitally
created on the computer The truth is it fits
into many categories It is more than
product photography You are creating a
scene that conveys a sense of being
somewhere
7302019 Heinrich Melanie - Studio Lighting Workbook
httpslidepdfcomreaderfullheinrich-melanie-studio-lighting-workbook 7189
you pull your entire learning experience
together I include details and diagrams
that will reinforce your understanding
Still life scenes are often used in a designers
set or in a showroom like in a furniture
store They can also be used to convey a
story quickly and help transfer the concept
and idea throughout the entire image These
lessons include tips on how to light objects
in small and detailed areas They will help
7302019 Heinrich Melanie - Studio Lighting Workbook
httpslidepdfcomreaderfullheinrich-melanie-studio-lighting-workbook 7289
Mixing Texture Shapes and Color
Film
Ektachrome 100
Camera Format
4 x 5 - Horsemen
Large Format View
Camera
Lens
150mm Normal
Light Source
Strobe with Softbox
MeterHandheld Incident
Tripod
Yes
Filters
None
7302019 Heinrich Melanie - Studio Lighting Workbook
httpslidepdfcomreaderfullheinrich-melanie-studio-lighting-workbook 7389
The image above was shot as a portfolio piece
Mixing textures shapes and colors the
photograph displays the photographers eye for
design It is photographed on black velvet which
adds saturation of the overall appearance by
absorbing all the light that falls on it The black
velvet can be purchased at any fabric store
Two scarves are positioned at opposing angles
adding strong graphic interest and competition
between them Against the soft colored scarves
the dark blue hat pops out The colored markers
are color complements to the blue hat and add
additional depth to the image
Resting on top of the scarves are brightly
colored objects which add spots of color andinterest The curvy lines of the ribbons break up
the edges of the two scarves and add a bit of fun
to the image The final crop of the image forces
the viewer to see the positive and negative
spaces of color within the frame Cropping plays
an important role in the success of your image
How the image was photographed ~
One main strobe light was used It was shot
through a softbox or mylar scrim Several white
and silver reflector cards surrounding the setbounced in a soft fill light Using the reflectors
as fill light evens out the overall appearance
without eliminating the direction of the main
light The shadows in the image are soft and
reveal more texture in the scarf
Minimal if any depth-of-field was needed in
this image so it was exposed at f56 The meter
reading is taken with an incident meter and
pointed directly at the camera Several readings
were taken of the entire image For example a
meter reading was taken of the light falling onthe hat the tip of the triangular scarf and the
black corners of the velvet before an exposure
was chosen A range of only 1 stop was allowed
between these exposure readings Reposition
your reflecting cards either closer or further
7302019 Heinrich Melanie - Studio Lighting Workbook
httpslidepdfcomreaderfullheinrich-melanie-studio-lighting-workbook 7489
from your subject to adjust the exposure
variations Your final exposure choice will be of
the area in the scene that is the brightest or
where the most light is falling If your exposure
variations are between f16 and f11 f16
indicates the brightest area in the scene You
should know this at this point in your educationIf you dont go back to the Camera Basics
section and read over the lessons Choosing f16
will prevent overexposure to the lighter areas in
your scene The camera was positioned directly
over the top of the set using a tripod Make sure
your tripod is capable of supporting your
camera in these unusual positions
Pick three or four objects that work well
together Lay them out on a solid colored
background in an interesting design pattern
Position your camera lights and reflectors
Using a color transparency film bracket your
frames as you shoot
Final crop of image
reflector
reflector
7302019 Heinrich Melanie - Studio Lighting Workbook
httpslidepdfcomreaderfullheinrich-melanie-studio-lighting-workbook 7589
Arranging a Set
Film
VPS 100 - Color Negative
Camera Format
2 14 square - Hasselblad
Medium Format
Lens
80mm Normal
Light Source
Strobe with Softbox
Meter
Handheld Incident
Tripod
Yes
Filters
None
7302019 Heinrich Melanie - Studio Lighting Workbook
httpslidepdfcomreaderfullheinrich-melanie-studio-lighting-workbook 7689
Within each image there can exist sets that pull the
entire image together The image above is an example
of one of these small sets The set is staged for a period
in time
Some professionals hire stylists to set something like
this up Background information helps convey a
message in the overall scene For example suppose you
are shooting the interior spaces of a Victorian home
and your client wants to place the product in the late
1800s Objects in the photo above will help transport
your viewer into that time in history Props are a very
important part in convincing your viewer of a place in
time You can find props at antique stores for this kind
of scene Time period images must be authentic down
to the smallest details Hire a historian for accuracy if
needed
Magazines use small inset photos that display intricate
details of settings They may not be set against a black
background as in the photograph above The
background should be dimly lit or out of focus to
help accent the subject Shallow depth of field and
object placement will work together to make your
image successful
One main strobe light was used in the photograph
above with no fill lights or reflectors This drops the
background of black velvet into black making it a
perfect place for white text Remember an
editor or designer usually needs to add type and will
need this space
7302019 Heinrich Melanie - Studio Lighting Workbook
httpslidepdfcomreaderfullheinrich-melanie-studio-lighting-workbook 7789
Still lifes have been used in fine art for many years The
image above happens to be found in nature but could
have just as easily have been set up in a studio The
arrangement of the plates and glass objects can be
emulated in the studio or in a set I have included this
image to show you that what you find most naturally in
life is how you should set up a scene whether in the
studio or on location Take your camera into the world
around you and shoot small stories such as the one
above These still lifes will help you to stylize your own
setups This lesson will help you learn how to crop and
balance your images Pay close attention to the light
falling on the objects in your scenes Follow the previous
example to determine the proper exposure of your film
Be deliberate when you consider the photographs you
will take Take your time
Remember to see within the boundaries of your frame
balancing objects from front to back side to side and
corner to corner See Visual Basics for more
information on setting an objects position within the
frame
7302019 Heinrich Melanie - Studio Lighting Workbook
httpslidepdfcomreaderfullheinrich-melanie-studio-lighting-workbook 7889
Photographing Beautiful Glass
Film
VPS 100 - Color Negative
Camera Format
2 14 square - Hassalblad
Medium Format
Lens
80mm Normal
Light Source
Strobe with Softbox
Meter
Handheld Incident
Tripod
Yes
Filters
None
7302019 Heinrich Melanie - Studio Lighting Workbook
httpslidepdfcomreaderfullheinrich-melanie-studio-lighting-workbook 7989
The image above will give you an idea of how to light
small objects in a room or on a set You can make
objects pop out that are a very small part of the sceneFor example the color in this image is something you
really want to show but each of the objects must be
placed and lit properly to portray the beauty of their
colors Small strobes with funnel snoots will spotlight
only the objects you are interested in The blue
background color was chosen as a color complement to
the colors in the glass
TIP A snoot can be made from a rolled piece of
poster board into the shape of a cone You can also
buy these cones to fit on the strobe Be careful if using
poster board as the lights can get very hot
Take a large piece of poster board and roll it into a
cylinder shape Fig 1 Tape the center of the cylinder
then expand one end and decrease the opposite end of
the cylinder Fig 2 Make the expanded end large
enough to fit over the strobe head The other end of
the cylinder should be small enough to direct the light
at whatever object you want to be lighting The size of
the smaller hole will dictate the angle of the light
pointed at the object
Fig 1 Fig 2
7302019 Heinrich Melanie - Studio Lighting Workbook
httpslidepdfcomreaderfullheinrich-melanie-studio-lighting-workbook 8089
WARNING
DO NOT USE POSTER BOARD CONES WITH
TUNGSTEN LIGHTS The chance of fire is far too
great NEVER leave powered lights unattended
The glass objects in the photograph above have had the
light pushed directly through them When the light
passes through the colors are revealed
Shooting glass with liquid in it is described in the
diagram below The softbox is placed directly above the
set and slightly tilted away from the camera With the
liquid in the glass place a reflector card behind the
liquid only Looking through the camera lens make sure
the card does not extend past the liquid above or to the
sides Tip the card backwards so it picks up some of the
light falling down from the softbox This will illuminate
the liquid giving it a glowing appearance
7302019 Heinrich Melanie - Studio Lighting Workbook
httpslidepdfcomreaderfullheinrich-melanie-studio-lighting-workbook 8189
Your background can be any color detail or density when
using this reflector card
7302019 Heinrich Melanie - Studio Lighting Workbook
httpslidepdfcomreaderfullheinrich-melanie-studio-lighting-workbook 8289
Messages in a Still Life
Film
Ektachrome 100
Camera Format
35mm - Nikon
Small Format
Lens
50mm Normal
Light Source
Strobe with Softbox
Meter
Handheld Incident
Tripod
Yes
Filters
5 Red CC Filter
7302019 Heinrich Melanie - Studio Lighting Workbook
httpslidepdfcomreaderfullheinrich-melanie-studio-lighting-workbook 8389
The above image sends a message of peace and
comfort to its viewer in a couple of different
methods
One method is achieved by the type of lighting
used (In this case a strobe within a softbox) A warm
glow of very soft light is scraping horizontally
across the image and highlights fall on the outer
pages of the book It has a golden quality Another
method is achieved by using a number 5 CC filter
over the camera lens This accents the rich red color
in the roses with their saturated hue and balances
perfectly with the gold color in the pages as well as
the reddish-brown boards that they sit on
TIP ~
A red or orange transparent gel in an acetate sheet
form could be placed over the softbox to warm the
color pushed into the set
The background falls off into black holding the
viewers eye on the bible and the perfectly balanced
roses
This was shot with a softbox to the right of the scene
with no fill cards or fill lights The main light source
is close to the subject so the light falls off very little
When the light is positioned close to the subject its effect
on the oppiste side is minimal
7302019 Heinrich Melanie - Studio Lighting Workbook
httpslidepdfcomreaderfullheinrich-melanie-studio-lighting-workbook 8489
Using light color balance and the right props this
image conveys both warmth and love The main
subject is the bible The roses are used to convey a
feeling of love If instead of roses guns were used as
props the message would be entirley different
perhaps of violence Props can make or break
your image
7302019 Heinrich Melanie - Studio Lighting Workbook
httpslidepdfcomreaderfullheinrich-melanie-studio-lighting-workbook 8589
Creating a Mood
Film
Ektachrome 100
Camera Format
35mm - Nikon
Small Format
Lens
50mm Normal
Light Source
Strobes and reflectors
Meter
Handheld Incident
Tripod
No
Filters
None
7302019 Heinrich Melanie - Studio Lighting Workbook
httpslidepdfcomreaderfullheinrich-melanie-studio-lighting-workbook 8689
Making a statement with your photography should
be foremost in your mind The image above tells us ~
bedroom lovers intimacy passion etc It is up to
our imagination to fill in the blanks You have only a
few moments to convey your message so be careful
not to be too subtle yet not so blatant that your
message is visually insulting
The location in this shot was specifically chosen
Shot on a wooden floor a rustic authenticity is
portrayed A cowboy feel was achieved with these
surrounding elements The lingerie casually draped
over the boots looks accidental and unplanned The
boot that is tipped over leads the viewer to believe an
impetuous moment of hurried passion is taking
place The background is evident but intentionally
made out of focus by shooting at f4 for shallow
depth of field
This image is far from haphazard It was planned
from layout to location to scouting to objectplacement The idea came first then the execution of
the image Although minor alterations of layouts are
common the concept will remain the same This
eliminates confusion by isolating one idea and
working it through from all directions
Scouting out locations can be a full-time job and you
may need special permission to shoot in a particular
place See property release in the Legal Forms
section to cover your legal requirements and release
forms
7302019 Heinrich Melanie - Studio Lighting Workbook
httpslidepdfcomreaderfullheinrich-melanie-studio-lighting-workbook 8789
This kind of image will work very well for an adselling lingerie A strobe light with a softbox was
used to light the boots and the lingerie from the
right A reflector card was placed close to the boots
to fill in the left side of the scene The light is
positioned low near the floor which scrapes the light
on a low plan This was placed to simulate a specific
time during the day sunset or early evening The
light at this time is warm in color value which adds
to the subject matters message The camera vantage
point is low also bringing the viewer into intimate
contact with the boots and lingerie
7302019 Heinrich Melanie - Studio Lighting Workbook
httpslidepdfcomreaderfullheinrich-melanie-studio-lighting-workbook 8889
Still Lifes Selling Products
Film
Ektachrome 100
Camera Format
2 14 square - Hassalblad
Medium Format
Lens
80mm Normal
Light Source
Strobe with Softbox
Meter
Handheld Incident
Tripod
Yes
FiltersNone
7302019 Heinrich Melanie - Studio Lighting Workbook
httpslidepdfcomreaderfullheinrich-melanie-studio-lighting-workbook 8989
Placement and staging of objects requires a thought-out layout and planned
execution when using multiple products Layering has been used in this image
where non-information has been overlapped for example where the licence
plates and shirts touch Your viewer does not need to see the entire object in
this case to know what it is Strong diagonal lines have been made by object
placement This helps pull the viewer through the image and leads the eye to
a specific area of an image This image was created to find funding for
Vietnam vets by selling these products
If you have been asked to shoot several products and put them all into one
image think of it in terms of a still life setting Larger items will be placed inthe background sometimes even being used as the background For example
picture a group of images all representing something American The
background for this scene could be a flag which is also one of the subjects
There is no need to see the entire flag because it is an easily recognizable icon
In the image above the wooden floor was used to add a sense of the rustic and
gritty realism of the Vietnam war It was lit with a softbox directly above the
subjects The aperture was a concern for foreground to background
sharpness so the camera was pulled back far enough from the scene to allow
for a large aperture of around f 56
Below is the final image This was dropped into a 3 fold 812 x 4 brochure
along with other images of the same sort
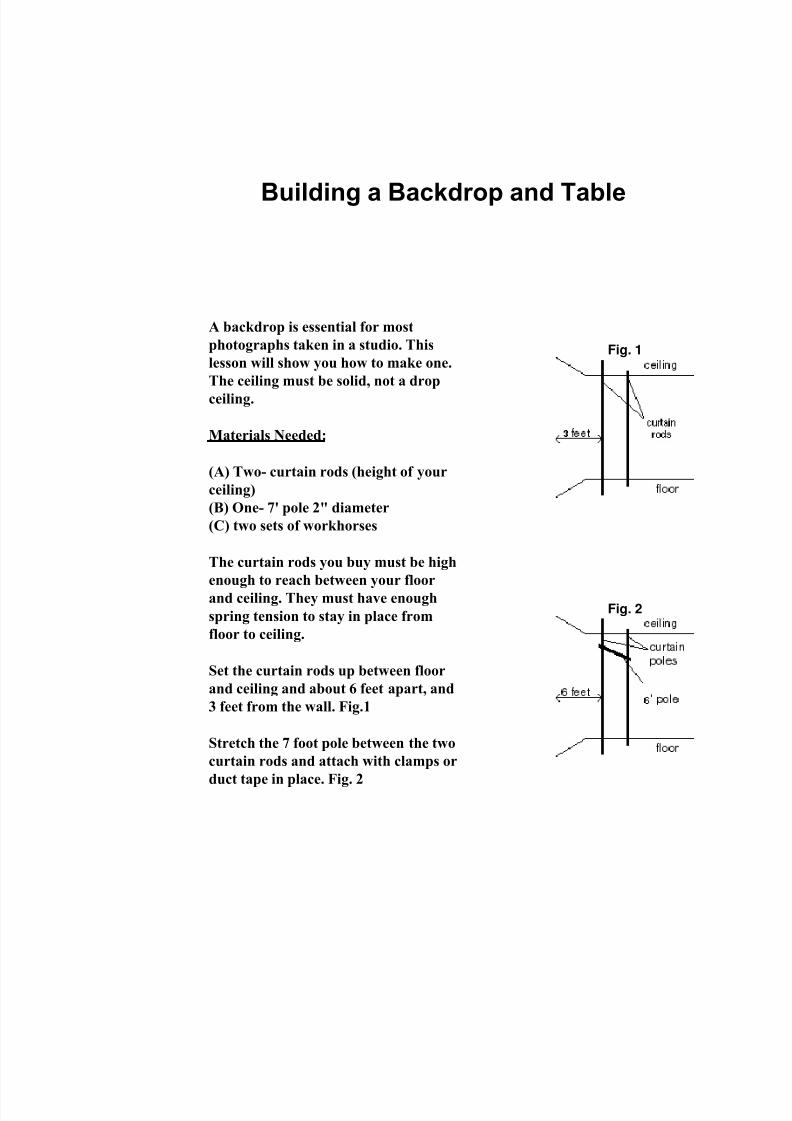
7302019 Heinrich Melanie - Studio Lighting Workbook
httpslidepdfcomreaderfullheinrich-melanie-studio-lighting-workbook 3489
frame using the double sided foam tape
Position the foam core so it fits against
the frame tightly
TIP ~
You can use this flat for many things
besides a reflector It will be sturdy
enough to hang things from it and can
even be useful as a backdrop Fig4
TRICK ~ Drape material over it for close-up
photography or simply use it to block
light from an area on your set Fig 5
Fig 5
Fig 4
Finally attach the foam core to the
4 Using the plumbers cement attach
the final 44 pieces of the base to the
right angles Fig 2
5 Using the plumbers cement attach
the frame to the base at the Ts Fig 3
7302019 Heinrich Melanie - Studio Lighting Workbook
httpslidepdfcomreaderfullheinrich-melanie-studio-lighting-workbook 3589
Some photographers have a real gift for
photographing people They are able toembrace humanity and capture on film the
very essence of life They reveal the
persons emotions without saying a word
They seem to understand the unspoken
word of the heart and are able to record it
without the distraction of camera and
technique
If you have clicked on to this page chances
are you are one of those people Perhapsyou just need a bit more help or
information to push your images to a new
level of success These lessons are aimed at
doing just that
In these lessons you will learn how to make
your subject comfortable and to reveal
the subjects true feelings It is true not all
people are comfortable enough with themselves
to trust and let go and you will discover who
is easy to shoot and who is not easy to
shoot There are ways to help people
become comfortable in front of a camera
Lessons in this section
Emotional Power Portrait
Creating a Sullen Emotion
Staging People
7302019 Heinrich Melanie - Studio Lighting Workbook
httpslidepdfcomreaderfullheinrich-melanie-studio-lighting-workbook 3689
The best way to shoot people is from a
distance Give them personal space andshoot with a long lens Pretend you are
shooting a couple of rolls to get them
familiar with being photographed Try not
to give much direction or you will find
yourself with very staged and stiff
subjects Follow them around if they will
permit it At some time they will be relaxed
this is when you will get the best shot
Let the people be themselves until they are
comfortable then direct them with very
simple suggestions Many factors come into
play when photographing people like the
texture of their skin what areas the light
hits their face their posture and the gait of
their walk Remember your basic visual
design elements when positioning a person
in the frame Colors will also play a large
role in the emotion you portray about the
person See visual design
Below are some successful photographs of
people Some of the people the photographer
knew and some of the people were just
shot on the street
7302019 Heinrich Melanie - Studio Lighting Workbook
httpslidepdfcomreaderfullheinrich-melanie-studio-lighting-workbook 3789
Emotional Power Portrait
Film
Ektachrome 100 Daylight
Film
Camera Format35mm - Nikon
Small Format
Lens
28mm Wide
Light Source
Strobe with softbox
Meter
Handheld Incident
Tripod
No
Filters
None
Polaroids
No
7302019 Heinrich Melanie - Studio Lighting Workbook
httpslidepdfcomreaderfullheinrich-melanie-studio-lighting-workbook 3889
The photograph was shot for a portfolio Our
photographer included this image in his portfolio in
an attempt to get jobs of this nature This image
reveals the ability to direct the subject
Understanding body posture is very important
when taking these kinds of photographs Knowing
the right moment to record the image as the model
stares into the photographers lens may take some
time to learn Study people and record in your
mind their posture and movements notice their
emotions and how they display them in their
bodies By studying people you will learn to
communicate and capture peoples emotion in your
images
Use props to direct your viewers eyes in your
images In the above image the model holds a
barbell that breaks into the lower part of the image
frame which leads the viewers eyes to the models
eyes The barbell was counterbalanced with her
face in the background Cropping is the key here
Dont be afraid to get in close It will help convey
the message of intimacy When the above image
was shot our photographer had to invade the
models personal space However our
photographer was able to capture something
unique in his image As a photographer you mustunderstand what effect and subtle nuances you
want to provoke and get in your images and then
know how to achieve them using your camera
through our lessons
Now ask yourself how was the light created in the
above image Where were the lights positioned
What type of light was used
The light was created by a strobe in a softbox (See
Building a Studio to learn how to build this kind of lighting system) The lighting was directdiffused A
small fill on the left side added a soft diffused fill
light This diffused light was created by bouncing
light from the main light and was placed close to
7302019 Heinrich Melanie - Studio Lighting Workbook
httpslidepdfcomreaderfullheinrich-melanie-studio-lighting-workbook 3989
the models face It was positioned approximately 3
feet from her and powered by a large power pack
of about 2000 watts
The background was intentionally dropped off intoblack leaving no more detail than necessary or
desired It was placed about 5 feet behind the
model
The model applied baby oil to her face for the shot
A spray bottle filled with water was used to add the
illusion of sweat She shook her head about to
provide the work-out like appearance After all
that the photographer was able to achieve the
image he wanted after paying close attention to the
small details and knowing how to use his camera
A wide-angle lens was used to take this shot It
helped to accentuate the barbell and hand of the
model The exposure was taken with a handheld
incident meter facing the camera Several frames
were shot bracketing the image and the final image
was chosen in editing Study your brackets
carefully on a good light table to pick a final
photograph
7302019 Heinrich Melanie - Studio Lighting Workbook
httpslidepdfcomreaderfullheinrich-melanie-studio-lighting-workbook 4089
Creating a Sullen Emotion
Film
Tmax 100 Black and White Film
Camera Format
2 14square - HasselbladMedium Format
Lens
80mm Normal
Light Source
Strobe with softbox and spot
stobe
Meter
Handheld Incident
Tripod
Yes
Filters
None
Polaroids
Yes
7302019 Heinrich Melanie - Studio Lighting Workbook
httpslidepdfcomreaderfullheinrich-melanie-studio-lighting-workbook 4189
Capturing a mood or creating a mood can be done using
dramatic light You should also direct your subject into
positions that convey the emotion you are after Be carefulnot to over direct your subject This can make the image
look contrived and fake Professional models are great
actors and will understand your direction very well If you
are not photographing a professional model you should do
a couple of things to help your model Use a long lens
Keeping a distance between you and the model will give
them room to relax Secondly pretend to shoot a couple of
rolls of film This should give them enough time to get
comfortable with the flashing lights and shutter clicks
Next shoot a lot of film Be clear with your directions
Design your set so you can move around freely and shootfrom different vantage points During the shoot your
model will become more relaxed and the images will turn
from stiff to candid
In the image above a softbox was positioned close to the
subject and was the main light The light was intentionally
overexposed This was done by taking a meter reading
from the subjects left side where the fill light fell off This
technique slightly overexposed the light on his right side
and forehead Now you can see how a slight change in
metering placement can change the entire feeling of an
image A white reflector card was used to bounce a
diffused fill light into the subjects right side This style is
meant to emulate the lighting found in a theatre ~ high
contrast and a dramatic mood A spotlight lights the back
part of his neck It is raised high above and pointed down
at the subject
7302019 Heinrich Melanie - Studio Lighting Workbook
httpslidepdfcomreaderfullheinrich-melanie-studio-lighting-workbook 4289
With a little direction we found the emotion we were
looking for The subject was told to rest his elbows on his
knees as he clutched his drumsticks The position of his
head relative to his body turns his face toward the viewer
This position is natural and comfortable for him His eyes
are looking downward as though in reflection of another
time It is a moody image because of the lighting and his
expression Practice photographing your friends by
directing them with posture poses and physical
appearance changes
7302019 Heinrich Melanie - Studio Lighting Workbook
httpslidepdfcomreaderfullheinrich-melanie-studio-lighting-workbook 4389
Staging People
Film
Ektachrome 100
Daylight
Camera Format
2 14 square - Hasselblad
Medium Format
Lens80mm Normal
Light ource
Two Umbrellas with
Strobes
Meter
Handheld Incident
Tripod
Yes
Filters
None
Polaroids
Yes
7302019 Heinrich Melanie - Studio Lighting Workbook
httpslidepdfcomreaderfullheinrich-melanie-studio-lighting-workbook 4489
When staging people you need to create a natural appearance
The same principle holds true when photographing people If you
hire professional models it will make your job much easier
Professional models will know exactly what to do with very little
direction More importantly they are completely comfortable in
front of the lens
The image above was shot for an architectural firm catalog The
company wanted to save money by using their own employees as
models We wanted to use professional models but made the
concession in order to secure the job We used familiar icons to
help the employees feel comfortable in front of the camera Oncewe had them working on the architectural model they had
forgotten about the camera and lights in the room We were able
to get the tools of their trade in the scene the employees
comfortable and then able to capture several successful images
for our client
We used two lights with umbrellas to light the scene One strobe
was placed to the right of the camera and pointed at the set and
the other strobe was positioned behind the left side of the camera
and was high in the air and pointed downward towards the set
See the diagram below
The two strobes were balanced and their meter readings were the
same When photographing people use a shutter speed that stops
any possible movement Do not shoot at a shutter speed below the
millimeter of the lens you are using For example if the lens you
are using is a 90mm lens your shutter speed will be 1125th or
faster Use 160th of a second if you have a focal plane shutter
Cameras with a leaf shutter do not hold to the same constraints as
a focal shutter Leaf shutter lens also sync at any speed Review
your camera manual to see if there are any limitations with your
lens and camera
7302019 Heinrich Melanie - Studio Lighting Workbook
httpslidepdfcomreaderfullheinrich-melanie-studio-lighting-workbook 4589
Film
Ektachrome 100
Daylight Film
Camera Format
2 14 square -
Hasselblad
Medium Format
Lens
80mm Normal
Light Source
Strobes with Two
umbrellas
Meter
Handheld Incident
Tripod
Yes
Filters
None
PolaroidsYes
7302019 Heinrich Melanie - Studio Lighting Workbook
httpslidepdfcomreaderfullheinrich-melanie-studio-lighting-workbook 4689
The second image was shot in a compressor room It portrays
the inspection division of the same company These men are not
models and have a very realistic appearance One man poses as
manager and the other as an inspector Again we used props to
set the stage and asked the men to talk with each other
Cleaning the compressors was an important part of making the
statement the client desired The client portrays a clean and safe
environment Cleaning a set before shooting is sometimes the
most important thing you can do Paying attention to the small
details will get you repeat business This cant be stressedenough If you need to paint something in the scene before you
shoot it to make sure it looks right do it It may make all the
difference in the world Your client will take notice of your
attention to detail This is why previewing a location before you
shoot it is very important It gives you a chance to hire someone
or ask the client to clean these areas for the shot
The image above was shot with two strobes both using
umbrellas Both strobes were placed to the right of the camera
One of the strobes was positioned somewhat behind the men and
set high in the air This pushed light onto the compressorsbehind the men The second strobe lights the men and the
foreground parts of the compressors
7302019 Heinrich Melanie - Studio Lighting Workbook
httpslidepdfcomreaderfullheinrich-melanie-studio-lighting-workbook 4789
The advertising field is very competitive
yet the potential for increased income isgreat Photographers who are doing
advertising work tend to specialize
depending on the area they live in For
example someone living in a small city
may need to have several specialties On
the other hand someone in New York
could specialize in one thing ie
childrens fashions or motorcycles An
advertising photographer will most of
the time be working with an art
director from a design or advertising
firm Clients rarely hire photographersdirectly unless they have established a
rapport with them It is generally the
AD (art director) working on the job
that will hire for the client
Ask yourself this question What is the
one thing that I like and feel
comfortable with Your answer is the
area you should be specializing in In
reality most people go through life and
their likes and dislikes change Aphotographer sometimes follows a
specialty For instance someone who
assisted a commercial photographer
shooting childrens clothes and liked it
decided to pursue that field The ideal
situation is to make a living doing whatyou really like
Lessons in this section
Lighting Multiple Glass ProductsUsing Props with Products
Multiple Exposures
Making Reflections Work for You
Using a Product for a Background
Floating a Product
Boring Product - Interesting Design
7302019 Heinrich Melanie - Studio Lighting Workbook
httpslidepdfcomreaderfullheinrich-melanie-studio-lighting-workbook 4889
The lessons in this section assume you
have a good working knowledge of
camera tools visual basics and lightingIf not go back to these sections and
learn these things first Also some of the
studio setups can be built Those
designs are described in Building a
Studio
The lessons in this section go into
extensive details showing you where to
position your lights and reflectors etc
in order to achieve a certain look and
feel in an image They includedescriptive diagrams for you to
duplicate
7302019 Heinrich Melanie - Studio Lighting Workbook
httpslidepdfcomreaderfullheinrich-melanie-studio-lighting-workbook 4989
Lighting Multiple Glass Products
FilmEktachrome 100
Daylight Film
Camera Format
4 x 5 - Horseman
Large Format
Lens
150mm Normal
Light SourceStrobe with Softbox and
Reflectors
Meter
Handheld Incident
Tripod
Yes
Filters
None
7302019 Heinrich Melanie - Studio Lighting Workbook
httpslidepdfcomreaderfullheinrich-melanie-studio-lighting-workbook 5089
The image above was an inset photograph for a
brochure cover The company sold gift baskets and
products The brochure was used to help their growing
marketing requirements The brochure had three
different images similar to this one along with
accompanying text The client was in the studiowhen this was taken and was the acting art director
So all proofs were finalized at the time of shooting
This eliminates any questionable fees for reshooting
Polaroids are used for the same reason An instant
image of lesser quality than film will serve as great
representations of the final photograph Polaroids
are sometimes faxed or scanned and emailed to the
client for approval Asking your client to sign off on
a photograph will give you the assurance that all is
okay and you can record the image on film
Shooting glass and high gloss labels can be a
frustrating exercise because of the multiple
reflections that occur Remember as you shoot to
look through the lens to see if you have any
reflections on your products in the set All
reflections are caused due to the angle between
lens and light source Review your polaroids
carefully for any reflections before you expose the
film
TIP ~ Moving the product a small amount may be the best
way to remove the reflections Before you do that
adjust your light to eliminate any glare and
reflection Each time you change the light position
you must check for glare
Place all the products on the table top according to
the layout supplied by your client or art director
The image above was tiered giving it height and
depth
The light is positioned directly over the set It is
tilted slightly toward the backdrop and away from
the camera The backdrop is set up as a sweep It is
a piece of gray formica See Building a Studio to
7302019 Heinrich Melanie - Studio Lighting Workbook
httpslidepdfcomreaderfullheinrich-melanie-studio-lighting-workbook 5189
learn how to make this if you are inexperienced in
studio construction
Three white or silver cards are used in the front andon both sides to pump additional light into the
scene These are carefully and strategically placed
to avoid seeing the reflector cards in the glass
When you are shooting glass objects the main light
should reflect in the glass It indicates the direction
of the light source The main light source reflection
is acceptable as long as it is not too bright The fill
light from the reflector cards should not dominate
your main light source
TIP ~ Reflector cards can be made from any material that
reflects light such as a white card Large pieces of
foam core are used and cut into smaller pieces
depending on the size of the set Silver cards are also
used They are positioned to reflect the light coming
from your main light source and bounce the light
softly back into the set These cards will add more
light and sometimes add unacceptable hot spots on
the products These hot spots are very distracting
and unsightly
Now that you have all your lighting sources in place
look through the camera to see if you have any
reflections If you have a lot of glare in your image
readjust the overhead light by tilting it more
towards the back or front Be careful to avoid lens
flare Lens flare is when your light or lights reflect a
glare back into the lens For example when
someone shoots into the sun the lens picks up a
glare Block the lens flare with a black card by
placing the card between the light and lens Make
sure not to put the card into your scenes final crop
or in a position where you block your image You
may need to move your lights or use a scrim to get
rid of the lens flare It will be easier to add a scrim if
you have previously adjusted all the glass for no
reflections Instead of a scrim you could use a lens
hood The lens hood attaches to the front of the lens
7302019 Heinrich Melanie - Studio Lighting Workbook
httpslidepdfcomreaderfullheinrich-melanie-studio-lighting-workbook 5289
It protrudes from the lens and blocks any glare
falling on the front lens element Each lens may use
a different hood These come in many different
shapes and sizes I use a scrim because it is far more
versatile
Assuming your light source is in a good position you
may still have some glare on the glass You can
eliminate many reflections by slightly tipping the
product forward Use a small object under the back
side of the product while not disturbing the
products position These are very slight movements
and will not change the appearance to any great
degree Also tip the reflectors back and forth and
side to side to remove any added glare from your
objects Be attentive to all the objects You may
eliminate glare in one object and produce it in
another You must check for any reflections in your
polaroids Some reflections are very difficult to
detect when viewing the set from behind the camera
using the modeling lights
Use an incident meter and read the light falling on
the set Always bracket your exposure Bracketing is
the process of taking many shots of the same set but
using different fstops For example if your meter
reads f32 at 160th of a second your bracket would
be one stop on either side f22 and f45 at the same
speed The image was shot at f32 or greater depth-
of-field Some photographers bracket with 12 stops
and 13 stop differences They shoot 5 sheets of film
using these small incremental changes
7302019 Heinrich Melanie - Studio Lighting Workbook
httpslidepdfcomreaderfullheinrich-melanie-studio-lighting-workbook 5389
Final cropping of image
The final image displayed on the left was
successfully shot with no glare on any of the
products All the products were in glass or were
wrapped in cellophane The image has been
cropped to match the final inset space for the
brochure This shot took about a half day toshoot
7302019 Heinrich Melanie - Studio Lighting Workbook
httpslidepdfcomreaderfullheinrich-melanie-studio-lighting-workbook 5489
Using Props with Products
FilmEktachrome 100
Daylight Film
Camera Format
4 x 5 - Horseman
Large Format
Lens
90mm Wide
Light SourceStrobe with Softbox
Meter
Handheld Incident
Tripod
Yes
Filters
None
7302019 Heinrich Melanie - Studio Lighting Workbook
httpslidepdfcomreaderfullheinrich-melanie-studio-lighting-workbook 5589
When using props to help convey your message
remember the visual basics about colorperspective framing contrast backgrounds
and balance
This image of a racing bike was shot from an
angle that enlarged the back wheel The wide
angle lens helps pronounce the wheel size as well
as increasing the elongated perspective of the
bike
The bike was shot against a black background
Isolating your subjects by eliminatingdistracting backgrounds will help make the
objects in the set stand out The three arrow-
shaped plexiglass pieces all point to the distance
This visually portrays the speed and forward
motion of a racing bike Primary colors of the
plexiglass are used to simplify the information
in the image The gears of the bike are
pronounced displaying the bikes power and
versatility The camera position is very low and
tilted upward to further increase the illusion of
size
A softbox was used to keep the glare on the
chrome to a minimum It was positioned
parallel to the bike seat on its right side and
tipped down slightly toward the pedals If you
look carefully you can see the reflection of the
softbox in the blue plexiglass This is acceptable
The light has bounced color from the plexiglass
back onto the chrome of the bike This adds
interesting color highlights to the image that
balance well with the other colors
Parts of the wheels reflect the colors of the
plexiglass adding an interesting bit of color
7302019 Heinrich Melanie - Studio Lighting Workbook
httpslidepdfcomreaderfullheinrich-melanie-studio-lighting-workbook 5689
backdrop will work also The velvet material
absorbs any light that falls on it
When you are taking your exposure readings
make sure that you take readings of the
background walls in the scene Do not face your
light toward the back wall The meter readingsof the walls should be at least 4 stops darker
than your final exposure This will maintain a
black background
The wide angle lens was used to achieve
maximum depth-of-field This image was
exposed at f45
The room was totally darkened for this shot
Some photographers will even paint their walls
black for a shot like this A black velvet
7302019 Heinrich Melanie - Studio Lighting Workbook
httpslidepdfcomreaderfullheinrich-melanie-studio-lighting-workbook 5789
Multiple Exposures
Film
Ektachrome 100
Daylight Film
Camera Format
4 x 5 - Horseman
Large Format
Lens
150mm Normal
and 90mm Wide
Light Source
Strobe with Softbox
Meter
Handheld Incident
Tripod
Yes
Filters
None
7302019 Heinrich Melanie - Studio Lighting Workbook
httpslidepdfcomreaderfullheinrich-melanie-studio-lighting-workbook 5889
This image was designed as a poster for a national bowling
tournament The objects were intentionally placed leavingblack areas for the white text or copy and logos to be placed
on the final poster
The image above was done by repositioning the camera
three different times and exposing the film each time with
the change (Three shots on one piece of film) In addition the
lens was changed for one of the shots
You will need a large piece of black velvet to absorb all
scattered light All exposures were shot on the black velvet
The velvet does not see light This leaves that area of the filmunexposed This allows you to expose something else in the
black area which occurs when you take your next exposure
You will also need a piece of acetate to place on the film
back for tracing the objects in each exposure This will help
you line everything up and avoid overlapping your
products By tracing the objects that appear on your film
back onto a piece of acetate you will be able to align
everything perfectly
The first exposure was made of the bowling ball in thebottom right with a wide angle lens The second exposure
was made of the bowling pin on the left bottom The third
exposure was made of the top right 2 bowling pins One of
these pins was raised up on a block for added dimension
With each exposure the camera was progressively pulled
away from the scene The camera lens to subject distance
was increased to help this illusion of depth Diagrams below
may help you understand this better
Make sure when taking photos like this that any part of the
image you wish to remain unexposed is filled with the black velvet You can add any lighter value to a black area with
film because it is unexposed
7302019 Heinrich Melanie - Studio Lighting Workbook
httpslidepdfcomreaderfullheinrich-melanie-studio-lighting-workbook 5989
When you are ready to make the first exposure trace the
film back onto the acetate by placing the acetate over your
film back Do this with each exposure
A softbox was used and placed close to all of the subjects
producing direct lighting Your exposure times and fstops
can be different for each exposure just as if you were taking
separate photographs In fact think of this type of image as
a composite
Wide Angel Lens Normal Lens Normal Lens
7302019 Heinrich Melanie - Studio Lighting Workbook
httpslidepdfcomreaderfullheinrich-melanie-studio-lighting-workbook 6089
Making ReflectionsWork for You
Film
Ektachrome 100
Daylight Film
Camera Format
4 x 5 - Horseman
Large Format
Lens
150mm Normal
Light Source
Strobe withSoftbox
Meter
Handheld
Incident
Tripod
Yes
Filters
None
7302019 Heinrich Melanie - Studio Lighting Workbook
httpslidepdfcomreaderfullheinrich-melanie-studio-lighting-workbook 6189
The image above was shot on a highly reflective
background It came in a long roll about 4 feet
wide The light was positioned toward the front
parts of the products to avoid a hard horizon lineThe light falls off into black making it useful for
the reversed type of white (see below) Be careful
to avoid lens flare when positioning the lights near
the camera lens Make sure to block any light that
may fall on the lens Use a scrim to block the light
A scrim is any black piece of material that will
function as a light block Black masking tape was
secured to the edge of the lens to block the light
Be careful not to show the tape in your
photograph
Glare can be a major problem with highly
reflective sets like this one Always remember to
look through your lens to avoid this Tip your
light toward the front or back of the scene to
adjust the glare on the set This shot was taken
using a strobe head inside a softbox This type of
light is often used in product photography
especially when shooting highly reflective objects
The light rays are scattered and softened by this
kind of light source
Each of the objects in this scene are veryreflective The reflective gold surface used to shoot
on adds interest to the products by adding a gold
reflection of the product onto the gold surface
This gives depth to the image
Adding different colored line art around the edge
of the image in the white border adds an extra
dimension to the final composite below This was
done by the designer after the image was taken
Some of the line art is in front of the image and
some is dropped behind the image Reverse text isused on the black part of the image and black text
is used on the white border
7302019 Heinrich Melanie - Studio Lighting Workbook
httpslidepdfcomreaderfullheinrich-melanie-studio-lighting-workbook 6289
Using a Product for a Background
Film
Ektachrome 100
Daylight Film
Camera Format
4 x 5 - Horseman
Large Format
Lens
150mm Normal
Light Source
Strobe with Softbox and
Reflector
Meter
Handheld Incident
Tripod
Yes
Filters
None
7302019 Heinrich Melanie - Studio Lighting Workbook
httpslidepdfcomreaderfullheinrich-melanie-studio-lighting-workbook 6389
This close-up of a computer chip was designed for the
front cover of a computer companys brochure (see
below) It was nesseccary to get the best detail for
enlargement reasons so a large format camera was used
The end image was 9 x 12 our negative was 4 x 5
A strobe with a softbox was used to light this subject
from the left side An accompanying white reflector card
was placed close to the subject to fill in the right side
with light (see diagram below)
The bellows on the 4 x 5 camera were extended to
enlarge this chip to fill the frame When extending the
bellows you increase the need for light to reach the film
In this case we did not need to have a small f-stop
number for sharpness so we left the lens open at f56and made our exposure appropriately Even if you need
to pop your flash a couple of times extending the
bellows should not be something to hold you back from
making the close-up you want to shoot The detail in this
shot is achieved by using a 4 x 5 camera with a good lens
TIP ~
Popping or firing the strobe multiple times is done with
the lens open in a darkened room so the only light in the
room is coming from your controlled multiple burst of
the flash Since you have no need for speed whenshooting inanimate objects keep pumping in the light to
get the exposure you need In a dark room you could
leave your lens open and just continually pop the strobe
Or you can cock the shutter and repeat the same
exposure until it adds up to the correct amount of light
required Make sure you are on a very steady tripod
The slightest amount of movement will blur your image
TIP ~
The best set up for any overhead shot with a 4 x 5 is to
put your set on the floor This is of course dependent on
the size of your set A short-legged set of horses works
very well also The legs used in this set were about 12
high
The hue of bluegreen works well with the yellow text
7302019 Heinrich Melanie - Studio Lighting Workbook
httpslidepdfcomreaderfullheinrich-melanie-studio-lighting-workbook 6489
The text pops off the image This color prevents the text
from falling into the background The background of the
computer chip remains a simple reminder of what the
company does It is the text that the viewer is expected to
read
This image would also make a great backdrop for a
collage or montage image
7302019 Heinrich Melanie - Studio Lighting Workbook
httpslidepdfcomreaderfullheinrich-melanie-studio-lighting-workbook 6589
Floating Product
Film
Ektachrome 100
Daylight Film
Camera Format4 x 5 - Horseman
Large Format
Lens
150mm Normal
and 90mm Wide
Light Source
Strobe with
Softbox
Meter
Handheld
Incident
Tripod
Yes
Filters
None
PolaroidsYes
7302019 Heinrich Melanie - Studio Lighting Workbook
httpslidepdfcomreaderfullheinrich-melanie-studio-lighting-workbook 6689
Both images in this lesson give the illusion of
floating The top image is propped up underneath by
a block A softbox directly above the computer
circuit board was used to achieve a soft even light In
todays high-tech industry these kinds of images are
being used in composites and as single images
TIP ~
Using black velvet as a backdrop can achieve a
similar effect where the subject appears to float The
light will be absorbed into the black velvet material
to create the illusion
The computer chip is not grounded to anything so it
appears to float (see Fig 1) The angle of the light on
the computer circuit board picked up some very
interesting highlights in Fig 1 which adds to the
high-tech feel of the image
A 4 x 5 camera was used to get greater detail with
the larger negative for enlargement purposes Depth-
of-field was achieved at f32
When shooting any subject like this you can portray
many kinds of interesting illusions The black velvet
material may be a little more expensive but nothing
else works as well This kind of material will help
you take the shots like the pros
Fig 1
7302019 Heinrich Melanie - Studio Lighting Workbook
httpslidepdfcomreaderfullheinrich-melanie-studio-lighting-workbook 6789
Boring Product -Interesting Design
Film
Ektachrome 100
Daylight Film
Camera Format
4 x 5 - Horseman
Large Format
Lens
150mm Normal
Light Source
Strobe with Softbox
Meter
Hanheld Incident
Tripod
Yes
Filters
None
7302019 Heinrich Melanie - Studio Lighting Workbook
httpslidepdfcomreaderfullheinrich-melanie-studio-lighting-workbook 6889
Some products you will be photographing will be justplain boring such as the rods in the shot above Its
your job as the photographer to bring life and interest
to boring products like these In the image above the
client needed his products shot for his company
catalog
Making something interesting from something boring
can be done by using an interesting background or
unusual lighting In this image the layout and diagonal
positioning of the rods directs the viewers eye to the
top right area of the image of the frame Text was
placed at the top and right side of this image (see final
image below)
The softbox was positioned above and to the left of the
product as indicated by the soft shadows Fig1 This
image could have easily been cut out from its
background and placed on any other background
Minimal depth-of-field is needed for this shot because
the maximum height of the product was only two
inches An aperture of f8 was used The exposure is
made with an incident meter reading to achieve an
overall well-balanced tone
Deep shadows could have been used to add interest to
these products by using a direct light at a very low
level to the table angle Fig 2 No softbox would be
used for this kind of shot
The set is placed on the floor so your camera position
is directly over the top of the set If shot on a table top
you would need to stand on top of a ladder to take the
shot The easier choice is to shoot on the floor
7302019 Heinrich Melanie - Studio Lighting Workbook
httpslidepdfcomreaderfullheinrich-melanie-studio-lighting-workbook 6989
Fig 1
Fig 2
7302019 Heinrich Melanie - Studio Lighting Workbook
httpslidepdfcomreaderfullheinrich-melanie-studio-lighting-workbook 7089
Lessons in this section
Mixing Texture Shapes and Color
Arranging a Set
Photographing Beautiful Glass
Messages in a Still Life
Creating a Mood
Still Lifes Selling Products
Setting the stage works to help convince the
viewer of a place and time or mood Small
details make a shot believable These
lessons will teach you how to think and tell
a story of a certain place in time Picking
the right props for your shoot will ensure
believability The lessons in this section
work in conjunction with the ProductPhotography section
A still life photographer can be found
working in a studio or on location This
type of photography demands the
recreation of a set or going to the set to
capture a moment in time This can be done
on location in the studio or digitally
created on the computer The truth is it fits
into many categories It is more than
product photography You are creating a
scene that conveys a sense of being
somewhere
7302019 Heinrich Melanie - Studio Lighting Workbook
httpslidepdfcomreaderfullheinrich-melanie-studio-lighting-workbook 7189
you pull your entire learning experience
together I include details and diagrams
that will reinforce your understanding
Still life scenes are often used in a designers
set or in a showroom like in a furniture
store They can also be used to convey a
story quickly and help transfer the concept
and idea throughout the entire image These
lessons include tips on how to light objects
in small and detailed areas They will help
7302019 Heinrich Melanie - Studio Lighting Workbook
httpslidepdfcomreaderfullheinrich-melanie-studio-lighting-workbook 7289
Mixing Texture Shapes and Color
Film
Ektachrome 100
Camera Format
4 x 5 - Horsemen
Large Format View
Camera
Lens
150mm Normal
Light Source
Strobe with Softbox
MeterHandheld Incident
Tripod
Yes
Filters
None
7302019 Heinrich Melanie - Studio Lighting Workbook
httpslidepdfcomreaderfullheinrich-melanie-studio-lighting-workbook 7389
The image above was shot as a portfolio piece
Mixing textures shapes and colors the
photograph displays the photographers eye for
design It is photographed on black velvet which
adds saturation of the overall appearance by
absorbing all the light that falls on it The black
velvet can be purchased at any fabric store
Two scarves are positioned at opposing angles
adding strong graphic interest and competition
between them Against the soft colored scarves
the dark blue hat pops out The colored markers
are color complements to the blue hat and add
additional depth to the image
Resting on top of the scarves are brightly
colored objects which add spots of color andinterest The curvy lines of the ribbons break up
the edges of the two scarves and add a bit of fun
to the image The final crop of the image forces
the viewer to see the positive and negative
spaces of color within the frame Cropping plays
an important role in the success of your image
How the image was photographed ~
One main strobe light was used It was shot
through a softbox or mylar scrim Several white
and silver reflector cards surrounding the setbounced in a soft fill light Using the reflectors
as fill light evens out the overall appearance
without eliminating the direction of the main
light The shadows in the image are soft and
reveal more texture in the scarf
Minimal if any depth-of-field was needed in
this image so it was exposed at f56 The meter
reading is taken with an incident meter and
pointed directly at the camera Several readings
were taken of the entire image For example a
meter reading was taken of the light falling onthe hat the tip of the triangular scarf and the
black corners of the velvet before an exposure
was chosen A range of only 1 stop was allowed
between these exposure readings Reposition
your reflecting cards either closer or further
7302019 Heinrich Melanie - Studio Lighting Workbook
httpslidepdfcomreaderfullheinrich-melanie-studio-lighting-workbook 7489
from your subject to adjust the exposure
variations Your final exposure choice will be of
the area in the scene that is the brightest or
where the most light is falling If your exposure
variations are between f16 and f11 f16
indicates the brightest area in the scene You
should know this at this point in your educationIf you dont go back to the Camera Basics
section and read over the lessons Choosing f16
will prevent overexposure to the lighter areas in
your scene The camera was positioned directly
over the top of the set using a tripod Make sure
your tripod is capable of supporting your
camera in these unusual positions
Pick three or four objects that work well
together Lay them out on a solid colored
background in an interesting design pattern
Position your camera lights and reflectors
Using a color transparency film bracket your
frames as you shoot
Final crop of image
reflector
reflector
7302019 Heinrich Melanie - Studio Lighting Workbook
httpslidepdfcomreaderfullheinrich-melanie-studio-lighting-workbook 7589
Arranging a Set
Film
VPS 100 - Color Negative
Camera Format
2 14 square - Hasselblad
Medium Format
Lens
80mm Normal
Light Source
Strobe with Softbox
Meter
Handheld Incident
Tripod
Yes
Filters
None
7302019 Heinrich Melanie - Studio Lighting Workbook
httpslidepdfcomreaderfullheinrich-melanie-studio-lighting-workbook 7689
Within each image there can exist sets that pull the
entire image together The image above is an example
of one of these small sets The set is staged for a period
in time
Some professionals hire stylists to set something like
this up Background information helps convey a
message in the overall scene For example suppose you
are shooting the interior spaces of a Victorian home
and your client wants to place the product in the late
1800s Objects in the photo above will help transport
your viewer into that time in history Props are a very
important part in convincing your viewer of a place in
time You can find props at antique stores for this kind
of scene Time period images must be authentic down
to the smallest details Hire a historian for accuracy if
needed
Magazines use small inset photos that display intricate
details of settings They may not be set against a black
background as in the photograph above The
background should be dimly lit or out of focus to
help accent the subject Shallow depth of field and
object placement will work together to make your
image successful
One main strobe light was used in the photograph
above with no fill lights or reflectors This drops the
background of black velvet into black making it a
perfect place for white text Remember an
editor or designer usually needs to add type and will
need this space
7302019 Heinrich Melanie - Studio Lighting Workbook
httpslidepdfcomreaderfullheinrich-melanie-studio-lighting-workbook 7789
Still lifes have been used in fine art for many years The
image above happens to be found in nature but could
have just as easily have been set up in a studio The
arrangement of the plates and glass objects can be
emulated in the studio or in a set I have included this
image to show you that what you find most naturally in
life is how you should set up a scene whether in the
studio or on location Take your camera into the world
around you and shoot small stories such as the one
above These still lifes will help you to stylize your own
setups This lesson will help you learn how to crop and
balance your images Pay close attention to the light
falling on the objects in your scenes Follow the previous
example to determine the proper exposure of your film
Be deliberate when you consider the photographs you
will take Take your time
Remember to see within the boundaries of your frame
balancing objects from front to back side to side and
corner to corner See Visual Basics for more
information on setting an objects position within the
frame
7302019 Heinrich Melanie - Studio Lighting Workbook
httpslidepdfcomreaderfullheinrich-melanie-studio-lighting-workbook 7889
Photographing Beautiful Glass
Film
VPS 100 - Color Negative
Camera Format
2 14 square - Hassalblad
Medium Format
Lens
80mm Normal
Light Source
Strobe with Softbox
Meter
Handheld Incident
Tripod
Yes
Filters
None
7302019 Heinrich Melanie - Studio Lighting Workbook
httpslidepdfcomreaderfullheinrich-melanie-studio-lighting-workbook 7989
The image above will give you an idea of how to light
small objects in a room or on a set You can make
objects pop out that are a very small part of the sceneFor example the color in this image is something you
really want to show but each of the objects must be
placed and lit properly to portray the beauty of their
colors Small strobes with funnel snoots will spotlight
only the objects you are interested in The blue
background color was chosen as a color complement to
the colors in the glass
TIP A snoot can be made from a rolled piece of
poster board into the shape of a cone You can also
buy these cones to fit on the strobe Be careful if using
poster board as the lights can get very hot
Take a large piece of poster board and roll it into a
cylinder shape Fig 1 Tape the center of the cylinder
then expand one end and decrease the opposite end of
the cylinder Fig 2 Make the expanded end large
enough to fit over the strobe head The other end of
the cylinder should be small enough to direct the light
at whatever object you want to be lighting The size of
the smaller hole will dictate the angle of the light
pointed at the object
Fig 1 Fig 2
7302019 Heinrich Melanie - Studio Lighting Workbook
httpslidepdfcomreaderfullheinrich-melanie-studio-lighting-workbook 8089
WARNING
DO NOT USE POSTER BOARD CONES WITH
TUNGSTEN LIGHTS The chance of fire is far too
great NEVER leave powered lights unattended
The glass objects in the photograph above have had the
light pushed directly through them When the light
passes through the colors are revealed
Shooting glass with liquid in it is described in the
diagram below The softbox is placed directly above the
set and slightly tilted away from the camera With the
liquid in the glass place a reflector card behind the
liquid only Looking through the camera lens make sure
the card does not extend past the liquid above or to the
sides Tip the card backwards so it picks up some of the
light falling down from the softbox This will illuminate
the liquid giving it a glowing appearance
7302019 Heinrich Melanie - Studio Lighting Workbook
httpslidepdfcomreaderfullheinrich-melanie-studio-lighting-workbook 8189
Your background can be any color detail or density when
using this reflector card
7302019 Heinrich Melanie - Studio Lighting Workbook
httpslidepdfcomreaderfullheinrich-melanie-studio-lighting-workbook 8289
Messages in a Still Life
Film
Ektachrome 100
Camera Format
35mm - Nikon
Small Format
Lens
50mm Normal
Light Source
Strobe with Softbox
Meter
Handheld Incident
Tripod
Yes
Filters
5 Red CC Filter
7302019 Heinrich Melanie - Studio Lighting Workbook
httpslidepdfcomreaderfullheinrich-melanie-studio-lighting-workbook 8389
The above image sends a message of peace and
comfort to its viewer in a couple of different
methods
One method is achieved by the type of lighting
used (In this case a strobe within a softbox) A warm
glow of very soft light is scraping horizontally
across the image and highlights fall on the outer
pages of the book It has a golden quality Another
method is achieved by using a number 5 CC filter
over the camera lens This accents the rich red color
in the roses with their saturated hue and balances
perfectly with the gold color in the pages as well as
the reddish-brown boards that they sit on
TIP ~
A red or orange transparent gel in an acetate sheet
form could be placed over the softbox to warm the
color pushed into the set
The background falls off into black holding the
viewers eye on the bible and the perfectly balanced
roses
This was shot with a softbox to the right of the scene
with no fill cards or fill lights The main light source
is close to the subject so the light falls off very little
When the light is positioned close to the subject its effect
on the oppiste side is minimal
7302019 Heinrich Melanie - Studio Lighting Workbook
httpslidepdfcomreaderfullheinrich-melanie-studio-lighting-workbook 8489
Using light color balance and the right props this
image conveys both warmth and love The main
subject is the bible The roses are used to convey a
feeling of love If instead of roses guns were used as
props the message would be entirley different
perhaps of violence Props can make or break
your image
7302019 Heinrich Melanie - Studio Lighting Workbook
httpslidepdfcomreaderfullheinrich-melanie-studio-lighting-workbook 8589
Creating a Mood
Film
Ektachrome 100
Camera Format
35mm - Nikon
Small Format
Lens
50mm Normal
Light Source
Strobes and reflectors
Meter
Handheld Incident
Tripod
No
Filters
None
7302019 Heinrich Melanie - Studio Lighting Workbook
httpslidepdfcomreaderfullheinrich-melanie-studio-lighting-workbook 8689
Making a statement with your photography should
be foremost in your mind The image above tells us ~
bedroom lovers intimacy passion etc It is up to
our imagination to fill in the blanks You have only a
few moments to convey your message so be careful
not to be too subtle yet not so blatant that your
message is visually insulting
The location in this shot was specifically chosen
Shot on a wooden floor a rustic authenticity is
portrayed A cowboy feel was achieved with these
surrounding elements The lingerie casually draped
over the boots looks accidental and unplanned The
boot that is tipped over leads the viewer to believe an
impetuous moment of hurried passion is taking
place The background is evident but intentionally
made out of focus by shooting at f4 for shallow
depth of field
This image is far from haphazard It was planned
from layout to location to scouting to objectplacement The idea came first then the execution of
the image Although minor alterations of layouts are
common the concept will remain the same This
eliminates confusion by isolating one idea and
working it through from all directions
Scouting out locations can be a full-time job and you
may need special permission to shoot in a particular
place See property release in the Legal Forms
section to cover your legal requirements and release
forms
7302019 Heinrich Melanie - Studio Lighting Workbook
httpslidepdfcomreaderfullheinrich-melanie-studio-lighting-workbook 8789
This kind of image will work very well for an adselling lingerie A strobe light with a softbox was
used to light the boots and the lingerie from the
right A reflector card was placed close to the boots
to fill in the left side of the scene The light is
positioned low near the floor which scrapes the light
on a low plan This was placed to simulate a specific
time during the day sunset or early evening The
light at this time is warm in color value which adds
to the subject matters message The camera vantage
point is low also bringing the viewer into intimate
contact with the boots and lingerie
7302019 Heinrich Melanie - Studio Lighting Workbook
httpslidepdfcomreaderfullheinrich-melanie-studio-lighting-workbook 8889
Still Lifes Selling Products
Film
Ektachrome 100
Camera Format
2 14 square - Hassalblad
Medium Format
Lens
80mm Normal
Light Source
Strobe with Softbox
Meter
Handheld Incident
Tripod
Yes
FiltersNone
7302019 Heinrich Melanie - Studio Lighting Workbook
httpslidepdfcomreaderfullheinrich-melanie-studio-lighting-workbook 8989
Placement and staging of objects requires a thought-out layout and planned
execution when using multiple products Layering has been used in this image
where non-information has been overlapped for example where the licence
plates and shirts touch Your viewer does not need to see the entire object in
this case to know what it is Strong diagonal lines have been made by object
placement This helps pull the viewer through the image and leads the eye to
a specific area of an image This image was created to find funding for
Vietnam vets by selling these products
If you have been asked to shoot several products and put them all into one
image think of it in terms of a still life setting Larger items will be placed inthe background sometimes even being used as the background For example
picture a group of images all representing something American The
background for this scene could be a flag which is also one of the subjects
There is no need to see the entire flag because it is an easily recognizable icon
In the image above the wooden floor was used to add a sense of the rustic and
gritty realism of the Vietnam war It was lit with a softbox directly above the
subjects The aperture was a concern for foreground to background
sharpness so the camera was pulled back far enough from the scene to allow
for a large aperture of around f 56
Below is the final image This was dropped into a 3 fold 812 x 4 brochure
along with other images of the same sort
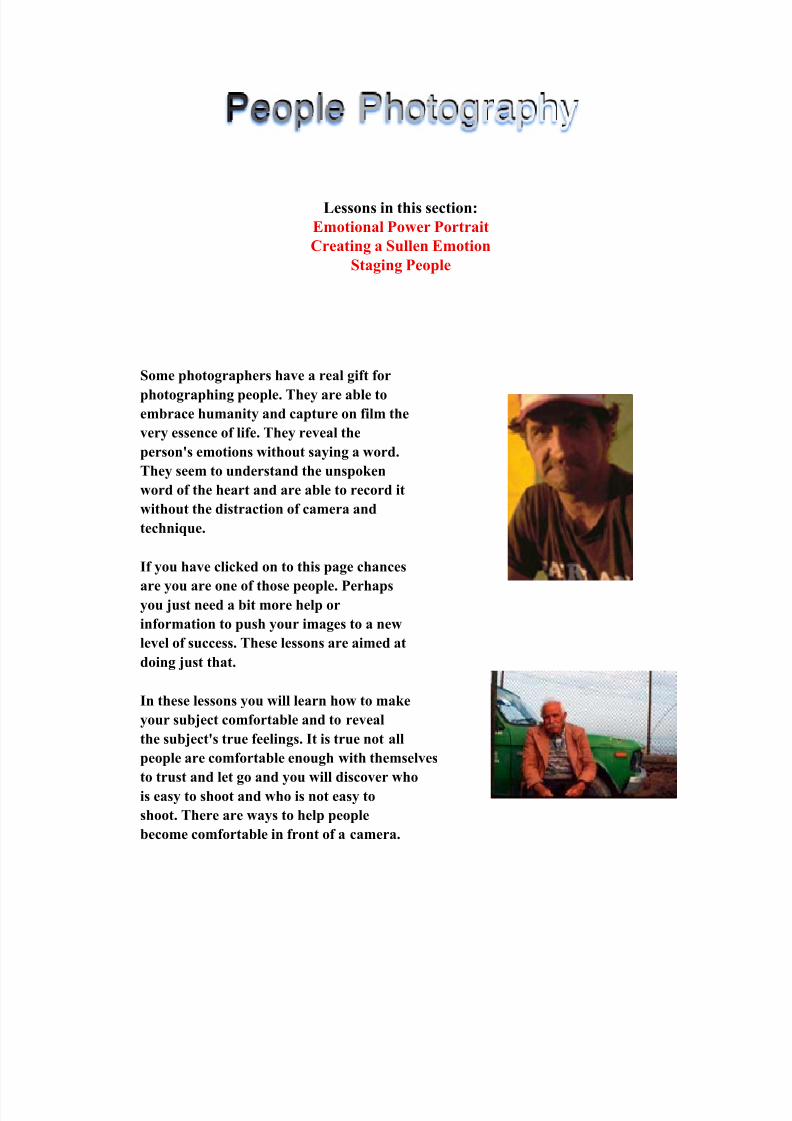
7302019 Heinrich Melanie - Studio Lighting Workbook
httpslidepdfcomreaderfullheinrich-melanie-studio-lighting-workbook 3789
Emotional Power Portrait
Film
Ektachrome 100 Daylight
Film
Camera Format35mm - Nikon
Small Format
Lens
28mm Wide
Light Source
Strobe with softbox
Meter
Handheld Incident
Tripod
No
Filters
None
Polaroids
No
7302019 Heinrich Melanie - Studio Lighting Workbook
httpslidepdfcomreaderfullheinrich-melanie-studio-lighting-workbook 3889
The photograph was shot for a portfolio Our
photographer included this image in his portfolio in
an attempt to get jobs of this nature This image
reveals the ability to direct the subject
Understanding body posture is very important
when taking these kinds of photographs Knowing
the right moment to record the image as the model
stares into the photographers lens may take some
time to learn Study people and record in your
mind their posture and movements notice their
emotions and how they display them in their
bodies By studying people you will learn to
communicate and capture peoples emotion in your
images
Use props to direct your viewers eyes in your
images In the above image the model holds a
barbell that breaks into the lower part of the image
frame which leads the viewers eyes to the models
eyes The barbell was counterbalanced with her
face in the background Cropping is the key here
Dont be afraid to get in close It will help convey
the message of intimacy When the above image
was shot our photographer had to invade the
models personal space However our
photographer was able to capture something
unique in his image As a photographer you mustunderstand what effect and subtle nuances you
want to provoke and get in your images and then
know how to achieve them using your camera
through our lessons
Now ask yourself how was the light created in the
above image Where were the lights positioned
What type of light was used
The light was created by a strobe in a softbox (See
Building a Studio to learn how to build this kind of lighting system) The lighting was directdiffused A
small fill on the left side added a soft diffused fill
light This diffused light was created by bouncing
light from the main light and was placed close to
7302019 Heinrich Melanie - Studio Lighting Workbook
httpslidepdfcomreaderfullheinrich-melanie-studio-lighting-workbook 3989
the models face It was positioned approximately 3
feet from her and powered by a large power pack
of about 2000 watts
The background was intentionally dropped off intoblack leaving no more detail than necessary or
desired It was placed about 5 feet behind the
model
The model applied baby oil to her face for the shot
A spray bottle filled with water was used to add the
illusion of sweat She shook her head about to
provide the work-out like appearance After all
that the photographer was able to achieve the
image he wanted after paying close attention to the
small details and knowing how to use his camera
A wide-angle lens was used to take this shot It
helped to accentuate the barbell and hand of the
model The exposure was taken with a handheld
incident meter facing the camera Several frames
were shot bracketing the image and the final image
was chosen in editing Study your brackets
carefully on a good light table to pick a final
photograph
7302019 Heinrich Melanie - Studio Lighting Workbook
httpslidepdfcomreaderfullheinrich-melanie-studio-lighting-workbook 4089
Creating a Sullen Emotion
Film
Tmax 100 Black and White Film
Camera Format
2 14square - HasselbladMedium Format
Lens
80mm Normal
Light Source
Strobe with softbox and spot
stobe
Meter
Handheld Incident
Tripod
Yes
Filters
None
Polaroids
Yes
7302019 Heinrich Melanie - Studio Lighting Workbook
httpslidepdfcomreaderfullheinrich-melanie-studio-lighting-workbook 4189
Capturing a mood or creating a mood can be done using
dramatic light You should also direct your subject into
positions that convey the emotion you are after Be carefulnot to over direct your subject This can make the image
look contrived and fake Professional models are great
actors and will understand your direction very well If you
are not photographing a professional model you should do
a couple of things to help your model Use a long lens
Keeping a distance between you and the model will give
them room to relax Secondly pretend to shoot a couple of
rolls of film This should give them enough time to get
comfortable with the flashing lights and shutter clicks
Next shoot a lot of film Be clear with your directions
Design your set so you can move around freely and shootfrom different vantage points During the shoot your
model will become more relaxed and the images will turn
from stiff to candid
In the image above a softbox was positioned close to the
subject and was the main light The light was intentionally
overexposed This was done by taking a meter reading
from the subjects left side where the fill light fell off This
technique slightly overexposed the light on his right side
and forehead Now you can see how a slight change in
metering placement can change the entire feeling of an
image A white reflector card was used to bounce a
diffused fill light into the subjects right side This style is
meant to emulate the lighting found in a theatre ~ high
contrast and a dramatic mood A spotlight lights the back
part of his neck It is raised high above and pointed down
at the subject
7302019 Heinrich Melanie - Studio Lighting Workbook
httpslidepdfcomreaderfullheinrich-melanie-studio-lighting-workbook 4289
With a little direction we found the emotion we were
looking for The subject was told to rest his elbows on his
knees as he clutched his drumsticks The position of his
head relative to his body turns his face toward the viewer
This position is natural and comfortable for him His eyes
are looking downward as though in reflection of another
time It is a moody image because of the lighting and his
expression Practice photographing your friends by
directing them with posture poses and physical
appearance changes
7302019 Heinrich Melanie - Studio Lighting Workbook
httpslidepdfcomreaderfullheinrich-melanie-studio-lighting-workbook 4389
Staging People
Film
Ektachrome 100
Daylight
Camera Format
2 14 square - Hasselblad
Medium Format
Lens80mm Normal
Light ource
Two Umbrellas with
Strobes
Meter
Handheld Incident
Tripod
Yes
Filters
None
Polaroids
Yes
7302019 Heinrich Melanie - Studio Lighting Workbook
httpslidepdfcomreaderfullheinrich-melanie-studio-lighting-workbook 4489
When staging people you need to create a natural appearance
The same principle holds true when photographing people If you
hire professional models it will make your job much easier
Professional models will know exactly what to do with very little
direction More importantly they are completely comfortable in
front of the lens
The image above was shot for an architectural firm catalog The
company wanted to save money by using their own employees as
models We wanted to use professional models but made the
concession in order to secure the job We used familiar icons to
help the employees feel comfortable in front of the camera Oncewe had them working on the architectural model they had
forgotten about the camera and lights in the room We were able
to get the tools of their trade in the scene the employees
comfortable and then able to capture several successful images
for our client
We used two lights with umbrellas to light the scene One strobe
was placed to the right of the camera and pointed at the set and
the other strobe was positioned behind the left side of the camera
and was high in the air and pointed downward towards the set
See the diagram below
The two strobes were balanced and their meter readings were the
same When photographing people use a shutter speed that stops
any possible movement Do not shoot at a shutter speed below the
millimeter of the lens you are using For example if the lens you
are using is a 90mm lens your shutter speed will be 1125th or
faster Use 160th of a second if you have a focal plane shutter
Cameras with a leaf shutter do not hold to the same constraints as
a focal shutter Leaf shutter lens also sync at any speed Review
your camera manual to see if there are any limitations with your
lens and camera
7302019 Heinrich Melanie - Studio Lighting Workbook
httpslidepdfcomreaderfullheinrich-melanie-studio-lighting-workbook 4589
Film
Ektachrome 100
Daylight Film
Camera Format
2 14 square -
Hasselblad
Medium Format
Lens
80mm Normal
Light Source
Strobes with Two
umbrellas
Meter
Handheld Incident
Tripod
Yes
Filters
None
PolaroidsYes
7302019 Heinrich Melanie - Studio Lighting Workbook
httpslidepdfcomreaderfullheinrich-melanie-studio-lighting-workbook 4689
The second image was shot in a compressor room It portrays
the inspection division of the same company These men are not
models and have a very realistic appearance One man poses as
manager and the other as an inspector Again we used props to
set the stage and asked the men to talk with each other
Cleaning the compressors was an important part of making the
statement the client desired The client portrays a clean and safe
environment Cleaning a set before shooting is sometimes the
most important thing you can do Paying attention to the small
details will get you repeat business This cant be stressedenough If you need to paint something in the scene before you
shoot it to make sure it looks right do it It may make all the
difference in the world Your client will take notice of your
attention to detail This is why previewing a location before you
shoot it is very important It gives you a chance to hire someone
or ask the client to clean these areas for the shot
The image above was shot with two strobes both using
umbrellas Both strobes were placed to the right of the camera
One of the strobes was positioned somewhat behind the men and
set high in the air This pushed light onto the compressorsbehind the men The second strobe lights the men and the
foreground parts of the compressors
7302019 Heinrich Melanie - Studio Lighting Workbook
httpslidepdfcomreaderfullheinrich-melanie-studio-lighting-workbook 4789
The advertising field is very competitive
yet the potential for increased income isgreat Photographers who are doing
advertising work tend to specialize
depending on the area they live in For
example someone living in a small city
may need to have several specialties On
the other hand someone in New York
could specialize in one thing ie
childrens fashions or motorcycles An
advertising photographer will most of
the time be working with an art
director from a design or advertising
firm Clients rarely hire photographersdirectly unless they have established a
rapport with them It is generally the
AD (art director) working on the job
that will hire for the client
Ask yourself this question What is the
one thing that I like and feel
comfortable with Your answer is the
area you should be specializing in In
reality most people go through life and
their likes and dislikes change Aphotographer sometimes follows a
specialty For instance someone who
assisted a commercial photographer
shooting childrens clothes and liked it
decided to pursue that field The ideal
situation is to make a living doing whatyou really like
Lessons in this section
Lighting Multiple Glass ProductsUsing Props with Products
Multiple Exposures
Making Reflections Work for You
Using a Product for a Background
Floating a Product
Boring Product - Interesting Design
7302019 Heinrich Melanie - Studio Lighting Workbook
httpslidepdfcomreaderfullheinrich-melanie-studio-lighting-workbook 4889
The lessons in this section assume you
have a good working knowledge of
camera tools visual basics and lightingIf not go back to these sections and
learn these things first Also some of the
studio setups can be built Those
designs are described in Building a
Studio
The lessons in this section go into
extensive details showing you where to
position your lights and reflectors etc
in order to achieve a certain look and
feel in an image They includedescriptive diagrams for you to
duplicate
7302019 Heinrich Melanie - Studio Lighting Workbook
httpslidepdfcomreaderfullheinrich-melanie-studio-lighting-workbook 4989
Lighting Multiple Glass Products
FilmEktachrome 100
Daylight Film
Camera Format
4 x 5 - Horseman
Large Format
Lens
150mm Normal
Light SourceStrobe with Softbox and
Reflectors
Meter
Handheld Incident
Tripod
Yes
Filters
None
7302019 Heinrich Melanie - Studio Lighting Workbook
httpslidepdfcomreaderfullheinrich-melanie-studio-lighting-workbook 5089
The image above was an inset photograph for a
brochure cover The company sold gift baskets and
products The brochure was used to help their growing
marketing requirements The brochure had three
different images similar to this one along with
accompanying text The client was in the studiowhen this was taken and was the acting art director
So all proofs were finalized at the time of shooting
This eliminates any questionable fees for reshooting
Polaroids are used for the same reason An instant
image of lesser quality than film will serve as great
representations of the final photograph Polaroids
are sometimes faxed or scanned and emailed to the
client for approval Asking your client to sign off on
a photograph will give you the assurance that all is
okay and you can record the image on film
Shooting glass and high gloss labels can be a
frustrating exercise because of the multiple
reflections that occur Remember as you shoot to
look through the lens to see if you have any
reflections on your products in the set All
reflections are caused due to the angle between
lens and light source Review your polaroids
carefully for any reflections before you expose the
film
TIP ~ Moving the product a small amount may be the best
way to remove the reflections Before you do that
adjust your light to eliminate any glare and
reflection Each time you change the light position
you must check for glare
Place all the products on the table top according to
the layout supplied by your client or art director
The image above was tiered giving it height and
depth
The light is positioned directly over the set It is
tilted slightly toward the backdrop and away from
the camera The backdrop is set up as a sweep It is
a piece of gray formica See Building a Studio to
7302019 Heinrich Melanie - Studio Lighting Workbook
httpslidepdfcomreaderfullheinrich-melanie-studio-lighting-workbook 5189
learn how to make this if you are inexperienced in
studio construction
Three white or silver cards are used in the front andon both sides to pump additional light into the
scene These are carefully and strategically placed
to avoid seeing the reflector cards in the glass
When you are shooting glass objects the main light
should reflect in the glass It indicates the direction
of the light source The main light source reflection
is acceptable as long as it is not too bright The fill
light from the reflector cards should not dominate
your main light source
TIP ~ Reflector cards can be made from any material that
reflects light such as a white card Large pieces of
foam core are used and cut into smaller pieces
depending on the size of the set Silver cards are also
used They are positioned to reflect the light coming
from your main light source and bounce the light
softly back into the set These cards will add more
light and sometimes add unacceptable hot spots on
the products These hot spots are very distracting
and unsightly
Now that you have all your lighting sources in place
look through the camera to see if you have any
reflections If you have a lot of glare in your image
readjust the overhead light by tilting it more
towards the back or front Be careful to avoid lens
flare Lens flare is when your light or lights reflect a
glare back into the lens For example when
someone shoots into the sun the lens picks up a
glare Block the lens flare with a black card by
placing the card between the light and lens Make
sure not to put the card into your scenes final crop
or in a position where you block your image You
may need to move your lights or use a scrim to get
rid of the lens flare It will be easier to add a scrim if
you have previously adjusted all the glass for no
reflections Instead of a scrim you could use a lens
hood The lens hood attaches to the front of the lens
7302019 Heinrich Melanie - Studio Lighting Workbook
httpslidepdfcomreaderfullheinrich-melanie-studio-lighting-workbook 5289
It protrudes from the lens and blocks any glare
falling on the front lens element Each lens may use
a different hood These come in many different
shapes and sizes I use a scrim because it is far more
versatile
Assuming your light source is in a good position you
may still have some glare on the glass You can
eliminate many reflections by slightly tipping the
product forward Use a small object under the back
side of the product while not disturbing the
products position These are very slight movements
and will not change the appearance to any great
degree Also tip the reflectors back and forth and
side to side to remove any added glare from your
objects Be attentive to all the objects You may
eliminate glare in one object and produce it in
another You must check for any reflections in your
polaroids Some reflections are very difficult to
detect when viewing the set from behind the camera
using the modeling lights
Use an incident meter and read the light falling on
the set Always bracket your exposure Bracketing is
the process of taking many shots of the same set but
using different fstops For example if your meter
reads f32 at 160th of a second your bracket would
be one stop on either side f22 and f45 at the same
speed The image was shot at f32 or greater depth-
of-field Some photographers bracket with 12 stops
and 13 stop differences They shoot 5 sheets of film
using these small incremental changes
7302019 Heinrich Melanie - Studio Lighting Workbook
httpslidepdfcomreaderfullheinrich-melanie-studio-lighting-workbook 5389
Final cropping of image
The final image displayed on the left was
successfully shot with no glare on any of the
products All the products were in glass or were
wrapped in cellophane The image has been
cropped to match the final inset space for the
brochure This shot took about a half day toshoot
7302019 Heinrich Melanie - Studio Lighting Workbook
httpslidepdfcomreaderfullheinrich-melanie-studio-lighting-workbook 5489
Using Props with Products
FilmEktachrome 100
Daylight Film
Camera Format
4 x 5 - Horseman
Large Format
Lens
90mm Wide
Light SourceStrobe with Softbox
Meter
Handheld Incident
Tripod
Yes
Filters
None
7302019 Heinrich Melanie - Studio Lighting Workbook
httpslidepdfcomreaderfullheinrich-melanie-studio-lighting-workbook 5589
When using props to help convey your message
remember the visual basics about colorperspective framing contrast backgrounds
and balance
This image of a racing bike was shot from an
angle that enlarged the back wheel The wide
angle lens helps pronounce the wheel size as well
as increasing the elongated perspective of the
bike
The bike was shot against a black background
Isolating your subjects by eliminatingdistracting backgrounds will help make the
objects in the set stand out The three arrow-
shaped plexiglass pieces all point to the distance
This visually portrays the speed and forward
motion of a racing bike Primary colors of the
plexiglass are used to simplify the information
in the image The gears of the bike are
pronounced displaying the bikes power and
versatility The camera position is very low and
tilted upward to further increase the illusion of
size
A softbox was used to keep the glare on the
chrome to a minimum It was positioned
parallel to the bike seat on its right side and
tipped down slightly toward the pedals If you
look carefully you can see the reflection of the
softbox in the blue plexiglass This is acceptable
The light has bounced color from the plexiglass
back onto the chrome of the bike This adds
interesting color highlights to the image that
balance well with the other colors
Parts of the wheels reflect the colors of the
plexiglass adding an interesting bit of color
7302019 Heinrich Melanie - Studio Lighting Workbook
httpslidepdfcomreaderfullheinrich-melanie-studio-lighting-workbook 5689
backdrop will work also The velvet material
absorbs any light that falls on it
When you are taking your exposure readings
make sure that you take readings of the
background walls in the scene Do not face your
light toward the back wall The meter readingsof the walls should be at least 4 stops darker
than your final exposure This will maintain a
black background
The wide angle lens was used to achieve
maximum depth-of-field This image was
exposed at f45
The room was totally darkened for this shot
Some photographers will even paint their walls
black for a shot like this A black velvet
7302019 Heinrich Melanie - Studio Lighting Workbook
httpslidepdfcomreaderfullheinrich-melanie-studio-lighting-workbook 5789
Multiple Exposures
Film
Ektachrome 100
Daylight Film
Camera Format
4 x 5 - Horseman
Large Format
Lens
150mm Normal
and 90mm Wide
Light Source
Strobe with Softbox
Meter
Handheld Incident
Tripod
Yes
Filters
None
7302019 Heinrich Melanie - Studio Lighting Workbook
httpslidepdfcomreaderfullheinrich-melanie-studio-lighting-workbook 5889
This image was designed as a poster for a national bowling
tournament The objects were intentionally placed leavingblack areas for the white text or copy and logos to be placed
on the final poster
The image above was done by repositioning the camera
three different times and exposing the film each time with
the change (Three shots on one piece of film) In addition the
lens was changed for one of the shots
You will need a large piece of black velvet to absorb all
scattered light All exposures were shot on the black velvet
The velvet does not see light This leaves that area of the filmunexposed This allows you to expose something else in the
black area which occurs when you take your next exposure
You will also need a piece of acetate to place on the film
back for tracing the objects in each exposure This will help
you line everything up and avoid overlapping your
products By tracing the objects that appear on your film
back onto a piece of acetate you will be able to align
everything perfectly
The first exposure was made of the bowling ball in thebottom right with a wide angle lens The second exposure
was made of the bowling pin on the left bottom The third
exposure was made of the top right 2 bowling pins One of
these pins was raised up on a block for added dimension
With each exposure the camera was progressively pulled
away from the scene The camera lens to subject distance
was increased to help this illusion of depth Diagrams below
may help you understand this better
Make sure when taking photos like this that any part of the
image you wish to remain unexposed is filled with the black velvet You can add any lighter value to a black area with
film because it is unexposed
7302019 Heinrich Melanie - Studio Lighting Workbook
httpslidepdfcomreaderfullheinrich-melanie-studio-lighting-workbook 5989
When you are ready to make the first exposure trace the
film back onto the acetate by placing the acetate over your
film back Do this with each exposure
A softbox was used and placed close to all of the subjects
producing direct lighting Your exposure times and fstops
can be different for each exposure just as if you were taking
separate photographs In fact think of this type of image as
a composite
Wide Angel Lens Normal Lens Normal Lens
7302019 Heinrich Melanie - Studio Lighting Workbook
httpslidepdfcomreaderfullheinrich-melanie-studio-lighting-workbook 6089
Making ReflectionsWork for You
Film
Ektachrome 100
Daylight Film
Camera Format
4 x 5 - Horseman
Large Format
Lens
150mm Normal
Light Source
Strobe withSoftbox
Meter
Handheld
Incident
Tripod
Yes
Filters
None
7302019 Heinrich Melanie - Studio Lighting Workbook
httpslidepdfcomreaderfullheinrich-melanie-studio-lighting-workbook 6189
The image above was shot on a highly reflective
background It came in a long roll about 4 feet
wide The light was positioned toward the front
parts of the products to avoid a hard horizon lineThe light falls off into black making it useful for
the reversed type of white (see below) Be careful
to avoid lens flare when positioning the lights near
the camera lens Make sure to block any light that
may fall on the lens Use a scrim to block the light
A scrim is any black piece of material that will
function as a light block Black masking tape was
secured to the edge of the lens to block the light
Be careful not to show the tape in your
photograph
Glare can be a major problem with highly
reflective sets like this one Always remember to
look through your lens to avoid this Tip your
light toward the front or back of the scene to
adjust the glare on the set This shot was taken
using a strobe head inside a softbox This type of
light is often used in product photography
especially when shooting highly reflective objects
The light rays are scattered and softened by this
kind of light source
Each of the objects in this scene are veryreflective The reflective gold surface used to shoot
on adds interest to the products by adding a gold
reflection of the product onto the gold surface
This gives depth to the image
Adding different colored line art around the edge
of the image in the white border adds an extra
dimension to the final composite below This was
done by the designer after the image was taken
Some of the line art is in front of the image and
some is dropped behind the image Reverse text isused on the black part of the image and black text
is used on the white border
7302019 Heinrich Melanie - Studio Lighting Workbook
httpslidepdfcomreaderfullheinrich-melanie-studio-lighting-workbook 6289
Using a Product for a Background
Film
Ektachrome 100
Daylight Film
Camera Format
4 x 5 - Horseman
Large Format
Lens
150mm Normal
Light Source
Strobe with Softbox and
Reflector
Meter
Handheld Incident
Tripod
Yes
Filters
None
7302019 Heinrich Melanie - Studio Lighting Workbook
httpslidepdfcomreaderfullheinrich-melanie-studio-lighting-workbook 6389
This close-up of a computer chip was designed for the
front cover of a computer companys brochure (see
below) It was nesseccary to get the best detail for
enlargement reasons so a large format camera was used
The end image was 9 x 12 our negative was 4 x 5
A strobe with a softbox was used to light this subject
from the left side An accompanying white reflector card
was placed close to the subject to fill in the right side
with light (see diagram below)
The bellows on the 4 x 5 camera were extended to
enlarge this chip to fill the frame When extending the
bellows you increase the need for light to reach the film
In this case we did not need to have a small f-stop
number for sharpness so we left the lens open at f56and made our exposure appropriately Even if you need
to pop your flash a couple of times extending the
bellows should not be something to hold you back from
making the close-up you want to shoot The detail in this
shot is achieved by using a 4 x 5 camera with a good lens
TIP ~
Popping or firing the strobe multiple times is done with
the lens open in a darkened room so the only light in the
room is coming from your controlled multiple burst of
the flash Since you have no need for speed whenshooting inanimate objects keep pumping in the light to
get the exposure you need In a dark room you could
leave your lens open and just continually pop the strobe
Or you can cock the shutter and repeat the same
exposure until it adds up to the correct amount of light
required Make sure you are on a very steady tripod
The slightest amount of movement will blur your image
TIP ~
The best set up for any overhead shot with a 4 x 5 is to
put your set on the floor This is of course dependent on
the size of your set A short-legged set of horses works
very well also The legs used in this set were about 12
high
The hue of bluegreen works well with the yellow text
7302019 Heinrich Melanie - Studio Lighting Workbook
httpslidepdfcomreaderfullheinrich-melanie-studio-lighting-workbook 6489
The text pops off the image This color prevents the text
from falling into the background The background of the
computer chip remains a simple reminder of what the
company does It is the text that the viewer is expected to
read
This image would also make a great backdrop for a
collage or montage image
7302019 Heinrich Melanie - Studio Lighting Workbook
httpslidepdfcomreaderfullheinrich-melanie-studio-lighting-workbook 6589
Floating Product
Film
Ektachrome 100
Daylight Film
Camera Format4 x 5 - Horseman
Large Format
Lens
150mm Normal
and 90mm Wide
Light Source
Strobe with
Softbox
Meter
Handheld
Incident
Tripod
Yes
Filters
None
PolaroidsYes
7302019 Heinrich Melanie - Studio Lighting Workbook
httpslidepdfcomreaderfullheinrich-melanie-studio-lighting-workbook 6689
Both images in this lesson give the illusion of
floating The top image is propped up underneath by
a block A softbox directly above the computer
circuit board was used to achieve a soft even light In
todays high-tech industry these kinds of images are
being used in composites and as single images
TIP ~
Using black velvet as a backdrop can achieve a
similar effect where the subject appears to float The
light will be absorbed into the black velvet material
to create the illusion
The computer chip is not grounded to anything so it
appears to float (see Fig 1) The angle of the light on
the computer circuit board picked up some very
interesting highlights in Fig 1 which adds to the
high-tech feel of the image
A 4 x 5 camera was used to get greater detail with
the larger negative for enlargement purposes Depth-
of-field was achieved at f32
When shooting any subject like this you can portray
many kinds of interesting illusions The black velvet
material may be a little more expensive but nothing
else works as well This kind of material will help
you take the shots like the pros
Fig 1
7302019 Heinrich Melanie - Studio Lighting Workbook
httpslidepdfcomreaderfullheinrich-melanie-studio-lighting-workbook 6789
Boring Product -Interesting Design
Film
Ektachrome 100
Daylight Film
Camera Format
4 x 5 - Horseman
Large Format
Lens
150mm Normal
Light Source
Strobe with Softbox
Meter
Hanheld Incident
Tripod
Yes
Filters
None
7302019 Heinrich Melanie - Studio Lighting Workbook
httpslidepdfcomreaderfullheinrich-melanie-studio-lighting-workbook 6889
Some products you will be photographing will be justplain boring such as the rods in the shot above Its
your job as the photographer to bring life and interest
to boring products like these In the image above the
client needed his products shot for his company
catalog
Making something interesting from something boring
can be done by using an interesting background or
unusual lighting In this image the layout and diagonal
positioning of the rods directs the viewers eye to the
top right area of the image of the frame Text was
placed at the top and right side of this image (see final
image below)
The softbox was positioned above and to the left of the
product as indicated by the soft shadows Fig1 This
image could have easily been cut out from its
background and placed on any other background
Minimal depth-of-field is needed for this shot because
the maximum height of the product was only two
inches An aperture of f8 was used The exposure is
made with an incident meter reading to achieve an
overall well-balanced tone
Deep shadows could have been used to add interest to
these products by using a direct light at a very low
level to the table angle Fig 2 No softbox would be
used for this kind of shot
The set is placed on the floor so your camera position
is directly over the top of the set If shot on a table top
you would need to stand on top of a ladder to take the
shot The easier choice is to shoot on the floor
7302019 Heinrich Melanie - Studio Lighting Workbook
httpslidepdfcomreaderfullheinrich-melanie-studio-lighting-workbook 6989
Fig 1
Fig 2
7302019 Heinrich Melanie - Studio Lighting Workbook
httpslidepdfcomreaderfullheinrich-melanie-studio-lighting-workbook 7089
Lessons in this section
Mixing Texture Shapes and Color
Arranging a Set
Photographing Beautiful Glass
Messages in a Still Life
Creating a Mood
Still Lifes Selling Products
Setting the stage works to help convince the
viewer of a place and time or mood Small
details make a shot believable These
lessons will teach you how to think and tell
a story of a certain place in time Picking
the right props for your shoot will ensure
believability The lessons in this section
work in conjunction with the ProductPhotography section
A still life photographer can be found
working in a studio or on location This
type of photography demands the
recreation of a set or going to the set to
capture a moment in time This can be done
on location in the studio or digitally
created on the computer The truth is it fits
into many categories It is more than
product photography You are creating a
scene that conveys a sense of being
somewhere
7302019 Heinrich Melanie - Studio Lighting Workbook
httpslidepdfcomreaderfullheinrich-melanie-studio-lighting-workbook 7189
you pull your entire learning experience
together I include details and diagrams
that will reinforce your understanding
Still life scenes are often used in a designers
set or in a showroom like in a furniture
store They can also be used to convey a
story quickly and help transfer the concept
and idea throughout the entire image These
lessons include tips on how to light objects
in small and detailed areas They will help
7302019 Heinrich Melanie - Studio Lighting Workbook
httpslidepdfcomreaderfullheinrich-melanie-studio-lighting-workbook 7289
Mixing Texture Shapes and Color
Film
Ektachrome 100
Camera Format
4 x 5 - Horsemen
Large Format View
Camera
Lens
150mm Normal
Light Source
Strobe with Softbox
MeterHandheld Incident
Tripod
Yes
Filters
None
7302019 Heinrich Melanie - Studio Lighting Workbook
httpslidepdfcomreaderfullheinrich-melanie-studio-lighting-workbook 7389
The image above was shot as a portfolio piece
Mixing textures shapes and colors the
photograph displays the photographers eye for
design It is photographed on black velvet which
adds saturation of the overall appearance by
absorbing all the light that falls on it The black
velvet can be purchased at any fabric store
Two scarves are positioned at opposing angles
adding strong graphic interest and competition
between them Against the soft colored scarves
the dark blue hat pops out The colored markers
are color complements to the blue hat and add
additional depth to the image
Resting on top of the scarves are brightly
colored objects which add spots of color andinterest The curvy lines of the ribbons break up
the edges of the two scarves and add a bit of fun
to the image The final crop of the image forces
the viewer to see the positive and negative
spaces of color within the frame Cropping plays
an important role in the success of your image
How the image was photographed ~
One main strobe light was used It was shot
through a softbox or mylar scrim Several white
and silver reflector cards surrounding the setbounced in a soft fill light Using the reflectors
as fill light evens out the overall appearance
without eliminating the direction of the main
light The shadows in the image are soft and
reveal more texture in the scarf
Minimal if any depth-of-field was needed in
this image so it was exposed at f56 The meter
reading is taken with an incident meter and
pointed directly at the camera Several readings
were taken of the entire image For example a
meter reading was taken of the light falling onthe hat the tip of the triangular scarf and the
black corners of the velvet before an exposure
was chosen A range of only 1 stop was allowed
between these exposure readings Reposition
your reflecting cards either closer or further
7302019 Heinrich Melanie - Studio Lighting Workbook
httpslidepdfcomreaderfullheinrich-melanie-studio-lighting-workbook 7489
from your subject to adjust the exposure
variations Your final exposure choice will be of
the area in the scene that is the brightest or
where the most light is falling If your exposure
variations are between f16 and f11 f16
indicates the brightest area in the scene You
should know this at this point in your educationIf you dont go back to the Camera Basics
section and read over the lessons Choosing f16
will prevent overexposure to the lighter areas in
your scene The camera was positioned directly
over the top of the set using a tripod Make sure
your tripod is capable of supporting your
camera in these unusual positions
Pick three or four objects that work well
together Lay them out on a solid colored
background in an interesting design pattern
Position your camera lights and reflectors
Using a color transparency film bracket your
frames as you shoot
Final crop of image
reflector
reflector
7302019 Heinrich Melanie - Studio Lighting Workbook
httpslidepdfcomreaderfullheinrich-melanie-studio-lighting-workbook 7589
Arranging a Set
Film
VPS 100 - Color Negative
Camera Format
2 14 square - Hasselblad
Medium Format
Lens
80mm Normal
Light Source
Strobe with Softbox
Meter
Handheld Incident
Tripod
Yes
Filters
None
7302019 Heinrich Melanie - Studio Lighting Workbook
httpslidepdfcomreaderfullheinrich-melanie-studio-lighting-workbook 7689
Within each image there can exist sets that pull the
entire image together The image above is an example
of one of these small sets The set is staged for a period
in time
Some professionals hire stylists to set something like
this up Background information helps convey a
message in the overall scene For example suppose you
are shooting the interior spaces of a Victorian home
and your client wants to place the product in the late
1800s Objects in the photo above will help transport
your viewer into that time in history Props are a very
important part in convincing your viewer of a place in
time You can find props at antique stores for this kind
of scene Time period images must be authentic down
to the smallest details Hire a historian for accuracy if
needed
Magazines use small inset photos that display intricate
details of settings They may not be set against a black
background as in the photograph above The
background should be dimly lit or out of focus to
help accent the subject Shallow depth of field and
object placement will work together to make your
image successful
One main strobe light was used in the photograph
above with no fill lights or reflectors This drops the
background of black velvet into black making it a
perfect place for white text Remember an
editor or designer usually needs to add type and will
need this space
7302019 Heinrich Melanie - Studio Lighting Workbook
httpslidepdfcomreaderfullheinrich-melanie-studio-lighting-workbook 7789
Still lifes have been used in fine art for many years The
image above happens to be found in nature but could
have just as easily have been set up in a studio The
arrangement of the plates and glass objects can be
emulated in the studio or in a set I have included this
image to show you that what you find most naturally in
life is how you should set up a scene whether in the
studio or on location Take your camera into the world
around you and shoot small stories such as the one
above These still lifes will help you to stylize your own
setups This lesson will help you learn how to crop and
balance your images Pay close attention to the light
falling on the objects in your scenes Follow the previous
example to determine the proper exposure of your film
Be deliberate when you consider the photographs you
will take Take your time
Remember to see within the boundaries of your frame
balancing objects from front to back side to side and
corner to corner See Visual Basics for more
information on setting an objects position within the
frame
7302019 Heinrich Melanie - Studio Lighting Workbook
httpslidepdfcomreaderfullheinrich-melanie-studio-lighting-workbook 7889
Photographing Beautiful Glass
Film
VPS 100 - Color Negative
Camera Format
2 14 square - Hassalblad
Medium Format
Lens
80mm Normal
Light Source
Strobe with Softbox
Meter
Handheld Incident
Tripod
Yes
Filters
None
7302019 Heinrich Melanie - Studio Lighting Workbook
httpslidepdfcomreaderfullheinrich-melanie-studio-lighting-workbook 7989
The image above will give you an idea of how to light
small objects in a room or on a set You can make
objects pop out that are a very small part of the sceneFor example the color in this image is something you
really want to show but each of the objects must be
placed and lit properly to portray the beauty of their
colors Small strobes with funnel snoots will spotlight
only the objects you are interested in The blue
background color was chosen as a color complement to
the colors in the glass
TIP A snoot can be made from a rolled piece of
poster board into the shape of a cone You can also
buy these cones to fit on the strobe Be careful if using
poster board as the lights can get very hot
Take a large piece of poster board and roll it into a
cylinder shape Fig 1 Tape the center of the cylinder
then expand one end and decrease the opposite end of
the cylinder Fig 2 Make the expanded end large
enough to fit over the strobe head The other end of
the cylinder should be small enough to direct the light
at whatever object you want to be lighting The size of
the smaller hole will dictate the angle of the light
pointed at the object
Fig 1 Fig 2
7302019 Heinrich Melanie - Studio Lighting Workbook
httpslidepdfcomreaderfullheinrich-melanie-studio-lighting-workbook 8089
WARNING
DO NOT USE POSTER BOARD CONES WITH
TUNGSTEN LIGHTS The chance of fire is far too
great NEVER leave powered lights unattended
The glass objects in the photograph above have had the
light pushed directly through them When the light
passes through the colors are revealed
Shooting glass with liquid in it is described in the
diagram below The softbox is placed directly above the
set and slightly tilted away from the camera With the
liquid in the glass place a reflector card behind the
liquid only Looking through the camera lens make sure
the card does not extend past the liquid above or to the
sides Tip the card backwards so it picks up some of the
light falling down from the softbox This will illuminate
the liquid giving it a glowing appearance
7302019 Heinrich Melanie - Studio Lighting Workbook
httpslidepdfcomreaderfullheinrich-melanie-studio-lighting-workbook 8189
Your background can be any color detail or density when
using this reflector card
7302019 Heinrich Melanie - Studio Lighting Workbook
httpslidepdfcomreaderfullheinrich-melanie-studio-lighting-workbook 8289
Messages in a Still Life
Film
Ektachrome 100
Camera Format
35mm - Nikon
Small Format
Lens
50mm Normal
Light Source
Strobe with Softbox
Meter
Handheld Incident
Tripod
Yes
Filters
5 Red CC Filter
7302019 Heinrich Melanie - Studio Lighting Workbook
httpslidepdfcomreaderfullheinrich-melanie-studio-lighting-workbook 8389
The above image sends a message of peace and
comfort to its viewer in a couple of different
methods
One method is achieved by the type of lighting
used (In this case a strobe within a softbox) A warm
glow of very soft light is scraping horizontally
across the image and highlights fall on the outer
pages of the book It has a golden quality Another
method is achieved by using a number 5 CC filter
over the camera lens This accents the rich red color
in the roses with their saturated hue and balances
perfectly with the gold color in the pages as well as
the reddish-brown boards that they sit on
TIP ~
A red or orange transparent gel in an acetate sheet
form could be placed over the softbox to warm the
color pushed into the set
The background falls off into black holding the
viewers eye on the bible and the perfectly balanced
roses
This was shot with a softbox to the right of the scene
with no fill cards or fill lights The main light source
is close to the subject so the light falls off very little
When the light is positioned close to the subject its effect
on the oppiste side is minimal
7302019 Heinrich Melanie - Studio Lighting Workbook
httpslidepdfcomreaderfullheinrich-melanie-studio-lighting-workbook 8489
Using light color balance and the right props this
image conveys both warmth and love The main
subject is the bible The roses are used to convey a
feeling of love If instead of roses guns were used as
props the message would be entirley different
perhaps of violence Props can make or break
your image
7302019 Heinrich Melanie - Studio Lighting Workbook
httpslidepdfcomreaderfullheinrich-melanie-studio-lighting-workbook 8589
Creating a Mood
Film
Ektachrome 100
Camera Format
35mm - Nikon
Small Format
Lens
50mm Normal
Light Source
Strobes and reflectors
Meter
Handheld Incident
Tripod
No
Filters
None
7302019 Heinrich Melanie - Studio Lighting Workbook
httpslidepdfcomreaderfullheinrich-melanie-studio-lighting-workbook 8689
Making a statement with your photography should
be foremost in your mind The image above tells us ~
bedroom lovers intimacy passion etc It is up to
our imagination to fill in the blanks You have only a
few moments to convey your message so be careful
not to be too subtle yet not so blatant that your
message is visually insulting
The location in this shot was specifically chosen
Shot on a wooden floor a rustic authenticity is
portrayed A cowboy feel was achieved with these
surrounding elements The lingerie casually draped
over the boots looks accidental and unplanned The
boot that is tipped over leads the viewer to believe an
impetuous moment of hurried passion is taking
place The background is evident but intentionally
made out of focus by shooting at f4 for shallow
depth of field
This image is far from haphazard It was planned
from layout to location to scouting to objectplacement The idea came first then the execution of
the image Although minor alterations of layouts are
common the concept will remain the same This
eliminates confusion by isolating one idea and
working it through from all directions
Scouting out locations can be a full-time job and you
may need special permission to shoot in a particular
place See property release in the Legal Forms
section to cover your legal requirements and release
forms
7302019 Heinrich Melanie - Studio Lighting Workbook
httpslidepdfcomreaderfullheinrich-melanie-studio-lighting-workbook 8789
This kind of image will work very well for an adselling lingerie A strobe light with a softbox was
used to light the boots and the lingerie from the
right A reflector card was placed close to the boots
to fill in the left side of the scene The light is
positioned low near the floor which scrapes the light
on a low plan This was placed to simulate a specific
time during the day sunset or early evening The
light at this time is warm in color value which adds
to the subject matters message The camera vantage
point is low also bringing the viewer into intimate
contact with the boots and lingerie
7302019 Heinrich Melanie - Studio Lighting Workbook
httpslidepdfcomreaderfullheinrich-melanie-studio-lighting-workbook 8889
Still Lifes Selling Products
Film
Ektachrome 100
Camera Format
2 14 square - Hassalblad
Medium Format
Lens
80mm Normal
Light Source
Strobe with Softbox
Meter
Handheld Incident
Tripod
Yes
FiltersNone
7302019 Heinrich Melanie - Studio Lighting Workbook
httpslidepdfcomreaderfullheinrich-melanie-studio-lighting-workbook 8989
Placement and staging of objects requires a thought-out layout and planned
execution when using multiple products Layering has been used in this image
where non-information has been overlapped for example where the licence
plates and shirts touch Your viewer does not need to see the entire object in
this case to know what it is Strong diagonal lines have been made by object
placement This helps pull the viewer through the image and leads the eye to
a specific area of an image This image was created to find funding for
Vietnam vets by selling these products
If you have been asked to shoot several products and put them all into one
image think of it in terms of a still life setting Larger items will be placed inthe background sometimes even being used as the background For example
picture a group of images all representing something American The
background for this scene could be a flag which is also one of the subjects
There is no need to see the entire flag because it is an easily recognizable icon
In the image above the wooden floor was used to add a sense of the rustic and
gritty realism of the Vietnam war It was lit with a softbox directly above the
subjects The aperture was a concern for foreground to background
sharpness so the camera was pulled back far enough from the scene to allow
for a large aperture of around f 56
Below is the final image This was dropped into a 3 fold 812 x 4 brochure
along with other images of the same sort
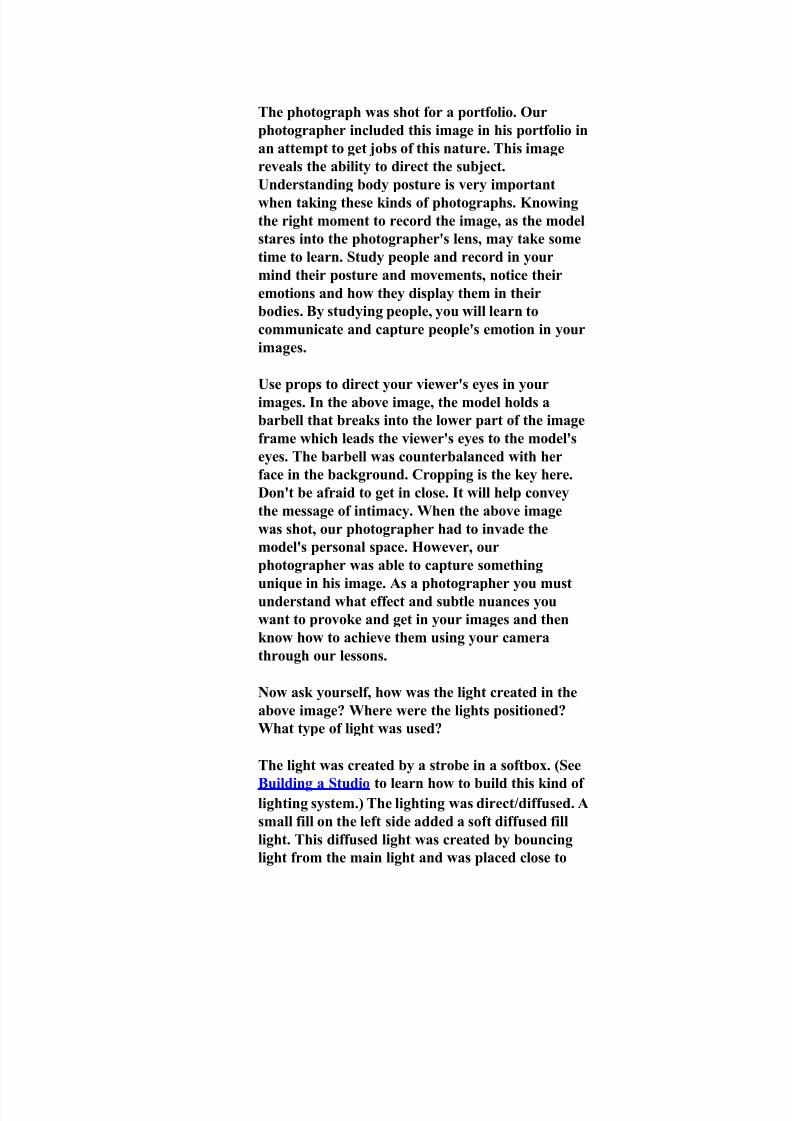
7302019 Heinrich Melanie - Studio Lighting Workbook
httpslidepdfcomreaderfullheinrich-melanie-studio-lighting-workbook 3889
The photograph was shot for a portfolio Our
photographer included this image in his portfolio in
an attempt to get jobs of this nature This image
reveals the ability to direct the subject
Understanding body posture is very important
when taking these kinds of photographs Knowing
the right moment to record the image as the model
stares into the photographers lens may take some
time to learn Study people and record in your
mind their posture and movements notice their
emotions and how they display them in their
bodies By studying people you will learn to
communicate and capture peoples emotion in your
images
Use props to direct your viewers eyes in your
images In the above image the model holds a
barbell that breaks into the lower part of the image
frame which leads the viewers eyes to the models
eyes The barbell was counterbalanced with her
face in the background Cropping is the key here
Dont be afraid to get in close It will help convey
the message of intimacy When the above image
was shot our photographer had to invade the
models personal space However our
photographer was able to capture something
unique in his image As a photographer you mustunderstand what effect and subtle nuances you
want to provoke and get in your images and then
know how to achieve them using your camera
through our lessons
Now ask yourself how was the light created in the
above image Where were the lights positioned
What type of light was used
The light was created by a strobe in a softbox (See
Building a Studio to learn how to build this kind of lighting system) The lighting was directdiffused A
small fill on the left side added a soft diffused fill
light This diffused light was created by bouncing
light from the main light and was placed close to
7302019 Heinrich Melanie - Studio Lighting Workbook
httpslidepdfcomreaderfullheinrich-melanie-studio-lighting-workbook 3989
the models face It was positioned approximately 3
feet from her and powered by a large power pack
of about 2000 watts
The background was intentionally dropped off intoblack leaving no more detail than necessary or
desired It was placed about 5 feet behind the
model
The model applied baby oil to her face for the shot
A spray bottle filled with water was used to add the
illusion of sweat She shook her head about to
provide the work-out like appearance After all
that the photographer was able to achieve the
image he wanted after paying close attention to the
small details and knowing how to use his camera
A wide-angle lens was used to take this shot It
helped to accentuate the barbell and hand of the
model The exposure was taken with a handheld
incident meter facing the camera Several frames
were shot bracketing the image and the final image
was chosen in editing Study your brackets
carefully on a good light table to pick a final
photograph
7302019 Heinrich Melanie - Studio Lighting Workbook
httpslidepdfcomreaderfullheinrich-melanie-studio-lighting-workbook 4089
Creating a Sullen Emotion
Film
Tmax 100 Black and White Film
Camera Format
2 14square - HasselbladMedium Format
Lens
80mm Normal
Light Source
Strobe with softbox and spot
stobe
Meter
Handheld Incident
Tripod
Yes
Filters
None
Polaroids
Yes
7302019 Heinrich Melanie - Studio Lighting Workbook
httpslidepdfcomreaderfullheinrich-melanie-studio-lighting-workbook 4189
Capturing a mood or creating a mood can be done using
dramatic light You should also direct your subject into
positions that convey the emotion you are after Be carefulnot to over direct your subject This can make the image
look contrived and fake Professional models are great
actors and will understand your direction very well If you
are not photographing a professional model you should do
a couple of things to help your model Use a long lens
Keeping a distance between you and the model will give
them room to relax Secondly pretend to shoot a couple of
rolls of film This should give them enough time to get
comfortable with the flashing lights and shutter clicks
Next shoot a lot of film Be clear with your directions
Design your set so you can move around freely and shootfrom different vantage points During the shoot your
model will become more relaxed and the images will turn
from stiff to candid
In the image above a softbox was positioned close to the
subject and was the main light The light was intentionally
overexposed This was done by taking a meter reading
from the subjects left side where the fill light fell off This
technique slightly overexposed the light on his right side
and forehead Now you can see how a slight change in
metering placement can change the entire feeling of an
image A white reflector card was used to bounce a
diffused fill light into the subjects right side This style is
meant to emulate the lighting found in a theatre ~ high
contrast and a dramatic mood A spotlight lights the back
part of his neck It is raised high above and pointed down
at the subject
7302019 Heinrich Melanie - Studio Lighting Workbook
httpslidepdfcomreaderfullheinrich-melanie-studio-lighting-workbook 4289
With a little direction we found the emotion we were
looking for The subject was told to rest his elbows on his
knees as he clutched his drumsticks The position of his
head relative to his body turns his face toward the viewer
This position is natural and comfortable for him His eyes
are looking downward as though in reflection of another
time It is a moody image because of the lighting and his
expression Practice photographing your friends by
directing them with posture poses and physical
appearance changes
7302019 Heinrich Melanie - Studio Lighting Workbook
httpslidepdfcomreaderfullheinrich-melanie-studio-lighting-workbook 4389
Staging People
Film
Ektachrome 100
Daylight
Camera Format
2 14 square - Hasselblad
Medium Format
Lens80mm Normal
Light ource
Two Umbrellas with
Strobes
Meter
Handheld Incident
Tripod
Yes
Filters
None
Polaroids
Yes
7302019 Heinrich Melanie - Studio Lighting Workbook
httpslidepdfcomreaderfullheinrich-melanie-studio-lighting-workbook 4489
When staging people you need to create a natural appearance
The same principle holds true when photographing people If you
hire professional models it will make your job much easier
Professional models will know exactly what to do with very little
direction More importantly they are completely comfortable in
front of the lens
The image above was shot for an architectural firm catalog The
company wanted to save money by using their own employees as
models We wanted to use professional models but made the
concession in order to secure the job We used familiar icons to
help the employees feel comfortable in front of the camera Oncewe had them working on the architectural model they had
forgotten about the camera and lights in the room We were able
to get the tools of their trade in the scene the employees
comfortable and then able to capture several successful images
for our client
We used two lights with umbrellas to light the scene One strobe
was placed to the right of the camera and pointed at the set and
the other strobe was positioned behind the left side of the camera
and was high in the air and pointed downward towards the set
See the diagram below
The two strobes were balanced and their meter readings were the
same When photographing people use a shutter speed that stops
any possible movement Do not shoot at a shutter speed below the
millimeter of the lens you are using For example if the lens you
are using is a 90mm lens your shutter speed will be 1125th or
faster Use 160th of a second if you have a focal plane shutter
Cameras with a leaf shutter do not hold to the same constraints as
a focal shutter Leaf shutter lens also sync at any speed Review
your camera manual to see if there are any limitations with your
lens and camera
7302019 Heinrich Melanie - Studio Lighting Workbook
httpslidepdfcomreaderfullheinrich-melanie-studio-lighting-workbook 4589
Film
Ektachrome 100
Daylight Film
Camera Format
2 14 square -
Hasselblad
Medium Format
Lens
80mm Normal
Light Source
Strobes with Two
umbrellas
Meter
Handheld Incident
Tripod
Yes
Filters
None
PolaroidsYes
7302019 Heinrich Melanie - Studio Lighting Workbook
httpslidepdfcomreaderfullheinrich-melanie-studio-lighting-workbook 4689
The second image was shot in a compressor room It portrays
the inspection division of the same company These men are not
models and have a very realistic appearance One man poses as
manager and the other as an inspector Again we used props to
set the stage and asked the men to talk with each other
Cleaning the compressors was an important part of making the
statement the client desired The client portrays a clean and safe
environment Cleaning a set before shooting is sometimes the
most important thing you can do Paying attention to the small
details will get you repeat business This cant be stressedenough If you need to paint something in the scene before you
shoot it to make sure it looks right do it It may make all the
difference in the world Your client will take notice of your
attention to detail This is why previewing a location before you
shoot it is very important It gives you a chance to hire someone
or ask the client to clean these areas for the shot
The image above was shot with two strobes both using
umbrellas Both strobes were placed to the right of the camera
One of the strobes was positioned somewhat behind the men and
set high in the air This pushed light onto the compressorsbehind the men The second strobe lights the men and the
foreground parts of the compressors
7302019 Heinrich Melanie - Studio Lighting Workbook
httpslidepdfcomreaderfullheinrich-melanie-studio-lighting-workbook 4789
The advertising field is very competitive
yet the potential for increased income isgreat Photographers who are doing
advertising work tend to specialize
depending on the area they live in For
example someone living in a small city
may need to have several specialties On
the other hand someone in New York
could specialize in one thing ie
childrens fashions or motorcycles An
advertising photographer will most of
the time be working with an art
director from a design or advertising
firm Clients rarely hire photographersdirectly unless they have established a
rapport with them It is generally the
AD (art director) working on the job
that will hire for the client
Ask yourself this question What is the
one thing that I like and feel
comfortable with Your answer is the
area you should be specializing in In
reality most people go through life and
their likes and dislikes change Aphotographer sometimes follows a
specialty For instance someone who
assisted a commercial photographer
shooting childrens clothes and liked it
decided to pursue that field The ideal
situation is to make a living doing whatyou really like
Lessons in this section
Lighting Multiple Glass ProductsUsing Props with Products
Multiple Exposures
Making Reflections Work for You
Using a Product for a Background
Floating a Product
Boring Product - Interesting Design
7302019 Heinrich Melanie - Studio Lighting Workbook
httpslidepdfcomreaderfullheinrich-melanie-studio-lighting-workbook 4889
The lessons in this section assume you
have a good working knowledge of
camera tools visual basics and lightingIf not go back to these sections and
learn these things first Also some of the
studio setups can be built Those
designs are described in Building a
Studio
The lessons in this section go into
extensive details showing you where to
position your lights and reflectors etc
in order to achieve a certain look and
feel in an image They includedescriptive diagrams for you to
duplicate
7302019 Heinrich Melanie - Studio Lighting Workbook
httpslidepdfcomreaderfullheinrich-melanie-studio-lighting-workbook 4989
Lighting Multiple Glass Products
FilmEktachrome 100
Daylight Film
Camera Format
4 x 5 - Horseman
Large Format
Lens
150mm Normal
Light SourceStrobe with Softbox and
Reflectors
Meter
Handheld Incident
Tripod
Yes
Filters
None
7302019 Heinrich Melanie - Studio Lighting Workbook
httpslidepdfcomreaderfullheinrich-melanie-studio-lighting-workbook 5089
The image above was an inset photograph for a
brochure cover The company sold gift baskets and
products The brochure was used to help their growing
marketing requirements The brochure had three
different images similar to this one along with
accompanying text The client was in the studiowhen this was taken and was the acting art director
So all proofs were finalized at the time of shooting
This eliminates any questionable fees for reshooting
Polaroids are used for the same reason An instant
image of lesser quality than film will serve as great
representations of the final photograph Polaroids
are sometimes faxed or scanned and emailed to the
client for approval Asking your client to sign off on
a photograph will give you the assurance that all is
okay and you can record the image on film
Shooting glass and high gloss labels can be a
frustrating exercise because of the multiple
reflections that occur Remember as you shoot to
look through the lens to see if you have any
reflections on your products in the set All
reflections are caused due to the angle between
lens and light source Review your polaroids
carefully for any reflections before you expose the
film
TIP ~ Moving the product a small amount may be the best
way to remove the reflections Before you do that
adjust your light to eliminate any glare and
reflection Each time you change the light position
you must check for glare
Place all the products on the table top according to
the layout supplied by your client or art director
The image above was tiered giving it height and
depth
The light is positioned directly over the set It is
tilted slightly toward the backdrop and away from
the camera The backdrop is set up as a sweep It is
a piece of gray formica See Building a Studio to
7302019 Heinrich Melanie - Studio Lighting Workbook
httpslidepdfcomreaderfullheinrich-melanie-studio-lighting-workbook 5189
learn how to make this if you are inexperienced in
studio construction
Three white or silver cards are used in the front andon both sides to pump additional light into the
scene These are carefully and strategically placed
to avoid seeing the reflector cards in the glass
When you are shooting glass objects the main light
should reflect in the glass It indicates the direction
of the light source The main light source reflection
is acceptable as long as it is not too bright The fill
light from the reflector cards should not dominate
your main light source
TIP ~ Reflector cards can be made from any material that
reflects light such as a white card Large pieces of
foam core are used and cut into smaller pieces
depending on the size of the set Silver cards are also
used They are positioned to reflect the light coming
from your main light source and bounce the light
softly back into the set These cards will add more
light and sometimes add unacceptable hot spots on
the products These hot spots are very distracting
and unsightly
Now that you have all your lighting sources in place
look through the camera to see if you have any
reflections If you have a lot of glare in your image
readjust the overhead light by tilting it more
towards the back or front Be careful to avoid lens
flare Lens flare is when your light or lights reflect a
glare back into the lens For example when
someone shoots into the sun the lens picks up a
glare Block the lens flare with a black card by
placing the card between the light and lens Make
sure not to put the card into your scenes final crop
or in a position where you block your image You
may need to move your lights or use a scrim to get
rid of the lens flare It will be easier to add a scrim if
you have previously adjusted all the glass for no
reflections Instead of a scrim you could use a lens
hood The lens hood attaches to the front of the lens
7302019 Heinrich Melanie - Studio Lighting Workbook
httpslidepdfcomreaderfullheinrich-melanie-studio-lighting-workbook 5289
It protrudes from the lens and blocks any glare
falling on the front lens element Each lens may use
a different hood These come in many different
shapes and sizes I use a scrim because it is far more
versatile
Assuming your light source is in a good position you
may still have some glare on the glass You can
eliminate many reflections by slightly tipping the
product forward Use a small object under the back
side of the product while not disturbing the
products position These are very slight movements
and will not change the appearance to any great
degree Also tip the reflectors back and forth and
side to side to remove any added glare from your
objects Be attentive to all the objects You may
eliminate glare in one object and produce it in
another You must check for any reflections in your
polaroids Some reflections are very difficult to
detect when viewing the set from behind the camera
using the modeling lights
Use an incident meter and read the light falling on
the set Always bracket your exposure Bracketing is
the process of taking many shots of the same set but
using different fstops For example if your meter
reads f32 at 160th of a second your bracket would
be one stop on either side f22 and f45 at the same
speed The image was shot at f32 or greater depth-
of-field Some photographers bracket with 12 stops
and 13 stop differences They shoot 5 sheets of film
using these small incremental changes
7302019 Heinrich Melanie - Studio Lighting Workbook
httpslidepdfcomreaderfullheinrich-melanie-studio-lighting-workbook 5389
Final cropping of image
The final image displayed on the left was
successfully shot with no glare on any of the
products All the products were in glass or were
wrapped in cellophane The image has been
cropped to match the final inset space for the
brochure This shot took about a half day toshoot
7302019 Heinrich Melanie - Studio Lighting Workbook
httpslidepdfcomreaderfullheinrich-melanie-studio-lighting-workbook 5489
Using Props with Products
FilmEktachrome 100
Daylight Film
Camera Format
4 x 5 - Horseman
Large Format
Lens
90mm Wide
Light SourceStrobe with Softbox
Meter
Handheld Incident
Tripod
Yes
Filters
None
7302019 Heinrich Melanie - Studio Lighting Workbook
httpslidepdfcomreaderfullheinrich-melanie-studio-lighting-workbook 5589
When using props to help convey your message
remember the visual basics about colorperspective framing contrast backgrounds
and balance
This image of a racing bike was shot from an
angle that enlarged the back wheel The wide
angle lens helps pronounce the wheel size as well
as increasing the elongated perspective of the
bike
The bike was shot against a black background
Isolating your subjects by eliminatingdistracting backgrounds will help make the
objects in the set stand out The three arrow-
shaped plexiglass pieces all point to the distance
This visually portrays the speed and forward
motion of a racing bike Primary colors of the
plexiglass are used to simplify the information
in the image The gears of the bike are
pronounced displaying the bikes power and
versatility The camera position is very low and
tilted upward to further increase the illusion of
size
A softbox was used to keep the glare on the
chrome to a minimum It was positioned
parallel to the bike seat on its right side and
tipped down slightly toward the pedals If you
look carefully you can see the reflection of the
softbox in the blue plexiglass This is acceptable
The light has bounced color from the plexiglass
back onto the chrome of the bike This adds
interesting color highlights to the image that
balance well with the other colors
Parts of the wheels reflect the colors of the
plexiglass adding an interesting bit of color
7302019 Heinrich Melanie - Studio Lighting Workbook
httpslidepdfcomreaderfullheinrich-melanie-studio-lighting-workbook 5689
backdrop will work also The velvet material
absorbs any light that falls on it
When you are taking your exposure readings
make sure that you take readings of the
background walls in the scene Do not face your
light toward the back wall The meter readingsof the walls should be at least 4 stops darker
than your final exposure This will maintain a
black background
The wide angle lens was used to achieve
maximum depth-of-field This image was
exposed at f45
The room was totally darkened for this shot
Some photographers will even paint their walls
black for a shot like this A black velvet
7302019 Heinrich Melanie - Studio Lighting Workbook
httpslidepdfcomreaderfullheinrich-melanie-studio-lighting-workbook 5789
Multiple Exposures
Film
Ektachrome 100
Daylight Film
Camera Format
4 x 5 - Horseman
Large Format
Lens
150mm Normal
and 90mm Wide
Light Source
Strobe with Softbox
Meter
Handheld Incident
Tripod
Yes
Filters
None
7302019 Heinrich Melanie - Studio Lighting Workbook
httpslidepdfcomreaderfullheinrich-melanie-studio-lighting-workbook 5889
This image was designed as a poster for a national bowling
tournament The objects were intentionally placed leavingblack areas for the white text or copy and logos to be placed
on the final poster
The image above was done by repositioning the camera
three different times and exposing the film each time with
the change (Three shots on one piece of film) In addition the
lens was changed for one of the shots
You will need a large piece of black velvet to absorb all
scattered light All exposures were shot on the black velvet
The velvet does not see light This leaves that area of the filmunexposed This allows you to expose something else in the
black area which occurs when you take your next exposure
You will also need a piece of acetate to place on the film
back for tracing the objects in each exposure This will help
you line everything up and avoid overlapping your
products By tracing the objects that appear on your film
back onto a piece of acetate you will be able to align
everything perfectly
The first exposure was made of the bowling ball in thebottom right with a wide angle lens The second exposure
was made of the bowling pin on the left bottom The third
exposure was made of the top right 2 bowling pins One of
these pins was raised up on a block for added dimension
With each exposure the camera was progressively pulled
away from the scene The camera lens to subject distance
was increased to help this illusion of depth Diagrams below
may help you understand this better
Make sure when taking photos like this that any part of the
image you wish to remain unexposed is filled with the black velvet You can add any lighter value to a black area with
film because it is unexposed
7302019 Heinrich Melanie - Studio Lighting Workbook
httpslidepdfcomreaderfullheinrich-melanie-studio-lighting-workbook 5989
When you are ready to make the first exposure trace the
film back onto the acetate by placing the acetate over your
film back Do this with each exposure
A softbox was used and placed close to all of the subjects
producing direct lighting Your exposure times and fstops
can be different for each exposure just as if you were taking
separate photographs In fact think of this type of image as
a composite
Wide Angel Lens Normal Lens Normal Lens
7302019 Heinrich Melanie - Studio Lighting Workbook
httpslidepdfcomreaderfullheinrich-melanie-studio-lighting-workbook 6089
Making ReflectionsWork for You
Film
Ektachrome 100
Daylight Film
Camera Format
4 x 5 - Horseman
Large Format
Lens
150mm Normal
Light Source
Strobe withSoftbox
Meter
Handheld
Incident
Tripod
Yes
Filters
None
7302019 Heinrich Melanie - Studio Lighting Workbook
httpslidepdfcomreaderfullheinrich-melanie-studio-lighting-workbook 6189
The image above was shot on a highly reflective
background It came in a long roll about 4 feet
wide The light was positioned toward the front
parts of the products to avoid a hard horizon lineThe light falls off into black making it useful for
the reversed type of white (see below) Be careful
to avoid lens flare when positioning the lights near
the camera lens Make sure to block any light that
may fall on the lens Use a scrim to block the light
A scrim is any black piece of material that will
function as a light block Black masking tape was
secured to the edge of the lens to block the light
Be careful not to show the tape in your
photograph
Glare can be a major problem with highly
reflective sets like this one Always remember to
look through your lens to avoid this Tip your
light toward the front or back of the scene to
adjust the glare on the set This shot was taken
using a strobe head inside a softbox This type of
light is often used in product photography
especially when shooting highly reflective objects
The light rays are scattered and softened by this
kind of light source
Each of the objects in this scene are veryreflective The reflective gold surface used to shoot
on adds interest to the products by adding a gold
reflection of the product onto the gold surface
This gives depth to the image
Adding different colored line art around the edge
of the image in the white border adds an extra
dimension to the final composite below This was
done by the designer after the image was taken
Some of the line art is in front of the image and
some is dropped behind the image Reverse text isused on the black part of the image and black text
is used on the white border
7302019 Heinrich Melanie - Studio Lighting Workbook
httpslidepdfcomreaderfullheinrich-melanie-studio-lighting-workbook 6289
Using a Product for a Background
Film
Ektachrome 100
Daylight Film
Camera Format
4 x 5 - Horseman
Large Format
Lens
150mm Normal
Light Source
Strobe with Softbox and
Reflector
Meter
Handheld Incident
Tripod
Yes
Filters
None
7302019 Heinrich Melanie - Studio Lighting Workbook
httpslidepdfcomreaderfullheinrich-melanie-studio-lighting-workbook 6389
This close-up of a computer chip was designed for the
front cover of a computer companys brochure (see
below) It was nesseccary to get the best detail for
enlargement reasons so a large format camera was used
The end image was 9 x 12 our negative was 4 x 5
A strobe with a softbox was used to light this subject
from the left side An accompanying white reflector card
was placed close to the subject to fill in the right side
with light (see diagram below)
The bellows on the 4 x 5 camera were extended to
enlarge this chip to fill the frame When extending the
bellows you increase the need for light to reach the film
In this case we did not need to have a small f-stop
number for sharpness so we left the lens open at f56and made our exposure appropriately Even if you need
to pop your flash a couple of times extending the
bellows should not be something to hold you back from
making the close-up you want to shoot The detail in this
shot is achieved by using a 4 x 5 camera with a good lens
TIP ~
Popping or firing the strobe multiple times is done with
the lens open in a darkened room so the only light in the
room is coming from your controlled multiple burst of
the flash Since you have no need for speed whenshooting inanimate objects keep pumping in the light to
get the exposure you need In a dark room you could
leave your lens open and just continually pop the strobe
Or you can cock the shutter and repeat the same
exposure until it adds up to the correct amount of light
required Make sure you are on a very steady tripod
The slightest amount of movement will blur your image
TIP ~
The best set up for any overhead shot with a 4 x 5 is to
put your set on the floor This is of course dependent on
the size of your set A short-legged set of horses works
very well also The legs used in this set were about 12
high
The hue of bluegreen works well with the yellow text
7302019 Heinrich Melanie - Studio Lighting Workbook
httpslidepdfcomreaderfullheinrich-melanie-studio-lighting-workbook 6489
The text pops off the image This color prevents the text
from falling into the background The background of the
computer chip remains a simple reminder of what the
company does It is the text that the viewer is expected to
read
This image would also make a great backdrop for a
collage or montage image
7302019 Heinrich Melanie - Studio Lighting Workbook
httpslidepdfcomreaderfullheinrich-melanie-studio-lighting-workbook 6589
Floating Product
Film
Ektachrome 100
Daylight Film
Camera Format4 x 5 - Horseman
Large Format
Lens
150mm Normal
and 90mm Wide
Light Source
Strobe with
Softbox
Meter
Handheld
Incident
Tripod
Yes
Filters
None
PolaroidsYes
7302019 Heinrich Melanie - Studio Lighting Workbook
httpslidepdfcomreaderfullheinrich-melanie-studio-lighting-workbook 6689
Both images in this lesson give the illusion of
floating The top image is propped up underneath by
a block A softbox directly above the computer
circuit board was used to achieve a soft even light In
todays high-tech industry these kinds of images are
being used in composites and as single images
TIP ~
Using black velvet as a backdrop can achieve a
similar effect where the subject appears to float The
light will be absorbed into the black velvet material
to create the illusion
The computer chip is not grounded to anything so it
appears to float (see Fig 1) The angle of the light on
the computer circuit board picked up some very
interesting highlights in Fig 1 which adds to the
high-tech feel of the image
A 4 x 5 camera was used to get greater detail with
the larger negative for enlargement purposes Depth-
of-field was achieved at f32
When shooting any subject like this you can portray
many kinds of interesting illusions The black velvet
material may be a little more expensive but nothing
else works as well This kind of material will help
you take the shots like the pros
Fig 1
7302019 Heinrich Melanie - Studio Lighting Workbook
httpslidepdfcomreaderfullheinrich-melanie-studio-lighting-workbook 6789
Boring Product -Interesting Design
Film
Ektachrome 100
Daylight Film
Camera Format
4 x 5 - Horseman
Large Format
Lens
150mm Normal
Light Source
Strobe with Softbox
Meter
Hanheld Incident
Tripod
Yes
Filters
None
7302019 Heinrich Melanie - Studio Lighting Workbook
httpslidepdfcomreaderfullheinrich-melanie-studio-lighting-workbook 6889
Some products you will be photographing will be justplain boring such as the rods in the shot above Its
your job as the photographer to bring life and interest
to boring products like these In the image above the
client needed his products shot for his company
catalog
Making something interesting from something boring
can be done by using an interesting background or
unusual lighting In this image the layout and diagonal
positioning of the rods directs the viewers eye to the
top right area of the image of the frame Text was
placed at the top and right side of this image (see final
image below)
The softbox was positioned above and to the left of the
product as indicated by the soft shadows Fig1 This
image could have easily been cut out from its
background and placed on any other background
Minimal depth-of-field is needed for this shot because
the maximum height of the product was only two
inches An aperture of f8 was used The exposure is
made with an incident meter reading to achieve an
overall well-balanced tone
Deep shadows could have been used to add interest to
these products by using a direct light at a very low
level to the table angle Fig 2 No softbox would be
used for this kind of shot
The set is placed on the floor so your camera position
is directly over the top of the set If shot on a table top
you would need to stand on top of a ladder to take the
shot The easier choice is to shoot on the floor
7302019 Heinrich Melanie - Studio Lighting Workbook
httpslidepdfcomreaderfullheinrich-melanie-studio-lighting-workbook 6989
Fig 1
Fig 2
7302019 Heinrich Melanie - Studio Lighting Workbook
httpslidepdfcomreaderfullheinrich-melanie-studio-lighting-workbook 7089
Lessons in this section
Mixing Texture Shapes and Color
Arranging a Set
Photographing Beautiful Glass
Messages in a Still Life
Creating a Mood
Still Lifes Selling Products
Setting the stage works to help convince the
viewer of a place and time or mood Small
details make a shot believable These
lessons will teach you how to think and tell
a story of a certain place in time Picking
the right props for your shoot will ensure
believability The lessons in this section
work in conjunction with the ProductPhotography section
A still life photographer can be found
working in a studio or on location This
type of photography demands the
recreation of a set or going to the set to
capture a moment in time This can be done
on location in the studio or digitally
created on the computer The truth is it fits
into many categories It is more than
product photography You are creating a
scene that conveys a sense of being
somewhere
7302019 Heinrich Melanie - Studio Lighting Workbook
httpslidepdfcomreaderfullheinrich-melanie-studio-lighting-workbook 7189
you pull your entire learning experience
together I include details and diagrams
that will reinforce your understanding
Still life scenes are often used in a designers
set or in a showroom like in a furniture
store They can also be used to convey a
story quickly and help transfer the concept
and idea throughout the entire image These
lessons include tips on how to light objects
in small and detailed areas They will help
7302019 Heinrich Melanie - Studio Lighting Workbook
httpslidepdfcomreaderfullheinrich-melanie-studio-lighting-workbook 7289
Mixing Texture Shapes and Color
Film
Ektachrome 100
Camera Format
4 x 5 - Horsemen
Large Format View
Camera
Lens
150mm Normal
Light Source
Strobe with Softbox
MeterHandheld Incident
Tripod
Yes
Filters
None
7302019 Heinrich Melanie - Studio Lighting Workbook
httpslidepdfcomreaderfullheinrich-melanie-studio-lighting-workbook 7389
The image above was shot as a portfolio piece
Mixing textures shapes and colors the
photograph displays the photographers eye for
design It is photographed on black velvet which
adds saturation of the overall appearance by
absorbing all the light that falls on it The black
velvet can be purchased at any fabric store
Two scarves are positioned at opposing angles
adding strong graphic interest and competition
between them Against the soft colored scarves
the dark blue hat pops out The colored markers
are color complements to the blue hat and add
additional depth to the image
Resting on top of the scarves are brightly
colored objects which add spots of color andinterest The curvy lines of the ribbons break up
the edges of the two scarves and add a bit of fun
to the image The final crop of the image forces
the viewer to see the positive and negative
spaces of color within the frame Cropping plays
an important role in the success of your image
How the image was photographed ~
One main strobe light was used It was shot
through a softbox or mylar scrim Several white
and silver reflector cards surrounding the setbounced in a soft fill light Using the reflectors
as fill light evens out the overall appearance
without eliminating the direction of the main
light The shadows in the image are soft and
reveal more texture in the scarf
Minimal if any depth-of-field was needed in
this image so it was exposed at f56 The meter
reading is taken with an incident meter and
pointed directly at the camera Several readings
were taken of the entire image For example a
meter reading was taken of the light falling onthe hat the tip of the triangular scarf and the
black corners of the velvet before an exposure
was chosen A range of only 1 stop was allowed
between these exposure readings Reposition
your reflecting cards either closer or further
7302019 Heinrich Melanie - Studio Lighting Workbook
httpslidepdfcomreaderfullheinrich-melanie-studio-lighting-workbook 7489
from your subject to adjust the exposure
variations Your final exposure choice will be of
the area in the scene that is the brightest or
where the most light is falling If your exposure
variations are between f16 and f11 f16
indicates the brightest area in the scene You
should know this at this point in your educationIf you dont go back to the Camera Basics
section and read over the lessons Choosing f16
will prevent overexposure to the lighter areas in
your scene The camera was positioned directly
over the top of the set using a tripod Make sure
your tripod is capable of supporting your
camera in these unusual positions
Pick three or four objects that work well
together Lay them out on a solid colored
background in an interesting design pattern
Position your camera lights and reflectors
Using a color transparency film bracket your
frames as you shoot
Final crop of image
reflector
reflector
7302019 Heinrich Melanie - Studio Lighting Workbook
httpslidepdfcomreaderfullheinrich-melanie-studio-lighting-workbook 7589
Arranging a Set
Film
VPS 100 - Color Negative
Camera Format
2 14 square - Hasselblad
Medium Format
Lens
80mm Normal
Light Source
Strobe with Softbox
Meter
Handheld Incident
Tripod
Yes
Filters
None
7302019 Heinrich Melanie - Studio Lighting Workbook
httpslidepdfcomreaderfullheinrich-melanie-studio-lighting-workbook 7689
Within each image there can exist sets that pull the
entire image together The image above is an example
of one of these small sets The set is staged for a period
in time
Some professionals hire stylists to set something like
this up Background information helps convey a
message in the overall scene For example suppose you
are shooting the interior spaces of a Victorian home
and your client wants to place the product in the late
1800s Objects in the photo above will help transport
your viewer into that time in history Props are a very
important part in convincing your viewer of a place in
time You can find props at antique stores for this kind
of scene Time period images must be authentic down
to the smallest details Hire a historian for accuracy if
needed
Magazines use small inset photos that display intricate
details of settings They may not be set against a black
background as in the photograph above The
background should be dimly lit or out of focus to
help accent the subject Shallow depth of field and
object placement will work together to make your
image successful
One main strobe light was used in the photograph
above with no fill lights or reflectors This drops the
background of black velvet into black making it a
perfect place for white text Remember an
editor or designer usually needs to add type and will
need this space
7302019 Heinrich Melanie - Studio Lighting Workbook
httpslidepdfcomreaderfullheinrich-melanie-studio-lighting-workbook 7789
Still lifes have been used in fine art for many years The
image above happens to be found in nature but could
have just as easily have been set up in a studio The
arrangement of the plates and glass objects can be
emulated in the studio or in a set I have included this
image to show you that what you find most naturally in
life is how you should set up a scene whether in the
studio or on location Take your camera into the world
around you and shoot small stories such as the one
above These still lifes will help you to stylize your own
setups This lesson will help you learn how to crop and
balance your images Pay close attention to the light
falling on the objects in your scenes Follow the previous
example to determine the proper exposure of your film
Be deliberate when you consider the photographs you
will take Take your time
Remember to see within the boundaries of your frame
balancing objects from front to back side to side and
corner to corner See Visual Basics for more
information on setting an objects position within the
frame
7302019 Heinrich Melanie - Studio Lighting Workbook
httpslidepdfcomreaderfullheinrich-melanie-studio-lighting-workbook 7889
Photographing Beautiful Glass
Film
VPS 100 - Color Negative
Camera Format
2 14 square - Hassalblad
Medium Format
Lens
80mm Normal
Light Source
Strobe with Softbox
Meter
Handheld Incident
Tripod
Yes
Filters
None
7302019 Heinrich Melanie - Studio Lighting Workbook
httpslidepdfcomreaderfullheinrich-melanie-studio-lighting-workbook 7989
The image above will give you an idea of how to light
small objects in a room or on a set You can make
objects pop out that are a very small part of the sceneFor example the color in this image is something you
really want to show but each of the objects must be
placed and lit properly to portray the beauty of their
colors Small strobes with funnel snoots will spotlight
only the objects you are interested in The blue
background color was chosen as a color complement to
the colors in the glass
TIP A snoot can be made from a rolled piece of
poster board into the shape of a cone You can also
buy these cones to fit on the strobe Be careful if using
poster board as the lights can get very hot
Take a large piece of poster board and roll it into a
cylinder shape Fig 1 Tape the center of the cylinder
then expand one end and decrease the opposite end of
the cylinder Fig 2 Make the expanded end large
enough to fit over the strobe head The other end of
the cylinder should be small enough to direct the light
at whatever object you want to be lighting The size of
the smaller hole will dictate the angle of the light
pointed at the object
Fig 1 Fig 2
7302019 Heinrich Melanie - Studio Lighting Workbook
httpslidepdfcomreaderfullheinrich-melanie-studio-lighting-workbook 8089
WARNING
DO NOT USE POSTER BOARD CONES WITH
TUNGSTEN LIGHTS The chance of fire is far too
great NEVER leave powered lights unattended
The glass objects in the photograph above have had the
light pushed directly through them When the light
passes through the colors are revealed
Shooting glass with liquid in it is described in the
diagram below The softbox is placed directly above the
set and slightly tilted away from the camera With the
liquid in the glass place a reflector card behind the
liquid only Looking through the camera lens make sure
the card does not extend past the liquid above or to the
sides Tip the card backwards so it picks up some of the
light falling down from the softbox This will illuminate
the liquid giving it a glowing appearance
7302019 Heinrich Melanie - Studio Lighting Workbook
httpslidepdfcomreaderfullheinrich-melanie-studio-lighting-workbook 8189
Your background can be any color detail or density when
using this reflector card
7302019 Heinrich Melanie - Studio Lighting Workbook
httpslidepdfcomreaderfullheinrich-melanie-studio-lighting-workbook 8289
Messages in a Still Life
Film
Ektachrome 100
Camera Format
35mm - Nikon
Small Format
Lens
50mm Normal
Light Source
Strobe with Softbox
Meter
Handheld Incident
Tripod
Yes
Filters
5 Red CC Filter
7302019 Heinrich Melanie - Studio Lighting Workbook
httpslidepdfcomreaderfullheinrich-melanie-studio-lighting-workbook 8389
The above image sends a message of peace and
comfort to its viewer in a couple of different
methods
One method is achieved by the type of lighting
used (In this case a strobe within a softbox) A warm
glow of very soft light is scraping horizontally
across the image and highlights fall on the outer
pages of the book It has a golden quality Another
method is achieved by using a number 5 CC filter
over the camera lens This accents the rich red color
in the roses with their saturated hue and balances
perfectly with the gold color in the pages as well as
the reddish-brown boards that they sit on
TIP ~
A red or orange transparent gel in an acetate sheet
form could be placed over the softbox to warm the
color pushed into the set
The background falls off into black holding the
viewers eye on the bible and the perfectly balanced
roses
This was shot with a softbox to the right of the scene
with no fill cards or fill lights The main light source
is close to the subject so the light falls off very little
When the light is positioned close to the subject its effect
on the oppiste side is minimal
7302019 Heinrich Melanie - Studio Lighting Workbook
httpslidepdfcomreaderfullheinrich-melanie-studio-lighting-workbook 8489
Using light color balance and the right props this
image conveys both warmth and love The main
subject is the bible The roses are used to convey a
feeling of love If instead of roses guns were used as
props the message would be entirley different
perhaps of violence Props can make or break
your image
7302019 Heinrich Melanie - Studio Lighting Workbook
httpslidepdfcomreaderfullheinrich-melanie-studio-lighting-workbook 8589
Creating a Mood
Film
Ektachrome 100
Camera Format
35mm - Nikon
Small Format
Lens
50mm Normal
Light Source
Strobes and reflectors
Meter
Handheld Incident
Tripod
No
Filters
None
7302019 Heinrich Melanie - Studio Lighting Workbook
httpslidepdfcomreaderfullheinrich-melanie-studio-lighting-workbook 8689
Making a statement with your photography should
be foremost in your mind The image above tells us ~
bedroom lovers intimacy passion etc It is up to
our imagination to fill in the blanks You have only a
few moments to convey your message so be careful
not to be too subtle yet not so blatant that your
message is visually insulting
The location in this shot was specifically chosen
Shot on a wooden floor a rustic authenticity is
portrayed A cowboy feel was achieved with these
surrounding elements The lingerie casually draped
over the boots looks accidental and unplanned The
boot that is tipped over leads the viewer to believe an
impetuous moment of hurried passion is taking
place The background is evident but intentionally
made out of focus by shooting at f4 for shallow
depth of field
This image is far from haphazard It was planned
from layout to location to scouting to objectplacement The idea came first then the execution of
the image Although minor alterations of layouts are
common the concept will remain the same This
eliminates confusion by isolating one idea and
working it through from all directions
Scouting out locations can be a full-time job and you
may need special permission to shoot in a particular
place See property release in the Legal Forms
section to cover your legal requirements and release
forms
7302019 Heinrich Melanie - Studio Lighting Workbook
httpslidepdfcomreaderfullheinrich-melanie-studio-lighting-workbook 8789
This kind of image will work very well for an adselling lingerie A strobe light with a softbox was
used to light the boots and the lingerie from the
right A reflector card was placed close to the boots
to fill in the left side of the scene The light is
positioned low near the floor which scrapes the light
on a low plan This was placed to simulate a specific
time during the day sunset or early evening The
light at this time is warm in color value which adds
to the subject matters message The camera vantage
point is low also bringing the viewer into intimate
contact with the boots and lingerie
7302019 Heinrich Melanie - Studio Lighting Workbook
httpslidepdfcomreaderfullheinrich-melanie-studio-lighting-workbook 8889
Still Lifes Selling Products
Film
Ektachrome 100
Camera Format
2 14 square - Hassalblad
Medium Format
Lens
80mm Normal
Light Source
Strobe with Softbox
Meter
Handheld Incident
Tripod
Yes
FiltersNone
7302019 Heinrich Melanie - Studio Lighting Workbook
httpslidepdfcomreaderfullheinrich-melanie-studio-lighting-workbook 8989
Placement and staging of objects requires a thought-out layout and planned
execution when using multiple products Layering has been used in this image
where non-information has been overlapped for example where the licence
plates and shirts touch Your viewer does not need to see the entire object in
this case to know what it is Strong diagonal lines have been made by object
placement This helps pull the viewer through the image and leads the eye to
a specific area of an image This image was created to find funding for
Vietnam vets by selling these products
If you have been asked to shoot several products and put them all into one
image think of it in terms of a still life setting Larger items will be placed inthe background sometimes even being used as the background For example
picture a group of images all representing something American The
background for this scene could be a flag which is also one of the subjects
There is no need to see the entire flag because it is an easily recognizable icon
In the image above the wooden floor was used to add a sense of the rustic and
gritty realism of the Vietnam war It was lit with a softbox directly above the
subjects The aperture was a concern for foreground to background
sharpness so the camera was pulled back far enough from the scene to allow
for a large aperture of around f 56
Below is the final image This was dropped into a 3 fold 812 x 4 brochure
along with other images of the same sort
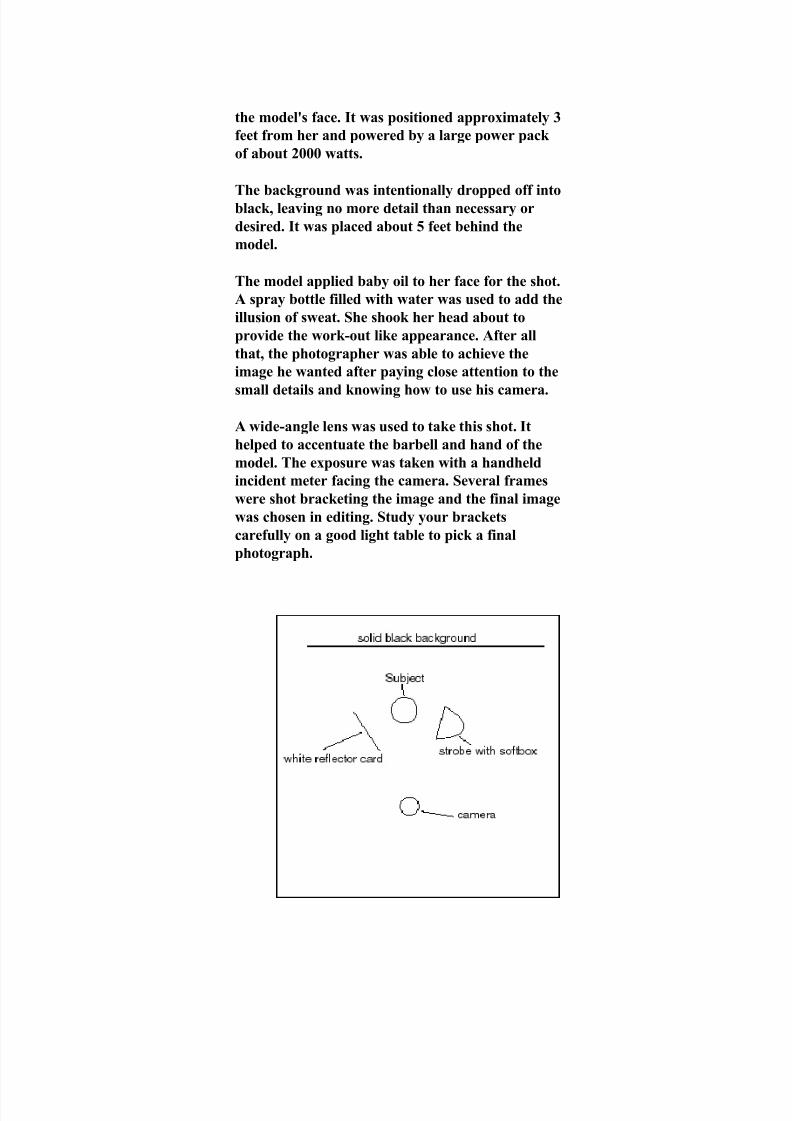
7302019 Heinrich Melanie - Studio Lighting Workbook
httpslidepdfcomreaderfullheinrich-melanie-studio-lighting-workbook 5289
It protrudes from the lens and blocks any glare
falling on the front lens element Each lens may use
a different hood These come in many different
shapes and sizes I use a scrim because it is far more
versatile
Assuming your light source is in a good position you
may still have some glare on the glass You can
eliminate many reflections by slightly tipping the
product forward Use a small object under the back
side of the product while not disturbing the
products position These are very slight movements
and will not change the appearance to any great
degree Also tip the reflectors back and forth and
side to side to remove any added glare from your
objects Be attentive to all the objects You may
eliminate glare in one object and produce it in
another You must check for any reflections in your
polaroids Some reflections are very difficult to
detect when viewing the set from behind the camera
using the modeling lights
Use an incident meter and read the light falling on
the set Always bracket your exposure Bracketing is
the process of taking many shots of the same set but
using different fstops For example if your meter
reads f32 at 160th of a second your bracket would
be one stop on either side f22 and f45 at the same
speed The image was shot at f32 or greater depth-
of-field Some photographers bracket with 12 stops
and 13 stop differences They shoot 5 sheets of film
using these small incremental changes
7302019 Heinrich Melanie - Studio Lighting Workbook
httpslidepdfcomreaderfullheinrich-melanie-studio-lighting-workbook 5389
Final cropping of image
The final image displayed on the left was
successfully shot with no glare on any of the
products All the products were in glass or were
wrapped in cellophane The image has been
cropped to match the final inset space for the
brochure This shot took about a half day toshoot
7302019 Heinrich Melanie - Studio Lighting Workbook
httpslidepdfcomreaderfullheinrich-melanie-studio-lighting-workbook 5489
Using Props with Products
FilmEktachrome 100
Daylight Film
Camera Format
4 x 5 - Horseman
Large Format
Lens
90mm Wide
Light SourceStrobe with Softbox
Meter
Handheld Incident
Tripod
Yes
Filters
None
7302019 Heinrich Melanie - Studio Lighting Workbook
httpslidepdfcomreaderfullheinrich-melanie-studio-lighting-workbook 5589
When using props to help convey your message
remember the visual basics about colorperspective framing contrast backgrounds
and balance
This image of a racing bike was shot from an
angle that enlarged the back wheel The wide
angle lens helps pronounce the wheel size as well
as increasing the elongated perspective of the
bike
The bike was shot against a black background
Isolating your subjects by eliminatingdistracting backgrounds will help make the
objects in the set stand out The three arrow-
shaped plexiglass pieces all point to the distance
This visually portrays the speed and forward
motion of a racing bike Primary colors of the
plexiglass are used to simplify the information
in the image The gears of the bike are
pronounced displaying the bikes power and
versatility The camera position is very low and
tilted upward to further increase the illusion of
size
A softbox was used to keep the glare on the
chrome to a minimum It was positioned
parallel to the bike seat on its right side and
tipped down slightly toward the pedals If you
look carefully you can see the reflection of the
softbox in the blue plexiglass This is acceptable
The light has bounced color from the plexiglass
back onto the chrome of the bike This adds
interesting color highlights to the image that
balance well with the other colors
Parts of the wheels reflect the colors of the
plexiglass adding an interesting bit of color
7302019 Heinrich Melanie - Studio Lighting Workbook
httpslidepdfcomreaderfullheinrich-melanie-studio-lighting-workbook 5689
backdrop will work also The velvet material
absorbs any light that falls on it
When you are taking your exposure readings
make sure that you take readings of the
background walls in the scene Do not face your
light toward the back wall The meter readingsof the walls should be at least 4 stops darker
than your final exposure This will maintain a
black background
The wide angle lens was used to achieve
maximum depth-of-field This image was
exposed at f45
The room was totally darkened for this shot
Some photographers will even paint their walls
black for a shot like this A black velvet
7302019 Heinrich Melanie - Studio Lighting Workbook
httpslidepdfcomreaderfullheinrich-melanie-studio-lighting-workbook 5789
Multiple Exposures
Film
Ektachrome 100
Daylight Film
Camera Format
4 x 5 - Horseman
Large Format
Lens
150mm Normal
and 90mm Wide
Light Source
Strobe with Softbox
Meter
Handheld Incident
Tripod
Yes
Filters
None
7302019 Heinrich Melanie - Studio Lighting Workbook
httpslidepdfcomreaderfullheinrich-melanie-studio-lighting-workbook 5889
This image was designed as a poster for a national bowling
tournament The objects were intentionally placed leavingblack areas for the white text or copy and logos to be placed
on the final poster
The image above was done by repositioning the camera
three different times and exposing the film each time with
the change (Three shots on one piece of film) In addition the
lens was changed for one of the shots
You will need a large piece of black velvet to absorb all
scattered light All exposures were shot on the black velvet
The velvet does not see light This leaves that area of the filmunexposed This allows you to expose something else in the
black area which occurs when you take your next exposure
You will also need a piece of acetate to place on the film
back for tracing the objects in each exposure This will help
you line everything up and avoid overlapping your
products By tracing the objects that appear on your film
back onto a piece of acetate you will be able to align
everything perfectly
The first exposure was made of the bowling ball in thebottom right with a wide angle lens The second exposure
was made of the bowling pin on the left bottom The third
exposure was made of the top right 2 bowling pins One of
these pins was raised up on a block for added dimension
With each exposure the camera was progressively pulled
away from the scene The camera lens to subject distance
was increased to help this illusion of depth Diagrams below
may help you understand this better
Make sure when taking photos like this that any part of the
image you wish to remain unexposed is filled with the black velvet You can add any lighter value to a black area with
film because it is unexposed
7302019 Heinrich Melanie - Studio Lighting Workbook
httpslidepdfcomreaderfullheinrich-melanie-studio-lighting-workbook 5989
When you are ready to make the first exposure trace the
film back onto the acetate by placing the acetate over your
film back Do this with each exposure
A softbox was used and placed close to all of the subjects
producing direct lighting Your exposure times and fstops
can be different for each exposure just as if you were taking
separate photographs In fact think of this type of image as
a composite
Wide Angel Lens Normal Lens Normal Lens
7302019 Heinrich Melanie - Studio Lighting Workbook
httpslidepdfcomreaderfullheinrich-melanie-studio-lighting-workbook 6089
Making ReflectionsWork for You
Film
Ektachrome 100
Daylight Film
Camera Format
4 x 5 - Horseman
Large Format
Lens
150mm Normal
Light Source
Strobe withSoftbox
Meter
Handheld
Incident
Tripod
Yes
Filters
None
7302019 Heinrich Melanie - Studio Lighting Workbook
httpslidepdfcomreaderfullheinrich-melanie-studio-lighting-workbook 6189
The image above was shot on a highly reflective
background It came in a long roll about 4 feet
wide The light was positioned toward the front
parts of the products to avoid a hard horizon lineThe light falls off into black making it useful for
the reversed type of white (see below) Be careful
to avoid lens flare when positioning the lights near
the camera lens Make sure to block any light that
may fall on the lens Use a scrim to block the light
A scrim is any black piece of material that will
function as a light block Black masking tape was
secured to the edge of the lens to block the light
Be careful not to show the tape in your
photograph
Glare can be a major problem with highly
reflective sets like this one Always remember to
look through your lens to avoid this Tip your
light toward the front or back of the scene to
adjust the glare on the set This shot was taken
using a strobe head inside a softbox This type of
light is often used in product photography
especially when shooting highly reflective objects
The light rays are scattered and softened by this
kind of light source
Each of the objects in this scene are veryreflective The reflective gold surface used to shoot
on adds interest to the products by adding a gold
reflection of the product onto the gold surface
This gives depth to the image
Adding different colored line art around the edge
of the image in the white border adds an extra
dimension to the final composite below This was
done by the designer after the image was taken
Some of the line art is in front of the image and
some is dropped behind the image Reverse text isused on the black part of the image and black text
is used on the white border
7302019 Heinrich Melanie - Studio Lighting Workbook
httpslidepdfcomreaderfullheinrich-melanie-studio-lighting-workbook 6289
Using a Product for a Background
Film
Ektachrome 100
Daylight Film
Camera Format
4 x 5 - Horseman
Large Format
Lens
150mm Normal
Light Source
Strobe with Softbox and
Reflector
Meter
Handheld Incident
Tripod
Yes
Filters
None
7302019 Heinrich Melanie - Studio Lighting Workbook
httpslidepdfcomreaderfullheinrich-melanie-studio-lighting-workbook 6389
This close-up of a computer chip was designed for the
front cover of a computer companys brochure (see
below) It was nesseccary to get the best detail for
enlargement reasons so a large format camera was used
The end image was 9 x 12 our negative was 4 x 5
A strobe with a softbox was used to light this subject
from the left side An accompanying white reflector card
was placed close to the subject to fill in the right side
with light (see diagram below)
The bellows on the 4 x 5 camera were extended to
enlarge this chip to fill the frame When extending the
bellows you increase the need for light to reach the film
In this case we did not need to have a small f-stop
number for sharpness so we left the lens open at f56and made our exposure appropriately Even if you need
to pop your flash a couple of times extending the
bellows should not be something to hold you back from
making the close-up you want to shoot The detail in this
shot is achieved by using a 4 x 5 camera with a good lens
TIP ~
Popping or firing the strobe multiple times is done with
the lens open in a darkened room so the only light in the
room is coming from your controlled multiple burst of
the flash Since you have no need for speed whenshooting inanimate objects keep pumping in the light to
get the exposure you need In a dark room you could
leave your lens open and just continually pop the strobe
Or you can cock the shutter and repeat the same
exposure until it adds up to the correct amount of light
required Make sure you are on a very steady tripod
The slightest amount of movement will blur your image
TIP ~
The best set up for any overhead shot with a 4 x 5 is to
put your set on the floor This is of course dependent on
the size of your set A short-legged set of horses works
very well also The legs used in this set were about 12
high
The hue of bluegreen works well with the yellow text
7302019 Heinrich Melanie - Studio Lighting Workbook
httpslidepdfcomreaderfullheinrich-melanie-studio-lighting-workbook 6489
The text pops off the image This color prevents the text
from falling into the background The background of the
computer chip remains a simple reminder of what the
company does It is the text that the viewer is expected to
read
This image would also make a great backdrop for a
collage or montage image
7302019 Heinrich Melanie - Studio Lighting Workbook
httpslidepdfcomreaderfullheinrich-melanie-studio-lighting-workbook 6589
Floating Product
Film
Ektachrome 100
Daylight Film
Camera Format4 x 5 - Horseman
Large Format
Lens
150mm Normal
and 90mm Wide
Light Source
Strobe with
Softbox
Meter
Handheld
Incident
Tripod
Yes
Filters
None
PolaroidsYes
7302019 Heinrich Melanie - Studio Lighting Workbook
httpslidepdfcomreaderfullheinrich-melanie-studio-lighting-workbook 6689
Both images in this lesson give the illusion of
floating The top image is propped up underneath by
a block A softbox directly above the computer
circuit board was used to achieve a soft even light In
todays high-tech industry these kinds of images are
being used in composites and as single images
TIP ~
Using black velvet as a backdrop can achieve a
similar effect where the subject appears to float The
light will be absorbed into the black velvet material
to create the illusion
The computer chip is not grounded to anything so it
appears to float (see Fig 1) The angle of the light on
the computer circuit board picked up some very
interesting highlights in Fig 1 which adds to the
high-tech feel of the image
A 4 x 5 camera was used to get greater detail with
the larger negative for enlargement purposes Depth-
of-field was achieved at f32
When shooting any subject like this you can portray
many kinds of interesting illusions The black velvet
material may be a little more expensive but nothing
else works as well This kind of material will help
you take the shots like the pros
Fig 1
7302019 Heinrich Melanie - Studio Lighting Workbook
httpslidepdfcomreaderfullheinrich-melanie-studio-lighting-workbook 6789
Boring Product -Interesting Design
Film
Ektachrome 100
Daylight Film
Camera Format
4 x 5 - Horseman
Large Format
Lens
150mm Normal
Light Source
Strobe with Softbox
Meter
Hanheld Incident
Tripod
Yes
Filters
None
7302019 Heinrich Melanie - Studio Lighting Workbook
httpslidepdfcomreaderfullheinrich-melanie-studio-lighting-workbook 6889
Some products you will be photographing will be justplain boring such as the rods in the shot above Its
your job as the photographer to bring life and interest
to boring products like these In the image above the
client needed his products shot for his company
catalog
Making something interesting from something boring
can be done by using an interesting background or
unusual lighting In this image the layout and diagonal
positioning of the rods directs the viewers eye to the
top right area of the image of the frame Text was
placed at the top and right side of this image (see final
image below)
The softbox was positioned above and to the left of the
product as indicated by the soft shadows Fig1 This
image could have easily been cut out from its
background and placed on any other background
Minimal depth-of-field is needed for this shot because
the maximum height of the product was only two
inches An aperture of f8 was used The exposure is
made with an incident meter reading to achieve an
overall well-balanced tone
Deep shadows could have been used to add interest to
these products by using a direct light at a very low
level to the table angle Fig 2 No softbox would be
used for this kind of shot
The set is placed on the floor so your camera position
is directly over the top of the set If shot on a table top
you would need to stand on top of a ladder to take the
shot The easier choice is to shoot on the floor
7302019 Heinrich Melanie - Studio Lighting Workbook
httpslidepdfcomreaderfullheinrich-melanie-studio-lighting-workbook 6989
Fig 1
Fig 2
7302019 Heinrich Melanie - Studio Lighting Workbook
httpslidepdfcomreaderfullheinrich-melanie-studio-lighting-workbook 7089
Lessons in this section
Mixing Texture Shapes and Color
Arranging a Set
Photographing Beautiful Glass
Messages in a Still Life
Creating a Mood
Still Lifes Selling Products
Setting the stage works to help convince the
viewer of a place and time or mood Small
details make a shot believable These
lessons will teach you how to think and tell
a story of a certain place in time Picking
the right props for your shoot will ensure
believability The lessons in this section
work in conjunction with the ProductPhotography section
A still life photographer can be found
working in a studio or on location This
type of photography demands the
recreation of a set or going to the set to
capture a moment in time This can be done
on location in the studio or digitally
created on the computer The truth is it fits
into many categories It is more than
product photography You are creating a
scene that conveys a sense of being
somewhere
7302019 Heinrich Melanie - Studio Lighting Workbook
httpslidepdfcomreaderfullheinrich-melanie-studio-lighting-workbook 7189
you pull your entire learning experience
together I include details and diagrams
that will reinforce your understanding
Still life scenes are often used in a designers
set or in a showroom like in a furniture
store They can also be used to convey a
story quickly and help transfer the concept
and idea throughout the entire image These
lessons include tips on how to light objects
in small and detailed areas They will help
7302019 Heinrich Melanie - Studio Lighting Workbook
httpslidepdfcomreaderfullheinrich-melanie-studio-lighting-workbook 7289
Mixing Texture Shapes and Color
Film
Ektachrome 100
Camera Format
4 x 5 - Horsemen
Large Format View
Camera
Lens
150mm Normal
Light Source
Strobe with Softbox
MeterHandheld Incident
Tripod
Yes
Filters
None
7302019 Heinrich Melanie - Studio Lighting Workbook
httpslidepdfcomreaderfullheinrich-melanie-studio-lighting-workbook 7389
The image above was shot as a portfolio piece
Mixing textures shapes and colors the
photograph displays the photographers eye for
design It is photographed on black velvet which
adds saturation of the overall appearance by
absorbing all the light that falls on it The black
velvet can be purchased at any fabric store
Two scarves are positioned at opposing angles
adding strong graphic interest and competition
between them Against the soft colored scarves
the dark blue hat pops out The colored markers
are color complements to the blue hat and add
additional depth to the image
Resting on top of the scarves are brightly
colored objects which add spots of color andinterest The curvy lines of the ribbons break up
the edges of the two scarves and add a bit of fun
to the image The final crop of the image forces
the viewer to see the positive and negative
spaces of color within the frame Cropping plays
an important role in the success of your image
How the image was photographed ~
One main strobe light was used It was shot
through a softbox or mylar scrim Several white
and silver reflector cards surrounding the setbounced in a soft fill light Using the reflectors
as fill light evens out the overall appearance
without eliminating the direction of the main
light The shadows in the image are soft and
reveal more texture in the scarf
Minimal if any depth-of-field was needed in
this image so it was exposed at f56 The meter
reading is taken with an incident meter and
pointed directly at the camera Several readings
were taken of the entire image For example a
meter reading was taken of the light falling onthe hat the tip of the triangular scarf and the
black corners of the velvet before an exposure
was chosen A range of only 1 stop was allowed
between these exposure readings Reposition
your reflecting cards either closer or further
7302019 Heinrich Melanie - Studio Lighting Workbook
httpslidepdfcomreaderfullheinrich-melanie-studio-lighting-workbook 7489
from your subject to adjust the exposure
variations Your final exposure choice will be of
the area in the scene that is the brightest or
where the most light is falling If your exposure
variations are between f16 and f11 f16
indicates the brightest area in the scene You
should know this at this point in your educationIf you dont go back to the Camera Basics
section and read over the lessons Choosing f16
will prevent overexposure to the lighter areas in
your scene The camera was positioned directly
over the top of the set using a tripod Make sure
your tripod is capable of supporting your
camera in these unusual positions
Pick three or four objects that work well
together Lay them out on a solid colored
background in an interesting design pattern
Position your camera lights and reflectors
Using a color transparency film bracket your
frames as you shoot
Final crop of image
reflector
reflector
7302019 Heinrich Melanie - Studio Lighting Workbook
httpslidepdfcomreaderfullheinrich-melanie-studio-lighting-workbook 7589
Arranging a Set
Film
VPS 100 - Color Negative
Camera Format
2 14 square - Hasselblad
Medium Format
Lens
80mm Normal
Light Source
Strobe with Softbox
Meter
Handheld Incident
Tripod
Yes
Filters
None
7302019 Heinrich Melanie - Studio Lighting Workbook
httpslidepdfcomreaderfullheinrich-melanie-studio-lighting-workbook 7689
Within each image there can exist sets that pull the
entire image together The image above is an example
of one of these small sets The set is staged for a period
in time
Some professionals hire stylists to set something like
this up Background information helps convey a
message in the overall scene For example suppose you
are shooting the interior spaces of a Victorian home
and your client wants to place the product in the late
1800s Objects in the photo above will help transport
your viewer into that time in history Props are a very
important part in convincing your viewer of a place in
time You can find props at antique stores for this kind
of scene Time period images must be authentic down
to the smallest details Hire a historian for accuracy if
needed
Magazines use small inset photos that display intricate
details of settings They may not be set against a black
background as in the photograph above The
background should be dimly lit or out of focus to
help accent the subject Shallow depth of field and
object placement will work together to make your
image successful
One main strobe light was used in the photograph
above with no fill lights or reflectors This drops the
background of black velvet into black making it a
perfect place for white text Remember an
editor or designer usually needs to add type and will
need this space
7302019 Heinrich Melanie - Studio Lighting Workbook
httpslidepdfcomreaderfullheinrich-melanie-studio-lighting-workbook 7789
Still lifes have been used in fine art for many years The
image above happens to be found in nature but could
have just as easily have been set up in a studio The
arrangement of the plates and glass objects can be
emulated in the studio or in a set I have included this
image to show you that what you find most naturally in
life is how you should set up a scene whether in the
studio or on location Take your camera into the world
around you and shoot small stories such as the one
above These still lifes will help you to stylize your own
setups This lesson will help you learn how to crop and
balance your images Pay close attention to the light
falling on the objects in your scenes Follow the previous
example to determine the proper exposure of your film
Be deliberate when you consider the photographs you
will take Take your time
Remember to see within the boundaries of your frame
balancing objects from front to back side to side and
corner to corner See Visual Basics for more
information on setting an objects position within the
frame
7302019 Heinrich Melanie - Studio Lighting Workbook
httpslidepdfcomreaderfullheinrich-melanie-studio-lighting-workbook 7889
Photographing Beautiful Glass
Film
VPS 100 - Color Negative
Camera Format
2 14 square - Hassalblad
Medium Format
Lens
80mm Normal
Light Source
Strobe with Softbox
Meter
Handheld Incident
Tripod
Yes
Filters
None
7302019 Heinrich Melanie - Studio Lighting Workbook
httpslidepdfcomreaderfullheinrich-melanie-studio-lighting-workbook 7989
The image above will give you an idea of how to light
small objects in a room or on a set You can make
objects pop out that are a very small part of the sceneFor example the color in this image is something you
really want to show but each of the objects must be
placed and lit properly to portray the beauty of their
colors Small strobes with funnel snoots will spotlight
only the objects you are interested in The blue
background color was chosen as a color complement to
the colors in the glass
TIP A snoot can be made from a rolled piece of
poster board into the shape of a cone You can also
buy these cones to fit on the strobe Be careful if using
poster board as the lights can get very hot
Take a large piece of poster board and roll it into a
cylinder shape Fig 1 Tape the center of the cylinder
then expand one end and decrease the opposite end of
the cylinder Fig 2 Make the expanded end large
enough to fit over the strobe head The other end of
the cylinder should be small enough to direct the light
at whatever object you want to be lighting The size of
the smaller hole will dictate the angle of the light
pointed at the object
Fig 1 Fig 2
7302019 Heinrich Melanie - Studio Lighting Workbook
httpslidepdfcomreaderfullheinrich-melanie-studio-lighting-workbook 8089
WARNING
DO NOT USE POSTER BOARD CONES WITH
TUNGSTEN LIGHTS The chance of fire is far too
great NEVER leave powered lights unattended
The glass objects in the photograph above have had the
light pushed directly through them When the light
passes through the colors are revealed
Shooting glass with liquid in it is described in the
diagram below The softbox is placed directly above the
set and slightly tilted away from the camera With the
liquid in the glass place a reflector card behind the
liquid only Looking through the camera lens make sure
the card does not extend past the liquid above or to the
sides Tip the card backwards so it picks up some of the
light falling down from the softbox This will illuminate
the liquid giving it a glowing appearance
7302019 Heinrich Melanie - Studio Lighting Workbook
httpslidepdfcomreaderfullheinrich-melanie-studio-lighting-workbook 8189
Your background can be any color detail or density when
using this reflector card
7302019 Heinrich Melanie - Studio Lighting Workbook
httpslidepdfcomreaderfullheinrich-melanie-studio-lighting-workbook 8289
Messages in a Still Life
Film
Ektachrome 100
Camera Format
35mm - Nikon
Small Format
Lens
50mm Normal
Light Source
Strobe with Softbox
Meter
Handheld Incident
Tripod
Yes
Filters
5 Red CC Filter
7302019 Heinrich Melanie - Studio Lighting Workbook
httpslidepdfcomreaderfullheinrich-melanie-studio-lighting-workbook 8389
The above image sends a message of peace and
comfort to its viewer in a couple of different
methods
One method is achieved by the type of lighting
used (In this case a strobe within a softbox) A warm
glow of very soft light is scraping horizontally
across the image and highlights fall on the outer
pages of the book It has a golden quality Another
method is achieved by using a number 5 CC filter
over the camera lens This accents the rich red color
in the roses with their saturated hue and balances
perfectly with the gold color in the pages as well as
the reddish-brown boards that they sit on
TIP ~
A red or orange transparent gel in an acetate sheet
form could be placed over the softbox to warm the
color pushed into the set
The background falls off into black holding the
viewers eye on the bible and the perfectly balanced
roses
This was shot with a softbox to the right of the scene
with no fill cards or fill lights The main light source
is close to the subject so the light falls off very little
When the light is positioned close to the subject its effect
on the oppiste side is minimal
7302019 Heinrich Melanie - Studio Lighting Workbook
httpslidepdfcomreaderfullheinrich-melanie-studio-lighting-workbook 8489
Using light color balance and the right props this
image conveys both warmth and love The main
subject is the bible The roses are used to convey a
feeling of love If instead of roses guns were used as
props the message would be entirley different
perhaps of violence Props can make or break
your image
7302019 Heinrich Melanie - Studio Lighting Workbook
httpslidepdfcomreaderfullheinrich-melanie-studio-lighting-workbook 8589
Creating a Mood
Film
Ektachrome 100
Camera Format
35mm - Nikon
Small Format
Lens
50mm Normal
Light Source
Strobes and reflectors
Meter
Handheld Incident
Tripod
No
Filters
None
7302019 Heinrich Melanie - Studio Lighting Workbook
httpslidepdfcomreaderfullheinrich-melanie-studio-lighting-workbook 8689
Making a statement with your photography should
be foremost in your mind The image above tells us ~
bedroom lovers intimacy passion etc It is up to
our imagination to fill in the blanks You have only a
few moments to convey your message so be careful
not to be too subtle yet not so blatant that your
message is visually insulting
The location in this shot was specifically chosen
Shot on a wooden floor a rustic authenticity is
portrayed A cowboy feel was achieved with these
surrounding elements The lingerie casually draped
over the boots looks accidental and unplanned The
boot that is tipped over leads the viewer to believe an
impetuous moment of hurried passion is taking
place The background is evident but intentionally
made out of focus by shooting at f4 for shallow
depth of field
This image is far from haphazard It was planned
from layout to location to scouting to objectplacement The idea came first then the execution of
the image Although minor alterations of layouts are
common the concept will remain the same This
eliminates confusion by isolating one idea and
working it through from all directions
Scouting out locations can be a full-time job and you
may need special permission to shoot in a particular
place See property release in the Legal Forms
section to cover your legal requirements and release
forms
7302019 Heinrich Melanie - Studio Lighting Workbook
httpslidepdfcomreaderfullheinrich-melanie-studio-lighting-workbook 8789
This kind of image will work very well for an adselling lingerie A strobe light with a softbox was
used to light the boots and the lingerie from the
right A reflector card was placed close to the boots
to fill in the left side of the scene The light is
positioned low near the floor which scrapes the light
on a low plan This was placed to simulate a specific
time during the day sunset or early evening The
light at this time is warm in color value which adds
to the subject matters message The camera vantage
point is low also bringing the viewer into intimate
contact with the boots and lingerie
7302019 Heinrich Melanie - Studio Lighting Workbook
httpslidepdfcomreaderfullheinrich-melanie-studio-lighting-workbook 8889
Still Lifes Selling Products
Film
Ektachrome 100
Camera Format
2 14 square - Hassalblad
Medium Format
Lens
80mm Normal
Light Source
Strobe with Softbox
Meter
Handheld Incident
Tripod
Yes
FiltersNone
7302019 Heinrich Melanie - Studio Lighting Workbook
httpslidepdfcomreaderfullheinrich-melanie-studio-lighting-workbook 8989
Placement and staging of objects requires a thought-out layout and planned
execution when using multiple products Layering has been used in this image
where non-information has been overlapped for example where the licence
plates and shirts touch Your viewer does not need to see the entire object in
this case to know what it is Strong diagonal lines have been made by object
placement This helps pull the viewer through the image and leads the eye to
a specific area of an image This image was created to find funding for
Vietnam vets by selling these products
If you have been asked to shoot several products and put them all into one
image think of it in terms of a still life setting Larger items will be placed inthe background sometimes even being used as the background For example
picture a group of images all representing something American The
background for this scene could be a flag which is also one of the subjects
There is no need to see the entire flag because it is an easily recognizable icon
In the image above the wooden floor was used to add a sense of the rustic and
gritty realism of the Vietnam war It was lit with a softbox directly above the
subjects The aperture was a concern for foreground to background
sharpness so the camera was pulled back far enough from the scene to allow
for a large aperture of around f 56
Below is the final image This was dropped into a 3 fold 812 x 4 brochure
along with other images of the same sort
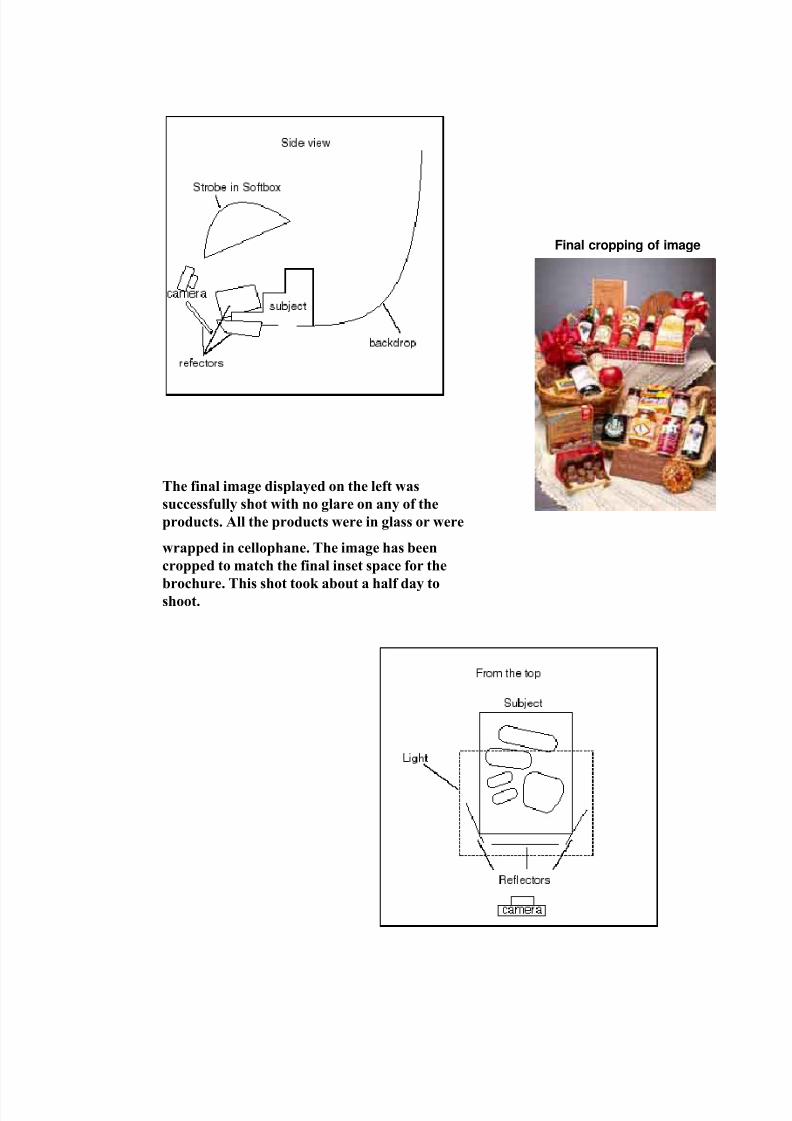
7302019 Heinrich Melanie - Studio Lighting Workbook
httpslidepdfcomreaderfullheinrich-melanie-studio-lighting-workbook 6289
Using a Product for a Background
Film
Ektachrome 100
Daylight Film
Camera Format
4 x 5 - Horseman
Large Format
Lens
150mm Normal
Light Source
Strobe with Softbox and
Reflector
Meter
Handheld Incident
Tripod
Yes
Filters
None
7302019 Heinrich Melanie - Studio Lighting Workbook
httpslidepdfcomreaderfullheinrich-melanie-studio-lighting-workbook 6389
This close-up of a computer chip was designed for the
front cover of a computer companys brochure (see
below) It was nesseccary to get the best detail for
enlargement reasons so a large format camera was used
The end image was 9 x 12 our negative was 4 x 5
A strobe with a softbox was used to light this subject
from the left side An accompanying white reflector card
was placed close to the subject to fill in the right side
with light (see diagram below)
The bellows on the 4 x 5 camera were extended to
enlarge this chip to fill the frame When extending the
bellows you increase the need for light to reach the film
In this case we did not need to have a small f-stop
number for sharpness so we left the lens open at f56and made our exposure appropriately Even if you need
to pop your flash a couple of times extending the
bellows should not be something to hold you back from
making the close-up you want to shoot The detail in this
shot is achieved by using a 4 x 5 camera with a good lens
TIP ~
Popping or firing the strobe multiple times is done with
the lens open in a darkened room so the only light in the
room is coming from your controlled multiple burst of
the flash Since you have no need for speed whenshooting inanimate objects keep pumping in the light to
get the exposure you need In a dark room you could
leave your lens open and just continually pop the strobe
Or you can cock the shutter and repeat the same
exposure until it adds up to the correct amount of light
required Make sure you are on a very steady tripod
The slightest amount of movement will blur your image
TIP ~
The best set up for any overhead shot with a 4 x 5 is to
put your set on the floor This is of course dependent on
the size of your set A short-legged set of horses works
very well also The legs used in this set were about 12
high
The hue of bluegreen works well with the yellow text
7302019 Heinrich Melanie - Studio Lighting Workbook
httpslidepdfcomreaderfullheinrich-melanie-studio-lighting-workbook 6489
The text pops off the image This color prevents the text
from falling into the background The background of the
computer chip remains a simple reminder of what the
company does It is the text that the viewer is expected to
read
This image would also make a great backdrop for a
collage or montage image
7302019 Heinrich Melanie - Studio Lighting Workbook
httpslidepdfcomreaderfullheinrich-melanie-studio-lighting-workbook 6589
Floating Product
Film
Ektachrome 100
Daylight Film
Camera Format4 x 5 - Horseman
Large Format
Lens
150mm Normal
and 90mm Wide
Light Source
Strobe with
Softbox
Meter
Handheld
Incident
Tripod
Yes
Filters
None
PolaroidsYes
7302019 Heinrich Melanie - Studio Lighting Workbook
httpslidepdfcomreaderfullheinrich-melanie-studio-lighting-workbook 6689
Both images in this lesson give the illusion of
floating The top image is propped up underneath by
a block A softbox directly above the computer
circuit board was used to achieve a soft even light In
todays high-tech industry these kinds of images are
being used in composites and as single images
TIP ~
Using black velvet as a backdrop can achieve a
similar effect where the subject appears to float The
light will be absorbed into the black velvet material
to create the illusion
The computer chip is not grounded to anything so it
appears to float (see Fig 1) The angle of the light on
the computer circuit board picked up some very
interesting highlights in Fig 1 which adds to the
high-tech feel of the image
A 4 x 5 camera was used to get greater detail with
the larger negative for enlargement purposes Depth-
of-field was achieved at f32
When shooting any subject like this you can portray
many kinds of interesting illusions The black velvet
material may be a little more expensive but nothing
else works as well This kind of material will help
you take the shots like the pros
Fig 1
7302019 Heinrich Melanie - Studio Lighting Workbook
httpslidepdfcomreaderfullheinrich-melanie-studio-lighting-workbook 6789
Boring Product -Interesting Design
Film
Ektachrome 100
Daylight Film
Camera Format
4 x 5 - Horseman
Large Format
Lens
150mm Normal
Light Source
Strobe with Softbox
Meter
Hanheld Incident
Tripod
Yes
Filters
None
7302019 Heinrich Melanie - Studio Lighting Workbook
httpslidepdfcomreaderfullheinrich-melanie-studio-lighting-workbook 6889
Some products you will be photographing will be justplain boring such as the rods in the shot above Its
your job as the photographer to bring life and interest
to boring products like these In the image above the
client needed his products shot for his company
catalog
Making something interesting from something boring
can be done by using an interesting background or
unusual lighting In this image the layout and diagonal
positioning of the rods directs the viewers eye to the
top right area of the image of the frame Text was
placed at the top and right side of this image (see final
image below)
The softbox was positioned above and to the left of the
product as indicated by the soft shadows Fig1 This
image could have easily been cut out from its
background and placed on any other background
Minimal depth-of-field is needed for this shot because
the maximum height of the product was only two
inches An aperture of f8 was used The exposure is
made with an incident meter reading to achieve an
overall well-balanced tone
Deep shadows could have been used to add interest to
these products by using a direct light at a very low
level to the table angle Fig 2 No softbox would be
used for this kind of shot
The set is placed on the floor so your camera position
is directly over the top of the set If shot on a table top
you would need to stand on top of a ladder to take the
shot The easier choice is to shoot on the floor
7302019 Heinrich Melanie - Studio Lighting Workbook
httpslidepdfcomreaderfullheinrich-melanie-studio-lighting-workbook 6989
Fig 1
Fig 2
7302019 Heinrich Melanie - Studio Lighting Workbook
httpslidepdfcomreaderfullheinrich-melanie-studio-lighting-workbook 7089
Lessons in this section
Mixing Texture Shapes and Color
Arranging a Set
Photographing Beautiful Glass
Messages in a Still Life
Creating a Mood
Still Lifes Selling Products
Setting the stage works to help convince the
viewer of a place and time or mood Small
details make a shot believable These
lessons will teach you how to think and tell
a story of a certain place in time Picking
the right props for your shoot will ensure
believability The lessons in this section
work in conjunction with the ProductPhotography section
A still life photographer can be found
working in a studio or on location This
type of photography demands the
recreation of a set or going to the set to
capture a moment in time This can be done
on location in the studio or digitally
created on the computer The truth is it fits
into many categories It is more than
product photography You are creating a
scene that conveys a sense of being
somewhere
7302019 Heinrich Melanie - Studio Lighting Workbook
httpslidepdfcomreaderfullheinrich-melanie-studio-lighting-workbook 7189
you pull your entire learning experience
together I include details and diagrams
that will reinforce your understanding
Still life scenes are often used in a designers
set or in a showroom like in a furniture
store They can also be used to convey a
story quickly and help transfer the concept
and idea throughout the entire image These
lessons include tips on how to light objects
in small and detailed areas They will help
7302019 Heinrich Melanie - Studio Lighting Workbook
httpslidepdfcomreaderfullheinrich-melanie-studio-lighting-workbook 7289
Mixing Texture Shapes and Color
Film
Ektachrome 100
Camera Format
4 x 5 - Horsemen
Large Format View
Camera
Lens
150mm Normal
Light Source
Strobe with Softbox
MeterHandheld Incident
Tripod
Yes
Filters
None
7302019 Heinrich Melanie - Studio Lighting Workbook
httpslidepdfcomreaderfullheinrich-melanie-studio-lighting-workbook 7389
The image above was shot as a portfolio piece
Mixing textures shapes and colors the
photograph displays the photographers eye for
design It is photographed on black velvet which
adds saturation of the overall appearance by
absorbing all the light that falls on it The black
velvet can be purchased at any fabric store
Two scarves are positioned at opposing angles
adding strong graphic interest and competition
between them Against the soft colored scarves
the dark blue hat pops out The colored markers
are color complements to the blue hat and add
additional depth to the image
Resting on top of the scarves are brightly
colored objects which add spots of color andinterest The curvy lines of the ribbons break up
the edges of the two scarves and add a bit of fun
to the image The final crop of the image forces
the viewer to see the positive and negative
spaces of color within the frame Cropping plays
an important role in the success of your image
How the image was photographed ~
One main strobe light was used It was shot
through a softbox or mylar scrim Several white
and silver reflector cards surrounding the setbounced in a soft fill light Using the reflectors
as fill light evens out the overall appearance
without eliminating the direction of the main
light The shadows in the image are soft and
reveal more texture in the scarf
Minimal if any depth-of-field was needed in
this image so it was exposed at f56 The meter
reading is taken with an incident meter and
pointed directly at the camera Several readings
were taken of the entire image For example a
meter reading was taken of the light falling onthe hat the tip of the triangular scarf and the
black corners of the velvet before an exposure
was chosen A range of only 1 stop was allowed
between these exposure readings Reposition
your reflecting cards either closer or further
7302019 Heinrich Melanie - Studio Lighting Workbook
httpslidepdfcomreaderfullheinrich-melanie-studio-lighting-workbook 7489
from your subject to adjust the exposure
variations Your final exposure choice will be of
the area in the scene that is the brightest or
where the most light is falling If your exposure
variations are between f16 and f11 f16
indicates the brightest area in the scene You
should know this at this point in your educationIf you dont go back to the Camera Basics
section and read over the lessons Choosing f16
will prevent overexposure to the lighter areas in
your scene The camera was positioned directly
over the top of the set using a tripod Make sure
your tripod is capable of supporting your
camera in these unusual positions
Pick three or four objects that work well
together Lay them out on a solid colored
background in an interesting design pattern
Position your camera lights and reflectors
Using a color transparency film bracket your
frames as you shoot
Final crop of image
reflector
reflector
7302019 Heinrich Melanie - Studio Lighting Workbook
httpslidepdfcomreaderfullheinrich-melanie-studio-lighting-workbook 7589
Arranging a Set
Film
VPS 100 - Color Negative
Camera Format
2 14 square - Hasselblad
Medium Format
Lens
80mm Normal
Light Source
Strobe with Softbox
Meter
Handheld Incident
Tripod
Yes
Filters
None
7302019 Heinrich Melanie - Studio Lighting Workbook
httpslidepdfcomreaderfullheinrich-melanie-studio-lighting-workbook 7689
Within each image there can exist sets that pull the
entire image together The image above is an example
of one of these small sets The set is staged for a period
in time
Some professionals hire stylists to set something like
this up Background information helps convey a
message in the overall scene For example suppose you
are shooting the interior spaces of a Victorian home
and your client wants to place the product in the late
1800s Objects in the photo above will help transport
your viewer into that time in history Props are a very
important part in convincing your viewer of a place in
time You can find props at antique stores for this kind
of scene Time period images must be authentic down
to the smallest details Hire a historian for accuracy if
needed
Magazines use small inset photos that display intricate
details of settings They may not be set against a black
background as in the photograph above The
background should be dimly lit or out of focus to
help accent the subject Shallow depth of field and
object placement will work together to make your
image successful
One main strobe light was used in the photograph
above with no fill lights or reflectors This drops the
background of black velvet into black making it a
perfect place for white text Remember an
editor or designer usually needs to add type and will
need this space
7302019 Heinrich Melanie - Studio Lighting Workbook
httpslidepdfcomreaderfullheinrich-melanie-studio-lighting-workbook 7789
Still lifes have been used in fine art for many years The
image above happens to be found in nature but could
have just as easily have been set up in a studio The
arrangement of the plates and glass objects can be
emulated in the studio or in a set I have included this
image to show you that what you find most naturally in
life is how you should set up a scene whether in the
studio or on location Take your camera into the world
around you and shoot small stories such as the one
above These still lifes will help you to stylize your own
setups This lesson will help you learn how to crop and
balance your images Pay close attention to the light
falling on the objects in your scenes Follow the previous
example to determine the proper exposure of your film
Be deliberate when you consider the photographs you
will take Take your time
Remember to see within the boundaries of your frame
balancing objects from front to back side to side and
corner to corner See Visual Basics for more
information on setting an objects position within the
frame
7302019 Heinrich Melanie - Studio Lighting Workbook
httpslidepdfcomreaderfullheinrich-melanie-studio-lighting-workbook 7889
Photographing Beautiful Glass
Film
VPS 100 - Color Negative
Camera Format
2 14 square - Hassalblad
Medium Format
Lens
80mm Normal
Light Source
Strobe with Softbox
Meter
Handheld Incident
Tripod
Yes
Filters
None
7302019 Heinrich Melanie - Studio Lighting Workbook
httpslidepdfcomreaderfullheinrich-melanie-studio-lighting-workbook 7989
The image above will give you an idea of how to light
small objects in a room or on a set You can make
objects pop out that are a very small part of the sceneFor example the color in this image is something you
really want to show but each of the objects must be
placed and lit properly to portray the beauty of their
colors Small strobes with funnel snoots will spotlight
only the objects you are interested in The blue
background color was chosen as a color complement to
the colors in the glass
TIP A snoot can be made from a rolled piece of
poster board into the shape of a cone You can also
buy these cones to fit on the strobe Be careful if using
poster board as the lights can get very hot
Take a large piece of poster board and roll it into a
cylinder shape Fig 1 Tape the center of the cylinder
then expand one end and decrease the opposite end of
the cylinder Fig 2 Make the expanded end large
enough to fit over the strobe head The other end of
the cylinder should be small enough to direct the light
at whatever object you want to be lighting The size of
the smaller hole will dictate the angle of the light
pointed at the object
Fig 1 Fig 2
7302019 Heinrich Melanie - Studio Lighting Workbook
httpslidepdfcomreaderfullheinrich-melanie-studio-lighting-workbook 8089
WARNING
DO NOT USE POSTER BOARD CONES WITH
TUNGSTEN LIGHTS The chance of fire is far too
great NEVER leave powered lights unattended
The glass objects in the photograph above have had the
light pushed directly through them When the light
passes through the colors are revealed
Shooting glass with liquid in it is described in the
diagram below The softbox is placed directly above the
set and slightly tilted away from the camera With the
liquid in the glass place a reflector card behind the
liquid only Looking through the camera lens make sure
the card does not extend past the liquid above or to the
sides Tip the card backwards so it picks up some of the
light falling down from the softbox This will illuminate
the liquid giving it a glowing appearance
7302019 Heinrich Melanie - Studio Lighting Workbook
httpslidepdfcomreaderfullheinrich-melanie-studio-lighting-workbook 8189
Your background can be any color detail or density when
using this reflector card
7302019 Heinrich Melanie - Studio Lighting Workbook
httpslidepdfcomreaderfullheinrich-melanie-studio-lighting-workbook 8289
Messages in a Still Life
Film
Ektachrome 100
Camera Format
35mm - Nikon
Small Format
Lens
50mm Normal
Light Source
Strobe with Softbox
Meter
Handheld Incident
Tripod
Yes
Filters
5 Red CC Filter
7302019 Heinrich Melanie - Studio Lighting Workbook
httpslidepdfcomreaderfullheinrich-melanie-studio-lighting-workbook 8389
The above image sends a message of peace and
comfort to its viewer in a couple of different
methods
One method is achieved by the type of lighting
used (In this case a strobe within a softbox) A warm
glow of very soft light is scraping horizontally
across the image and highlights fall on the outer
pages of the book It has a golden quality Another
method is achieved by using a number 5 CC filter
over the camera lens This accents the rich red color
in the roses with their saturated hue and balances
perfectly with the gold color in the pages as well as
the reddish-brown boards that they sit on
TIP ~
A red or orange transparent gel in an acetate sheet
form could be placed over the softbox to warm the
color pushed into the set
The background falls off into black holding the
viewers eye on the bible and the perfectly balanced
roses
This was shot with a softbox to the right of the scene
with no fill cards or fill lights The main light source
is close to the subject so the light falls off very little
When the light is positioned close to the subject its effect
on the oppiste side is minimal
7302019 Heinrich Melanie - Studio Lighting Workbook
httpslidepdfcomreaderfullheinrich-melanie-studio-lighting-workbook 8489
Using light color balance and the right props this
image conveys both warmth and love The main
subject is the bible The roses are used to convey a
feeling of love If instead of roses guns were used as
props the message would be entirley different
perhaps of violence Props can make or break
your image
7302019 Heinrich Melanie - Studio Lighting Workbook
httpslidepdfcomreaderfullheinrich-melanie-studio-lighting-workbook 8589
Creating a Mood
Film
Ektachrome 100
Camera Format
35mm - Nikon
Small Format
Lens
50mm Normal
Light Source
Strobes and reflectors
Meter
Handheld Incident
Tripod
No
Filters
None
7302019 Heinrich Melanie - Studio Lighting Workbook
httpslidepdfcomreaderfullheinrich-melanie-studio-lighting-workbook 8689
Making a statement with your photography should
be foremost in your mind The image above tells us ~
bedroom lovers intimacy passion etc It is up to
our imagination to fill in the blanks You have only a
few moments to convey your message so be careful
not to be too subtle yet not so blatant that your
message is visually insulting
The location in this shot was specifically chosen
Shot on a wooden floor a rustic authenticity is
portrayed A cowboy feel was achieved with these
surrounding elements The lingerie casually draped
over the boots looks accidental and unplanned The
boot that is tipped over leads the viewer to believe an
impetuous moment of hurried passion is taking
place The background is evident but intentionally
made out of focus by shooting at f4 for shallow
depth of field
This image is far from haphazard It was planned
from layout to location to scouting to objectplacement The idea came first then the execution of
the image Although minor alterations of layouts are
common the concept will remain the same This
eliminates confusion by isolating one idea and
working it through from all directions
Scouting out locations can be a full-time job and you
may need special permission to shoot in a particular
place See property release in the Legal Forms
section to cover your legal requirements and release
forms
7302019 Heinrich Melanie - Studio Lighting Workbook
httpslidepdfcomreaderfullheinrich-melanie-studio-lighting-workbook 8789
This kind of image will work very well for an adselling lingerie A strobe light with a softbox was
used to light the boots and the lingerie from the
right A reflector card was placed close to the boots
to fill in the left side of the scene The light is
positioned low near the floor which scrapes the light
on a low plan This was placed to simulate a specific
time during the day sunset or early evening The
light at this time is warm in color value which adds
to the subject matters message The camera vantage
point is low also bringing the viewer into intimate
contact with the boots and lingerie
7302019 Heinrich Melanie - Studio Lighting Workbook
httpslidepdfcomreaderfullheinrich-melanie-studio-lighting-workbook 8889
Still Lifes Selling Products
Film
Ektachrome 100
Camera Format
2 14 square - Hassalblad
Medium Format
Lens
80mm Normal
Light Source
Strobe with Softbox
Meter
Handheld Incident
Tripod
Yes
FiltersNone
7302019 Heinrich Melanie - Studio Lighting Workbook
httpslidepdfcomreaderfullheinrich-melanie-studio-lighting-workbook 8989
Placement and staging of objects requires a thought-out layout and planned
execution when using multiple products Layering has been used in this image
where non-information has been overlapped for example where the licence
plates and shirts touch Your viewer does not need to see the entire object in
this case to know what it is Strong diagonal lines have been made by object
placement This helps pull the viewer through the image and leads the eye to
a specific area of an image This image was created to find funding for
Vietnam vets by selling these products
If you have been asked to shoot several products and put them all into one
image think of it in terms of a still life setting Larger items will be placed inthe background sometimes even being used as the background For example
picture a group of images all representing something American The
background for this scene could be a flag which is also one of the subjects
There is no need to see the entire flag because it is an easily recognizable icon
In the image above the wooden floor was used to add a sense of the rustic and
gritty realism of the Vietnam war It was lit with a softbox directly above the
subjects The aperture was a concern for foreground to background
sharpness so the camera was pulled back far enough from the scene to allow
for a large aperture of around f 56
Below is the final image This was dropped into a 3 fold 812 x 4 brochure
along with other images of the same sort
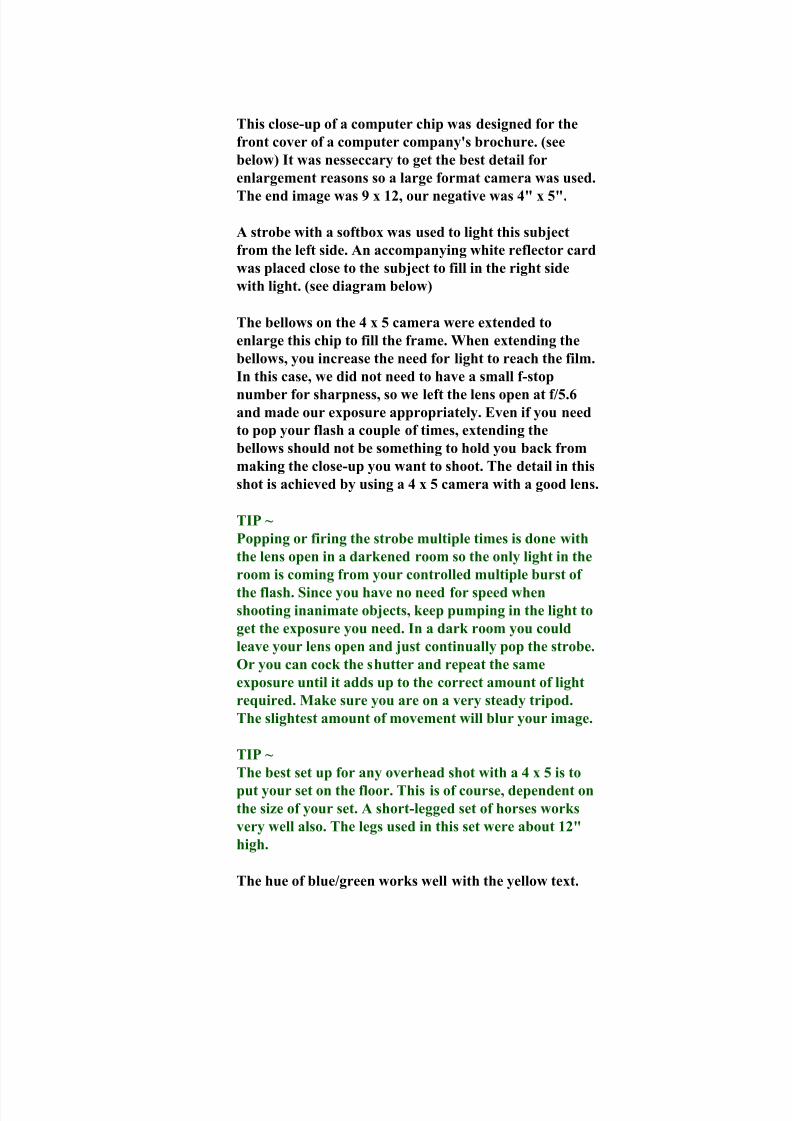
7302019 Heinrich Melanie - Studio Lighting Workbook
httpslidepdfcomreaderfullheinrich-melanie-studio-lighting-workbook 6989
Fig 1
Fig 2
7302019 Heinrich Melanie - Studio Lighting Workbook
httpslidepdfcomreaderfullheinrich-melanie-studio-lighting-workbook 7089
Lessons in this section
Mixing Texture Shapes and Color
Arranging a Set
Photographing Beautiful Glass
Messages in a Still Life
Creating a Mood
Still Lifes Selling Products
Setting the stage works to help convince the
viewer of a place and time or mood Small
details make a shot believable These
lessons will teach you how to think and tell
a story of a certain place in time Picking
the right props for your shoot will ensure
believability The lessons in this section
work in conjunction with the ProductPhotography section
A still life photographer can be found
working in a studio or on location This
type of photography demands the
recreation of a set or going to the set to
capture a moment in time This can be done
on location in the studio or digitally
created on the computer The truth is it fits
into many categories It is more than
product photography You are creating a
scene that conveys a sense of being
somewhere
7302019 Heinrich Melanie - Studio Lighting Workbook
httpslidepdfcomreaderfullheinrich-melanie-studio-lighting-workbook 7189
you pull your entire learning experience
together I include details and diagrams
that will reinforce your understanding
Still life scenes are often used in a designers
set or in a showroom like in a furniture
store They can also be used to convey a
story quickly and help transfer the concept
and idea throughout the entire image These
lessons include tips on how to light objects
in small and detailed areas They will help
7302019 Heinrich Melanie - Studio Lighting Workbook
httpslidepdfcomreaderfullheinrich-melanie-studio-lighting-workbook 7289
Mixing Texture Shapes and Color
Film
Ektachrome 100
Camera Format
4 x 5 - Horsemen
Large Format View
Camera
Lens
150mm Normal
Light Source
Strobe with Softbox
MeterHandheld Incident
Tripod
Yes
Filters
None
7302019 Heinrich Melanie - Studio Lighting Workbook
httpslidepdfcomreaderfullheinrich-melanie-studio-lighting-workbook 7389
The image above was shot as a portfolio piece
Mixing textures shapes and colors the
photograph displays the photographers eye for
design It is photographed on black velvet which
adds saturation of the overall appearance by
absorbing all the light that falls on it The black
velvet can be purchased at any fabric store
Two scarves are positioned at opposing angles
adding strong graphic interest and competition
between them Against the soft colored scarves
the dark blue hat pops out The colored markers
are color complements to the blue hat and add
additional depth to the image
Resting on top of the scarves are brightly
colored objects which add spots of color andinterest The curvy lines of the ribbons break up
the edges of the two scarves and add a bit of fun
to the image The final crop of the image forces
the viewer to see the positive and negative
spaces of color within the frame Cropping plays
an important role in the success of your image
How the image was photographed ~
One main strobe light was used It was shot
through a softbox or mylar scrim Several white
and silver reflector cards surrounding the setbounced in a soft fill light Using the reflectors
as fill light evens out the overall appearance
without eliminating the direction of the main
light The shadows in the image are soft and
reveal more texture in the scarf
Minimal if any depth-of-field was needed in
this image so it was exposed at f56 The meter
reading is taken with an incident meter and
pointed directly at the camera Several readings
were taken of the entire image For example a
meter reading was taken of the light falling onthe hat the tip of the triangular scarf and the
black corners of the velvet before an exposure
was chosen A range of only 1 stop was allowed
between these exposure readings Reposition
your reflecting cards either closer or further
7302019 Heinrich Melanie - Studio Lighting Workbook
httpslidepdfcomreaderfullheinrich-melanie-studio-lighting-workbook 7489
from your subject to adjust the exposure
variations Your final exposure choice will be of
the area in the scene that is the brightest or
where the most light is falling If your exposure
variations are between f16 and f11 f16
indicates the brightest area in the scene You
should know this at this point in your educationIf you dont go back to the Camera Basics
section and read over the lessons Choosing f16
will prevent overexposure to the lighter areas in
your scene The camera was positioned directly
over the top of the set using a tripod Make sure
your tripod is capable of supporting your
camera in these unusual positions
Pick three or four objects that work well
together Lay them out on a solid colored
background in an interesting design pattern
Position your camera lights and reflectors
Using a color transparency film bracket your
frames as you shoot
Final crop of image
reflector
reflector
7302019 Heinrich Melanie - Studio Lighting Workbook
httpslidepdfcomreaderfullheinrich-melanie-studio-lighting-workbook 7589
Arranging a Set
Film
VPS 100 - Color Negative
Camera Format
2 14 square - Hasselblad
Medium Format
Lens
80mm Normal
Light Source
Strobe with Softbox
Meter
Handheld Incident
Tripod
Yes
Filters
None
7302019 Heinrich Melanie - Studio Lighting Workbook
httpslidepdfcomreaderfullheinrich-melanie-studio-lighting-workbook 7689
Within each image there can exist sets that pull the
entire image together The image above is an example
of one of these small sets The set is staged for a period
in time
Some professionals hire stylists to set something like
this up Background information helps convey a
message in the overall scene For example suppose you
are shooting the interior spaces of a Victorian home
and your client wants to place the product in the late
1800s Objects in the photo above will help transport
your viewer into that time in history Props are a very
important part in convincing your viewer of a place in
time You can find props at antique stores for this kind
of scene Time period images must be authentic down
to the smallest details Hire a historian for accuracy if
needed
Magazines use small inset photos that display intricate
details of settings They may not be set against a black
background as in the photograph above The
background should be dimly lit or out of focus to
help accent the subject Shallow depth of field and
object placement will work together to make your
image successful
One main strobe light was used in the photograph
above with no fill lights or reflectors This drops the
background of black velvet into black making it a
perfect place for white text Remember an
editor or designer usually needs to add type and will
need this space
7302019 Heinrich Melanie - Studio Lighting Workbook
httpslidepdfcomreaderfullheinrich-melanie-studio-lighting-workbook 7789
Still lifes have been used in fine art for many years The
image above happens to be found in nature but could
have just as easily have been set up in a studio The
arrangement of the plates and glass objects can be
emulated in the studio or in a set I have included this
image to show you that what you find most naturally in
life is how you should set up a scene whether in the
studio or on location Take your camera into the world
around you and shoot small stories such as the one
above These still lifes will help you to stylize your own
setups This lesson will help you learn how to crop and
balance your images Pay close attention to the light
falling on the objects in your scenes Follow the previous
example to determine the proper exposure of your film
Be deliberate when you consider the photographs you
will take Take your time
Remember to see within the boundaries of your frame
balancing objects from front to back side to side and
corner to corner See Visual Basics for more
information on setting an objects position within the
frame
7302019 Heinrich Melanie - Studio Lighting Workbook
httpslidepdfcomreaderfullheinrich-melanie-studio-lighting-workbook 7889
Photographing Beautiful Glass
Film
VPS 100 - Color Negative
Camera Format
2 14 square - Hassalblad
Medium Format
Lens
80mm Normal
Light Source
Strobe with Softbox
Meter
Handheld Incident
Tripod
Yes
Filters
None
7302019 Heinrich Melanie - Studio Lighting Workbook
httpslidepdfcomreaderfullheinrich-melanie-studio-lighting-workbook 7989
The image above will give you an idea of how to light
small objects in a room or on a set You can make
objects pop out that are a very small part of the sceneFor example the color in this image is something you
really want to show but each of the objects must be
placed and lit properly to portray the beauty of their
colors Small strobes with funnel snoots will spotlight
only the objects you are interested in The blue
background color was chosen as a color complement to
the colors in the glass
TIP A snoot can be made from a rolled piece of
poster board into the shape of a cone You can also
buy these cones to fit on the strobe Be careful if using
poster board as the lights can get very hot
Take a large piece of poster board and roll it into a
cylinder shape Fig 1 Tape the center of the cylinder
then expand one end and decrease the opposite end of
the cylinder Fig 2 Make the expanded end large
enough to fit over the strobe head The other end of
the cylinder should be small enough to direct the light
at whatever object you want to be lighting The size of
the smaller hole will dictate the angle of the light
pointed at the object
Fig 1 Fig 2
7302019 Heinrich Melanie - Studio Lighting Workbook
httpslidepdfcomreaderfullheinrich-melanie-studio-lighting-workbook 8089
WARNING
DO NOT USE POSTER BOARD CONES WITH
TUNGSTEN LIGHTS The chance of fire is far too
great NEVER leave powered lights unattended
The glass objects in the photograph above have had the
light pushed directly through them When the light
passes through the colors are revealed
Shooting glass with liquid in it is described in the
diagram below The softbox is placed directly above the
set and slightly tilted away from the camera With the
liquid in the glass place a reflector card behind the
liquid only Looking through the camera lens make sure
the card does not extend past the liquid above or to the
sides Tip the card backwards so it picks up some of the
light falling down from the softbox This will illuminate
the liquid giving it a glowing appearance
7302019 Heinrich Melanie - Studio Lighting Workbook
httpslidepdfcomreaderfullheinrich-melanie-studio-lighting-workbook 8189
Your background can be any color detail or density when
using this reflector card
7302019 Heinrich Melanie - Studio Lighting Workbook
httpslidepdfcomreaderfullheinrich-melanie-studio-lighting-workbook 8289
Messages in a Still Life
Film
Ektachrome 100
Camera Format
35mm - Nikon
Small Format
Lens
50mm Normal
Light Source
Strobe with Softbox
Meter
Handheld Incident
Tripod
Yes
Filters
5 Red CC Filter
7302019 Heinrich Melanie - Studio Lighting Workbook
httpslidepdfcomreaderfullheinrich-melanie-studio-lighting-workbook 8389
The above image sends a message of peace and
comfort to its viewer in a couple of different
methods
One method is achieved by the type of lighting
used (In this case a strobe within a softbox) A warm
glow of very soft light is scraping horizontally
across the image and highlights fall on the outer
pages of the book It has a golden quality Another
method is achieved by using a number 5 CC filter
over the camera lens This accents the rich red color
in the roses with their saturated hue and balances
perfectly with the gold color in the pages as well as
the reddish-brown boards that they sit on
TIP ~
A red or orange transparent gel in an acetate sheet
form could be placed over the softbox to warm the
color pushed into the set
The background falls off into black holding the
viewers eye on the bible and the perfectly balanced
roses
This was shot with a softbox to the right of the scene
with no fill cards or fill lights The main light source
is close to the subject so the light falls off very little
When the light is positioned close to the subject its effect
on the oppiste side is minimal
7302019 Heinrich Melanie - Studio Lighting Workbook
httpslidepdfcomreaderfullheinrich-melanie-studio-lighting-workbook 8489
Using light color balance and the right props this
image conveys both warmth and love The main
subject is the bible The roses are used to convey a
feeling of love If instead of roses guns were used as
props the message would be entirley different
perhaps of violence Props can make or break
your image
7302019 Heinrich Melanie - Studio Lighting Workbook
httpslidepdfcomreaderfullheinrich-melanie-studio-lighting-workbook 8589
Creating a Mood
Film
Ektachrome 100
Camera Format
35mm - Nikon
Small Format
Lens
50mm Normal
Light Source
Strobes and reflectors
Meter
Handheld Incident
Tripod
No
Filters
None
7302019 Heinrich Melanie - Studio Lighting Workbook
httpslidepdfcomreaderfullheinrich-melanie-studio-lighting-workbook 8689
Making a statement with your photography should
be foremost in your mind The image above tells us ~
bedroom lovers intimacy passion etc It is up to
our imagination to fill in the blanks You have only a
few moments to convey your message so be careful
not to be too subtle yet not so blatant that your
message is visually insulting
The location in this shot was specifically chosen
Shot on a wooden floor a rustic authenticity is
portrayed A cowboy feel was achieved with these
surrounding elements The lingerie casually draped
over the boots looks accidental and unplanned The
boot that is tipped over leads the viewer to believe an
impetuous moment of hurried passion is taking
place The background is evident but intentionally
made out of focus by shooting at f4 for shallow
depth of field
This image is far from haphazard It was planned
from layout to location to scouting to objectplacement The idea came first then the execution of
the image Although minor alterations of layouts are
common the concept will remain the same This
eliminates confusion by isolating one idea and
working it through from all directions
Scouting out locations can be a full-time job and you
may need special permission to shoot in a particular
place See property release in the Legal Forms
section to cover your legal requirements and release
forms
7302019 Heinrich Melanie - Studio Lighting Workbook
httpslidepdfcomreaderfullheinrich-melanie-studio-lighting-workbook 8789
This kind of image will work very well for an adselling lingerie A strobe light with a softbox was
used to light the boots and the lingerie from the
right A reflector card was placed close to the boots
to fill in the left side of the scene The light is
positioned low near the floor which scrapes the light
on a low plan This was placed to simulate a specific
time during the day sunset or early evening The
light at this time is warm in color value which adds
to the subject matters message The camera vantage
point is low also bringing the viewer into intimate
contact with the boots and lingerie
7302019 Heinrich Melanie - Studio Lighting Workbook
httpslidepdfcomreaderfullheinrich-melanie-studio-lighting-workbook 8889
Still Lifes Selling Products
Film
Ektachrome 100
Camera Format
2 14 square - Hassalblad
Medium Format
Lens
80mm Normal
Light Source
Strobe with Softbox
Meter
Handheld Incident
Tripod
Yes
FiltersNone
7302019 Heinrich Melanie - Studio Lighting Workbook
httpslidepdfcomreaderfullheinrich-melanie-studio-lighting-workbook 8989
Placement and staging of objects requires a thought-out layout and planned
execution when using multiple products Layering has been used in this image
where non-information has been overlapped for example where the licence
plates and shirts touch Your viewer does not need to see the entire object in
this case to know what it is Strong diagonal lines have been made by object
placement This helps pull the viewer through the image and leads the eye to
a specific area of an image This image was created to find funding for
Vietnam vets by selling these products
If you have been asked to shoot several products and put them all into one
image think of it in terms of a still life setting Larger items will be placed inthe background sometimes even being used as the background For example
picture a group of images all representing something American The
background for this scene could be a flag which is also one of the subjects
There is no need to see the entire flag because it is an easily recognizable icon
In the image above the wooden floor was used to add a sense of the rustic and
gritty realism of the Vietnam war It was lit with a softbox directly above the
subjects The aperture was a concern for foreground to background
sharpness so the camera was pulled back far enough from the scene to allow
for a large aperture of around f 56
Below is the final image This was dropped into a 3 fold 812 x 4 brochure
along with other images of the same sort
7302019 Heinrich Melanie - Studio Lighting Workbook
httpslidepdfcomreaderfullheinrich-melanie-studio-lighting-workbook 7089
Lessons in this section
Mixing Texture Shapes and Color
Arranging a Set
Photographing Beautiful Glass
Messages in a Still Life
Creating a Mood
Still Lifes Selling Products
Setting the stage works to help convince the
viewer of a place and time or mood Small
details make a shot believable These
lessons will teach you how to think and tell
a story of a certain place in time Picking
the right props for your shoot will ensure
believability The lessons in this section
work in conjunction with the ProductPhotography section
A still life photographer can be found
working in a studio or on location This
type of photography demands the
recreation of a set or going to the set to
capture a moment in time This can be done
on location in the studio or digitally
created on the computer The truth is it fits
into many categories It is more than
product photography You are creating a
scene that conveys a sense of being
somewhere
7302019 Heinrich Melanie - Studio Lighting Workbook
httpslidepdfcomreaderfullheinrich-melanie-studio-lighting-workbook 7189
you pull your entire learning experience
together I include details and diagrams
that will reinforce your understanding
Still life scenes are often used in a designers
set or in a showroom like in a furniture
store They can also be used to convey a
story quickly and help transfer the concept
and idea throughout the entire image These
lessons include tips on how to light objects
in small and detailed areas They will help
7302019 Heinrich Melanie - Studio Lighting Workbook
httpslidepdfcomreaderfullheinrich-melanie-studio-lighting-workbook 7289
Mixing Texture Shapes and Color
Film
Ektachrome 100
Camera Format
4 x 5 - Horsemen
Large Format View
Camera
Lens
150mm Normal
Light Source
Strobe with Softbox
MeterHandheld Incident
Tripod
Yes
Filters
None
7302019 Heinrich Melanie - Studio Lighting Workbook
httpslidepdfcomreaderfullheinrich-melanie-studio-lighting-workbook 7389
The image above was shot as a portfolio piece
Mixing textures shapes and colors the
photograph displays the photographers eye for
design It is photographed on black velvet which
adds saturation of the overall appearance by
absorbing all the light that falls on it The black
velvet can be purchased at any fabric store
Two scarves are positioned at opposing angles
adding strong graphic interest and competition
between them Against the soft colored scarves
the dark blue hat pops out The colored markers
are color complements to the blue hat and add
additional depth to the image
Resting on top of the scarves are brightly
colored objects which add spots of color andinterest The curvy lines of the ribbons break up
the edges of the two scarves and add a bit of fun
to the image The final crop of the image forces
the viewer to see the positive and negative
spaces of color within the frame Cropping plays
an important role in the success of your image
How the image was photographed ~
One main strobe light was used It was shot
through a softbox or mylar scrim Several white
and silver reflector cards surrounding the setbounced in a soft fill light Using the reflectors
as fill light evens out the overall appearance
without eliminating the direction of the main
light The shadows in the image are soft and
reveal more texture in the scarf
Minimal if any depth-of-field was needed in
this image so it was exposed at f56 The meter
reading is taken with an incident meter and
pointed directly at the camera Several readings
were taken of the entire image For example a
meter reading was taken of the light falling onthe hat the tip of the triangular scarf and the
black corners of the velvet before an exposure
was chosen A range of only 1 stop was allowed
between these exposure readings Reposition
your reflecting cards either closer or further
7302019 Heinrich Melanie - Studio Lighting Workbook
httpslidepdfcomreaderfullheinrich-melanie-studio-lighting-workbook 7489
from your subject to adjust the exposure
variations Your final exposure choice will be of
the area in the scene that is the brightest or
where the most light is falling If your exposure
variations are between f16 and f11 f16
indicates the brightest area in the scene You
should know this at this point in your educationIf you dont go back to the Camera Basics
section and read over the lessons Choosing f16
will prevent overexposure to the lighter areas in
your scene The camera was positioned directly
over the top of the set using a tripod Make sure
your tripod is capable of supporting your
camera in these unusual positions
Pick three or four objects that work well
together Lay them out on a solid colored
background in an interesting design pattern
Position your camera lights and reflectors
Using a color transparency film bracket your
frames as you shoot
Final crop of image
reflector
reflector
7302019 Heinrich Melanie - Studio Lighting Workbook
httpslidepdfcomreaderfullheinrich-melanie-studio-lighting-workbook 7589
Arranging a Set
Film
VPS 100 - Color Negative
Camera Format
2 14 square - Hasselblad
Medium Format
Lens
80mm Normal
Light Source
Strobe with Softbox
Meter
Handheld Incident
Tripod
Yes
Filters
None
7302019 Heinrich Melanie - Studio Lighting Workbook
httpslidepdfcomreaderfullheinrich-melanie-studio-lighting-workbook 7689
Within each image there can exist sets that pull the
entire image together The image above is an example
of one of these small sets The set is staged for a period
in time
Some professionals hire stylists to set something like
this up Background information helps convey a
message in the overall scene For example suppose you
are shooting the interior spaces of a Victorian home
and your client wants to place the product in the late
1800s Objects in the photo above will help transport
your viewer into that time in history Props are a very
important part in convincing your viewer of a place in
time You can find props at antique stores for this kind
of scene Time period images must be authentic down
to the smallest details Hire a historian for accuracy if
needed
Magazines use small inset photos that display intricate
details of settings They may not be set against a black
background as in the photograph above The
background should be dimly lit or out of focus to
help accent the subject Shallow depth of field and
object placement will work together to make your
image successful
One main strobe light was used in the photograph
above with no fill lights or reflectors This drops the
background of black velvet into black making it a
perfect place for white text Remember an
editor or designer usually needs to add type and will
need this space
7302019 Heinrich Melanie - Studio Lighting Workbook
httpslidepdfcomreaderfullheinrich-melanie-studio-lighting-workbook 7789
Still lifes have been used in fine art for many years The
image above happens to be found in nature but could
have just as easily have been set up in a studio The
arrangement of the plates and glass objects can be
emulated in the studio or in a set I have included this
image to show you that what you find most naturally in
life is how you should set up a scene whether in the
studio or on location Take your camera into the world
around you and shoot small stories such as the one
above These still lifes will help you to stylize your own
setups This lesson will help you learn how to crop and
balance your images Pay close attention to the light
falling on the objects in your scenes Follow the previous
example to determine the proper exposure of your film
Be deliberate when you consider the photographs you
will take Take your time
Remember to see within the boundaries of your frame
balancing objects from front to back side to side and
corner to corner See Visual Basics for more
information on setting an objects position within the
frame
7302019 Heinrich Melanie - Studio Lighting Workbook
httpslidepdfcomreaderfullheinrich-melanie-studio-lighting-workbook 7889
Photographing Beautiful Glass
Film
VPS 100 - Color Negative
Camera Format
2 14 square - Hassalblad
Medium Format
Lens
80mm Normal
Light Source
Strobe with Softbox
Meter
Handheld Incident
Tripod
Yes
Filters
None
7302019 Heinrich Melanie - Studio Lighting Workbook
httpslidepdfcomreaderfullheinrich-melanie-studio-lighting-workbook 7989
The image above will give you an idea of how to light
small objects in a room or on a set You can make
objects pop out that are a very small part of the sceneFor example the color in this image is something you
really want to show but each of the objects must be
placed and lit properly to portray the beauty of their
colors Small strobes with funnel snoots will spotlight
only the objects you are interested in The blue
background color was chosen as a color complement to
the colors in the glass
TIP A snoot can be made from a rolled piece of
poster board into the shape of a cone You can also
buy these cones to fit on the strobe Be careful if using
poster board as the lights can get very hot
Take a large piece of poster board and roll it into a
cylinder shape Fig 1 Tape the center of the cylinder
then expand one end and decrease the opposite end of
the cylinder Fig 2 Make the expanded end large
enough to fit over the strobe head The other end of
the cylinder should be small enough to direct the light
at whatever object you want to be lighting The size of
the smaller hole will dictate the angle of the light
pointed at the object
Fig 1 Fig 2
7302019 Heinrich Melanie - Studio Lighting Workbook
httpslidepdfcomreaderfullheinrich-melanie-studio-lighting-workbook 8089
WARNING
DO NOT USE POSTER BOARD CONES WITH
TUNGSTEN LIGHTS The chance of fire is far too
great NEVER leave powered lights unattended
The glass objects in the photograph above have had the
light pushed directly through them When the light
passes through the colors are revealed
Shooting glass with liquid in it is described in the
diagram below The softbox is placed directly above the
set and slightly tilted away from the camera With the
liquid in the glass place a reflector card behind the
liquid only Looking through the camera lens make sure
the card does not extend past the liquid above or to the
sides Tip the card backwards so it picks up some of the
light falling down from the softbox This will illuminate
the liquid giving it a glowing appearance
7302019 Heinrich Melanie - Studio Lighting Workbook
httpslidepdfcomreaderfullheinrich-melanie-studio-lighting-workbook 8189
Your background can be any color detail or density when
using this reflector card
7302019 Heinrich Melanie - Studio Lighting Workbook
httpslidepdfcomreaderfullheinrich-melanie-studio-lighting-workbook 8289
Messages in a Still Life
Film
Ektachrome 100
Camera Format
35mm - Nikon
Small Format
Lens
50mm Normal
Light Source
Strobe with Softbox
Meter
Handheld Incident
Tripod
Yes
Filters
5 Red CC Filter
7302019 Heinrich Melanie - Studio Lighting Workbook
httpslidepdfcomreaderfullheinrich-melanie-studio-lighting-workbook 8389
The above image sends a message of peace and
comfort to its viewer in a couple of different
methods
One method is achieved by the type of lighting
used (In this case a strobe within a softbox) A warm
glow of very soft light is scraping horizontally
across the image and highlights fall on the outer
pages of the book It has a golden quality Another
method is achieved by using a number 5 CC filter
over the camera lens This accents the rich red color
in the roses with their saturated hue and balances
perfectly with the gold color in the pages as well as
the reddish-brown boards that they sit on
TIP ~
A red or orange transparent gel in an acetate sheet
form could be placed over the softbox to warm the
color pushed into the set
The background falls off into black holding the
viewers eye on the bible and the perfectly balanced
roses
This was shot with a softbox to the right of the scene
with no fill cards or fill lights The main light source
is close to the subject so the light falls off very little
When the light is positioned close to the subject its effect
on the oppiste side is minimal
7302019 Heinrich Melanie - Studio Lighting Workbook
httpslidepdfcomreaderfullheinrich-melanie-studio-lighting-workbook 8489
Using light color balance and the right props this
image conveys both warmth and love The main
subject is the bible The roses are used to convey a
feeling of love If instead of roses guns were used as
props the message would be entirley different
perhaps of violence Props can make or break
your image
7302019 Heinrich Melanie - Studio Lighting Workbook
httpslidepdfcomreaderfullheinrich-melanie-studio-lighting-workbook 8589
Creating a Mood
Film
Ektachrome 100
Camera Format
35mm - Nikon
Small Format
Lens
50mm Normal
Light Source
Strobes and reflectors
Meter
Handheld Incident
Tripod
No
Filters
None
7302019 Heinrich Melanie - Studio Lighting Workbook
httpslidepdfcomreaderfullheinrich-melanie-studio-lighting-workbook 8689
Making a statement with your photography should
be foremost in your mind The image above tells us ~
bedroom lovers intimacy passion etc It is up to
our imagination to fill in the blanks You have only a
few moments to convey your message so be careful
not to be too subtle yet not so blatant that your
message is visually insulting
The location in this shot was specifically chosen
Shot on a wooden floor a rustic authenticity is
portrayed A cowboy feel was achieved with these
surrounding elements The lingerie casually draped
over the boots looks accidental and unplanned The
boot that is tipped over leads the viewer to believe an
impetuous moment of hurried passion is taking
place The background is evident but intentionally
made out of focus by shooting at f4 for shallow
depth of field
This image is far from haphazard It was planned
from layout to location to scouting to objectplacement The idea came first then the execution of
the image Although minor alterations of layouts are
common the concept will remain the same This
eliminates confusion by isolating one idea and
working it through from all directions
Scouting out locations can be a full-time job and you
may need special permission to shoot in a particular
place See property release in the Legal Forms
section to cover your legal requirements and release
forms
7302019 Heinrich Melanie - Studio Lighting Workbook
httpslidepdfcomreaderfullheinrich-melanie-studio-lighting-workbook 8789
This kind of image will work very well for an adselling lingerie A strobe light with a softbox was
used to light the boots and the lingerie from the
right A reflector card was placed close to the boots
to fill in the left side of the scene The light is
positioned low near the floor which scrapes the light
on a low plan This was placed to simulate a specific
time during the day sunset or early evening The
light at this time is warm in color value which adds
to the subject matters message The camera vantage
point is low also bringing the viewer into intimate
contact with the boots and lingerie
7302019 Heinrich Melanie - Studio Lighting Workbook
httpslidepdfcomreaderfullheinrich-melanie-studio-lighting-workbook 8889
Still Lifes Selling Products
Film
Ektachrome 100
Camera Format
2 14 square - Hassalblad
Medium Format
Lens
80mm Normal
Light Source
Strobe with Softbox
Meter
Handheld Incident
Tripod
Yes
FiltersNone
7302019 Heinrich Melanie - Studio Lighting Workbook
httpslidepdfcomreaderfullheinrich-melanie-studio-lighting-workbook 8989
Placement and staging of objects requires a thought-out layout and planned
execution when using multiple products Layering has been used in this image
where non-information has been overlapped for example where the licence
plates and shirts touch Your viewer does not need to see the entire object in
this case to know what it is Strong diagonal lines have been made by object
placement This helps pull the viewer through the image and leads the eye to
a specific area of an image This image was created to find funding for
Vietnam vets by selling these products
If you have been asked to shoot several products and put them all into one
image think of it in terms of a still life setting Larger items will be placed inthe background sometimes even being used as the background For example
picture a group of images all representing something American The
background for this scene could be a flag which is also one of the subjects
There is no need to see the entire flag because it is an easily recognizable icon
In the image above the wooden floor was used to add a sense of the rustic and
gritty realism of the Vietnam war It was lit with a softbox directly above the
subjects The aperture was a concern for foreground to background
sharpness so the camera was pulled back far enough from the scene to allow
for a large aperture of around f 56
Below is the final image This was dropped into a 3 fold 812 x 4 brochure
along with other images of the same sort

7302019 Heinrich Melanie - Studio Lighting Workbook
httpslidepdfcomreaderfullheinrich-melanie-studio-lighting-workbook 7189
you pull your entire learning experience
together I include details and diagrams
that will reinforce your understanding
Still life scenes are often used in a designers
set or in a showroom like in a furniture
store They can also be used to convey a
story quickly and help transfer the concept
and idea throughout the entire image These
lessons include tips on how to light objects
in small and detailed areas They will help
7302019 Heinrich Melanie - Studio Lighting Workbook
httpslidepdfcomreaderfullheinrich-melanie-studio-lighting-workbook 7289
Mixing Texture Shapes and Color
Film
Ektachrome 100
Camera Format
4 x 5 - Horsemen
Large Format View
Camera
Lens
150mm Normal
Light Source
Strobe with Softbox
MeterHandheld Incident
Tripod
Yes
Filters
None
7302019 Heinrich Melanie - Studio Lighting Workbook
httpslidepdfcomreaderfullheinrich-melanie-studio-lighting-workbook 7389
The image above was shot as a portfolio piece
Mixing textures shapes and colors the
photograph displays the photographers eye for
design It is photographed on black velvet which
adds saturation of the overall appearance by
absorbing all the light that falls on it The black
velvet can be purchased at any fabric store
Two scarves are positioned at opposing angles
adding strong graphic interest and competition
between them Against the soft colored scarves
the dark blue hat pops out The colored markers
are color complements to the blue hat and add
additional depth to the image
Resting on top of the scarves are brightly
colored objects which add spots of color andinterest The curvy lines of the ribbons break up
the edges of the two scarves and add a bit of fun
to the image The final crop of the image forces
the viewer to see the positive and negative
spaces of color within the frame Cropping plays
an important role in the success of your image
How the image was photographed ~
One main strobe light was used It was shot
through a softbox or mylar scrim Several white
and silver reflector cards surrounding the setbounced in a soft fill light Using the reflectors
as fill light evens out the overall appearance
without eliminating the direction of the main
light The shadows in the image are soft and
reveal more texture in the scarf
Minimal if any depth-of-field was needed in
this image so it was exposed at f56 The meter
reading is taken with an incident meter and
pointed directly at the camera Several readings
were taken of the entire image For example a
meter reading was taken of the light falling onthe hat the tip of the triangular scarf and the
black corners of the velvet before an exposure
was chosen A range of only 1 stop was allowed
between these exposure readings Reposition
your reflecting cards either closer or further
7302019 Heinrich Melanie - Studio Lighting Workbook
httpslidepdfcomreaderfullheinrich-melanie-studio-lighting-workbook 7489
from your subject to adjust the exposure
variations Your final exposure choice will be of
the area in the scene that is the brightest or
where the most light is falling If your exposure
variations are between f16 and f11 f16
indicates the brightest area in the scene You
should know this at this point in your educationIf you dont go back to the Camera Basics
section and read over the lessons Choosing f16
will prevent overexposure to the lighter areas in
your scene The camera was positioned directly
over the top of the set using a tripod Make sure
your tripod is capable of supporting your
camera in these unusual positions
Pick three or four objects that work well
together Lay them out on a solid colored
background in an interesting design pattern
Position your camera lights and reflectors
Using a color transparency film bracket your
frames as you shoot
Final crop of image
reflector
reflector
7302019 Heinrich Melanie - Studio Lighting Workbook
httpslidepdfcomreaderfullheinrich-melanie-studio-lighting-workbook 7589
Arranging a Set
Film
VPS 100 - Color Negative
Camera Format
2 14 square - Hasselblad
Medium Format
Lens
80mm Normal
Light Source
Strobe with Softbox
Meter
Handheld Incident
Tripod
Yes
Filters
None
7302019 Heinrich Melanie - Studio Lighting Workbook
httpslidepdfcomreaderfullheinrich-melanie-studio-lighting-workbook 7689
Within each image there can exist sets that pull the
entire image together The image above is an example
of one of these small sets The set is staged for a period
in time
Some professionals hire stylists to set something like
this up Background information helps convey a
message in the overall scene For example suppose you
are shooting the interior spaces of a Victorian home
and your client wants to place the product in the late
1800s Objects in the photo above will help transport
your viewer into that time in history Props are a very
important part in convincing your viewer of a place in
time You can find props at antique stores for this kind
of scene Time period images must be authentic down
to the smallest details Hire a historian for accuracy if
needed
Magazines use small inset photos that display intricate
details of settings They may not be set against a black
background as in the photograph above The
background should be dimly lit or out of focus to
help accent the subject Shallow depth of field and
object placement will work together to make your
image successful
One main strobe light was used in the photograph
above with no fill lights or reflectors This drops the
background of black velvet into black making it a
perfect place for white text Remember an
editor or designer usually needs to add type and will
need this space
7302019 Heinrich Melanie - Studio Lighting Workbook
httpslidepdfcomreaderfullheinrich-melanie-studio-lighting-workbook 7789
Still lifes have been used in fine art for many years The
image above happens to be found in nature but could
have just as easily have been set up in a studio The
arrangement of the plates and glass objects can be
emulated in the studio or in a set I have included this
image to show you that what you find most naturally in
life is how you should set up a scene whether in the
studio or on location Take your camera into the world
around you and shoot small stories such as the one
above These still lifes will help you to stylize your own
setups This lesson will help you learn how to crop and
balance your images Pay close attention to the light
falling on the objects in your scenes Follow the previous
example to determine the proper exposure of your film
Be deliberate when you consider the photographs you
will take Take your time
Remember to see within the boundaries of your frame
balancing objects from front to back side to side and
corner to corner See Visual Basics for more
information on setting an objects position within the
frame
7302019 Heinrich Melanie - Studio Lighting Workbook
httpslidepdfcomreaderfullheinrich-melanie-studio-lighting-workbook 7889
Photographing Beautiful Glass
Film
VPS 100 - Color Negative
Camera Format
2 14 square - Hassalblad
Medium Format
Lens
80mm Normal
Light Source
Strobe with Softbox
Meter
Handheld Incident
Tripod
Yes
Filters
None
7302019 Heinrich Melanie - Studio Lighting Workbook
httpslidepdfcomreaderfullheinrich-melanie-studio-lighting-workbook 7989
The image above will give you an idea of how to light
small objects in a room or on a set You can make
objects pop out that are a very small part of the sceneFor example the color in this image is something you
really want to show but each of the objects must be
placed and lit properly to portray the beauty of their
colors Small strobes with funnel snoots will spotlight
only the objects you are interested in The blue
background color was chosen as a color complement to
the colors in the glass
TIP A snoot can be made from a rolled piece of
poster board into the shape of a cone You can also
buy these cones to fit on the strobe Be careful if using
poster board as the lights can get very hot
Take a large piece of poster board and roll it into a
cylinder shape Fig 1 Tape the center of the cylinder
then expand one end and decrease the opposite end of
the cylinder Fig 2 Make the expanded end large
enough to fit over the strobe head The other end of
the cylinder should be small enough to direct the light
at whatever object you want to be lighting The size of
the smaller hole will dictate the angle of the light
pointed at the object
Fig 1 Fig 2
7302019 Heinrich Melanie - Studio Lighting Workbook
httpslidepdfcomreaderfullheinrich-melanie-studio-lighting-workbook 8089
WARNING
DO NOT USE POSTER BOARD CONES WITH
TUNGSTEN LIGHTS The chance of fire is far too
great NEVER leave powered lights unattended
The glass objects in the photograph above have had the
light pushed directly through them When the light
passes through the colors are revealed
Shooting glass with liquid in it is described in the
diagram below The softbox is placed directly above the
set and slightly tilted away from the camera With the
liquid in the glass place a reflector card behind the
liquid only Looking through the camera lens make sure
the card does not extend past the liquid above or to the
sides Tip the card backwards so it picks up some of the
light falling down from the softbox This will illuminate
the liquid giving it a glowing appearance
7302019 Heinrich Melanie - Studio Lighting Workbook
httpslidepdfcomreaderfullheinrich-melanie-studio-lighting-workbook 8189
Your background can be any color detail or density when
using this reflector card
7302019 Heinrich Melanie - Studio Lighting Workbook
httpslidepdfcomreaderfullheinrich-melanie-studio-lighting-workbook 8289
Messages in a Still Life
Film
Ektachrome 100
Camera Format
35mm - Nikon
Small Format
Lens
50mm Normal
Light Source
Strobe with Softbox
Meter
Handheld Incident
Tripod
Yes
Filters
5 Red CC Filter
7302019 Heinrich Melanie - Studio Lighting Workbook
httpslidepdfcomreaderfullheinrich-melanie-studio-lighting-workbook 8389
The above image sends a message of peace and
comfort to its viewer in a couple of different
methods
One method is achieved by the type of lighting
used (In this case a strobe within a softbox) A warm
glow of very soft light is scraping horizontally
across the image and highlights fall on the outer
pages of the book It has a golden quality Another
method is achieved by using a number 5 CC filter
over the camera lens This accents the rich red color
in the roses with their saturated hue and balances
perfectly with the gold color in the pages as well as
the reddish-brown boards that they sit on
TIP ~
A red or orange transparent gel in an acetate sheet
form could be placed over the softbox to warm the
color pushed into the set
The background falls off into black holding the
viewers eye on the bible and the perfectly balanced
roses
This was shot with a softbox to the right of the scene
with no fill cards or fill lights The main light source
is close to the subject so the light falls off very little
When the light is positioned close to the subject its effect
on the oppiste side is minimal
7302019 Heinrich Melanie - Studio Lighting Workbook
httpslidepdfcomreaderfullheinrich-melanie-studio-lighting-workbook 8489
Using light color balance and the right props this
image conveys both warmth and love The main
subject is the bible The roses are used to convey a
feeling of love If instead of roses guns were used as
props the message would be entirley different
perhaps of violence Props can make or break
your image
7302019 Heinrich Melanie - Studio Lighting Workbook
httpslidepdfcomreaderfullheinrich-melanie-studio-lighting-workbook 8589
Creating a Mood
Film
Ektachrome 100
Camera Format
35mm - Nikon
Small Format
Lens
50mm Normal
Light Source
Strobes and reflectors
Meter
Handheld Incident
Tripod
No
Filters
None
7302019 Heinrich Melanie - Studio Lighting Workbook
httpslidepdfcomreaderfullheinrich-melanie-studio-lighting-workbook 8689
Making a statement with your photography should
be foremost in your mind The image above tells us ~
bedroom lovers intimacy passion etc It is up to
our imagination to fill in the blanks You have only a
few moments to convey your message so be careful
not to be too subtle yet not so blatant that your
message is visually insulting
The location in this shot was specifically chosen
Shot on a wooden floor a rustic authenticity is
portrayed A cowboy feel was achieved with these
surrounding elements The lingerie casually draped
over the boots looks accidental and unplanned The
boot that is tipped over leads the viewer to believe an
impetuous moment of hurried passion is taking
place The background is evident but intentionally
made out of focus by shooting at f4 for shallow
depth of field
This image is far from haphazard It was planned
from layout to location to scouting to objectplacement The idea came first then the execution of
the image Although minor alterations of layouts are
common the concept will remain the same This
eliminates confusion by isolating one idea and
working it through from all directions
Scouting out locations can be a full-time job and you
may need special permission to shoot in a particular
place See property release in the Legal Forms
section to cover your legal requirements and release
forms
7302019 Heinrich Melanie - Studio Lighting Workbook
httpslidepdfcomreaderfullheinrich-melanie-studio-lighting-workbook 8789
This kind of image will work very well for an adselling lingerie A strobe light with a softbox was
used to light the boots and the lingerie from the
right A reflector card was placed close to the boots
to fill in the left side of the scene The light is
positioned low near the floor which scrapes the light
on a low plan This was placed to simulate a specific
time during the day sunset or early evening The
light at this time is warm in color value which adds
to the subject matters message The camera vantage
point is low also bringing the viewer into intimate
contact with the boots and lingerie
7302019 Heinrich Melanie - Studio Lighting Workbook
httpslidepdfcomreaderfullheinrich-melanie-studio-lighting-workbook 8889
Still Lifes Selling Products
Film
Ektachrome 100
Camera Format
2 14 square - Hassalblad
Medium Format
Lens
80mm Normal
Light Source
Strobe with Softbox
Meter
Handheld Incident
Tripod
Yes
FiltersNone
7302019 Heinrich Melanie - Studio Lighting Workbook
httpslidepdfcomreaderfullheinrich-melanie-studio-lighting-workbook 8989
Placement and staging of objects requires a thought-out layout and planned
execution when using multiple products Layering has been used in this image
where non-information has been overlapped for example where the licence
plates and shirts touch Your viewer does not need to see the entire object in
this case to know what it is Strong diagonal lines have been made by object
placement This helps pull the viewer through the image and leads the eye to
a specific area of an image This image was created to find funding for
Vietnam vets by selling these products
If you have been asked to shoot several products and put them all into one
image think of it in terms of a still life setting Larger items will be placed inthe background sometimes even being used as the background For example
picture a group of images all representing something American The
background for this scene could be a flag which is also one of the subjects
There is no need to see the entire flag because it is an easily recognizable icon
In the image above the wooden floor was used to add a sense of the rustic and
gritty realism of the Vietnam war It was lit with a softbox directly above the
subjects The aperture was a concern for foreground to background
sharpness so the camera was pulled back far enough from the scene to allow
for a large aperture of around f 56
Below is the final image This was dropped into a 3 fold 812 x 4 brochure
along with other images of the same sort
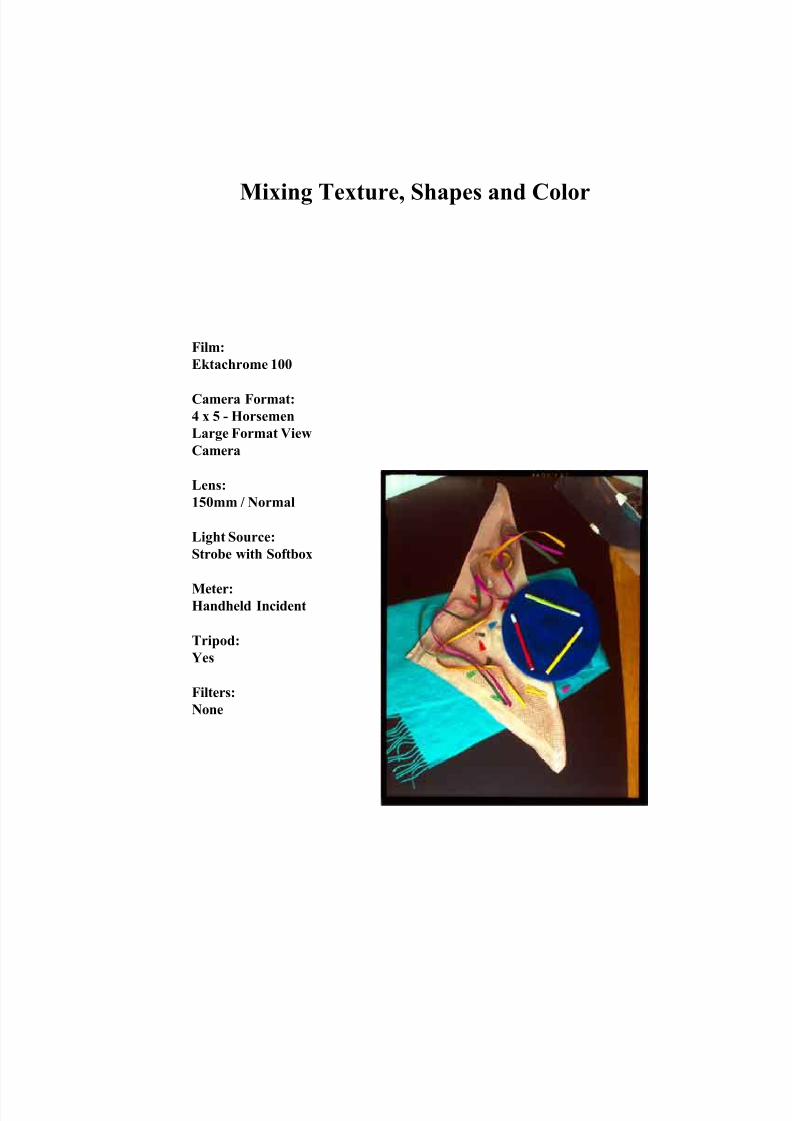
7302019 Heinrich Melanie - Studio Lighting Workbook
httpslidepdfcomreaderfullheinrich-melanie-studio-lighting-workbook 7489
from your subject to adjust the exposure
variations Your final exposure choice will be of
the area in the scene that is the brightest or
where the most light is falling If your exposure
variations are between f16 and f11 f16
indicates the brightest area in the scene You
should know this at this point in your educationIf you dont go back to the Camera Basics
section and read over the lessons Choosing f16
will prevent overexposure to the lighter areas in
your scene The camera was positioned directly
over the top of the set using a tripod Make sure
your tripod is capable of supporting your
camera in these unusual positions
Pick three or four objects that work well
together Lay them out on a solid colored
background in an interesting design pattern
Position your camera lights and reflectors
Using a color transparency film bracket your
frames as you shoot
Final crop of image
reflector
reflector
7302019 Heinrich Melanie - Studio Lighting Workbook
httpslidepdfcomreaderfullheinrich-melanie-studio-lighting-workbook 7589
Arranging a Set
Film
VPS 100 - Color Negative
Camera Format
2 14 square - Hasselblad
Medium Format
Lens
80mm Normal
Light Source
Strobe with Softbox
Meter
Handheld Incident
Tripod
Yes
Filters
None
7302019 Heinrich Melanie - Studio Lighting Workbook
httpslidepdfcomreaderfullheinrich-melanie-studio-lighting-workbook 7689
Within each image there can exist sets that pull the
entire image together The image above is an example
of one of these small sets The set is staged for a period
in time
Some professionals hire stylists to set something like
this up Background information helps convey a
message in the overall scene For example suppose you
are shooting the interior spaces of a Victorian home
and your client wants to place the product in the late
1800s Objects in the photo above will help transport
your viewer into that time in history Props are a very
important part in convincing your viewer of a place in
time You can find props at antique stores for this kind
of scene Time period images must be authentic down
to the smallest details Hire a historian for accuracy if
needed
Magazines use small inset photos that display intricate
details of settings They may not be set against a black
background as in the photograph above The
background should be dimly lit or out of focus to
help accent the subject Shallow depth of field and
object placement will work together to make your
image successful
One main strobe light was used in the photograph
above with no fill lights or reflectors This drops the
background of black velvet into black making it a
perfect place for white text Remember an
editor or designer usually needs to add type and will
need this space
7302019 Heinrich Melanie - Studio Lighting Workbook
httpslidepdfcomreaderfullheinrich-melanie-studio-lighting-workbook 7789
Still lifes have been used in fine art for many years The
image above happens to be found in nature but could
have just as easily have been set up in a studio The
arrangement of the plates and glass objects can be
emulated in the studio or in a set I have included this
image to show you that what you find most naturally in
life is how you should set up a scene whether in the
studio or on location Take your camera into the world
around you and shoot small stories such as the one
above These still lifes will help you to stylize your own
setups This lesson will help you learn how to crop and
balance your images Pay close attention to the light
falling on the objects in your scenes Follow the previous
example to determine the proper exposure of your film
Be deliberate when you consider the photographs you
will take Take your time
Remember to see within the boundaries of your frame
balancing objects from front to back side to side and
corner to corner See Visual Basics for more
information on setting an objects position within the
frame
7302019 Heinrich Melanie - Studio Lighting Workbook
httpslidepdfcomreaderfullheinrich-melanie-studio-lighting-workbook 7889
Photographing Beautiful Glass
Film
VPS 100 - Color Negative
Camera Format
2 14 square - Hassalblad
Medium Format
Lens
80mm Normal
Light Source
Strobe with Softbox
Meter
Handheld Incident
Tripod
Yes
Filters
None
7302019 Heinrich Melanie - Studio Lighting Workbook
httpslidepdfcomreaderfullheinrich-melanie-studio-lighting-workbook 7989
The image above will give you an idea of how to light
small objects in a room or on a set You can make
objects pop out that are a very small part of the sceneFor example the color in this image is something you
really want to show but each of the objects must be
placed and lit properly to portray the beauty of their
colors Small strobes with funnel snoots will spotlight
only the objects you are interested in The blue
background color was chosen as a color complement to
the colors in the glass
TIP A snoot can be made from a rolled piece of
poster board into the shape of a cone You can also
buy these cones to fit on the strobe Be careful if using
poster board as the lights can get very hot
Take a large piece of poster board and roll it into a
cylinder shape Fig 1 Tape the center of the cylinder
then expand one end and decrease the opposite end of
the cylinder Fig 2 Make the expanded end large
enough to fit over the strobe head The other end of
the cylinder should be small enough to direct the light
at whatever object you want to be lighting The size of
the smaller hole will dictate the angle of the light
pointed at the object
Fig 1 Fig 2
7302019 Heinrich Melanie - Studio Lighting Workbook
httpslidepdfcomreaderfullheinrich-melanie-studio-lighting-workbook 8089
WARNING
DO NOT USE POSTER BOARD CONES WITH
TUNGSTEN LIGHTS The chance of fire is far too
great NEVER leave powered lights unattended
The glass objects in the photograph above have had the
light pushed directly through them When the light
passes through the colors are revealed
Shooting glass with liquid in it is described in the
diagram below The softbox is placed directly above the
set and slightly tilted away from the camera With the
liquid in the glass place a reflector card behind the
liquid only Looking through the camera lens make sure
the card does not extend past the liquid above or to the
sides Tip the card backwards so it picks up some of the
light falling down from the softbox This will illuminate
the liquid giving it a glowing appearance
7302019 Heinrich Melanie - Studio Lighting Workbook
httpslidepdfcomreaderfullheinrich-melanie-studio-lighting-workbook 8189
Your background can be any color detail or density when
using this reflector card
7302019 Heinrich Melanie - Studio Lighting Workbook
httpslidepdfcomreaderfullheinrich-melanie-studio-lighting-workbook 8289
Messages in a Still Life
Film
Ektachrome 100
Camera Format
35mm - Nikon
Small Format
Lens
50mm Normal
Light Source
Strobe with Softbox
Meter
Handheld Incident
Tripod
Yes
Filters
5 Red CC Filter
7302019 Heinrich Melanie - Studio Lighting Workbook
httpslidepdfcomreaderfullheinrich-melanie-studio-lighting-workbook 8389
The above image sends a message of peace and
comfort to its viewer in a couple of different
methods
One method is achieved by the type of lighting
used (In this case a strobe within a softbox) A warm
glow of very soft light is scraping horizontally
across the image and highlights fall on the outer
pages of the book It has a golden quality Another
method is achieved by using a number 5 CC filter
over the camera lens This accents the rich red color
in the roses with their saturated hue and balances
perfectly with the gold color in the pages as well as
the reddish-brown boards that they sit on
TIP ~
A red or orange transparent gel in an acetate sheet
form could be placed over the softbox to warm the
color pushed into the set
The background falls off into black holding the
viewers eye on the bible and the perfectly balanced
roses
This was shot with a softbox to the right of the scene
with no fill cards or fill lights The main light source
is close to the subject so the light falls off very little
When the light is positioned close to the subject its effect
on the oppiste side is minimal
7302019 Heinrich Melanie - Studio Lighting Workbook
httpslidepdfcomreaderfullheinrich-melanie-studio-lighting-workbook 8489
Using light color balance and the right props this
image conveys both warmth and love The main
subject is the bible The roses are used to convey a
feeling of love If instead of roses guns were used as
props the message would be entirley different
perhaps of violence Props can make or break
your image
7302019 Heinrich Melanie - Studio Lighting Workbook
httpslidepdfcomreaderfullheinrich-melanie-studio-lighting-workbook 8589
Creating a Mood
Film
Ektachrome 100
Camera Format
35mm - Nikon
Small Format
Lens
50mm Normal
Light Source
Strobes and reflectors
Meter
Handheld Incident
Tripod
No
Filters
None
7302019 Heinrich Melanie - Studio Lighting Workbook
httpslidepdfcomreaderfullheinrich-melanie-studio-lighting-workbook 8689
Making a statement with your photography should
be foremost in your mind The image above tells us ~
bedroom lovers intimacy passion etc It is up to
our imagination to fill in the blanks You have only a
few moments to convey your message so be careful
not to be too subtle yet not so blatant that your
message is visually insulting
The location in this shot was specifically chosen
Shot on a wooden floor a rustic authenticity is
portrayed A cowboy feel was achieved with these
surrounding elements The lingerie casually draped
over the boots looks accidental and unplanned The
boot that is tipped over leads the viewer to believe an
impetuous moment of hurried passion is taking
place The background is evident but intentionally
made out of focus by shooting at f4 for shallow
depth of field
This image is far from haphazard It was planned
from layout to location to scouting to objectplacement The idea came first then the execution of
the image Although minor alterations of layouts are
common the concept will remain the same This
eliminates confusion by isolating one idea and
working it through from all directions
Scouting out locations can be a full-time job and you
may need special permission to shoot in a particular
place See property release in the Legal Forms
section to cover your legal requirements and release
forms
7302019 Heinrich Melanie - Studio Lighting Workbook
httpslidepdfcomreaderfullheinrich-melanie-studio-lighting-workbook 8789
This kind of image will work very well for an adselling lingerie A strobe light with a softbox was
used to light the boots and the lingerie from the
right A reflector card was placed close to the boots
to fill in the left side of the scene The light is
positioned low near the floor which scrapes the light
on a low plan This was placed to simulate a specific
time during the day sunset or early evening The
light at this time is warm in color value which adds
to the subject matters message The camera vantage
point is low also bringing the viewer into intimate
contact with the boots and lingerie
7302019 Heinrich Melanie - Studio Lighting Workbook
httpslidepdfcomreaderfullheinrich-melanie-studio-lighting-workbook 8889
Still Lifes Selling Products
Film
Ektachrome 100
Camera Format
2 14 square - Hassalblad
Medium Format
Lens
80mm Normal
Light Source
Strobe with Softbox
Meter
Handheld Incident
Tripod
Yes
FiltersNone
7302019 Heinrich Melanie - Studio Lighting Workbook
httpslidepdfcomreaderfullheinrich-melanie-studio-lighting-workbook 8989
Placement and staging of objects requires a thought-out layout and planned
execution when using multiple products Layering has been used in this image
where non-information has been overlapped for example where the licence
plates and shirts touch Your viewer does not need to see the entire object in
this case to know what it is Strong diagonal lines have been made by object
placement This helps pull the viewer through the image and leads the eye to
a specific area of an image This image was created to find funding for
Vietnam vets by selling these products
If you have been asked to shoot several products and put them all into one
image think of it in terms of a still life setting Larger items will be placed inthe background sometimes even being used as the background For example
picture a group of images all representing something American The
background for this scene could be a flag which is also one of the subjects
There is no need to see the entire flag because it is an easily recognizable icon
In the image above the wooden floor was used to add a sense of the rustic and
gritty realism of the Vietnam war It was lit with a softbox directly above the
subjects The aperture was a concern for foreground to background
sharpness so the camera was pulled back far enough from the scene to allow
for a large aperture of around f 56
Below is the final image This was dropped into a 3 fold 812 x 4 brochure
along with other images of the same sort
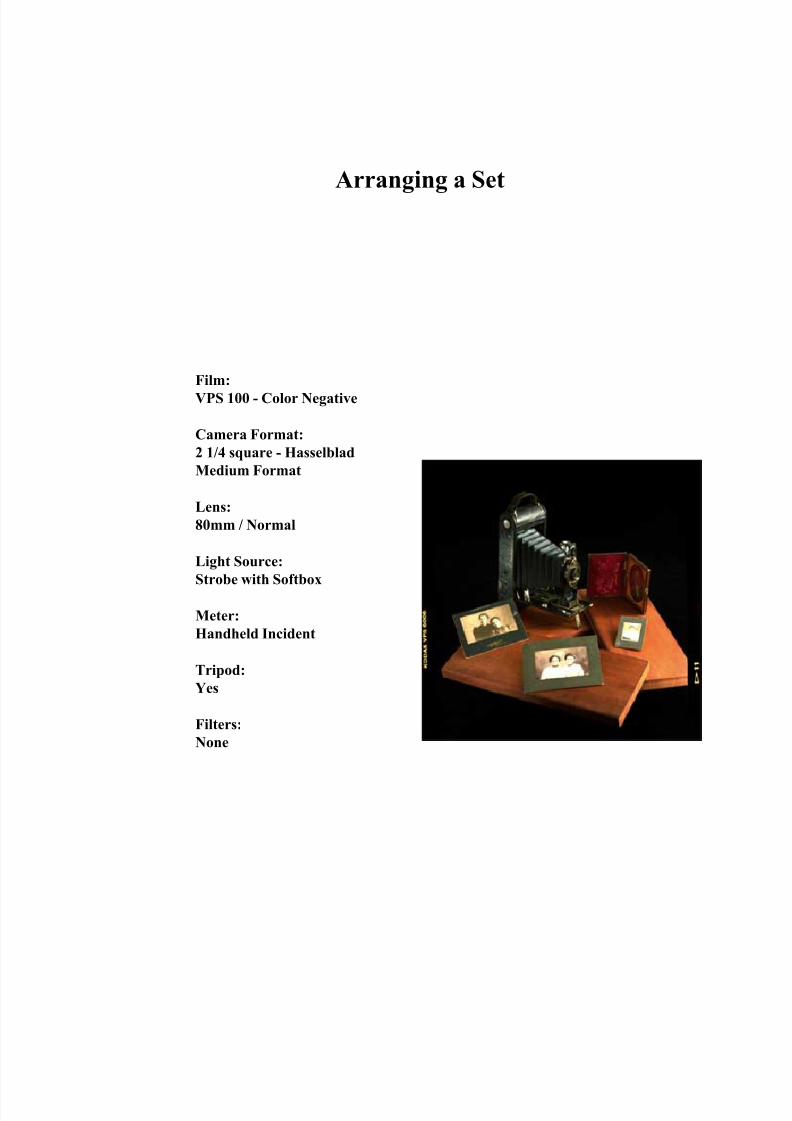
7302019 Heinrich Melanie - Studio Lighting Workbook
httpslidepdfcomreaderfullheinrich-melanie-studio-lighting-workbook 7889
Photographing Beautiful Glass
Film
VPS 100 - Color Negative
Camera Format
2 14 square - Hassalblad
Medium Format
Lens
80mm Normal
Light Source
Strobe with Softbox
Meter
Handheld Incident
Tripod
Yes
Filters
None
7302019 Heinrich Melanie - Studio Lighting Workbook
httpslidepdfcomreaderfullheinrich-melanie-studio-lighting-workbook 7989
The image above will give you an idea of how to light
small objects in a room or on a set You can make
objects pop out that are a very small part of the sceneFor example the color in this image is something you
really want to show but each of the objects must be
placed and lit properly to portray the beauty of their
colors Small strobes with funnel snoots will spotlight
only the objects you are interested in The blue
background color was chosen as a color complement to
the colors in the glass
TIP A snoot can be made from a rolled piece of
poster board into the shape of a cone You can also
buy these cones to fit on the strobe Be careful if using
poster board as the lights can get very hot
Take a large piece of poster board and roll it into a
cylinder shape Fig 1 Tape the center of the cylinder
then expand one end and decrease the opposite end of
the cylinder Fig 2 Make the expanded end large
enough to fit over the strobe head The other end of
the cylinder should be small enough to direct the light
at whatever object you want to be lighting The size of
the smaller hole will dictate the angle of the light
pointed at the object
Fig 1 Fig 2
7302019 Heinrich Melanie - Studio Lighting Workbook
httpslidepdfcomreaderfullheinrich-melanie-studio-lighting-workbook 8089
WARNING
DO NOT USE POSTER BOARD CONES WITH
TUNGSTEN LIGHTS The chance of fire is far too
great NEVER leave powered lights unattended
The glass objects in the photograph above have had the
light pushed directly through them When the light
passes through the colors are revealed
Shooting glass with liquid in it is described in the
diagram below The softbox is placed directly above the
set and slightly tilted away from the camera With the
liquid in the glass place a reflector card behind the
liquid only Looking through the camera lens make sure
the card does not extend past the liquid above or to the
sides Tip the card backwards so it picks up some of the
light falling down from the softbox This will illuminate
the liquid giving it a glowing appearance
7302019 Heinrich Melanie - Studio Lighting Workbook
httpslidepdfcomreaderfullheinrich-melanie-studio-lighting-workbook 8189
Your background can be any color detail or density when
using this reflector card
7302019 Heinrich Melanie - Studio Lighting Workbook
httpslidepdfcomreaderfullheinrich-melanie-studio-lighting-workbook 8289
Messages in a Still Life
Film
Ektachrome 100
Camera Format
35mm - Nikon
Small Format
Lens
50mm Normal
Light Source
Strobe with Softbox
Meter
Handheld Incident
Tripod
Yes
Filters
5 Red CC Filter
7302019 Heinrich Melanie - Studio Lighting Workbook
httpslidepdfcomreaderfullheinrich-melanie-studio-lighting-workbook 8389
The above image sends a message of peace and
comfort to its viewer in a couple of different
methods
One method is achieved by the type of lighting
used (In this case a strobe within a softbox) A warm
glow of very soft light is scraping horizontally
across the image and highlights fall on the outer
pages of the book It has a golden quality Another
method is achieved by using a number 5 CC filter
over the camera lens This accents the rich red color
in the roses with their saturated hue and balances
perfectly with the gold color in the pages as well as
the reddish-brown boards that they sit on
TIP ~
A red or orange transparent gel in an acetate sheet
form could be placed over the softbox to warm the
color pushed into the set
The background falls off into black holding the
viewers eye on the bible and the perfectly balanced
roses
This was shot with a softbox to the right of the scene
with no fill cards or fill lights The main light source
is close to the subject so the light falls off very little
When the light is positioned close to the subject its effect
on the oppiste side is minimal
7302019 Heinrich Melanie - Studio Lighting Workbook
httpslidepdfcomreaderfullheinrich-melanie-studio-lighting-workbook 8489
Using light color balance and the right props this
image conveys both warmth and love The main
subject is the bible The roses are used to convey a
feeling of love If instead of roses guns were used as
props the message would be entirley different
perhaps of violence Props can make or break
your image
7302019 Heinrich Melanie - Studio Lighting Workbook
httpslidepdfcomreaderfullheinrich-melanie-studio-lighting-workbook 8589
Creating a Mood
Film
Ektachrome 100
Camera Format
35mm - Nikon
Small Format
Lens
50mm Normal
Light Source
Strobes and reflectors
Meter
Handheld Incident
Tripod
No
Filters
None
7302019 Heinrich Melanie - Studio Lighting Workbook
httpslidepdfcomreaderfullheinrich-melanie-studio-lighting-workbook 8689
Making a statement with your photography should
be foremost in your mind The image above tells us ~
bedroom lovers intimacy passion etc It is up to
our imagination to fill in the blanks You have only a
few moments to convey your message so be careful
not to be too subtle yet not so blatant that your
message is visually insulting
The location in this shot was specifically chosen
Shot on a wooden floor a rustic authenticity is
portrayed A cowboy feel was achieved with these
surrounding elements The lingerie casually draped
over the boots looks accidental and unplanned The
boot that is tipped over leads the viewer to believe an
impetuous moment of hurried passion is taking
place The background is evident but intentionally
made out of focus by shooting at f4 for shallow
depth of field
This image is far from haphazard It was planned
from layout to location to scouting to objectplacement The idea came first then the execution of
the image Although minor alterations of layouts are
common the concept will remain the same This
eliminates confusion by isolating one idea and
working it through from all directions
Scouting out locations can be a full-time job and you
may need special permission to shoot in a particular
place See property release in the Legal Forms
section to cover your legal requirements and release
forms
7302019 Heinrich Melanie - Studio Lighting Workbook
httpslidepdfcomreaderfullheinrich-melanie-studio-lighting-workbook 8789
This kind of image will work very well for an adselling lingerie A strobe light with a softbox was
used to light the boots and the lingerie from the
right A reflector card was placed close to the boots
to fill in the left side of the scene The light is
positioned low near the floor which scrapes the light
on a low plan This was placed to simulate a specific
time during the day sunset or early evening The
light at this time is warm in color value which adds
to the subject matters message The camera vantage
point is low also bringing the viewer into intimate
contact with the boots and lingerie
7302019 Heinrich Melanie - Studio Lighting Workbook
httpslidepdfcomreaderfullheinrich-melanie-studio-lighting-workbook 8889
Still Lifes Selling Products
Film
Ektachrome 100
Camera Format
2 14 square - Hassalblad
Medium Format
Lens
80mm Normal
Light Source
Strobe with Softbox
Meter
Handheld Incident
Tripod
Yes
FiltersNone
7302019 Heinrich Melanie - Studio Lighting Workbook
httpslidepdfcomreaderfullheinrich-melanie-studio-lighting-workbook 8989
Placement and staging of objects requires a thought-out layout and planned
execution when using multiple products Layering has been used in this image
where non-information has been overlapped for example where the licence
plates and shirts touch Your viewer does not need to see the entire object in
this case to know what it is Strong diagonal lines have been made by object
placement This helps pull the viewer through the image and leads the eye to
a specific area of an image This image was created to find funding for
Vietnam vets by selling these products
If you have been asked to shoot several products and put them all into one
image think of it in terms of a still life setting Larger items will be placed inthe background sometimes even being used as the background For example
picture a group of images all representing something American The
background for this scene could be a flag which is also one of the subjects
There is no need to see the entire flag because it is an easily recognizable icon
In the image above the wooden floor was used to add a sense of the rustic and
gritty realism of the Vietnam war It was lit with a softbox directly above the
subjects The aperture was a concern for foreground to background
sharpness so the camera was pulled back far enough from the scene to allow
for a large aperture of around f 56
Below is the final image This was dropped into a 3 fold 812 x 4 brochure
along with other images of the same sort
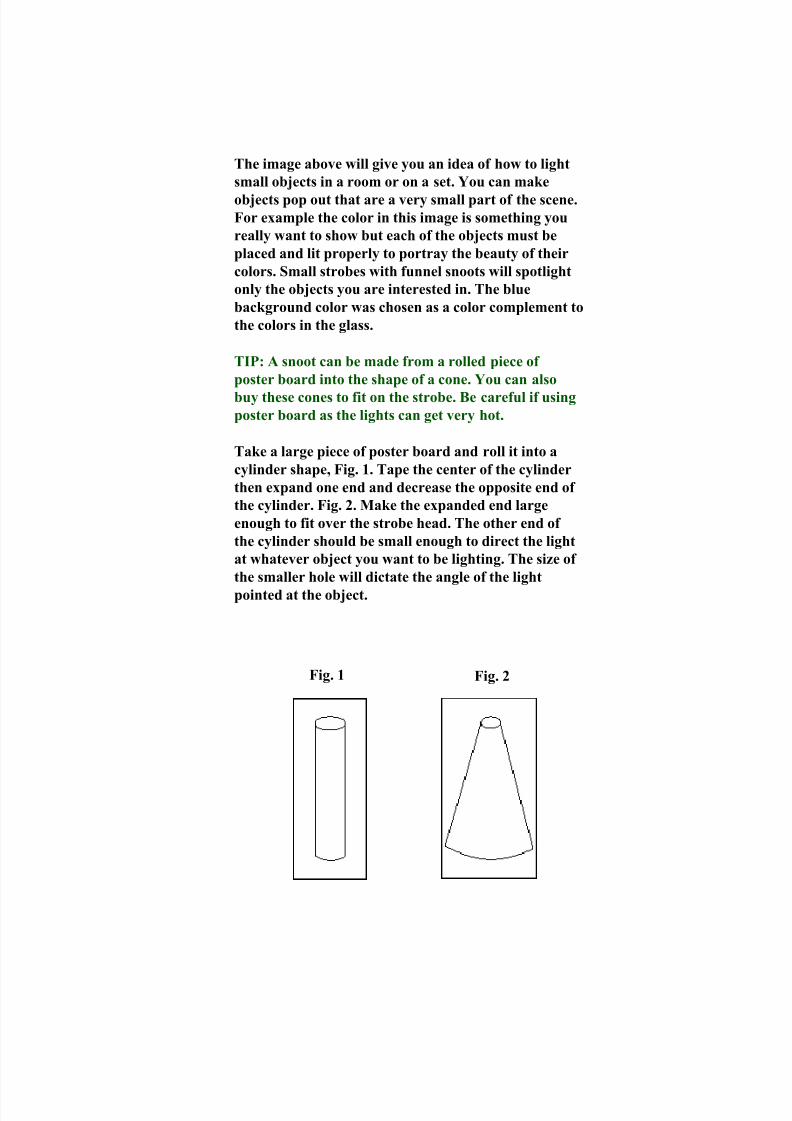
7302019 Heinrich Melanie - Studio Lighting Workbook
httpslidepdfcomreaderfullheinrich-melanie-studio-lighting-workbook 8989
Placement and staging of objects requires a thought-out layout and planned
execution when using multiple products Layering has been used in this image
where non-information has been overlapped for example where the licence
plates and shirts touch Your viewer does not need to see the entire object in
this case to know what it is Strong diagonal lines have been made by object
placement This helps pull the viewer through the image and leads the eye to
a specific area of an image This image was created to find funding for
Vietnam vets by selling these products
If you have been asked to shoot several products and put them all into one
image think of it in terms of a still life setting Larger items will be placed inthe background sometimes even being used as the background For example
picture a group of images all representing something American The
background for this scene could be a flag which is also one of the subjects
There is no need to see the entire flag because it is an easily recognizable icon
In the image above the wooden floor was used to add a sense of the rustic and
gritty realism of the Vietnam war It was lit with a softbox directly above the
subjects The aperture was a concern for foreground to background
sharpness so the camera was pulled back far enough from the scene to allow
for a large aperture of around f 56
Below is the final image This was dropped into a 3 fold 812 x 4 brochure
along with other images of the same sort