hira hero: learning hiragana fluency through gameplay · pdf filehira hero: learning hiragana...
TRANSCRIPT

Hira Hero: Learning Hiragana Fluency
Through Gameplay
A Major Qualifying Project Report
Submitted to the Faculty of
WORCESTER POLYTECHNIC INSTITUTE
in partial fulfillment of the requirements
for graduation by:
Adam Myers
Jesse Marciano
Yuheng Huo
Project Advisors:
Professor Jennifer deWinter
Professor Charles Rich

Abstract
This report describes the development process of Hira Hero , a game created for our
Major Qualifying Project requirement at Worcester Polytechnic Institute. Hira Hero is a
dungeon crawler RPG for Android devices that educates a player with little to no knowledge of
hiragana, one of the syllabaries of the Japanese language, on how to write it fluently. The game
was developed at Osaka University in Osaka Prefecture, Japan over a course of three months,
from July 10, 2016 to October 4, 2016. This report describes our experience and educational
goals for the game, which is to simulate the feeling of danger and thrill of a roguelike game and
teach hiragana writing fluency respectively. It details the research and development we made to
reach those goals, a summary of our testing to see whether our game met those goals, and a
postmortem of what went well with our game and what could have been improved.
1
Acknowledgements
We would like to thank our advisors Jennifer deWinter and Charles Rich for the feedback
and suggestions provided to us throughout the project. These suggestions helped guide us to
meet deadlines while still creating a more complete game.
We are also thankful to Osaka University for hosting us and allowing us to work at the
Takemura lab on their Toyonaka campus. We would specifically like to thank Professor Kiyoshi
Kiyokawa for the assistance and guidance he provided us at the lab during our project. We
appreciated the kindness of the other lab members, who welcomed us and became good friends
during our stay in Japan.
Finally, we would like to thank the WPI students who tested our game. Their feedback is
appreciated and helped us improve our game..
2

Table of Contents
1 Introduction 4
2 User Story 9
3 Design 14 3.1 Gameplay 14 3.2 Procedural Dungeons 20 3.3 Rewards 22
4 Implementation 25 4.1 Version Control and Organization 25 4.2 Unity 26 4.3 Android 27 4.4 Character Pathfinding 28 4.5 Procedural Dungeon Creation 31
4.5.1 Alternative Algorithms 31 4.5.2 Binary Space Partitioning 35
4.6 Handwriting Recognition 44 4.6.1 Handwriting Recognition Libraries 45 4.6.2 Handwriting Recognition System 47
4.7 Stroke Order Animations 53 4.8 Inventory 54 4.9 Art and Audio 56
5 Testing 57 5.1 Procedures 57 5.2 Results 60 5.3 Discussion 61
6 Postmortem 64
7 Appendix 67 7.1 Asset List and Sources 67 7.2 Questionnaires 69 7.3 Secondary Projects 72
7.3.1 Head Mounted Tunnel (Jesse and Adam) 72 7.3.2 Jumping Rope with Six Skippings (Yuheng) 74
References 76
3
1 Introduction
Hira Hero is a dungeon crawler RPG in which quickly and accurately writing hiragana,
one of the syllabaries that are part of the Japanese language, is the key to succeeding in battles.
From a top-down perspective, players explore procedurally generated tile-based dungeons
containing enemies and a boss, moving the player character through the world using an Android
phone’s touchscreen. They learn how to write hiragana by fighting enemies in RPG turn based
combat - where one’s ability to quickly and actually write the character corresponding to the
English syllable shown determines how many attacks one makes. The hiragana characters will be
initially taught to them at the start of each level through a series of animations that play at the
start of battles that contain new characters. These animations will play again if too many
mistakes are made in a battle. Players will find themselves progressing from simply drawing the
characters to fluently writing them as the testing of stroke order and speed forces them to become
more comfortable with mentally associating the characters and their syllables. Players will have
to defeat the level’s boss, with a more difficult test of the hiragana the player learned in the level.
In order to progress to the next level and learn and practice more hiragana characters.
The goal of this project is to create a game where players feel the danger and thrill of a
roguelike game with limited health and resources, and the risk of losing everything that has been
earned and achieved in a level looming over them. The players will feel this danger as they must
learn to write hiragana characters fluently enough, fluency being defined as ease and accuracy of
writing or speaking a language, to land enough attacks before the enemy or boss defeats them.
4

The thrill will come from the limited time a player has to write these characters, as if the
character is not written fast enough the player will be given less attacks. If the player’s writing
fluency and writing speed are not apt, he may not be able to land enough attacks to defeat the
enemies and will have to restart the level. Though the levels are only a few minutes long, the
player will not want to have to miss out on the rewards from finishing a level, so restarting is a
punishment that does not feel overly harsh because levels are short and the player keeps any
equipment he had before playing the level.
In terms of educating the player, we have the following goals: the goal is to have the
player become fluent in writing all 46 hiragana characters on the Fifty Sound Table (see Figure
1.1) by the time he has beaten all of the game’s levels. Each of the game’s levels consists of
teaching up to 5 hiragana characters based on their groupings on the Fifty Sound Table (see
Figure 1.1). The game teaches the player how to write these characters through its twitch based
combat. The player’s writing is graded, with positive reinforcement for high grades being given
in the form of additional actions. If the player is writing the character with poor fluency or at a
slow speed, he will feel the impact of this as less or no actions will be given and an animation
will follow showing how to correctly write the character. The player will also know if he is too
slow based on text that will briefly pop up with a comment on his writing saying “Timeout!”.
5
Figure 1.1: Fifty Sounds Table, with labels showing which column of characters will be in which level (Hadamitzky
& Spahn, 2013). Characters marked with yellow dots are the ones implemented in the current game.
The challenge in making this game is that inherent to making an educational game: The
game must be compelling enough that “real user engagement” occurs (Godwin-Jones, 2014). If
this can be be achieved, then the player will see stop seeing the gameplay as some kind of
assignment and instead experiment with the game like she would with a non-serious dungeon
crawler game. Past this challenge, there are two key benefits to teaching how to write hiragana
fast and fluently in a game as opposed to traditional means. These benefits are:
1. The ability to capture the user’s data and evaluate whether or not the learning methods in
the game are successful or not.
6
2. The learning environment and curriculum is consistent (Godwin-Jones, 2014).
With the ability to capture user data, we can see if a player is not writing a character fluently
very often, or if she fails to write a certain character within the time limit. In a classroom setting
this data can identify the user’s personal troubles in writing hiragana, and they can be given the
appropriate external help. Outside of a classroom setting, this data can be used in continued
development of the game, where if it is found that a large amount of players are not improving at
writing fast or fluently with a certain character, we can change the way it is taught so that this
learning can be improved. Hira Hero is not made for a classroom setting, however its’ learning
environment and curriculum can be compared with that of a classroom setting. In a classroom,
the time devoted to teaching certain subjects may vary based on the teacher, the students, or the
number of days the class will last. With our game’s levels, the hiragana will always be taught to
the user in the same order as another user. There will be variation in the level’s map layout and
enemy placement, but it the levels will always contain enough enemies needed to teach the user
each of the hiragana characters in a level.
This report discusses the development of Hira Hero , including our design choices, why
we went with our design choices, and how we implemented our design. Chapter 2 describes a
user story of a standard playthrough of a level in Hira Hero . Chapter 3 delves into the design of
Hira Hero , including the exploration and battle mechanics, procedural dungeon generation, and
the game’s reward system. Chapter 4 will describe the systems and technology used and created
to achieve our design, such as our decision in choosing to develop with Unity and on the Android
platform, creating procedurally generated dungeons, implementing the Zinnia handwriting
recognition library, and grading the player’s hiragana writing speed and fluency. Chapter 5 lays
7

out the art implemented in the game, and describes the reasoning on why the given models and
art style was chosen. Chapter 6 shows our playtesting results with Hira Hero , including methods,
the results we drew from the data gathered, and a discussion about what the results mean.
Chapter 7 concludes the report with a post mortem, discussing what we did right and wrong,
what we would change and advice to future projects that plan to develop similar games.
8

2 User Story
Jacob opens the game on his smartphone. He is greeted with a menu screen that displays
the name of the game, Hira Hero. He sees multiple options on his screen, including a tutorial
button, a button for each level, and a credits button (see Figure 2.1).
9

Figure 2.1: Layout of main menu that Jacob sees in this example
A list of levels are displayed, those that are not playable to Jacob yet are locked out (see
Figure 2.1). He could play one of the levels he has beaten before to earn more equipment and
yen, but he feels he is ready to play the newest level he unlocked. He taps the level, which is
called “Level 2”. The game loads a map which takes up the entire phone screen, where he sees
his character, and an enemy. He then taps his character to open up his inventory. Here he checks
his character’s current equipment, and looks through all the equipment he has earned to see if he
can equip anything better (see Figure 2.2). He finds the boots he earned from his last play session
in his inventory, and he taps and holds them to see the stats on them. It seems that they are better,
so Jacob then drags the boots from his inventory onto his character to equip them. His old boots
are returned to his inventory. He wants to remove some of his older equipment so he has more
inventory space. So he drags said old equipment from his inventory to the trash slot located on
the upper right of the inventory screen for each piece of equipment he gets rid of. Jacob closes
his inventory by tapping the ‘x’ button on the top right. He then taps the enemy, which moves his
character to that location.
10

Figure 2.2: Layout of the inventory screen. Player can be seen dragging the ‘New Shirt’ item from the inventory to
the Shirt equipment slot to equip the shirt.
11
The game changes to a new perspective, where Jacob’s character is on the left side of the
screen and the enemy is on the right side of the screen. Similar to a fighting game like Street
Fighter, Jacob sees a life bar and an action bar right below it above his character and the enemy.
Above the enemy Jacob sees the syllable ‘Ka’ written out in English, which he understands
means he must write the hiragana character for ‘Ka’. Since this is his first encounter with this
character, an animation is playing out for Jacob at the center of the screen showing him how to
draw ‘Ka’ and in the correct stroke order. Jacob copies the animation by drawing in the box
located in the bottom half of the screen. After he finishes the last stroke, the game gives positive
feedback indicating that his written character was pretty much perfect (as expected from tracing)
and for his fluency and speed his character gets to use three actions against the enemy this turn.
He then taps attack as his first action, and the enemy attacks at the same time with a block action.
Block beats attack, so Jacob’s character takes damage. Since he can see the enemy has no more
actions, indicated by its action bar, he proceeds to tap attack twice, showing his character attack
and damaged the enemy twice. This is just enough to defeat the enemy. He earns a health potion
that is put into his inventory and is returned to the dungeon map.
This movement has revealed that an enemy that appears to be the boss is four squares to
the left of Jacob’s character. Jacob thinks this level is easy enough and that his equipment is
good enough to take on the boss early. Jacob is confident and goes to fight the boss. A battle
perspective is entered similar to Jacob’s encounter with the previous enemy. It takes multiple
turns, which progress when either the timer reaches 0 or when both characters use all of their
actions for him to defeat the boss. With each turn, the hiragana he had to write changed. The
12

hiragana he had not encountered such as “Ku” played an animation similar to before. However,
when ‘Ka’ appeared the animation did not play again and Jacob had to rely on his memory. ‘Ka’
was the only character he messed up during the boss fight, which gave him no actions that turn.
Thankfully the next time ‘Ka’ showed up during the boss fight, the animation played again for
him, but did not leave a trace like the first time. Jacob did not mess up again and defeated the
boss.
Jacob wants to earn more new equipment, so after he is brought back to the level select
screen, he selects the same level again. This time, the map layout is completely different, and
new obstacles are nearby including two enemies. He plays through the level again with different
characters being asked for in each fight than before. When he finishes the level and sees that he
acquired new gloves for his character, he stops playing for the day.
13

3 Design
Hira Hero is intended to teach the player to write Hiragana fast and fluently by making
these two aspects skills the player must develop to defeat enemies. This section discusses the
design process of Hira Hero’s two gameplay elements, which are exploration and combat, along
with the procedural dungeon generation and the reward system.
3.1 Gameplay
Exploration consists of the player navigating her character through a dungeon from a top
down perspective by tapping on the tile she wishes to move the player character to. The player’s
view of the dungeon is limited, so she must move the player character to discover new areas of
the dungeon (see Figure 3.1). While moving the player may discover enemies along the way. The
player can fight these enemies by tapping on the enemy or the tile it is on to move to it. This will
transition the game into a turn based RPG battle with the enemy that the player tapped. To beat
the level, the player must find and defeat the boss in battle, who will appear much larger than
standard enemies in the dungeon to make it obvious that it is the boss.
14

Figure 3.1: Two screenshots of exploration portion of the game. The left screenshot shows the player tapping a
location (hand cursor not actually in game), and then the right screenshot shows the result of the screen (camera) and
player character moving to that location.
This sets up a risk and reward system when it comes to exploring for enemies and the
boss. While the end goal is to find and defeat the boss, the player may not feel confident with her
fluency and speed in writing the characters for a given level. In this case, she may choose to find
and defeat all of the normal enemies first. Not only for the writing experience but also the item
each enemy will drop that may give the player the edge she needs to defeat the boss. However,
the player character will likely take some amount of damage while fighting these enemies and
therefore may be entering a boss fight with less than full health. This system adds the danger and
15

thrill of the game, where each of these choices the player can make while exploring can be
dangerous and said choice is thrilling to make.
Battles take on a different perspective than exploration does, where the camera now
shows the player character on the left side of the screen and the enemy on the right side of the
screen, with a GUI at the bottom (see Figure 3.2).
Figure 3.2: Screenshot of the start of a battle with labels indicating and describing key components of the
interface.
Both characters have a health and action bar above them, along with a timer between
them. This timer indicates the time the player has to write the English character, which is
16

displayed above the enemy, in hiragana in the box at the bottom screen (see Figure 3.2). If this is
the player’s first time encountering the given hiragana character, an animation will play showing
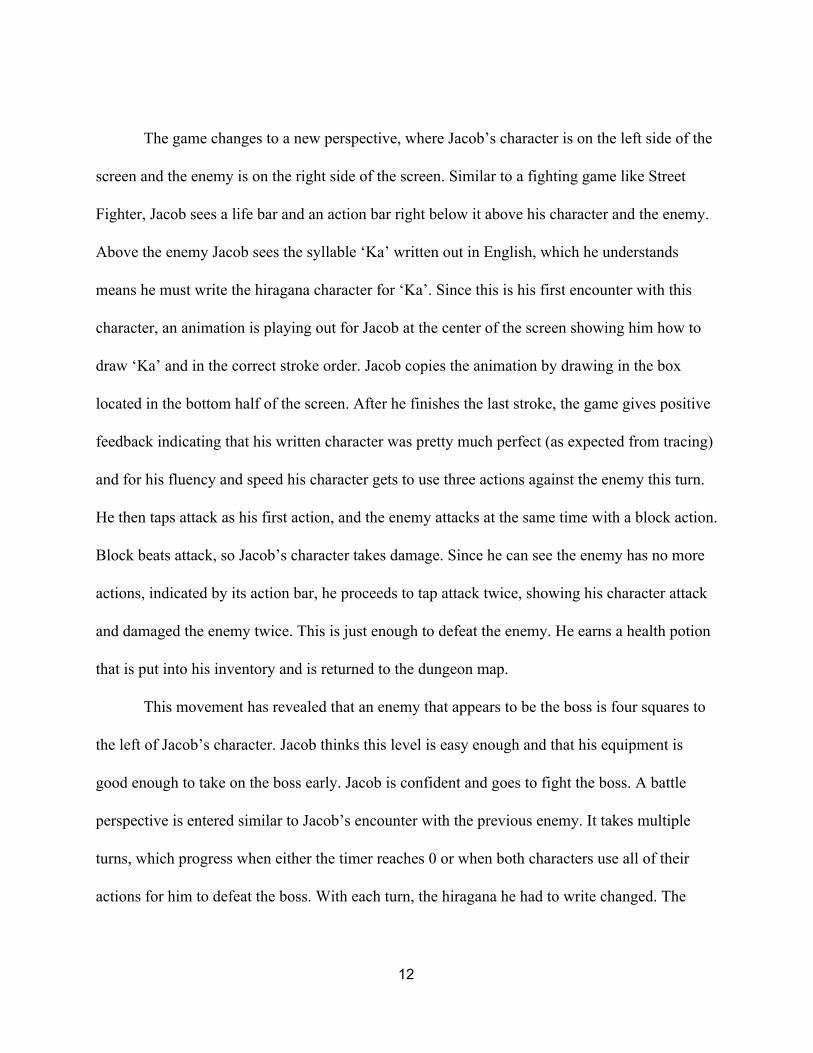
the correct way to write the hiragana character. This animation will remain on the screen for the
player to trace (see Figure 3.3 for an example). The implementation of these animations is
described in section 4.7. The player writes the character on the screen with his hand in the box at
the bottom screen, and then selects the first action he wishes to perform against the enemy. If the
character is not accurate at all, or is not written within the time limit then the player receives no
actions for that turn. Otherwise, the player will receive an appropriate number of actions to
perform this turn based on how fluent and fast he wrote the character, up to a maximum of 3
actions. The number of actions the player earns is apparent by looking at the action bar displayed
below the player’s health bar (see Figure 2.2). The enemy’s actions can be seen this way too,
with normal enemies always receiving 1 actions per turn and the boss receiving 2 actions per
turn. Since the enemy will always at least get 1 action to use against the player, the player is
further encouraged to write fast and accurately or else no actions will be earned and the enemy
will be able to land a free attack against him.
17
Figure 3.3: Example of animation that plays when first introduced to a new character, or for when the player makes
too many mistakes with a character. In this case, the character is ‘ I ’ as shown above the enemy.
18

Actions represent the moves the player or enemy can perform in a turn. A turn ends when
the player and enemy have no actions left, or when the timer reaches 0. The player performs one
action at a time, which interact with the enemy’s action (if it has one left to perform). These
interactions are similar to those in Rock, Paper, Scissors, and can be seen in detail in Figure 2.4.
The cycle of turns continue until either the enemy’s health or the player’s health reaches 0,
which will be indicted by the health bar going completely white. We wanted the core of combat
to be simple, which is why we chose to design this Rock, Paper, Scissors style system. With a
simpler system like this the player is not overwhelmed with having to learn a complex combat
system alongside writing characters that she is also unfamiliar with. If the player dies, then she
will lose all progress and items gained in a level and will have to restart. Otherwise, the player
will earn an item from defeating the enemy, and will also beat the level if said enemy was the
boss. Normal enemies drop items that are “strong” or “weak”, while bosses drop “strong” items.
The item chosen is randomly chosen from any valid item, and if the players have a full
inventory, they will be warned and receive nothing. These items are listed in full in section 3.3.
19

Figure 3.4: Interactions the Attack, Block, and Throw actions have with each other. Similar to Rock, Paper, Scissors.
Attack beats Throw. Throw beats Block. Block beats Attack.
3.2 Procedural Dungeons
Instead of featuring handcrafted maps, Hira Hero generates a new dungeon map every
time a level is played. These dungeons are not truly “random” but are instead procedurally
generated with randomized elements. After considering the size restrictions of the map and
rooms within it, an algorithm produces rooms that satisfy those restrictions with rooms being
connected to make sure no room is inaccessible to the player. This style of procedural dungeon
20

generation is traditional to the roguelike genre that Hira Hero ’s map exploration gameplay is
based on (see section 4.5 for more on procedural dungeon generation).
We felt that procedural dungeon generation was a good fit for Hira Hero for several
reasons. This style of dungeon creation is traditional with good purpose: roguelikes are highly
replayable, and Hira Hero is no different. We intend for players to play the same level in Hira
Hero many times as they practice different sets of characters. Having handcrafted dungeons,
even with several possibilities for each level, would quickly make playing the same level more
than a few times repetitive and boring. Procedural generation also makes it easier to change maps
on both a large and small scale. We can easily alter the generation algorithm to improve all
levels’ maps at once, affecting the entire game. Improving and expanding on the algorithm in the
future enables all levels to have the same base level of quality no matter when they were added
to the game. If we handcrafted levels, we would have to manually update every old level to fit
our new standards for designing levels if our approach changed over time, and levels with the
oldest maps would inherently be worse off due to us getting better at level design as we worked.
If we do need to specifically adjust something for a single level, we can just change its
parameters and affect only its maps. Finally, a side benefit of this traditional design is that it
appeals to fans of the roguelike genre, as “interesting random maps are one of the things that
make roguelike games unique” (Anderson). Though we are not explicitly targeting them, having
procedurally generated dungeons may draw them in.
21

3.3 Rewards
When the player defeats an enemy or the boss, she will receive a random item for her
character. This will be selected from a pool of items, all of which are listed in figure 3.5 below.
The random selection and value of the rewards helps add to the danger and thrill of the game. It
creates more interesting choices during the exploration part of the game as one can risk fighting
an enemy for a chance at an item that will help her win. If she fails to receive the desired item
then the player will likely be in a dangerous situation as health was likely lost in the battle. These
random items include equipment. Equipment adds to how much damage the player character
deals to the enemy when attacking or it will reduce the damage the player character takes when
dealt damage by the enemy. Equipment stays with the player character unless the player removes
it from her inventory by dropping it in the trash on the inventory, or if the player character dies
and that piece of equipment was earned in that level. Another type of item the player can receive
are consumables. Consumables are one time use items and only persist with the player until she
uses them while exploring. The only consumable in Hira Hero is the health potion, which will
restore some of the player’s health when dragged onto the player character in the inventory
screen.
The player may be near the boss with low health, and can choose to risk fighting a normal
enemy for the chance at a health potion, or take a chance at fighting the boss with low health if
she believes the health potion will not drop. There is also a risk to using health potions, as the
player may want to save the potion for the next level if she is confident enough to beat the
current level without it. The player must also decide if her equipment is strong enough for the
22
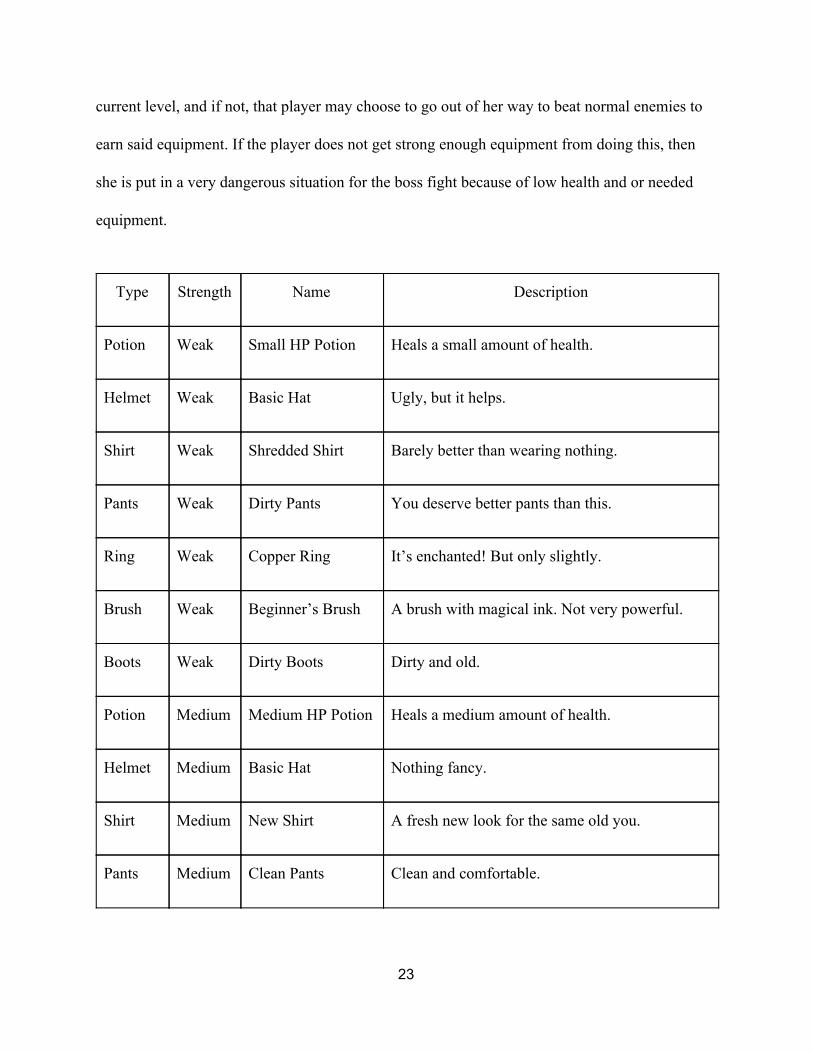
current level, and if not, that player may choose to go out of her way to beat normal enemies to
earn said equipment. If the player does not get strong enough equipment from doing this, then
she is put in a very dangerous situation for the boss fight because of low health and or needed
equipment.
Type Strength Name Description
Potion Weak Small HP Potion Heals a small amount of health.
Helmet Weak Basic Hat Ugly, but it helps.
Shirt Weak Shredded Shirt Barely better than wearing nothing.
Pants Weak Dirty Pants You deserve better pants than this.
Ring Weak Copper Ring It’s enchanted! But only slightly.
Brush Weak Beginner’s Brush A brush with magical ink. Not very powerful.
Boots Weak Dirty Boots Dirty and old.
Potion Medium Medium HP Potion Heals a medium amount of health.
Helmet Medium Basic Hat Nothing fancy.
Shirt Medium New Shirt A fresh new look for the same old you.
Pants Medium Clean Pants Clean and comfortable.
23

Ring Medium Bronze Ring The magic in the metal makes you feel stronger.
Brush Medium Strong Brush The magic ink contains a powerful curse.
Boots Medium Worn Boots They’re not new, but their previous owner had
good taste.
Potion Strong Large HP Potion Heals a large amount of health.
Helmet Strong Fancy Hat Now that’s a good look!
Shirt Strong High Class Shirt You couldn’t afford this if you hadn’t looted it.
Pants Strong Cleaner Pants You didn’t think this could be possible!
Ring Strong Wooden Ring The wood’s uncomfortable, but the tree it came
from contained an ancient power.
Brush Strong Artisan’s Brush The magical ink at the end of this brush is of the
highest quality.
Boots Strong Slippers Surprisingly comfortable.
Table 3.5: List of all items currently in the game.
24

4 Implementation
In this section we discuss the process and decision of making a game in the Unity Engine
and building it for the Android platform. We then discuss the various technical features of the
game and how those features were implemented.
4.1 Version Control and Organization
We wanted to create an environment where we could collaborate on the implementation
of features. As we are all programmers and would only be spending a relatively small amount of
time working on tasks that were not related to coding, it was very important that we could all be
programming script simultaneously without issue. We opted for using Git with Atlassian’s
Bitbucket service to host our remote repository. As we all had some experience with Git from
classes at WPI, and two of us had specifically used Atlassian’s services before, we were more
comfortable using this for our version control rather than spending more time familiarizing
ourselves with a different service.
We used SourceTree to provide a GUI when managing all of our branches in Git. This
allowed us to easily see where branches had been created and merged, as well as the contents of
any changes, which helped when resolving merge conflicts when they occurred. We used Visual
Studio as our external merge editor, as it had useful features that clearly displayed discrepancies
in code and allowed us to pick and choose what we wanted from differing versions. As we made
a new branch for each feature that we were developing or each distinct improvement to an
25
existing feature that we were making, we both kept our merges relatively painless and
established good software engineering practices.
When problems did occur, they were generally tied to our initial lack of understanding
regarding how Unity stored certain files for use with version control. We repeatedly encountered
issues where we could not merge Unity’s scene files and had to replicate the changes manually in
the master branch’s version of the scene. This was a time consuming process, particularly on
days when multiple branches were being merged into the master branch, and it also invited a lot
of room for error if we did not replicate the change perfectly. After a couple weeks of dealing
with this and getting increasingly frustrated, we decided to seek out a solution. Through using
Google to search for others who had dealt with this problem, we learned of and enabled Unity’s
options for storing such assets in text form and to provide metadata for these assets that can be
used for version control. This quickly cut down on the number of conflicts we had to manually
resolve when merging scene files, and beyond that, made it so we could generally resolve those
conflicts in Visual Studio rather than in Unity’s editor. On the now very rare occasions where we
did have to fix merges in the editor, the differing text files could be used as a guide for what was
specifically not carried over and needed to be altered.
4.2 Unity
Unity is an open source game engine that is available to develop video games for
multiple platforms, including iOS and Android (Technologies, U, 2016). We developed Hira
Hero on the latest version at the time of this project, which is 5.4.1. Additionally we developed
on the 32-bit version as it allowed for compatibility with the writing recognition library, Zinnia,
26

we were interested in using while 64-bit did not. In addition to being open source, we chose
Unity for its updated documentation, large community support and activity, and the ability to
develop on mobile platforms. Unreal Engine (What is Unreal Engine 4, 2016) is also an open
source game engine with the features we wanted; however, Unity’s superior options in its asset
store is what helped us make our decision to choose Unity. Both engines have asset stores, but
the Unity asset store has much more assets available to use for free or to buy. As a team with no
artists this interested us greatly as we could put less time into the creation and implementation of
art in the game and devote more time into technical development as well as have good in game
assets for a team with no little to no experience in art.
In addition Unity Remote 5, which is a free application developed by Unity
Technologies, is a very helpful tool in developing the game. Instead of spending a large amount
of time building and testing the game on an Android device, this tool streams the game scene to
an android device that is connected to PC via an USB cable and sends any touch information
collected from the phone the back to PC. This program increase the speed of our debugging
process, as we can not only test play the game on the phone but also watch the program output
and make changes to the code at the same time.
4.3 Android
As a Hira Hero level was planned to be beat in a few minutes, we aimed for developing
on the game for mobile phones so that it can be played anywhere at anytime. So our choices
were Android or iOS based on the Unity support for these two platforms. We decided to develop
for Android devices due to its rising popularity and market share overtake of iOS devices
27

(Twohig, 2015) in order to make our game available to the most amount of people. To build the
game on the android platform in Unity, we needed to download the latest version of the Android
SDK (25.1.6).
4.4 Character Pathfinding
There are many solutions to pathfinding which we researched, and of those we decided to
use a tile-based data structure that we search through using A* search. In Hira Hero , we wanted
the player to be able to move the character using the touch screen. We could have implemented
arrow buttons on the interface while exploring, where tapping an arrow would move the
character in the relevant direction, but we wanted a clean interface for exploration that just shows
the dungeon being navigated. With these two thoughts in mind, we thought that the player could
just tap the adjacent tile he wished to moved to, but we felt this would be unnatural and would be
annoying in a game where part of the experience is exploration. So we decided that just tapping
the desired location the player wants to move to would be the best, and then the player character
would then move to said location automatically. To do this, some form of pathfinding would
have to be implemented for the player character so that we could show the character moving to
its destination.
We looked at navigation meshes, as Unity can generate them itself. Navigation meshes
are data structures that partition open space on terrain into a network of convex polygons. The
benefit to using a navigation mesh would be that any obstacles on the map can just not be a part
of the navigation mesh so that the player character will always avoid those obstacles while
moving. In comparison, solutions would require some form of detection to see if an obstacle
28

intercepting the given path (Leonard, 2014). Navigation meshes are also beneficial with Unity, as
one can just select geometry in the scene and click a button to build the mesh (Technologies, U,
2016). However, this can only be done with a scene that has already been made, meaning Unity
cannot build its navigation meshes at runtime. As described further on in section 4.5, Hira Hero
has dungeons generated procedurally at runtime, so we could not use this system and would have
to create our own for a simple navigation system where no obstacles other than enemies are
present.
Our other solution was to use the tile objects we create the dungeon with as the data
structure for pathfinding instead of polygons like in the navigation meshes. Tiles in our game are
just squares with a location that is the center of that square. All tiles are of the same width, so it
is easy to detect adjacent tiles just by checking width units apart from a given tile in a given
direction. It is also possible to create a form of collision detection, as each tile object can keep
track of what Unity GameObject is above its center. And when searching for a path, the
algorithm will not add tiles to the path that contain an obstacle like an enemy, unless said tile is
the destination. Knowing we only cared about getting the player from point A to point B by the
quickest path and avoiding enemies along the way, we decided to go with this tile-based data
structure. Creating our own navigation meshes for each new dungeon at run time could be more
time consuming and possibly CPU heavy, while in comparison we already have to create tiles for
the dungeon itself so this data structure will not burden the CPU any further.
We looked into what algorithm we would be implementing to search our data structure
for a path to a given destination. One possible algorithm was Dijkstra's Algorithm, where you
start at a node and search adjacent edge nodes to find a path to the destination. It starts with
29

searching nodes that are the shortest distance to the destination and repeats until it reaches the
destination. Nodes that are already searched once are considered closed by the algorithm and
cannot be searched again. This creates a path that will be the shortest distance (Wenderlich,
2011). Other algorithms we found were based on this, and varied in measuring the best path with
measures other than distance such as terrain type in a game where different terrain is featured
which may affect speed.
The most common variant of Dijkstra's Algorithm is the A* search, which considers the
estimated cost or distance in addition to the actual cost or distance when selecting the next open
node to search (Wenderlich, 2011). With A* we could find not only the shortest path, but also
the most optimal path so we could add optimizations such as preferring natural paths where the
player does not zig zag in the future (see Figure 4.1). As A* does not use any more resources
than Dijkstra's Algorithm does to run, we decided to implement the A* search so that we could
expand upon what can be considered the best path for the player character to take. The A* search
implemented in Hira Hero is based off a simple online example that was implemented in C# and
was expanded by us to be implemented in Unity with our tile objects (Clift, 2014). These
expansions included using our in game tile objects as nodes instead of having a node class to
search for a path, and using Unity’s own distance calculation function for calculating the exact
distance between two game objects instead of the example’s distance function for its’ nodes.
30

Figure 4.1: Example of simple A* search/ Dijkstra's Algorithm (left, currently implemented), and the desired
expanded A* search (right, not implemented) which would favor paths of the same distance that are more natural
and smooth. The player is the red dot, while the desired destination is the blue dot.
4.5 Procedural Dungeon Creation
A major decision for the roguelike portion of our game was the algorithm for dungeon
generation. In this section we discuss the algorithms we examined before making our final
decision. We then elaborate on our implementation of the Binary Space Partitioning algorithm
we chose to use.
4.5.1 Alternative Algorithms
As many roguelike games exist, there are many approaches to dungeon generation. One
of the first approaches we found while researching this is the one used by the roguelike Brogue .
This algorithm places a room on the map, then repeatedly places new rooms, moving each until it
fits next to an existing room. This continues until no more rooms can be made. These rooms can
31

be one of many different shapes including rectangles, circles, and a “large donut shape” (Smith,
2015). Doors are then created between some adjacent rooms before other features are added.
There is also a possibility that the map will have a cavernous starting room, made through a
process where randomly placed tiles take up 55% of the map and this noise is repeatedly
smoothed out. Some roguelikes take this further, making an initial cavern and then only adding
onto it by creating new rooms that overlap and intersect the previous one, or by using cellular
automata to create a cave system with no distinct rooms (Cook, 2013). In any case, this did not
fit what we were looking for. We wanted rectangular rooms that weren’t so directly connected,
and did not need the elaborate spaces that Brogue’s algorithm was focused around creating.
Another algorithm we found is the one used by a roguelike named Tyrant . This algorithm
fills an entire map with earth (effectively wall tiles, and in Hira Hero , empty space) and then
carves out a room of walkable tiles at the center. It then repeatedly picks a random wall of any
room, tries to add a random feature in that direction, and then connects the feature to the room if
successful. These features are unique room shapes or rooms with unique properties, including a
“large room, small room, corridor, circular arena, vault etc.” (Anderson). This is done until the
dungeon is complete and no more can be added. This algorithm seemed effective, but still didn’t
match our desires. It prioritizes features, but there are no features by its definition of the term in
our design as the only specially placed things are placed within existing rooms. We had no
interest in adding groups of hand-crafted rooms or variations in generation within rooms to our
scope. We also wanted to have maps that did not always have a central room, which this
algorithm seems predisposed to creating. Both this algorithm and the previous one also view the
map as a literal dungeon dug into earth, while we wanted something that better fit our design of
32
having empty space rather than blocked tiles. We felt empty space would encourage the player to
explore outwards rather than make them feel enclosed inside the rooms they had already
encountered.
We found a much more complicated algorithm that seemed to suit our needs better at first
glance. This algorithm first generates a large batch of rectangular rooms in a circle around the
map’s center, with the rooms overlapping at many points at this time. These rooms are all made
up of tiles snapped onto a grid. The rooms are then moved apart until no overlapping is still
occurring, whether by the use of “separation steering behavior” (Adonaac, 2015) or through a
physics engine. If the physics engine is used, a different initial shape should be used to
accommodate skewing room sizes without stretching out the map in the opposite dimension.
Rooms with dimensions above a specified average are then designated as main rooms, and all
other rooms are effectively discarded. The midpoint of these rooms are run through a process of
Delaunay triangulation, and a Minimum Spanning Tree is constructed from the resulting graph.
Some edges from the graph are then added back to the tree to make sure that there is more than
just a single path through the dungeon. Finally, hallways are added between rooms that have an
edge connecting them. These hallways can be vertical, horizontal, or L-shaped as appropriate,
and any discard rooms that intersect a hallway are re-added to the map. The example results of
this algorithm did look close to what we were seeking, particularly if we skipped the step of
re-adding discarded rooms to keep the room count lower. However, this approach seemed
needlessly complicated, especially with the use of triangulation, multiple complex data
structures, and having to implement a way to move the rooms at the start of the algorithm. We
continued to look elsewhere with the hope of finding something simpler.
33

One algorithm we examined focused on the creation of mazes. A perfect (here meaning
containing no loops or cycles) maze is created in the space the map will take up. Then some dead
ends are pruned, with others having holes cut in their walls to add imperfections. Rooms are then
placed alongside the maze, turning it into a hallway system. Alternatively, the rooms can be
placed first. If they overlap with a previously placed room, they are placed again; after a
specified number of failed attempts, they are discarded, with higher attempt counts leading to
denser maps. Mazes are then generated in the spaces between rooms. Connections are
recursively made between rooms and mazes, followed by dead ends being filled in. The resulting
map is definitely interesting to explore as there are many twisting hallways that go unexpected
places, but even the algorithm’s designer found that this could go badly and could produce
“annoyingly windy passages between rooms” (Nystrom, 2014). Furthermore, as we did not
design for anything to appear in hallways, this would only drastically slow down the pace of
playing without any reward. We were also worried that the repeated placement attempts during
map generation could make levels’ load times longer and frustrating for the player.
34

4.5.2 Binary Space Partitioning
Figure 4.2: Example of finished BSP Tree that has split into four leaf nodes.
The algorithm we ended up using focuses on Binary Space Partitioning (or BSP).
Looking at even a basic description of this approach showed that it was simple both in concept
and in execution, while producing maps in the style that we were looking for (“Basic BSP
Dungeon Generation”). The information regarding the partitioning is stored in a data structure
called a BSP Tree. This data structure is commonly used by roguelikes for this purpose, to the
point where the popular roguelike library libtcod includes an implementation of it (“Creating a
BSP Tree”). An example of a BSP tree is shown above in Figure 4.2. Each node in this tree
represents a partitioned rectangle of 2D space, with the root representing the entire map. A leaf
node in the tree represents a partition of space that a room is created in. The parameters for map
35
generation, set in the TileManagerBSP class that handles map generation, are the minimum
width and height of space represented by a node, the minimum width and height of rooms, the
maximum width and height of the map, and the required margin between the edge of a room and
the edge of the partition it is in. In our implementation, all lengths are measured in floor tiles, as
otherwise we would be constantly converting from the tiles’ size in 3D space while making
calculations. These tiles are game objects in Unity that represent a 5 units by 5 units square, with
a height of 1 unit. These tiles all display the same ground texture without variation. Additionally,
when this algorithm calls for randomization, we generated integers using the
UnityEngine.Random.Range() method, which has an inclusive lower bound and an exclusive
upper bound.
36

Figure 4.3: Pseudocode for the node splitting algorithm.
Nodes are created recursively from the initial root node, as shown in the pseudocode
above in Figure 4.3. In our implementation, all nodes are instantiations of a Node class object.
These Node objects contain information about the node, its placement and space within the map,
its children, and lists of all the rooms and tiles within its space. Upon creation, a node
immediately tries to split the rectangle of space it represents further so that it can have child
37

nodes. To do this, it first checks if its space can contain two minimally sized spaces according to
the parameters. It checks this for both a horizontal and vertical split. If both directions are valid,
then it checks the space’s dimensions to see if one length is at least 25% larger than the other, in
which case the relevant direction is chosen; otherwise each direction has a 50% chance of being
picked. If only one direction is valid, that direction is used. In any case, the split is made down
the middle of the room in the chosen direction, with the left child node in the tree being given the
extra tile in the case of an odd number of tiles. Figure 4.4 below shows an example of the results
of the splitting process, as the full map space corresponding to the root node is repeatedly split.
Figure 4.4: Example of map that has been fully split, matching the BSP Tree example in Figure 4.2.
Figure 4.5: Pseudocode for the creation of rooms and hallways in node splitting algorithm.
38
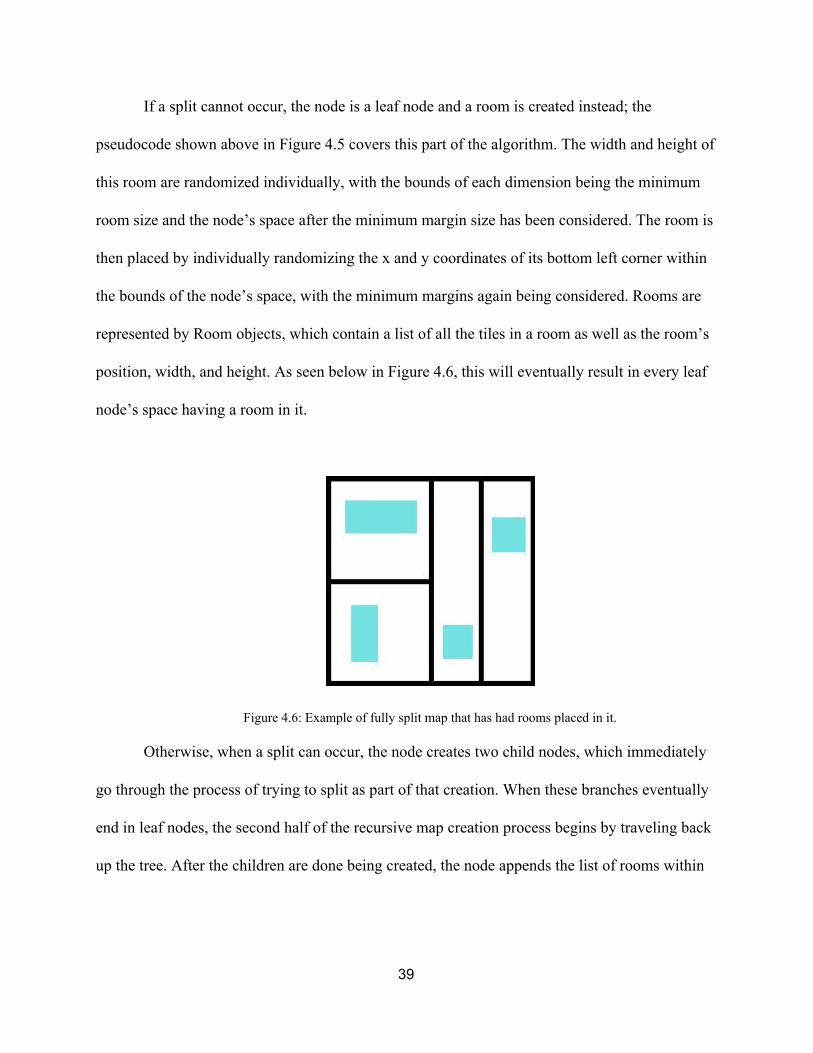
If a split cannot occur, the node is a leaf node and a room is created instead; the
pseudocode shown above in Figure 4.5 covers this part of the algorithm. The width and height of
this room are randomized individually, with the bounds of each dimension being the minimum
room size and the node’s space after the minimum margin size has been considered. The room is
then placed by individually randomizing the x and y coordinates of its bottom left corner within
the bounds of the node’s space, with the minimum margins again being considered. Rooms are
represented by Room objects, which contain a list of all the tiles in a room as well as the room’s
position, width, and height. As seen below in Figure 4.6, this will eventually result in every leaf
node’s space having a room in it.
Figure 4.6: Example of fully split map that has had rooms placed in it.
Otherwise, when a split can occur, the node creates two child nodes, which immediately
go through the process of trying to split as part of that creation. When these branches eventually
end in leaf nodes, the second half of the recursive map creation process begins by traveling back
up the tree. After the children are done being created, the node appends the list of rooms within
39

the space they represent to its own list of rooms within its space, effectively combining the lists
of both children, so that it can be added to its own parent’s list in turn if it is not the root.
Figure 4.7: The rooms in Child 1a and Child 1b have been connected by a hallway, as have the rooms in Child 2a
and Child 2b. Child 1 and Child 2 have also been connected by a hallway between the rooms in Child 1a and Child
2b
Both child nodes then need to be connected. To do this, the node adds a hallway to the
dungeon between the two rooms; Figure 4.7 above shows the end result of this process. It first
selects a random room from each of the child nodes’ list of rooms. If these rooms are parallel in
any way, the hallway will be a straight line between two randomly selected parallel tiles on the
closest edges. If they are not, the hallway will be made up of two straight lines with a single
corner. The starting and ending tiles will be random tiles on the closest edges of the two rooms,
with the sides depending on the initial and ending directions. The chances of a hallway starting
with a vertical line or a horizontal line are 50% each; after the corner, the hallway heads in the
second direction towards the second room. By connecting the child nodes to each other at each
level of the tree, we ensure that every room can be reached by the player, even if the only direct
connection is the room in its sibling leaf node. Hallways are represented by Hall class objects
40
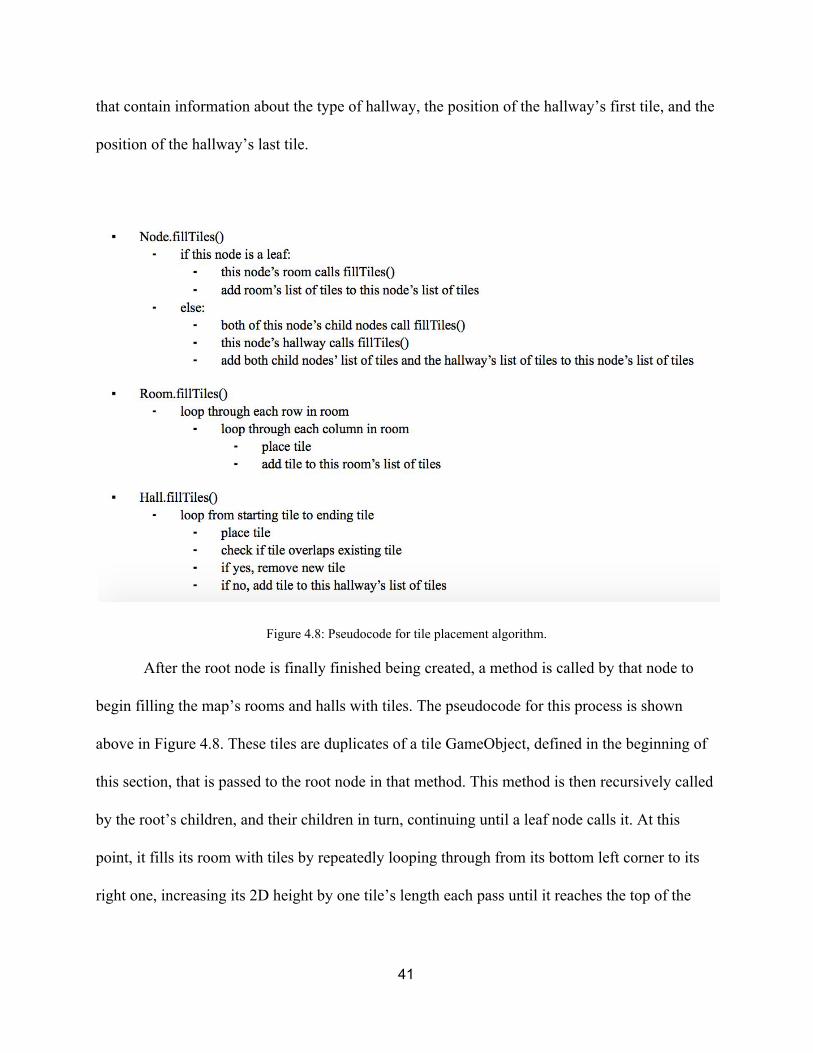
that contain information about the type of hallway, the position of the hallway’s first tile, and the
position of the hallway’s last tile.
Figure 4.8: Pseudocode for tile placement algorithm.
After the root node is finally finished being created, a method is called by that node to
begin filling the map’s rooms and halls with tiles. The pseudocode for this process is shown
above in Figure 4.8. These tiles are duplicates of a tile GameObject, defined in the beginning of
this section, that is passed to the root node in that method. This method is then recursively called
by the root’s children, and their children in turn, continuing until a leaf node calls it. At this
point, it fills its room with tiles by repeatedly looping through from its bottom left corner to its
right one, increasing its 2D height by one tile’s length each pass until it reaches the top of the
41

room. During this process, the room’s measurements in terms of tiles are multiplied by the tile
object’s relevant Unity dimension in order to correctly place them. The room’s list of tile objects
is then added to the node’s own list.
Once both child nodes of a node are finished with this process, it also fills its hallway
with tiles. This is a more complicated process than filling rooms. Once this is finished, the lists
of tiles in both children and the hall are added to the node’s list of tiles before the method
returns, such that the root node eventually has a list of all the tile objects that are in the map.
Purely vertical hallways are filled from the bottom up, and purely horizontal hallways are filled
from the left to the right. Hallways with a corner are filled differently depending on how the two
rooms are positioned in relation to each other, as during the hallway creation process one room is
designated as the starting room and the other as the ending room. For such hallways that first
head vertically, the vertical direction is from the starting tile’s vertical position to the ending
tile’s vertical position, and then horizontally left to right. Similarly, if the hallway first heads
horizontally, the horizontal direction is from the starting tile to the ending tile, and then vertically
bottom to top. The direction the tile placement algorithm follows in different cases is shown
below in figure 4.9.
42
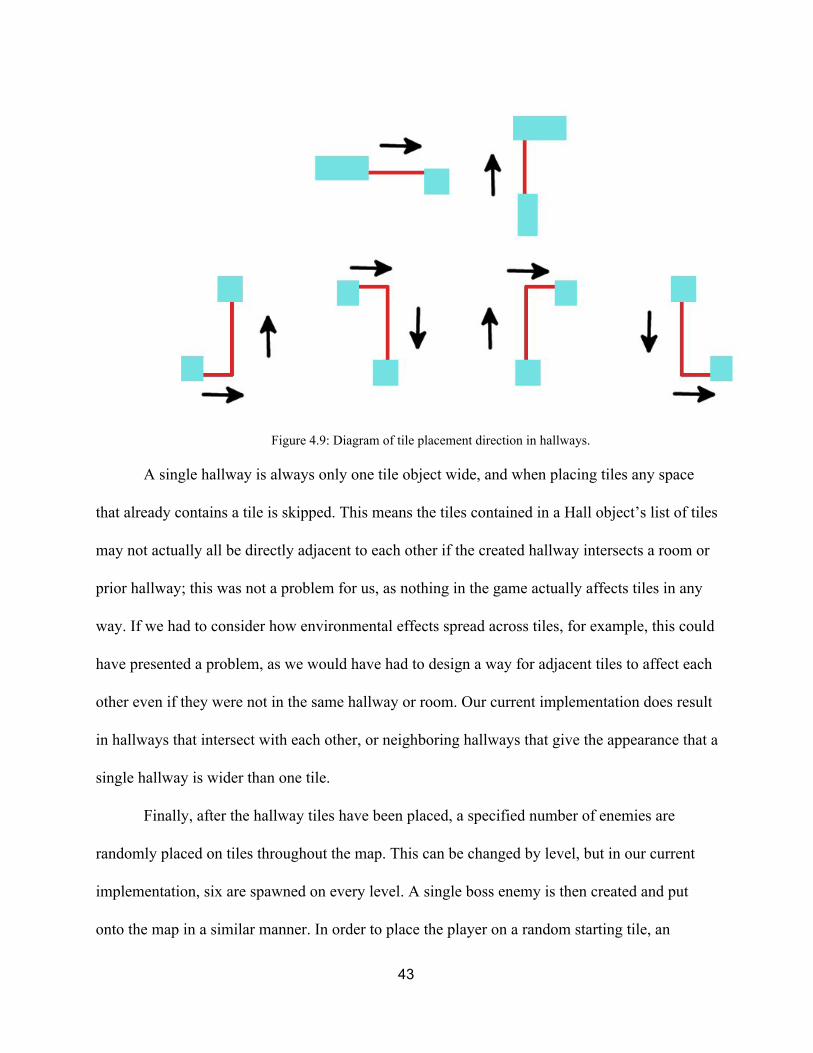
Figure 4.9: Diagram of tile placement direction in hallways.
A single hallway is always only one tile object wide, and when placing tiles any space
that already contains a tile is skipped. This means the tiles contained in a Hall object’s list of tiles
may not actually all be directly adjacent to each other if the created hallway intersects a room or
prior hallway; this was not a problem for us, as nothing in the game actually affects tiles in any
way. If we had to consider how environmental effects spread across tiles, for example, this could
have presented a problem, as we would have had to design a way for adjacent tiles to affect each
other even if they were not in the same hallway or room. Our current implementation does result
in hallways that intersect with each other, or neighboring hallways that give the appearance that a
single hallway is wider than one tile.
Finally, after the hallway tiles have been placed, a specified number of enemies are
randomly placed on tiles throughout the map. This can be changed by level, but in our current
implementation, six are spawned on every level. A single boss enemy is then created and put
onto the map in a similar manner. In order to place the player on a random starting tile, an
43

integer between 0 and the number of tiles in the map is generated. The tile with that index in the
map’s list of every tile is retrieved. If an enemy is on that tile, this process is repeated until an
unoccupied tile is chosen. The player is then placed onto that tile, and the player can begin to
play the level.
4.6 Handwriting Recognition
Handwriting recognition is a vital component of Hira Hero’s battle system. During the
battle, the player receives actions based on the fluency of his writing. Fluency being defined as
ease and accuracy of one’s writing, so we evaluate this by measuring the following:
● Accuracy - How accurate the player’s writing of the character is (including stroke order)
● Speed - How fast the player successfully wrote the character
The combination of writing a character accurately and at a fast speed means that the player had
an easy time writing the character. So if both of these measures are positive, it means the player
is writing a character fluently. The accuracy measure is calculated based on the accuracy output
of the recognizer and the time measure is based on the seconds the player spent on writing the
character. To implement this part of our design, we first had to choose a handwriting recognition
library to use before moving on to creating the handwriting recognition system. This section goes
over our options for libraries, why we ended up choosing the Zinnia writing recognition library,
and the implementation of the handwriting system in our game.
44

4.6.1 Handwriting Recognition Libraries
Since the educational goal of Hira Hero is to increase the player’s ability to write
hiragana fluently, having a handwriting recognizer that could recognize all of the hiragana the
user writes on the screen was essential. However, Japanese handwriting recognizers can be
sensitive intelligence property, whose source code are often be protected by the companies that
developed them. This meant that a well documented open source handwriting recognizer was
difficult to find to find. Through our research, we encountered three kinds of handwriting
recognition methods (see Table 4.10), which included the gesture recognizer scripts for Unity,
the Tomoe handwriting recognition engine, and the Zinnia handwriting recognition system.
Name of the Program Method of Recognition Has Stroke Data Stroke Order Sensitive
gesture recognizer Compare against
template
No Not Applicable
Tomoe Compare against
template
Yes No
Zinnia SVM Yes Yes
Table 4.10: Comparison Between Different Methods of Recognition Programs.
The gesture recognizer (Unity Community Wiki, 2010) is a set of Unity open source
scripts that can be found on Unity wiki. This program collects all the points a user draws on the
screen in one stroke, and then resamples the array of points to unify the distance between each
point. Then it rotates and scale the stroke based on its center and size. Finally, it translates the
45

center of the stroke to the origin of the coordinate system, and matches the processed points
against a set of templates. However, the problem with this method is that the recognizer is
written for the purpose of recognizing shapes with only one stroke. For this recognizer to work in
our game, we would need to change it so it can recognize shapes with multiple strokes. We
would also need to write our own template for each hiragana character, which could cost a lot of
time and effort to achieve. Even considering the benefit of working with scripts already written
for use in Unity, that cost was high enough that we decided to look elsewhere for our
handwriting recognition solution.
The Tomoe handwriting recognition engine is an open source program that has a built in
template that contains the stroke data for recognizing all 46 hiragana characters. This program
collects all of the strokes the user writes on the screen and then utilizes a corner finding
algorithm to optimize which points are collected for each stroke. This results in only the points
on each end of a straight line and the points lying within the corner of a curved line being saved.
The program then takes the optimized array of strokes and compares them against the trained
characters that have the same amount of strokes, comparing each stroke’s angle and length. The
algorithm of the Tomoe handwriting recognition engine is written in ActionScript and is able to
run in a flash program. We tested the program and found out that the program had a high
accuracy rate for recognizing the handwritten characters. However, the fact that the program
recognized handwritten characters written with an incorrect stroke order with no way of
indicating that they were written incorrectly was not going to be helpful for the players to
improve their writing skills. Additionally, we did not plan to work with ActionScript and were
wary of having to port the library. We decided to designate this program as a backup in case the
46

plan of using the Zinnia handwriting library did not work well during our development of our
game.
Zinnia (Sourceforge) is a portable and customizable online handwriting recognition
system based on support vector machines. It receives user input as a sequence of coordinate data
and outputs the n-best characters ranked by their SVM confidence. In addition to directly
recognizing characters from input strokes, Zinnia can be trained by the user to recognize
additional characters and shapes with multiple strokes. In order for Zinnia to recognize
handwritten characters, it needs a trained model. Fortunately, there is one character recognition
model for Zinnia trained by Tomoe’s data which came packaged with Zinnia; this contains all
the training data for hiragana, katakana and kanji. Additionally, the recognition system is also
stroke sensitive. If the user does not input a character’s strokes in the correct order, then the
program is unlikely to recognize it. This property of Zinnia fits the educational goal of our game
as it allows us to evaluate fluency by detecting characters written with the correct stroke order,
and rejecting characters written in the incorrect stroke order. This binary approach to handling
stroke order was not ideal, but a harsher approach was preferable to ignoring stroke order
entirely as Tomoe did.
4.6.2 Handwriting Recognition System
To build this handwriting recognition system, we created three classes: the draw line
class, the hiragana class, and the recognizer class. This section will explain in detail how the
functions of each class are implemented.
47

The draw line class takes care of the visual feedback part of the system. Its function is to
show players what they have drawn on the screen. In this class, we utilized the line renderer
component in Unity to enable the player to draw lines in the game world. The line renderer
draws a free floating line in the three dimensional game world between two given points. To
draw a line, the line renderer needs to know how many vertices are in the line and what their
positions are in within the game world. Furthermore, in order to draw a line with a smooth curve,
which is featured in most strokes of hiragana characters, we need to give the line render as many
points as possible. For each stroke, we decided to feed all of the touch positions collected by
Unity to the line renderer, and update the amount of vertices as more points are being collected.
One of the merits of using a line renderer is that it allows us to edit the width and color of the
line, which we took advantage of to improve the aesthetic of the player’s writing and make the
line look like as if was painted by a brush.
The hiragana class contains information on the hiragana characters that are included in
the game. The information includes the hiragana in romaji form, the hiragana in character form,
the stroke count of the character, the stroke order animation, as well as a boolean representing
whether the player has encountered this character in current level. At the beginning of the level, a
set of hiragana characters will be shuffled into a list. When a battle begins, the hiragana at the top
of the list will be retrieved, then an animation showing the stroke order and a romaji of that
character will show up in the battle scene. The recognizer keeps track of the correct stroke
amount for that character, and will start the recognizing process after the player has written the
correct amount of strokes. After recognition finishes, the recognizer will compare the target
character against a list of the three characters it thinks are most likely to be what the player
48

wrote. If the list contains the target character, then the player has written the correct answer. This
is admittedly a simplistic implementation of deeming whether a character was correct or not.
However, given the limited pool of hiragana characters currently in the game, it avoids potential
issues that could be encountered with some of the unused characters that are very similar looking
to each other.
At the end of each turn, the selected target hiragana will be removed from the list of
potential target characters, and if that list is now empty, the program will generate a new list by
starting from the same set of hiragana objects and shuffling it using the Fisher-Yates shuffle
algorithm (Bostock, 2012). The Fisher-Yates shuffle algorithm is a very simple algorithm. First,
it takes in a list of objects as its input. In this case, the input is the level’s list of hiragana
characters. It then picks a random number from 0 to m, where m is initially the total number of
objects in the list. The object whose index is the selected number is swapped with the last object
in the list, and m is decreased by 1. By repeating the steps above until m is 0, all of the members
in the list will be shuffled. The reason we put hiragana characters in a shuffled list is because we
did not want the player to be able to expect what she is going to be asked to write next. At the
same time, we wanted the player to learn and practice all of the hiragana characters featured in
the level, so we made sure that they would always see the characters in batches in this way.
Ideally, we would implement a more complex system to modify the probability of each potential
target character being selected based on how recently it had been encountered. This would
ensure that all the characters would be reinforced without making the end of each batch as
predictable. However, at the time that we added this feature, we felt that the shuffled batch
49
method would still allow for a version of what we wanted while not straining the time we had
left to develop it.
The recognizer class is the heart of the recognizing system in the game. Similar to the
draw line class, it collects the same pixel points that the player touched and analyzes those points
by calling functions from the Zinnia library. For the Zinnia library to recognize a character,
several steps must be done. First the recognizer class needs to initialize the recognizer by calling
the relevant function from the library. Then the recognizer needs to load a model file that
contains all of the trained data for each hiragana character. After that, we need to create an empty
character object that will then hold information about the size of the drawing area as well as the
stroke data that the player is inputting. The Zinnia recognition library can take any number of
points for each stroke. Here, the points collected as one stroke are the points the player draws
from when he first touches the screen till when he removes his finger from the screen. After
collecting all of the strokes for a character, the recognize function is called and outputs what the
possible characters it may be are. These characters in this output, the number of which having
been specified by us beforehand, are stored in a list and sorted with a score calculated by the
Zinnia based on the confidence of its support vector machine. Unfortunately, it was hard for us to
use this score in our work directly as the confidence algorithm Zinnia used to produce this score
was not documented clearly, and we were afraid of the effects this unknown element could have
on our accuracy scores. To calculate the accuracy score we instead considered the ranking of
characters. For example, a player will get total fifty points for how accurate she wrote the
hiragana. If the character she is supposed to write is listed in the first place in the outputs of the
recognizer, then the player will be rewarded full score for perfect accuracy. However, if the
50

character is listed in second or third place on the output list, then the accuracy score will be
reduced accordingly as punishment. If the character the player was supposed to write is not in
this top three at all, then the player is given an accuracy score of zero.
There were several distinct big challenges we faced when we tried to implement the
Zinnia library in our game. The first challenge was importing the functions from the Zinnia
library, which originally written in C to Unity’s C# environment. It was hard to find resources on
using external libraries in Unity when they were not designed for that purpose. Often, those
resources were related to modifying the library’s source code, which we were hesitant to do.
However, we had access to the Zinnia source code package’s DLL file, but were not sure how to
give Unity the ability to access it, and even after we figured this out, we faced numerous crashes
of Unity upon running the game. Thank to Professor Rich’s advice, we started to build a library
just for a simple “hello world” program and expand from there. We quickly realized that we had
to change some methods’ return types and then modify how an error check worked, and after that
point, we were able implement and test Zinnia recognizer in Unity on Windows.
The second challenge we encountered was trying to improve Zinnia’s accuracy. We built
a handwriting recognition program prototype to test the accuracy of the recognition system. At
the first, the result was not ideal. Although we tried our best to draw the hiragana characters on
the screen, the recognizer output was random and did not contain the desired character. Due to
lack of documentation, we needed to figure out how to improve the accuracy of Zinnia by
experimenting with different methods. We tried to reduce the size of the trained model. The
Japanese recognition model that was included in the Zinnia source code contains a vast amount
of data for hiragana, katakana, and kanji characters. As the only characters we make use of are
51

hiragana, the other data was not applicable. After we reduced the data in the trained model, the
improvement of accuracy was not as obvious as we hoped it would be. The second method we
tried was to confine the player’s writing space within a square. Our initial plan was to allow the
user to write on the entire screen, but we found out that Zinnia needs to know the size of the
relevant writing space, and we assume Zinnia will scale the point information of drawn shape
base on the writing space. Most Android phones have rectangular screens, so in order for Zinnia
to recognize correctly, the characters drawn on the screen needed to be stretched horizontally or
vertically depending on how the player is holding the phone.
All of the characters are written within square shapes. Not using a square would result in
stretched hiragana characters that look distorted and would hinder beginning learners on how to
write the characters correctly. After confining the writing space to a 900x900 pixel square, the
accuracy of the recognizer improved vastly. According to our test, 31 out of 46 hiragana had an
accuracy rate over 90%. Seven hiragana had a slightly worse accuracy rate which range from
60-80%. Only “す” is very hard to recognize by the recognizer for unknown reason, and we also
found “も” can only be recognized when written in wrong stroke order. As our current version of
the game only uses the first three sets of characters and specifically does not include “す”, we
avoided causing any player frustration as a result of these quirks. Fixing this would be a matter
of retraining Zinnia’s model for any characters with issues which is not too difficult to do but
would be time consuming enough that we opted to simply avoid using that character instead for
the purposes of this proof of concept.
The third challenge was to build Zinnia’s library for Android devices. Android devices
can have different CPU structures from one another, with ARM and x86 being the most
52

common. As a result, Android devices require library files in a format different than the DLL
library file used by Windows. Fortunately, we had access to the source code of Zinnia written in
C and so were able to rebuild the library ourselves. We used Android NDK to help us build the
library; this toolset that allows the implementation of native code into an Android program. The
building of the library was not easy as there were many variables and statements that we needed
to write and were unsure of how they were going to affect the result. Just as with getting the DLL
library to work, the solution was to start small and build up from a “hello world” program until
everything we needed was working. Eventually, we figured out the correct values for the
variables and put correct flags as statements and were able to create libraries for both ARM and
x86 CPU structures.
4.7 Stroke Order Animations
Whenever a target hiragana character is encountered in a battle for the first time, an
animation of how the character should be drawn is presented in the drawing box. This allows the
player to be able to trace the animation and learn the correct stroke order for the character. This
animation is also played the after a character is encountered following a time when it is written
incorrectly, so the player can be reminded of how to write it properly.
The animation was made in Unity’s sprite animator. The source images for these
animations were originally in .gif format and were downloaded from a website (Kumar, 2013).
Each frame of the gif was first extracted and edited in Gimp 2, a free image editing tool, and was
then loaded into Unity 5 to make the animation. Each character’s animation is an prefab object
with correspond animator, and each prefab was then loaded by the recognizer class script. This
53

script contains a function to keep track of the current camera location, so that the animation will
always be shown in front of the camera within the drawing box.
It should be noted that we had to specifically alter the stroke order animation of “そ”.
The original animation showed the character as being written in a single stroke, but the
recognizer expects the character to be written in two strokes instead. Figure 4.11 and 4.12 show
these two different ways in writing “そ”. An inconsistency like this is not unique as there are
many other Japanese characters with alternate stroke orders that may differ from our recognizer’s
model data. We need to pay special attention to each new character if we want to expand the
content of this game in the future.
Figure 4.11: Writing “そ” in one stroke. Figure 4.12: Writing “そ” in two strokes.
4.8 Inventory
When the player taps on his character, the inventory and equipment menu opens. This
menu is shown earlier in the document in Figure 2.2. The entire menu is scaled to the size of the
phone’s screen, as the placement and size of the GUI This menu has labeled equipment slots for
each of the six equipment types available to the player: helmets, shirts, rings, brushes, pants, and
boots. Additionally, the player has ten inventory slots to hold unused items in. Each equipment
54

type, as well as health potions, has its own icon that is displayed when that item is in a slot.
These icons are all 60x60 .png images that scale to match the size of the slot, which is 18.75% of
the screen’s width wide and 12.5% of the screen’s height tall. The player’s stats and current
health are also displayed. These stats are dynamically updated as the player’s equipment
changes.
As with the rest of the game, the inventory menu is specifically designed for use with an
Android phone’s touchscreen. The player interacts with the menu by touching an item’s icon and
dragging it with the icon’s image being moved to reflect the finger’s new position (see section 2,
Figure 2.2 for an example of this). By dragging the time to a different inventory or equipment
slot, and then raising his finger from the screen, the player can organize or equip his items. If the
item is not released over a valid part of the screen or is released over an equipment slot that does
not match its item type, it is put back into its originating slot. If there is already another item in
the slot the item is being released in and it is a valid move, the items will swap slots. If the
destination slot’s item is not valid for the originating equipment slot, the destination slot’s
current item will just be returned to the inventory in the next open slot rather than being
swapped. However, if no slots are open, then both items will just remain in their original slots.
This menu has additional functions besides just equipping items. By dragging a potion to
the health bar when it is not full, the player can consume it to regain a set amount of health. If the
player wishes to remove an item from his inventory, the player can release it over the Trash slot,
which removes it permanently. When an item is being dragged, its name, description, and stats
are all displayed in the menu screen, allowing players to compare items’ powers. Finally, by
55
tapping the exit button placed in the top right corner of the screen, the player can return to
playing the rest of the game.
All of this is maintained by a Menu script that handles both the GUI and touch events that
are integral to the menu working. The icon, name, description, stats, and ID number of items are
all stored in an Item object. Similarly, a single ItemHolder object contains all the possible Items
in the game as defined in section 3.3 (Figure 3.5). This is also used for generating the random
item drops from enemies mentioned in section 3.1. Its final use is to fetch items by their
associated ID number, which is used when loading a returning player’s inventory at the start of a
level as only the IDs and not the actual Item objects are saved upon level completion.
4.9 Art and Audio
As our team was entirely made up of programmers, it was hard for us to create art for the
project ourselves. To compensate for this, our game used royalty free assets as well as assets
available to buy from the unity store (see Appendix 7.1 for this list of assets). The models and
textures we chose were relatively low in polygon amount and detail in order to ensure optimal
performance on most Android phones. The music was selected to enhance the gameplay
experience, which is to make exploration and battles feel more thrilling and dangerous. Lastly,
we chose sounds to help provide feedback on what is occurring in battle, such as the player
getting hurt or the player running out of time to write a given hiragana character. We gave the
player character and enemies sounds while attacking to give players a stronger connection to
what is happening, and to give a stronger indication of whether they are doing well or not (see
Appendix 7.1 for a list of these sounds).
56
5 Testing
The purpose of Hira Hero is to teach hiragana fluency with the danger and thrill of a
roguelike game such as Desktop Dungeons or Pokemon Mystery Dungeon . This section discusses
the procedures we took to recruit and test participants to see if our game meets this purpose.
Afterward it discusses the results we received from these tests and what those results can mean.
5.1 Procedures
Volunteers for the study were members of the student population at Worcester
Polytechnic Institute, recruited through friends. Each volunteer was sent a zip file containing a
pre-play and post-play questionnaire (see Appendix 7.2), an APK file to install on her Android
device, and a text file each volunteer was instructed to read first for guidance in installing the
game. The pre-play questions accessed any hiragana writing experience the volunteer may have.
The post-play questions assessed whether the game achieved its experience goal of giving a
feeling of danger and thrill, along with testing the volunteer’s hiragana writing again to see if he
learned or improved. This does not completely test the user’s writing accuracy and speed, so we
also asked the volunteers to send a file that the game creates which tracked her accuracy and
speed scores from the gameplay session.
After each completion of a level, Hira Hero creates this text file with various statistics
based on his accuracy and speed in writing each hiragana character (see Figure 5.1). These
statistics are based on the time and accuracy scores the game uses when rewarding the player
57
with actions in battle. Each hiragana character keeps track of its total time score for a level,
which is the sum of the time scores given for every time that character was written in that level.
Each character also keeps track of the first time score that is earned, the last time score that is
earned, the number of times that character is encountered, and the average time score. The same
type of statistics are tracked for accuracy scores for each character. With these statistics, we can
look for any patterns, such as “Does the average time score increase as the number of times the
character is encountered increases?” Based on these patterns we can evaluate whether or not the
game was successful in teaching the educational content, and how it can be improved to teach
the content better, resulting in plans such as “Make sure X character is always encountered X
amount of times”
58

Figure 5.1: Example of stats file produced by Hira Hero after completion of Level 1 in this example. Time and
accuracy scores have the same scaling (a max of 50 points can be earned for each individual score)
59

5.2 Results
A total of three participants were able to test each level in our game until completion. All
three were male, aged between 20 to 21 years old. One of three expressed explicit interest in
wanting to learn to write hiragana fluently while the other two did not in the pre-play
questionnaire. None of the three had ever studied hiragana.
In the post-play questionnaires, none of the participants expressed strong feelings towards
whether or not they felt they were ever in danger or if the game was thrilling (selected ‘3’ on a
‘1-5’ scale for danger and thrill, see Appendix 7.5). While this shows that our game is not
exactly calm or boring, it shows that it is not at the level of danger and thrill we desire it out to
be as none of our testers expressed a strong opinion of a ‘4’ or ‘5’ for these questions. Our open
ended question asking what could be added to make the game more thrilling shows that Hira
Hero can be improved in this aspect. Two of the suggestions here explicitly pointed out that
features could be added to exploration like finding treasure, finding other obstacles besides
enemies, and preventing the boss from spawning too close to the player. From here we can try to
implement these features and others to the exploration section of the game, as this feedback
seems to imply that the exploration section was lacking in giving the sensation of danger and
thrill.
Each of the participants felt the educational content was taught at appropriate times and
that their hiragana writing speed improved, but only one of the three felt his writing accuracy
improved while the other two did not. Each of the participants were also able to write all of the
given english syllables in hiragana with recognizable accuracy, which seems to contradict the
60

two who felt they had no improved accuracy. This suggests that we might not be giving enough
feedback to the players as they did not realize their skills were improving. If players feel
mistakenly discouraged, it could make them less likely to play the game in the future. The
in-game stats also show that the average accuracy score was higher for almost every character
that was tested than the speed score (seen as time score in the example Figure 5.1).
5.3 Discussion
It is worth noting that due our low participant count, we cannot prove any of these results
were statistically significant, but the results brought up here do give ideas for future
improvements to the game as well as testing. The questionnaires suggest that Hira Hero has at
least partially missed the mark in terms of its experience goal as players did not feel the
sensation of danger and thrill. The open question answers appear to point to the exploration
sections of the game being its weak points where there is no danger or thrill to be had, and
adding more obstacles or features to this section in the future could help improve that. However,
the questionnaire results do suggest Hira Hero was successful in its educational goal of teaching
hiragana writing fluency by testing accuracy and speed. Each participant felt an improvement in
his writing speed, and while not all of the participants felt an improvement in accuracy, the
in-game stats and writing test in the questionnaire suggest that each of them had learned to write
the tested characters with at least recognizable accuracy. For future testing, in addition to more
participants, the results could be much more significant if we let participants play the game a
small amount each day over the course of the week and then tested each of them at the end. This
61

way we could make sure that they actually learned the educational content while playing in the
manner that we are targeting, and that it is not just temporary.
Based on this feedback, there are three design and balance changes we would make:
● Rebalance the attributes of items to make the player have a more gradual increase in
power. Currently the player can become overly powerful after gaining a few items if they
are lucky. As we want the game to be replayable, it is important that the player not
become bored due to their own strength before they are confident enough to proceed to
later levels. Additionally, potions as they are currently implemented are too weak, and are
not given to the player often enough. This resulted in some players becoming frustrated
by their inability to recover their health after fighting enemies as they received equipment
instead of potions, making it unfairly difficult to survive fighting the level’s boss.
Balancing this and giving the player other ways to recover health would make the risk
versus reward aspect of the game feel more fair instead of annoying the player.
● Make sure the boss does not spawn too close to the player, or at least in the same room.
This way the player always has to explore to find the boss, making this part of the
gameplay more important. It also will increase the chance the player will have to fight a
standard enemies and therefore increase the amount of characters she has to write,
hopefully improving her writing fluency by encountering the characters more often than
once or twice in a boss fight. This also means that the player will acquire more items,
meaning that it is unlikely that she will encounter the boss fight when she is not powerful
enough to defeat it.
62

● Implement more obstacles to encounter in the exploration part of the game. In addition to
wanting exploration to be more important by moving the boss away from the player, we
also want this part of the gameplay to be just as dangerous and thrilling as the combat
part of the gameplay. As two of our three testers expressed interest in more features to
exploration, we feel adding more obstacles than just enemies and the boss will satisfy
those interests in improving exploration. Ideas for this include treasure chests as
suggested, so that fighting is not the only way to earn loot. Our other idea would be other
NPC characters the player can find, who will have some type of quest or puzzle the
player must solve by writing hiragana characters fluently. We would still want these
obstacles to be dangerous, so there will be twists such as a treasure chest could possibly
be a mimic that is a very strong enemy or the NPC could be a thief that randomly steals
an item from the player’s inventory and the player must explore to find and defeat him to
get the item back. This way, there is still a danger and thrill sensation from choosing to
encounter one of these obstacles just like there is in deciding to fight an enemy for loot.
63

6 Postmortem
Our team achieved in making Hira Hero with the core gameplay features we wanted. It
can run on Android phones as we wanted and it runs well on them, with no crashes discovered
yet. We were able to implement the core roguelike and dungeon crawler features we desired such
as exploration, procedural dungeons, items, the ability to progress with the items, and player
death that causes the player to lose his items earned in a level upon failing a level. These features
are at a more basic level than what we had desired, and if we had more time we would expand
upon them. The game would benefit from including other obstacles besides enemies to find when
the player explores, such as treasure chests or friendly NPCs. Additionally, more interesting
items with more intricate differences would be appealing, like a brush that would give the player
a new attack, or armor that regenerates health on a successful block. By expanding features like
these, we feel would improve the game to make its exploration and combat more thrilling and
engaging, while also adding more danger as the player has more obstacles to overcome while
exploring and loot would become more important to keep safe. Alternatively, it may have been a
good idea to simplify the equipment system even further. With six equipment slots and a limited
time to balance the final game, it was difficult to balance the items we did have, and fewer slots
would have made that easier. More time would have given us more freedom to experiment with
different equipment and stat systems to find a good compromise between depth and accessibility.
The core writing recognition system and the combat system to go with it were
implemented successfully. Implementing the Zinnia writing recognition library took much more
of our development time than we initially expected, and we would perhaps have been better off
64

more actively trying to find other solutions with better documentation. We only implemented 14
of the 46 hiragana characters we planned to in order to make sure that all of the game’s features
could be fully functional, so the rest of the game’s levels and the characters that go with each
would be implemented next so that we can teach the players writing fluency with all hiragana as
we intended. Additionally, both the writing and combat systems need improved feedback to let
the player know what is going on. As we were close to finishing the game we realized this, and
only had time to implement a few features such as distinct sounds that let the player know how
fast or accurately he wrote the character. Other feedback features we would like to add would be
clearer animations or imagery of what type of attack the enemy used, so that it is clearer to
players why they lost health or why the enemy lost health. In particular, visualizing which fighter
gained the advantage during an attack would be helpful. Additionally, an animation that shows
the character the player drew flowing up into the player’s action bar would help tie together the
writing and combat system, as the player would visually see and understand that her writing
fluency is what is allowing her to use actions against the enemy rather than having new actions
suddenly appear.
Testing could have been planned out earlier, such that we could obtain approval to test
WPI students earlier. Then we could have recruited volunteers at WPI earlier, and students
would be more likely to have a time available to test the game. With more time and testers, our
results for this test would prove much more helpful to further development. Furthermore, we
would have been able to test with more players that do not usually play games, allowing us to
find ways to expand our audience. This was particularly an issue as our testers had other
65

commitments as the end of the term approached, making it harder for us to receive detailed
feedback that could affect balancing and mechanical changes.
What we would implement next would be more features to the exploration part of the
game, such as the additional obstacles discussed in section 5.3 like treasure chests and NPCs.
Once we finished those additional features, we would implement a proper in-game tutorial
instead of the current text only tutorial such that it is more clear to players on how to play our
game and how the combat works. As things are currently, there is an expectation of familiarity
with roguelikes and RPGs that could limit our ability to reach our target audience, so improving
the introduction to the game would make it easier to keep unfamiliar players interested. After
implementing the in-game tutorial, we would implement any minor, non-game changing features
that would improve the game such as making sure the boss does not spawn too close to the
player which makes the game too easy. Once all the features are complete, we would implement
the rest of the levels such that the game would have all of the 46 hiragana characters, instead of
just the current 14 characters. We would then run a larger test with more participants that
features the participants playing our game over the course of a week, and then being tested at the
end of the week to see if the game met our experience and educational goals. From our feedback
from these new tests, we would implements and improve any features we felt necessary until test
results show that Hira Hero meets its goals and is ready for a public release. Finally, we would
then be able to expand beyond Android devices to iOS devices as well, as we know there were
people who expressed interest in the game who were unable to play it due to owning an iPhone,
and furthermore this would be an important step towards expanding the audience we can reach.
66

7 Appendix
7.1 Asset List and Sources
Player and Bat Models and Animations - Shop3DSA www.shop3dsa.com (Unity Asset Store)
Explore Music:
Adventure Meme Kevin MacLeod
(incompetech.com)
Licensed under Creative Commons By Attribution 3.0
http://creativecommons.org/licenses/by/3.0/
Battle Music:
Rhinoceros Kevin MacLeod
(incompetech.com)
Licensed under Creative Commons By Attribution 3.0
http://creativecommons.org/licenses/by/3.0/
Menu Music:
Eastminster Kevin MacLeod
(incompetech.com)
Licensed under Creative Commons By Attribution 3.0
http://creativecommons.org/licenses/by/3.0/
The following sounds are from Freedsound.org (formated as author__nameofsound)
Timeout - themusicalnomad__negative-beeps.wav
Incorrect - gabrielaraujo__failurewrong-action.wav
Fair - grunz_success.wav
67

Good - fins_success-1.wav
Fantastic - fins__success-2.wav
The following sounds are from Sonniss GDC sound pack:
Player Attack - Action Switch_HW 02 (www.sonniss.com)
Player Throw - Action Swirl Woosh_HW 04 (www.sonniss.com)
Player Hurt - Slice_Crunchy_Fienup_002 (www.soundopolis.net)
Player Death - Timpani_Hit_Fienup_001 (www.soundopolis.net)
Bat Attack/Throw - Hisses Dry 11.M (www.rdgsoundfx.com)
Bat Hurt - Hisses Dry 14.M (www.rdgsoundfx.com)
Bat Death - EFX SD Female Ragging Creature 03 (www.sonniss.com)
68
7.2 Questionnaires
Questionnaire (Pre-play)
Age: _________
Gender: _________
Have you studied hiragana? (circle yes or no)
Yes No
What’s your comfort level writing hiragana accurately? (circle one)
Not Comfortable Very
Comfortable
1 2 3 4 5
How fast do you feel you can write hiragana? (circle one)
Not Fast Very Fast
1 2 3 4 5
Do you want to learn to write hiragana more fluently? (circle yes or no)
Yes No
Write the following in hiragana:
69

a ka e ku sa so u
____ _____ _____ _____ ______ ______ ______
Questionnaire (Post-play)
How often did you feel you were in a danger of losing? (circle one)
Not Often Very Often
1 2 3 4 5
How thrilling did you feel the game was? (circle one)
Not Thrilling Very Thrilling
1 2 3 4 5
Did the battle system make sense? (circle yes or no)
Yes No
Do you feel the educational content was taught at appropriate times? (circle yes or no)
Yes No
Do you feel the speed at which you write hiragana improved as you played? (circle yes or no)
Yes No
Do you feel your hiragana accuracy improved as you played? (circle yes or no)
70

Yes No
If you had to learn to write hiragana fast and accurately, would you continue to use this game to
learn? (circle yes or no)
Yes No
Write the following in hiragana:
i ke e ki sa se o
____ _____ _____ _____ ______ ______ ______
What do you feel could be added to make the game more thrilling?
What do you feel could be added to help teach the educational content?
71

7.3 Secondary Projects
As part of our work at Osaka University, we took part in a secondary project. This
involved being split into groups supporting other Osaka University students who had begun these
projects in a weekly class. Of our three group members, Jesse and Adam worked with one of
these groups while Yuheng worked with a different one.
7.3.1 Head Mounted Tunnel (Jesse and Adam)
Figure 7.1: Screenshot of Head Mounted Tunnel models in Blender.
Our group was working on a device they called a “Head Mounted Tunnel” or “HMT”.
This was a series of connected rectangular frames extending outward from the head of the person
72

that the device is strapped to. The frames are increasingly smaller the further outward they are.
Strips of LED lights on these frames flash in intervals proceeding from the furthest frame to the
closest frame to the face in order to create the illusion of movement.
We were tasked with creating a simulation of this device with differing frame sizes and
light intervals. Adam created the frame models in Blender and began scripting the lighting
simulation in Unreal Engine. Jesse placed the lighting on the different models in Unreal Engine,
added to the scripting, and recorded video of different setups in action as requested by the other
group members. The variables for these setups were different time intervals between each
subsequent frame flashing and which of the three frame models was used. By inputting different
time interval variables into the simulation’s scripts, it was easy to create new setups, though
switching models required loading a different Unreal Engine project. This data was to be used by
them to create a physical prototype. However, after they received simulation data that they were
pleased with, we were never asked for additional data nor were told any news of how this project
ended.
This is not too surprising, as we were not informed of how the original group members
decided upon this project or what the intended use case for the device was beyond inducing the
feeling of moving quickly. We had issues communicating with the group members to clarify its
details, as all three group members knew very little English, and we in turn knew very little
Japanese. After an initial meeting where we all struggled to talk to each other, they primarily
communicated with us via LINE messages or e-mails. This allowed for clearer communication
than talking in person, since we could all use machine translators. We only met in person twice
after the initial meeting, as on one day all the groups went shopping for prototype supplies
73
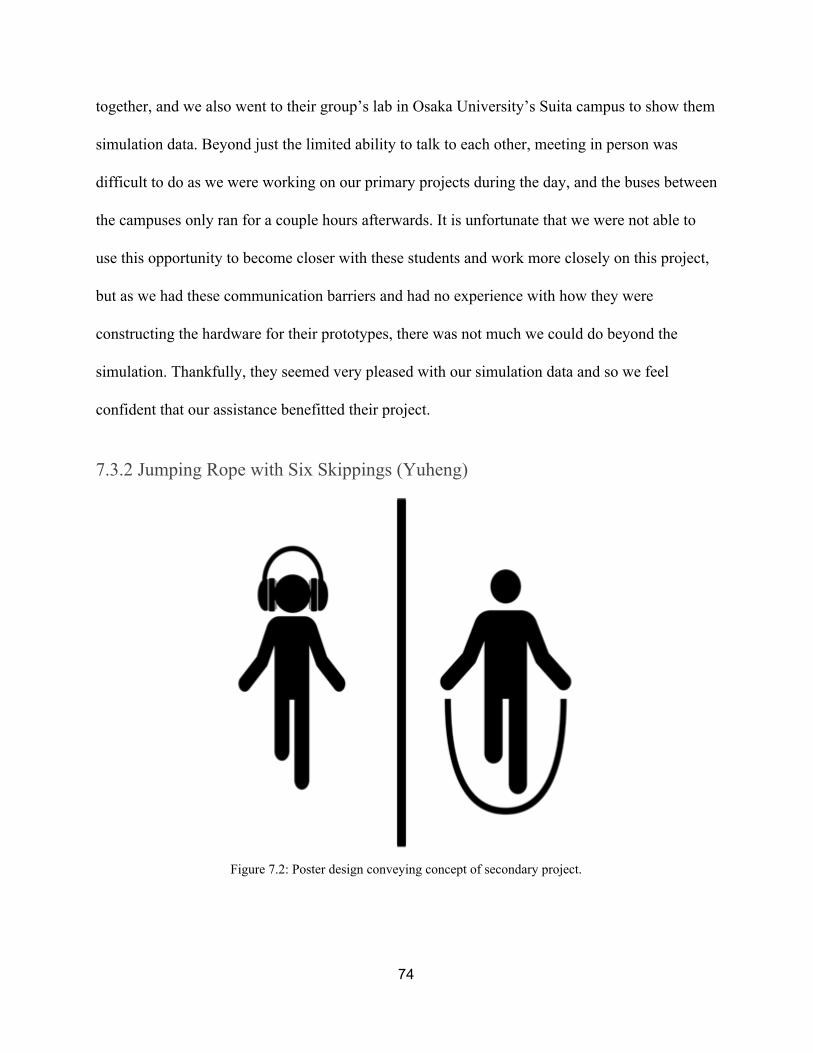
together, and we also went to their group’s lab in Osaka University’s Suita campus to show them
simulation data. Beyond just the limited ability to talk to each other, meeting in person was
difficult to do as we were working on our primary projects during the day, and the buses between
the campuses only ran for a couple hours afterwards. It is unfortunate that we were not able to
use this opportunity to become closer with these students and work more closely on this project,
but as we had these communication barriers and had no experience with how they were
constructing the hardware for their prototypes, there was not much we could do beyond the
simulation. Thankfully, they seemed very pleased with our simulation data and so we feel
confident that our assistance benefitted their project.
7.3.2 Jumping Rope with Six Skippings (Yuheng)
Figure 7.2: Poster design conveying concept of secondary project.
74
The group I participated in for the secondary project was developing a virtual reality
device about jump ropes. This device will allow people who have different background in
jumping ropes to experience jumping six skips, which means rolling the rope six times in one
jump. The device contains three parts: a screen with laser projector, a pair of stereo speakers, and
a pair of handles embedded with motors. The user will stand in front of the screen, watching the
laser shoot out a beam that emulates a rope rolling in front of them. The user will also hold
handles which will shake to simulate the feeling of rolling the rope, and at the same time rope
swinging sounds will be played from the speakers. Eventually the user will have an intense jump
rope experience without actually doing any of the work involved in turning the rope quickly. As
a group member, I was assigned to design the poster that shows off the main idea of our project,
as seen above in Figure 7.1.
75
References
Adonaac, A. (2015, September 3). Procedural Dungeon Generation Algorithm. Retrieved
September 20, 2016, from
http://www.gamasutra.com/blogs/AAdonaac/20150903/252889/Procedural_Dungeon_Ge
neration_Algorithm.php
Anderson, M. (n.d.). Dungeon-Building Algorithm. Retrieved September 20, 2016, from
http://www.roguebasin.com/index.php?title=Dungeon-Building_Algorithm
Basic BSP Dungeon Generation. (n.d.). Retrieved September 20, 2016, from
http://www.roguebasin.com/index.php?title=Basic_BSP_Dungeon_generation
Bostock, M. (2012, January 14). Fisher-Yates Shuffle. Retrieved September 15, 2016, from
https://bost.ocks.org/mike/shuffle/
Cook, M. (2013, July 23). Generate Random Cave Levels Using Cellular Automata. Retrieved
September 20, 2016, from
https://gamedevelopment.tutsplus.com/tutorials/generate-random-cave-levels-using-cellul
ar-automata--gamedev-9664
76

Clift, M. (2014). A Simple A* Path-Finding Example in C# . Two-Cats Blog. Retrieved from
http://blog.two-cats.com/2014/06/a-star-example/
Creating a BSP Tree. (n.d.). Retrieved September 20, 2016, from
http://roguecentral.org/doryen/data/libtcod/doc/1.5.1/html2/bsp_init.html
Godwin-Jones, R. (2014). Games in language learning: Opportunities and challenges . Language
Learning & Technology 18(2), 9–19 Retrieved from
http://llt.msu.edu/issues/june2014/emerging.pdf
Hadamitzky, W. & Spahn, M. (2013). Japanese Kanji And Kana (JLPT All Levels) . North
Clarendon, Vermont: Tuttle Publishing.
Kumar, P. (2013, January 08). How to write Hiragana (Animated hiragana stroke order).
Retrieved August 3, 2016, from
http://jlpt-japanese-studies.blogspot.jp/2013/01/how-to-write-hiragana.html
Leonard, T. (2014). Procedural Generation of Navigation Meshes In Arbitrary 2D
Environments . Game Behaviour, 1(1). Retrieved from
http://computing.derby.ac.uk/ojs/index.php/gb/article/view/13
77
Nystrom, B. (2014, December 21). Rooms and Mazes: A Procedural Dungeon Generator.
Retrieved September 20, 2016, from
http://journal.stuffwithstuff.com/2014/12/21/rooms-and-mazes/
Smith, G. (2015, July 28). Interview: How Does Level Generation Work In Brogue? Retrieved
September 20, 2016, from
https://www.rockpapershotgun.com/2015/07/28/how-do-roguelikes-generate-levels/
Sourceforge. Zinnia . Retrieved from
https://sourceforge.net/projects/zinnia.
Technologies, U. (2016). Unity - Download .Unity . Retrieved 22 September 2016, from
https://store.unity.com/download?ref=personal
Technologies, U. (2016). Unity - Manual: Building a NavMesh . Docs.unity3d.com. Retrieved
from https://docs.unity3d.com/Manual/nav-BuildingNavMesh.html
Tomoe. Retrieved from
http://www.be-interactive.org/works/tomoe.html.
78

Twohig, Gregory. (2015). Mobile Software Statistics 2015 . (2015). mobiForge . Retrieved 22
September 2016, from
https://mobiforge.com/research-analysis/mobile-software-statistics-2015
Unity Community Wiki. (2010, October 12). Gesture Recognizer . Retrieved from
http://wiki.unity3d.com/index.php?title=gesture_recognizer.
Wenderlich, Ray. (2011). Introduction to A* Pathfinding . Retrieved from
http://www.raywenderlich.com/4946/introduction-to-a-pathfinding
What is Unreal Engine 4. (2016). Retrieved 22 September 2016, from
https://www.unrealengine.com/what-is-unreal-engine-4
79