home theater mastercache-m2.smarthome.com/manuals/8026.pdfthe home theater master sl-9000 remote...
TRANSCRIPT

Home Theater MasterPreprogrammed 6 Learning
Remote Control
SL-9000Operating
Manlral

Table of
IntroductionBattery Installation
ContentsPage
23
A. To Open and Close Battery Compartment Cover 3B. Low Battery Message 3
Using Your Remote Control 4A. Function Table Reference 4
Function Tables 5B. Preprogrammed Set Up 8
Three Digit Code Method 8Auto Search Method 10Recalling the Set Up Code Number 12
C. Learning Set Up 13Learning New Functions on the Main Keypad 13Learning New Functions on Device Buttons -- 16Erasing Learned Functions 17
Erasing Individual Buttons 17Erasing All Buttons in One Device Mode 18Erasing All Buttons in All Device Modes - 18
D. Operation 19Device Buttons --- 20
Main Device Mode 2 0Automatic Audio Mode 2 0
Backlighting 21Advanced Features --_-- 22
A. Punch Through Controls -- 22Volume “Punch Through” - 22Channel “Punch Through” - --- 23Transport “Punch Through” ~~ 25
B. Memory Buttons - -- 27Programming Memory Buttons ~- 29Erasing Memory Buttons . -------- 30
C. Changing the LCD Display -- 31D. Programming a Second TV, VCR, etc. to other Device Buttons 32
3s3737383840424548505354
GlossaryAppendix
Assignment of AudiolVideo EquipmentSet Up Code Tables
Audio -- -SatelliteTVVCR ---Cable -CDDVD - -AUX --
1

introduction
The Home Theater Master SL-9000 remote control ispreprogrammed to operate over 1,000 Audio and Videocomponents so that you can set it up by simply punchingin a three digit code number that matches your equipment.
The SL-9000 also has the ability to learn new functions fromyour original remote controls, allowing you to customizethe remote to your own needs and update it as you addnew equipment. Please refer to page 8 - 18 for instructionson setting up the remote control.
The Home neater Master SL-9000 remote control operatesup to eight different audio and video devices in your homeentertainment svstem. Thev are listed below:
1234
5678
J J
TVs, Monitors, Video/LCD ProjectorsVCRs, TV/VCR combination unitsCable boxes, Internet set-topsSatellite receivers - DSS, Primestar, Dish, DSS,C-BandAudio receivers, Preamplifiers, Surround processorsCompact disc players, Mu1 &Disc changersDVD, Laser disc players, Cassette decksCassette Tape Players, DAT, MiniDisc, Switchers,Lighting, Home Control Devices, and Line Doublers
Setting up the remote control to work with your equipmentis simple. The remote control also has many advancedfeatures that can add ease and enjoyment to the operationof your home entertainment system. Please follow theinstructions in this manual, and retain the manual for futurereference.
For any questions or comments about this remote control,please contact Universal Remote Control, Inc., 271 NorthAvenue, New Rochelle, NY 10801, or call (914) 235-2610.Service hours are 9:00 AM to 6:00 PM EST, Monday- Friday.
2

Battery installation
This remote control uses four AAA 1.5 V batteries. Pleasebe sure to match the batteries with the (+) and (-) markingsinside the battery compartment during installation.
A: To Open and Close the BatteryCompartment Cover
1 To open the battery cover, push the latch forward towardthe top of the remote control, and lift the latch up.
2 To close the battery cover, slideback in (toward the top of theuntil it “clicks” into place.
I
the battery cover straightremote) and push down
B: Low Battery MessageWhen the Li uid Crystal Display (LCD) flashes L-BAT,the batteries sa ould be replaced.Note: Batteries should last about 6 months under normalconditions. The SL-9000 remote control will retain itsprogrammed memory for up to oue year after the batteries areremoved and up to ten years after the batteries go “dead I’.
3

Using Your Remote
A: Function Table Reference
-PpIP- SHIFT TEST
TAPE CENTEI
HOME THEATER MASTERLEARNING REVOTE CONTROL
4

Using Your Remote
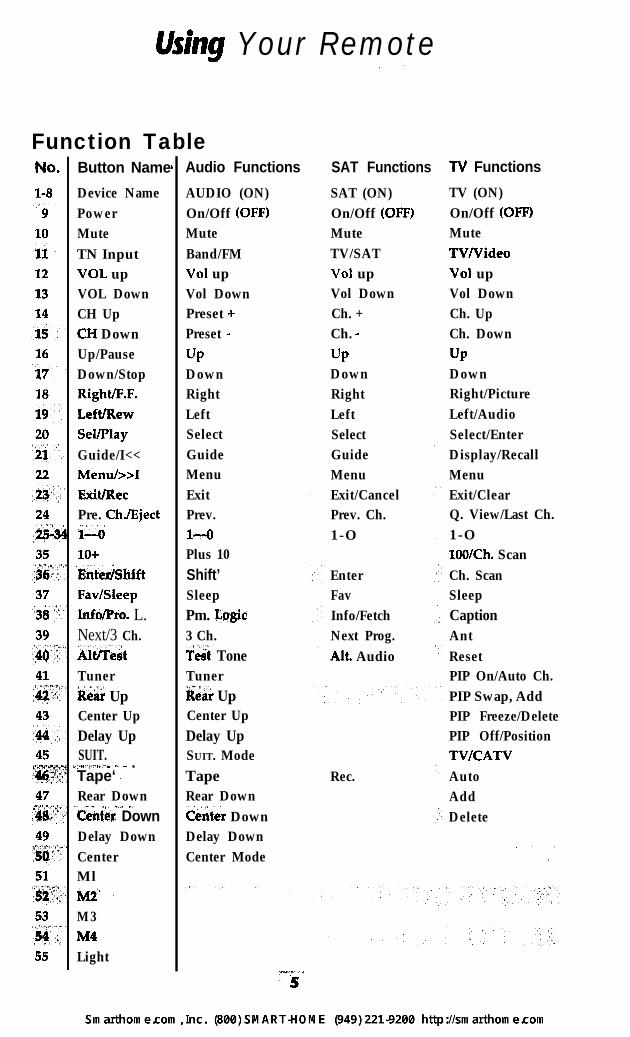
Function TableNo. Button Name
l-89
1011121314151617181920il22B‘24> ( I*25-335I_“, *36 :
3738“39ti =*41'**"("XI&:434445qgq
47F"""" A,_?~;w49*\ qw I"‘50
Device NamePowerMuteTN InputVOL upVOL DownCH UpCH DownUp/PauseDown/StopRightfF.F.Left/RewSeWlayGuide/I<<Menu/>>1ExiVRecPre. ChJEject1-OlO+; %“I. ,̂ ,iEntedShiftFav/SleepInfo/Pro. L.Next/3 Ch.AltrrestTunerR&w UpCenter UpDelay UpSUIT.I~*~p’*w*l\‘**~ i- .- .Tape‘ r
Rear Downx )̂ -̂ * “<I 8~)_ ** / ,Cmter DownDelay DownCenterMlMi 'M3Me ’Light
Audio Functions SAT Functions TV Functions
AUDIO (ON) SAT (ON) TV (ON)On/Off (OFF) On/Off (OFF) On/Off (OFF)MuteBand/FMVol upVol DownPreset +Preset -
UPDownRightLeftSelectGuideMenuExitPrev.1-OPlus 10Shift’ ’
SleepPrtlr. togic3 Ch.Test ToneTunerRear UpCenter UpDelay UpSUIT. ModeTape .
Rear Down
MuteTV/SATVol upVol DownCh. +Ch. -
UPDownRightLeftSelectGuideMenuExit/CancelPrev. Ch.1-O
EnterFavInfo/FetchNext Prog.AR. Audio
Rec.
Center DownDelay DownCenter Mode
MuteTVlVideoVol upVol DownCh. UpCh. Down
UPDownRight/PictureLeft/AudioSelect/EnterDisplay/RecallMenuExit/ClearQ. View/Last Ch.1-O1WCh. ScanCh. ScanSleepCaptionAntResetPIP On/Auto Ch.PIP Swap, AddPIP Freeze/DeletePIP Off/PositionTVICATVA&toAddDelete
Using Your Remote
Function TableButton NameL
Device NamePowerMuteTN InputVOL upVOL DownCH UpCH DownUp/PauseDown/StopRightfF.F.Left/RewSel/PlayGuide/I<<Menu/>>1ExWRecPre. ChJEject1-OlO+; %“I. ,^ ,iEntexYShiftFav/SleepInfo/Pro. L.Next/3 Ch.AltrrestTunerR&w UpCenter UpDelay UpSUIT.‘a~*~P’*w*~\‘**~ i- .- .Tape‘ r
Rear Down,x )^-^* “<I 8~)_ ** / ,Cmter DownDelay DownCenterMlMi ’M3Me ’
Light
Audio Functions
AUDIO (ON)On/Off (OFF)MuteBand/FMVol upVol DownPreset +Preset -
UPDownRightLeftSelectGuideMenuExitPrev.1-OPlus 10Shift’ ’
SleepPm. togic3 Ch.Test ToneTunertieal UpCenter UpDelay UpSUIT. ModeTape .
Rear DownCenter DownDelay DownCenter Mode
SAT Functions
SAT (ON)On/Off (OFF)MuteTV/SATVol upVol DownCh. +Ch. -
UPDownRightLeftSelectGuideMenuExit/CancelPrev. Ch.1-O
EnterFavInfo/FetchNext Prog.AR. Audio
Rec.
TV Functions
TV (ON)On/Off (OFF)MuteTVlVideoVol upVol DownCh. UpCh. Down
UPDownRight/PictureLeft/AudioSelect/EnterDisplay/RecallMenuExit/ClearQ. View/Last Ch.1-O1WCh. ScanCh. ScanSleepCaptionAntResetPIP On/Auto Ch.PIP Swap, AddPIP Freeze/DeletePIP Off/PositionTVICATVAutoAddDelete

Using Your Remote
Function TableNo. Button Name
1-8 Device Name9 Power
10 Mute11 T/V Input12 VOL up13 VOL Down14 CH Up15 CH Down16 Up/Pause17 Down/Stop18 Right/F.F.19 Left/Rew20 Sel/Play21 Guide/I<<22 Menu/>>123 ExWRec24 Pre. Ch./Eject25-34 1-O35 lO+36 Enter/Shift37 Fav/Sleep38 Info/Pro. L.39 Next/3 Ch.40 AWTest41 Tuner42 Rear Up43 Center Up44 Delay Up45 Surr.46 Tape47 Rear Down48 Center Down49 Delay Down50 Center51 Ml52 M253 M354 M455 Light
VCR Functions
VCR (ON)On/Off (OFF)Mute
VCRfN
Vol upVol DownCh UpCh DownPausestopFast ForwardRewindPlayF. Adv./Slow<X2/intro/Slow>RecordEject1-Ol - 1 0 0EnterProgramDisplayC-CounterResetAuto ChAdd +Delete -Tape SpeedVCR PlusTracking +Tracking -Auto TrackingSlow -Slow +IndexQTR OnQTR OffEdit
Cable Functions
CABLE (ON)On/Off (OFF))MuteSwitch/A/BVol upVol DownCh UpCh DownUp/Fine +Down/Fine -Right/Fine RLeft/Fine LSelectGuide/RecallMenuExitPrev. Ch14*/HelpEnter/MemoryFavInfo *
PPV/BuyP/Delete I
Page -Page +Day -.Day +Record
6

Ushg Your Remote
Function TableNo. Button Name
l-8 Device Name9 Power
10 Mute11 T/V Input12 VOL up13 VOL Down14 CH Up15 CH Down16 Up/Pause17 Down/Stop18 Right/F.F.19 Left/Rew20 SellPlay21 Guide/I<<22 Menu/>>123 Exit/Ret24 Pre. Ch./Eject25-34 1-O35 lO+36 Enter/Shift37 FavlSleep38 Info/Pro. L.39 Next/3 Ch.40 AR/Test41 Tuner42 Rear Up43 Center Up44 Delay Up45 Surr.46 Tape47 Rear Down48 Center Down49 Delay Down50 Center51 Ml52 M253 M354 M455 Light
CD Functions
CD (ON)On/Off (OFF)Mute/FaderRandomVol upVol Down/Track +/Skip +/Track-/Skip -PausestopFFlSearch +REWlSearch -PlaySearch -Search +
Eject/Intro1-OPlus 10DiscProgramDisplayRepeatClearDisc 1Disc 2Disc 3Disc 4Disc 5A-BTimeIntroEdit
DVD Functions
DVD (ON)On/Off (OFF)
Skip >>ISkip I<<PausestopF.F.REWPlaySet UpMenuClearOpen/Close1-OlO+EnterReturnDisplaySub. On/OffAudio
UPDownSelectAngleSlowLeftRightSubtitleRepeatRandomA/B RepeatTTitleMemory
AUX Functions
TAPE (ON)On/Off (OFF)Mute/Ret Mute
PausestopF.F.REWPlayDeck ADeck BRecordRev. Play
Deck ADeck B
REWFor. PLAYF.F.stopREV. PlayPauseRecord

using Your Remote
B: Preprogrammed Set UpThe Home Theater Master universal remote control canoperate up to eight separate audio and video devices(equipment). To program the remote control for yourdevices, please use the following steps:
Three Digit Code Method1 Turn on the device you would like the remote control to
operate, either manually or with your original remotecontrol.
2 Find the three digit Set-Up Code number for yourdevice from the tables on pages (38 - 55).
Example: To set up the remote to operate with a SONYTV, go to the TV Set-Up Code table found on pages (42 -44) and look for SONY under the Manufacturer/Brandcolumn. You will find that the Set-Up Code numbers forSONY TVs are 070,085,139 and 147.
3 Press the corresponding Device Button (TV, VCR, SAT,CBL, AUD, CD, DVD, or AUX) and the MUTE buttonon the remote control, simultaneously. SET will appearin the LCD.
Mlrte Brrttorl
Device Brr ttom
Example: To set-up the remote to operate a TV, press theTV Device Button and Mute button, simultaneously.
8

using Your Remote
Note: SET appears in the LCD for 20 seconds to indicate thatthe remote control is ready to be programmed. The followingsteps must be entered while SET appears in the LCD.
4 Point the remote control toward the device that wasturned on in Step 1 and press in the first three-digit Set-Up Code number for that device using the number buttons(O-9) on the remote control. SET followed by the numberwill appear in the LCD.Your device will turn off when the correct Set-Up Codenumber has been selected. If the device does not turnoff, press in the next Set-Up Code number from the listing.Continue to select Set-Up Code numbers until yourdevice turns off, before you proceed to Step 5.
Note: If you have tried all of the three digit Set-Up Codenumbers listed for your device and it still did not turn 08, pleaseproceed to the Auto Search Method on page (IO) toprogram your remote control.
5
6
Once your device turns off, press the Device Buttonselected in Step 3 once again to store the Set-Up Codenumber. PASS will flash in the LCD.
Test the remote control for your device. Try the POWER,CHANNEL UP AND DOWN, VOLUME UP AND DOWNbuttons, etc. If any of the buttons do not perform as theyshould, please repeat the set-up from Step 1 using thenext Set-Up Code number for your device.
Note: Sowze audio/video devices have separate buttons forPOWER ON and POWER OFF. To operate these devices onthe remote, press the corresponding DEVICE Button to turn theequipment ON and press the POWER button to turn theequipment OFF.
7 Please repeat the above steps to program the remotecontrol for each of your other devices.
9

Using Your Remote
Auto Search MethodPlease use this method if none of the Set-Up Code numbersworked for your device during the standard set-up proce-dure or if the manufacturer or brand for your device is notlisted in Set-Up Code Tables.
1
2
Turn on the device you would like the remote control tooperate, either manually or with your original remotecontrol.
Press the corresponding Device Button (TV, VCR, SAT,CBL, AUD, CD, DVD, or AUX) and the MUTE button,simultaneously. SET will appear in the LCD.
Mute Buftort
Dmice Bu ttom
Note: SET appears in the LCD for 20 seconds to indicate thatthe remote control is ready to be programmed. The followingsteps must be entered while SET appears in the LCD.
3 Point the remote control toward the device and press theCHANNEL UP button on the remote control. Each but-ton press sends the signal for one Set-Up Code number.Keeping the CHANNEL UP button pressed produces aquick scanning of the Set-Up Code numbers.Release the CHANNEL UP button as soon as the deviceturns off. Please confirm that you have the correct codeby pressing the MUTE button on the remote. You shouldbe able to turn your device on and off with this button.
1 0

Using Your .Remote
If you pass the correct Set-Up Code number, you canreturn to it by pressing the CHANNEL DOWN button,one Set-Up Code number at a time, until your deviceturns back on.
Note: During programming, the signal for POWER ON andPOWER OFF is located on the MUTE button. For devices thatuse separate POWER ON and POWER OFF buttons, pressingthe MUTE button on the remote control during programmingwill only turn the device OFF.
4 Once the correct code is confirmed, press the DeviceButton to store the Set-Up Code number. PASS willappear in the LCD.
Test the remote control for your device. Try the POWER,CHANNEL UP AND DOWN, VOLUME UP AND DOWNbuttons, etc. If any of the buttons do not perform as theyshould, please repeat the set-up from Step 1 using thenext Set-Up Code number for your device.
Note: Some audio/video devices have separate buttons forPOWER ON and POWER OFF. To operate these devices onthe remote, press the corresponding DEVICE Button to turn theequipment ON and press the POWER button to turn theequipment OFF.
6 Please repeat the above steps to program the remotecontrol for each of your other devices.
Ushg Your Remote
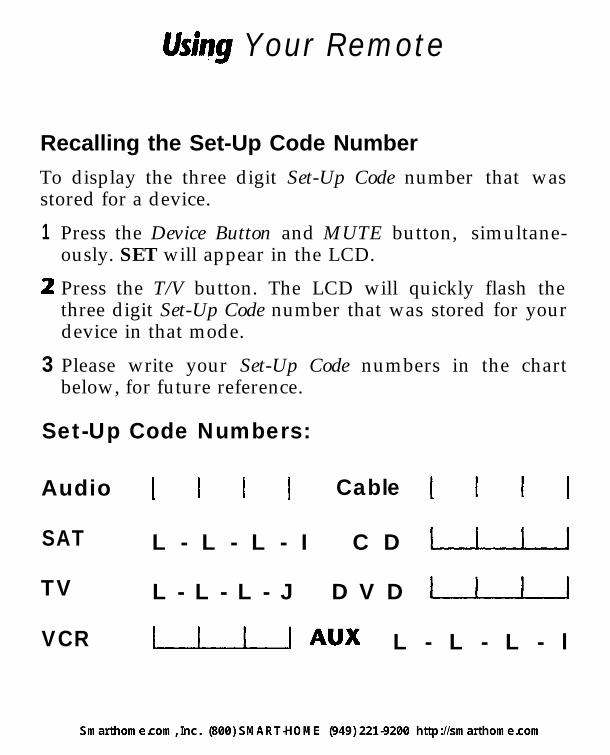
Recalling the Set-Up Code Number
To display the three digit Set-Up Code number that wasstored for a device.
1
2
3
Press the Device Button and MUTE button, simultane-ously. SET will appear in the LCD.
Press the T/V button. The LCD will quickly flash thethree digit Set-Up Code number that was stored for yourdevice in that mode.
Please write your Set-Up Code numbers in the chartbelow, for future reference.
Set-Up Code Numbers:
Audio 1 1 1 1 Cable 1 I I 1
SAT L - L - L - I C D I
TV L - L - L - J D V D I
VCR L_l_L_l AUX L - L - L - l
12

Using Your Remote
C: learning Set UpThe Home Theater Master SL-9000 has the ability to learnnew functions from your original remote controls:
There are 8 “pages,, of learning with each page correspondingto the 8 Device modes on the remote control: AUDIO, CD,DVD, AUX, SAT, TV, VCR, CBL.
All buttons in all Device modes can learn, except the LIGHTbutton.The 8 Device buttons at the toy(AUD, CD, DVD, SAT, l-I-$ VCRthe Audio mode.
of the remote control labeledand CBL) learn only in
Learned functions override any existing preprogrammedfinctions on the remote control.Learned finctions are automatically erased when a newfinction is learned on the same button.Learnedjkctions are retained even afler a diflerent threedigit code number is programmed into the remote control.To erase a learnedfirnction and return to an originalpreprogrammed jknction, please refer to the sectionErasing Learned Functions (page 17).
Learnina New Functions on the Main KevDadd I#
1
2
Select the mode in which you wish to learn the newfunction by pressing the corresponding Device button.
Place the SL-9000 and the original remote control to belearned from, on a flat surface. Line up the remotecontrols head to head, about 2 to 3 inches apart.
Origina 1 rem0 te
13

Using Your Remote
3 Press and hold both the Device button selected in Step 1and the SEL/PLAY button for about three seconds, untilthe LCD on the SL-9000 shows LEARN. The SL-9000 isnow in the learning mode.
Note: Each of the following steps must be completed within 20seconds. If the remote does not receive any new commands with-in
4
the allotted time, it will return to its liormal operating mode.
Press and release a button on the SL-9000 you haveselected to learn the new function. The LCD will showREADY.
5 Press and hold the button on the original remote controlfor about 3 seconds from which you are learning the newfunction. The LCD on the SL-9000 will show - - - -indicating that it is receiving the information from theoriginal remote control.
6 Release the button on the original remote control. TheLCD on the SL-9000 will show RETRY.
7 Press and hold the same button on the original remoteonce again, for about 3 seconds. The LCD on the SL-9000will flash GOOD, the Device Mode and then return toLEARN, verifying that the new function has beenlearned.
Dezdcc Bu f fom
SELIPLAY Btr ttolz
14

Using Your Remote
Repeat Steps 4 through 7 for any other buttons you wish tolearn new functions.
8 Once you have completed the learning for all the desiredbuttons in a Device mode, store the learned functions bypressing the Device and SEL/ PLAY buttons simultane-ously, once again. The LCD in the SL-9000 will showSAVED and then return to the Device Mode. T h eremote has now returned to the original operating mode.
Once you have stored the learned functions, test the but-tons that have been taught. If any of the buttons do notoperate as they should, please repeat from Step 1 for thosebuttons.Note: If the LCD shows FAIL at any time during the learningprocess, the SL-9000 was unable to learn the new jkzctions.Please repeat fvom Step 4. If the SL-9000 continues to showFAIL during the learning process, please try the followingsuggestions:
Increase or decrease the head to head distance between the tworemote controls, within a 1 to 5 inch range.Increase or decrease the time you press and hold the button onthe original remote control in step 5, for 1 to 2 seconds.Avoid fluorescent lights or strong sunlight during the set up.These lighting conditions can cause interference with the learningprocess.Veri! that the original remote control containsjkesh batteries.
Some remote controls operate at non-standard IR, UHF orultrasonic frequencies, and are unable to be learned. If youcontinue to experience difficulty during set up, pleasecontact our customer service department for assistance.
15

Using Your Remote
Learning New Functions on Device ButtonsThe eight Device buttons at the top of the remote controlcan also learn new functions. These buttons can only be setup in the Audio mode. If a new function is learned on aDevice button, the new function will override any existingpreDrogrammed information on the Device button.
1
2
I v
Place the SL-9000 and the original remote control to belearned from, on a flat surface. Line up the remotecontrols head to head, about 2 to 3 inches apart.
Press and hold both the Audio and SEL/ PLAY buttonssimultaneously, for about three seconds, until the LCDon the SL-9000 shows LEARN. The SL-9000 is now inthe learning mode.
Note: Each of the following steps must be completed within 20seconds. If the remote does not receive any commands within theallotted time, it will return to its normal operating mode.
3
4
5
6
Press and release one of the eight Device buttons on theSL-9000. The LCD will show READY.
Press andyou wishThe LCDthat it is
hold the button on the original remote controlto teach into the SL-9000, for about 3 seconds.on the SL-9000 will show - - - - indicatingreceiving the information from the original
aremote control.
Release the button on the original remote control. TheLCD on the SL-9000 will show RETRY.
Press and hold the same button on the original remoteagain, for about 3 seconds. The LCD on the SL-9000 willflash GOOD, the Device Mode and then return toLEARN, verifying that the new function has beenlearned.
76

using Your Remote
Repeat steps 3 through 6 for any other Device buttons youwish to teach new functions.
7 Once you have completed the learning for all the desiredDevice buttons, store the learned functions by pressingthe AUDIO and SEL / PLAY buttons simultaneously,once again. The LCD in the SL-9000 will show SAVEDand then return to the AUDIO mode. The remote hasnow returned to the original operating mode.
Erasing Learned FunctionsTo erase learned functions, please refer to the followingprocedures:
Erasing Individual Buttons:
1
2
3
4
Press the Device button for the mode where the learnedfunction has been stored.
Press and hold the Device and the SEL/ PLAY buttonssimultaneously, for about 3 seconds, until the LCDshows LEARN.
Press and release the button toshow READY.
Press the LIGHT button. The
be erased. The LCD will
LCD will flash ERASE,LEARN.CLEAR, Device Mode and then return to
Repeat Steps 3 and 4 for any other buttons to be erased.
5 To return to the normal operating mode, press theDevice and the SEL / PLAY buttons simultaneously.
The learned functions on the selected buttons have nowbeen erased. The preprogrammed functions for thesebuttons will now operate on the remote control.

Using Your Remote
Erasing All Buttons in One Device Mode:
1 Press the Device button for the mode to be erased.
2
3
Press and hold the Device and SELlPLAY buttonssimultaneously, for about 3 seconds, until the LCDshows LEARN.
Press and hold the Device and LIGHT buttons simulta-neously, for approximately five seconds and then releasethe buttons. The LCD will flash ERASE and then alter-nately CLEAR and the Device Mode.
Note: This procedure takes about two minutes to complete.When the LCD on the remote returns to the Device Mode, allthe learned finctions in the selected Device mode have beenerased. All the buttolzs in that Device mode will now operatewith the preprogrammed functions in that mode.
Erasing All Buttons in All Device Modes
1 Press and hold the TV Device Button and the LIGHTbutton simultaneously, for approximately ten seconds.The LCD will flash ERASE ten times, flash CLEARand then return to the TV mode.
When the LCD on the remote returns to TV, all thelearned functions in all eight Device modes have beenerased. All the buttons in all Device modes will now oper-ate with the preprogrammed functions in their respectivemodes.
1 8

Using Your Remote
D: OperationAfter you have programmed the remote control for yourequipment, use the following procedures to operate yourhome entertainment svstem:
1
2
3
J
Press the Device Button that you wish to operate: e.g. tooperate a TV, press the TV Device Button; to operate aVCR, press the VCR Device Button, etc.
Aim the remote control at the device and press thePOWER button to turn on the device.
Press the buttons that send out the commands youdesire.
Note: Some audiolvideo devices have separate but tons forPOWER ON and POWER OFF. To operate these devices onthe remote, press the corresponding DEVICE Button to turn theequipment ON and press the POWER button to turn theeuipment OFF.
Please try all the functions of this remote control with yourequipment. The most common functions are labeled on theremote. However, some of the secondary functions mightbe stored under a button that has a different name from theone on your original remote control. Please refer to theFunction Tables on pages (5 - 7) for details.
‘i9

using Your Remote.’ 4 *’: : ^ ” ’
Device ButtonsPressing a Device button at the top of the remote performsthe following functions:
1 .2.
3.
4.
Changes the Device mode on the SL-9000 remote control.Sends out a Power ON command for the Device,if applicable.Sends out a preprogrammed or learned Audio receiver1preamplifier INPUT SELECTION, if applicable.Toggles between the Main Device mode and theAutomatic Audio Mode.
Note: Device buttons can learn new information only in theAudio mode. Please refer to page 16 for details.
Main Device ModeWhen the main Device mode is displayed in the LCD, theSL-9000 will operate in a standard operating mode and allthe buttons will operate the preprogrammed, learned andpunch through features for that Device mode.
Automatic Audio ModeThe SL-9000 is designed to provide convenient and contin-uous operation of your home theater system’s A/V receiveror preamplifier. You can have full and immediate access toyour receiver’s audio volume and surround controls inseven different device modes of the remote control bypressing the same Device button a second time.The Automatic Audio Mode enables you to watch a videoprogram or listen to a CD and also adjust audio volumeand surround levels in the same Device mode. The LCDwill show A-XXX indicating that the remote control is inthe Automatic Audio mode.
2 0 ‘

Ushg Your. :. - r;‘
Example: Pressing the SAT Device buttonwill change the LCD from SAT to A-SAT.
Main Device Mode Automatic Audio Mode
In the Automatic Audio Mode, you gain control of the
a second time
receiver or preamplifier volume and surround levels whilealso maintaining full control of the Channel, Transport andNumeric Keypad of the device in the same mode.
Backlighting
1 POWER 1 mVOL
El
Device Bu ttorts
Volume Buttons
Surround Controls
All the buttons and the LCD on the SL-9000 are back-litfor 7 seconds when the LIGHT button is pressed. The back-light is extended an additional 7 seconds with any buttonpress while the backlight is on.

After you set-up the remote control to operate yourequipment, you can also program advanced features onthe remote control. The advanced features are designedto enhance the use of the remote control with your homeentertainment system.
At Punch ThroughsVolume Control “Punch Through”
You can program the remote control so that either theAUDIO or TV Volume Control (VOLUME Ul? DOWN ANDMUTE) will also operate in other modes on the remote control.
Example: Raise, lower and mute the VOLUME of yourAudio receiver while the remote control is in the Satellitemode.
Note: When this feature is active, the AUDIO or TV VOLUMEand MUTE will override any existing volume controls in thatmode.
To Set-Up:1
2
3
4
Select the mode that you wish to program for VolumeControl “Punch Through. ”
Press the corresponding Device Button and the MUTEbutton, simultaneously. SET will appear in the LCD.
Press the VOLUME UP button. PUNCH will appearin the LCD.
Press either the AUDIO Device Button to set-up for AudioVolume Control or the TV Device Button to set-uVolume Control. AUDIO or TV will flash in tK
for TVe LCD,
depending on which Device Button was selected.AUDIO or TV Volume Control will now override theoriginal VOLUME and MUTE in this mode.
9;

Advanced Features
To Return to the Original Setting:1 Select the mode that you want to turn off the Volume
Control “Punch Through. If
2 Press the corresponding Device Button and the MUTEbutton, simultaneously. SET will appear in the LCD.
3 Press the VOLUME UP button. PUNCH will appear inthe LCD.
4 Press the same Device Button, again. The DEVICE Modewill flash in the LCD.
The AUDIO or TV Volume Control “Punch Through” isnow turned off. The VOLUME and MUTEdevice will operate on the remote control.
of the or!ginal
Channel Control “Punch Through”
You can program the remote so that either the VCR or CableChannel Controls (CHANNEL UP and DOWN) will alsooperate in other modes on the remote control.
Example: Change CHANNELS UP and DOkVN on yourcable box while the remote is in the Audio mode.
Note: Mrhelz this feature is active, VCR or Cable CHANNELUP and DOWN will override any existing channel controls inthat mode.
To Set-Up:1
2
3
Select the mode that you wish to program for ChannelControl “Punch Through. ”
Press the corresponding Device Button and the MUTEbutton, simultaneously. SET will appear in the LCD.
Press the VOLUME DOWN button. PUNCH will appearin the LCD.

Advanced katum
4 Press either the VCR Device Button to set-up for VCRChannel Control or the CBL Device Button to set-up forCable Channel Control. Either VCR or CBL will flashin the LCD, depending on the Device Button selected.VCR or Cable Channel Controls will now override theoriginal CHANNEL UP and DOWN in this mode.
To Return to the Original Setting:1 Select the mode that you want to turn off the Channel
Control “Punch Through. ”
2 Press the corresponding Device Button and the MUTEbutton, simultaneously. SET will appear in the LCD.
3 Press the VOLUME DOWN button. PUNCH will appearin the LCD.
4 Press the same Device Button again. The DEVICE Modewill flash in the LCD.
The VCR or Cable Channel Control /‘Punch Through” isnow turned off. The CHANNEL UP and DOWN of theoriginal device will now operate on the remote control.
2 4

Advanced kuturpI,- .:_i‘ 3 :_ ’̂, I ,, 2 q
Transport Control “Punch Through”
You can set-up your remote control so that VCR or CDTransport Controls (PLAY, STOP, FAST FORWARD,REWIND, PAUSE, and RECORD) will also operate in othermodes on the remote control.
Transport Controls
Example: Control VCR functions while operating theremote control in the TV mode.
Note: When this feature is active, the VCR or CD functions(PLAY, STOP, FAST FORWARD, REWIND, PAUSE, andRECORD) will override any existing functions pre-assigned tothese buttons in that mode.
To Set-Up:1
2
3
4
Select the mode into which you want to programTransport Control “Punch Through. If
Press the corresponding Device Button and the MUTEbutton, simultaneously. SET will appear in the LCD.
Press the SELECT/PLAY button. PUNCH will appear inthe LCD.
Press either the VCR Device Button to set-up for VCRTransport Control or the CD Device Button to set-up forCD Transport Control. VCR or CD will flash in the LCD,depending on the Device Button selected.
25

Advanced Features
The VCR or CD Transport Controls (PLAY, STOP FASTFORWARD, REWIND, PAUSE, and RECORD) will nowoverride the original functions of the buttons in this mode.
To Return to the Oriainal Settina:1
2
3
J d
Select the mode that you want to turn off the TransportCon fro1 “Punch Through. ”
Press the corresponding Device Button and the MUTEbutton, simultaneously. SET will appear in the LCD.
Press the SELECT/PLAY button. PUNCH will appearin the LCD.
4 Press the Device Button again. The Device Mode willflash in the LCD.
The VCR or CD Transport Control lfPunch Through”feature is now turned off. The original functionsassigned to these buttons are restored.

Advanced Features
B: Memory ButtonsThe buttons labeled Ml, M2, M3, M4, and POWER areMemory Buttons. The Ml-M4 buttons can store yourfavorite channels, create macro commands, or be used to“relocate” functions from one mode to another.
The POWER button can operate either as a POWER buttonfor a single device or as a memory button, when youprogram it.Note: Because the POWER button can also be programmed asa Memory Button, the MUTE button is used to enter POWERcommands during Memory Button programming. SeeExample: Memoy Button Programming' for illustration.
Each Memory Button can send out up to ten commandswith one button push. Any function from any mode(except CHANNEL UP, CHANNEL DOWN and MUTE) canbe programmed into a Memory Button. The Memory Buttonscan be programmed differently in each of the followingfive modes: AUDIO, SAT, TV, VCR, and CABLE.
l Favorite Channels:Memory Buttons can provide direct access to your favoritechannels with one button push.
Example: In the SAT mode, each of the Memory ButtonsMl, M2, M3, and M4 can provide direct access to a dif-ferent DSS satellite channel by sending out the three digitchannel number for that channel with one button push.
2 7

Advanced Featutzs
l Macro Commands:Memory Buttons can store multiple selections includingPower On / Off sequences.
Example: In the Audio mode, the POWER Memoy Buttoncan be programmed to turn on the TV, turn on the Audioreceiver, turn on the VCR and turn on the Satellite receiverwith one button push.
l “Relocating” Functions:Memory Buttons can be programmed to store functionsfrom one mode into other modes.
Example: In the AUDIO mode, Memory Buttons can storevarious functions from the TV, VCR, and Satellite modes.
Power Button
Memory Bu ttorrs
MI -M4 Buttons
‘ 2 8

Advanced katuru)s” . . .~. .
Programming Memory Buttons:1
2
3
Select the mode that you wish to program the MemoryButton in by pressing the corresponding Device Button(TV, VCR, CBL, SAT, or AUD) and MUTE button,simultaneously. SET will appear in the LCD.
Press one of the Memory Buttons (Ml, M2, M3, M4, orPOWER) into which you wish to store the functions.M(l-5)_# # will appear in the LCD.
Press in up to ten commands that you want stored inthat Memory button. Each successive button selectionwill appear as M(l-5)_(01-10) in the LCD.You can select functions from another mode by firstpressing the corresponding Device Button and then thebuttons where those functions are located within thatmode. The selection of a Device Button alsoone command.
counts as
Note: Each insertion of a Device Button adds adelay to the command sequence.
4 Press the CHANNEL UP button to store your
l/2 second
selections.SAVE will flash three times in the LCd to confirm theprogramming.
Note: It can take up to 10 seconds to send out 1 0commands from a memory button. Please continue to pointthe remote control at the device(s) until all the commandsMemory Button have been sent out. This will ensure thatcommands are received by the device(s).
on theall the
Example: Memory Button Programming.To program Memory Button M2 in the Audio mode to sendthe following commands: turn on the Audio receiver, turnon the TV, turn on a VCR, and turn on a satellite receiver.

1 Press the Audio Device Button and the MUTE button,simultaneously. SET will appear in the LCD.
2 Press Memory Button M2. M2_ # # will appear in theLCD.
3 Press the MUTE button (to turn on the Audio receiver)M2_01 will appear in the LCD.
Press the TV Device Button (to change to the TV mode)M2 02 will appear in the LCD.
Press theMUTE button (to turn on the TV)M2 03 will appear in the LCD.
Press theVCR Device Button (to change to the VCR mode)M2 04 will appear in the LCD.
Press theMUTE button (to turn on the VCR)M2 05 will appear in the LCD.
Press thesAT Device Button (to change to SAT mode)M2 06 will appear in the LCD.
Press theMUTE button (to turn on the Satellite receiver)M2_07 will appear in the LCD.
4 Press the CHANNEL UP button. SAVE will flash in theLCD, and the remote will return to the AUDIO mode.
Erasing Memory Buttons1 Select the mode in which you want to erase the Memory
Button.
2 Press the corresponding Device Button and MUTEbutton, simultaneously. Press the Memory Button to beerased. M(l-5) -# # will appear in the LCD.
3 Press the CHANNEL UP button. SAVE will flash in theLCD. The Memory Button is now erased.
Note: Any previously stored commands on a Memoy Buttonwill be erased when new commands are stored on the sameMemoy Button.

Using Your Remote
C. Changing the LCD DisplayFour different LCD displays can be selected for each Devicemode of the remote control. To select an alternate LCDdisplay, please use the following procedure:
1
2
3
Press and hold the Device button for which you wouldlike to change the LCD setting.
While pressing the Device button, press and release theMENU button. Each time the MENU button is pressed,the LCD will show one of four displays.
Release the Device button when you find the displayvou wish to assign to the Device mode.
SAT TV VCR C A B L E A U D I O C D DVD AUXVID4 TV-V3 Vl v2 AUDl AUD2 AUD3 AUD4TV2 VID2 VIDEO TV2 RECVR DVD LD TAPE
VCR2 PROJ VID3 VCR2 AUD2 SURR LASER WEB
LCD Displays

Advanced Features
LCD Displays in the Automatic Audio ModeA-SAT A-TV A-VCR A-CAB AUDIO A-CD A-DVD A-AUXA-V4 A-TV3 A-V1 A-V2 AUDl A-A2 A-A3 A-A4
A-TV2 A-V2 A-VID A-TV2 RECVR A-DVD A-LD A-TPEA-VC2 A-PRJ A-V3 A - V C 2 AUD2 A - S U R A - L S R A - W E B
D: Programming a Second TV, VCR, etc.to Other Device Buttons.
This feature is used to program the remote control for twoor more TVs, VCRs, etc., or to program a device into amode with a different Device Button name. You can storethe three-digit Set-Up Code number for any device into anyother unused Device Button.
Example: If your home entertainment system containstwo VCRs. First, using the VCR Device button, programthe remote via standard set-up to operate the first VCR.Then, program your second VCR into a Device Button thatis not being used, e.g., AUX using this method.
12
3
4
Turn on the device.
On the remote control, press the Device Button thatyou will assign for the device and the MUTE button,simultaneously. SET will appear in the LCD.
Press the Device Button that corresponds to the originaldevice. SET will still appear in the LCD.
Locate the Set-Up Code number for the device from thetables found on pages (38 - 55).
S Point the remote toward the device and pressin the first Set-Up Code number. SET, followed by theSet-Up Code number will appear in the LCD.
3 2

Advanced katures:>
Your device will turn off when the correct Set-Up Codenumber has been selected. If it does not turn off, select thenext Set-Up Code number from the table, and press in thatcode number. When your device turns off, proceed to Step 6.
6 Press the Device Button that was selected in Step 2.to store the Set-Up Code number. PASS will flash in theLCD to confirm the programming.
The second device can now be operated by pressing theassigned Device Button and using the buttons within thismode.
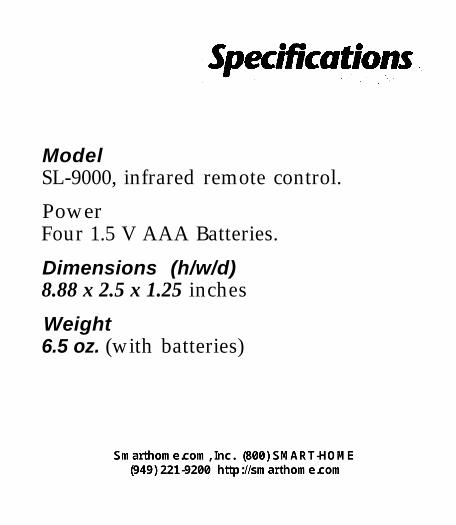
ModelSL-9000, infrared remote control.
PowerFour 1.5 V AAA Batteries.
Dimensions (h/w/d)8.88 x 2.5 x 1.25 inches
Weight6.5 oz. (with batteries)

Glossary
Cursor ControlButtons that correspond to the UP, DOWN, LEFT, RIGHT,SELECT, GUIDE, MENU and EXIT functions of youraudio / video equipment.
DeviceAudio or video equipment, e.g. Television, VCR, Cablebox, Audio receiver, Satellite receiver, etc.
Device ButtonAny of the eight buttons located at the top of the remotecontrol labeled AUD, CD, DVD, AUX, SAT, TV, VCR andCBL. Device Buttons are used to select modes of operationand to program the remote control.
LearningTransfer of a function from a button of an original remotecontrol to a button on the SL-9000 remote control.
LCDLiquid crystal display window located at the top of theremote control. During normal operation the LCDindicates the mode. The LCD also indicates the remote’sprogramming status.
Memory ButtonsButtons labeled Ml, M2, M3, M4, and POWER. These but-tons can be programmed to store Favorite Channels, MacroCommands, or to “relocate” functions from one mode toanother.
ModesModes corresdisplayed in tr:
ond to Device Button selections. Modes aree LCD as AUDIO, CD, DVD, AUX, SAT, TV,
VCR and CABLE. Modes indicate the type of device theremote control is currently operating.

Glossary
Punch ThroughAdvanced feature that enables you to operate Volume,Channel or Transport Control functions of one devicewhile in another mode.
Example: Audio Volume Control “Punch Through,”gives you the ability to raise, lower and mute your Audioreceiver volume while operating the remote control in theTV mode.
Set-Up Code NumberThe three-digit number that is used to program the remotecontrol for your particular manufacturer or brand of audio/video equipment. Set-Up Code numbers are located intables in the appendix, on pages 38 - 55 of the instructionmanual. Set-Up Code numbers are categorized by type ofdevice, e.g. TV, VCR, Audio, CD, DVD, Cable, AUX andSatellite.More than one Set-Up Code number may work with yourdevice. You should test the functions for each of the Set-UpCode numbers that work with your device to determine thebest Set-Up Code number for your particular device.Note: Some devices, such as CD players and DVD Decks thatdo not have POWER buttons on their original remote controls,may not shut off during programming. For these devices, it maybe necessary to first store the Set-Up Code number and then testfinctions like PLAY, STOP, etc., to determine if the correct Set-Up Code number has been selected.
Transport ControlButtons that correspond to the PLAY, STOP, REWIND,FAST FORWARD, PAUSE, SEARCH/SKIP and RECORDfunctions on your audio / video equipment.
36

Appendix
A: Assignment of Audio/VideoEquipment
Please use the following listing to locate the correct Set-UpCode Tables for your equipment:
AUDIO Set-Up Code Table:Audio Receivers, Preamplifiers, Surround Processors
Satellite Set-Up Code Table:DSS, Primestar, DBS, Echostar, C Band receivers
TV Set-Up Code Table:TVs, Monitors, Video/LCD Projectors
VCR Set-Up Code Table:VCRs, TV/VCR combination units
CABLE Set-Up Code Table:Cable Boxes, Internet/TV Set-Tops
CD Set-Up Code Table:CD Players, CD Changers
DVD Set-Up Code Table:DVD Players, Laser Disc
AUX Set-Up Code Table:Cassette Tape Players, DAT systems, MiniDisc,Switchers, Lighting, Home Control Devices,and Line Doublers

Set-Up Code Tables
Manufacturer/BrandADCOMAIWAAKAIA M CANAMANGSTROMARCAMAUDIO ACCESSAUDIO ALCHEMYAUDIO DESIGNAUDIO EASEAUDIO MATRIXAUDIOFILEAUDIO TECHNICAB & KBOSEBRYSTONCARVERCASIOCHIROCINEMA SOUNDCITATIONCLARIONCURTIS MATHESDENONELANENLIGHTENED AUDIOFISHERFOSGATEGEGOLDSTARHARMAN KARDONHITACHIJC PENNYJENSEN
JVCKENWOODKRELLKYOCERALEXICONLINN
Audio
Set-Up Code Number082092225161018104170188202203211213138 189125 126127128081142141147135011084087088089194221021167071134096 097070 170023006022027028029053061077180185201214226076140034148 .026076002027034037109215229230234057098 099029 047 180 214062 231232056008118 121153 154 231233 254020076058114 191240026066145146180190192197199222150 072007120 235 236 237
*
124
38

&t-Up Code Tables
Manufacturer/BrandLUXMANLX1MAGNAVOXMARANTZMCINTOSHMCSMERIDIANMITSUBISHIMONDIALNADNAKAMICHINECONKYOOPTIMUSPANASONICPARASOUNDPHILIPSPIONEERPROCEEDRCAREALISTICROTELSAMSUNGSANSUISANYOSCOTTSEARSSHARPSHERWOODSONYSOUNDESIGNSOUNDSTREAMSSISUM0TEACTECHNICSTHETA DIGITALTOSHIBAWARDSYAMAHAZENITH
Audio ’
Set-Up Code Number004 009 052096115137139165056 076086152164208006028031040063185186251238009 076 079012 013 100021204 242 243042043112157158113 186111172 183 244 245176017046064079080090107108187026 041138032 177 195 219129 130 132063249250251014 033 035 039 044 045 050 069 078 098 116 159 168144010048067117156019056073075078095074 083 085016035 040048110119047 051059019 081091076026 094131175181024 038 051055102103105106015 018047093101160166218223247248036118068171005 019 049 111212122176177178193200219255136060051001026067169173205253143

Set-Up Code TabkSatellite
I I
Manufacturer/BrandAMPLICABIRDVIEWBSRCAPETRONICSCHANNEL MASTERCHAPARRALCITOHCURTIS MATHESDRAKEDX ANTENNAECHOSTARELECTROHOMEEUROSATFUJITSUGENERAL ELECTRICGENERAL INSTRUMENT 003 004 016 029 031059 101
Set-Up Code Number050051113126129053053013 014 015 018 036 055008 009 012 077054050005006007010011112116141024 046 056 076038 040 057 058 093 094 095 096 097 098 099 100 122089114017021022027133134001106
HITACHI 139 140HOME CABLE 080 044 029HOUSTON TRACKER 033037039104057HUGHES 068HYTEK 053ICR 023JANIEL 060JERROLD 061KATHREIN 108LEGEND 057LUXOR 062 144MACOM 010 059 063 064 065MEMOREX 057NEXTWAVE 028NORSAT 069 070PACE 143PANASONIC 060 142PANSAT 121PERSONAL CABLE 117
PHILIPS 071PICO 105PL 023 026PRESIDENT 019 102PRIMESTAR 110 030PROSAT 072
4 0 ’

Set-Up Code Tabks
Manufacturer/BrandPROSCANRCAREALISTICSAMSUNGSATELLITE SERVICESCIENTIFIC ATLANTASONYSTARCASTSUPERGUIDETEE COMTOSHIBATOWN & COUNTRYUNIDEN
US ELECTRONICSVIEWSTARWINEGARDZENITH
Satellite
Set-Up Code Number0 0 1 1 0 6
001106043 074123028 035 047 085032 138103041020023 026075 087088090 107130137002 127023 026016025042043 044045048049078079080086101135 136023115128 146081082 083 084 091120

Set-Up Code TabksTV
Manufacturer/BrandADMIRALAKAIAMARKAMPROAMSTRADANAMAOCBLAUPUNKTCANDLECAPEHARTCETRONICCITIZENCLASSICCONCERTOCONTECCORONADOCRAIGCROWNCURTIS MATHESc x cDAEWOO
DAYTRONDWINDYNASTYDYNATECHEIKIELECTROHOMEEMERSON
FISHERFUNAIFUTURETECHGE
GOLDSTARHALL MARKHITACHIINFINITY
JBLJCPENNY
Set-Up Code Number072081160161001146112 143073 167052043054056080104112131001004 112 058088001002 003 004058043001002 003 004 043 101103 143043004043 050 051143043 054043 143001101004 143043004 016 017043 044 055 071076103107111114120123125127143004 143177043062187024 143001004005 028043 047048050051096143151153 154 155007 057028 043043001008 009 034 056 073 074 130 144 155 160 161165 004 091004 102 106 110 112 113 116 119 127 137 143004004 009 010 011012 023 075 143 158 163 166164164001004 008 009 024 030 065 101143 156 160
4 2

Set-Up Code Tab/es
Manufacturer/Brand
TV
Set-Up Code Number013034038070083145043001070002 059143001043 143 154072072004166007015052081160164001003 004 022 059 060 061063 064 127 160 164 094001164164007 072 004088001004 024 028 042088004 024 028 040 042 109 124 146 191001004062101015 025132130134001040016024056019043043043019 081034056080092164001003 024 056 059 060 063 064 164 004001003 004005 038 059093127164001018023025116135190004 143144160161165167004 058131143171173034 056 092019 043 143 004 127160 161165 065 156 144 001004 023 024 056 074 152007 019 043 047186168169178179180181182183001058 004004050089101105127133137143160
JENSEN
JVC .KECKENWOODKLOSSKMCKTVLODGENETLOGIKLUXMANLXIMAGNAVOXMARANTZMATSUIMEMOREXMETZM G AMINERVAMITSUBISHIMTCNADNECNIKEIONKINGONWAOPTONICAPANASONICPHILCOPHILIPSPIONEERPORTLANDPROSCANPROTONQUASARRADIO SHACKRCAREALISTICROCTECRUNCOSAMPOSAMSUNG
4i3
Set-Up Code Tables
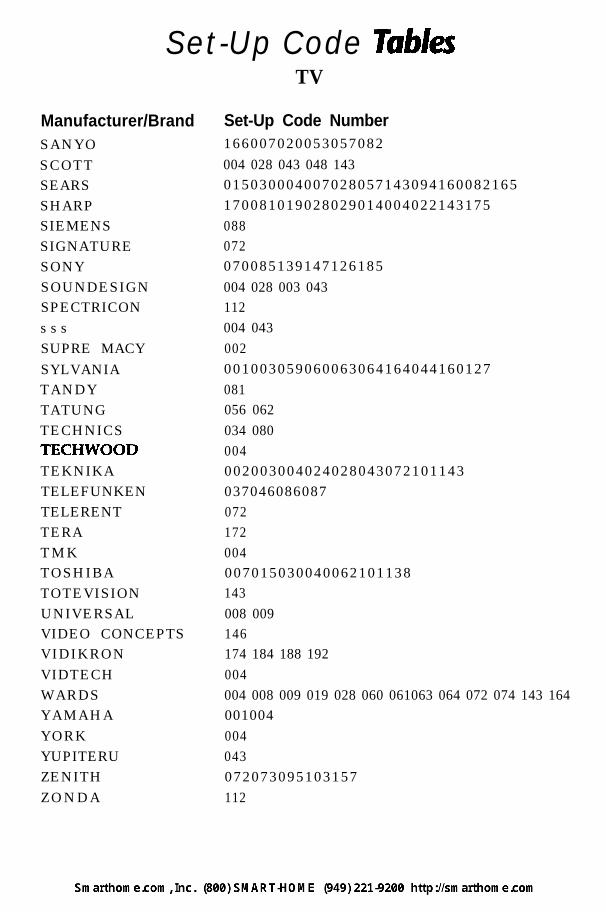
Manufacturer/BrandSANYOSCOTTSEARSSHARPSIEMENSSIGNATURESONYSOUNDESIGNSPECTRICONs s sSUPRE MACYSYLVANIATANDYTATUNGTECHNICSTECHWOODTEKNIKATELEFUNKENTELERENTTERATMKTOSHIBATOTEVISIONUNIVERSALVIDEO CONCEPTSVIDIKRONVIDTECHWARDSYAMAHAYORKYUPITERUZENITHZONDA
TV
Set-Up Code Number166007020053057082004 028 043 048 143015030004007028057143094160082165170081019028029014004022143175088072070085139147126185004 028 003 043112004 043002001003059060063064164044160127081056 062034 080004002003004024028043072101143037046086087072172004007015030040062101138143008 009146174 184 188 192004004 008 009 019 028 060 061063 064 072 074 143 164001004004043072073095103157112

Set-Up Code TabkVCR
Manufacturer/BrandAIWAAKAIAMPROANAMAUDIO DYNAMICSBROOKSONICCANONCAPEHARTCRAIGCURTIS MATHESDAEWOODAYTRONDBXDYNATECHELECTROHOMEEMERSON
FISHERFUNAIGEGO VIDEOGOLDSTARHARMAN KARDONHITACHIINSTANTREPLAY
JCLJCPENNYJENSEN
JVCKENWOODLLOYDLX1MAGINMAGNAVOXMARANTZMARTAMATSUIME1MEMOREXM G AMINOLTA
Set-Up Code Number034016043 046124125142146072031012 023 039 043035 037 129028 031108003 040 135031041005 007010065108110111112116117119108012 023 039 043034 053059006017025027029031034035036037046101129131138153003 008 009 010034031063072107109144147132 136 155012013020101106114123012 045004018026034043 063137150031031012 013 015 040 066 101043012 031043 048 050 055 060 130 150 152014 048 034 047034003009017034106040031034 041067 068012 031067 069101027 030031003 010 014 031034 053 072 101102 134 139045 046 059013 020

&t-Up Code TabkVCR
Manufacturer/Brand Set-Up Code NumberMITSUBISHIMTCMULTITECHNECNORDMENDEOPTONICAPANASONICPENTAXPHILCOPHILIPSPILOTPIONEERPORTLANDPULSARQUARTZQUASARRADIO SHACKRCAREALISTICRICORUNCOSALORASAMSUNGSANSUISANYOSCOTTSEARSSHARPSHINTOMSIGNATURESONYSOUNDESIGNSTSSYLVANIASYMPHONICTANDYTATUNGTEACTECHNICSTEKNIKATHOMAS
013 020 045 046 051059 061142 151034 040024 034012 023 039 043 048043053 054066070083133140145013 020 031063031034 067031034 054 067 071101101013 021048108072002 014066 145123013020 041107109140144145147034040003008010014031034040053054101058148014032040102104105107109112113115120122125022 043 048 135003007010014134102017037112129131003 008 009 010 013 014 081101017031054 149024034003031052056057058076077078149154034013031034 059 067034010 034039 043034 039 043031070019 031034 101034
4 6

Manufacturer/Brand Set-Up Code Number
TMK 006
TOSHIBA 008013042047059079082112131
TOTEVISION 040 101
UNITECH 040VECTOR RESEARCH 012
VICTOR 048
VIDEO CONCEPTS 012 034 046 141
VIDEOSONIC 040WARDS 003 013 017 024 031034 040 053 054 131
YAMAHA 012 034 039 043ZENITH 034048056058072080101

Set-Up Code TabksCable i ’
Manufacturer/BrandABCAMERICASTANTRONIXARCHERCABLE STARCENTURIONCENTURYCITIZENCOLOUR VOICECOMBANOCOMTRONICSDIAMONDEAGLEEASTERNELECTRICORDGENERAL ELECTRICGEMINIGENERAL INSTRUMENTGOLDEN CHANNELHAMLINHITACHIHOSPITALITYJERROLDM-NETMACOMMAGNAVOXMEMOREXMOVIE TIMENSCOAKPANASONICPARAGONPHILIPSPIONEERPOST NEWS WEEKPRUCERPTSPULSARRCARECOTONREGAL
, ‘ IX .I
Set-Up Code Number001003004039042046053099014005007014024026092007007065 090080 081019 030023020 030 040057 062 066032072008 022 025 054001074030049 050 055001055070 077001002 003 004008009010069074037033010 012 064 079 094 095052028 032015 028038071073016 031037 053044 047052006012013020065085090001034051063076016059011048 071073 074052047098049 050
4 8
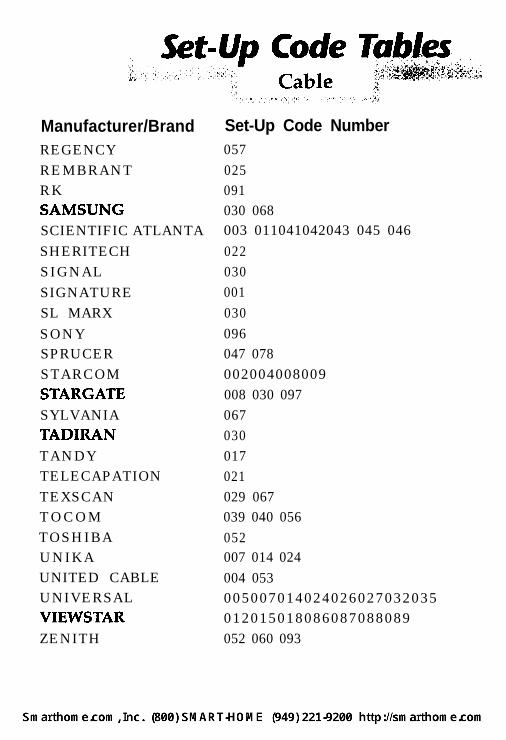
Manufacturer/Brand Set-Up Code NumberREGENCY 057REMBRANT 025RK 091SAMSUNG 030 068SCIENTIFIC ATLANTA 003 011041042043 045 046SHERITECH 022SIGNAL 030SIGNATURE 001SL MARX 030SONY 096SPRUCER 047 078STARCOM 002004008009STARGATE 008 030 097SYLVANIA 067TADIRAN 030TANDY 017TELECAPATION 021TEXSCAN 029 067TOCOM 039 040 056TOSHIBA 052UNIKA 007 014 024UNITED CABLE 004 053UNIVERSAL 005007014024026027032035VIEWSTAR 012015018086087088089ZENITH 052 060 093
Set-Up Code Tabks
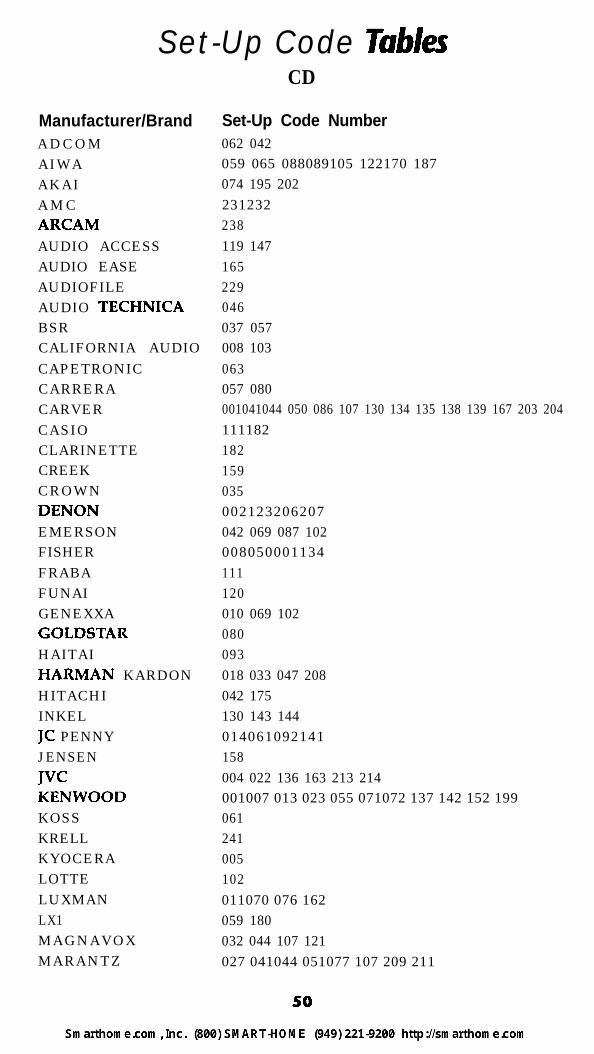
Manufacturer/BrandADCOMAIWAAKAIA M CARCAMAUDIO ACCESSAUDIO EASEAUDIOFILEAUDIO TECHNICABSRCALIFORNIA AUDIOCAPETRONICCARRERACARVERCASIOCLARINETTECREEKCROWNDENONEMERSONFISHERFRABAFUNAIGENEXXAGOLDSTARHAITAIHARMAN KARDONHITACHIINKELJC PENNYJENSEN
JVCKENWOODKOSSKRELLKYOCERALOTTELUXMANLX1MAGNAVOXMARANTZ
CD
Set-Up Code Number062 042059 065 088089105 122170 187074 195 202231232238119 147165229046037 057008 103063057 080001041044 050 086 107 130 134 135 138 139 167 203 204111182182159035002123206207042 069 087 102008050001134111120010 069 102080093018 033 047 208042 175130 143 144014061092141158004 022 136 163 213 214001007 013 023 055 071072 137 142 152 199061241005102011070 076 162059 180032 044 107 121027 041044 051077 107 209 211
50

Set-Up Code Tabks
Manufacturer/BrandMCINTOSHMCSMEMOREXMERIDIANM G AMISSIONMISUBISHIMITSUMIMODULAIREMONDIALNADNAKAMICHINECNIKKONSMONKYOOPTIMUSPANASONICPARASOUNDPHILIPSPIONEERPROCEEDPROTONQUASARRADIO SHACKRCARCXREALISTICROTELRUNCOSAESAMSUNGSANSUISANYOSCOTTSHARPSHERWOODSIGNATURESONYSOUNDESIGNSUM0
CD
Set-Up Code Number212014 073 092010094025044 107121153182147006 005 067 122095 217 218 219014 062046044 107030038039168010013049050057058081082083085093008 068 103 113 172 201233032041044107010 020 025 056 106 117 121174 175 176239044 107 228008 103116 120017 021042 150185042049050051102181182187044 107127044 107021044069107125128171190050 075069 102013 026 031051066 152003 019 051096 112 115 119 166033048053081097110126133164177225226251155
51
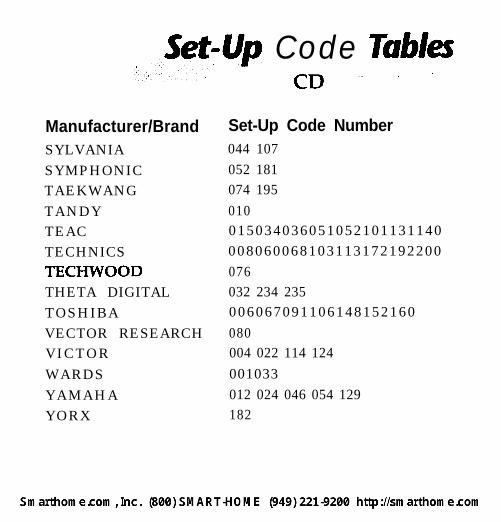
Set-Up Code TabksCn -L- ’ .
Manufacturer/Brand Set-Up Code NumberSYLVANIA 044 107
SYMPHONIC 052 181TAEKWANG 074 195
TANDY 010TEAC 015034036051052101131140
TECHNICS 008060068103113172192200
TECHWOOD 076THETA DIGITAL 032 234 235TOSHIBA 006067091106148152160
VECTOR RESEARCH 080VICTOR 004 022 114 124
WARDS 001033
YAMAHA 012 024 046 054 129YORX 182
52

M-Up Code TabksDVD
Manufacturer/Brand Set-Up Code NumberAIWA 004AKAI 005CALIFORNIA AUDIO 008DAEWOO 230DENON 007 206 207GE 026 027GOLDSTAR 057 223HITACHI 011
JVC 012KENWOOD 152LOTTE 032MAGNAVOX 032 035MERIDIAN 035MITSUBISHI 017NAD 121ONKYO 035OPTIMUS 049PANASONIC 008 021068 113PHILIPS 032 035PIONEER 023 106 107PROSCAN 026REALISTIC 049RCA 002 027RUNCO 127SANYO 075SAMSUNG 056 229SHARP 120 152SONY 033 053 110TECHNICS 008 068 113THETA DIGITAL 032 235THOMPSON 026 027TOSHIBA 035 152YAMAHA 042 001129ZENITH 043

Set-Up Code TabkAUX
Manufacturer/Brand3MAIWAAKAIARCHERCARVERDENONDMXDWINEXTRONFISHERGOLDSTARHARMAN KARDON
JVCKENWOOD
, LINNLUTRONLUXMANMAGNAVOXMAKITAMARANTZMCINTOSHNADNAKAMICHINILESNSMONKYOOPTIMUSPANASONICPHILIPSPIONEERPOLK AUDIOQUASARS/ASANSUISHARPSHERWOODSONYTAEKWANGTEAC
. ”
Set-Up Code Number152015 071100 114138155006008027024105 227 229156157151064011233106 116 185 239 240005013023026064145146181190124158 159035 137 139027186014027056065087238029 048025 244 245160 187161002012016017018019115026 054 055 138007010032088195027 087003039047050066098222162007 088163027113119224026057131175181001004 028 030 033 034020022052084089164165166138009 059 212
54

Manufacturer/Brand Set-Up Code NumberTECHNICS 007010076088109122193TOSHIBA 112TURBOSCAN 167VICTOR 106x-10 183XANTECH 168169170171172188189YAMAHA 021026 031067