hostess rewards project instructions · hostess rewards project instructions ... z3292 rustic home...
TRANSCRIPT
© CTMH Co. UC 11/2016
Hostess Rewards Project Instructions U.S. • Canada
Level 1 Hostess Rewards Products Hostess Rewards products needed: A1193 My Acrylix® Wreath Z3294 Memo Fundamentals 1385 12" x 12" White Daisy Cardstock Z899 Black Memento™ Ink Pad Basic tools needed: Scissors Paper trimmer Adhesives Optional products: 1386 Black Cardstock Z2454 Leaf Green Marker Z2459 Pastel Green Marker Z3292 Rustic Home Ribbon Pack Z1979 Journaling Pen Z697 Sponge Z1151 3-D Foam Tape Kraft Gift Bag Clear plastic gift box for candy
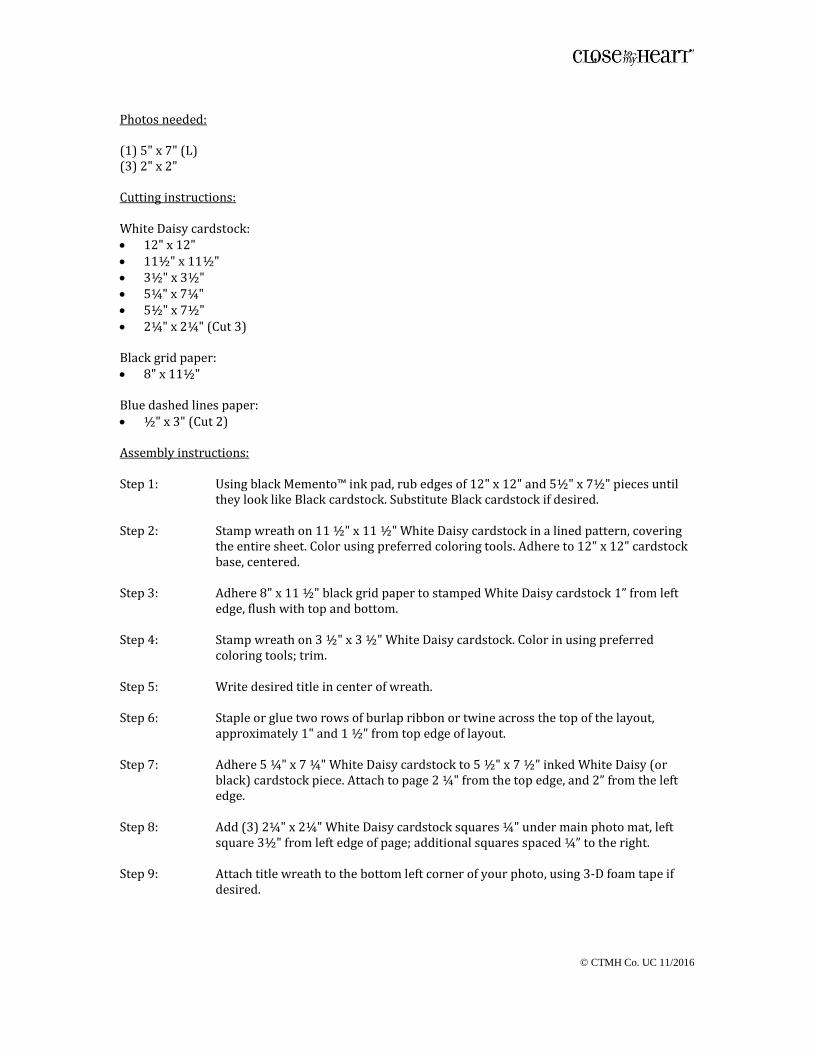
12" x 12" Sisters Page
© CTMH Co. UC 11/2016
Photos needed: (1) 5" x 7" (L) (3) 2" x 2"
Cutting instructions: White Daisy cardstock: 12" x 12" 11½" x 11½" 3½" x 3½" 5¼" x 7¼" 5½" x 7½" 2¼" x 2¼" (Cut 3) Black grid paper: 8" x 11½" Blue dashed lines paper: ½" x 3" (Cut 2) Assembly instructions: Step 1: Using black Memento™ ink pad, rub edges of 12" x 12" and 5½" x 7½" pieces until
they look like Black cardstock. Substitute Black cardstock if desired. Step 2: Stamp wreath on 11 ½" x 11 ½" White Daisy cardstock in a lined pattern, covering
the entire sheet. Color using preferred coloring tools. Adhere to 12" x 12" cardstock base, centered.
Step 3: Adhere 8" x 11 ½" black grid paper to stamped White Daisy cardstock 1” from left
edge, flush with top and bottom. Step 4: Stamp wreath on 3 ½" x 3 ½" White Daisy cardstock. Color in using preferred
coloring tools; trim. Step 5: Write desired title in center of wreath. Step 6: Staple or glue two rows of burlap ribbon or twine across the top of the layout,
approximately 1" and 1 ½" from top edge of layout. Step 7: Adhere 5 ¼" x 7 ¼" White Daisy cardstock to 5 ½" x 7 ½" inked White Daisy (or
black) cardstock piece. Attach to page 2 ¼" from the top edge, and 2” from the left edge.
Step 8: Add (3) 2¼" x 2¼" White Daisy cardstock squares ¼" under main photo mat, left
square 3½" from left edge of page; additional squares spaced ¼” to the right. Step 9: Attach title wreath to the bottom left corner of your photo, using 3-D foam tape if
desired.
© CTMH Co. UC 11/2016
Step 10: Add journaling to the two ½" x 3" blue dashed lines paper and dovetail the ends. Sponge edges using black Memento™ ink pad as desired. Adhere these tucked under title wreath, as shown.
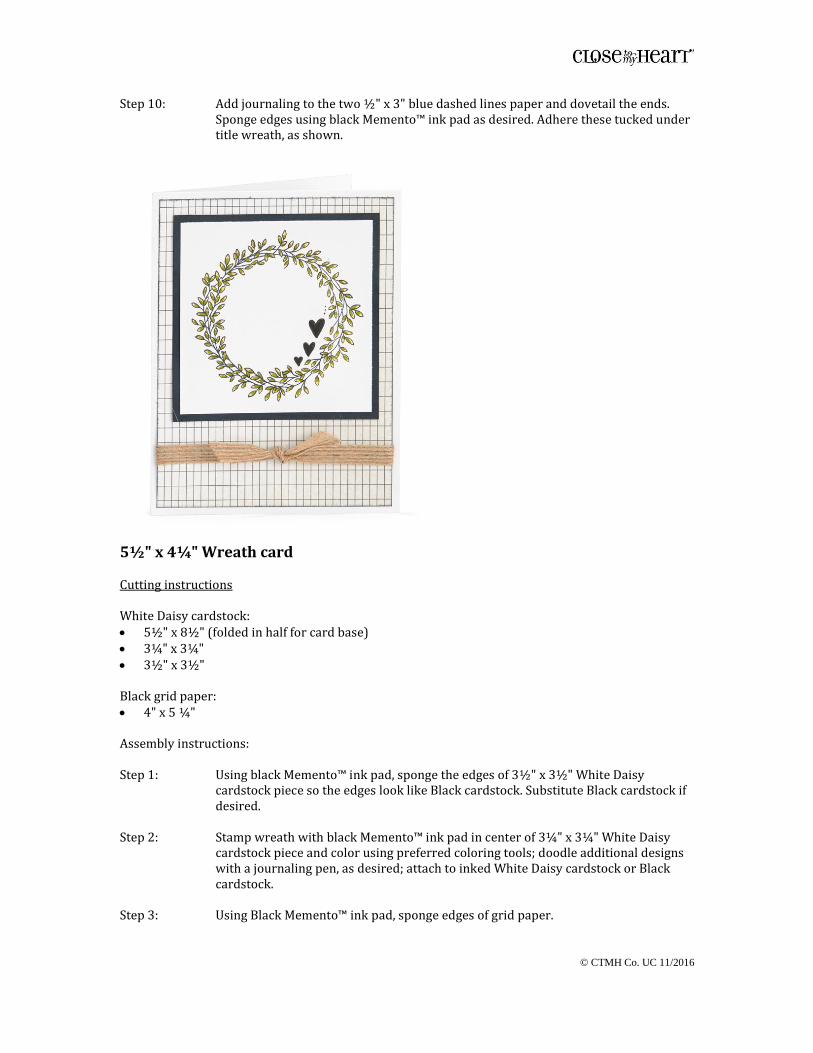
5½" x 4¼" Wreath card Cutting instructions White Daisy cardstock: 5½" x 8½" (folded in half for card base) 3¼" x 3¼" 3½" x 3½"
Black grid paper: 4" x 5 ¼" Assembly instructions: Step 1: Using black Memento™ ink pad, sponge the edges of 3½" x 3½" White Daisy
cardstock piece so the edges look like Black cardstock. Substitute Black cardstock if desired.
Step 2: Stamp wreath with black Memento™ ink pad in center of 3¼" x 3¼" White Daisy
cardstock piece and color using preferred coloring tools; doodle additional designs with a journaling pen, as desired; attach to inked White Daisy cardstock or Black cardstock.
Step 3: Using Black Memento™ ink pad, sponge edges of grid paper.
© CTMH Co. UC 11/2016
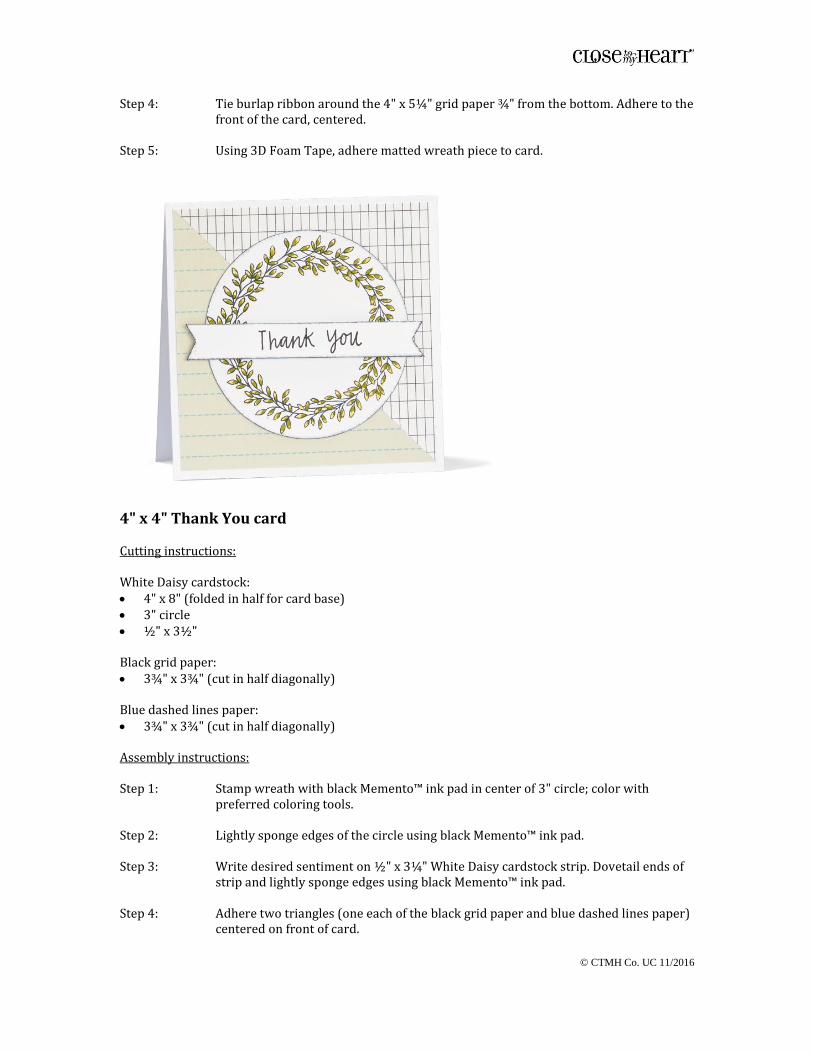
Step 4: Tie burlap ribbon around the 4" x 5¼" grid paper ¾" from the bottom. Adhere to the front of the card, centered.
Step 5: Using 3D Foam Tape, adhere matted wreath piece to card.
4" x 4" Thank You card Cutting instructions: White Daisy cardstock: 4" x 8" (folded in half for card base) 3" circle ½" x 3½" Black grid paper: 3¾" x 3¾" (cut in half diagonally) Blue dashed lines paper: 3¾" x 3¾" (cut in half diagonally) Assembly instructions: Step 1: Stamp wreath with black Memento™ ink pad in center of 3" circle; color with
preferred coloring tools. Step 2: Lightly sponge edges of the circle using black Memento™ ink pad. Step 3: Write desired sentiment on ½" x 3¼" White Daisy cardstock strip. Dovetail ends of
strip and lightly sponge edges using black Memento™ ink pad. Step 4: Adhere two triangles (one each of the black grid paper and blue dashed lines paper)
centered on front of card.

© CTMH Co. UC 11/2016
Step 5: Adhere stamped cardstock circle to front of card, centered. Step 6: Attach your sentiment across middle of wreath, using 3-D foam tape if desired.
Gift Bag We used a Kraft gift bag measuring 8" x 10" on the front. *Note: Adjust width to fit your gift bag. Height will stay the same. Cutting instructions: White Daisy cardstock: 3" circle 8" x ¼" (Cut 2) Blue dashed lines paper: 8" x 3½"
© CTMH Co. UC 11/2016
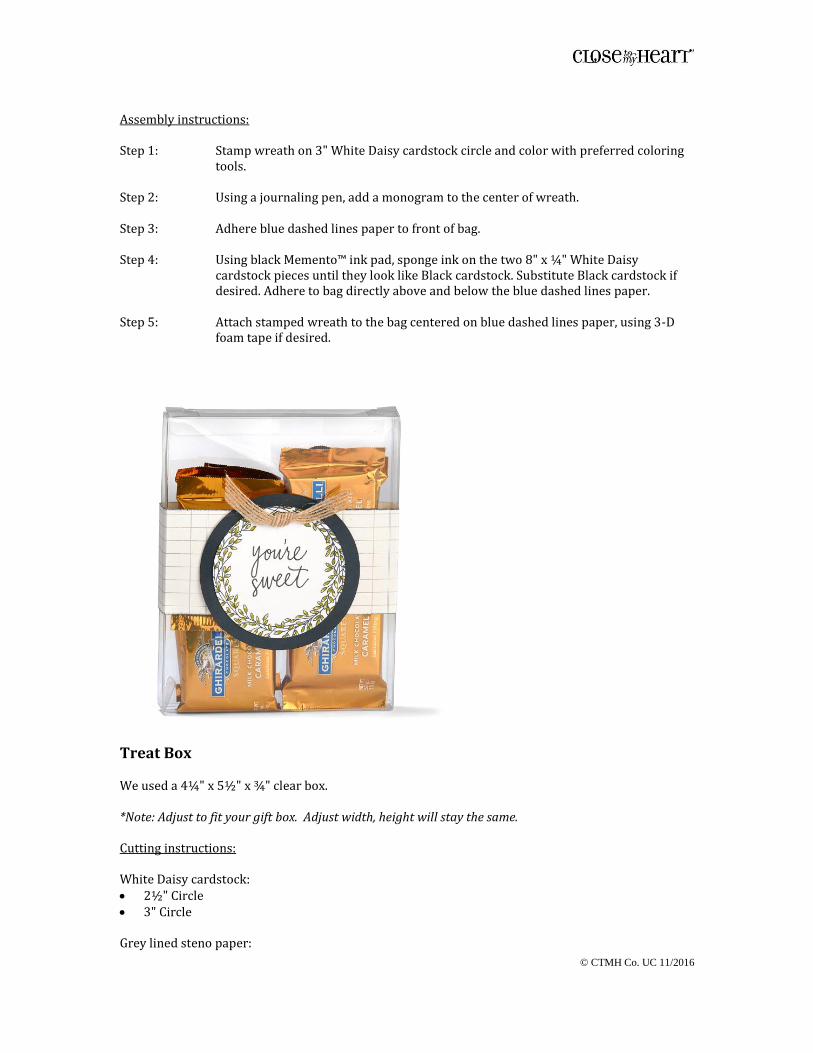
Assembly instructions: Step 1: Stamp wreath on 3" White Daisy cardstock circle and color with preferred coloring
tools. Step 2: Using a journaling pen, add a monogram to the center of wreath. Step 3: Adhere blue dashed lines paper to front of bag. Step 4: Using black Memento™ ink pad, sponge ink on the two 8" x ¼" White Daisy
cardstock pieces until they look like Black cardstock. Substitute Black cardstock if desired. Adhere to bag directly above and below the blue dashed lines paper.
Step 5: Attach stamped wreath to the bag centered on blue dashed lines paper, using 3-D
foam tape if desired.
Treat Box We used a 4¼" x 5½" x ¾" clear box. *Note: Adjust to fit your gift box. Adjust width, height will stay the same. Cutting instructions: White Daisy cardstock: 2½" Circle 3" Circle Grey lined steno paper:
© CTMH Co. UC 11/2016
12" x 2" *Paper needs to go around box. Adjust width depending on the size of your gift box. Assembly instructions: Step 1: Using Black Memento™ ink pad, lightly sponge edges of the grey lines paper and
then wrap around box and adhere in the back. Step 2: Using Black Memento™ Ink Pad, sponge edges of 3" White Daisy circle until it looks
like Black cardstock. Substitute Black cardstock if desired. Step 3: Stamp wreath with Black Memento™ Ink Pad on 2½" White Daisy cardstock circle,
allowing stamped image to go off the edge of the circle. Color using preferred coloring tools. Adhere to 3" circle.
Step 4: Using a journaling pen, add a sentiment to the center of the wreath piece. Step 5: Adhere wreath circle to the front of the box. Step 6: Tie knot in burlap ribbon and attach to top of wreath.
© CTMH Co. UC 11/2016
Level 2 Hostess Rewards Products Hostess Rewards products needed: 1385 12" x 12" White Daisy Cardstock Z3253 Adventure Fundamentals Z3264 Good Life Complements Adventure Cardstock Combo Pack (included in Cricut® Flower Market Collection) 50%-off item: Z3285 Cricut® Flower Market Collection
Includes: Adventure Cardstock Combo Pack Sending Smiles Stamp Set Line It Up Stamp Set Playful Patterns Stamp Set
Basic tools needed: Scissors Paper trimmer Adhesives Optional products: Z679 Liquid Glass Z1912 Corner Rounder Z1151 3-D Foam Tape 4¼" 5½" clear bag for treat bag project
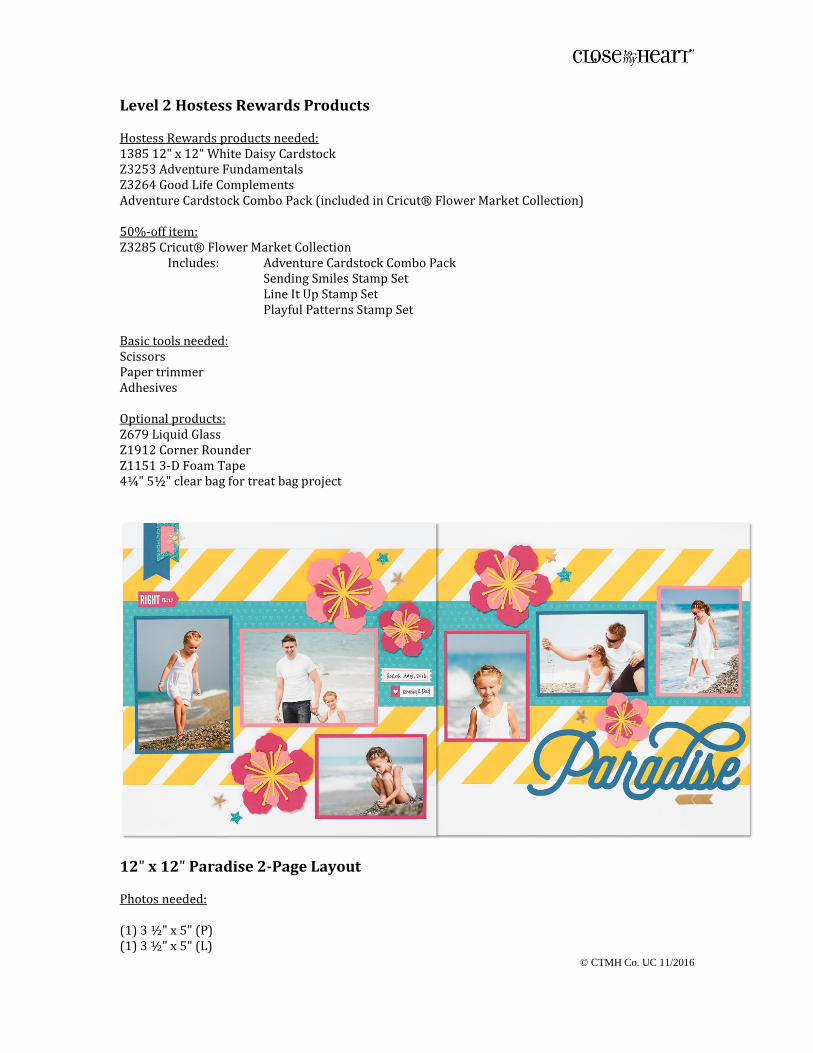
12" x 12" Paradise 2-Page Layout Photos needed: (1) 3 ½" x 5" (P) (1) 3 ½" x 5" (L)
© CTMH Co. UC 11/2016
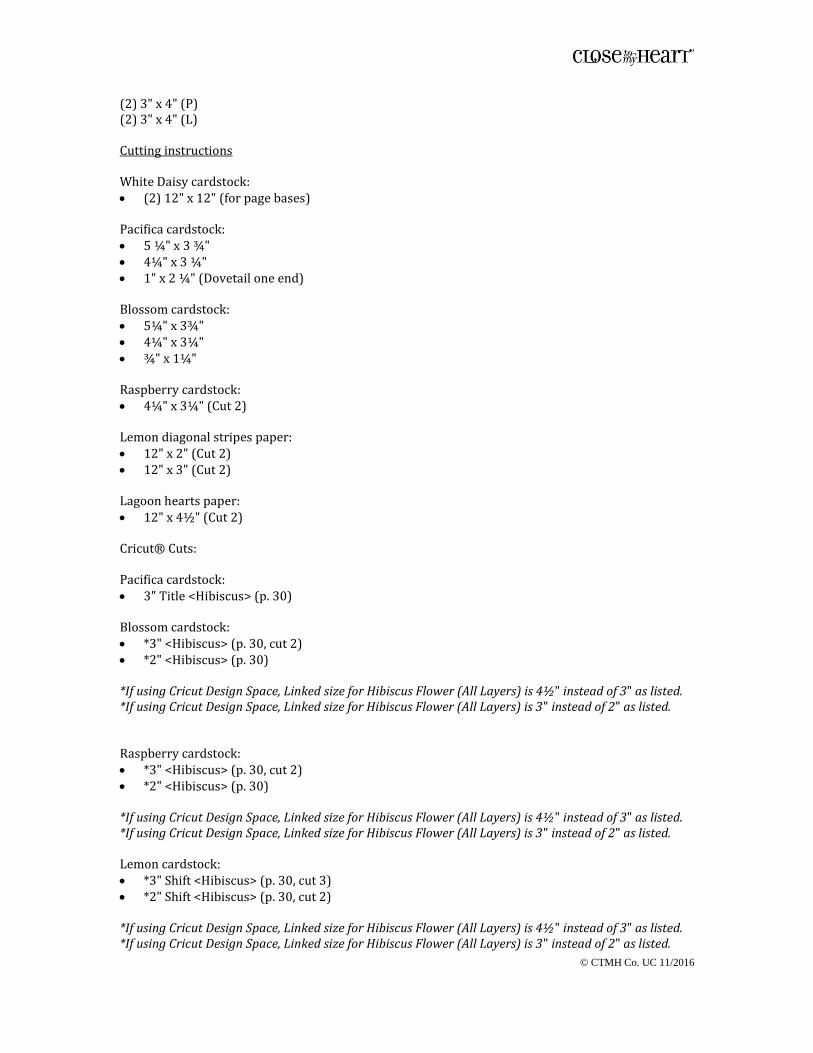
(2) 3" x 4" (P) (2) 3" x 4" (L)
Cutting instructions White Daisy cardstock: (2) 12" x 12" (for page bases) Pacifica cardstock: 5 ¼" x 3 ¾" 4¼" x 3 ¼" 1" x 2 ¼" (Dovetail one end)
Blossom cardstock: 5¼" x 3¾" 4¼" x 3¼" ¾" x 1¼" Raspberry cardstock: 4¼" x 3¼" (Cut 2) Lemon diagonal stripes paper: 12" x 2" (Cut 2) 12" x 3" (Cut 2) Lagoon hearts paper: 12" x 4½" (Cut 2) Cricut® Cuts: Pacifica cardstock: 3" Title <Hibiscus> (p. 30)
Blossom cardstock: *3" <Hibiscus> (p. 30, cut 2) *2" <Hibiscus> (p. 30) *If using Cricut Design Space, Linked size for Hibiscus Flower (All Layers) is 4½" instead of 3" as listed. *If using Cricut Design Space, Linked size for Hibiscus Flower (All Layers) is 3" instead of 2" as listed.
Raspberry cardstock: *3" <Hibiscus> (p. 30, cut 2) *2" <Hibiscus> (p. 30) *If using Cricut Design Space, Linked size for Hibiscus Flower (All Layers) is 4½" instead of 3" as listed. *If using Cricut Design Space, Linked size for Hibiscus Flower (All Layers) is 3" instead of 2" as listed. Lemon cardstock: *3" Shift <Hibiscus> (p. 30, cut 3) *2" Shift <Hibiscus> (p. 30, cut 2) *If using Cricut Design Space, Linked size for Hibiscus Flower (All Layers) is 4½" instead of 3" as listed. *If using Cricut Design Space, Linked size for Hibiscus Flower (All Layers) is 3" instead of 2" as listed.
© CTMH Co. UC 11/2016
Assembly instructions for left page Step 1: Using 12" x 12" White Daisy cardstock as your base, adhere 12" x 2" Lemon diagonal
stripes piece 1" from top edge. Adhere 12" x 4 ½" Lagoon hearts piece directly below that, and the 12" x 3" Lemon diagonal stripes directly below that.
Step 2: Adhere dovetailed 1" x 2¼" Pacifica cardstock piece to top left corner, ¾" from left
edge and flush with top. Step 3: Attach Lagoon glitter banner Complement to ¾" x 1 ¼" Blush cardstock piece; trim
excess and attach to the right of the Pacifica Dovetailed piece, overlapping about ½". Step 4: Attach photo mats to page as shown in photo. Step 7: Embellish with complements from the Good Life Complements as desired. Step 8: Layer Cricut® flowers and attach as shown. Assembly instructions for right page: Step 1: Using 12" x 12" White Daisy cardstock as your base, adhere 12" x 2" Lemon diagonal
stripes piece 1" from top edge. Adhere 12" x 4 ½" Lagoon hearts piece directly below that, and the 12" x 3" Lemon diagonal stripes piece below that.
Step 2: Attach photo mats to page as shown in photo. Step 3: Adhere the “Paradise” title to the bottom of the 3" Lemon diagonal stripes piece,
approximately ¼" from right edge. Step 4: Embellish with Complements as desired. Step 5: Layer Cricut® flowers and attach as shown.
© CTMH Co. UC 11/2016
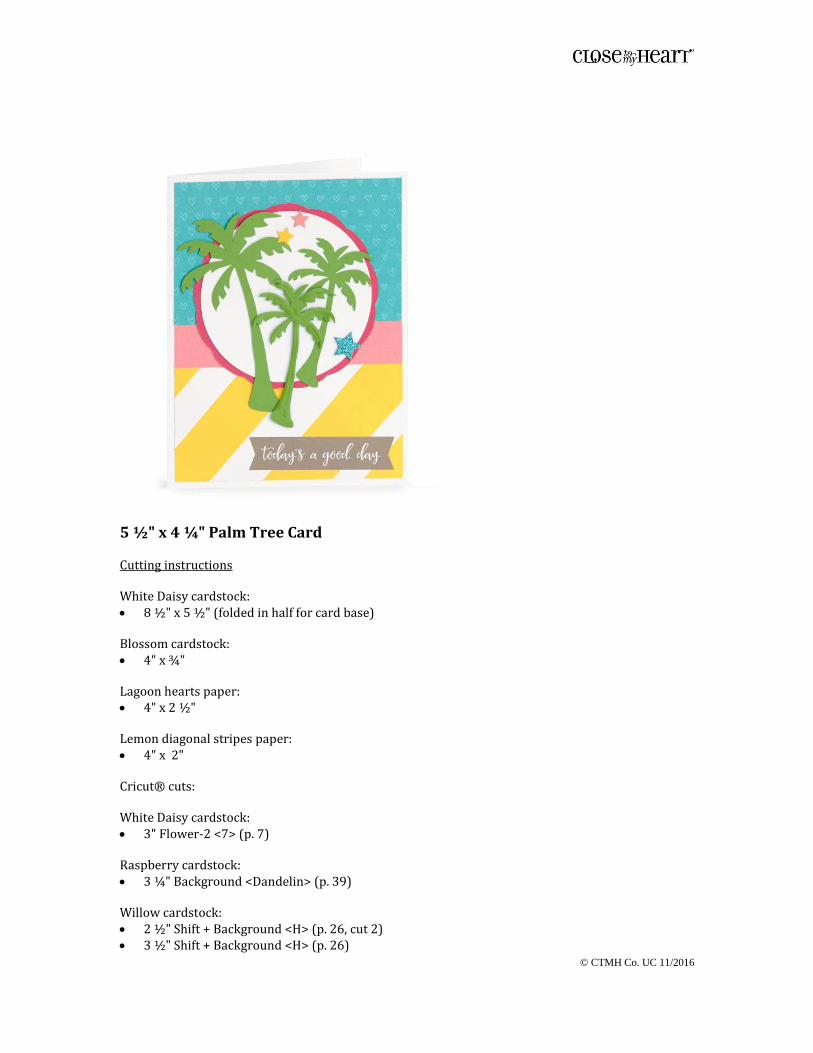
5 ½" x 4 ¼" Palm Tree Card Cutting instructions White Daisy cardstock: 8 ½" x 5 ½" (folded in half for card base) Blossom cardstock: 4" x ¾" Lagoon hearts paper: 4" x 2 ½" Lemon diagonal stripes paper: 4" x 2" Cricut® cuts: White Daisy cardstock: 3" Flower-2 <7> (p. 7) Raspberry cardstock: 3 ¼" Background <Dandelin> (p. 39) Willow cardstock: 2 ½" Shift + Background <H> (p. 26, cut 2) 3 ½" Shift + Background <H> (p. 26)
© CTMH Co. UC 11/2016
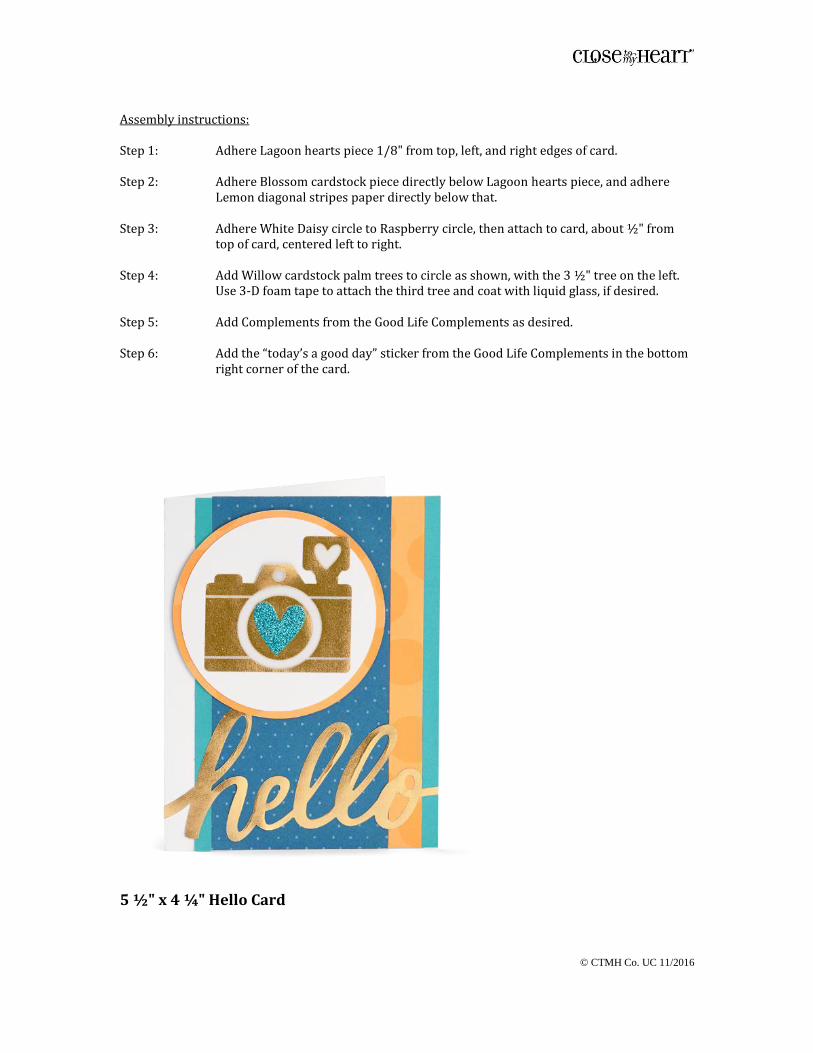
Assembly instructions: Step 1: Adhere Lagoon hearts piece 1/8" from top, left, and right edges of card. Step 2: Adhere Blossom cardstock piece directly below Lagoon hearts piece, and adhere
Lemon diagonal stripes paper directly below that. Step 3: Adhere White Daisy circle to Raspberry circle, then attach to card, about ½" from
top of card, centered left to right. Step 4: Add Willow cardstock palm trees to circle as shown, with the 3 ½" tree on the left.
Use 3-D foam tape to attach the third tree and coat with liquid glass, if desired. Step 5: Add Complements from the Good Life Complements as desired. Step 6: Add the “today’s a good day” sticker from the Good Life Complements in the bottom
right corner of the card.
5 ½" x 4 ¼" Hello Card
© CTMH Co. UC 11/2016
Cutting instructions White Daisy cardstock: 8 ½" x 5 ½" (folded in half for card base) Lagoon cardstock: ¼" x 5 ½" (Cut 2) Tangerine large dots paper: 1/2" x 5 ½" Pacifica small dots paper: 2¾" x 5½" Cricut® cuts: White Daisy cardstock: 3" Flower-2 <7> (p. 7) Tangerine large dots paper: 3¼" Flower-2 <7> (p. 7) Assembly instructions: Step 1: Starting at the right edge of the card, attach the following paper strips, right to left:
Lagoon cardstock strip, Tangerine large dots strip, Pacifica small dots paper, and the other Lagoon cardstock strip.
Step 2: Attach White Daisy cardstock circle to the Tangerine Large Dots circle. Step 3: Adhere camera to center of White Daisy cardstock circle, and then attach the largest
Lagoon glitter heart from the Good Times Complements in center of lens. Step 4: Attach circle piece to card, approximately 1/8” from the top and left side of the card,
using 3-D foam tape if desired. Step 5: Adhere the gold “hello” from the Good Day Complements to the card. Trim edges of
“hello” along sides of card.
© CTMH Co. UC 11/2016
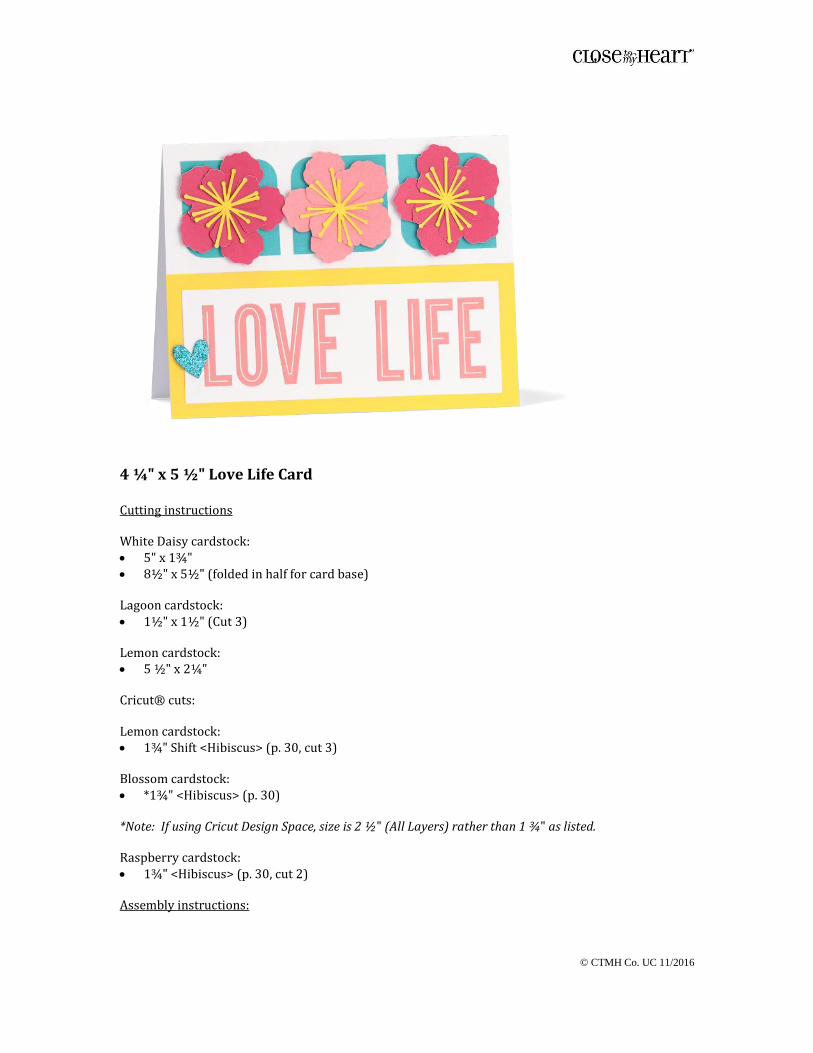
4 ¼" x 5 ½" Love Life Card Cutting instructions White Daisy cardstock: 5" x 1¾" 8½" x 5½" (folded in half for card base) Lagoon cardstock: 1½" x 1½" (Cut 3) Lemon cardstock: 5 ½" x 2¼"
Cricut® cuts: Lemon cardstock: 1¾" Shift <Hibiscus> (p. 30, cut 3) Blossom cardstock: *1¾" <Hibiscus> (p. 30) *Note: If using Cricut Design Space, size is 2 ½" (All Layers) rather than 1 ¾" as listed. Raspberry cardstock: 1¾" <Hibiscus> (p. 30, cut 2) Assembly instructions:
© CTMH Co. UC 11/2016
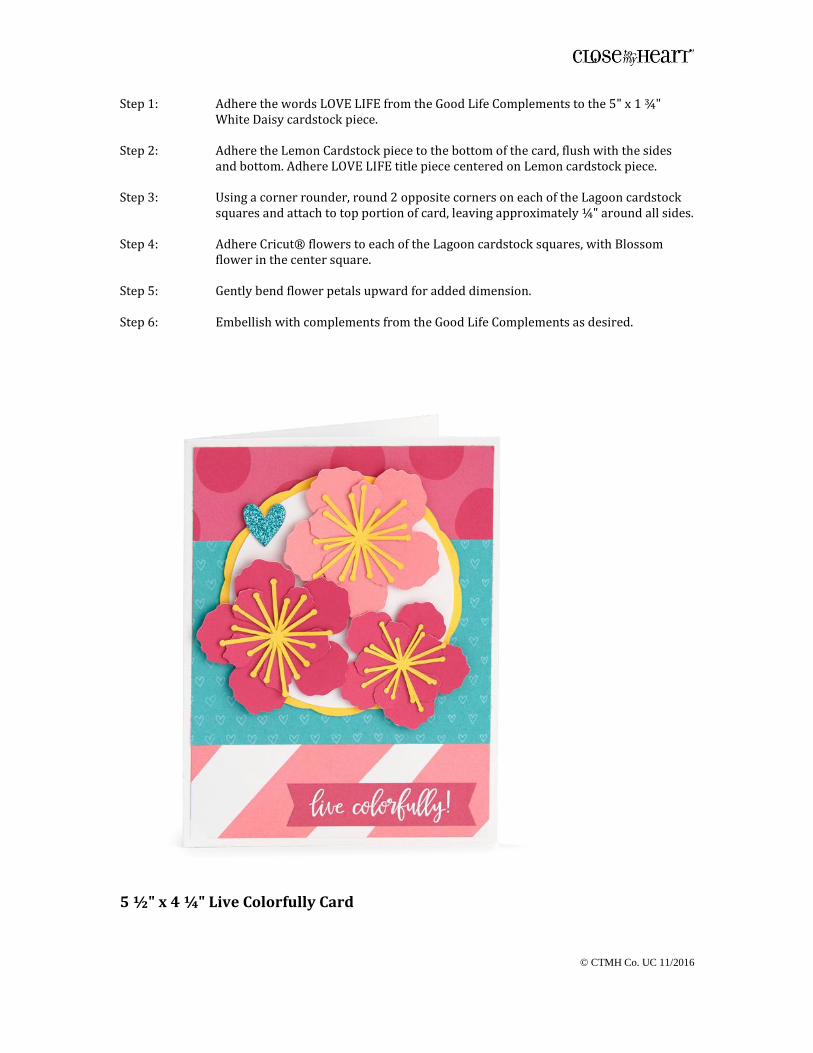
Step 1: Adhere the words LOVE LIFE from the Good Life Complements to the 5" x 1 ¾" White Daisy cardstock piece.
Step 2: Adhere the Lemon Cardstock piece to the bottom of the card, flush with the sides
and bottom. Adhere LOVE LIFE title piece centered on Lemon cardstock piece. Step 3: Using a corner rounder, round 2 opposite corners on each of the Lagoon cardstock
squares and attach to top portion of card, leaving approximately ¼" around all sides. Step 4: Adhere Cricut® flowers to each of the Lagoon cardstock squares, with Blossom
flower in the center square. Step 5: Gently bend flower petals upward for added dimension. Step 6: Embellish with complements from the Good Life Complements as desired.
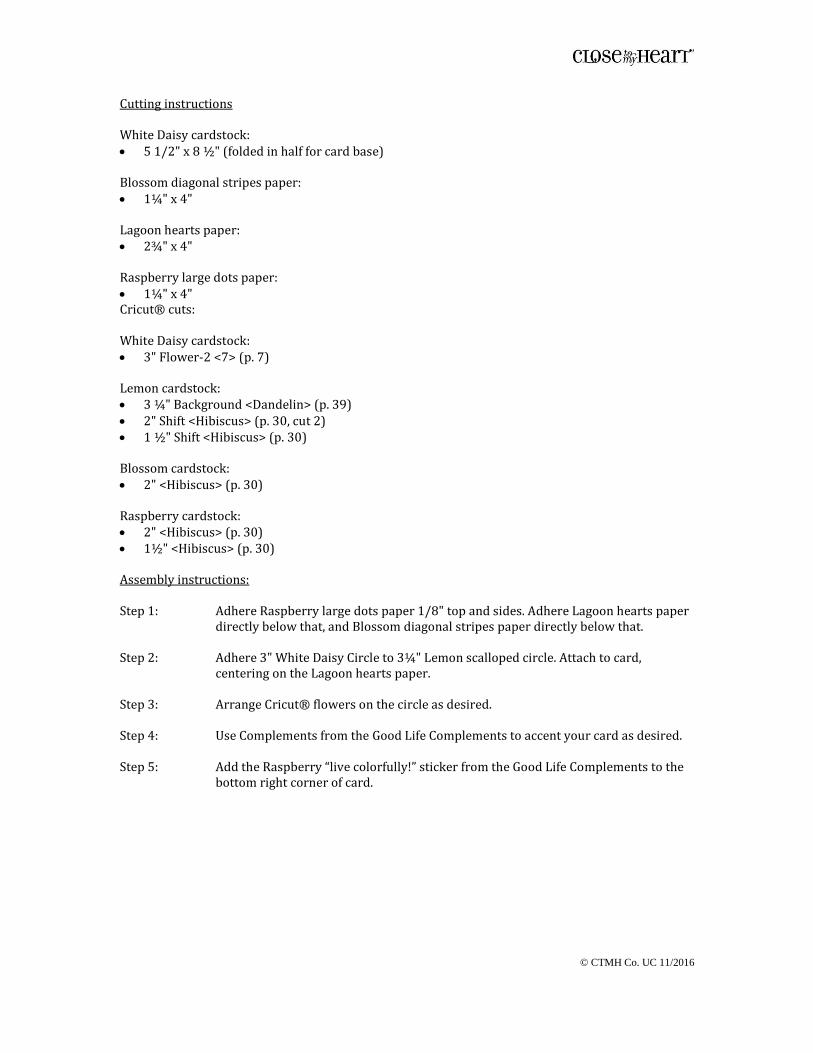
5 ½" x 4 ¼" Live Colorfully Card
© CTMH Co. UC 11/2016
Cutting instructions White Daisy cardstock: 5 1/2" x 8 ½" (folded in half for card base) Blossom diagonal stripes paper: 1¼" x 4" Lagoon hearts paper: 2¾" x 4" Raspberry large dots paper: 1¼" x 4" Cricut® cuts: White Daisy cardstock: 3" Flower-2 <7> (p. 7) Lemon cardstock: 3 ¼" Background <Dandelin> (p. 39) 2" Shift <Hibiscus> (p. 30, cut 2) 1 ½" Shift <Hibiscus> (p. 30) Blossom cardstock: 2" <Hibiscus> (p. 30) Raspberry cardstock: 2" <Hibiscus> (p. 30) 1½" <Hibiscus> (p. 30) Assembly instructions: Step 1: Adhere Raspberry large dots paper 1/8" top and sides. Adhere Lagoon hearts paper
directly below that, and Blossom diagonal stripes paper directly below that. Step 2: Adhere 3" White Daisy Circle to 3¼" Lemon scalloped circle. Attach to card,
centering on the Lagoon hearts paper. Step 3: Arrange Cricut® flowers on the circle as desired. Step 4: Use Complements from the Good Life Complements to accent your card as desired. Step 5: Add the Raspberry “live colorfully!” sticker from the Good Life Complements to the
bottom right corner of card.
© CTMH Co. UC 11/2016
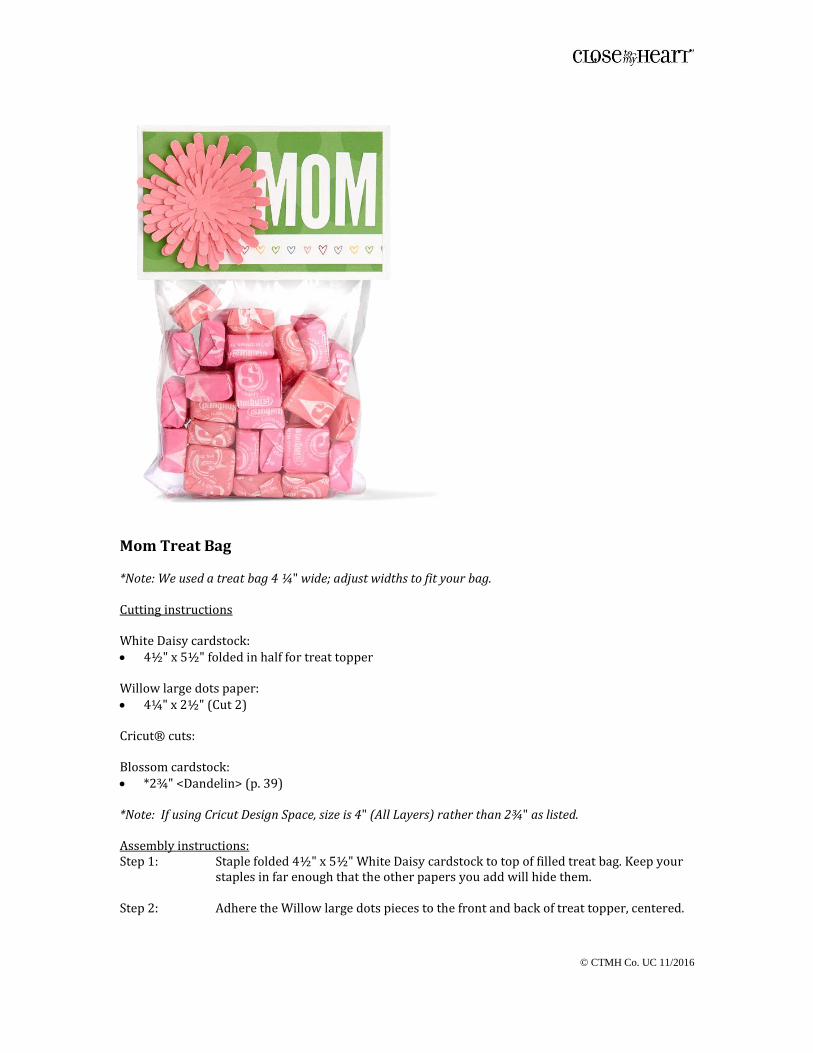
Mom Treat Bag *Note: We used a treat bag 4 ¼" wide; adjust widths to fit your bag. Cutting instructions White Daisy cardstock: 4½" x 5½" folded in half for treat topper Willow large dots paper: 4¼" x 2½" (Cut 2) Cricut® cuts: Blossom cardstock: *2¾" <Dandelin> (p. 39) *Note: If using Cricut Design Space, size is 4" (All Layers) rather than 2¾" as listed. Assembly instructions: Step 1: Staple folded 4½" x 5½" White Daisy cardstock to top of filled treat bag. Keep your
staples in far enough that the other papers you add will hide them. Step 2: Adhere the Willow large dots pieces to the front and back of treat topper, centered.
© CTMH Co. UC 11/2016
Step 3: Adhere the letters “MOM” from the Good Life Complements to the front of your treat topper, approximately ¼" from the top of the Willow large dots paper, working right to left.
Step 4: Adhere the row of hearts sticker from the Good Life Complements approximately
1/8" under the letters, and 1/8" from bottom edge of the Willow large dots piece on the front of the topper.
Step 5: Glue flower together in layers, largest to smallest. When your flower is assembled
and you have “fluffed” the petals by bending them a bit, adhere your flower to the left of “MOM” and the row of hearts sticker.

© CTMH Co. UC 11/2016
Level 3 Hostess Rewards Products Hostess Rewards products needed: M1150 My Acrylix® Little Leaves A1182 My Acrylix® Etched Alphabet Z3254 Enchantment Fundamentals 1388 12" x 12" Colonial White Cardstock Z3265 School K-6 Complements Z899 Black Memento™ Ink Pad Z2457 ShinHan™ Touch Twin™ Marigold Marker Enchantment Cardstock Combo Pack (included in Cricut® Artistry Collection) 50% off item: Z3167 Cricut® Artistry Collection
Includes: Enchantment Cardstock Combo Pack Life is Sweet stamp set Perfect Picture stamp set Love Right Now stamp set
Basic tools needed: Scissors Paper trimmer Adhesives Optional products used: Z3288 Enchantment Ribbon Pack Z2448 ShinHan™ Touch Twin™ Carmine Marker Z3293 Shimmer Brush—Clear Z1151 3-D Foam Tape Corner Rounder
© CTMH Co. UC 11/2016
12" x 12" School 2-Page Layout Photos Needed: (3) 3" x 4" (P) (1) 4" x 6" (L)
Cutting instructions Colonial White cardstock: 12" x 12" (2, for bases) 6 ¼" x 4 ¼" 3 ¼" x 4 ¼" (Cut 3) Eggplant large polka dot paper: 12" x ¼" (Cut 2) 12" x ½" (Cut 2) 2 ¼" x 6 ½" 3 ½" x 6 ½" Peacock grid paper: 2 ¼" 6 ½" 3 ½" x 6 ½" Saffron small polka dot paper: 2 ¼" x 6 ½" 12" x ¼" (Cut 4) Fern grid paper: 2 ¼" x 6 ½" 3 ½" x 6 ½" Sapphire small polka dot paper: 2 ¼" x 6 ½" 11" x 4 ¼" Cricut® cuts: Eggplant cardstock: 2" Banner <3> (p. 3) Assembly instructions for left page: Step 1: Attach 12" x ¼" Eggplant large polka dot paper across top of the page and the 12" x
¼" Saffron small polka dot paper directly below it. Step 2: Attach 12" x ½" Eggplant large polka dot paper across the bottom of the page and
the 12" x ¼" Saffron small polka dot paper directly above it. Step 3: Attach 2 ¼" x 6 ½" Eggplant large polka dot paper 2" from top edge and 1/8" from
left side. Attach the other (4) 2 ¼" x 6 ½" papers across the page aligned with Eggplant paper with approximately 1/8" between each, in this order: Peacock grid, Saffron small polka Dot, Fern grid, and Sapphire small polka dot.
© CTMH Co. UC 11/2016
Step 4: Attach 6 ¼" x 4 ¼" Colonial White piece 2 ½" from top of page and ½" from right edge.
Step 5: Attach lined-paper circle piece from K-6 Complements to Cricut®-cut circle; attach
desired number sticker from Complements, and then attach circle near lower left corner of photo, using 3-D foam tape if desired.
Step 5: Using Black Memento™ ink and Etched Alphabet stamp set, stamp GRADE on Saffron
checked sticker from K-6 Complements; attach sticker beside Cricut®-cut circle piece, tucked under left edge.
Step 6: Cluster K-6 Complements as shown left of photo; embellish remainder of page as
desired.
Assembly instructions for right page Step 1: Attach 12" x ¼" Eggplant large polka dot paper across top of the page and the 12" x
¼" Saffron small polka dot paper directly below it. Step 2: Attach the 12" x ½" Eggplant large polka dot paper across the bottom of the page
and the 12" x ¼" Saffron small polka dot paper directly above it. Step 3: Attach the 11" x 4 ¼" Sapphire small polka dot paper 2" from the top edge and ½"
from left and right edges. Step 4: Dovetail the bottom ends of the 3 ½" x 6 ½" Peacock grid, Egpplant large polka dot,
and Fern grid papers; attach Peacock grid piece ¼" from left edge of Sapphire small polka dot piece and ½" from top; attach Eggplant piece directly right of Peacock piece, and Fern grid directly right of Eggplant piece.
Step 5: Attach 3 ¼" x 4 ¼" Colonial White cardstock pieces 1/8" from top and sides of each
of the dovetailed pieces. Step 6: Create cluster with Enchantment Fundamentals K-6 Complements in lower right
portion of page; add additional embellishments to page as desired.
© CTMH Co. UC 11/2016
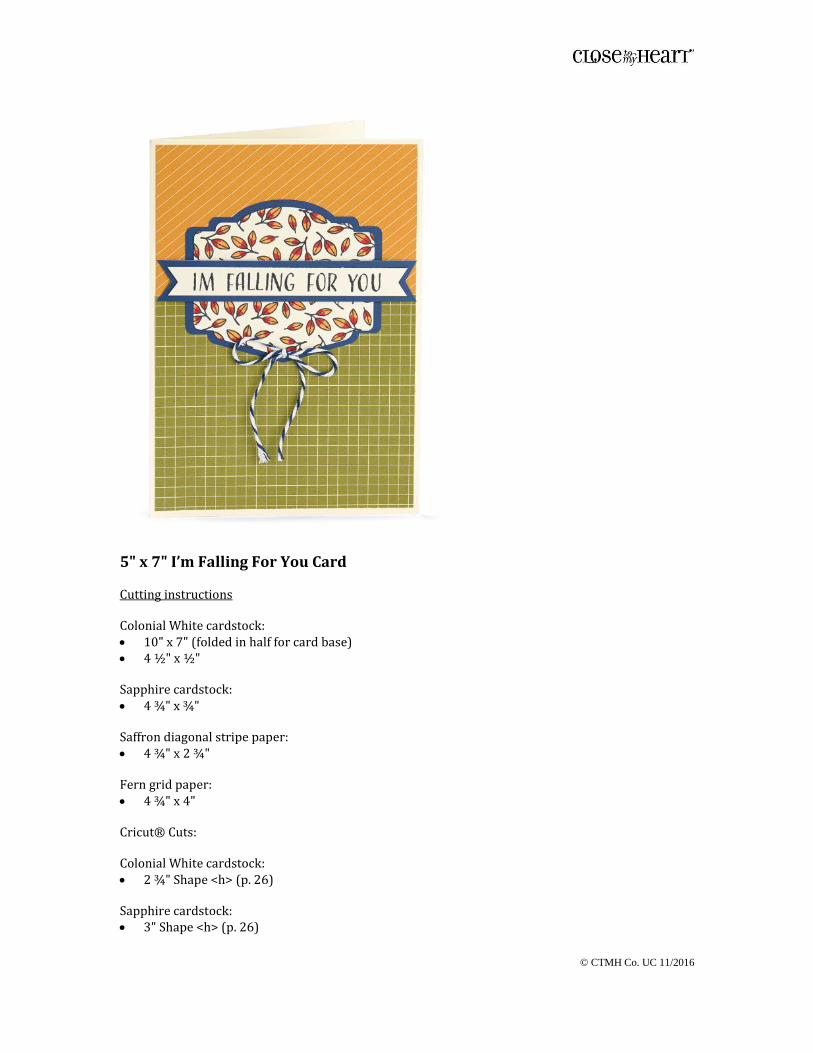
5" x 7" I’m Falling For You Card Cutting instructions Colonial White cardstock: 10" x 7" (folded in half for card base) 4 ½" x ½"
Sapphire cardstock: 4 ¾" x ¾"
Saffron diagonal stripe paper: 4 ¾" x 2 ¾" Fern grid paper: 4 ¾" x 4" Cricut® Cuts: Colonial White cardstock: 2 ¾" Shape <h> (p. 26) Sapphire cardstock: 3" Shape <h> (p. 26)
© CTMH Co. UC 11/2016
Assembly instructions: Step 1: Attach 4 ¾" x 2 ¾" Saffron diagonal stripe paper to top of card, 1/8" from top and
side edges. Step 2: Adhere Fern grid paper directly below Saffron piece. Step 3: Using Black Memento™ Ink Pad and Little Leaves stamp set, stamp leaves repeatedly
on Colonial White Cricut® piece. Color in with Marigold and Carmine Shin Han Markers.
Step 4: Attach stamped leaves piece to Sapphire Cricut® cut piece, then adhere to the card,
centered over the seam of the Saffron and Fern papers. Step 5: Using the Black Memento™ ink pad and the Etched Alphabet stamp set, stamp “IM
FALLING FOR YOU” on the 4 ½" x ½" Colonial White cardstock piece. Dovetail both ends. Adhere to 4 ¾" x ¾" Sapphire cardstock piece and dovetail ends. Attach to card using 3-D Foam Tape if desired.
Step 7: Tie bow in Sapphire twine and attach at bottom of stamped leaves piece.
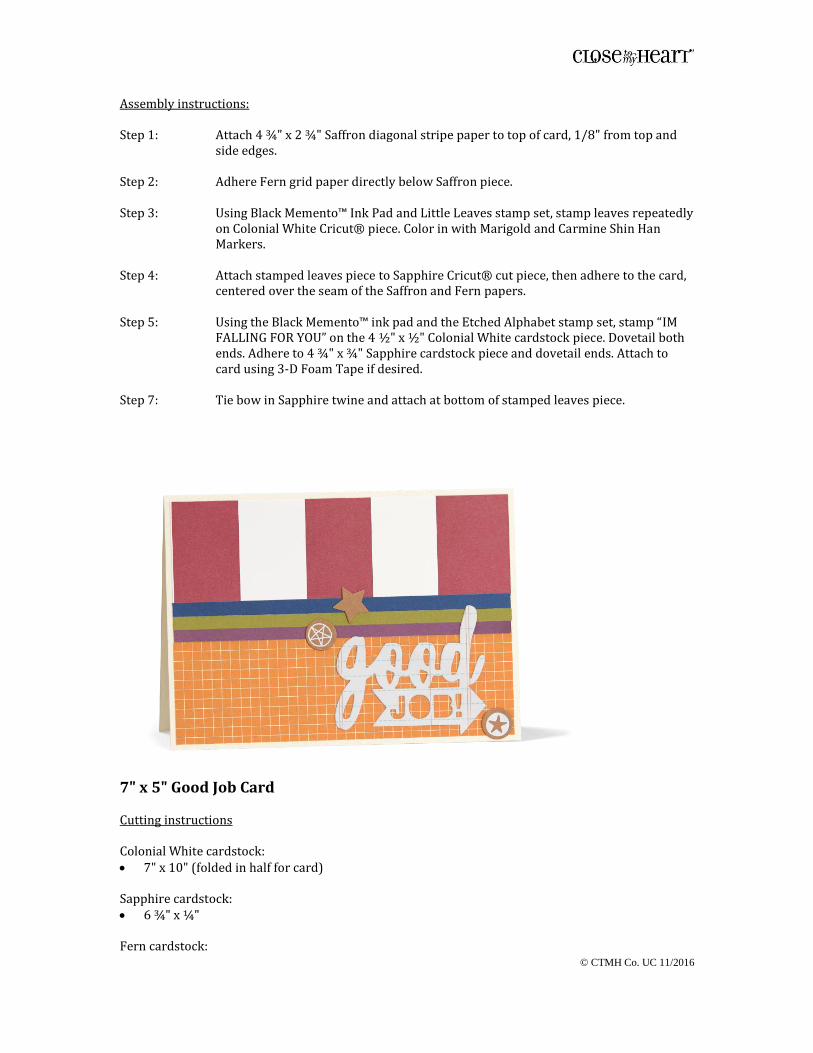
7" x 5" Good Job Card Cutting instructions Colonial White cardstock: 7" x 10" (folded in half for card) Sapphire cardstock: 6 ¾" x ¼" Fern cardstock:
© CTMH Co. UC 11/2016
6 ¾" x ¼" Eggplant cardstock: 6 ¾" x ¼" Goldrush grid paper: 6 ¾" x 2" Pomegranate large stripes B&T: 6 ¾" x 2" Assembly instructions: Step 1: Attach Pomegranate large stripes paper to top of card, 1/8" from top and sides. Step 2: Adhere Goldrush grid paper to bottom of card, 1/8" from top and sides. Step 3: Attach ¼" x 6 ¾" Eggplant cardstock strip directly above Goldrush paper; attach ¼"
x 6 ¾" Fern cardstock strip directly above Eggplant, and ¼" x 6 ¾" Sapphire cardstock strip directly above Fern.
Step 4: Add “Good Job” and stars from K-6 Complements as desired.
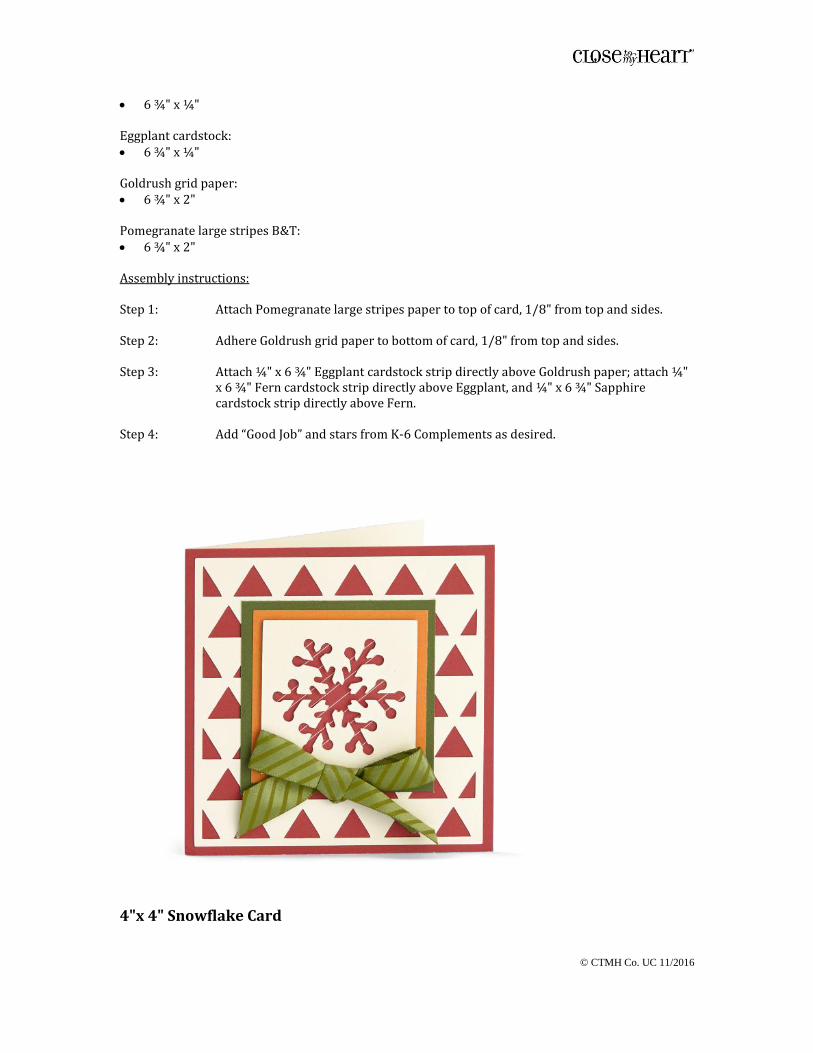
4"x 4" Snowflake Card
© CTMH Co. UC 11/2016
Cutting instructions Colonial White cardstock: 4" x 8" (folded in half for card base) Ruby cardstock: 4" x 4" New England Ivy cardstock: 2 ½" x 2 ½" Goldrush cardstock: 2 ¼" x 2 ¼" Ruby diagonal stripe paper: 2" x 2" Cricut® cuts: Colonial White cardstock: 3¾" Background <p> (p. 20) 2" Shift + Layer <Winter> (p. 49) Assembly instructions: Step 1: Attach Colonial White Cricut® piece with triangles cut out on Ruby 4” x 4”
cardstock, leaving about 1/8" around all sides. Attach Ruby cardstock to card front. Step 2: Using 3-D Foam Tape, attach Colonial White cardstock with snowflake cut out of it
to Ruby diagonal stripes paper. Attach to Goldrush cardstock; attach Goldrush cardstock to New England Ivy Square; Attach to card front ¾" from top and sides.
Step 3: Tie a bow in Fern ribbon and attach below snowflake. Use shimmer brush on
Colonial White snowflake layer as desired;
© CTMH Co. UC 11/2016
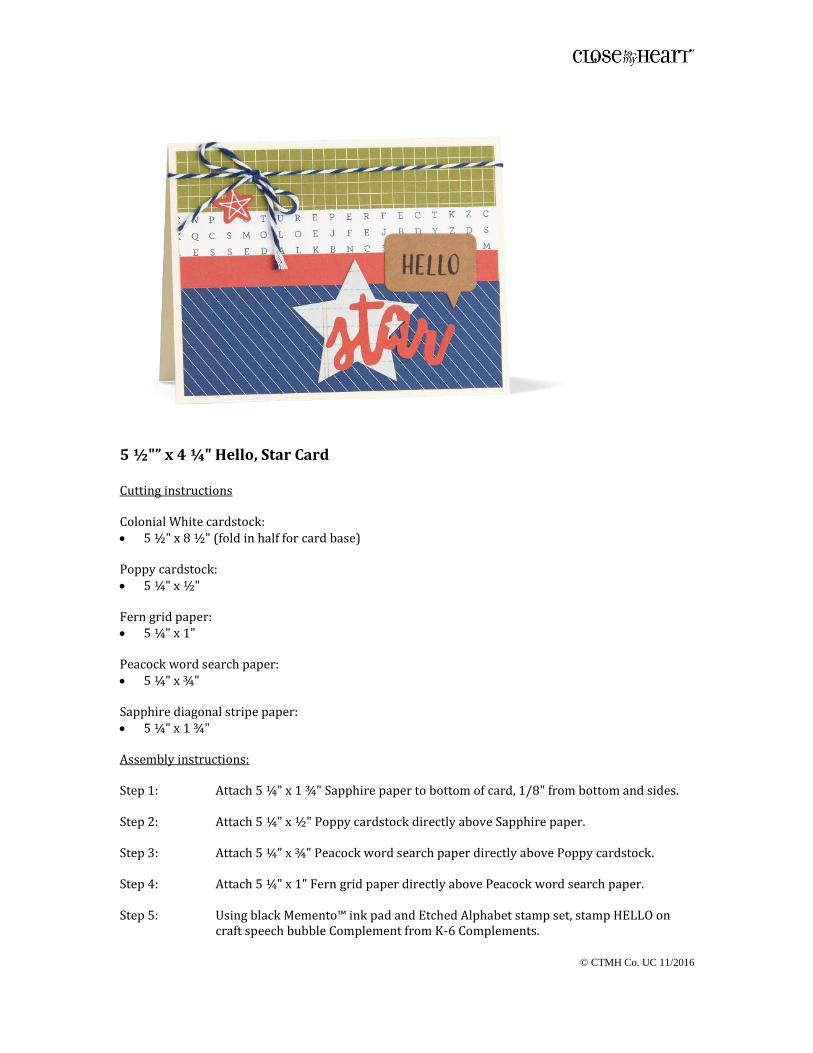
5 ½"” x 4 ¼" Hello, Star Card Cutting instructions Colonial White cardstock: 5 ½" x 8 ½" (fold in half for card base) Poppy cardstock: 5 ¼" x ½" Fern grid paper: 5 ¼" x 1" Peacock word search paper: 5 ¼" x ¾" Sapphire diagonal stripe paper: 5 ¼" x 1 ¾" Assembly instructions: Step 1: Attach 5 ¼" x 1 ¾" Sapphire paper to bottom of card, 1/8" from bottom and sides. Step 2: Attach 5 ¼" x ½" Poppy cardstock directly above Sapphire paper. Step 3: Attach 5 ¼" x ¾" Peacock word search paper directly above Poppy cardstock. Step 4: Attach 5 ¼" x 1" Fern grid paper directly above Peacock word search paper. Step 5: Using black Memento™ ink pad and Etched Alphabet stamp set, stamp HELLO on
craft speech bubble Complement from K-6 Complements.
© CTMH Co. UC 11/2016
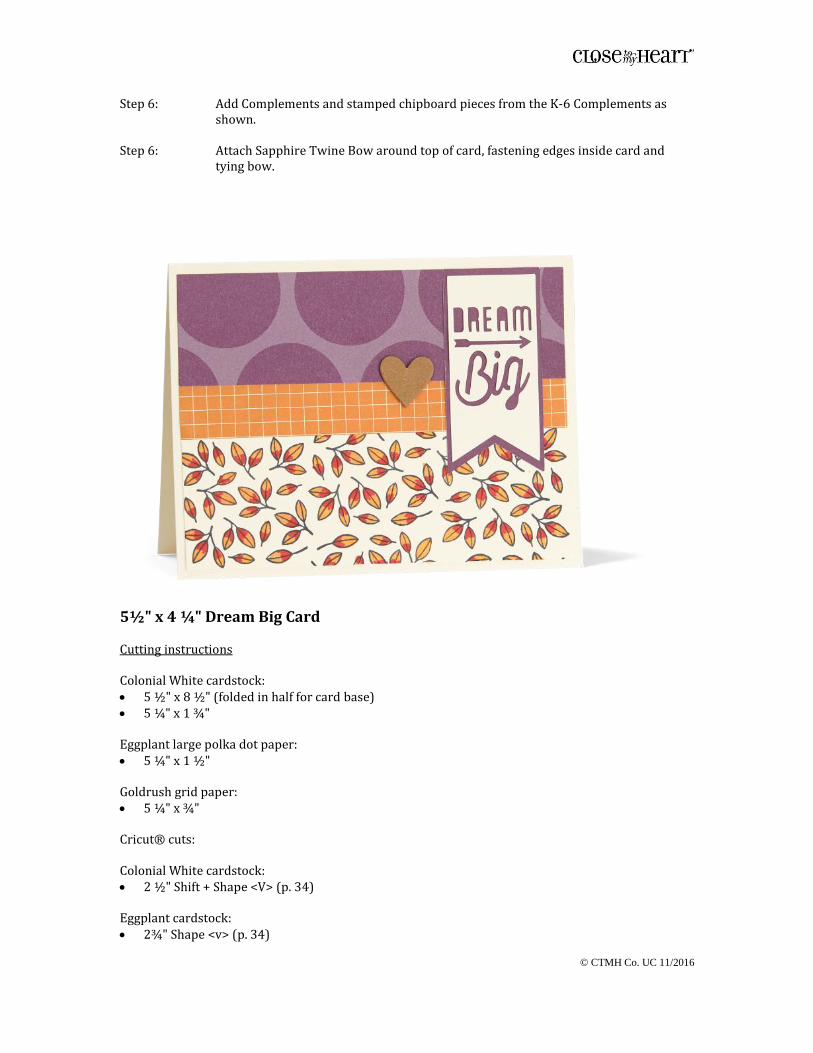
Step 6: Add Complements and stamped chipboard pieces from the K-6 Complements as shown.
Step 6: Attach Sapphire Twine Bow around top of card, fastening edges inside card and
tying bow.
5½" x 4 ¼" Dream Big Card Cutting instructions Colonial White cardstock: 5 ½" x 8 ½" (folded in half for card base) 5 ¼" x 1 ¾" Eggplant large polka dot paper: 5 ¼" x 1 ½" Goldrush grid paper: 5 ¼" x ¾" Cricut® cuts: Colonial White cardstock: 2 ½" Shift + Shape <V> (p. 34) Eggplant cardstock: 2¾" Shape <v> (p. 34)
© CTMH Co. UC 11/2016
Assembly instructions: Step 1: Using black Memento™ ink pad and Little Leaves stamp set, stamp leaves repeatedly
on 5 ¼" x 1¾" Colonial White cardstock piece and color in with Marigold and Carmine Shin Han Markers.
Sep 2: Adhere stamped 5 ¼" x 1 ¾" Colonial White piece to bottom of the card, 1/8" from
sides and bottom. Step 3: Adhere Goldrush grid paper directly above stamped cardstock piece, and Eggplant
large polka dot paper directly above that. Step 4: Attach “Dream Big” Colonial White cardstock Cricut® cut piece to the Eggplant
cardstock Cricut® cut piece. Adhere this to the card ½" from right side of the card and flush with the top of the Eggplant polka dot paper.
Step 5: Embellish using Complements as desired.
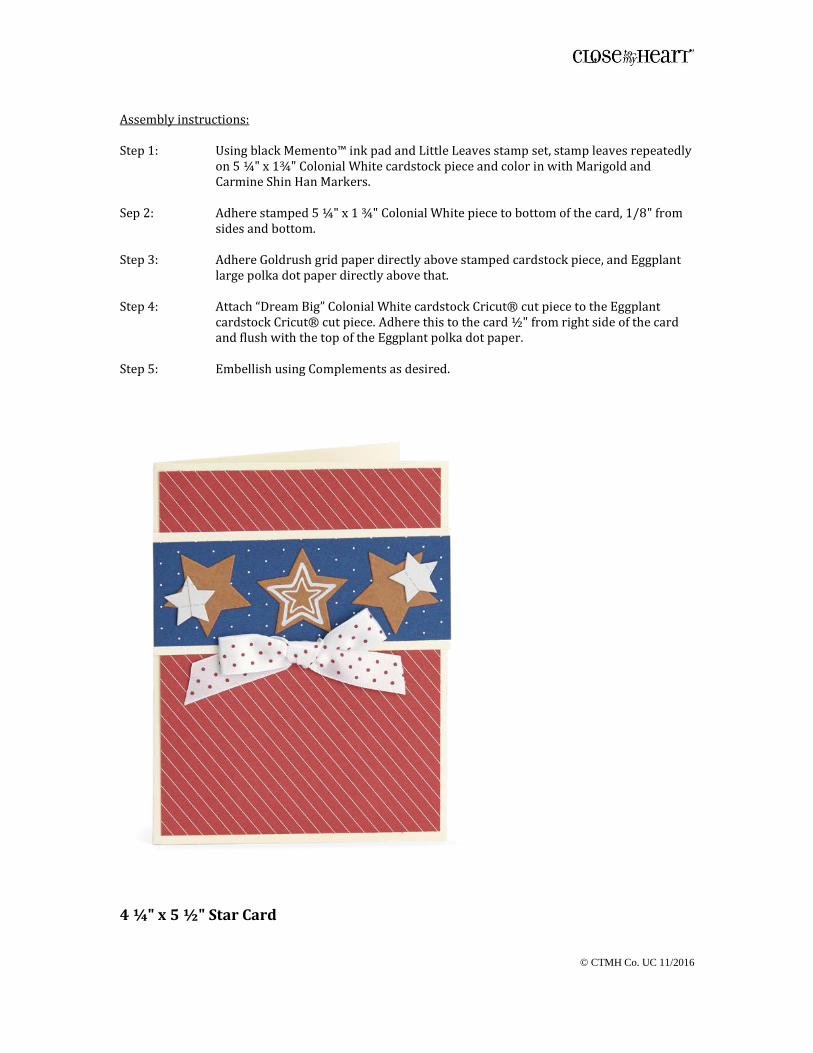
4 ¼" x 5 ½" Star Card
© CTMH Co. UC 11/2016
Colonial White cardstock: 5 ½" x 8 ½" (folded in half for card base) 4 ¼” x 1 ¾" Sapphire small polka dot paper: 4 ¼" x 1 ½" Ruby diagonal stripe paper: 4" x 5 ¼" Assembly instructions: Step 1: Attach Ruby diagonal stripe paper to front of card, leaving approximately 1/8"
around all edges. Step 2: Attach 4 ¼” x 1 ¾" Colonial White cardstock strip to card, 1" from top edge. Step 3: Attach Sapphire small polka dot paper centered on 4 ¼" x 1 ¾" Colonial White
cardstock. Step 4: Attach star die-cuts from K-6 Complements to card as desired. Step 5: Tie a bow in Ruby polka dot ribbon bow and attach below Sapphire paper.
© CTMH Co. UC 11/2016
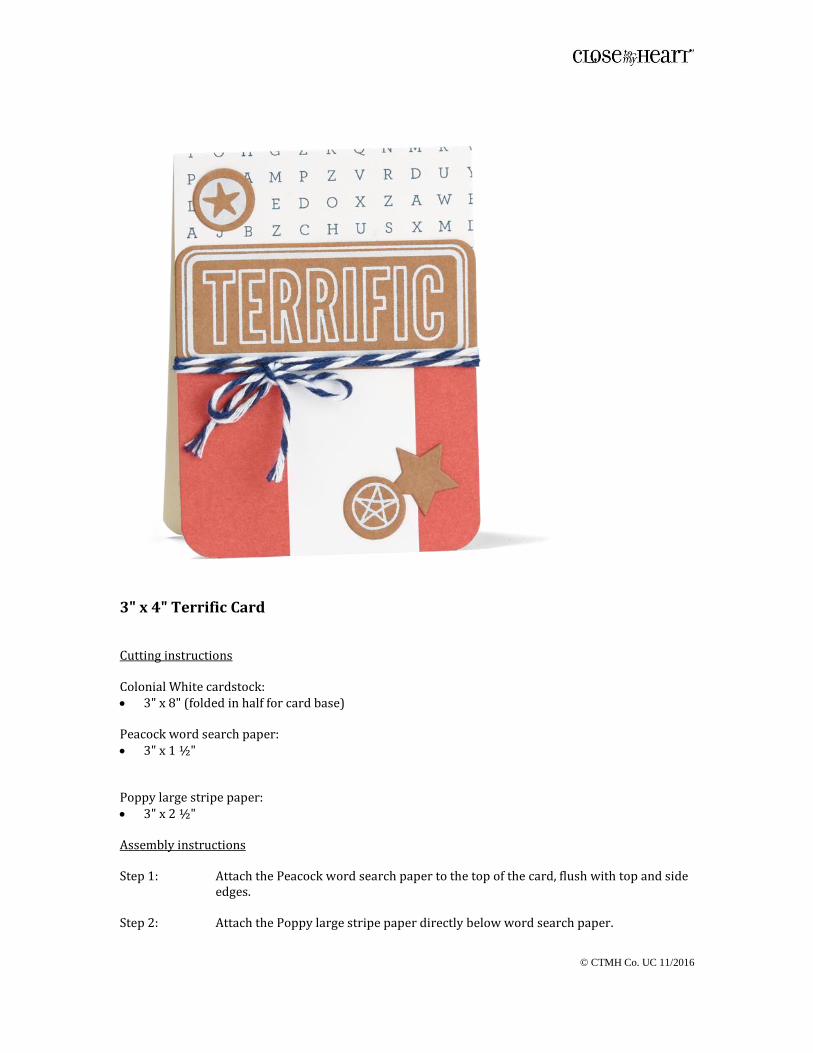
3" x 4" Terrific Card Cutting instructions Colonial White cardstock: 3" x 8" (folded in half for card base) Peacock word search paper: 3" x 1 ½" Poppy large stripe paper: 3" x 2 ½" Assembly instructions Step 1: Attach the Peacock word search paper to the top of the card, flush with top and side
edges. Step 2: Attach the Poppy large stripe paper directly below word search paper.
© CTMH Co. UC 11/2016
Step 3: Use a corner rounder to round the bottom corners of the card, if desired. Step 4: Attach “Terrific” die-cut shape from K-6 Complements to card ¾" from top. Attach
additional die-cut shapes as desired. Step 5: Wrap Sapphire twine twice around card directly below “Terrific” die-cut, tying in
bow.