hot times -...
TRANSCRIPT

Hot times
Part 4 Heat and fire
Acknowledgments
The Centre for Learning Innovation gratefully acknowledges the following owners of
copyright material for permission to reproduce their work.
NSW Board of Studies, Science Years 7–10 syllabus,
<http://www.boardofstudies.nsw.edu.au/syllabus_sc/index.html#science.pdf> (accessed
10 June 2004). © Board of Studies, NSW, 2003.
All reasonable efforts have been made to obtain copyright permissions. All claims will be
settled in good faith.
Writer Susan Doolan
Revisions 1999 Rhonda Caddy
Revisions 2004 Richard Alliband
Editor Ric Morante
Illustrator 1999 Susan Doolan
Illustrator 2004 Thomas Brown
Desktop publisher Alide Schimke
Version date 3 December 2004
Produced by the Centre for Learning Innovation, 51 Wentworth Road, Strathfield NSW 2135.
Part 4 Heat and fire 1
Contents – Part 4
Lesson 16 – The fire triangle ............................................ 3
What is the fire triangle? ...........................................................4
Fuels ..........................................................................................5
What did you achieve? ...........................................................12
Lesson 17 – Testing substances .................................... 13
What did you achieve? ...........................................................20
Lesson 18 – The burning candle .................................... 21
What did you achieve? ...........................................................24
Lesson 19 – Bushfires .................................................... 25
What did you achieve? ...........................................................29
Lesson 20 – Fire-extinguishers....................................... 30
Classes of fire..........................................................................30
Types of extinguishers............................................................31
What did you achieve? ...........................................................37
Suggested answers – Part 4........................................... 39
Exercises – Part 4 .......................................................... 41

2 Hot times
Part 4 Heat and fire 3
Lesson 16 – The fire triangle
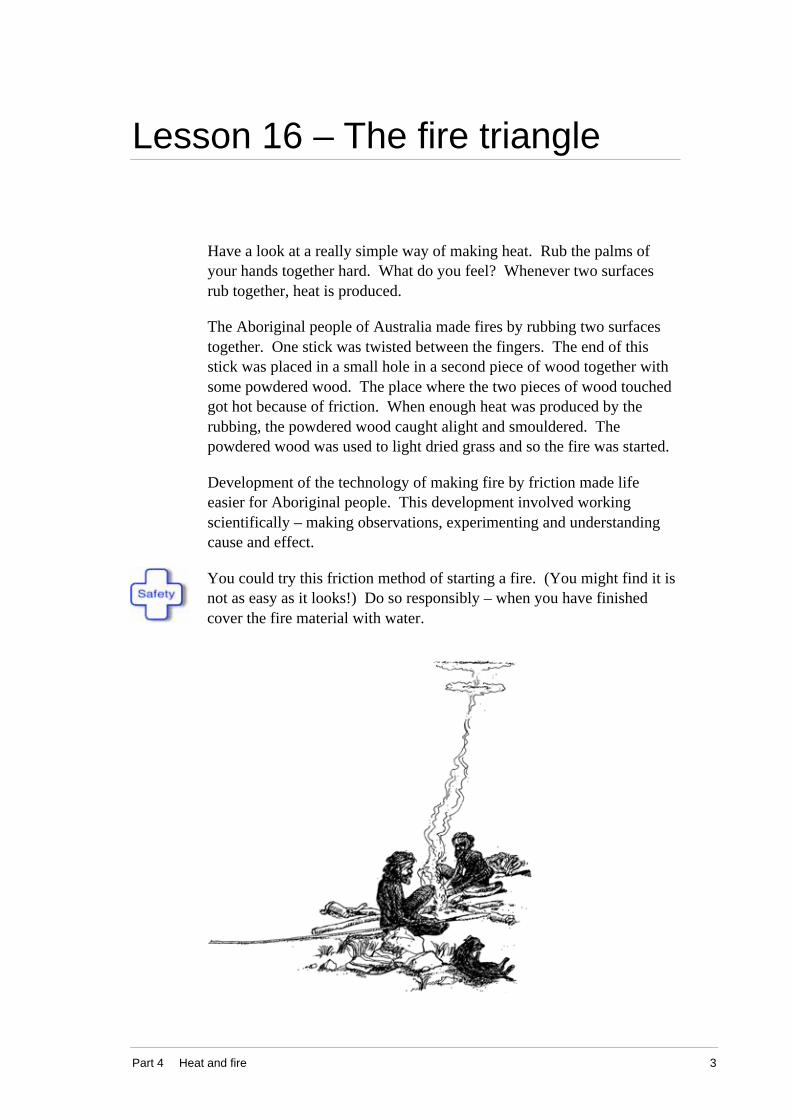
Have a look at a really simple way of making heat. Rub the palms of
your hands together hard. What do you feel? Whenever two surfaces
rub together, heat is produced.
The Aboriginal people of Australia made fires by rubbing two surfaces
together. One stick was twisted between the fingers. The end of this
stick was placed in a small hole in a second piece of wood together with
some powdered wood. The place where the two pieces of wood touched
got hot because of friction. When enough heat was produced by the
rubbing, the powdered wood caught alight and smouldered. The
powdered wood was used to light dried grass and so the fire was started.
Development of the technology of making fire by friction made life
easier for Aboriginal people. This development involved working
scientifically – making observations, experimenting and understanding
cause and effect.
You could try this friction method of starting a fire. (You might find it is
not as easy as it looks!) Do so responsibly – when you have finished
cover the fire material with water.

4 Hot times
Activity: What is needed for a fire?
Think about the aboriginal method of starting a fire. Two things that are
needed for a fire were mentioned. Can you write down what they are?
__________________________________________________________
__________________________________________________________
The two things were wood and heat.
Can you think of a third thing that is needed?
__________________________________________________________
A fire also needs oxygen.
Three things are needed for a fire to burn:
• a fuel, that is something to burn
• heat
• oxygen that usually comes from the air.
What is the fire triangle?The ‘fire triangle’ is an easy way to remember that three things are
necessary for a fire to burn.

Part 4 Heat and fire 5
Activity: The fire triangle
Fill in the three sides of the fire triangle with the names of the things that
are needed to make a fire burn.
Fire
Check your response by going to the suggested answers section.
Take away any one of the components on the fire triangle and you have
no fire!
FuelsIn our homes, there are many materials which can catch on fire. Some of
these are meant to, but many of them are not.
Use your dictionary to look up the meaning of flammable. Write the
meaning on the lines below.
___________________________________________________________
___________________________________________________________
Flammable means burns readily.

6 Hot times
Flammable materials
Some flammable materials are used as fuels. Fuels are used to heat and
sometimes light your home; to cook your food; for transport.
Activity: Flammable materials
Here is a list of materials. Which of the materials are often used as fuels?
Write the names of the materials under the correct heading.
wood paint cotton
natural gas kerosene wool
nylon petrol candle wax
Commonly used fuels Materials not meant to burn
Check your response by going to the suggested answers section.
Oxygen
A supply of oxygen is needed for a fire to start and to continue burning.
If fires don’t have enough oxygen, they may go out. If something is
burnt in oxygen alone, it burns more quickly than in air.
Have you ever gently fanned a fire to get it started? By gently blowing
air over the fire you provide more oxygen for the fire to use.

Part 4 Heat and fire 7
The Bunsen burner
In school laboratories, heat for experiments is usually supplied by a
Bunsen burner.
The parts of a Bunsen burner
Gas enters the burner through the rubber tubing. Air enters through the
hole near the base of the burner. The air and gas mix in the tube and the
mixture is set alight at the top of the tube.

8 Hot times
Jane’s initial observations
When Jane was doing an experiment, she noticed that her Bunsen burner
could give two different flames. You can see the two flames the
following photographs.
The yellow flame of a Bunsen burner
© State of New South Wales, Department of Education and Training, 2004
The yellow, flickering flame above is produced when the air hole of the
Bunsen burner is closed. Very little oxygen is mixed with the gas when
the air hole is closed.

Part 4 Heat and fire 9
The blue flame of a Bunsen burner
© State of New South Wales, Department of Education and Training, 2004
The steady blue flame is produced when the air hole of the Bunsen
burner is open. Plenty of oxygen enters the air hole and is well mixed
with the gas before the gas and air mixture leaves the burner and starts to
burn.
Jane’s tests
Jane decided to so some tests to find out what was different about the two
flames. She set up some equipment to find out which flame was faster at
making water boil.
Jane noticed that Sharon, on the bench next to her, was doing the same
thing. Here is a drawing showing Sharon’s experiment.

10 Hot times
Sharon’s experiment
Jane did not think that Sharon’s experiment was a fair test. Look closely
at the beakers. Do you agree the test isn’t fair? What would you change
to make the test fair?
__________________________________________________________
__________________________________________________________
Did you notice that the amounts of water in the beakers were different?
They should be the same for the test to be fair.
Jane’s final observations
Jane made her experiment fair by putting 50 mL of water in each beaker.
These are the results.
• Time for the yellow flame to boil 50 mL of water = 12 minutes
• Time for the blue flame to boil 50 mL of water = 4 minutes

Part 4 Heat and fire 11
Activity: Bunsen flames
Answer the following questions based on Jane’s experimental results.
1 Which flame was faster at making the water boil?
_______________________________________________________
2 Which flame do you think is hotter?
_______________________________________________________
The blue flame was faster at making the water boil. The blue flame is
hotter.
3 Compare the two flames by finishing this sentence:
The yellow flame is different from the blue flame because the yellow
flame is________________________________________________ .
The yellow flame is different from the blue flame because the yellow flame
is cooler than the blue flame.
Jane noticed another difference between the two flames. The beaker she
heated with the yellow flame was covered in black soot. The presence of
soot indicates that there was not enough oxygen to burn the fuel
completely. Cars which are not tuned properly often have soot around
the exhaust pipe.
4 Write another sentence comparing the amount of soot produced by
the two flames.
The yellow flame is different from the blue flame because the yellow
flame _________________________________________________ .
The yellow flame is different from the blue flame because the yellow flame
leaves soot on the container it is used to heat.
Go to the exercises section and complete the Exercise 4.1: Fire safety
equipment in school science rooms.

12 Hot times
What did you achieve?Tick what you can do.
describe technology used by Australian Aboriginal people to start
fires
identify the three things needed to make a fire burn
explain how a Bunsen burner can produce a blue flame or a
yellow flame.

Part 4 Heat and fire 13
Lesson 17 – Testing substances
How can you find out what substances are produced when a material
burns? You can use the properties of substances to identify them.
Things that you can observe about a substance are called the properties of
the substance. Some examples of properties are the state of the
substance, how it tastes and smells, and its colour. Other properties are
whether the substance burns and how it changes when it is mixed with
other substances.
Do you remember what group of scientists investigate substances?
Write the name of the group of scientists that investigate substances.
___________________________________________________________
Chemists investigate substances. Chemistry is the investigation of substances.
Chemists often need to identify an unknown substance (find out what a
substance is). To do this, they find out the properties of the unknown
substance. Then they compare its properties to those of known
substances. If two substances have identical properties, they are almost
certainly the same substance.
Activity: Preparing limewater
Getting organised
You will need some limewater for this lesson and it must be prepared
before you start the lesson. Here is how you can prepare it.
1 Get an old glass jar which has a screw-on lid. Make sure the lid fits
tightly.
2 Get the packet marked calcium hydroxide from your minikit. Read
the safety instructions on the packet. Explain to your supervisor how
you will use the chemical safely.
3 Put on your safety goggles.
14 Hot times
4 Empty the contents of the packet into the jar. Half-fill the jar with
water. Screw the lid on and shake the mixture. Unscrew the lid and
fill the jar with water. Screw the lid on again so it is airtight.
5 Use a texta to label the jar as limewater. Put it somewhere safe.
Where will you store it?
_______________________________________________________
6 Don’t shake the jar again. You want the liquid, not the solid on the
bottom.
After you have used some of the limewater you can top up the water in
the jar, as long as some white powder is left on the bottom of the jar. It is
important that you screw the lid on again so that it is airtight.
Make sure the white powder has settled before you use the limewater
again.
Activity: Investigating properties of carbon dioxide
Use carbon dioxide as an example. Carbon dioxide is a colourless,
odourless gas produced when substances containing carbon burn in the
presence of oxygen. If you are going to investigate carbon dioxide, you
will need to make some.
You will need:
• 2 test tubes
• safety goggles
• spirit burner or a lighted match
• some vinegar
• some baking soda from your kitchen
• jar of limewater that you made earlier
• empty glass jar with a lid
• matches
• drinking straw
• a clean spoon.
Part 4 Heat and fire 15
Are you wearing your safety goggles?
Why do you think you need goggles to perform this experiment?
___________________________________________________________
___________________________________________________________
Perhaps the vinegar will splash, so the goggles will protect your eyes.
What you should do:
1 Put about 1 teaspoon of baking soda in the bottom of the empty jar.
2 Slowly pour in some vinegar. Don’t let the mixture fizz out of the
jar.
In the next step do not screw the lid on.
The jar could explode.
3 Wait until the fizzing dies down a bit and then rest the lid loosely
over the top of the jar. The fizzing is the sound of carbon dioxide
being produced.
Observing the properties of carbondioxide
Now that you have made some carbon dioxide it is time to test it.
Activity: Observing the properties of carbon dioxide
1 Appearance
Your jar contains the gas carbon dioxide above the vinegar and
baking soda mixture. Describe the appearance of the carbon dioxide.
To do this, write down its colour and state. (State means whether it
is a solid, liquid or gas.)
_______________________________________________________
Carbon dioxide is a colourless gas.

16 Hot times
For this next part of the activity you need to have your supervisor present.
2 Effect on a flame
Light your spirit burner and pour some of the carbon dioxide onto
the flame. That might seem a strange idea, but you can pour a gas
even if you can’t see it. Be careful that you don’t pour out any of the
liquid in your jar. Pour as though you were emptying out the top
two-thirds of a full jar.
What effect does the carbon dioxide have on the flame?
_______________________________________________________
Carbon dioxide puts out, or extinguishes, the flame.
3 Effect on limewater
The other jar you set up to make limewater should have some white
powder on the bottom and a clear liquid on top. The clear liquid is
limewater. Pour some of the clear limewater out of this jar very
carefully so that none of the white powder comes with it.
Pour out enough clear limewater so that there is 1 or 2 cm in the
bottom of a test tube. Now pour some carbon dioxide gas from the
jar where you made carbon dioxide into the test tube. The diagram
below shows you how.
Pouring carbon dioxide from a jar into a test tube containing limewater
Part 4 Heat and fire 17
Observe the surface of the limewater carefully. Write down what
you observe.
_______________________________________________________
The surface turns white or cloudy.
Summary of the properties of carbondioxide
The sentence below summarises what you have found out about the
properties of carbon dioxide.
Activity: Properties of carbon dioxide
Fill in the spaces in this sentence.
Carbon dioxide is a ________________ gas which ________________
flames and makes limewater turn ________________ .
Carbon dioxide is a colourless gas which extinguishes flames and makes
limewater turn cloudy.
Now you have recognised some of the properties of carbon dioxide use
that information to develop a test for carbon dioxide.
Testing for carbon dioxide
How can you test a gas to find out if it is carbon dioxide? That’s easy!
Carbon dioxide is the only colourless gas which turns limewater cloudy.
So if you want to find out if carbon dioxide is present, you can test the
gas with limewater.
Have you been told that the air you breathe out contains a lot of carbon
dioxide? Test your breath and find out if that is true.

18 Hot times
Activity: Testing for carbon dioxide
Pour about 3 or 4 cm of limewater into a test tube. Get a straw and start
gently blowing bubbles into the limewater. Stop after every breath and
observe what is happening to the limewater.
Do you think your breath contains carbon dioxide? Why do you think
that?
__________________________________________________________
__________________________________________________________
Your breath contains carbon dioxide because your breath turns limewater
cloudy.
Testing for water
Water is a colourless liquid. How can you test a liquid to find out if it is
water? One test that chemists use involves a substance called cobalt
chloride. Paper can be coated with cobalt chloride to make cobalt
chloride paper. Cobalt chloride paper turns from blue to pink in the
presence of water.
Imagine that you have a strip of blue cobalt chloride paper. You put a
drop of water onto it. What would you expect to see?
__________________________________________________________
__________________________________________________________
The paper would change colour from blue to pink wherever it was wet with
water.
Imagine the water soaks right through the cobalt chloride paper. Now it
is all coloured pink. You warm the paper by putting it in an oven on the
lowest setting or by blowing some warm air onto it from a hair drier.
What would you expect to see?
__________________________________________________________
__________________________________________________________
The wet paper would dry. As it does, it would change colour from pink to blue.

Part 4 Heat and fire 19
Water is the only colourless liquid which turns cobalt chloride paper
from blue to pink. Some liquids which contain water will also cause the
same colour change. (For example, methylated spirits often contains
some water so it can turn blue cobalt chloride paper pink.) You can turn
the paper from pink to blue many times as long as you don’t wash the
cobalt chloride off the paper.
Go to the exercises section and complete the Exercise 4.2: Describing
chemicals
Fuels
Most fuels are hydrocarbons – chemicals made up of carbon and
hydrogen.
When a fuel burns with oxygen the carbon from the hydrocarbon fuel
combines with oxygen to produce carbon dioxide. This can be
represented as a summary called a chemical equation. The means
gives or produces.
carbon + oxygen carbon dioxide
The hydrogen from the hydrocarbon fuel combines with oxygen to
produce water:
hydrogen + oxygen water
A summary of the burning of a hydrocarbon in oxygen (or air) is:
hydrocarbon + oxygen water + carbon dioxide
Heat energy released by the burning fuel produces a mixture of hot gases
(mostly water and carbon dioxide) called a flame or flames.
If there is not enough oxygen for the fuel to completely burn the
hydrocarbon may produce poisonous carbon monoxide gas or carbon
particles called soot.

20 Hot times
What did you achieve?Tick what you can do.
follow the planned procedure when performing an investigation
describe a test for carbon dioxide
describe a test for water.

Part 4 Heat and fire 21
Lesson 18 – The burning candle
In this lesson you identify the substances produced by a burning candle.
Activity: Fire triangle revision
First, a memory check before you begin your investigation.
1 Write down the three things that are needed for a fire to start:
_______________________________________________________
_______________________________________________________
2 When you light a candle, can you:
a name the fuel?
___________________________________________________
b say where the heat comes from to start the fuel burning?
___________________________________________________
c say where the oxygen for the fire comes from?
___________________________________________________
Check your response by going to the suggested answers section.
For this next activity your supervisor must be present.

22 Hot times
Activity: Testing products of a burning candle
You will need:
• an eyedropper
• a clock glass or saucer
• safety goggles
• a beaker
• a test tube holder
• a candle holder (not your best silver one) or an old saucer
• a candle
• some matches
• limewater.
Make sure you are wearing your safety goggles.
What you should do:
1 Put the candle in the candle holder. If you are going to put the
candle on a saucer, use dripping wax from the lighted candle to
attach the base of the candle to the saucer.
2 Get some limewater in your eyedropper by squeezing the rubber
bulb and then putting the tip of the eyedropper into the limewater
and letting go of the rubber bulb.
Hold the eyedropper in the air away from the candle flame.
Press the end of the eyedropper so that a drop of limewater is
exposed to the air. (See the diagram below.)
Watch the drop. How long does it take to look cloudy? (If it has not
turned cloudy after 2 minutes, write more than 2 minutes on the line
below and go on with the experiment.)
_______________________________________________________
3 Squeeze out the limewater into an empty beaker and wash out the
eyedropper with water. Then get a fresh drop of limewater and hold
it near the flame of the candle.

Part 4 Heat and fire 23
How long does it take to look cloudy?
_______________________________________________________
4 Now get your clock glass and hold it by its edge horizontally about
10 cm above the burning candle. Keep it there for a few seconds and
then look at what is formed on the glass.
Do you see some small drops of liquid? If you do not, wait until the
clock glass is cool and try again.
What do you think the substance is? Why?
_______________________________________________________
Did you notice that the liquid is colourless? Perhaps it is water.
A drop of the liquid put onto some blue cobalt chloride paper turns
the paper pink.
Does this help you to identify the liquid substance? Why?
_______________________________________________________
Yes. Water turns blue cobalt chloride paper pink so the colourless liquid is
water or contains water.
5 Now, use a test tube holder to hold the clock glass. Wave it through
the candle flame for 30 seconds (no longer!). What do you see on
the clock glass?
_______________________________________________________
You should see soot (carbon) formed on the outside of the clock
glass.
Go to the exercises section and complete the Exercise 4.3: Observations
on a burning candle.

24 Hot times
What did you achieve?Tick what you can do.
test a burning candle for carbon dioxide and water
distinguish between qualitative and quantitative observations.
Part 4 Heat and fire 25
Lesson 19 – Bushfires
Bushfires are a relatively common event in Australia. They have shaped
the landscape.
Fire and the Aboriginal people
Fire has been of great importance to the Aboriginal people. It was used
for warmth, for cooking food and for protection from spirits. Fires were
lit at night by some Aboriginal people to keep away the spirits of the
dead. Some Aboriginal people would not walk alone in the dark bush
without a fire stick.
Fire has been used by the Aboriginal people in managing the land.
An explorer in 1889 wrote:
The natives were about burning, burning, ever burning...
Ernest Giles, 1889
Why did the Aboriginal people burn off so often?
It seems there were several reasons. Fire was a help in the hunt for food.
The Aboriginal people used fire to drive out kangaroos and other animals
from bushy areas.
A second use for fire was for encouraging new plant growth.
Fire destroyed a lot of grasses which had hard, dry leaves and which
were not good for animals to eat. After these plants were burnt, new
plants with soft leaves would grow. Kangaroos would then move into
the area to eat these soft leaved grasses.
The burning also produced ash. Ash is a good fertiliser for the soil.
So, by burning bushland, the Aboriginal people produced good
grasslands. When white settlers moved inland they often did not realise
that Aboriginal people using burning had created the rich grasslands
which the new settlers admired so much.

26 Hot times
Activity: Fire and the Aboriginal people
Answer these questions using the information about fire and Aboriginal
people.
1 Write down three reasons why fire was important in the everyday
lives of Aboriginal people.
_______________________________________________________
_______________________________________________________
_______________________________________________________
2 Write down three benefits that Aboriginal people obtained from
burning bushland.
_______________________________________________________
_______________________________________________________
_______________________________________________________
Check your response by going to the suggested answers section.
Today bushfires are often treated as disasters needing management.
Part 4 Heat and fire 27
‘Modern’ methods of managingbushfires
Australia, has some of the worst bushfires in the world. Now scientists
believe that the Aborigines’ way of dealing with fire has a lot to teach us.
Think about the fire triangle. Three things are needed for a fire to start.
If you remove one of the three things, a fire is not likely to start at all.
Activity: ‘Modern’ methods of managing bushfires
Which do you think is the easiest thing on the fire triangle to remove to
prevent bushfires starting?
___________________________________________________________
It would be easiest to remove the fuel for the fire.
Scientists believe that the fuel for a bushfire can be reduced by lighting
small fires when the weather is cool. Then, when it is hot and dry there
will not be enough fuel available to start large bushfires. Scientists from
all over the world have come to Australia to see how the method works.
Australian bushfires are amongst the most dangerous in the world.
How are modern methods of fire control similar to those of the
Aboriginal people?
Modern methods of fire control are similar to those used by the
Aboriginal people because they both _____________________________
___________________________________________________________
They both reduce the amount of fuel available by lighting many small fires.

28 Hot times
Activity: Mastery test on understanding fires
Lesley tested two methods of putting out a fire. First she made two
identical fires. Then she timed how long it took to get the water and the
carbon dioxide and how long it took to put the fire out. Her results were:
Method of putting outthe fire
Time to get to the fire Time to put out the fire
water 25 seconds 5 seconds
carbon dioxide 12 seconds 11 seconds
1 What did Lesley do to make sure that she carried out a fair test?
_______________________________________________________
2 How does water make the fire triangle collapse?
_______________________________________________________
3 How does carbon dioxide make the fire triangle collapse?
_______________________________________________________
4 Which was the faster method for putting out the fire?
_______________________________________________________
5 What is the total time taken for each method of putting out the fire?
a water ______________________________________________
b carbon dioxide _______________________________________
6 Can you suggest a reason for the time it took to collect the water?
_______________________________________________________
Check your response by going to the suggested answers section.
Go to the exercises section and complete Exercise 4.4: Applying the fire
triangle.
Part 4 Heat and fire 29
What did you achieve?Tick what you can do.
relate Aboriginal peoples’ use of fire to their environment
compare ‘modern’ and Aboriginal methods of using fire
apply the fire triangle to extinguish fires.

30 Hot times
Lesson 20 – Fire-extinguishers
A fire-extinguisher is a device for putting out fires. The chemical that
comes out of the fire extinguisher is called the extinguisher. In science
laboratories there is often a bucket of sand. Sand is a good extinguisher
for small fires of burning liquid or burning metal.
Before you can talk about ways of putting out a fire, you need to look at
some of the different types of fires.
Classes of fireThere are many different ways to classify or group fires. The method
used in the following table classifies a fire by the fuel that is burning.
Class of fire Fuel Examples
A materials found in thehome
curtains, wood
B flammable liquids petrol, methylated spirits
C electrical equipment fire in a toaster, fire in anelectric heater
D metals which burn lithium, magnesium
Activity: Which class of fire
If these fuels or objects were burning, which class of fire would be the
result?
Identify the class of fires where the fuel listed below is burning.
1 cooking oil _____________________________________________
2 record player ____________________________________________
3 kerosene _______________________________________________

Part 4 Heat and fire 31
4 chair __________________________________________________
5 sodium metal ____________________________________________
Check your response by going to the suggested answers section.
Different classes of fire are best controlled using different types of
extinguishers.
Types of extinguishersHere are some of the chemicals used as extinguishers in putting out fires.
Extinguisher How it works Advantage Disadvantage
water removes heat cheap dangerous nearelectricity
sand cuts off air cheap heavy to carry
carbon dioxide cuts off air no mess blows awayoutside
foam cuts off air doesn’t blowaway easily
messy
dry chemicalpowder
cuts off air fast acting none
Activity: Types of extinguishers
Use the information about types of extinguishers to answer these
questions.
1 Which extinguishers work by cutting off air from the fire?
_______________________________________________________
2 Why would you prefer to use a carbon dioxide extinguisher inside
rather than outside?
_______________________________________________________
32 Hot times
3 Why would you prefer to use a foam extinguisher outside rather than
inside?
_______________________________________________________
4 Look at the top row in the table. It gives you information about how
water can be an extinguisher. Here is a paragraph that converts
information from the row into sentences.
Water can extinguish a fire because it removes heat. It is cheap to
use but can be dangerous near electricity.
Choose three other extinguishers from the table. Convert the
information into sentences.
• ___________________________________________________
___________________________________________________
___________________________________________________
• ___________________________________________________
___________________________________________________
___________________________________________________
• ___________________________________________________
___________________________________________________
___________________________________________________
Check your response by going to the suggested answers section.
Deciding which type of extinguisher to use is important.
How can you choose the right sort of fire-extinguisher? The flow chart
can help.
Part 4 Heat and fire 33
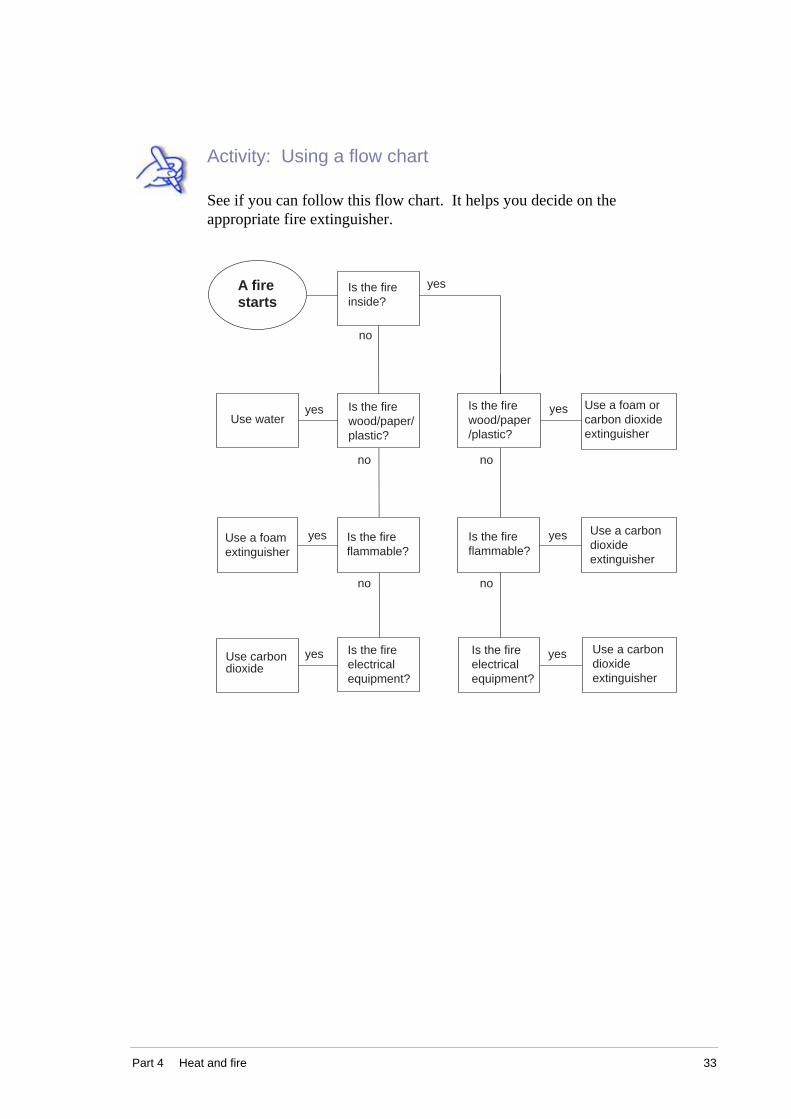
Activity: Using a flow chart
See if you can follow this flow chart. It helps you decide on the
appropriate fire extinguisher.
Is the fireinside?
Use waterIs the firewood/paper/plastic?
Use a foam orcarbon dioxideextinguisher
Use a foamextinguisher
Is the fireflammable?
Use a carbondioxideextinguisher
Use carbondioxide
Is the fireelectricalequipment?
Use a carbondioxideextinguisher
A firestarts
Is the fireflammable?
Is the firewood/paper/plastic?
yes
no
yes yes
yesyes
yesyes
no no
no no
Is the fireelectricalequipment?
34 Hot times
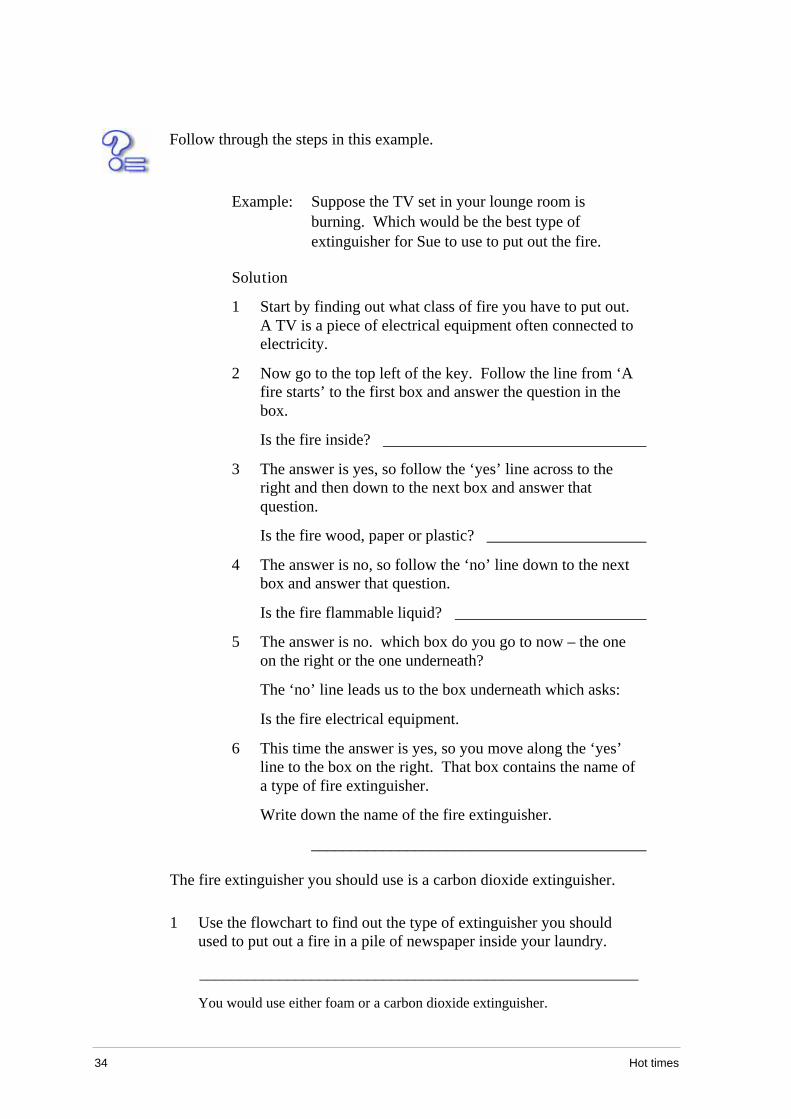
Follow through the steps in this example.
Example: Suppose the TV set in your lounge room is
burning. Which would be the best type of
extinguisher for Sue to use to put out the fire.
Solution
1 Start by finding out what class of fire you have to put out.
A TV is a piece of electrical equipment often connected to
electricity.
2 Now go to the top left of the key. Follow the line from ‘A
fire starts’ to the first box and answer the question in the
box.
Is the fire inside? _________________________________
3 The answer is yes, so follow the ‘yes’ line across to the
right and then down to the next box and answer that
question.
Is the fire wood, paper or plastic? ____________________
4 The answer is no, so follow the ‘no’ line down to the next
box and answer that question.
Is the fire flammable liquid? ________________________
5 The answer is no. which box do you go to now – the one
on the right or the one underneath?
The ‘no’ line leads us to the box underneath which asks:
Is the fire electrical equipment.
6 This time the answer is yes, so you move along the ‘yes’
line to the box on the right. That box contains the name of
a type of fire extinguisher.
Write down the name of the fire extinguisher.
__________________________________________
The fire extinguisher you should use is a carbon dioxide extinguisher.
1 Use the flowchart to find out the type of extinguisher you should
used to put out a fire in a pile of newspaper inside your laundry.
_______________________________________________________
You would use either foam or a carbon dioxide extinguisher.

Part 4 Heat and fire 35
2 Would your answer be the same if the pile of newspaper were outside?
_______________________________________________________
No – this time you would use water to put out the fire.
Portable fire-extinguishers can be carried to a fire by the average person.
you can see them in public buildings, schools, shops, etc. and may even
have one or more at home. They are colour coded and labelled with their
contents.
No extinguisher is suitable for all fires. Firefighters choose an
appropriate extinguisher for:
• ordinary combustibles eg, wood, paper, plastics
• flammable liquids eg, petrol, methylated spirits
• flammable gases eg, LPG (liquefied petroleum gas), CNG
(compressed natural gas)
• energised electrical equipment (electrical equipment connected to
electricity)
• cooking oils/fats.
Activity: Types of fire-extinguishers in the community
Locate three portable fire-extinguishers in your community. Record the
location, colour and labelling of the fire-extinguishers in the table below.
Location Colour Labelling
Check your response by going to the information in the Portable fire
extinguisher chart below.

36 Hot times
Indicator
Type of fire
Identifyingcolours
Type ofextinguisher
Water
Wetchemical
Alcoholresistant
foam
AFFFtypefoam
AB(E)dry
chemicalpowder
B(E)dry
chemicalpowder
Carbondioxide(CO2)
Vaporisingliquid
(fumes maybe danderous
in confinedspaces)
Carbon dioxide and vaporising liquid extinquishers are not suitable for deep seated smouldering A class fires. Fumes may be dangerous in confined places, eg lifts
red
yellow
blue
red
red
white
red
red
black
red
red
yellow
A B C (E) F
Ordinarycombustibles(wood, paper,plastics,etc.)
Flammableand
combustibleliquids
Flammablegases
Fireinvolvingenergisedelectrical
equipment
Fireinvolving
cooking oilsand fats
Extinguisher suitability
Portable fire extinguisher chart
Go to the exercises section and complete the Exercise 4.5: Australian
bushfires

Part 4 Heat and fire 37
What did you achieve?Tick what you can do.
acknowledge that different types of fire require different types of
fire extinguisher
identify the different types of fire-extinguisher in your
community
appreciate the importance of knowing the type and frequency of
bushfires where you live.

38 Hot times

Part 4 Heat and fire 39
Suggested answers – Part 4
Check your responses against these suggested answers.
Activity: The fire triangle
Fire
oxygen
heatfuel
Activity: Flammable materials
Commonly used fuels Materials not meant to burn
wood paint
natural gas cotton
kerosene wool
petrol nylon
candle wax
Activity: Fire triangle revision
1 The three things that are needed are a fuel, oxygen and heat.
2 a The fuel is the wax that the candle is made from.
b__ The heat comes from the burning match that you use to light the candle.
c The oxygen comes from the air.
Activity: Fire and the Aboriginal people
1 • for warmth
• for cooking food
• for protection from spirits.
2 • to help in the hunt for food
• to bring on new plant growth

40 Hot times
• to produce ash which is a good fertiliser to help produce good
grasslands.
Activity: Mastery test on understanding fires
1 Lesley made two identical fires. She also measured the time it took to put
the fire out separately from the time to get the extinguisher.
2 Water removes heat from the fuel.
3 Carbon dioxide prevents oxygen reaching the fuel.
4 Water
5 a 30 seconds
b 23 seconds
6 She probably had to find a bucket and then fill it.
Activity: Which class of fire?
1 cooking oil class B
2 record player class C
3 kerosene class B
4 chair class A
5 sodium metal class D
Activity: Types of extinguishers
1 Sand, carbon dioxide, foam and dry chemical powder all work by cutting
off the air to the fire.
2 A carbon dioxide extinguisher is preferred inside because outside, the gas
might blow away and not put out the fire.
3 A foam extinguisher is usually used outside because it would make a mess
inside.
4 Here are some examples of paragraphs about the different extinguishers.
• Sand can put out a fire as it cuts off the air. It is cheap but is heavy
to carry
• A carbon dioxide extinguisher cuts off air from a fire to extinguish it.
It does not make a mess because carbon dioxide is a gas but this can
be a disadvantage because the gas blows away outside.
• Foam prevents air from getting to a fire and therefore extinguishes it.
It does not blow away easily outside but makes a mess.
• Dry chemical powder extinguishes a fire by stopping air reaching the
fire. It works very quickly and is easy to clean up.
Part 4 Heat and fire 41
Exercises – Part 4
Exercises 4.1 to 4.5 Name ____________________________
Teacher ____________________________
Exercise 4.1: Fire safety equipment in school sciencerooms
Each school science room must contain:
• an approved fire blanket placed in a prominent position, visible and
accessible to students and staff. It is used for smothering small fires
in containers and burning clothes or hair.
• a carbon dioxide (CO2) portable fire-extinguisher (red with a
black band)
Metal fire buckets in preparation rooms contain dry sand. Sand stops the
spread of fire by absorbing burning liquid. Sand can also be used to
smother small fires of burning metal.
The PASS method for using fire-extinguisher is recommended.
Pull the pin
Aim low at the base of the fire
Squeeze the handle
Sweep from side to side at the base of the fire.
In a school the fire-extinguisher should only be used by the teacher, and
only on small and containable fires or to help people escape the fire. If
there is any doubt whether the fire can be put out it is safer to leave the
area and raise the alarm.
There are good scientific reasons behind this information.
Think scientifically before answering each question.

42 Hot times
1 If a person’s clothing or hair is on fire they must be stopped from
running around. Why would running around increase the fire?
_______________________________________________________
_______________________________________________________
_______________________________________________________
2 How does a fire blanket stop clothes or hair burning?
_______________________________________________________
_______________________________________________________
_______________________________________________________
3 Sand must NEVER be put on a hair or clothing fire. How would the
sand affect treatment of the person’s burns.
_______________________________________________________
_______________________________________________________
_______________________________________________________
4 Why is a fire-extinguisher aimed at the base of the flames rather than
middle or the top?
_______________________________________________________
_______________________________________________________
_______________________________________________________

Part 4 Heat and fire 43
Exercise 4.2: Describing chemicals
Congratulations, you have just handled seven different chemicals.
The table below gives details about these seven chemicals. Full details
are given for calcium carbonate, the white solid formed when carbon
dioxide dissolves in limewater.
The middle column shows you the shorthand way chemists have of
writing chemical formulas – you probably already know H2O for water.
There is no need to learn the formulas. In the fourth column put solid,
liquid or gas.
Note: (aq) stands for aqueous solution meaning solution in water.
commonname
chemicalname
chemicalformula
state ofmatter
colourlessor white
lime calciumhydroxide
Ca(OH)2
water dihydrogenoxide
H2O
limewater solution ofcalciumhydroxide inwater
Ca(OH)2 (aq) liquid solution
baking soda sodiumhydrogencarbonate
NaHCO3
vinegar solution ofacetic acid inwater
CH3COOH (aq) liquid solution
carbondioxide
carbondioxide
CO2
chalk calciumcarbonate
CaCO3 solid white
44 Hot times
Exercise 4.3: Observations on a burning candle
Quantitative observations answer the question ‘how much?’ by giving
quantities. Other observations are called qualitative.
Complete quantitative and qualitative observations for your burning
candle by filling in the missing spaces. You will probably need to relight
your candle to answer some of the observations.
The candle I used was _______________ in shape, _______________
centimetres across and _______________ centimetres high. The wick is
made of _______________ strands twisted together.
When it is burning most of the wick is black except for the top
_______________ centimetres which glows red. The wick is straight
until _______________ centimetres from its top.
The flame is about _______________ centimetres high and about
_______________ centimetres at its widest. The flame begins about
_______________ centimetres above the top of the candle where there is
a pool of _______________ colourless liquid. The bottom of the flame
is a _______________ colour, while the rest of the flame is mostly
_______________ in colour. Around the wick is a dark flame region
about _______________ cm high and _______________ cm wide.
A finger feels uncomfortable after 10 seconds when held
_______________ cm above the flame. The same finger feels
uncomfortable after 10 seconds when held _______________ cm to the
side of the flame.
Use a pencil to draw a circle around each quantitative observation.

Part 4 Heat and fire 45
Exercise 4.4: Applying the fire triangle
You can extinguish a fire by removing one or more of the things a fire
needs to burn.
If you can make the fire triangle collapse by taking away one of its sides,
the fire will go out. Here are some common ways of extinguishing fires.
Work out which side of the fire triangle has been removed in each
example:
1 Imagine your little sister is standing in front of an electric radiator
and her dress catches on fire. You grab her and roll her on the
ground to put out the fire. Well done! How did you make the fire
triangle collapse?
_______________________________________________________
_______________________________________________________
2 Imagine your brother is watering the garden when he sees that the
garden shed has caught on fire. He turns the hose on the shed and
puts out the fire. How did he make the fire triangle collapse?
_______________________________________________________
_______________________________________________________
3 When you pour carbon dioxide on a flame the flame goes out. How
did this make the fire triangle collapse?
_______________________________________________________
_______________________________________________________
4 You are hiking in the bush and use a fire to cook lunch. Before you
leave you make sure the fire is out by covering it with sand and dirt.
How did you make the fire triangle collapse?
_______________________________________________________
_______________________________________________________

46 Hot times
5 When homes are threatened firefighters often use back-burning.
This means they start a small fire between the bush and the houses.
How are firefighters trying to collapse the fire triangle?
_______________________________________________________
_______________________________________________________

Part 4 Heat and fire 47
Exercise 4.5: Australian bushfires
Use crosses to show where you live or have lived on these maps of
Australia and New South Wales.
Select one of the locations in NSW where you have lived or know about.
Now use the information in both maps to describe bushfire conditions at
this NSW location. Be careful in your answer. The two maps show
different things.
Low fire risk – low risk to people
Possible forest, scrub and grass fires– moderate risk to people
Areas of possible disaster fires
Bushfire risk zones
WESTERNAUSTRAL IA
NORTHERNTERRITORY
SOUTHAUSTRAL IA
QUEENSLAND
NEW SOUTHWALES
TASMANIA
VICTORIA
Bushfire risk zones
© State of New South Wales, Department of Education and Training, 2004

48 Hot times
every twenty years or less
every ten years or less
every five years
every three years
Sydney
Bushfire frequencies in NSW
© State of New South Wales, Department of Education and Training, 2004
Bushfire conditions at _________________________________location:
__________________________________________________________
__________________________________________________________
__________________________________________________________
__________________________________________________________
__________________________________________________________
__________________________________________________________
__________________________________________________________
__________________________________________________________